How the Collection Works
Tinker's Collection is the game's optional collectible counter: 140 secret clues in total. Two kinds of pickup add to it, and nothing in the main story depends on them.
- Secret clues hide inside close-ups. When you zoom into a spot, look for a faint teal shape and tap it; a ghostly teal figure rises and a TINKER'S COLLECTION banner shows the new count out of 140.
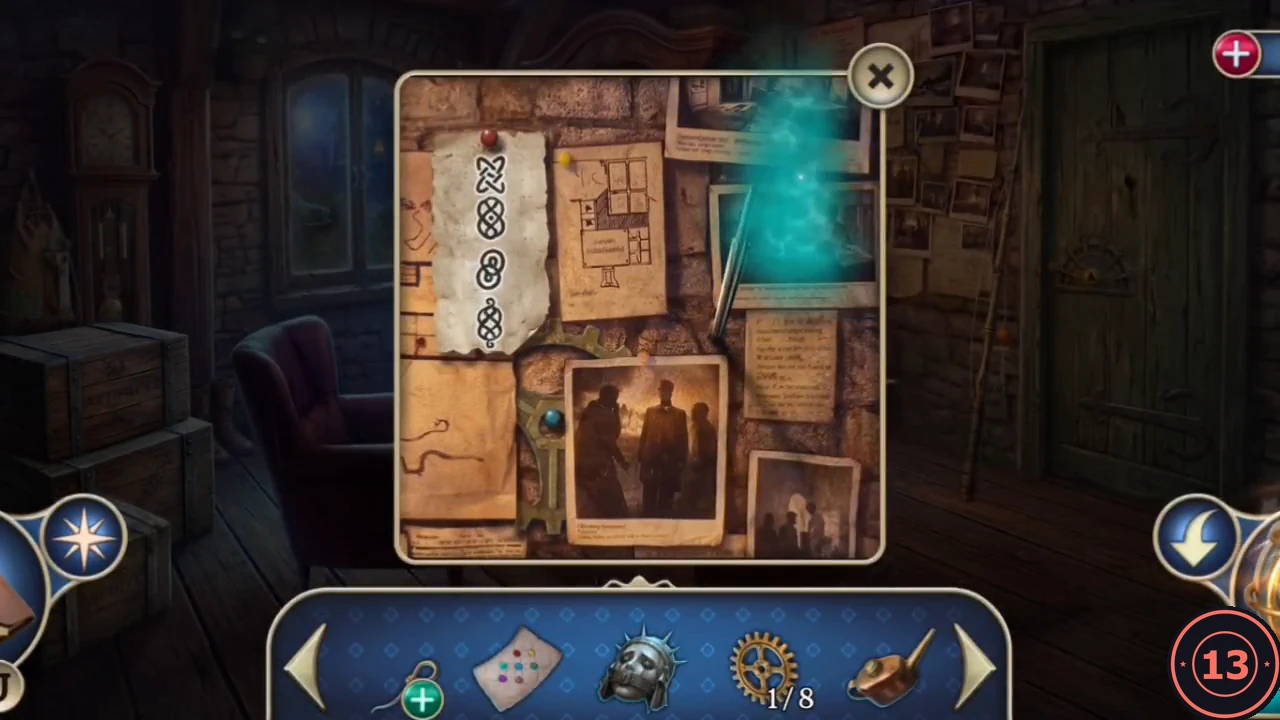
A secret clue: the teal figure rises from the close-up after you tap it. - Morph objects sit in the main room views. Each one slowly changes from one object into another while you watch, for example a sign that turns into a numbered tag and back. Tap it while it is changing to collect it; it also adds one to the 140 count.
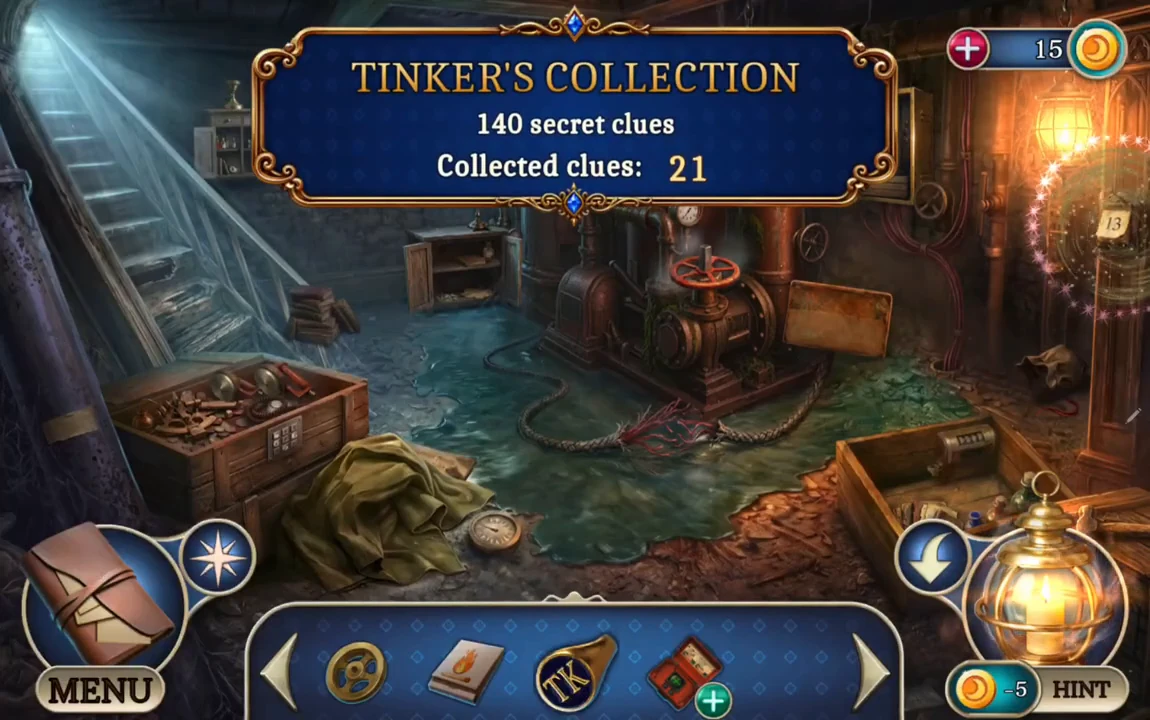
Collecting a morph object: the sparkle ring on the right wall and the TINKER'S COLLECTION banner with the new count. - Every room has exactly one morph object. The map shows a counter (0/1 or 1/1) under each room picture, so open the map to see which rooms still hide one.
- The lists below follow the order in which the items become reachable during the story. Together they give all 140 pickups: 56 morph objects and 84 secret clues.
Chapter 1 Collectibles
Chapter 1 has 5 morph objects, one per room, and this list gives 13 secret clues found there. Pick them up whenever you visit these places; they never block the story.
- Gate, morph object: the flyer lying on the pavement at the foot of the green-door steps.
- Gate, secret clue: zoom into the storm drain and tap the teal shape in the close-up.
- Gate, secret clue: zoom into the brass postbox (top) and tap the teal shape in the close-up.
- Study, secret clue: zoom into the desk, by the lamp and papers and tap the teal shape in the close-up.
- Study, secret clue: zoom into the corkboard and tap the teal shape in the close-up.
- Study, morph object: a small object high on the wall above the top-left corner of the window.
- Gate, secret clue: zoom into the intercom and tap the teal shape in the close-up.
- Courtyard, morph object: the stone lion on the gate post to the right of the veiled statue.
- Courtyard, secret clue: zoom into the car interior and tap the teal shape in the close-up.
- Wine cellar, morph object: a small object on the floor to the left of the floor hatch.
- Wine cellar, secret clue: zoom into the bottle crate and tap the teal shape in the close-up.
- Wine cellar, secret clue: zoom into the automaton on the back wall and tap the teal shape in the close-up.
- Wine cellar, secret clue: zoom into the lathe and tap the teal shape in the close-up.
- Wine cellar, secret clue: zoom into the floor hatch and tap the teal shape in the close-up.
- Study, secret clue: zoom into the satchel and tap the teal shape in the close-up.
- Lobby, morph object: the right side of the room, near the staircase.
- Lobby, secret clue: zoom into the automaton pulley mechanism and tap the teal shape in the close-up.
- Courtyard, secret clue: zoom into the automaton and tap the teal shape in the close-up.
Chapter 2 Collectibles
Chapter 2 has 7 morph objects, one per room, and this list gives 13 secret clues found there. Pick them up whenever you visit these places; they never block the story.
- Library hallway, morph object: a vase on the right-hand bookshelf.
- Tank room, morph object: the right-hand wall.
- Basement, morph object: the sign on the right pillar that switches between a lightning symbol and a "13" tag.
- Basement, secret clue: zoom into the boiler gauges and tap the teal shape in the close-up.
- Tank room, secret clue: zoom into the pipe and pump valve under the tank and tap the teal shape in the close-up.
- Basement, secret clue: zoom into the chest and tap the teal shape in the close-up.
- Basement, secret clue: zoom into the boot at the window and tap the teal shape in the close-up.
- Game room, morph object: the lower right of the room.
- Game room, secret clue: zoom into the slot machine and tap the teal shape in the close-up.
- Game room, secret clue: zoom into the fortune teller and tap the teal shape in the close-up.
- Corridor with the green-cross sign, morph object: the lower right.
- Operating room, morph object: the upper right.
- Operating room, secret clue: zoom into the desk and tap the teal shape in the close-up.
- Conservatory, morph object: the lower right.
- Conservatory, secret clue: zoom into the potion table and tap the teal shape in the close-up.
- Operating room, secret clue: zoom into the leather case and tap the teal shape in the close-up.
- Tank room, secret clue: zoom into the safe and tap the teal shape in the close-up.
- Conservatory, secret clue: zoom into the bell jar and tap the teal shape in the close-up.
- Conservatory, secret clue: zoom into the monster-head ornament on the door and tap the teal shape in the close-up.
- Operating room, secret clue: zoom into the lab bench and tap the teal shape in the close-up.
Chapter 3 Collectibles
Chapter 3 has 7 morph objects, one per room, and this list gives 12 secret clues found there. Pick them up whenever you visit these places; they never block the story.
- Second-floor hallway, morph object: the left side, by the lamp table.
- Second-floor hallway, secret clue: zoom into the ledge of the boarded window and tap the teal shape in the close-up.
- Upper deck (cable car and doll chair), morph object: the right side.
- Upper deck, secret clue: zoom into the doll and tap the teal shape in the close-up.
- Upper deck, secret clue: zoom into the funicular console and tap the teal shape in the close-up.
- Surveillance room, morph object: the centre right.
- Surveillance room, secret clue: zoom into the pneumatic tube and tap the teal shape in the close-up.
- Surveillance room, secret clue: zoom into the monitors and tap the teal shape in the close-up.
- Lower station, morph object: the right-hand base of the lit watch booth, just left of the cloth-covered chair.
- Lower station, secret clue: zoom into the blueprint table and tap the teal shape in the close-up.
- Lower station, secret clue: zoom into the spilled paint tin and tap the teal shape in the close-up.
- Red-lamp tunnel, morph object: the round orange sign on the left wall.
- Platform, morph object: the floor at the lower left.
- Platform, secret clue: zoom into the monogram tile and tap the teal shape in the close-up.
- Platform, secret clue: zoom into the clown mask on the bench and tap the teal shape in the close-up.
- Train car, morph object: the spot to the left of the broker.
- Train car, secret clue: zoom into the switch box and tap the teal shape in the close-up.
- Train car, secret clue: zoom into the suitcase and tap the teal shape in the close-up.
- Train car, secret clue: zoom into the mannequin in the wreckage and tap the teal shape in the close-up.
Chapter 4 Collectibles
Chapter 4 has 7 morph objects, one per room, and this list gives 7 secret clues found there. Pick them up whenever you visit these places; they never block the story.
- Stair passage under the conservatory, morph object: a round object on the upper-left wall.
- Underground hall, morph object: the upper part of the left wall.
- Underground hall, secret clue: zoom into the crane console and tap the teal shape in the close-up.
- Collection hall, morph object: high on the wall above the display cases, left of centre.
- Collection hall, secret clue: zoom into the book on the armchair and tap the teal shape in the close-up.
- Second exhibit hall, morph object: the right side.
- Aquarium room, morph object: the floor at the lower right.
- Collection hall, secret clue: zoom into the thorn exhibit and tap the teal shape in the close-up.
- Collection hall, secret clue: zoom into the Medusa exhibit and tap the teal shape in the close-up.
- Laboratory, morph object: the centre, beside the right-hand frozen figure.
- Freezer, morph object: the top centre, above the vault wheel between the two ice blocks.
- Freezer, secret clue: zoom into the chest and tap the teal shape in the close-up.
- Laboratory, secret clue: zoom into the vent grate and tap the teal shape in the close-up.
- Freezer, secret clue: zoom into the frozen hand and tap the teal shape in the close-up.
Chapter 5 Collectibles
Chapter 5 has 7 morph objects, one per room, and this list gives 8 secret clues found there. Pick them up whenever you visit these places; they never block the story.
- Dining room, morph object: the right side, near the vase.
- Attic stair hall, morph object: the upper left.
- Attic stair hall, secret clue: zoom into the green box and tap the teal shape in the close-up.
- Attic, morph object: the skull at the bottom left.
- Attic, secret clue: zoom into the wall panel and tap the teal shape in the close-up.
- Maid's room, morph object: the floor, centre right.
- Maid's room, secret clue: zoom into the shoes under the bed and tap the teal shape in the close-up.
- Maid's room, secret clue: zoom into the dresser and tap the teal shape in the close-up.
- Attic, secret clue: zoom into the green box with four number wheels and tap the teal shape in the close-up.
- Maid's room, secret clue: zoom into the wardrobe and tap the teal shape in the close-up.
- Roof, morph object: the right side, by the gargoyle and the clock door.
- Roof, secret clue: zoom into the chest and tap the teal shape in the close-up.
- Spiral stairway, morph object: the lower-left railing.
- Control room, morph object: a narrow object on the wall immediately left of the world map.
- Control room, secret clue: zoom into the world map and tap the teal shape in the close-up.
Chapter 6 Collectibles
Chapter 6 has 9 morph objects, one per room, and this list gives 10 secret clues found there. Pick them up whenever you visit these places; they never block the story.
- Path with the angel and clock post, morph object: the left side, by the angel.
- Path with the angel and clock post, secret clue: zoom into the angel statue and tap the teal shape in the close-up.
- Hedge path with the weeping statues, morph object: the right side.
- Hedge junction, morph object: the top left, above the arch.
- Shed, morph object: the lower right.
- Shed, secret clue: zoom into the plant pot by the tap and tap the teal shape in the close-up.
- Lakeside, morph object: the centre right.
- Rose path with the lamp post, morph object: the top left.
- Barn, morph object: the left wall.
- Barn, secret clue: zoom into the saw table and tap the teal shape in the close-up.
- Barn, secret clue: zoom into the truck bed and tap the teal shape in the close-up.
- Barn, secret clue: zoom into the gap in the barn door and tap the teal shape in the close-up.
- Lakeside, secret clue: zoom into the sunken boat and tap the teal shape in the close-up.
- Porch, morph object: the upper-left wall.
- Porch, secret clue: zoom into the fuel cap of the car and tap the teal shape in the close-up.
- Porch, secret clue: zoom into the dug-up ground and tap the teal shape in the close-up.
- Crypt grounds, morph object: the left side, by the stone cross.
- Crypt grounds, secret clue: zoom into the round slot in the crypt door and tap the teal shape in the close-up.
- Crypt, secret clue: zoom into the barred cage in the sarcophagus and tap the teal shape in the close-up.
Chapter 7 Collectibles
Chapter 7 has 7 morph objects, one per room, and this list gives 11 secret clues found there. Pick them up whenever you visit these places; they never block the story.
- Foyer, morph object: the right side.
- Upstairs hall, morph object: a small item against the far back wall, top centre.
- Upstairs hall, secret clue: zoom into the fireplace and tap the teal shape in the close-up.
- Upstairs hall, secret clue: zoom into the jewel box and tap the teal shape in the close-up.
- Upstairs hall, secret clue: zoom into the blue toy chest and tap the teal shape in the close-up.
- Alice's room, morph object: the lower right.
- Alice's room, secret clue: zoom into the dressing table and tap the teal shape in the close-up.
- Alice's room, secret clue: zoom into the cuckoo clock and tap the teal shape in the close-up.
- Foyer, secret clue: zoom into the tray and tap the teal shape in the close-up.
- Storage room, morph object: the wall above the fireplace, left of the grandfather clock.
- Storage room, secret clue: zoom into the bust and tap the teal shape in the close-up.
- Laser landing, morph object: the left side.
- Laser landing, secret clue: zoom into the gramophone and tap the teal shape in the close-up.
- Toys corridor, morph object: the centre.
- Storage room, secret clue: zoom into the scales and tap the teal shape in the close-up.
- Library, morph object: the top right.
- Library, secret clue: zoom into the birdcage and tap the teal shape in the close-up.
- Library, secret clue: zoom into the secretary desk and tap the teal shape in the close-up.
Chapter 8 Collectibles
Chapter 8 has 7 morph objects, one per room, and this list gives 10 secret clues found there. Pick them up whenever you visit these places; they never block the story.
- Tinker's study, morph object: the top of the arched window behind the desk.
- Tinker's study, secret clue: zoom into the brass oxygen cylinder with gauges beside Tinker's chair and tap the teal shape in the close-up.
- Doll-tree courtyard, morph object: high in the tree among the hanging dolls, just right of the trunk.
- Doll-tree courtyard, secret clue: zoom into the doll on the tree and tap the teal shape in the close-up.
- Chapel, morph object: the centre.
- Chapel, secret clue: zoom into the bas-relief and tap the teal shape in the close-up.
- Chapel, secret clue: zoom into the seated skeleton and tap the teal shape in the close-up.
- Outside the boathouse, morph object: the top left, above the left edge of the boathouse roof.
- Boathouse, morph object: the top left.
- Boathouse, secret clue: zoom into the crate and tap the teal shape in the close-up.
- Boathouse, secret clue: zoom into the water by the bollard and tap the teal shape in the close-up.
- Doll workshop, morph object: the doll face at the lower right.
- Doll workshop, secret clue: zoom into the figurine shelf and tap the teal shape in the close-up.
- Doll workshop, secret clue: zoom into the wax doll head and tap the teal shape in the close-up.
- Cinema, morph object: a small framed picture high on the wall, left of the curtains.
- Cinema, secret clue: zoom into the projector and tap the teal shape in the close-up.
- Cinema, secret clue: after the automaton fight, zoom into the tear in the cinema screen (where you find Knurling Wheel 3/4) and tap the teal shape at the lower right of the hole.