Studio: first visit
A couple frozen at a table fills the studio with a new anomaly, and a Polaroid is the way to clear it.
- Zoom into the armchair and take the Polaroid body.
- Zoom into the easel and take Colored shard 6/8. The sketch is unfinished, and your character wonders what the artist meant to paint.
- Zoom into the paint box on the shelf and take Paint tube 2. Use both Paint tubes on the empty slots, open the drawer and take the Brush.
- Zoom into the anomaly table and take the Fishing lure. Your character says the anomaly reacts to a camera.
- Zoom into the blue cabinet at the lower right and take the Polaroid lens.
- On the embankment, use the Fishing lure on the tackle box. Take the Memory landscape.
- In the square, use the Memory landscape on the easel. Take Bear claws 5/5 and the Red button.
- Optional morphing object: tap the still-life picture on the studio wall.
Bear claws
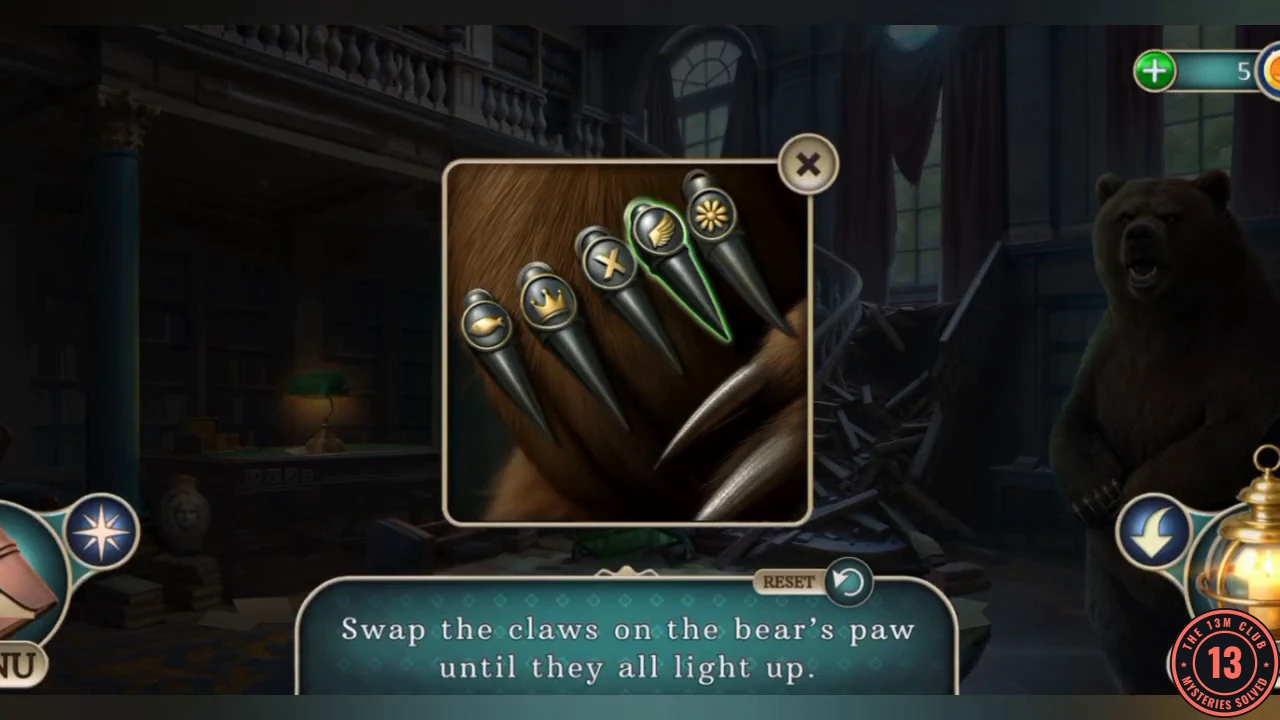
The instruction reads "Swap the claws on the bear's paw until they all light up."
- Use all five Bear claws on the bear's paw in the library to start the puzzle.
- Swap the claws until they read from left to right: wing, crown, fish, X, flower. The paw opens when all five are in place.CODEWing, Crown, Fish, X, Flower
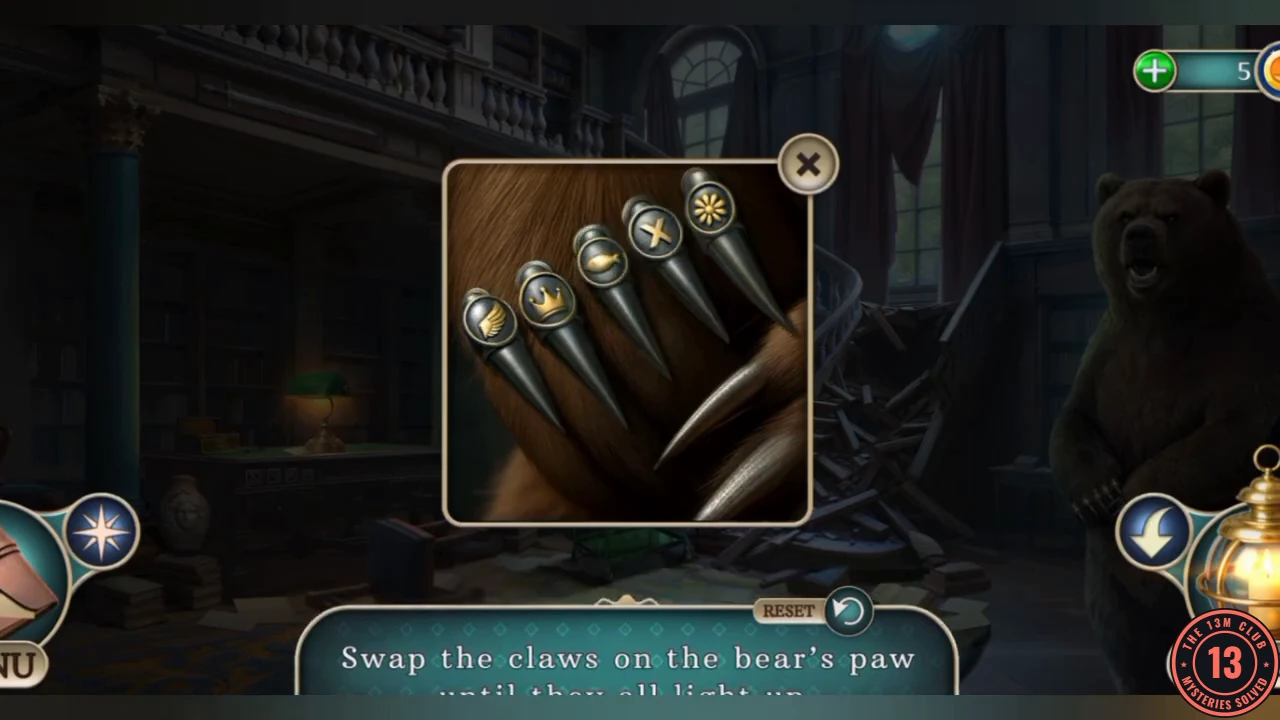
The correct order from left to right: wing, crown, fish, X, flower. The paw opens a moment later. - Take the Dirty photo cartridge.
Clearing the studio anomaly
Assemble the Polaroid, photograph the couple and then correct the memory it shows.
- In the studio, zoom into the desk. Use the Dirty photo cartridge and the Brush there and take the Polaroid cartridge.
- Open the Polaroid body in your inventory and add the Polaroid lens, Polaroid cartridge and Red button to get the Polaroid.
- Use the Polaroid on the anomaly. The photo shows flowers and a slice of cake that are missing from the table. Take the Dessert spatula. The text says you need to add a few things to correct the memory.
- On the embankment, zoom into the wall niche and take the Red flowers from the blue box.
- In the kid's room, use the Dessert spatula on the cake on the table. Take the Piece of cake and keep the spatula.
- In the city, use the Dessert spatula on the suitcase in the car trunk. Take the Heart locket.
- In the studio, use the Red flowers, Piece of cake and Heart locket on the anomaly. Take the Mechanism token from the table.
Basement door
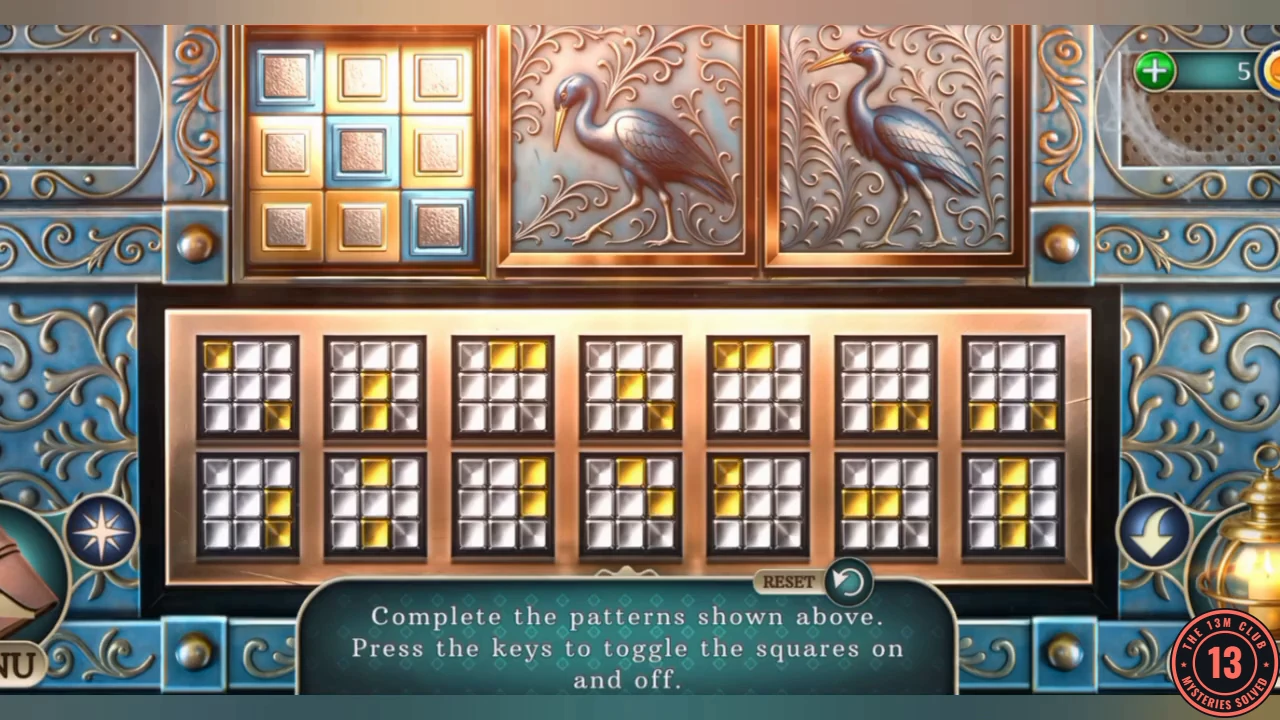
The instruction reads "Complete the patterns shown above. Press the keys to toggle the squares on and off." Each key flips its own set of squares, and pressing a key twice cancels it. On the grid, blue marks a square you still need, green a correct square and red a square lit in error. Number the keys 1 to 7 along the top row and 8 to 14 along the bottom row. Other key combinations can also work.
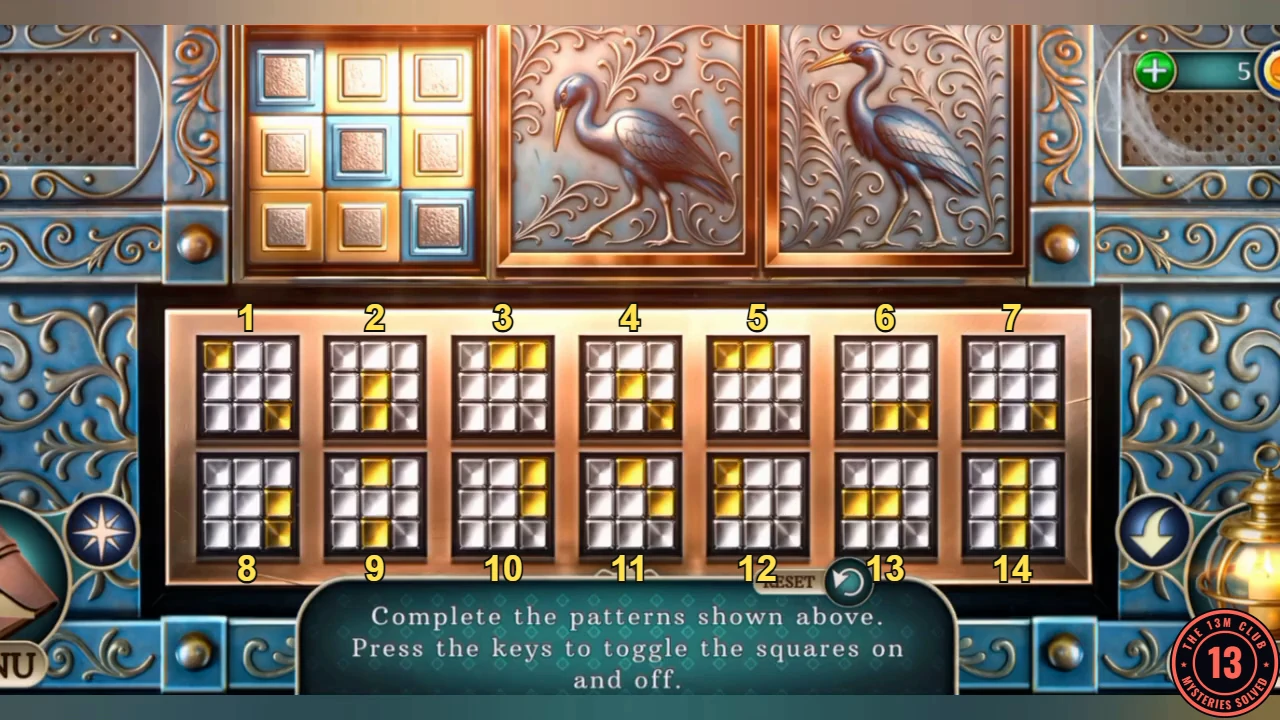
- Use the Mechanism token on the basement door to start the puzzle.
- First pattern: press keys 2, 4, 5 and 14.CODE2, 4, 5, 14
- Second pattern: press keys 1, 3, 7, 9, 11 and 12.CODE1, 3, 7, 9, 11, 12
- Third pattern: press keys 2, 3, 4, 7 and 9. The door opens and you enter the basement.CODE2, 3, 4, 7, 9
Restoring the film
Owen's portable projector can show the Scratched film, but both need repairs first.
- In the basement, zoom into the projector table and take the Winding key. The hairdryer needs parts before it will work.
- Zoom into the wall of notes and portraits. Read the notes and take the Flower photo. The portrait is sealed, but your character notes it could be unscrewed.
- Zoom into the machine with dripping paint and take the Tweezers.
- Optional morphing object: tap the paint can on the basement stairs. It starts as a bucket and shifts shape. You get the ITEM FOUND banner when you catch it.
- In the studio, use the Tweezers on the armchair. Take the Rabbit talisman and the Hairdryer cap and notice the crystal skull, which needs two gemstone eyes.
- Zoom into the paint box and use the Winding key on the red box. Take the Spatula and the Polish.
- In the square, use the Rabbit talisman on the box in the statue's lap and take the Spiral heater.
- In the basement, use the Spiral heater and the Hairdryer cap on the hairdryer. Take the working Hairdryer.
- Use the Spatula on the machine with dripping paint. Take the Fork and the Small cloth.
- In the studio, use the Fork on the armchair. Take the City photo.
- Zoom into the desk. Use the Scratched film, the Polish, the Hairdryer and the Small cloth there. Take the Restored film.
- In the basement, use the Restored film on the projector. Take the Portable projector.
- On the embankment, give the Portable projector to Owen. He remembers that Mnemosyne stole his Muse's face. Take the Palette knife and the Three hands talisman.
- In the basement, use the Palette knife on the portrait to unscrew it. Take the Girl photo. A sealed door with an empty slot is behind it.
Painting Owen's Muse
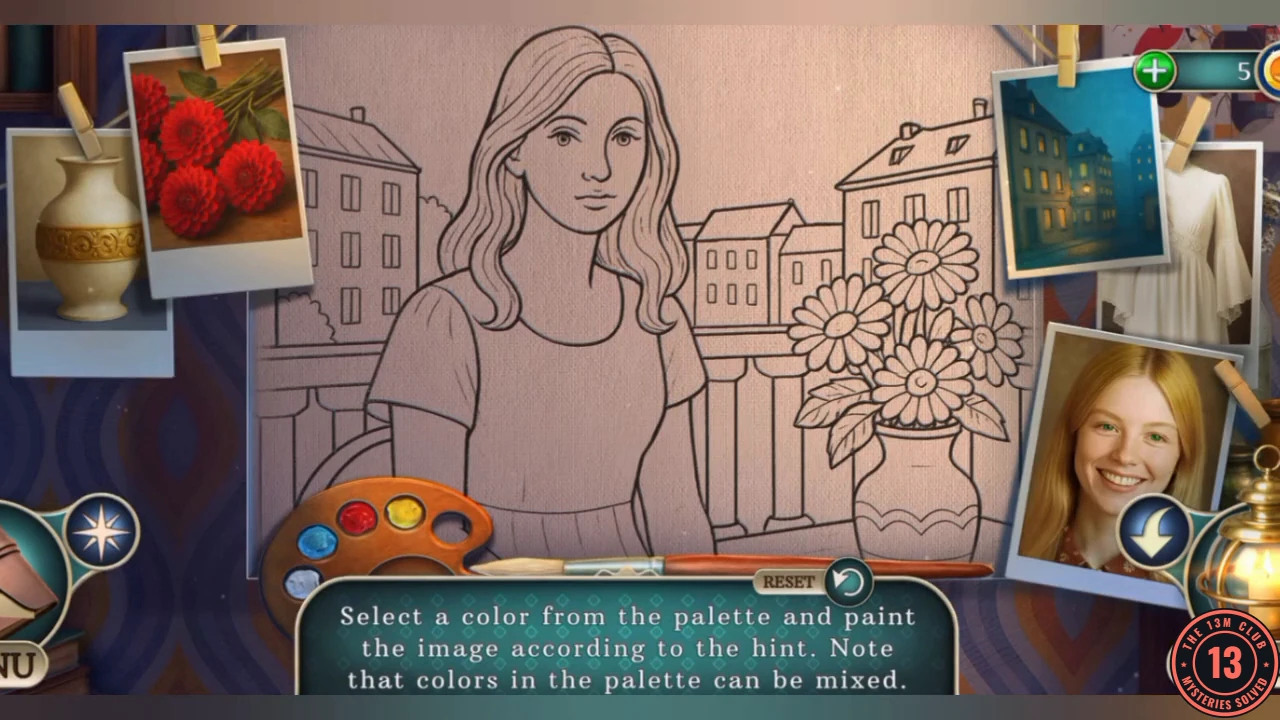
The instruction reads "Select a color from the palette and paint the image according to the hint. Note that colors in the palette can be mixed." The palette has blue, red, yellow, white and black, plus a mixing well. The photos show the colours, but the shirt is white even though the girl's photo suggests otherwise.
- In the studio, use the Flower, City and Girl photos on the easel to start the puzzle.
- Paint the flowers red, the hair yellow, the shirt white and the sky blue. Press Reset only if you want to start the picture again.
- Mix yellow and blue in the well to make green and paint the leaves.
- Mix red and white to make pink and paint the skin.
- Mix black and white to make grey and paint the buildings. The canvas finishes and you receive the Artist's Muse.
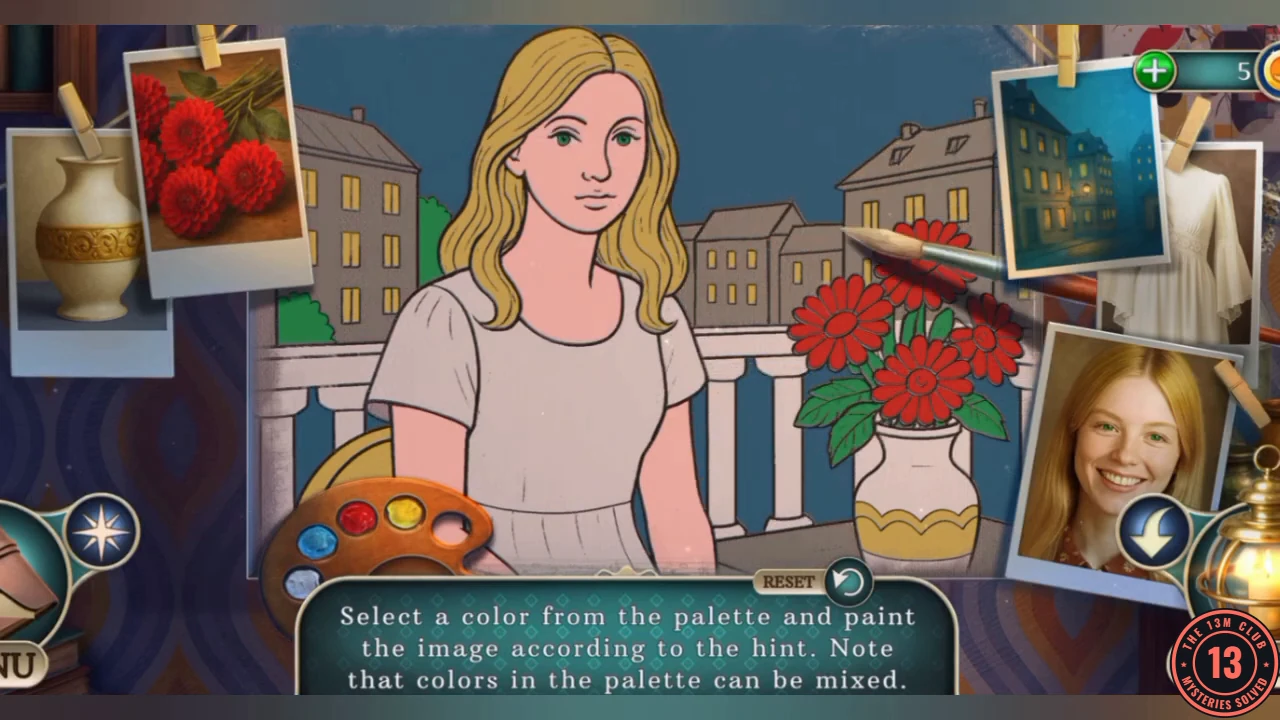
The finished canvas: yellow hair, pink skin, white shirt, blue sky, red flowers, green leaves and grey buildings.
Battle for Owen
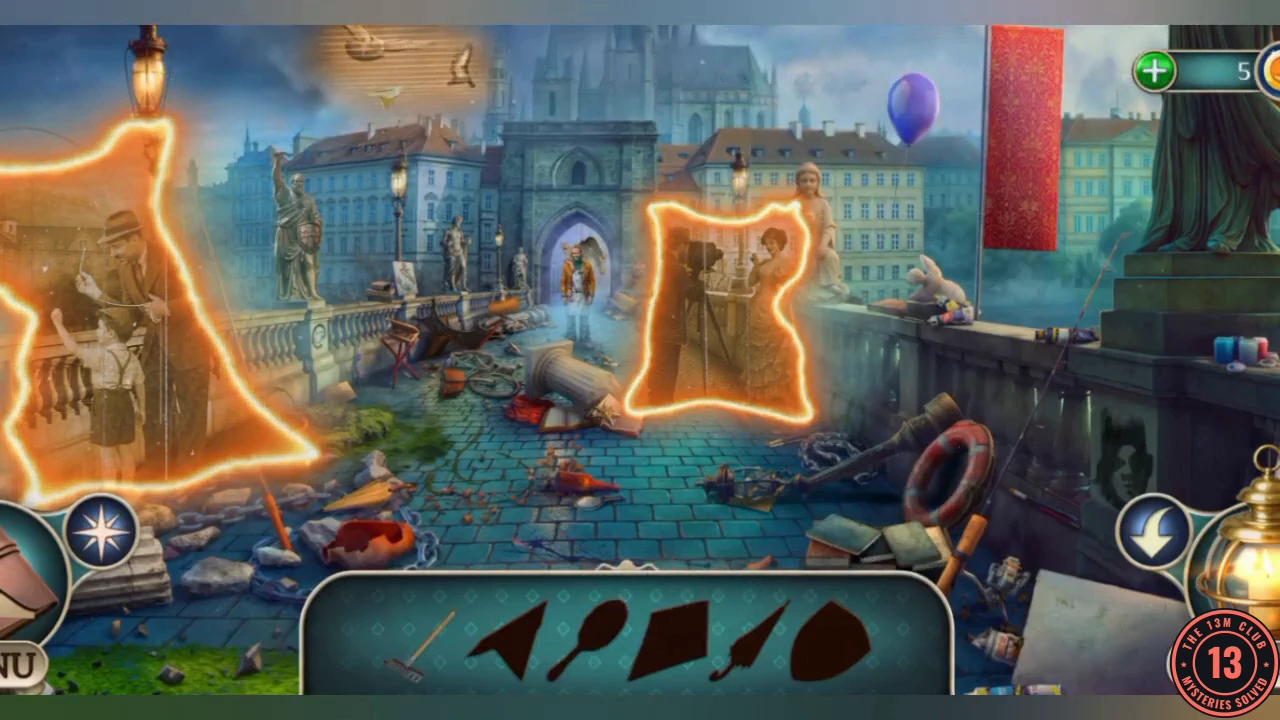
A bridge scene opens with a bar of item silhouettes along the bottom. Pan left and right to see all of it. New silhouettes appear as you use items, so check the bar after each use.
- On the embankment, give the Artist's Muse to Owen to start the scene.
- Take the rake lying across the bottom of the scene. Zoom into the sky at the top left, where the pigeons fly, and use the rake to knock down the paper airplane.
- Take the closed yellow umbrella from the rocks above the broken orange pot on the left. Zoom into the fallen street lamp left of the life ring and use the umbrella on it. Take the kite that was under the lamp.
- Zoom into the sepia photo on the left showing a man and a boy. Give the paper airplane to the boy and the kite to the man.
- Take the hand mirror lying on the cobbles beside the red traffic cone in the centre of the bridge.
- Zoom into the bearded statue with a raised arm on the left side of the bridge and take its shield. Its chest is missing an ornament: take the star from the end of the fallen column in the middle of the bridge and put it on the statue's chest. The statue gives you the sickle.
- Zoom into the sepia photo on the right showing a photographer and a woman, and give the hand mirror to the woman.
- Take the sun emblem held by the seated woman statue on the right parapet, then the gold scorpion lying on the paint palette on the stand beside the rocking chair.
- Zoom into the strapped wicker basket near the bicycle in the middle of the bridge. Cut the strap with the sickle, then take the movie camera and the small brass part that fall out.
- Find the last items: the round fan with ribbons beside the rocking chair, the anchor drawn on the paper sign on the left parapet, the first-aid kit on the rocking chair seat and the purple telephone receiver hanging on the left balustrade.
- When Owen appears in the arch, use the fan, the shield, the movie camera and the first-aid kit on him in turn.
- Take the Movie camera and the Toggle switch at the end of the scene.
Crossing the river
Owen tells you Sylvia owns the cinema and helped Mnemosyne with her rituals. The boat is the way across.
- Talk to Owen and take the Artist's talisman. The objective becomes Cross the river.
- In the basement, use the Artist's talisman on the sealed door. Turn the valve inside, then take the Emerald eye and the Steering wheel and read the note.
- On the embankment, zoom into the boat and use the Steering wheel and the Toggle switch on its dashboard.
- Zoom into the rubble and take the Ruby eye.
- In the studio, use the Emerald eye and the Ruby eye on the crystal skull in the armchair. Take the second Toggle switch from its mouth.
- On the embankment, use the second Toggle switch on the boat's dashboard. The boat carries you across to the cinema.