How the Collection Tracker Works
Most main-game locations hide small model ships (collectibles) and morphing objects, which keep changing shape and are tapped like any other object. Tap the tracker emblem at the top left of the screen to see how many are left in the current location: "There are collectibles to find here: N" and "There are morphing objects to find here: N". Each one flies to the tracker when you tap it. Collect them before you leave each location: the recordings only show them being picked up on the first visit, and returning to earlier story locations was not checked. The bonus chapter is not included here.
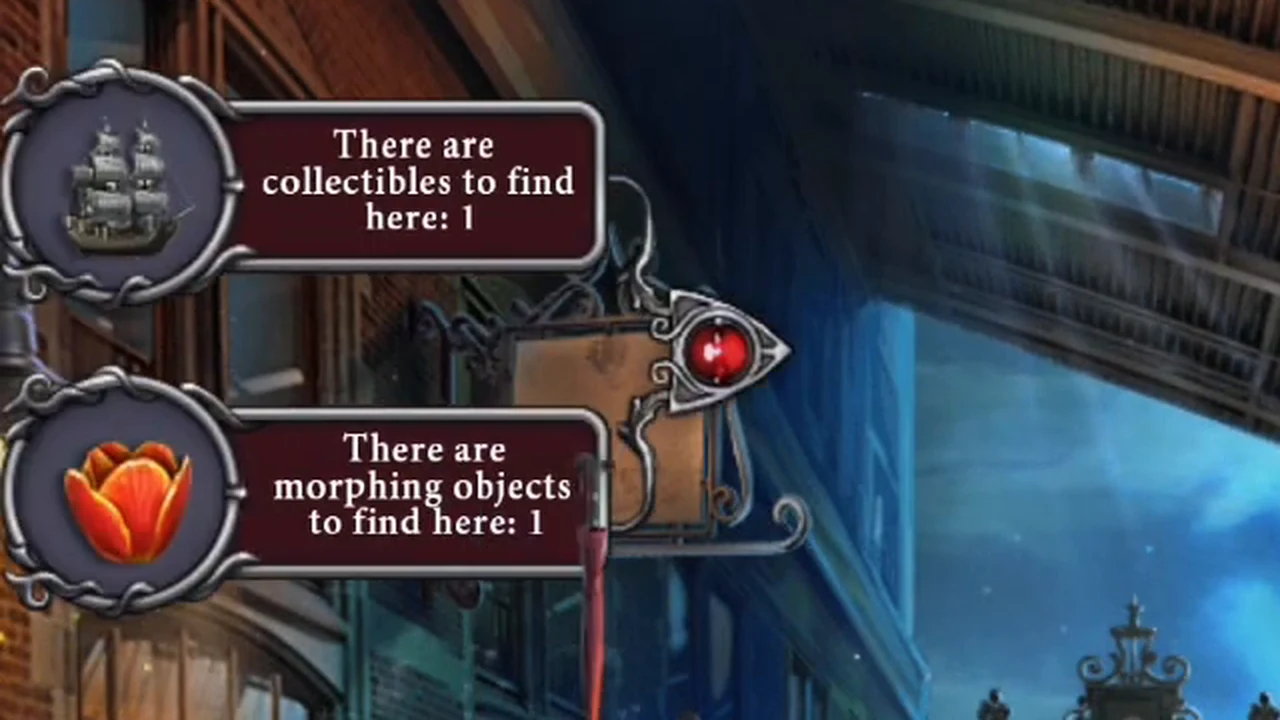
- Open the tracker in each new location. When both lines read "There are no more collectibles here." and "There are no more morphing objects here.", the location is finished. The locations below follow the story order. Positions come from a recording of the current free-to-play version.
- No tracker counts were shown for the Amsterdam harbour, where you repair the boat and meet the newspaper boy. If your tracker shows anything there, search that area as well. The recordings show no reward screen or collection menu for completing the set.
Station, Palace Square and Council Chamber
One collectible and one morphing object at the station and on Palace Square; one collectible and two morphing objects in the council chamber.
- Station platform. Morphing object: the red closed umbrella hanging under the shop-sign bracket on the left wall. Collectible: the small golden ship lying on the seat of the front bench.
- Royal Palace square. Morphing object: the red Amsterdam flag with three white crosses on the church front, left of the big window. Collectible: the small golden figure on the wet cobbles just below the monument base, above the tulips.
- Council chamber. Morphing objects: the thin pen with a green tip lying on the table between the glass ashtray and the teapot, and the faint model ship on the floor under the grand piano, between a piano leg and the red chair. Collectible: the golden sailing ship on top of the tall cabinet at the back left.
Vondelpark and the Tugboat Canal
Two collectibles and two morphing objects in each location.
- Vondelpark. Morphing objects: the copper jug on the right end of the bench by the red bicycle, and the purple iris lying on the cobbles to the right of the bench. Collectibles: the golden ship on top of the tall central lamp post, and the model ship among the blue flowers at the foot of the bridge stair railing, bottom left.
- Canal dock with the tugboat. Morphing objects: the round lifebuoy-like object on the canal wall just above the tugboat's bow, and the white folding fan caught in the treetop. Collectibles: the golden ship on the building ledge behind the top of the crane, left of the tree, and the small golden ship on the far canal bank by the mooring rail beyond the bridge railing.
Arjen's Pier and the Lighthouse Island
Two collectibles and two morphing objects in each location.
- Arjen's pier (daytime). Morphing objects: the fishing rod lying on the cobbles in front of the left pile of nets, and the ship's wheel hanging from the crane hook over the water, top right. Collectibles: the golden model ship tucked between the rails of the front-right pier railing, and the small orange ship on the left end of the shed roof, top left.
- Lighthouse island yard. Morphing objects: the spiky pine-cone-like object on the bottom step of the wooden stairs, bottom left, and the ship's wheel leaning against the house wall (it turns into a lifebuoy). Collectibles: the pale golden ship on the roof of the left house, and the orange model ship in the window niche at the top of the lighthouse tower.
- Lighthouse keeper's house. Morphing objects: the object hanging on the left edge of the small blue window frame, which keeps switching between a knotted rope and a blue shape, and the loose sheet of paper beside the rolled-up chart on the rug. Collectibles: the golden model ship lying on the rug in front of the lamp, and the ship pictured on the red lampshade.
Inside the Lighthouse
Two collectibles and two morphing objects on each floor.
- Lighthouse base with the lift and the fuse box. Morphing objects: the blue-handled trowel stuck upright in the floor by the lift doorway, and the small framed ship picture on the wall above the grandfather clock. Collectibles: the model ship on the wall shelf left of the fuse box, above the sewing machine, and the model ship on the bracket inside the glass shaft to the right of the lift.
- Lamp room at the top. Morphing objects: the blue book leaning against the front of the left crate, and the yellow scrap of paper floating by the top-left window. Collectibles: the small model ship leaning against the crate under the safe, and the ship emblem on the front of the copper lamp pedestal.
The Smugglers' Lair and Drebbel's Street
Two collectibles and two morphing objects in each location. In the lair the tracker counts become available after the gem duel.
- Smugglers' lair. Morphing objects: the wooden clog on the floor by the left table, and the oil lantern standing on the crate behind the captain. Collectibles: the golden model ship on the rock ledge above the stone stairs, left of the lantern, and the model ship sailing on the sea seen through the cave mouth.
- Drebbel's street. Morphing objects: the windmill-shaped weathervane on the distant rooftop, top left of centre, and the crow on the window ledge above the door on the right. Collectibles: the model ship in the nest on the bracket above that door, and the model ship lying on the newspaper on the cobbles in the centre.
Drebbel's Apartment and Kimmelaar's Room
Two collectibles and two morphing objects in each room.
- Drebbel's living room. Morphing objects: the red skull-and-crossbones sign on the panel of the door at the back, and the blue top hat on the small round table by the window. Collectibles: the model sailing ship on top of the dark chest of drawers behind Drebbel's wheelchair, and the small model ship floating in the blue light by the window, right of the green door.
- Kimmelaar's room. Morphing objects: the brass wall lamp just right of the glowing projector screen, and the pot of pink flowers on the floor to the right of the green armchair. Collectibles: the model sailing ship on the desk beside the black projector case, next to the armchair, and the ship in the framed painting right of the screen.
The Pier at Night, the Tavern and the Submarine
Two collectibles and two morphing objects in each location.
- Pier at night, while the fire is burning. Morphing objects: the newspaper on the cobbles in front of the fire (it turns into a white kitten), and the red-white-blue flag on the distant pole above the rooftops, left of the tall house. Collectibles: the model ship on the bracket on the brick wall right of the flower balcony, and the small model ship on the gable of the low house in the distance, left of the tall house.
- Tavern interior (the room with the birdcage and the cheese). Morphing objects: the grey teapot sitting on the stack of plates on the shelf above the birdcage, left of the bottles, and the red Amsterdam flag hanging from the upper gallery. Collectibles: the ship on the poster pinned to the shelving right of the bottles, and the sailing ship drawn on the wall map left of the drawer cabinet, above the man at the desk.
- Submarine. You can collect these while Arjen is still unconscious. Morphing objects: the small round pressure gauge on the wall beside the ladder, left of the grey electrical box, and the bunch of red and pink flowers lying on top of the pipe, top right. Collectibles: the faint model ship on the pipe ledge right of the ceiling lamp, and the model ship on the small bracket on the left wall between the big brass gauge and the steering console.