CHAPTER 4
Underground Lake: Waking Mallory
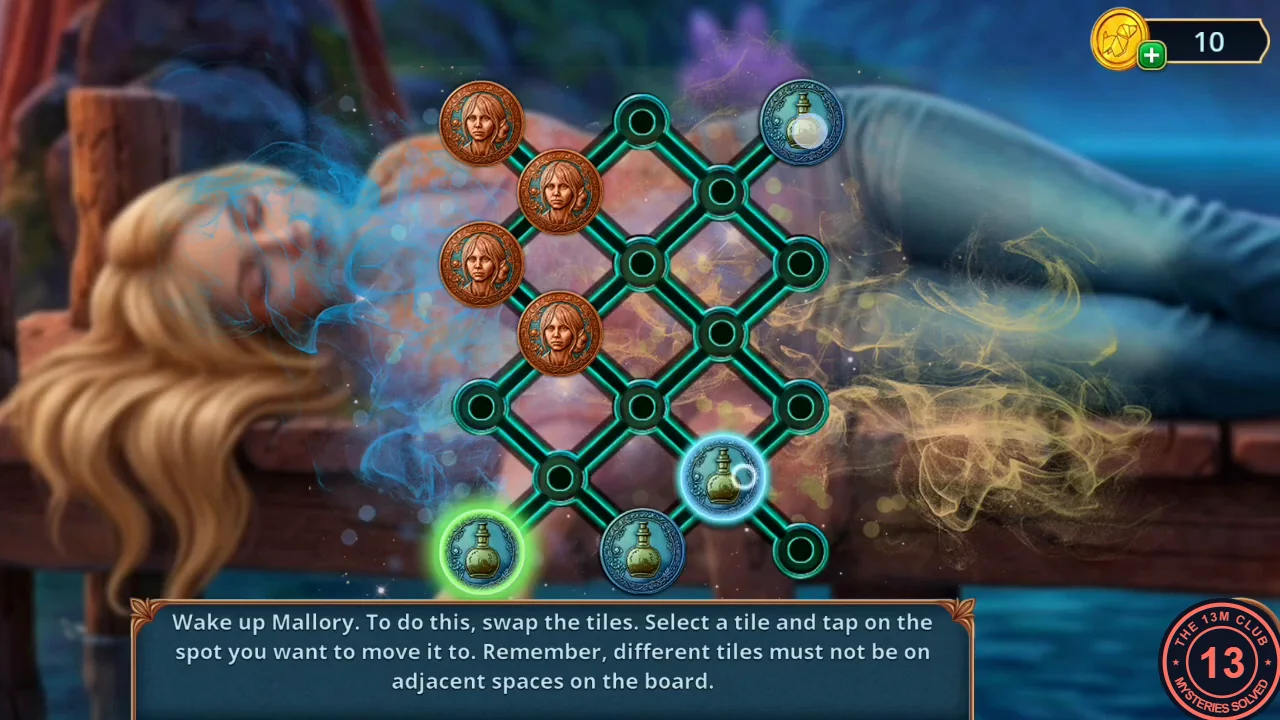
Mallory lies unconscious on the pier. Jules wants to wake her and leave.
- Read James's note. In the rat niche take Spiral Sun Amulets (1/2), the Torch and the Battery; a Shell is here.
- At the edge of the pond lies a pink handheld fan without blades. Open it and fit the Blades (the teal propeller Jules took from the university locker drawer in Chapter 3), then insert the Battery. The fan blows the green algae off the water; take the Ammonia from the lily pad.
- Use the Ammonia on Mallory. The board has five columns of spots joined by diagonal lines: columns 1, 3 and 5 have four spots (rows 1, 3, 5, 7 from the top) and columns 2 and 4 have three (rows 2, 4, 6). The four copper tiles start in column 1 and the four blue tiles in column 5; they must swap sides. Tap a tile, then tap a highlighted empty spot one step along a line. Never leave a copper and a blue tile on two spots joined by a line. Method: move the copper tiles into the middle in a tight group, slip the blue tiles past them along the top and bottom edges one at a time, and move a copper tile into each corner on the right as soon as it is free. A checked sequence of 40 moves under these rules (C = copper, B = blue, column-row): C 1-1 to 2-2, C 1-3 to 2-4, C 1-7 to 2-6, C 2-2 to 1-3, C 2-6 to 3-5, B 5-3 to 4-2, B 4-2 to 3-1, C 2-4 to 3-3, C 3-5 to 2-4, B 5-5 to 4-6, C 3-3 to 4-4, C 2-4 to 3-3, C 1-5 to 2-4, B 4-6 to 3-7, B 3-7 to 2-6, B 2-6 to 1-7, B 5-7 to 4-6, B 4-6 to 3-7, C 2-4 to 3-5, C 1-3 to 2-4, C 4-4 to 5-5, C 3-3 to 4-4, B 3-1 to 2-2, B 2-2 to 1-1, B 5-1 to 4-2, B 4-2 to 3-1, C 2-4 to 3-3, C 4-4 to 5-3, C 3-3 to 4-4, B 3-1 to 2-2, B 2-2 to 1-3, C 4-4 to 3-3, C 3-3 to 4-2, C 3-5 to 4-4, B 3-7 to 2-6, B 2-6 to 1-5, C 4-2 to 5-1, C 4-4 to 3-5, C 3-5 to 4-6, C 4-6 to 5-7. Tiles on their target column glow green.
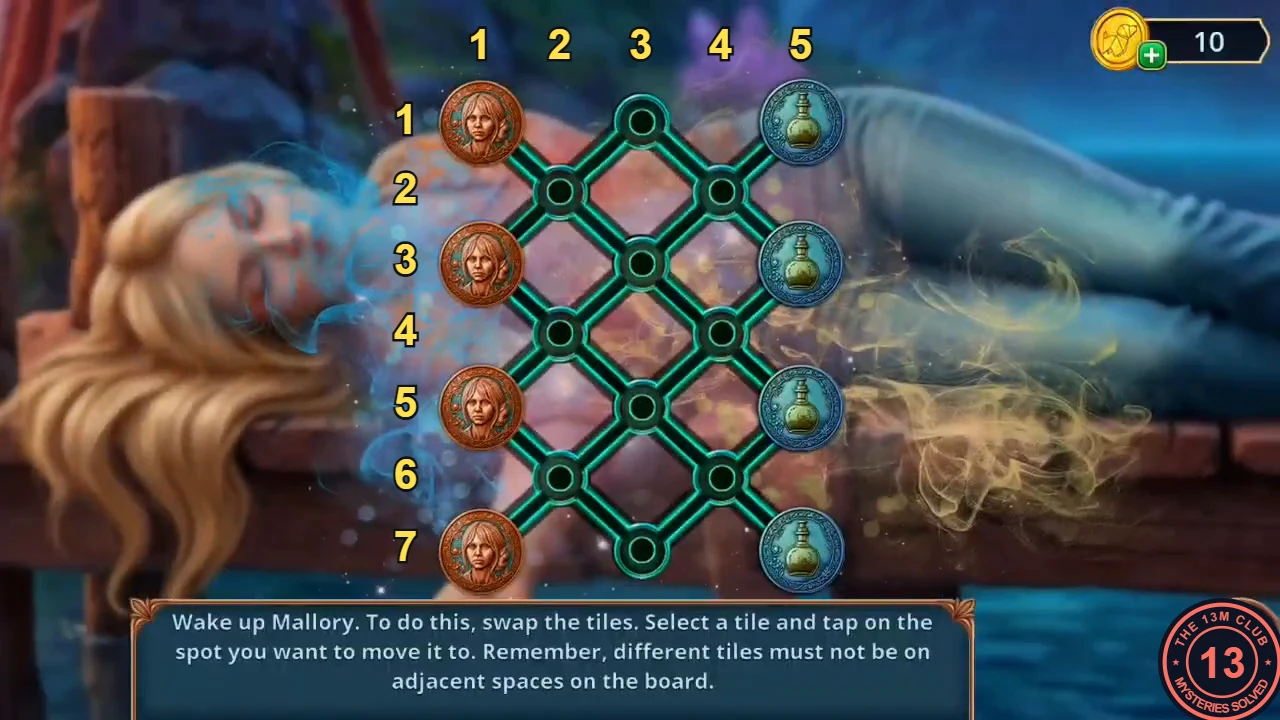
Column and row numbers used in the move list (column-row). Copper tiles start in column 1, blue in column 5.
CHAPTER 4
Underground Lake: The Underwater Path
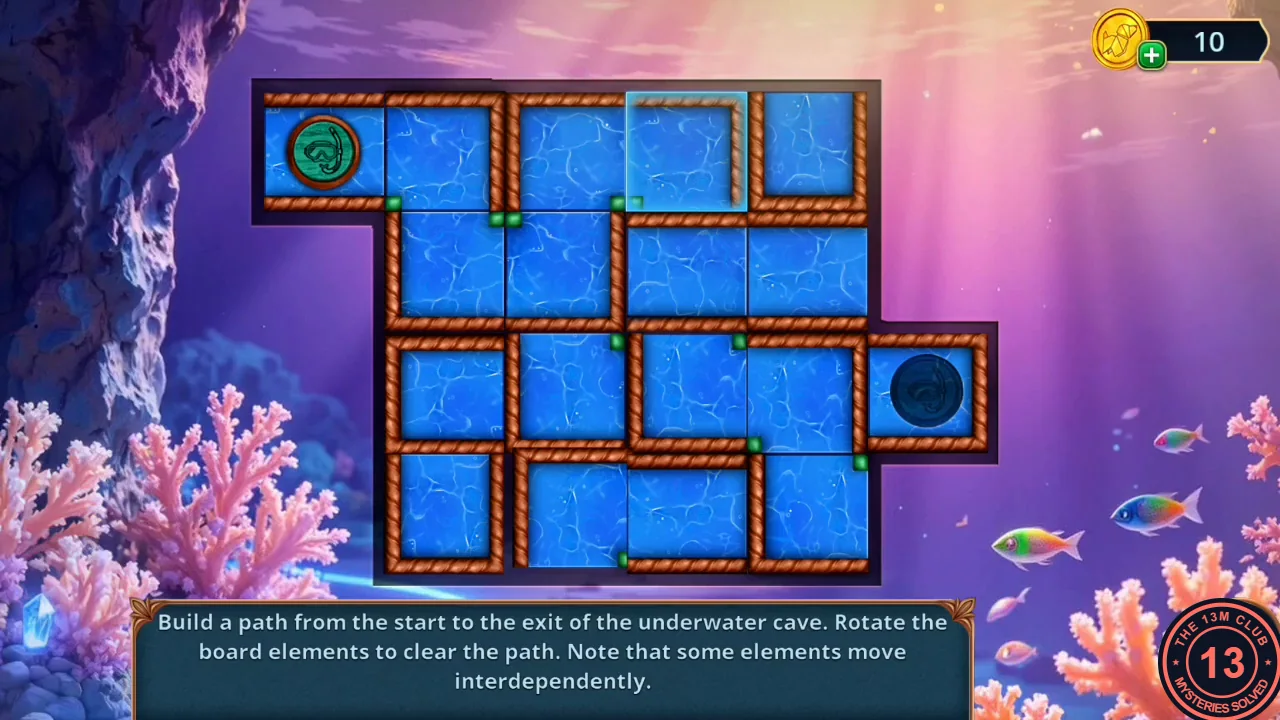
Thirty minutes later Eli arrives at the same lake. Mallory is gone.
- Take the Empty Lighter and the Razor from the lily pond. Cut the rope in the rat niche with the Razor and take the second yellow Oxygen Tank (2/2; the first came from the boat sacks in the hotel lounge).
- Open the scuba backpack on the rocks of the underground lake and fit the Yellow Cylinders and the Breathing Tube (from the minecart) into its two slots.
- Rotate board pieces to open a channel of water, free of rope walls, from the snorkel token (left of the top row) to the exit (right of the third row). The board is four squares wide and four high. Tap a square to turn it; some squares turn together with others, so after each tap check which squares moved. Target route in the recording: from the snorkel into the first square of the top row, down to the second row, right one square, back up into the top row, right one more square, then straight down the third column through rows 2 and 3, left one square, down into the bottom row, right along the bottom row to the last column, up one square and out to the exit. Work from both ends toward the middle: once a square of the route is open on the correct sides, prefer squares that turn without moving it. The top-right corner square is not part of the route. The snorkel swims to the exit when the channel is complete.
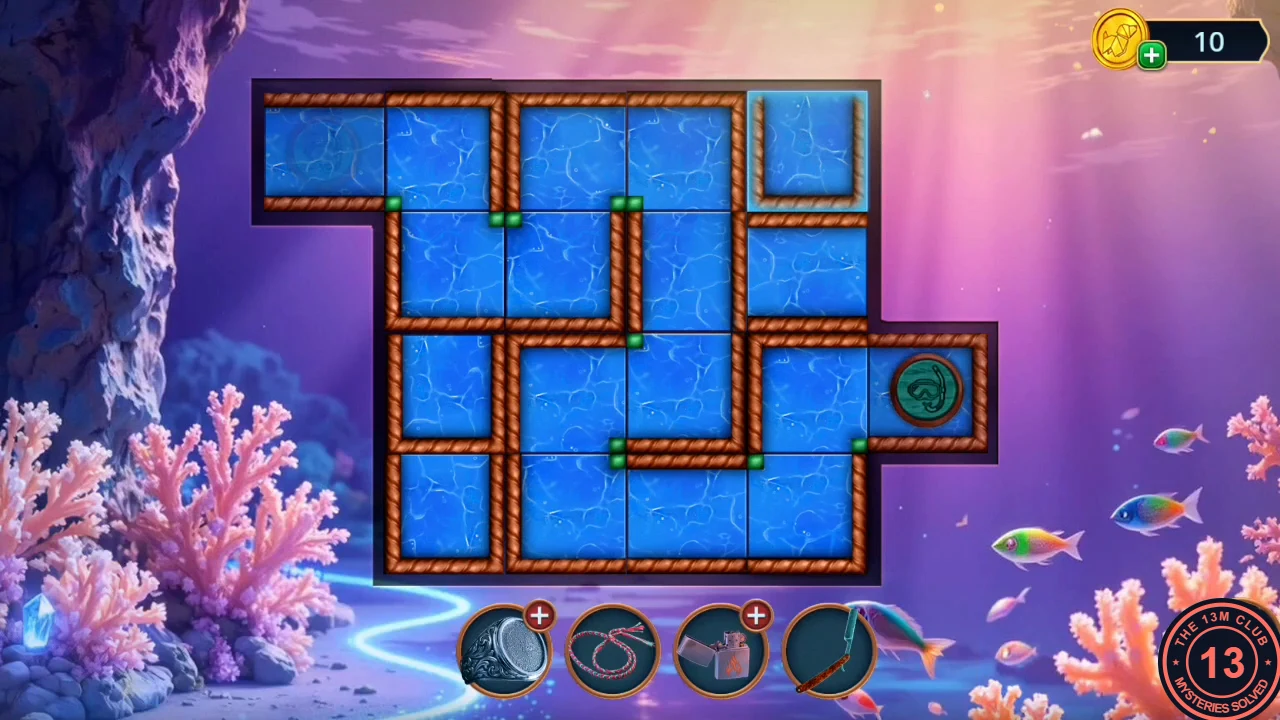
The completed channel; the snorkel token has reached the exit on the right. - Decision point with Emily: "Easy! Create a distraction. Derail the ritual." costs 60 coins and gives 2 stars; "Hold on, I need more time to think about it!" is free and gives none.
CHAPTER 4
Lagoon: The Underwater Chest
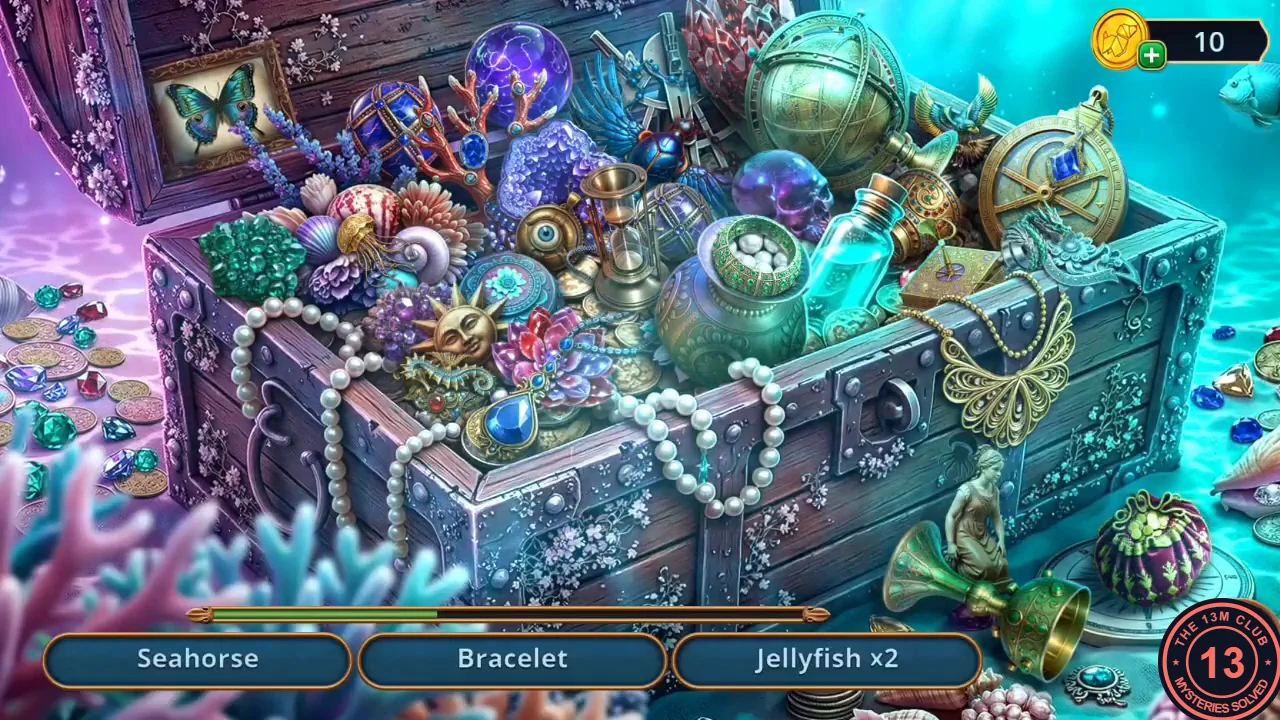
At the lagoon, free the Fishing Rod and pull a chest out of the pond.
- Cut the ropes of the net on the rock. Read the note about a lost soldering iron and take the gold crescent chip. Take the Fishing Rod.
- Use the Fishing Rod in the pond to pull up the chest. Find three each of Seahorse, Bracelet and Jellyfish; when the Seahorses are done, Sapphire Pendant ×3 takes their place (each hint costs 5 coins). The view can be zoomed and moved. Seahorses: the blue glass seahorse on the sand at the far left beside the coins; the gold seahorse brooch on top of the round red-and-purple pouch at the lower right; and the gold seahorse with a red gem just below the golden sun face in the chest, left of the big blue teardrop pendant. Bracelets: the gold bangle lying below the glass bottle, left of the big gold compass dial; the gold bracelet resting on the frame of the butterfly picture in the lid; and the green patterned band around the rim of the green jar of pearls. Jellyfish: the see-through jellyfish floating in the water above the gold compass dial; the small gold jellyfish among the shells right of the green crystal cluster on the left; and the faint jellyfish shape on the front of the chest just left of the head of the small bronze statue of a woman. Sapphire Pendants: the blue pendant hanging on the gold compass dial; the pale blue pendant hanging on the red coral branch between the blue patterned egg and the purple crystals; and the big blue teardrop pendant at the front of the chest below the sun face. You receive the Metal Detector.
CHAPTER 4
Lagoon: Soldering the Signet Ring
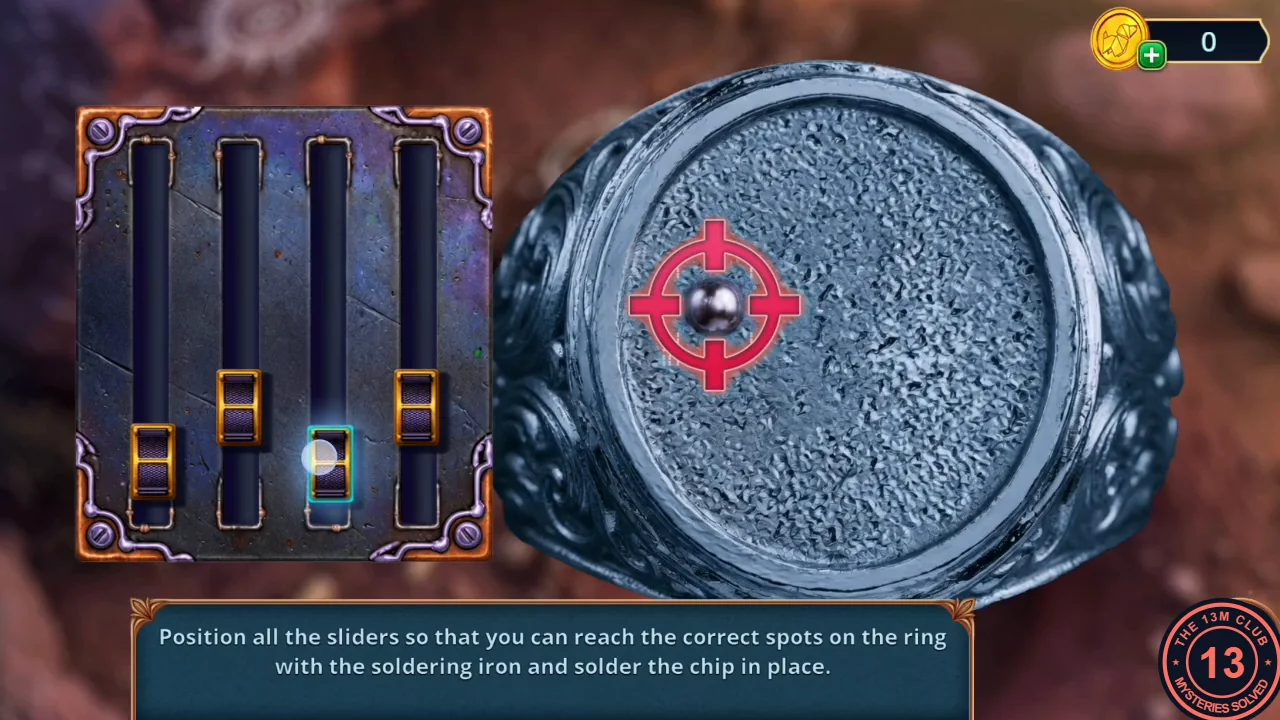
Find the Soldering Iron with the Metal Detector and repair the signet ring.
- Sweep the ground below the sun-and-moon symbol box with the Metal Detector and dig up the Soldering Iron.
- Open the Broken Ring from the inventory and add the crescent chip and the Soldering Iron. The four sliders on the left steer the red crosshair, which is the tip of the iron; a small silver bead on the ring marks the spot to solder. Move one slider at a time and watch which way the crosshair travels, then combine sliders to bring the crosshair exactly onto the bead. When it sits on the bead, the iron solders that part of the crescent chip and a new bead appears. The recording soldered three spots: left of centre (the left half of the crescent), upper right (its top end) and lower right (its bottom end).
- Open the burnt chest Near the Cave Entrance with the Signet Ring. Take the Metal Plate with Symbols; a Shell is by the chest.
CHAPTER 4
Lagoon: The Treasure Chest Again
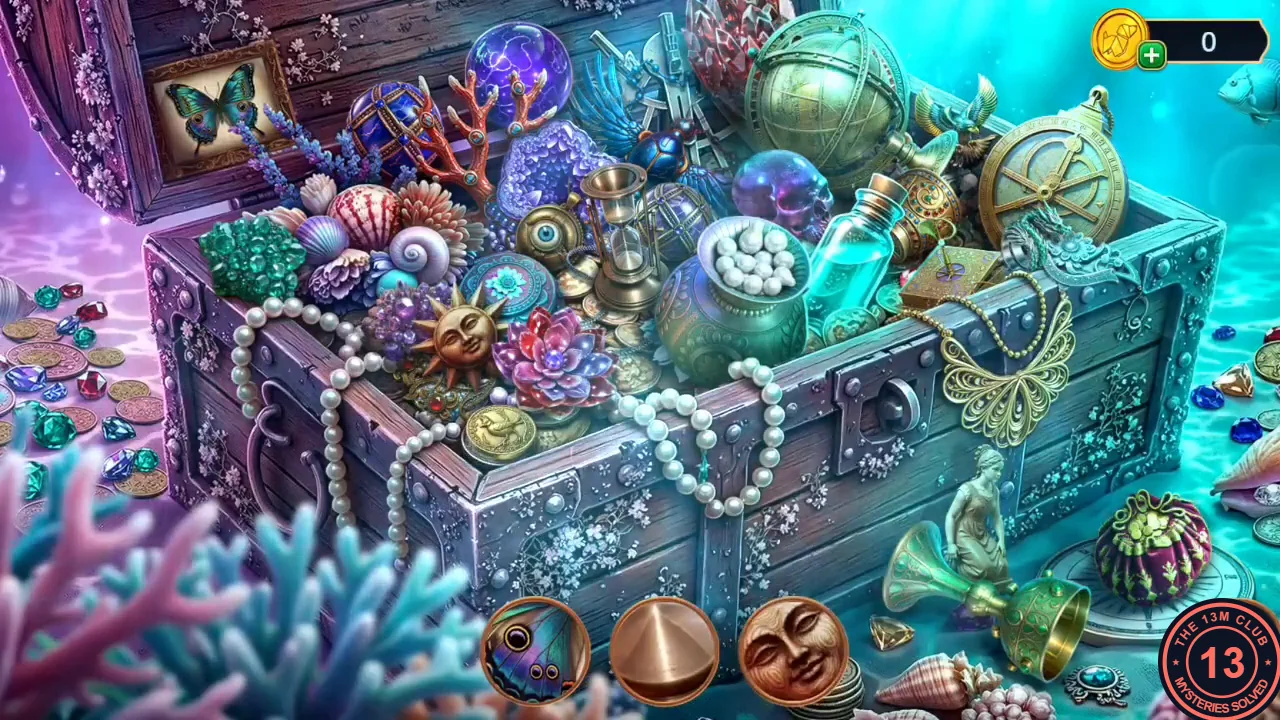
The Metal Plate goes on the symbol box, and the chest has a second search.
- Place the Metal Plate with Symbols on the symbol box by the pyre. Take the round relic.
- Search the chest again. Each round slot shows a close-up detail of an object in the scene; the objects stay in place and flash when you tap the right one, and a new detail fills the slot. Answers in the order the recording found them: red-striped shell – the red-and-white scallop shell among the shells left of the purple crystals; red pouch – the round red-and-purple pouch on the sand at the lower right; olive drapery – the small bronze statue of a woman at the lower right; turquoise liquid – the glass bottle of blue liquid; brass sphere – the big brass globe at the top; smiling face – the golden sun face; copper cone – the top of the brass hourglass in the middle; green crystals – the green crystal cluster on the left; purple crystals – the amethyst cluster right of the red coral; dark blue with fine lines – the blue egg with a gold lattice at the top left; butterfly wing – the butterfly picture in the lid; teal flower – the small teal flower on the silver dragon figure at the right rim of the chest, below the gold compass dial. You receive the Loaded Crossbow.
- Shoot the rope of the raised footbridge with the Loaded Crossbow. Read the note about the herbs and take the dry leaves.
CHAPTER 4
Underground Lake: The Musical Notes
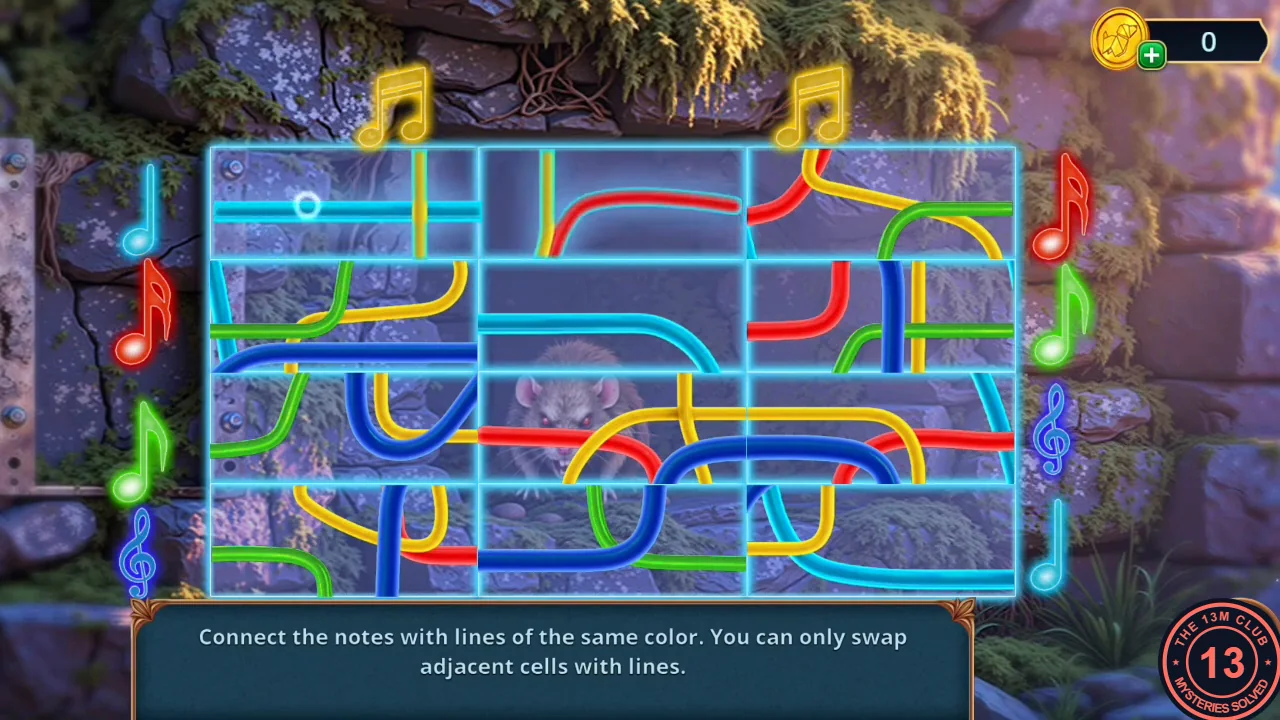
At the underground lake, connect the musical notes at the rat niche.
- At the rat niche, the board is 3 columns by 4 rows of tiles; tap two neighbouring tiles to swap them. The notes are the line ends: two yellow notes above the left and right columns (joined by one yellow line); on the left, top to bottom, cyan, red, green and blue; on the right, top to bottom, red, green, blue and cyan. Work from the edges: first get tiles whose line ends meet the side notes into the left and right columns, then fit the middle column so the lines continue across. Solved board in the recording: cyan runs straight along the top row from the left note, drops down the right edge of the middle column and runs along the bottom row to the cyan note at the bottom right; red leaves its left note in row 2, dips under the centre, comes back up into the right column and climbs to the red note at the top right; green drops from row 3 to the bottom of the two left columns, rises through the middle column and crosses the right column up to the green note in row 2; blue loops from the bottom-left note up through the left and middle columns, back down, then rises to the blue clef in row 3; yellow comes down from the left yellow note, loops round the centre, runs to the bottom row and climbs the right column to the right yellow note. The last swap in the recording is the top-right tile with the one below it.
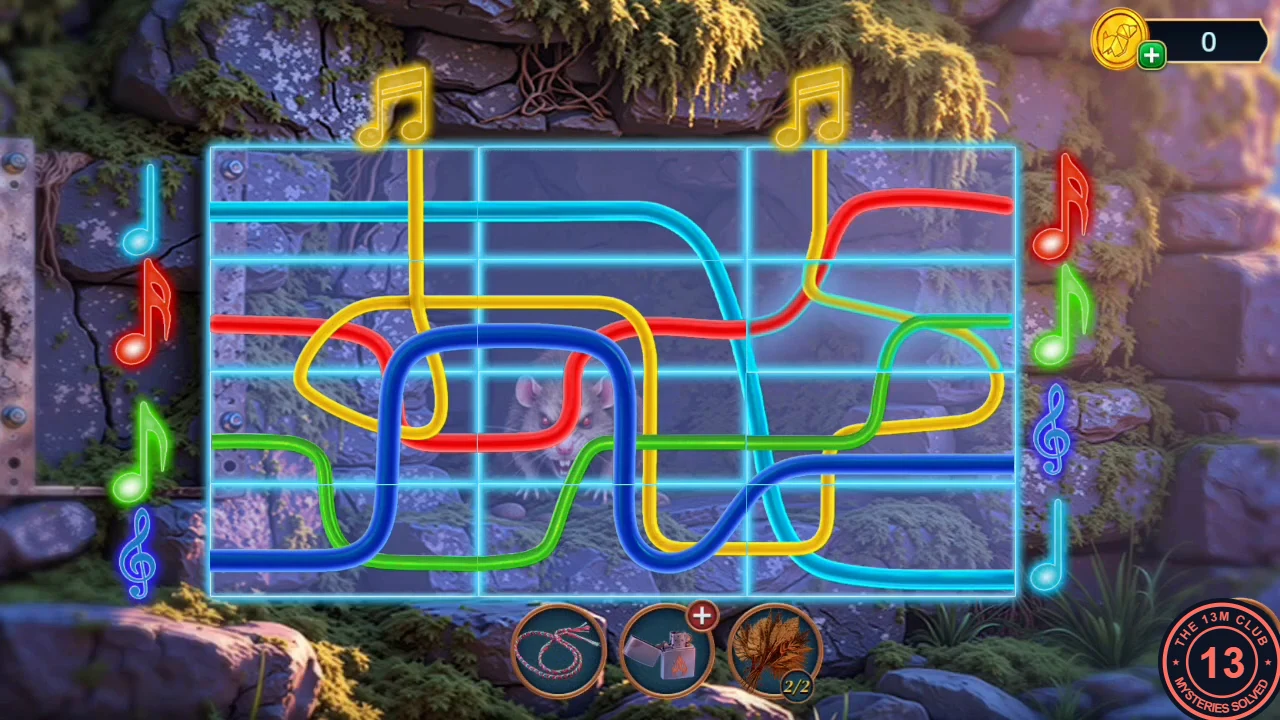
The solved board from the recording. - The rat leaves the niche; take the Oil. Open the Empty Lighter from the inventory and add the Woven Bracelet (as a wick) and the Oil to make the Lighter.
CHAPTER 4
Lagoon: Lighting the Pyre
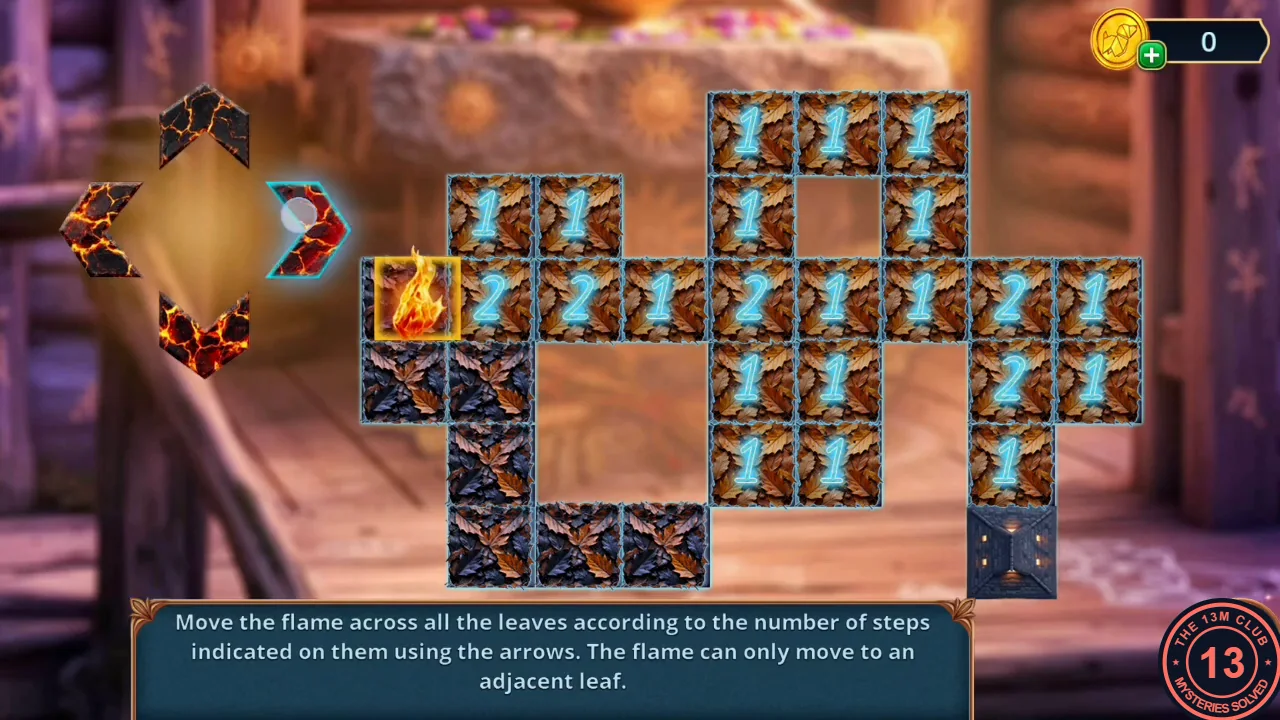
Light the dry leaves under the pyre bowl and guide the flame across the leaves.
- Put the dry leaves under the bowl at the pyre and light them with the Lighter.
- Move the flame with the arrow buttons on the left, one leaf at a time; each number shows how many times the flame must still pass over that leaf, and burnt-out leaves can no longer be entered. The flame starts on the bottom row and the exit box is at the lower right. The route used in the recording (36 moves): Left, Left, Up, Up, Up, Down, Left, Up, Right, Right, Left, Up, Right, Down, Right, Right, Right, Down, Down, Left, Up, Up, Up, Up, Right, Right, Down, Down, Right, Down, Up, Right, Down, Left, Down, Down. In words: go left and up the left column, use the 2 below the 3 and the far-left pair, double back through the 3 and 2 of the top-left block, cross the middle row, loop down and back up through the centre column, go round the top, then finish the right-hand block (both 2s) and drop into the exit.
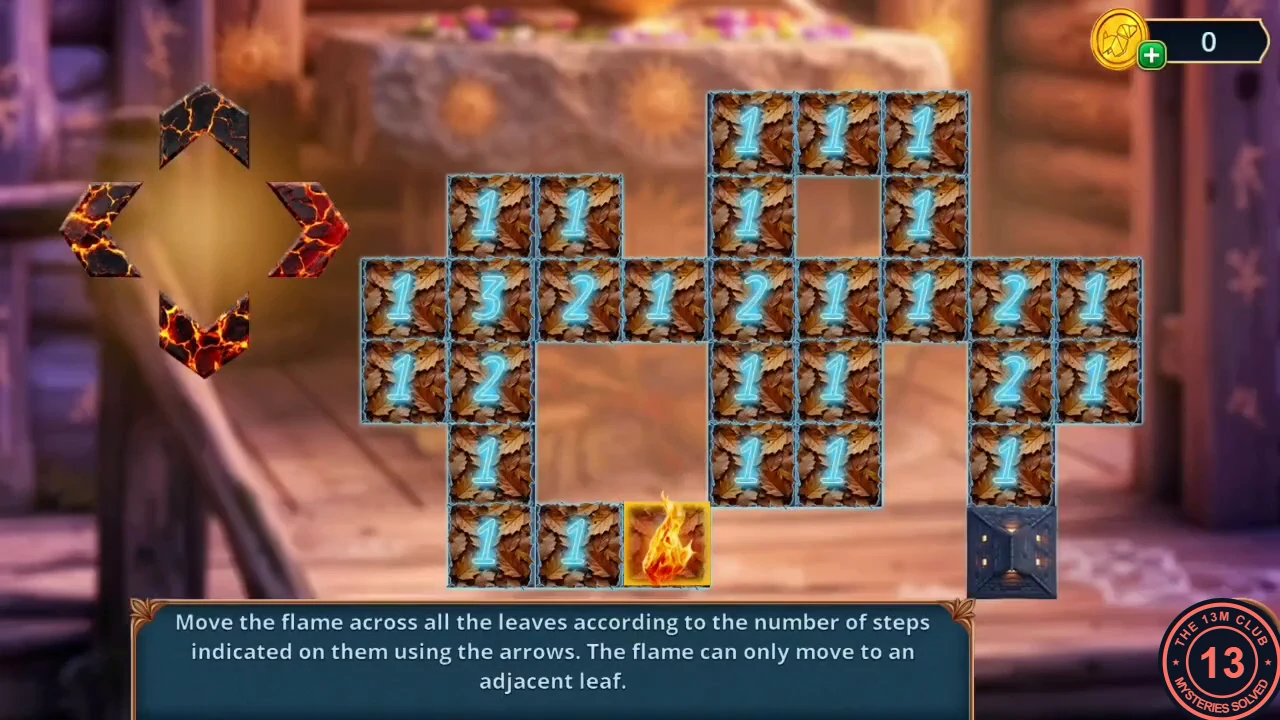
The start board the move list begins from. - Decision point with the hypnotised Jules: "Save yourself" is free (0 stars); "Take Jules away" costs 30 coins (2 stars); "Dispel hypnosis" costs 60 coins (6 stars).