Hotel Pool: Trap the Tape
Eli is in his own hotel room. He reads a letter: "Now you're where everyone else is."
- Open the tray on the table and take all three items: the green Yo-Yos (1/2), the "Missing" photo of a woman (1/2) and the Suction-Cup Keychain. Eli notes that one photo is missing.
- Open the cupboard with the glass pane and use the Suction-Cup Keychain to pull the glass out. Take the Feather and the second "Missing" photo ("Another one went missing") from behind the glass; the photos are now 2/2. Open the suitcase on the floor at the foot of the bed and put the photos inside; the suitcase closes. Eli can now open the door.
- Decision point: "Tell me everything from the beginning." costs 60 coins (2 stars); "Maybe you're exaggerating." is free (0 stars). The Welcome task completes and the hotel pool opens.
- At the pool, open the noticeboard and move the missing-person posters aside. Take the Skateboard without Wheels.
- Inspect the red car's door. It stays locked for now, but take the Rope hanging from the sign beside it and the Shark Tablet stuck to the outside of the door.
- Place the Shark Tablet on the noticeboard and take the Scoop Net.
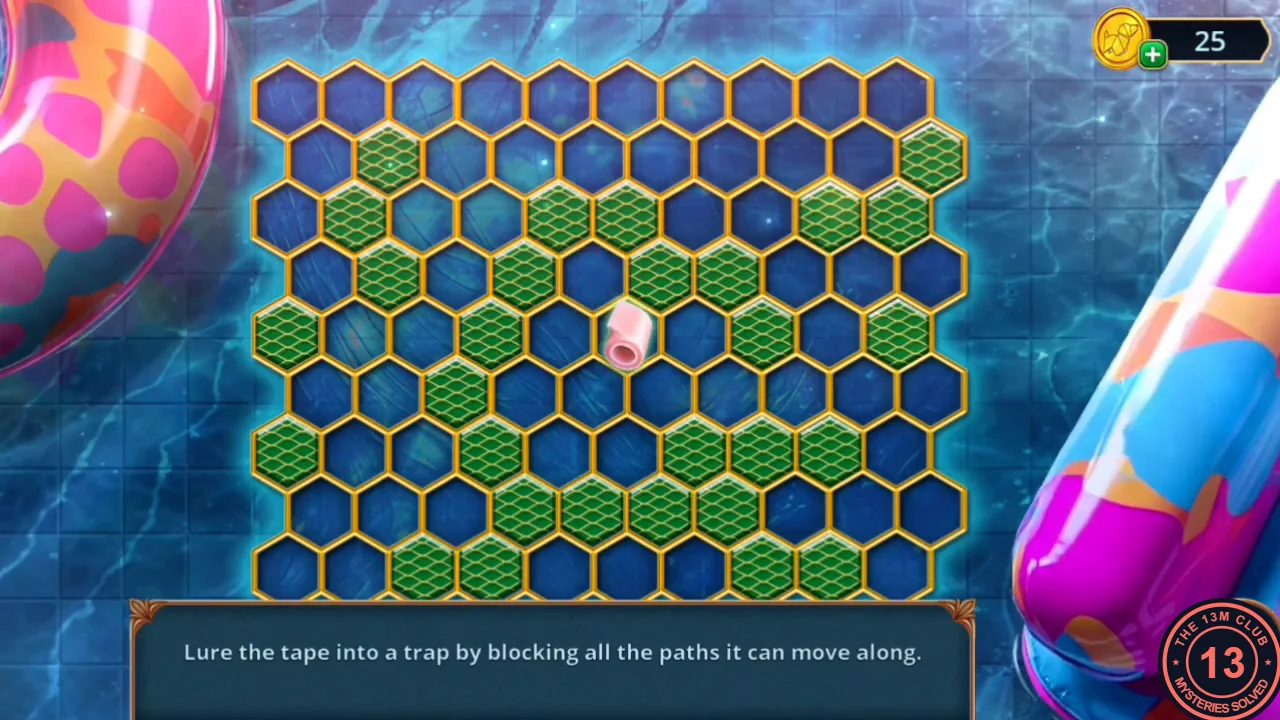
- Use the Scoop Net on the roll of tape floating in the pool. Each tap turns a hexagon into a blocker, then the tape moves one cell. Build a closed ring of blockers around it, cutting off the side nearest the edge first, until it cannot move. You receive the Duct Tape.
Jules and Mallory's Room: Spot the Differences
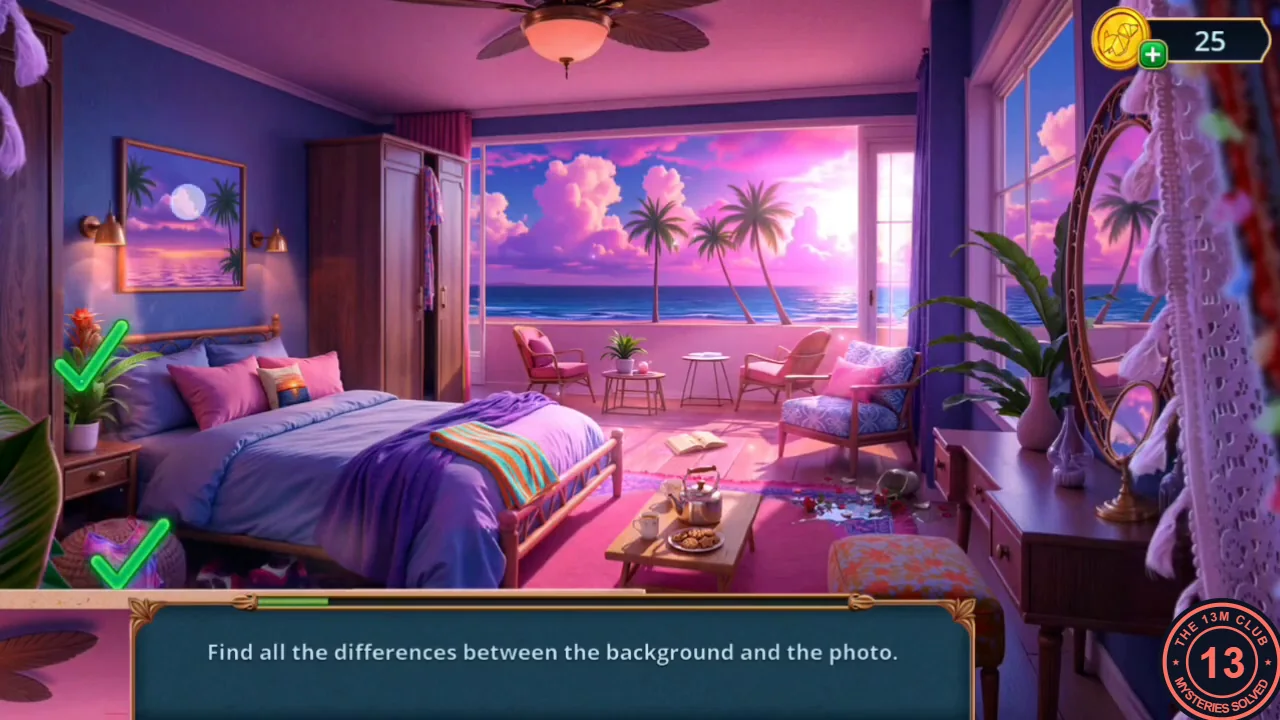
Eli wants to calm Jules down with a drink and something to eat, and looks around her room for clues.
- Go to Jules and Mallory's room. Open the vanity, read Mallory's note and take the Painting Parts (1/2).
- Use the Duct Tape on the torn photo on the vanity to repair the Room Photo. The room view then opens: find the 12 places where the room differs from the photo. Tap: the painting above the bed; the sky left of the palm trees in the big window; the sky at the top right, by the balcony door; the potted plant left of the bed; the patterned cushion on the bed; the striped towel on the bed; the open book on the floor in the middle; the cushion on the blue armchair; the teapot and plate of cookies on the coffee table; the broken things spilled on the rug right of the table; the vase on the vanity below the mirror; and the swimsuit in the wicker basket at the bottom left. Each correct tap leaves a green tick. You receive the Car Key.
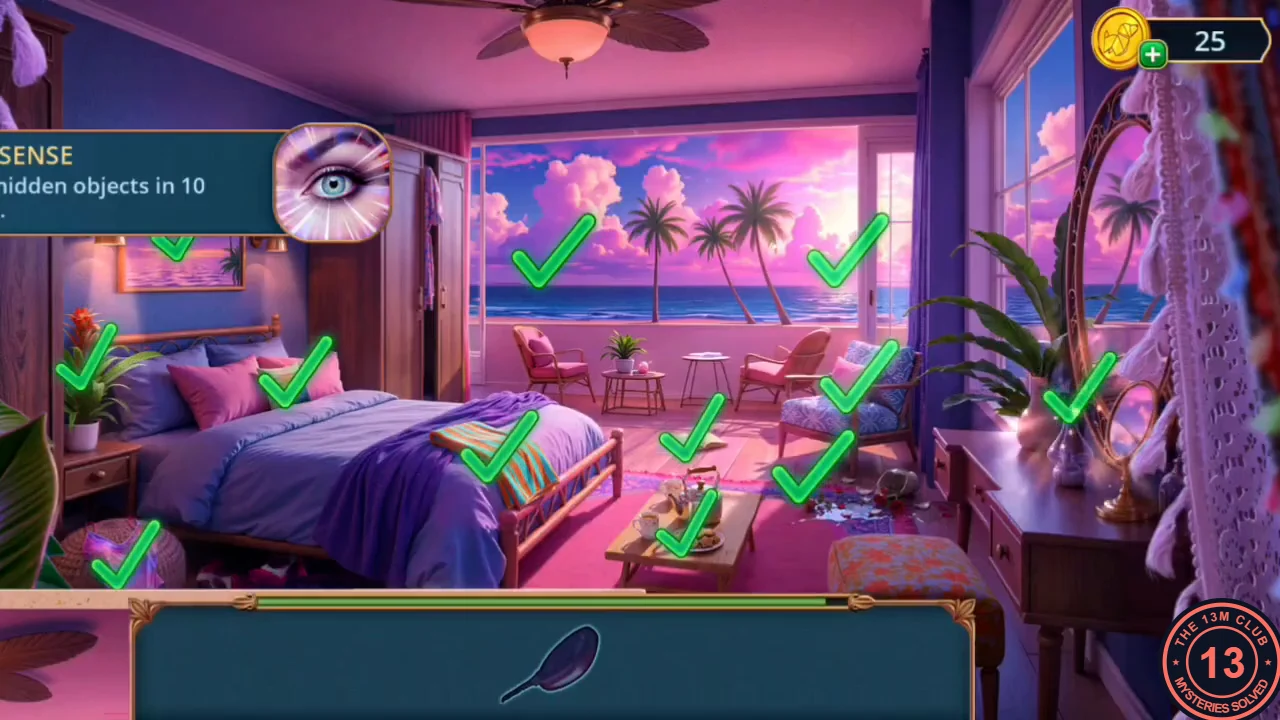
All twelve differences ticked. An achievement banner briefly covers the painting's tick at the top left.
Jules and Mallory's Room: Hidden-Object Scene
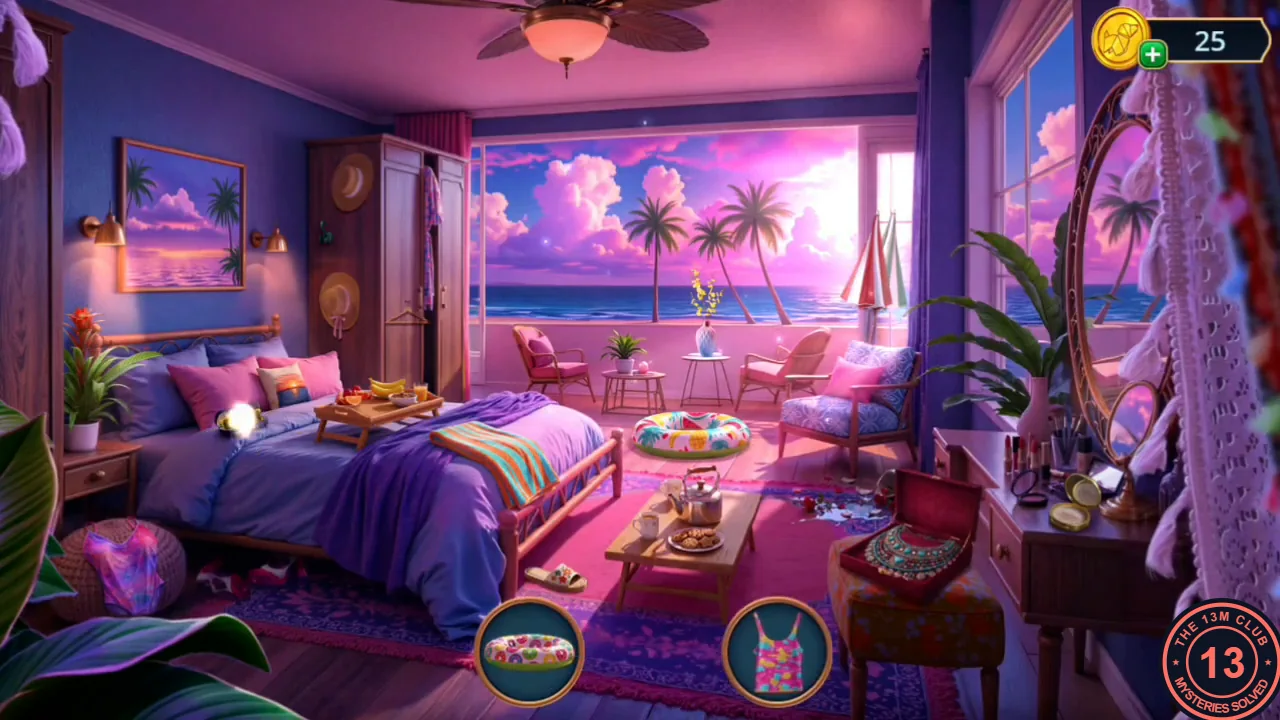
Unlock the red car, clear the crate on the beach, then search Jules and Mallory's room.
- At the pool, unlock the red car door with the Car Key. Take the second green Yo-Yos from the top of the brown toolbox on the seat; with the half from Eli's table the Yo-Yos are now complete (2/2). A Shell is also in the car.
- On the beach, open the crate behind the fence (STOP sign). Place the Skateboard without Wheels under it and fit the complete Yo-Yos (2/2) as its wheels; the crate rolls aside. Take the Dead Flashlight.
- Return to Jules and Mallory's room and play the scene. Here you do not search for the items at the bottom: drag each one to the place in the room where it belongs, and it appears there. Three items show at a time: Necklace – into the open red jewellery box on the stool at the lower right; Compact – onto the vanity beside the mirror; Beach Umbrella – on the balcony at the right, next to the green umbrella; Sunglasses – on the bed by the pillows; Tank Top – on the hanger on the wardrobe door; Curtain – the top left corner of the big window; Palm Tree – into the view at the left of the big window; Sandals – on the rug at the foot of the bed, beside the other pair; Fruit Plate – onto the breakfast tray on the bed; Yellow Flowers – into the vase on the balcony table; Swim Ring – on the balcony floor beside the other ring; brown Hat – on the side of the wardrobe with the other hats. You receive the Painting Parts (2/2).
Hotel Pool: The Beach Map
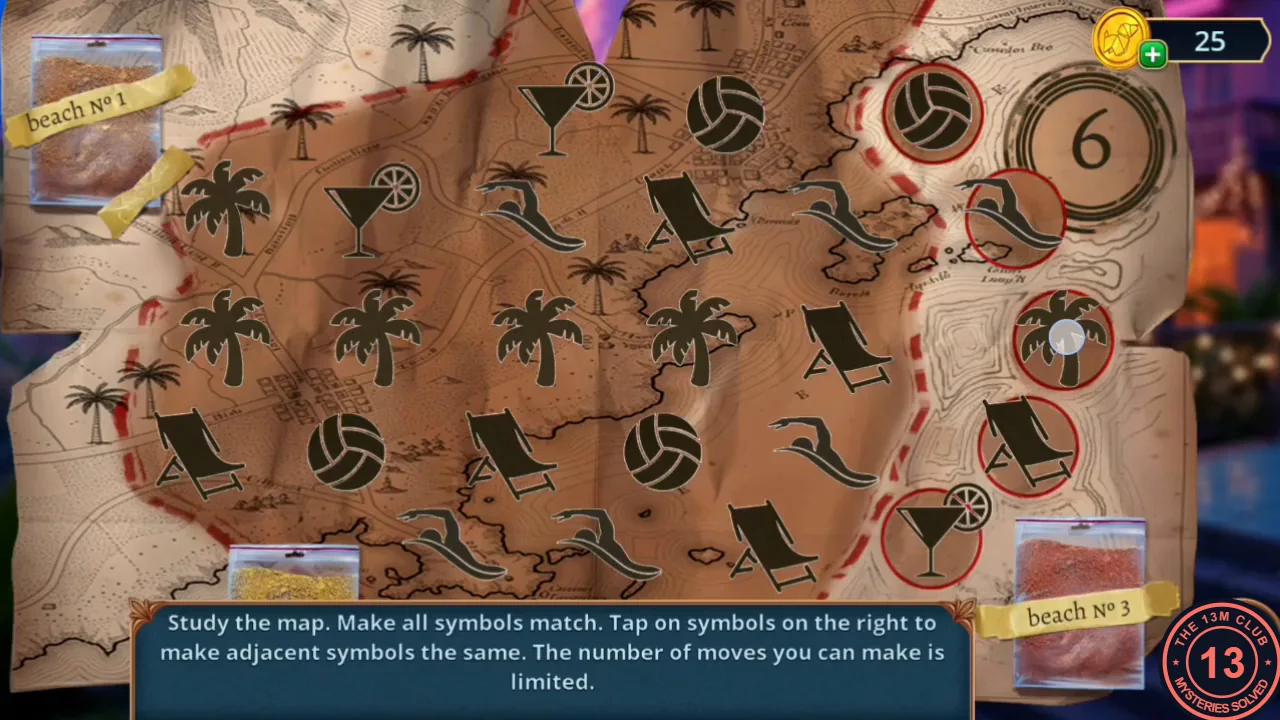
The painting in the room and the sand under the rug lead to the beach map on the pool noticeboard.
- In Jules and Mallory's room, open the carved palm panel beside the peeling wallpaper and place the Painting Parts. Take the Bas-Relief Parts (1/3) and the Hotel Pamphlet.
- Open the turned-up rug corner. Place the Hotel Pamphlet as a cone by the sand and sweep the sand into it with the Feather to get the Sand.
- At the pool noticeboard, put the Sand in the empty "beach No 2" slot of the map. Tap the symbols in the right-hand column to change the connected area to that symbol until the whole map shows one symbol, within six moves. The starting map was the same in two recordings; this order solved it in five moves: palm tree, sun lounger, cocktail glass, volleyball, wave.
- Take the Nippers and the Blank Business Card from the noticeboard. A new task appears: explore the forest edge.
Forest Edge: The Hut Window Lock
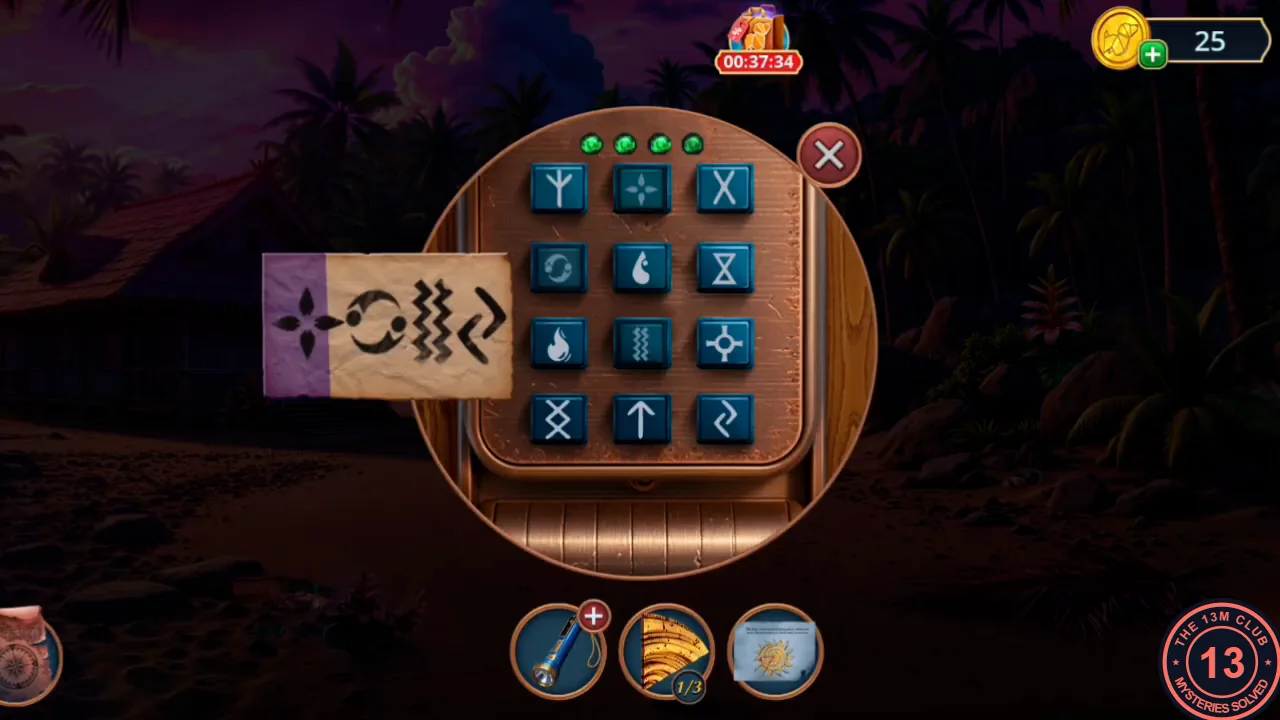
Cut through to the Forest Edge, copy the symbols from the carved stone and open the hut window.
- Go to the beach and cut the fence beside the crate with the Nippers. Go through to the Forest Edge, a beach with a hut.
- Open the rock between the palm leaves. Take the Picture (a sun drawing) and the Hook, then place the Blank Business Card over the carving on the stone. Jules says she needs to copy the code somehow.
- Combine the Hook with the Rope and throw it up the cliff. On the ledge with the sun relief, take the Fan.
- Open the crab sign and use the Fan to blow away the glass shards. Take the Pencil.
- Rub the Pencil over the card on the rock to copy the four symbols. Take the card (now the Code) to the hut window lock and tap the same four symbols in order on the 3x4 keypad. In the recording the code was: four-pointed star (top row, middle), circular arrow (second row, left), three wavy lines (third row, middle), double curved chevron (bottom row, right). All four lights turn green and the window opens.
Forest Edge Hut: Paired Items
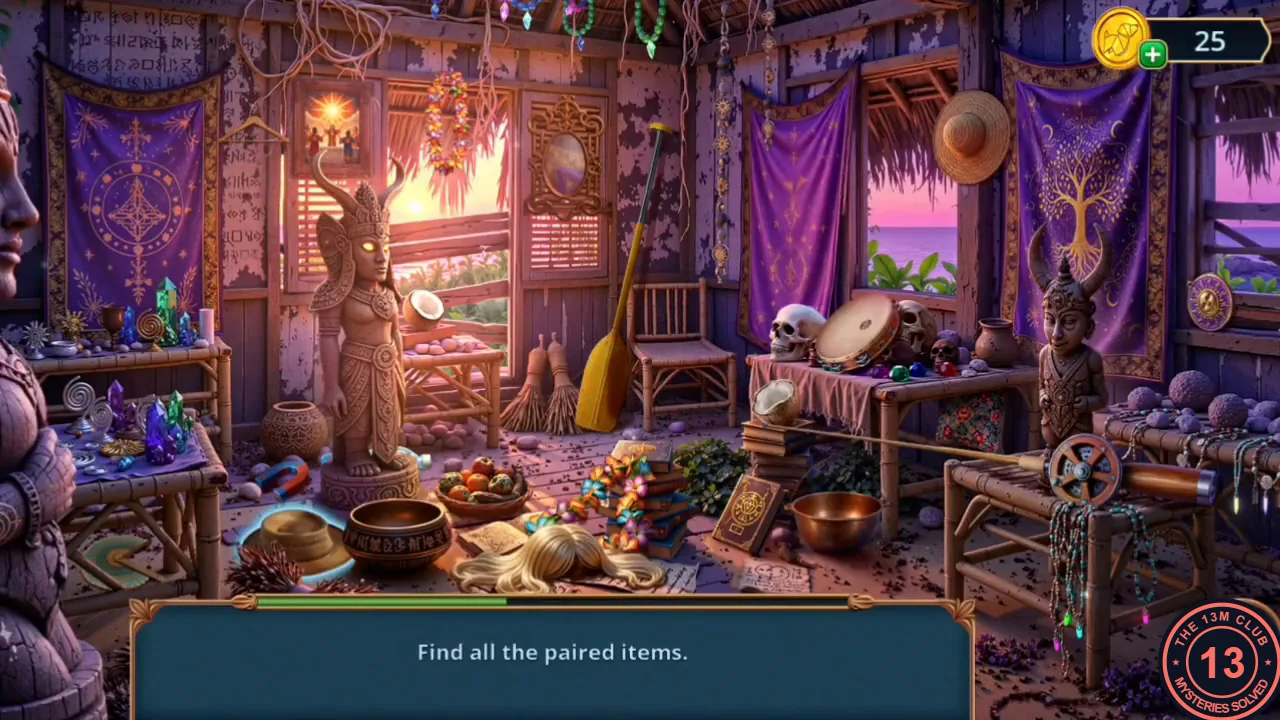
Inside the hut, find the pairs to get water for the smoking campfire.
- Play the hut scene: tap two objects that belong together and both disappear. There are six pairs: the small blue fan on the shelf at the top left with the round patterned fan on the right, beside the spinning wheel; the two geometric oil burners, one among the crystals on the left table and one on the right table beside the drum; the sun-patterned poncho hanging left of the statue with the cloth draped over the chair in the doorway; the straw hat on the wall at the top right with the straw basket on the floor at the bottom left; the two coconut halves, one on the window ledge right of the statue and one on the edge of the table below the skull; and the flower garland hanging at the top of the doorway with the pile of flower garlands on the floor in the middle. You receive the Water Bottle.
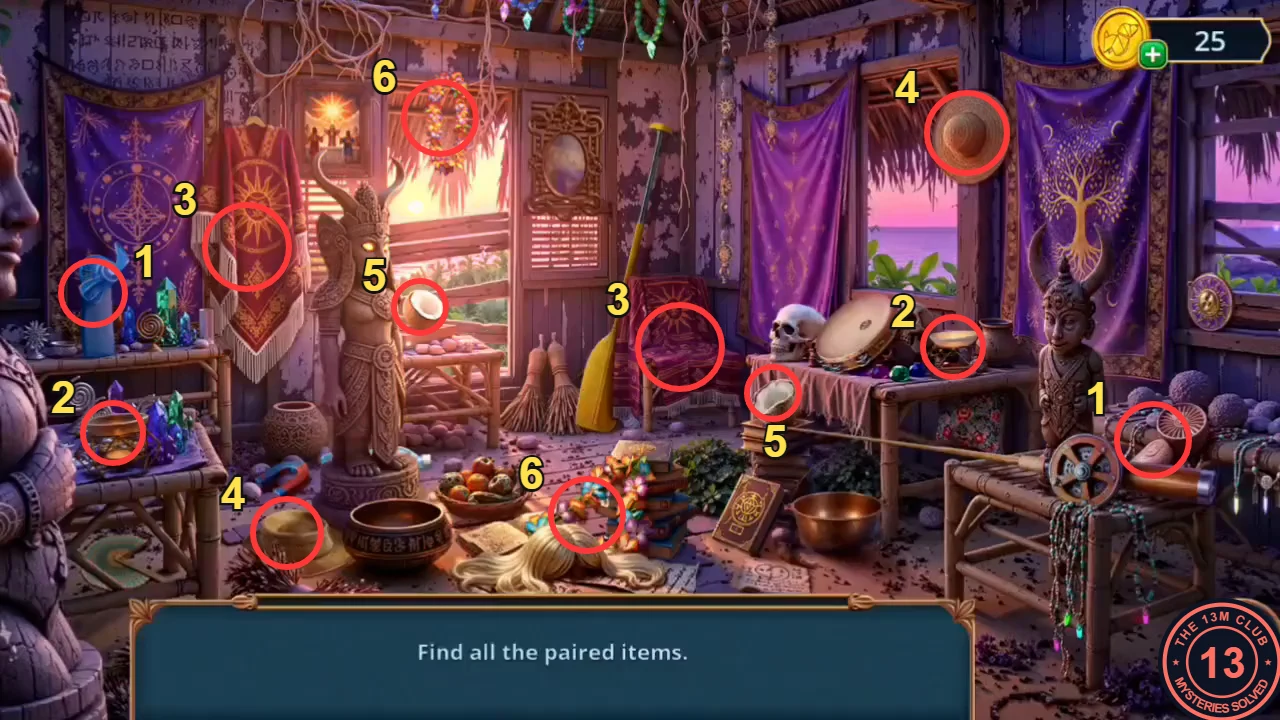
Same number = one pair: 1 fans, 2 oil burners, 3 poncho and draped cloth, 4 straw hat and basket, 5 coconut halves, 6 flower garlands. - Pour the Water Bottle over the smoking campfire. Jules's singed drawing appears. Take Mallory's Hairpin and the Broken Glasses.
Jules and Mallory's Room: The Wooden Circles
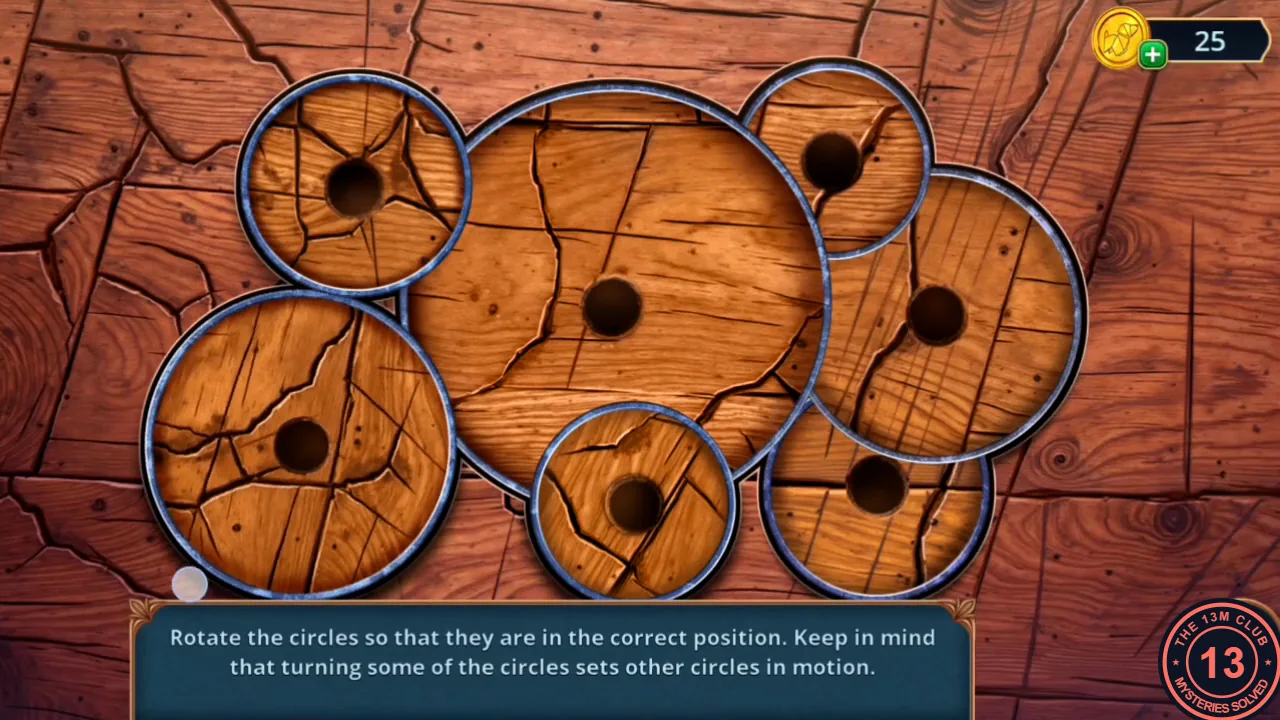
The Broken Glasses open a hidden circle puzzle in Jules and Mallory's room.
- Use the map to go to Jules and Mallory's room. Insert the Broken Glasses behind the peeled wallpaper by the framed art to open the circle puzzle.
- Tap the seven wooden circles to rotate them. The goal is a continuous floor: every crack must run on across the circle edges into its neighbours and into the planks around the group. Some circles turn others when you rotate them, so recheck circles you have already set and correct them last.
- Take the Animal Figurine (seahorse) and the Jam from the compartment.
Forest Edge Hut: Word Associations
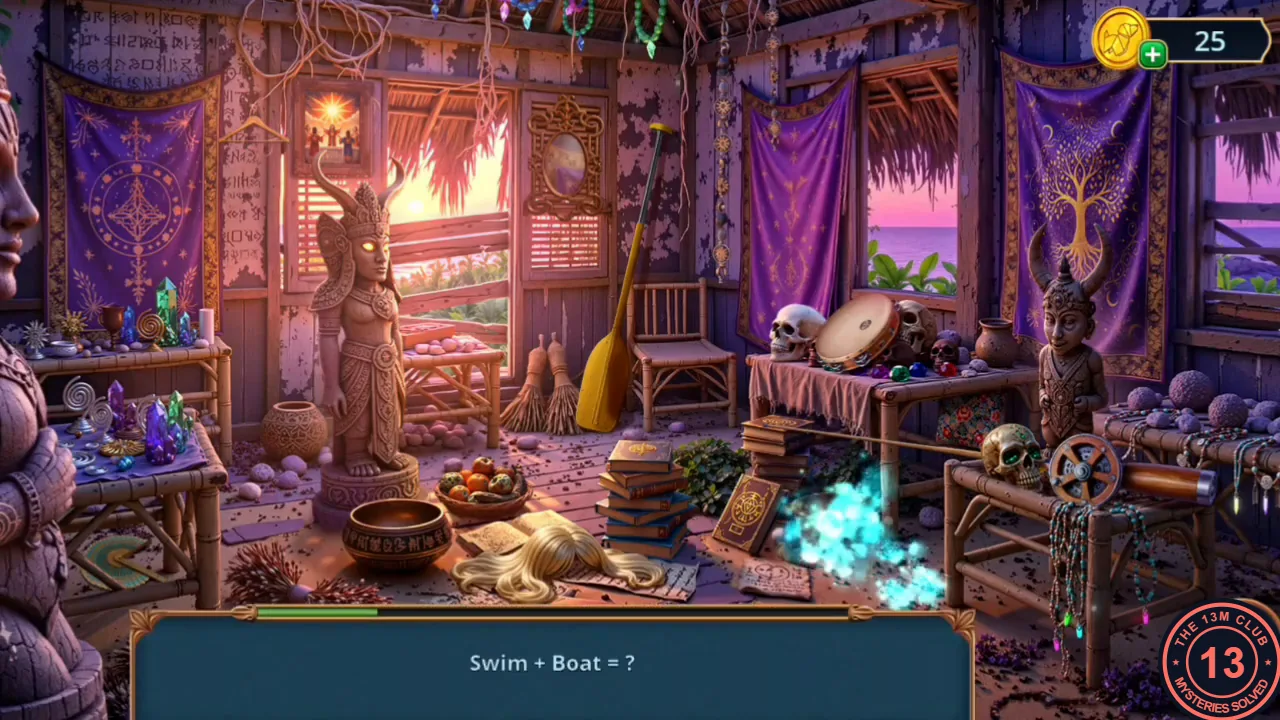
Items from Eli's room lead back to the hut for a word-association scene.
- Go to Eli's room and open the tray. Place the Animal Figurine on the empty stand. The stand turns and opens a compartment: take the Tweezers, the orange Feather Duster and the Octopus Parts (1/2). Keep the Feather Duster; Eli needs it in Chapter 2.
- In Eli's room, open the shelf with the mugs and the golden octopus and use the Tweezers on the narrow crack in the wall at the left edge of the shelf to pull out the Bas-Relief Parts (2/3).
- Return to the hut at the Forest Edge and play the scene. One pair of clue words shows at a time; tap the object that combines both. The view drifts slightly, so go by the landmarks. In the order they appeared in the recording: Round + Illumination – the round purple-and-gold sun medallion leaning on the right-hand window frame, right of the tree tapestry; Attraction + Metal – the red-and-blue horseshoe magnet on the left table, below the crystals; Hike + Cooking – the copper pot on the floor in front of the book stacks, left of the low right-hand table; Swim + Boat – the yellow paddle leaning against the window beside the chair; Hook + Fishing – the fishing rod with its big reel lying across the low right-hand table, behind the golden skull; Hair + Fake – the blonde wig on the floor in front of the fruit bowl; Look + Reflection – the oval mirror in its carved frame on the wall above the shutters, right of the bright window; Paints + Frame – the framed picture of figures under a sun high on the left wall, just left of the window above the statue's horns; Wind + Handle – the green folding fan on the floor under the left table; Container + Fruit – the bowl of fruit on the floor in the middle; Feather + Dream – the flowered pillow under the skull table, just behind the golden skull; Beat + Music – the tambourine on the skull table. Finally a Banana appears beside the golden skull on the low right-hand table; tap it to receive the Banana.
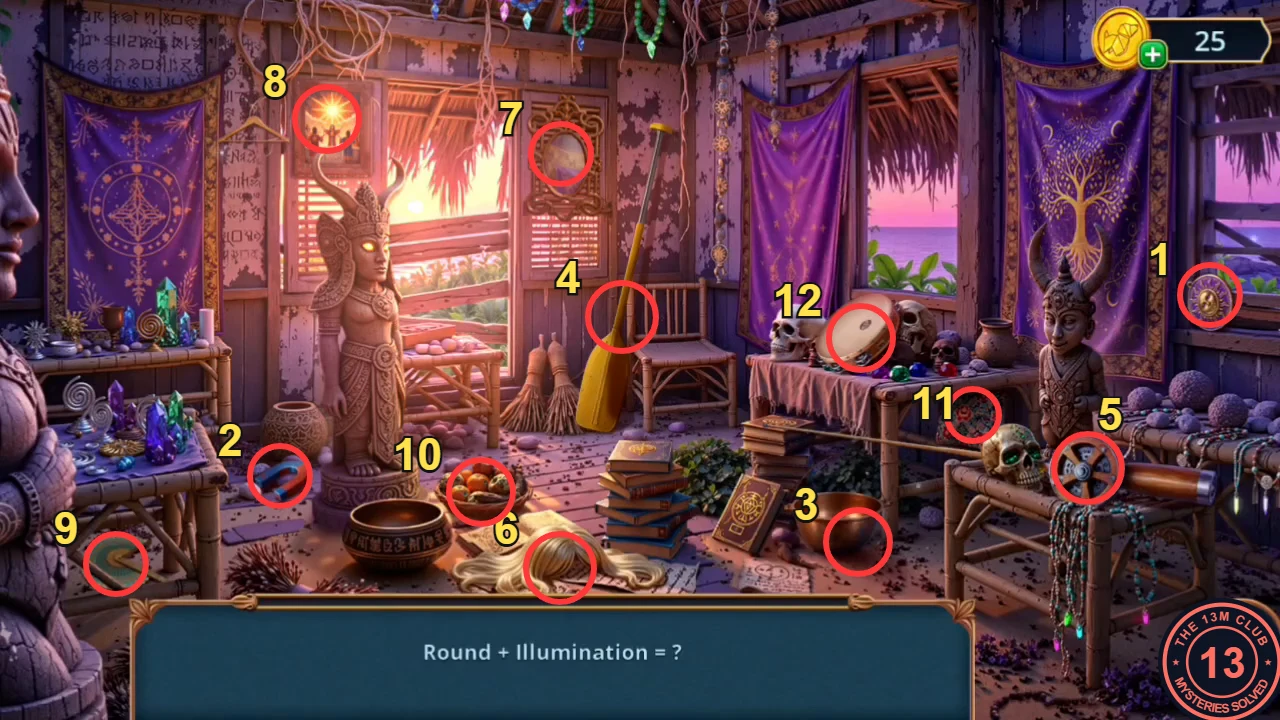
Numbers follow the order of the clue list above: 1 sun medallion, 2 magnet, 3 copper pot, 4 paddle, 5 fishing rod and reel, 6 wig, 7 mirror, 8 framed picture, 9 fan, 10 fruit bowl, 11 pillow, 12 tambourine. The Banana then appears just left of the golden skull, beside 5. The view drifts a little during play.
Forest Edge: The Sun Relief
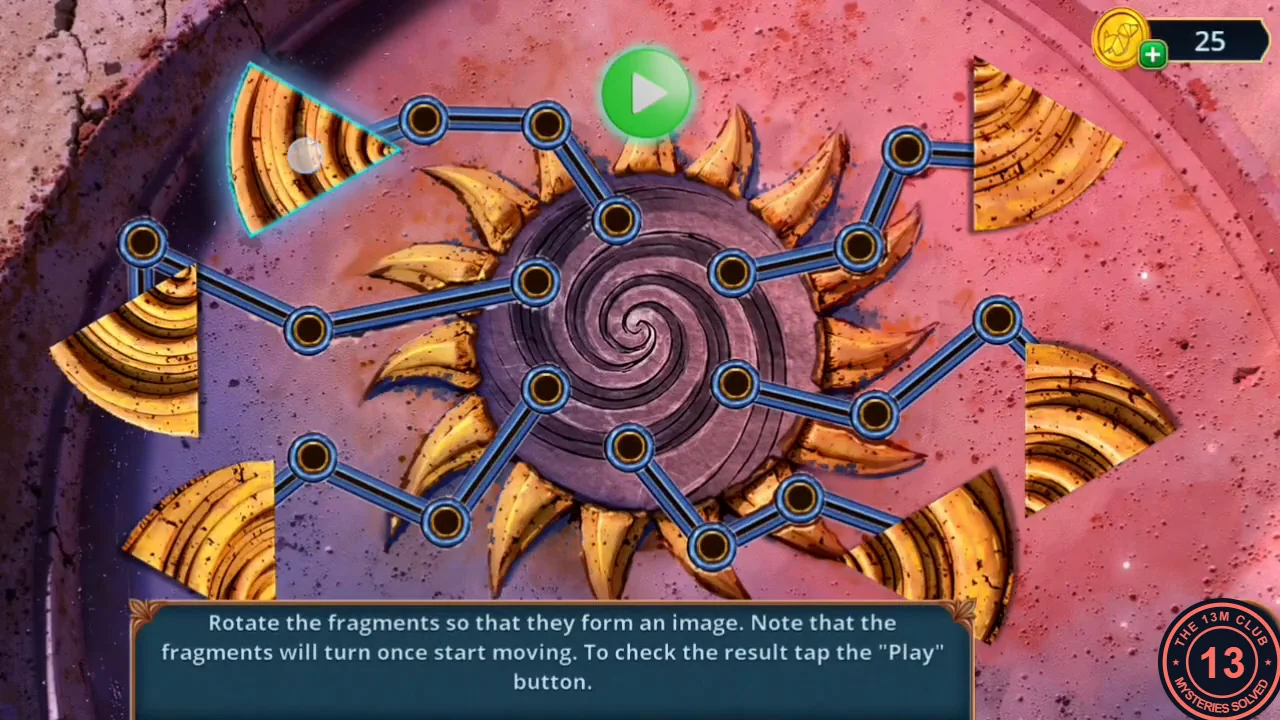
Collect the last Bas-Relief Parts and complete the sun relief on the Forest Edge cliff.
- Give the Banana to Harry the crab by the sign. When he leaves, take the Broken Bottle Neck.
- At the pool, open the red car and cut the straps around the toolbox with the Broken Bottle Neck. Read Mallory's diary and take the Sturdy File.
- Open the lizard statue in the pool planter. Put the Sturdy File into its mouth, then place the Picture under it. The lizard cuts out the sun: take the Bas-Relief Parts (3/3).
- Climb to the sun relief on the Forest Edge cliff and place the Bas-Relief Parts. Tap a fragment to rotate it. The game warns that each fragment turns once more while it travels along its track to the centre, so set them for the journey, not for their current spot. The starting positions varied, but the arrangement just before Play was identical in two recordings and assembled the spiral sun on the first try: match the image, then tap the green Play button.
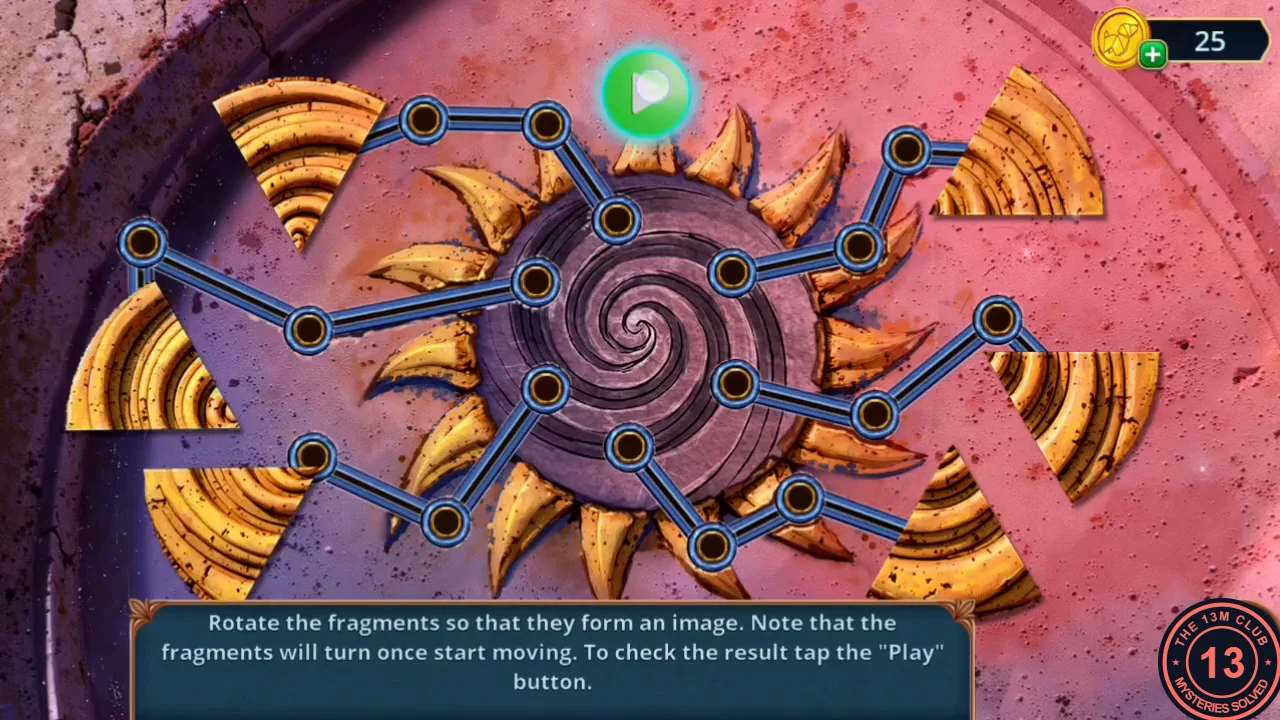
The arrangement just before tapping Play, the same in two recordings. Copy each fragment's orientation. - Read the note signed C.M. about six girls and take the Pin.
Forest Edge: The Fragment Sequence
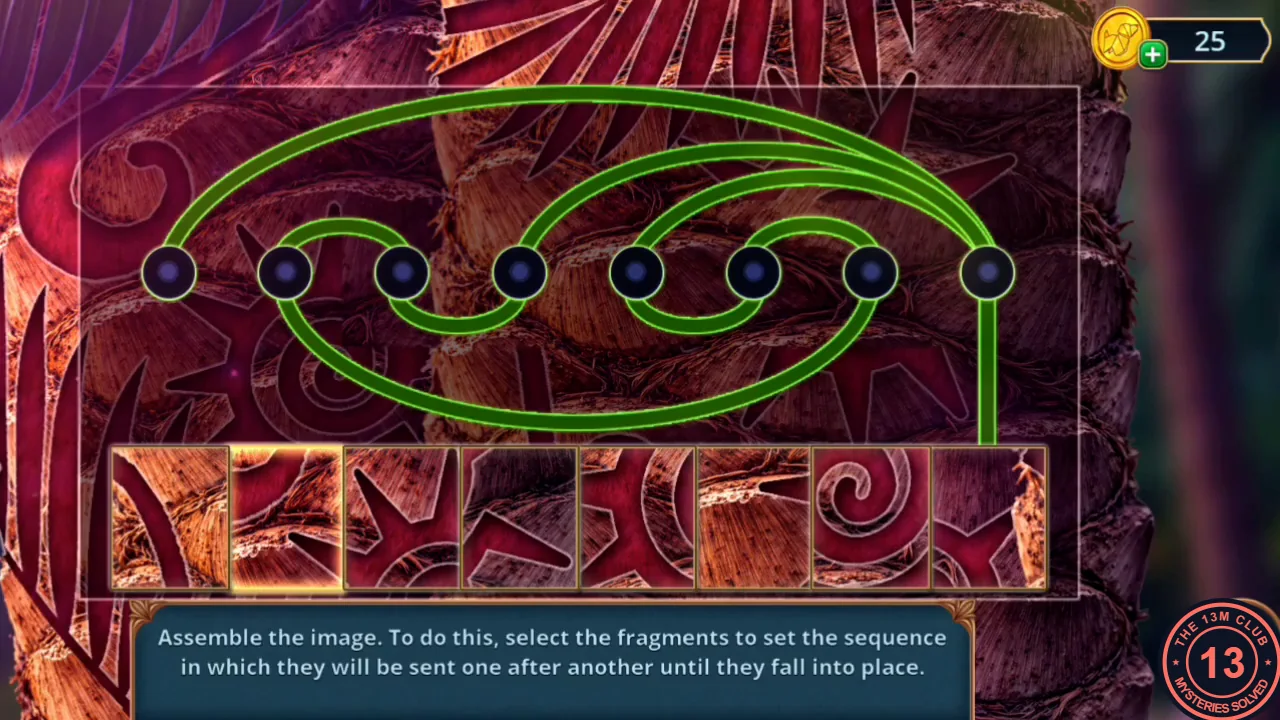
Pick the green chest and light up the dark crevice to reach the fragment puzzle.
- Open the green chest by the stones and pick its padlock with the Pin. Take all three items: the Knife, the red Valve and the Battery. Keep the Valve; Eli needs it at the fountain in Chapter 2.
- Add the Battery to the Dead Flashlight to get the Flashlight. Shine it into the dark crevice between the palm and the rocks.
- Tap the eight fragments in the bottom row to choose the order in which they are sent along the green track; each tapped fragment lights up. The starting row was identical in two recordings, and this order (counting the fragments from the left) assembled the picture: 2, 6, 5, 7, 3, 8, 1, then 4. The fragments then travel along the track and fill the top row.
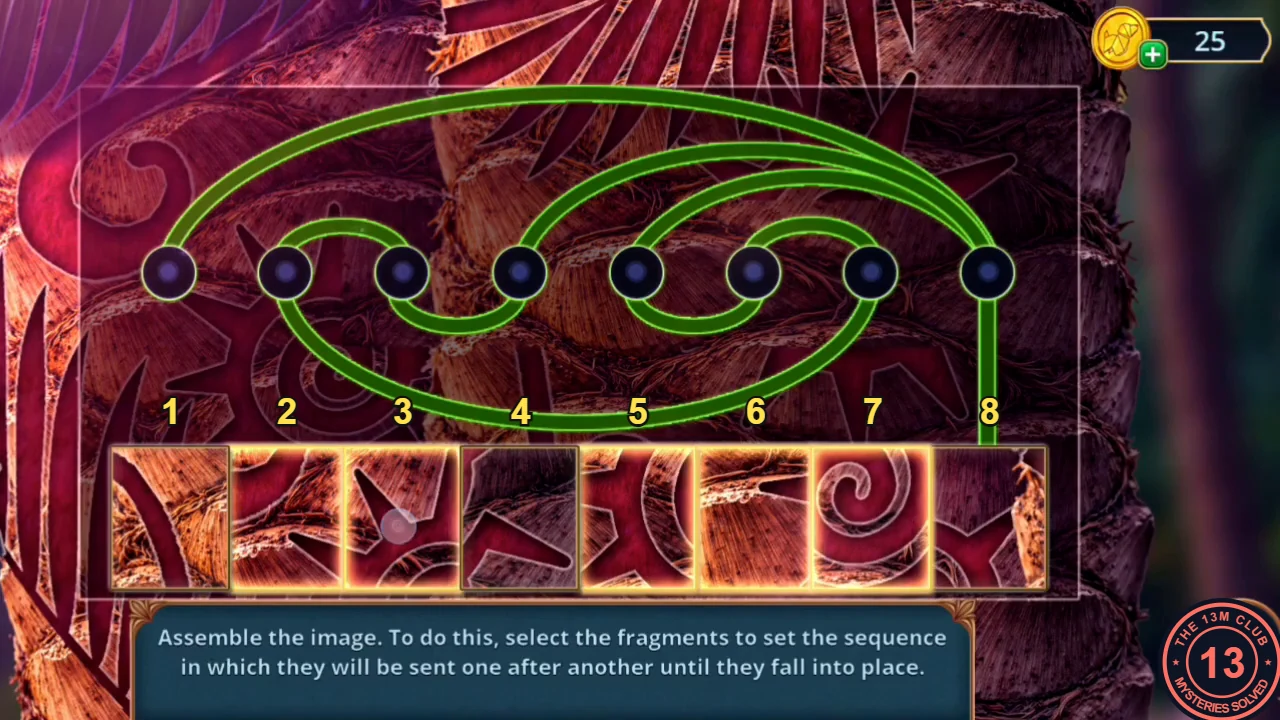
Fragment positions 1–8, counted from the left. Here 2, 6, 5, 7 and 3 are already chosen (lit); 8, 1 and 4 follow. - Take everything from the crevice: the blue gear (Mechanism Parts; it shows as Gear 1/3 in your inventory), the Candle, the red-and-white mushroom Earring and the Octopus Parts (2/2). Keep the gear, the Candle and the Earring for Chapter 2.
- Decision point with Jules: "Don't worry, we'll find her." costs 60 coins (2 stars); "Try to control yourself better." is free (0 stars).
Eli's Room: Jam on Toast
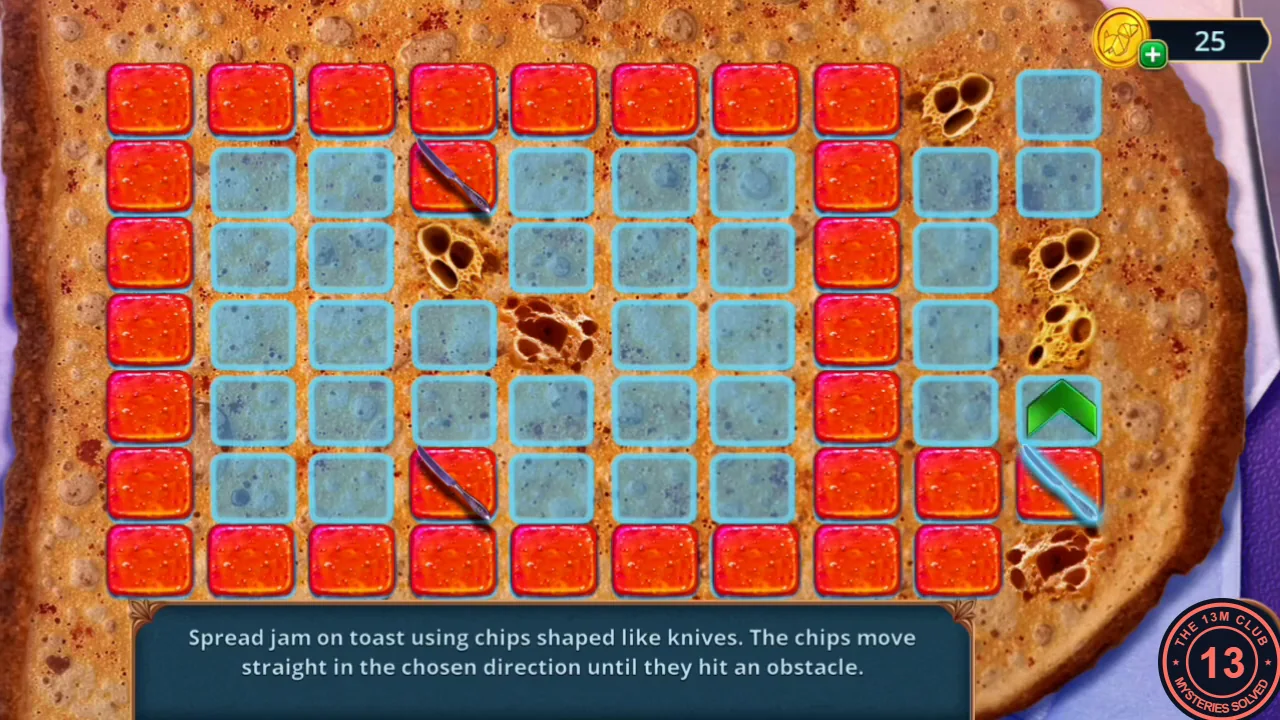
The dinner tray in Eli's room needs a mug, cutlery and something sweet.
- Open the tray and place the Knife in the cutlery slot and the Jam in the sweets slot.
- Open the shelf and attach the Octopus Parts to the golden octopus. It releases the Mug; place the Mug on the tray and pour from the thermos.
- Spread jam on the toast: tap a knife-shaped chip, then one of the green arrows beside it. The chip slides straight until it meets an obstacle (the edge, a hole in the bread, another knife or jam already spread) and colours every square it crosses red. Because spread jam blocks later moves, cover the outer rows first and work inward, saving the short gaps around the holes for last, until no blue square remains.
- Chapter 1 ends with the Decision Points journal for this chapter (0, 4 and 10 star outcomes). See the Decision points section for the full list.