Old Chapel: The Gear Eye
Eli is playable now. He still carries items he picked up in Chapter 1: the Feather Duster (tray in his room), the red Valve (green chest), the blue gear shown as Gear 1/3 (crevice), the Candle and the mushroom Earring.
- Inside the chapel, sweep the wood splinters on the floor plate with the Feather Duster. Take the Glasses and the Gear (2/3). The plate has two holes for a hook.
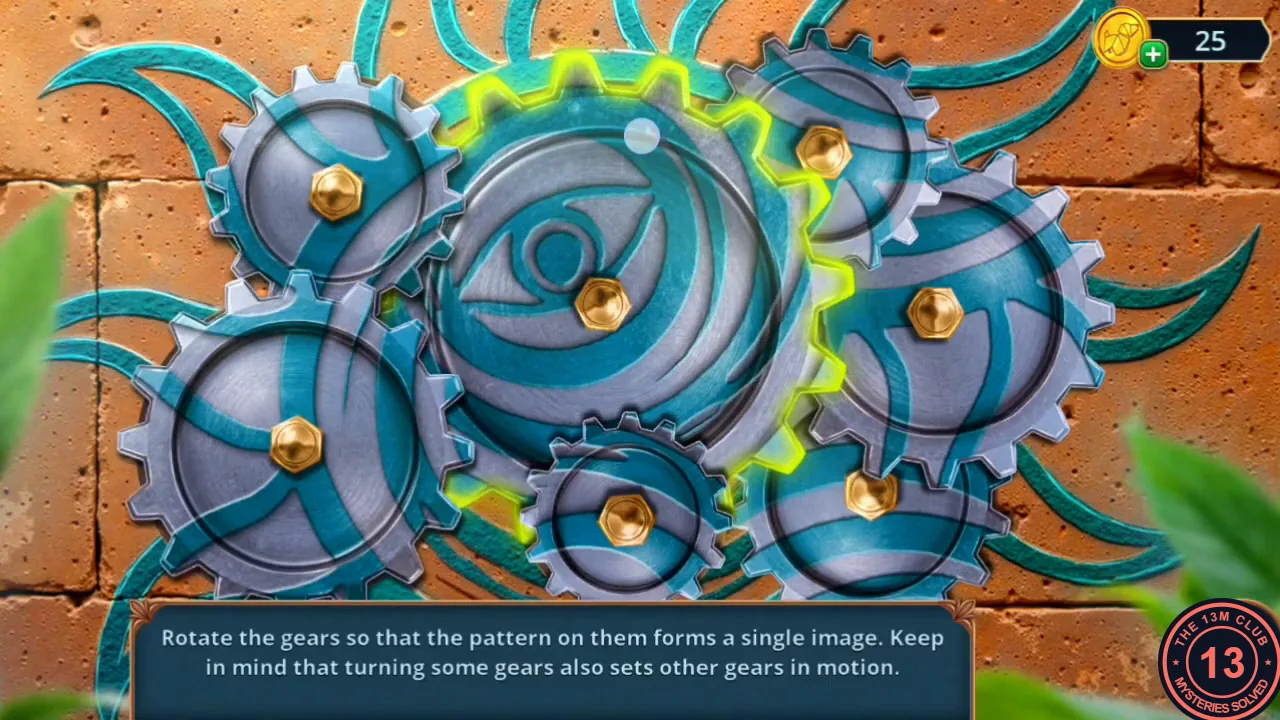
- Open the brick wall with the spirals. On top of the blue cabinet lie the third gear and the Heavy Book: take both (the gear counter reaches 3/3). The spirals need a soft-wax impression, which comes later. Then place the three Gears in the wall mechanism.
- Rotate the gears until the pattern forms one eye picture. Turning some gears also turns others.
- Read the "Blessed by the sun" note and take the Ritual Peg. A Shell is in the niche by the crystal chest.
- Open the giant shell by the stone mortar (a Shell). Set the Ritual Peg in its crack and strike it with the Heavy Book. Read the note about moving the statues from the tower and take the Button (a Shell).
- Decision point with Jules about breaking the statues: "That's a great idea! It might just work!" is free and gives 1 star; "There's so little time as it is..." gives none. Climb the ladder to the tower.
Promenade: The Souvenir Kiosk
Explore the chapel tower, fix the junction box and take the cable car to the Promenade kiosk.
- In the tower take the Saw Handle from the floor. On the workbench attach it to the saw blade to get the Saw, and take Frame Parts (1/2).
- Cut the ropes on the chest with the Saw and take the Nutcracker. Downstairs, unscrew the blue wall panel with the Nutcracker and take Frame Parts (2/2).
- Fix the Frame Parts on the tower painting. A paint-covered door appears behind it; take the Harmonica stuck in the paint.
- Play the Harmonica at the bat on the workbench. It flies off; take the Paint Thinner and dissolve the paint on the door. Read the note and take the Bow.
- Go to the junction box at the Top of the Mountain and put the Button in it. Ride the cable car down to the Promenade.
- On the pier, use the Bow to pull in the floating balls (Round Buoys). At the arcade machine take a Shell from the cactus planter, the Glass Cutter and the Desk Bell.
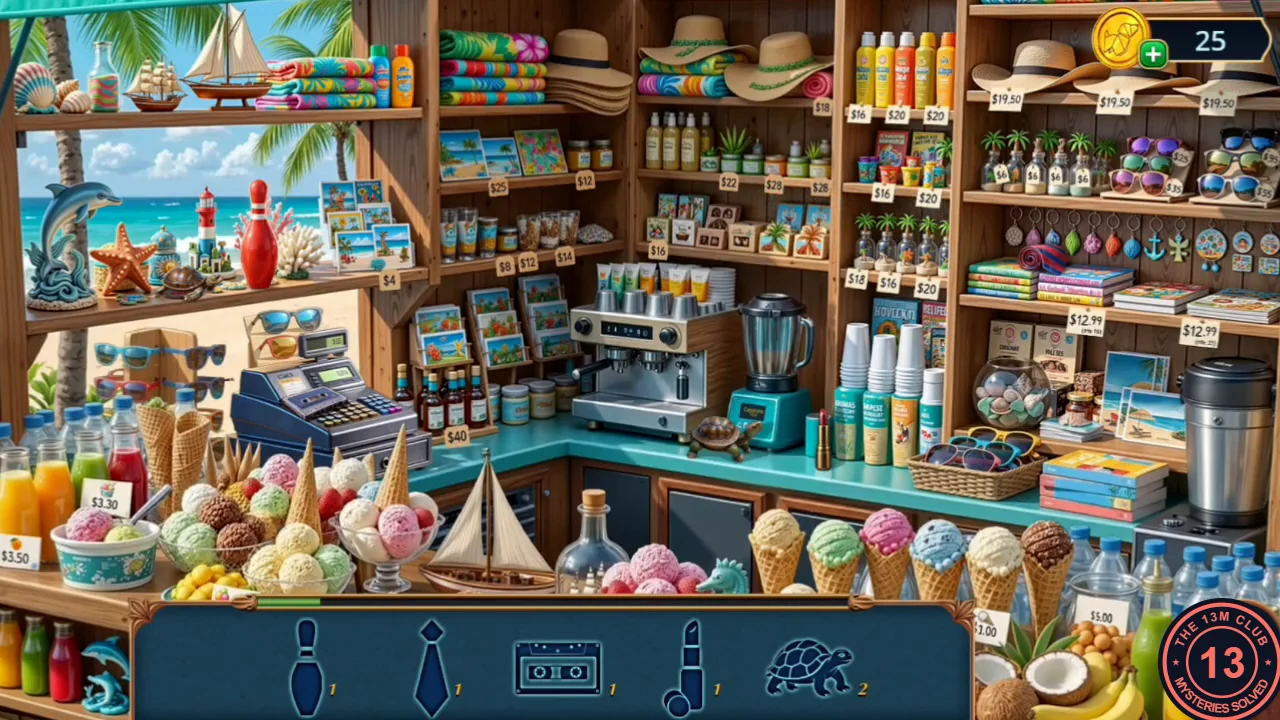
- Place the Desk Bell on the "Seller" plate of the kiosk. The bar shows six silhouettes, each needed twice. Locations in the recording: Telephone – the green rotary phone on the back counter behind the cash register, and the teal phone on the right-hand shelf; Tie – the blue tie hanging on the upper middle shelf beside the towels, and the rolled striped tie on the books below the keychains on the right shelf; Bowling Pin – the pin beside the glass jar on the right, and the red-and-white pin on the window sill at the left; Cassette – the tape among the small boxes on the middle shelf below the hats, and the one lying on the cash register keypad; Lipstick – lying in the toy sailboat at the front of the counter, and standing on the counter just right of the teal blender; Turtle – the turtle figure on the back counter between the espresso machine and the blender, and the small turtle on the left window sill by the coral (drag the view left to reach it). Finally the silhouette of a mustache on a stick appears: the blue mustache leans against the counter by the paper cups right of the blender. You receive the Masquerade Mustache.
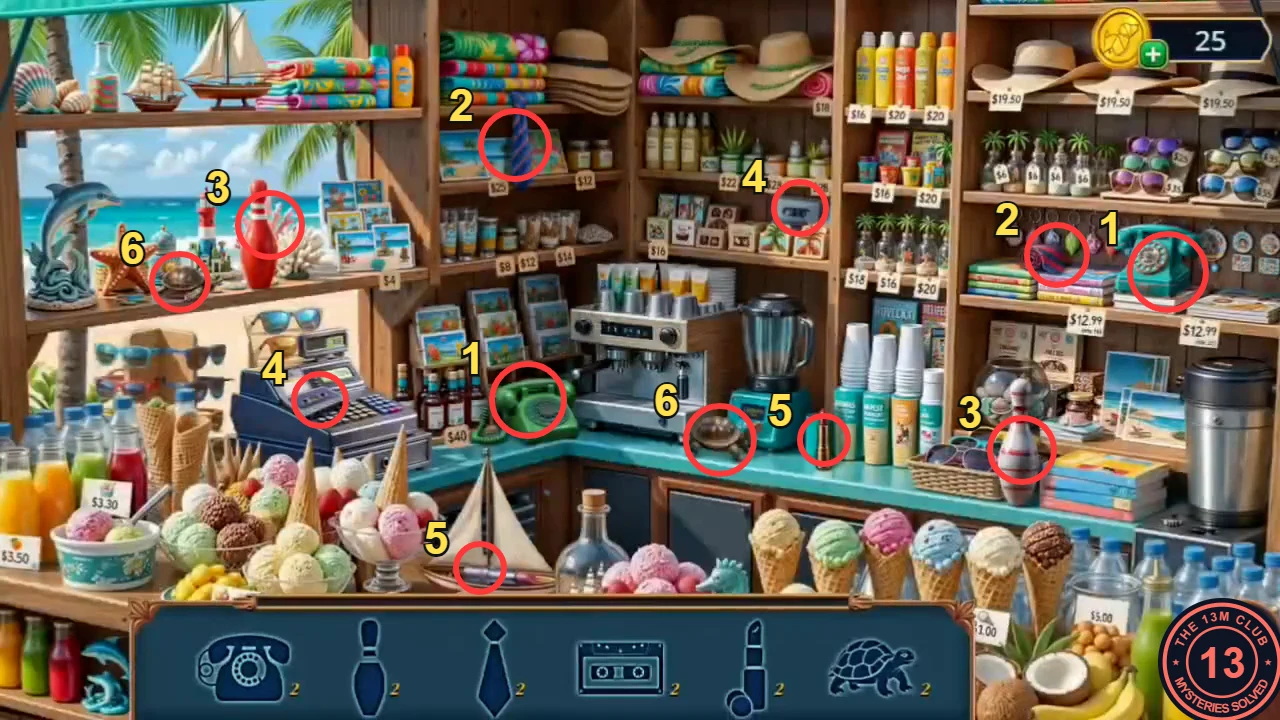
Same number = same silhouette: 1 telephones, 2 ties, 3 bowling pins, 4 cassettes, 5 lipsticks, 6 turtles. The second turtle (left sill) may need the view dragged left; the mustache appears only at the end.
Concert Venue: The Fuse Panel
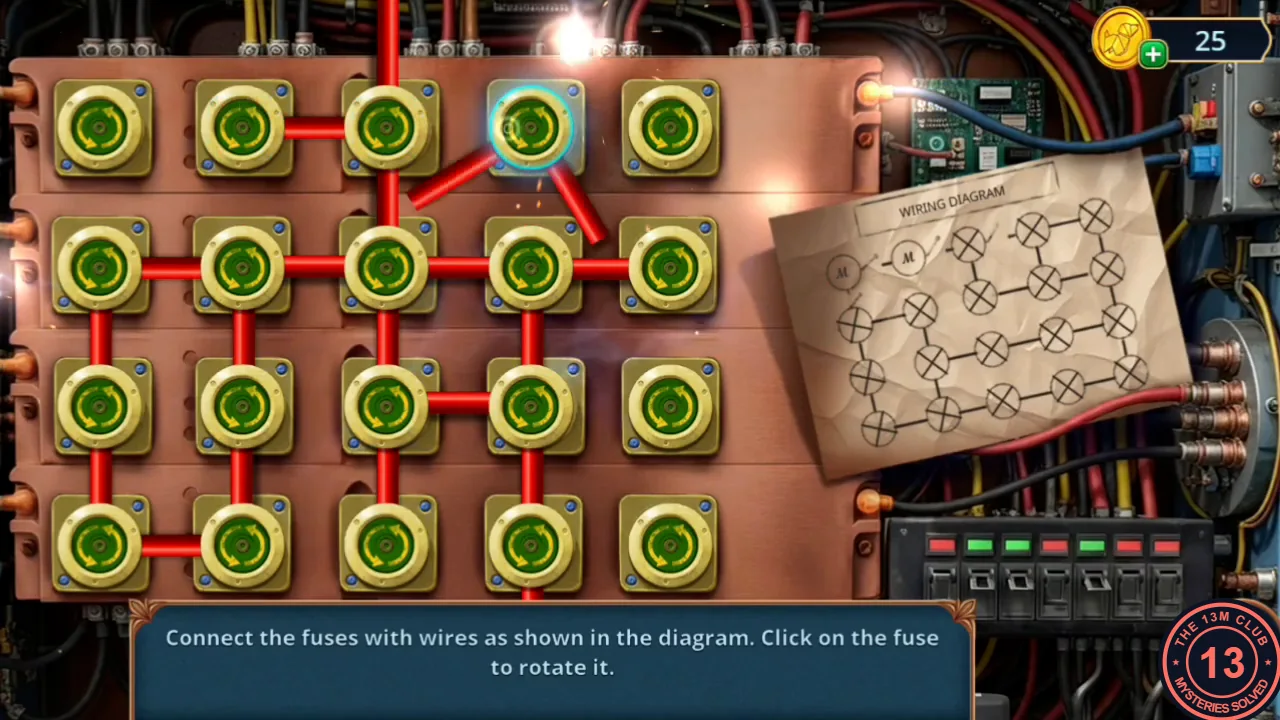
The VIP Pass opens the Concert Venue, where the fuse panel by the stage needs rewiring.
- Use the Masquerade Mustache to hook the VIP Pass out of the cactus. Read the concert poster to unlock the Concert Venue.
- Decision point with Jules: "Rock out? Easy!" costs 60 coins and gives 2 stars; "I've given up playing guitar..." is free and gives none. Jules gives you the Mask.
- At the fountain read the group manager's note and take the Wiring Diagram and the Press Handle.
- Place the Wiring Diagram on the electrical panel by the stage. Tap fuses to rotate them until the wires match the diagram.
- Talk to the guard at the backstage door and place the Mask in one of his two slots; he also wants a guitar.
Chapel Tower: Pushing the Statues Out
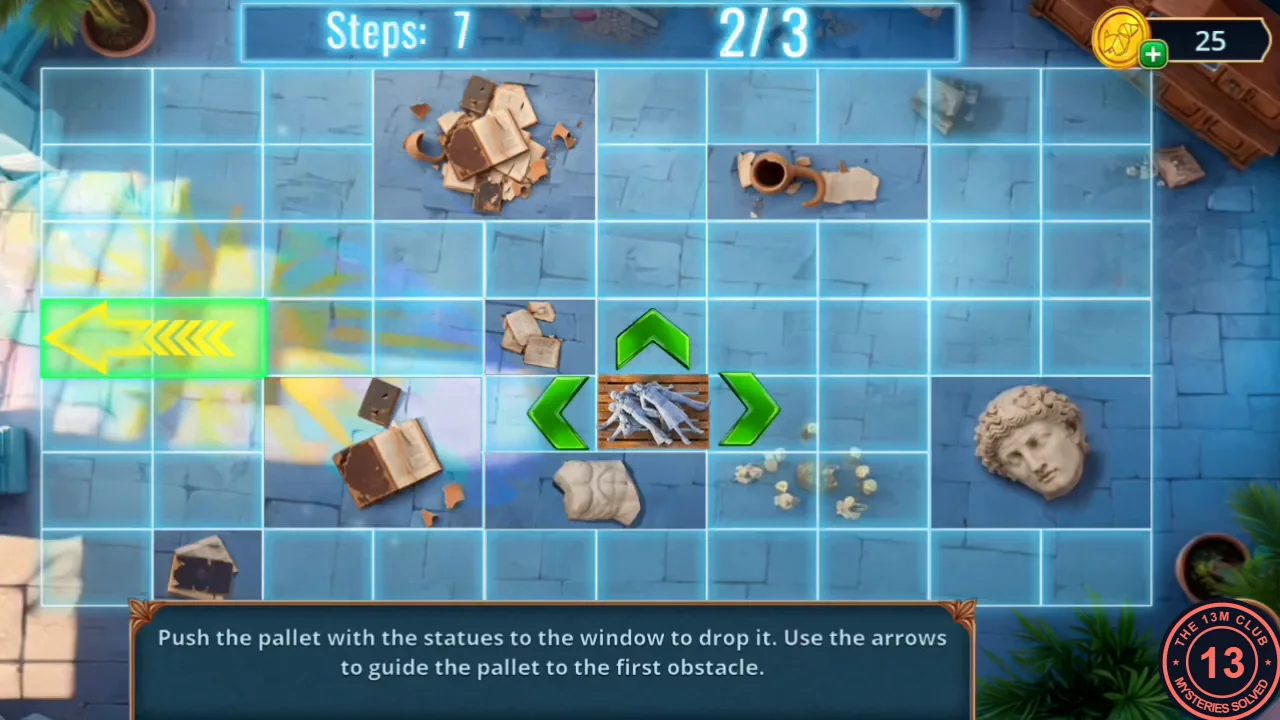
The Round Buoys let you push the statue pallet out of the tower window.
- In the tower, put the Round Buoys under the statue pallet.
- Push the pallet to the window (the glowing yellow arrow on the left edge) using the green arrows around it; it slides until it hits an obstacle or the wall. Each of the three stages has a step counter at the top, and these sequences from the recording use exactly the allowed steps. Stage 1 (2 steps): Left, Down. Stage 2 (10 steps): Down, Left, Down, Right, Up, Left, Up, Right, Down, Left. Stage 3 (6 steps): Down, Left, Up, Right, Down, Left.
- Attach the red Valve (from the green chest in Chapter 1) to the fountain tap at the Concert Venue (parts are still missing) and fix the Press Handle on the stone press in the chapel.
Near the Old Chapel: The Tree Bas-Relief
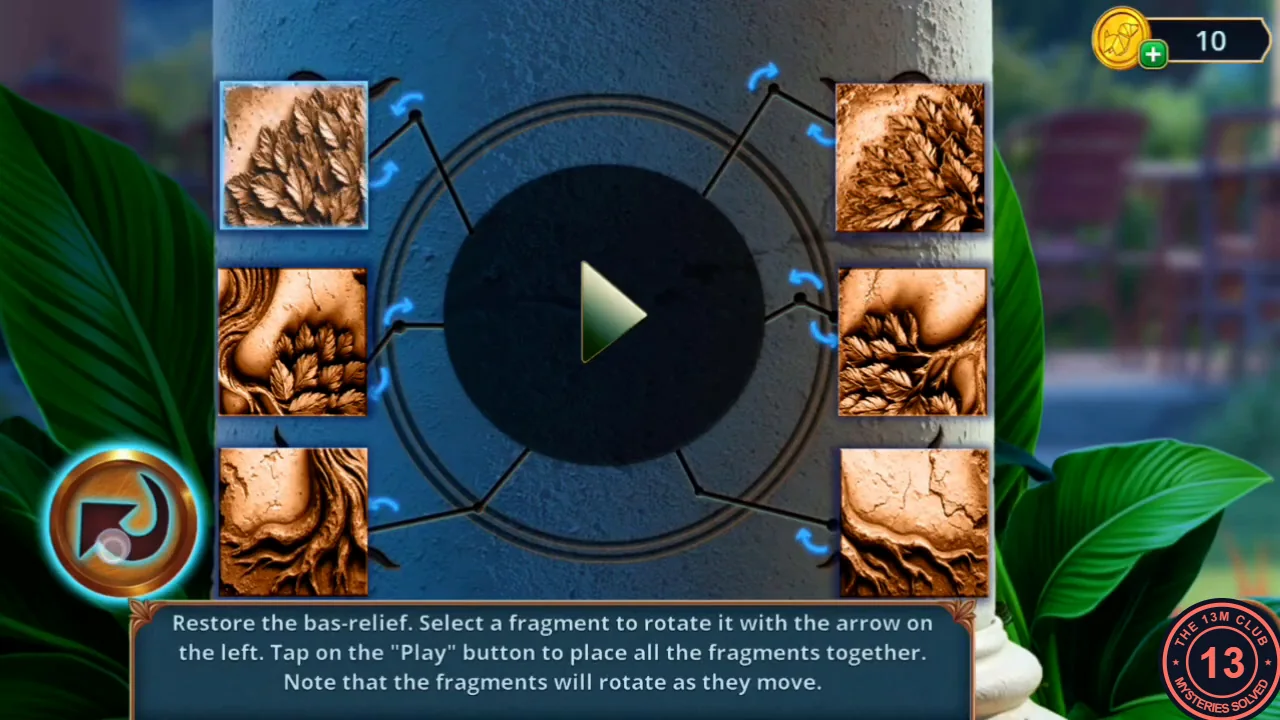
The guitar case holds a fragment for the bas-relief on the column pedestal.
- At the Concert Venue open the guitar case and pick its padlock with the Earring. Take the Broken Guitar and the Bas-Relief Fragment.
- Insert the fragment into the column pedestal Near the Old Chapel. Six fragments sit beside the Play button, three on each side. Tap a fragment, then the round arrow button at the lower left to rotate it. When you tap Play, every fragment turns once more as it travels into the frame, so set each one for the journey, not for its current spot. Because those turns are fixed, the pre-Play arrangement that worked does not depend on how the fragments started. In the recording this arrangement assembled the tree on the first Play: left top – leaves filling the tile, pointing up and right; left middle – leaves on the left with a branch curving over the top, bare stone at the right; left bottom – the trunk entering from the left with bare stone at the lower right; right top – leaves in the upper right with a bare lower-left corner; right middle – leaves on the right with the branch curving at the left; right bottom – mostly bare cracked stone with roots along the top edge. Match the image, then tap Play.
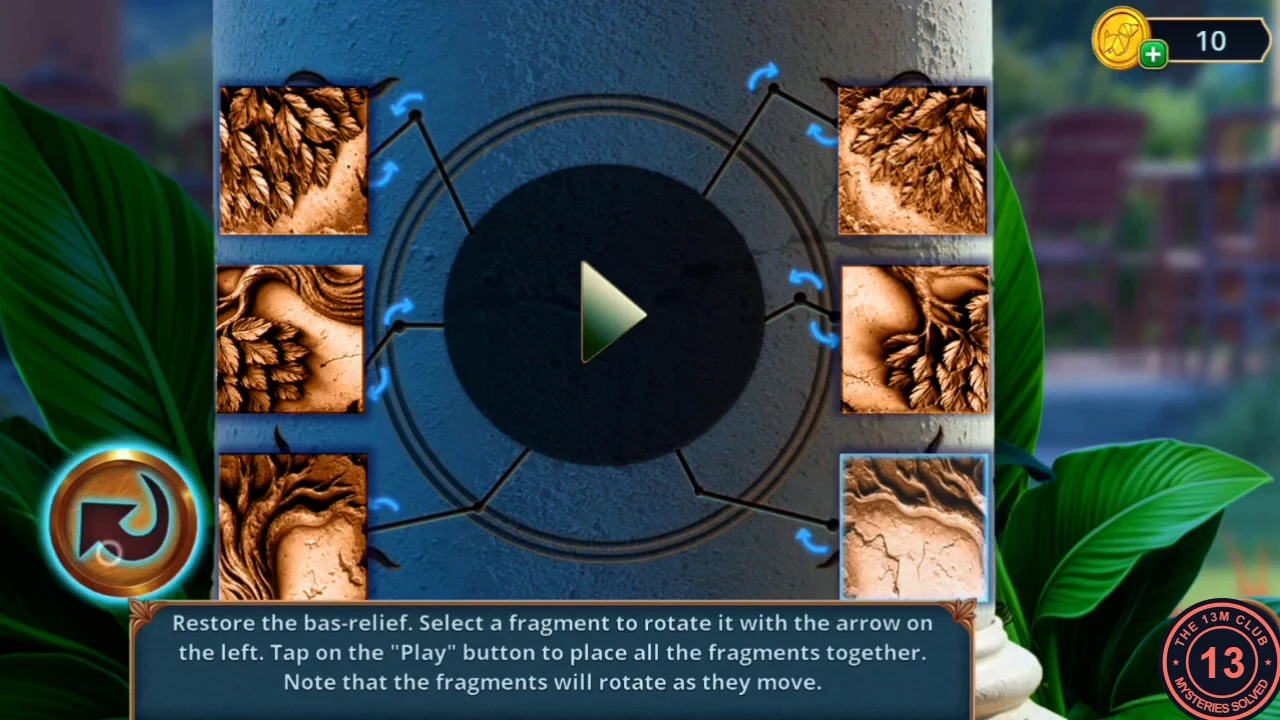
The arrangement that assembled the tree on the first Play. - Take the Mermaid Figurine.
Old Chapel: The Paired-Items Scene
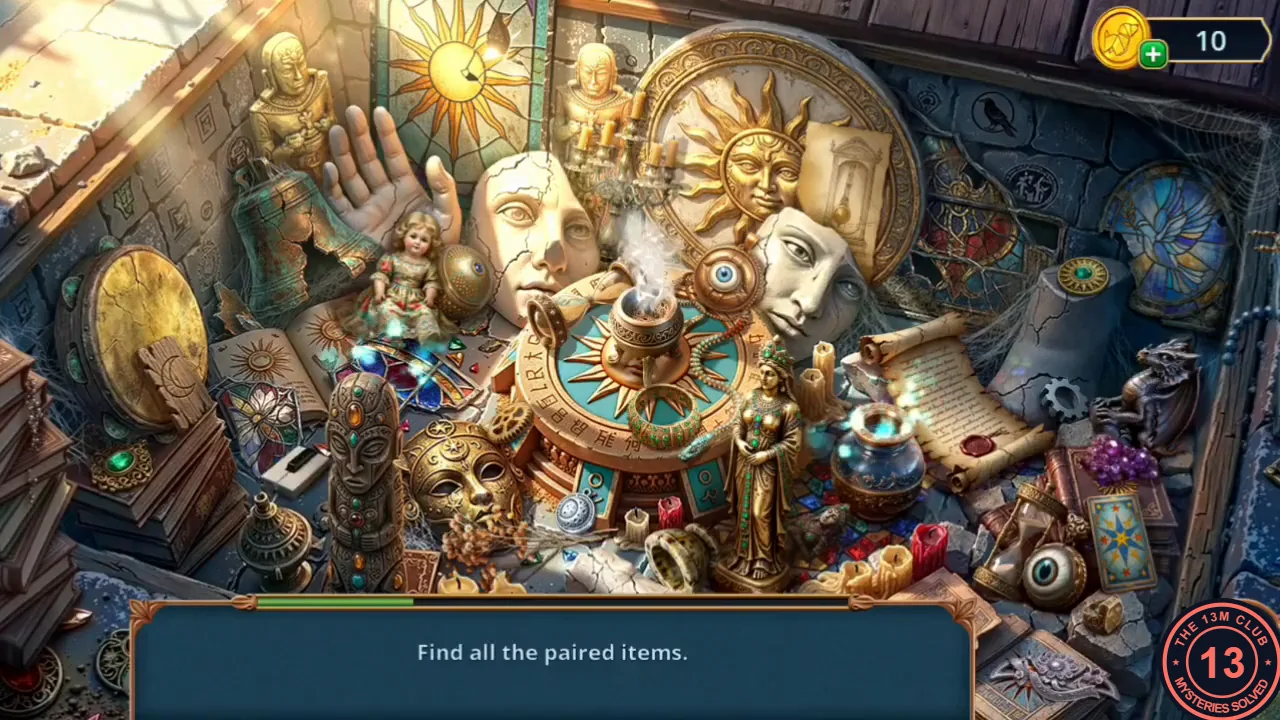
The Mermaid Figurine opens a hidden room under the chapel floor.
- Place the Mermaid Figurine in the giant shell and take the Hook. Attach it to the two holes of the floor plate to open the hatch.
- In the hidden room, tap two matching objects to clear a pair; the progress bar fills as you go. The six pairs in the recording: oil lamps – the jewelled lamp by the cracked bell at the left, and the brass lamp beside the smoking brazier in the middle; spyglasses – one on the open book left of the doll, one on the blue glass jar right of the golden statue; cogwheels – the gold gear on the left edge of the zodiac table by the golden mask, and the silver gear on the scroll beside the gargoyle at the right; moon emblems – the wooden tablet with a crescent moon in front of the gold disc at the left, and the silver moon medallion below the table, near the red candle; hourglasses – one lying on the zodiac table left of the brazier, one standing beside the eyeball at the lower right; green-gem brooches – one on the broken grey column by the stained glass at the upper right, and one on the stack of books at the far left (the recording dragged the view down slightly before this pair). You receive the Ritual Crystal.
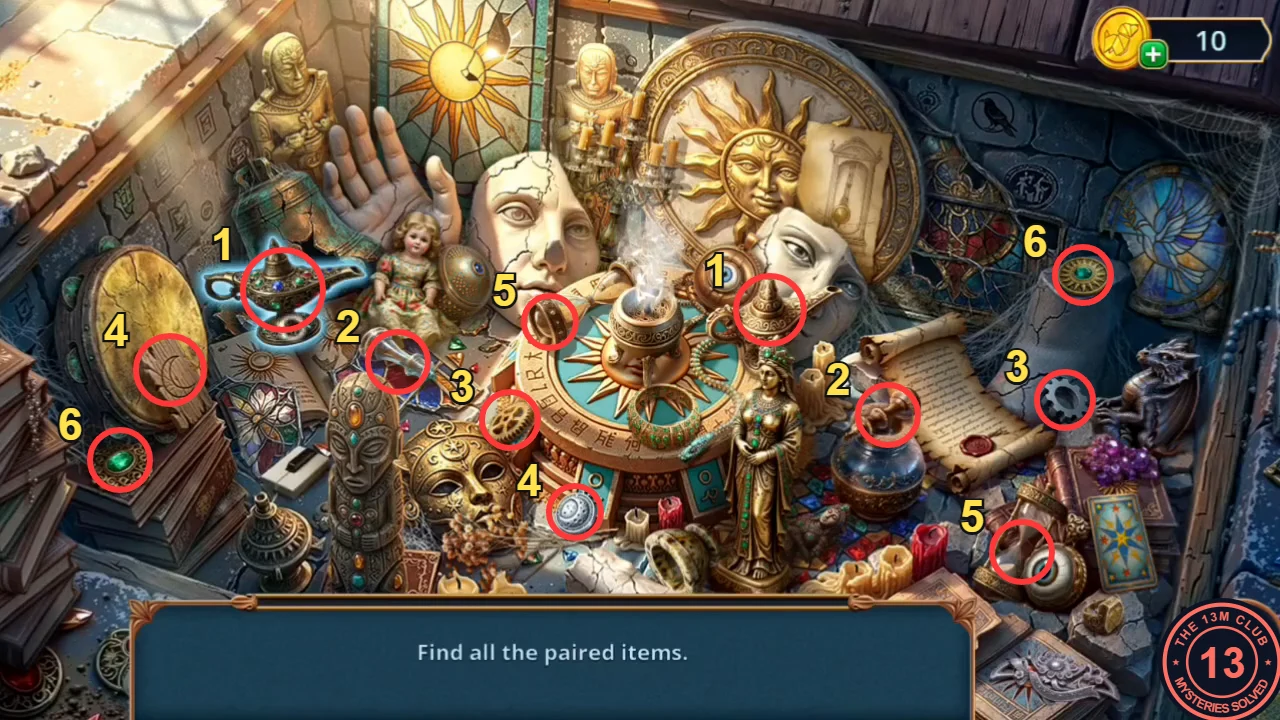
Same number = one pair: 1 oil lamps, 2 spyglasses, 3 cogwheels, 4 moon emblems, 5 hourglasses, 6 green-gem brooches. - Put the Ritual Crystal on the pink crystal chest. Take the Wire Cutters, the Tuning Pegs and the Lighter.
Promenade: The Spiral Sliders
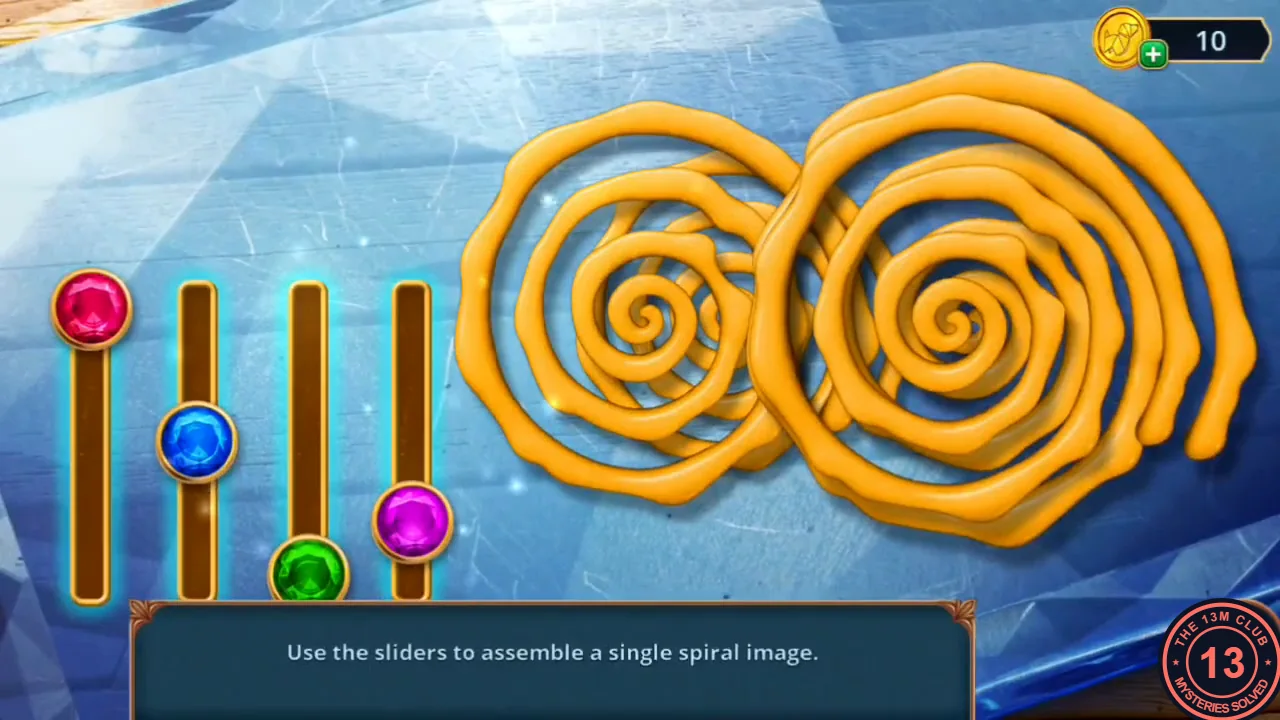
Make an imprint of the wall spiral, then cut the glass of the kitten box on the pier.
- Press the Candle into the wall spiral and soften it with the Lighter to get the Imprint on Candle.
- At the kitten box on the pier, place the Imprint on Candle on the glass and use the Glass Cutter. Each of the four sliders (red, blue, green, pink from left to right) shifts part of the wax spiral; drag one slider at a time and watch which rings move. In the recording the spiral was complete with the knobs forming a rising diagonal: red about two-thirds of the way down its track, blue a little higher (just below the middle), green a little above the middle and pink highest, about one-third of the way down. Nearly aligned is not enough; keep making small adjustments, especially to the pink slider, until the layers lock into a single spiral.
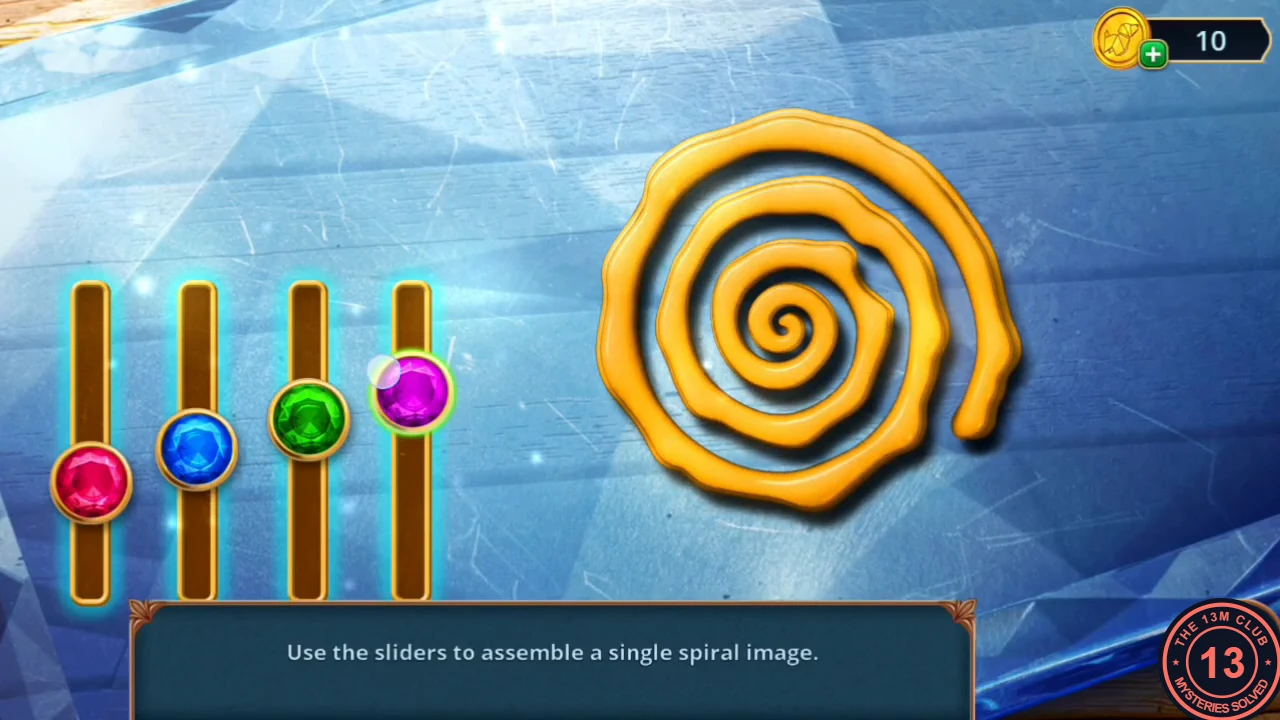
The completed spiral and the slider positions that produced it. - Take the Glass Spiral. Insert it in the chapel wall spirals and take the Comb. Comb the amber cobweb on the crystal chest and take Hair Clips (1/2).
Promenade: The Kiosk Again

A second kiosk search gives milk for the kitten.
- Return to the kiosk on the Promenade. Each round slot at the bottom shows a close-up of part of the shelves; tap that spot in the scene (it flashes and the slot clears). The twelve spots in the order the recording found them: the lighthouse and coral on the window ledge at the upper left; the glass jars with tiny palm trees on the right-hand shelves; the stacked striped towels above the beach postcards, upper middle; the teal blender on the counter; the postcard rack and brown bottles behind the cash register; the glass bowl of shells above the basket of sunglasses, right of the counter; the ice-cream sundae bowls in front of the cash register, lower left; the sunglasses stand above the water bottles and juices at the far left; the row of ice-cream cones along the front, lower middle-right; the shelf of lotion bottles with the $22 tag, upper middle; the ship in a bottle beside the model sailboat, bottom middle; and the small bottles with palm trees ($6 tags) next to the sunglasses at the upper right. You receive the Milk.
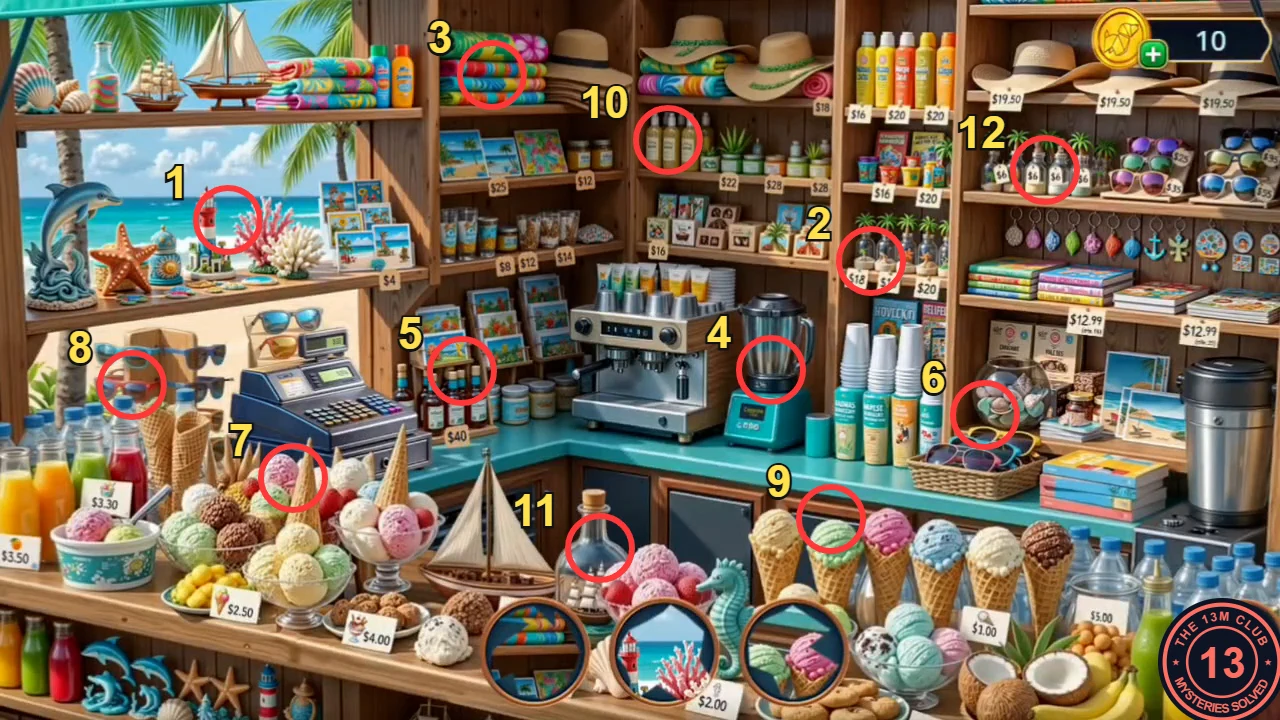
Numbers follow the order of the list above (the order the recording found them). - Pour the Milk into the kitten's bowl. The kitten moves away; take the Nut and the Studded Boots (1/2).
- Fit the Nut on the fountain at the Concert Venue; water flows again. Look at the fountain base: a wooden Clothespin is stuck beside the lock. Take it (you need it in Chapter 3). The lock itself needs picking later.
Old Chapel: The Riddle Scene
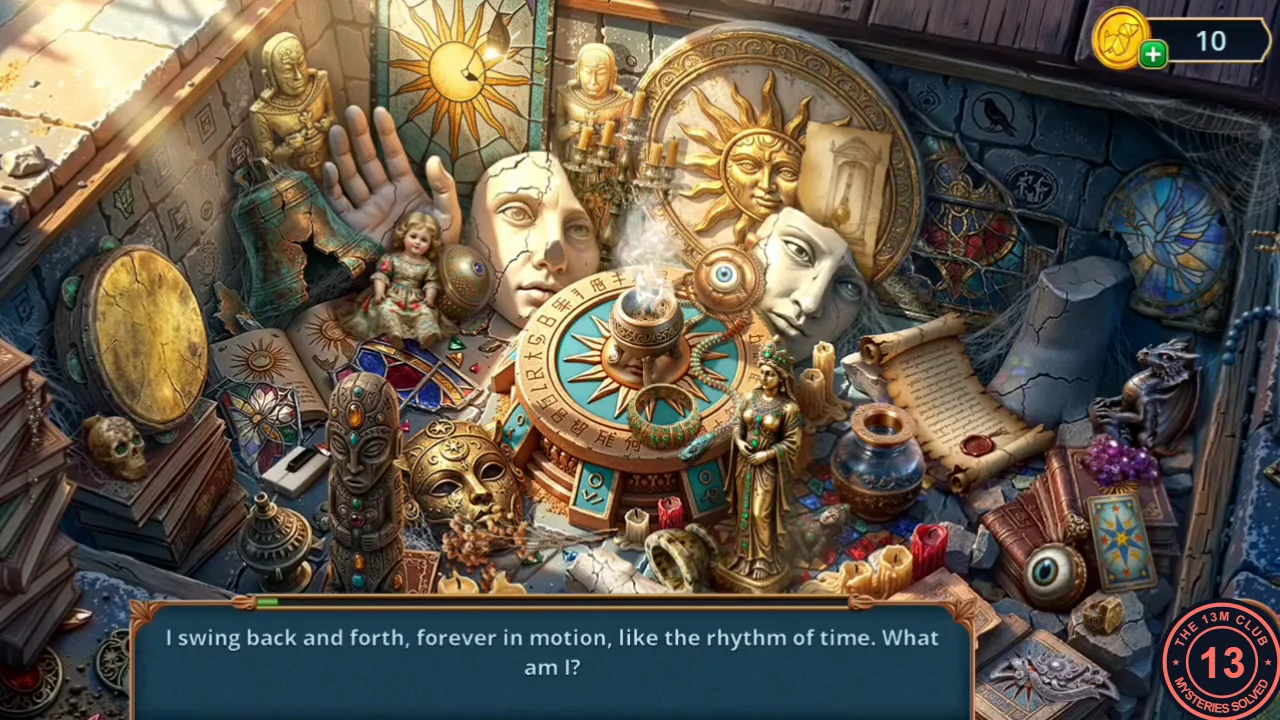
Go down the chapel hatch and solve the riddles to find a token.
- Go down the hatch in the chapel. One riddle shows at a time at the bottom; tap the object it describes. The view does not move. In the order they appeared in the recording: "a giant rooted to the ground, growing leaves and fruits" – the tree drawing in the open book at the left, below the doll; "I swing back and forth… like the rhythm of time" – the card with a pendulum clock drawing, tucked between the big golden sun and the white mask at the top; "companion to magic; I push and stir" – the stone mortar lying on its side at the bottom middle, between the candles and the golden statuette; "the key to notes and music" – the little white piano keyboard at the left, beside the carved totem; "a nostalgic, twisted ribbon… secrets rustling inside" – the rolled scroll with a red wax seal at the right, next to the glass ink pot; "the secret mirror of fate" – the blue tarot card with a star on the book at the right, above the eyeball; "the dark master of night… cries out in the wind" – the owl carving on the blue wall tiles at the top right; "a magical wisp of smoke… a pleasant scent" – the smoking incense burner on top of the round sun dial in the middle; "a beauty with golden hair and a gentle smile" – the doll at the left, beside the white mask; "the silent guardian of oblivion; empty eye sockets" – the small golden skull on the stack of books at the far left; "a branch bearing light, holding candles" – the candelabra at the top, between the open hand and the golden sun; "preserved summer, dried and delicate" – the bunch of dried flowers in front of the gold mask at the bottom left. Then the bar shows the last item: tap the small copper-coloured object on the wall between the large open hand and the golden statue at the top (marked F in the second image) to finish.
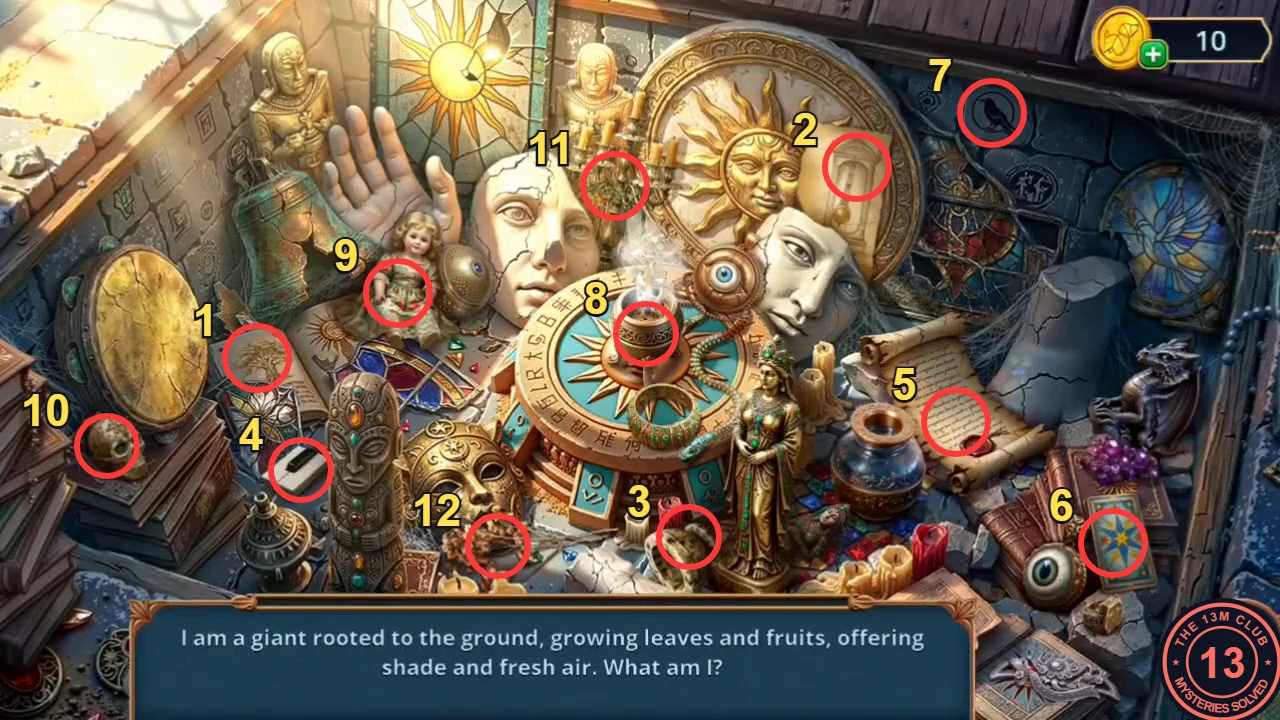
Numbers follow the riddle order above: 1 tree drawing, 2 pendulum-clock card, 3 mortar, 4 piano keyboard, 5 sealed scroll, 6 tarot card, 7 owl carving, 8 incense burner, 9 doll, 10 golden skull, 11 candelabra, 12 dried flowers. 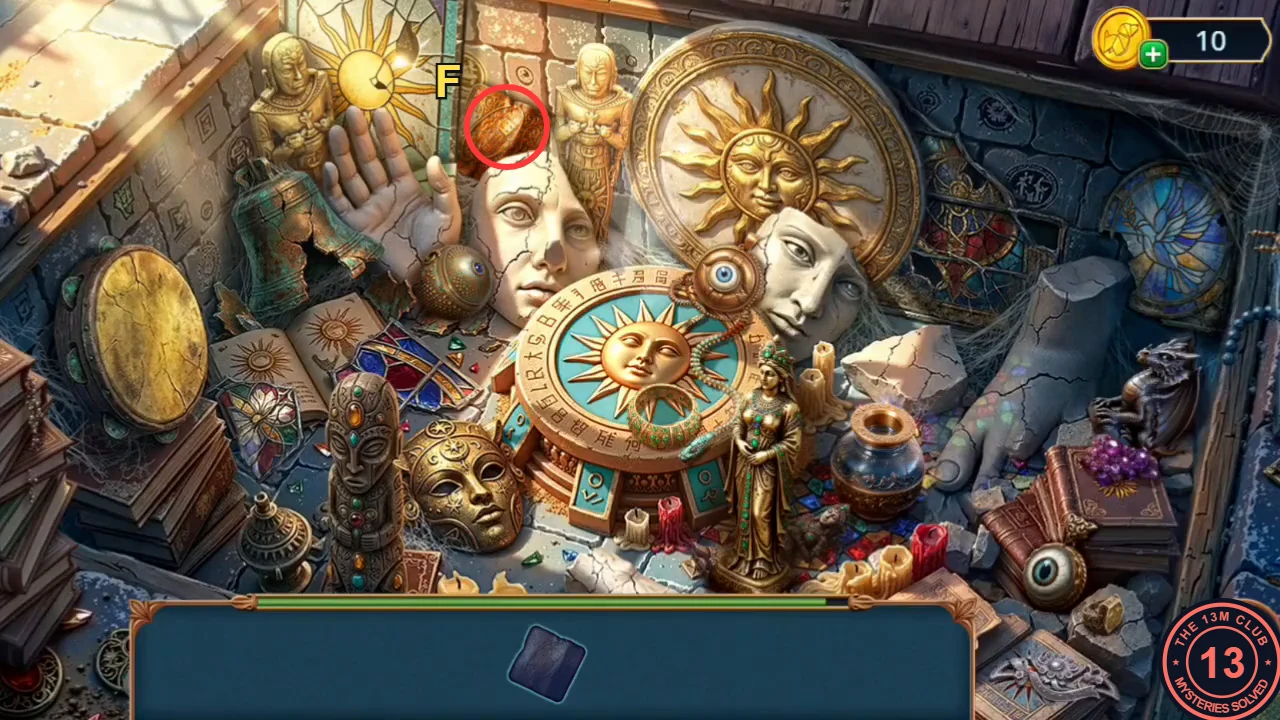
After the twelfth riddle: tap the copper-coloured object marked F, between the open hand and the golden statue. - You receive the Bent Token. Flatten it in the stone press to get the Token.
Promenade: The Arcade Board Game
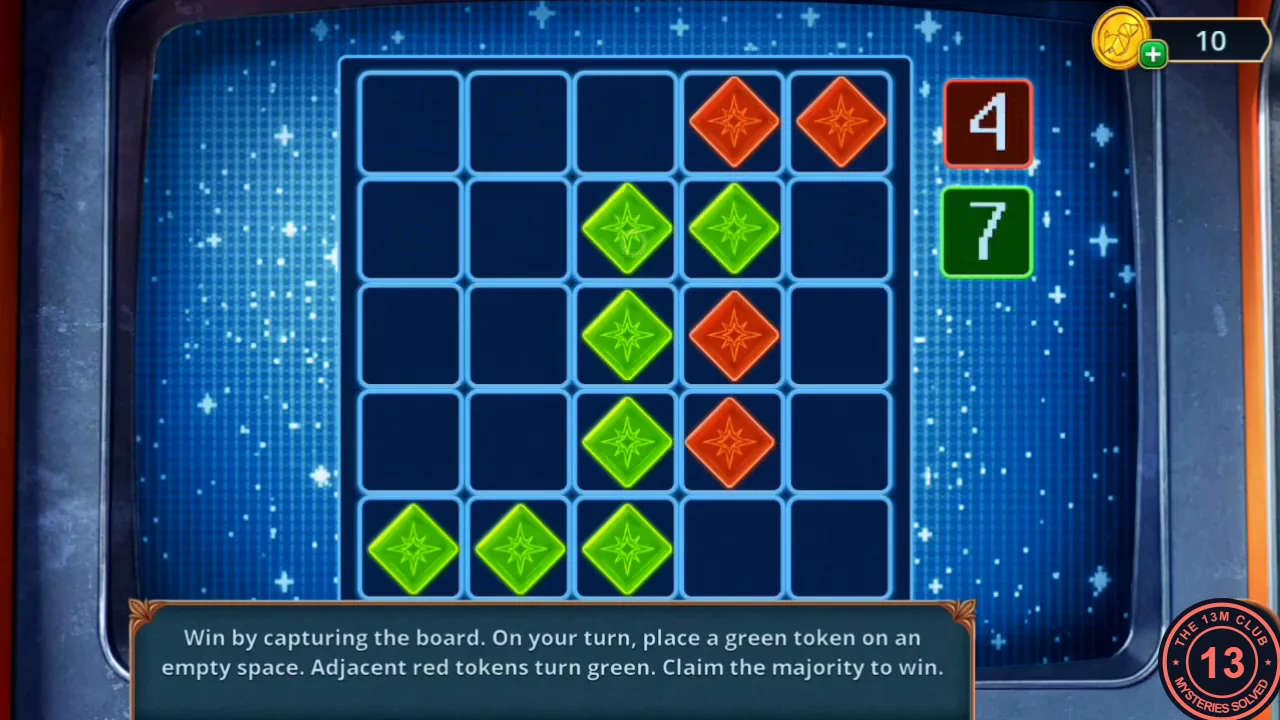
The flattened Token starts the arcade board game on the Promenade.
- Insert the Token in the arcade machine. On your turn place a green token on an empty cell; adjacent red tokens turn green. Choose cells that convert the most red tokens and take corners and edges. Win with the majority.
- The machine pays out two prizes onto the pavement: pick up Hair Clips (2/2) and the Brush (you need the Brush in Chapter 3).
- Pick the fountain lock with the Hair Clips and cut the fishing line with the Wire Cutters. Take the Thick Pipe and the Line.
- Open the Broken Guitar in your inventory and add the Line as strings and the Tuning Pegs to get the Guitar.
Concert Venue: Fooling the Guard
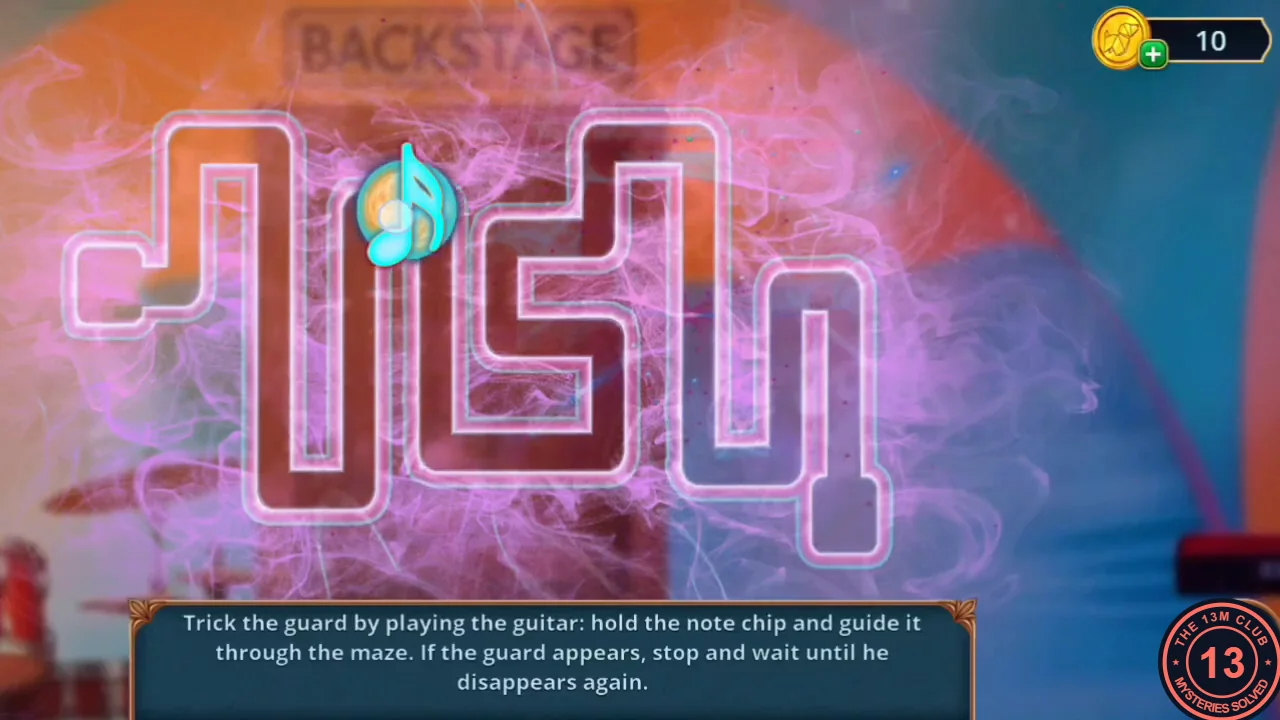
With the guitar repaired, trick the backstage guard.
- Give the Guitar to the backstage guard (second slot).
- Hold the note chip and drag it along the maze. When the guard appears, stop and wait until he disappears again.
- Chapter 2 ends with the Decision Points journal (0, 4 and 10 star outcomes). Eli recognises his sister Emily backstage.