Promenade: The Claw Machine Scene
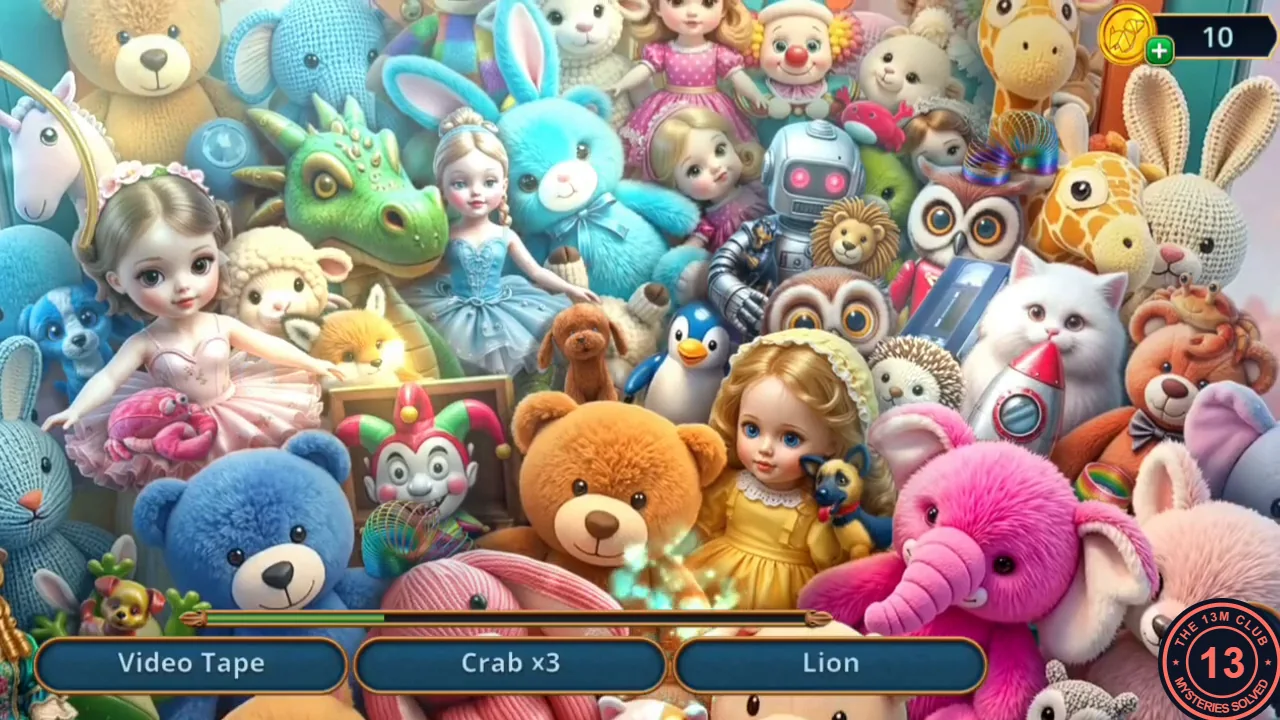
Jules wants to get into the university and find out about Caleb Morrow. The green toolbox on the bench needs a code.
- Open the window poster and take the Lever (a red joystick) from the display.
- Open the claw machine and attach the Lever as its joystick. Read the note about one game per coupon and take the Broken Magician's Cane.
- Find the listed objects in the claw machine; each name shows how many are left, and when a name is finished the next one (Slinky ×3) replaces it. The pile of plush toys drifts slowly, so use the big toys as landmarks. Video Tapes: low down between the blue teddy bear and the pink knitted bunny; under the turquoise bunny, right of the doll in the blue dress; and the small blue cassette box between the brown owl and the white cat. Lions: above the green dragon's head at the top left; at the bottom, between the pink knitted bunny's ear and the pink elephant; and between the grey robot and the owl. Crabs: just above the owl, right of the robot's head; in the pink skirt of the ballerina doll at the left; and right of the white cat near the red-and-white rocket. Slinkies: beside the blue bear's paw below the jester toy; at the top right beside the giraffe's head; and between the pink elephant's ear and the pink bunny on the right. You receive the Frisbee.
- Give the Frisbee to the dog on the university steps. It runs off and the door opens.
University: The Key Rack
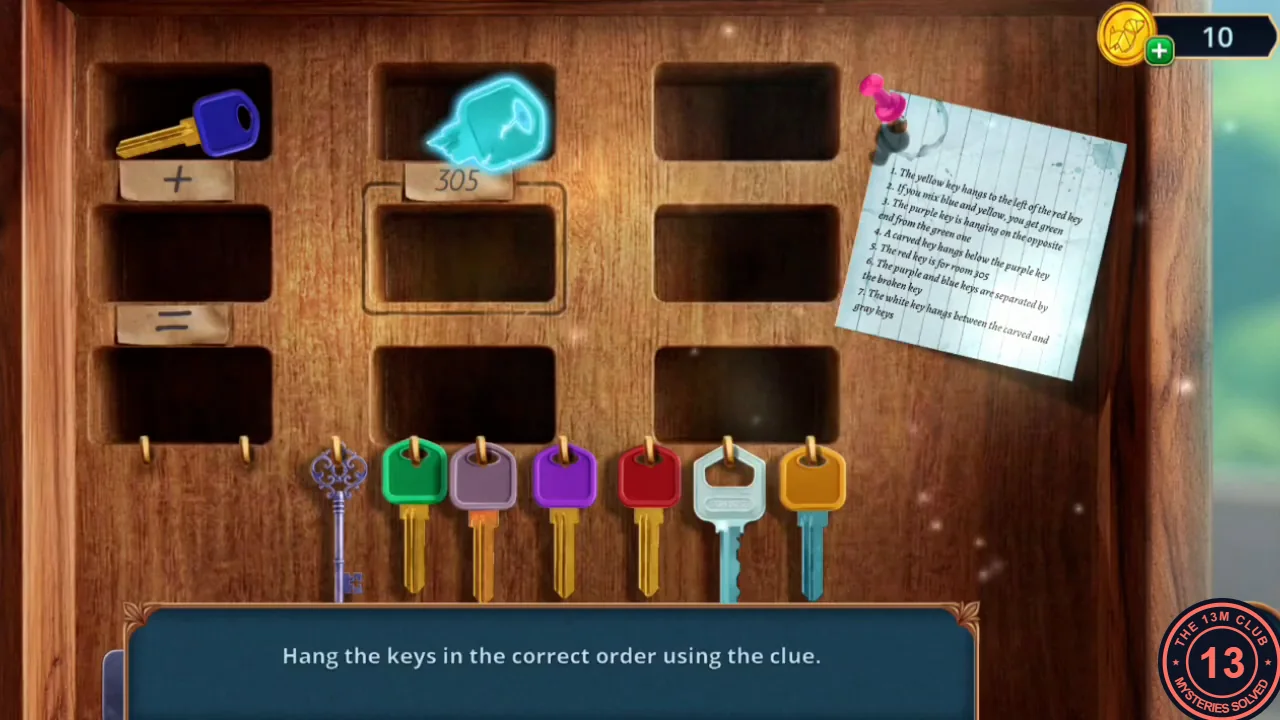
At the university, reach into the security booth and hang the keys in the right order.
- Open the lockers and take the Industrial Suction Cup and the Baseball Bat. Then open the security booth counter: take Film Reel (1/2) from the left of the counter (a Shell is also here).
- Open the Broken Magician's Cane in your inventory and add the Baseball Bat and the blue tape to make the Long Cane. Reach through the booth window with it to start the key rack.
- Hang the keys using the clue note. Solution: top row blue, broken, purple; middle row yellow, red, carved; bottom row green, gray, white.
Caleb's Office: The Safe Dial
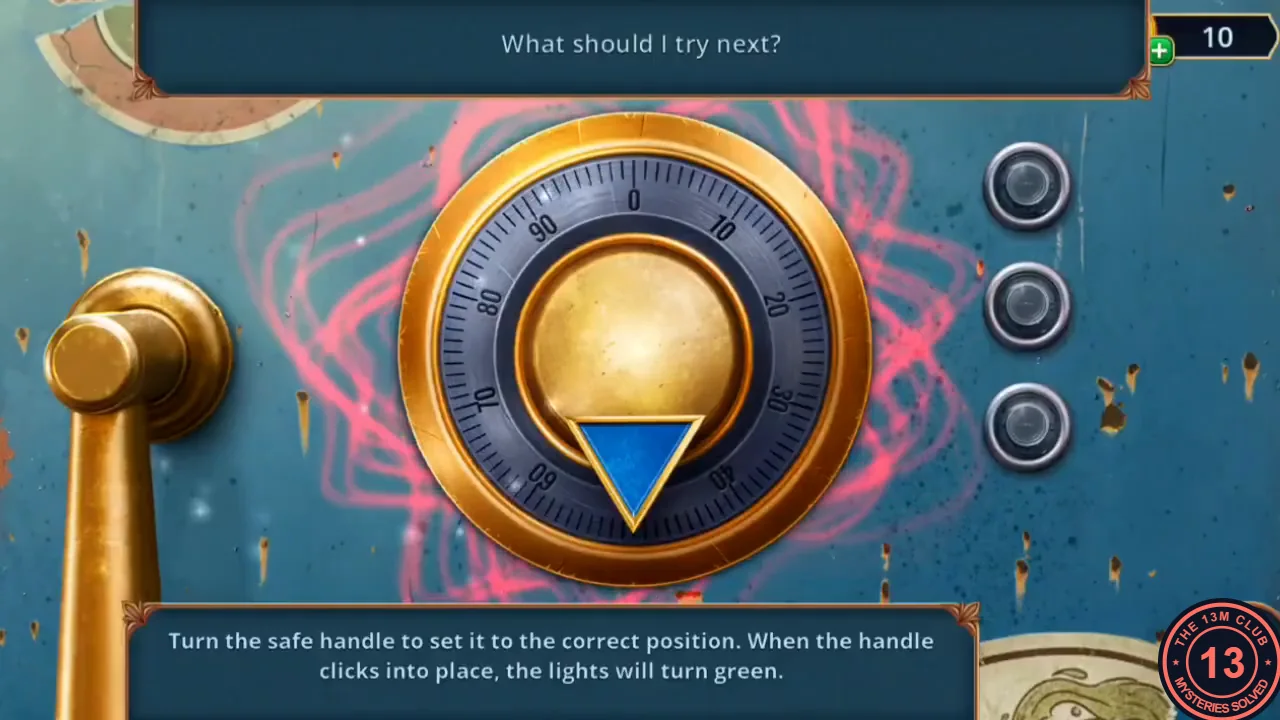
The Office Key opens Professor Caleb Morrow's office and its wall safe.
- Unlock Professor Caleb Morrow's door with the Office Key. Take the Safe Handle from the desk. A Shell is in the office.
- Attach the Safe Handle to the wall safe. Turn the handle slowly; when it clicks into place a light turns green. Repeat until all three lights are green.
- Look at the torn family photo and take the Sun Earring. Attach it as the zipper pull of the guitar case and take the Guitar Pick.
- Pry the typewriter drawer with the Guitar Pick. Read the note about Olivia and Noah and take Key 215.
University: The Door Path
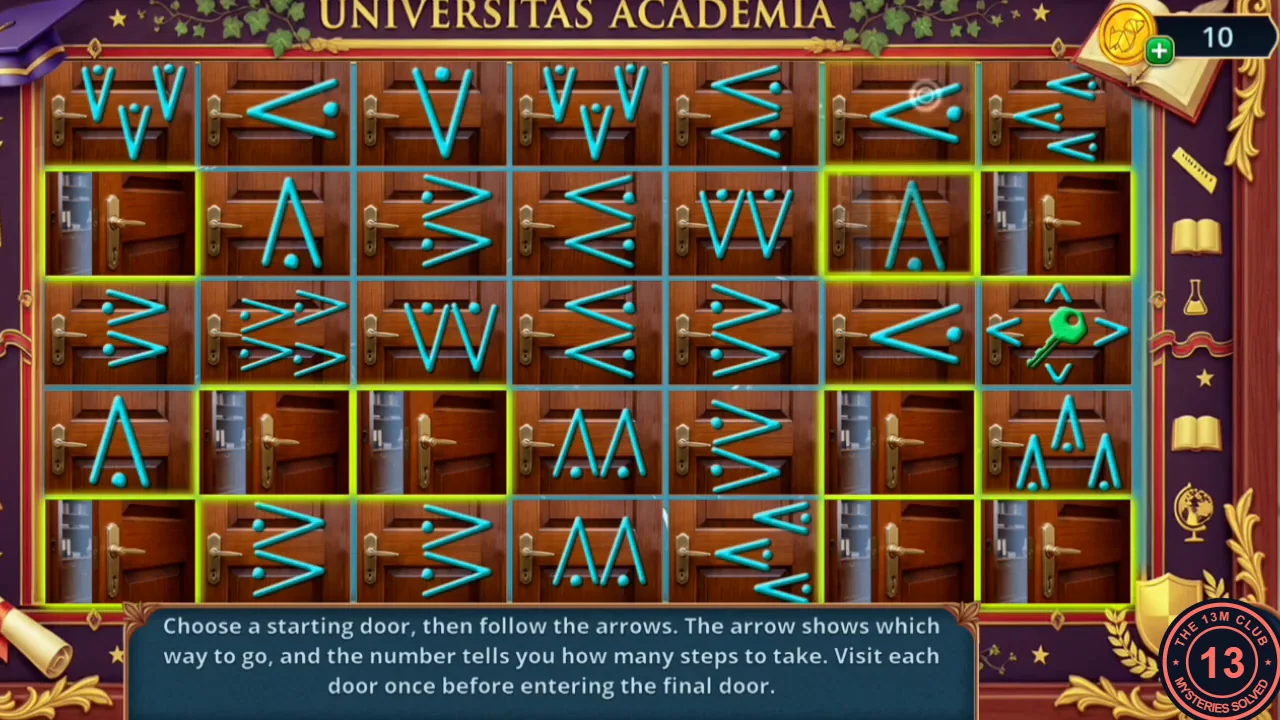
Key 215 opens the door board in the hallway: visit every door once and finish on the key door.
- Use Key 215 on the door board in the hallway. Each door shows arrows: their direction is the way to go and the number of chevrons is the number of doors to move. You must visit all 34 arrow doors once and finish on the door with the green key (third row, far right). Start on the leftmost door of the second row (three downward chevrons) and keep tapping the door each arrow leads to. Counting rows 1-5 from the top and columns 1-7 from the left, the full route is: R2C1, R5C1, R4C2, R4C3, R4C6, R5C6, R5C7, R2C7, R2C6, R1C6, R1C5, R1C3, R2C3, R2C5, R4C5, R4C7, R1C7, R1C4, R4C4, R2C4, R2C2, R1C2, R1C1, R4C1, R3C1, R3C3, R5C3, R5C5, R5C2, R5C4, R3C4, R3C2, R3C6, R3C5, then the key door R3C7.
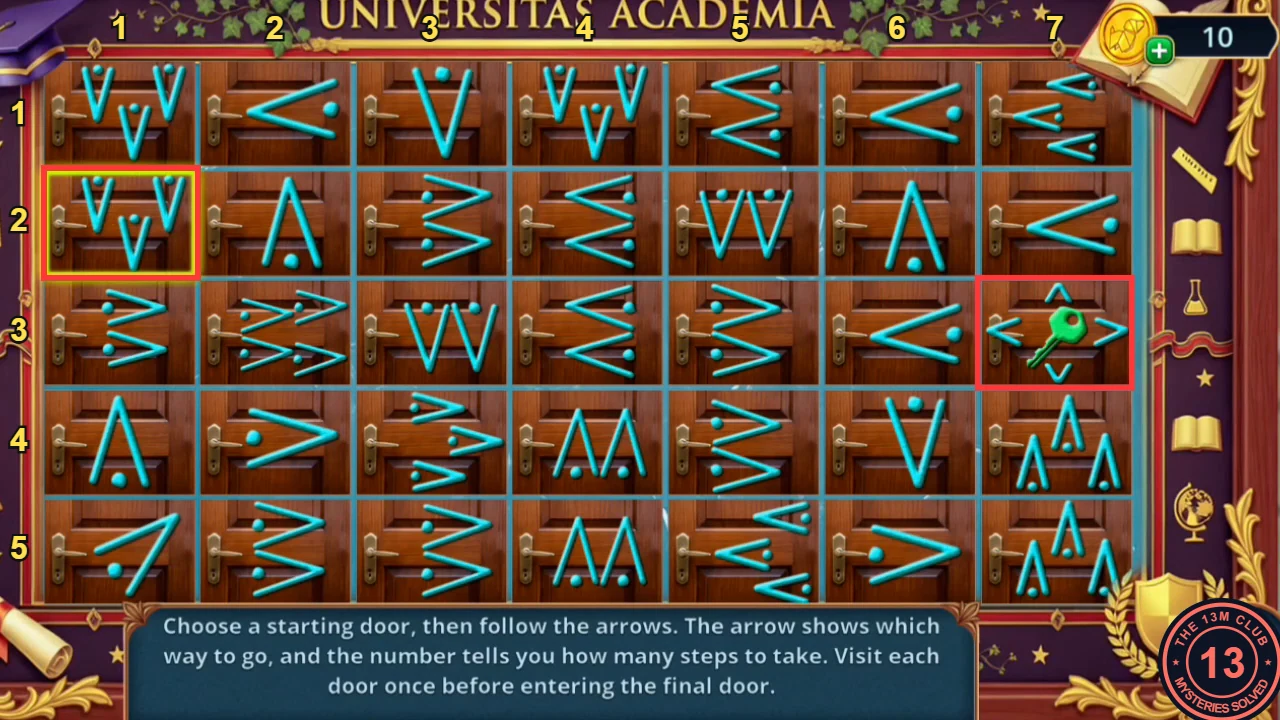
Rows and columns numbered as in the route. Red frames: the start door (R2C1) and the key door (R3C7). The yellow frame shows the selected door.
Lecture Hall: The First Film
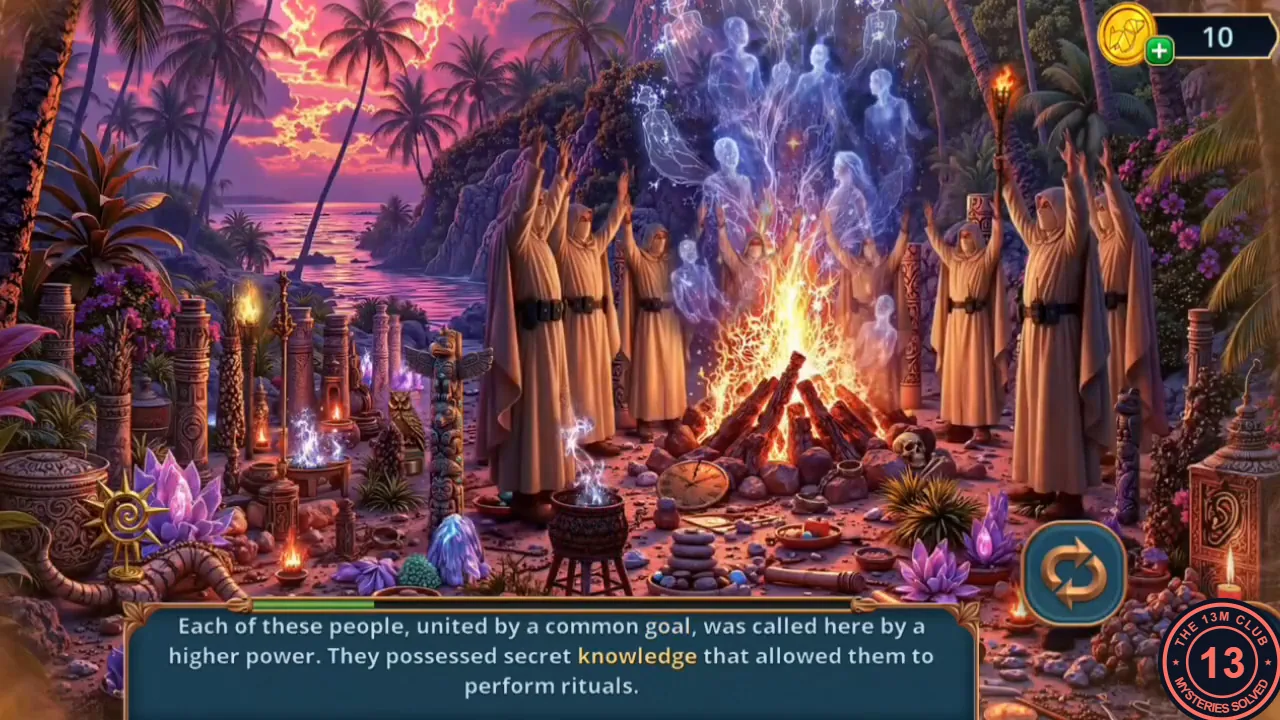
In the lecture hall, clean the chalkboard and run the first film on the projector.
- Open the chalkboard. Take the pink Sponge and Clock Weights (1/2) from its ledge, then use the Industrial Suction Cup to lift the glass cover off the board.
- Caleb arrives. Decision point: "Those who do not know history are doomed to repeat its mistakes..." is free and gives 1 star; "I wouldn't want to waste my time on that." gives none. Caleb asks for the cult's candle.
- On the desk with the pink cloth take a Shell, the Broken Pendant, Film Reel (2/2) and the Molecules. Mount both Film Reels (the first came from the security booth counter) on the projector.
- The film narration appears in six pages; tap the object that matches each highlighted word. Some objects are only in the day view and some only at night, so use the round cycle button at the lower right to switch. The matches in the recording: "films" – the small film canister on the ground in front of the bonfire stones (day); "observed" – the eye carved into the rock behind the robed figures (day); "goal" – the smoking cauldron at the lower left of the fire (night); "knowledge" – the owl figure among the totems on the left (night); "souls" – the ghostly figures rising above the fire (night); "Dead" – the skull right of the bonfire (night); "time" – the pocket watch lying in front of the fire (night); "spiral" – the golden sun ornament with a spiral centre on the far left (night); "Earth's" – the blue globe on the small table between the carved posts on the left (day); "images" – the photo lying on the ground beside the blue furry object (day); "circle" – the red ring on top of the carved post behind the figures, upper right (day); "heard" – the carved ear on the lantern post at the right edge (night). You receive the Burner Handle.
Promenade: Cleaning the Window Poster
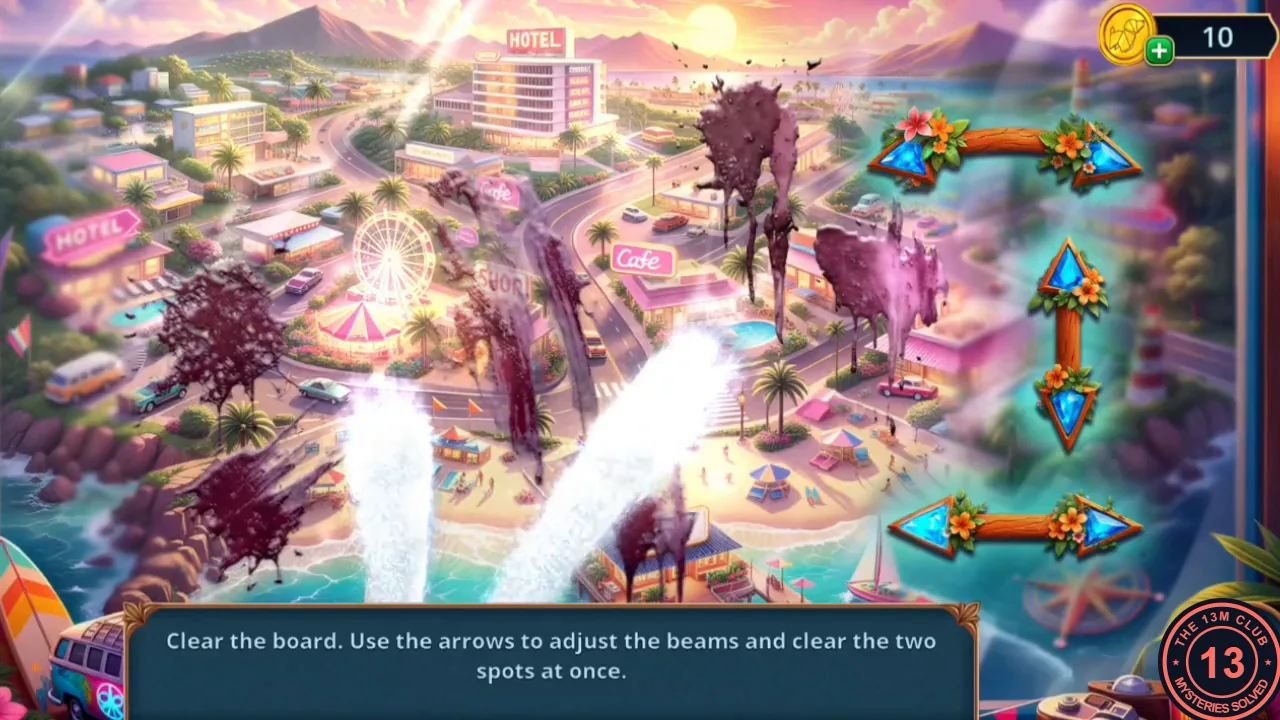
Find tools in the classroom and hallway, then clean the stained window poster on the Promenade.
- Attach the Burner Handle to the gas burner on the classroom desk, turn the flame off and take the Line-Tightening Machine.
- In the hallway put the Line-Tightening Machine on the racket in the lockers to get the Badminton Racket. Fish the Window Cleaner out of the janitor's bucket with it.
- Place the Sponge and the Window Cleaner on the stained window poster on the Promenade. The bottle sprays two beams at once, and the arrows on the right move and angle them. The task is to clear two stains at the same moment: aim one beam at one stain and the other beam at a different stain, so that each beam ends on its own stain. Both stains vanish together. Repeat with the next pair of stains until the poster is clean.
- Enter 457 on the green toolbox. Take a Shell and the Septum Ring.
Lecture Hall: The Second Film
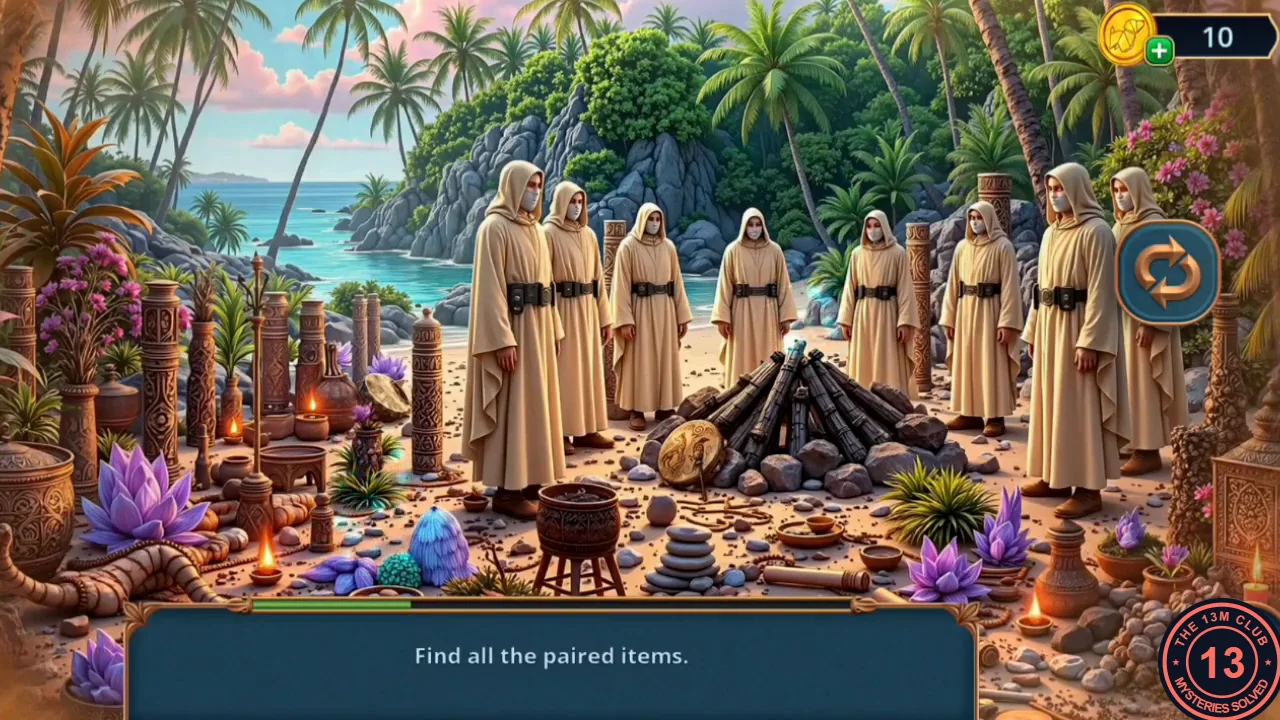
Get the Blinds Buttons and run the projector again for a paired-items scene.
- Use the Septum Ring as the handle of the lab-bench drawer and take the Blinds Buttons.
- Run the projector again. Tap two matching objects to clear a pair; three pairs are in the day view and three at night (switch with the round cycle button). Day: the two infinity signs – a blue figure-eight on a carved post at the left and one lying on the ground at the lower right by a candle; the two sacks – the red sack at the lower left and the small tan sack on the sand between the robed figures beyond the bonfire; the two drums – one tucked behind the carved post left of the figures and the drum with a beater leaning on the bonfire stones. Night: the two torches – a lit torch among the carved posts on the left and the torch held up at the upper right; the two totems – the winged totem pole left of the cauldron and the small carved figure at the right edge beside the lantern; the two shackles – one on the ground at the lower left by the crystals and one right of the cauldron. You receive the Occult Candle.
- Decision point with Caleb: "Do you know where Mallory is?! Tell me where she is, right now!" costs 60 coins and gives 2 stars; "Mallory? Please... I beg you..." is free and gives none. Caleb gives you the Symbol Scheme.
- Place the Occult Candle in the blue hands on the classroom desk and take Molecules (2/2).
Caleb's Office: The Molecule Tiles
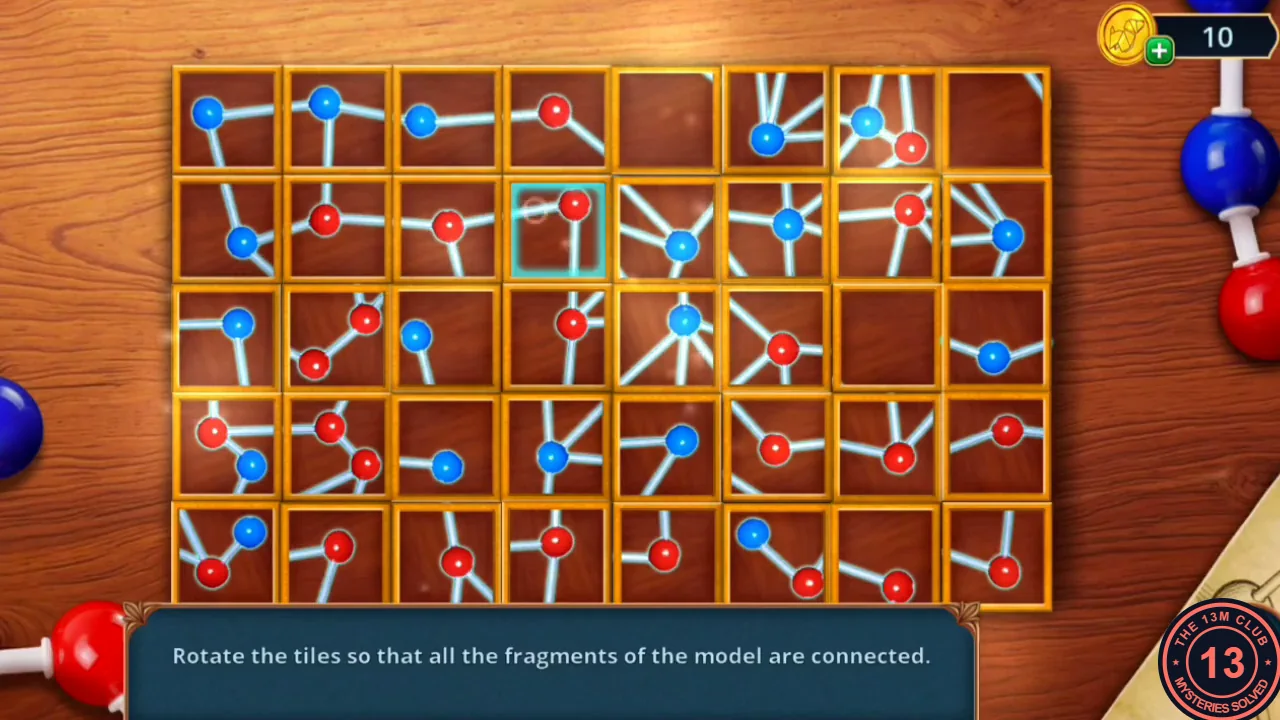
Complete the molecule model by the office blinds.
- Add the Molecules to the model by the office blinds. The board has 8 columns and 5 rows; tap a tile to turn it a quarter turn. Three tiles are blank (top row, 5th and 8th columns; middle row, 7th column) and never need turning. Every bond stub must meet a matching stub on the neighbouring tile, so no stub may point off the board or into a blank tile. Start with the corners and edges, where those rules usually leave only one possible orientation, then work inward tile by tile, fixing each tile whose neighbours are already settled. The solved board in the recording is shown in the image; match it tile by tile if you get stuck.
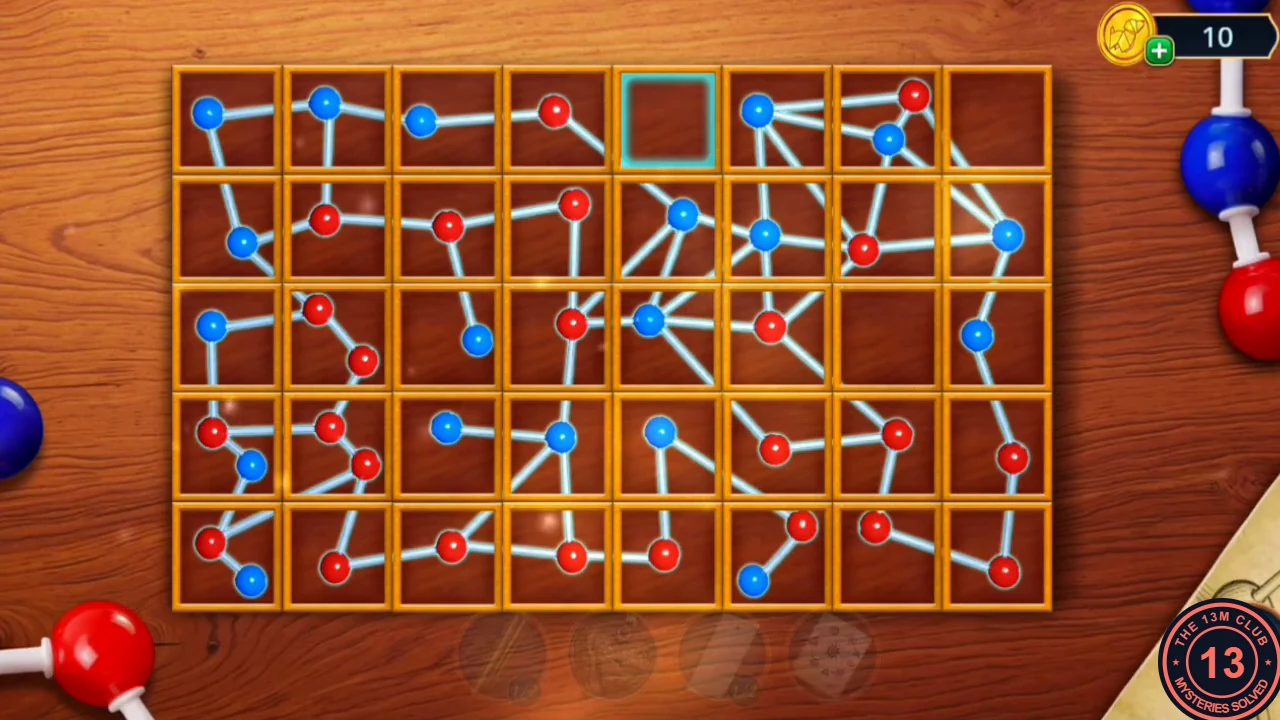
The solved board. The highlighted square in the top row is a blank tile and needs no turning. - Take the Jar Stickers. Label the jars in the safe (Solvent, Reagent, Chlorine) and take the Reagent and the Umbrella Button. Take the Ink Tapes from the clock.
Promenade: The Stuffed Dogs
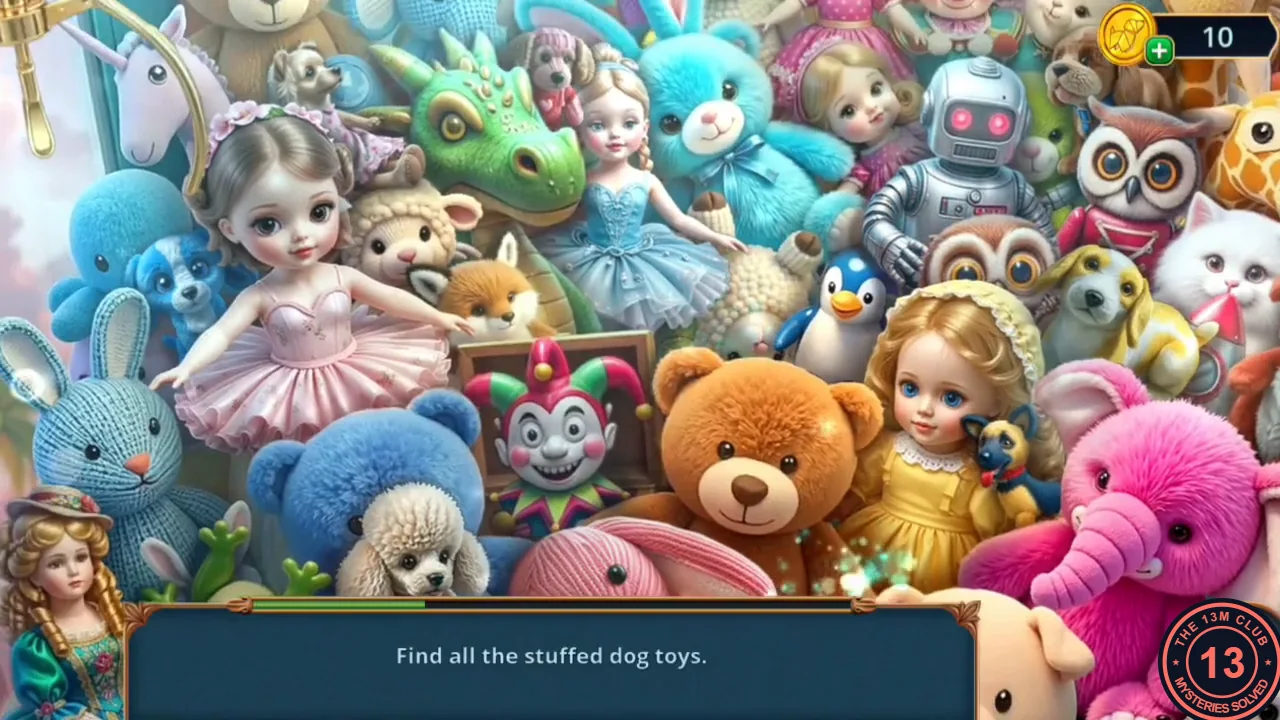
A coupon from the umbrella buys another game at the claw machine.
- Attach the Umbrella Button to the pink umbrella by the bench. Read the lecture invitation, then take the One-Game Coupon and the Plug (a purple electric plug) lying beside it on the umbrella.
- Insert the coupon in the claw machine and find all the stuffed dog toys (there is no list; a progress bar fills). The pile drifts slowly, so use the big toys as landmarks. The recording found eleven: the small yellow puppy on the green frog beside the doll in the green dress, far lower left; the curly brown puppy above the teddy bear, next to the penguin; the red puppy right of the pink knitted bunny, below the teddy; the blue puppy left of the ballerina doll; the small grey dog above the head of the ballerina doll, left of the green dragon; the pink dog just right of the head of the dragon; the brown spaniel at the top between the clown doll and the giraffe; the black-and-tan dog held by the doll in the yellow dress; the yellow-and-white puppy between the owl and the white cat; the red-and-white dog beside the rocket, right of the white cat; and the cream poodle sitting on the orange cat at the lower left. You receive the Dean with Diploma.
- Place the Dean with Diploma between the graduate figures by the lockers. A drawer in the lockers opens: read the note about Sarah and take a Shell, the Blades (a teal propeller) and the Grabber (a ring on a long handle). Take the Chemistry Textbook from the janitor cart.
Lecture Hall: Restoring the Pendant
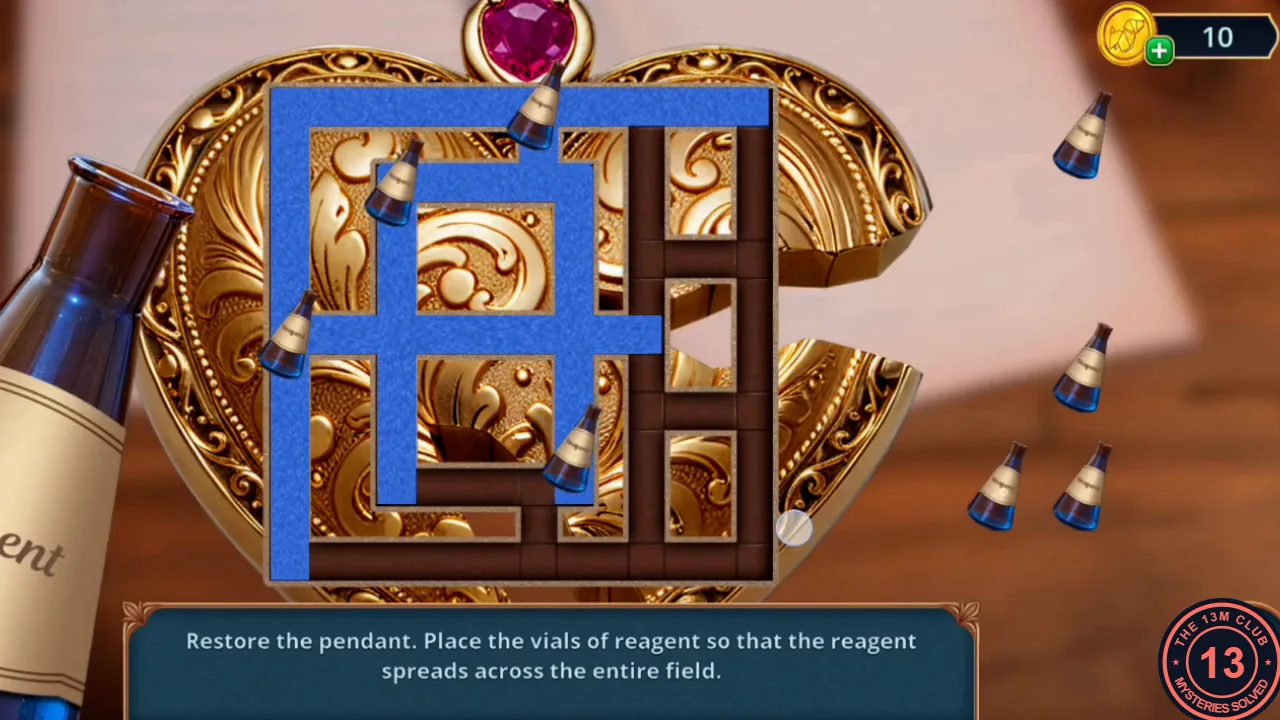
Load the typewriter, then restore the Broken Pendant with reagent on the lab bench.
- Put the Ink Tapes and the Symbol Scheme into the typewriter in Caleb's office. The middle slot still needs a carriage.
- Place the Broken Pendant, the Reagent and the Chemistry Textbook on the lab bench.
- Drag the reagent vials from the right onto the channels of the pendant. From the spot where you drop it, a vial floods outward in every straight direction until each line meets a wall or a bend, so one vial on a junction fills a whole cross of channels. Work from the outside in: first drop vials that fill the long outer runs (the top edge, the left edge, the right edge and the bottom edge), then use junctions where an inner cross-piece meets an already-filled run, and finish with the short dead-end stubs that are still bare. Do not waste a vial on a run that is already blue. In the recording the whole field was blue with one vial still unused; the image shows where each vial was placed.
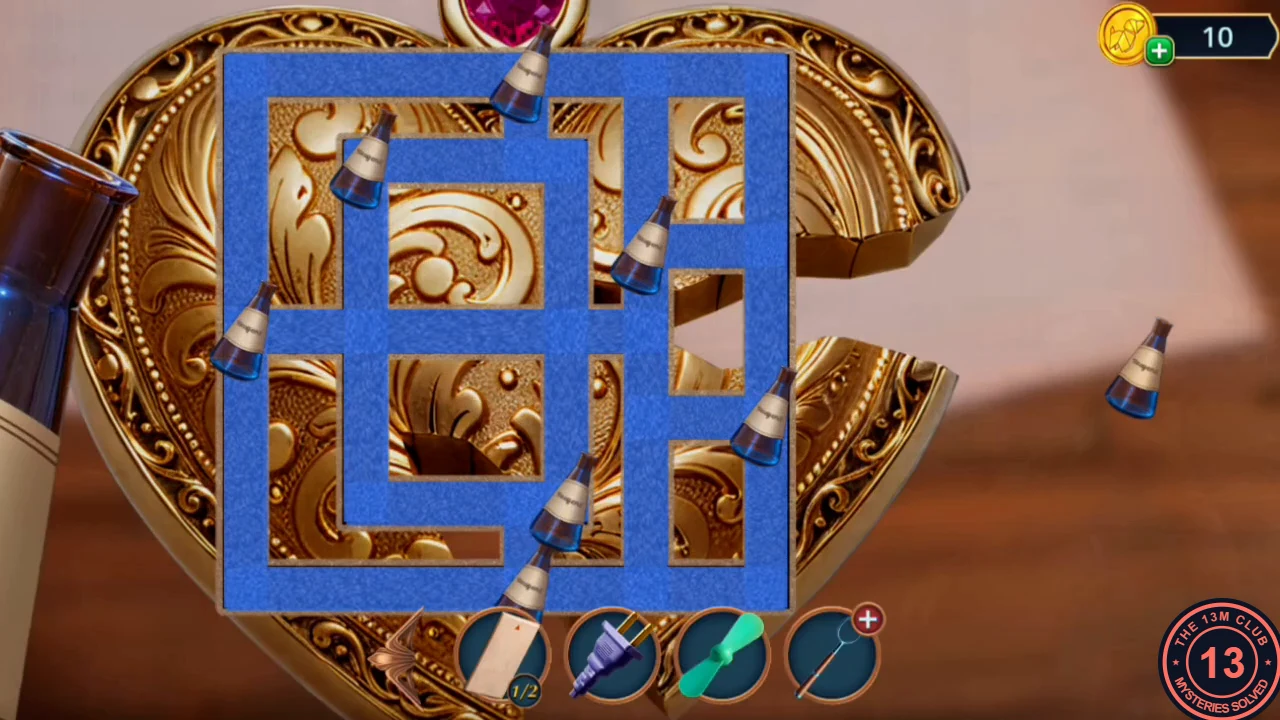
The finished field: each vial on the pendant marks where one was dropped. The vial at the right was not needed. - Use the Restored Pendant on the red book under the desk to read Sarah's diary. Take the Soldering Iron from the desk drawer.
Caleb's Office: The Typewriter Cipher
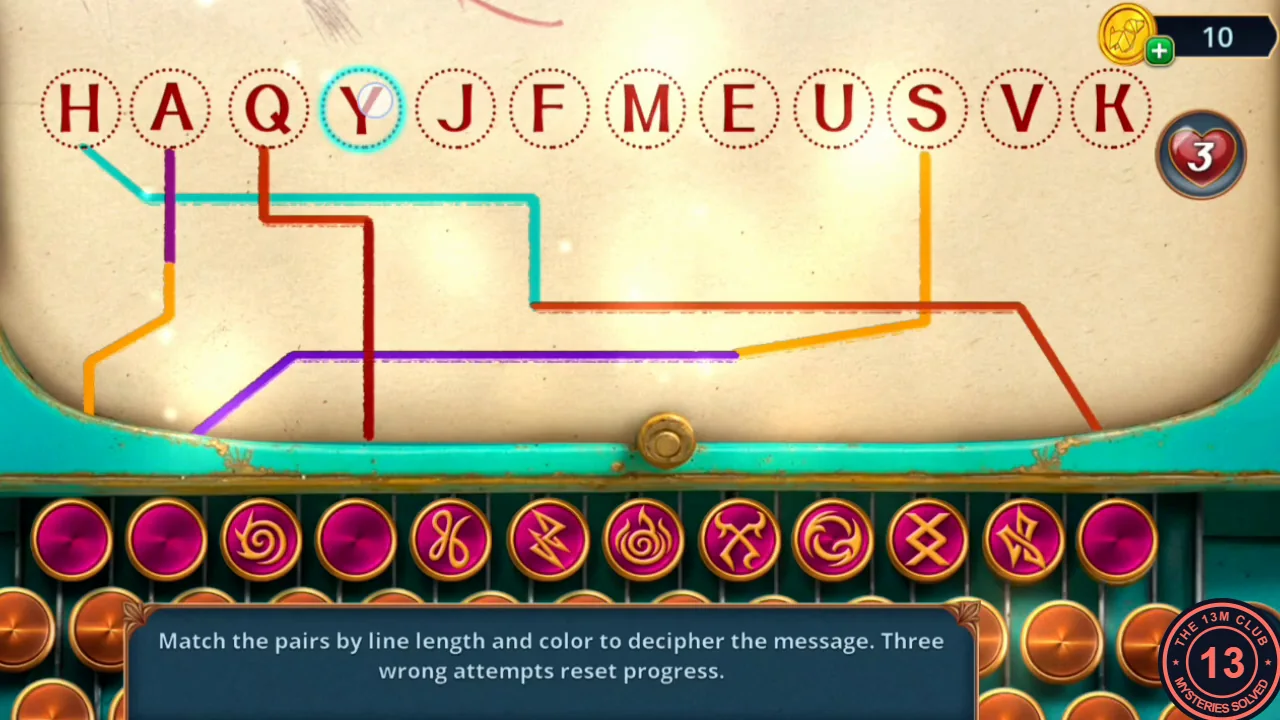
Collect the last typewriter parts and decipher the message. Inserting the carriage locks you out of earlier locations, so finish any searches first.
- Open the soldering station on the classroom desk and put the Soldering Iron into it. Take the second gold clock weight that appears on the desk (Clock Weights 2/2). In the office, hang the weights on the chains of the grandfather clock and take the Threads from the opened clock face.
- Put the Blinds Buttons into the switch panel beside the office blinds. The blinds rise: read Caleb's book on the sill, then take the Bottle of Fresh Water, the Sticky Tape (a red roll) and the Typewriter Carriage from the sill.
- Put the Typewriter Carriage in the typewriter. A warning says you cannot return to earlier locations after this task: collect any missing Shells first, then choose YES.
- Match each top letter to a bottom symbol whose line has the same length and colour. Three wrong attempts reset the progress.
- Read the note about six blonde maidens and a girl with flame-coloured hair. Decision point when Caleb hypnotises Jules: "Submit" is free (0 stars); "Ask Caleb to stop" costs 30 coins (2 stars); "Resist hypnosis" costs 60 coins (6 stars).