CHAPTER 4
Lagoon: The Gear Lock
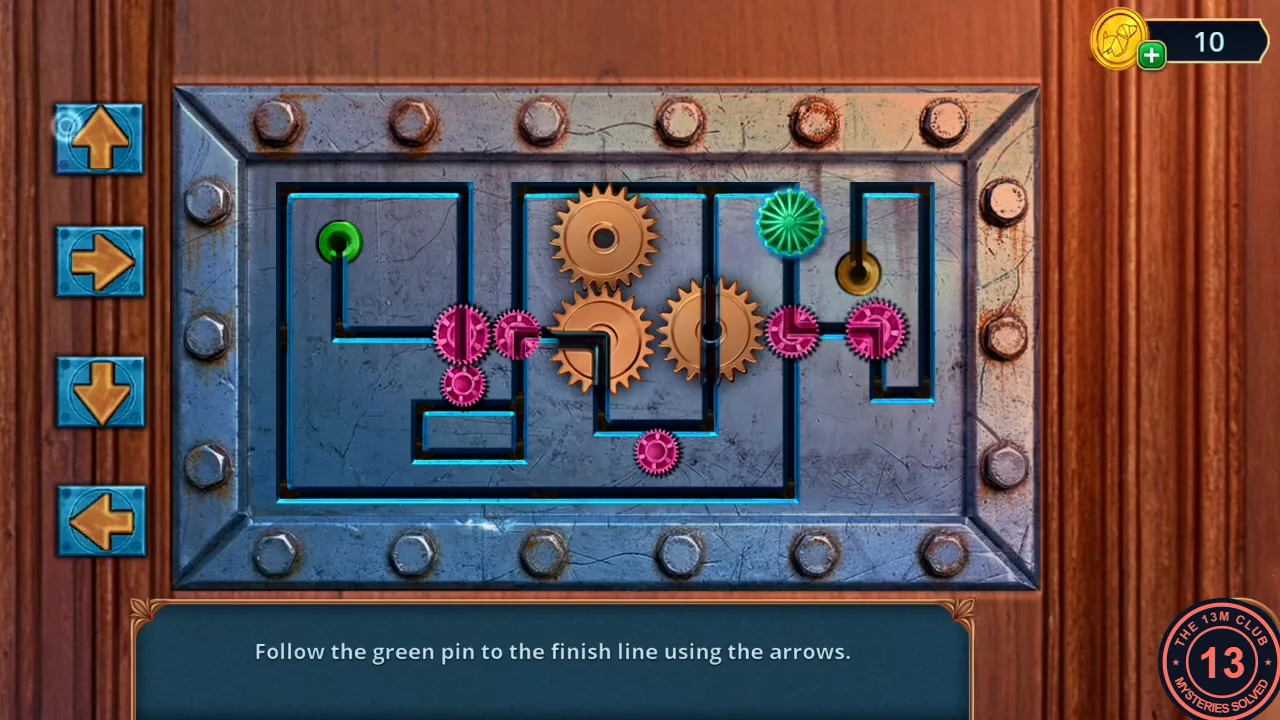
Eli escapes into a lagoon guarded by two cultists. Over a walkie-talkie his sister Emily, who has lost her memory, asks for help.
- Zoom in on the old chest lying in the burnt firewood on the path in front of the waterfall (marked "Secret"). Zoom in on its clasp and take Fresco Fragments (2/2) from it.
- Place both Fresco Fragments in the cracked mosaic by the waterfall. The panel opens on a stone toad: take the blue Metal Plate from its tongue and the Mirror beside it.
- Zoom in on the chained wooden door and put the Mirror in the gap left of the chain; its reflection shows the chain hooked into a slide latch on the inside. Put the Hook (from behind the barrel in Chapter 3) on the latch, and the gear lock appears. Move the green pin from the upper right to the green finish dot at the upper left with the four arrow buttons; each press slides the pin along the channel until it stops. Every move also turns the pink gears, and their teeth block or open the channels, so the same move can stop at a different place later. The recording’s route: Up, Right, Down, Left, Up, Left, Up, Left, Down, Left, Up, Left, Down, Left (14 moves), which brings the pin into the small square loop at the lower left. There the way up is blocked, so the pin was sent round the loop (Down, Right, Up, Left) twice to turn the gears. On the third time round, Down, Right, then Up runs all the way to the top channel; finish with Left and Up (27 moves in all). If your gears block a different spot, keep circling that lower-left loop until the channel above it opens.
- Decision point with Emily: "Of course! I won't leave you alone again." is free and gives 1 star; "Now is not the best time for memories." gives none. Emily gives you the Cultist's Walkie-Talkie.
CHAPTER 4
Abandoned Hotel: Inflating the Boat
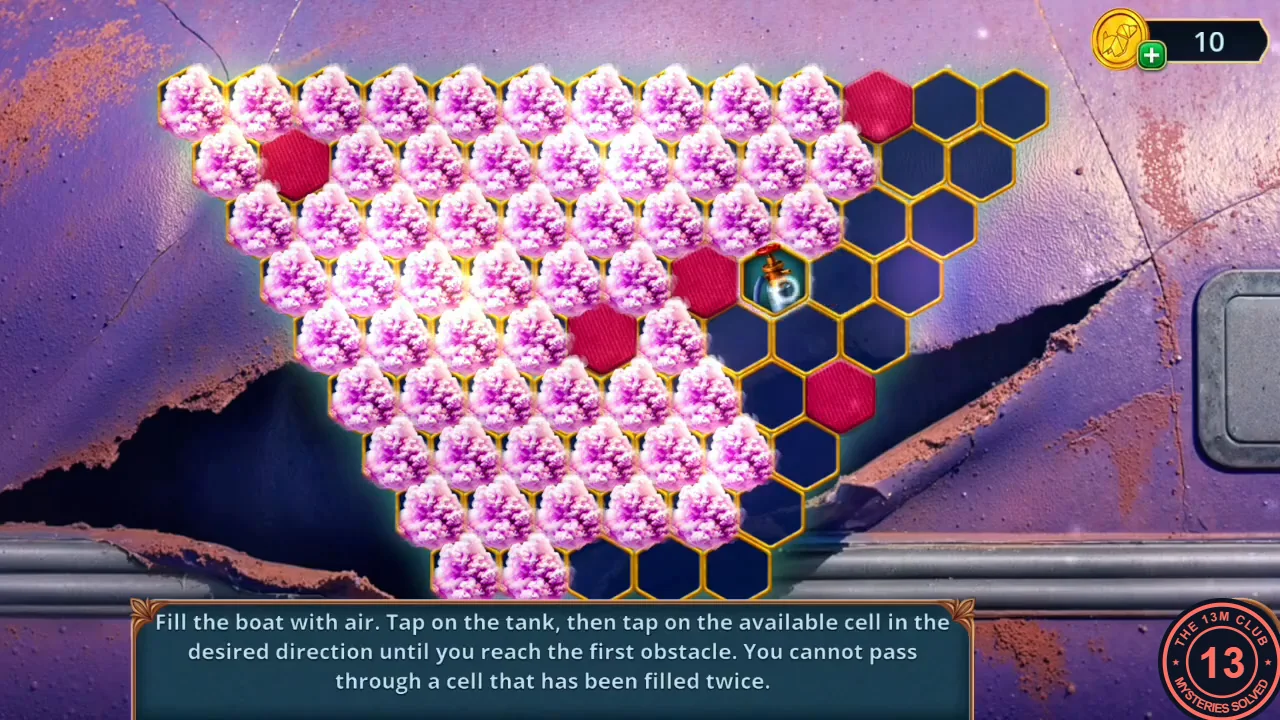
In the abandoned hotel, patch the deflated boat in the lounge and fill it with air.
- In Emily's bedroom zoom in on the instant camera on the low table in the foreground (among the carved figurines): take Record Fragments (1/2) and the Pliers lying beside it. Then zoom in on the yellow cloak in the pile of clothes at the right and take the Silver Dragonfly pinned to it. The camera is missing a button, the window is nailed shut and the turntable has no record.
- In the lounge, open the frosted glass case on the wall above the boarded crate and take the Glue; Lock Picks (1/2) come out of the case with it. Then open the sacks by the lamp, where a deflated purple boat has a hole. Spread the Glue on the hole, press the pink Rubber from Chapter 3 onto it and attach the red Hand Pump to the valve.
- Tap the air tank, then a neighbouring cell in the direction you want; the tank rolls in a straight line, filling every cell, until it hits the edge, a red blocked cell or a cell that has already been filled twice (those cannot be crossed again). Fill every pink cell. Plan so that the long straight runs fill new cells and only short links cross filled ones. The recording worked in this order: from the bottom, run up the right-hand side to the top right corner, then zig-zag down and up again to finish the right third; sweep the top two rows from right to left; come down the left edge and fill the left third; finally fill the pocket in the middle around the central red cells, working from its outer cells toward the bottom centre, where the last cell was filled. If a run is blocked by a twice-filled cell, back up and approach the remaining cells from another direction.
- Open the sacks by the inflated boat again. Read James's note ("First burns bright the scarlet flame. Then the deep blue calls your name. After, moss in green will creep. Last, the violet falls asleep.") and take Oxygen Tanks (1/2), a yellow cylinder, from the sacks.
CHAPTER 4
Emily's Room: Restoring the Record
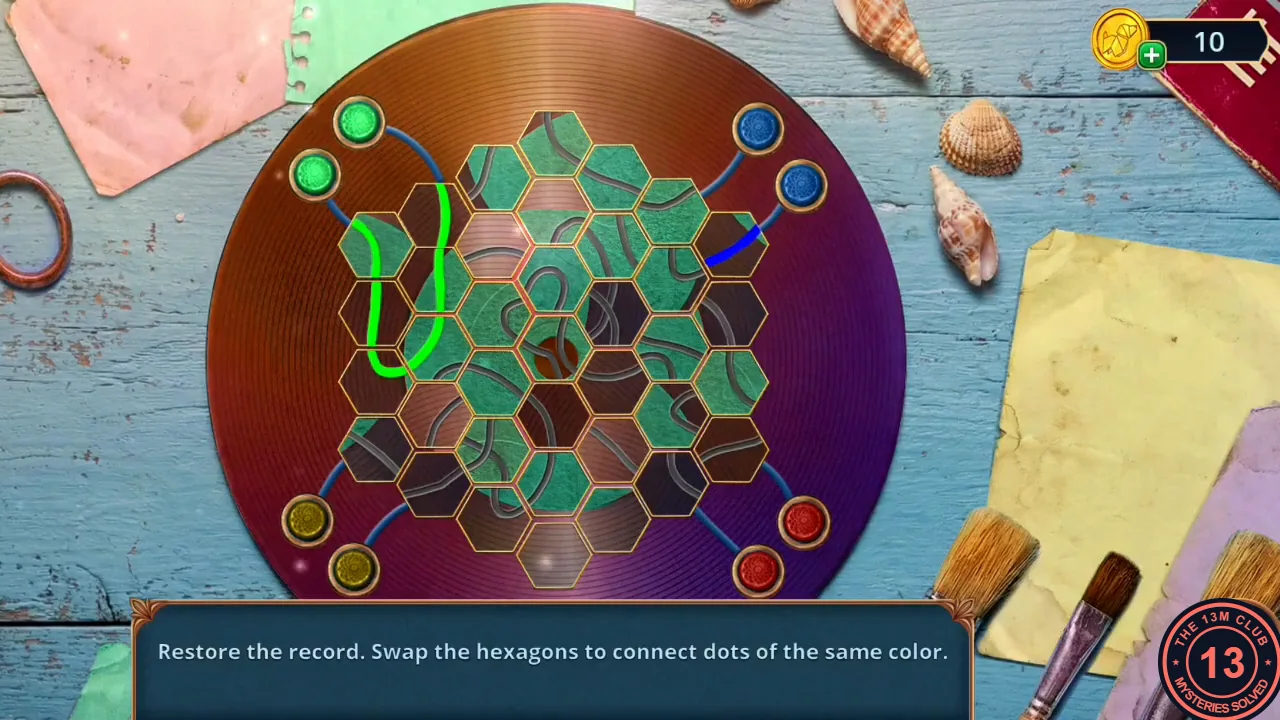
Get the second record fragment and restore the record on the turntable.
- At the crystal rock in the lagoon press red, blue, green, then violet. Look at the photo of the leader, then take the blue crystal and the Wire.
- Place the Silver Dragonfly on the toad's tongue and take Record Fragments (2/2).
- Put the Record on the turntable. Tap two hexagons to swap them. Each hexagon carries a piece of line, and every coloured dot on the rim must be joined to its twin: green (upper left), blue (upper right), yellow (lower left) and red (lower right). Build one colour at a time, starting next to its dots at the edge and adding tiles inward, and leave finished lines alone. In the solved record green runs down the left side; yellow loops through the lower left; blue arcs across the top and winds down the right; and red crosses the centre from the top middle to the lower right, passing between the blue curves. Tiles in the middle are shared crossings, so place them last. Use the solved image as the target.
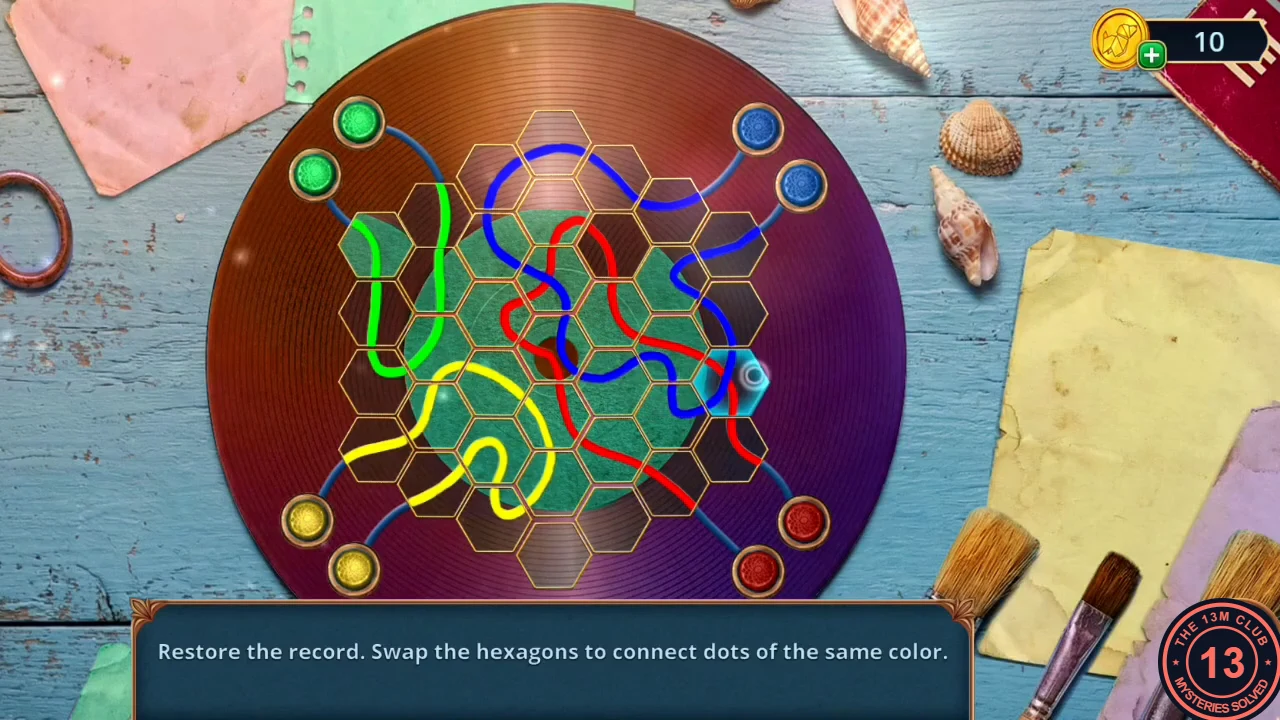
The solved record to use as the target. - Take the Bird's Head from beside the turntable. Put it on the headless bird statue on the bird basin by the lobby armchair; a Shell appears here. The basin is cracked and leaking.
CHAPTER 4
Lagoon: Fooling the Cultists
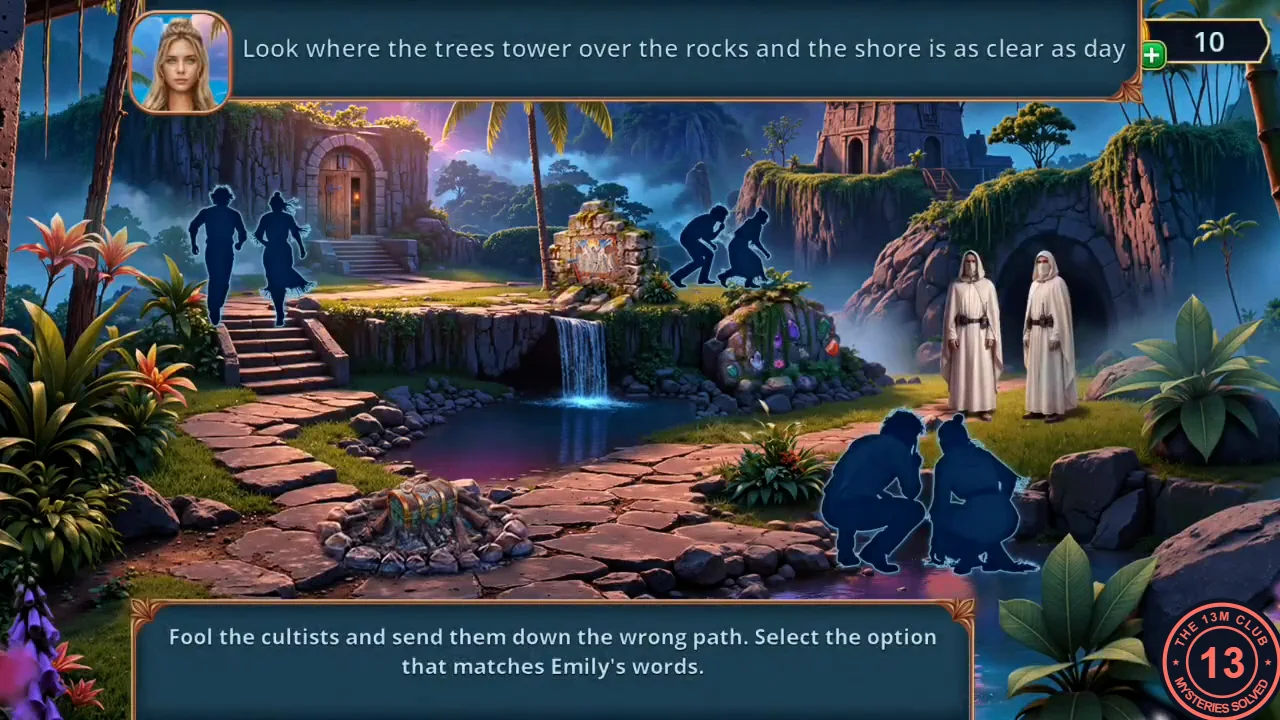
Fix the camera and the cultist's walkie-talkie, then send the cultists the wrong way.
- Pull the nails from the bedroom window with the Pliers and take the Scissors. Cut the red cord of the cloak and take the Band-Aid.
- Seal the crack in the lobby bird basin with the Band-Aid. The bird dips its beak and uncovers the red Camera Button; take it. Put it in the camera in the bedroom and press it: the photo restores Emily's memories.
- Open the Cultist's Walkie-Talkie from the inventory and add the Wire and the Foil (from the beach sack in Chapter 3) to its two empty slots.
- Use the Walkie-Talkie on the cultists and pick the silhouette pair that matches Emily's words. Round 1 ("trees tower over the rocks and the shore is as clear as day"): the crouching pair on the ledge beside the mosaic, right of the waterfall. Round 2 ("hands are full, and shadows cut through the light"): the crouching pair in front of the beach hut on the left. The guards leave.
- Decision point in the cave: "I won't leave Jules and the other girls here. We'll save them." costs 60 coins and gives 2 stars; "They won't catch us... I guess." is free and gives none.
CHAPTER 4
Cave behind the Waterfall: The Carvings Scene
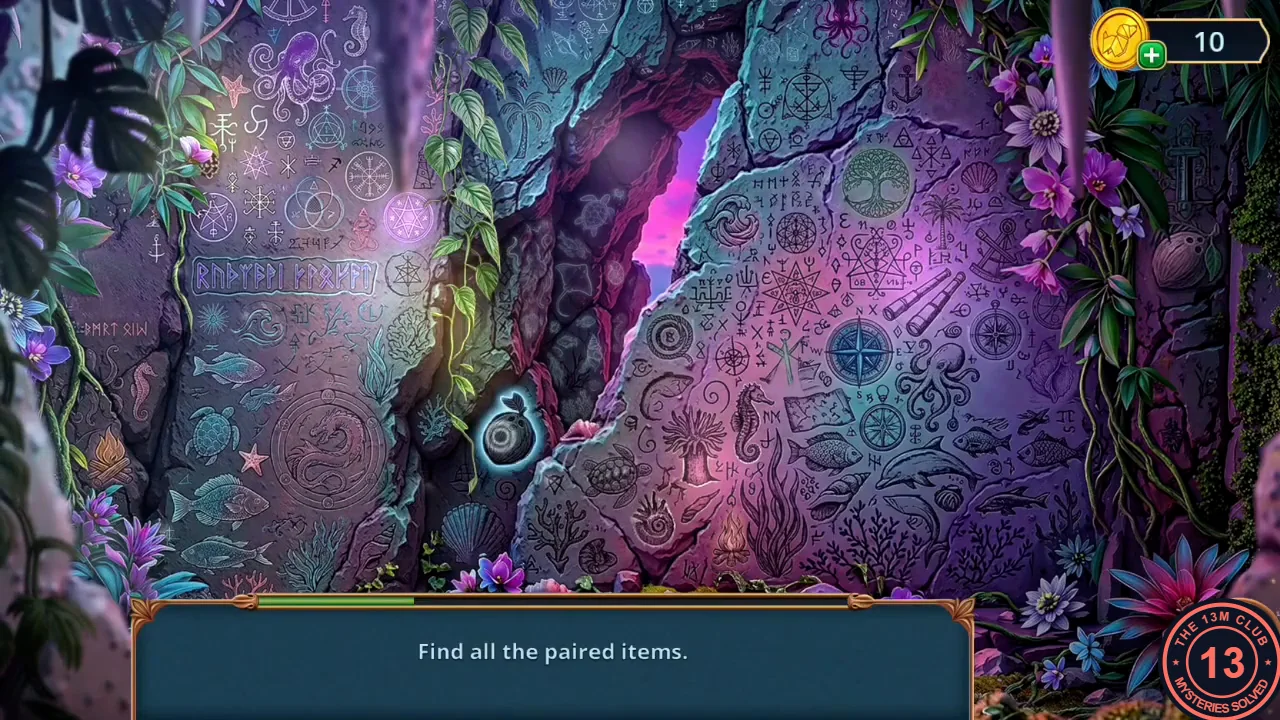
Behind the waterfall, clear the moss from the cave wall and search the carvings.
- Take Book List (1/2) and the Comb from the minecart. Scrape the moss off the wall with the Comb.
- Find all paired items among the carvings: tap two matching carvings to clear a pair. The six pairs in the recording: lighthouses – one among the symbols above the rune band at the upper left, one in the middle beside the sea anemone, left of the large compass; spiral suns – one in the stone circle on the left among the fish and turtles, one at the lower right among the dolphins above the white flower; coconuts – one in the dark crevice in the middle, one at the right beside the pink orchids; campfires – one at the far left edge near the bottom, one at the bottom middle among the seaweed; wave symbols – a pale round one below the rune band on the left, and a carved wave on the rock edge by the pink crack; palm trees – one at the upper left of the crack, one at the upper right below the tree of life. You receive the Sharpening Wheel.
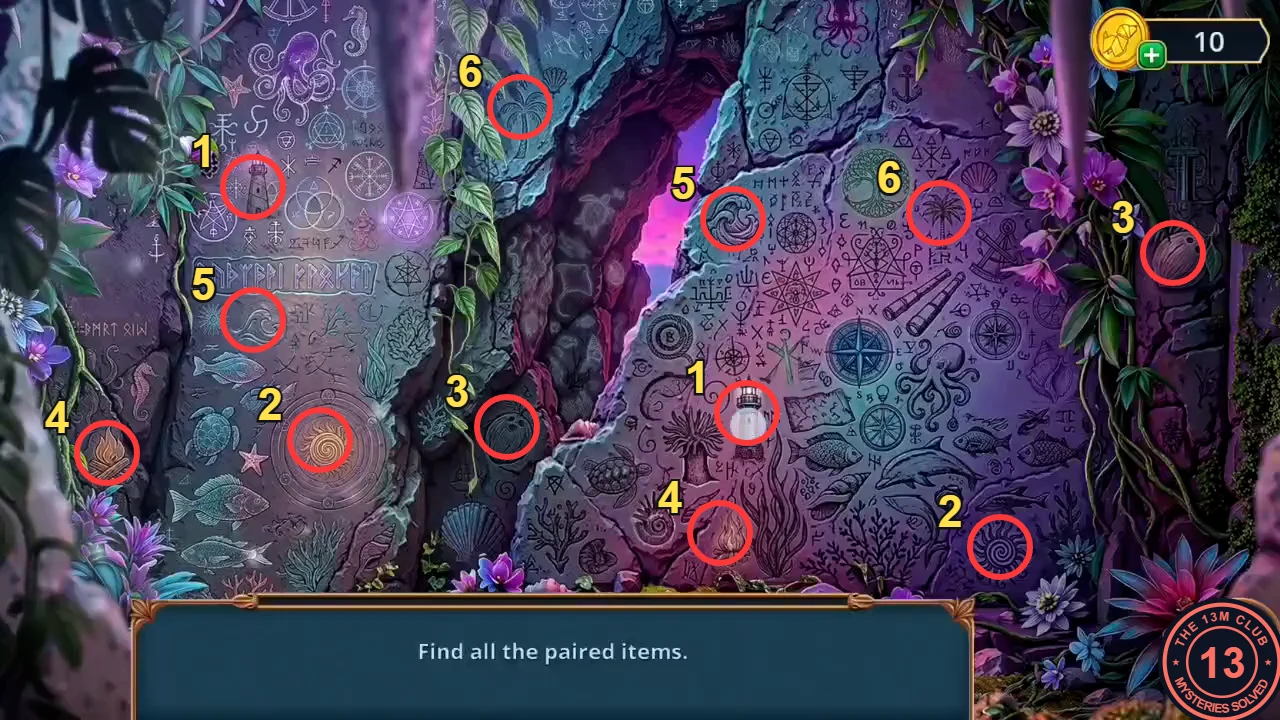
Same number = one pair: 1 lighthouses, 2 spiral suns, 3 coconuts, 4 campfires, 5 wave symbols, 6 palm trees. - Attach the Sharpening Wheel to the minecart so it rolls aside. Take the Breathing Tube and the Broken Glass Cutter from the track (the green bag has a rune lock). Add the blue crystal to it to make the Glass Cutter.
CHAPTER 4
Abandoned Hotel: The Flower Window
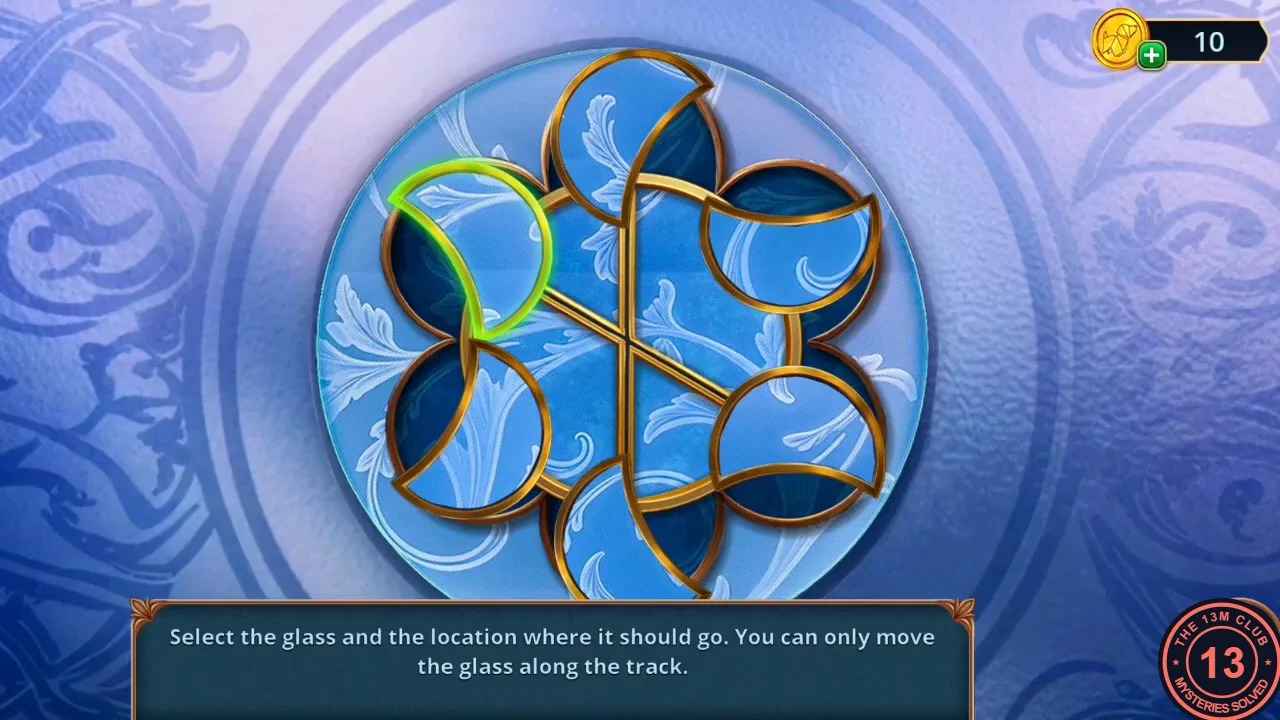
Use the Glass Cutter on the frosted round window in the lounge.
- Use the Glass Cutter on the frosted round window in the lounge. Tap a glass piece (it lights green), then tap the free petal it should move to; pieces only travel along the gold tracks and the whole frame shifts as they move. Use the empty petal as the parking space: always move a piece into the gap that lets the next piece reach its place. In the recording the window was solved in three moves: the glass at the left edge to the lower-right petal; then the glass in the top petal to the bottom petal; then the glass at the left edge again to the lower-right petal. The six petals then close around a round centre. If your window looks different, keep using the empty petal as a buffer until all six petals are filled.
- Take Book List (2/2) from the opened window and take the Broken Ring (a blue signet ring) from the skull on the shelf. The torn red lace stocking at the skull cannot be mended yet.
CHAPTER 4
Abandoned Hotel: The Bookshelf Scene
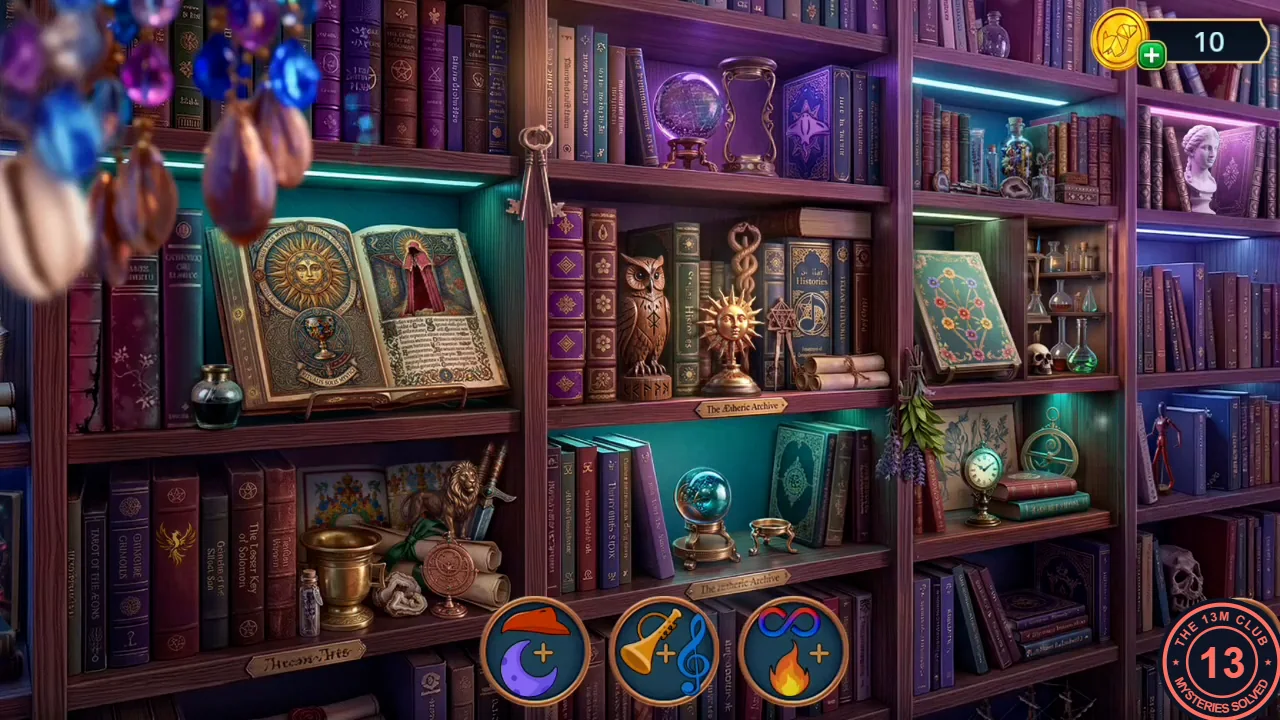
Search the round bookshelf in the hotel lounge.
- Search the round bookshelf. Each round slot shows two clues joined by a plus sign; tap the one object on the shelves that combines them (the view slides as you look around). The answers in the recording: feather + coloured pencils – the book with the colourful parrot on its cover; ball + map – the old globe beside the crystal ball; skull + dumbbell – the bone among the purple books; horn + musical note – the book with the music emblem right of the golden sun statue (moderate confidence); moon + cap – the carved owl left of the sun statue; fire + infinity sign – the red book with the golden phoenix; water drop + cup – the goblet drawn on the left page of the big open book; scientist + orange smear – the bronze lion statue on the scrolls; red hat + cape – the hooded figure on the right page of the open book; purple bust + stone – the picture of the white marble bust at the upper right; hourglass + 12 – the small clock on the shelf; lightning + fish – the purple book with the ray (electric fish) on its cover. You receive the Saw Blade.
- Mount the Saw Blade on the drill press in the lounge and put the Metal Plate from the stone toad on its table; the saw cuts the second lock pick out of it, completing the Lock Picks (2/2) with the one from the lounge glass case. Pick the keyhole of the cabinet under the bird basin and take the Paper with Symbols.
CHAPTER 4
Cave behind the Waterfall: Folding the Note
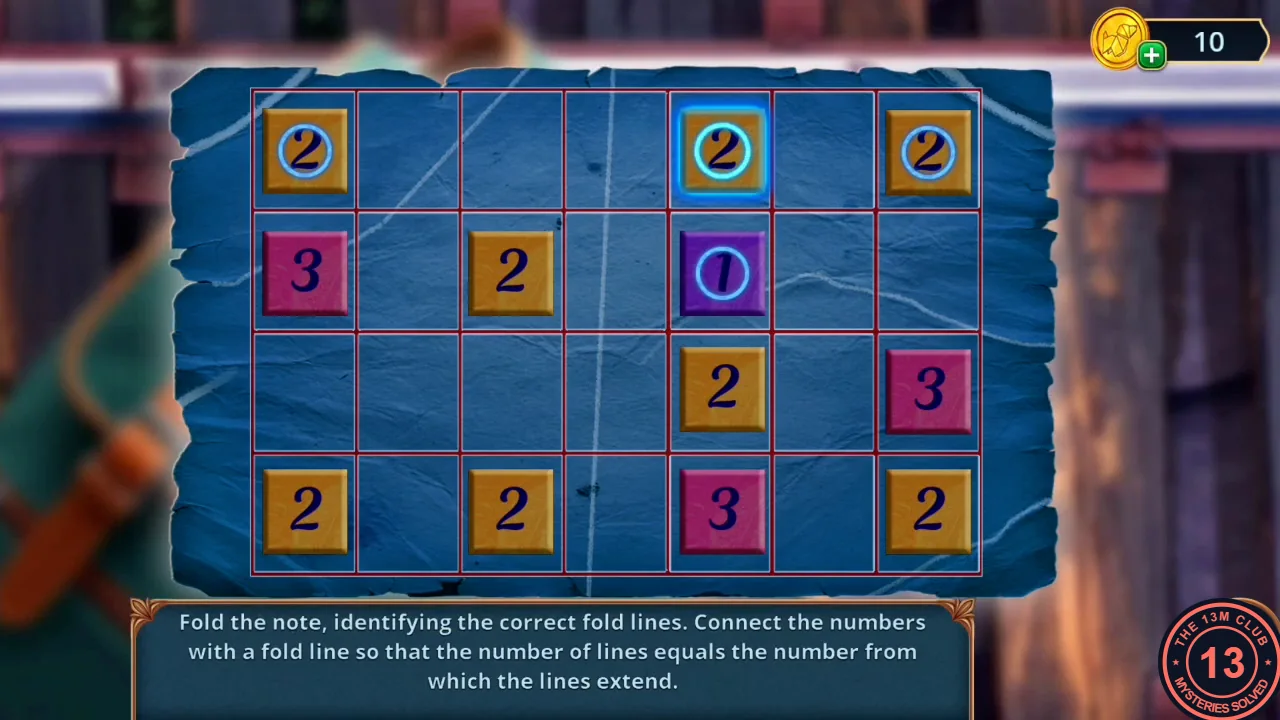
The green bag in the minecart has a rune lock; the note shows the runes once it is folded correctly.
- Use the note on the rune lock of the green bag in the minecart. Draw straight fold lines between numbered squares (along a row or column, over empty squares only) so that each number ends with exactly that many lines; each number counts down as you connect it. The note is a grid of 7 columns (A-G, left to right) and 4 rows (1-4, top to bottom). Numbers: row 1 – A1 2, E1 2, G1 2; row 2 – A2 3, C2 2, E2 1; row 3 – E3 2, G3 3; row 4 – A4 2, C4 2, E4 3, G4 2. Solution (13 lines): A1-E1, E1-G1, G1-G3, E3-G3, E3-E4, G3-G4, E4-G4, C4-E4, A4-C4, A2-A4, A1-A2, A2-C2, C2-E2.
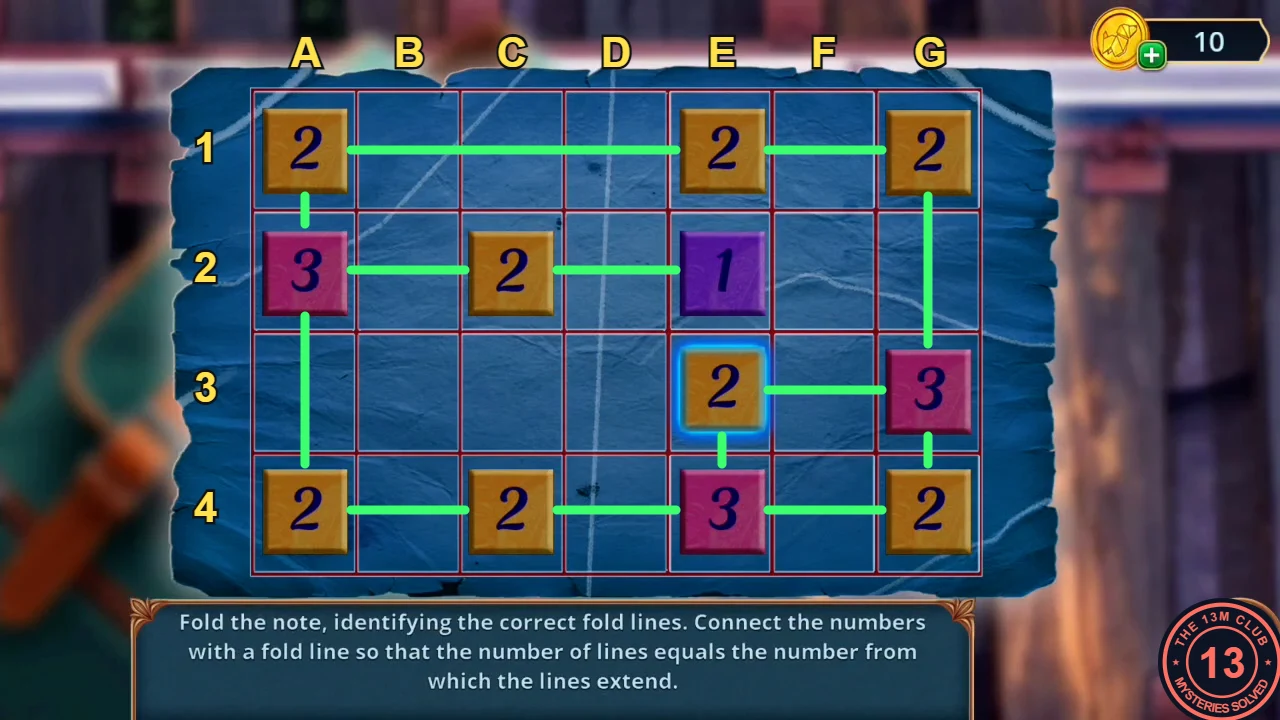
Columns A–G and rows 1–4 as used in the solution; the green lines are the thirteen fold lines. - Enter the four runes shown on the note in the bag's lock and take the Woven Bracelet and the Golden Stencil.
CHAPTER 4
Cave behind the Waterfall: The Ruby Door
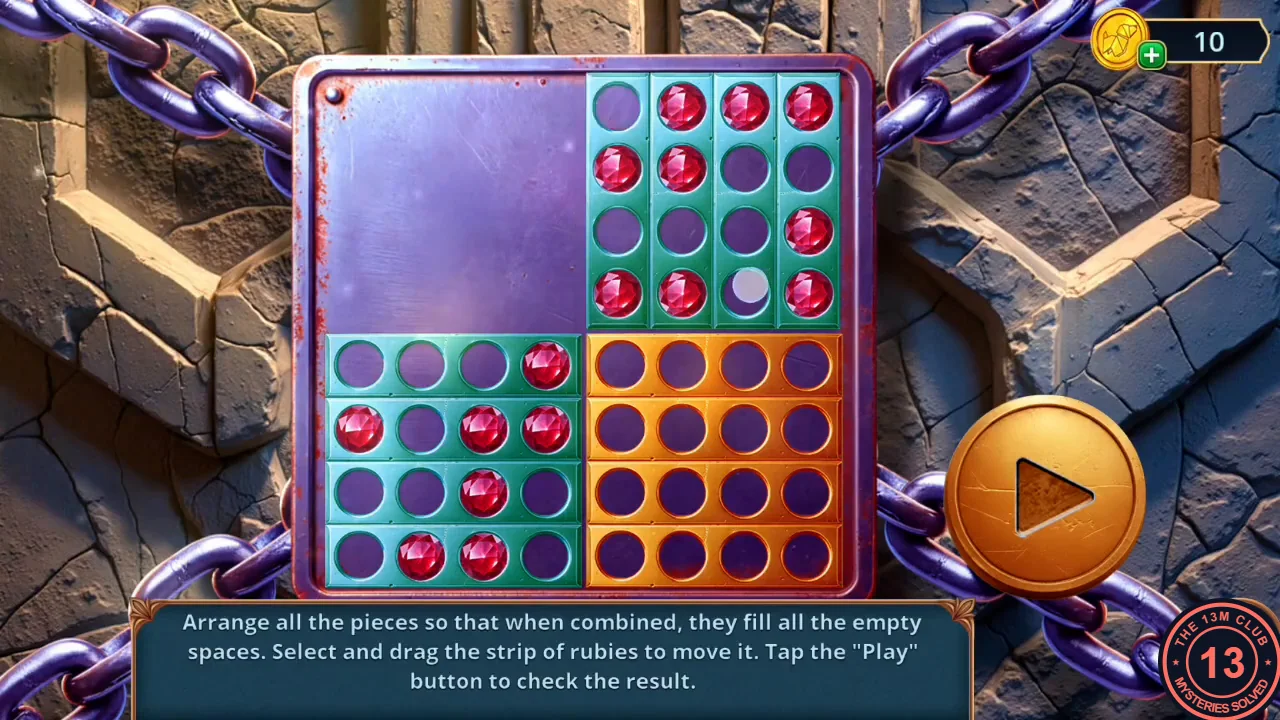
The Golden Stencil fits the chained panel of the rune door.
- Place the Golden Stencil on the chained panel of the rune door. Two 4×4 ruby grids sit next to the empty orange grid. In the upper grid each vertical column is a strip, and in the left grid each horizontal row is a strip; drag a strip to swap it into another position. On Play both grids fold onto the orange grid, so every hole in one grid must be covered by a ruby in the other (the left grid lands turned upside down). Arrangement that worked in the recording: in the upper grid, drag the leftmost column to the far right, so the columns read (top to bottom, R = ruby, o = hole) o R o R | R o o o | R o R R | R R o R. In the left grid, reorder the rows to (left to right) o o R o / R o R R / o R R o / o o o R, i.e. the original third row moves to the top, the original top row to the bottom and the fourth row up into third place. Then tap Play.
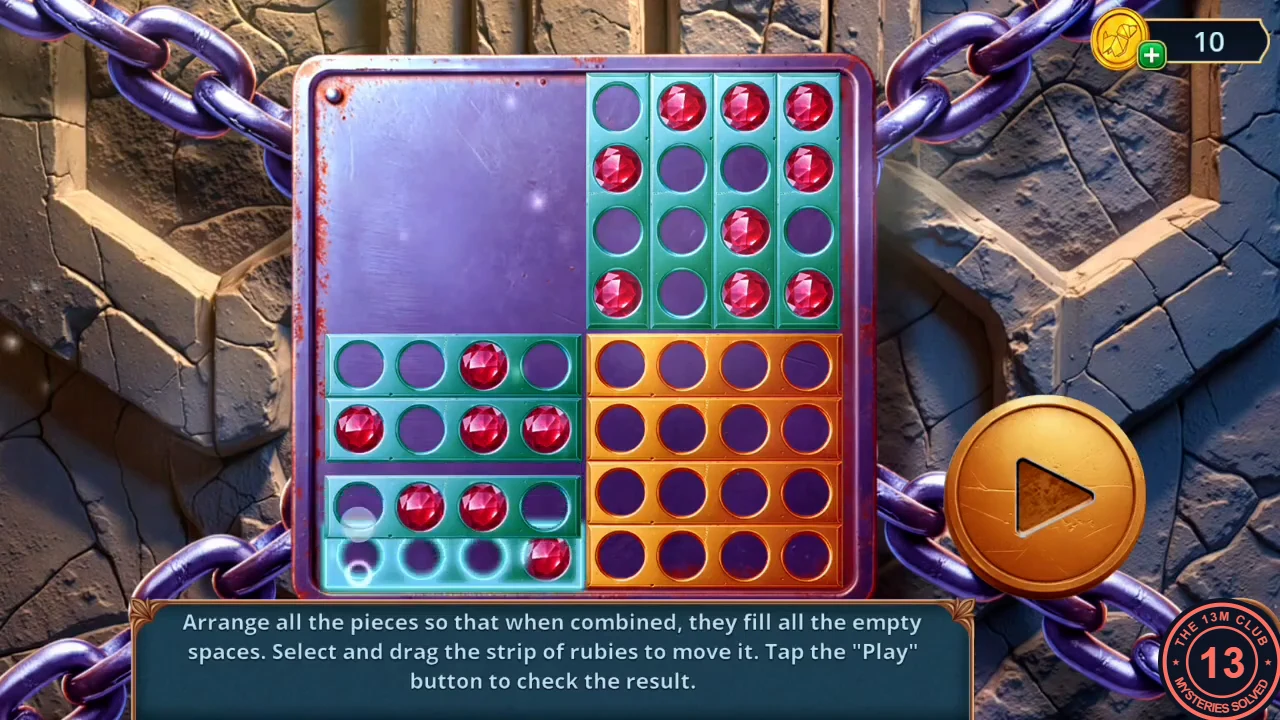
The arrangement that worked, just before tapping Play. - Emily saw Caleb lure Jules inside. You now play as Jules at the underground lake.