The upstairs apartment
With the power on, the stairs lead up to the apartment.
- Go upstairs. Darren's daughter, Daniela, confronts you with a candelabra: "Who are you?! What are you doing in my house?" Show her the Detective License ("Oh, you're a detective..."). You receive the Tracking Device.
- Zoom into the trophy shelf on the left. Take the Notepad and the Light Bulb.
- Recording Studio only: put the Clef Amulet on the treble-clef panel beside the wall guitar and award certificate. The certificate compartment opens: take the Chain.
- Take the Aquarium Filter Part from the slide projector housing on the right. Fit the Light Bulb and insert the Slides to turn the projector on.
Projector slides
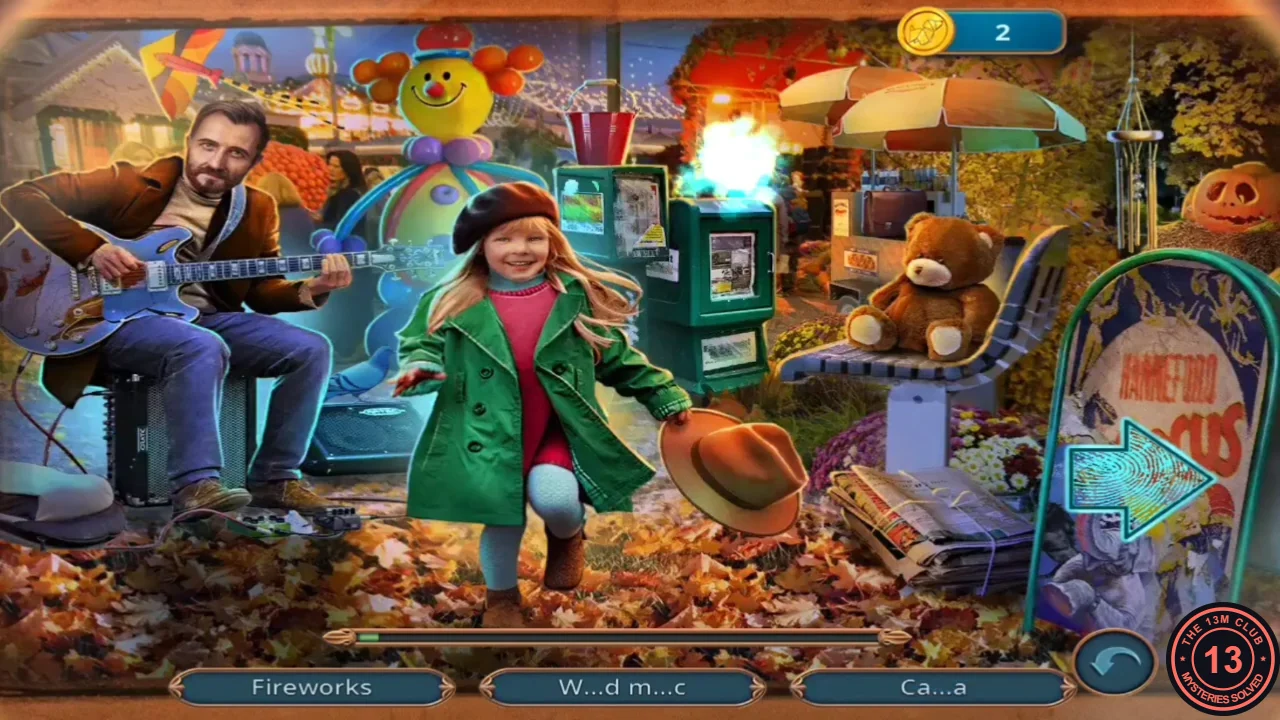
Three linked photo scenes (a wedding, an autumn park and a bedroom). Use the arrows to switch between them.
- Find the listed items across the three scenes, for example the fireworks, cup of coffee, camera, bag, wedding cake, pigeon, ribbon bow, album, rings and stiletto shoe. You receive the Lighter.
Dig up the backyard
Melt the wax on the trophy shelf to get something to dig with.
- Melt the wax in the dish on the trophy shelf with the Lighter to reveal the treble emblem and take the Goblet.
- Dig in the mound where the lawnmower was with the Goblet. A crate with a blue strap and a glass-encased object appear. You cannot get into the glass case yet. Tap the end panel of the crate and take the Hammer and the Tin Container. Careful of the shards inside.
- Clear the shards in the crate with the Glove and take the Charger.
Recording Studio chain lights
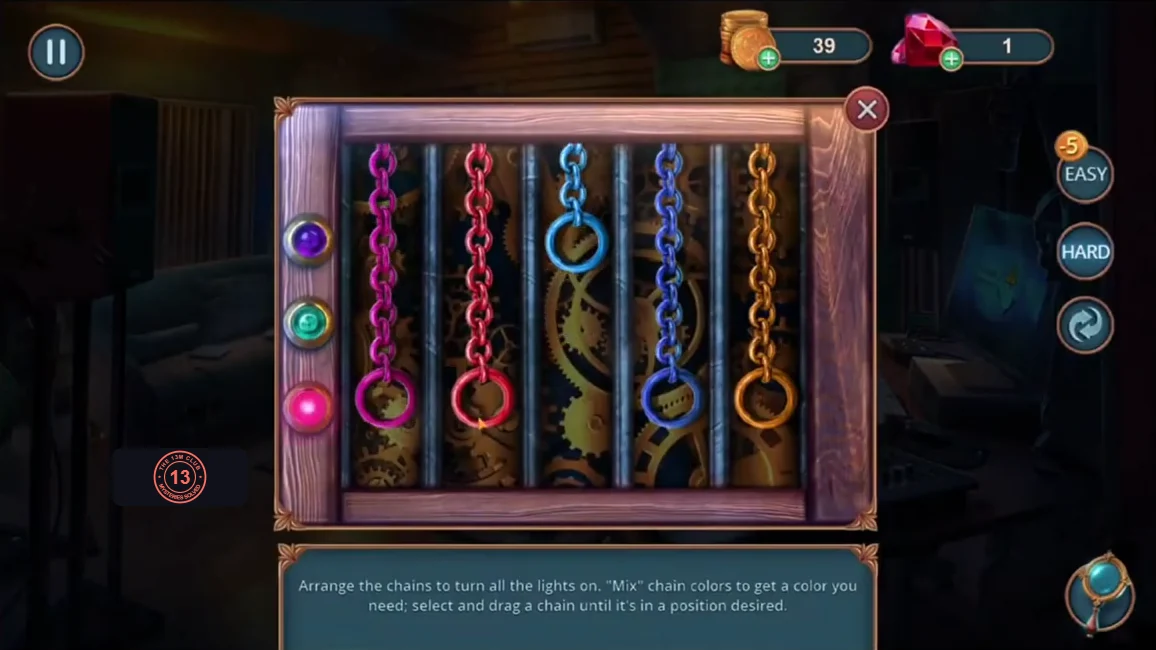
Recording Studio only. Hang the Chain in the empty slot of the studio chain cabinet. Arrange the chains so that all three lights turn on; rings at the same height mix their colours.
- Hang the Chain in the empty slot of the cabinet.
- Drag the chains so that: the magenta ring sits at the bottom (pink light); the red ring and the dark blue ring sit at the top (purple light); and the light blue ring and the orange ring sit in the middle (teal light).
- Take the Hand Vacuum from the opened cabinet. Use it on the hole in the couch to get the Plastic Bowl.
- Recording Studio only: put the Adjustable Handle and the Plastic Bowl together to make a Handmade Suction Cup. Use it on the glass case in the mound and take the Old CD.
Surveillance van wires
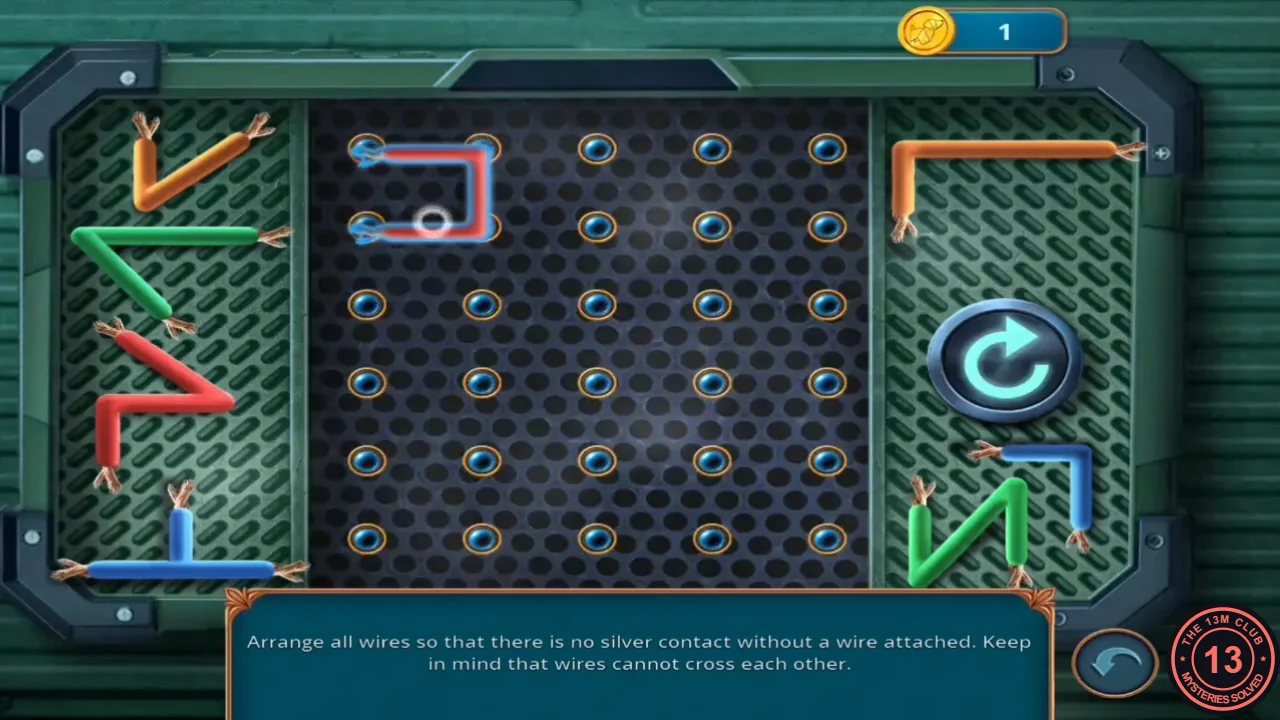
Plug the Charger into the side terminal of the surveillance van in the street.
- At the van's side terminal, plug the Charger from the dug-up crate into the round socket on the right and put the Tracking Device into the central frame. A red light comes on and the wire puzzle starts.
- Place and rotate the red, orange, green and blue wires so that every silver contact has a wire on it and no wires cross. Match the solved image.
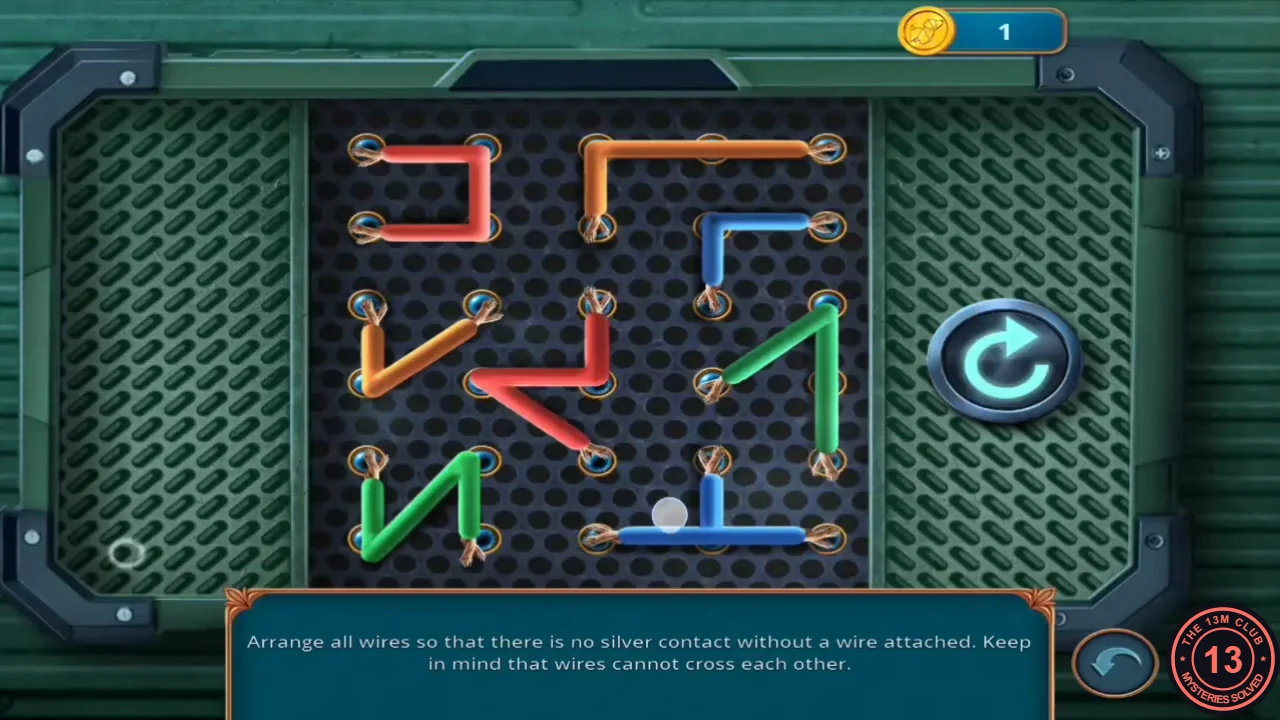
Solved wire layout. - Watch the van monitor. Darren says "No one shall learn the truth!", and Scott sends you to look for a hatch in Darren's room.
Darren's room
Scott keeps the suspects busy while you search.
- Scott sends you to look for the hatch in Darren's room and offers one more answer with a coin price. The wording differs between versions: one shows "Good! Let's get to work." as the priced answer, another "Agreed! We make up a wonderful team, don't you think?". You always receive the Tie Clip. The recording that got the Multi-Tool Pocketknife had picked all three coin-priced answers in this chapter: the one for Sandra in the jazz club, the one for Scott's plan outside the shop and this one. The chains on the portrait were already gone at this choice. Scott then hands over the Pocketknife for the big box in Darren's room. The recording that picked the free answers received only the Tie Clip.
- Go into the shop (Darren's daughter asks to go home) and upstairs into Darren's room.
- Something is inside the wall guitar. Hook it out with the Tie Clip to get the Star Statuette.
- Put the Star Statuette on the treble-clef trophy base on the shelf. A drawer opens: take Lock Parts 1/2 and the Piano Keys.
Darren's taped box (Pocketknife reward)
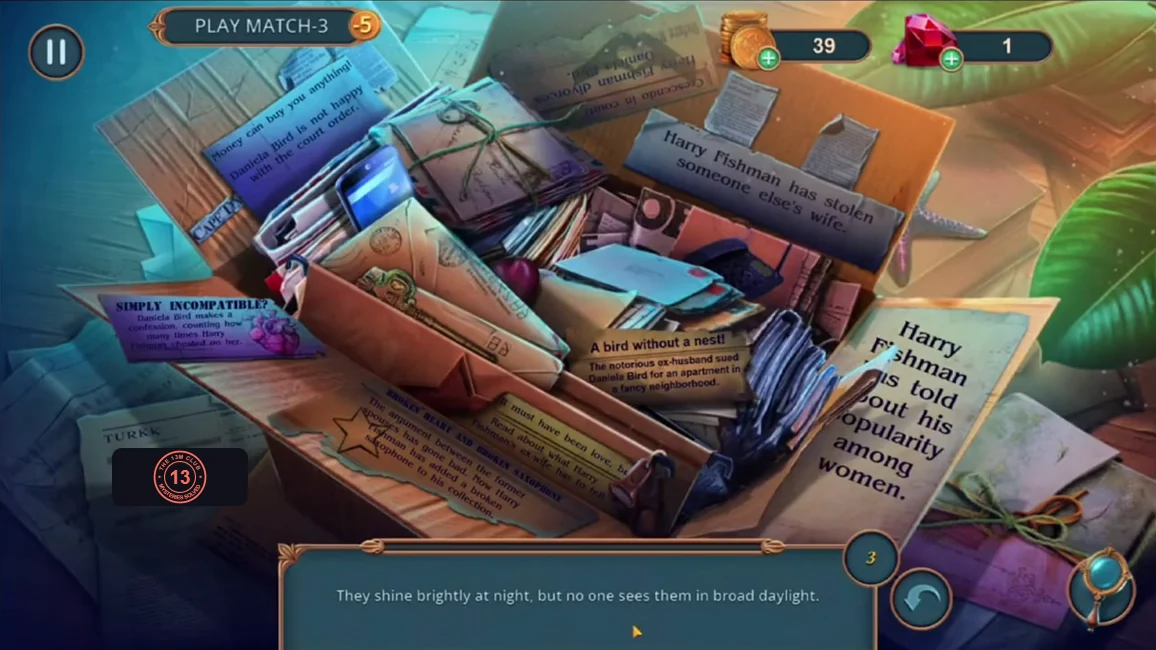
Only if Scott gave you the Multi-Tool Pocketknife.
- Cut the tape on the cardboard box on the right of Darren's room (by the plant and lamp) with the Multi-Tool Pocketknife. The box is full of newspaper clippings about Harry Fishman. There are four riddles, and each one is answered by three matching objects; the small number beside the riddle shows how many are still missing. Some objects are drawn on the clippings themselves: tap a clipping to enlarge it, then tap the object on it. Answers: "They shine brightly at night, but no one sees them in broad daylight." = stars (one is on the "Broken heart and broken saxophone" clipping, another is the folded red paper star on the brown envelope). "They are beating loudly day and night, keeping everyone alive." = hearts (on the "Simply incompatible?" and "Crescendo in court!" clippings, plus one in the box). "Magic circle spinning fast. Soon I'll talk to my friend at last." = telephones (for example the red telephone at the bottom of the box). "It hides its head, leaving its tail on display. Turn it and it'll open a way." = keys (for example the ornate key lying on the brown envelope). Some versions offer a match-3 alternative. No item reward appears when the scene closes.
Piano tune
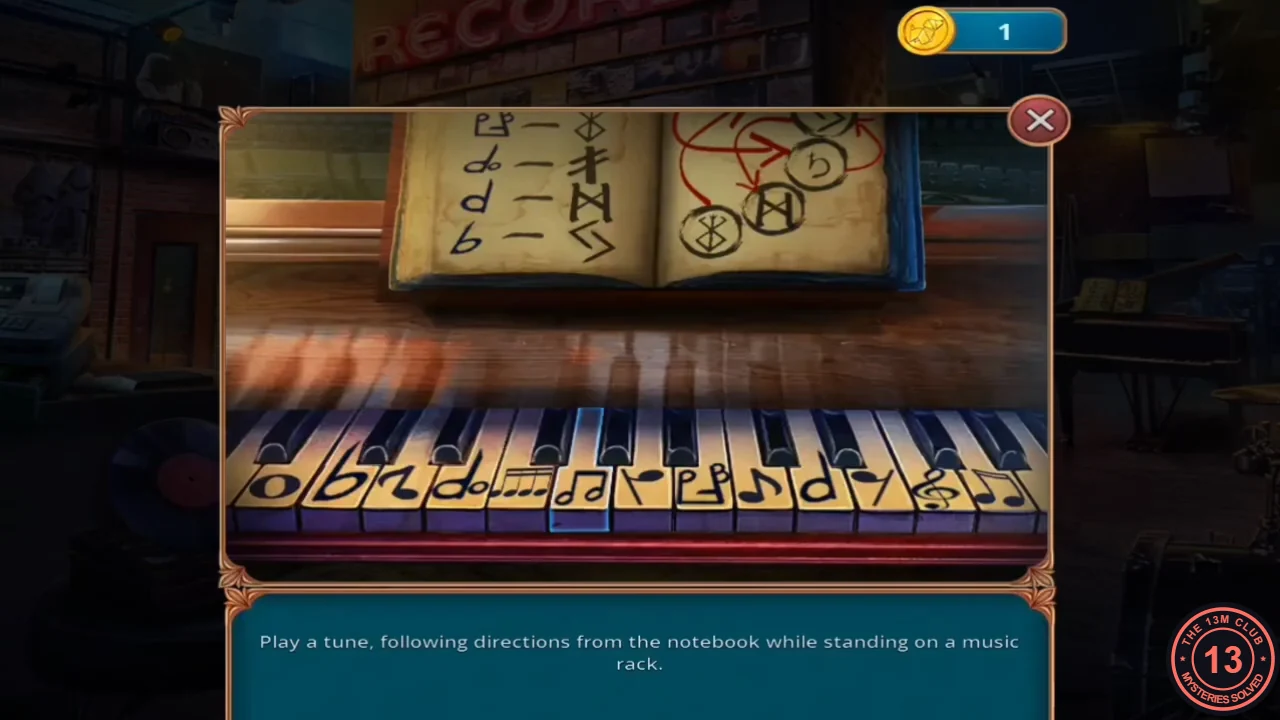
Put the Piano Keys on the grand piano in the shop. Play the tune from the notebook on the music rack.
- Put the Piano Keys on the grand piano.
- Number the 13 keys from left to right. Press keys 8, 12, 4, 6, 2 and 10. These are the beamed-pair key, the treble clef, the half-and-whole note, the two beamed eighths, the flat and the half note. The lid opens.CODE8-12-4-6-2-10
- Take the Telescope Lens from the compartment under the lid.
Star chart
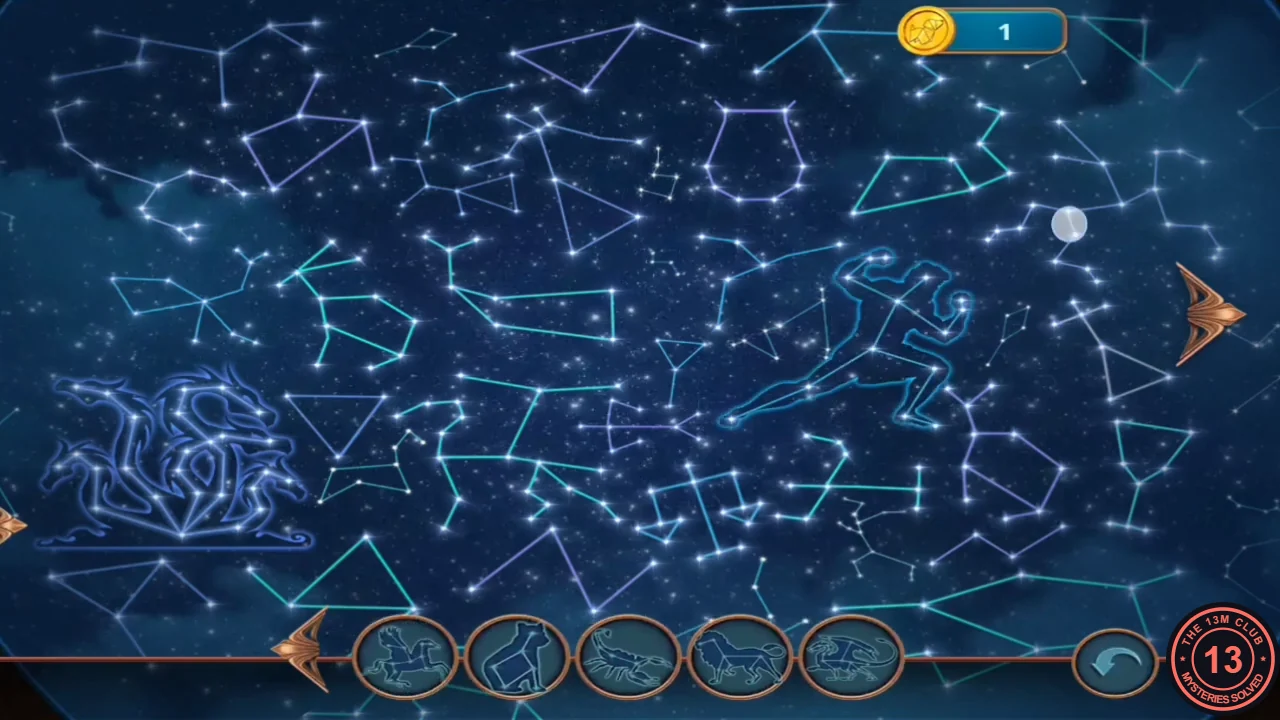
The D.B. chest on the backyard wicker chair has no lock; its stars must form a constellation. Attach the Telescope Lens to the telescope by the grill.
- Examine the star chest on the wicker chair. You need a constellation drawing.
- Put the Notepad on the side table under the telescope and attach the Telescope Lens to the telescope. The star chart opens.
- Scroll the sky with the arrows and find each constellation shown in the tray; found ones glow and the tray refills. Constellations include a sea dragon, a swan, a bear, a maiden with wheat, Pegasus, an archer, a rabbit, a lion, a ship, a bird, a dragon and a scorpion. You receive the Constellation Drawing.
Star chest and the aquarium
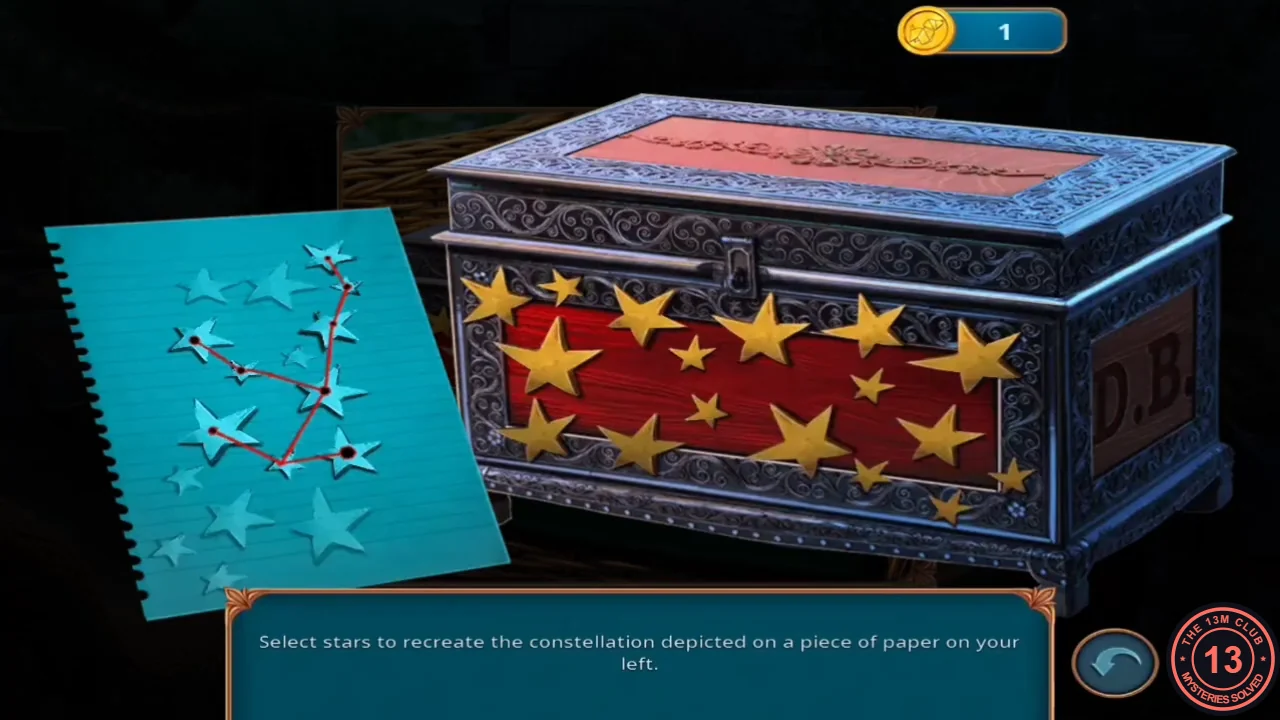
Select the chest stars that match the drawing on the left.
- Place the Constellation Drawing on the chest and tap the stars that recreate it; selected stars turn blue. Match the solved image.
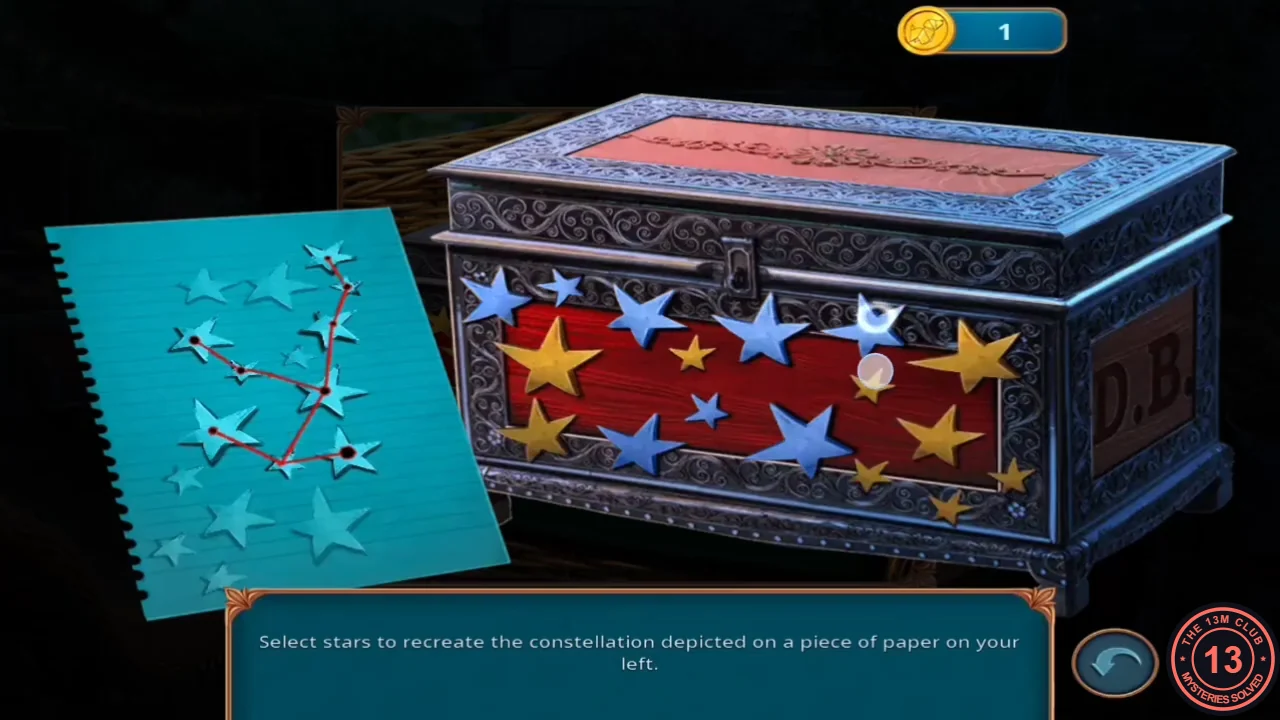
The constellation drawing and the selected chest stars. - The chest opens. Read Daniela's note about Harry and take the Plastic Pipe. Sale Coupon 17/70 is here.
- The Aquarium Filter Part alone is not enough. In your inventory, combine it with the Plastic Pipe and the Sponge. Put the assembled filter in the aquarium at the back left of Darren's room. Once the water clears, tap the green net hanging inside the left end of the tank, then tap the Lock Parts lying on the gravel at the lower left to scoop them out. You now have Lock Parts 2/2.
The floor hatch
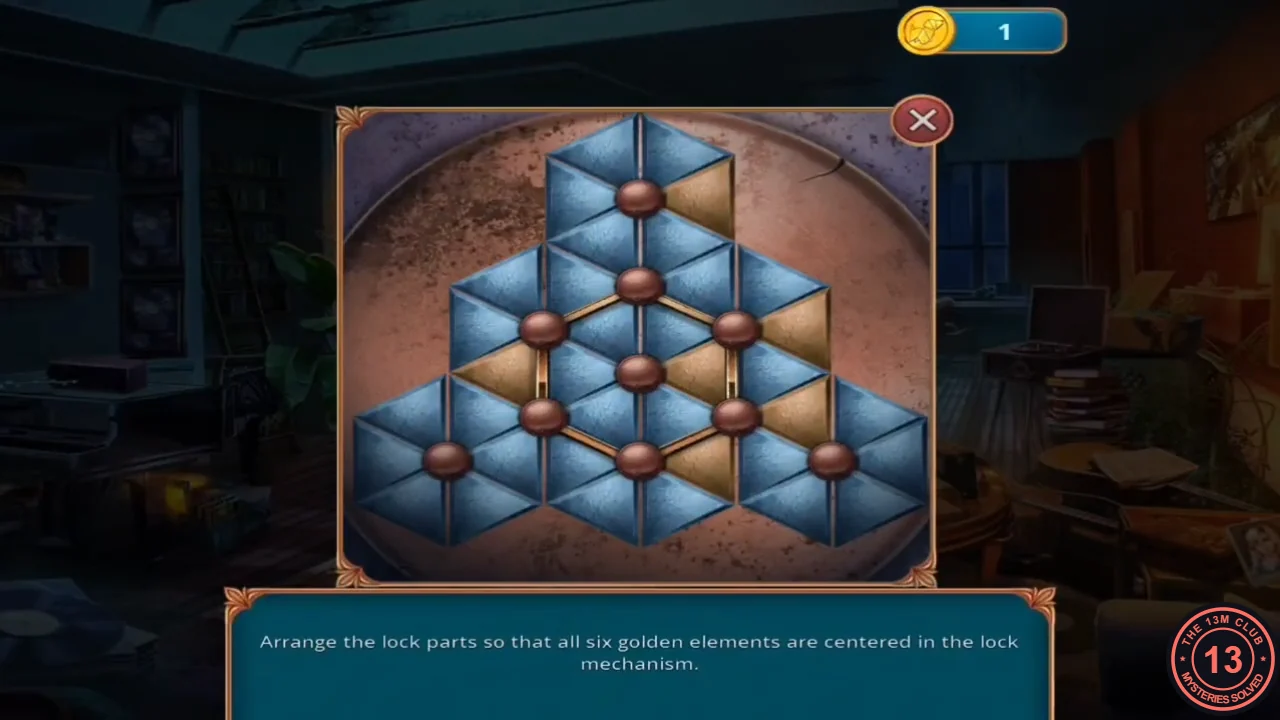
Put the Lock Parts on the hatch under the rug in the middle of Darren's room.
- Put the Lock Parts on the floor hatch.
- Tap a brass knob to turn the six triangles around it one step clockwise. Neighbouring knobs share triangles, so one turn can also move a gold triangle out of a neighbouring group. The goal is to fill all six triangles around the centre knob, inside the brass hexagon frame, with gold. Use the knobs on that frame to bring outside gold triangles in, then turn them into the gaps. The puzzle is solved when the six gold triangles form a full hexagon around the centre knob.
- Read Luke's letter to Daniela asking her to run away with him, and take the Cane. When you read the train tickets, a warning says you cannot return to earlier locations. If you still have optional studio work or coupons left, answer NO and finish them first.
Recording Studio: computer password
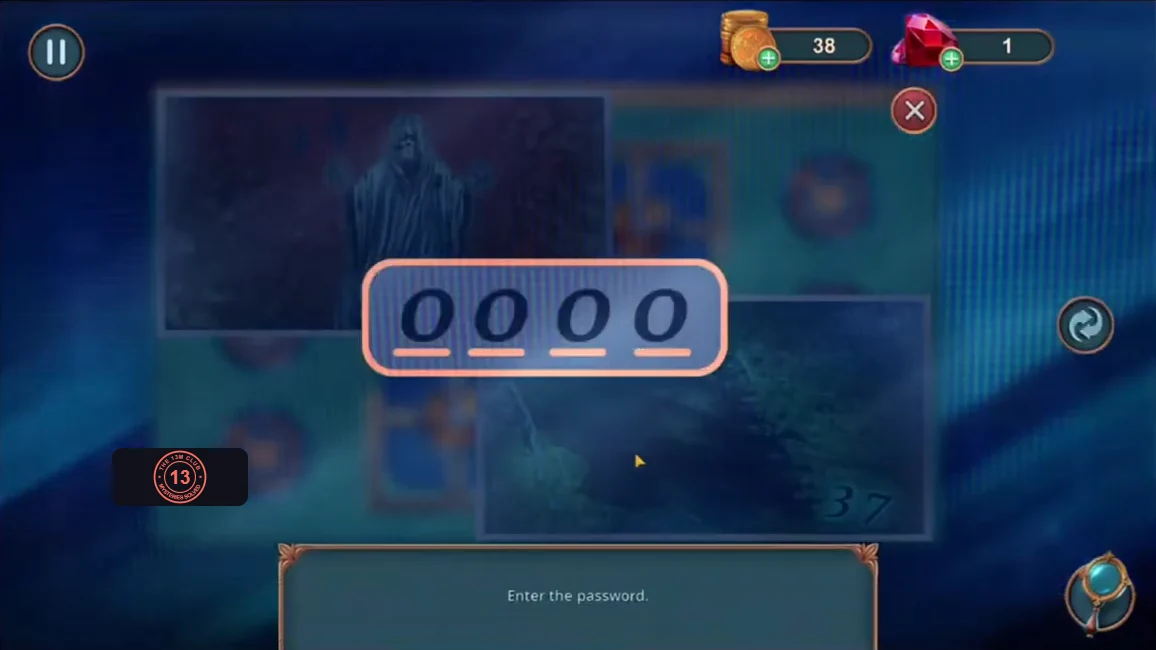
Recording Studio only. Insert the Old CD into the studio computer.
- Insert the Old CD and browse the photos with the arrows. The forest photo shows 37 and the hooded-figure photo shows 24. Enter the password 3724.CODE3724
Recording Studio: labyrinth and Harry's recordings
Recording Studio only. After the password, the computer shows a labyrinth.
- Make one continuous path through the 3×3 labyrinth, from the gap at the top to the gap at the bottom. Select a round tile to move it into the vacant spot next to it; the arrow buttons on either side of a row rotate all the tiles in that row. At the start the vacant spot is in the middle of the left column; in the solved image it is in the middle of the right column. Match the solved image.
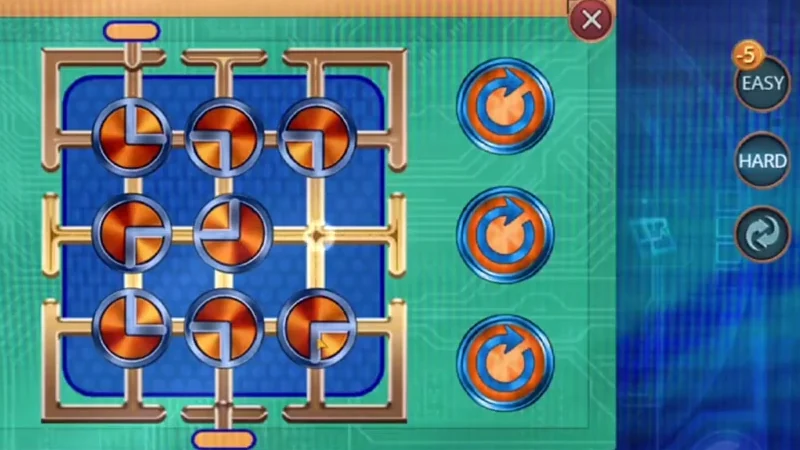
Solved labyrinth. - Watch Harry's video, in which he tells Darren that the student has surpassed the teacher. The task Listen to Harry Fishman's records is complete. Achievement: Studio Record.