Fire in the Office
Use the revolver to open the wardrobe in the clothes shop, then put out the fire in the judge's office.
- In the clothes shop, shoot the wardrobe lock in the dumbwaiter alcove with the revolver to earn Risky Task. Take the peacock fan and the lion-head handle from the jacket pocket.
- Insert the lion-head handle in the counter panel next to the sleeping dog and take the fire extinguisher.
- In the judge's office, put out the burning roll-top desk with the extinguisher. Read the letter to Ms. Powell and the construction company blueprint, collect the note, take the lockpick tool from the silver tray and the stone token in the upper-right cubby.
- Unlock the glass cabinet with the lockpick tool and take the green hand towel from the bottom. Smash the wooden lattice with the wooden fist from the gateway and take the red cord behind it.
The Pond and the Window
Build a landing net and open the barred study window.
- Open the net in inventory and thread the red cord through it to make a landing net.
- Sweep the pond with the landing net to bring up a hand mirror. The net then snags; cut it open with the scalpel and take the coiled cable caught in the cut net on the rocks.
- At the barred ground-floor window by the ladder, hook the cable onto the bars and turn the winch to pull them out, then climb into the study.
The Judge's Study
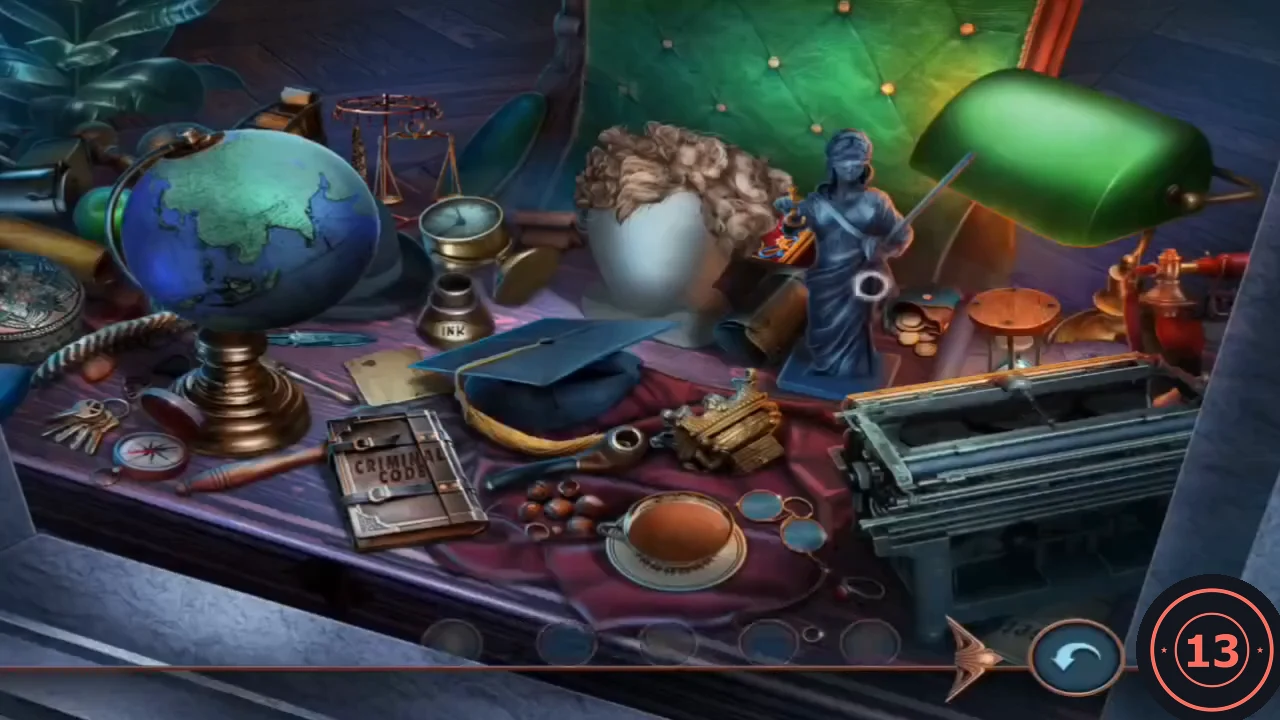
Each object at the bottom is shown only as an outline. Several objects must be fixed or uncovered before you can take them. A wrong click shows "That wasn't right."
- Take the simple objects first: the globe at the top left, the Criminal Code book at the front left, the typewriter at the front right, the gold ornament to the right of the graduation cap, the round glasses to the right of the teacup and the graduation cap itself. Turn the upturned teacup upright and take the lemon slice inside it (the half-moon outline). Lady Justice "looks all wrong without her scale": take the small brass scales at the top left behind the bowler hat, put them in her hand, then take the statue.
- Take the bunch of keys at the far left edge of the desk (the hand-shaped outline). Put the hairbrush from beside the bowler hat on the wig on the bust, then take the wig; a red box appears where the bust stood. Take the brass watch with the open lid next to the inkwell. Finally, pick up the quill at the left edge by the scissors, dip it in the INK pot to the right of the bowler hat, write on the blank card left of the red cloth and take the card.
- The red box opens. Take the gavel.
The Construction Company Street
The gavel opens the way to Liam Powell's construction company.
- Back in the judge's office, place the gavel in the gavel-shaped recess inside the open globe. Take the wrench and the purple key that appear. Unlock the office door with the key and talk to Liam Powell at the construction company.
- Open the shelves on the left of the company street. Take the pliers lying on the sawdust pile and the stone token at the top left of the shelf. Sweep the sawdust away with the peacock fan and take the brass spyglass it uncovers. The rusty chest latch below needs a chemical cleaner.
- Open the grinding machine and take the first construction emblem (1/4) on the left. The grinder needs a new drill bit, which comes later. Jam the spyglass into the spokes of the spinning wheel to stop it, then take the hairpin from under the wheel.
- At the company door, which is held by a chain, put the hand mirror in the gap to see the chain, then lift the chain off its latch with the hairpin. Enter the workshop.
The Workshop
Repair the lathe.
- Take the sponge from the red sofa; its cushion needs something to prop it up. The lathe on the right is missing some blades. Open the blue locker and take the second construction emblem (2/4). Cover the sharp blades on the upper shelf with the green hand towel, then take the blades. Leave the clothes at the bottom of the locker for now: they need hangers.
The Lathe Blades
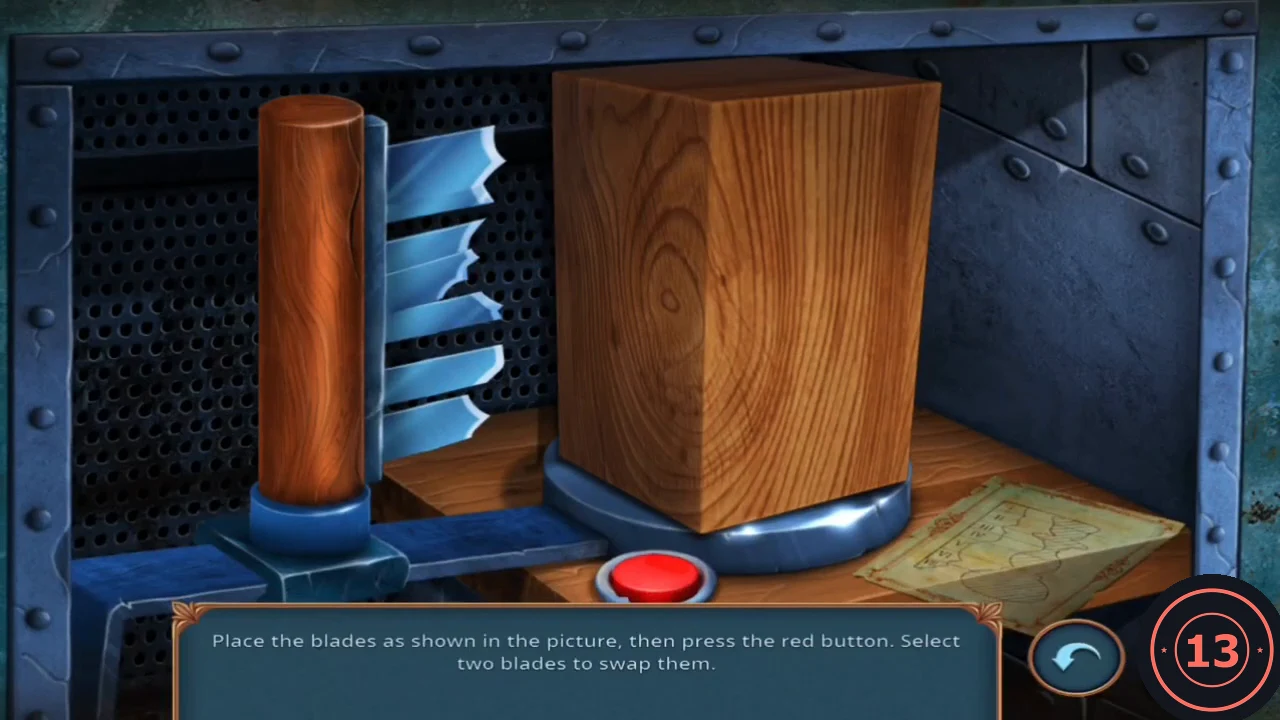
Add the blades to the lathe. Place the blades so the cutting profile matches the candlestick drawing, then press the red button. Select two blades to swap them.
- Add the blades to the lathe.
- Swap blades until their edges trace the outline of the candlestick in the picture, then press the red button.
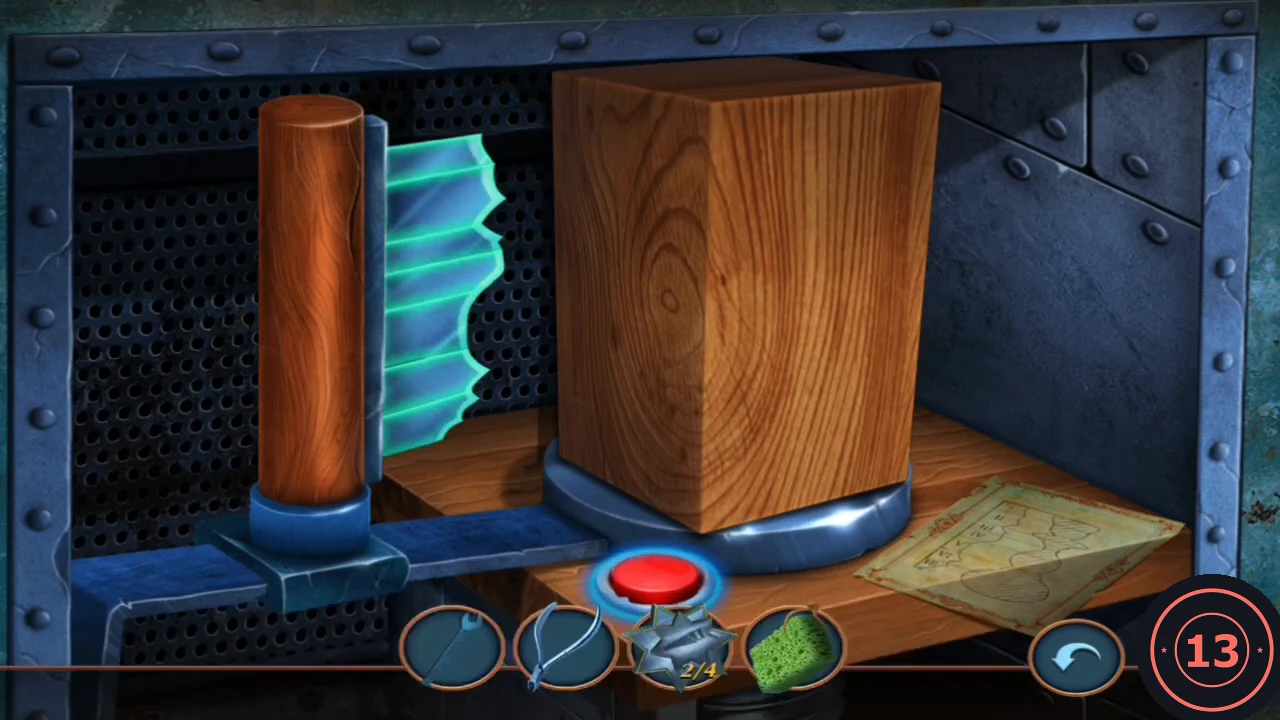
Blades in the correct profile, just before pressing the red button. - Take the wooden candlestick.
Finding Cameron
Follow Cameron into the warehouse and gather the four construction emblems.
- Prop the sofa cushion with the candlestick and take the cart wheel from the compartment.
- Fit the wheel to the green wheelbarrow and tighten its nut with the wrench from the globe. The wheelbarrow rolls, the beams collapse, and you chase Cameron into the warehouse.
- Open the green crate. Take the third construction emblem (3/4) from its lid, then pull out the staples with the pliers and open the crate. Take the broken umbrella frame and the poker from the wood shavings. The gear box on the wall is missing a gear.
- Open the close-up at the top left of the warehouse: a barred cage sits on a raised platform high on the wall. Hook it with the poker and pull it down. Below, beside the steaming pipe, take the skimmer, the glass shard and the solvent bottle. The pipe needs a plug.
- On the company street, open the shelves again. Put the sponge on the rusty chest latch and pour the solvent over it. Open the chest and take the last construction emblem (4/4) and the long tool.
The Hook Board
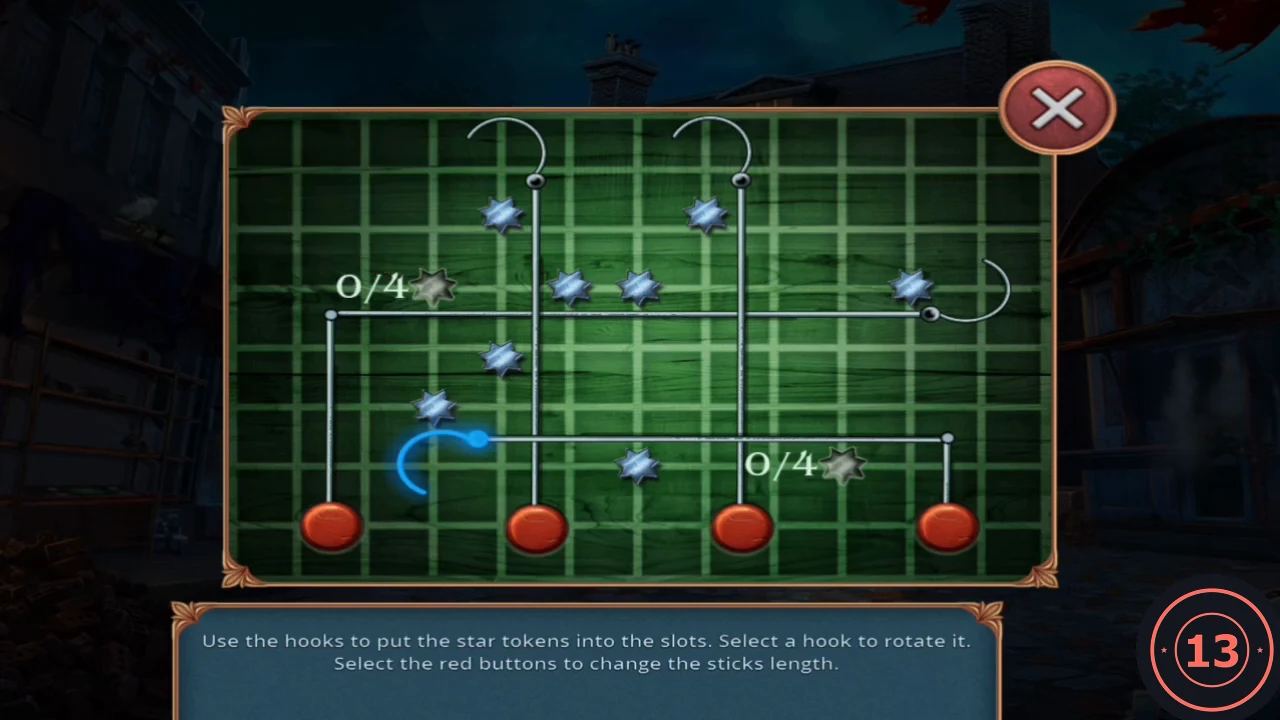
Read the workers' note on the scaffold crate and place the four construction emblems on it to open a hook board. The board holds eight small stars and two receptacles, each marked 0/4: one at the left end of the upper rail and one at the right end of the lower rail. Each red button at the bottom moves its own stick; clicking a hook rotates it.
- Place the four construction emblems on the scaffold crate.
- Number the red buttons 1 to 4 from left to right. Fill the upper receptacle first: press button 3, and its stick drops and carries the star at the top down to the lower rail. Press button 2, and its top hook carries its star down onto the upper rail, so four stars now sit there. Press button 1: the upper rail slides left and the hook at its right end sweeps all four stars into the upper-left receptacle (4/4).
- Now fill the lower receptacle. Click the hook at the left end of the lower rail to rotate it under the star beside it. Press button 2 again to lower its stick and bring the star on it down to the lower rail, so four stars now sit on that rail. Press button 4: the lower rail slides right and pushes all four stars into the right-hand receptacle (4/4).
- The puzzle rewards you with the umbrella ribs. In the opened crate, take the metal pipe lying on the bag, then cut the tied bag open with the glass shard and take the hangers.
The Umbrella
Build an umbrella to shield yourself from the scalding steam.
- In the workshop, hang the clothes in the locker with the hangers. Take the umbrella canopy and the maroon glove.
- Open the umbrella frame in inventory, add the canopy and the ribs and open it.
- Use the umbrella at the steaming doorway on the company street. This earns Strong Protection and opens the shed.
The Shed Keys
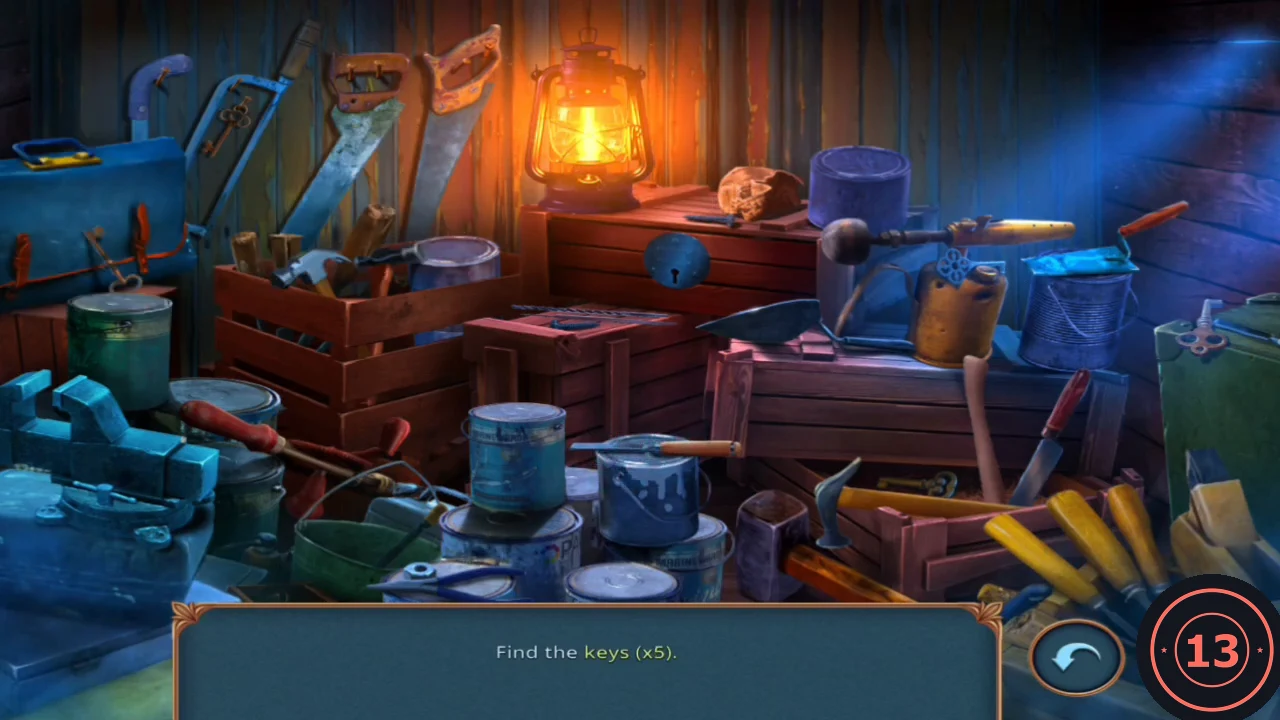
Find twelve keys hidden in the shed, then choose the one that fits the padlock.
- Find all twelve keys. Left side: on the blue bench vise at the far left; hanging from the clasp of the blue toolbox above it; on the blue hacksaw frame at the top left; hanging from the handle of the saw at the top, left of centre; on the lid of the blue paint can beside the red-handled screwdriver; on the green bucket at the bottom left. Centre: lying on the small red crate; on the crate under the oil lamp; on the lid of the blue paint can at the bottom centre. Right side: the blue key on the brass blowtorch right of centre; in the shadow inside the open crate at the bottom right, behind the yellow handles; on the green can at the far right edge. It's All Connected can unlock during this scene, and its message briefly covers the top left of the shed.
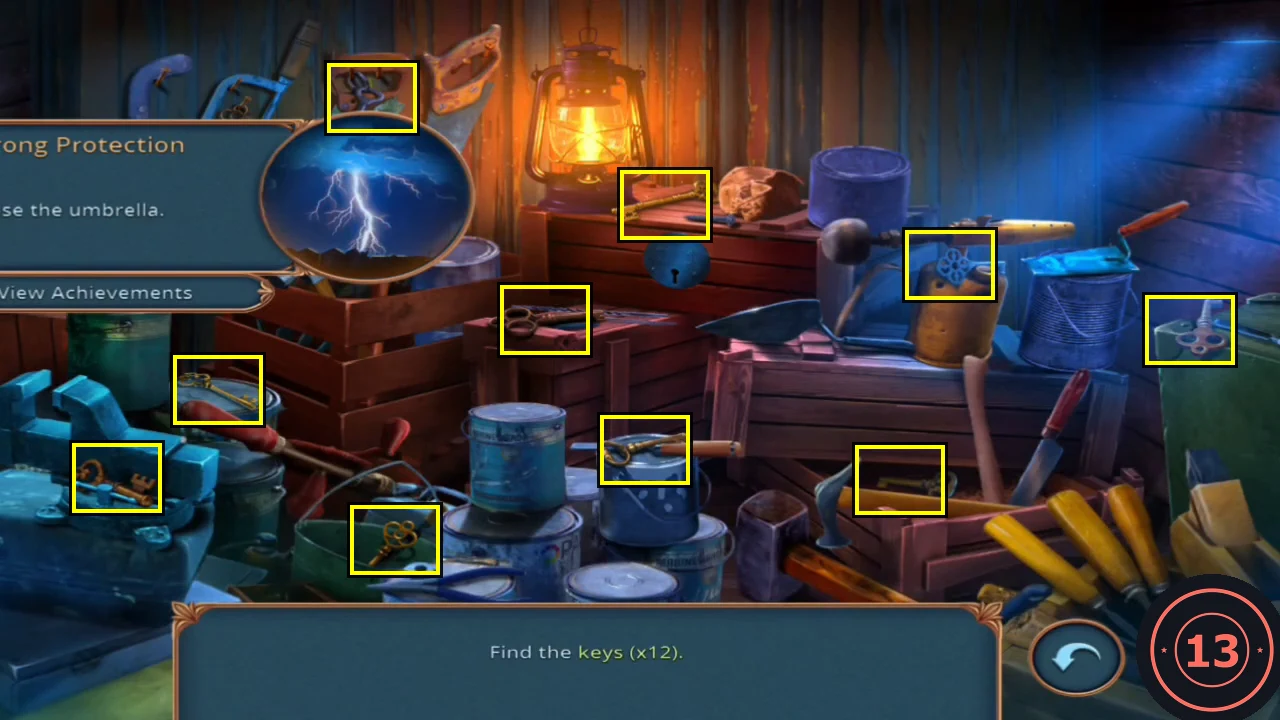
Ten of the twelve key spots, marked at the start of the hunt (boxes added). The achievement message covers the top left of the shed here. 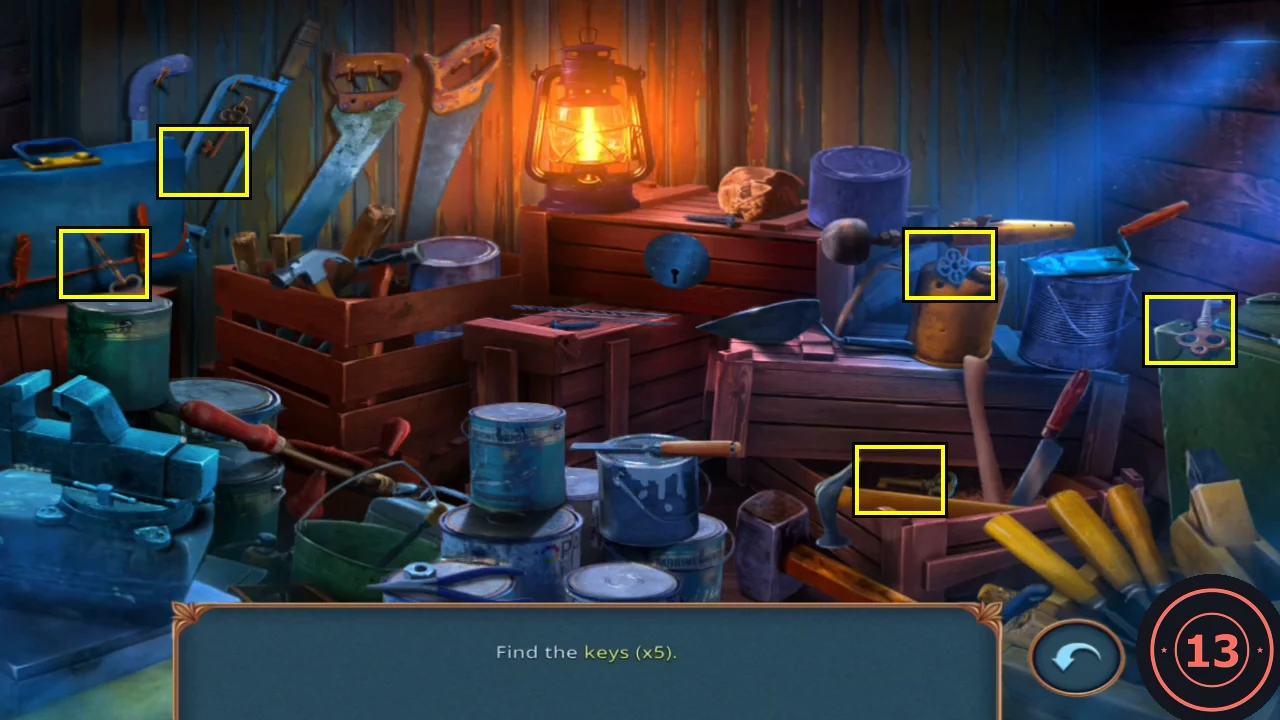
Later in the hunt, with the message gone: the keys on the blue toolbox clasp and the blue hacksaw frame (top left), plus the three right-hand keys still to find (boxes added). - Choose the light steel-blue key with a long shaft; it matches the blue padlock. Take the drill bit.
The Boarded Door
Repair the machines and break through to Cameron's office.
- Fit the drill bit to the grinding machine and take the gear.
- Place the gear in the warehouse wall gear box. The bucket lowers; take the mallet.
- Break the planks on the boarded doorway with the mallet. In the Mystery Files app, the next area requires spending an adventure key to unlock; then Liam searches the office.
Cameron's Office
Liam is locked in a cell. Gather the emblems for the medicine cabinet.
- Open the food table. Read Liam's note and take the first snake-chalice emblem (1/3) beside the stove. The soup is too hot for your fingers: fish in it with the skimmer to get the clothespin.
- Open the desk and take the trowel (the curved teal blade). Use the clothespin on the crack in the desktop to pull out the ring-pull handle.
- In the workshop, fit the ring-pull handle to the sofa compartment and take the leather strap.
- At the barred warehouse window, wrap the strap around the bars and twist them apart with the metal pipe from the crate. Climb out to the stable courtyard.