CHAPTER 4
Anubris's Office: sand pyramid search (second visit)
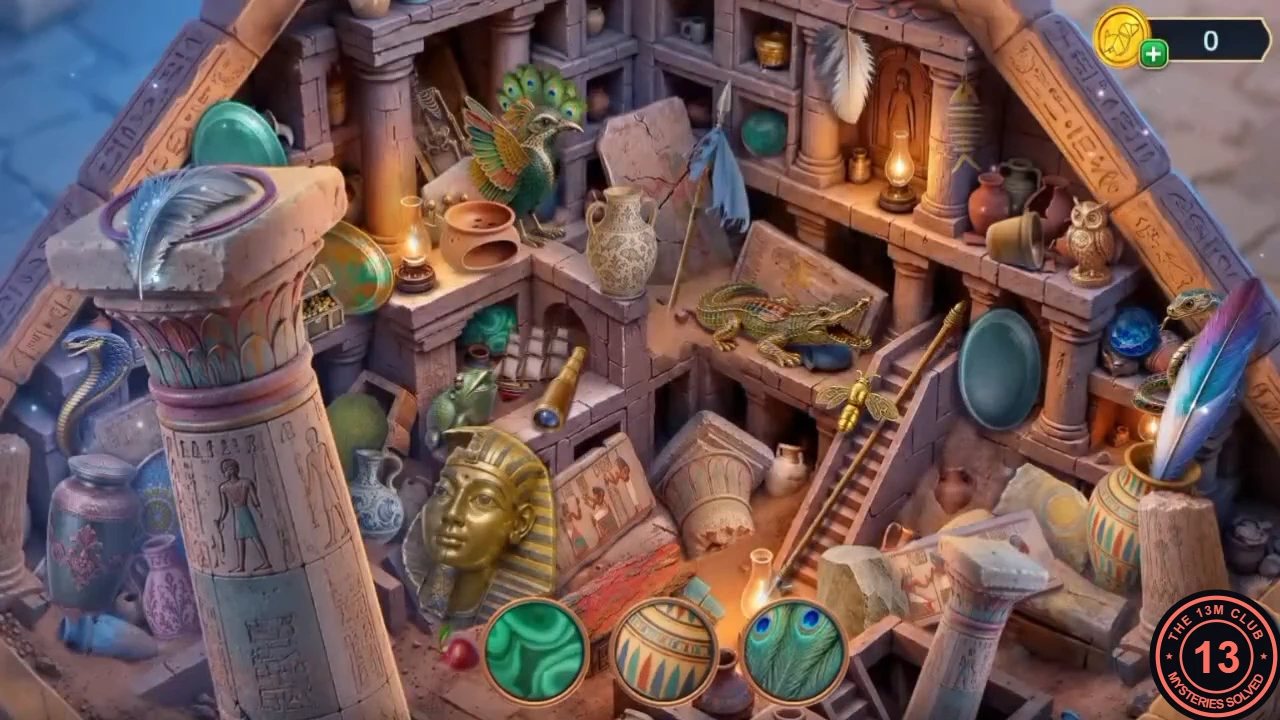
Build a sieve, sift the sand pyramid and restore the office press.
- In Anubris's Office, put the golden horned figurine in the groove of the sandstone block. The block crumbles; take the Thin Cloth.
- Open the stapled racket frame in the inventory and add the Thin Cloth to make the Sieve.
- Zoom into the sand pyramid and sift the sand with the Sieve. The pyramid opens into a hidden-object scene.
- This time the three slots at the bottom show close-up textures instead of names (for example green malachite, a painted vase pattern and a peacock feather). Find the object in the scene with that surface and tap it; a new texture replaces each one you find, and some objects only appear after using other objects from the scene.
- Fit the Typewriter Roller to the press beside the desk. It prints a page; take the Heraldic Lily.
CHAPTER 4
Family Court knight: heraldic shield
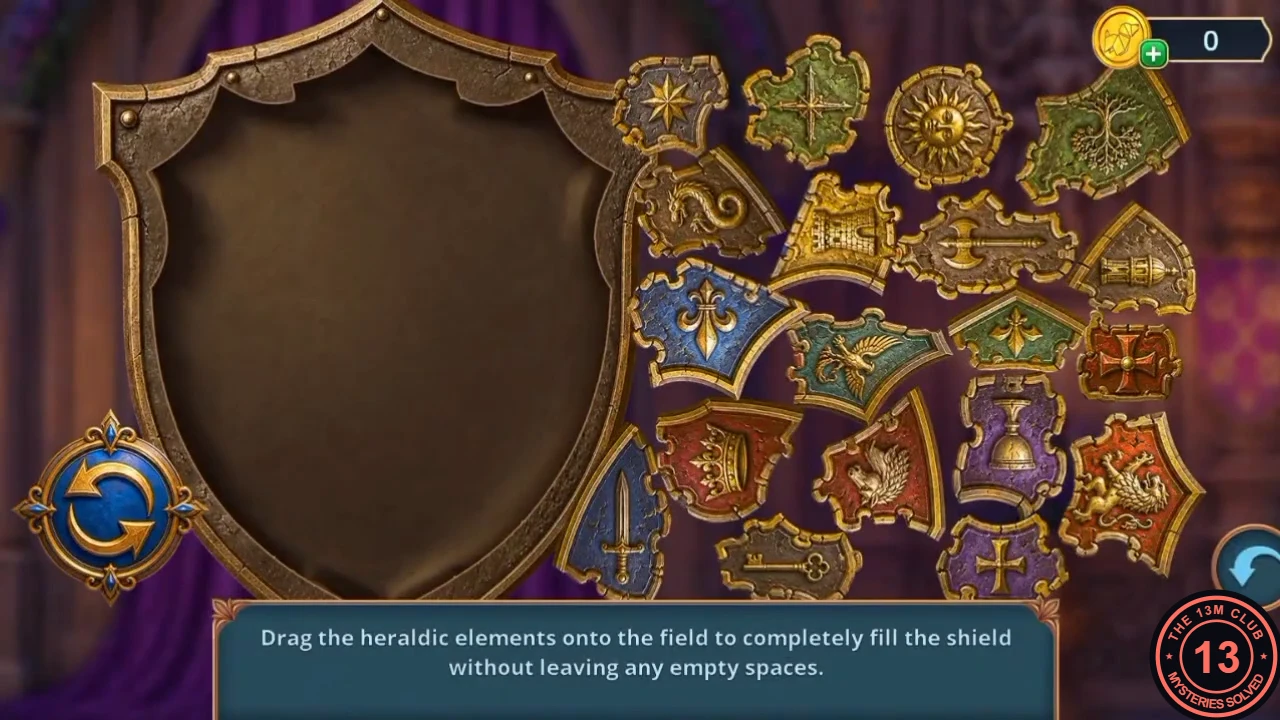
Complete the knight's coat of arms to win the Sword of Power.
- In the Family Court, zoom into the knight and put the Heraldic Lily on his shield to start the puzzle.
- Puzzle: "Drag the heraldic elements onto the field to completely fill the shield without leaving any empty spaces." Pieces snap into place and the button at the bottom left rotates the selected piece. Fill the narrow edges and the tip of the shield first, because only a few pieces fit there. In the recording the last piece (the green eagle) needed two presses of the rotate button before it fitted the top-right corner. The completed image shows the full shield.
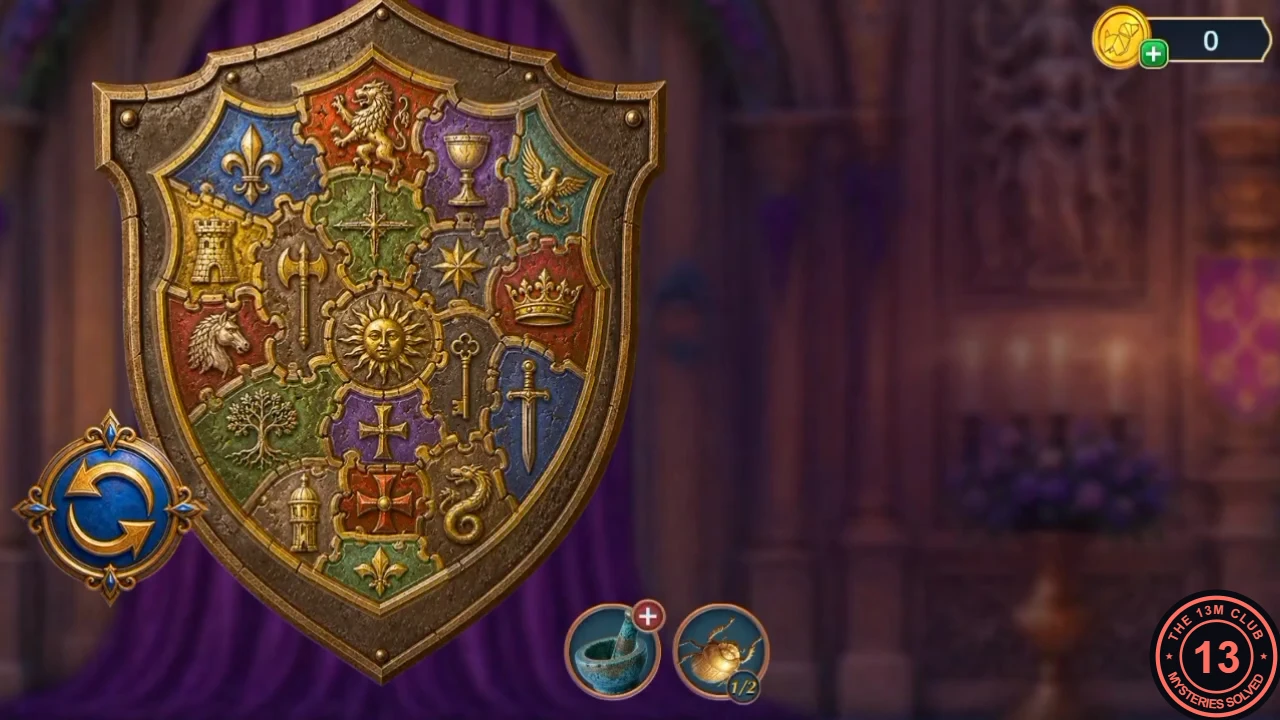
The completed shield. - The knight lowers his sword; take the Sword of Power.
- Zoom into the altar and put the Sword of Power in its central gap. Drawers open: take the Tarot Cards (1/3) and the Dry Bait. A hint notes that the empty pedestal could be revealed with a lens held up to the light (later).
CHAPTER 4
Monsters' Gallery: aquarium formulas
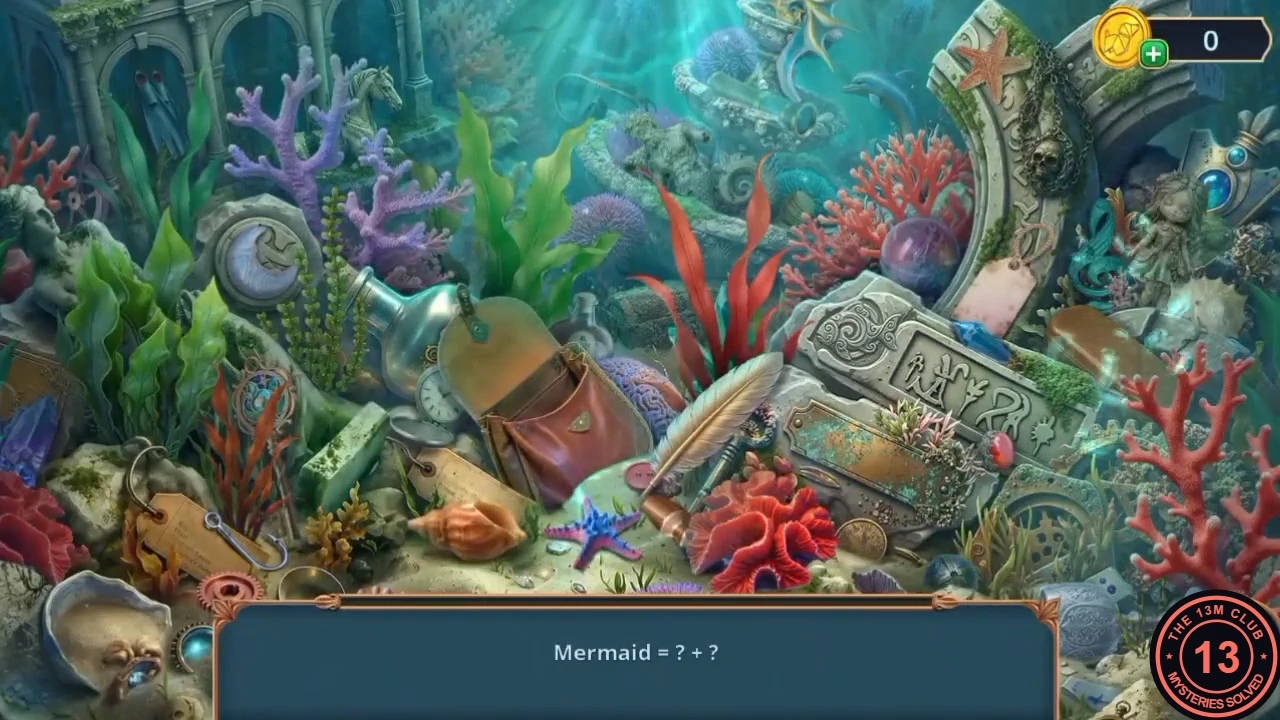
Feed the aquarium to open its second scene.
- In the Monsters' Gallery, drop the Dry Bait into the fish tank to open a hidden-object scene.
- Each line is a formula "X = ? + ?". Find the two objects that combine into the named thing. The recorded formulas, in order: Mermaid = Dolphin + Girl Doll; Seahorse = Horse Figurine + Triton with Curled Tail; Moon-Fish = Silver Crescent + Fish; Pirate = Ship's Wheel + Skull; Diver = Flippers + Diving Mask; Anchor = Hook + Weight.
CHAPTER 4
Castle Courtyard: delivery bats
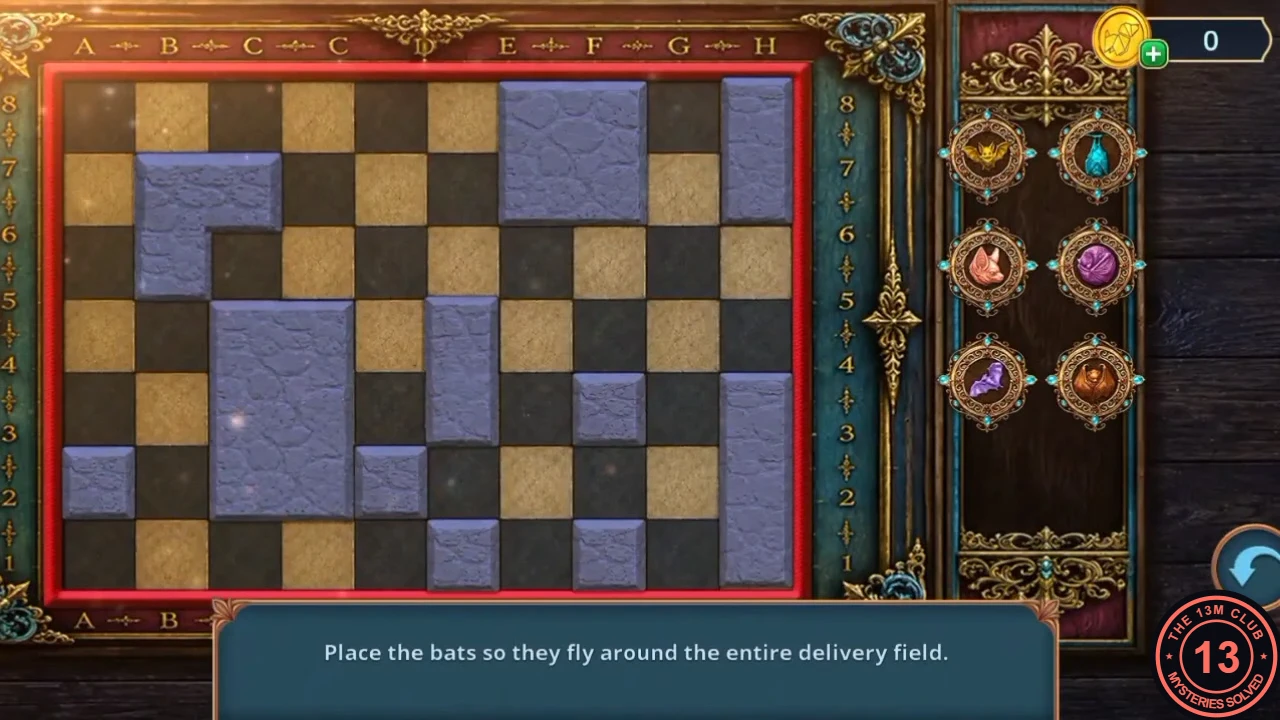
Clean the pumpkin pile in the square and send the bats out with a tag.
- In the Festival Square, fit the Water Pump Handle to the pump. The water washes the pumpkin pile; take the Scales Weights, the Golden Crescent and the Posting Tag (addressed to Anubris). The market stall still lacks scales (later).
- In the Castle Courtyard, give the Posting Tag to the bats at the birdhouse to start the puzzle.
- Puzzle: "Place the bats so they fly around the entire delivery field." There are six bats to place. Each bat placed on the board sends its flight lines in four directions until they hit a stone block. Place the bats so that together they cover every open cell; start with cells that are boxed in by blocks, since only a bat on their row or column can reach them. The recorded solution (see the completed image): lilac bat in the top-left corner, magenta bat in the second row from the top just left of the large top block, blue bat one row lower and one column further left, yellow bat between the two blocks on the right side, pink bat above the bottom-middle blocks and brown bat in the bottom row, second column.
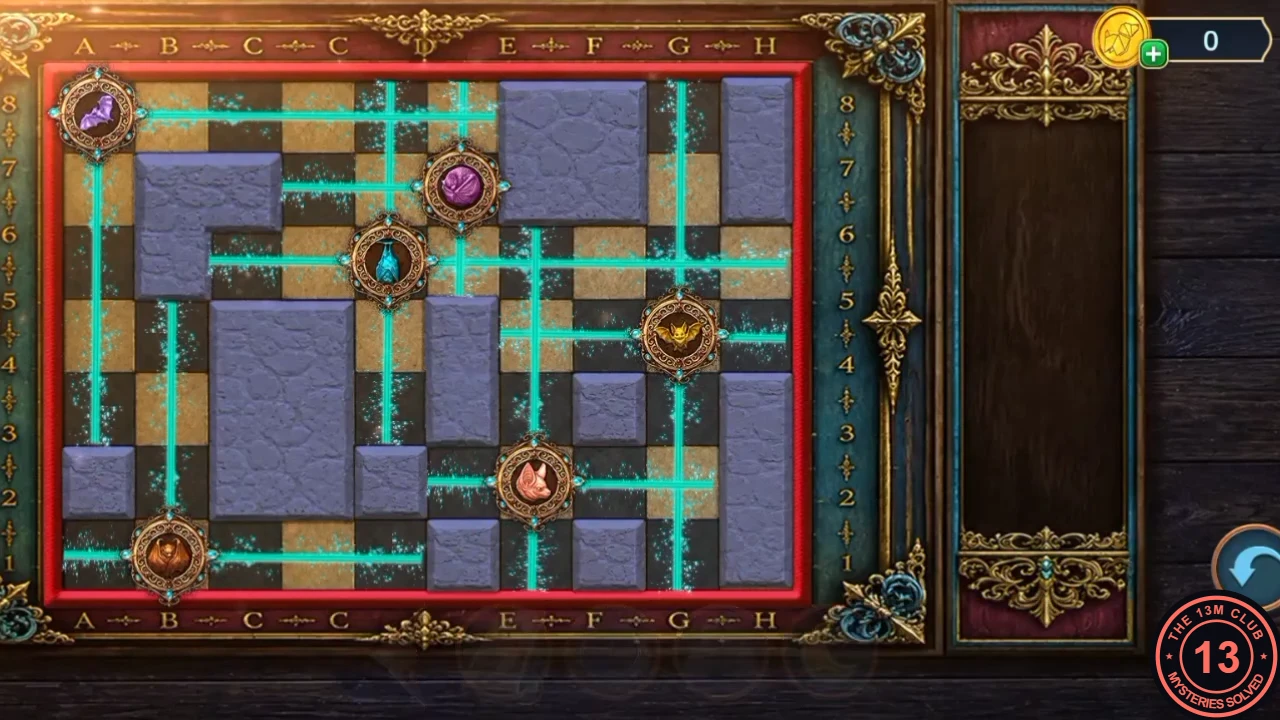
The recorded solution with all six bats. - The bats deliver the Botany Book; take it.
- Zoom into the pond bank and use the Botany Book there. Take the Tyrian Purple.
CHAPTER 4
My Room: cauldron ingredients
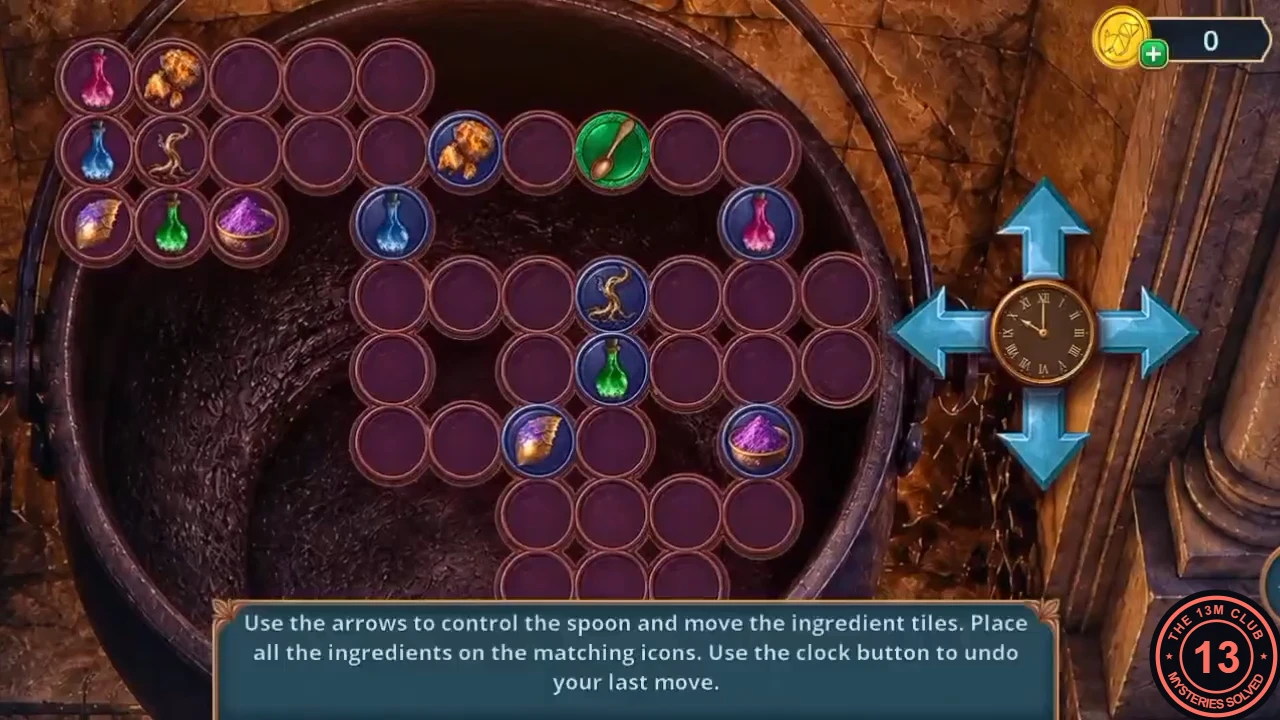
Finish the Strong Wyvern Glue.
- Open the Mortar and Pestle in the inventory, add the Tyrian Purple and grind it into the Purple Powder.
- In your room, add the Purple Powder to the last cauldron slot to start the puzzle.
- Puzzle: "Use the arrows to control the spoon and move the ingredient tiles. Place all the ingredients on the matching icons. Use the clock button to undo your last move." This is a very long pushing puzzle. Plan each push so that a tile never ends against a wall away from its icon, place the tiles whose icons are hardest to reach first, and use the clock button freely to take back mistakes.
- Take the Magic Glue and the Glycerin Residue from the cauldron.
CHAPTER 4
Monsters' Gallery: wyvern wings
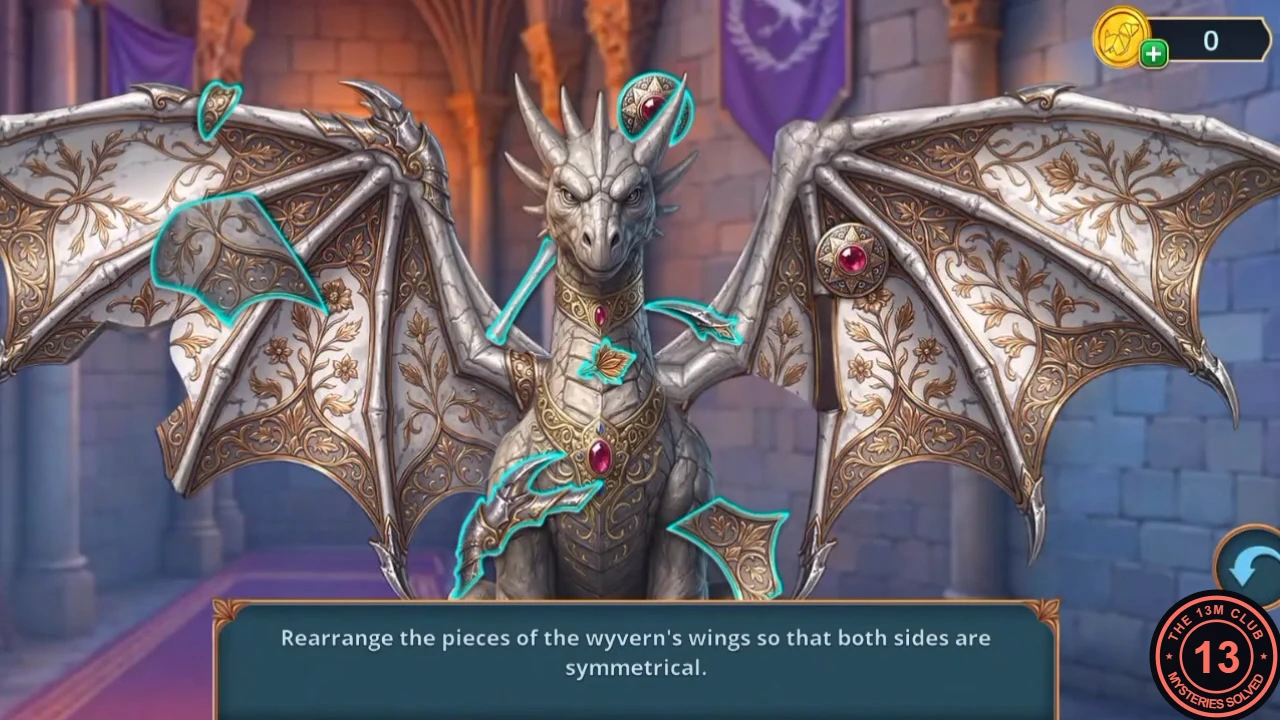
Fill two sockets for later, then repair the stone wyvern.
- Zoom into the star-sky lid of the suitcase and put the Golden Crescent in the empty moon socket. One star is still missing, so nothing opens yet.
- In the Family Court, put the Mirror Button in the socket near the 5 o'clock mark of the clock. The clock stays locked.
- In the Monsters' Gallery, apply the Magic Glue to the wyvern's broken wing socket.
- In your room, pour the Glycerin Residue into the lava-lamp cylinder. The lamp heats up; take the Wyvern Wing that forms inside.
- Attach the Wyvern Wing to the wyvern to start the puzzle.
- Puzzle: "Rearrange the pieces of the wyvern's wings so that both sides are symmetrical." Loose pieces outlined in teal lie scattered over both wings, the head and the chest (for example the jewelled medallion on the head and a wing panel on the left). Drag each one to the gap or bare spot where it makes the two wings mirror images of each other; the medallion goes on the left wing, matching the one on the right. The completed image shows both wings finished.
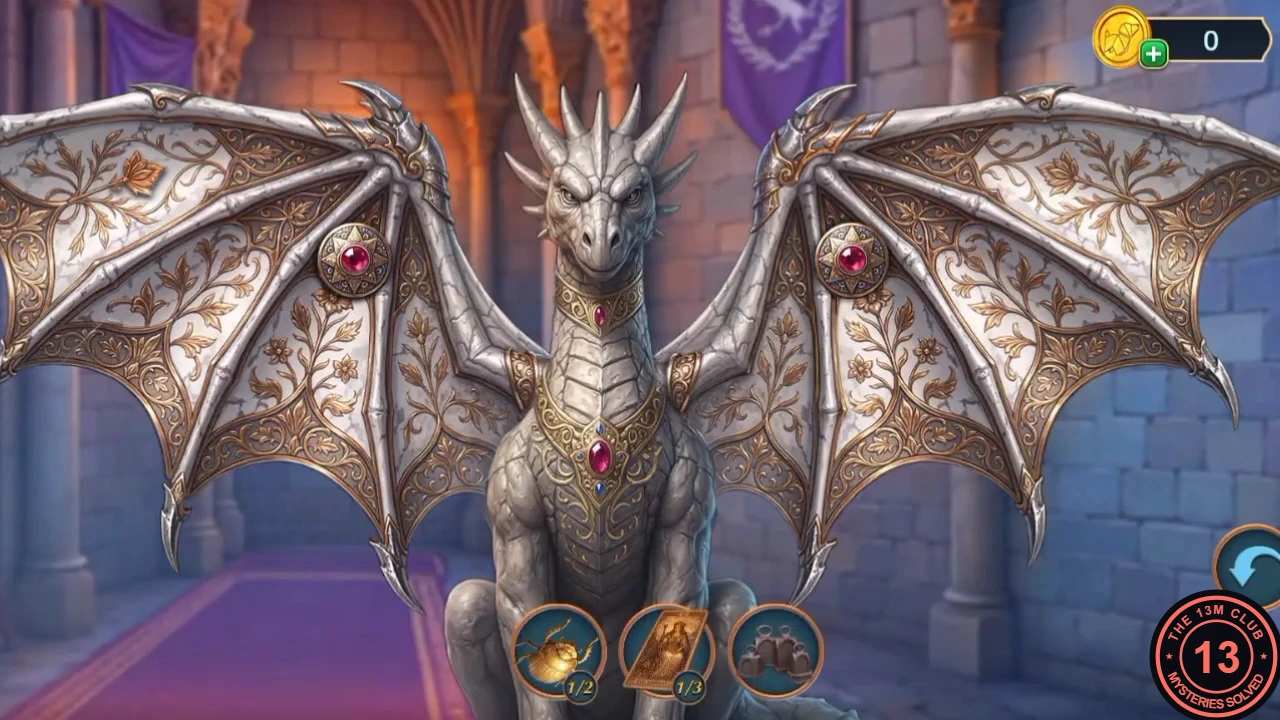
The finished, symmetrical wings. - The wyvern yields another Tarot Card (2/3).
- Zoom into the glass-dome pedestal and use the wand on the dome to switch off the laser security. Take the Scarab in Amber.
CHAPTER 4
Anubris's sarcophagus: relief tiles
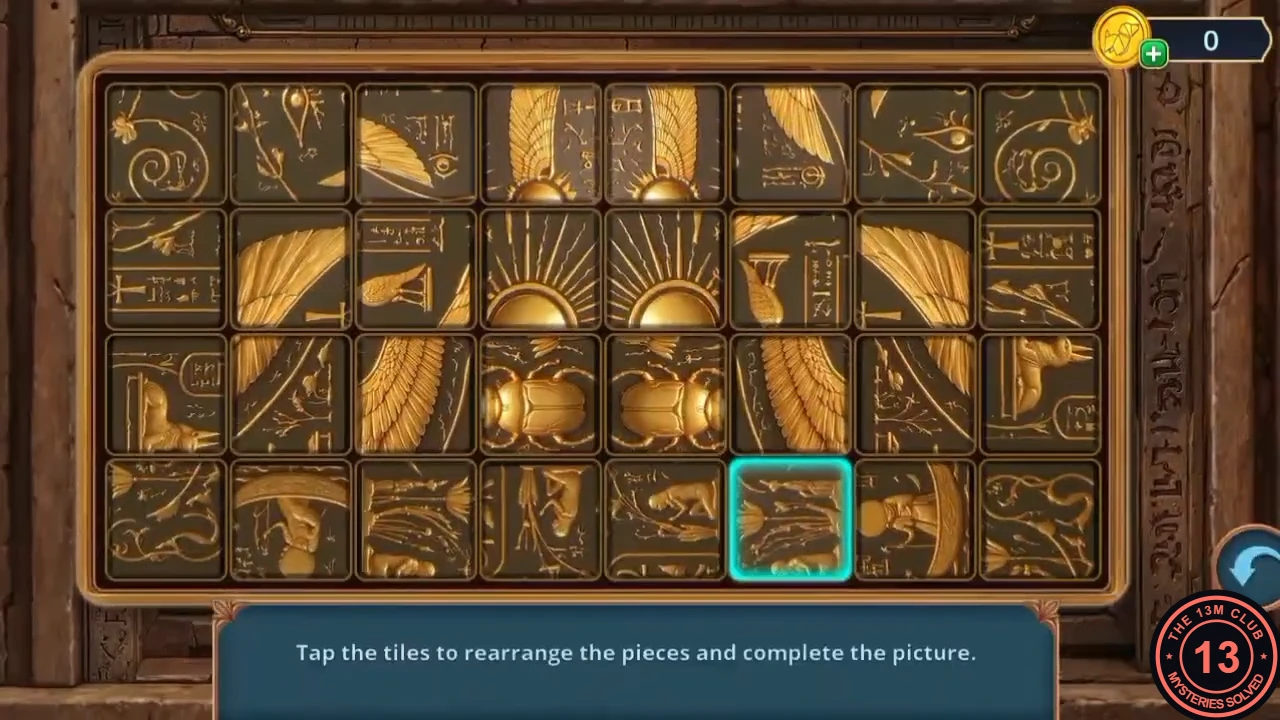
Free the second scarab and open Anubris's sarcophagus.
- In Anubris's Office, place the Scarab in Amber by the gold mummy statuette next to the typewriter. The amber breaks and the scarab completes the Golden Scarabs (2/2).
- Zoom into the front of the sarcophagus and put the Golden Scarabs in the two round sockets to start the puzzle.
- Puzzle: "Tap the tiles to rearrange the pieces and complete the picture." The 32 tiles (8 across, 4 down) never change place; they are only turned the wrong way. Each tap turns the tapped tile a quarter turn clockwise. It also turns the tiles directly above, below, left and right of it, but never the diagonal ones. A tap therefore turns five tiles in the middle of the board, four along an edge and three in a corner. Order does not matter: only the number of taps on each tile counts, and four taps on the same tile cancel out. Fixing tiles one at a time keeps undoing their neighbours, so tap by count instead. For the starting layout shown in the overview, tap each tile this many times (the counts are also marked on the tiles in the first image below; rows from top to bottom, tiles from left to right): row 1 = 0, 3, 0, 0, 1, 1, 1, 1; row 2 = 3, 2, 3, 2, 3, 0, 3, 0; row 3 = 0, 0, 2, 3, 3, 3, 1, 1; row 4 = 0, 1, 1, 3, 3, 0, 3, 1. That is 48 taps in total, and it is the only combination that solves this layout. These counts were checked against the starting board and the completed picture. The recorded playthrough did not follow them exactly: it made some extra taps and then corrected them. Its last tap, on the bottom-right corner, completed the relief. Check your board against the overview first. Only one playthrough was available, so it is not confirmed that the starting layout is always the same. If yours differs, work out how many clockwise quarter turns each tile needs, using the completed picture below as the target. Then remember that each tap also turns the neighbouring tiles, and plan the taps around that.
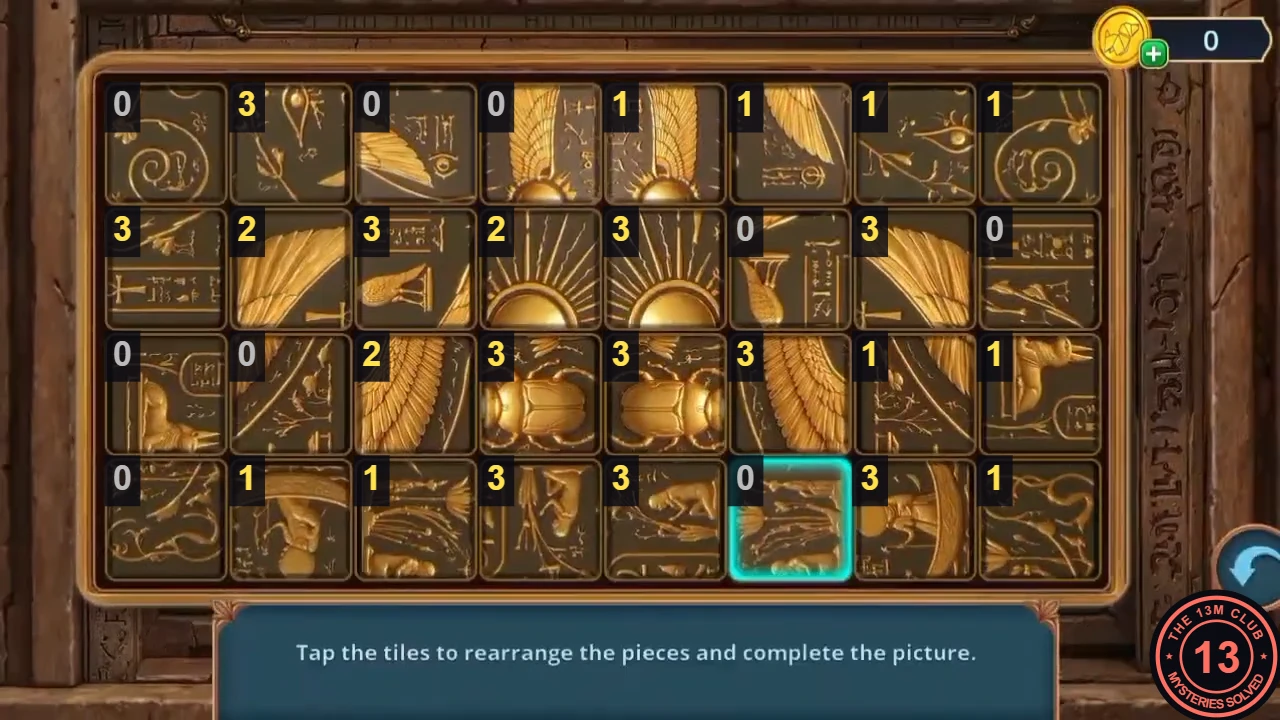
How many times to tap each tile for this starting layout (0 = leave it). The order does not matter. 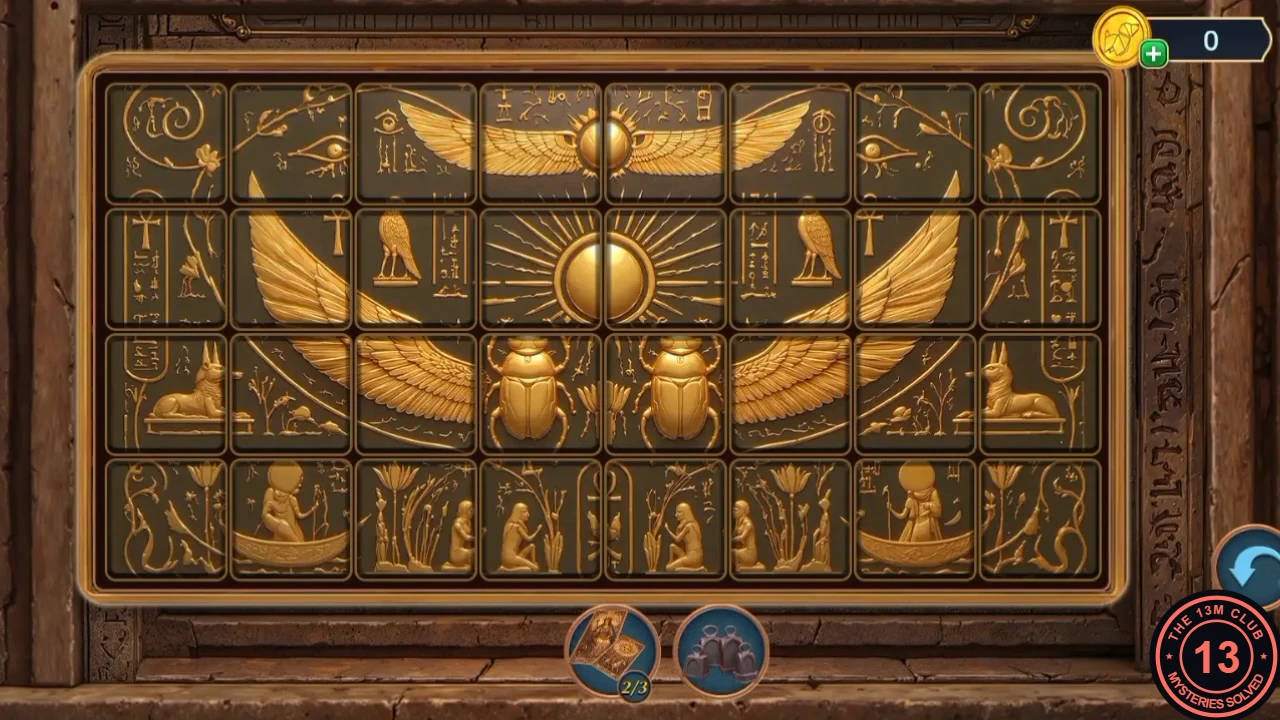
The target picture. - The sarcophagus opens. Read Anubris's letter about the mask choosing someone else for ten generations, then take the Forceps.
CHAPTER 4
My Room: crystal-ball riddles
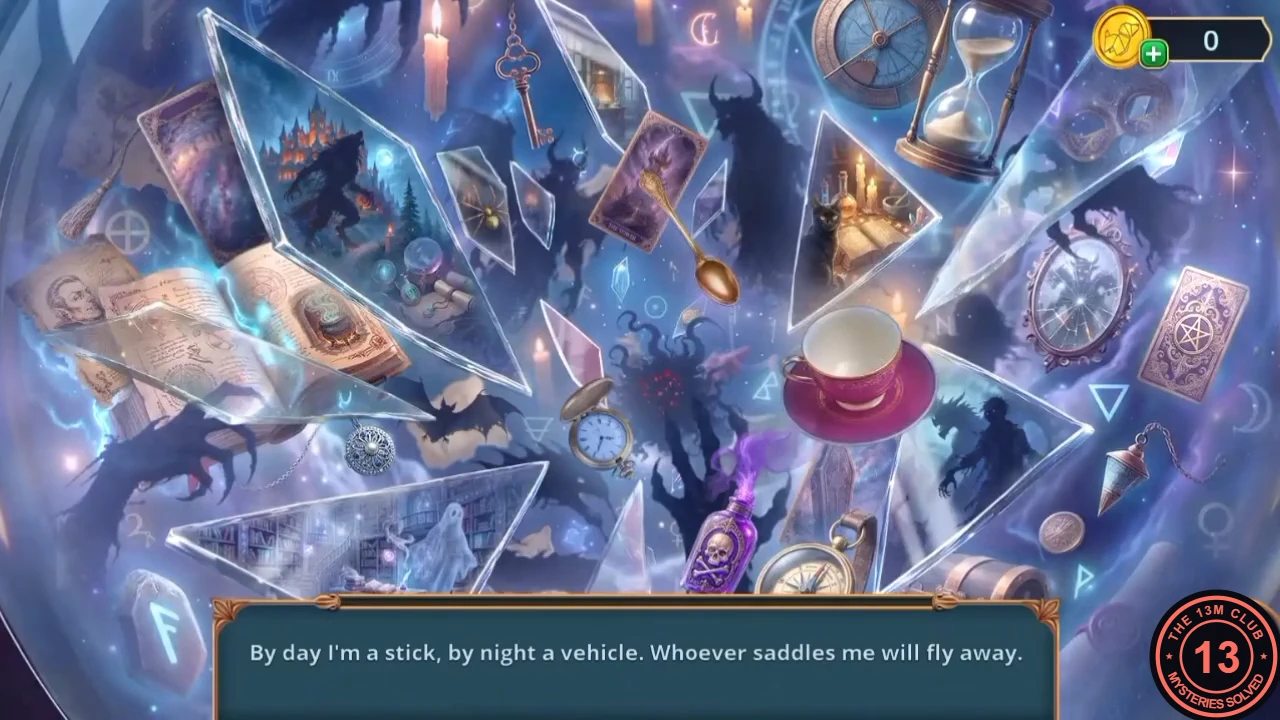
Collect the last tarot card and let the crystal ball ask its riddles.
- In your room, zoom into the cracked base of the lava lamp and pull the item out with the Forceps. Take the Tarot Cards (3/3) and My Fibula.
- Zoom into the crystal ball and lay the Tarot Cards on the table in front of it. The ball glows and opens a hidden-object scene.
- Riddles appear one at a time; tap the object that answers each. Recorded riddles and answers: "By day I'm a stick, by night a vehicle..." = broomstick; "He crawls out of the grave... he sucks blood" = vampire (tap the sketched portrait of a pale man on the old page at the far left); the shaggy creature that lives under the bed = the monster under the bed; "At midnight he rises from his gray grave..." = skeleton; "I boil without soup..." = cauldron; "I have no body, but I love sheets and drafts" = ghost; "I sleep upside down, and I bring news at night" = bat; "I have no skin, but I still smile" = skull; "The person who makes it sells it..." = coffin; the creature considered bad luck that consorts with witches = black cat; "I can be kind, I can be evil - People hide behind me..." = mask.
- Put the Golden Star in the last empty star socket of the suitcase lid. The lid opens; take the Crab Flavor Chips.
CHAPTER 4
Festival Square: market shelves
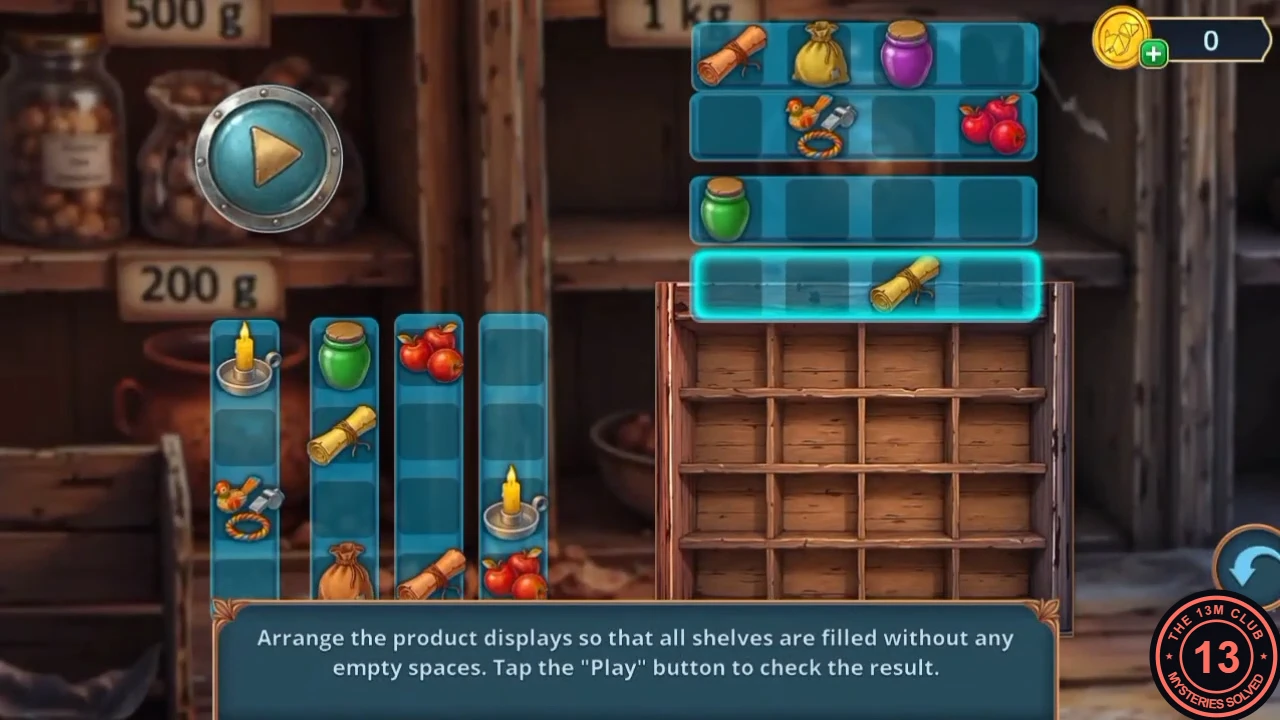
Lure away the rat, set up the market scales and open the Family Court clock.
- In the Festival Square, give the Crab Flavor Chips to the rat on the pumpkin pile. The rat leaves; take the Commercial Scales.
- Zoom into the market stall, place the Commercial Scales and put the Scales Weights on them to start the puzzle.
- Puzzle: "Arrange the product displays so that all shelves are filled without any empty spaces. Tap the 'Play' button to check the result." There are four upright strips on the left (one per shelf column) and four flat strips at the top right (one per shelf row). Tapping two strips of the same kind swaps their order. Play lays both sets over the 4×4 shelf, and every cell must end up with exactly one product: where an upright strip shows an item, the flat strip for that row must be empty in that place, and the other way round. Winning order in the recording, upright strips from left to right: candle at the top and toy bird third; apples at the top and paper roll at the bottom; candle third and apples at the bottom; green jar, scroll and sack (top, second, bottom). Flat strips from top to bottom: scroll in the third place; paper roll, sack and purple jar; toy bird second and apples fourth; green jar first. See the step images.
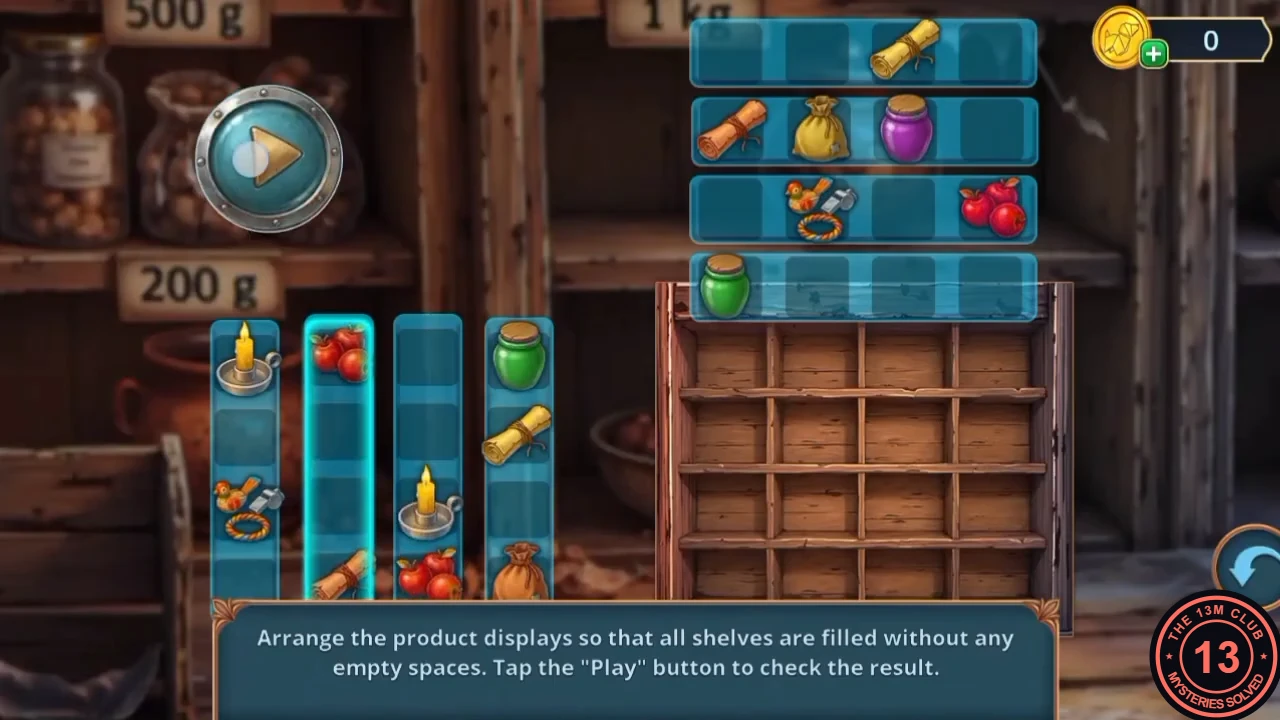
The strip order that filled the shelf. 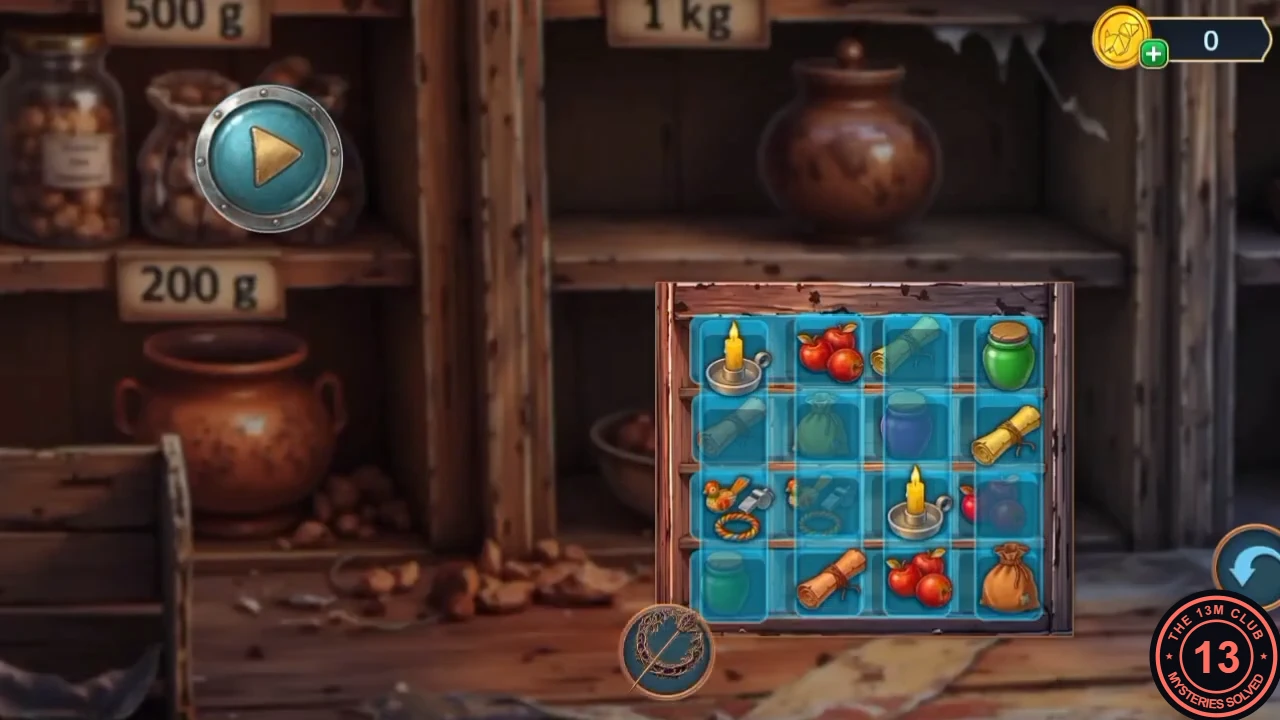
Every shelf cell holds one product. - Zoom into the scales and take the ornate Key.
- In the Family Court, unlock the clock with the Key. Read the parchment "The monocle of the past" and take the Old Monocle.
CHAPTER 4
Family Court: questioning Anubris
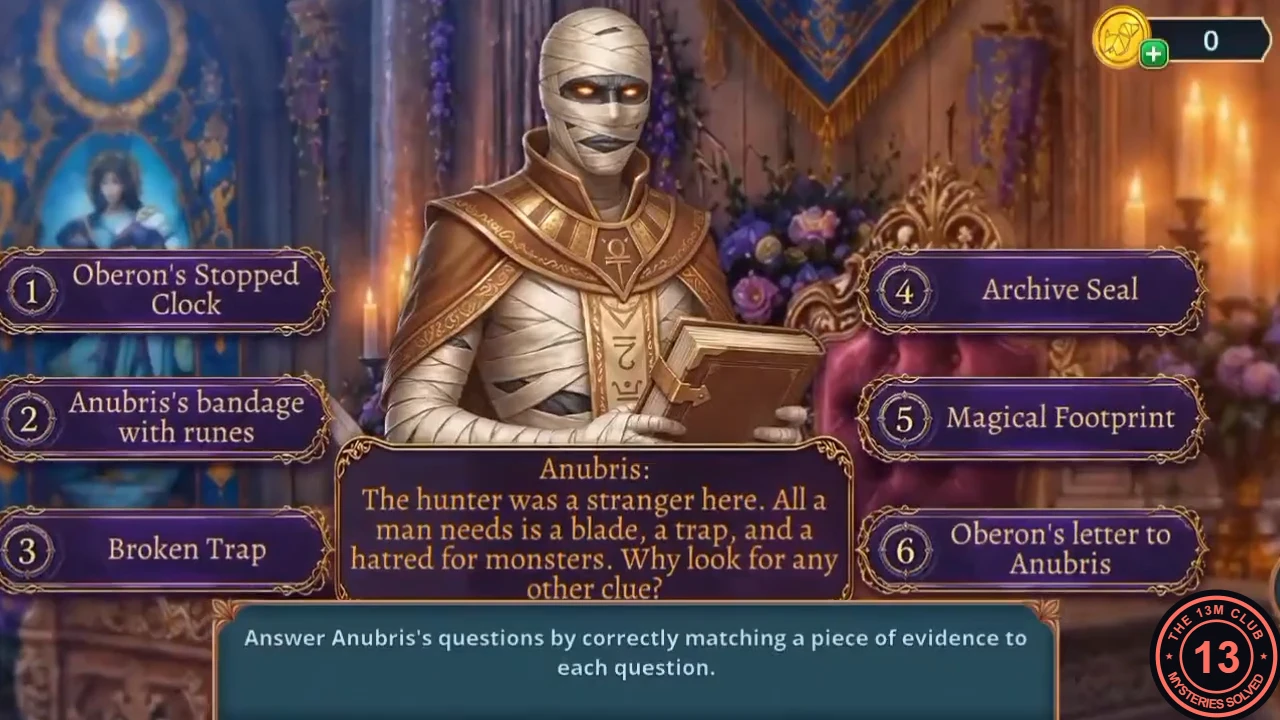
Present the evidence to the family court and rebut each of Anubris's claims.
- Put the Old Monocle in the bowl of the vortex table. Ezra says there is enough evidence. Decision: "I'm ready." (60 coins, +2) or "I'm scared..." (free). Ezra hands over the Evidence Bag.
- Open the Evidence Bag in the inventory and examine each item: Anubris's runed bandage, Ezra's broken trap, the magical footprint, Oberon's stopped clock and the seal and letter. Take the Evidence.
- Zoom into the judge's desk and place the Evidence to start the confrontation.
- Puzzle: "Answer Anubris's questions by correctly matching a piece of evidence to each question." Recorded answers: the hunter was a stranger with a blade and a trap = Magical Footprint; Ezra's trap was right next to the crime scene = Broken Trap; the murder happened fast and anyone could have been there = Oberon's Stopped Clock; the Tower is open to the whole family = Archive Seal; "I never tried to go against her will" = Oberon's letter to Anubris; "you have nothing to link me to Oberon's death" = Anubris's bandage with runes.
CHAPTER 4
Family Court: evidence tablets
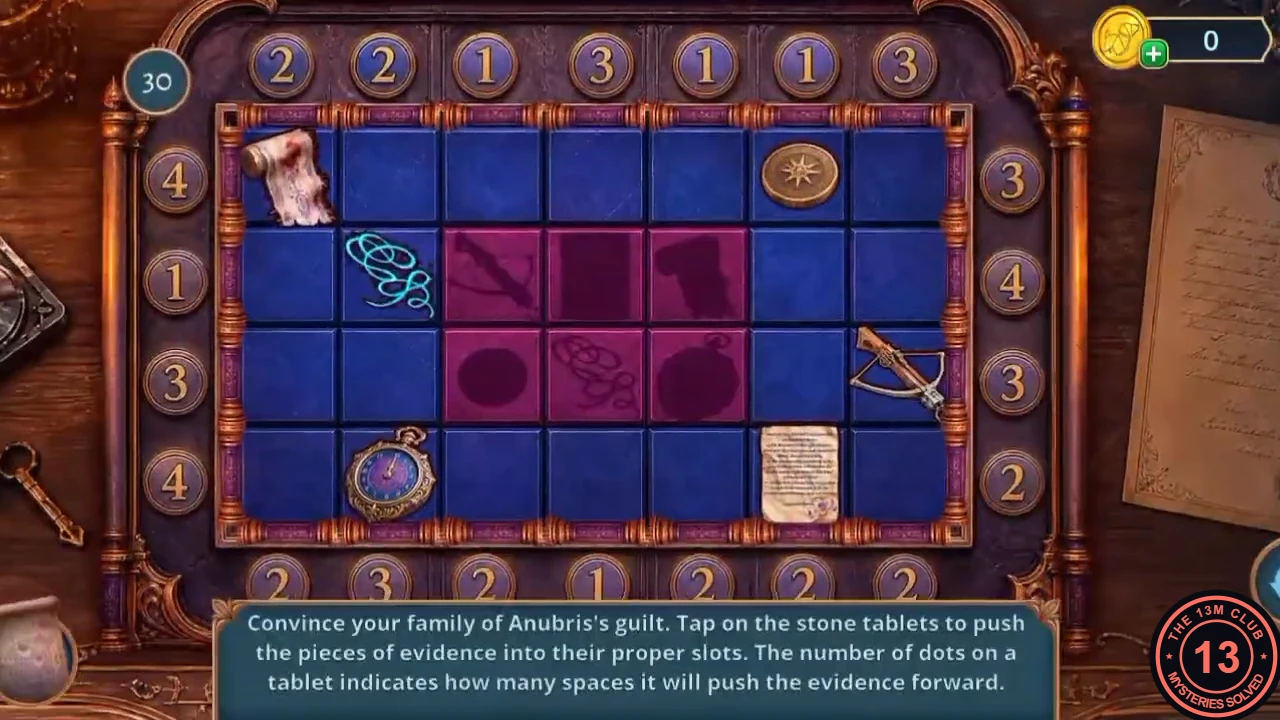
Convince the family of Anubris's guilt.
- Puzzle: "Convince your family of Anubris's guilt. Tap on the stone tablets to push the pieces of evidence into their proper slots. The number of dots on a tablet indicates how many spaces it will push the evidence forward." Push the six evidence pieces into the 2×3 target block within the move limit (30 in the recording). Recorded final layout: top row trap, letter, bandage; bottom row seal, footprint, clock. A tablet pushes every piece in its row or column at once (the final tap on the top tablet above the third column moved both the trap and the seal down one space), so check what else sits in that line before tapping. Bring in the pieces furthest from the target first. The recording finished with 7 moves to spare.
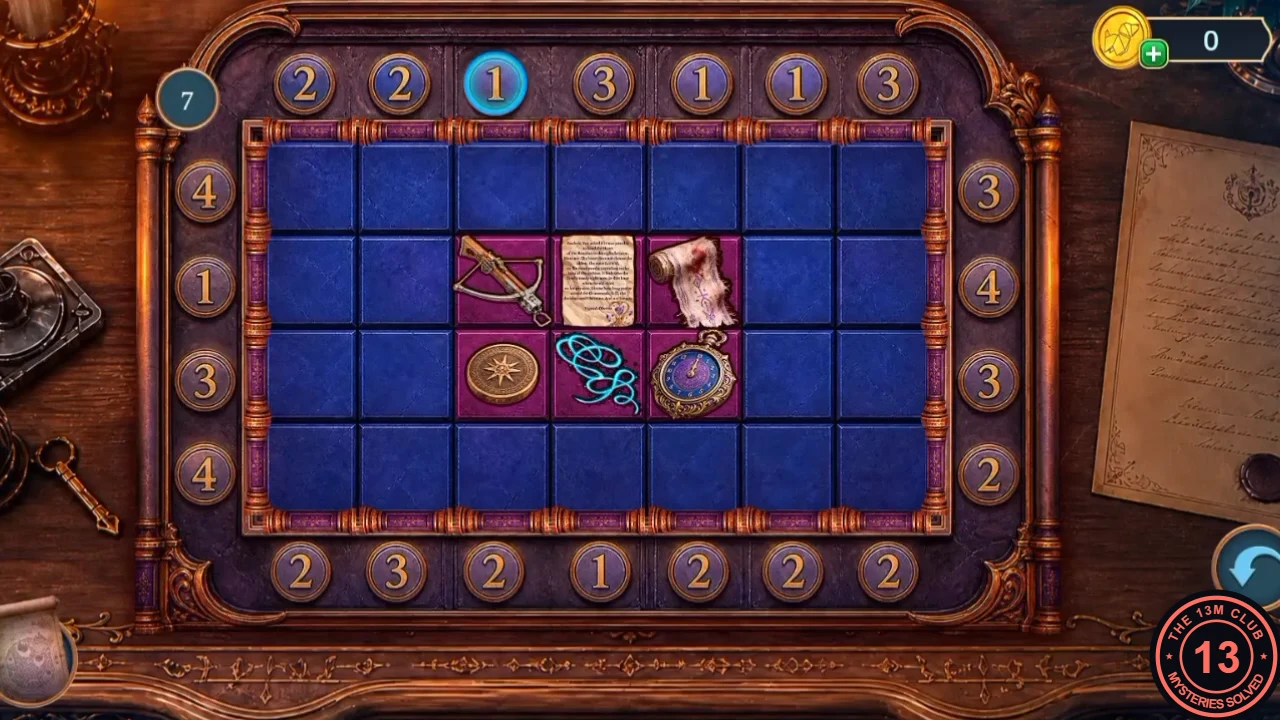
The finished layout.
CHAPTER 4
Chapter 4 decision points
The last chapter also ends with the Decision Points summary.
- The summary shows four rows with its own labels and point values: Do nothing (0), Warn Ezra (3) or Protect Ezra with magic (6); Return to search (0) or Monsters can keep secrets (2); Express suspicions (0) or Hide suspicions (2); I'm afraid (0) or I'm ready (2). The maximum is 12 points. Three rows match dialogue buttons by their wording: the Archives answer ("Monsters know how to keep secrets", 60 coins, +2), Anubris in the Family Court ("Hide your suspicions", 60 coins, +2) and the answer before the trial ("I'm ready.", 60 coins, +2). The three-answer row is not confirmed. The chapter's three-button choice, after Rufus's rescue, read No time to talk / Truth comes first (30 coins, +2) / He's my kin (60 coins, +6). Those labels differ from the row, and the middle value (3) differs from the +2 on the button. The recording scored 0, so it cannot show how that choice is counted.
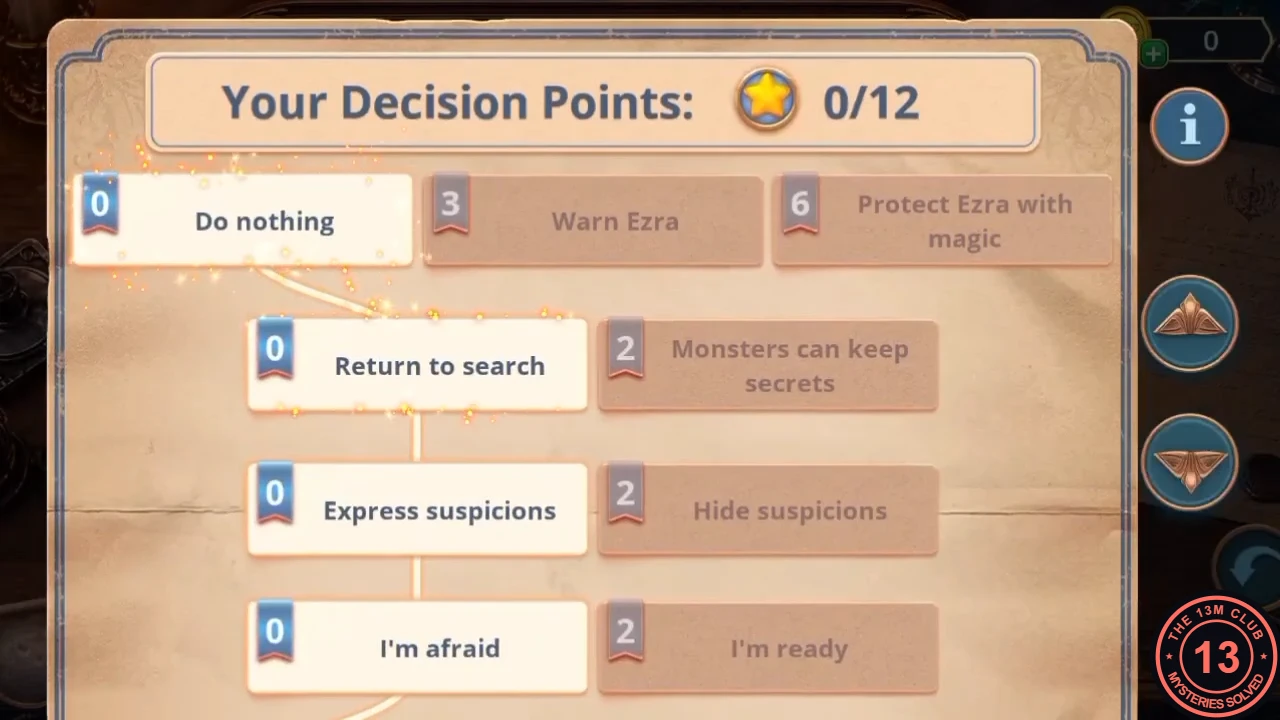
The Chapter 4 summary from the recording (0 of 12 points). - Outcome panels unlock at 0, 4 and 10 points. The recording earned 0 points, so only the 0-point outcome is shown. The 4- and 10-point outcomes are not shown. We could not find any playthrough or written walkthrough that shows them, so they are not covered in this guide.
ENDING
The recorded ending
The final scene of the recorded playthrough.
- Anubris lies fallen and bound while Ezra aims his crossbow at him, and the heart-shaped amulet rests on the floor. Then the title "Grimwood Secrets: Cursed Heirloom" appears. The recording ends at this title, so nothing after it is described here.
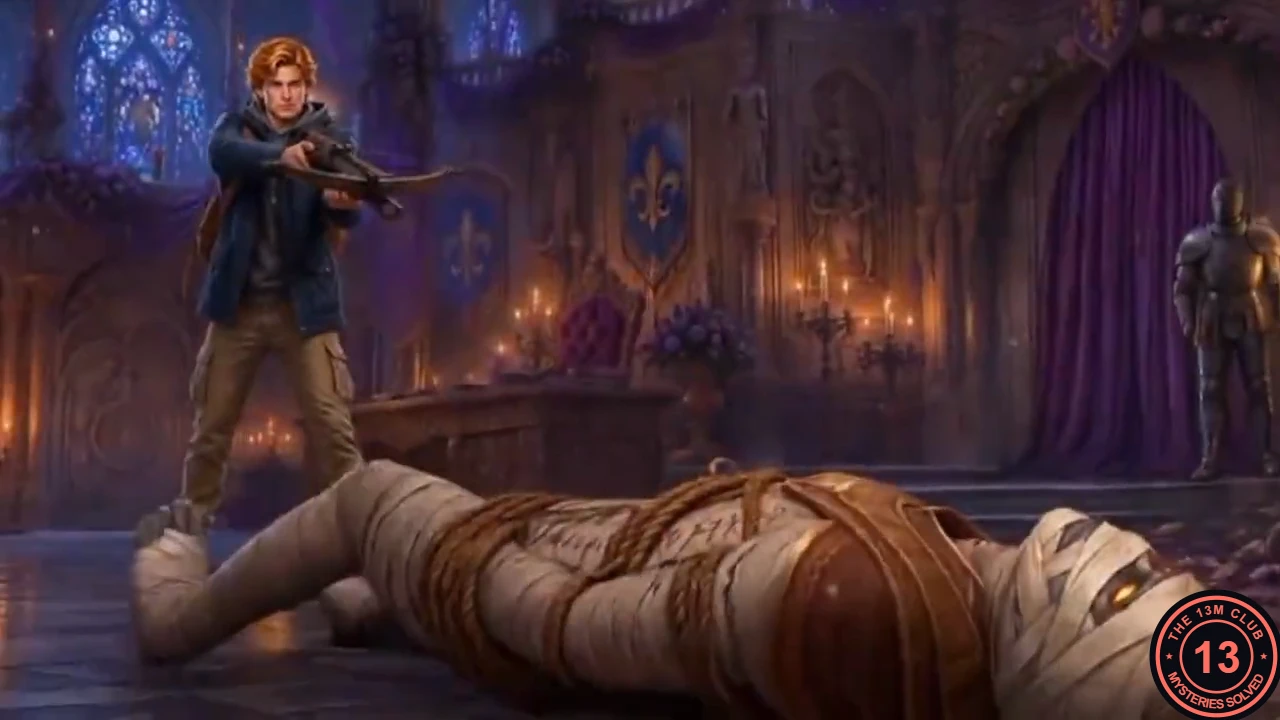
The final scene of the recording.