The Birdcage and the Poppy Gate
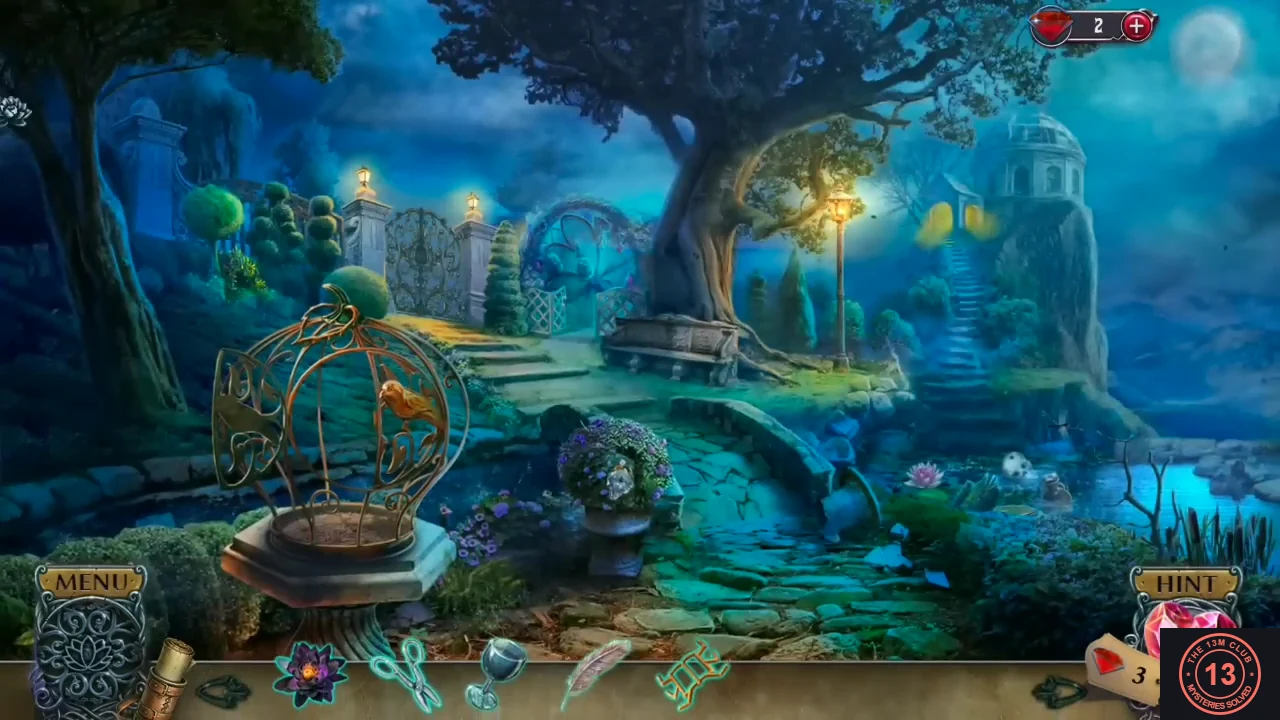
Chase the countess through the castle garden: free the second bronze bird from the pond, open the birdcage for the poppy emblem and unlock the gate.
- New objective: Catch the countess. Zoom into the birdcage on the stone pedestal at the left and take the white feather caught in the upper left of the cage.
- Place the bronze bird on the right-hand perch of the birdcage. One perch is still empty.
- Zoom into the round flowering bush to the right of the cage. Read Raymond's note ('Paul has escaped. Be careful!') and take the small teal book emblem that drops out of it. A broken glass key with no handle is stuck in the bush; leave it for later.
- Zoom into the foliage-covered stand at the front of the path. Take the note pinned there ('The old observatory is closed until further notice!'); the pin is an awl, which goes into your inventory. Cut away the twigs with the scissors to uncover a round metal plate with peg holes and three wooden seal slots above it. Place the star pins on the plate. The middle seal is missing, so leave the plate for now.
- Zoom into the pond at the lower right. A second bronze bird is stuck on a log. Use the awl to prise it free and take it.
- Return to the birdcage and set the second bronze bird on the empty left perch. The cage opens; take the pink poppy emblem from inside.
- Zoom into the lotus-bud lock on the iron gate at the back and insert the poppy emblem. The gate opens. A golden hook hangs across the gate; it needs repairing before you can take it.
- Optional collectible: the castle garden hides 2 phoenixes. Tap the round tree canopy framed by the golden curved branch, just above the lit lamp post, and the yellowish fronds in the fern just right of the birdcage's stone base.
Hidden Objects: 12 Dead Flowers and the Constellation Pins
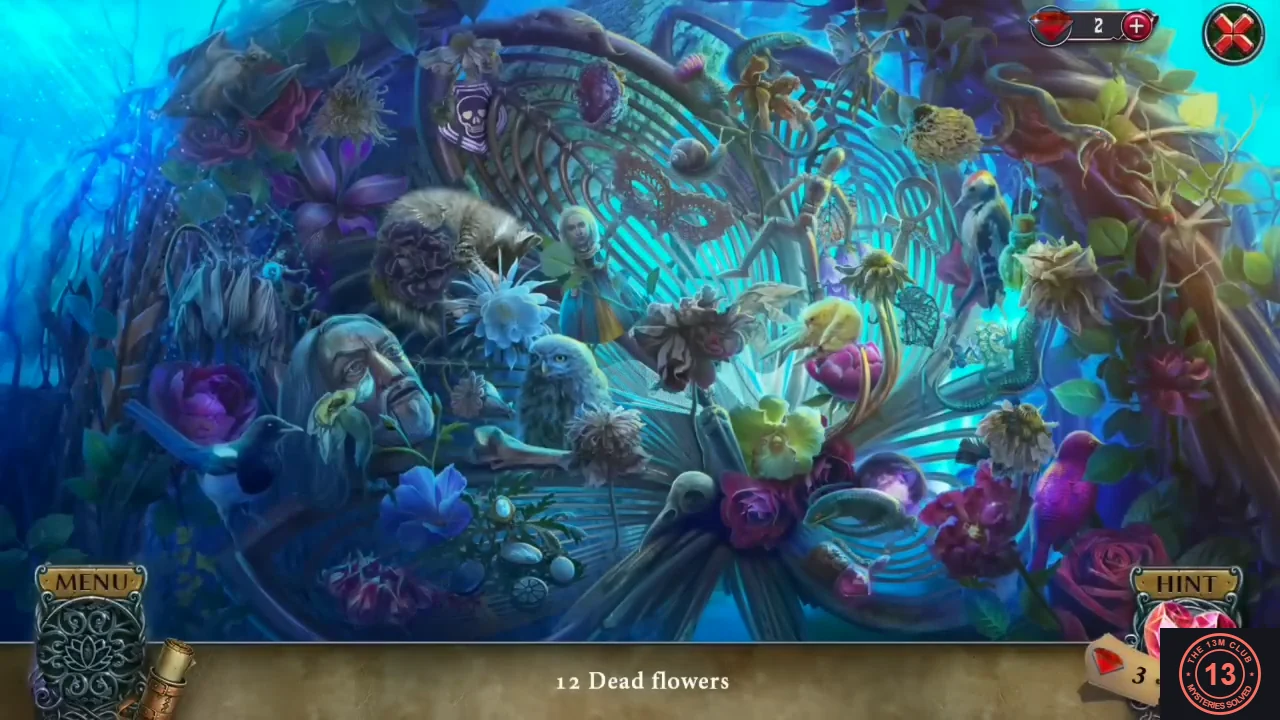
Find all twelve dead flowers for the constellation seal, then recreate the three constellations on the garden plate to open the way to the observatory.
- Enter the scene beyond the gate. You need 12 dead flowers. Find: a spiky dried flower at the top left by the red roses; a grey dried bunch hanging at the left; a brown dried carnation by the raccoon; a small pale-yellow flower in front of the old man's beard; a wilted bloom to the right of the owl; a small dried flower at the top above the skull badge; a brown dried flower at the top centre by the snail; a dried yellowish head at the top right; a dried rose to the left of the yellow chick; a wilted sunflower above the chick; a large cream dried flower to the right of the green bottle; and a dried flower below the green snake. Take the reward: a round wooden constellation seal.
- Back at the foliage stand, place the constellation seal in the empty middle slot above the metal plate.
- Puzzle: 'Recreate the constellations one by one. Press a pin to pick it up or put it down.' Each wooden seal above the plate shows a figure of stars and lines. Move the six pins so they copy the figure on the left seal (the triangle) first, then the middle seal, then the right seal (the K-shaped figure). A seal glows when its figure is correct. When all three are done, the way opens and you enter the old observatory.
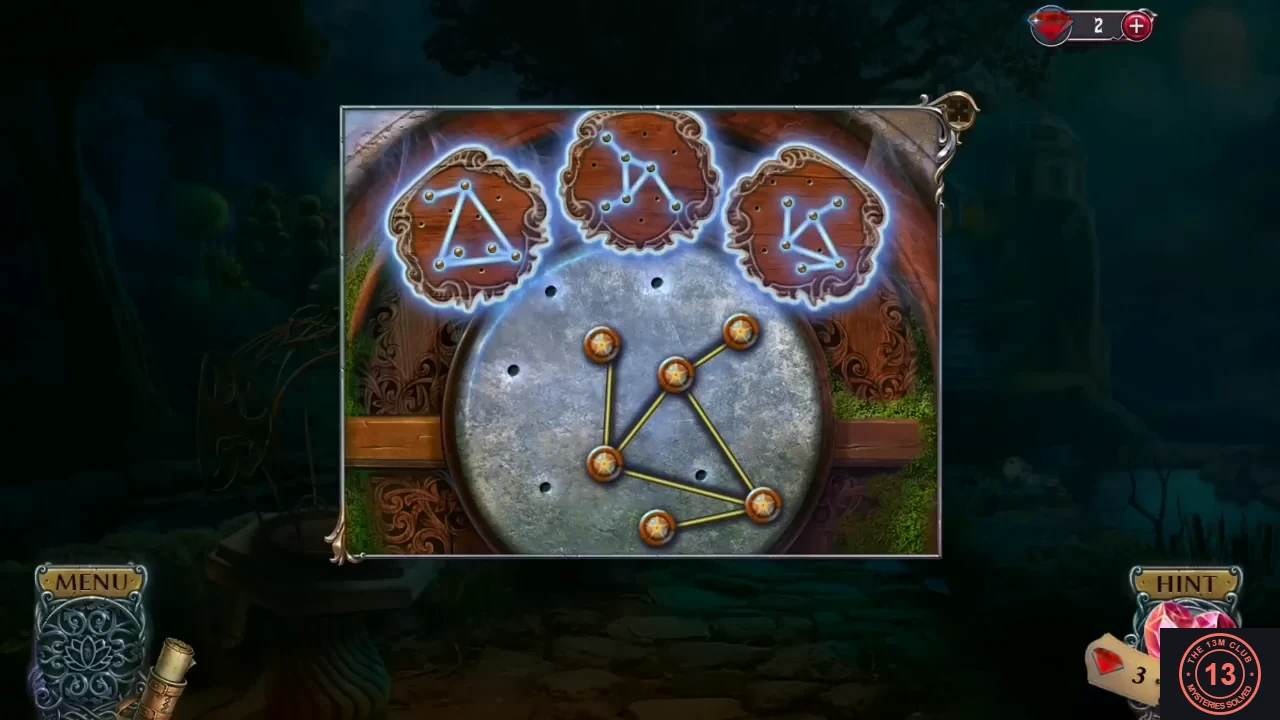
All three seals glow once each constellation has been copied.
The Podium Legs and the Hanging Bundle
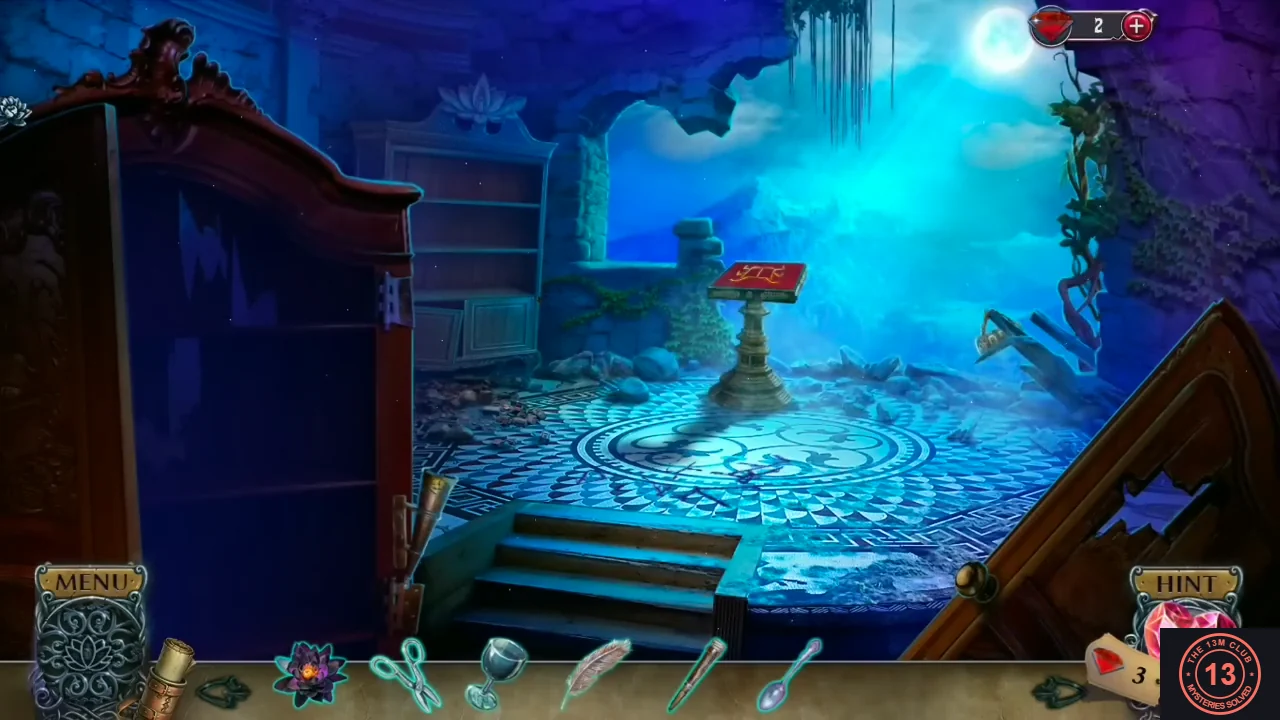
Gather a spoon, torch and strap in the observatory, turn the garden's golden hook into a long hook and clear the pond with bug spray and use the long hook to reach the bundle hanging over the cliff.
- Zoom into the cracked floor at the front centre of the observatory. Take the silver spoon and the unlit torch. Something is buried under the floor, but you need a stronger tool to break it.
- Zoom into the podium in the centre ('Is that a book with legs?') and place the book emblem into the book-shaped recess. The podium still needs replacement legs and a book.
- Zoom into the broken wall at the right, at the edge of the cliff. A bundle hangs out of reach on a broken post. Take the leather strap lying on the rubble.
- Return to the garden and zoom into the alcove in the foliage behind the birdcage. Cut the twigs with the scissors, then dig with the spoon to take a clod of dirt. Something else lies too far back to reach.
- Zoom into the gate and tie the leather strap to the golden hook stuck across it to make a long hook. Then use the long hook in the alcove behind the birdcage to pull out a bottle of bug spray.
- Zoom into the pond and spray the flies with the bug spray. When the yellow cloud clears, tap the six things in the water; each turns into something else. In the recording they changed in this order: the pink water lily (it becomes a red jewelled box), the clay jar (a striped metal bell), the dragonfly (a gold fish figurine), the skull (a jewelled egg), the frog (a long-handled gold spoon) and finally the lily pad, which becomes the dirty lotus while a bottle of scented oil rises from the reeds. Both go into your inventory. You do not need the long hook here.
- Return to the cliff edge in the observatory and use the long hook to pull the hanging bundle onto the ledge. It is a leather book bound with gold leaves; it opens on a page of element symbols. Take the elemental note and the metal legs.
- Attach the metal legs to the podium. Its arms fold out; it now only needs a book.
- Optional collectible: the observatory hides 2 phoenixes. Tap the pile of blue boulders on the floor at the back, left of the pedestal, and the twisted vines at the top of the ruined right wall.
The Elemental Goblets and the Podium Book
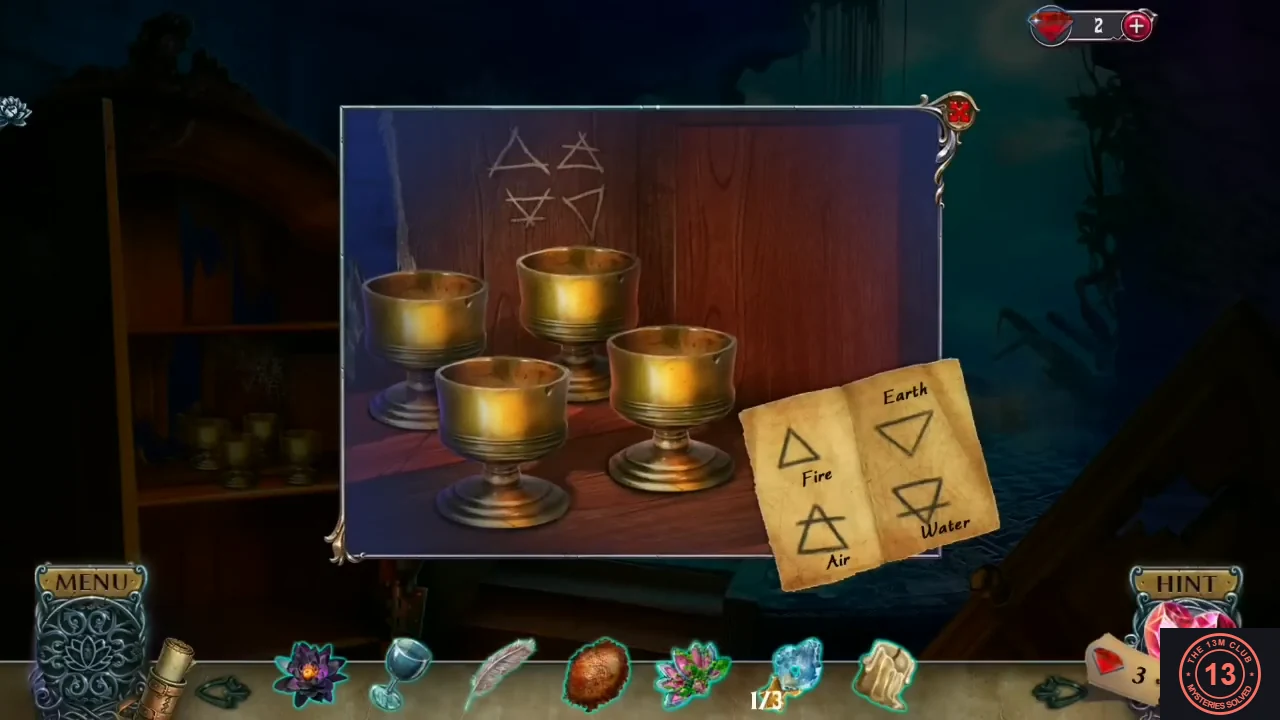
Free the first ice crystal from the bedroom relief, light the torch to open the observatory wardrobe and fill the four goblets with the matching elements.
- Go from the garden back up to the castle bedroom and zoom into the stone relief of the woman with crossed arms. Rub the scented oil on her hands. The hands loosen and lotus petals fan open; take the blue ice crystal piece from the cavity (ice crystals 1/3).
- Zoom into the bedroom fireplace and light the torch in the fire.
- Go back to the observatory and put the lit torch in the empty holder beside the wardrobe on the left. The wardrobe opens: four brass goblets stand on its shelves. Zoom in, take the candle stub from the top-left goblet and place the elemental note beside the goblets. Four element symbols are carved on the back of the wardrobe.
- Puzzle: 'Looks like I need to gather the four elements.' The four symbols carved on the wardrobe back are laid out in the same 2×2 pattern as the goblets: Fire △ (top left) = back-left goblet; Air △ with a bar (top right) = back-middle goblet; Water ▽ with a bar (bottom left) = front-left goblet; Earth ▽ (bottom right) = front-right goblet. Pour the glass of water into the front-left goblet, put the dirt in the front-right goblet and the feather in the back-middle goblet. The unlit candle is refused, so light the candle stub at the lit torch in its holder beside the wardrobe and place the lit candle in the back-left goblet. A red book slides out and falls to the floor; pick it up.
- Place the red book on the podium. The book shows six green triangles, three on each page, and the podium has six hinged arms with arrowhead tips, three on each side. Tap each arm so its arrowhead folds down onto the green triangle at the same height. When all six are in place the book opens: read Raymond's scroll ('If I freeze the lotus and bring it back to the pond, I can reverse its effects.'). Take the ice crystal (2/3) and the glass key handle.
The Third Ice Crystal and the Symmetry Gate
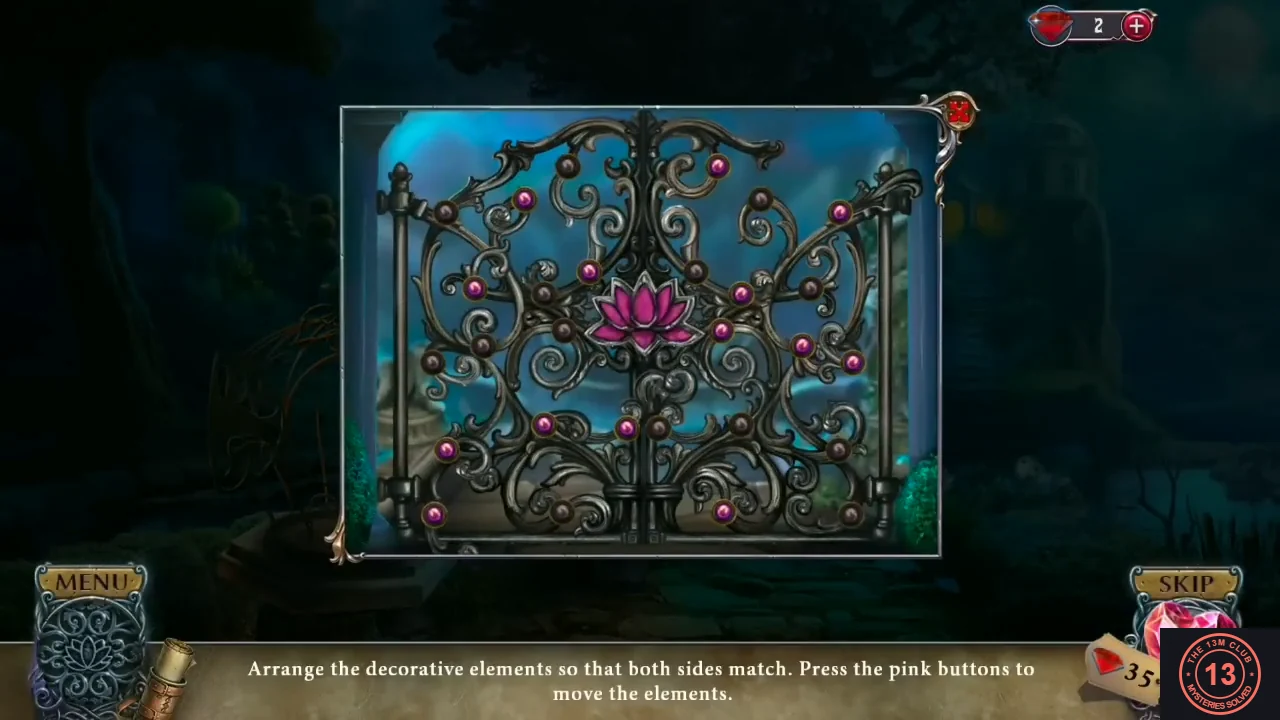
Repair the glass key for the last ice crystal, wash the dirty lotus and use it to open the wrought-iron gate at the back of the garden.
- In the garden, zoom into the flowering bush and join the glass key handle to the broken glass key. It turns into an ice crystal: ice crystals 3/3.
- Go to the bedroom and drop the dirty lotus into the black basin under the golden fish spout in the right foreground. Take the clean pink lotus.
- Return to the garden and zoom into the wrought-iron gate at the back left, behind the topiaries. Place the pink lotus in the lotus-shaped recess in the centre. Puzzle: 'Arrange the decorative elements so that both sides match. Press the pink buttons to move the elements.' The pink buttons stay where they are; pressing them moves the silver scroll pieces. Keep pressing until the scrollwork on one side is the exact mirror image of the other side across the centre post. Compare with the solved gate image: when both halves match, the gate opens. If you get stuck, you can use SKIP.
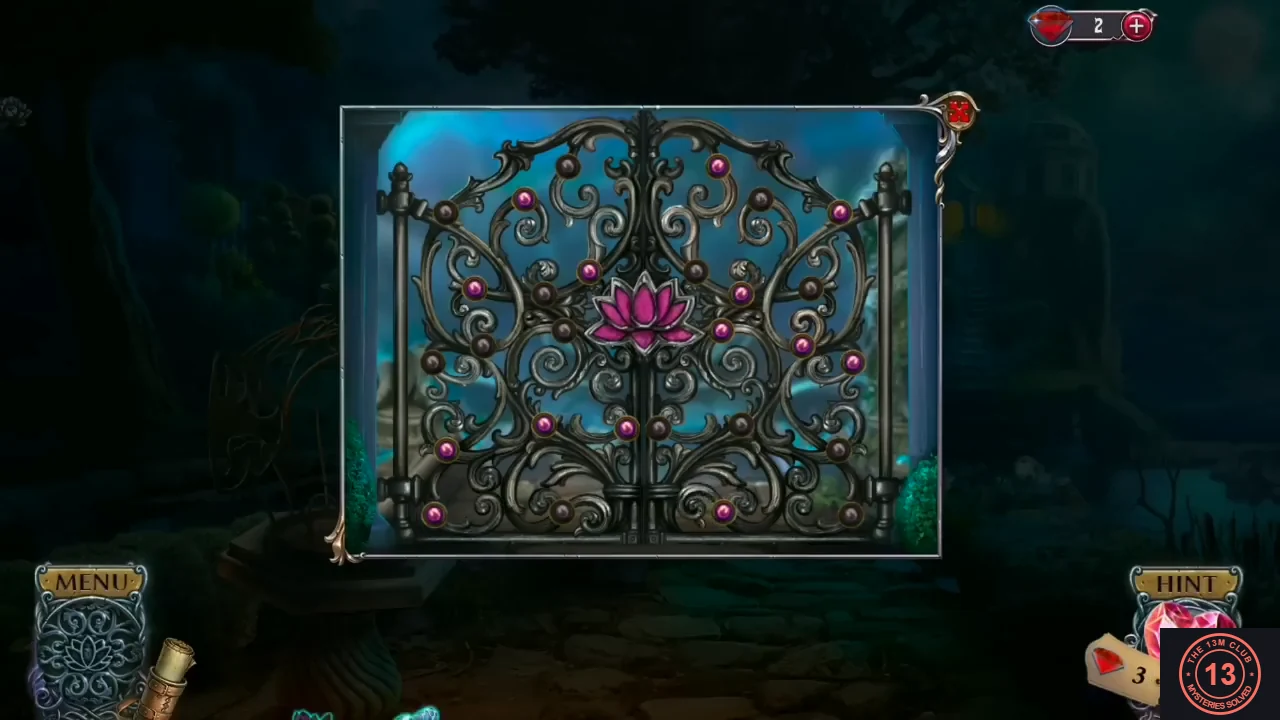
The solved gate: both halves are mirror images.
The Lotus Ritual and the First Face Plaque
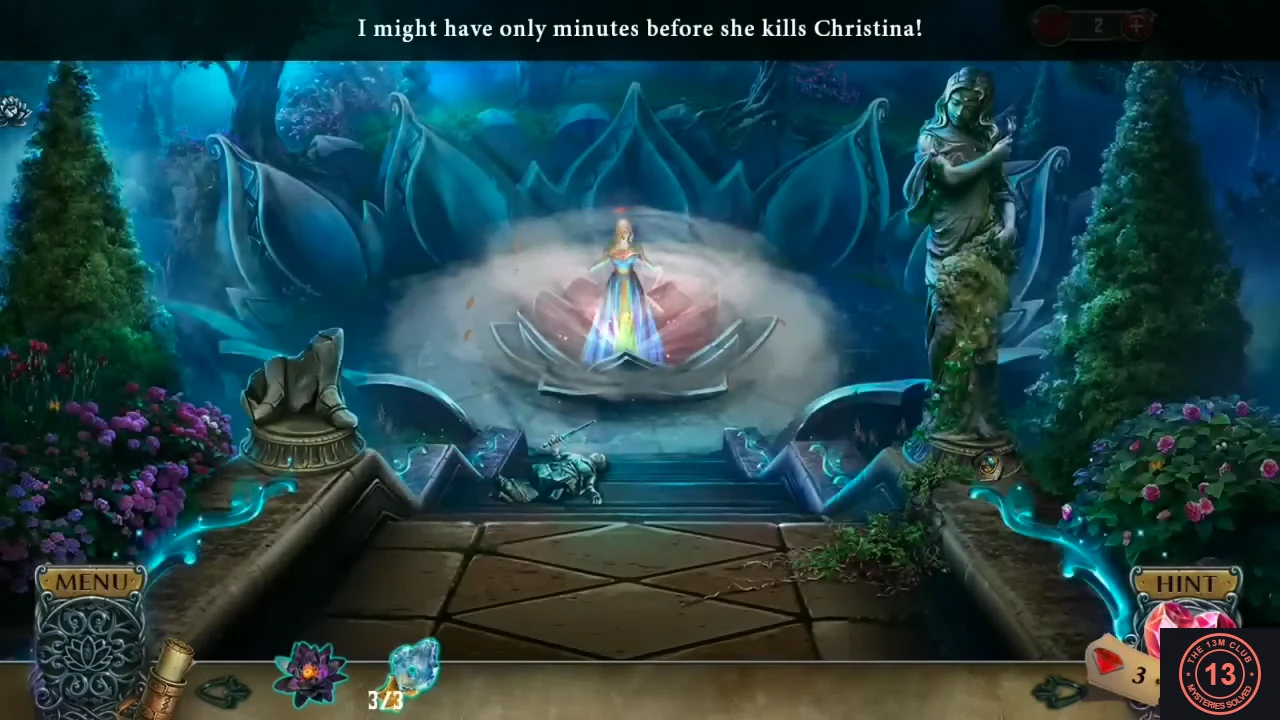
Follow the countess to the ritual courtyard, take the old sword and the face plaque, and break open the observatory floor.
- Go through the open gate. The countess pours a red liquid into the pond and rises inside a giant lotus. New objective: Prevent the countess from finishing the lotus ritual.
- Zoom into the stone hand holding a sword and take the old sword.
- Zoom into the pentagonal face plaque set in a stone base ('It's stuck!') and prise it out with the old sword. Take the face plaque. The black lotus and the sword do nothing at the lotus dais yet.
- Go back through the garden to the observatory and zoom into the cracked floor. Smash it with the old sword to reveal a wooden hatch with a lotus medallion ringed by face plaques, with two empty slots at the top and bottom. Put the face plaque in the top slot. You still need another plaque.
- Optional collectible: the ritual courtyard hides 2 phoenixes. Tap the mossy lower robe of the ivy-covered statue on the right, and the purple-blue shrubs at the upper left, between the tree trunk and the curled stone wing.
Hidden Objects: The Skull Plaque and Freezing the Black Lotus
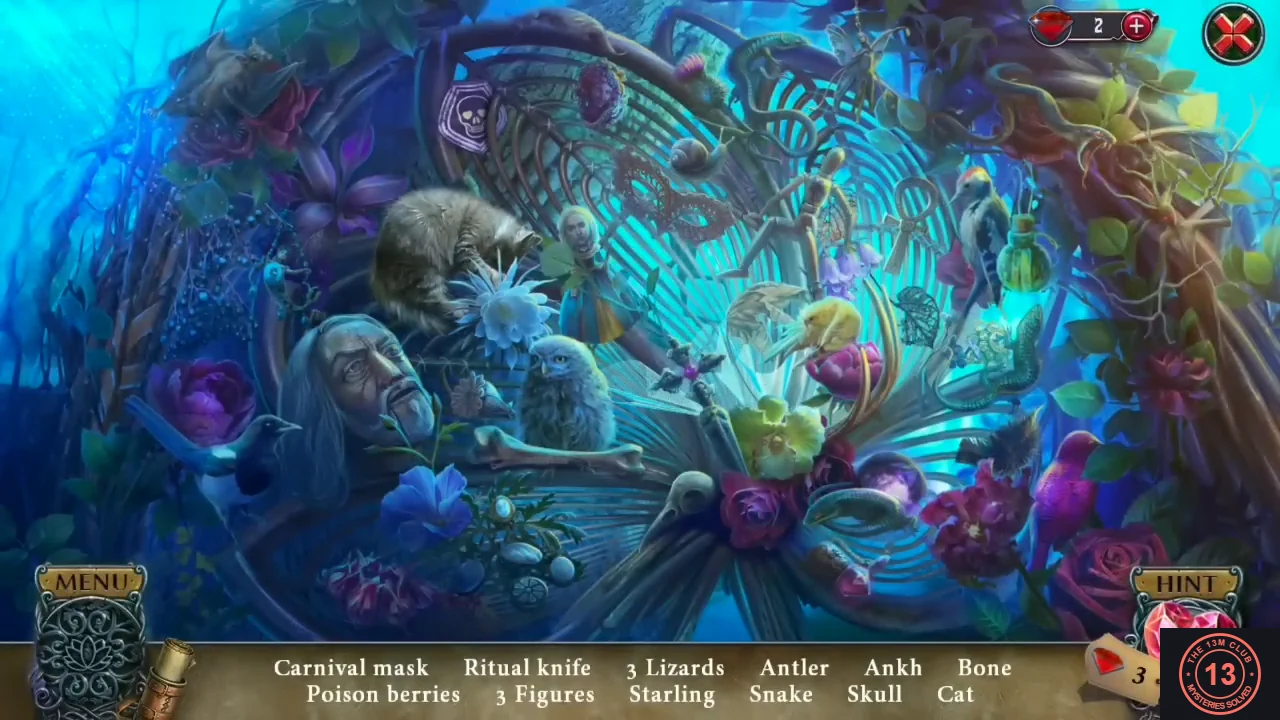
Search the garden arbor once more for the second face plaque, open the observatory hatch for the medallion and use the ice crystals to freeze the black lotus.
- Return to the garden and enter the hidden-object scene beyond the gate again. Find: the purple skull badge at the top left of centre; the grey tabby cat lying above the old man's bust; three figures (the doll girl in a yellow and blue dress in the middle, the old man's bust at the lower left and the wooden artist's mannequin at the upper right); the lacy carnival mask on the arch left of the mannequin; the long bone to the right of the old man; the blue poison berries at the far left; three lizards (a curled green lizard at the right of centre, a green lizard on top of the arch and one on the branch at the top right); the grey-green snake coiled under the purple orb at the lower right of centre; the small ritual knife with a pink gem in the middle; the curved yellow antler beside the pink peony; the ankh at the upper right of centre; and the purple starling at the lower right. Take the reward: the skull plaque.
- Go back to the observatory and zoom into the hatch. Put the skull plaque in the empty bottom slot. The plaques spread apart and a round gold-and-teal medallion rises from the centre; take it.
- Open the medallion in your inventory to examine it. It has three diamond-shaped sockets: put the three ice crystals in them. The medallion opens to reveal a glass flask ('I need to freeze the lotus to reverse its effects.'). Put the black lotus in the flask. It freezes into a white lotus ('Alright! Now I just have to bring it to the pond.'). The flask with the frozen lotus goes to your inventory.
The Final Lotus Board and the Ending
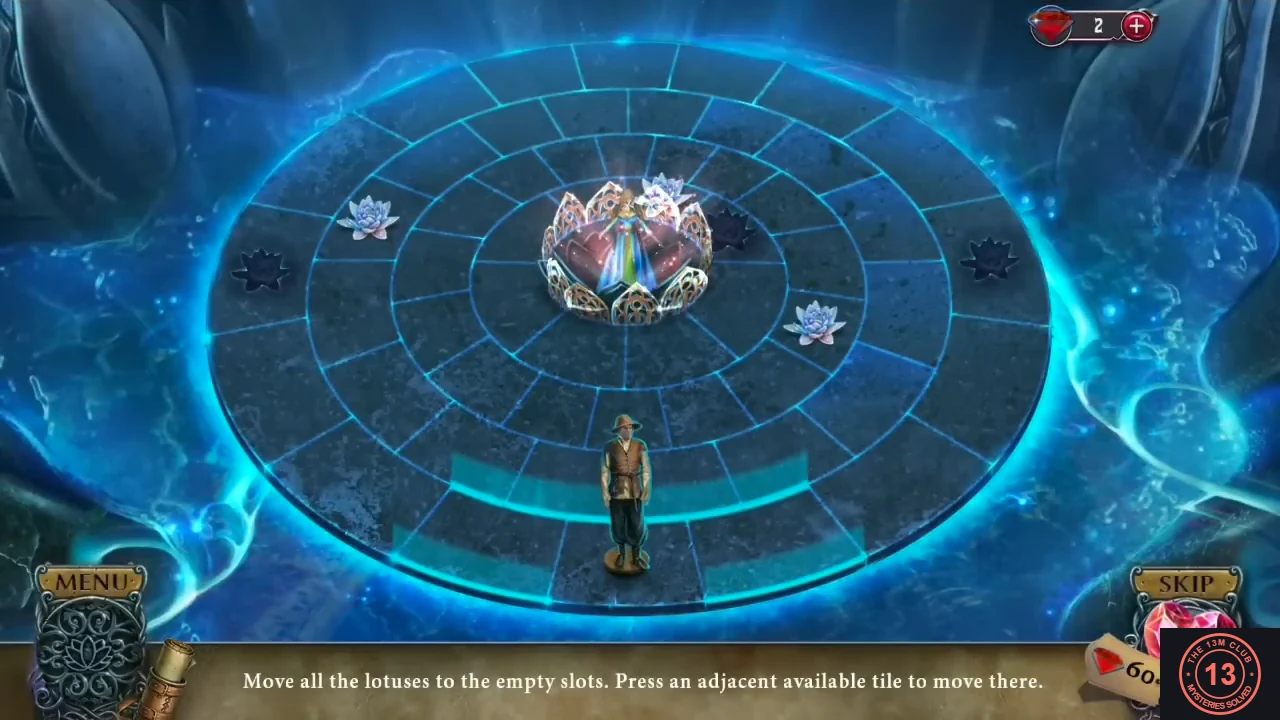
Bring the frozen lotus to the countess, then carry the three white lotuses into the three dark slots on the ring board to break her ritual.
- Go through the garden to the ritual courtyard and use the frozen white lotus on the countess's giant lotus. 'I can't reach her! She's blocking me somehow.' The final board puzzle starts.
- Puzzle: 'Move all the lotuses to the empty slots. Press an adjacent available tile to move there.' The board is four rings of tiles around the countess, who stands inside a cage of petals. Your figure starts at the bottom of the outer ring. Tap a highlighted tile next to your figure to move one tile. Step onto a white lotus to pick it up and step onto a dark lotus slot to put it down. There are three white lotuses: one on the second ring to the right of the countess, one on the third ring at the upper left and one in the innermost ring directly behind the countess. There are three dark slots: one on the outer ring at the far left, one on the outer ring at the far right and one in the innermost ring to the upper right of the countess.
- Walk along the outer ring to the right side, then up the right side to the top right. Step into the second ring and walk down onto the lotus to the right of the countess to pick it up. Carry it back down the right side, along the bottom of the board and up the left edge to the dark slot at the far left of the outer ring.
- Walk round to the top of the outer ring and along it to the upper left, then step down onto the lotus on the third ring at the upper left to pick it up. Carry it back out to the outer ring and clockwise across the top to the dark slot at the far right. Part of the petal cage around the countess falls away.
- Walk to the second ring directly below the countess and step up into the innermost ring. Go round the left side of the innermost ring to the top and pick up the lotus behind the countess. Carry it back round the left side and the bottom to the dark slot at the upper right of the countess. When all three slots are filled, the puzzle is solved.
- Watch the ending. The frozen lotus breaks the curse on the pond, the countess ages, and a bearded man runs to her ('Lis, I'm coming!') and stays at her side as the giant lotus closes. The trapped spirits are freed and Christina wakes up young again. You return to the main menu with the message 'Well done! You may now access the bonus game!'