Lion Node Board
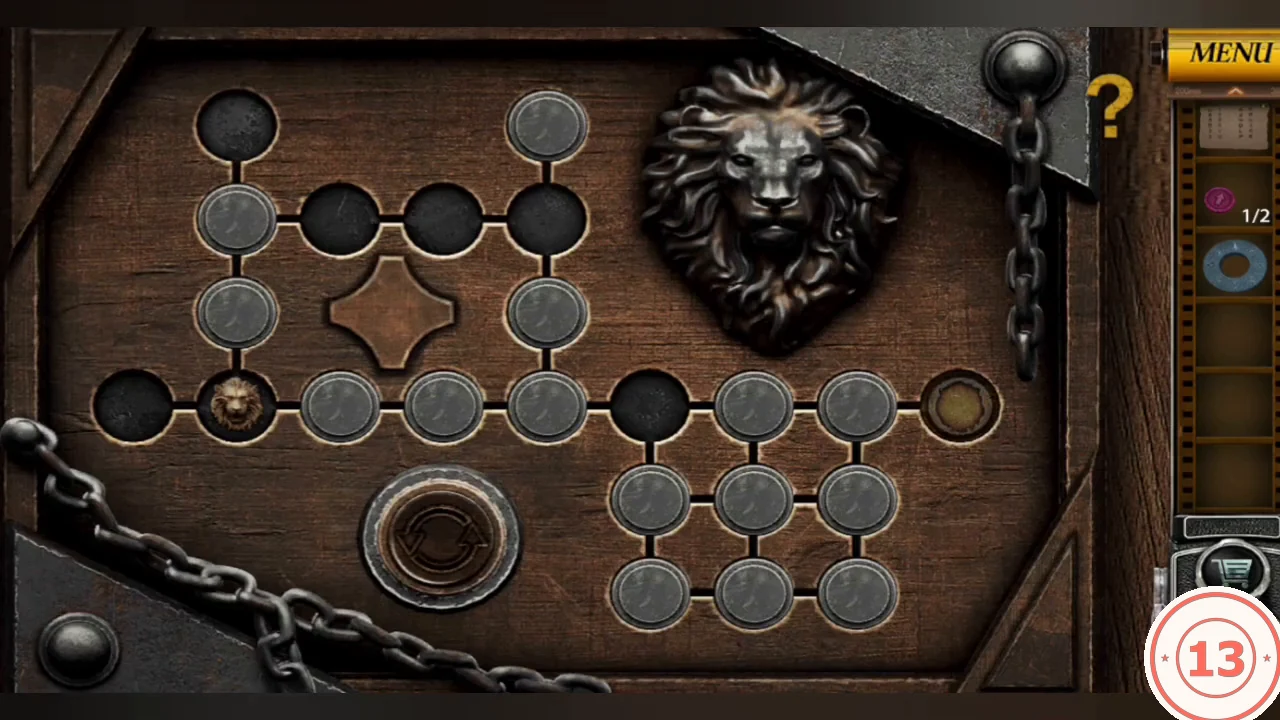
Collect three items in the cellar, then solve the lion board in the box on the centre table. Its nodes form a loop of eight at the top left, a middle track leading right to a gold socket and a 3x2 block at the lower right. Grey discs fill most nodes.
- Take the Lion Head medallion from the top of the candle niche on the back wall.
- On the left wall by the hay, take the pink arrow token (1/2) from the red round button left of the wooden tile panel. The panel itself is solved at the very end.
- In the bed niche, move the pillow and take the blue stone ring.
- Place the Lion Head on the top-left node of the table box.
- Tap a disc next to an empty node to slide it (and any straight line of discs behind it) into the gap. Clear the middle track: park grey discs in the top loop and the lower-right block until the lion's path to the gold socket is open, then tap the lion to slide it into the socket. Just before the end, all eight loop nodes and all six block nodes were filled, one grey disc sat on the track behind the lion and the three nodes before the socket were empty.
Bottle Arrow Discs
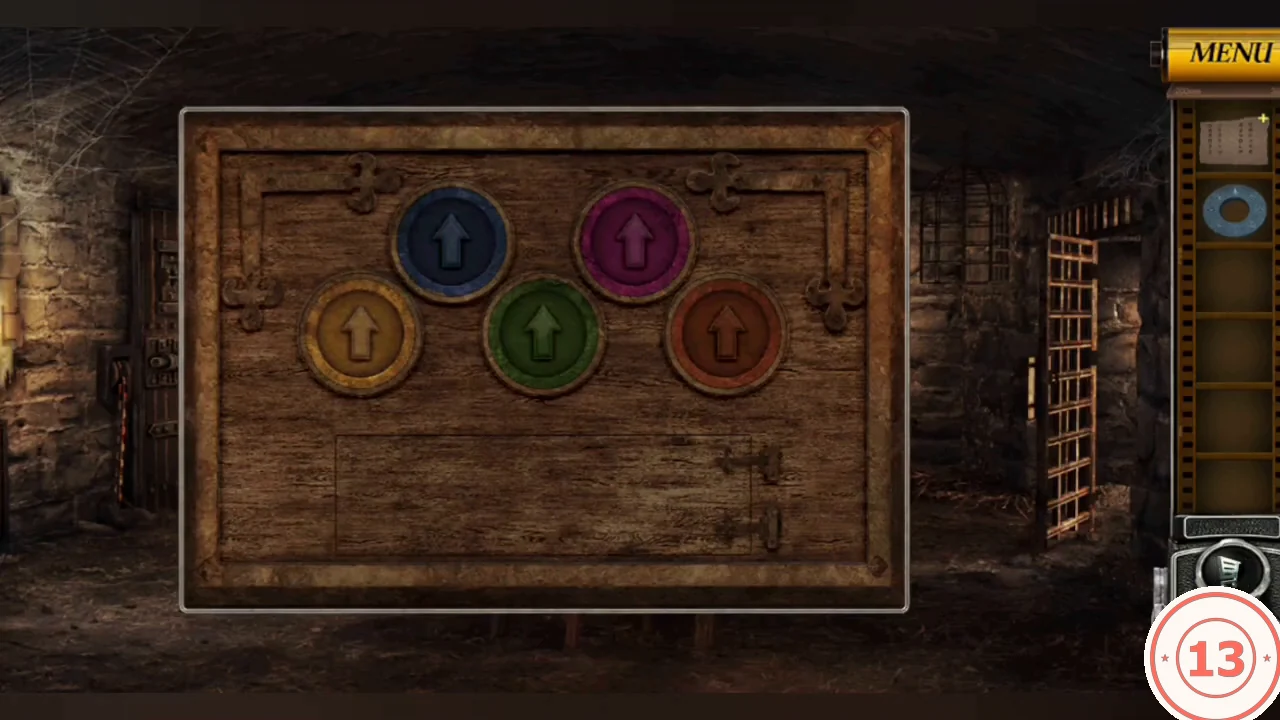
The lion chest holds five bottles with coloured stoppers. The framed panel above the bed has five arrow-disc sockets; blue, green and red discs are already there.
- In the opened lion chest, tap among the bottles to find the orange arrow token (2/2). The bottles' stopper colours and tilts are the clue.
- Place the tokens in the panel above the bed: orange-yellow in the left socket, pink in the upper right.
- Tap discs to turn them so the arrows point like the matching bottles: yellow-orange down right, blue up right, green down, pink right, red up left. Take the bronze chalice token from the lower hatch.CODEYellow ↘, blue ↗, green ↓, pink →, red ↖
Bear Head Flame Ring
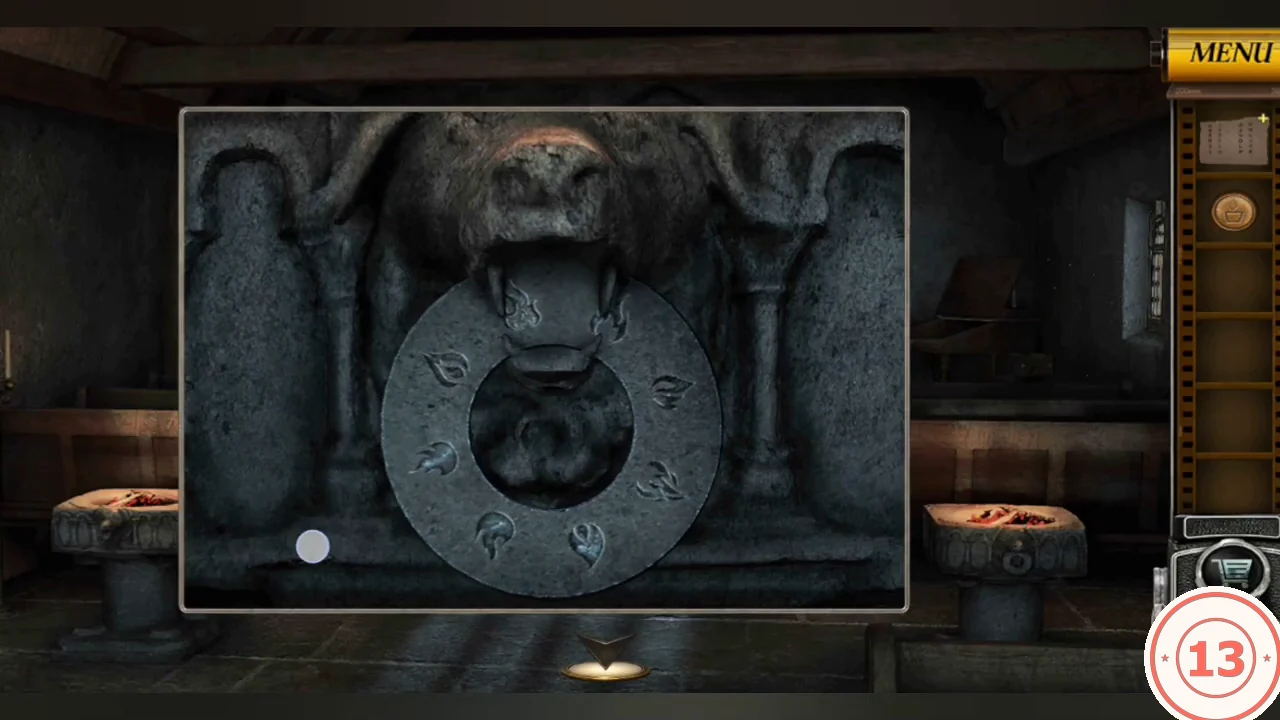
A carved bear head holds a ring of eight flame symbols. One is above the left font in the nave and one is in the back altar room. The eagle carving on the left wall of the cellar's bed niche, with flames on its wings and talons, is the clue.
- In the chapel nave, put the blue stone ring in the mouth of the bear head above the left font. Turning this ring does not open anything, and it resets when you leave. The working ring is in the altar room.
- In the back altar room, drag the ring in the bear head's mouth three notches (135°) clockwise from its starting position. The upright two-tongued flame ends at the top and the reddish teardrop flame at the upper right.
- A box rises from the nave floor. Take the second chalice token from its top.
Candle Niche Heights
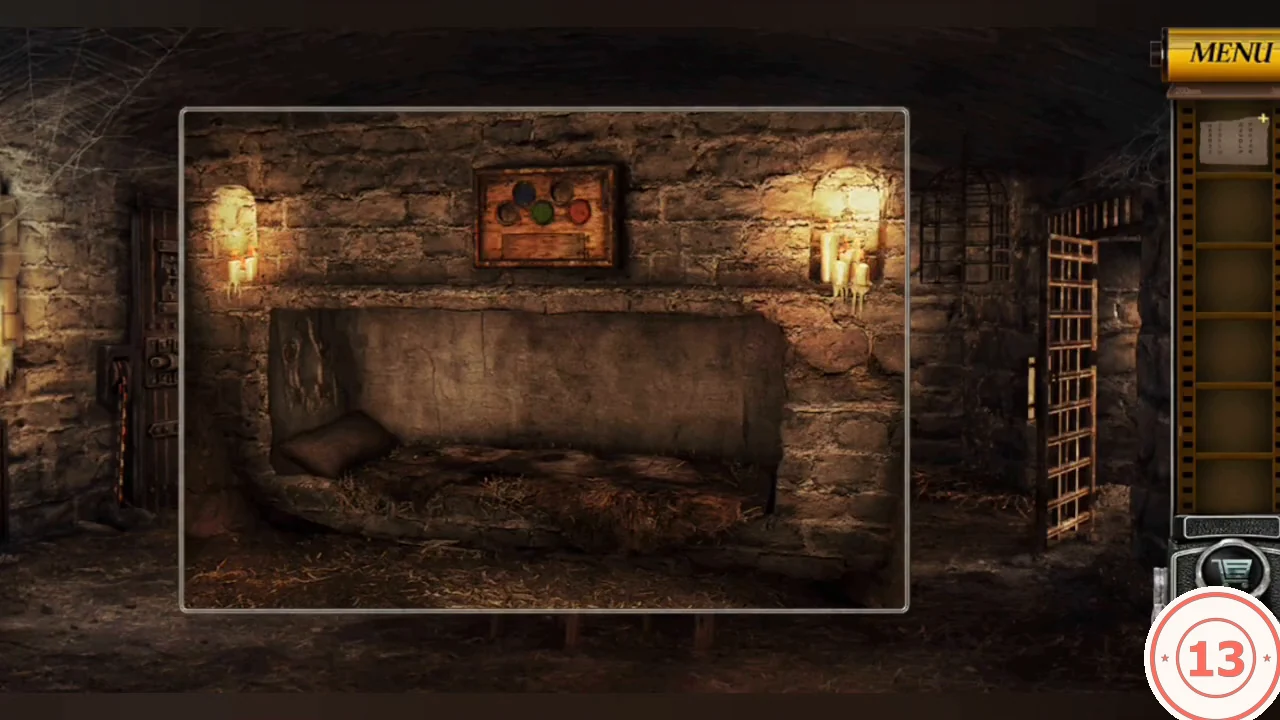
The cellar has four candle niches, left to right: a narrow sconce at the far left, a narrow sconce between the wooden door and the ladder, and two wide niches on the back wall. Each holds a token you can drag down to one of several pegs.
- Place the two chalice tokens (Candle Piece) in the two wide back-wall niches.
- Behind the pillow in the bed niche, four arched panels each have one mark: left to right, lower middle, high, low and upper middle.
- Set each niche to match its arch, left to right: far-left sconce on the second peg below the top, second sconce left at the top, back-left niche on the lowest peg, back-right niche on the first peg below the top. The left dungeon door opens.CODE2nd peg, top, lowest, 1st peg
Sofa Numbers and Grandfather Clock
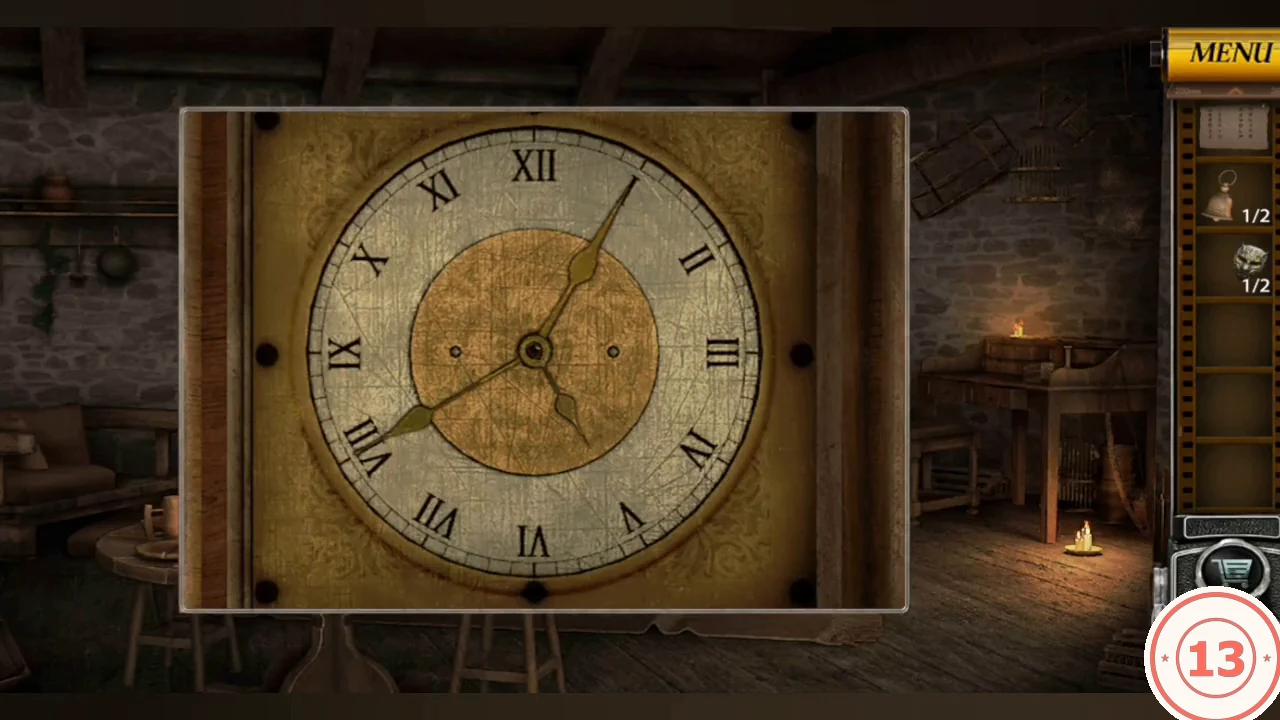
Behind the left dungeon door is a cabin-style room with a table chest, a grandfather clock, a desk and a sofa.
- Lift the floor cloth and take Bell 1/2.
- Move the sofa cushion. Take Mask 1/2 and note the carving V : VIII : I.
- Set the grandfather clock hands: short hand to V, long hand to VIII, thin third hand to I. Take the gold bell (Bells 2/2).CODEV, VIII, I
Symbol Wheel Chart and Table Chest
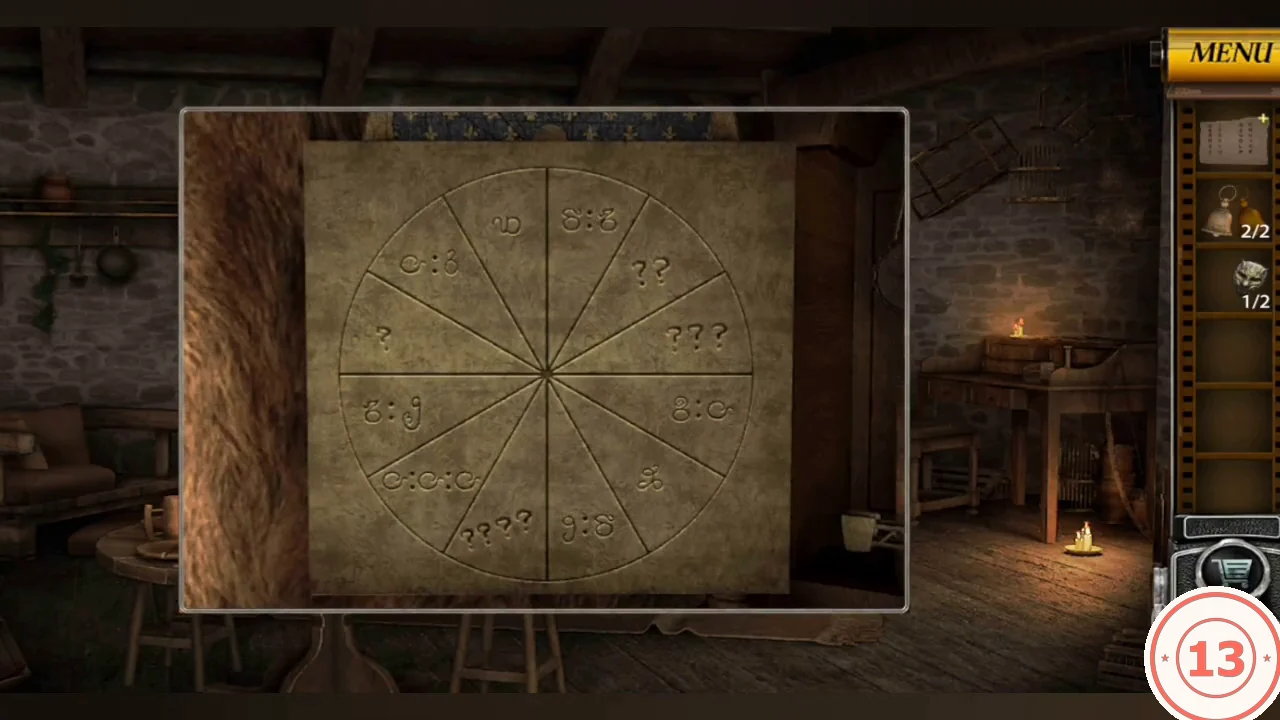
The wheel chart behind the fur pelt has twelve sectors. Four show one to four question marks; the others show numeral symbols from the Clue Image.
- Each question-mark sector equals the sum of the numerals in the opposite sector: ? = 4, ?? = 3, ??? = 10, ???? = 6.
- Turn the four dials on the table chest (each steps from I to XII) to IV, III, X, VI.CODEIV, III, X, VI
- Take the Confidential Agreement note (its five helm icons are the next clue) and the ship's helm Wheel.
Clock Helm
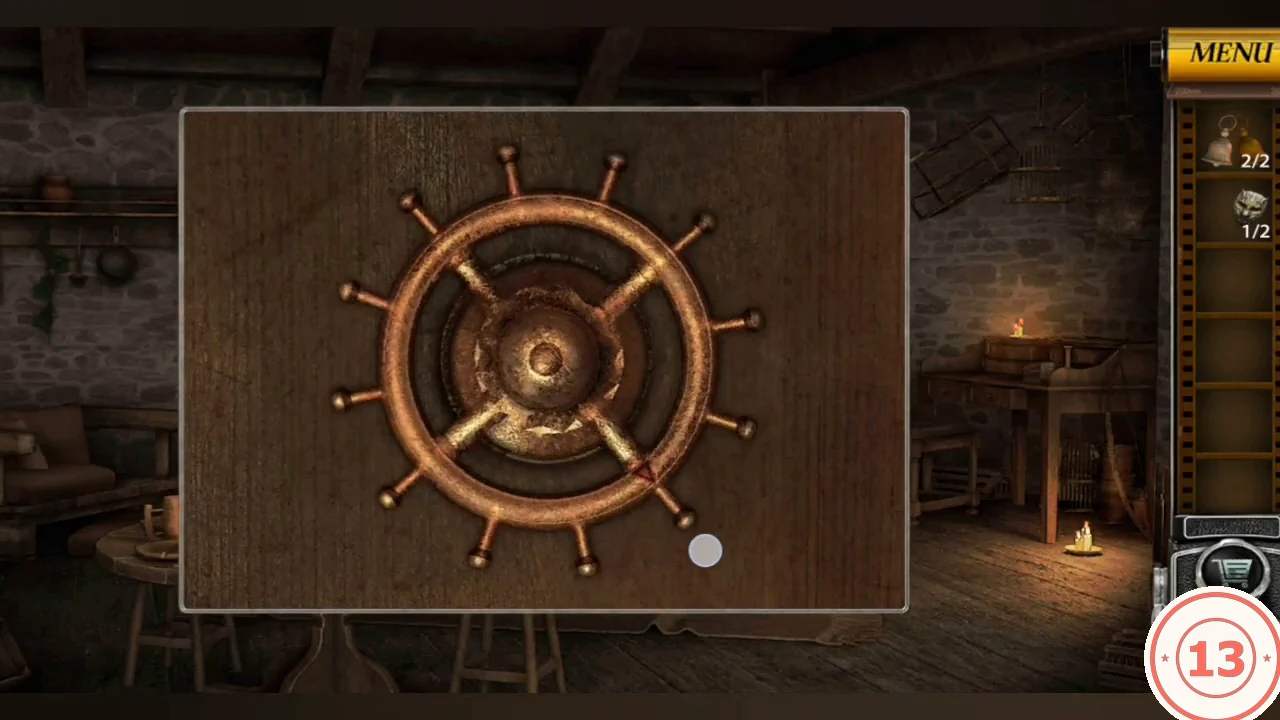
The grandfather clock takes both bells and the helm. Drag the helm so its red rim arrow points where each icon on the note shows.
- Use the Bells on the clock, then place the helm Wheel on its lower panel.
- Drag the helm, pausing at each position in order: about 5 o'clock, 12, about 4 o'clock, 9 and about 1 o'clock. The clock case opens.CODE5, 12, 4, 9, 1 o'clock
- Tap the bottom of the clock case and take Mask 2/2. The three gear rings at the top of the clock cannot be used yet.
Mask Board
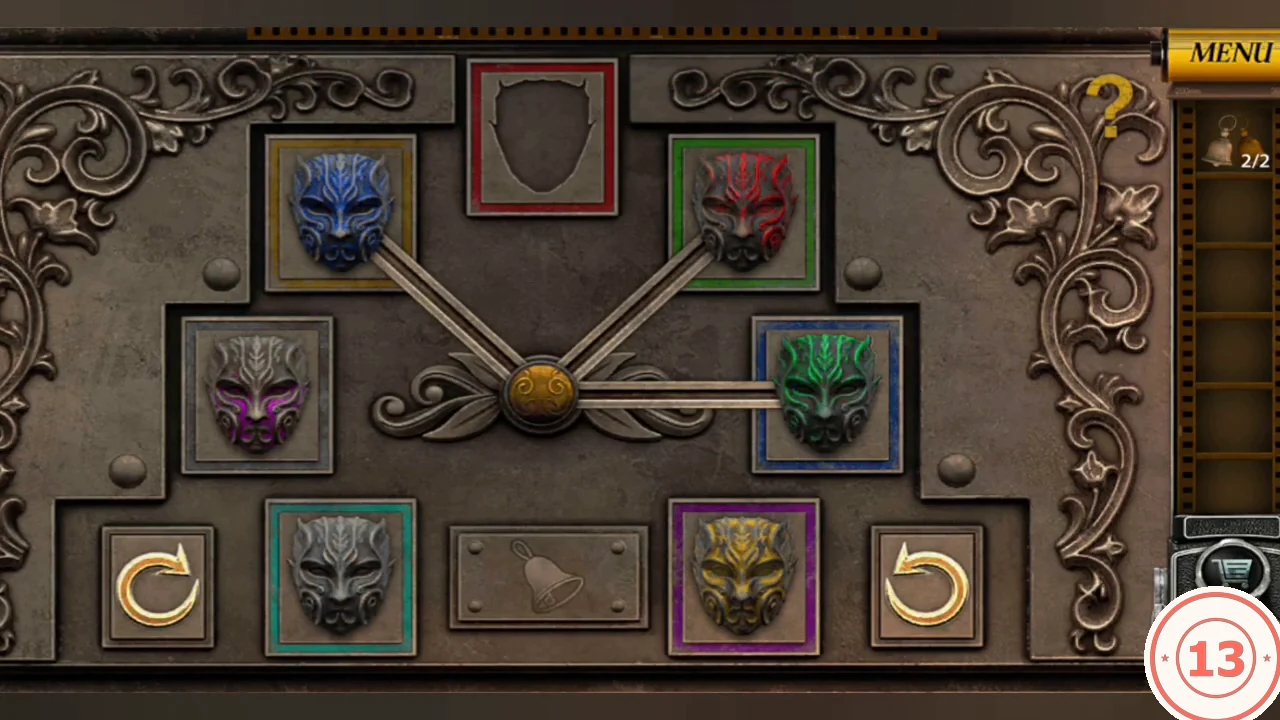
The board on the wooden plank right of the door has seven coloured frames around a hub (top red, upper right green, right blue, lower right purple, lower left teal, left grey, upper left gold); the bottom holds a fixed bell plate. Three rotor arms point from the hub. The left button turns them 45° clockwise and the right button 45° counter-clockwise. Tapping a mask at an arm's end slides it to the empty slot at another arm's end.
- Place both Masks on the board. Starting layout: blue upper left, red upper right, green right, purple left, grey lower left, yellow lower right, top empty; arms at upper left, upper right and right.
- Finish with red top, green upper right, blue right, purple lower right, grey left, yellow upper left and the teal lower-left frame empty. From the start shown, this sequence follows those rules and never turns an arm onto the bell plate (Left/Right = the buttons; a colour = tap that mask). Group 1: Left, green, Right, blue, red, Right, purple, green, Right, grey, red. Check: grey top, purple upper right, blue right, yellow lower right, red lower left, green left, upper left empty. Group 2: Left, Left, blue, purple, Right, green, grey. Check: top empty, green upper right, purple right, grey left, blue upper left. Group 3: Left, Left, yellow, purple, Right, blue, Right, Right, yellow, red. If a mask does not move, check that the arms point where the last check says and that the empty frame is at an arm end.CODE28 moves in three checked groups
- Watch the mask eyes light in a repeating cycle: blue, grey, purple, green, yellow. Red never lights.
Bell Lintel
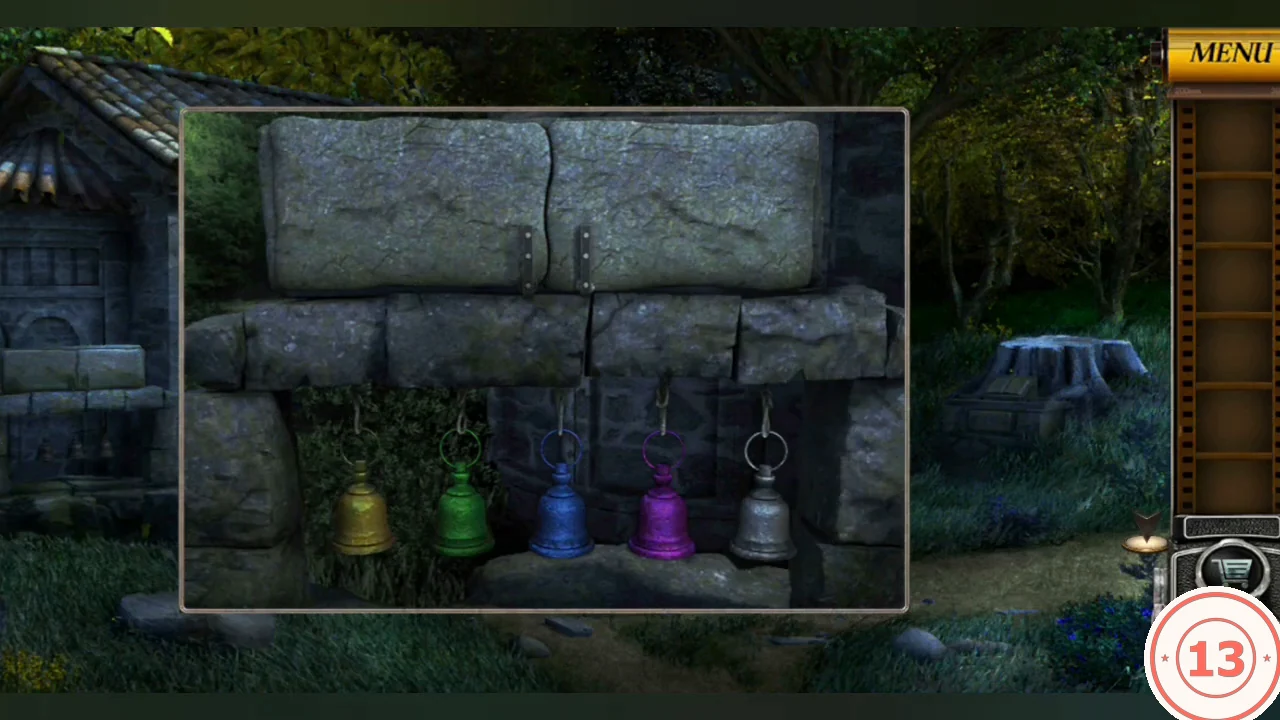
Outside the cabin, a stone lintel has green, blue and purple bells hanging and two empty hooks.
- Hang the Bells on the empty hooks: gold at the far left, silver at the far right.
- Ring the bells in the eye order, reading the gold bell as yellow and the silver bell as grey: blue, silver, purple, green, gold. The lintel opens; take the Circular Piece and the Clue Note.CODEBlue, silver, purple, green, gold
Clock Gear Rings
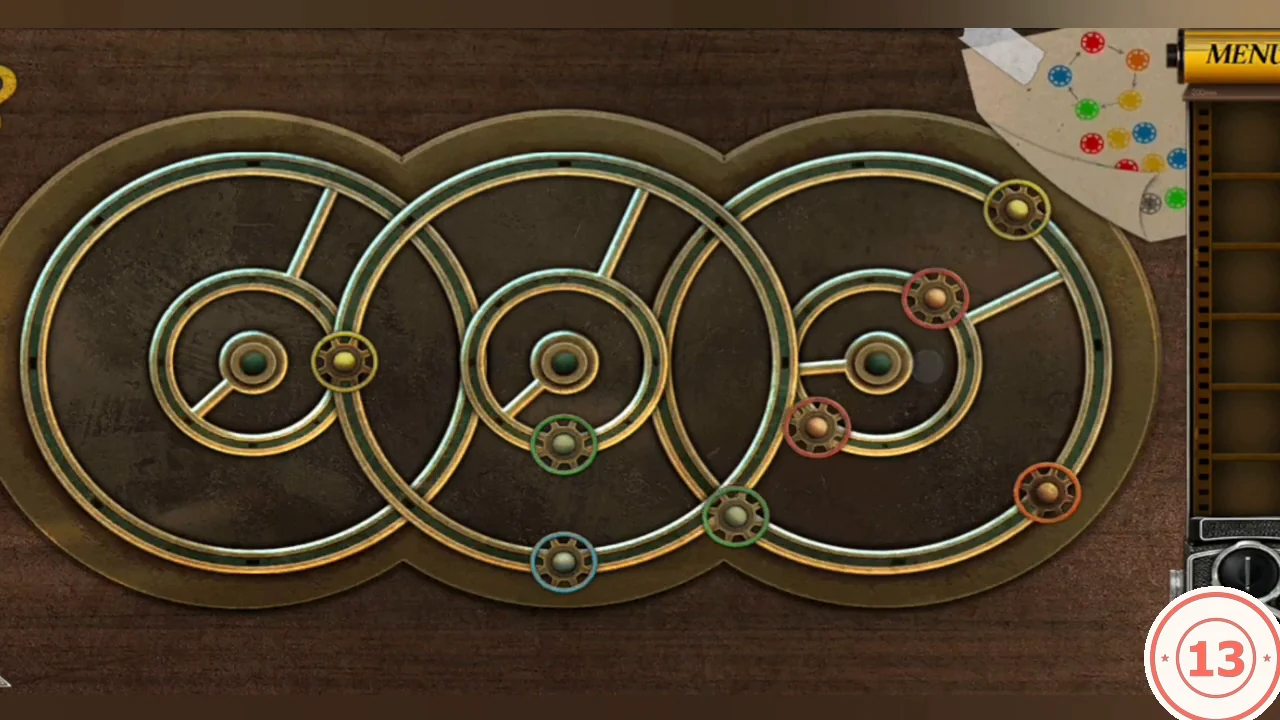
The clock top has three overlapping wheels, each with an outer and inner track. Tapping a wheel's centre turns that whole wheel one eighth clockwise, carrying any disc on its tracks, including discs where it overlaps a neighbour. The wheels share eight positions: four on the centre line, where one wheel's inner track touches the next wheel's outer track, and four where neighbouring outer tracks cross.
- Place the Circular Piece (yellow disc) in the empty socket on the left wheel's inner track.
- The Clue Note shows the colour cycle red, orange, yellow, green, blue, with each disc two steps along from the last. The answer row is green, red, yellow, blue, orange, green, red, yellow.
- Goal: all eight discs on the horizontal centre line in that order from left to right. Start from the layout right after placing the piece: yellow on the left wheel where it touches the middle wheel; on the middle wheel, green at the bottom of the inner track and blue at the bottom of the outer track; on the right wheel, yellow at the top and orange at the right of the outer track, green at the bottom of the outer track, and red at the top and bottom of the inner track. Tap the wheel centres (L = left, M = middle, R = right) in this order, 27 taps: L R R M L R M L M | M M L M R R R R R | L M R M R M L L L. Check after the first nine taps: yellow sits at the lower right of the right wheel's outer track, and red sits at the bottom of the middle wheel's inner track. After eighteen taps, yellow and red sit at the top of the right wheel's outer and inner tracks, and green sits at its bottom. If you turned wheels before starting, undo each earlier tap first by tapping that same wheel seven more times, working back from your last tap.CODEL R R M L R M L M M M L M R R R R R L M R M R M L L L
- Take the round orange token from the clock's lower drawer.
Flip Path Panel and Ending
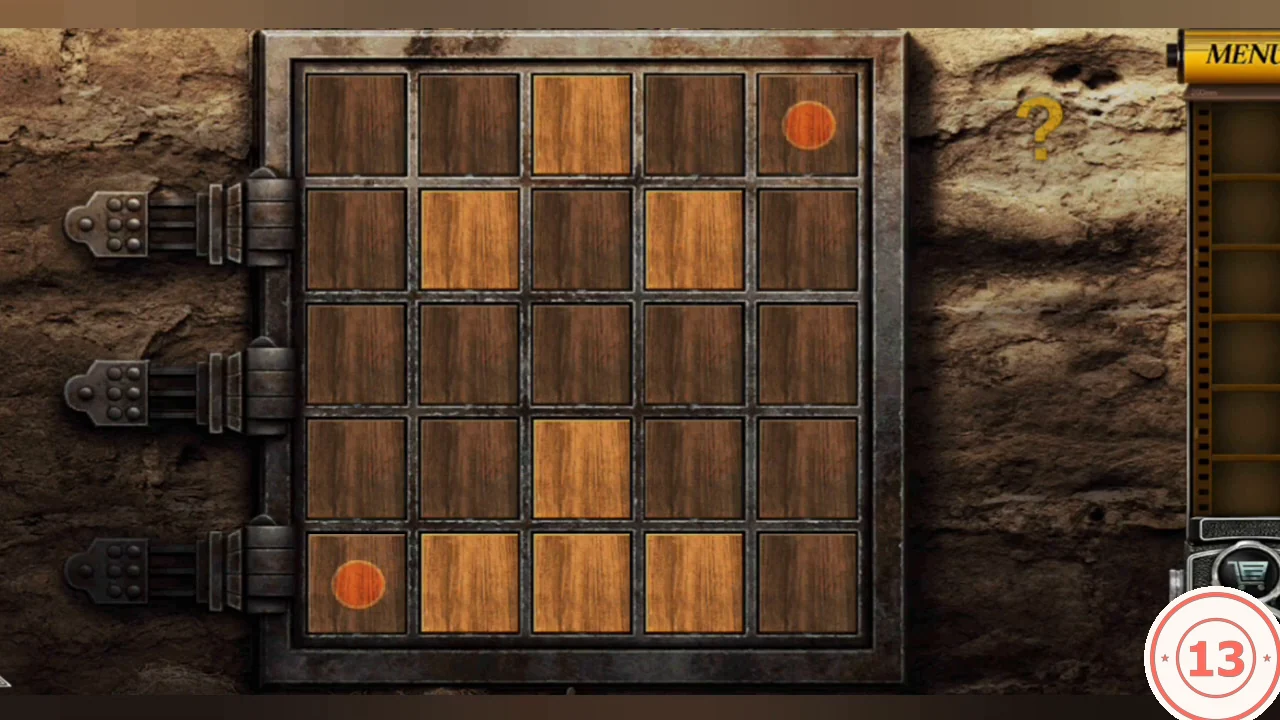
The wooden 5x5 panel on the cellar wall flips tiles along a dragged path. Start a drag on an orange dot; every cell the path crosses flips between light and dark when you let go. Make all 25 cells light.
- Place the orange token in the empty round socket at the panel's top right. Starting layout (rows top to bottom, columns left to right): light cells at r1c3, r2c2, r2c4, r4c3, r5c2, r5c3 and r5c4; orange dots at r1c5 and r5c1.
- Path 1: from r1c5 drag to r1c4, r2c4, r2c5, r3c5, r4c5, r5c5, r5c4, r5c3, r5c2.
- Path 2: from r5c1 drag to r5c2, r5c3, r5c4, r4c4, r3c4, r2c4, r2c3, r3c3, r3c2, r4c2, r4c1, r3c1, r2c1, r1c1, r1c2. Every cell turns light and the panel opens.
- Take the ledger from the alcove. It is photographed automatically, and the ending cutscene plays.