Red Wells: The Trailer Park Gate
After Bishop's funeral, Laura sends agent Raymond Cooper to Red Wells near McConnell Dam. Talk to the locals and open the gate to the trailer park.
- On the Red Wells street outside Big Dave's Eats your task is to talk to the locals. Collectible: Soda can 1/8 is on the street; a morphing object glints at the lower right near a tyre.
- Enter the diner and talk to the waitress. New task: meet Frank in the trailer park. Take MUSICAL NOTES (1/4) from the booth table with the newspaper. Collectible: Soda can 2/8 is by the left booths.
- On the street, take the KNIFE from the green car on the right.
- In the diner, cut the stitched cushion of the red bar stool with the KNIFE and take the KEY. A morphing object is at the left near the window.
- Unlock the ICE freezer left of the diner with the KEY. Take the TONGS and use them on the ice block to take the FLAG.
- Place the FLAG in the flag-shaped recess on the lock of the chain-link gate on the trailer-park path.
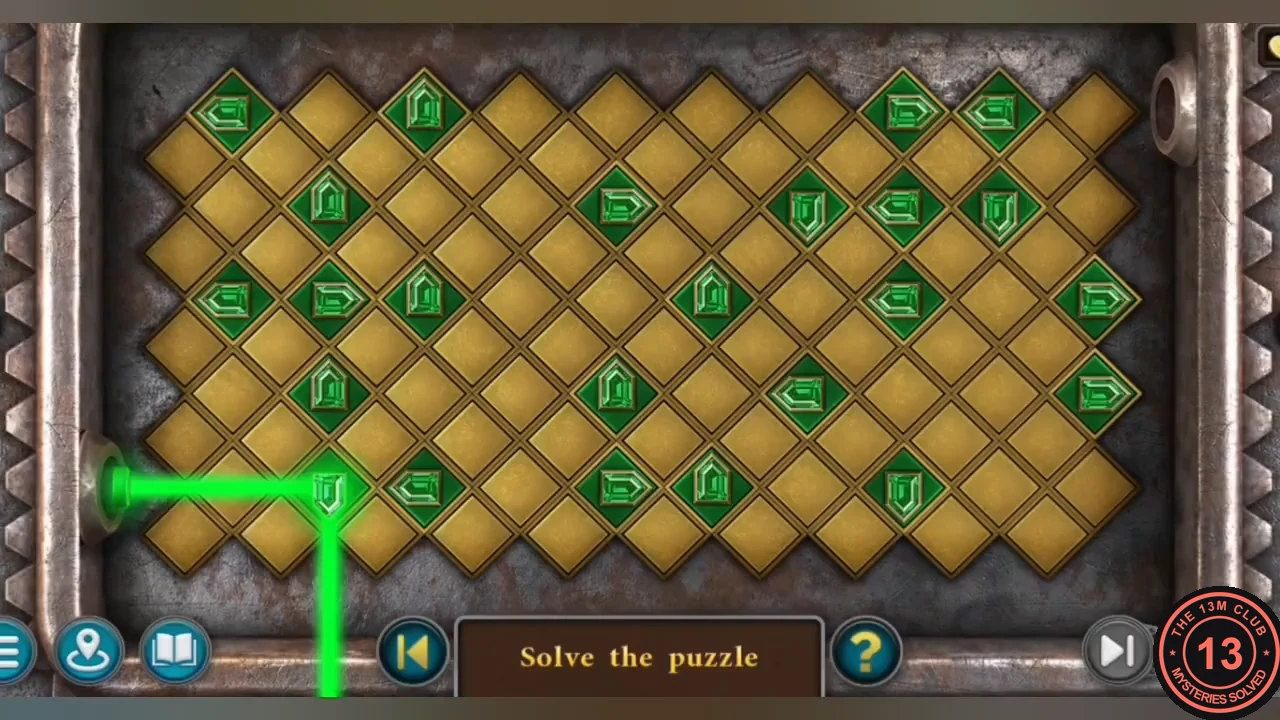
- Beam puzzle: click the green arrow tiles on the diamond grid to turn them. Guide the green beam from the emitter on the left, tile by tile, to the receptor at the top right. See the solved-state image.
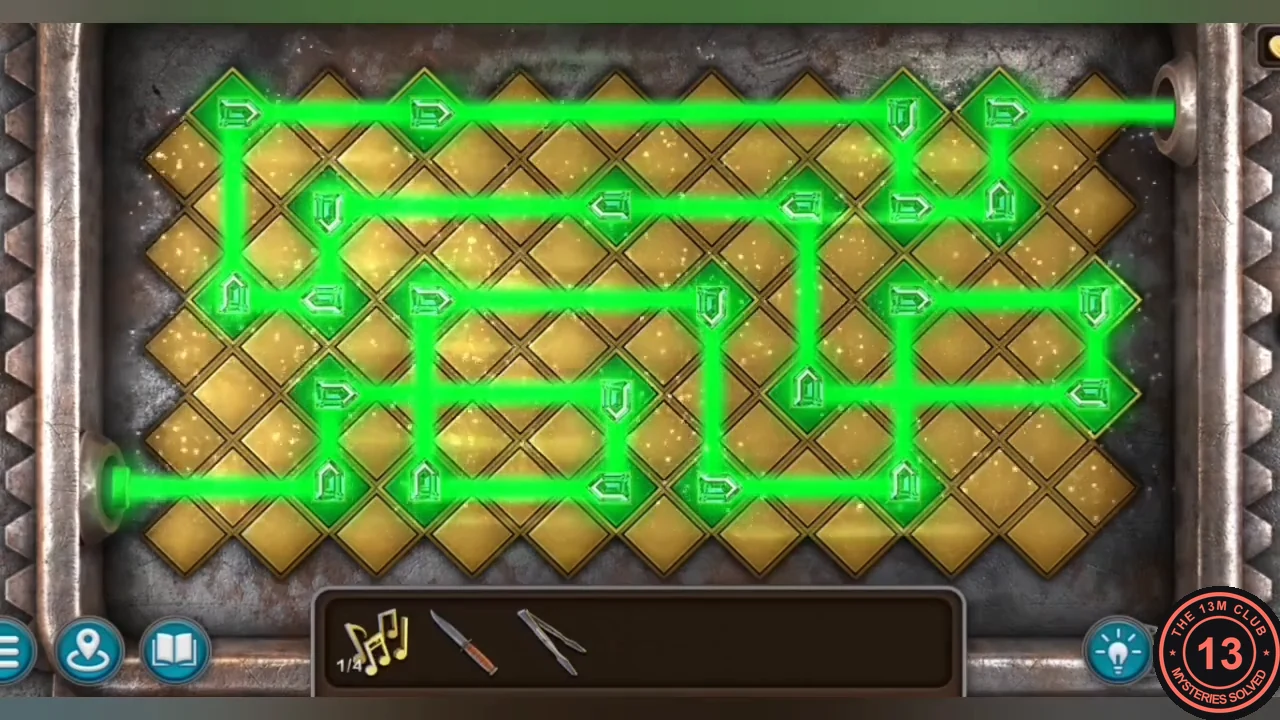
Solved: the green beam runs tile by tile from the emitter at the lower left to the receptor at the top right.
Big Dave's Eats: The Arcade Lemons
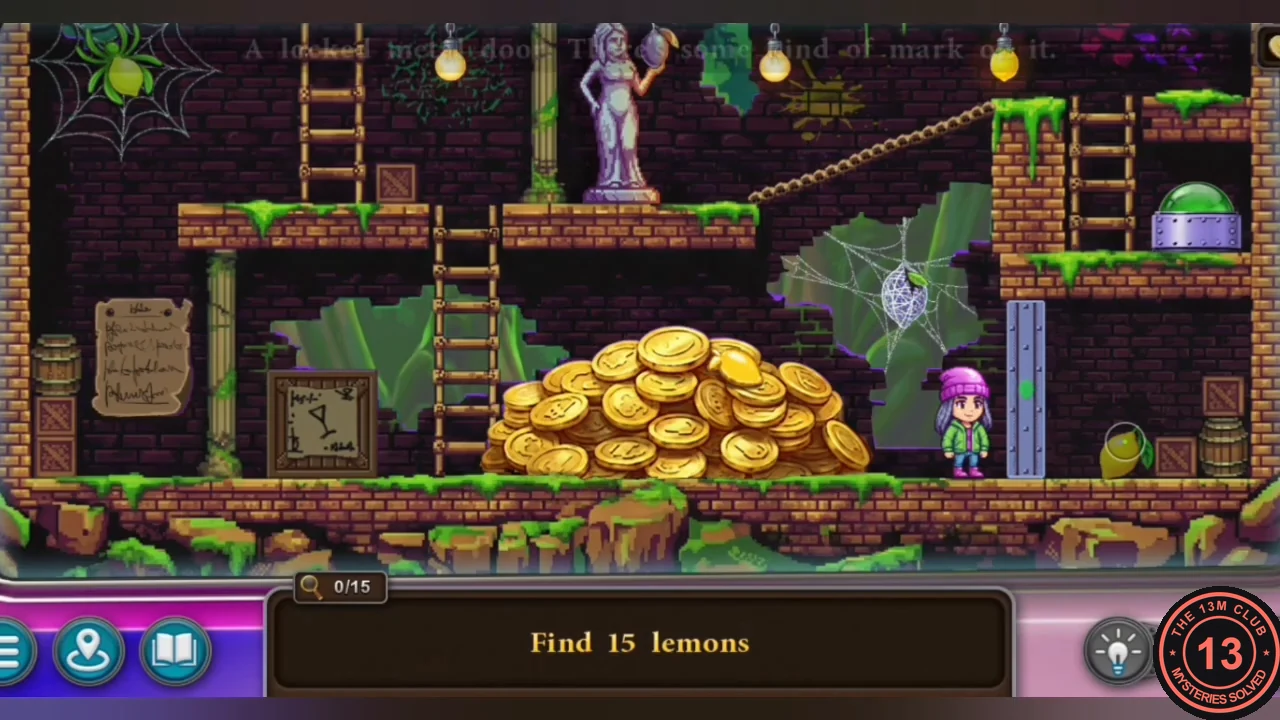
Frank has lost his key. Collect the parts to repair the diner's arcade machine and win the key from it.
- In the trailer park, talk to the man in the chair – Frank. He has lost his key (task: find the key). Take MUSICAL NOTES (2/4) from the trailer's upper window. Collectible: Life ring 1/8 glints on the right of the trailer roof; a morphing object is at the left by the bicycle.
- Cut the flagpole rope tied to the wall cleat left of the trailer with the KNIFE. The flag drops; take the CLASP from it. Open the bicycle's saddle bag with the CLASP and take the SCREWDRIVER.
- On the street, take the SEASHELL from the wooden swing on the left. The symbols on the swing have been painted over.
- Place the SEASHELL in the lock of the gate on the left of the trailer park and go down the stairs to the shore. A morphing object is high in the sky at the top centre.
- Take the JOYSTICK from the hull of the rowboat on the shore. Collectible: Life ring 2/8 is on the left by the water. Take the TOKEN from the gate control box (its code is the painted-over symbols on the swing).
- In the diner, put the TOKEN in the gumball machine on the counter and take the ELECTRICAL TAPE. Repair the frayed power cable of the arcade cabinet with the ELECTRICAL TAPE and plug it in.
- Fit the JOYSTICK on the arcade control panel and press START.
- Arcade game: walk the pink-haired hero and climb ladders across three linked screens to collect 15 lemons. They lie on ledges and beside statues in the coin cavern and the green jungle room, in the jungle room's safe (opened with the apparatus at the upper left) and in the chests of the upper room – the red floor button opens the upper chest, and the bottom-left chest holds the last lemon.
- Take Frank's KEY from the arcade dispenser.
Frank's Trailer: The Symbol Books
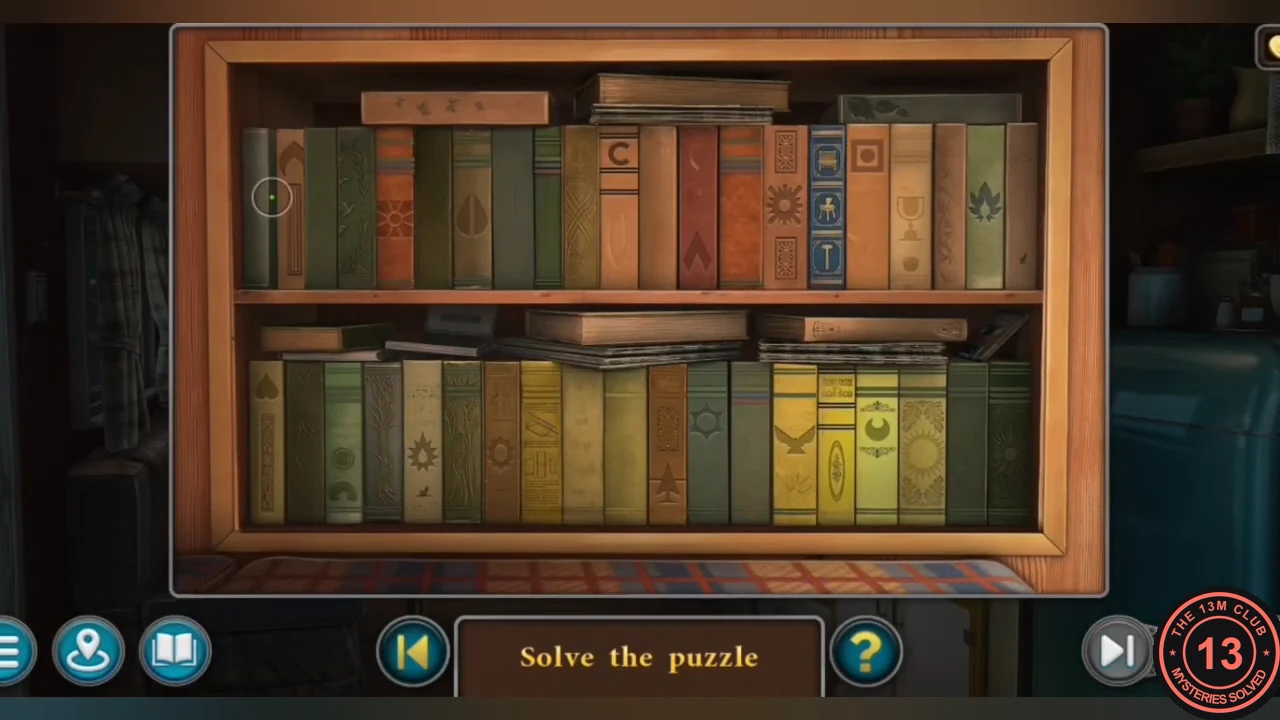
Return Frank's key, enter his trailer and use the traffic-light equation on the bookshelf.
- Give the KEY to Frank. New task: infiltrate the dam – you need the gate code. Open the trailer door with the KEY.
- Inside the trailer, a morphing object is on the shelf just above the turquoise fridge on the right, and Collectible: Life ring 3/8 is here.
- On the street, look at the traffic lights and the cross-shaped road sign between them. Left light: red arch, yellow sun, blue flame. Right light: red arch, yellow arrow, blue bird. Together they read like an equation.
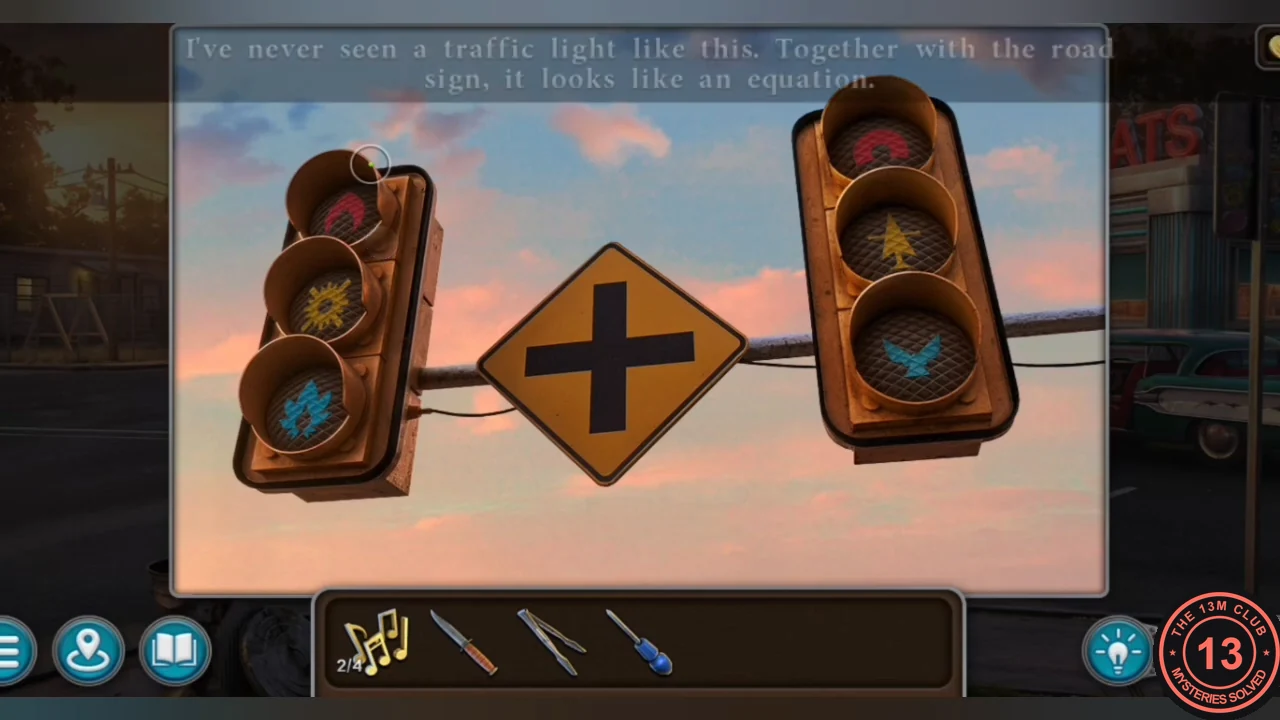
The traffic-light clue: left light arch, sun and flame; right light arch, arrow and bird. - At the trailer bookshelf, push in the six books whose spines show those symbols: the arch (top shelf, 2nd book), the sun (top shelf, brown book right of centre), the flame (top shelf, green book on the right), the second arch (bottom shelf, light-green book, 3rd from the left), the arrow (bottom shelf, brown book) and the bird (bottom shelf, yellow book).
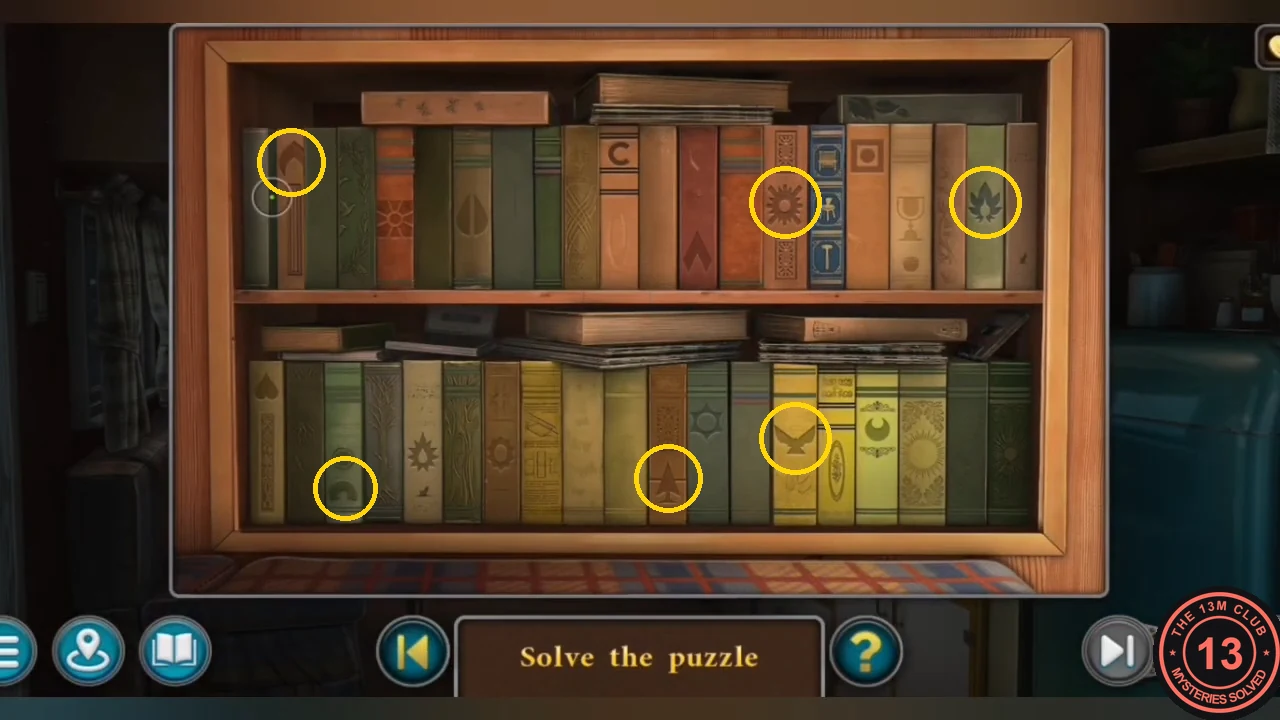
The six books to push in: arch, sun and flame (top shelf); arch, arrow and bird (bottom shelf). - Take the BUTTONS (two button tiles) and PIZZA FIGURINE (1/4) from behind the shelf.
Frank's Trailer: The Retro Token Arc
Gather the four pizza slices and open the cupboard above the trailer sofa.
- On the trailer table (Frank Bennett's termination letter, signed Vincent Delambert), take PIZZA FIGURINE (2/4) and the COIN.
- Pry the wall vent by the door with the KNIFE (the screwdriver does not work) and take the HANDLE.
- Unscrew the sink drain with the SCREWDRIVER and take PIZZA FIGURINE (3/4).
- Outside, fit the HANDLE on the lid of the red kettle grill and open it. Use the TONGS on the grate and take PIZZA FIGURINE (4/4).
- Place the four PIZZA FIGURINES in the round recess of the cupboard above the trailer sofa.
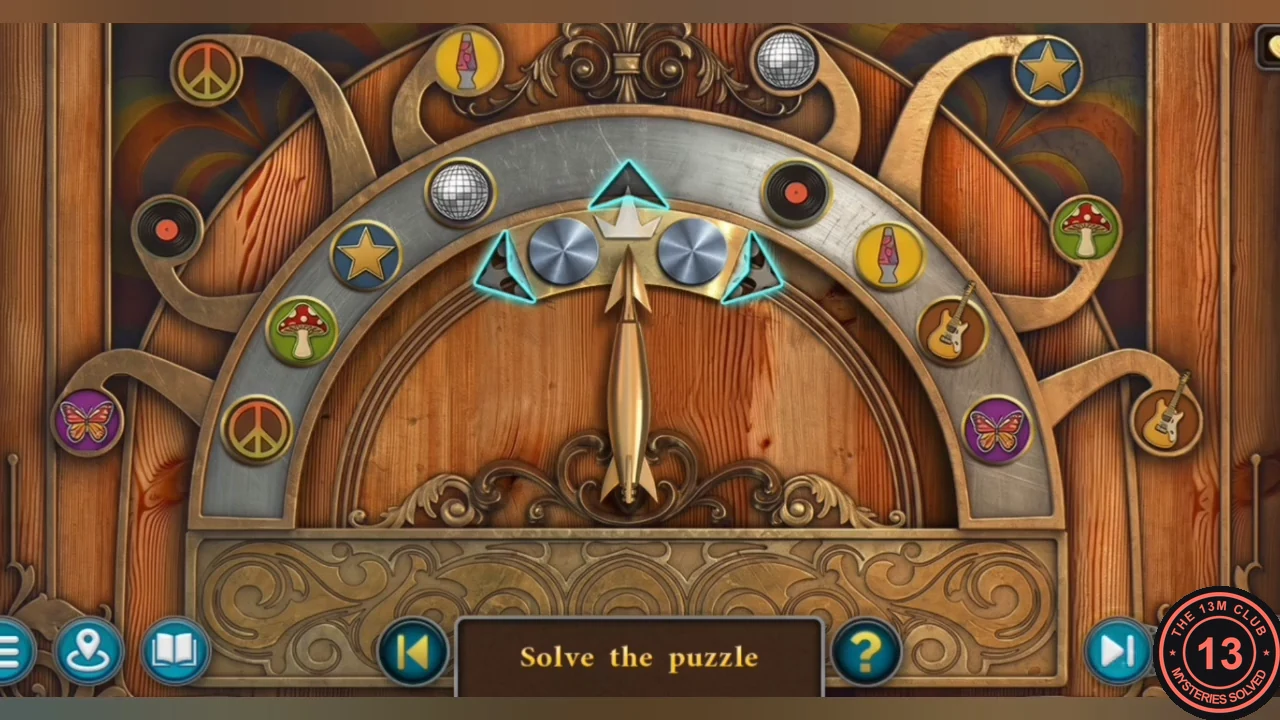
- Token arc: eight retro tokens (peace sign, lava lamp, disco ball, star, mushroom, guitar, butterfly and record) sit on a semicircular track. The outer ring shows which symbol belongs beside each slot. Move the pointer arm along the arc and use its blue triangle arrows to turn its three-slot selector, which exchanges the tokens under it. A token glows blue when it is beside its matching outer symbol; finish with all eight glowing. This takes many moves; see the solved-state image.
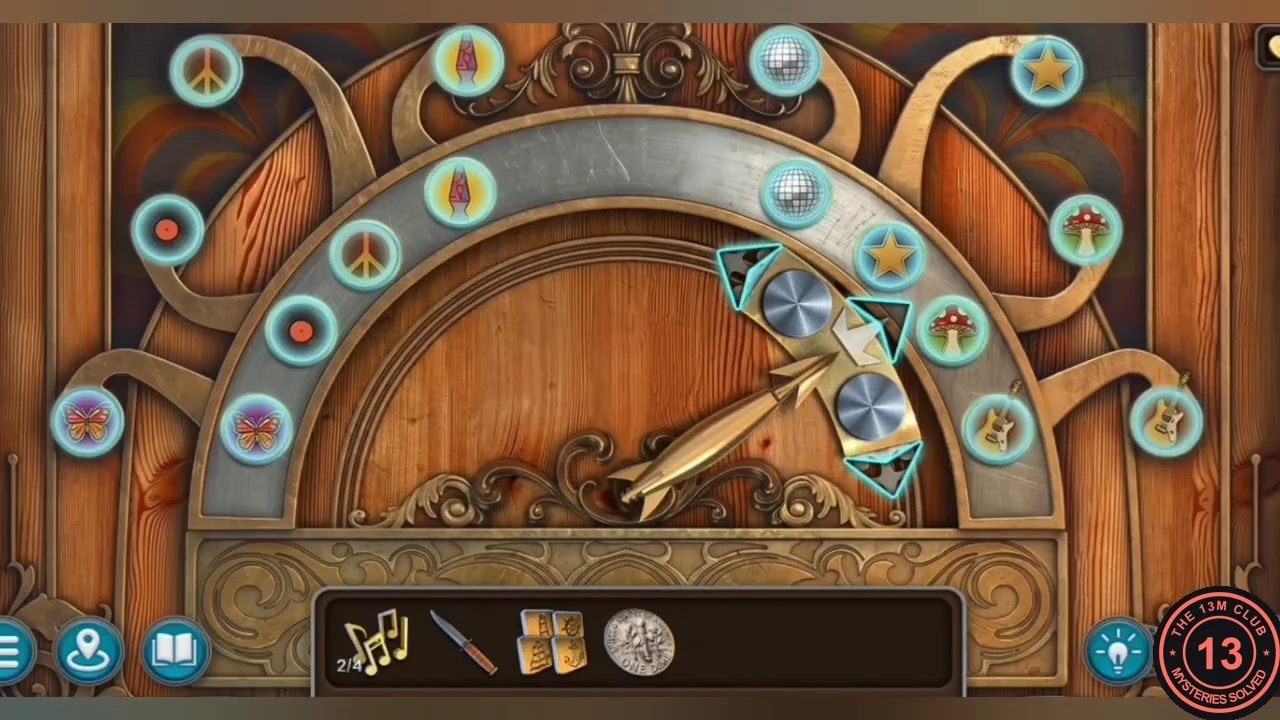
Solved: every token sits beside its matching outer symbol and glows blue. - Take the PAINT THINNER and the WIRE CUTTERS from the cupboard.
Red Wells Shore: The Waterfront Gate Keypad
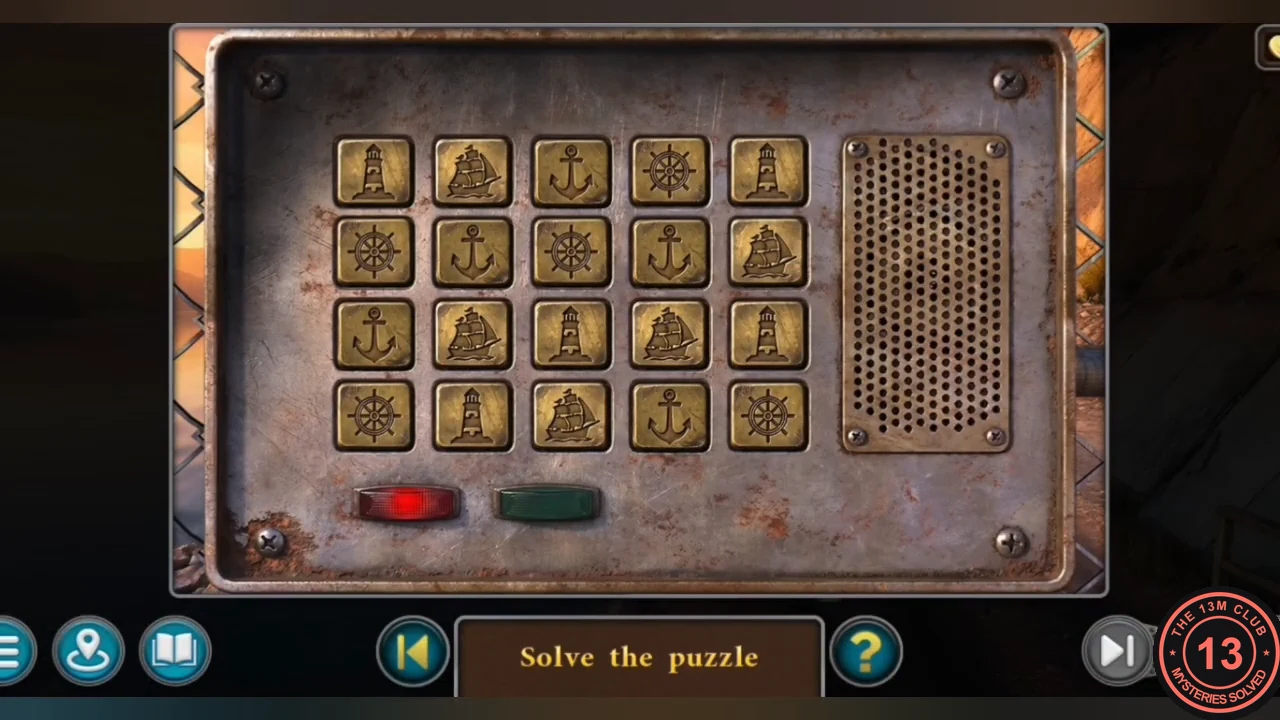
Uncover the gate code on the swing and enter it on the waterfront gate's symbol keypad.
- Clean the painted swing on the street with the PAINT THINNER. The symbols are SHIP, LIGHTHOUSE, SHIP'S WHEEL and ANCHOR.
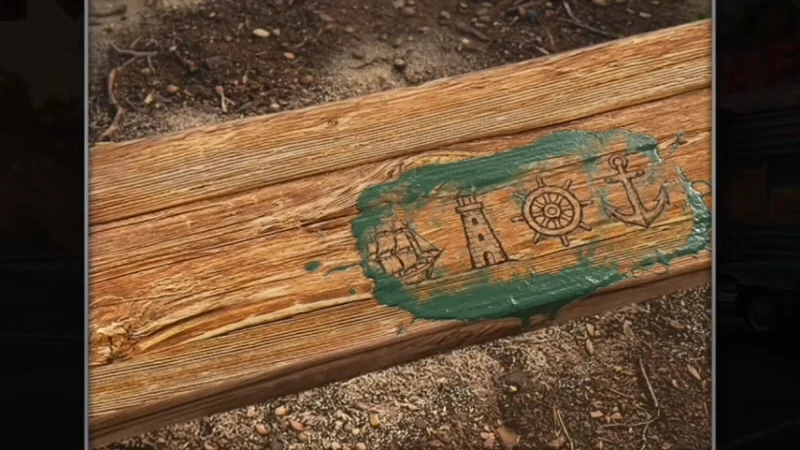
The cleaned swing: ship, lighthouse, ship's wheel, anchor. - At the gate control box on the shore, put the BUTTONS in the two empty slots. A 5x4 symbol keypad appears.
- Keypad: press one continuous chain of neighbouring tiles that repeats ship, lighthouse, ship's wheel, anchor; each pressed tile goes dark, and all 20 must be used. With rows numbered from the top and columns from the left, press: row 3 col 4, row 3 col 5, row 4 col 5, row 4 col 4, row 4 col 3, row 4 col 2, row 4 col 1, row 3 col 1, row 3 col 2, row 3 col 3, row 2 col 3, row 2 col 4, row 2 col 5, row 1 col 5, row 1 col 4, row 1 col 3, row 1 col 2, row 1 col 1, row 2 col 1, row 2 col 2. The light turns green and the gate opens.
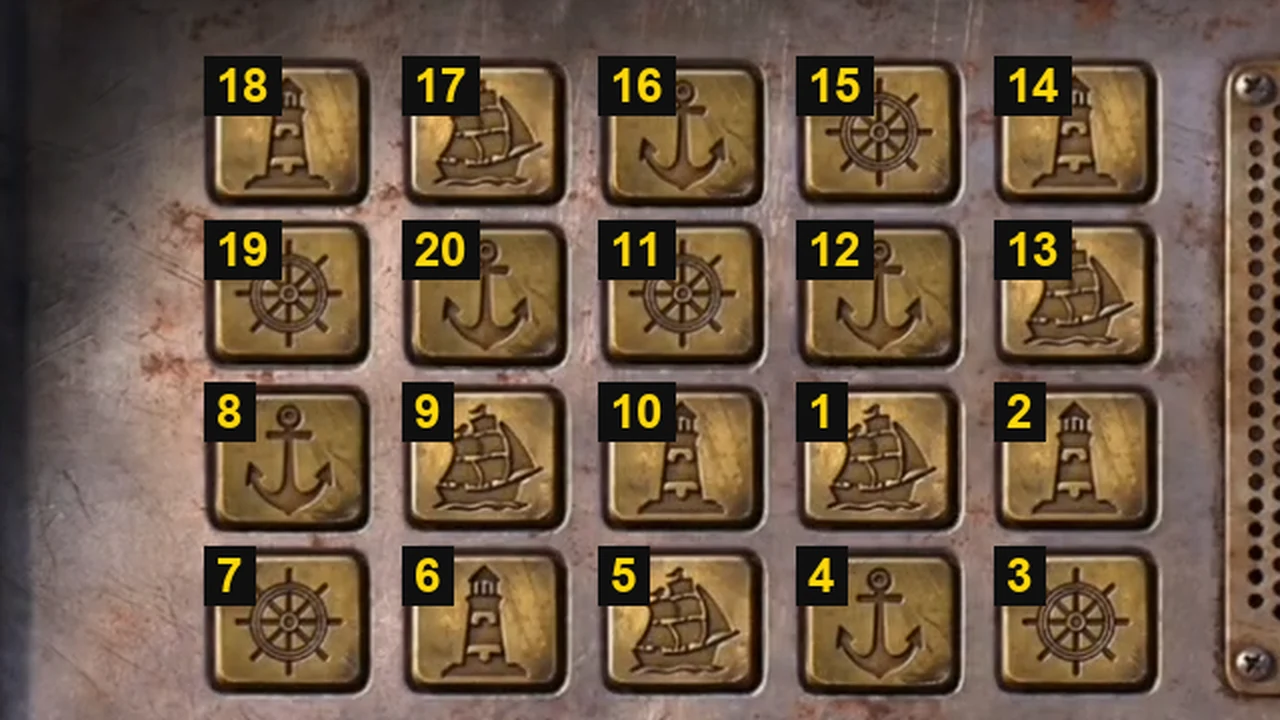
Press order 1–20: each step moves to a neighbouring tile and the symbols repeat ship, lighthouse, ship's wheel, anchor.
Big Dave's Eats: The Jukebox
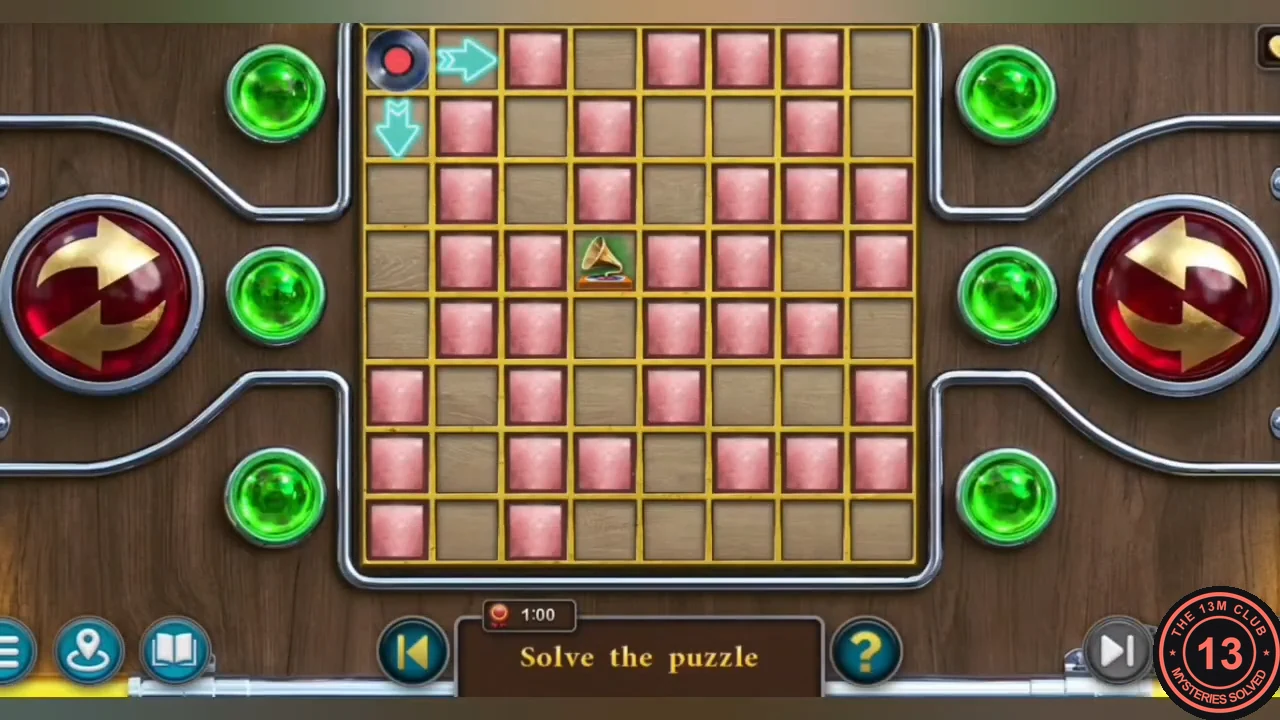
Collect the last musical notes and play the jukebox puzzle.
- Go through the gate to the dock with the warehouse and crane. Take the HOOK from the dock edge by the sunken boat. A morphing object is on the dock; Collectible: Life ring 4/8 is on the right warehouse wall.
- Use the HOOK on the boathouse window (left of its door) and take MUSICAL NOTES (3/4).
- On the street, cut the chain on the fire hydrant with the WIRE CUTTERS and take MUSICAL NOTES (4/4).
- Place the four MUSICAL NOTES on the diner jukebox.
- Jukebox puzzle: a record token starts at the top left of an 8x8 grid of pink blocks and gaps. Click a cyan arrow to send the record sliding until it hits a block. The large red-and-gold buttons on the left and right turn the whole grid, which changes the record's possible paths. Bring the record to rest on the gold triangle in the centre (achievement Gifted). See the solved-state image.
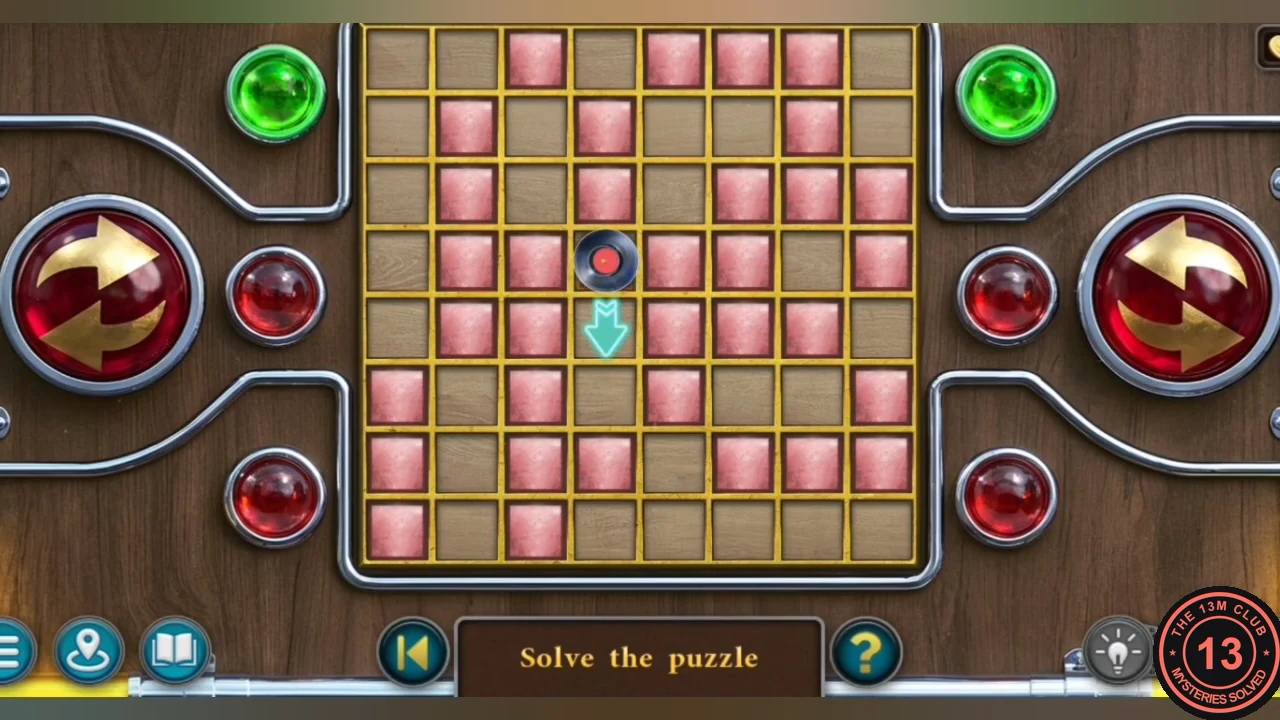
Solved: the record rests on the gold triangle in the centre. - Take the KEY and PIECES (1/3) from the jukebox.
Red Wells Waterfront: The Boathouse Ropes
Use the crane and the old boat to find the two fish that open the boathouse door.
- At the small landing below the cliff road (Waterfront), unlock the bow hatch of the moored boat with the KEY. Take FISH (1/2) and the CRANK.
- Fit the CRANK on the gear at the base of the dock crane and turn it. The crane lowers a netted crate onto the dock.
- Cut the net with the KNIFE, open the crate and take the PICKAXE and PIECES (2/3).
- On the shore, dig at the cracked rock on the right of the cliff with the PICKAXE to uncover a buried chest, then break it open with the PICKAXE. Take FISH (2/2). Leave the old DIVING HELMET in the chest for now.
- Place both FISH on the fish emblem plate of the boathouse door.
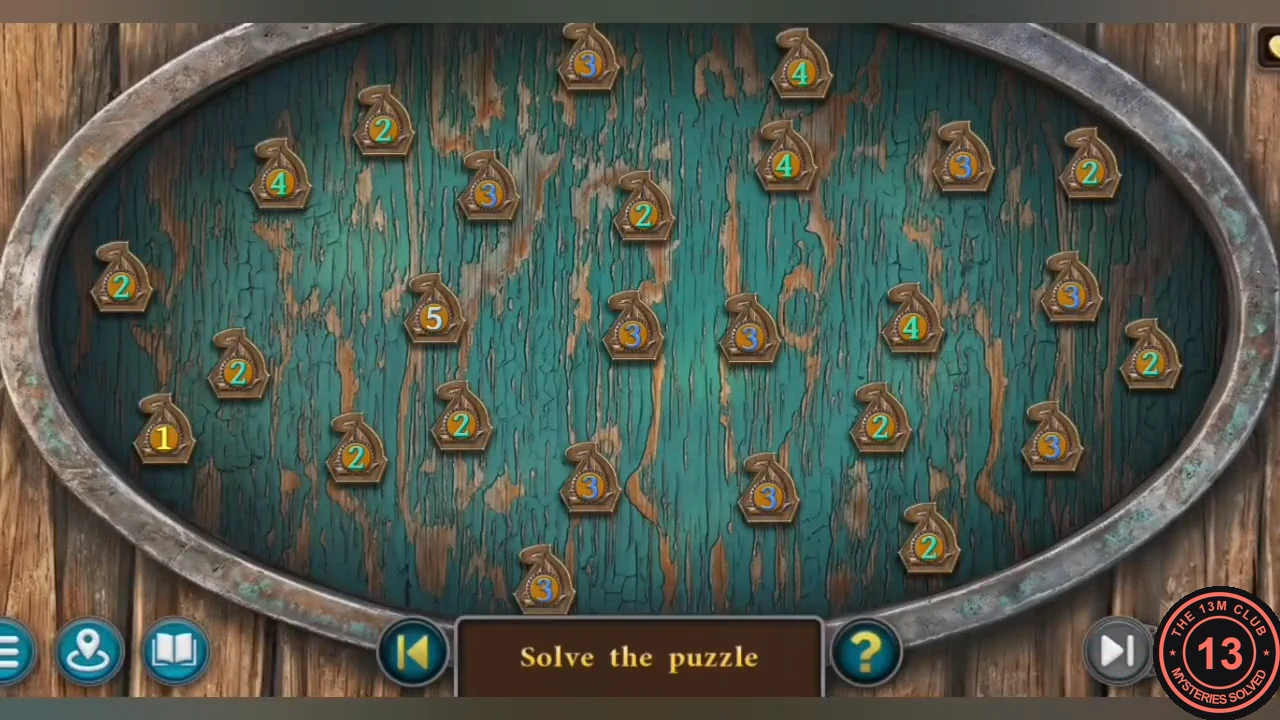
- Rope puzzle: about 30 cleats sit on an oval board, each with a number (1 to 5) for how many ropes it needs. Click a cleat to show its cyan reach circle, then click another cleat inside the circle to tie a rope between them. Numbers count down and turn into plain orange discs when satisfied. Satisfy every cleat; cleats with high numbers and few neighbours in reach are the best starting points. See the solved-state image.
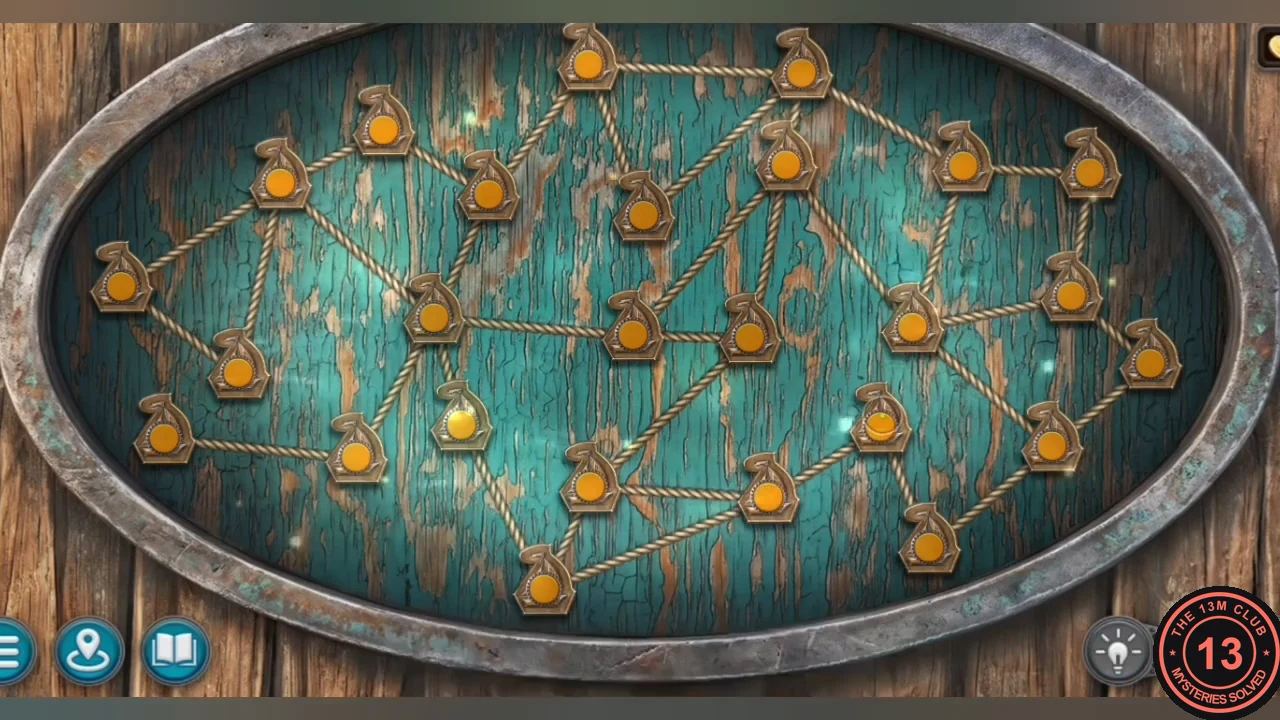
Solved: every cleat is satisfied (plain orange disc).
Red Wells Boathouse: Taking the Boat Engine
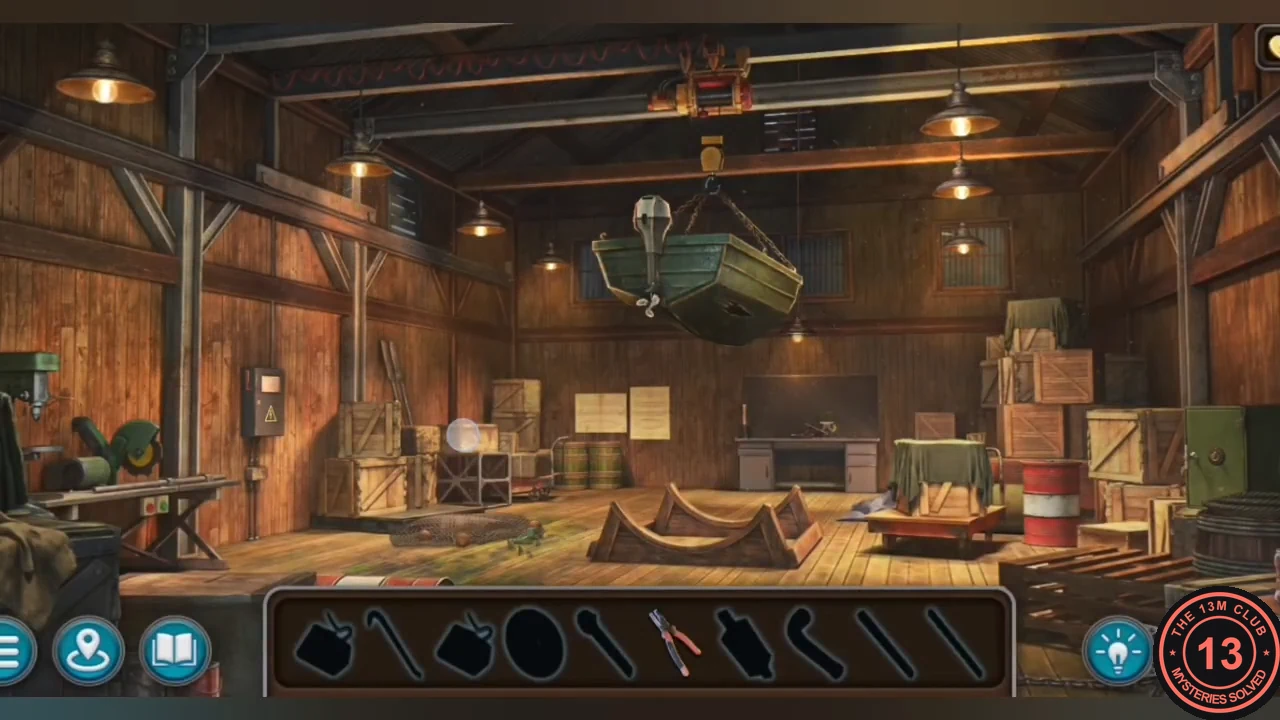
The boathouse boat has a hole in its hull, but its engine is in great shape. This is an interactive search scene: each item in the silhouette bar is used inside the scene.
- Move the bottle on the floor net at the left and take the PLIERS. Take the yellow CUTTING DISC hanging on the wall by the workbench.
- Pull the DRILL BIT out of the wall by the boat blueprint with the PLIERS. Fit it on the hand drill and drill the green box clamped in the vise. The vise is too stiff to open by hand.
- Take the WRENCH beside the green safe on the crate and open the safe for the FUSE. Remove the chop saw's worn disc with the WRENCH, fit the CUTTING DISC and press the green button to cut a PIPE.
- Put the PIPE on the vise handle as a lever and open the vise. Open the green box and take the PANEL KEY.
- Open the electrical panel on the left wall with the PANEL KEY. Pull the red lever down to cut the power, insert the FUSE in the empty slot and push the lever back up. The hoisted boat lowers.
- Take the empty GAS CAN and the CROWBAR from the boat. Pry the cap off the red drum at the front left with the CROWBAR and fill the GAS CAN with gasoline. Use the full GAS CAN on the boat; you receive the BOAT ENGINE.
- On the shore, replace the rowboat's rusty outboard with the BOAT ENGINE. Cooper motors to the dam.
McConnell Dam: The Mossy Crate
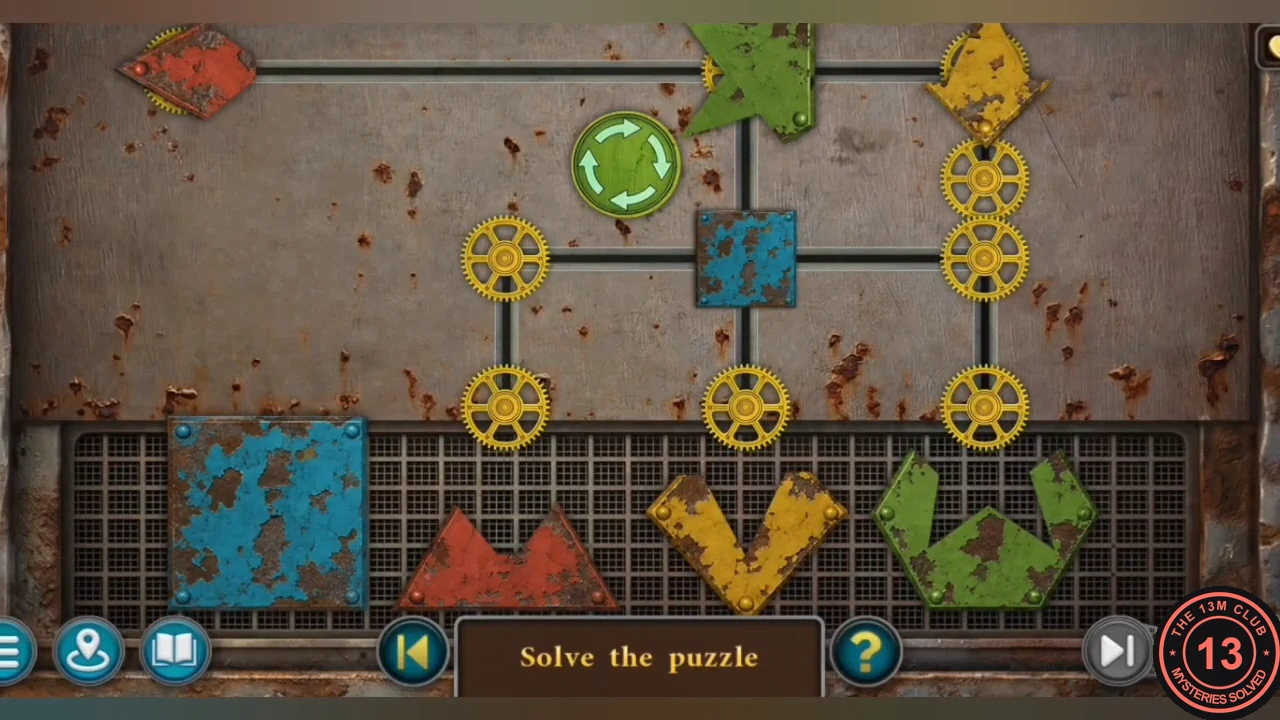
At the dam's maintenance dock, collect the tool tiles, open the red toolbox and solve the mossy crate.
- At the dam tunnel, Collectible: Life ring 5/8 floats on the water left of the tunnel mouth; a morphing object (red fan) is on the far-left rocks. Inside, at the maintenance dock, a morphing object is at the upper right.
- Open the electrical box on the centre pillar and take PIECES (3/3). Its fuse sockets are empty. New task: reach the lower levels.
- Pull the chain at the bollard on the dock edge and take the mossy CRATE. Collectible: Life ring 6/8 is at the upper middle of the dock.
- In the trailer park, place the three PIECES in the empty hexagonal slots of the red toolbox by the fence. Take the FUSES and the WRENCH.
- In Frank's trailer, remove the two bolts of the skylight window with the WRENCH and take the PIECE (a hexagonal tile).
- Open the CRATE from your inventory and put the PIECE in the hexagon on its front.
- Crate puzzle: rusty pieces (a blue square, a red rhombus, a yellow arrowhead and a green star-shaped piece) sit on nodes joined by track lines. Click a piece, then an empty connected node, to slide it there. The green round button turns all loose pieces at once. The bottom row holds a blue square plate and three incomplete shapes – a red triangle, a yellow V and a green cup. Park the blue square out of the way in the top-left corner and drop the red, yellow and green pieces, turned the right way, onto the bottom nodes to complete the triangle, diamond and hexagon. See the solved-state image.
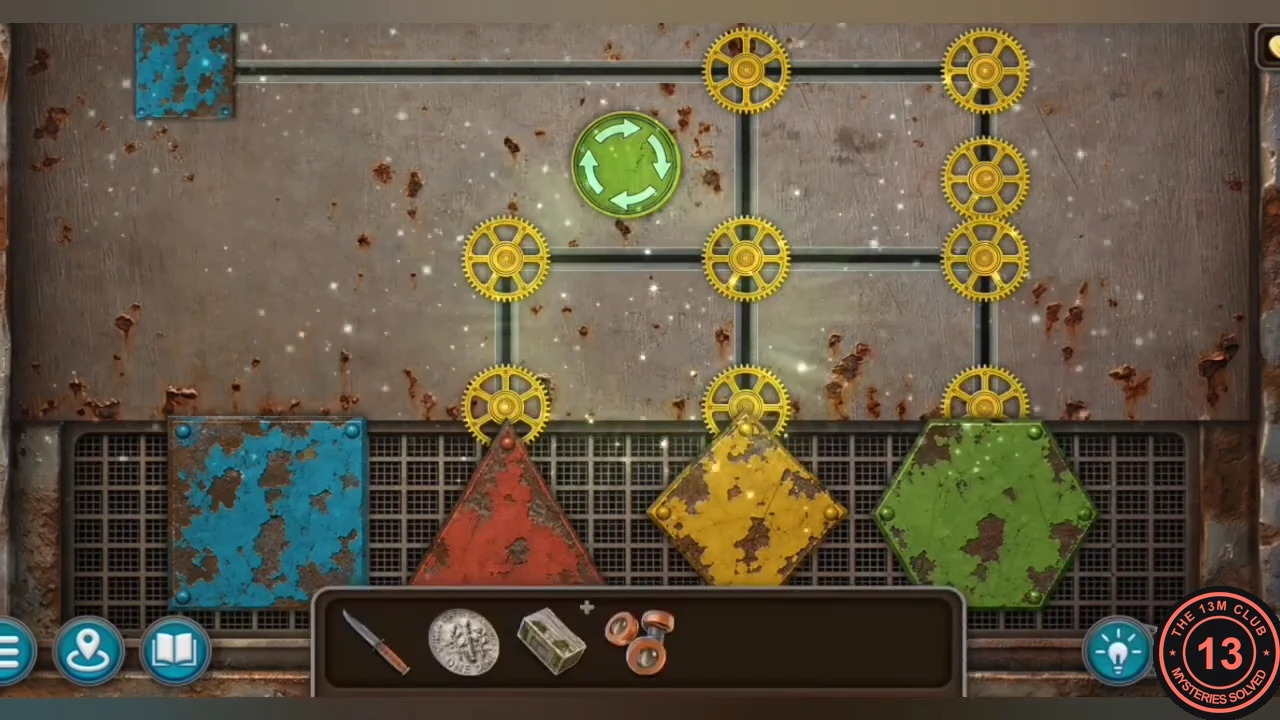
Solved: blue square parked at the top left; triangle, diamond and hexagon completed on the bottom row. - Take the LEVER and BALL (1/5) from the crate.
Dam Lower Level: The Blast Door Lights
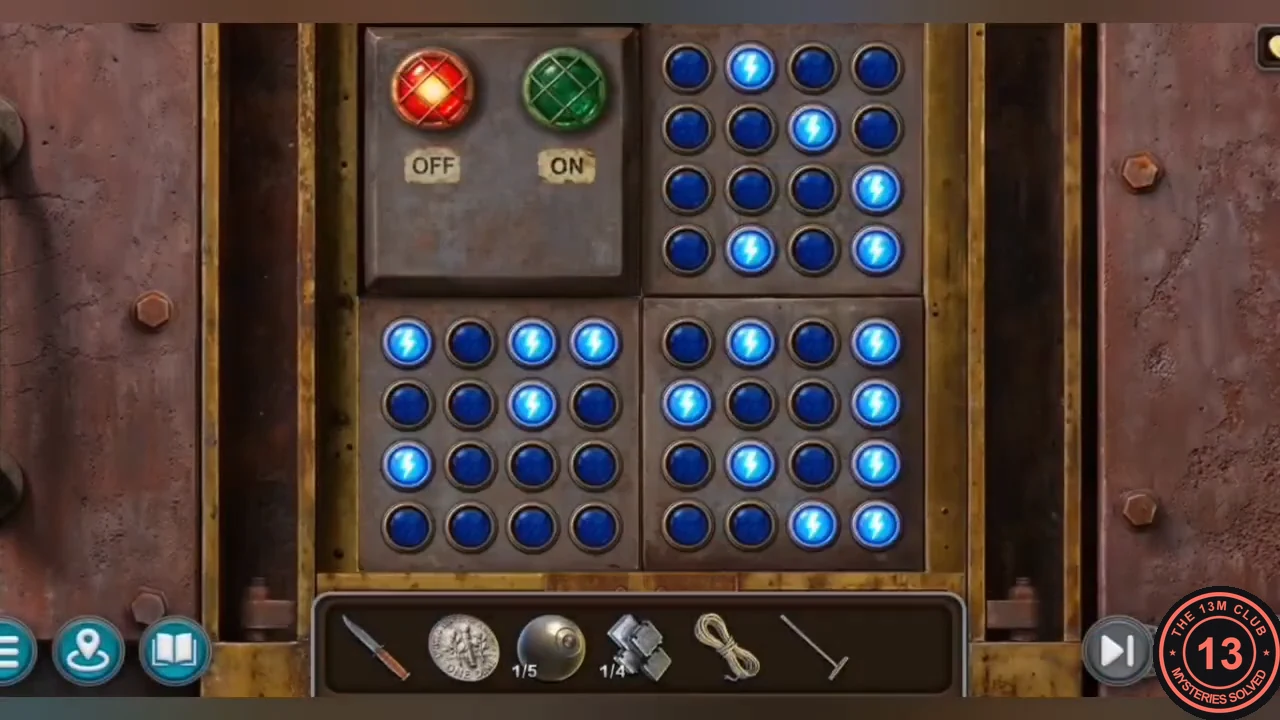
Restore the lights at the maintenance dock and open the riveted blast door on the lower level.
- At the maintenance dock, insert the FUSES in the electrical box, fit the LEVER in its slot and pull it. The lights come on and the way to the lower level opens.
- On the lower level, open the cardboard box among the crates at the left with the KNIFE. Take TRANSISTORS (1/4) and the ROPE, and take the MOP leaning beside the crate.
- Zoom into the big riveted blast door in the centre to start the lamp puzzle.
- Lamp puzzle: three 4x4 lamp grids form an L-shaped board (top right, bottom left and bottom right) with an OFF/ON indicator in the top-left corner. Clicking a lamp switches it and all eight lamps around it, also across the edge into the neighbouring grid. Light all 48 lamps; the move counter starts at 60. Plan from the edges inwards. Example solution for the starting layout shown in the overview image (grid, row, column from the top left): top-right grid 1-1, 1-4, 2-3, 2-4, 3-1, 3-2, 3-3, 3-4, 4-1; bottom-left grid 1-1, 2-1, 2-3, 2-4, 3-2, 3-3, 4-3; bottom-right grid 2-2, 4-1 – 18 clicks in any order. If your lamps start differently, use the rule above instead.
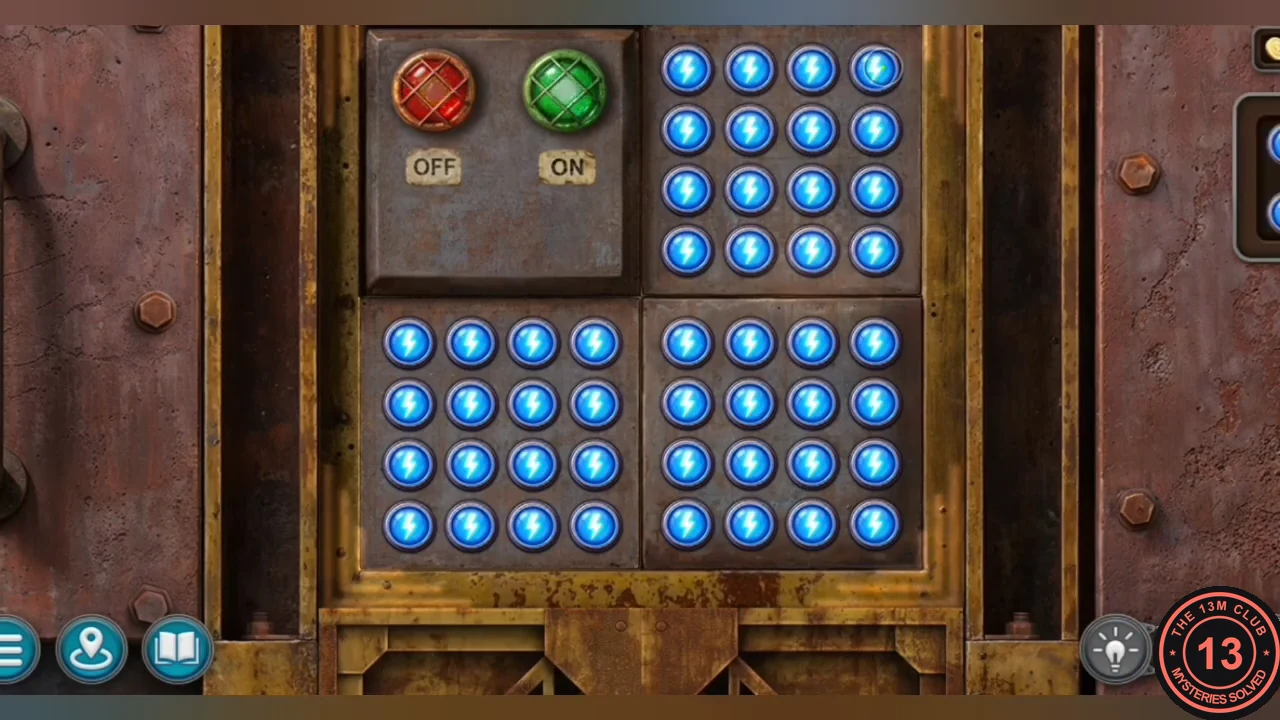
Solved: all 48 lamps lit and the ON light turns green.
Dam Control Room: The Elevator Console
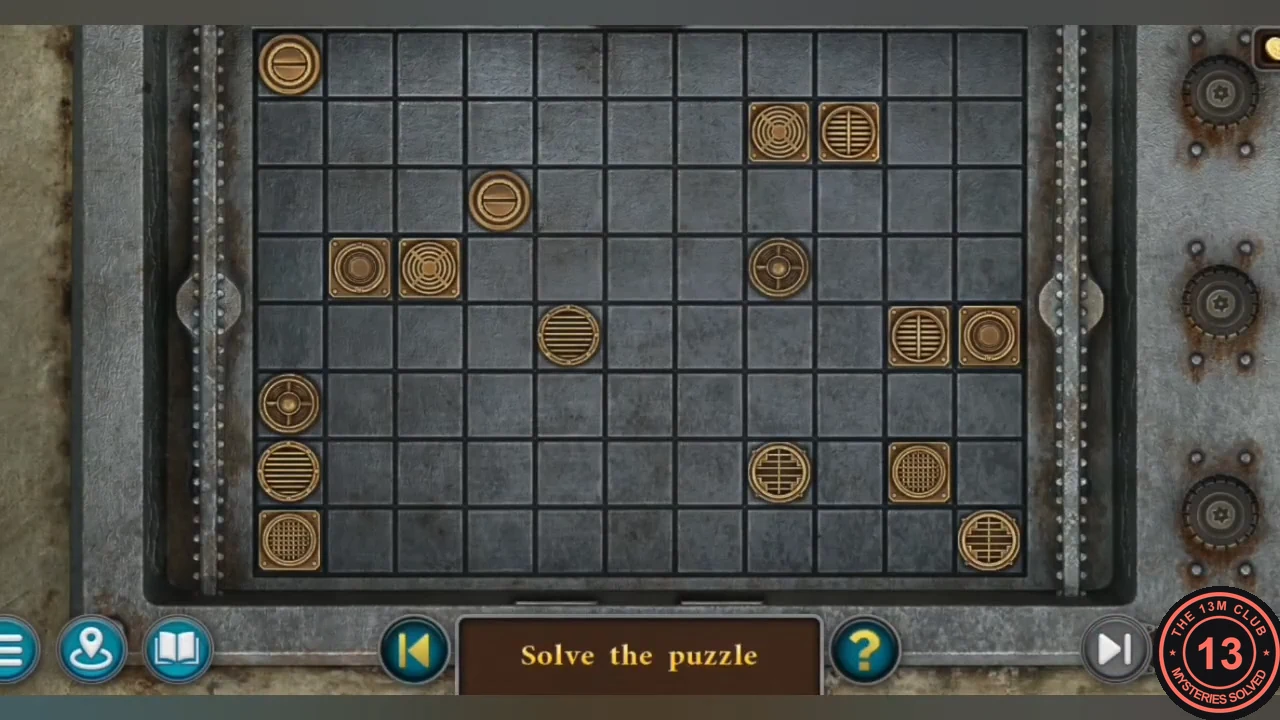
Search the control room and machine hall and reset the elevator from its console.
- In the control room, Collectible: Soda can 3/8 is at the right edge. Take TRANSISTORS (2/4) from the potted plant on the right. A morphing object is at the lower left.
- Zoom into the ceiling fan at the top of the control room and take the HANDWHEEL.
- On the lower level, fit the HANDWHEEL on the side door left of the blast door and open it to reach the machine hall. Collectible: Soda can 4/8 is at the lower left; a morphing object is on the railing at the right.
- Take the HEXAGON from the bottom left of the fire-extinguisher cabinet on the left wall.
- Zoom into the ladder cage in the centre and use the MOP there (nothing visible happens, but the mop is used up). The leaking steam pipe nearby will need fixing later.
- The elevator call panel shows "Error 555-1805". Take the HANDLE from the panel.
- On the lower level, lift the floor grate with the HANDLE and take the KEY (blue tag) from among the pipes.
- Use the KEY on the elevator console in the control room to start the connection puzzle.
- Connection puzzle: eight pairs of bronze discs carry matching symbols on an 11x8 grid. Drag a line from each disc to its twin along the grid squares; lines may not cross or share a square. See the solved-state image.
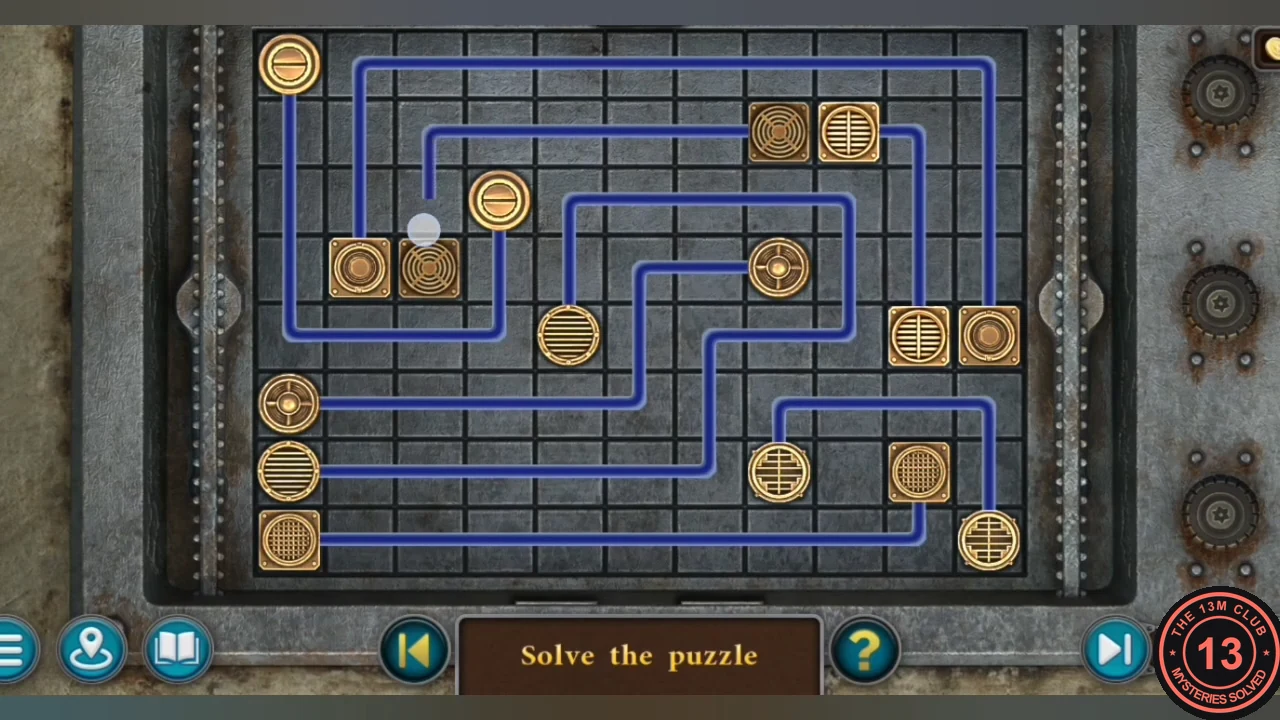
Solved: every pair is linked and no lines cross. - Press the red button on the right of the console to reset it: LOADING, then ELEVATOR IN SERVICE.
Red Wells: The Payphone Call
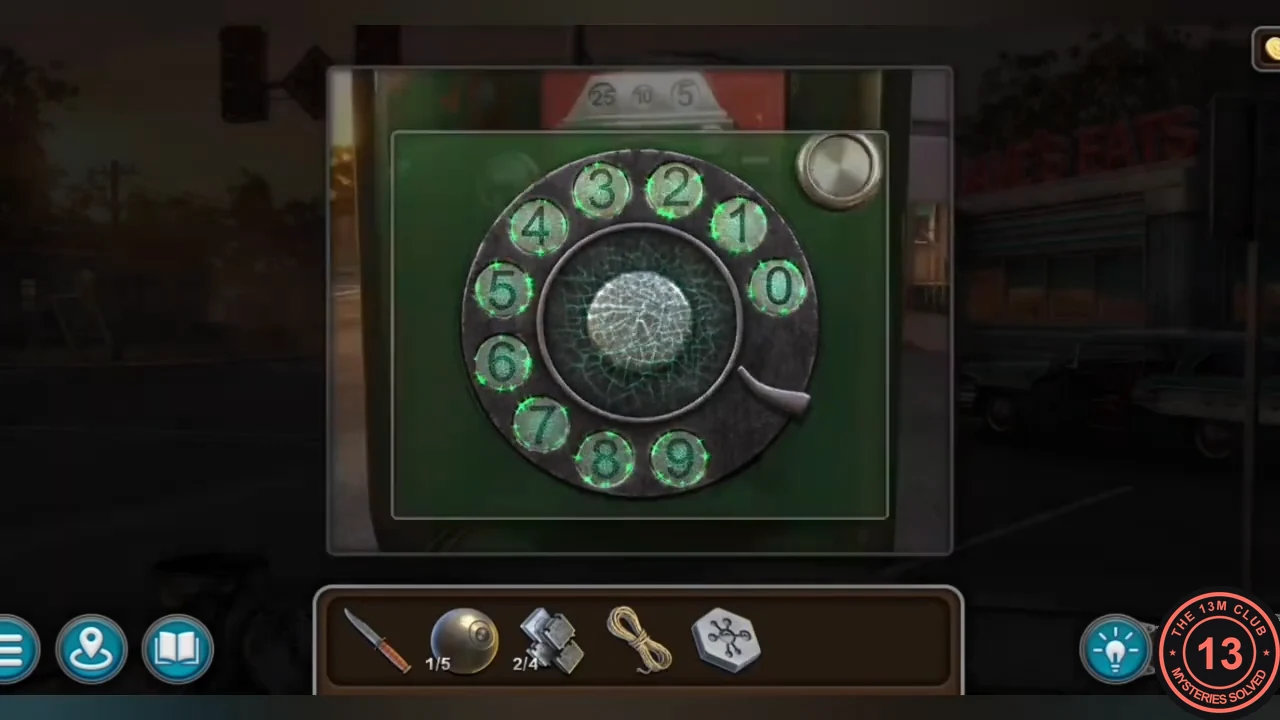
The elevator needs an access card. Call elevator service from the payphone in town.
- At the machine-hall elevator, the keypad needs an access card. Cooper decides to call the elevator service number 555-1805.
- At the payphone by the traffic lights in town, put the COIN in the slot and dial 5-5-5-1-8-0-5 on the rotary dial. Cooper poses as Frank Bennett, and the service promises to send a card by pneumatic tube.CODE5551805
- In the control room, take the CROSS-SHAPED KEY from the pneumatic tube receiver on the left wall. Unlock the grated locker on the left with it and take the ACCESS CARD from the coat pocket.
- At the machine-hall elevator, use the ACCESS CARD on the keypad and press -3. The elevator takes you to an observation post overlooking a laboratory, where a vampire is at work.
Observation Post: The Dice Case
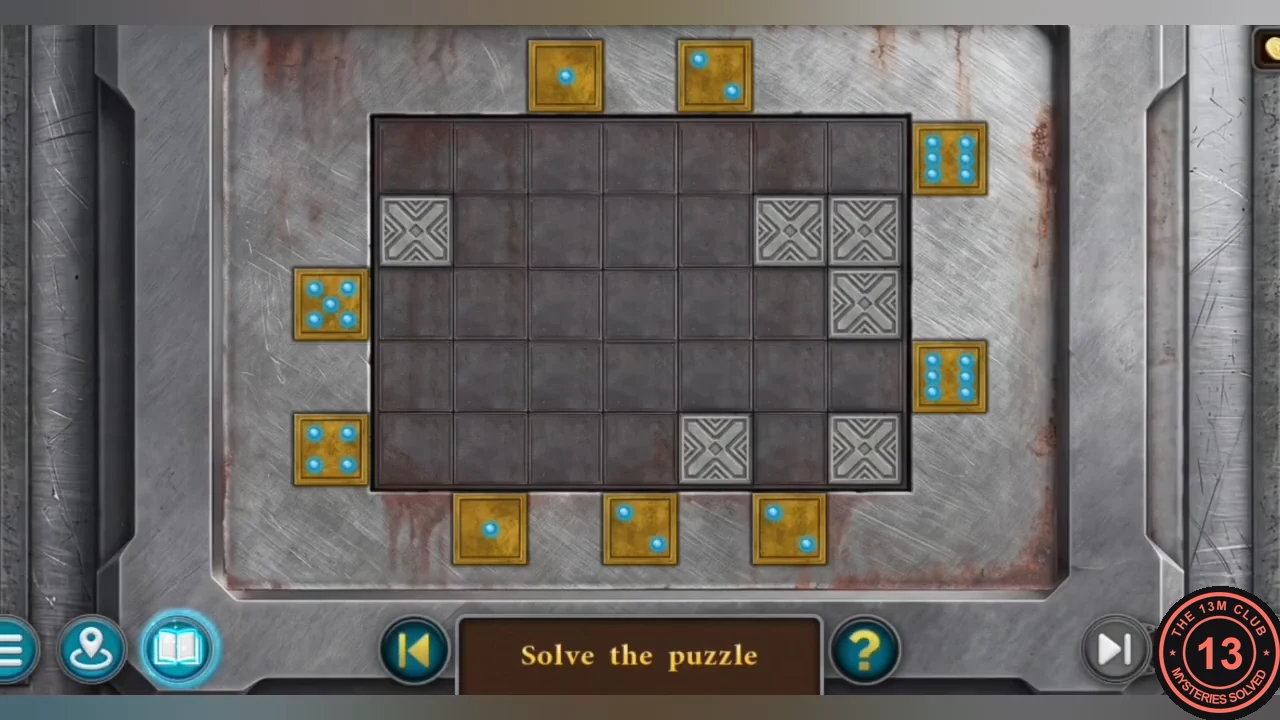
Open the green case on the observation-post floor with the hexagon.
- Put the HEXAGON in the empty slot of the hexagon-pattern lock on the green case on the floor.
- Dice puzzle: dice around a 7x5 grid each fire as many red tokens as their dots into the grid in a straight line. Tokens skip cells that are already filled, and cells marked X are blocked. Fill all 29 open cells. The order matters; this order works: top die above column 5, right die beside row 1, top die above column 3, bottom die below column 6, right die beside row 4, left die beside row 5, bottom die below column 4, left die beside row 3, bottom die below column 2.
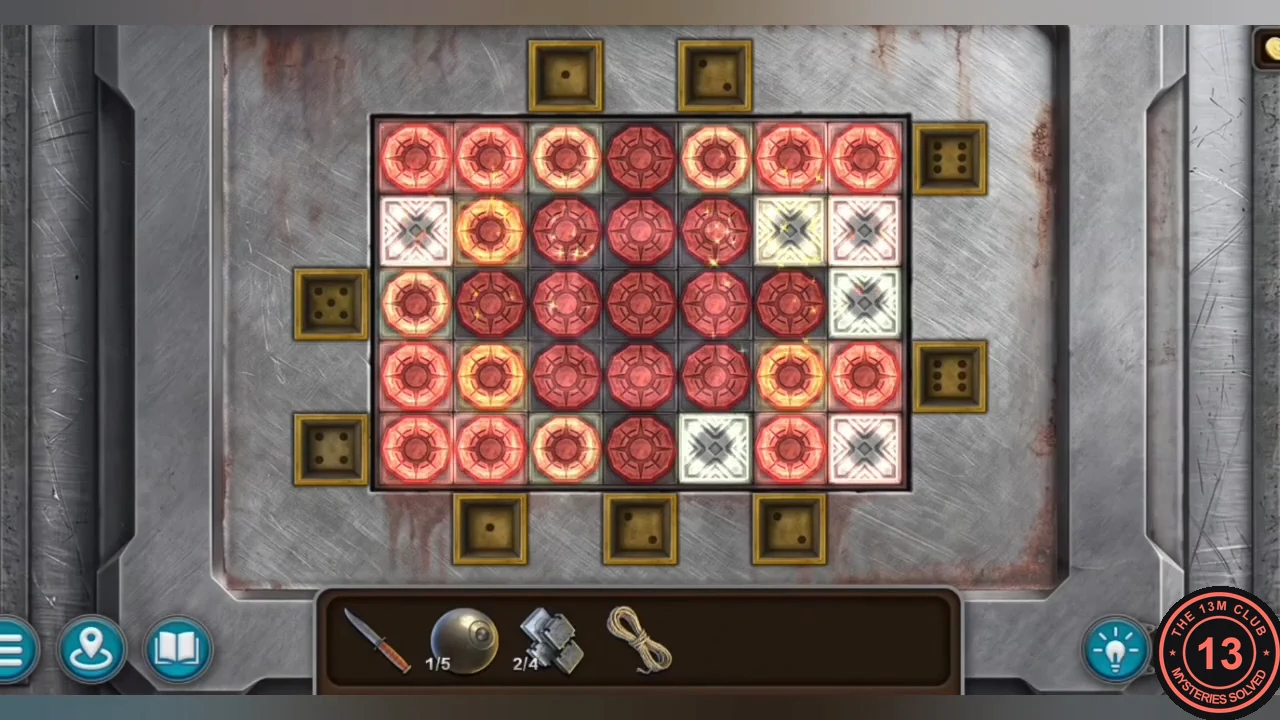
Solved: every open cell holds a red token (the glowing rims are the completion highlight); only the X cells stay empty. - Read the First Quarter Reports (the Immortals group, the "Vampire-1" serum and "Suppressant-02") and take the BUTTONS (blue and red).