Donnelly's Apartment: The Nightstand Gear Lock
Enter apartment 14, uncover the hidden safe and open the nightstand drawer.
- Use KEY 14 on the apartment 14 door in the Residential building corridor. The morphing object in the living room is the car seen through the lower part of the right-hand window. New task: search Donnelly's apartment. Collectible: Record 4/9 near the table lamp.
- In the bedroom, take the SCREWDRIVER from the bed pillows. Remove the four screws of the wall vent with it. Behind the vent is a wall safe with a symbol dial, and a KEY lies in the vent – take it.
- Use the KEY on the bedroom nightstand drawer to open its gear lock.
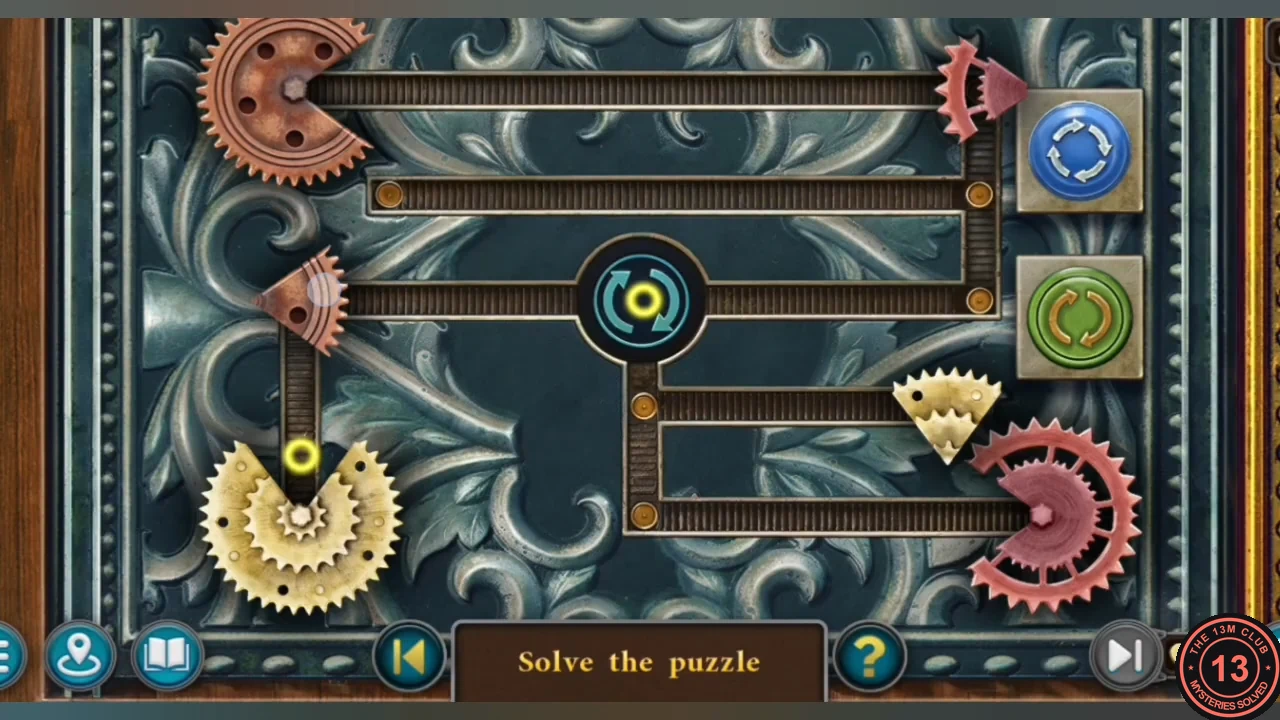
- Gear lock: three gears – cream at the bottom left, copper at the top left and red at the bottom right – each miss a wedge of their own colour. Click a wedge to move it along the tracks; the yellow dots show where it can stop. A wedge must face the right way to fit, so turn it on the round centre hub or at the blue and green button stations on the right first. Fit each wedge into the gap of its matching gear. One order that works: complete the cream gear first, then the red, then the copper.
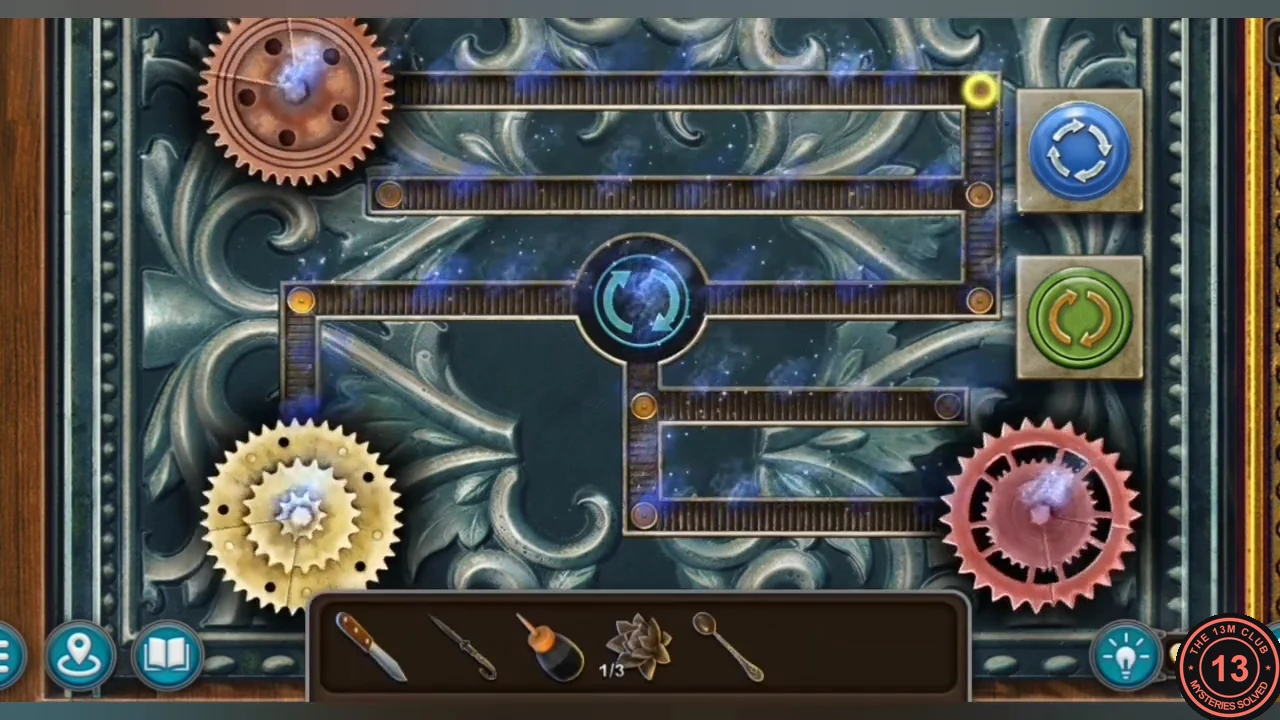
Solved: all three gears are whole with their wedges in place, and the blue sparkle confirms the lock. - Read the channel-switch note in the drawer. Its PASSWORD row shows the left knob pointing right (horizontal) and the right knob pointing down-left (diagonal). Take the LIGHT BULB.
7th Avenue Coffee Kiosk
The TV needs a knob and a plug adapter. Open the coffee kiosk to get a quarter for the lobby vending machine.
- In the living room, open the centre door (a dark storage closet). Screw the LIGHT BULB into the wall socket and take the MOP.
- In the Residential lobby, use the MOP on the ceiling lamp with the red ribbon and take the SWITCH (a knob).
- Attach the SWITCH to the TV as its left knob. Laura notes that the TV plug does not fit the wall outlet and that she needs an adapter from the lobby vending machine, which takes a quarter. Take the CUP from the fruit bowl beside the TV.
- On 7th Avenue, place the SPOON and then the CUP on the plaque of the coffee kiosk shutter. The shutter opens.
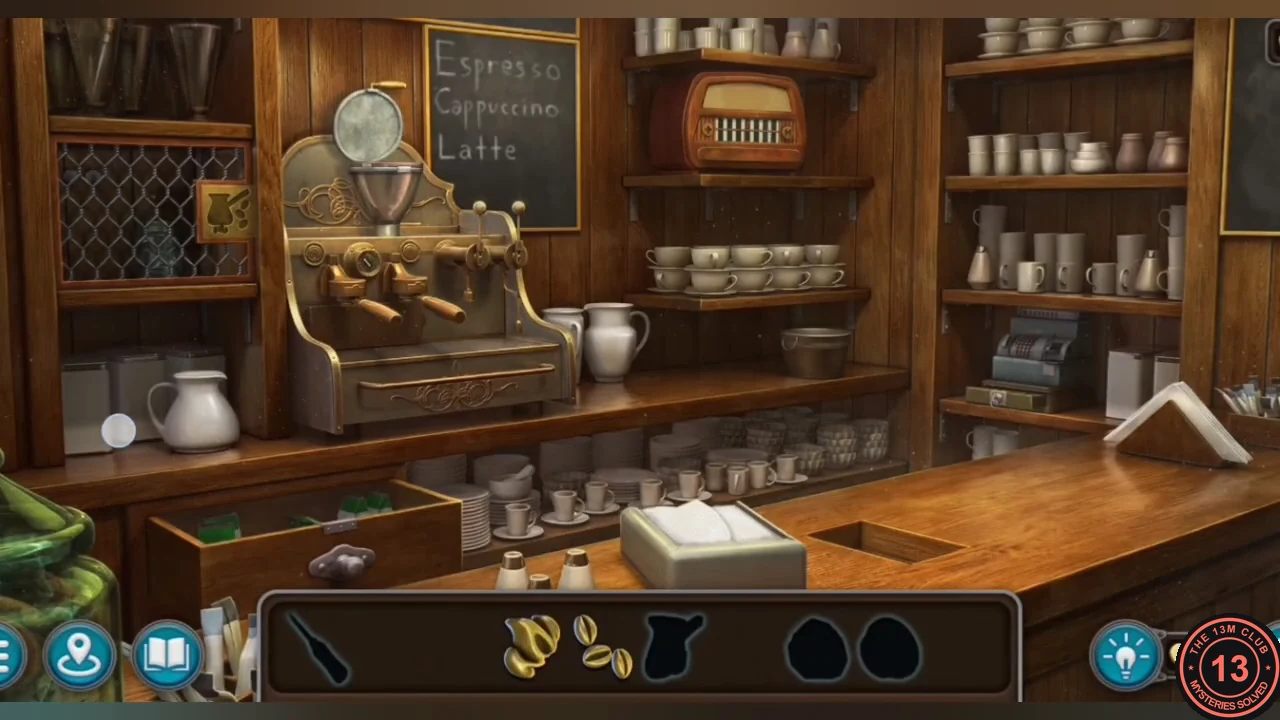
- Kiosk scene, part 1: move the napkin box and take the DRAWER KNOB. Put it on the counter drawer and take the HANDLE. Fit the HANDLE on the grinder hopper clamp and take the FLAME FIGURINE. Take the STIRRER beside the ice bucket. Use it through the mesh cabinet to hook a KEY, then use the KEY on the cash register to get the COFFEE BEANS emblem.
- Kiosk scene, part 2: take the ORANGE KNOB from the cup shelf on the right and fit it on the radio. Take the ICE PICK from the glasses at top left and chip the ice bucket three times to free the second ORANGE KNOB. Fit it on the radio and take the CEZVE emblem from the drawer that opens. Place the cezve, the flame figurine and the coffee beans on the cabinet plaque. Inside the cabinet, take the QUARTER from the jar.
- In the Residential lobby, insert the QUARTER in the blue vending machine and take the ADAPTER.
Donnelly's Bedroom Safe: The TV Symbols
Tune the TV to the password setting, note the four symbols and enter them on the bedroom safe dial.
- Place the ADAPTER in the wall outlet to the right of the TV.
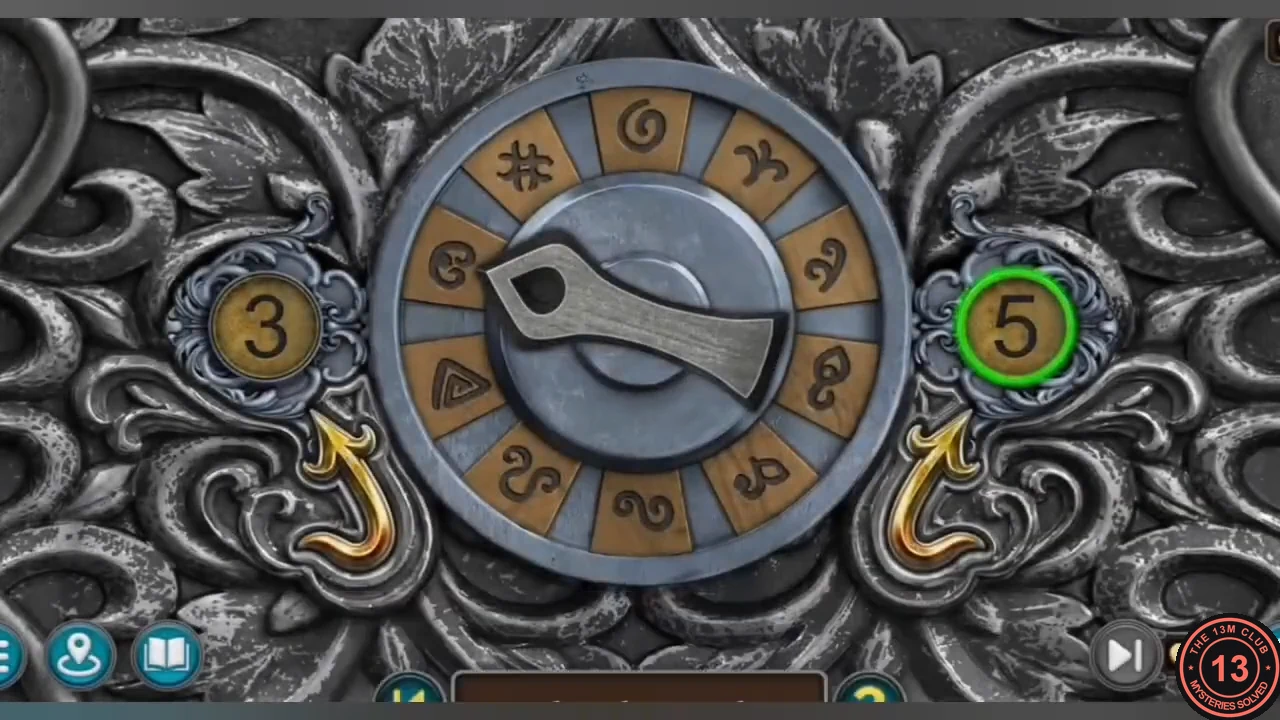
- Turn on the TV and set the knobs to the PASSWORD row of the nightstand note: left knob pointing right, right knob pointing down-left. A show opening displays four large symbols: a Y-shaped curl, a looped leaf, a triangle with an inner spiral and a double curl.
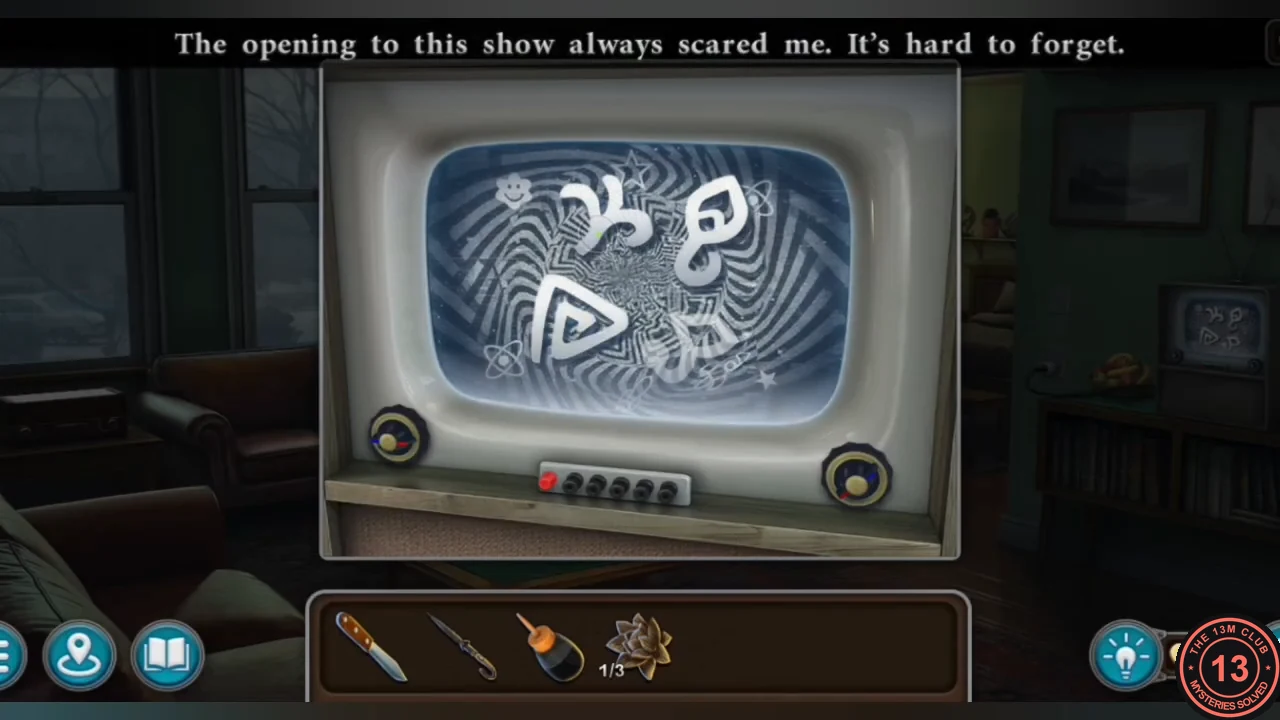
The clue: the four symbols on the TV after setting the PASSWORD knob positions. - Bedroom safe dial: ten symbols surround a pointer. The "3" and "5" buttons set the step size, and the curved arrows turn the pointer that many places left or right. Stopping on an unlit symbol lights it green, and wrong symbols light up too. Stopping again on a lit wrong symbol switches it off. The safe opens when exactly the four TV symbols are lit, so switch off any wrong symbol you have lit.
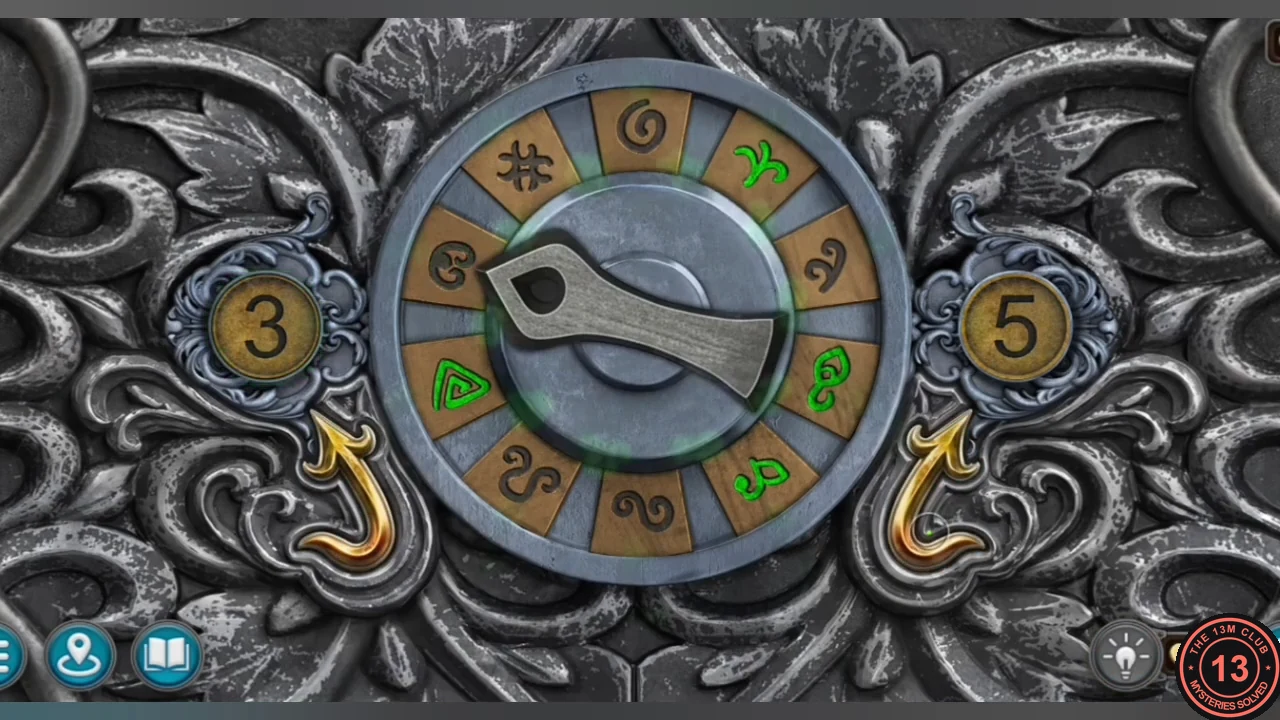
Solved: only the four TV symbols are lit; any wrong symbol has been switched off again. - The safe holds a letter and money. A cutscene follows and Laura ends up in the sewers.
The Sewers: The Toolbox Lock
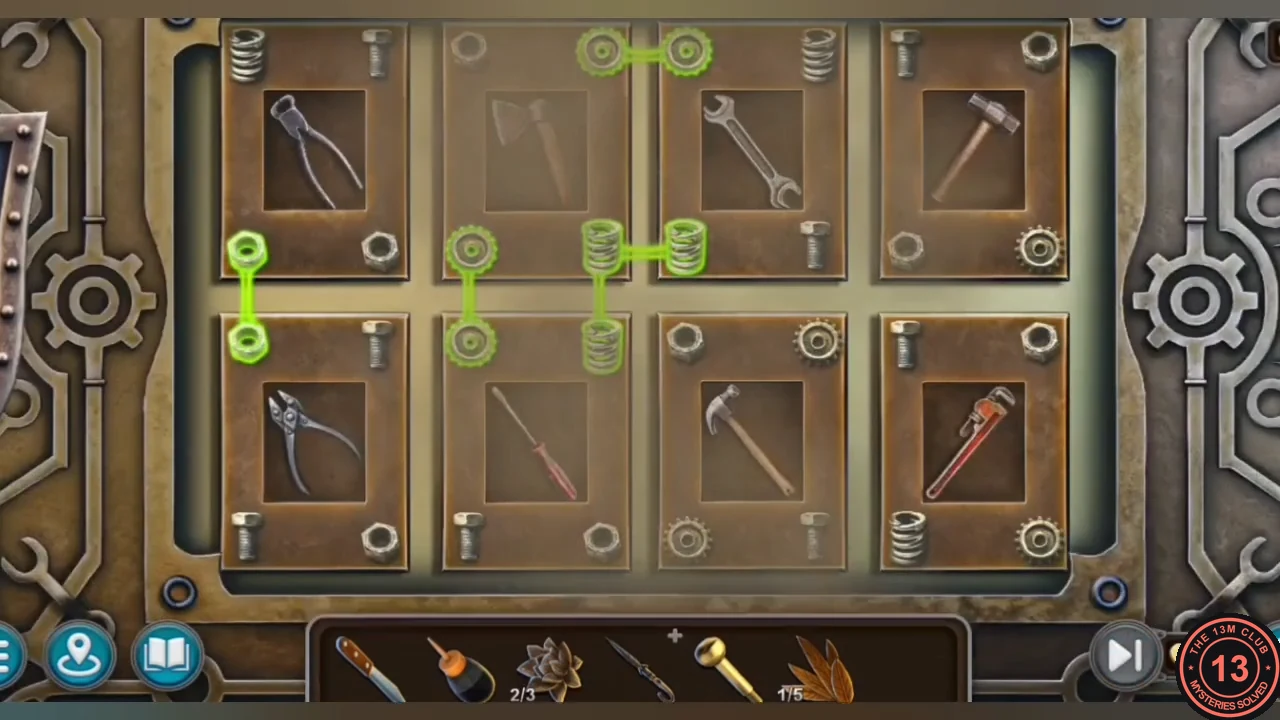
Refuel the bulldozer to power the jackhammer, then open the green toolbox to climb out.
- Click the morphing object at the lower left near the lamp and rubble. Take the COAT OF ARMS from the puddle at centre left and fit it on the UMBRELLA handle. The handle opens: read the "412" vial and take the gold SWITCH.
- Take the HANDLE (green lever handle) from the left puddle and the LOTUSES (2/3) from the side of the bulldozer engine. The fuel cap shows the bulldozer is out of fuel. Collectible: Record 5/9 in the upper-right arch. Take the FUNNEL from the rubble by the cracked brick wall (a jackhammer stands beside it).
- Fit the HANDLE on the bulldozer cab door. Take the FLASHLIGHT and the FEATHERS (1/5) from the cab, then the GAS CAN from under the blade.
- Put the FUNNEL in the fuel tank and pour in the GAS CAN. Operate the jackhammer on the cracks until the wall breaks, then light the dark passage with the FLASHLIGHT.
- In the second tunnel, click the morphing object on the floor at centre left. Zoom into the pipes on the right: Collectible: Record 6/9 there; take the BATTLE-AXE.
- Place the BATTLE-AXE on the shield lock of the green toolbox in front of the bulldozer.
- Toolbox puzzle: eight tool tiles in two rows. Click two tiles to swap them. Each edge connector turns green when its two halves (bolts, springs, hooks) match the neighbouring tile. Swap until every joint is green.
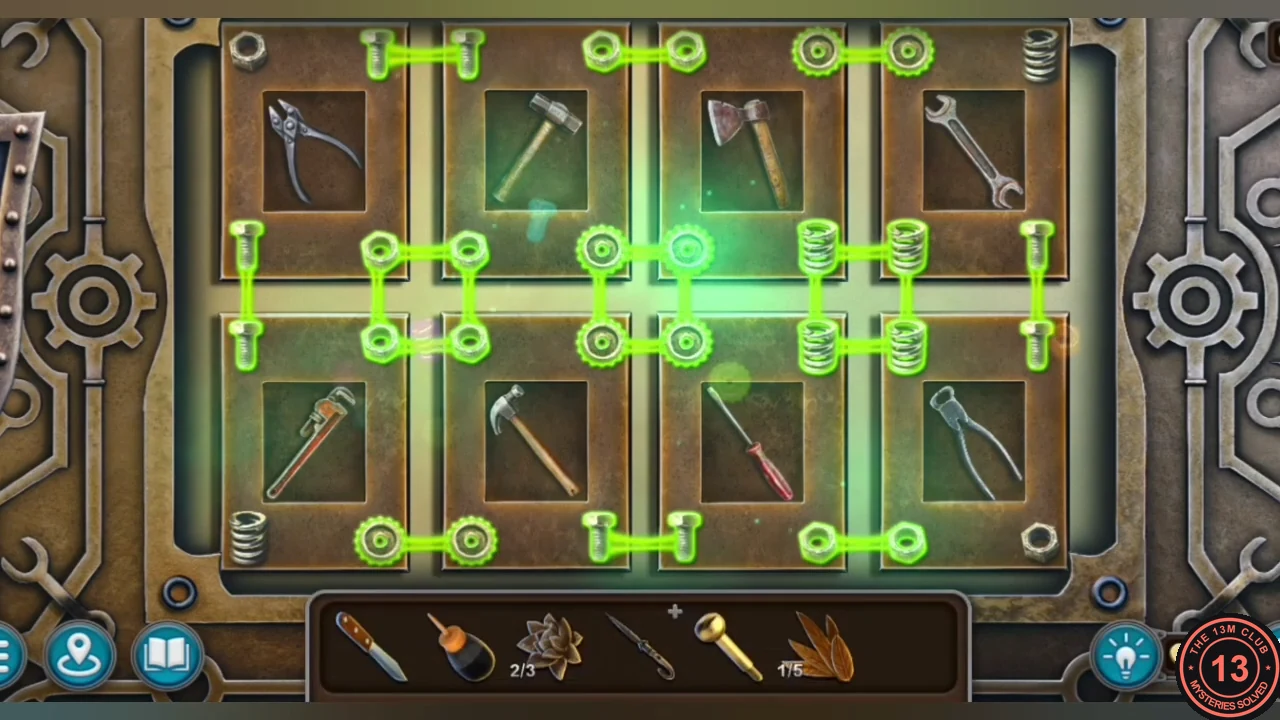
Solved: every joint between neighbouring tiles is green. - Take the RUNGS and the HAMMER from the toolbox.
- Place the RUNGS on the end wall of the second tunnel and hammer each one in with the HAMMER. Climb up and push open the manhole cover to reach the gallery street.
Harper's Workshop: The Lotus Cabinet
Photograph Harper's hidden painting for the reporter Mr. Pike.
- Talk to the reporter on the gallery street and take his CAMERA. New task: photograph Harper's "Girl in a Hat" painting.
- At the frozen window in Rosenthal's office, break the ice with the HAMMER and take the LOTUSES (3/3).
- In Harper's workshop, place the LOTUSES in the three recesses on the cabinet doors on the left.
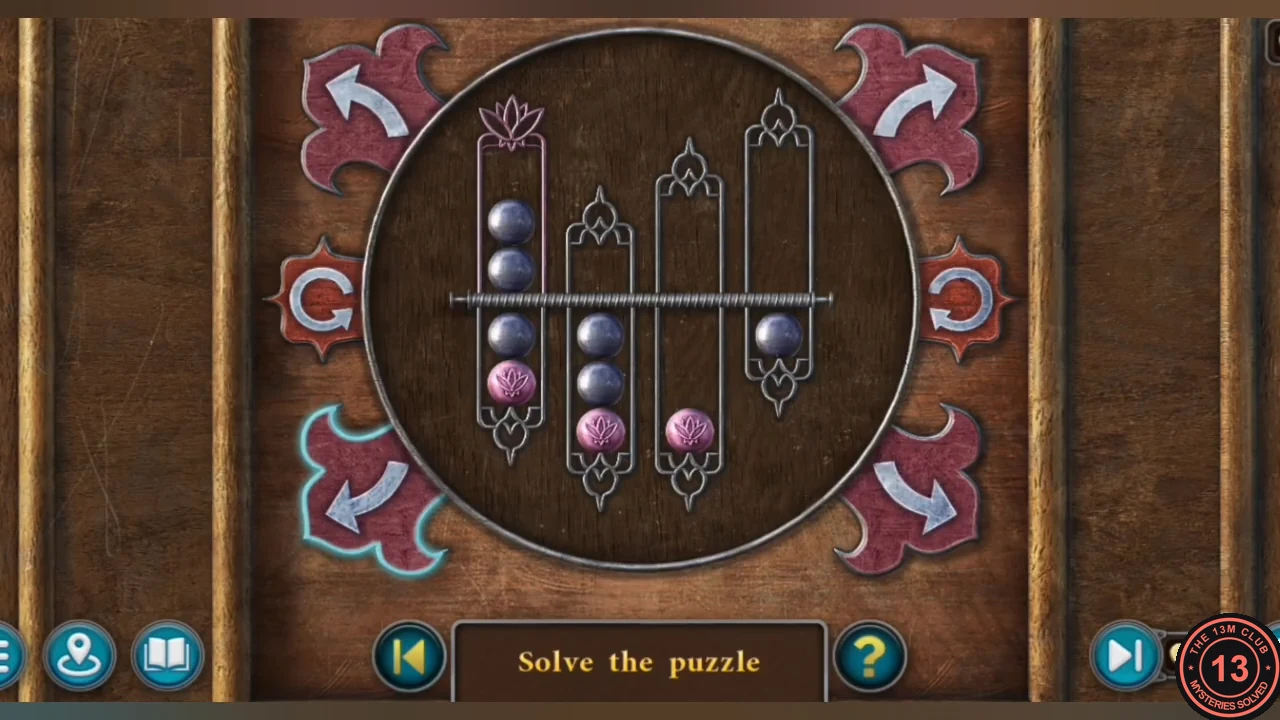
- Lotus tubes: four tubes turn on a central axle. Use the curved corner arrows and the side rotate buttons to move and flip the tubes so the balls roll between them. Gather all three pink lotus balls in the tube that carries the lotus emblem on its end.
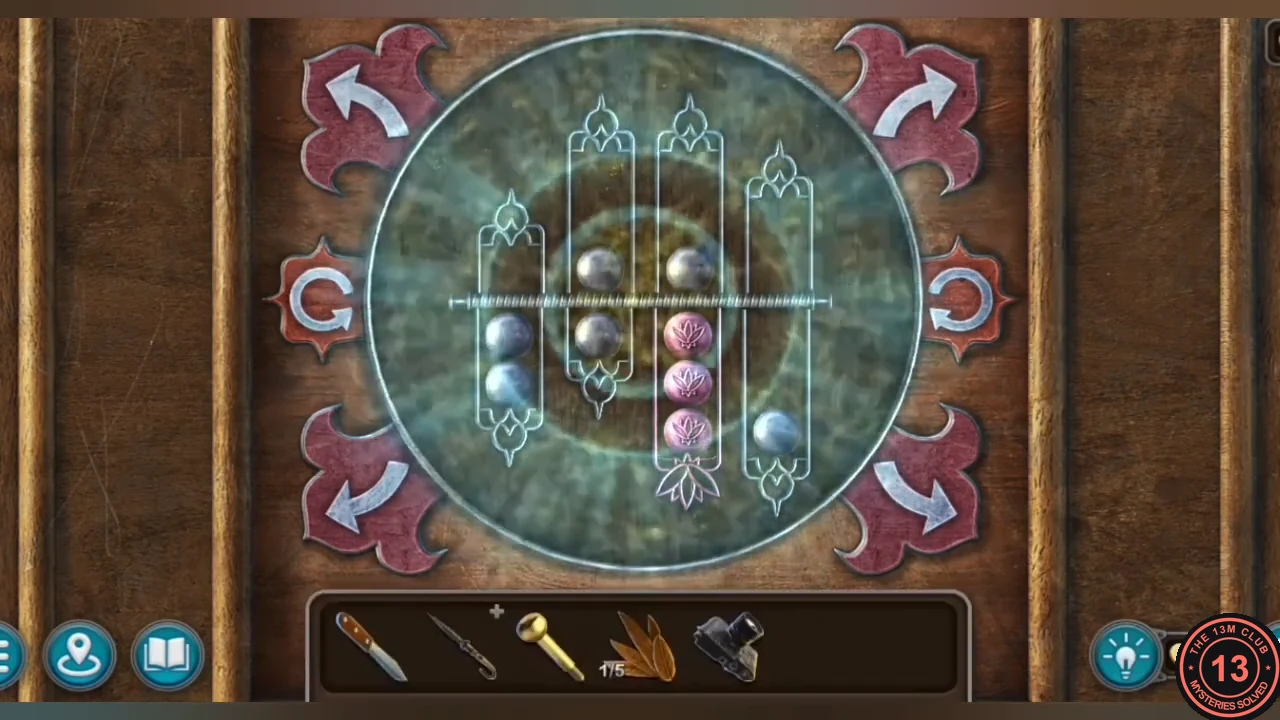
Solved: the three pink lotus balls are together in the lotus tube. - Photograph the "Girl in a Hat" painting with the CAMERA and take the PHOTO. Take the FEATHERS (2/5) from the books on the bottom shelf of the cabinet.
- Give the PHOTO to Mr. Pike on the gallery street; he gives you a MEMBERSHIP CARD. New task: explore the Lotus.
Residential Lobby: The Cog Cabinet
Enter Club Lotus, stop the sewer steam leak and fill the cog grid in the lobby cabinet.
- Show the MEMBERSHIP CARD to the doorman at the Club Lotus door (right end of the gallery street) to enter the billiard room. Collectible: Record 7/9 on the left wall near the door.
- Take the GEAR (a wooden disc) from the pool table and the POKER from the fireplace. Use the POKER under the red sofa on the left to get the HANDWHEEL. Click the morphing object by the side table on the right and take the AIRPLANE (red biplane) from the side table.
- In the second sewer tunnel, fit the HANDWHEEL on the leaking steam valve and turn it. Take the FEATHERS (3/5) from the pipe crack.
- In the Residential lobby, place the GEAR in the wooden cabinet with the round porthole window behind the reception area, then pull the lever.
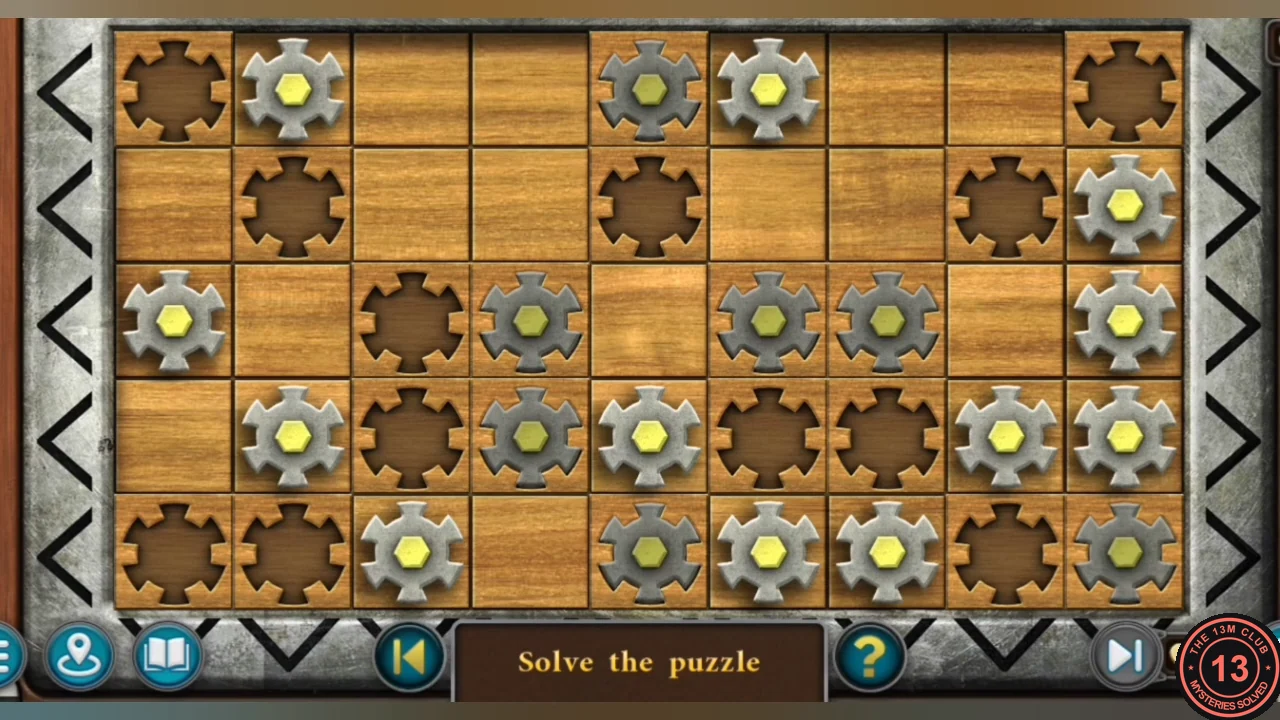
- Cog grid: bright silver cogs are loose, dark sockets are empty targets and dull cogs are already seated. Move each loose cog through empty squares into a socket; a seated cog turns dull. Fill all twelve sockets. This puzzle takes many moves: clear the routes into the corner sockets first so later cogs are not blocked.
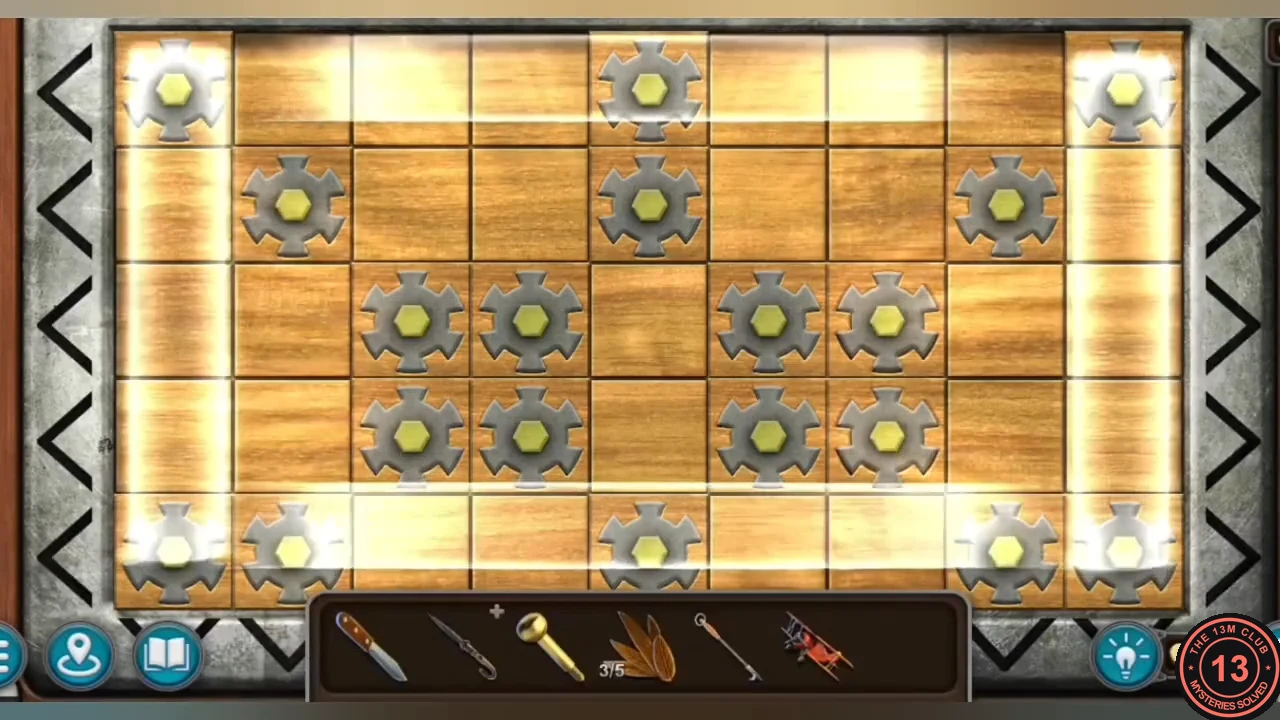
Solved: every socket holds a seated cog. - Take the KEY and the white AIRPLANE from the cabinet.
Donnelly's Office: The Airplane Shelf
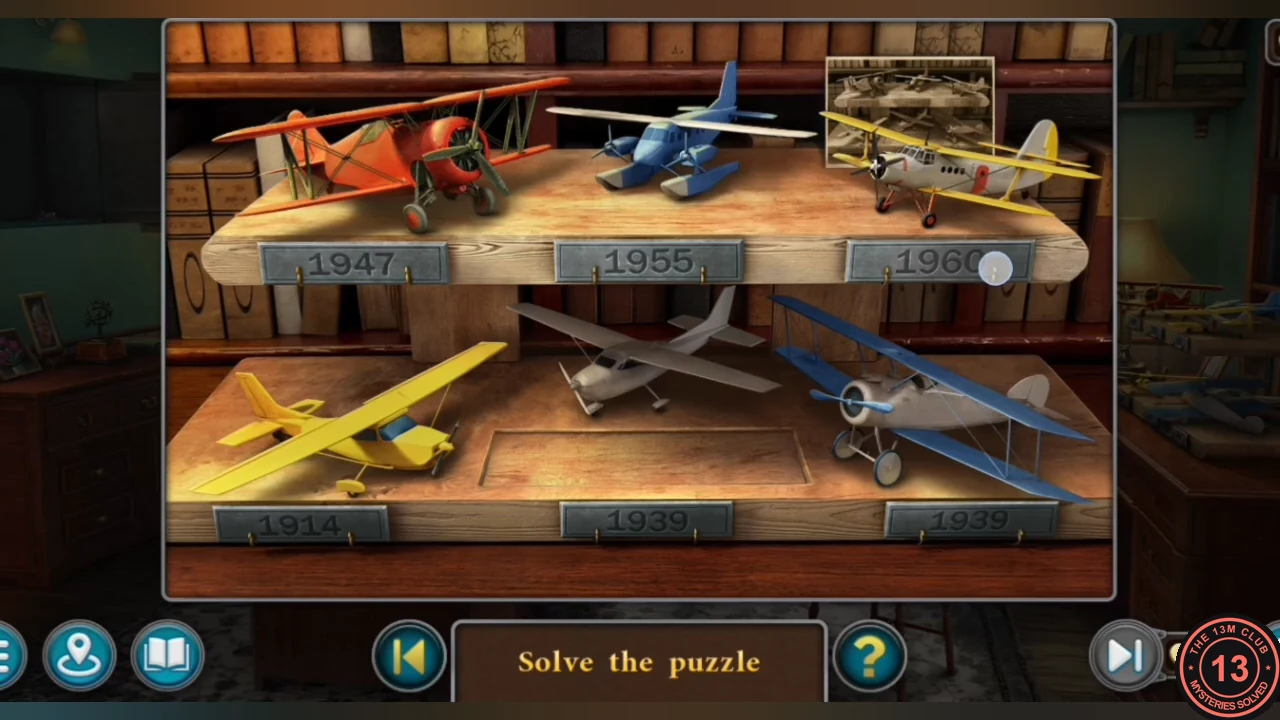
Use the photo from Donnelly's suitcase to set the dates on his airplane shelf.
- In Donnelly's apartment, open the suitcase on the living-room table with the KEY. Take the FEATHERS (4/5) and the PHOTO of the airplane shelf.
- At the airplane shelf in Donnelly's office (Carnegie Hall), place the red biplane in the top-left gap, the white AIRPLANE in the bottom-middle gap and the PHOTO as the guide.
- Swap the date plates (the planes stay put) to match the photo. Top row, left to right: 1960, 1914, 1939. Bottom row: 1939, 1947, 1955.CODE1960 1914 1939 / 1939 1947 1955
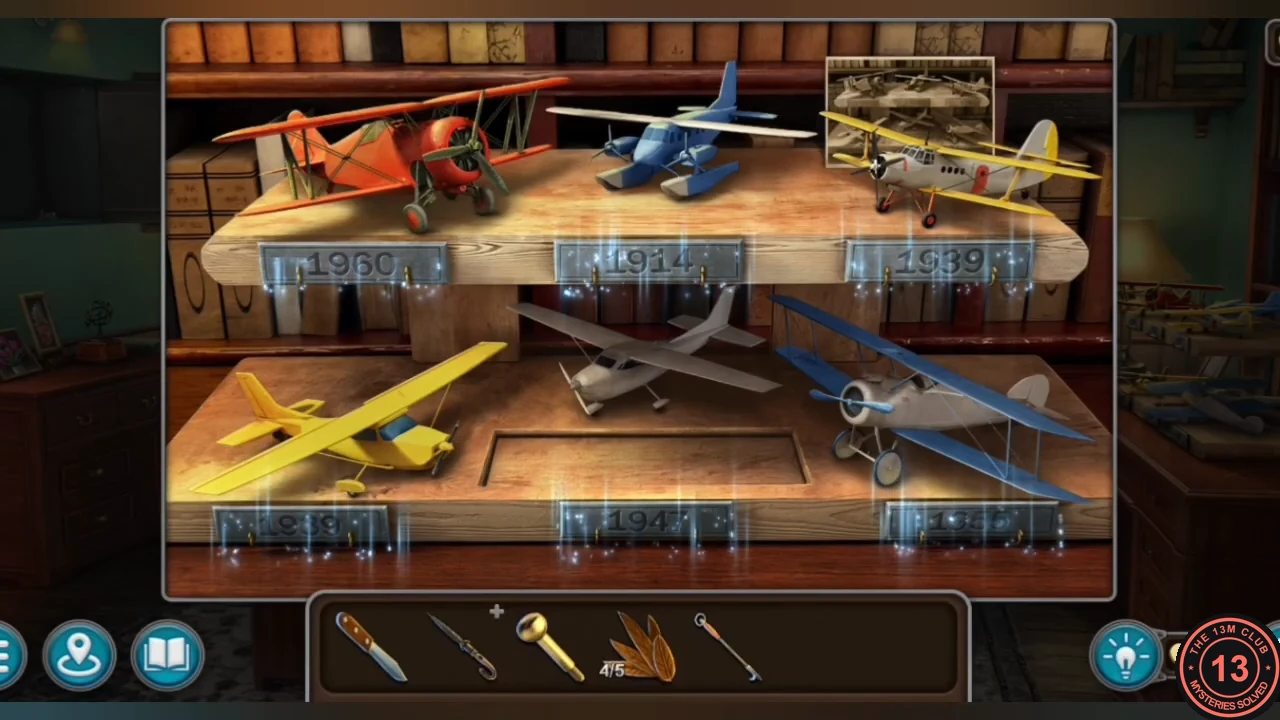
Solved: the date plates match the photo. - Take the FEATHERS (5/5) and the ARROW (a gold dart) from the tray.
Club Lotus Library: The Roman Numeral Shelves
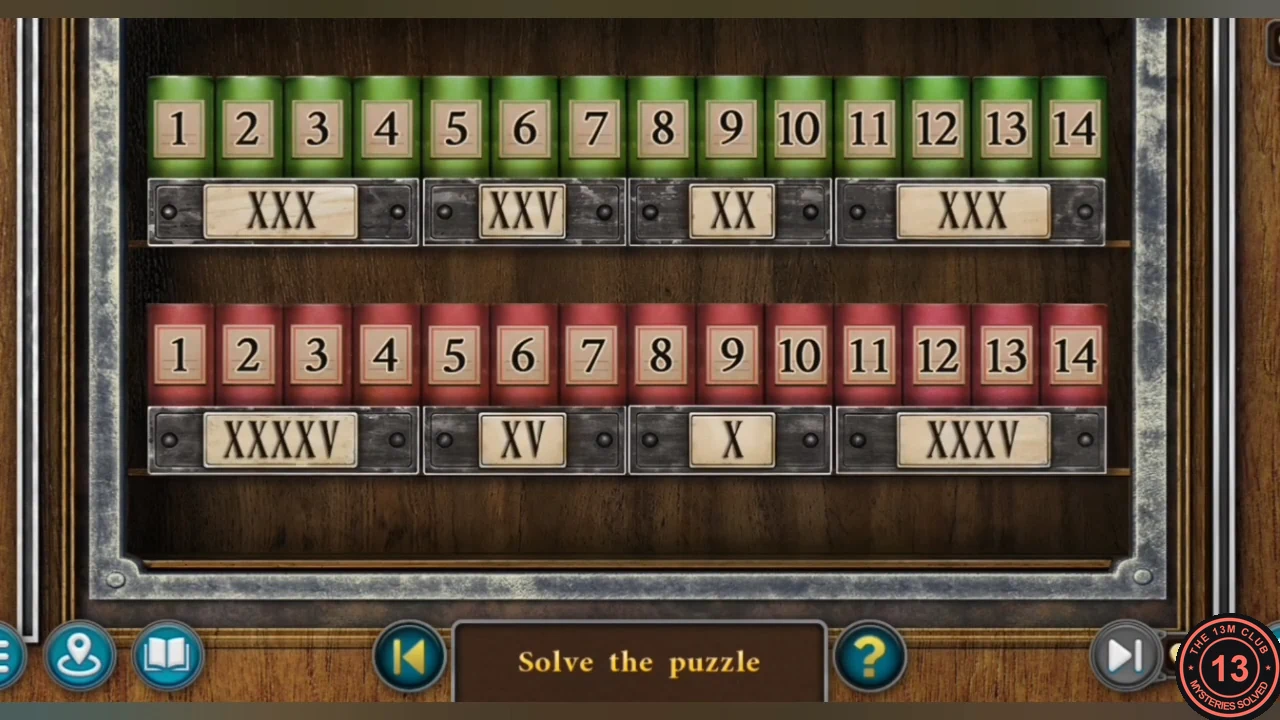
Open the library with the feathers and arrange the numbered books to match the Roman numeral totals.
- In Club Lotus, place the FEATHERS in the owl wings on the library door on the back wall.
- Book puzzle: two shelves hold books numbered 1–14. Each shelf is split into brackets of 4, 3, 3 and 4 books with Roman-numeral totals: top shelf XXX, XXV, XX, XXX; bottom shelf XXXXV, XV, X, XXXV. Click two books to swap them; a bracket turns green when its books add up to its total. One working arrangement: top [8, 10, 11, 1] [5, 6, 14] [4, 7, 9] [3, 12, 13, 2]; bottom [14, 13, 12, 6] [3, 4, 8] [7, 1, 2] [11, 5, 10, 9].
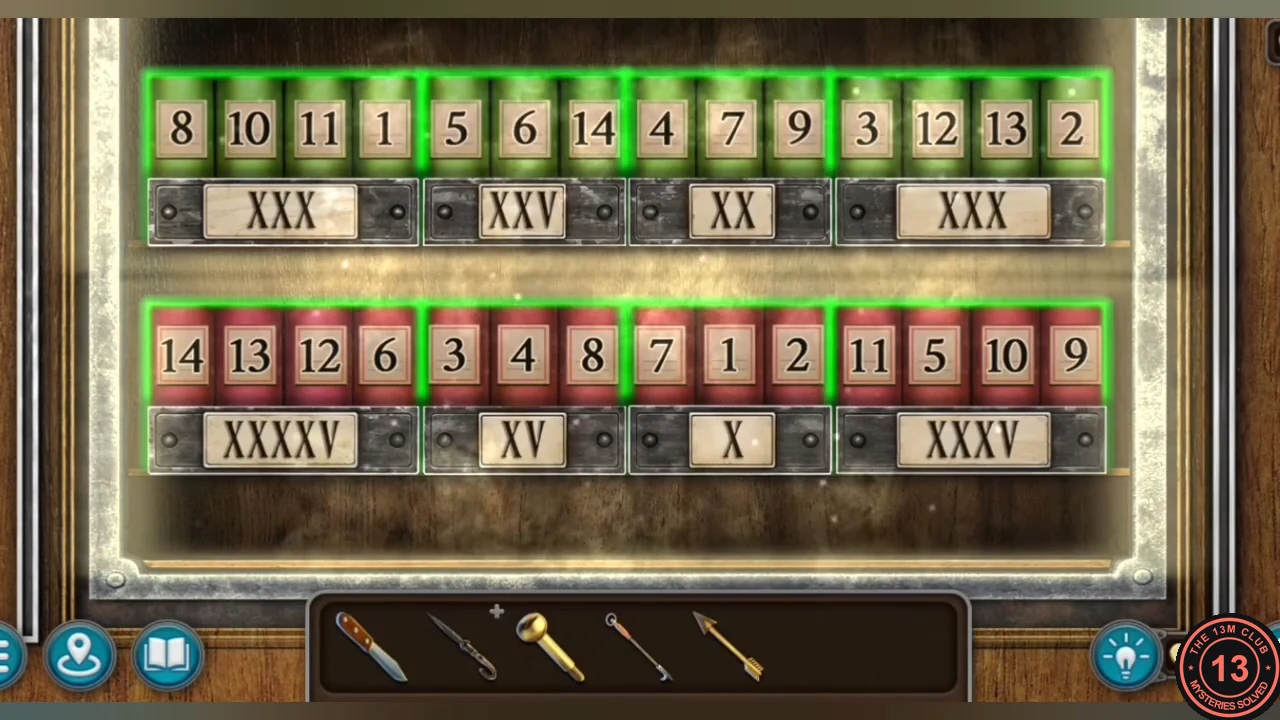
One working arrangement: every bracket adds up to its Roman numeral total. - In the library, Collectible: Record 8/9 on the left; click the morphing object at the top left. On the table, take the RING (skull signet) and the FLAG (1/4). Open the leather case's skull clasp with the RING to read "Regarding the excavations". A cutscene follows. New task: uncover Delambert's motives.
- In the billiard room, insert the ARROW in the slot of the pool-table leg at the right end and take the FLAG (2/4).
Club Lotus: The Cryptex
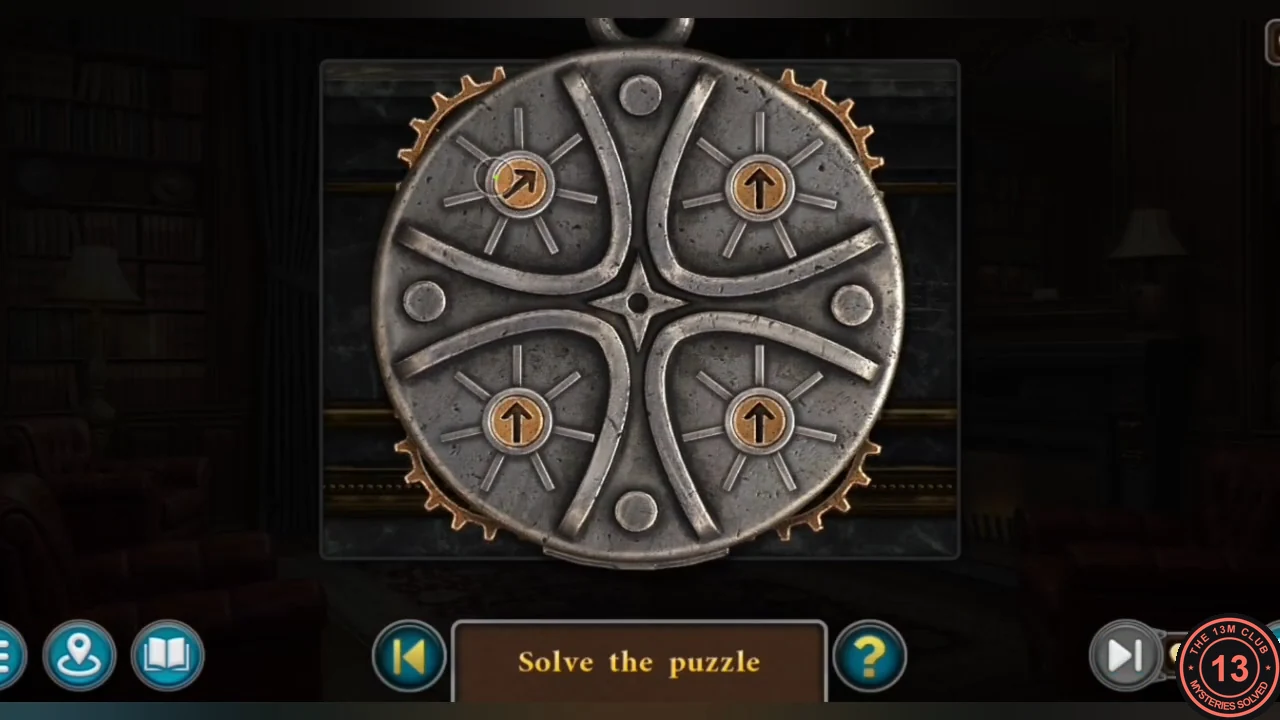
Search Delambert's office and open the cryptex with the scratched arrow clue.
- Enter Delambert's office (the green room) from Club Lotus. Collectible: Lyre 7/7 on the left bookshelf (achievement Collector); the morphing object is the white ashtray on the small wooden desk at the lower right, beside the chair.
- Use the POKER in the library fireplace and take the WING (a bat wing).
- At the gargoyle ink-blotter box on Delambert's desk, take the CRYPTEX from the top. Place the WING on the gargoyle and take the FLAG (3/4) from the drawer.
- Pry the gold ornament panel on the library mantel with the KNIFE. Take the CONTINENT map piece and note the hand-scratched arrows: up-right, left, left, down-right.
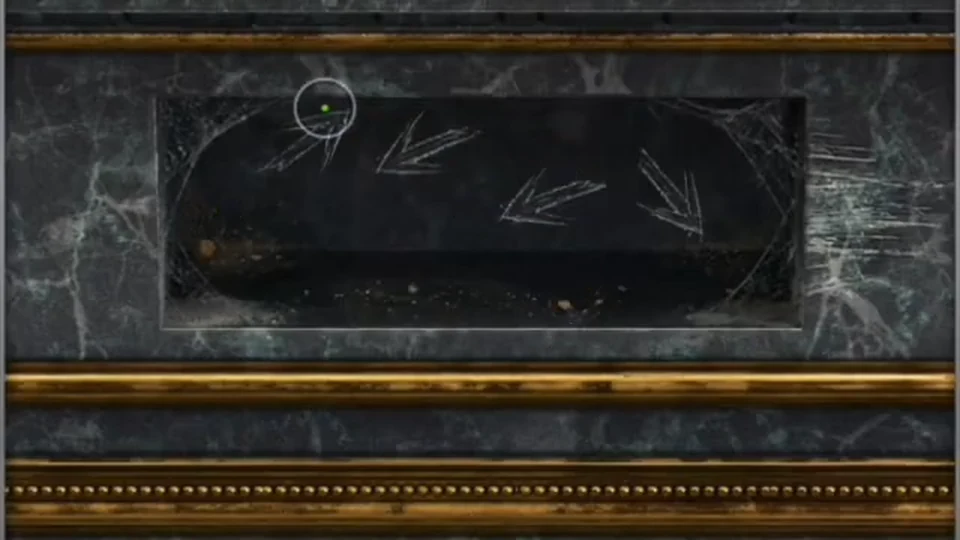
The scratched arrows on the library mantel panel, read left to right: up-right, left, left, down-right. - Open the CRYPTEX: turn the four arrow dials to match the scratches – top left up-right, top right left, bottom left left, bottom right down-right. Take the KEY.
- Unlock the small cabinet left of the library window with the KEY. Read file No. 0021 on Edward Donnelly and take the HANDLE (1/2).
Delambert's Office: Flags on the Map
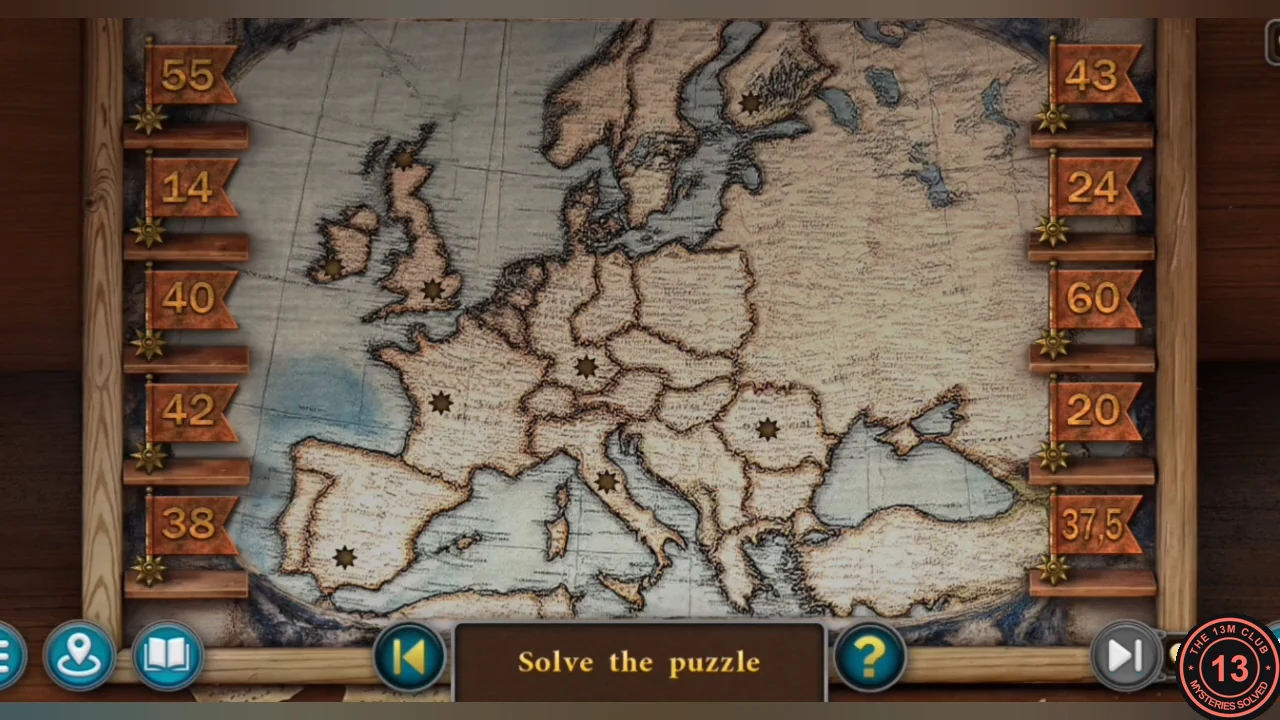
Complete the flags and pin them to the countries of the drinks on Delambert's bottle shelf.
- Put the CONTINENT piece in the globe on the right and take the FLAG (4/4).
- Place the FLAGS on the Europe map board on the right-hand desk. The clue is the bottle shelf in the office: 43% Irish Whiskey (Ireland), 40% Scotch Whisky (Scotland), 24% Tuica (Romania), 14% Sherry (Spain) and 38% Finnish Vodka (Finland).
- Drag the numbered flags from the side racks onto the countries: 43 on Ireland, 40 on Scotland, 24 on Romania, 14 on Spain and 38 on Finland. Leave 55, 42, 60, 20 and 37.5 unused.
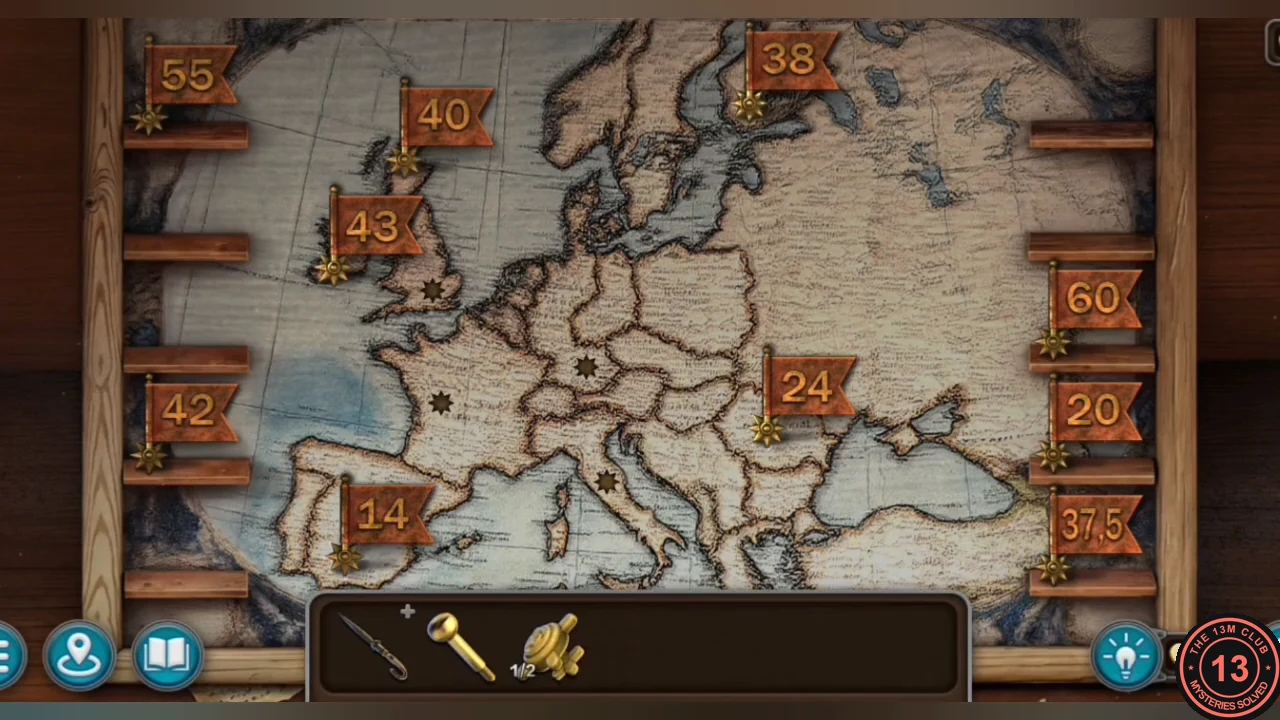
Solved: 43 Ireland, 40 Scotland, 24 Romania, 14 Spain, 38 Finland. - Take the HANDLE (2/2) from the board drawer.
Delambert's Safe: The Symbol Lattice
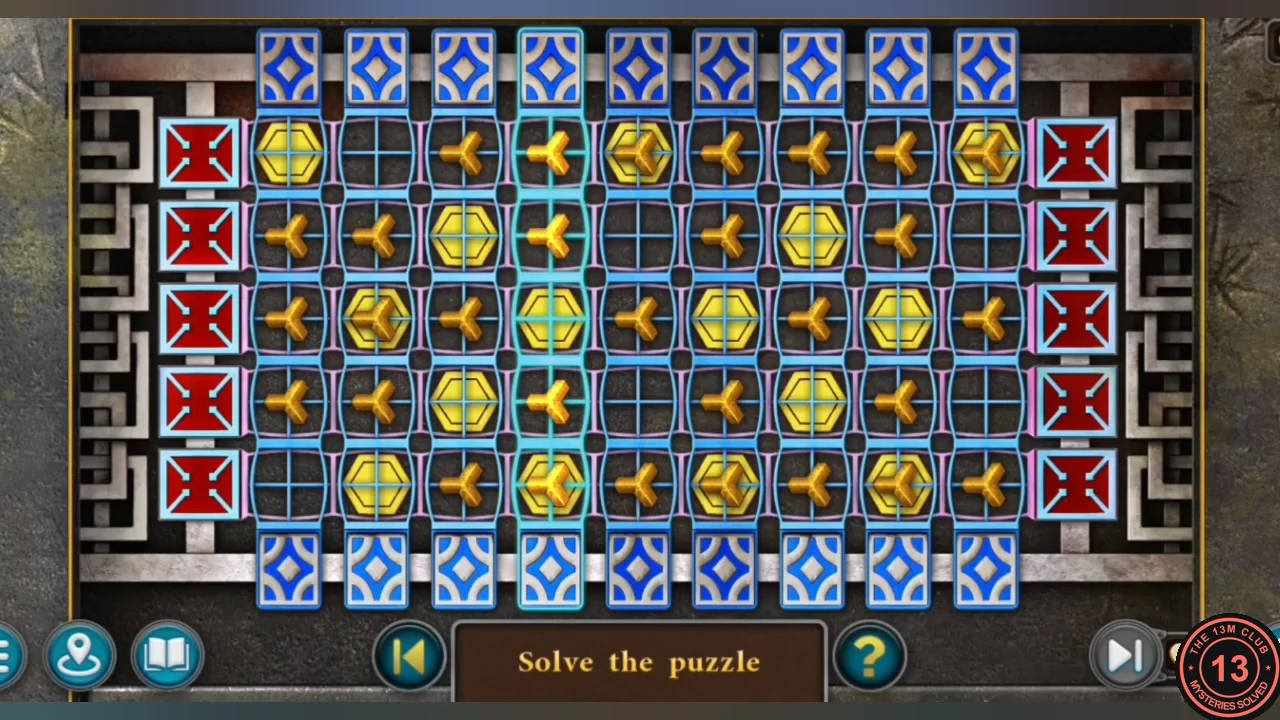
Open Delambert's large safe by leaving exactly one symbol in every cell.
- Attach both HANDLES to the large safe right of the desk and turn them.
- Lattice puzzle: drag a column vertically by its blue end tile or a row horizontally by its red end tile. Gold hexagons and trefoils sit on separate layers, so at the start some cells are empty and some hold two overlapping symbols. Shift rows and columns until every cell holds exactly one symbol, with no gaps or overlaps. This is a long rearrangement puzzle; see the completed-state image.
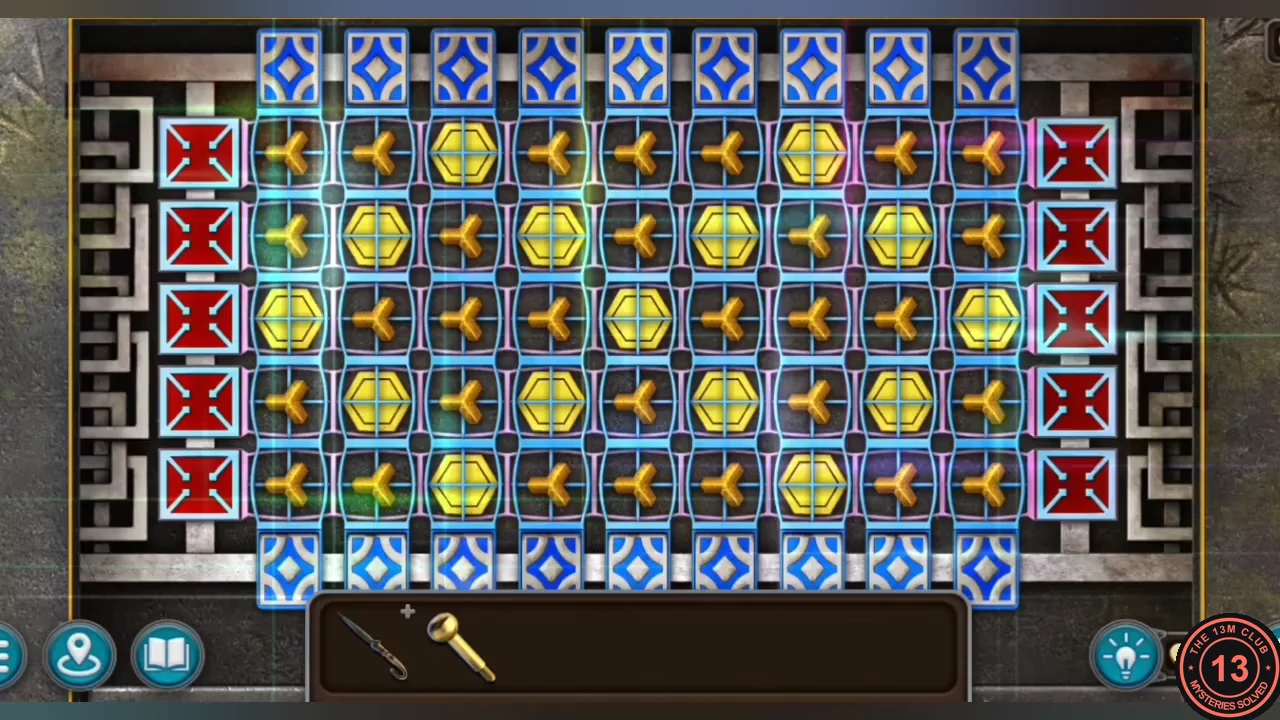
Completed state: one symbol in every cell. The gold hexagons form a symmetrical diamond pattern and the trefoils fill the remaining cells. - Read the excavation map and documents (Delambert hired the dig workers; a sarcophagus is involved) and take the BATTERIES.
Club Lotus Library: The Four Lamps
Read the clock radio's light pattern and copy it with the library lamps to reveal the hidden book.
- In the billiard room, insert the BATTERIES in the clock radio on the side table. It shows 20:30, then four lights: ON, off, off, ON.
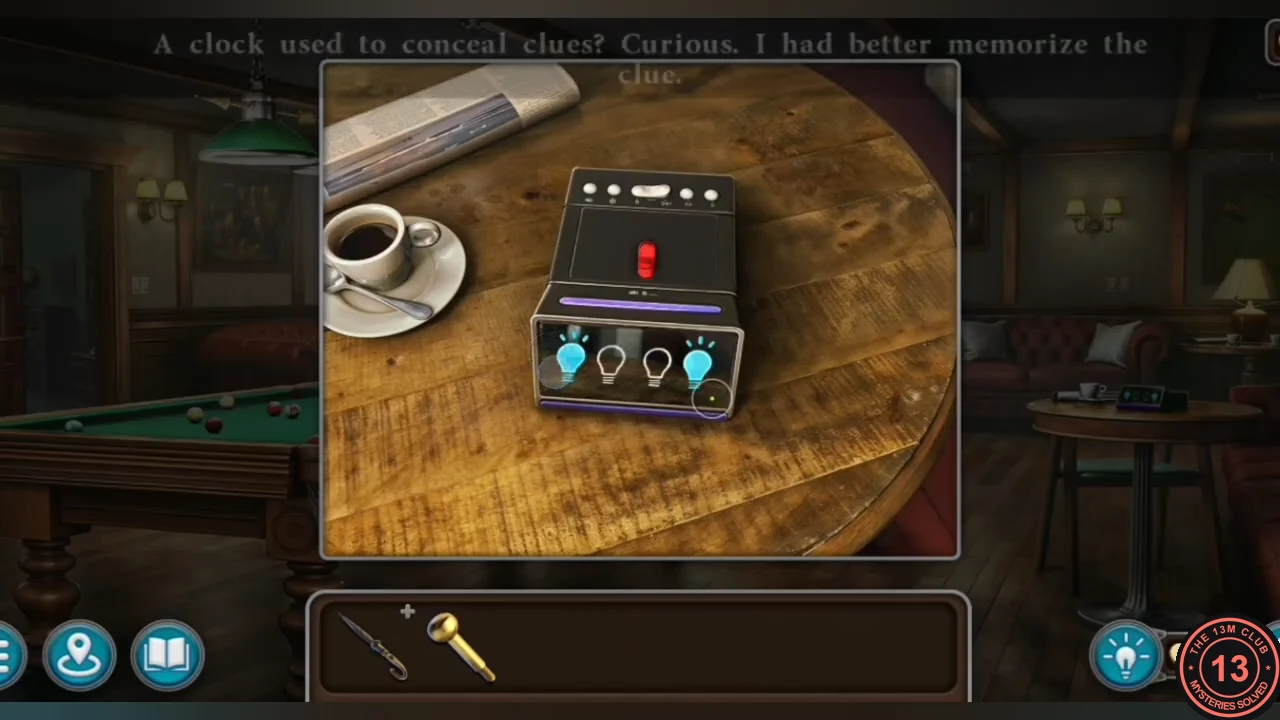
The clue: the clock radio's four lights read ON, off, off, ON. - In the library, the four lamps from left to right are the floor lamp by the bookcase, the floor lamp behind the armchair, the small lamp on the bookshelf and the lamp on the mantel. Place the gold SWITCH (from the umbrella handle) on the lamp that is missing its switch. Then set the lamps to ON, off, off, ON from left to right. A secret bookshelf compartment opens.
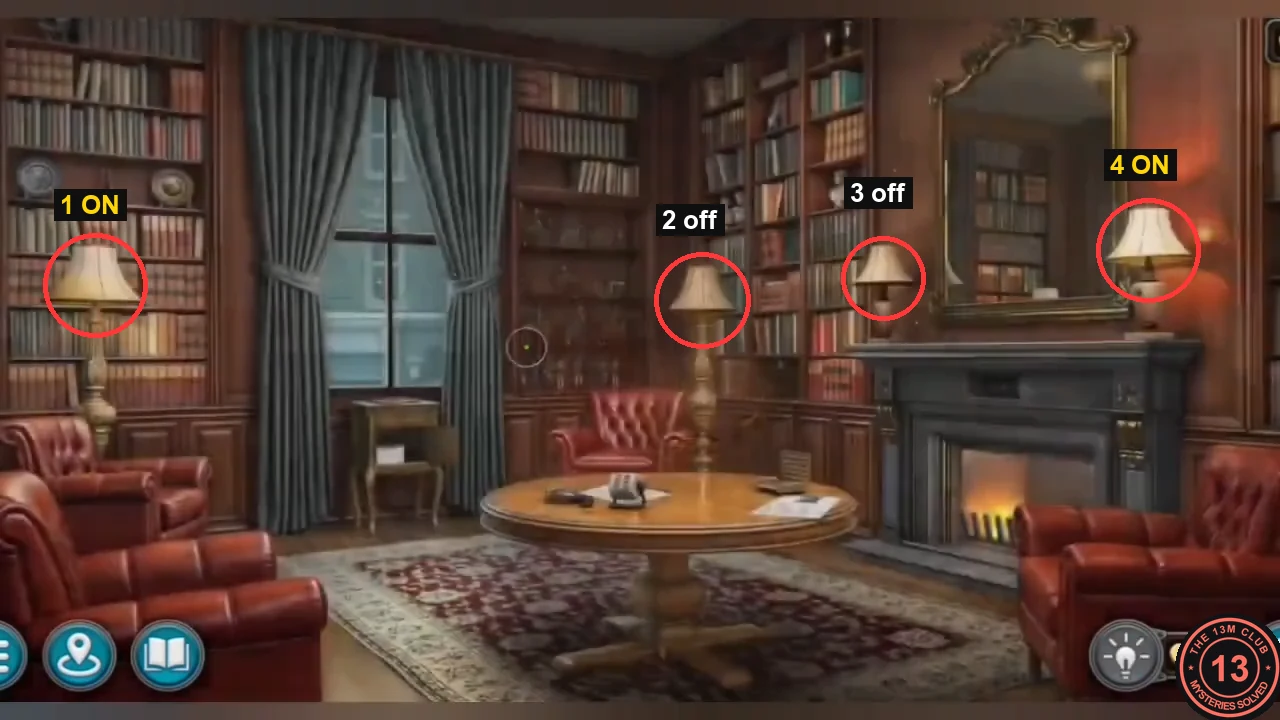
The four lamps from left to right; set them ON, off, off, ON. - Read the book "Awakening of Blood" in the compartment. The closing cutscene plays and the chapter's plot is complete. Choose CONTINUE if you still need collectibles.
- Collection cleanup: the 16th morphing object is on 7th Avenue, at the upper left near the top of the left lamp post and tree by the far building. Collectible: Record 9/9 is at the lower-right edge of the Carnegie Hall stage view (achievement Music Lover). Once the chapter shows 16/16 morphing objects and all collectibles, choose NEXT EPISODE.