Mapleford Hotel and Street: The Garage Gears
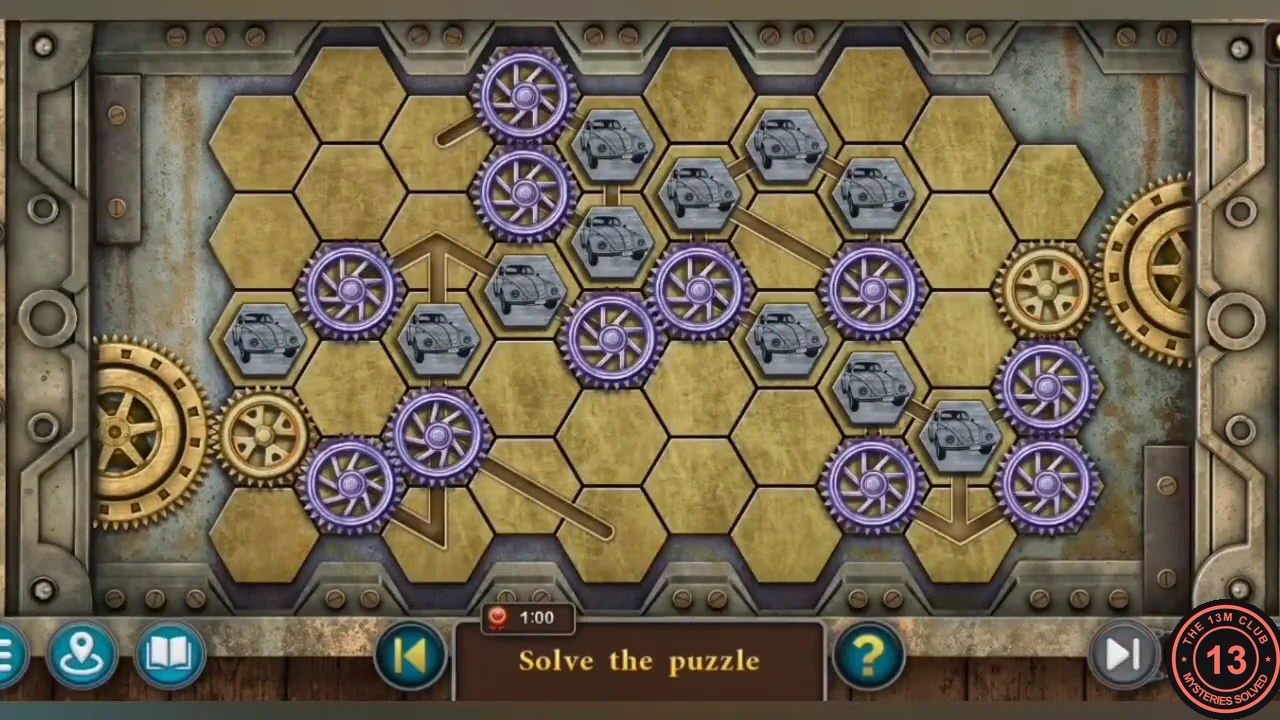
Lucas Bishop wakes up in a Mapleford hotel room after the train journey. Gather the two toy cars and open the garage door with its gear puzzle.
- In the hotel room, a morphing object is on the left side near the lamp and window. Collectible: Maple leaf 1/7 is in this room. Open the suitcase on the bed, look at the photo and take the KNIFE and the LIGHTER.
- Use the KNIFE on the stuck drawer of the nightstand right of the bed. Take the NAIL PULLER and CARS (1/2).
- Leave through the hotel door to the street and talk to the boy by the red car. On the cart at left (green tarp), open the red crate with the NAIL PULLER and take the JACK.
- Use the JACK on the rear wheel of the red car and take the COAT OF ARMS. A morphing object is at the upper right of the street; Collectible: Maple leaf 2/7 is also on the street.
- In the hotel room, place the COAT OF ARMS on the bed headboard. A round compartment opens: take the SMALL KEY. Look closely at the inside of the lid – a 6x4 grid with four X marks (row 1, squares 3 and 4; row 4, squares 2 and 5). You need it for the toolbox later.
- Open the glass-domed jewellery box in the hotel room with the SMALL KEY. Take the OILER and CARS (2/2).
- On the street, place the CARS on the picture of cars on the garage door (left building) to start the gear puzzle.
- Gear puzzle: purple gears and grey car tiles slide along the lines drawn on the panel, each piece only along its own line. Move the pieces until an unbroken chain of purple gears links the gold drive gear on the left to the gold gear on the right. The grey car tiles move the same way and can block a line. This takes many moves; work from the gold gears inwards and see the solved-state image.
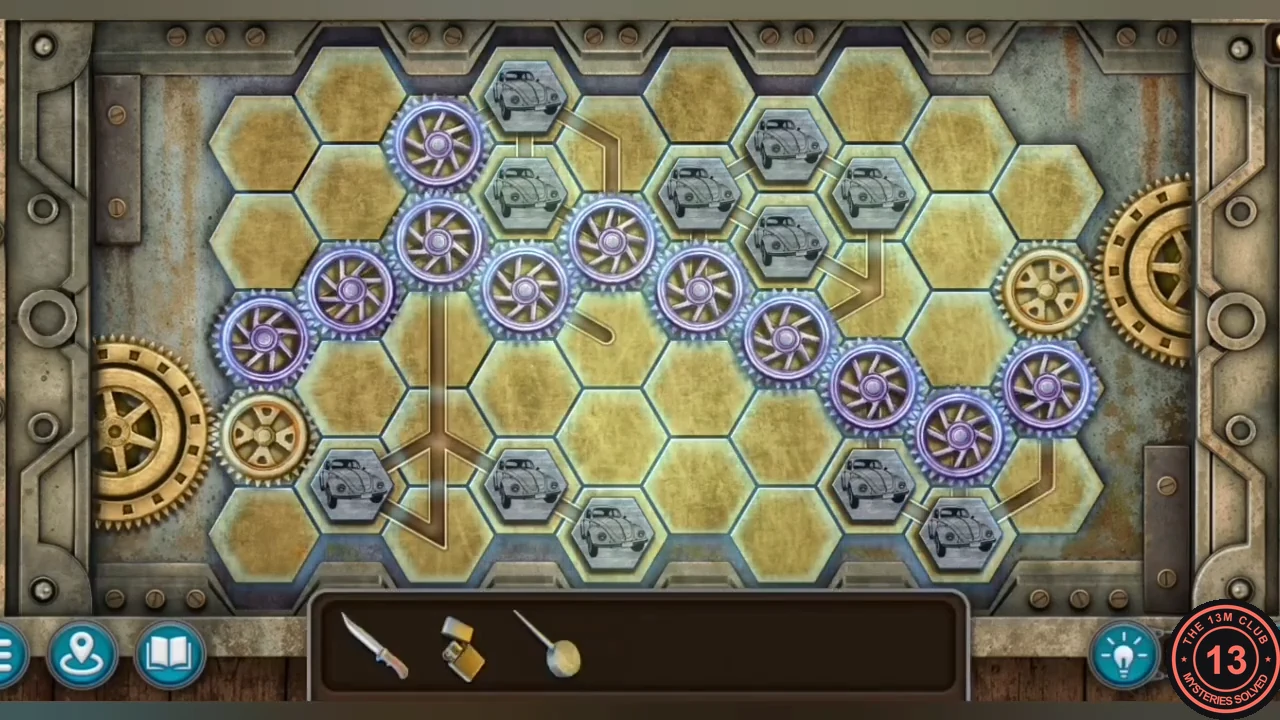
Solved: an unbroken chain of purple gears runs from the small gold gear at the left drive wheel to the small gold gear at the right. The car tiles are parked out of the way.
Mapleford Garage: The Toolbox Nuts
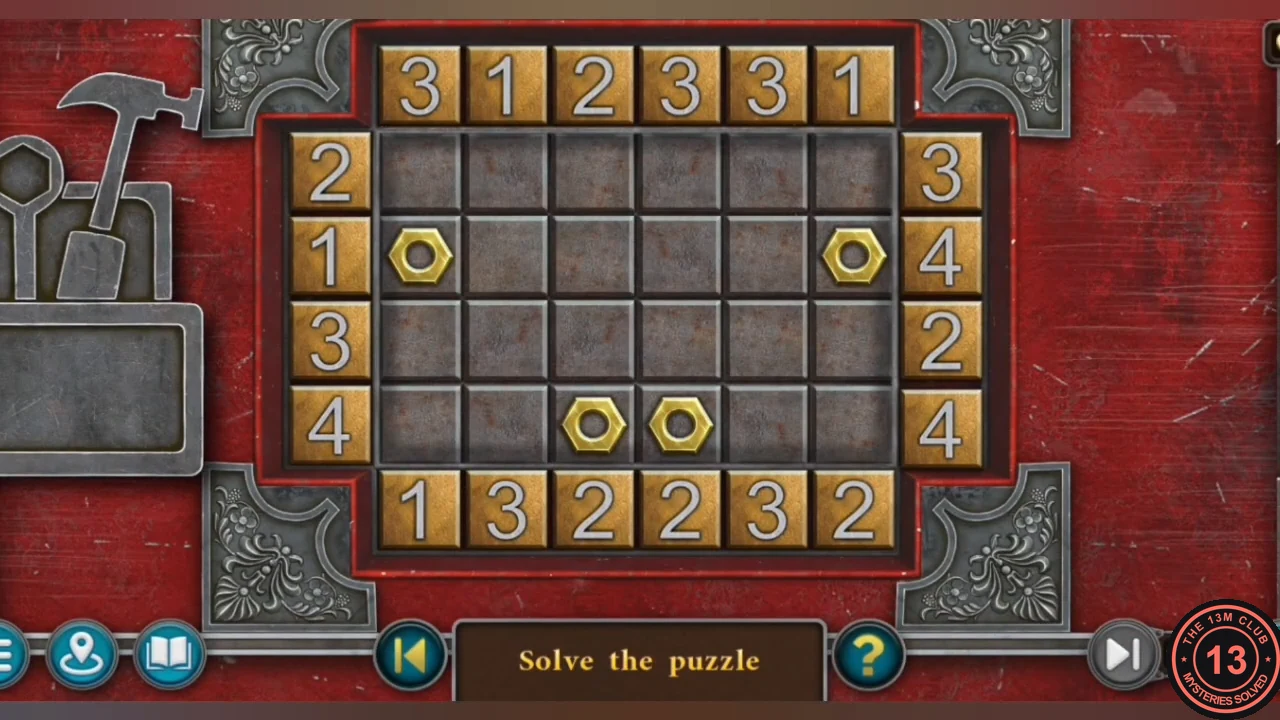
Inside the garage, find tools in the old truck and open the red toolbox using the headboard grid.
- Enter the garage. A morphing object is at the left by the red gas cylinder; Collectible: Goblet 1/8 is at the upper left of the garage.
- Use the OILER on the latch of the truck's hood to open it. The engine's spark plugs are brand-new, but you need a wrench to remove them.
- Cut the truck's cab seat with the KNIFE and take the TOOLS. Place the TOOLS in the tool-shaped recess on the lid of the red toolbox on the right-hand workbench.
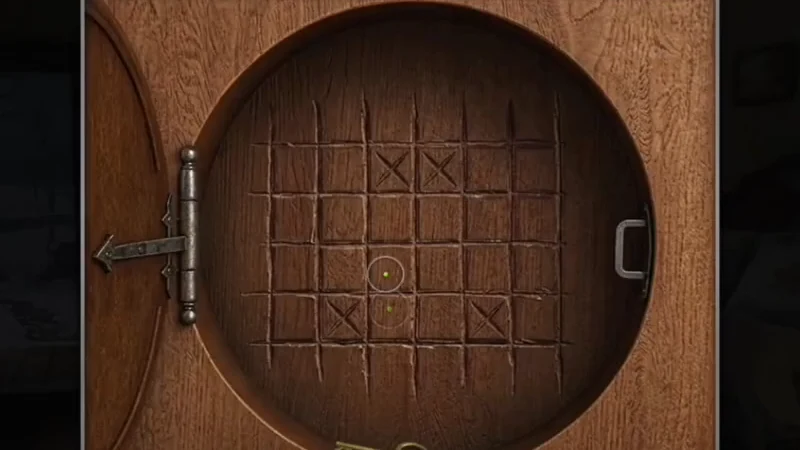
The clue inside the headboard lid: X marks on row 1, squares 3 and 4, and row 4, squares 2 and 5. - Nut puzzle: four nuts sit on a 6x4 grid with numbers around the edge. Tapping an edge number fires a bolt along that row or column; it pushes the first nut it meets by that many squares. Move the nuts onto the four X squares from the headboard lid: row 1, squares 3 and 4, and row 4, squares 2 and 5.
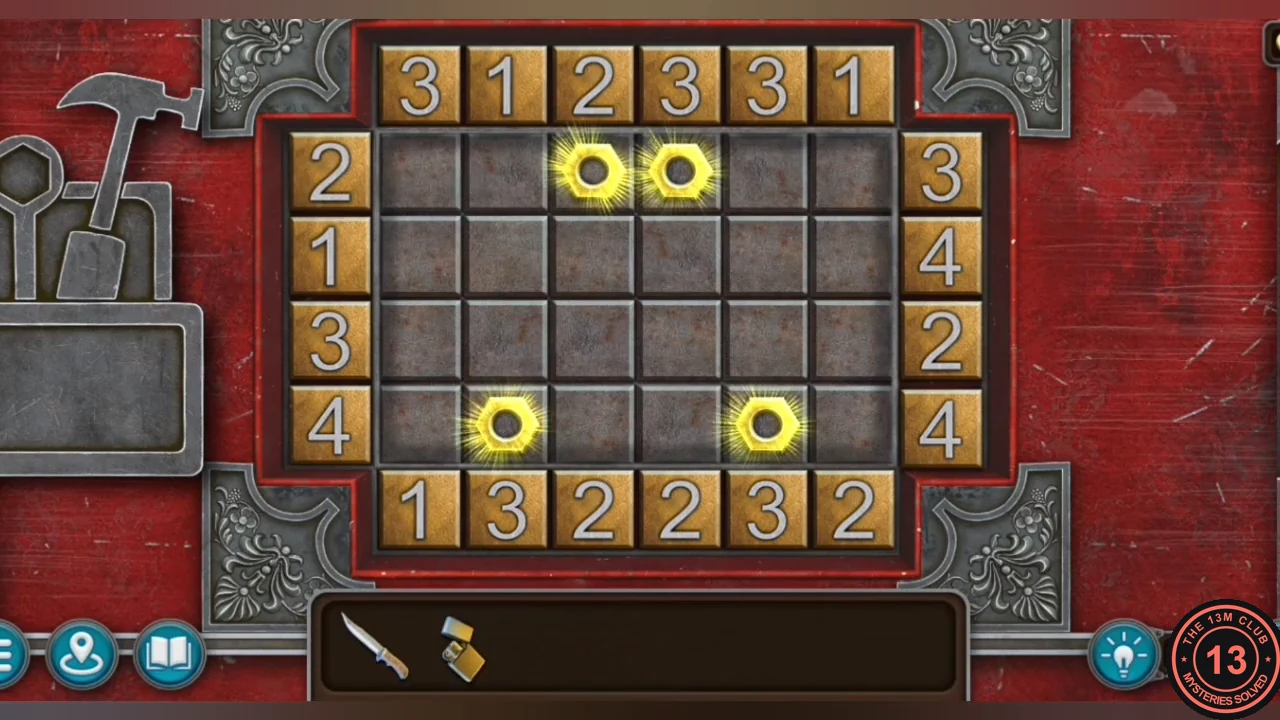
Solved: the nuts sit on the four X squares from the headboard lid. - Take the SPARK PLUG WRENCH and MEDALLION (1/6) from the toolbox.
- Use the SPARK PLUG WRENCH on the truck engine and take the SPARK PLUGS.
Garage Workshop: Getting the Wheel
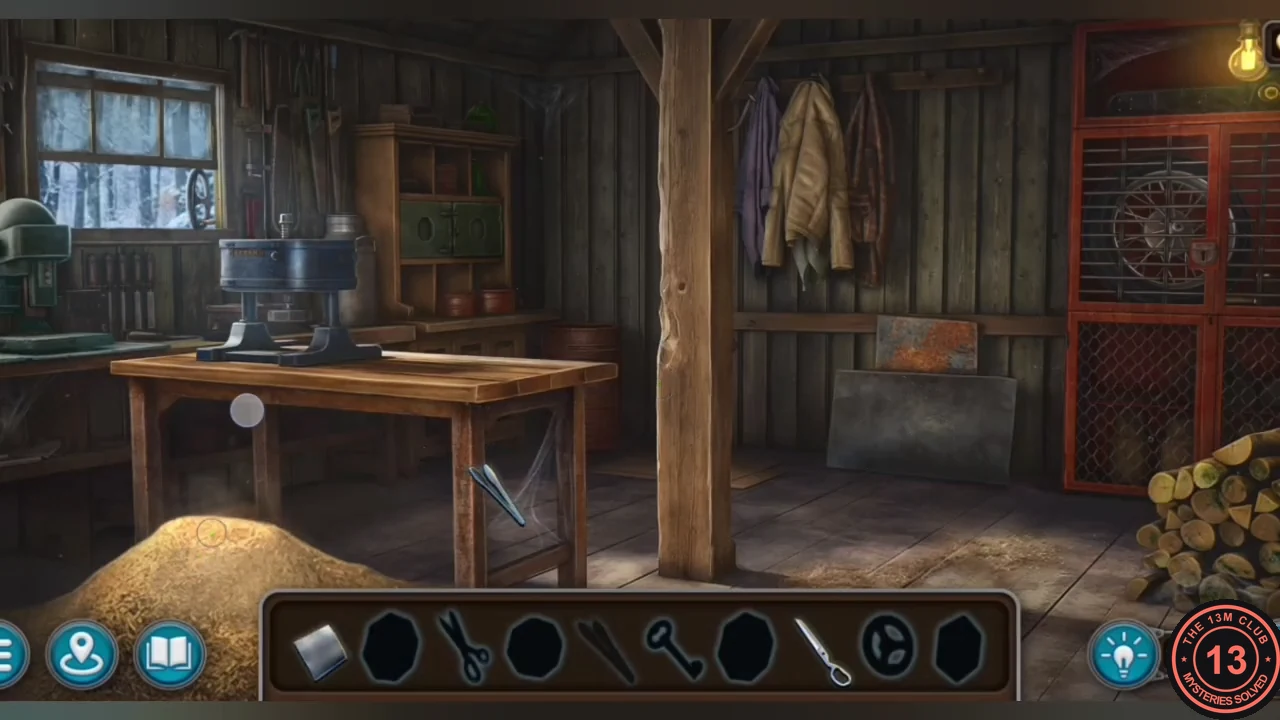
The workshop behind the garage is an interactive search scene: the bar at the bottom shows silhouettes of the objects you need.
- Go through the door on the left side of the garage into the workshop. Lucas sees a wheel that should fit the car, locked in the red cage.
- Take the BLADE hanging on the post and the SHEET METAL from the floor. Take the scissor half from the shelf to complete the SCISSORS, then cut the patch on the hanging coats with them and take the INSERT (a silver medallion with a stag).
- At the red cage, slide the BLADE between the bars (the gaps are just wide enough for something flat) and pull out the DIE, a gold octagonal stamp with a stag.
- Put the SHEET METAL in the punch machine to get a BLANK. Place the DIE and the BLANK in the screw press. The press cannot be lowered yet: take the HANDWHEEL from the post by the window, fit it on the press and turn it to stamp a second INSERT.
- Place both INSERTS in the octagonal recesses of the green cabinet on the back wall and take the KEY. Unlock the padlock on the red cage with it and take the WHEEL.
- On the street, open the red car's engine: remove the worn spark plugs with the SPARK PLUG WRENCH, fit the new SPARK PLUGS and tighten them.
- Go to the red car's jacked-up rear wheel (the right-hand wheel in the street view, where you used the JACK). Loosen the nut with the SPARK PLUG WRENCH, remove the damaged wheel, mount the WHEEL, tighten it and lower the jack. The boy drives Lucas to the town square.
Mapleford Town Square: The Churchyard Gate
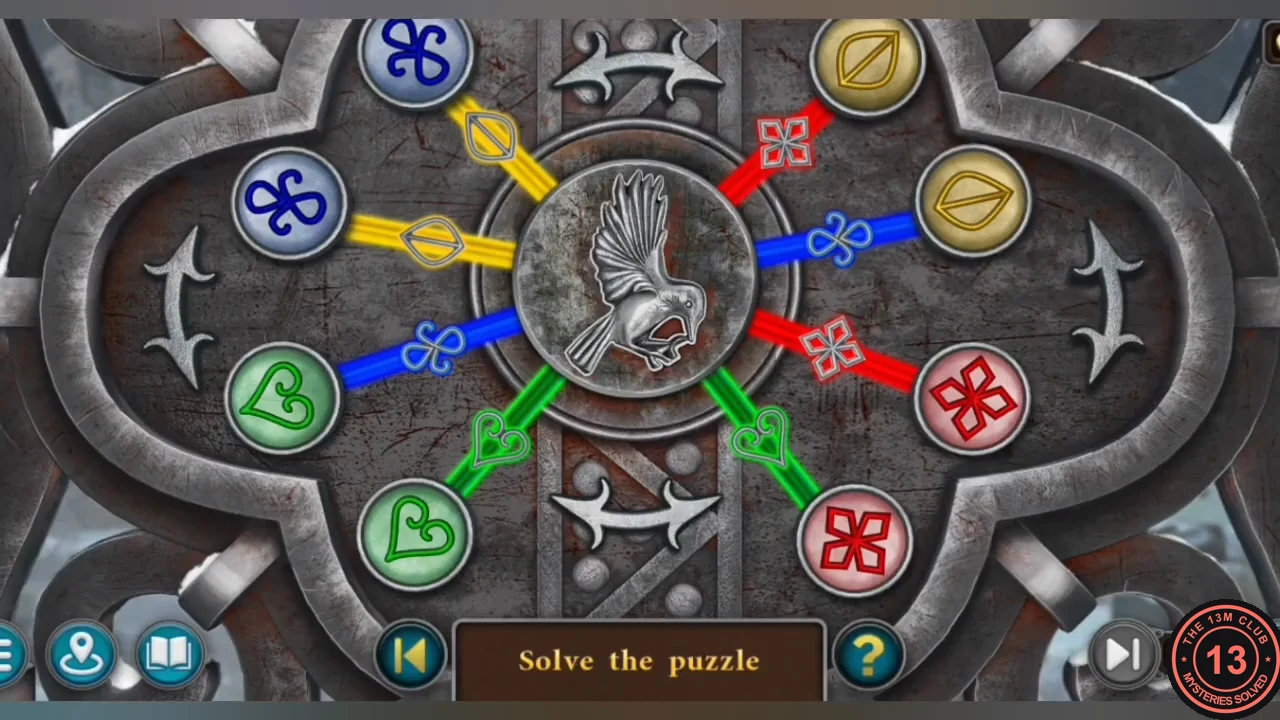
Search the town square and open the bird lock on the churchyard gate.
- In the town square (pharmacy, bookshop kiosk, iron gate) your task is to talk to the witnesses. Collectible: Maple leaf 3/7 is by the pharmacy; a morphing object is the pale round shape on the grey church tower, just above the lamp of the bookshop kiosk.
- Open the shutter of the bookshop kiosk. On the desk, read the book of vampire legends and take the THERMOS and the BIRD figure.
- Place the BIRD on the lock of the iron churchyard gate to start the rod puzzle.
- Bird lock: eight coloured rods point out from the bird disc towards eight fixed coins – two blue trefoils at upper left, two yellow leaves at upper right, two green hearts at lower left and two red flowers at lower right. The four double-headed arrow ornaments (top, bottom, left and right) each move a group of rods around the disc; press one at a time and watch which rods change. Finish with every rod pointing at a coin of its own colour. This puzzle is long; see the solved-state image.
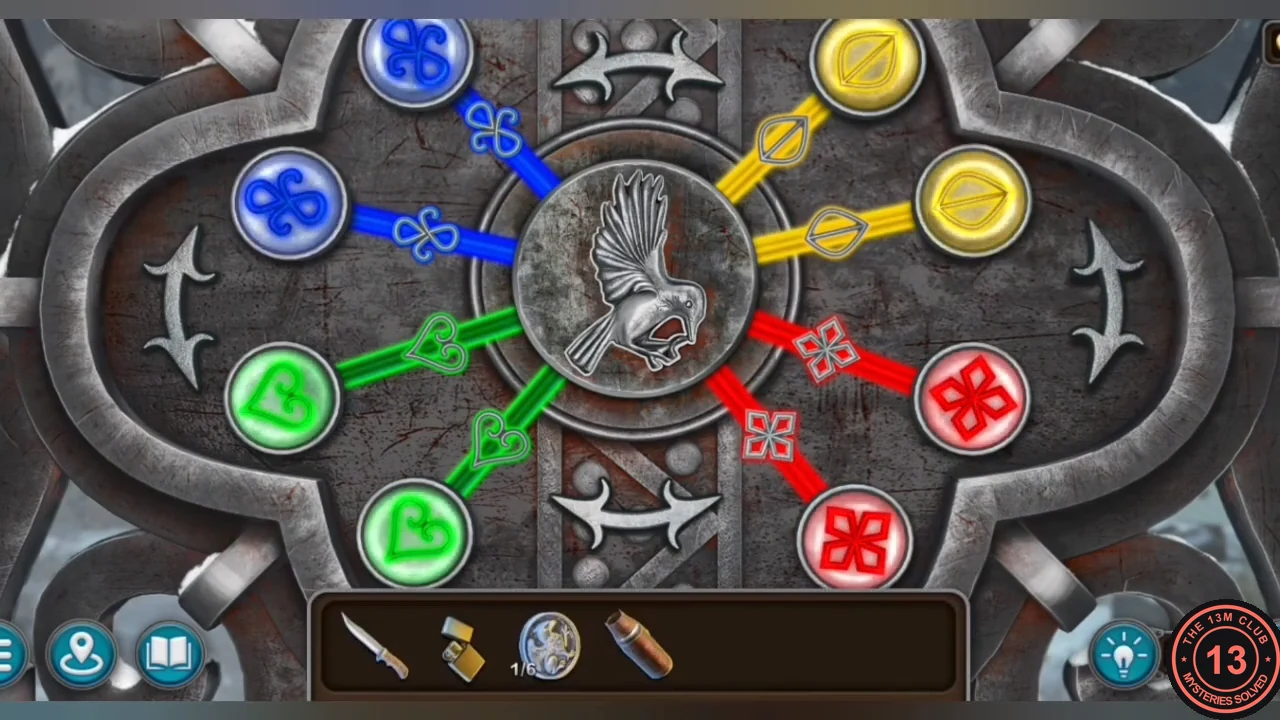
Solved: every rod points at a coin of its own colour – blue upper left, yellow upper right, green lower left, red lower right.
The Old Woman's House: The Pantry
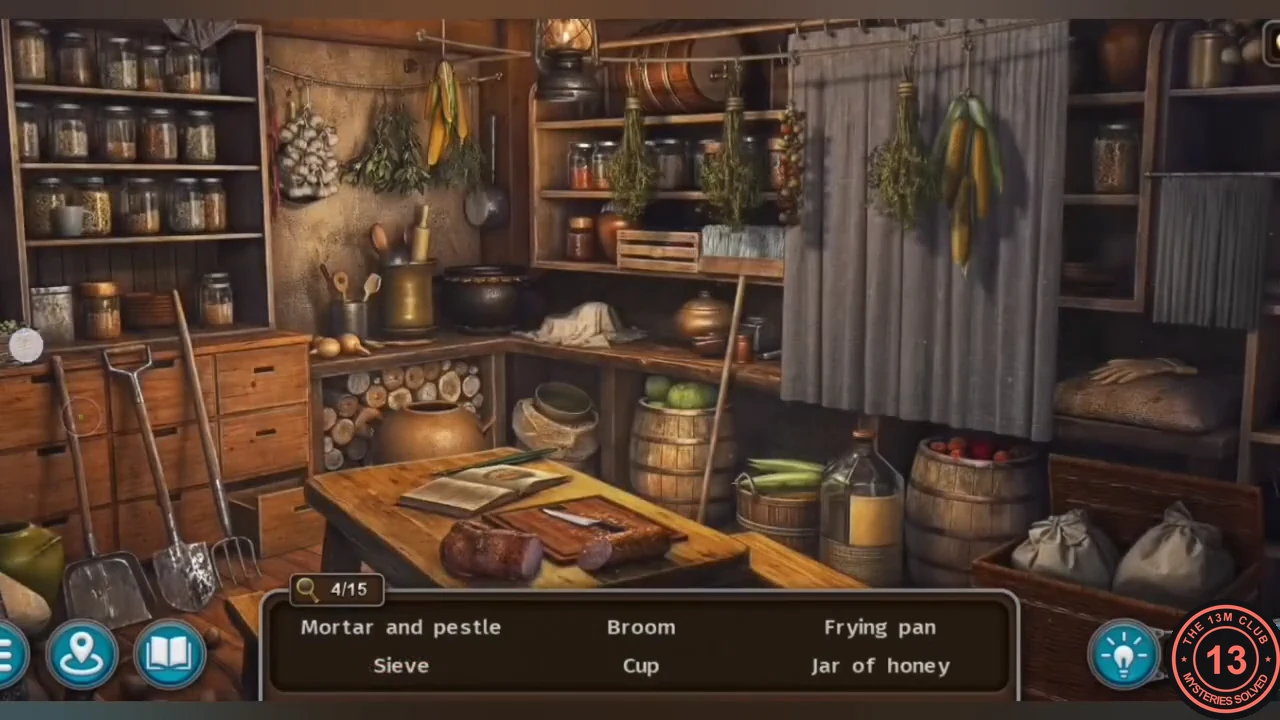
Visit the old woman who lives by the churchyard. She asks Lucas to perform a ritual; search her pantry for the wine.
- In the churchyard, Collectible: Goblet 2/8 is on the right by the statue and tombstone; a morphing object is at the left edge by the church wall.
- Go to the old woman's house. Collectible: Maple leaf 4/7 is outside; a morphing object is on the roof. Zoom into the tree stump and take MEDALLION (2/6).
- Knock with the door knocker and talk to the old woman. She gives you the ROD OF ASCLEPIUS and asks you to perform a ritual.
- Inside, zoom into the chest of drawers on the right: Collectible: Maple leaf 5/7. The top drawer is locked. On the round table, read the RITUAL INSTRUCTIONS (they go to your inventory) and take the KEY.
- At the stove, take the SALT. Light the burner with the LIGHTER and put the THERMOS on it to get BOILING WATER.
- Pry up the loose staircase step with the KNIFE and take the LION HEAD. Open the top drawer with the KEY and take the door HANDLE and MEDALLION (3/6).
- Attach the HANDLE to the back door (its handle doubles as the lock) to enter the pantry search scene.
- Pantry: find the 15 listed objects – scissors (top drawer), carrot (bottom drawer), flashlight, bottle, cup, frying pan, rolling pin, sieve, broom, bread, mortar and pestle, glove, matches, jar of honey (behind the curtain) and a hammer (put the toolbox handle and the head on the shelf together). Take the WINE as your reward.
Mapleford Pharmacy: The Snake Door
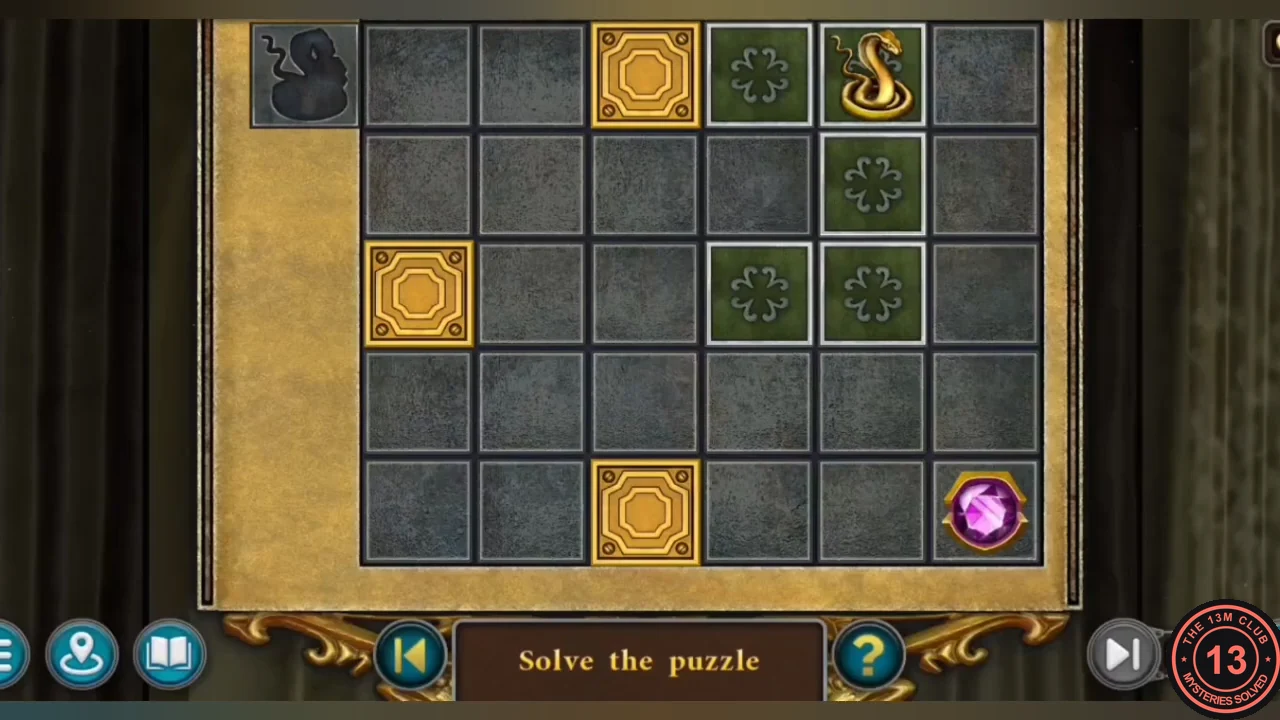
The pharmacy is locked but its light is on. Open it with the Rod of Asclepius.
- Use the map to return to the town square. Place the ROD OF ASCLEPIUS on the pharmacy door.
- Snake puzzle: the snake token sits at the top of a 6x5 board and can only travel over green clover tiles; the clover tiles slide, the gold squares are fixed obstacles. Slide tiles to build a path that leads the snake to the purple gem at the bottom right, then build a path back to the snake's slot at the top left. This takes many moves; see the solved-state image.
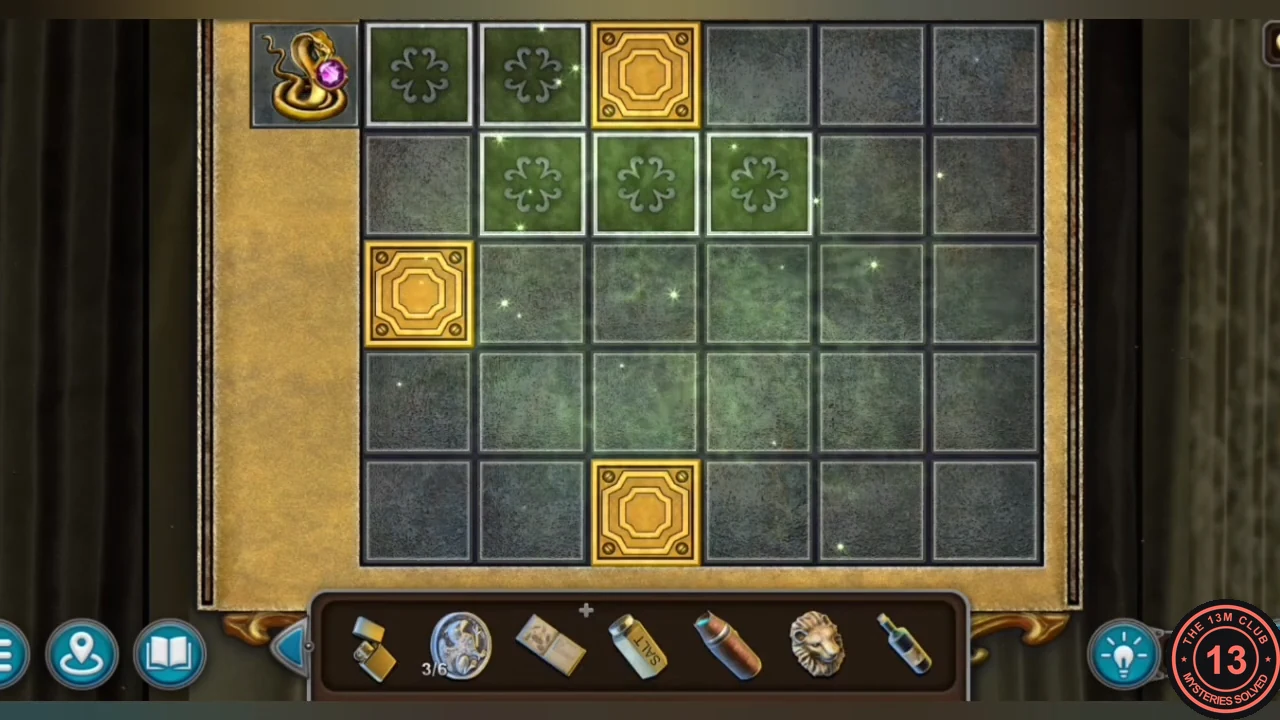
Solved: the snake has fetched the gem and is back in its slot at the top left.
Mapleford Pharmacy: The Lettered Drawers
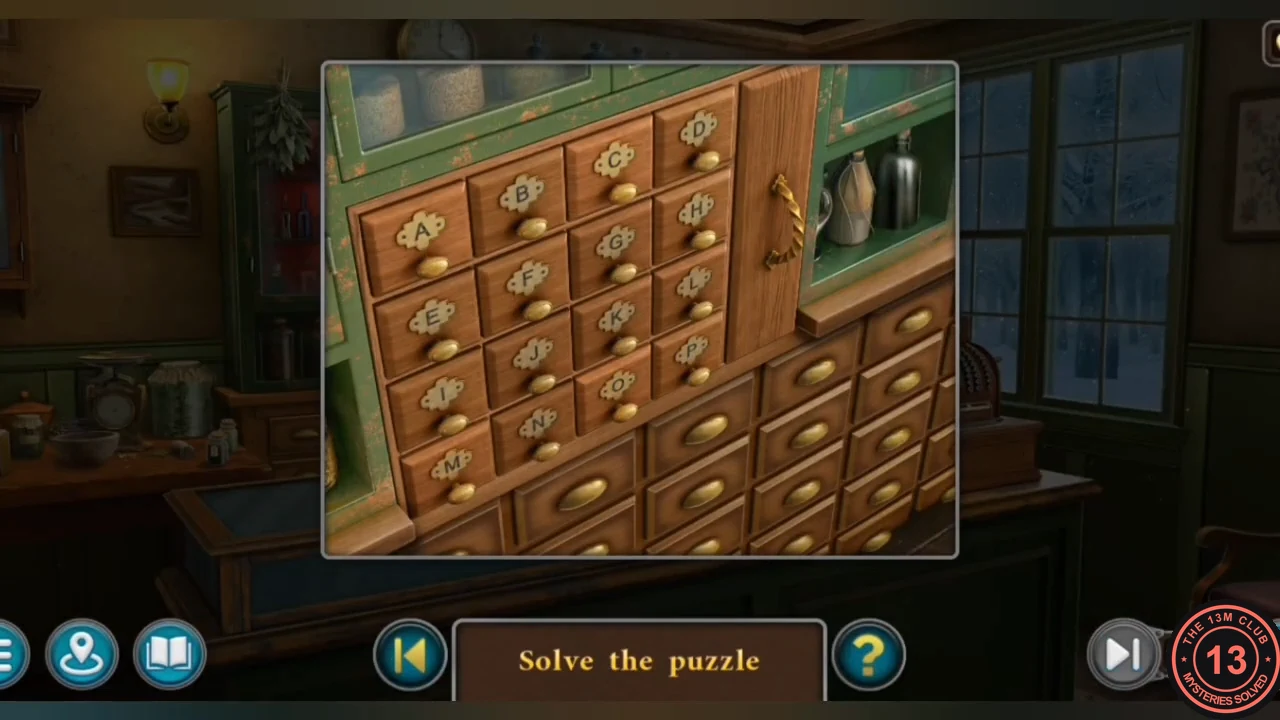
Search the pharmacy and the town, read Celia's letter and open the lettered drawer cabinet.
- In the pharmacy, read the "Powerful sleep aid" recipe on the table (needed later) and take the WORMWOOD. A morphing object is on the upper shelves; Collectible: Goblet 3/8 is in the display cabinet in the centre.
- Pour the BOILING WATER on the frozen planter left of the pharmacy and take the HAMMER.
- Place the LION HEAD on the fountain and take the SCREWDRIVER and the FLAG from its compartment.
- Go to the burned house. Put the FLAG on the mailbox, read the letter to T. Daemon signed "Celia" and take the HANDLE (a crank).
- In the pharmacy, zoom into the cabinet of lettered drawers (A to P). Open the drawers C, E, L, I and A – the letters of CELIA. They do not have to be opened in spelling order (I, E, L, C, A also works). When all five are out, they close and a side compartment slides open. Take SAPPHIRE (1/4) and the MUSTARD SEEDS.CODECELIA
The Burned House: The Banishing Ritual
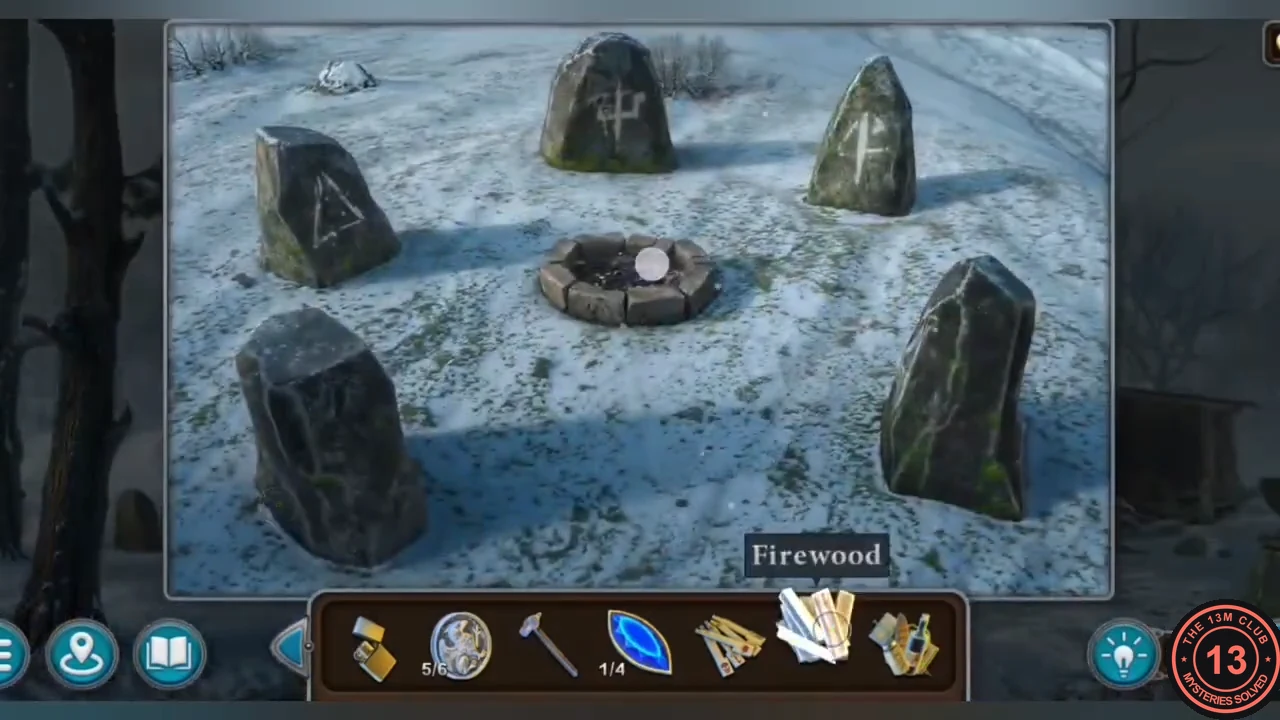
Collect the remaining medallions and ritual ingredients and light the ritual fire at the burned house.
- In the churchyard, unscrew the "All Saints Church" sign in the left foreground with the SCREWDRIVER and take MEDALLION (4/6).
- At the burned house, attach the HANDLE to the well, crank up the bucket and take the SUN emblem. Put the SUN in the lock plate of the cellar door beside the porch, enter and take the SHOVEL and the LOG.
- In the churchyard, dig the thawed patch on the right by the statue with the SHOVEL (three times) to uncover a chest. Break its rusty padlock with the HAMMER and take the KEYS, the IRON BRACKETS and MEDALLION (5/6).
- At the burned house, fix the IRON BRACKETS to the dead tree beside the house and hammer them in with the HAMMER. Climb up to the ruined upper floor and take the OWL FEATHER and the AXE from the nest.
- Place the LOG on the chopping block among the broken planks right of the porch and split it with the AXE to get FIREWOOD.
- Open the RITUAL INSTRUCTIONS from your inventory and add the five ingredients: SALT, WINE, MUSTARD SEEDS, OWL FEATHER and WORMWOOD. You get the RITUAL SET.
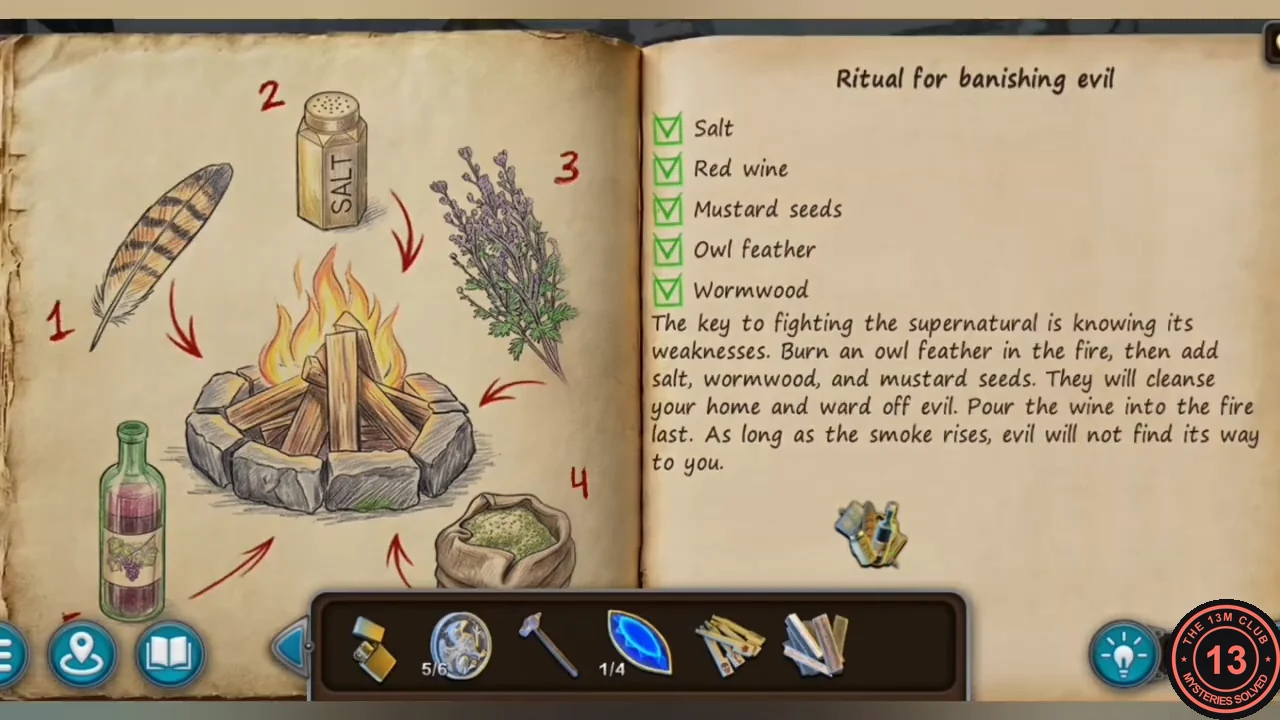
The ritual instructions with all five ingredients added: salt, red wine, mustard seeds, owl feather and wormwood. - In the burned-house yard, put the FIREWOOD in the stone fire pit, light it with the LIGHTER and add the RITUAL SET. The flames change colour.
- Return to the old woman. She gives you MEDALLION (6/6) and tells you about the crypt beneath the church. New task: find a way to the mansion.
All Saints Church: The Church Door
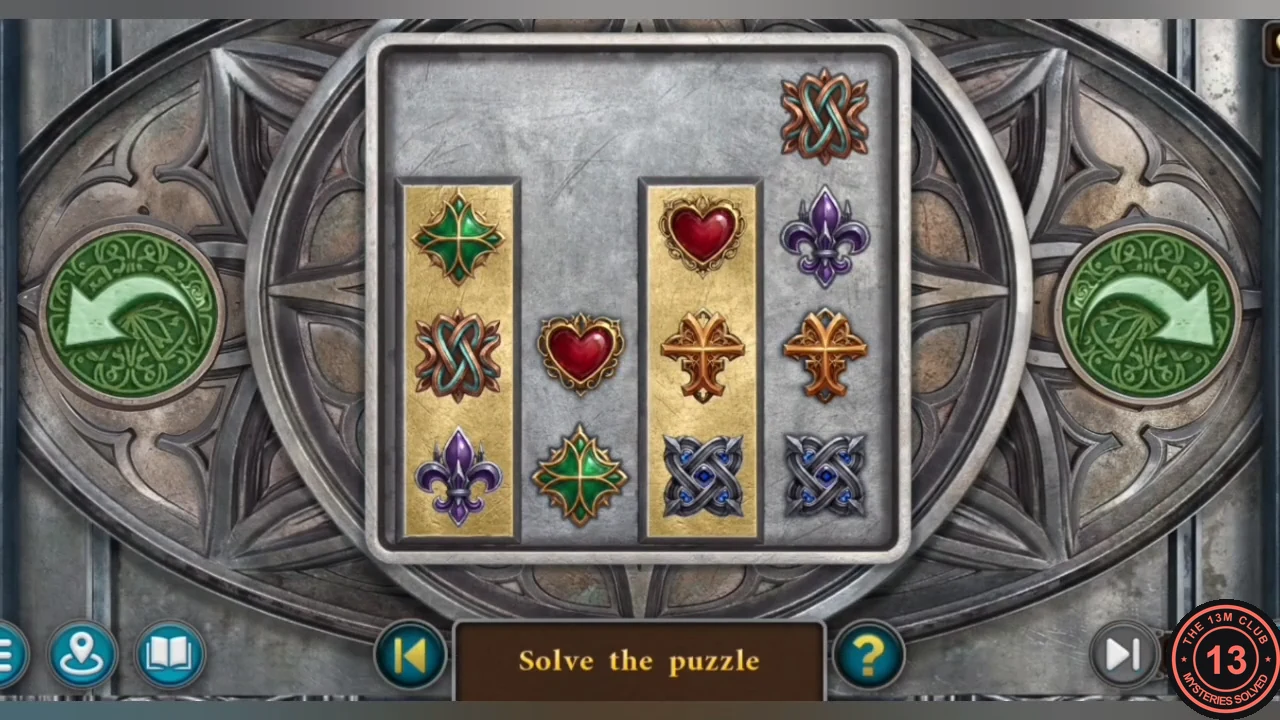
Place the six griffin medallions on the church doors and solve the rotating symbol panel.
- Place the six MEDALLIONS on the church double doors.
- Door panel: a 4x4 panel holds two fixed gold bars of three symbols (left bar: green cross, copper knot, purple fleur-de-lis; right bar: red heart, orange cross, blue knot) and six loose symbol tiles. The green arrows turn the whole panel a quarter turn; after each turn the loose tiles drop as far down as they can, while the gold bars turn with the panel. Keep turning until every loose tile rests directly beside its identical symbol in a gold bar. See the solved-state image.
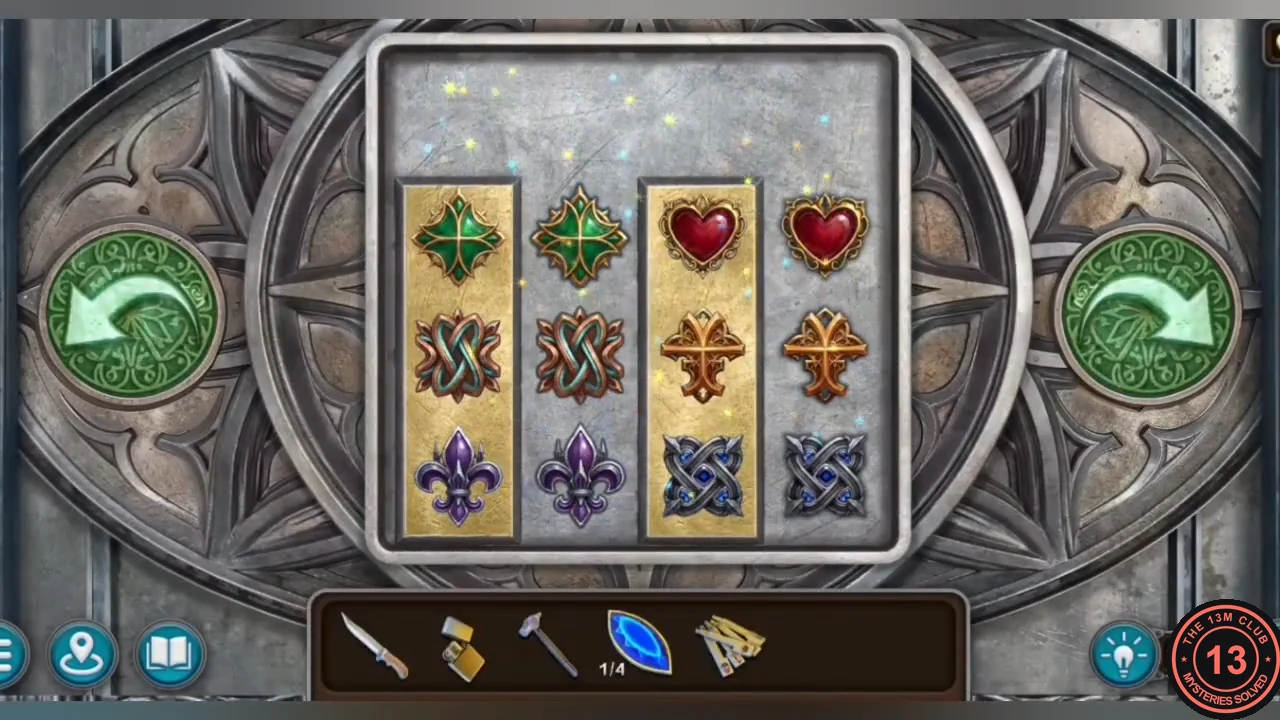
Solved: each loose tile rests beside its twin – green cross, knot and fleur-de-lis by the left bar; heart, orange cross and blue knot by the right bar.
Mapleford Hotel: The Number Trunk
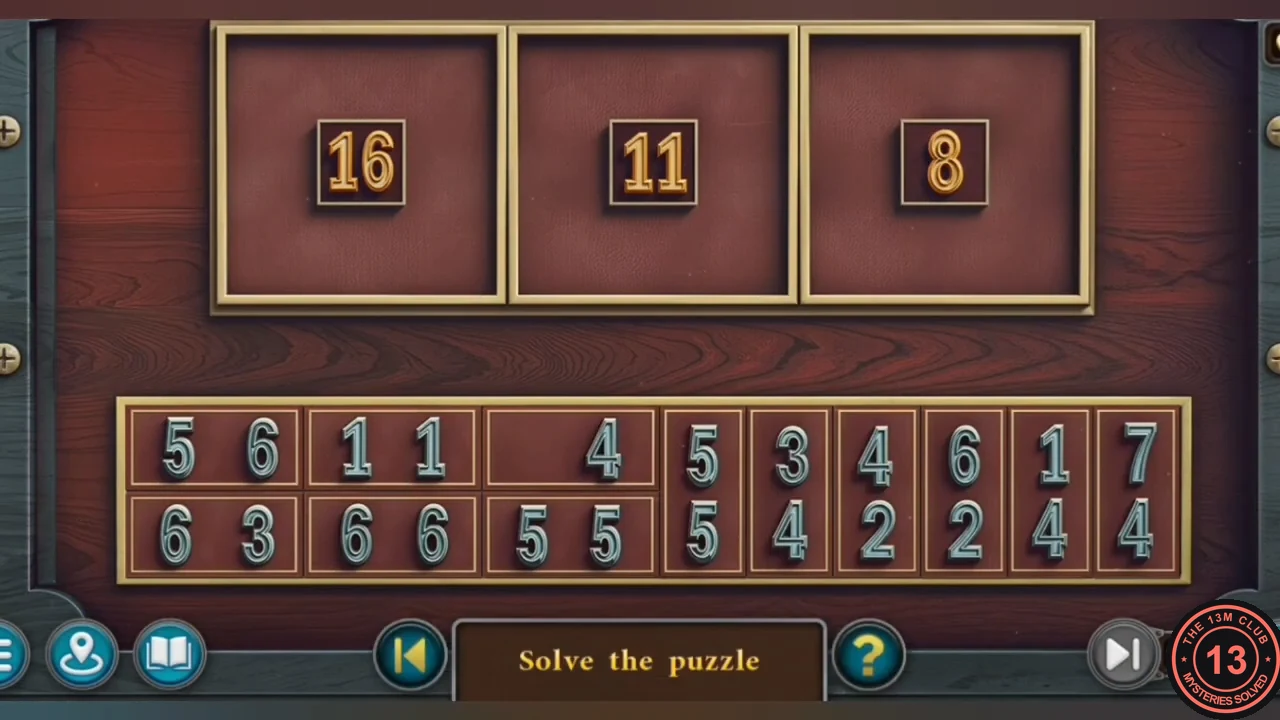
Search the church, fetch the stone flower from the bookshop lantern and open the blue trunk in the hotel room.
- In the church, Collectible: Maple leaf 6/7. A morphing object is on the far right pillar, half-way up. Take the STEPLADDER leaning on the right pillar and the MOTH from the pillar close-up.
- At the front pew with the cloth, take the POWDER COMPACT and SAPPHIRE (2/4).
- In the town square, set the STEPLADDER under the lantern of the bookshop kiosk, pry the lantern door open with the KNIFE and take the STONE FLOWER.
- In the hotel room, place the MOTH on the lid of the blue trunk to start the number puzzle.
- Number trunk: three frames have centre numbers 16, 11 and 8. Place the twelve domino tiles around the frames so every outer row and column of a frame adds up to its centre. Solution – frame 16: top 5|6, right 5/5, left 7/4, bottom 6|6. Frame 11: top 5|5, left 1/4, right 4/2, bottom 6|3. Frame 8: top 1|1 (middle and right), left 6/2, right 3/4, bottom blank|4 (left and middle).
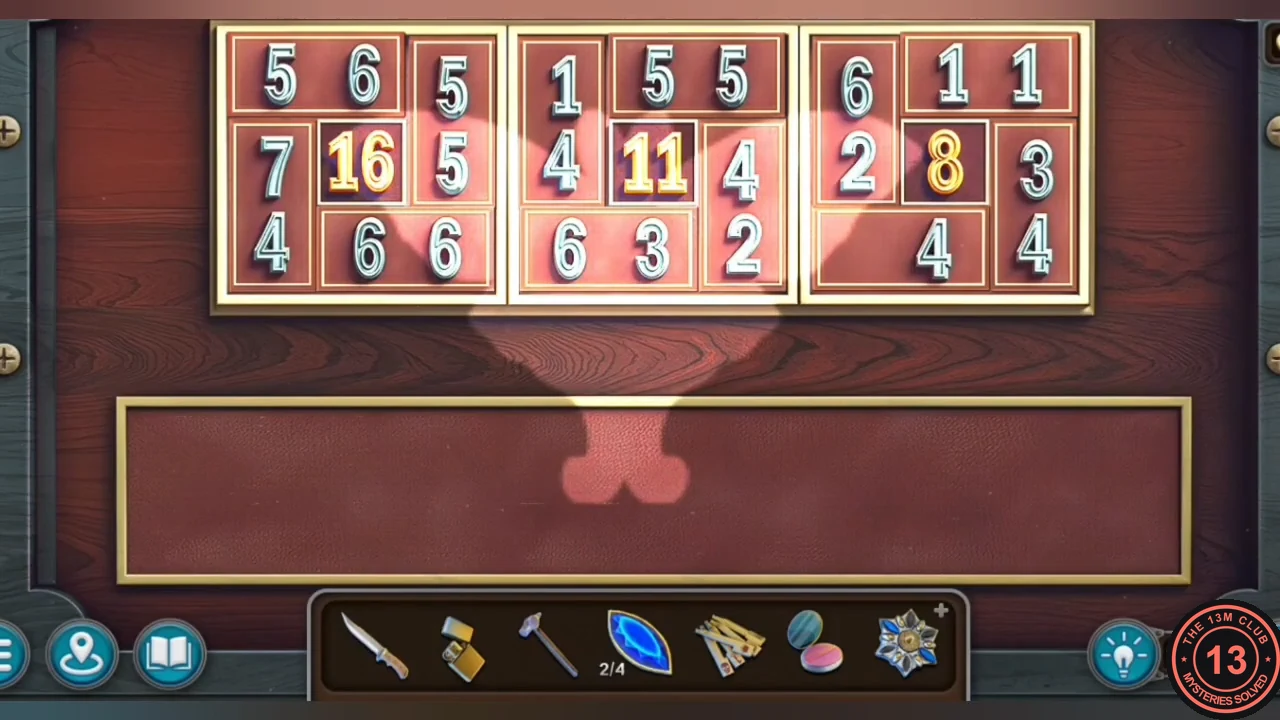
Solved: every outer row and column of each frame adds up to its centre number. - Take the BRUSH and SAPPHIRE (3/4) from the trunk.
All Saints Church: The Symbol Organ
Clean the heraldic tombstone to learn the four symbols, then play them on the church organ.
- In the churchyard, clean the green tombstone on the right with the BRUSH. Its crest shows two crescent moons (top left), a full moon with four stars (top right), three crowns (bottom left) and a raven (bottom right).
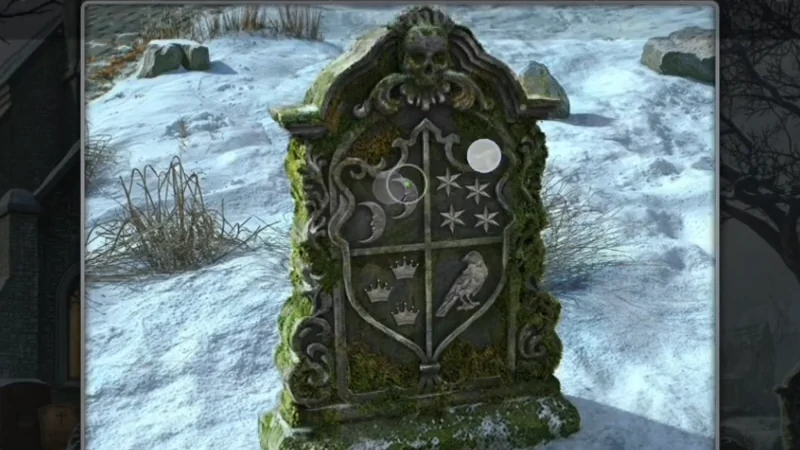
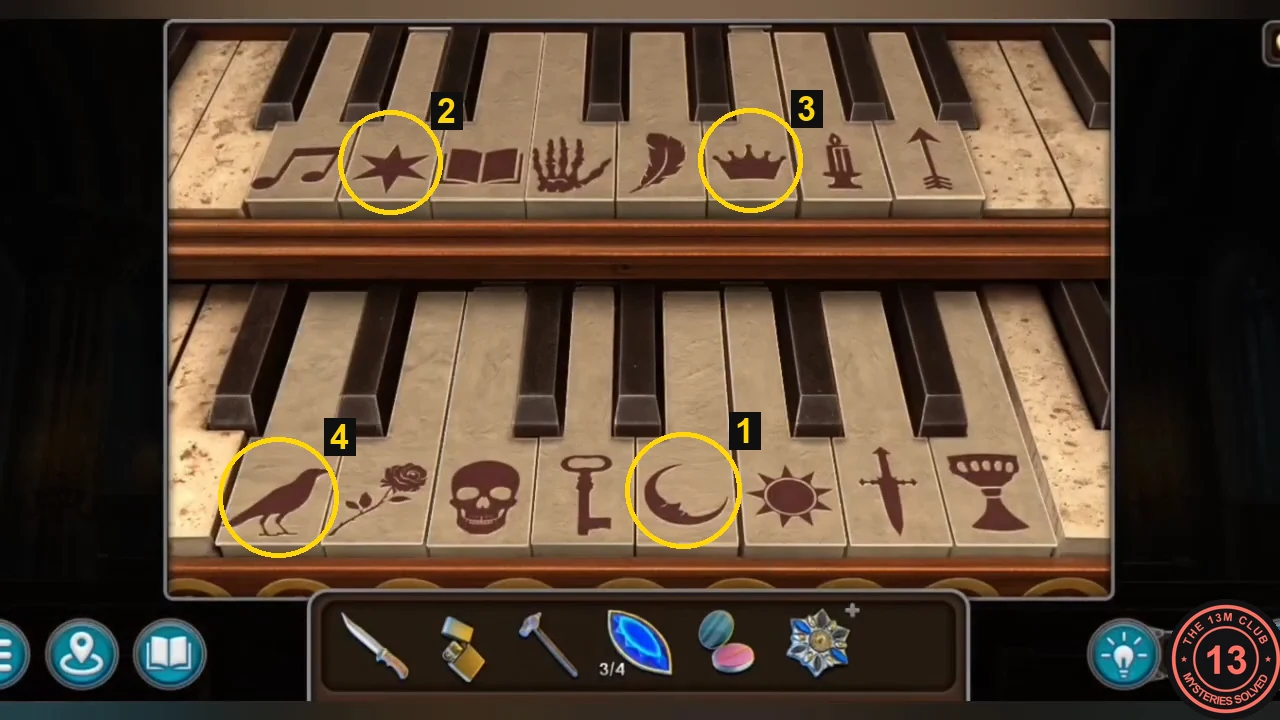
The cleaned tombstone crest: crescent moons (top left), full moon with stars (top right), three crowns (bottom left) and a raven (bottom right). - In the church, place the KEYS on the organ. The keyboard shows symbols: upper row note, star, book, hand, quill feather, crown, candle, arrow; lower row raven, rose, skull, key, moon, sun, dagger, goblet.
- Play the crest in order: MOON (lower row), STAR (upper row), CROWN (upper row), RAVEN (lower row). Take the GOLDEN LION and SAPPHIRE (4/4).CODEMoon, Star, Crown, Raven
All Saints Church: The Altar Beams
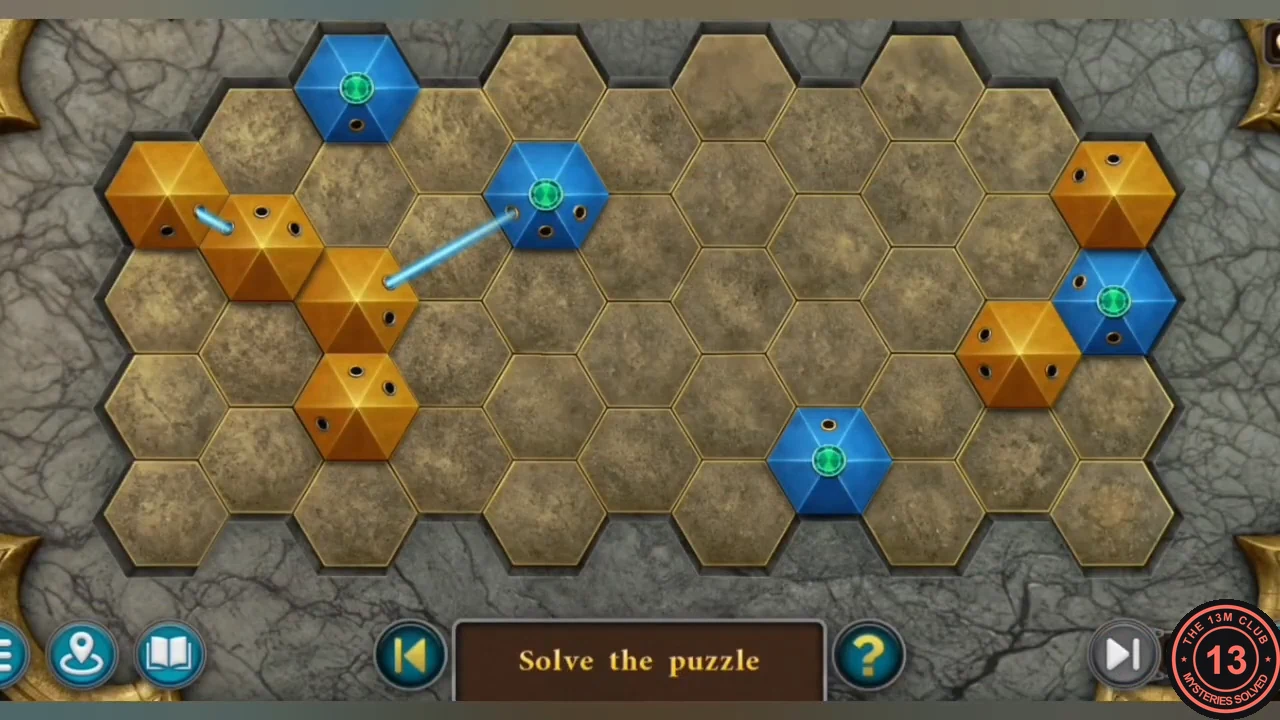
Complete the flower medallion and open the passage beneath the altar.
- In your inventory, set the four SAPPHIRES into the STONE FLOWER to make the FLOWER MEDALLION.
- Place the FLOWER MEDALLION in the star-shaped recess at the front of the altar.
- Beam puzzle: four fixed blue emitters shine beams across a hexagonal board. Drag the six gold hexagonal prisms so the beams pass through their holes and every emitter and prism is linked. See the solved-state image for the final layout.
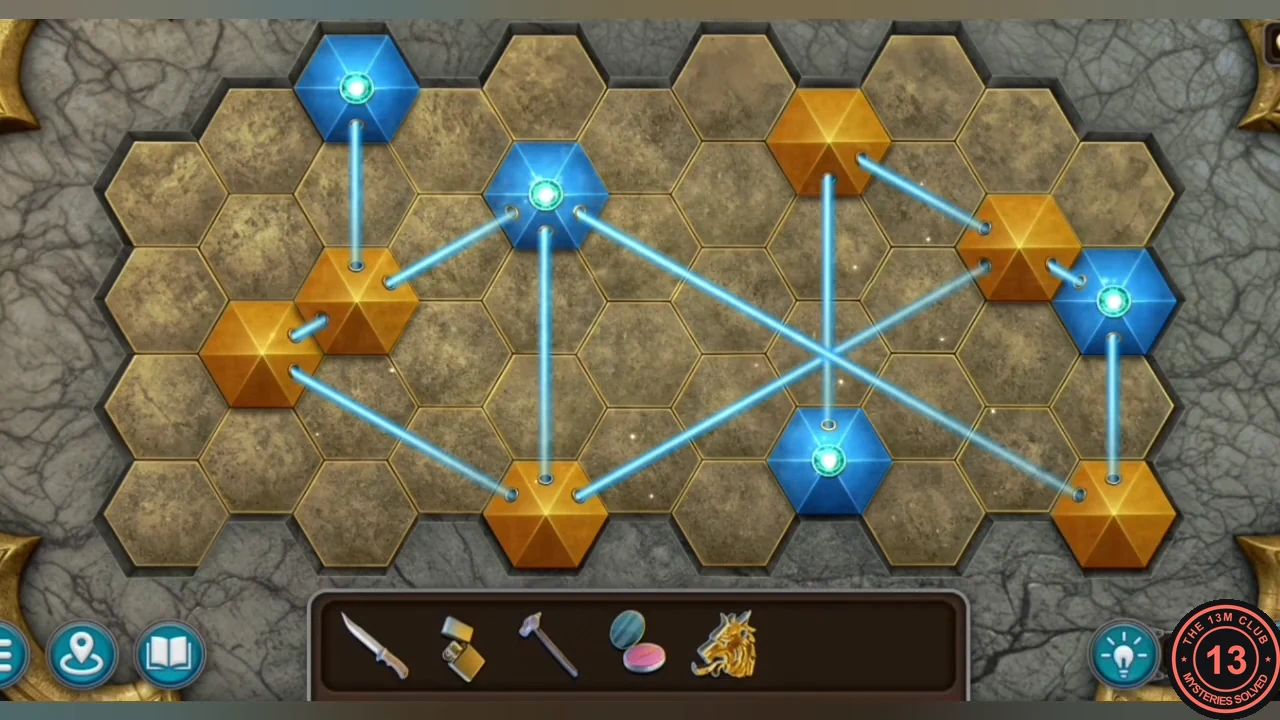
Solved layout: every emitter and prism is linked by a beam. - Go down the stairs into the crypt. In a cell, a woman (Vivian) recognises Lucas as a vampire, says she will see him at the mansion and vanishes in mist. New task: escape the crypt.
Church Crypt: The Coat of Arms Floor
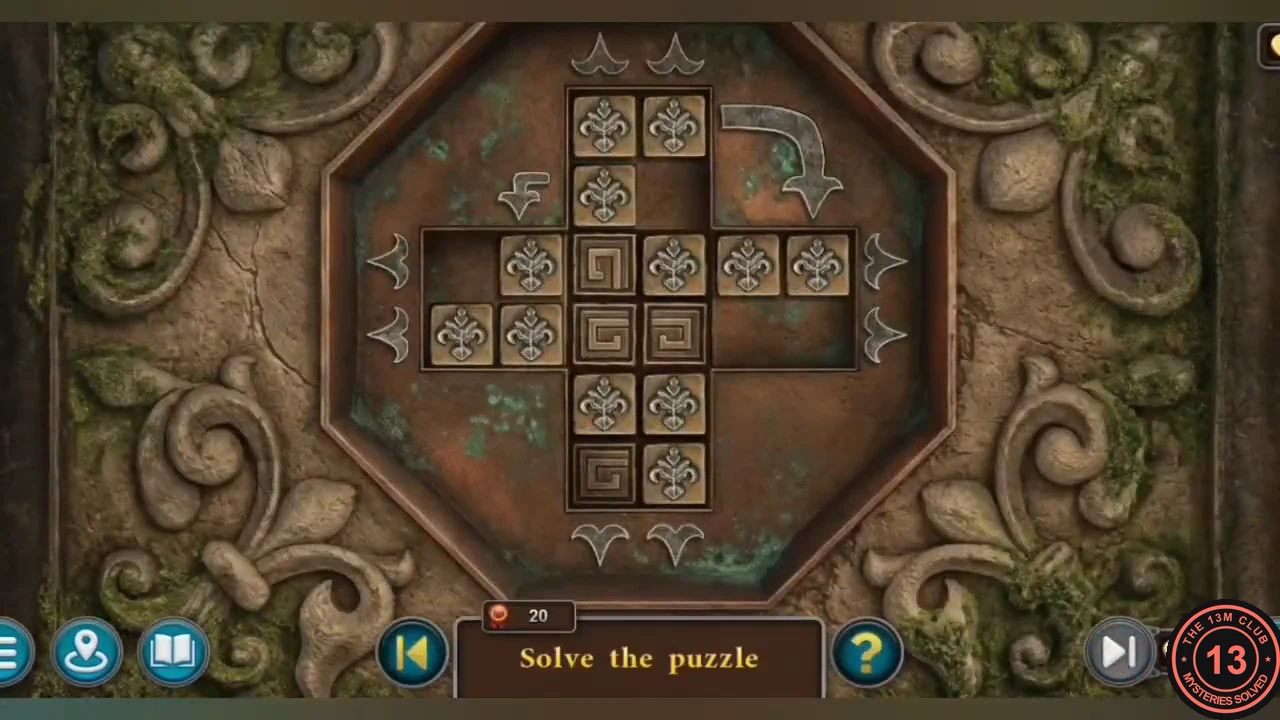
Collect the three heraldic lions and solve the cross-shaped floor panel to escape the crypt.
- The crypt is dark after Vivian vanishes. Zoom into the unlit torch mounted on the stone pillar and light it with the LIGHTER: the candles all over the crypt light up and you can see the gate.
- In the crypt, Collectible: Goblet 4/8 is at the lower left; a morphing object glows at the lower left. Pry up the cracked floor slab in the centre with the KNIFE and take HERALDIC LION (1/3).
- Take the BOARDS by the corner of the gate on the right and HERALDIC LION (2/3) from the sarcophagus on the right. Lay the BOARDS over the pit in the left side passage.
- At the statue with the blank shield, place the GOLDEN LION on the shield. A wall ledge opens: take the LEVER, BIRDS (1/2) and HERALDIC LION (3/3).
- Put the LEVER in the wall slot right of the gate and pull it. A floor slab opens to reveal a carved coat of arms; place the HERALDIC LIONS on it.
- Cross puzzle: a cross-shaped board (a 2x2 centre with four 2x2 arms) holds fleur-de-lis tiles, spiral tiles and gaps. The arrows on the edges slide rows and columns, and the curved arrows shift tiles around. Gather the eight spiral tiles in the centre square and the bottom arm, with fleurs-de-lis filling the top, left and right arms. Letting the move counter reach zero did not end or reset the puzzle. See the solved-state image.
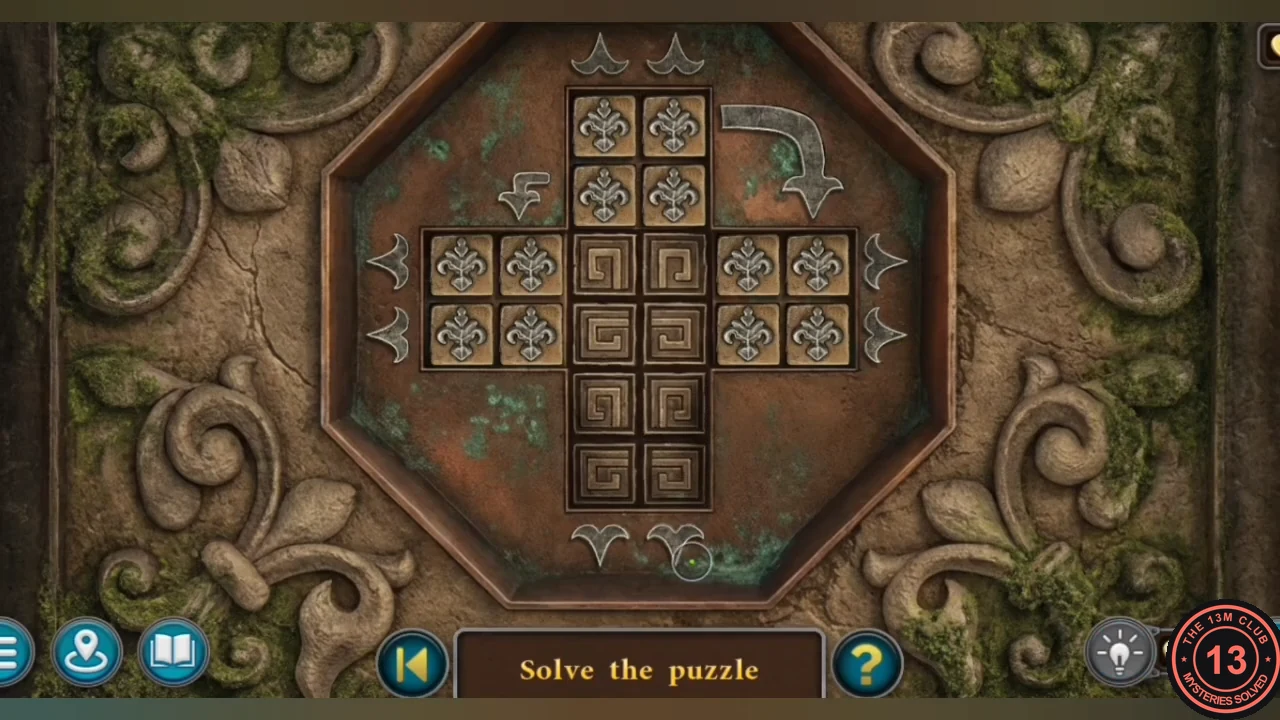
Solved: eight spirals in the centre and bottom arm; fleurs-de-lis in the top, left and right arms. - Light the candle in the dark rear passage with the LIGHTER and climb the stairs. You come out of a hatch in the gazebo of the Bauer mansion grounds. New task: get into the mansion.