Bridge and Village Street
Chapter 3 follows Chapter 2. Laura is back, and Bishop tells her that Noah's grandfather was the real artist. A green car has crashed by the bridge. New task: get into the building. Cassettes, billiard balls and baseball cards return as collection items; see the Chapter 3 collectibles section.
- At the foot of the bridge, zoom into the old work glove lying in the grass beside a small toolbox and take the KEY from it.
- Cross the bridge to the village street. Take the GLASS CUTTER from the wheelbarrow of broken glass in the middle of the street and the BELL CLAPPER from the path in front of the house steps.
- Open the green door of the house on the left with the KEY and go in.
Village Bedroom
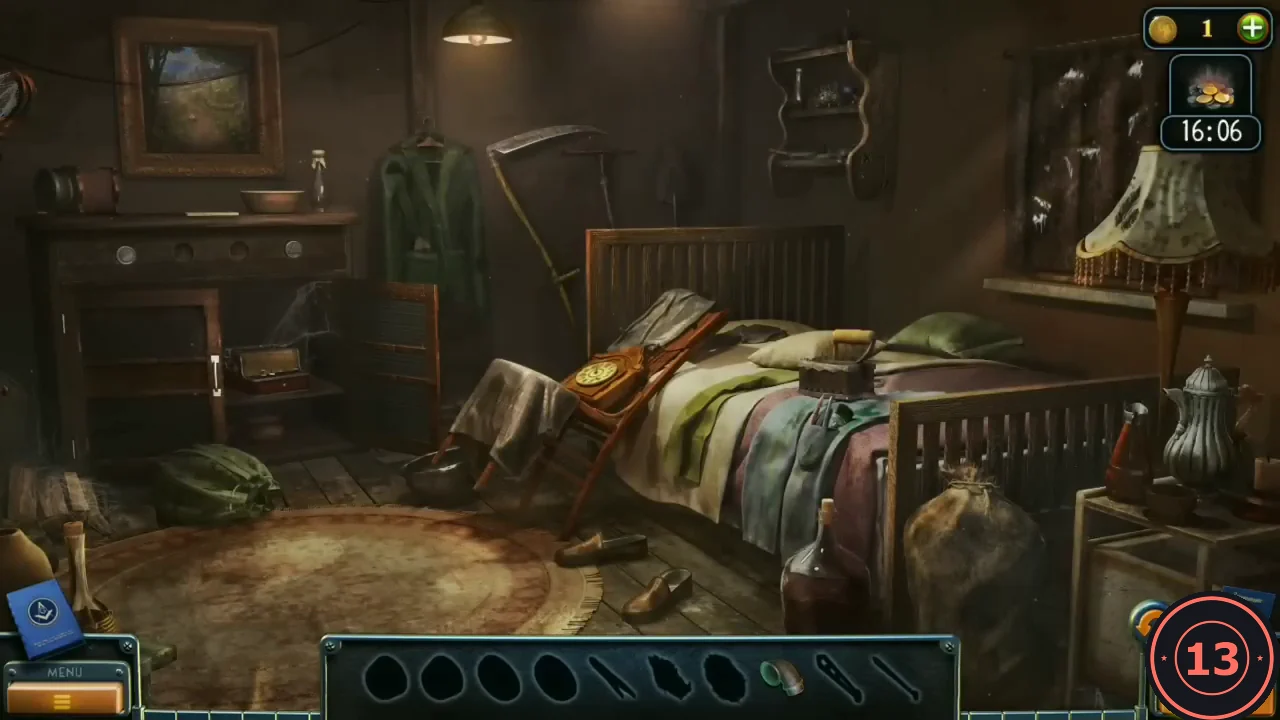
An interactive search room with its own item bar: two knobs and two buttons are among the silhouettes. Laura wants something that will free the ladder outside.
- Tap the green rucksack on the floor at the left: TUBE (an elbow pipe). Tap the scythe on the wall; it falls and a PIECE OF FABRIC drops onto the chair.
- Zoom into the iron on the bed. Tap the cloth pocket twice: TWEEZERS, then a KNOB. Put the TUBE into the hole in the iron; the lid opens and a BUTTON lies in the ash.
- Zoom into the small hanging shelves on the wall above the right end of the bed. Use the TWEEZERS on the hedgehog pincushion on the upper shelf: BUTTON. Then take the second PIECE OF FABRIC from the metal bowl at the left of the lower shelf.
- Zoom into the lampshade at the right: it has two holes. Put one PIECE OF FABRIC into each hole. The patched shade shows fruit in this order: cherries, grapes, strawberry, pear.
- Open the lower door of the cabinet at the left and put both BUTTONS into the empty places of the fruit button box.
Fruit Button Box
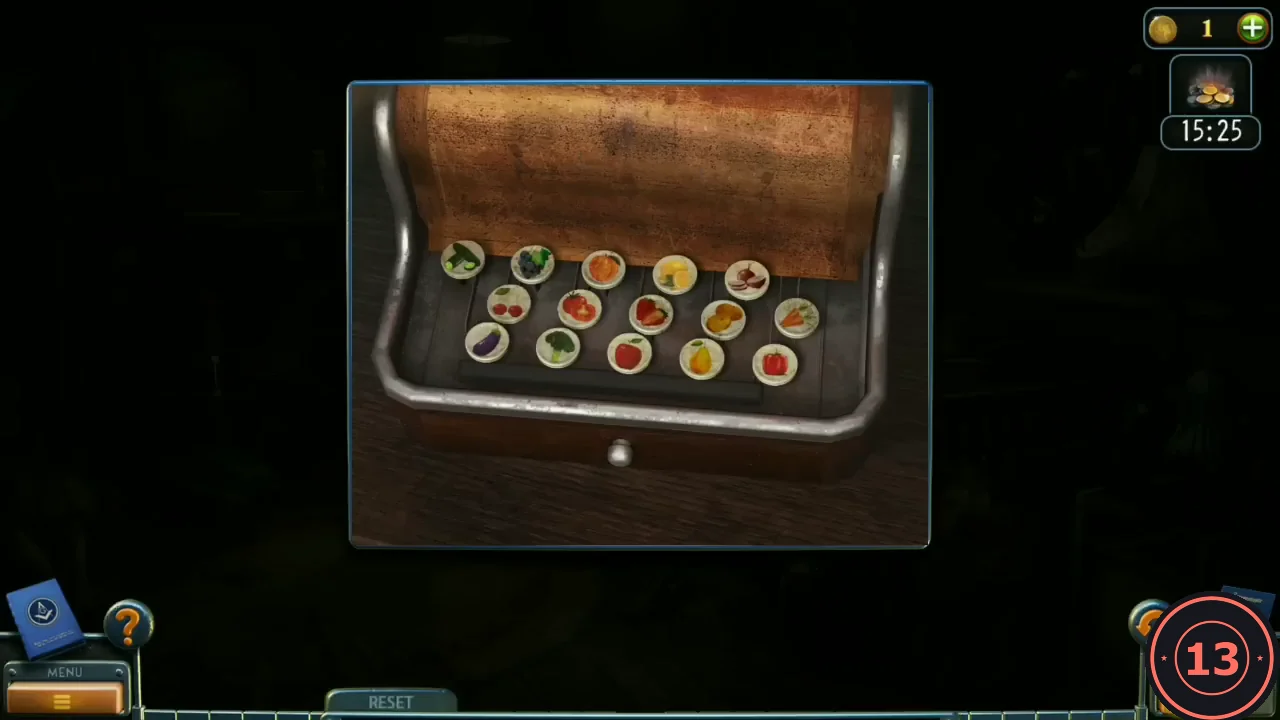
In-game rule: press the buttons in a specific order. You've seen the hint before. The hint is the lampshade patches.
- Press the fruit buttons in this order: cherries, grapes, strawberry, pear.CODEcherries, grapes, strawberry, pear
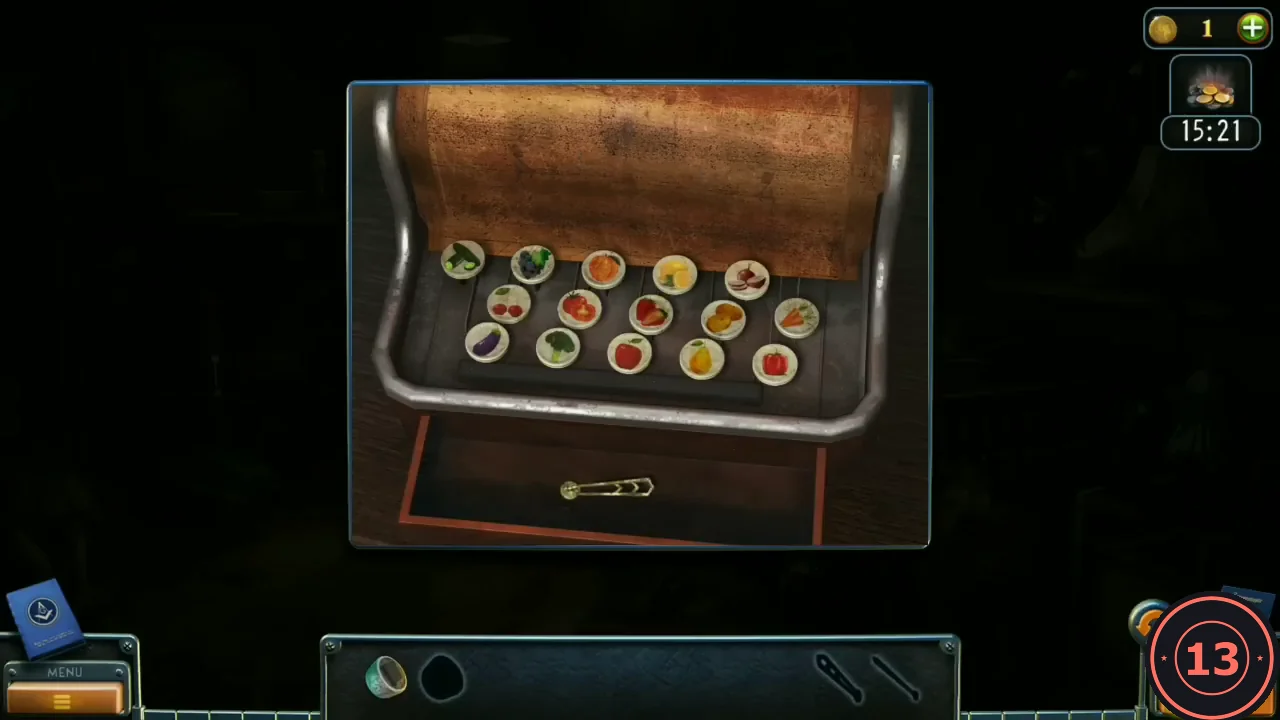
After cherries, grapes, strawberry, pear the drawer opens with a CLOCK HAND. - The drawer below opens: take the CLOCK HAND. Take the second CLOCK HAND hanging from a pin under the lampshade.
Mantle Clock and Knob Drawer
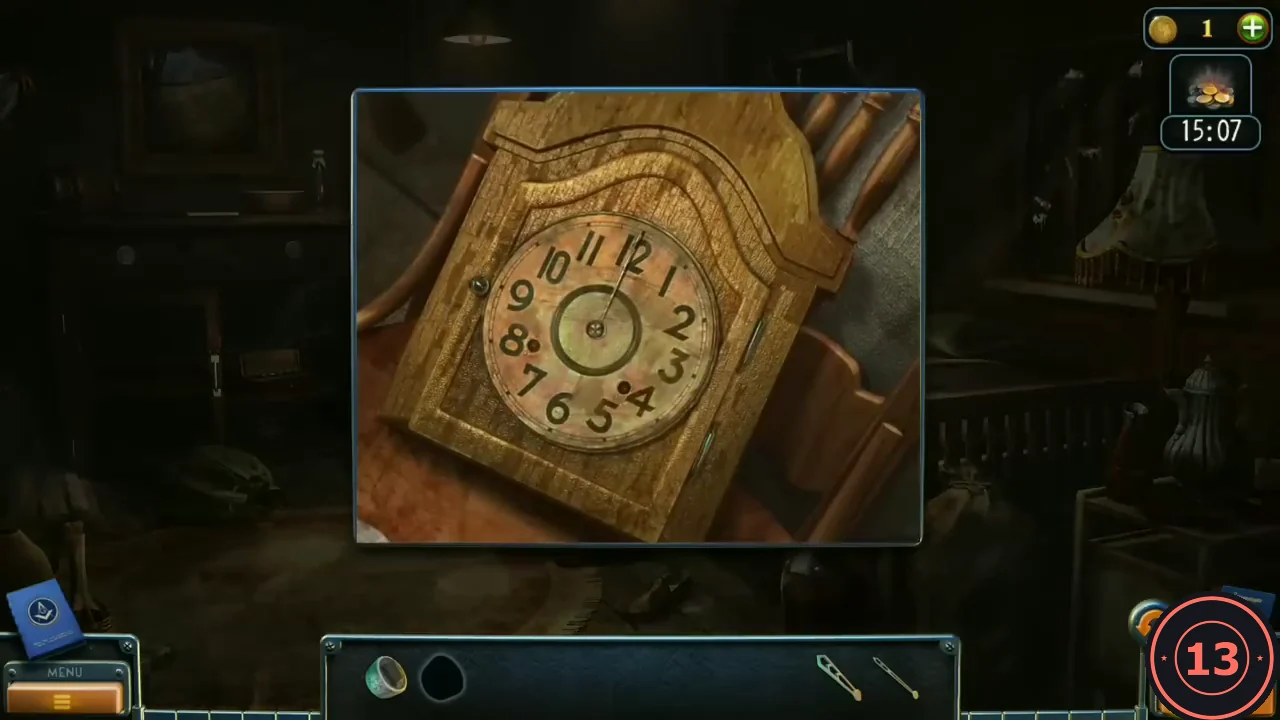
The mantle clock on the chair has no hands. In-game rule: set the specific time. You've seen the hint before.
- Put both CLOCK HANDS on the clock and set it to 9:30: the short hand on 9 and the long hand on 6. Ignore the thin needle that already points to 12; it is not one of the hands you set. The clock door opens: take the KNOB inside.CODE9:30
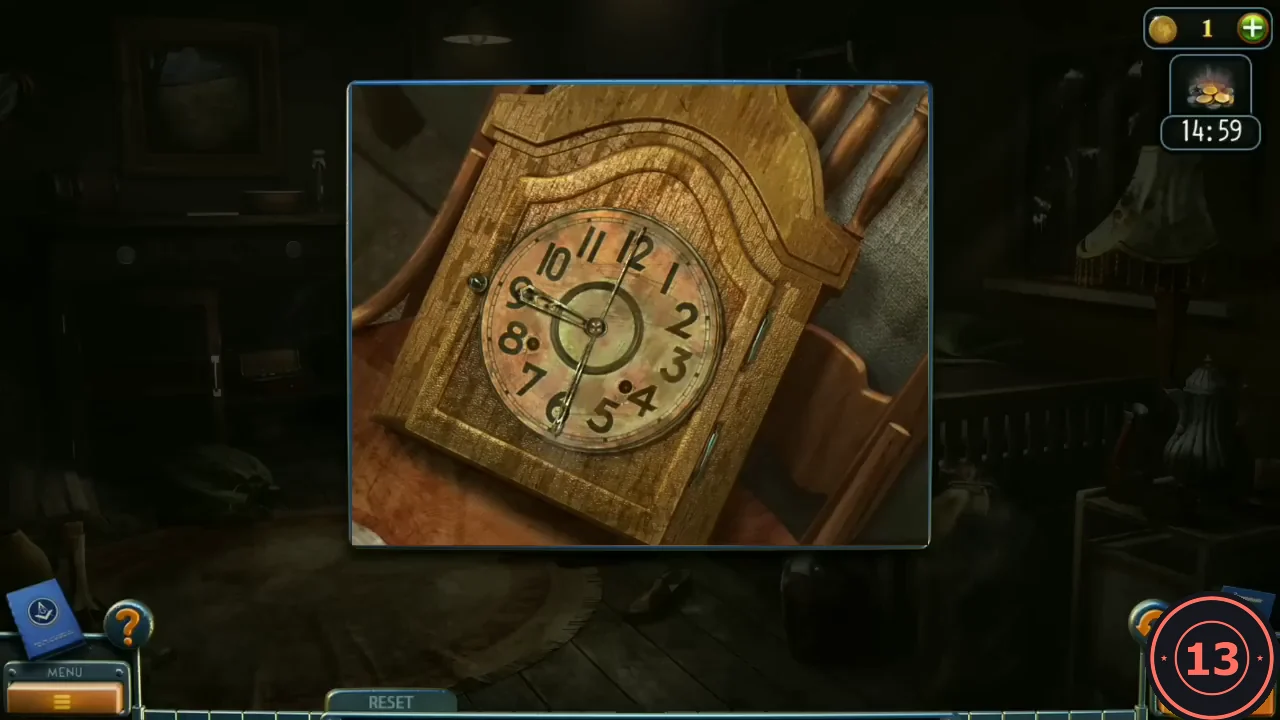
The clock set to 9:30: short hand on 9, long hand on 6. The thin needle at 12 was already there. - Open the top drawer of the cabinet at the left. Put both KNOBS into the empty sockets, so that the four knobs read circle, hexagon, square, triangle from left to right.
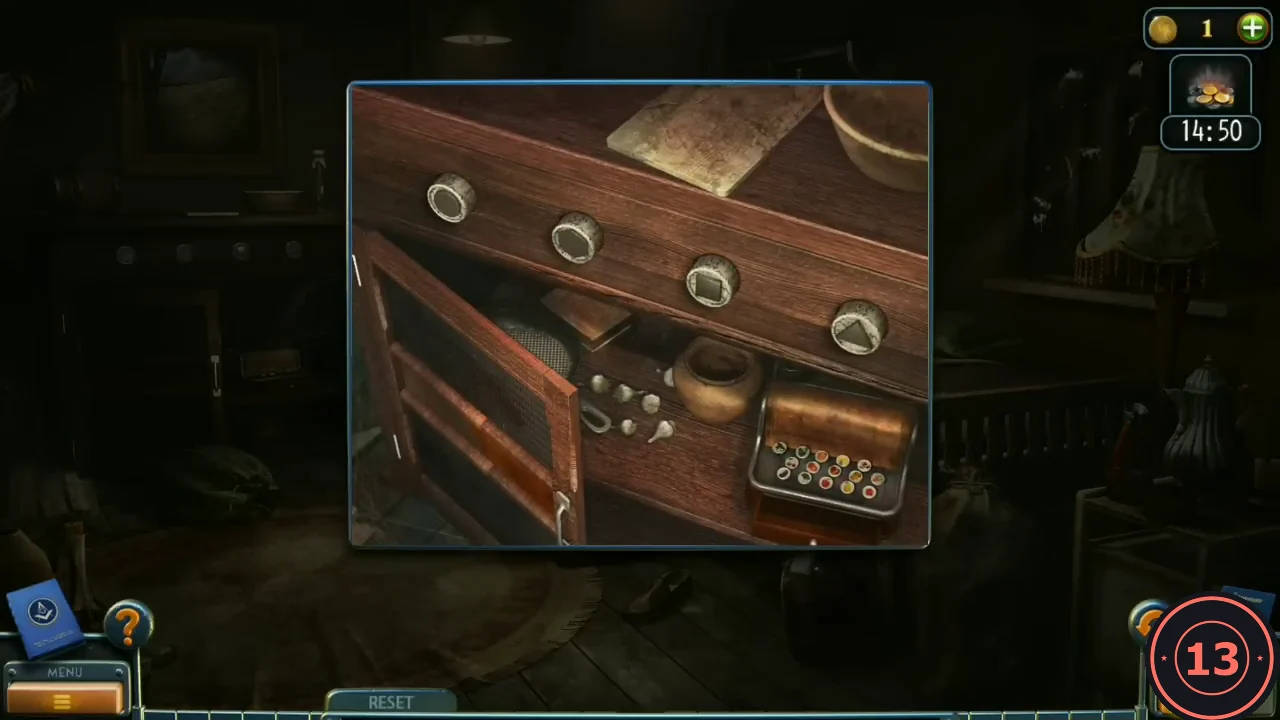
The top cabinet drawer with all four knobs in place: circle, hexagon, square, triangle. - Press the knobs in the order 1, 4, 3, 2 (from the left: first, fourth, third, second). The drawer opens: take the ADJUSTABLE WRENCH. The room scene ends.CODE1, 4, 3, 2
Ladder and Bell Tower
Back on the village street, the bell tower stands on the right.
- Unbolt the ladder fixed to the wall of the right-hand building with the ADJUSTABLE WRENCH: LADDER.
- Place the LADDER at the base of the bell tower and climb to the bell. Take the DETAIL from the bell platform and hang the BELL CLAPPER in the bell.
- Go back to the bridge. Open the small toolbox beside the work glove with the DETAIL and take the BANDAGE.
- Cut the side window of the green car with the GLASS CUTTER and look inside.
Inside the Green Car
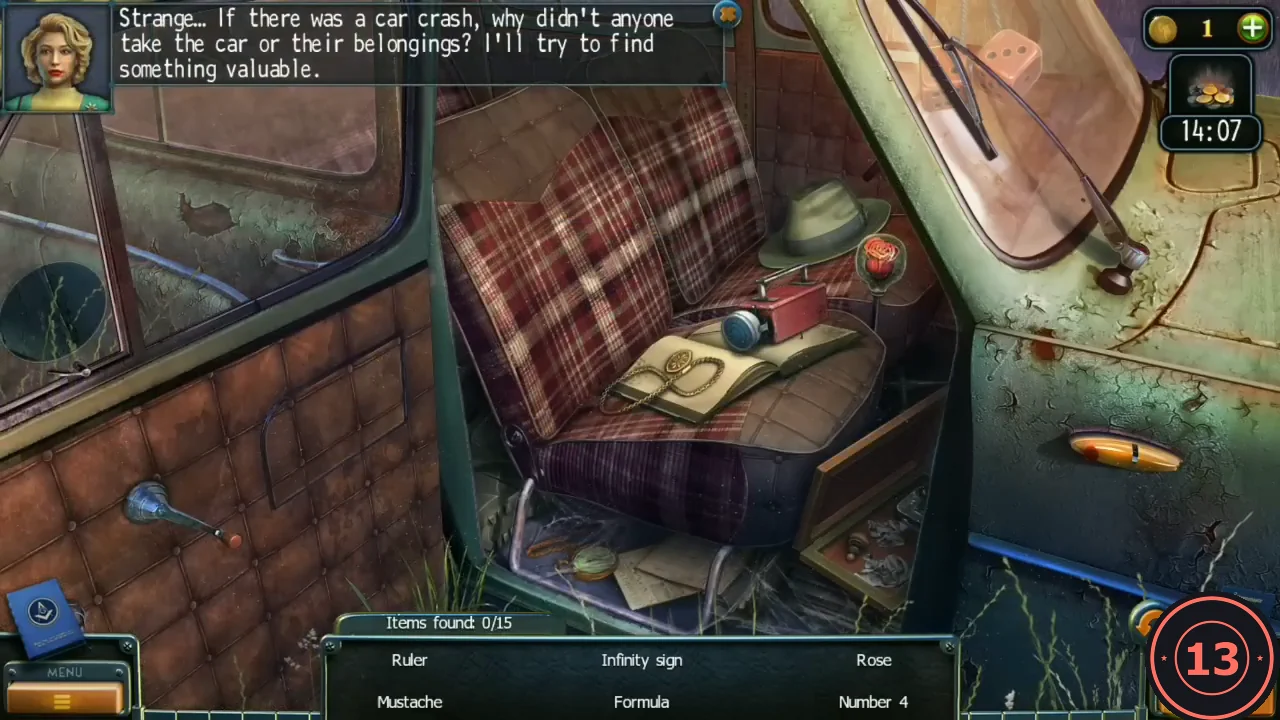
A word-list search with 15 items. Some are inside close-ups: the newspaper on the seat, the red case and the notebook. The list refills as you find items.
- Find: ruler, formula, film roll (newspaper close-up), rocket (connect the dots on the newspaper), pear, horse, bolt and pen (in the red case), feather (on the notebook), number 4 (the dice on the mirror), mustache, rose and infinity sign.
- Zoom into the wooden box on the floor and read the letter: "Hello, Noah ... meeting on September 28 at 9:00 PM at the bridge". The small matchbox in the box is the matches, and the dollar sign is on the box lid.
- When all 15 are found, take the reward: MATCHES.
The Bell and the Van
Ringing the bell will bring someone to the bridge.
- Climb to the bell again. Wrap the BANDAGE around the clapper and light it with the MATCHES. The bell rings.
- Go back to the bridge: a red van arrives and parks on the left. Take the KEY from the ignition in the cab and open the rear door with it. Laura decides to return the keys.
- Put the KEY back in the ignition, then climb into the back of the van through the rear door. The van drives off and Laura ends up locked in a garage.
Garage Safe
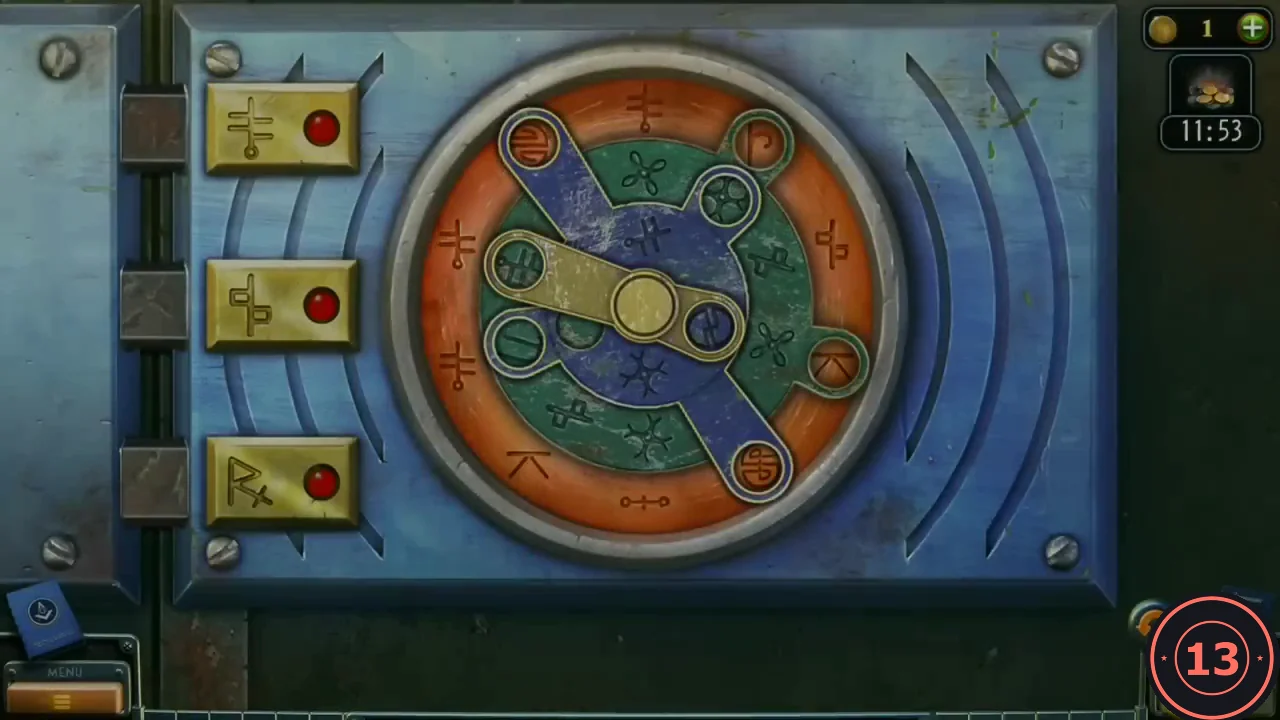
Laura is locked in the garage. The safe on the green wall behind the blue tool cart needs a symbol code.
- Take the HINT from the blue tool cart beside the van. It lists three symbols with numbers: the cross symbol with a circle at the bottom 5, the fork symbol 3 and Rx 1.
- Put the HINT on the safe to start the puzzle. A green ring with tabs, a blue three-armed piece and a yellow bar turn over a ring of orange symbols, and together they hold nine gold-rimmed windows.
- Turn the pieces until the windows show the hint: the cross-with-circle symbol in five windows (top, left, lower left, the left end of the yellow bar and bottom), the fork symbol in three (the upper-left and right arms of the blue piece and the right end of the yellow bar) and Rx in the green tab at the upper right.CODEcross-with-circle x5, fork x3, Rx x1
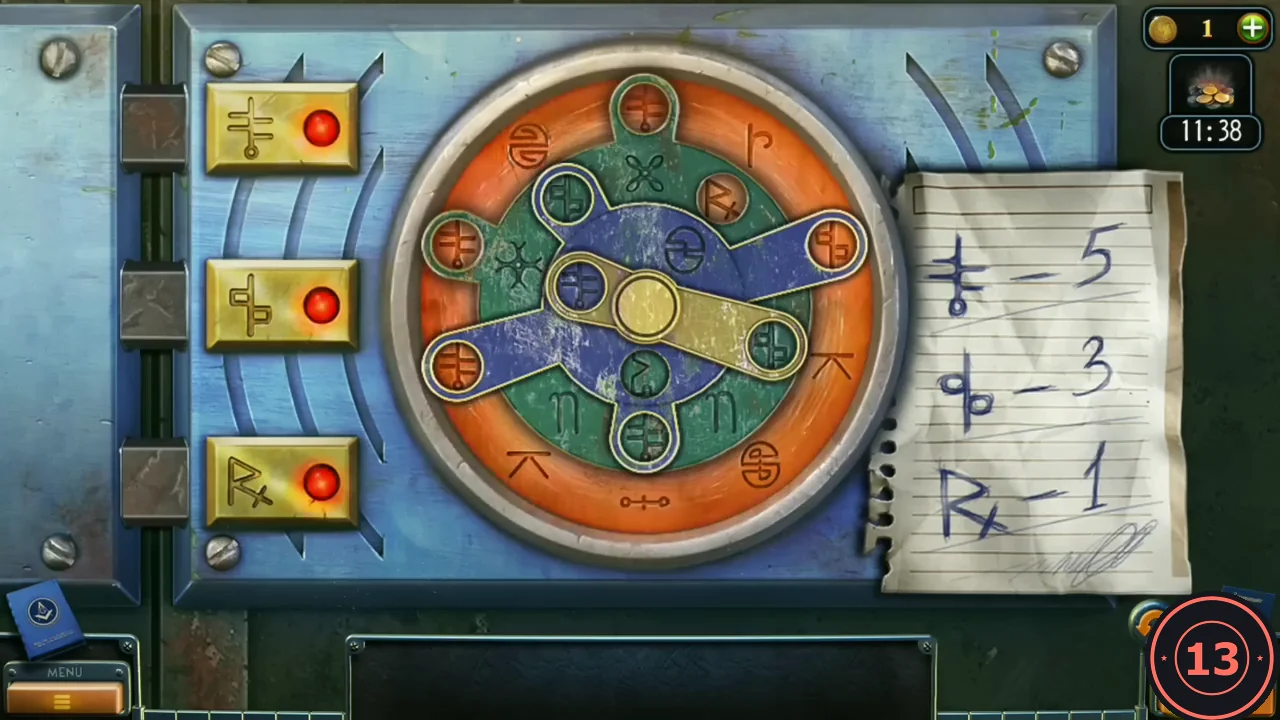
Solved position next to the HINT: five cross-with-circle symbols, three forks and one Rx. - The safe glows and the back door behind the pickup truck opens. Go through to the mansion courtyard.
Mansion Courtyard
It is dusk. The first floor of the mansion is full of people, the second floor is empty but alarmed. A key lies under the drain grate in the left foreground, and the security booth on the left needs a key card.
- Take the HANDLE from the plank of the green trailer.
- Go back to the garage. Fit the HANDLE to the drawer of the blue tool cart and open it: SCREWDRIVER and WIRE.
- In the courtyard, fish the KEY out from under the drain grate with the WIRE.
- In the garage, open the pickup truck door with the KEY. Take the MAGNETIC KEY CARD and BALL (1/3) from the seat.
- In the courtyard, put the MAGNETIC KEY CARD in the reader of the security booth and go in. Open the lower desk drawer: MAGNET and a second HANDLE. Tap the monitor to start the alarm puzzle.
Alarm Panel
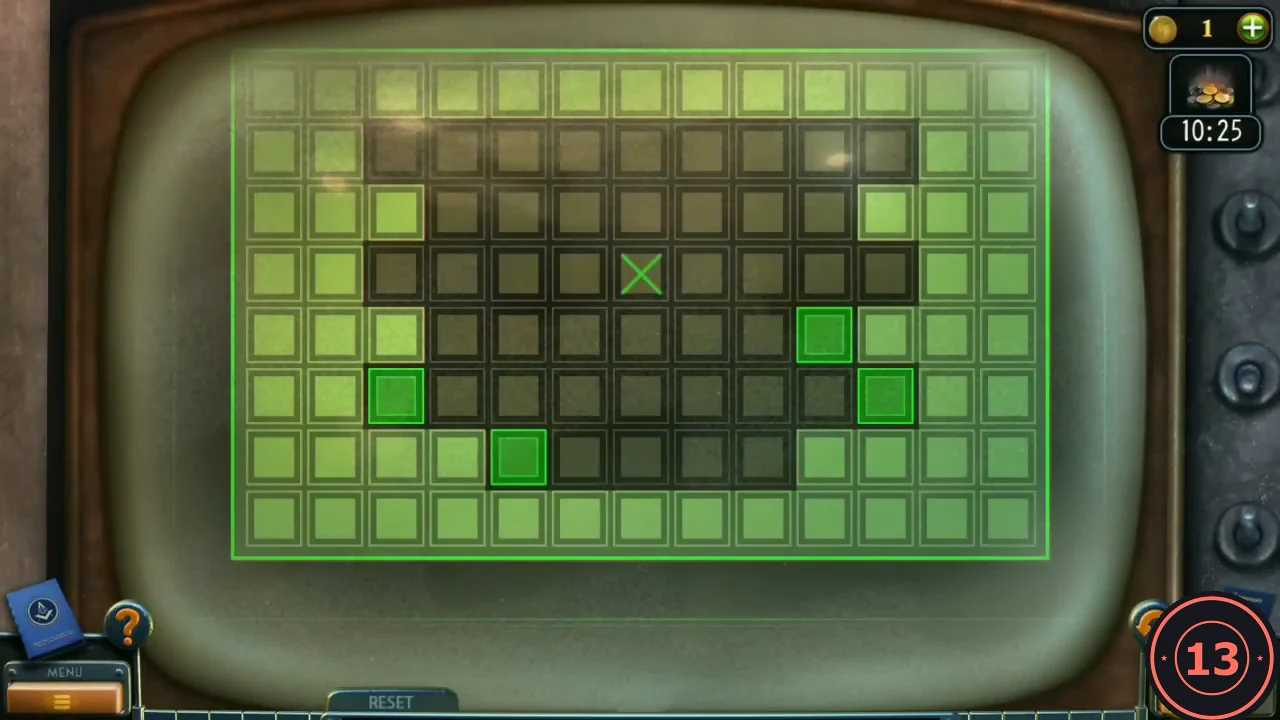
The monitor says "Alarm: ON". Four grey blocks lie on a floor of dark cells with an X in the middle. A block slides in the direction you swipe until it hits the edge of the floor or another block. Blocks pass over the X; the alarm turns off when a block stops on it. Count the floor rows 1 to 6 from the top and the columns 1 to 9 from the left: rows 1, 3 and 5 are nine cells wide, rows 2 and 4 cover columns 2 to 8, and row 6 covers columns 3 to 7. The X is in row 3, column 5.
- Start: block A in row 4, column 8; block B in row 5, column 1; block C in row 5, column 9; block D in row 6, column 3. Check that your start matches before using the moves below; if it differs, use the moves as an example of the method.
- Moves 1 to 7: A down; B right (stops beside A); A up to row 1; C left (stops beside B); B down to row 6; B left (stops beside D); B up to row 1.CODEA down, B right, A up, C left, B down, B left, B up
- Moves 8 to 14: C up (stops under A); A left (stops beside B); A down to row 6; D right (stops beside A); D up (stops under B); C left (stops beside D); A up. A stops on the X under C.CODEC up, A left, A down, D right, D up, C left, A up
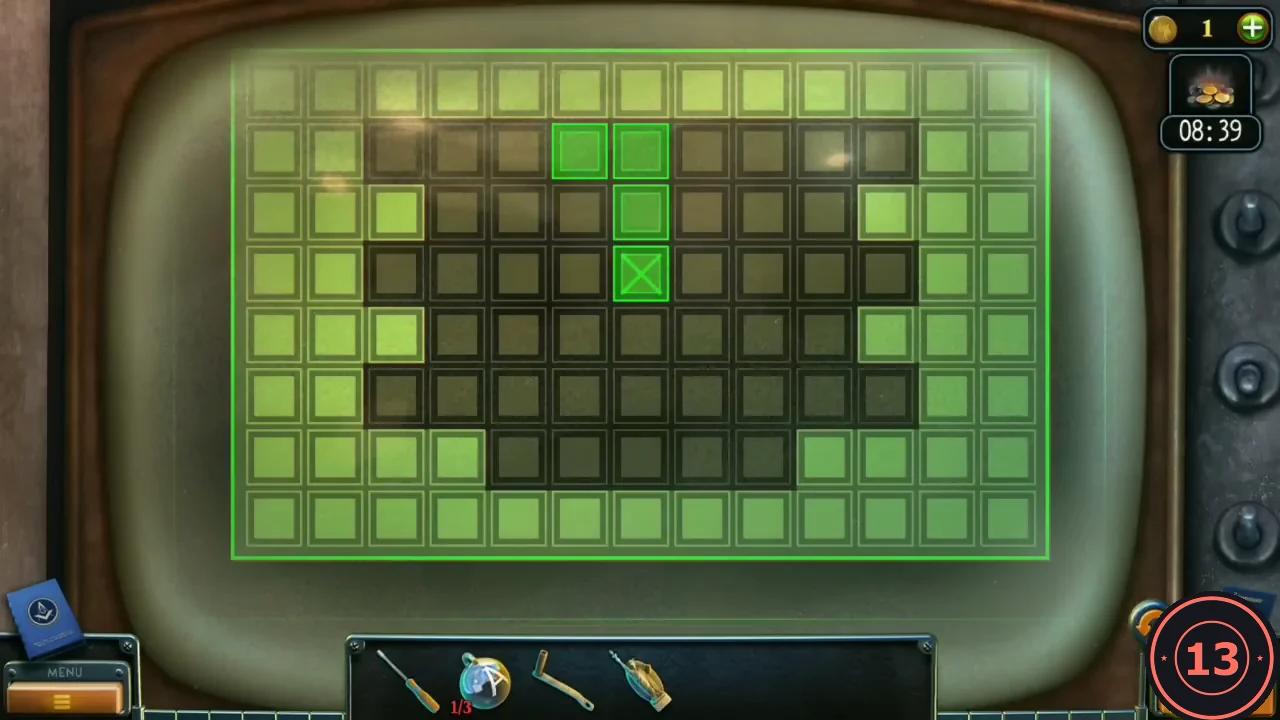
After move 14 block A stops on the X, held there by block C above it.
Into the Mansion
With the alarm off, Laura can climb to the empty second floor.
- In the courtyard, put the second HANDLE on the winch right of the front door and crank it. The green trailer is pulled under the balcony.
- Zoom into the balcony window, open its latch with the SCREWDRIVER and climb into the bedroom.
- Use the MAGNET on the aquarium at the right: ENGRAVED DETAIL.
- Leave by the right door to the upstairs hall. Lift the cloche on the serving cart in the foreground: the second ENGRAVED DETAIL. Take the KNIFE from the cloth.
- Back in the bedroom, put both ENGRAVED DETAILS into the round lock of the ottoman at the foot of the bed. Take the SLIDES and FLOWER (1/3) from the side panel.
- Cut the ottoman upholstery at the left corner with the KNIFE: WOODEN DETAIL (shaped like a fan).
Library and Portrait
The door at the upper right of the hall has a carved round lock, and the red casket on the hall desk is locked. The library lies straight ahead from the hall.
- Go into the library. Take FLOWER (2/3) beside the slide projector on the desk at the right. Put the SLIDES in the projector and watch the Black Stone Order presentation. New task: tell Bishop what you have found.
- Note the floor hex-tile puzzle in the centre of the library (a tile is missing on the left), the hourglass and glass dome on the round table at the left, the carved cabinet door on the left wall and the telescope on the balcony. They are used later.
- In the bedroom, put the WOODEN DETAIL on the ornament at the bottom of the portrait frame above the bed. The compartment opens: HEXAGON TILE and GOLDEN ELEMENT.
- Put the GOLDEN ELEMENT on the lid of the red casket on the hall desk to start the tile puzzle.
Casket Symbol Tiles
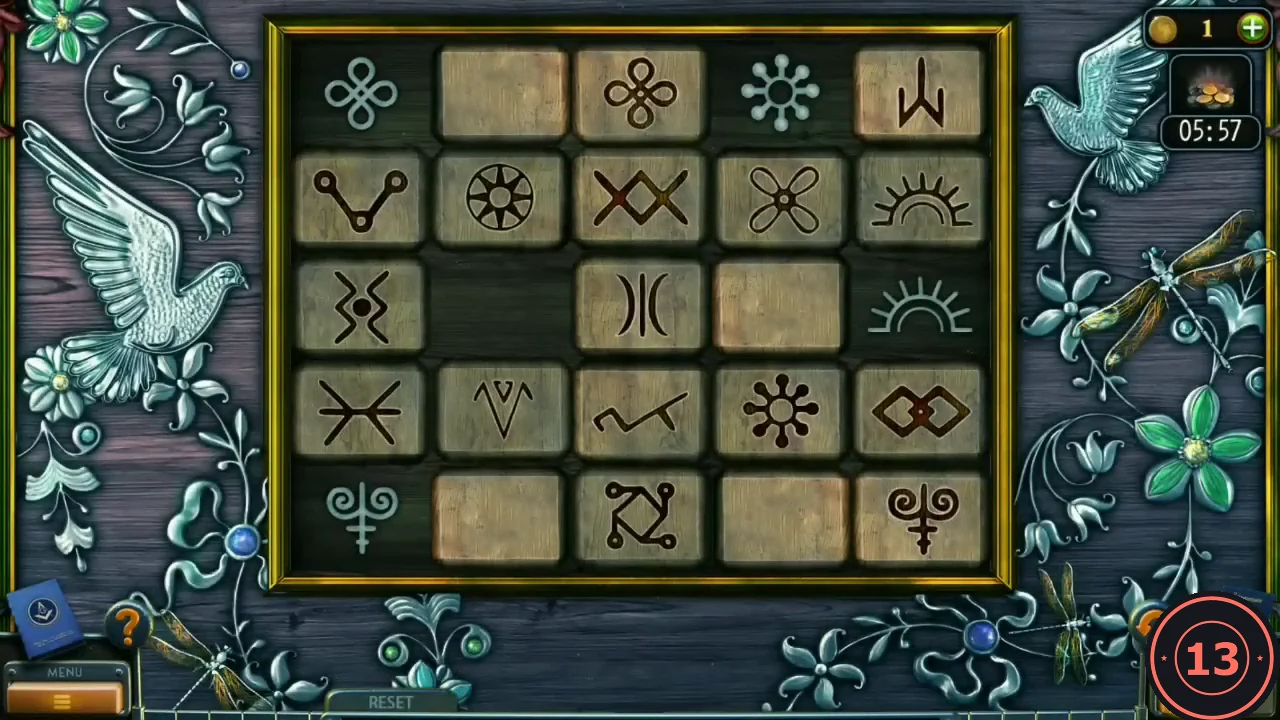
A 5 by 5 board holds 16 symbol tiles, 4 blank tiles and 5 empty cells. Tap a tile next to an empty cell to slide it there. The engraving under each empty cell shows which symbol belongs there, and a tile glows orange when it is in its place. The start layout is not always the same, so place the tiles by the target layout below rather than by a fixed move list.
- Goal: all 16 symbols around the border; the four blank tiles and five empty cells end in the middle 3 by 3. Top row, left to right: four-loop knot, zigzag, X-petal flower, sunburst, V-arrow. Right column below the V-arrow, top to bottom: eight-spoke sun, half sun, square knot, X with a red dot (the bottom-right corner).
- Bottom row, left to right: psi-trident (bottom-left corner), )(, V with dots, crossed arrows, then the X with a red dot. Left column below the four-loop knot, top to bottom: W-trident, double-diamond eye, XX, then the psi-trident. Work the border into place a few tiles at a time, using the middle cells as space to move tiles around.
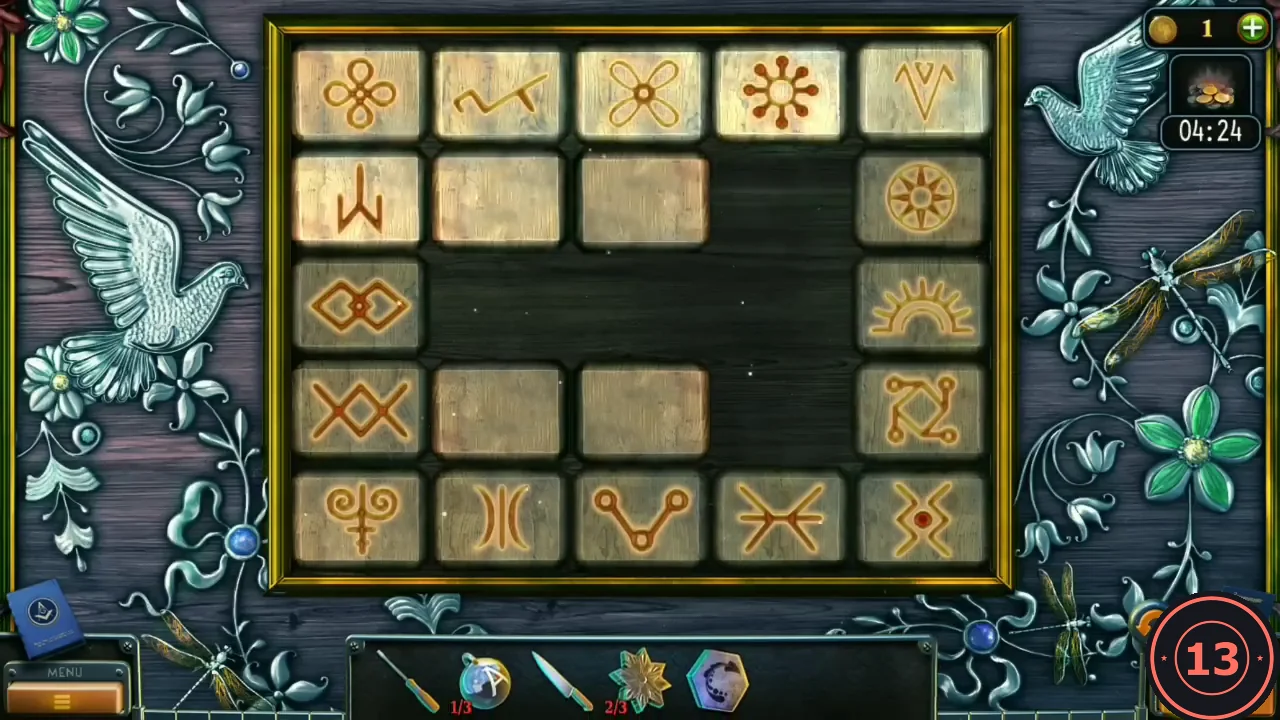
The target layout: every symbol tile glows in its place around the border. - The casket opens: take the KEY and BALL (2/3).