Pier Office
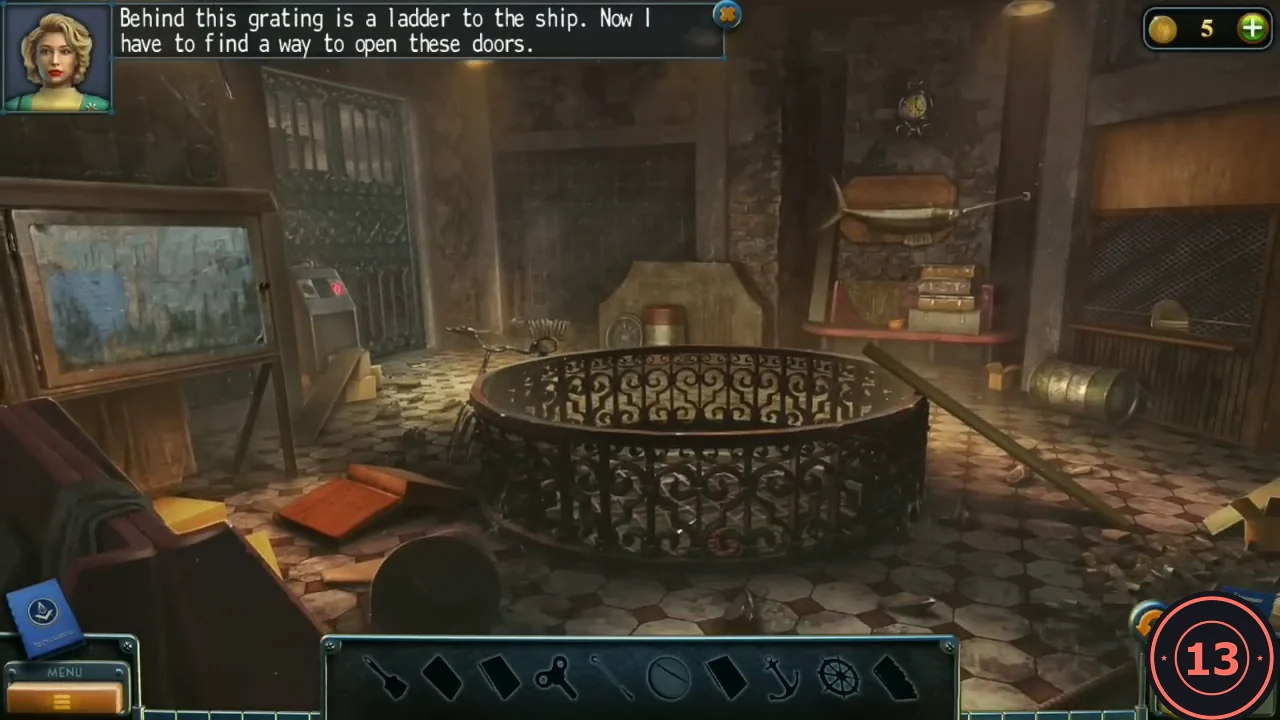
Inside the pier building, a grating at the back left hides the ladder to the ship, and its reader needs a keycard. This is an interactive hidden-object room: the bar at the bottom shows ten silhouettes, and most of them are found by using one item on another part of the room.
- Take the BRUSH by the gate panel. Zoom into the cracked window corner on the left, sweep the glass away with the BRUSH and take the WIND-UP KEY and the FIN.
- Open the glass case of the notice board with the WIND-UP KEY, remove the papers and take the ROUND GLASS. A drawing of a lens pattern is pinned underneath; you need a notebook to copy it.
- Zoom into the swordfish on the back right wall. Open the suitcase below it and take the NOTEBOOK, then put the FIN on the fish. The ANCHOR drops into the suitcase: take it, then tap the long hooked bill of the fish to take the PIKE POLE.
- Go back to the notice board and use the NOTEBOOK on the drawing to copy it. You now have the NOTEPAD WITH A PICTURE.
- Zoom into the grid of the round railing in the centre and hook the SHIP'S WHEEL with the PIKE POLE.
Lens Cabinet
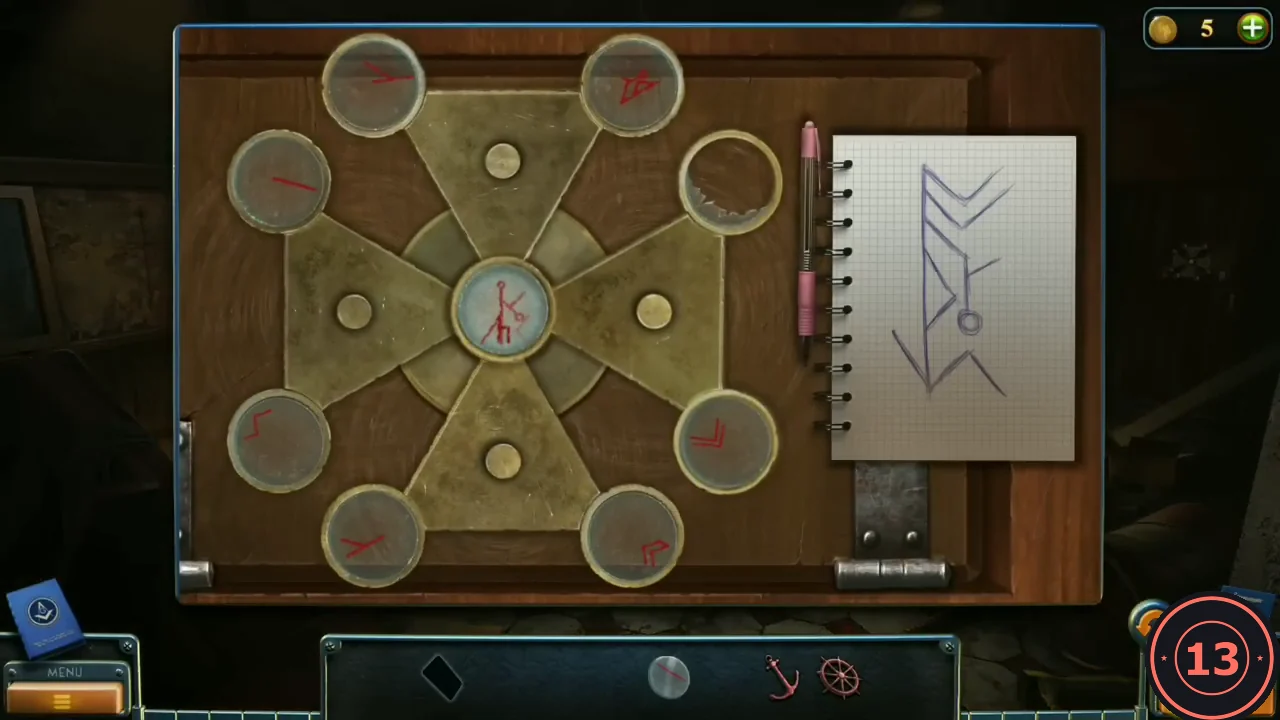
In-game rule: move the glass lenses to recreate the pattern in the centre, as shown in the drawing. One lens is broken, so the ROUND GLASS fills the empty slot first. Tapping a rotation point turns the lenses around it. This guide describes the target instead of a move list; RESET restores the start.
- Zoom into the wall cabinet, place the ROUND GLASS in the empty slot and open the NOTEPAD WITH A PICTURE to see the target pattern.
- Turn the lenses until the shapes they show line up in the centre exactly as in the drawing. When it matches, the cabinet opens.
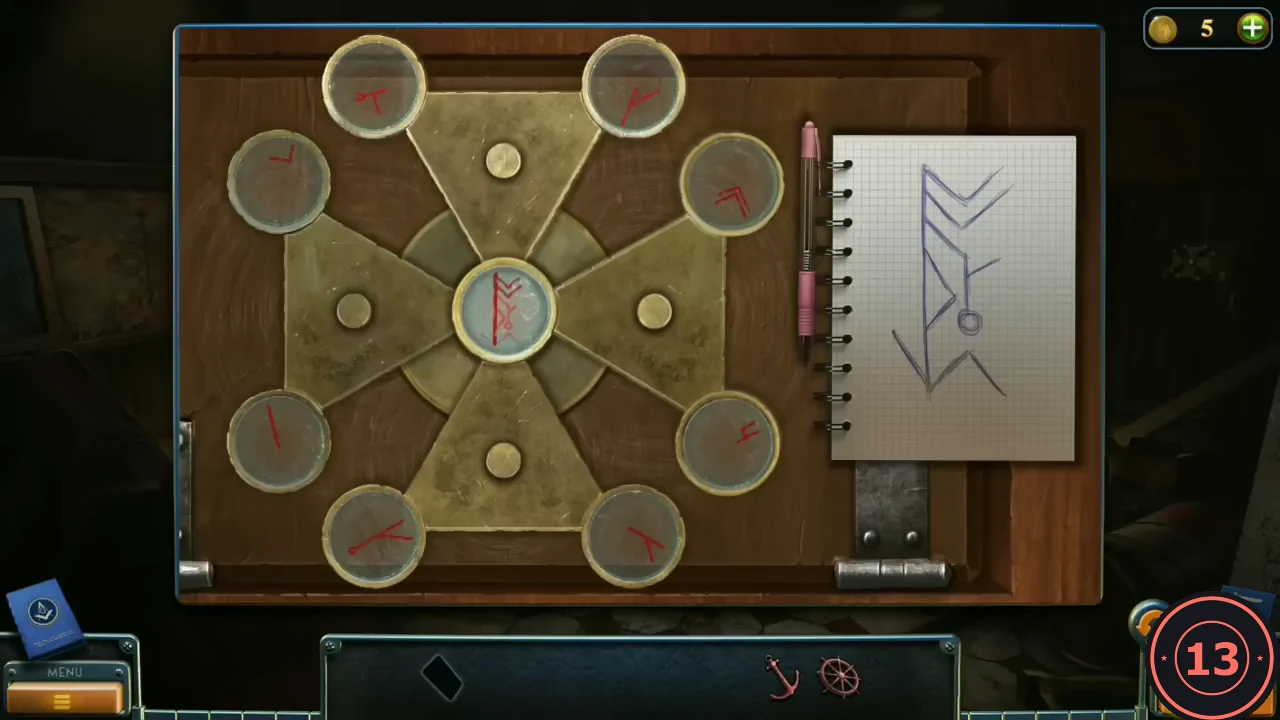
Solved: the symbol in the centre matches the drawing. - When the cabinet has opened, zoom into the grey filing cabinet beside the desk. Fit the SHIP'S WHEEL and the ANCHOR into the two shaped recesses on its drawers; the bottom drawer opens. Take the KEYCARD. Swipe it in the gate reader; the grating opens and you climb to the ship's bridge.
Ship's Bridge
The console in the centre needs a clue. A blue metal cabinet has a hexagon bolt, and a briefcase has three emblem slots.
- Cut the US flag on the right wall with the UTILITY KNIFE and take the EAGLE FIGURINE.
- Travel back to the park gazebo and put the EAGLE FIGURINE in the emblem above the star. The panel opens: take the HEX KEY SET.
- Back on the bridge, open the blue metal cabinet with the HEX KEY SET and take WIND ROSE (3/3).
- Put the three WIND ROSES in the briefcase. Take the TRANQUILIZER (the note says it puts the beast to sleep in 15 to 20 seconds) and the CLUE colour strip.
Bridge Console
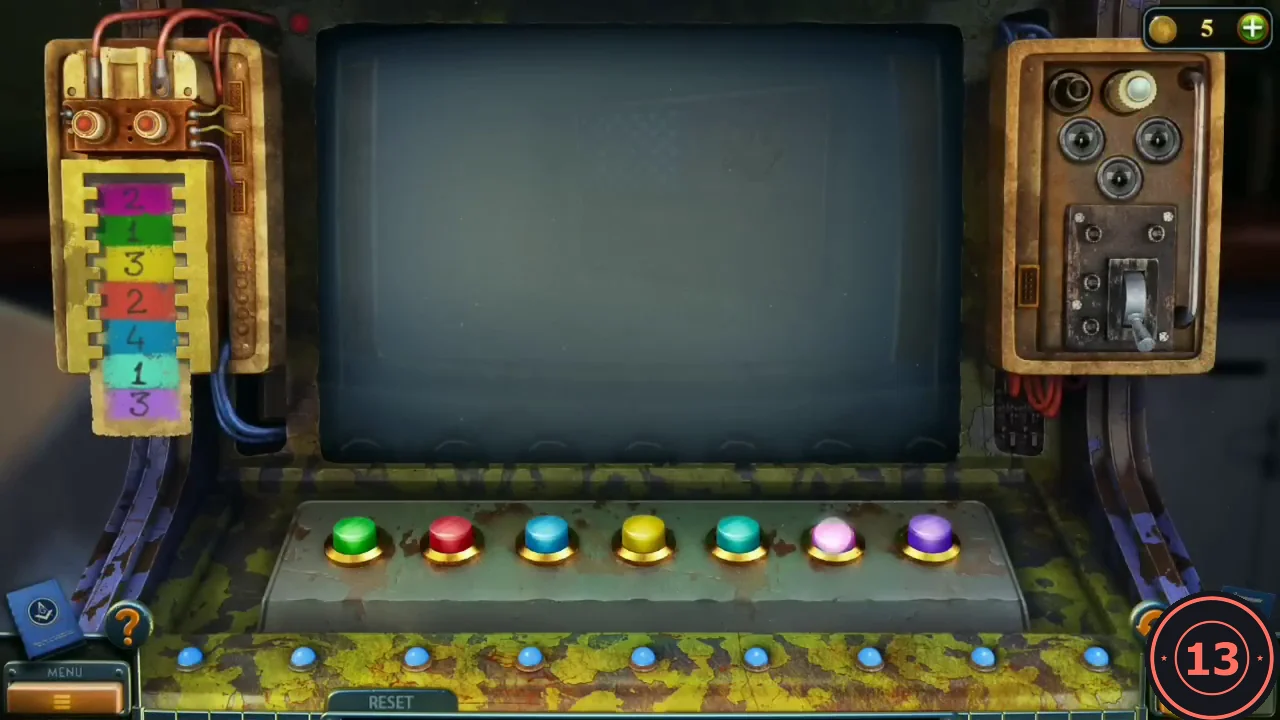
The console has seven coloured buttons and a screen. First enter the colour code from the CLUE, then steer a ship across three screen boards.
- Place the CLUE in the holder on the left of the console. Each colour on the strip shows how many times to press that button: magenta 2, green 1, yellow 3, red 2, blue 4, teal 1, purple 3.
- The buttons from left to right are green, red, blue, yellow, teal, magenta and purple. Press them in this order: 6, 6, 1, 4, 4, 4, 2, 2, 3, 3, 3, 3, 5, 7, 7, 7.CODE6,6,1,4,4,4,2,2,3,3,3,3,5,7,7,7
- In-game rule for the screen: select highlighted arrows to move the ship over all the filled cells. Arrows move the ship one or two cells, and it may cross cells it has already cleared. Plan a route that ends on the last filled cell; a green lamp lights on the right after each of the three boards.
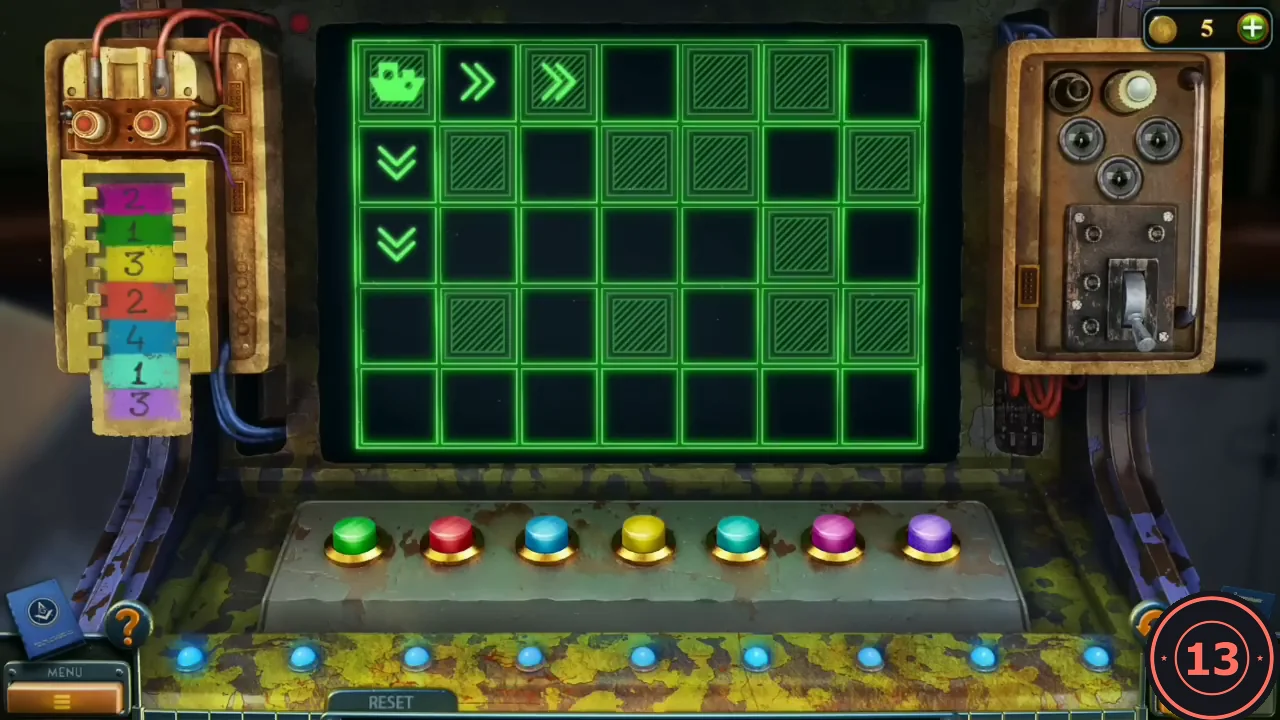
The first screen board. Hatched cells still have to be crossed; the arrows next to the ship show where it can move. - The red door opens. Tap it: Laura tranquilizes the monster on deck and it is taken away. The story moves on to the street of Noah's old house.
Noah's Street
A homeless man will give you the attic key in exchange for a soda.
- Talk to the homeless man. Press the button of the red vending machine left of the building and take the SODA.
- Take the UMBRELLA from the junk box in front of the car.
- Zoom into the raised fire-escape ladder on the right, pull it down with the UMBRELLA and climb to the roof.
Roof
Live wires block the shed door, and an old suitcase has a simple lock.
- Open the piano lid and take the CAN OPENER. Open the SODA with it.
- Tap the junk pile to start the hidden-object scene.
Roof Junk Pile
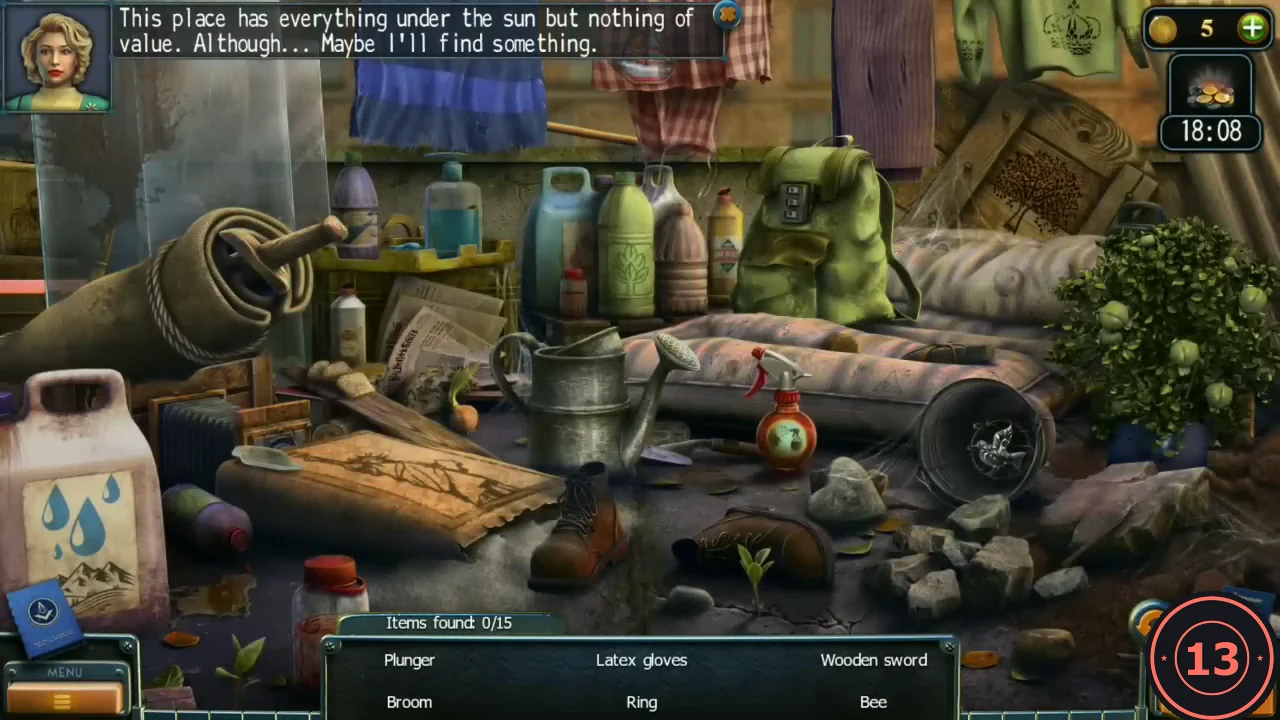
Find the 15 listed items (the list shows six at a time): Plunger, Latex Gloves, Wooden Sword, Broom, Ring, Bee, Tree, Statue of Liberty, Boat, Onion, Camera, Toothbrush, Heart, Fire and Bird. The latex gloves are locked in a backpack with a three-reel picture lock.
- Water the roses with the watering can: four buds open. Wash the stain on the glass: two planes stay drawn on it. Two old candies lie in the pile.
- Set the backpack reels (candy, flower, plane) to 2, 4, 2 and take the LATEX GLOVES from it.CODE2-4-2
- Find the rest of the listed items to finish the scene.
Noah's Attic
With the gloves on you can pull the wires off the shed door.
- Remove the wires from the shed door with the LATEX GLOVES.
- Go down to the street and give the opened SODA to the homeless man. Take the KEY.
- Open the roof shed with the KEY and enter Noah's attic. The safe has fallen through a hole in the floor, the glass case holds figurines and lacks a harp, the sewing machine is missing a centre part and the wardrobe needs a cross-shaped handle. The kitchen is through the door on the left.
- Take the STOOL from the roof and put it at the kitchen shelves. Take the COLANDER and the KITCHEN KNIFE.
- Cut the kitchen window curtain with the KITCHEN KNIFE and take the FLOWER and the METAL SPONGE. Scrub the stain on the kitchen wall with the METAL SPONGE: it shows the time 17:45.
- The red fridge is full of cockroaches; you need insecticide.
Harp and Handle
Several small chains around the attic, roof and street lead to the harp and the wardrobe handle.
- Put the FLOWER on the sewing machine and take the PICKLOCK. Open the suitcase on the roof with it and take BUTTONS (1/5).
- On the roof, cut the clothesline at the top left with the KITCHEN KNIFE and take the ROPE. Tie the ROPE at the hole in the attic floor, climb down and take the INSECTICIDE.
- Spray the fridge with the INSECTICIDE and take the CANNED FOOD. Open it with the CAN OPENER in your inventory.
- On the roof, spray the rotten pumpkin with the INSECTICIDE, then cut it with the KITCHEN KNIFE and take the ITEM IN WAX.
- On the street, put the OPEN FOOD CAN at the cellar hatch to lure the rats out and take the HARP.
- Put the COLANDER on the burning barrel and drop the ITEM IN WAX into it. The wax melts: take the HANDLE.
Glass Case Figurines
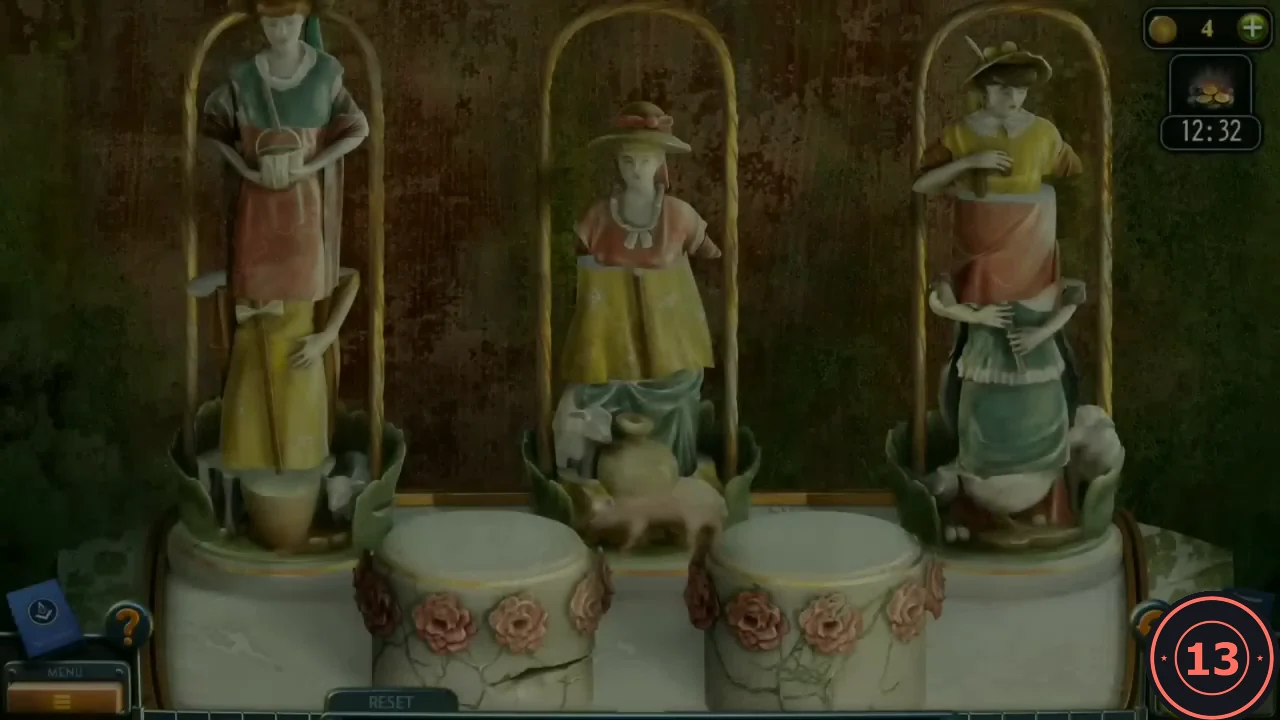
In-game rule: complete each figurine using the two empty pedestals to stack sections from large to small temporarily. Each figurine has a large skirt, a torso and a small head. The method is given instead of a move list; RESET restores the start.
- Put the HARP on the glass case in the attic to start the puzzle.
- Move one top section at a time and never put a larger section on a smaller one. Park sections on the two front pedestals while you free the ones underneath. Finish with the green figurine under the left dome, yellow in the centre and red on the right.
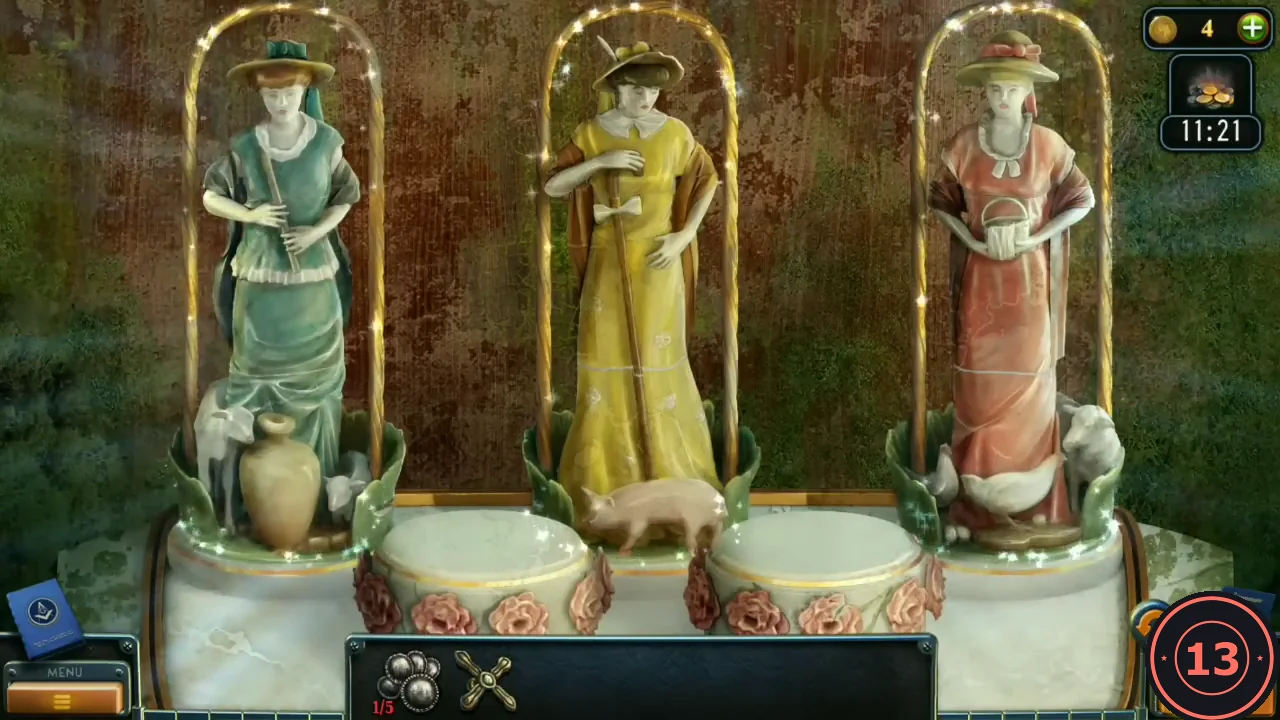
Finished: green on the left, yellow in the centre, red on the right. - The case opens: take BUTTONS (2/5). Put the HANDLE on the wardrobe, open it and take the CLUE paper and BUTTONS (3/5).
Roof Piano
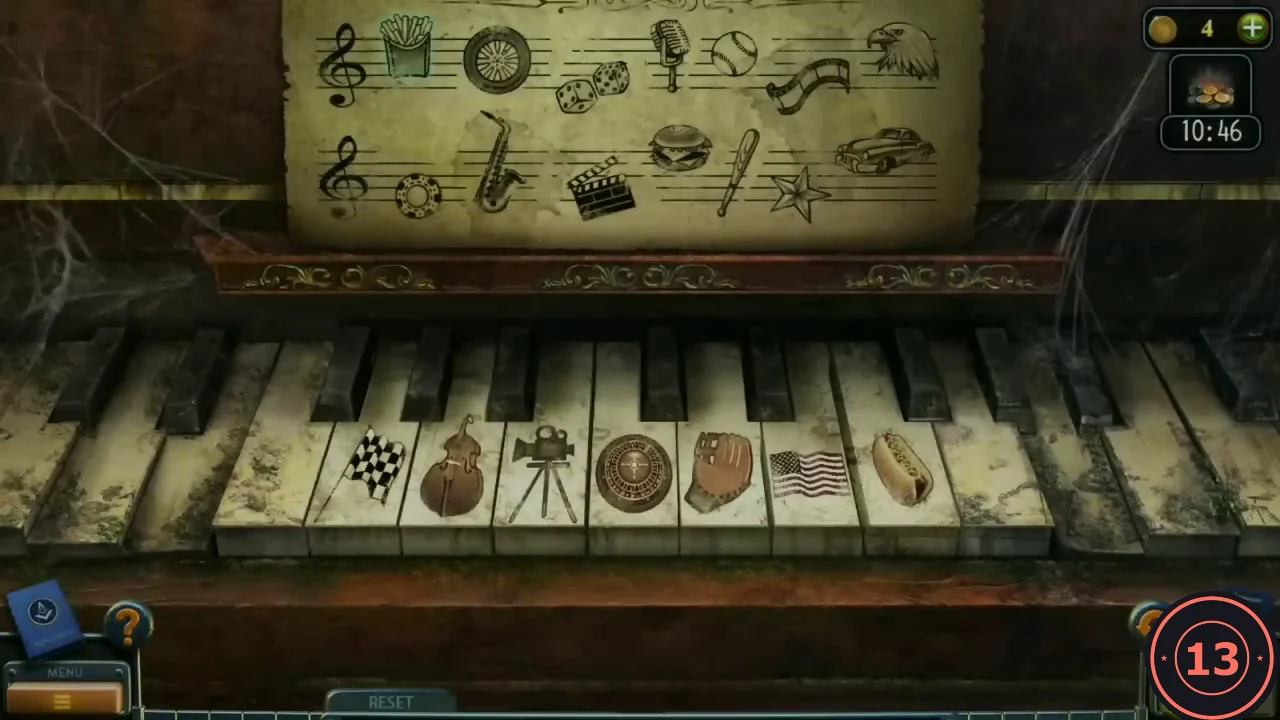
Place the CLUE sheet on the piano. Each white key has a picture: 1 checkered flag, 2 double bass, 3 movie camera, 4 roulette wheel, 5 baseball glove, 6 US flag, 7 hot dog (keys counted from the left). Play the key whose theme matches each picture on the sheet. Getting it right on the first attempt earns the Virtuoso achievement.
- Put the CLUE on the music stand of the roof piano.
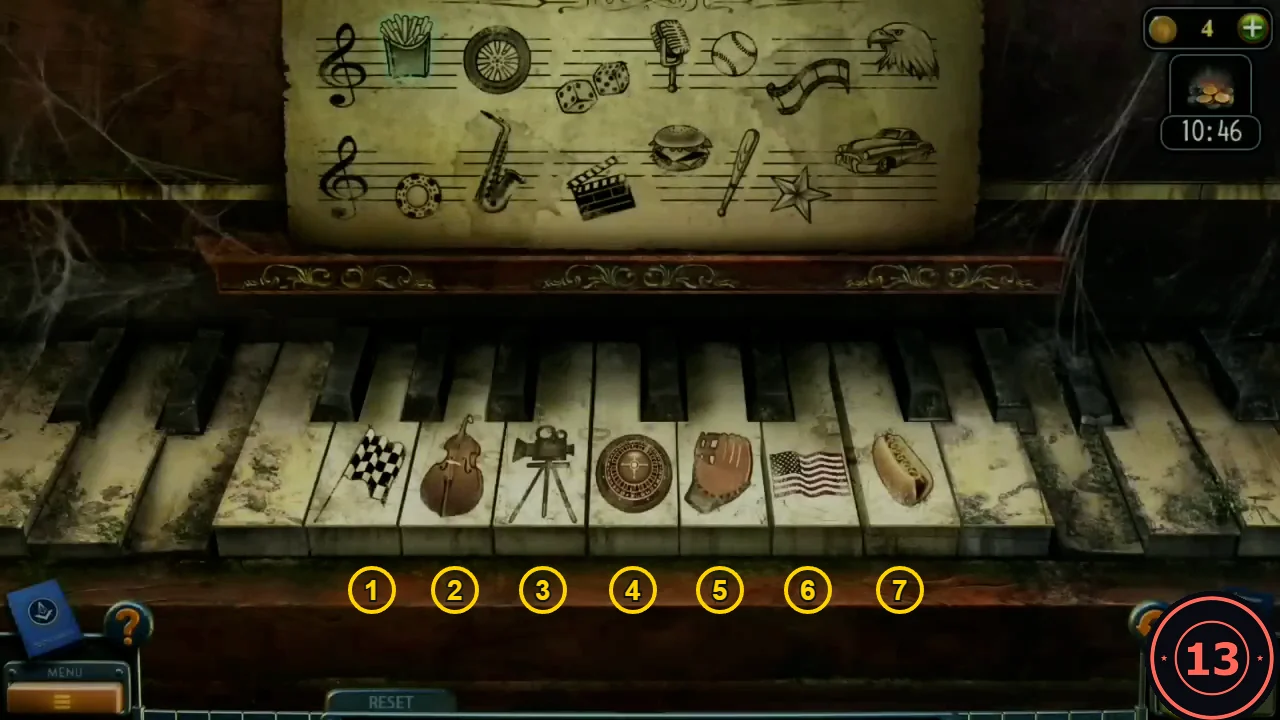
Picture keys numbered from the left, as used in the key order below. - Play 7, 1, 4, 2, 5, 3, 6, 4, 2, 3, 7, 5, 6, 1 (fries, car wheel, dice, microphone, baseball, film strip, eagle, casino chip, saxophone, clapperboard, hamburger, baseball bat, star, vintage car). Each sheet picture turns green when you hit it.CODE7,1,4,2,5,3,6,4,2,3,7,5,6,1
- Open the compartment above the keys and take the CLOCK HANDS and BUTTONS (4/5).
- Put the CLOCK HANDS on the grandfather clock in the attic and set it to 17:45 (5:45): hour hand on 5, minute hand on 9. The clock accepts this setting. Take BUTTONS (5/5).CODE5:45
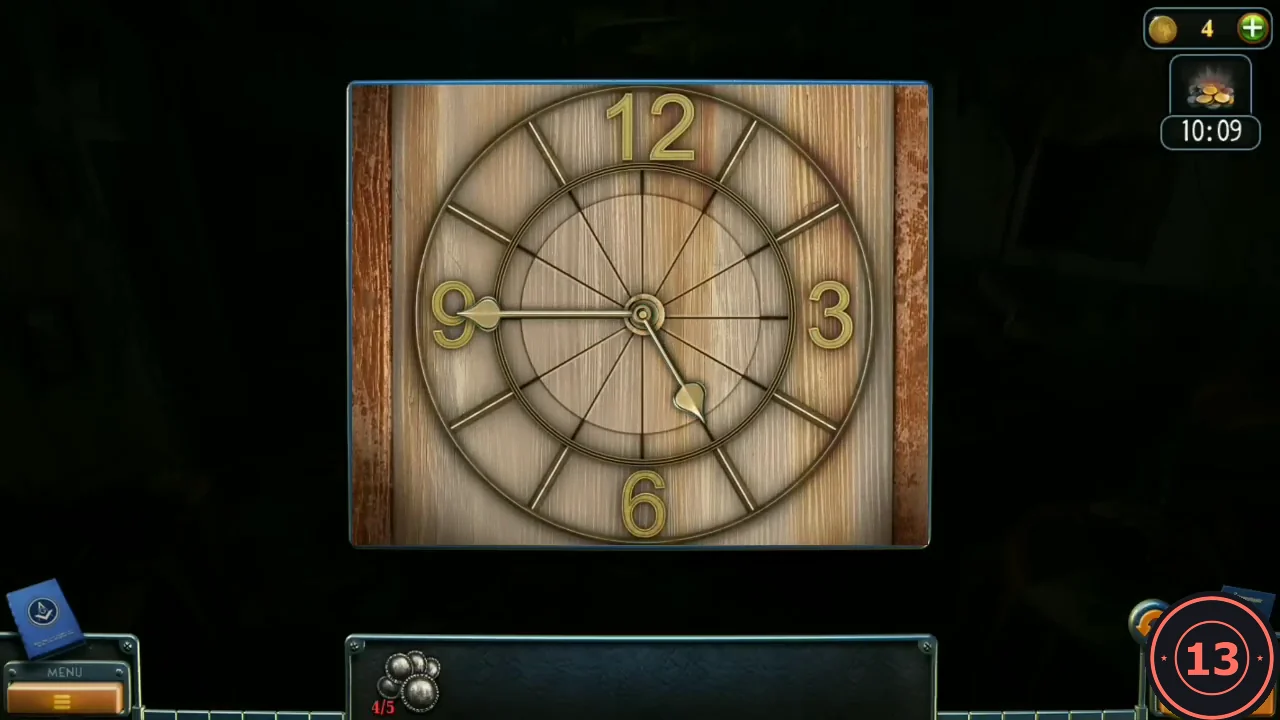
The attic clock set to 5:45: hour hand on 5, minute hand on 9.
Red Chest Hexagons
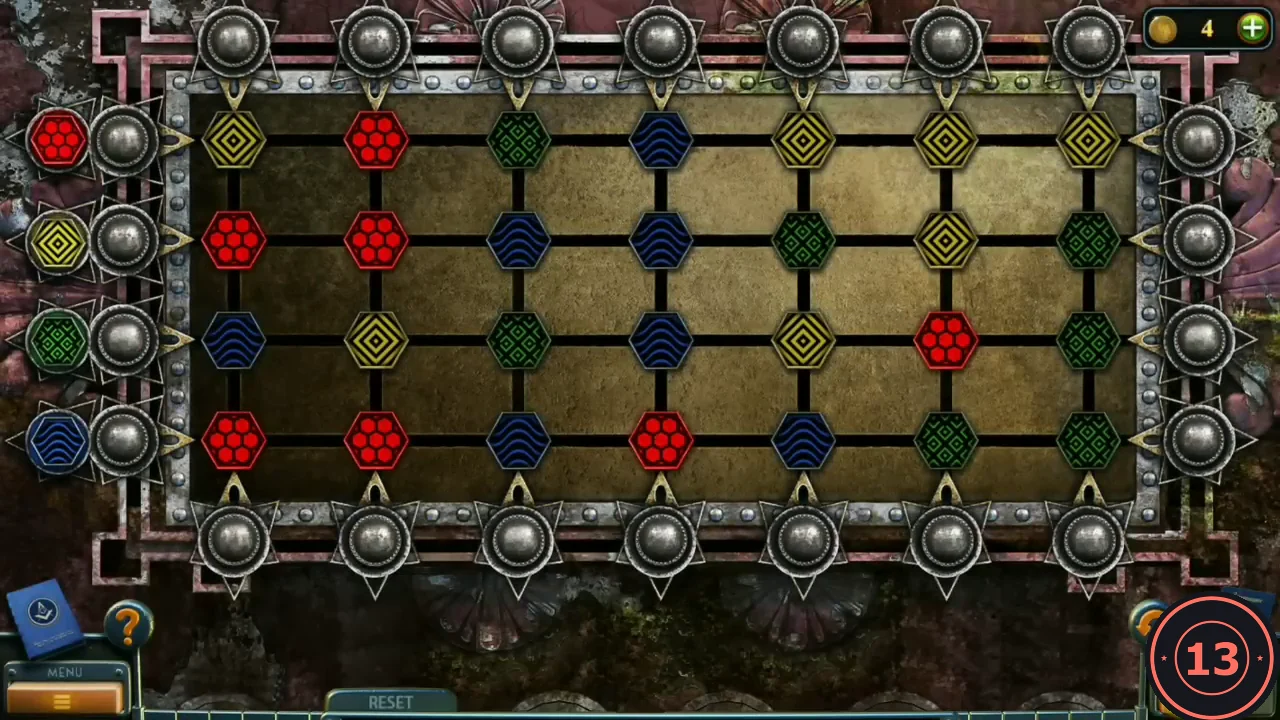
The red chest in the attic has five button slots. Its board has four rows of seven coloured hexagons. The buttons on the left and right shift a row one step, wrapping around; the buttons above and below shift a column. Goal: every row matches the colour marker at its left, which is red, yellow, green and blue from the top. Solving it in under 70 moves earns the Handyman achievement. The solution is long, so the method is given; RESET restores the start.
- Put the five BUTTONS into the slots of the red chest.
- Starting rows (left to right): row 1 yellow, red, green, blue, yellow, yellow, yellow; row 2 red, red, blue, blue, green, yellow, green; row 3 blue, yellow, green, blue, yellow, red, green; row 4 red, red, blue, red, blue, green, green.
- Row 1 (red) first. Nothing is finished yet, so use any row and column moves until all seven hexagons of the top row are red. A finished row is a single colour, so shifting it left or right later does no harm, but a column move changes one hexagon in every row.
- From now on, fix hexagons with this four-move swap on one column and two neighbouring rows (an upper and a lower row): shift the column down one step, shift the lower row one step right, shift the column up one step, then shift the lower row one step left. Only three hexagons change: the lower row's hexagon just left of that column rises into the upper row, the upper row's hexagon in that column drops into the lower row, and the lower row's hexagon in that column moves one step left. Every other row ends exactly as before. (For the leftmost column, "just left" wraps round to the rightmost column.)
- Row 2 (yellow): use rows 2 and 3 as the pair. Shift row 3 until a yellow hexagon sits just left of a column where row 2 has a wrong colour, then do the swap. Repeat until row 2 is all yellow. If row 3 has no yellow left, first lift one from row 4 with the same swap on rows 3 and 4. Row 3 (green): do the same with rows 3 and 4. When row 3 is green, row 4 can only hold blue hexagons and the chest opens. The method is reliable but may need more than the 70 moves required for Handyman.
- The chest opens on the artist's diary. Chapter 1 is complete and Chapter 2 becomes available.
Chapter 1 Collectibles
Chapter 1 has 15 Morphing Objects, 5 cassettes, 4 billiard balls and 6 baseball cards. Morphing Objects are scene objects that change shape: tap them while they change. Collection items lie in the scene. The counters show totals for the whole game: 42 Morphing Objects, 10 cassettes, 9 billiard balls, 11 baseball cards and 12 hats.
- Street and gallery. Street: Morphing Object on the round lamp on the building wall left of the tree; cassette under the street light on the right kerb. Gallery hall: Morphing Object on the round window above the left door; billiard ball at the foot of the statue on the right. Security room: Morphing Object on the right edge of the console next to the plant; cassette on the floor on the left by the ladder.
- Workshop and basement. Workshop: Morphing Object in front of the knight statue, centre left; baseball card on the floor at the lower right, just right of the black fridge at the foot of the white statue. Boiler room: Morphing Object at the top of the painting with a face standing in the left foreground; baseball card on the top shelf on the left.
- Alley, construction street and sewer. Alley: Morphing Object on top of the green bin on the left; billiard ball in the rubbish bag at the lower right. Construction street: Morphing Object on the pink neon sign, centre right; baseball card by the small fence on the far left. Sewer: Morphing Object (a blue cup) on the pipe railing far right; billiard ball by the brick arch far left.
- Park and pier. Park: Morphing Object on the low wall at the right end behind the bench; baseball card on the ground by the puddle. Pier: Morphing Object (a rubber duck) on the net at the lower left; cassette on the steps at the lower right. Ship's bridge: Morphing Object on the round gauge on the upper left wall above the left console; cassette on the left console by the window.
- Noah's street, roof, attic and kitchen. Street: Morphing Object on the building by the door on the right; baseball card at the right edge by the doorway. Roof: Morphing Object on the ground in front of the table, centre left; cassette in the rubble at the lower left. Attic: Morphing Object on the red chair at the lower right; billiard ball on the bed on the right. Kitchen: Morphing Object on the floor in front of the table leg; baseball card on the chair at the lower left.