What There Is to Collect
The Extras > Collections screen on the title menu tracks every collectible in the game.
- The main game hides 30 morphing objects, 10 manuscripts and four collections: 8 medallions, 7 tarot cards, 8 wolf figurines and 7 flowers. The Bonus Chapter adds 13 goblets. A small popup confirms each find. Morphing objects shimmer and change shape; tap one while it is changing. Completing a set earns an achievement: Florist (flowers), Treasure hunter (wolf figurines), Predictor (tarot cards), Collector (medallions), Master of Details (morphing objects) and Antiquarian (goblets). The following sections list every find in the order the areas are visited, with its position on the screen. Pick them up as you go, because earlier areas may not stay reachable. Manuscript numbers follow the order of pickup, so yours may count differently if you collect them in another order.
Collectibles in Chapter 1
Finds in the tavern, the witch forest and the druid's home, in visiting order.
- Tavern yard (well) — Morphing object 1/30: upper left, by the house porch near the well rope.
- Tavern yard — Flower 1/7: grass right of the path in front of the shed.
- Tavern hall — Morphing object 2/30: jugs on the counter left of the central post. Tarot card 1/7: right, under the coat/chair.
- Tavern hall, floor-crack zoom — Manuscript 1/10: note lying on the boards.
- Forest camp (night fire) — Medallion 1/8: top-left among the leaves.
- Forest camp — Morphing object 3/30: ground right of the campfire.
- Swamp ruins (grate, stairs, frame) — Wolf figurine 1/8: ground left of the fallen frame.
- Swamp ruins — Morphing object 4/30: upper centre-right by the beam/chain.
- Ruins with stone box (Help the kid) — Flower 2/7: red slab right of the stone box.
- Same ruins — Morphing object 5/30: small bird shape on the big tree trunk, far left upper.
- Skeleton swamp — Morphing object 6/30: small bush in fog right of centre. Wolf figurine 2/8: bottom left near the skeleton's feet.
- Druid yard (scarecrow, oven) — Morphing object 7/30: top of oven chimney.
- Druid yard — Flower 3/7: flowers left of the oven.
- Druid house — Medallion 2/8: above the round blue window, left. Morphing object 8/30: upper right hanging decoration.
- Druid house, table zoom by round window — Manuscript 2/10.
- Druid yard (scarecrow) — Manuscript 3/10: zoom on the hollow log near the scarecrow: note on the grass.
- Wagon swamp (big tree, wagon) — Manuscript 4/10: zoom on the big-leaf plant left of the tree base: note on a rock.
Collectibles in Chapter 2
Finds around the pirate ship and the swamp, in visiting order.
- Ship hull (figurehead) — Tarot card 2/7: porthole at top of hull.
- Ship hull — Morphing object 9/30: next to it.
- Ship deck — Medallion 3/8: deck left of mast base near barrel. Manuscript 5/10: paper on the deck by the crate, right of centre. Morphing object 10/30: round dark object right of the broken mast, lower right.
- Lighthouse swamp — Tarot card 3/7: mossy log foreground left of centre. Morphing object 11/30: water centre near boat.
- Captain's cabin — Morphing object 12/30: hanging from the ceiling beam, upper left of centre. Wolf figurine 3/8: floor right near desk.
- Magic flower swamp (wagon, tree) — Morphing object 13/30: hollow in big tree trunk, left.
- Magic flower swamp — Wolf figurine 4/8: by the wagon wheel, bottom right.
- Gallows (caged boy) — Morphing object 14/30: on top of the wall left of the cage.
- Gallows — Flower 4/7: ground left-centre by rocks.
Collectibles in Chapter 3
Finds in the groom's hut and the witch city, in visiting order.
- Groom's hut exterior — Morphing object 15/30: hut roof upper right. Medallion 4/8: bushes right of door, right edge.
- Groom's hut interior — Manuscript 6/10: paper at the right end of the wooden trough. Tarot card 4/7: floor centre by trough. Morphing object 16/30: far right by the pot.
- City tunnel exit (lanterns) — Morphing object 17/30: left by the flower planter.
- City tunnel exit — Wolf figurine 5/8: right foreground on cobbles by barrel.
- City street (flags) — Medallion 5/8: upper right on dark building near lantern.
- City street — Morphing object 18/30: lower right near steps/crate.
- Fountain square — Morphing object 19/30: tree above the fountain. Tarot card 5/7: left of the fountain base.
- Blacksmith shop — Morphing object 20/30: small figure on workbench left of anvil. Wolf figurine 6/8: floor right of anvil by crate.
- Tower interior (wheel) — Tarot card 6/7: right by stool/bench.
- Tower interior — Morphing object 21/30: far left on the barrel. Manuscript 7/10: under the red cloth on the left table.
- Library — Morphing object 22/30: right bookshelf, low. Medallion 6/8: seat of the left chair. Manuscript 8/10: beside the desk, front right.
Collectibles in Chapter 4
Finds from the waterfall to the temple, in visiting order.
- Waterfall — Flower 5/7: rocks right-centre by the water. Morphing object 23/30: red bush upper left beside the waterfall.
- Resistance camp — Flower 6/7: left edge by water plants. Morphing object 24/30: right near rocks below tent.
- Camp, chest zoom — Manuscript 9/10: inside the bag (with key).
- River with broken waterwheel — Wolf figurine 7/8: on the wooden sluice beam at left.
- Waterwheel river — Morphing object 25/30: right edge on rocks.
- Windmill — Medallion 7/8: upper left in tree leaves. Morphing object 26/30: right foreground bushes.
- Temple square (golem) — Manuscript 10/10: page on the cobbles in front of the golem pedestal.
- Temple square — Morphing object 27/30: lower left cobbles. Wolf figurine 8/8: right side of the golem's pedestal base.
- Carriage with donkey — Flower 7/7: ground left-centre by lantern.
- Carriage — Morphing object 28/30: left edge on wall/post.
- Temple crypt (sarcophagus) — Tarot card 7/7: left by candles.
- Temple crypt — Morphing object 29/30: left of sarcophagus, low.
- Temple entrance (green beam) — Morphing object 30/30: in the tree right.
- Temple entrance — Medallion 8/8: tree upper right.
Bonus Chapter Goblets
Thirteen goblets are hidden in the Bonus Chapter; the popup counts them as "Collection items found". Finding all 13 earns the Antiquarian achievement.
- Goblet 1/13 — Mine with cart rails (bonus start): upper left beside carved idol face.
- Goblet 2/13 — Prison guardhouse interior (trough): upper right dark corner.
- Goblet 3/13 — Town outskirts: roof of central house.
- Goblet 4/13 — Gallows road (cage): ground right near gallows post.
- Goblet 5/13 — Market street (yellow awning): right edge mid height.
- Goblet 6/13 — Fountain square (tower): right edge of the tower beside the round window.
- Goblet 7/13 — Prison exterior: upper left on wooden house wall.
- Goblet 8/13 — Blacksmith house by prison wall: right near prison wall.
- Goblet 9/13 — Dungeon corridor (barrel, skull): floor centre-left.
- Goblet 10/13 — Prisoner cell (bed, candle): upper right above bed.
- Goblet 11/13 — Crypt with knight statue/sarcophagus: floor left by debris.
- Goblet 12/13 — Throne hall (gargoyle): floor left near pillar base.
- Goblet 13/13 — Artifact-chest hall (red curtains, candles): lower right among the candles.
The Extras Menu and the Bonus Game
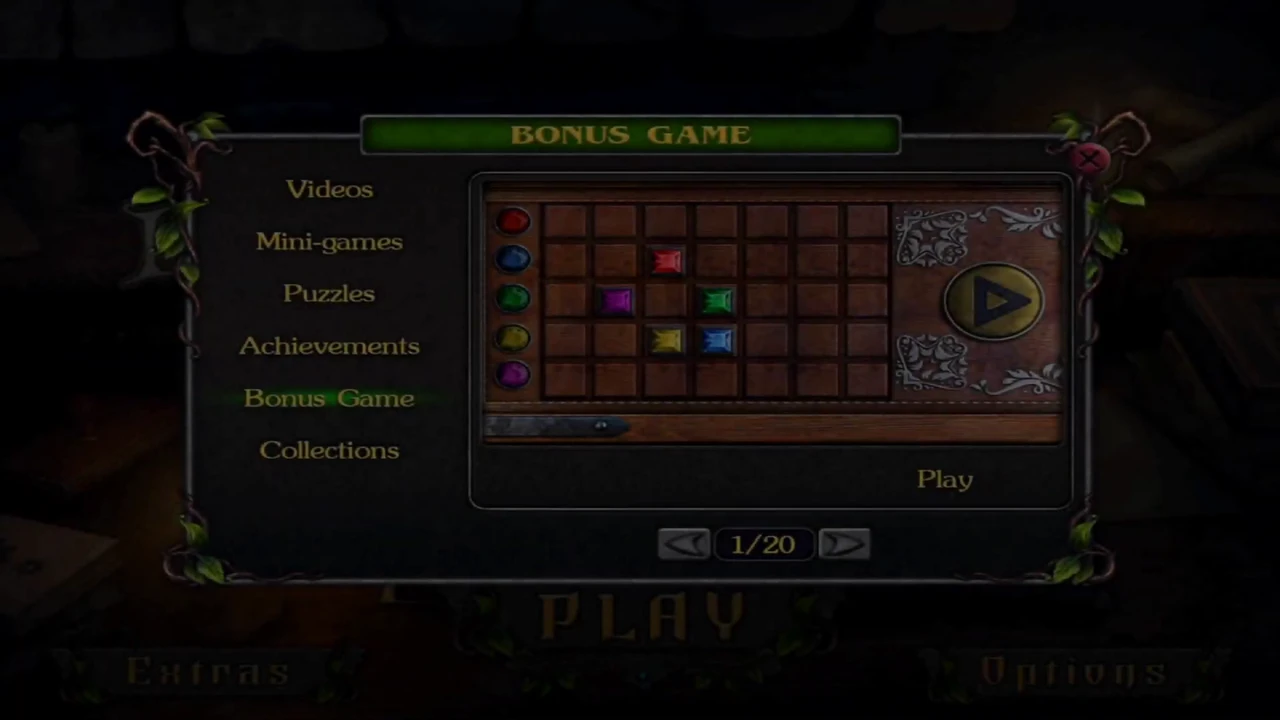
The Extras menu on the title screen holds replays of the story mini-games and a 20-level Bonus Game of sliding gems. After the rules, each level step gives the start positions, the loops and a tap order that solves it.
- On the title screen tap Extras. Mini-games replays 14 mini-games from the story: pick one with the arrows (9/14, for example, is the node-and-line puzzle) and tap Play. Each is solved as described in its story section of this guide.
- In Extras tap Bonus Game. Pick a level with the arrows (it shows 1/20 at first) and tap Play. According to a published review of this mobile version, the Bonus Game unlocks once you have found all 30 morphing objects; the recordings do not show the unlock message itself.
- Rules: each orb on the left (red, blue, green, yellow and purple, top to bottom) has its own rectangular loop on the 7 x 5 board, and the game outlines each loop in turn when a level starts. Tapping an orb moves every gem lying on its loop one square clockwise around that loop. Where two loops overlap, a gem can be passed from one loop to the other. The level is solved when every gem sits in the first column, beside the orb of its own colour. Reset restarts the level.
- How to read the level steps: rows count 1 to 5 from the top (row 1 is beside the red orb) and columns count 1 to 7 from the orbs. Each level lists the starting position of every gem, each orb's loop and one tap order that solves the level; "red x2" means tap the red orb twice. These start positions come from one recording, so first check that your board matches. If it does not, use the loops: bring one gem home at a time, starting with the top rows, and turn other loops to park finished gems out of the way.
- Level 1. Start: red row 2 col 3, blue row 4 col 4, green row 3 col 4, yellow row 4 col 3, purple row 3 col 2. Loops: red rows 1-3, cols 1-3; blue rows 3-5, cols 3-5; green rows 1-5, cols 2-4; yellow rows 4-5, cols 1-5; purple rows 2-4, cols 1-4. Tap order (15 taps): green x1, red x2, blue x2, purple x1, red x1, blue x1, green x1, red x2, green x2, yellow x2. Every gem ends beside its own orb.
- Level 2. Start: red row 1 col 3, blue row 4 col 2, green row 3 col 4, yellow row 5 col 1, purple row 1 col 1. Loops: red rows 1-5, cols 1-3; blue rows 2-4, cols 1-4; green rows 1-5, cols 2-4; yellow rows 2-5, cols 1-5; purple rows 4-5, cols 1-2. Tap order (14 taps): red x3, purple x1, blue x2, red x1, green x1, red x2, green x1, yellow x1, green x1, purple x1. Every gem ends beside its own orb.
- Level 3. Start: red row 3 col 4, blue row 2 col 1, green row 2 col 3, yellow row 3 col 1, purple row 1 col 2. Loops: red rows 1-2, cols 1-2; blue rows 2-3, cols 1-4; green rows 2-5, cols 2-4; yellow rows 3-5, cols 1-3; purple rows 2-4, cols 2-3. Tap order (14 taps): blue x2, purple x1, red x1, purple x2, green x2, red x1, green x1, yellow x4. Every gem ends beside its own orb.
- Level 4. Start: red row 4 col 2, blue row 1 col 3, green row 1 col 1, yellow row 5 col 2, purple row 5 col 4. Loops: red rows 1-3, cols 1-5; blue rows 1-4, cols 2-4; green rows 2-5, cols 1-4; yellow rows 3-5, cols 1-3; purple rows 1-5, cols 3-4. Tap order (10 taps): red x1, purple x1, red x1, green x1, red x1, blue x1, green x1, red x3. Every gem ends beside its own orb.
- Level 5. Start: red row 1 col 1, blue row 1 col 4, green row 2 col 1, yellow row 3 col 1, purple row 3 col 2. Loops: red rows 1-3, cols 1-4; blue rows 2-4, cols 2-4; green rows 2-3, cols 1-2; yellow rows 3-4, cols 1-3; purple rows 4-5, cols 1-4. Tap order (19 taps): red x3, yellow x1, red x1, blue x1, red x3, blue x1, red x1, yellow x1, red x1, green x1, purple x5. Every gem ends beside its own orb.
- Level 6. Start: red row 1 col 1, blue row 3 col 5, green row 2 col 3, yellow row 3 col 1, purple row 3 col 3. Loops: red rows 1-4, cols 1-5; blue rows 2-4, cols 1-5; green rows 3-5, cols 2-5; yellow rows 1-4, cols 3-5; purple rows 4-5, cols 1-2. Tap order (15 taps): blue x1, yellow x1, blue x2, purple x1, blue x5, purple x1, blue x1, purple x1, blue x2. Every gem ends beside its own orb.
- Level 7. Start: red row 3 col 1, blue row 2 col 6, green row 4 col 6, yellow row 4 col 2, purple row 2 col 2. Loops: red rows 1-5, cols 1-7; blue rows 1-2, cols 1-2; green rows 1-2, cols 6-7; yellow rows 4-5, cols 6-7; purple rows 4-5, cols 1-2. Tap order (23 taps): red x1, blue x1, red x1, blue x1, red x3, green x1, red x4, yellow x1, red x6, purple x1, red x1, blue x1, red x1. Every gem ends beside its own orb.
- Level 8. Start: red row 2 col 3, blue row 3 col 3, green row 4 col 6, yellow row 1 col 3, purple row 3 col 4. Loops: red rows 1-2, cols 1-4; blue rows 2-4, cols 1-3; green rows 4-5, cols 1-6; yellow rows 3-5, cols 3-5; purple rows 2-3, cols 2-3. Tap order (16 taps): red x3, yellow x3, green x4, yellow x2, blue x4. Every gem ends beside its own orb.
- Level 9. Start: red row 4 col 3, blue row 1 col 4, green row 2 col 6, yellow row 5 col 2, purple row 3 col 5. Loops: red rows 1-5, cols 1-2; blue rows 1-2, cols 2-4; green rows 2-4, cols 3-5; yellow rows 3-5, cols 3-5; purple rows 2-3, cols 5-6. Tap order (27 taps): red x5, blue x3, green x1, purple x2, green x1, blue x1, red x2, green x4, blue x1, red x2, blue x1, red x4. Every gem ends beside its own orb.
- Level 10. Start: red row 2 col 4, blue row 4 col 4, green row 3 col 1, yellow row 4 col 3, purple row 2 col 2. Loops: red rows 1-2, cols 1-6; blue rows 3-5, cols 1-6; green rows 1-5, cols 3-5; yellow rows 2-4, cols 5-7; purple rows 4-5, cols 4-6. Tap order (22 taps): blue x2, purple x1, yellow x2, red x3, green x3, red x1, green x6, blue x4. Every gem ends beside its own orb.
- Level 11. Start: red row 3 col 3, blue row 3 col 1, green row 1 col 1, yellow row 5 col 1, purple row 1 col 3. Loops: red rows 1-5, cols 1-3; blue rows 1-2, cols 1-3; green rows 2-3, cols 1-2; yellow rows 3-4, cols 1-3; purple rows 4-5, cols 1-2. Tap order (13 taps): red x3, green x1, red x2, green x1, blue x1, yellow x1, red x1, blue x1, yellow x2. Every gem ends beside its own orb.
- Level 12. Start: red row 3 col 1, blue row 3 col 2, green row 3 col 3, yellow row 3 col 5, purple row 2 col 2. Loops: red rows 1-4, cols 1-4; blue rows 2-5, cols 2-5; green rows 1-2, cols 1-2; yellow rows 3-4, cols 1-5; purple rows 4-5, cols 1-3. Tap order (15 taps): blue x1, green x1, yellow x1, blue x1, red x2, green x2, purple x1, yellow x1, purple x3, blue x1, yellow x1. Every gem ends beside its own orb.
- Level 13. Start: red row 2 col 1, blue row 5 col 1, green row 3 col 1, yellow row 4 col 1, purple row 1 col 1. Loops: red rows 1-4, cols 1-2; blue rows 2-5, cols 2-4; green rows 3-5, cols 1-5; yellow rows 1-5, cols 4-5; purple rows 3-5, cols 2-4. Tap order (16 taps): red x4, purple x1, green x1, purple x3, green x1, purple x1, green x1, red x4. Every gem ends beside its own orb.
- Level 14. Start: red row 2 col 1, blue row 3 col 1, green row 4 col 1, yellow row 1 col 1, purple row 5 col 1. Loops: red rows 1-2, cols 1-4; blue rows 3-4, cols 1-6; green rows 1-3, cols 4-6; yellow rows 2-5, cols 2-3; purple rows 3-5, cols 1-4. Tap order (16 taps): red x5, yellow x1, red x3, yellow x4, blue x1, yellow x1, red x1. Every gem ends beside its own orb.
- Level 15. Start: red row 1 col 2, blue row 5 col 2, green row 4 col 2, yellow row 2 col 2, purple row 3 col 2. Loops: red rows 1-3, cols 1-3; blue rows 3-5, cols 1-3; green rows 1-5, cols 2-4; yellow rows 3-4, cols 1-5; purple rows 1-5, cols 3-4. Tap order (15 taps): blue x1, yellow x1, green x3, purple x1, green x4, blue x3, red x2. Every gem ends beside its own orb.
- Level 16. Start: red row 2 col 1, blue row 4 col 1, green row 1 col 1, yellow row 3 col 1, purple row 5 col 1. Loops: red rows 1-2, cols 1-4; blue rows 2-4, cols 1-3; green rows 4-5, cols 1-4; yellow rows 1-5, cols 3-6; purple rows 4-5, cols 5-6. Tap order (17 taps): blue x1, red x2, blue x1, red x3, blue x1, red x1, blue x4, red x4. Every gem ends beside its own orb.
- Level 17. Start: red row 2 col 6, blue row 1 col 5, green row 1 col 4, yellow row 1 col 6, purple row 3 col 6. Loops: red rows 1-3, cols 1-2; blue rows 3-5, cols 1-5; green rows 1-3, cols 4-6; yellow rows 2-4, cols 5-7; purple rows 1-5, cols 2-3. Tap order (18 taps): green x2, blue x1, green x1, blue x2, green x1, blue x1, green x1, blue x4, purple x2, red x1, purple x1, red x1. Every gem ends beside its own orb.
- Level 18. Start: red row 4 col 4, blue row 2 col 2, green row 5 col 5, yellow row 1 col 1, purple row 3 col 3. Loops: red rows 1-2, cols 1-2; blue rows 2-5, cols 1-4; green rows 3-5, cols 1-5; yellow rows 4-5, cols 1-5; purple rows 2-5, cols 3-5. Tap order (14 taps): blue x1, red x2, blue x4, green x1, blue x1, red x1, blue x4. Every gem ends beside its own orb.
- Level 19. Start: red row 2 col 2, blue row 2 col 4, green row 3 col 2, yellow row 2 col 3, purple row 3 col 4. Loops: red rows 1-3, cols 1-3; blue rows 1-3, cols 3-5; green rows 3-5, cols 1-3; yellow rows 3-5, cols 3-5; purple rows 2-4, cols 2-4. Tap order (14 taps): red x1, purple x1, green x1, red x1, green x1, purple x1, green x3, purple x1, yellow x1, red x3. Every gem ends beside its own orb.
- Level 20. Start: red row 1 col 5, blue row 5 col 2, green row 3 col 1, yellow row 2 col 3, purple row 1 col 4. Loops: red rows 1-3, cols 1-5; blue rows 2-4, cols 4-5; green rows 3-5, cols 1-3; yellow rows 2-3, cols 1-3; purple rows 3-5, cols 1-5. Tap order (16 taps): red x1, yellow x1, red x3, yellow x2, green x1, red x1, yellow x1, green x2, red x1, green x3. Every gem ends beside its own orb.
Achievements
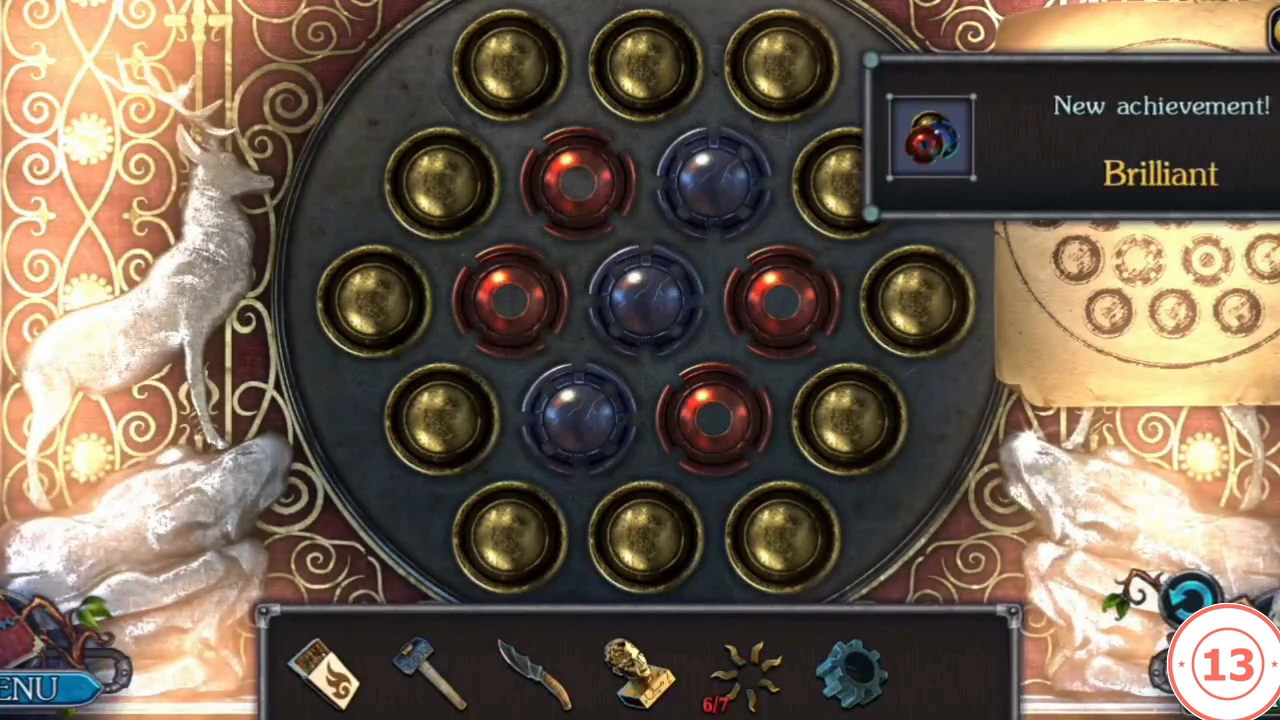
The Extras menu has an Achievements page, and a "New achievement!" popup appears at the top right whenever you earn one. The conditions below are the game's official achievement descriptions, published for its PC edition; every achievement named here also pops up in this mobile version. Several depend on how you play, so read them before you start.
- Before you start, decide whether you want the four play-style achievements. They are awarded together when the Bonus Chapter ends, and only if both the main game and the Bonus Chapter were played this way: Puzzle Lover (no mini-game skipped), Messiah of Light (no hints used at all), Strong will (no hints used in the hidden-object scenes) and History Buff (no dialogue or video skipped). So never press Skip or Hint, and let every conversation and cut-scene play to the end.
- Lightning: finish any mini-game in under one minute. In our recording it popped up right after the forest path maze in Chapter 1.
- Clever: solve three mini-games in a row without pressing Skip.
- Specialist: solve the rune disc held by the stone goddess at the druid gate (Chapter 1) in under two minutes.
- Handyman: solve the Stones of Dreams board in the druid's house (the official list calls it the dreamcatcher) in fewer than 35 moves. Work out where each ball must go before you press an arrow.
- Erudite: solve the Hexagon Rune Board at the totem (Chapter 2) in under one minute. Read its rules in the Chapter 2 section first, then play it straight through.
- Brilliant: solve the Stag Ball Puzzle hidden in the town alley wall (Chapter 3) in fewer than 60 moves.
- Skillful: solve the chip map in the tower (Chapter 3) on your first attempt. Plan a route that uses every road once before you move the chip.
- Supersonic: finish any hidden-object scene in under two minutes.
- Expert: the official list says to finish the main chapter on Hard difficulty. Neither mobile recording shows a difficulty choice, and in both the Expert popup appears together with the "You have completed the main game!" message, so on this version it appears to come with finishing the main game.
- Collection achievements: Florist (all 7 flowers), Treasure hunter (all 8 wolf figurines), Predictor (all 7 tarot cards), Collector (all 8 medallions), Master of Details (all 30 morphing objects) and Antiquarian (all 13 goblets in the Bonus Chapter). The Collectibles sections list where every one is.
- Virtuoso: solve the Ruby lock of the Three-Gem Door in the Bonus Chapter (all three rounds of red beams) in under two minutes.
- Unstoppable: solve all 20 levels of the Bonus Game in Extras.