Case File evidence and the two endings
Every chapter has a Case File corkboard with five evidence photos, 40 in total. How many you hold when you open the final door in Chapter 8 decides which ending you see.
- Evidence is recorded when you examine certain objects: a polaroid pops up, the screen flashes white and that chapter's Case File counter rises (for example 'Chapter 1: Bitter Memories (2/5)'). Most entries come from actions you must do anyway, but several come from optional taps that are easy to skip; this guide flags every one of them. Collect all 40 before you open the steel door at the end of Chapter 8 to get the true ending; with fewer you get the bad ending (see the Endings section at the end of the guide). Many puzzles also offer a 'Skip for 3' badge button; the guide gives the real solution for each of them instead.
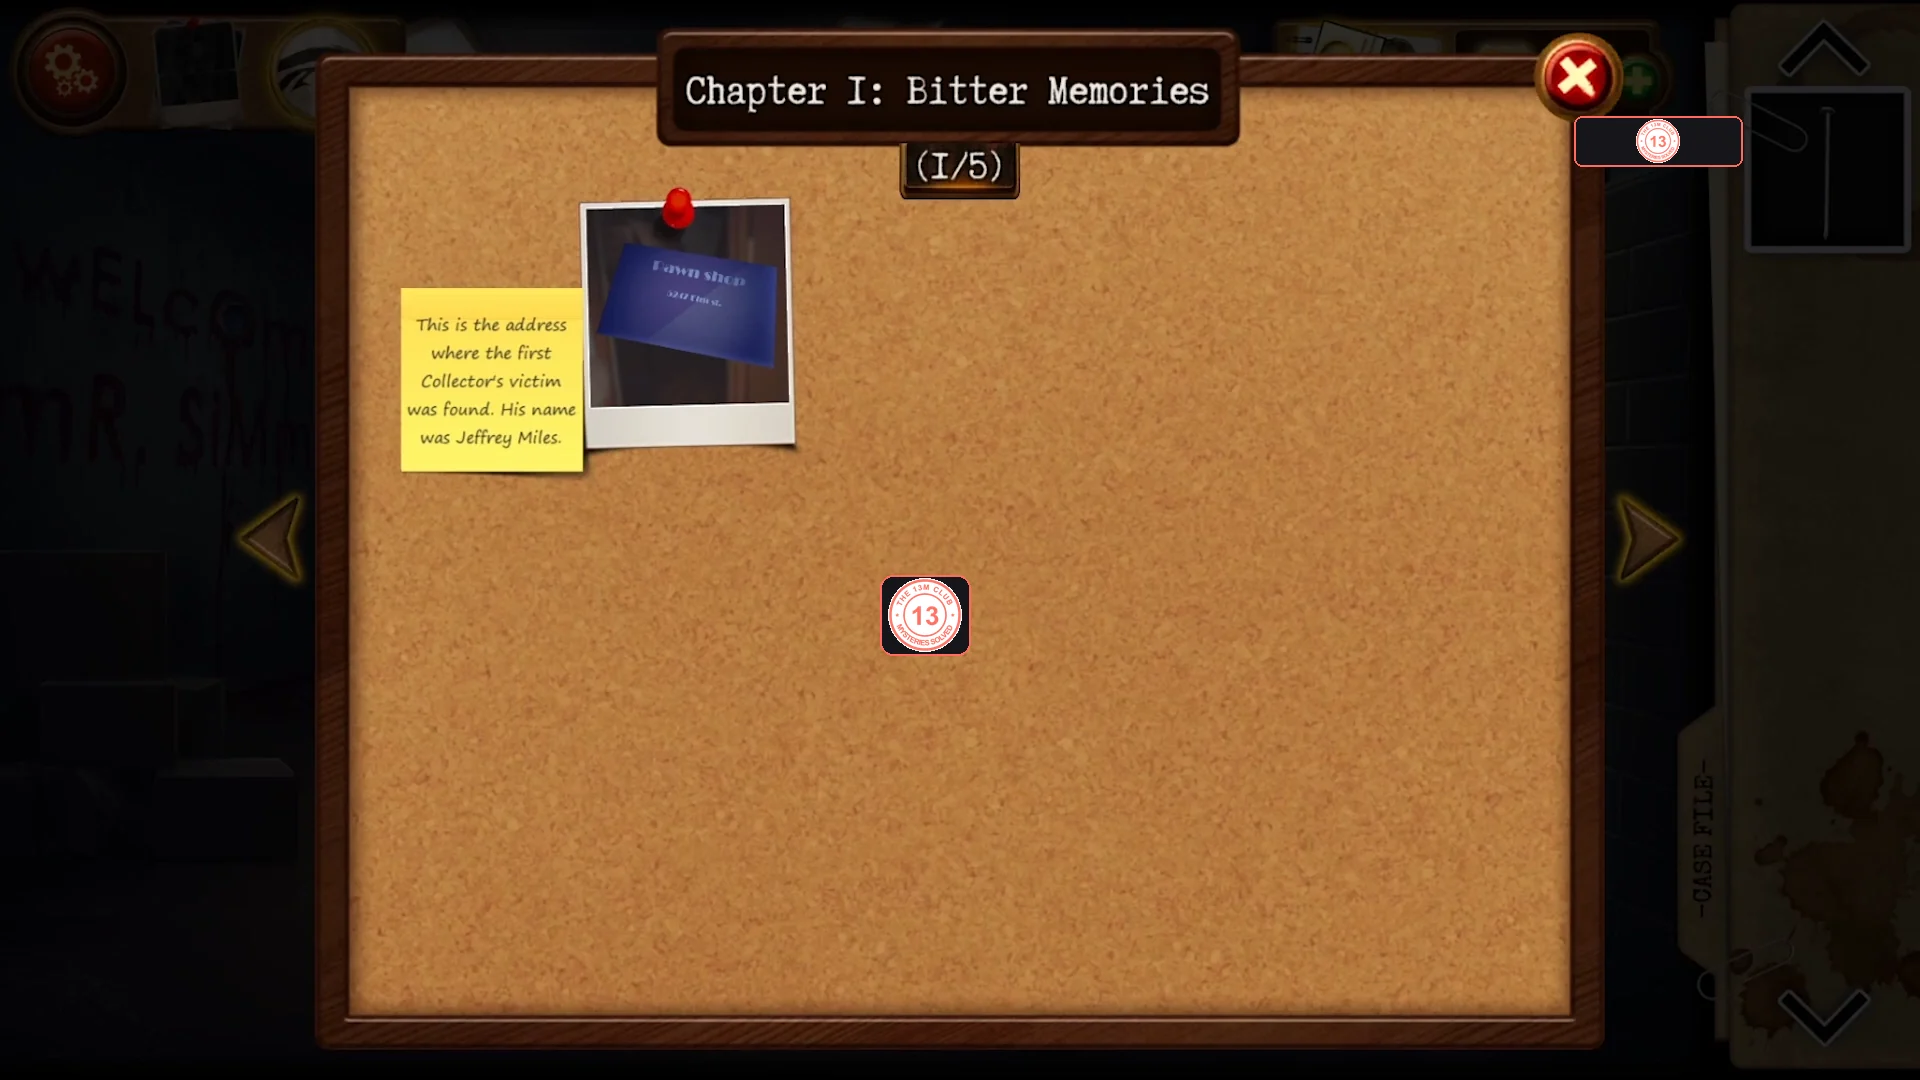
The Case File board. Each chapter has its own board and counter; here Chapter 1 shows its first entry (1/5).
Locker hallway: blood circle, floor hatch and the locker safe
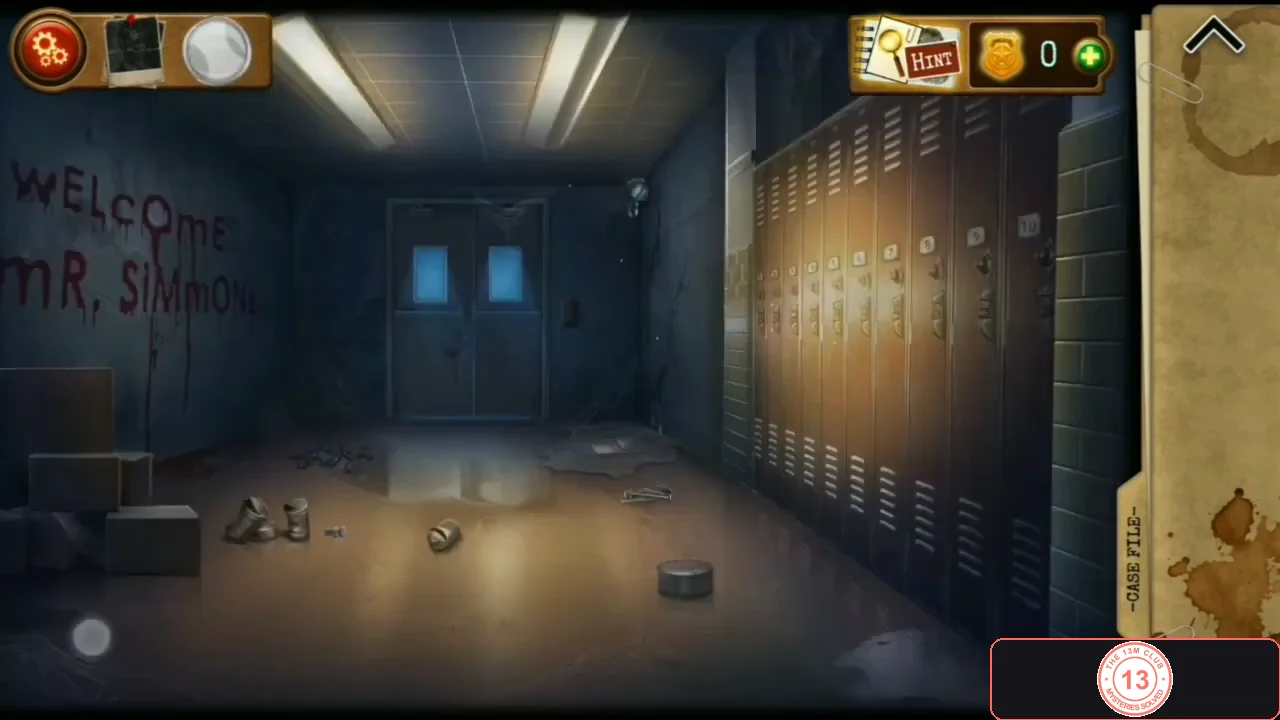
A school hallway with lockers 1-10, a keypad on the double door and 'WELCOME MR. SIMMONS' on the wall. Collect the loose hardware, dig Locker key 4 out of the blood circle, mop the puddle to reach a floor hatch with Locker key 7, and open the safe in locker 4 with the pawn shop number.
- From the main menu choose New game and click through the opening comic (Chapter I: Bitter Memories). When the 'Tutorial?' box appears in the hallway, choose No to skip it or Yes to play it. Pick up the Nail from the floor in front of the lockers and the Bolts lying in the middle of the hallway.
- Take the Can lid from the open tin can on the hallway floor.
- Zoom into the blood-red circle painted on the left wall ('Damn, it's blood...'). Use the Can lid on the plaster inside the circle to scrape it away, revealing a blue tin. Open the tin and take Locker key No. 4.
- Open the view of lockers 1-5 on the right wall and use Locker key 4 on locker 4. Inside are a wall safe with a keypad (you need its code later) and a Mop and bucket; take the Mop and bucket.
- Back in the hallway, use the Mop and bucket on the puddle in the middle of the floor. This exposes a metal floor plate with a handle and two empty bolt holes.
- Zoom into the floor plate. Use the Bolts on the two empty holes so all four corners have screws, then use the Nail on the plate. The plate slides open; take Locker key No. 7.
- Open the view of lockers 6-10 and use Locker key 7 on locker 7 (skull sticker). Inside are a satchel, a note on the door and a blue card. Click the blue card: 'Pawn shop / 5247 Elm st.' ('That's where we found your first victim.'). This is Case File entry 1.
- Return to lockers 1-5, open locker 4 and zoom into the electronic safe. Enter 5247, the pawn shop's street number. Take the Hammer head, the Hammer handle and the Battery, then combine the Hammer head and Hammer handle in the inventory to make a Hammer.CODE5247
Locker 7: torn photo and the hallway door code
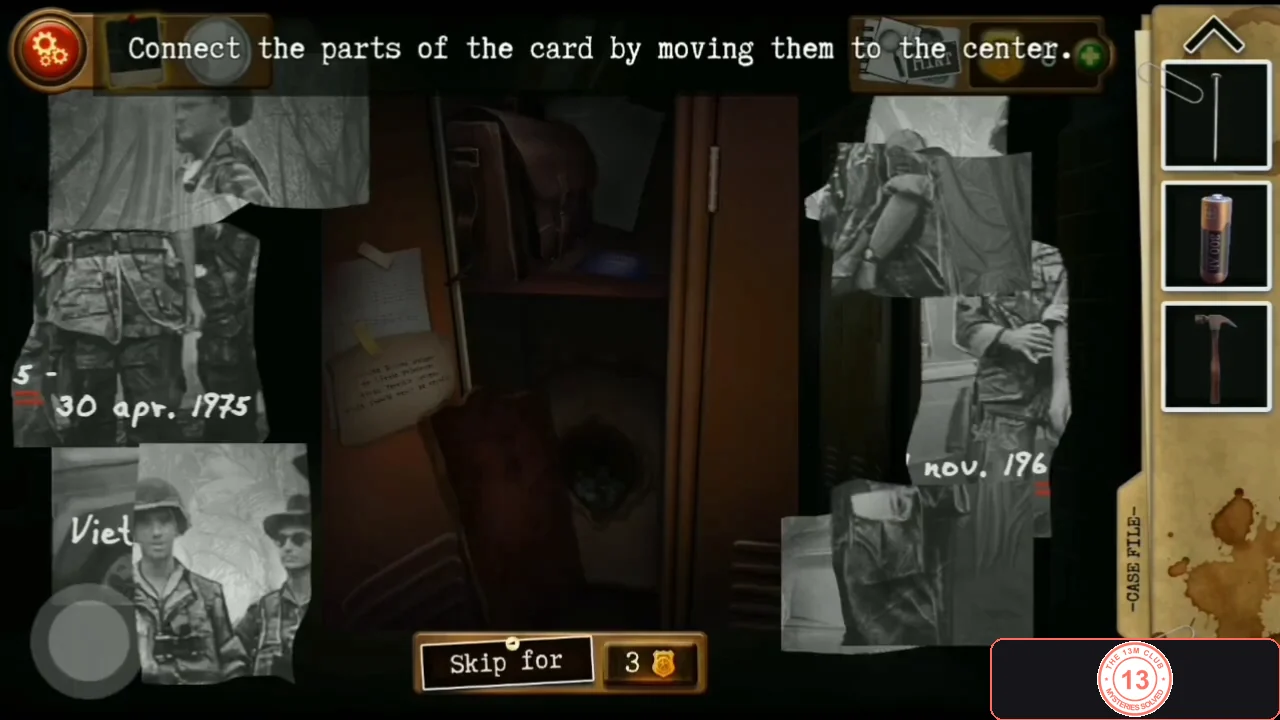
Break through the back of locker 7 with the hammer, reassemble a torn photograph, and use its date on the keypad of the hallway double door.
- Go back to locker 7 and use the Hammer on the cracked back wall of the locker. Torn photo pieces appear behind it.
- Puzzle 'Connect the parts of the card by moving them to the center': drag the torn pieces together until they form one black-and-white photo of soldiers. The finished photo reads 'Vietnam / nov. 1965 - 30 apr. 1975'. The year you need is the first one, 1965.
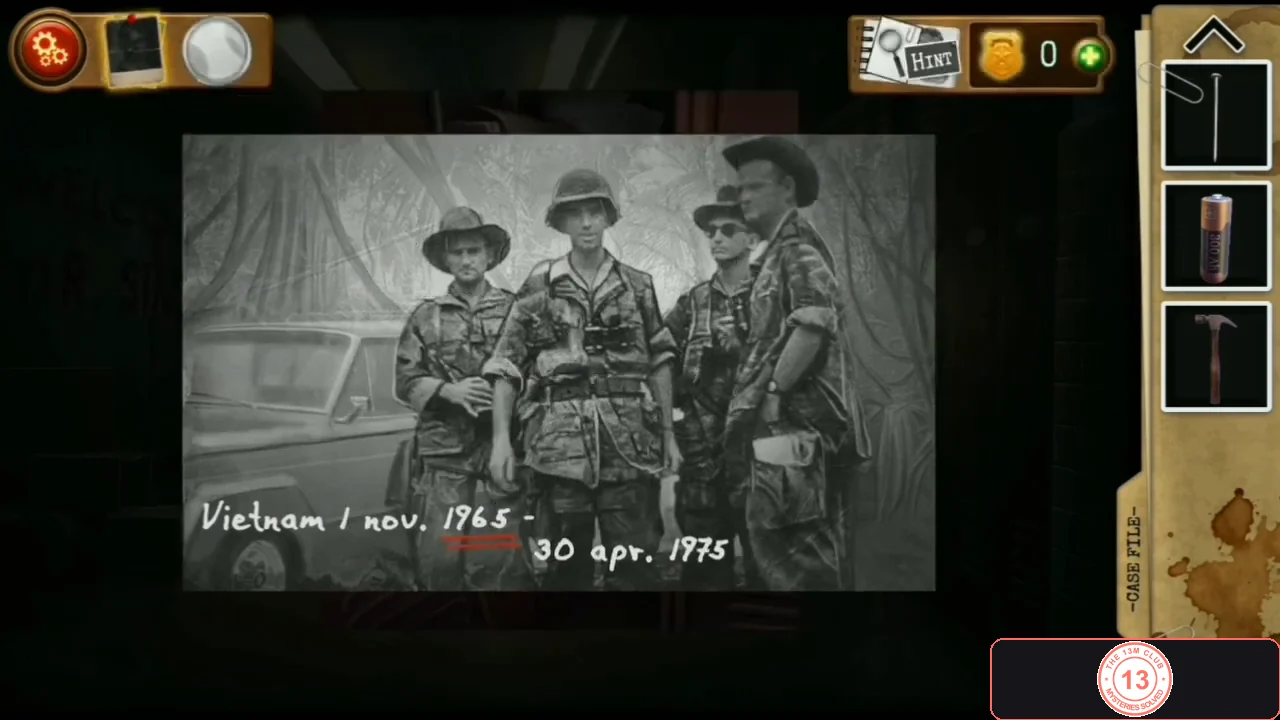
Completed photo. The door code is the first year, 1965. - Read the note pinned inside the door of locker 7: 'White Ravens whisper to Little Princesses those Terrible Secrets that should never be revealed'. It is the clue for two boxes in the workshop.
- Zoom into the keypad beside the double door at the end of the locker hallway and enter 1965. The light turns green and the door opens into a carpeted corridor.CODE1965
Painting corridor: Four Horsemen keypad
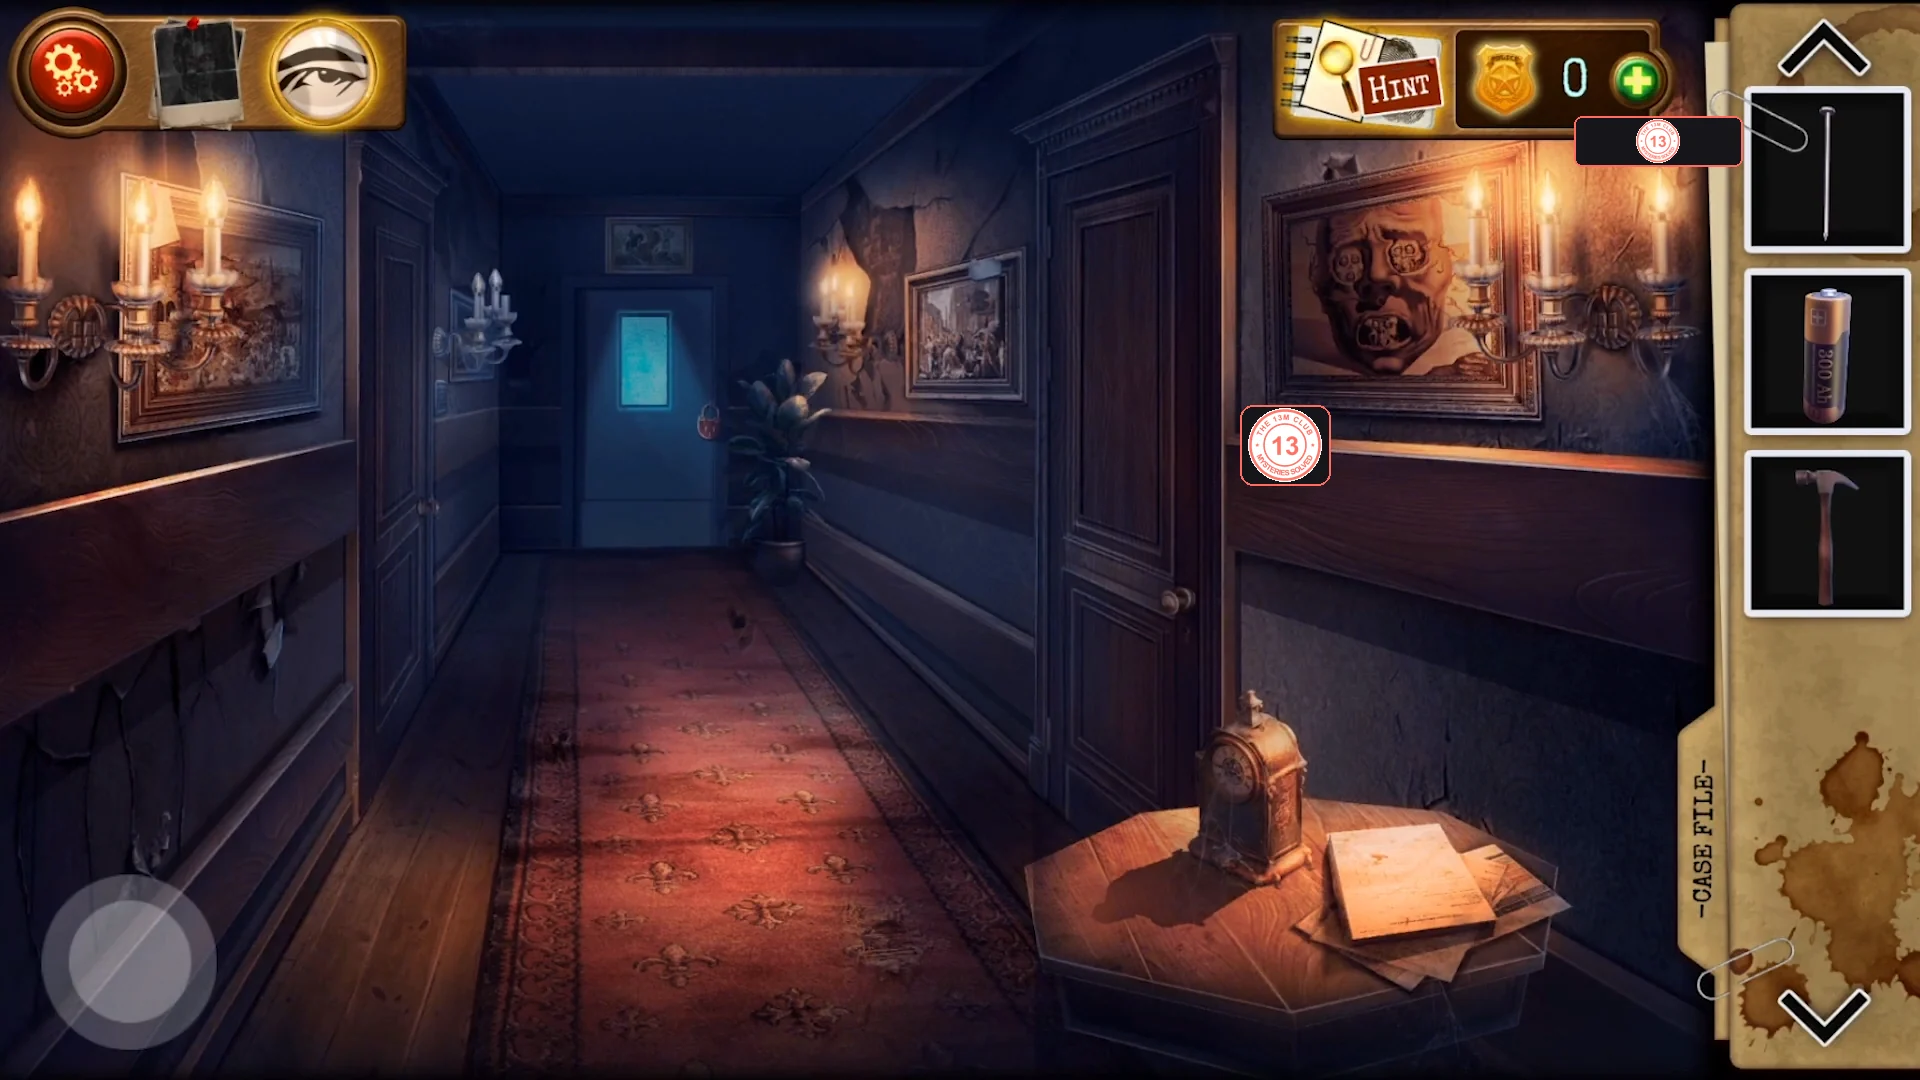
The corridor has four small paintings with numbers on them and a large Four Horsemen painting. Order the numbers by the horsemen to open the keypad door to the workshop.
- Easy to miss (Case File entry 2): zoom into 'The Death of Seneca' (5 on the pillar) and click the folded paper corner sticking out at the right edge of the frame. The painting swings aside and reveals a polaroid labelled 'CAM 3' (a red-haired man seen from behind). Click it to add the entry ('Hank, my partner... Damn, why hadn't you waited for me?!'). No puzzle needs it, so it is easy to walk past.
- Read the numbers on the four small paintings: 'Plague of Ashdod' 8, 'The Face of War' 2, 'Great Famine' 7 and 'The Death of Seneca' 5. Then zoom into the large Four Horsemen painting. The riders carry emblems for Pestilence (biohazard sign), War (crossed swords), Famine and Death. Read the riders from right to left - Pestilence, War, Famine, Death - and take each one's painting number: 8-2-7-5. Enter 8275 on the keypad of the corridor door to enter the workshop.CODE8275
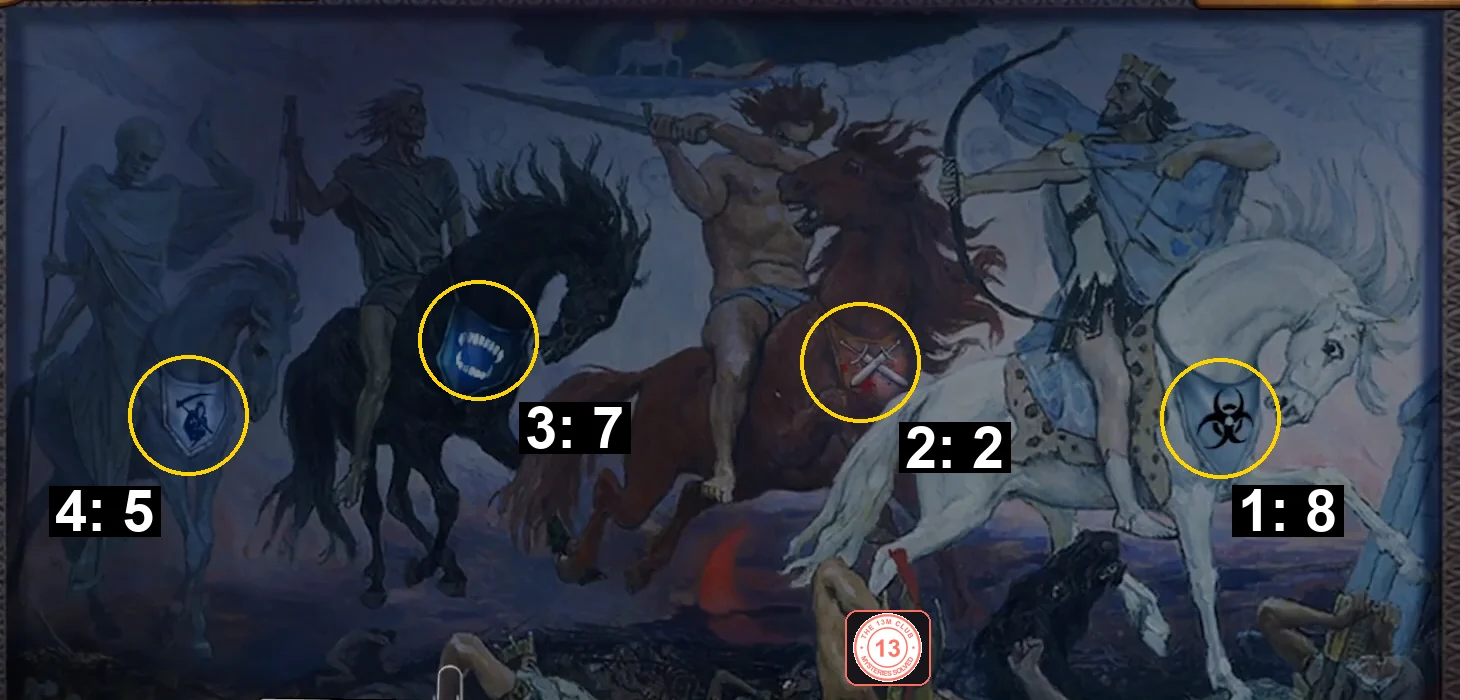
Read the riders right to left by their emblems: Pestilence 8, War 2, Famine 7, Death 5 - code 8275.
Workshop: remote, scratch ticket and the letter box
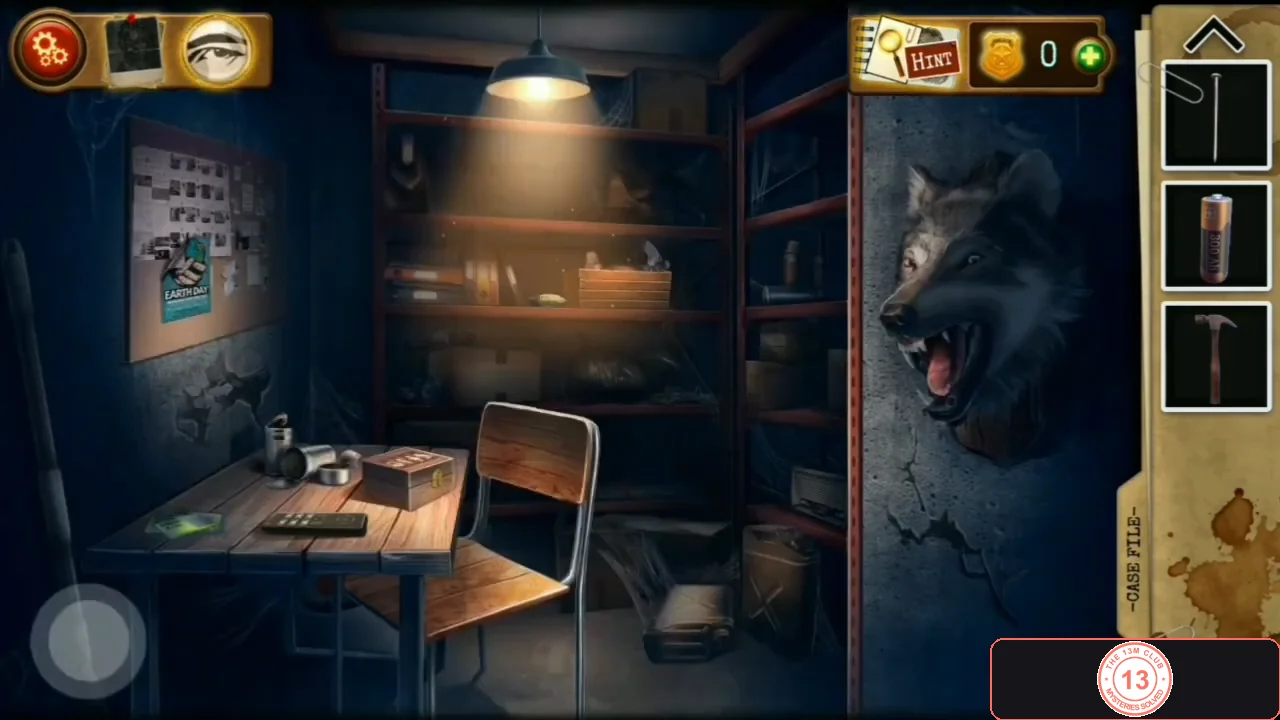
In the workshop, power the remote, scratch the Black Rose ticket, take the light bulb, and solve the letter box hidden in the toolbox to get the first wolf fang.
- Easy to miss (Case File entry 3): zoom into the lottery tickets on the desk. Move the top 'YOU LOSE' ticket aside, then use the Nail on the grey coating of the 'Black Rose' scratch ticket to reveal a black rose ('You left the same tickets at the body of each of your victims'). The ticket is not needed for anything else.
- Take the Light bulb from the middle shelf. Zoom into the TV remote on the desk and put the Battery into its open compartment; the Remote control goes into your inventory.
- Zoom into the toolbox on the shelf and move the bottle, ball, pliers, scissors, spool and other clutter aside to uncover a wooden box with a 3x3 letter grid (W A I / R H E / V T N). Puzzle 'Make two words using the symbols below the letters': each outline below the grid is the shape of a letter's position, pigpen style. The words are WHITE and RAVEN, as in the locker note. Select W-H-I-T-E, then R-A-V-E-N. The box opens; take the Upper fang.CODEWHITE RAVEN
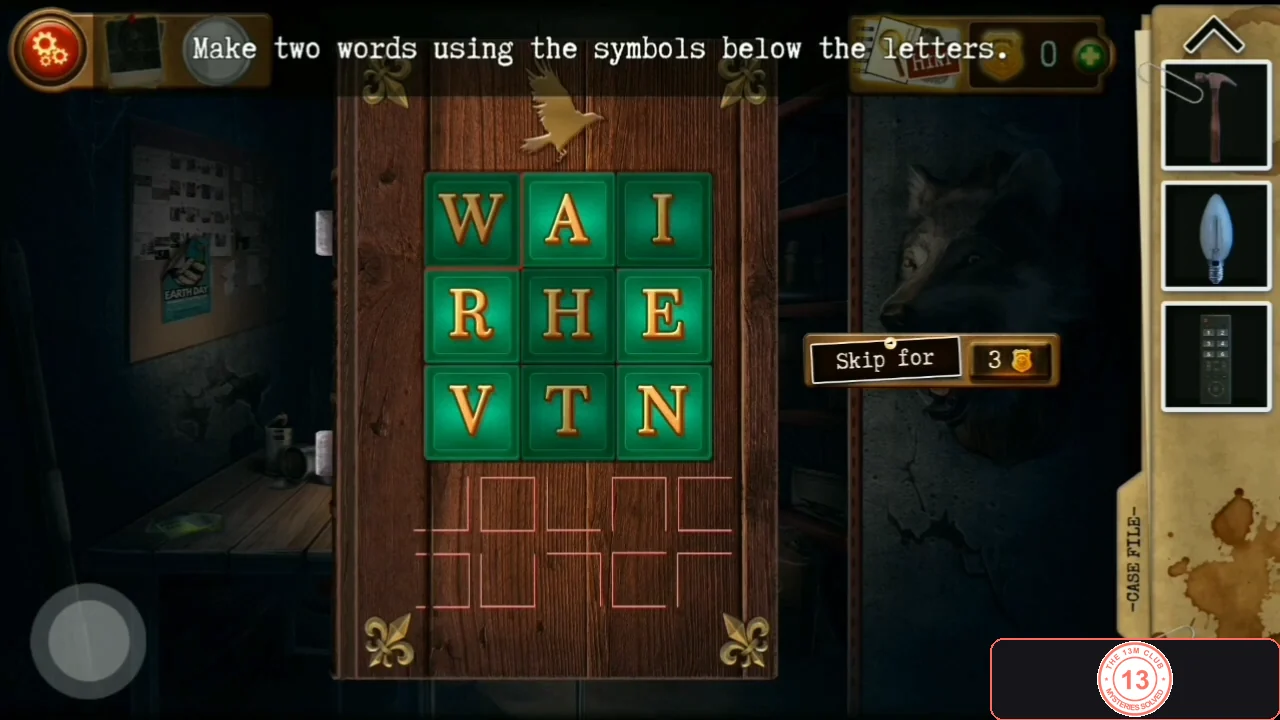
The letter box. Each outline below the grid marks one letter's position; together they spell WHITE and RAVEN.
Workshop: symbol box and the wolf head
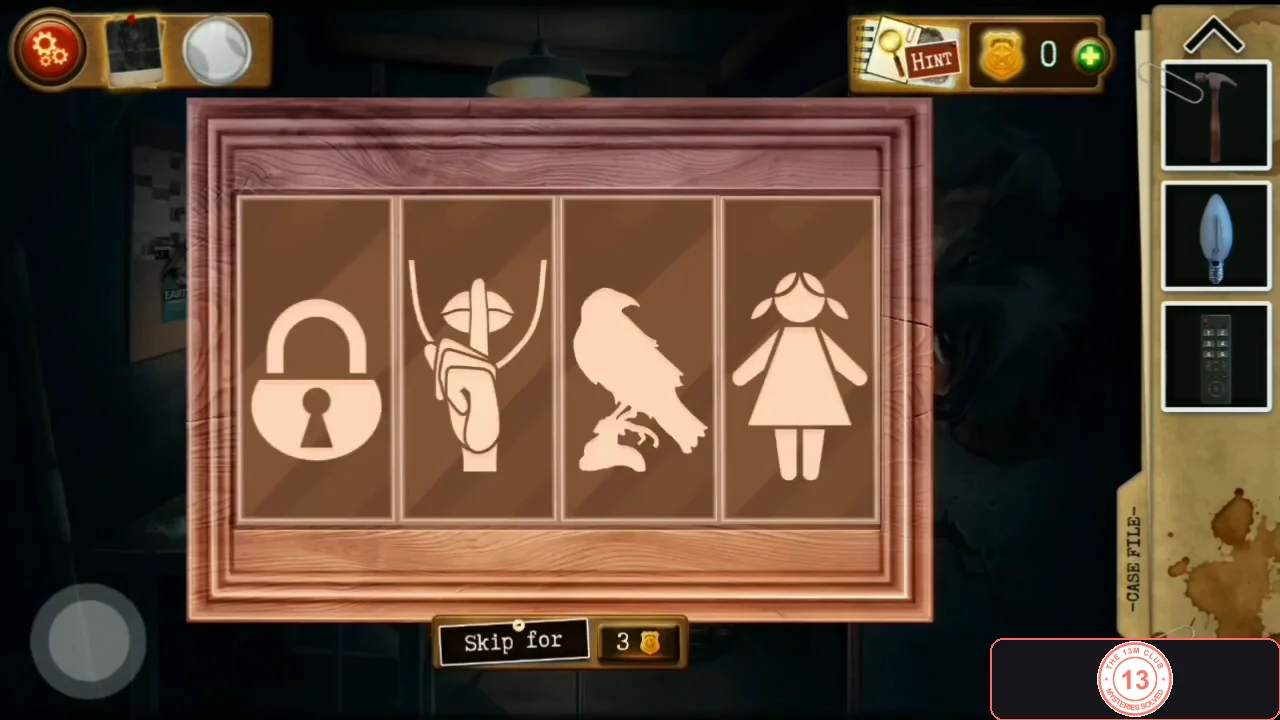
Solve the four-picture box on the desk using the locker note, then put both fangs into the wolf head to move the Four Horsemen painting.
- Zoom into the small box on the desk. Puzzle 'Click on the squares and put the correct sequence of drawings': clicking a square cycles its picture. Follow the locker note word by word - White Ravens / whisper / Little Princesses / Terrible Secrets - and set, from left to right: raven, figure holding a finger to its lips, doll, padlock. The box opens; take the Lower fang and the Door key.CODEraven, hush, doll, padlock
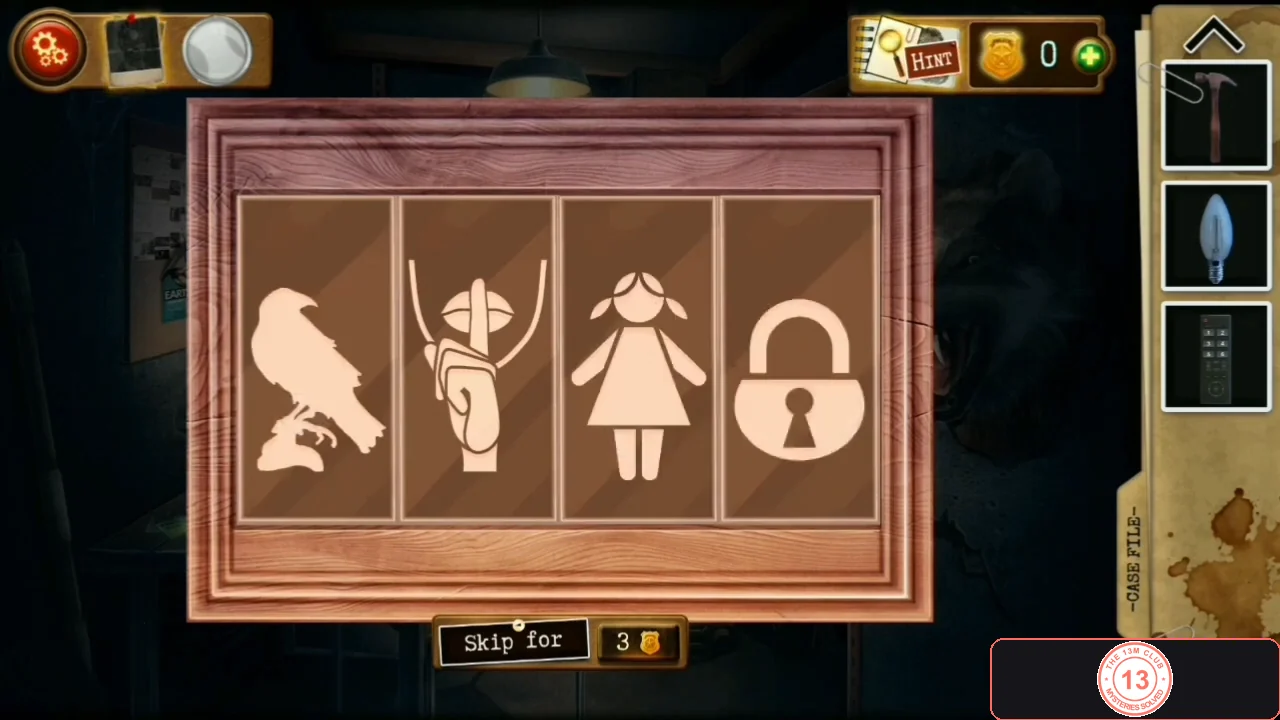
Solved order from left to right: raven, hushing figure, doll, padlock. - Click the wolf head on the right wall ('There are missing fangs in the mouth') and use both fangs on its mouth. 'Looks like something moved in the hallway': the Four Horsemen painting in the corridor is now tilted, but it hangs too high to reach for now.
The cell: toilet, crowbar and the hidden symbol safe
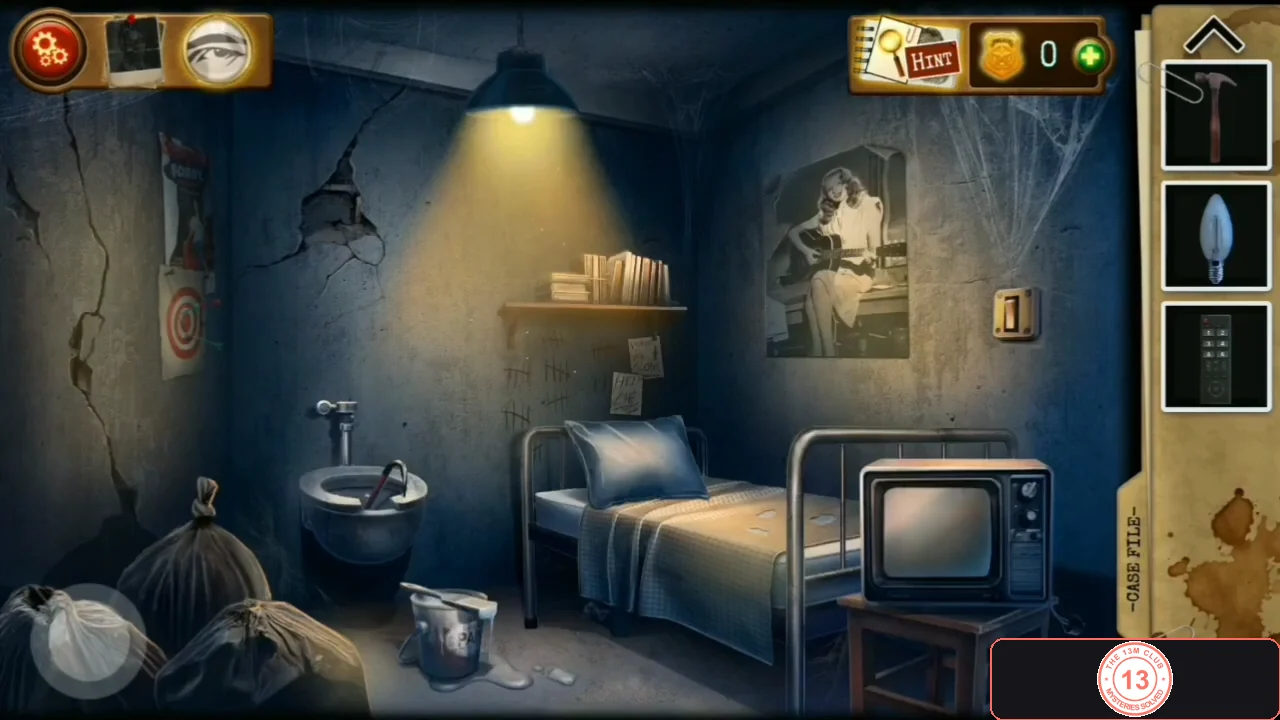
Unlock the side door in the corridor to reach a cell with a bed, toilet and TV. Drain the toilet for a crowbar, break the cracked wall to find a safe with four symbol dials, and switch off the light to see symbol I.
- In the corridor, use the Door key on the side door to enter the cell ('There's a crack in the wall...').
- Look under the bed and take the Toilet handle. Zoom into the toilet (dirty water with a crowbar in it, flush pipe without a handle) and use the Toilet handle on the flush pipe. The water drains; take the Crowbar ('It can be useful.').
- Use the Crowbar on the crack in the left wall (above the target). The plaster breaks and reveals a small safe with four symbol dials ('I have no idea what to enter here. I'll look for all the symbols.'). You need four symbols numbered I-IV; the other three are found in the next sections.
- Flip the light switch on the right wall. In the dark, glowing writing appears - 'I am always one step ahead' with a rose - and on the left wall a symbol marked I. Remember its shape, then switch the light back on.
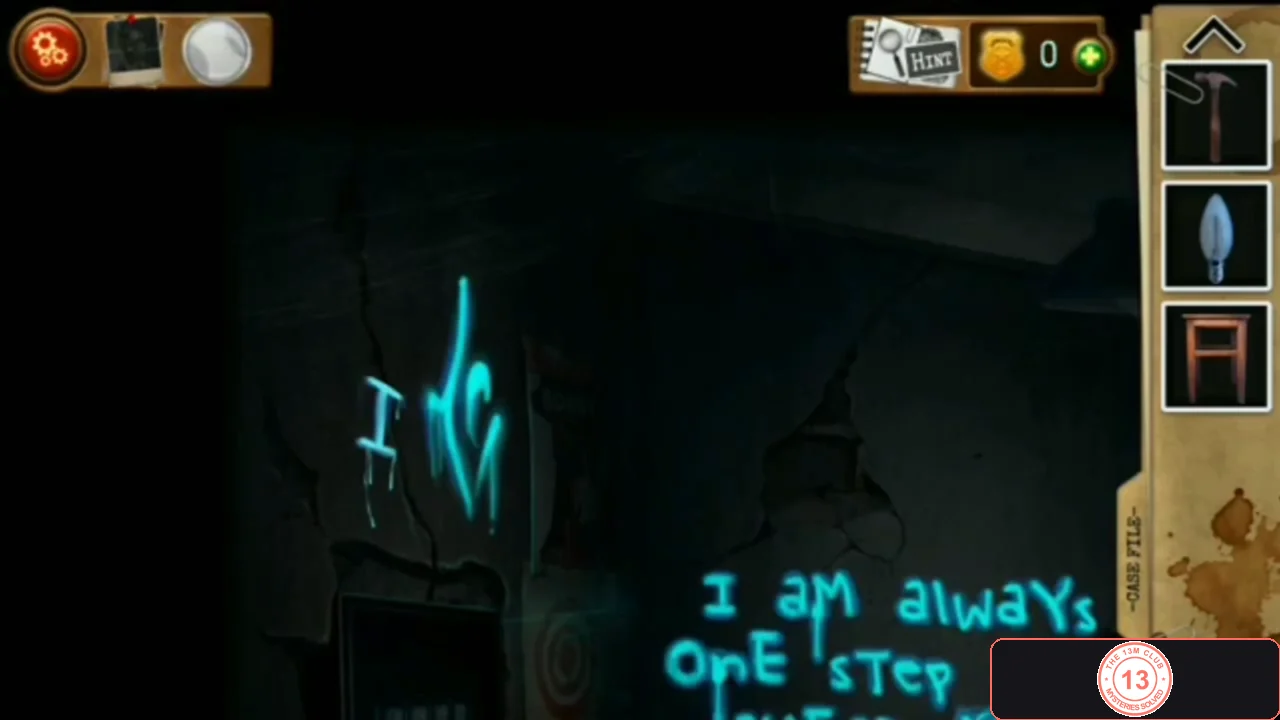
With the light off, symbol I glows on the left wall. Note its shape for the safe.
The cell: TV number sequence
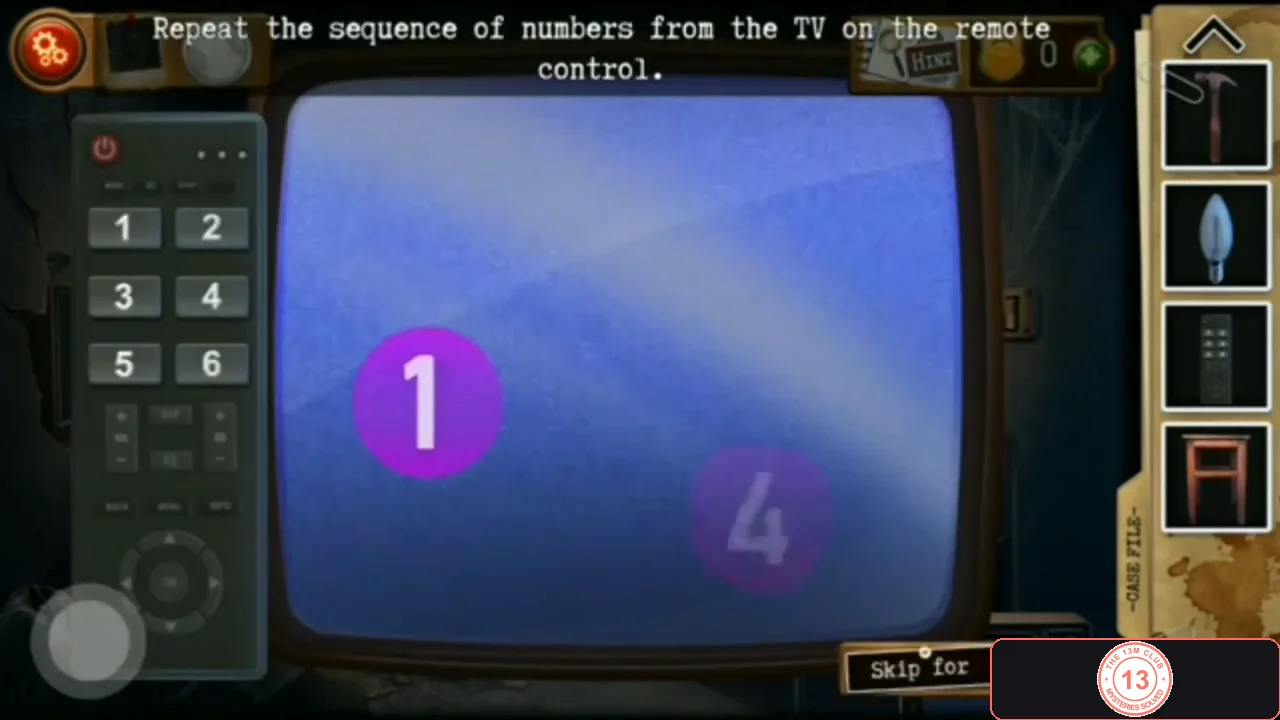
Lower the TV so it reaches the socket, plug it in and repeat the number sequences on the remote to reveal symbol II.
- Zoom into the TV on the stool ('The cord will not reach, I need to put the TV lower'). Take the Stool; the TV goes to the floor next to the socket. Click the plug to put it into the socket.
- Use the Remote control on the TV. Puzzle 'Repeat the sequence of numbers from the TV on the remote control': coloured numbered circles appear one at a time; press the same digits on the remote in the same order. The digits are random in every playthrough and there are several rounds, so watch each round and copy it rather than using a fixed code. After the last round the static clears and shows a figure symbol marked II.
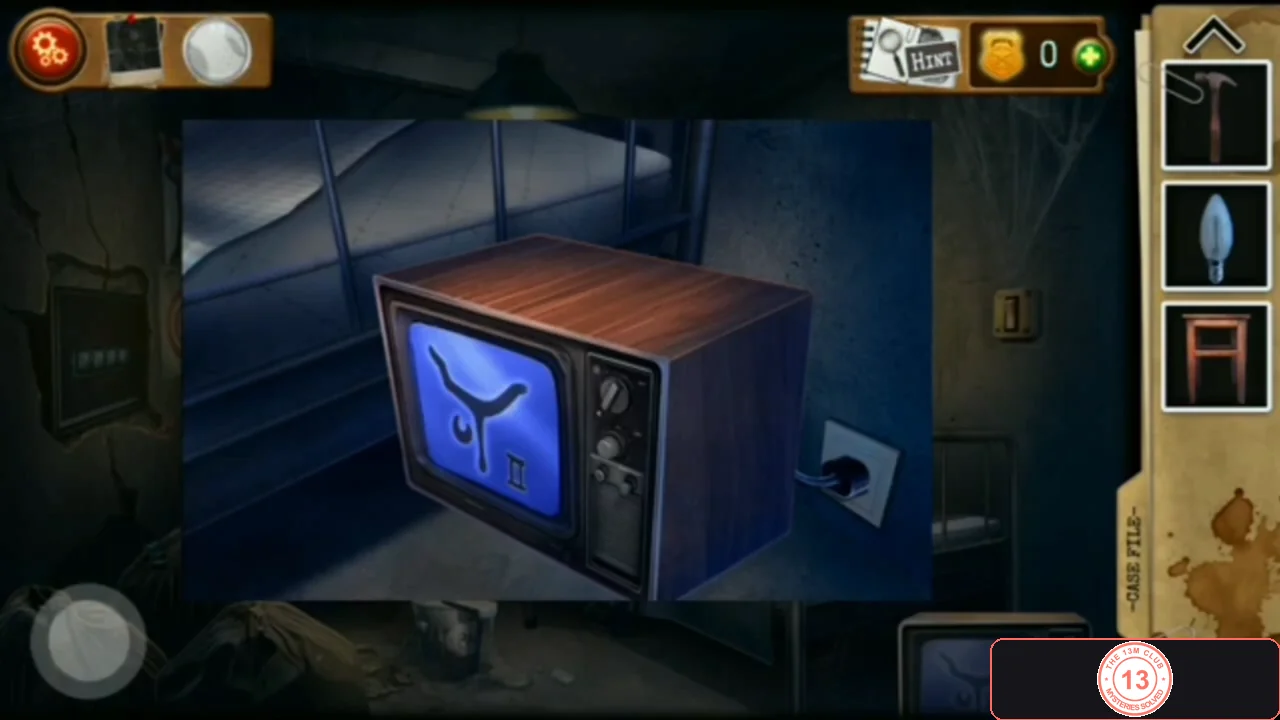
After the last round the TV shows symbol II.
Corridor: skull panel behind the Four Horsemen
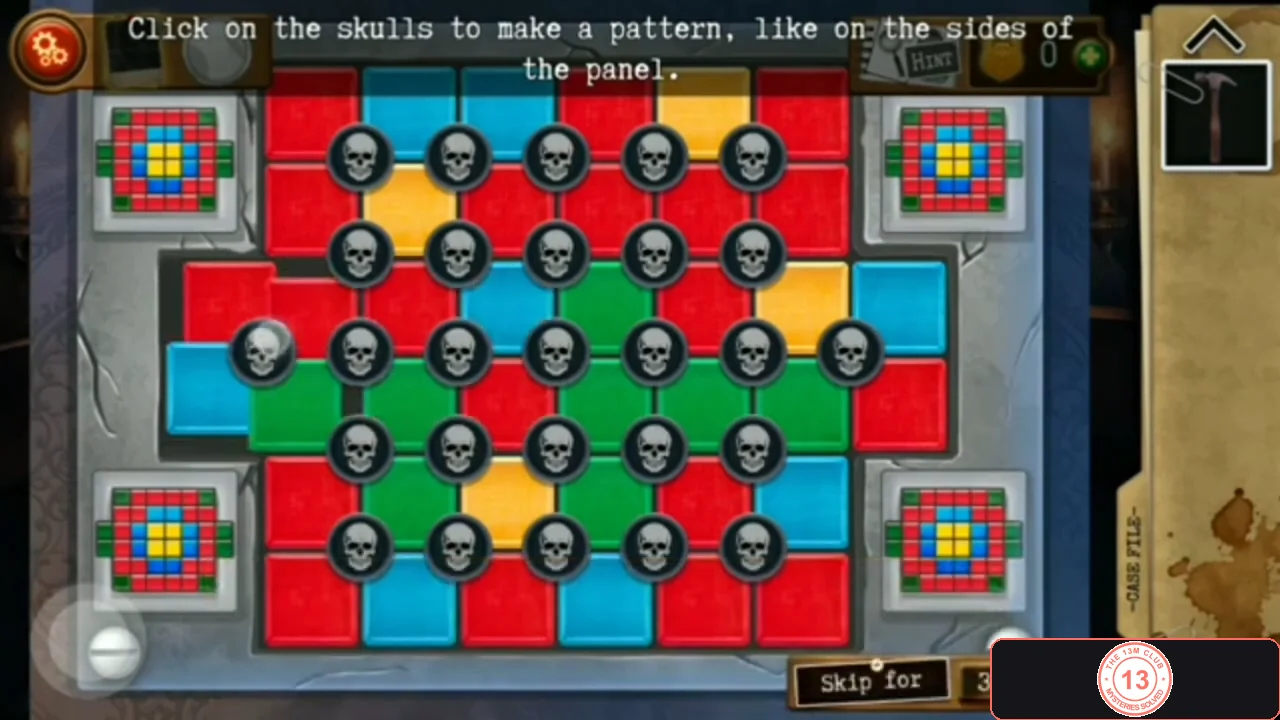
Light the corridor and use the stool to reach the tilted painting. Solve the skull colour panel behind it, then smash the glass case for the big key and symbol III.
- In the corridor, use the Light bulb on the empty lamp at the far end so the area is lit, and use the Stool on the floor below the tilted Four Horsemen painting.
- Click the painting; it slides aside to reveal a panel ('Click on the skulls to make a pattern, like on the sides of the panel'). Clicking a skull rotates the four coloured tiles around it by one place. The target is shown by the small patterns in the panel's corners: a yellow 2x2 block in the centre, a diamond-shaped ring of eight blue tiles around it, red tiles everywhere else in the main grid, and green tiles in the four corners plus the two tiles that stick out on each side. Work from the outside in: put the green corner and side tiles in place first, then the red frame, then the blue ring, and finish the yellow centre block with the middle skulls. Four clicks on the same skull bring its tiles back to where they started. When the pattern matches, the panel opens.
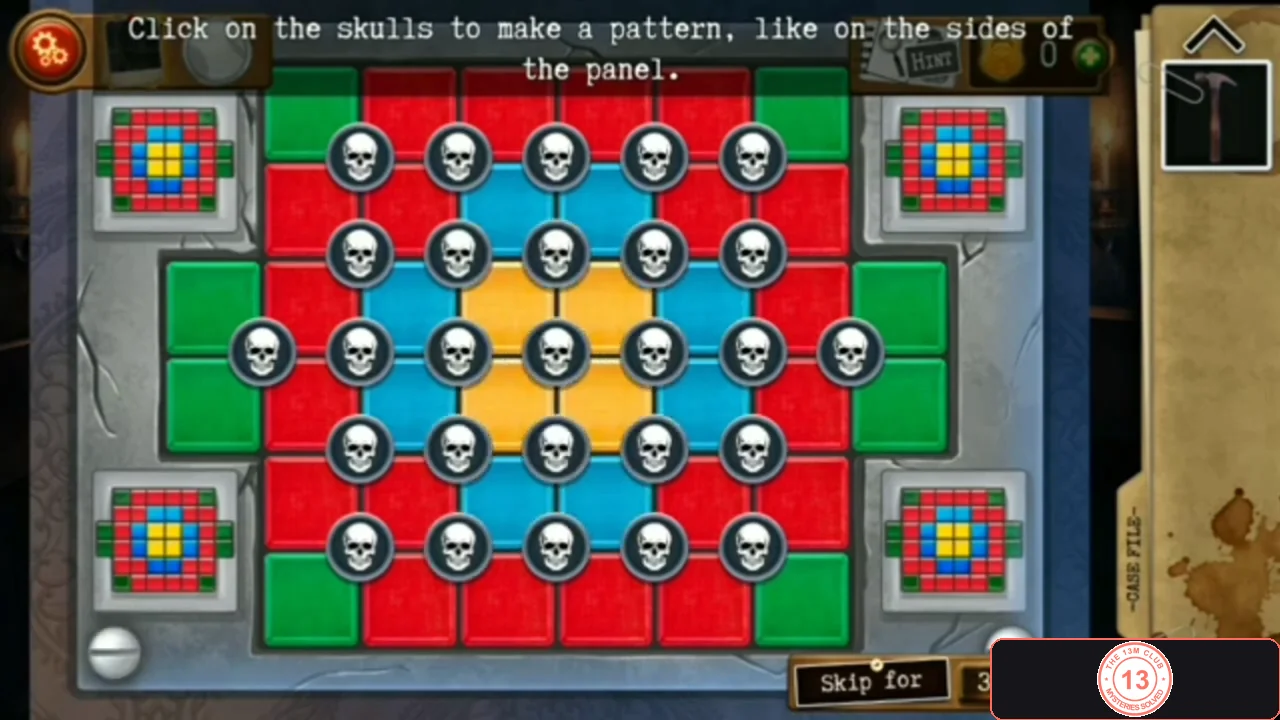
The finished pattern just before the panel opens: yellow centre block, blue ring, red frame and green corner and side tiles, as in the small corner patterns. - Use the Hammer on the glass case. Take the Old big key and look at the note under it: a red figure symbol marked III.
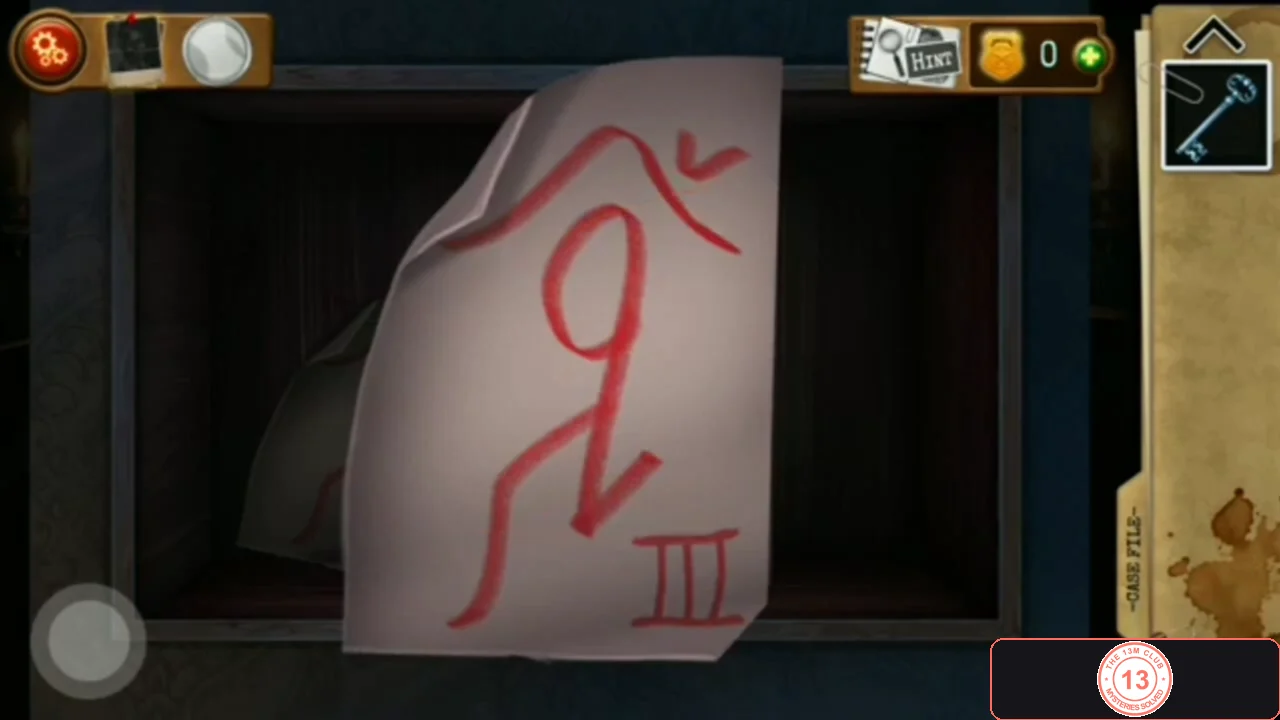
Symbol III on the note under the Old big key.
Bathroom: Hank, the hidden camera and the lever panel
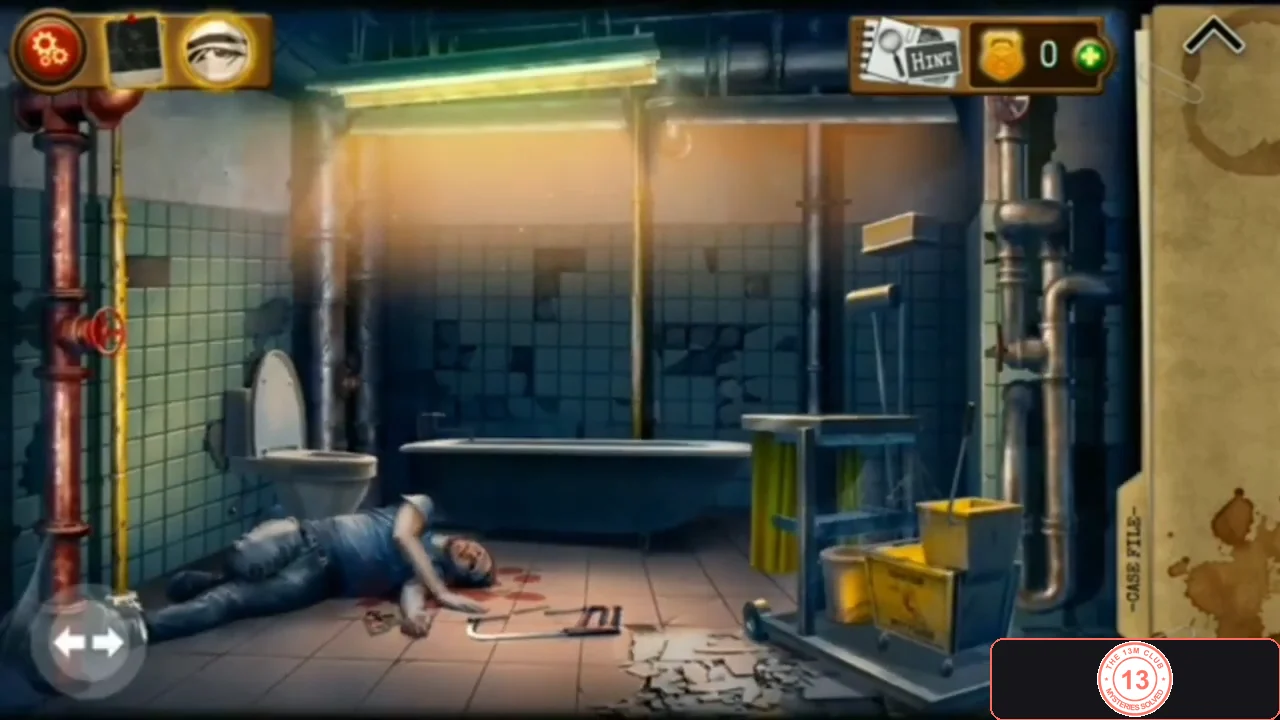
The far door leads into a bathroom that locks behind you. Find symbol IV on Hank's body, shoot the mirror and cut the hidden camera, then turn all the levers vertical to open the door.
- Use the Old big key on the door at the far end of the corridor and go through. The door shuts behind you and the bathroom is locked until you solve the lever panel.
- Zoom into Hank's head ('Damn, Hank... I'm sorry I didn't come in time...') and click the object in his eye socket: a small scroll unrolls with a symbol marked IV.
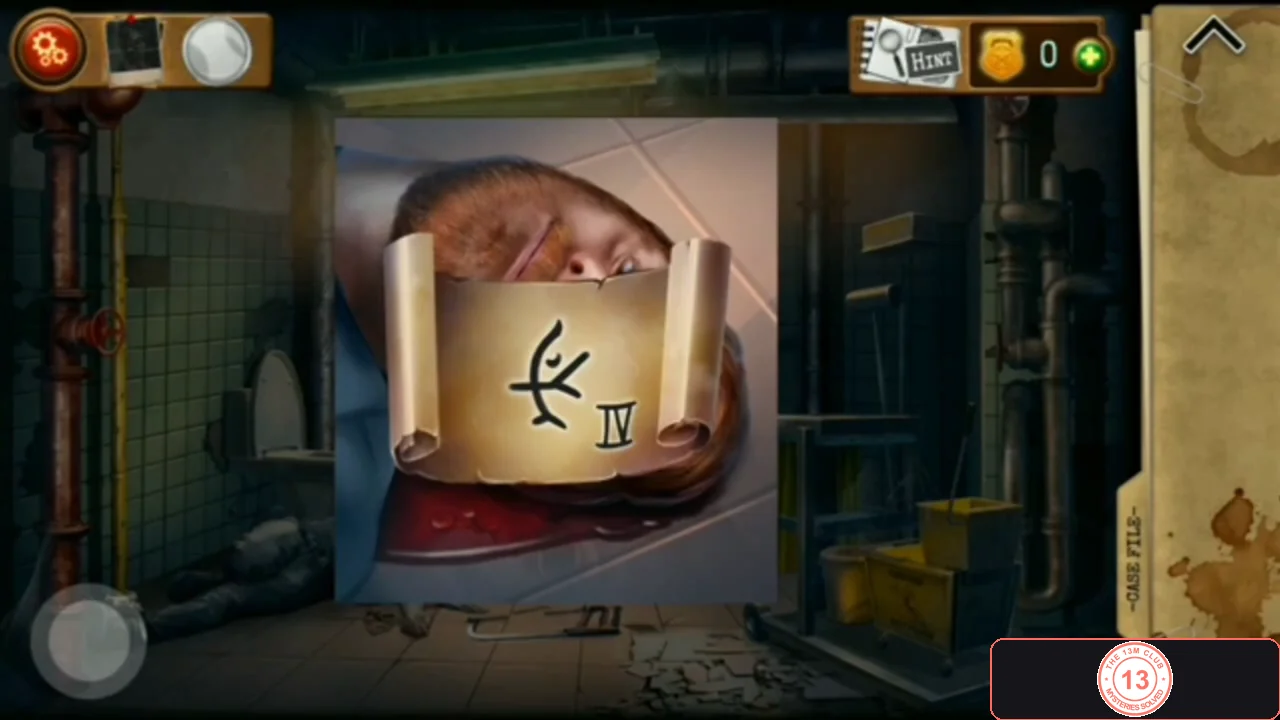
Symbol IV on the scroll from Hank's eye. - Pick up the gun Magazine under the leaking pipe by the toilet and the Gun from the garbage bag in the bathtub ('Hell... it's empty'). Open the toilet cistern lid and take the Wire cutters. Combine the Gun and Magazine into a Loaded gun. The photos on the floor read 'Turn only horizontal', a hint for the lever panel.
- Turn left to the sinks and the big mirror ('Mirror like in interrogation rooms? There is something behind it...'). Use the Loaded gun on the mirror, then zoom into the hole and use the Wire cutters on the hidden video camera's cable ('Well, you've left another mark, dear.'). This is Case File entry 4.
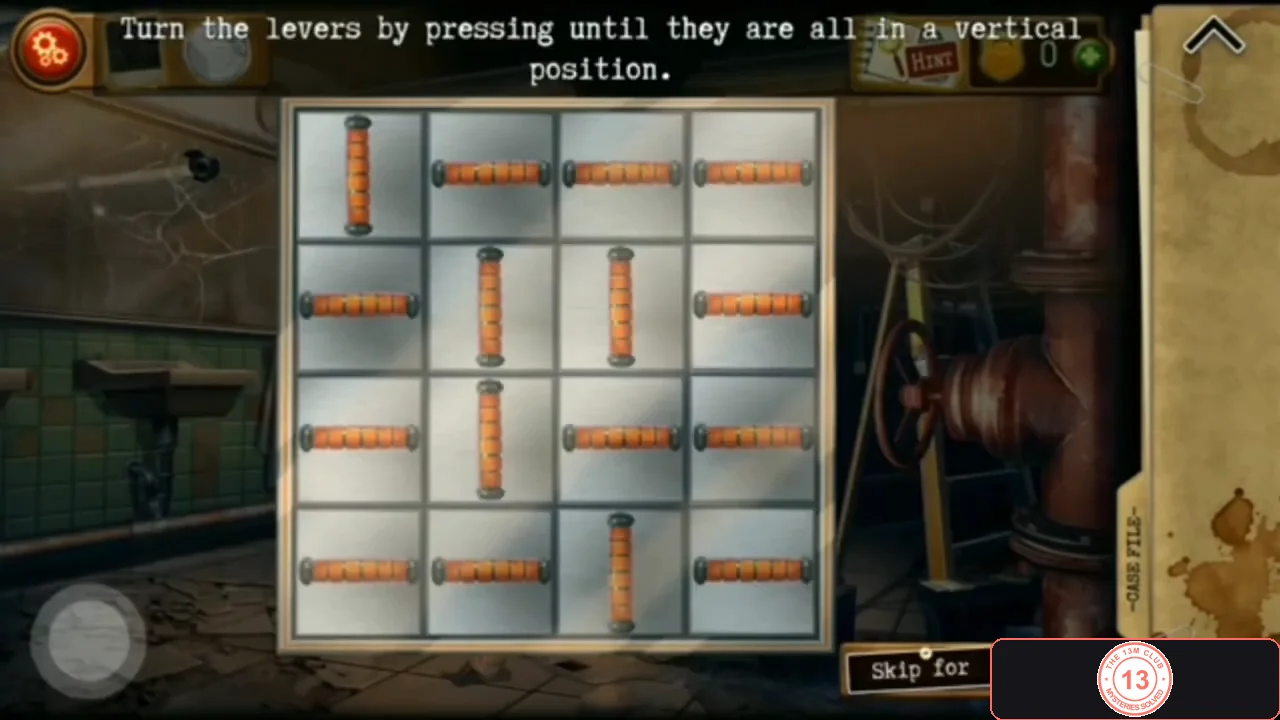
Example starting layout of the lever panel. Your layout may differ; use the row-and-column method. - Open the lever panel beside the door. Puzzle 'Turn the levers by pressing until they are all in a vertical position': pressing a lever flips it and every other lever in the same row and the same column. The starting layout differs between playthroughs. Method: to flip a single horizontal lever and nothing else, press all seven levers in its row and column, including itself. Do that for each horizontal lever; if a lever would be pressed twice, skip it instead, because two presses cancel out. When all 16 levers are vertical the door opens.
The cell: opening the symbol safe
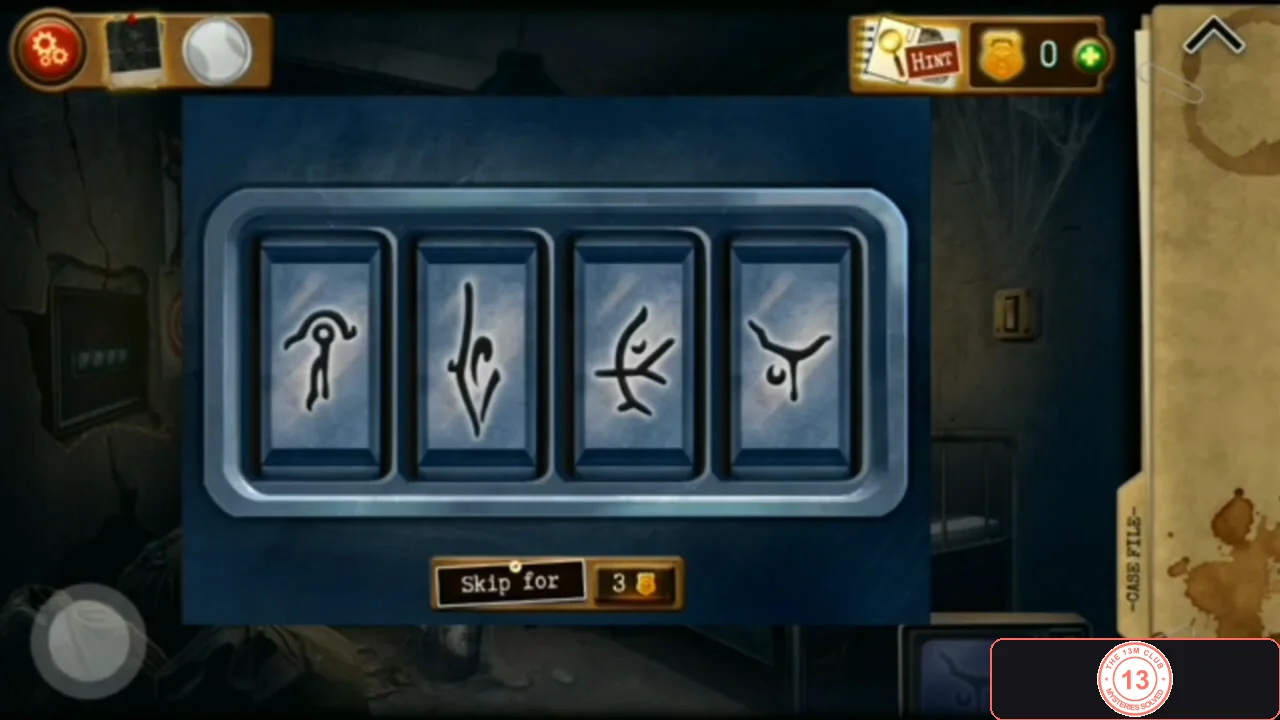
Back in the cell, set the four dials to symbols I, II, III and IV, in that order, to open the safe and end the chapter.
- Return to the cell and zoom into the safe in the left wall. Click each dial to cycle its symbol and set, from left to right: the symbol from the dark wall (I), the TV symbol (II), the symbol on the note under the big key (III) and the symbol on Hank's scroll (IV). The safe opens to show a jar with an eye and a note: 'That is my gift to you, detective. You should start your own collection'. This is Case File entry 5 and the chapter ends.
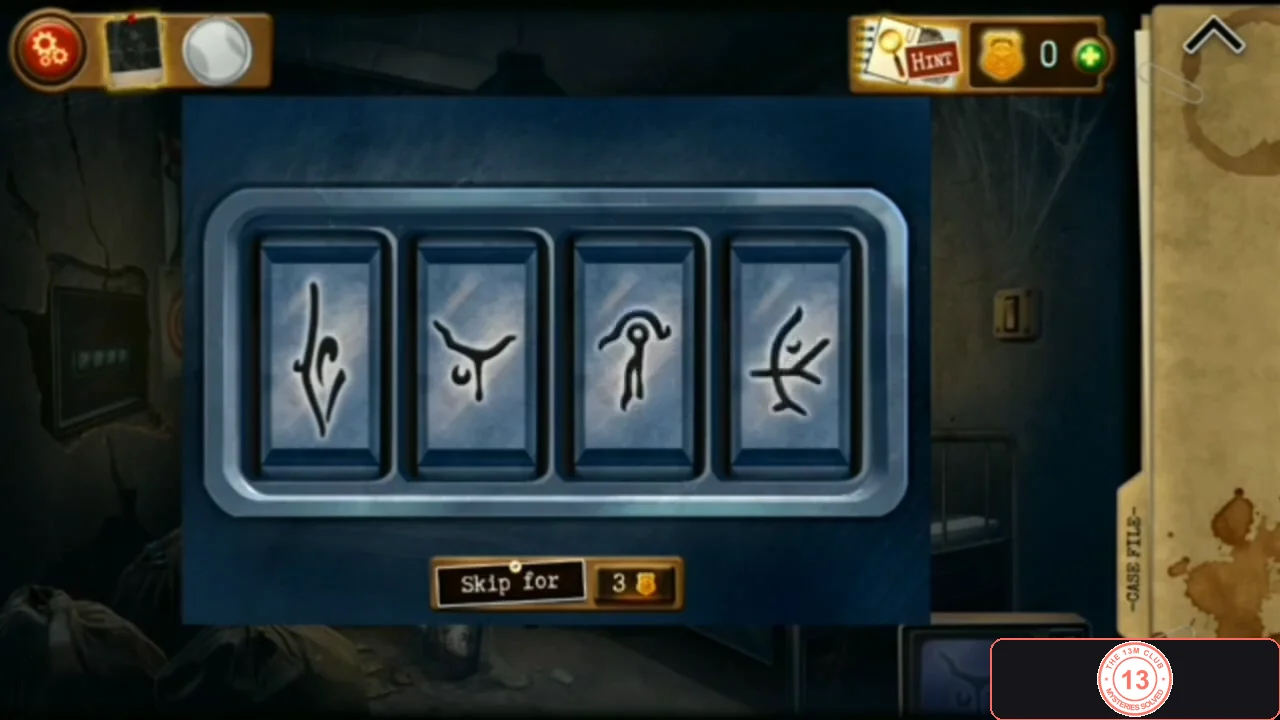
Correct setting, left to right: symbol I (dark wall), II (TV), III (note), IV (scroll).