Stalled Elevator: Sliding Bolt Lock
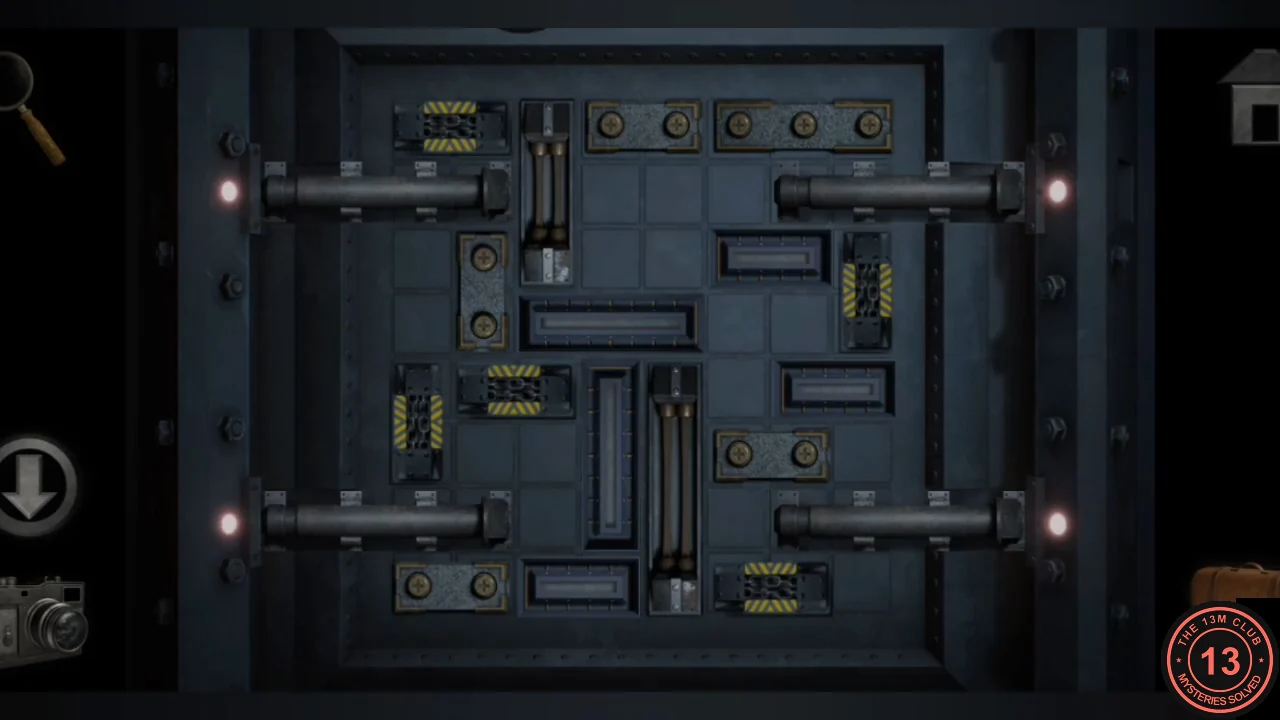
After the "Previously on Meridian 157" recap, you wake up trapped in a stalled elevator. The panel beside the door hides a sliding-block lock: four bolts, two near the top and two near the bottom, must each be dragged inward until its red light turns green. Blocks slide only along their long side, so the job is to clear a straight path for each bolt.
- Tap the floor just in front of the elevator door and pick up the small coin.
- Use the coin on the screws of the panel beside the door. The cover comes off and reveals the 8 x 8 sliding-block lock.
- Free the two top bolts first: slide the striped upright block in the left column up 2 squares and the striped bar next to it left 1, move the slotted block in row 3 right 1 and push the upper piston down 2. Drag both top bolts inward; their lights turn green. Then free the bottom pair: move the right-hand panel of row 4 left 1, the striped upright block in the right column down 2 and the right-hand panel of row 2 right 1, slide the long row-3 panel as far right as it goes, push the upper piston down 2 more, move the upright panel in column 3 up 2 and the lower piston up 2. Drag both bottom bolts inward. If a block will not move, check which piece blocks it and clear that one first; the goal is simply an open line for each bolt.
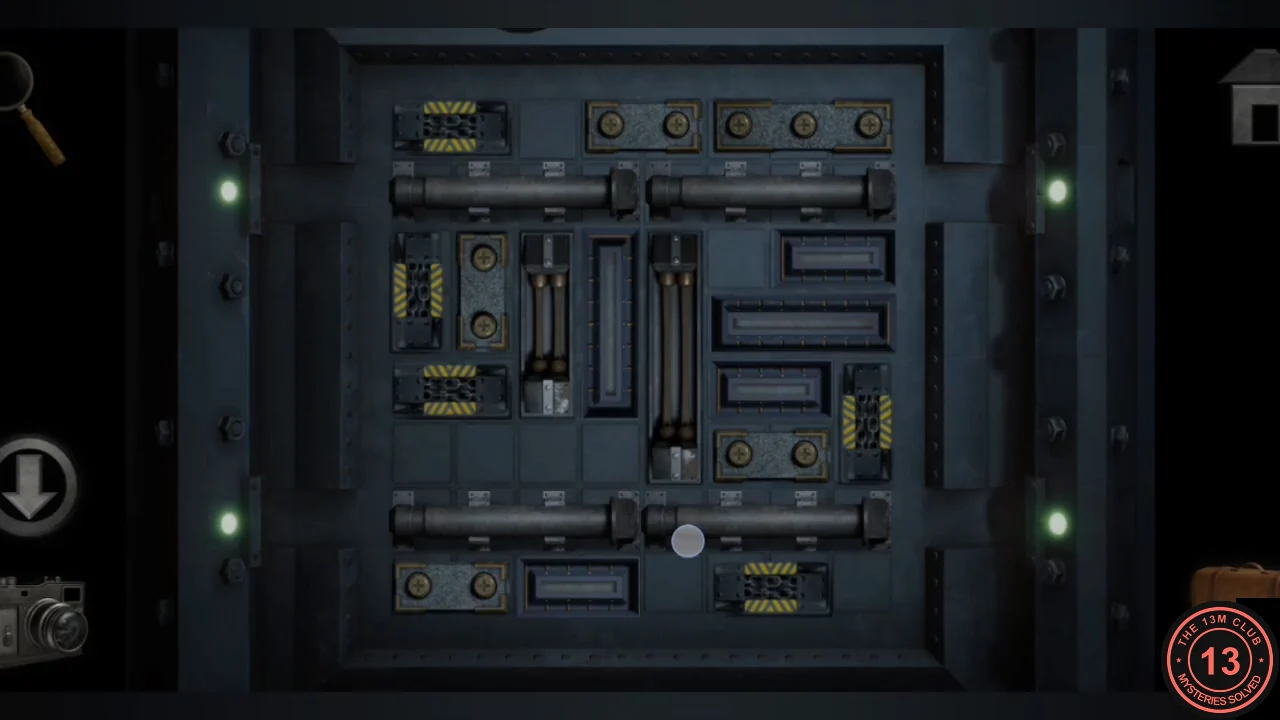
All four bolts free and all four lights green. - With all four lights green, the elevator door slides open. Step out into the access tunnels.
Access Tunnels: Pliers, Lightbulb and Lamp Clue
The tunnels branch at a direction sign: the Machine Room is to the right, the Power Room and Residence Area to the left. A blue door in the corridor near the elevator is blocked by hot steam for now. Your camera lets you photograph clues and review them at any time, so snap every drawing and note mentioned below.
- Look around the Control Room first. Its window blinds are "missing something"; there is a facility map, a to-do list, a cabinet with three dials, an offline computer, a bookshelf with gaps beside a green safe, and a door marked Computer Access Only. Photograph the to-do list: 1 lighthouse, 2 water filters, 3 fire alarms, 4 boat, 5 movie night.
- Take the left branch toward the Power Room. The tunnel ends at a rockfall; pick up the pair of pliers from the rubble at the foot of the collapse.
- In the corridor between the elevator and the cavern, use the pliers on the closed wooden chest on the floor (right side) and take the lightbulb inside.
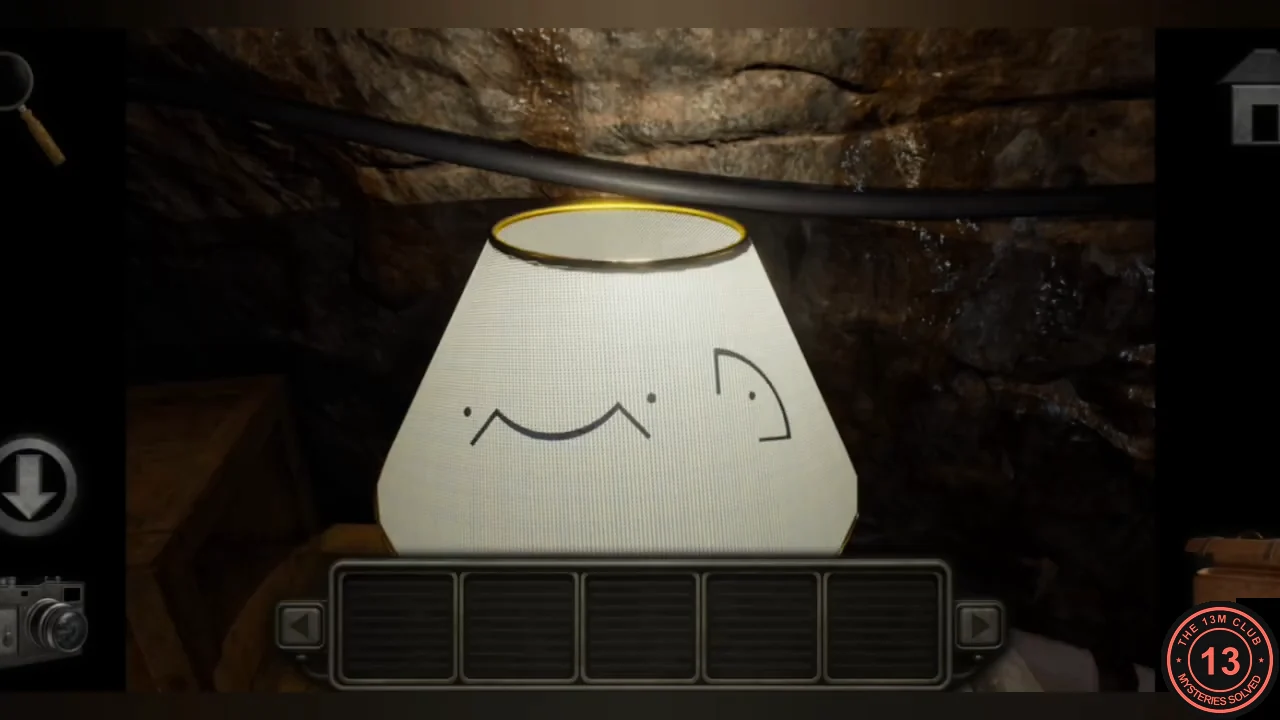
- Take the right branch toward the Machine Room. Its door is locked. Screw the lightbulb into the desk lamp standing on the crates beside the door. The lit lampshade shows a drawing of curved lines and dots; photograph it.
- Back in the Control Room, pick up the brush lying under the notice board.
- Follow the left branch to the Residence Area corridor by the yellow duct and pick up the extension cable; you will need it much later. Something is caught inside the overturned metal cage beside the locked Residence Area door, but your hands are too big to reach it.
Control Room Cabinet: Three-Dial Lock
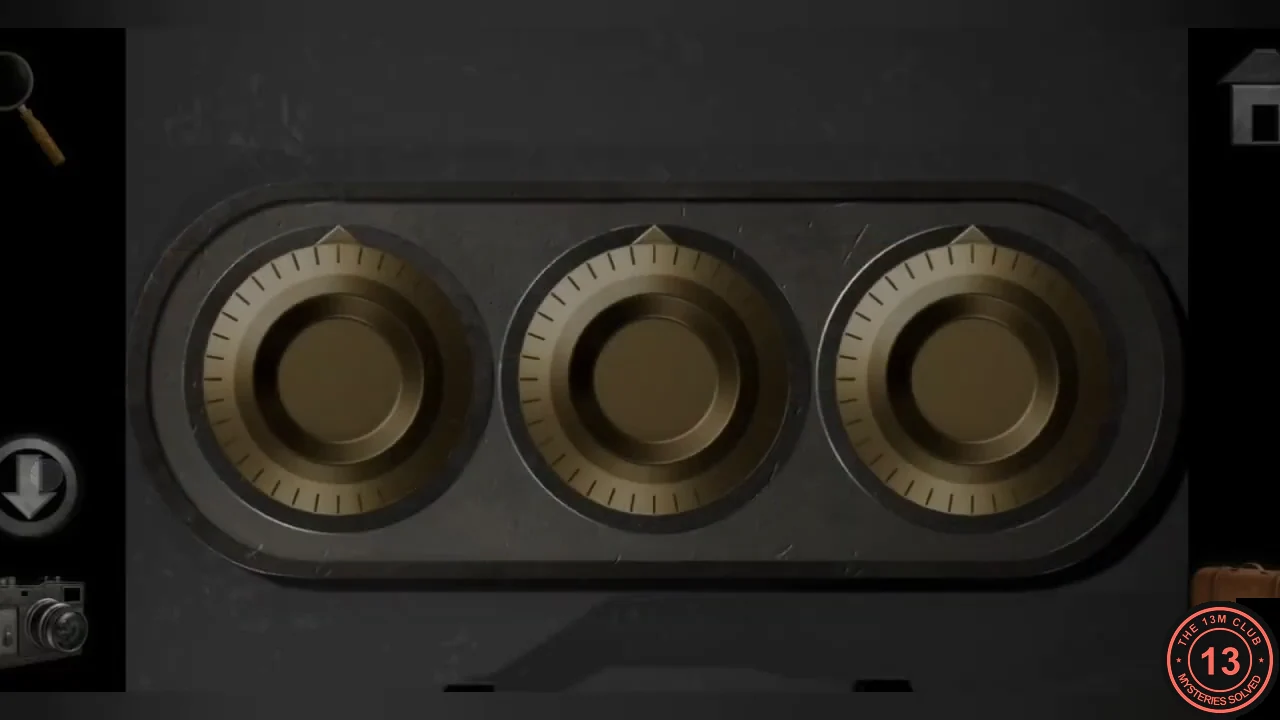
A cabinet in the Control Room has three rotating dials, each with a pointer. The clue is painted on a dusty crate at the rockfall in the Power Room tunnel, and the crate is lying upside down.
- Return to the rockfall in the Power Room tunnel and use the brush on the dusty crate. Three dial drawings appear, together with a "THIS SIDE UP" arrow pointing down. Photograph them.
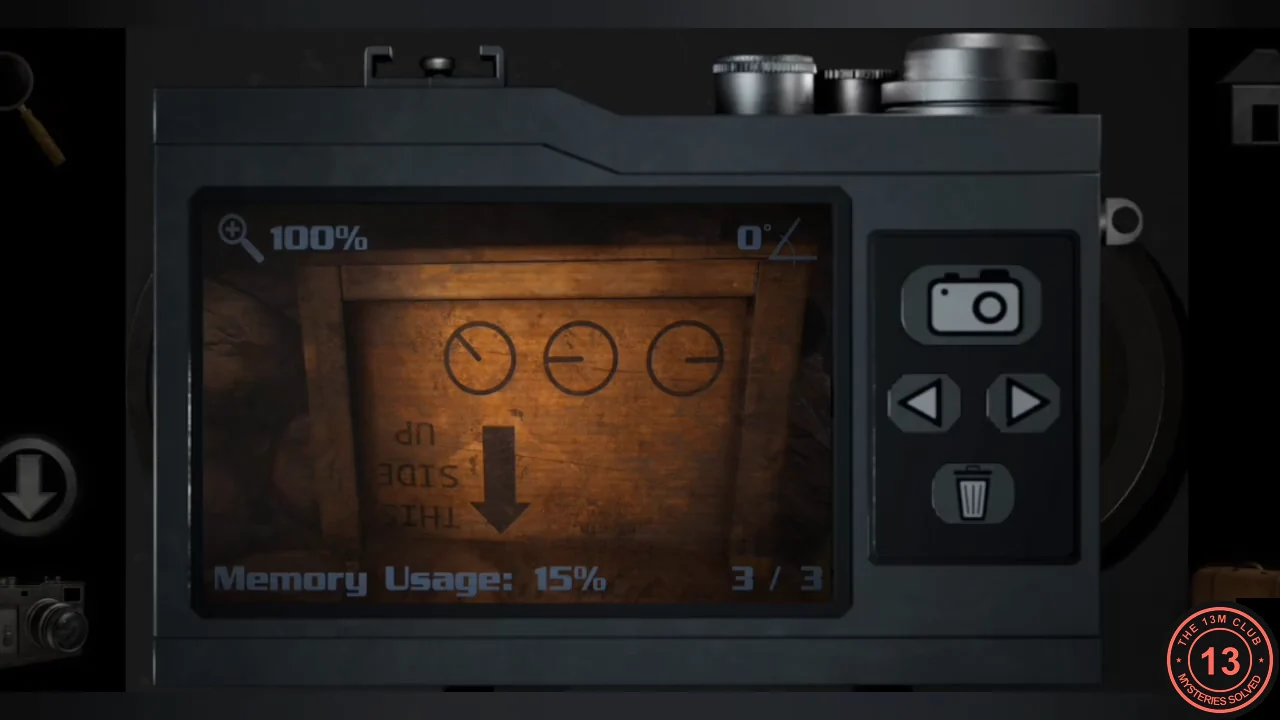
The dial drawings on the crate, photographed with the camera. The crate is upside down. - The downward arrow tells you the crate is upside down, so turn the drawing 180 degrees in your head before copying it. In the Control Room, tap the cabinet dials until the left dial points left (9 o'clock), the middle dial points right (3 o'clock) and the right dial points down and to the right (between 4 and 5 o'clock). The cabinet opens.
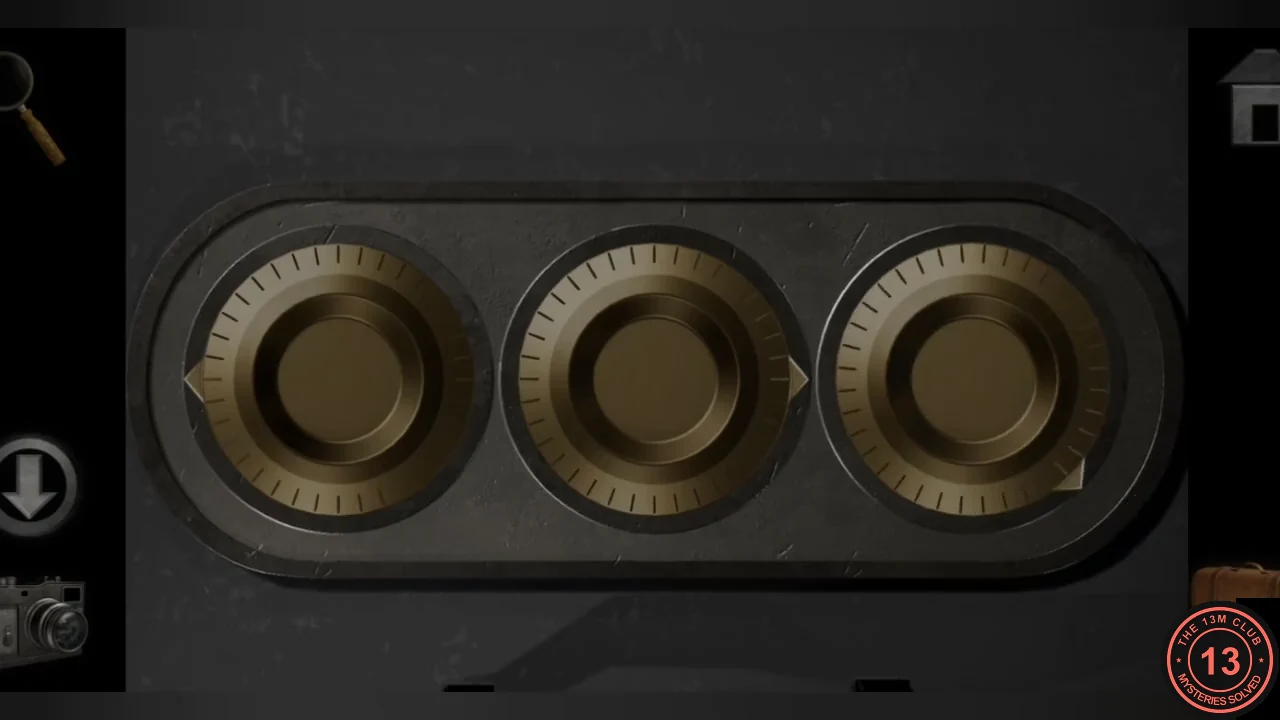
The dials set to match the drawing turned 180 degrees. - Take the pair of tweezers from the cabinet, then open the folder of personnel files (596-10, 782-06 and a terminated employee). Each file has a faint watermark made of two symbols; photograph all three.
Office Desk: Symbol Slider Drawer
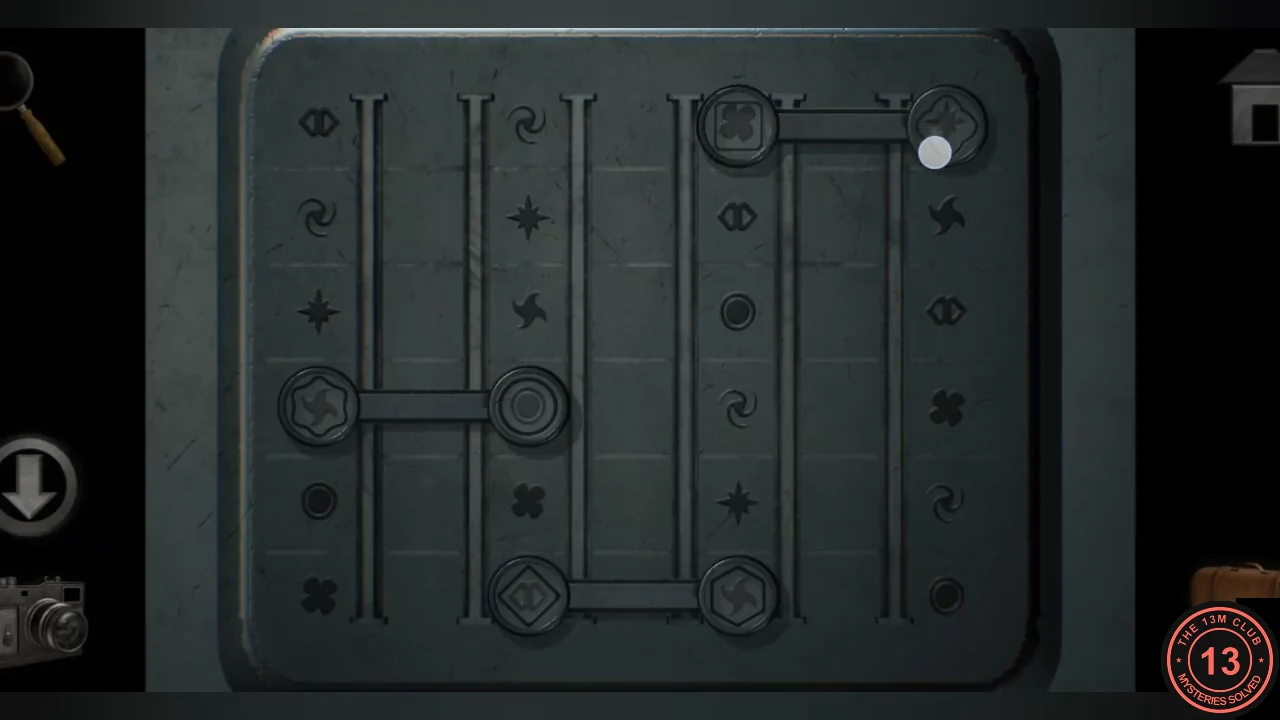
The middle drawer of the desk in the Control Room office, under the painting, holds a metal box with four columns of six symbols and three sliding bars. Each bar spans two neighbouring columns and frames the pair of symbols beside it. The watermark pairs from the personnel files tell you where each bar goes.
- Open the middle desk drawer to reach the slider box. Number the columns 1 to 4 from the left and the rows 1 to 6 from the top; the bars join columns 1-2, 2-3 and 3-4.
- Slide each bar up or down until it frames one watermark pair: the bar between columns 1 and 2 to row 1 (double diamond and swirl), the bar between columns 2 and 3 to row 5 (clover and four-point star) and the bar between columns 3 and 4 to row 6 (shuriken and dot). The box unlocks.
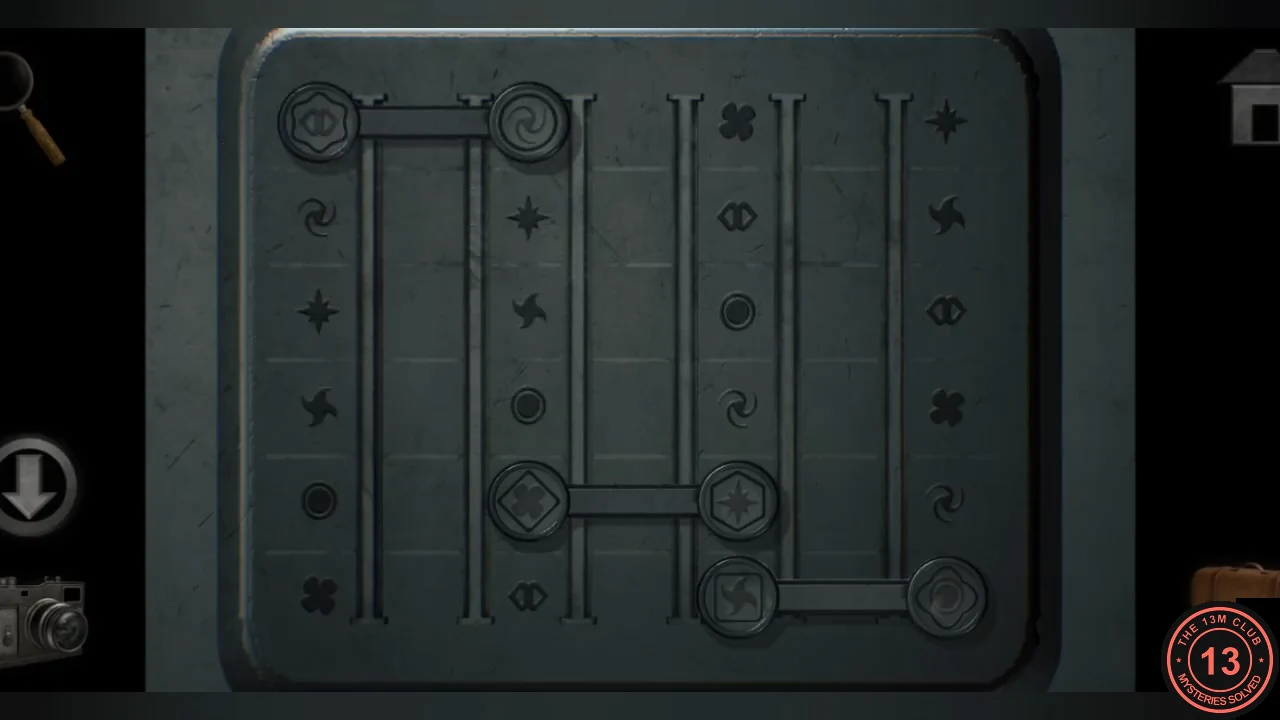
Each bar frames one watermark pair. - Take the rather old-looking key from inside the box.
Knife, Drawstring and the Hidden Symbols
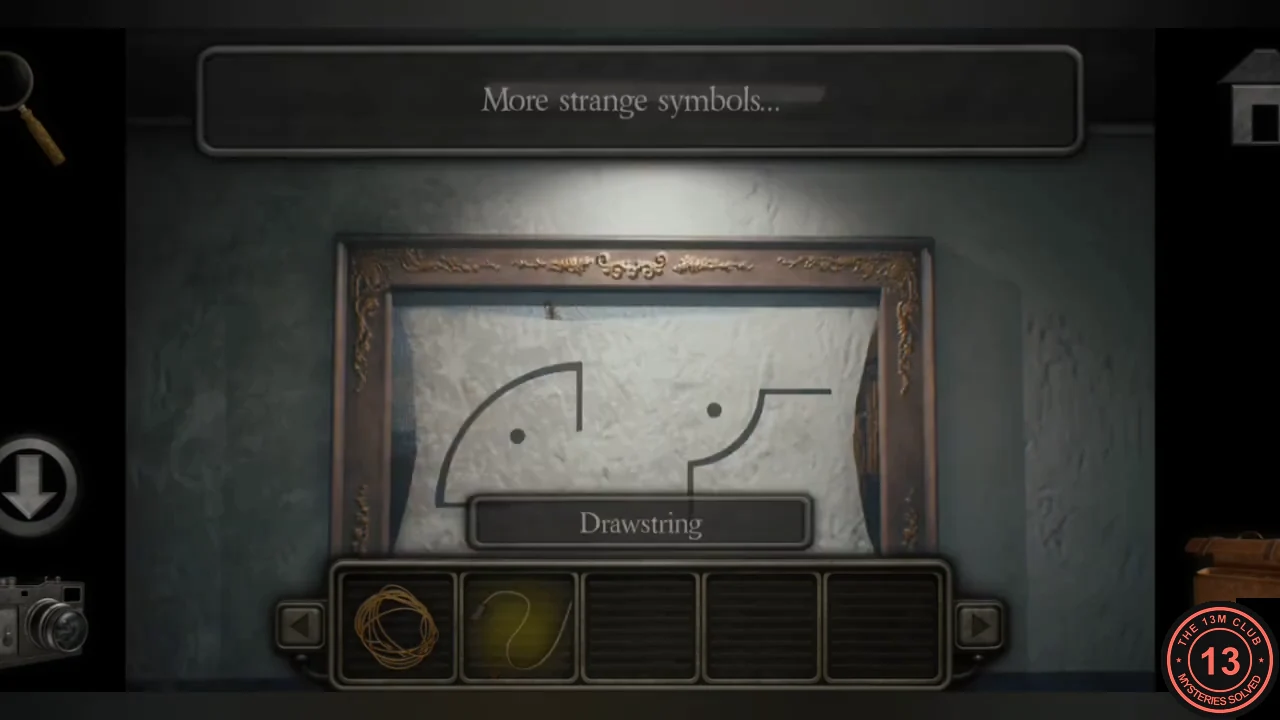
The steam valve needs three symbol drawings. You already have the lampshade; the other two are hidden in the office painting and on the Control Room window blinds.
- In the steam-filled corridor, use the old key on the blue steel door in the left wall. Behind it is a round bronze plate that controls the steam. Take the knife from the bottom of the opening.
- Go back to the overturned cage beside the Residence Area door and use the tweezers on it to pull out the drawstring.
- In the Control Room office, use the knife on the painting above the desk. Two more strange symbols are hidden under the cut canvas; photograph them.
- Use the drawstring on the Control Room window blinds, then pull the cord to lower the blind. Two more symbols are drawn across the closed slats; if the slats are still open, turn the rod on the left of the blind to close them. Photograph the symbols.
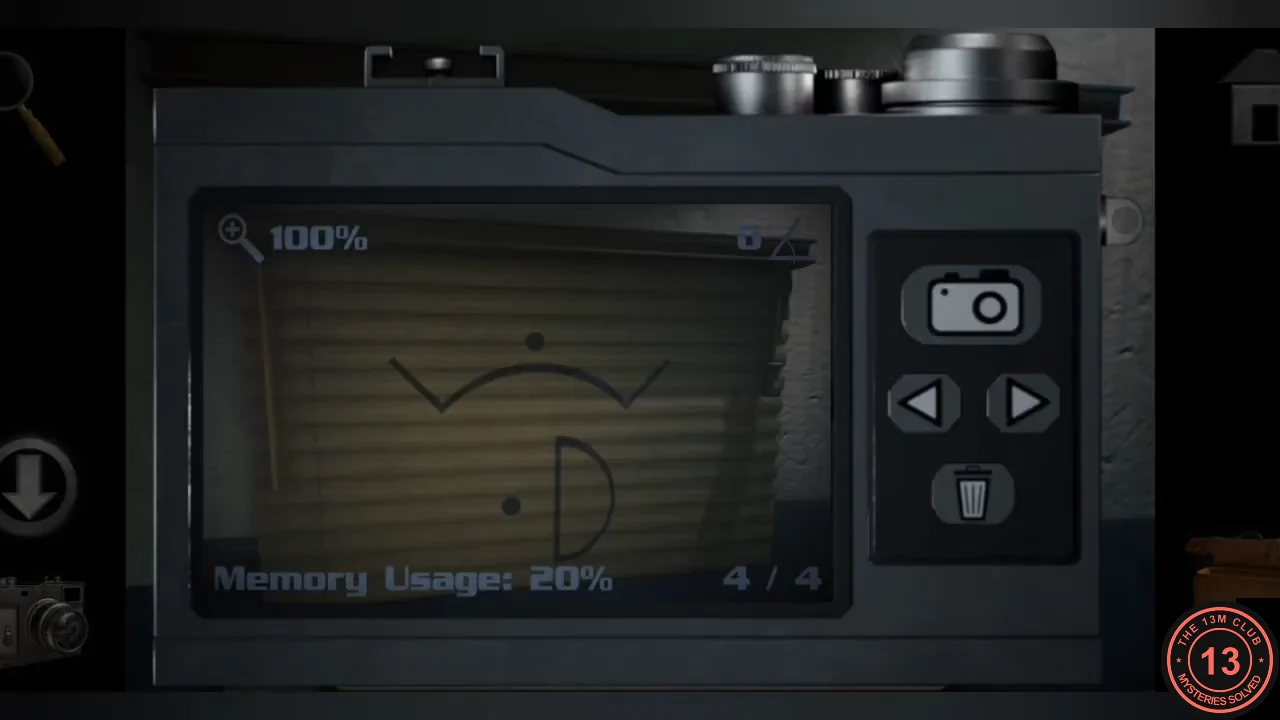
The symbols on the closed blinds, photographed with the camera.
Steam Corridor: Bronze Valve Plate
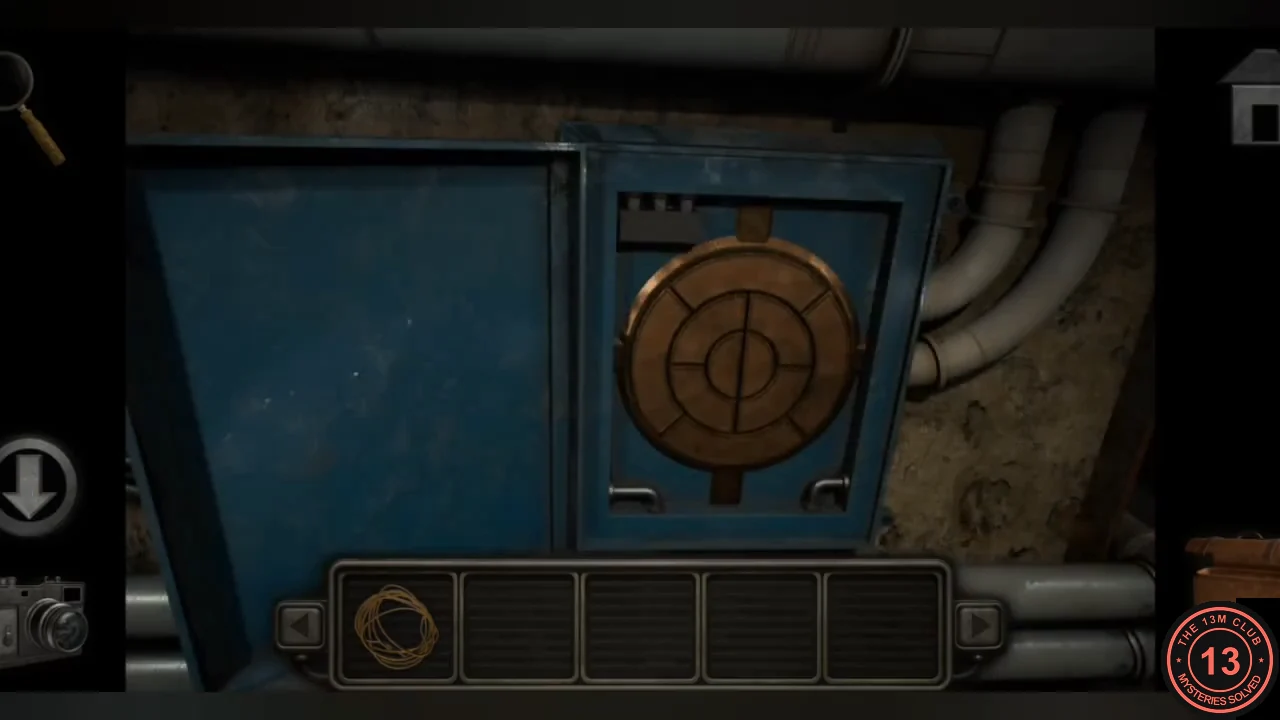
The bronze plate behind the blue door is divided into three rings: four thin outer segments (top, right, bottom, left), four middle quarters and a centre split into left and right halves. Tapping a part presses it in. Your three photos hold six outline shapes in total, and each one is the outline of a part to press: three thin arcs (outer segments), two quarter shapes (middle quarters) and one half circle (a centre half).
- Press exactly these six parts: the left, right and top outer segments; the upper-left and upper-right middle quarters; and the left half of the centre. Leave the bottom outer segment, both lower middle quarters and the right centre half raised. Your character remarks that the steam seems to be off.
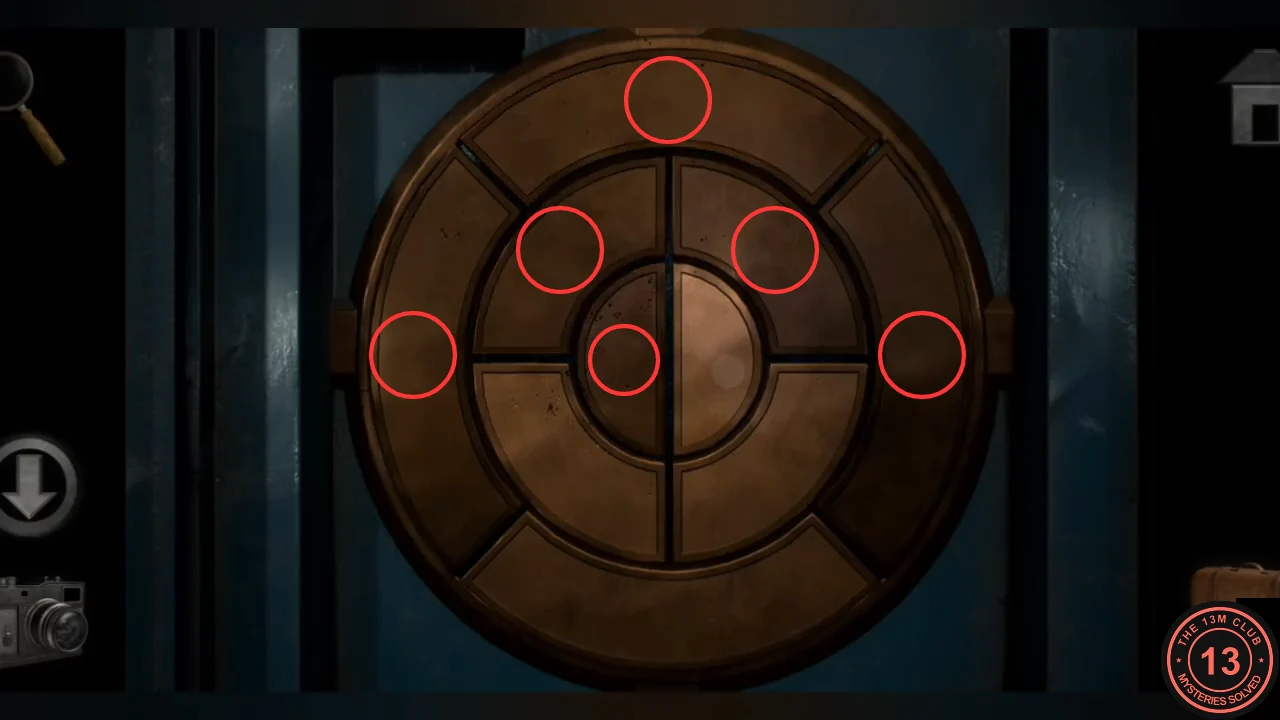
Red circles mark the six pressed parts. The bottom segment, the lower quarters and the right centre half stay raised. - Enter the alcove that the steam was blocking and pick up the couple of books from the bench.
Control Room: Bookshelf and Green Safe
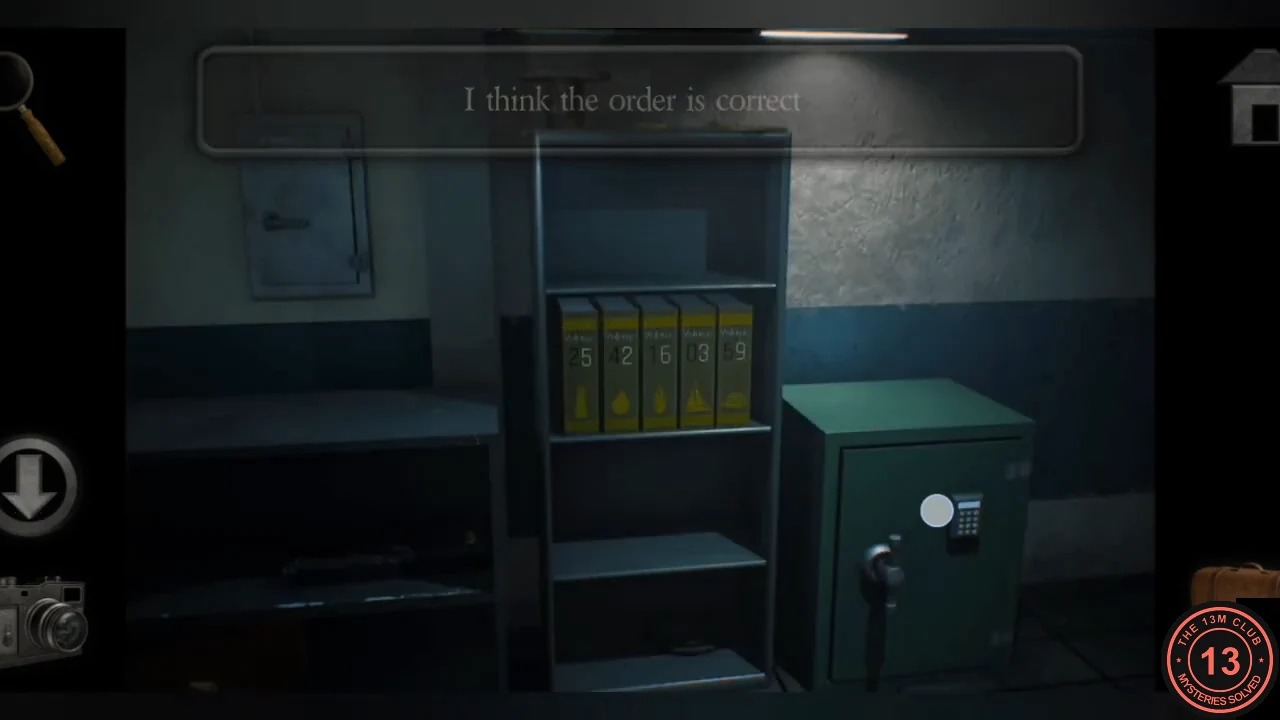
The bookshelf beside the green safe is missing two volumes. Each spine shows a symbol and a two-digit number; one digit of every number is black and the other white. The to-do list gives the shelf order, and the keypad tells you which colour of digit to take.
- Put the couple of books into the gaps on the Control Room shelf.
- Swap the volumes into to-do list order, matching each task to a spine symbol: 25 (lighthouse), 42 (water drop for the water filters), 16 (flame for the fire alarms), 03 (boat), 59 (film reel for movie night).
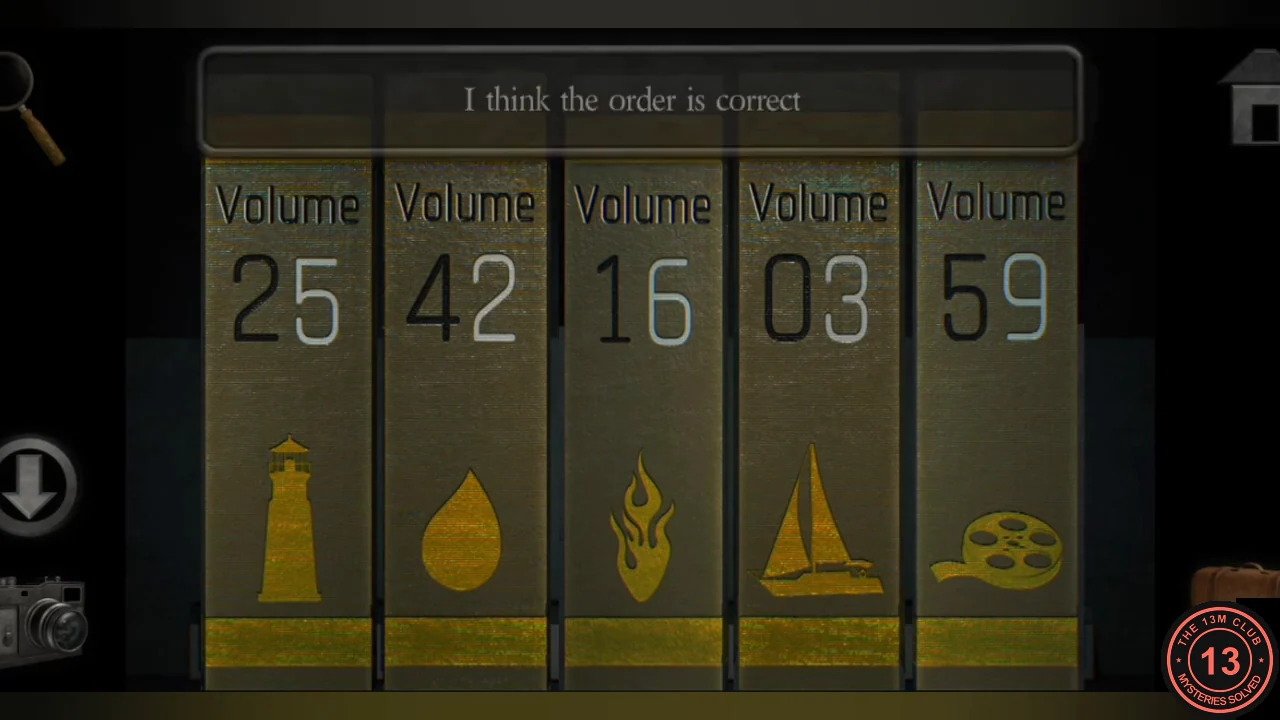
The volumes in to-do list order. - Tap the safe keypad. As you enter the code, the entry box colours each position in turn: black, black, white, black, white. Take the digit of that colour from each book in shelf order: black 2 from 25, black 4 from 42, white 6 from 16, black 0 from 03 and white 9 from 59. Enter 24609.CODE24609
- The safe opens. Take the residence key.