Forest Edge
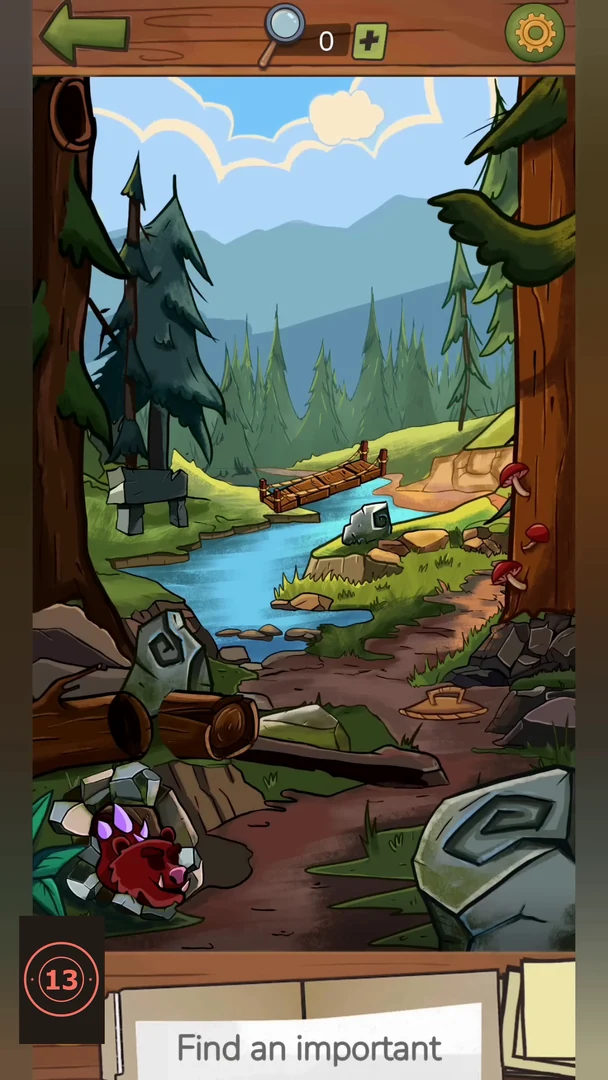
Open Part 3 from its card in the chapter menu once Part 2 is finished. It begins as the sheriff comes out of the portal at the edge of a forest in another world (his first thought starts 'Wow! Where...'). The checklist has nine items: pink bird, sheep, green fruit, spotted cow, basket of mushrooms, purple creature, green lizard with a snail shell, pink stick and orange crab-like creature. Then find the important clue.
- The sheriff arrives through the portal at the edge of a forest. The wooden bridge across the stream in the middle of the scene has missing planks. Drag the loose plank pieces lying on the right-hand riverbank into the gaps of the bridge until it is whole.
- Tap the green lizard with a snail shell when it climbs the big tree on the right.
- Tap the rock in the stream to the left of the path. A small creature climbs out and changes colour from olive to blue to purple. Tap it once it is purple.
- Fill the empty basket on the right side of the path with mushrooms. Drag the orange mushrooms growing on the left tree trunk into the basket, then the red mushroom from the near riverbank. Pull the axe out from behind the big grey spiral stone at the bottom right and drag it to the hollow log on the left. The log splits and a purple mushroom appears; drag it into the basket too. Tap the full basket.
- After the bridge is repaired, the spotted cow crosses to the right bank and eats the green cabbage there. Tap the cow.
- Tap the green fruit hanging in the dark pine tree on the left.
- Watch the clouds at the top right: one drifting cloud is shaped like a sheep. Tap it.
- At the top left, a pink bird hides in the round hole of the big tree trunk. When it pops out of the hole, tap the bird.
- A pink stick sprouts from the ground on the path, just left of the flat green rock in the middle. Tap it when it has grown.
- At the top right, an orange crab-like creature hides among the leaves of the right tree. When it climbs out and shows its blue eyes, tap it.
- Important clue: a green fruit appears on the ground beside the big spiral stone. The red, spiky bear-like creature sleeping in its den at the bottom left wakes up and walks over to the fruit, revealing a golden object in its den. Tap the golden object. The sheriff thinks: 'It seems we're in a parallel universe. I need to find Joe quickly.' The map opens with Stone House as the next location.
Stone House (Outside)
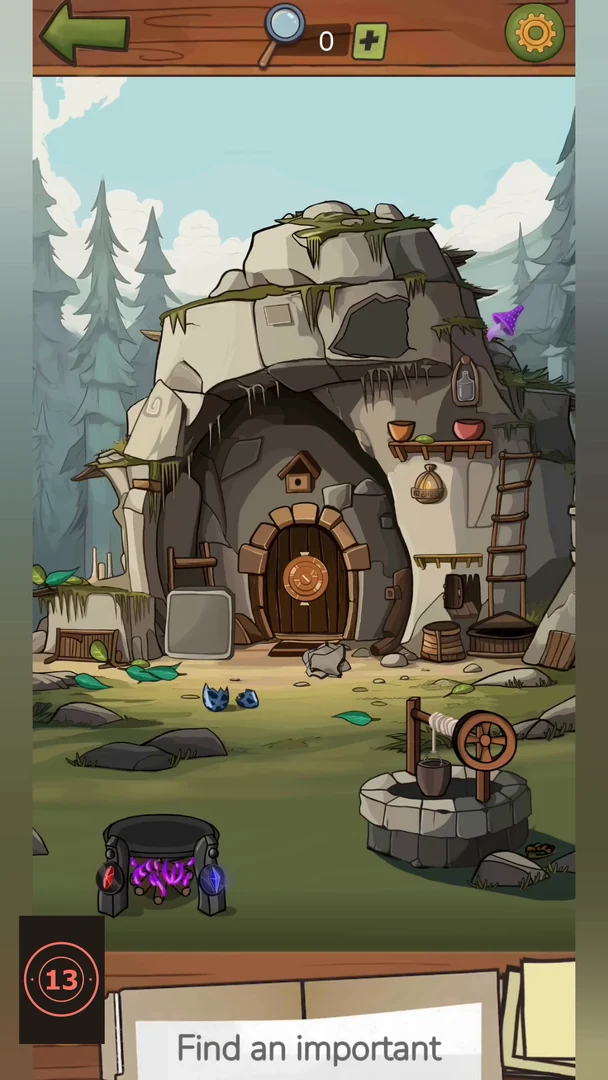
Choose Stone House on the map. The sheriff stands outside a house built into a big rock and thinks: 'We should go inside maybe Joe was here.' The checklist has nine items: purple mug, gnome, yellow chick, red flag, axe, animal skull, pine cone, purple triangle tile and red pot. The stone well at the bottom right is used several times. Then open the locked door as the important clue.
- On the ledge under the hanging sack to the right of the door, tap the purple mug.
- A gnome with a red hat peeks out from behind the tall stone pillar on the left of the house. Tap it when its face shows.
- Tap the stone slab with the purple pattern on the left of the door to open a 2 x 2 tile puzzle. Tap the tiles to turn them until the purple lines join into one symbol: a large triangle with a slanted line through it (the same symbol as the purple card on the checklist). When it is complete, the symbol tile is collected.
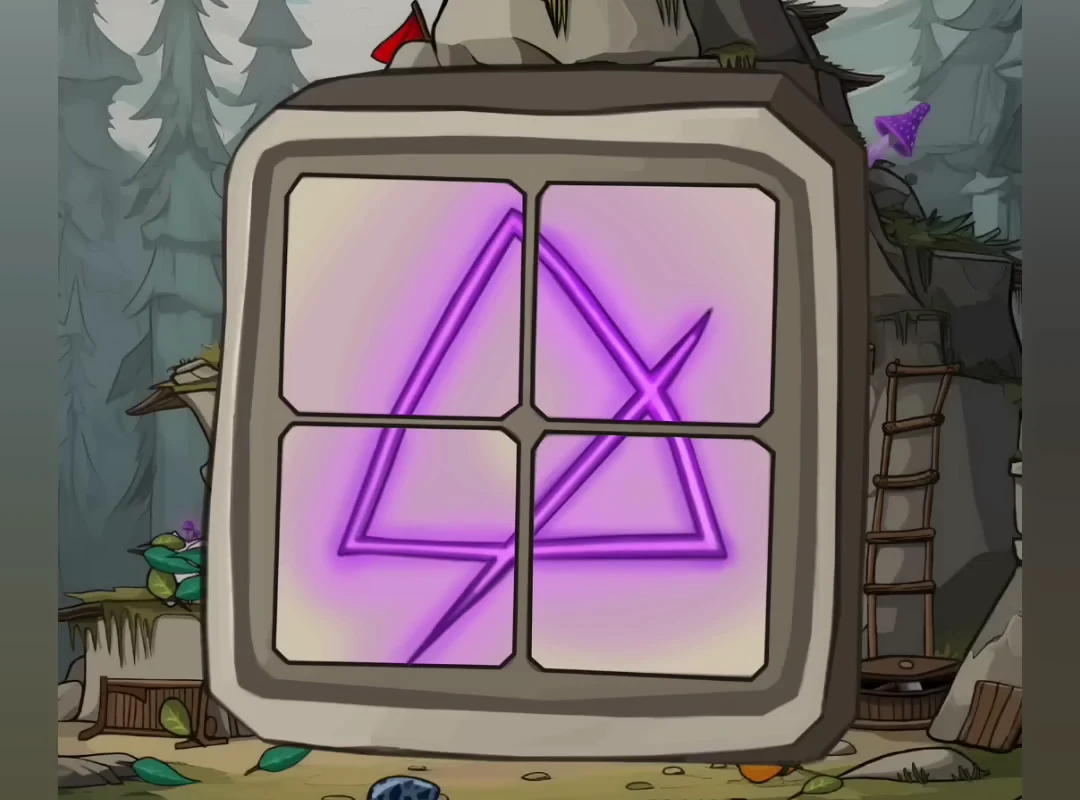
Solved tiles: the purple lines form one triangle crossed by a slanted line, the same symbol as the checklist card. - On the ledge at the far left, slide the green leafy plant aside. An animal skull is behind it; tap the skull.
- Turn the wheel of the stone well at the bottom right. The bucket goes down and comes back up with a hammer. Drag the hammer to the cracked, bricked-up round window high on the rock above the door. The window breaks open and shows a red crystal and a blue crystal inside.
- At the bottom of the well there is a grey rock with a pine cone partly hidden behind it. Slide the rock to uncover the pine cone and tap it.
- At the top left of the rock roof there is a small red flag. Pull it up so it stands on its tall pole, then tap it.
- Turn the well wheel again. This time the bucket brings up a wooden handle. Drag the handle to the axe head lying in the grass left of the well; the axe is complete. Tap it.
- Tap the blue spotted egg lying on the ground in front of the house. It cracks and a yellow chick hatches. Tap the chick.
- Turn the well wheel to bring up a full bucket of water and drag it to the empty cooking pot on the stand at the bottom left. Then drag the red crystal and the blue crystal from the broken window to the stand under the pot. A purple fire starts, the pot turns red and the soup cooks. Tap the red pot.
- Important clue: open the round wooden door. A lock with a centre bar and two rings appears; each part has light stripes, with a triangle marker above and below. Turn the centre and rings until all stripes line up: the centre bar stands upright pointing at both triangle markers, and the ring stripes form two triangles meeting at the bar, one pointing up and one pointing down. The door opens and the sheriff thinks: 'Finally managed to open the door. Let's see what's inside!' On the map, Stone House is circled; choose it to go inside.
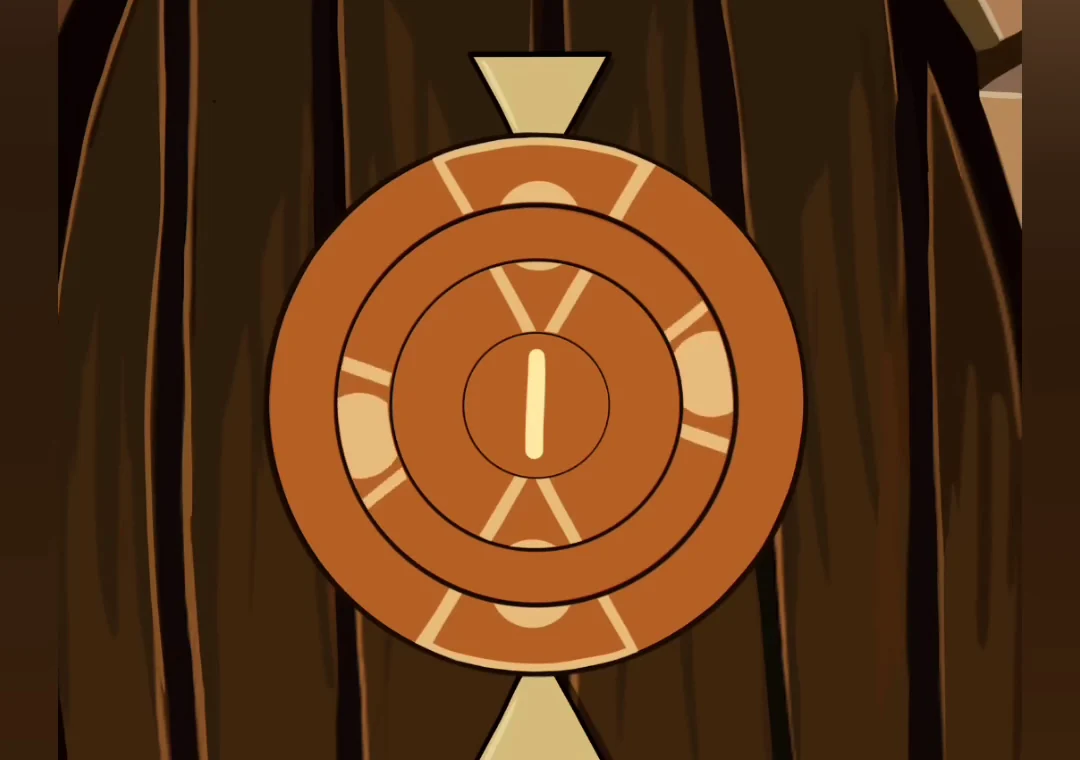
Solved door lock: centre bar upright, ring stripes forming two triangles that meet at the bar.
Stone House (Inside)
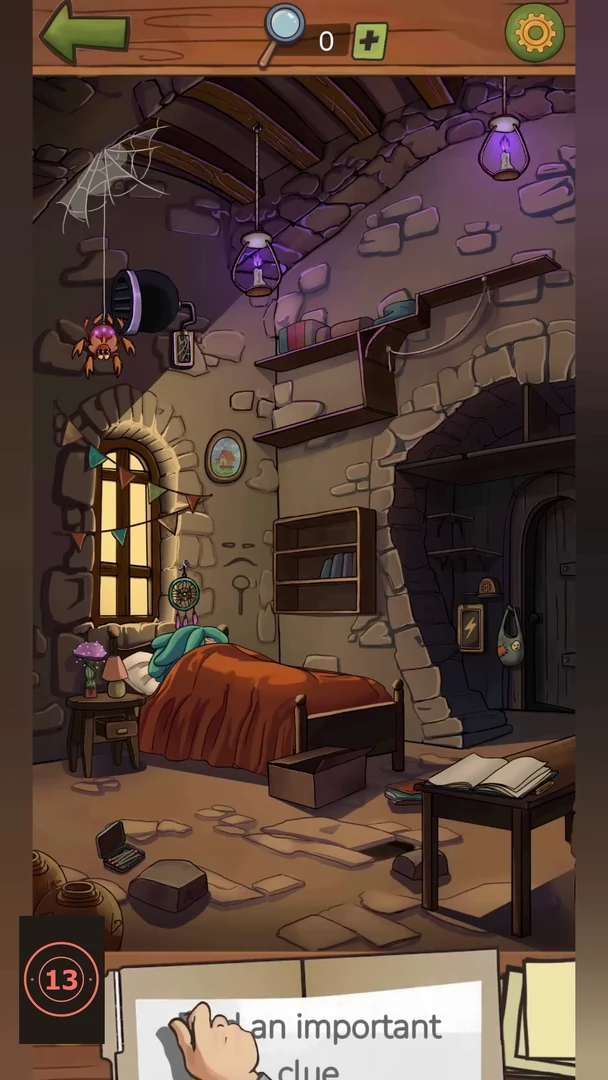
Inside the stone house someone is asleep under an orange blanket; the sheriff thinks: 'Someone is sleeping here!' The checklist has nine items: blue vase with flowers, cheese, totem, mortar and pestle, stone disc, purple lantern, orange flower, photo of the bed and triangular amulet. Then find the important clue that wakes the sleeper.
- Tap the white camera on the top-right shelf. A 'CAM 5000' viewfinder opens. Move it so the frame shows the head of the bed with the orange blanket and the small bookshelf above it, as on the checklist picture, and press the red button. A photo of the wrong area is not accepted.
- Tap the round vent on the upper left wall. It opens and a blue vase with flowers is inside. Tap the vase.
- Pull out the drawer under the bed. Take the dreamcatcher from it and drag it to the wall above the sleeper's head. A dream bubble with a piece of cheese appears; tap the cheese.
- Drag the bundle of herbs hanging under the shelf down to the stone mortar on the floor. The herbs are ground and the mortar and pestle can be collected; tap them.
- Slide aside the loose floor stone at the bottom middle of the room to find a matchbox. Drag the matchbox to the lantern standing by the bed. The lantern lights with a purple flame; tap it.
- Drag the loose head piece from the dark alcove on the right onto the green totem on the lower shelf. A close-up of the totem opens with three parts: head, mouth band and body. Tap each part to change it until the totem matches the checklist picture: gold head with squinting eyes, teal frowning mouth band and purple body holding a purple torch. The totem is then collected.
- Tap the spider in the cobweb in the top-left corner. It drops down on its thread and leaves behind a triangular amulet with an eye. Tap the amulet.
- Open the drawer of the small bedside table to the left of the bed and take the brass key. Drag it to the strap lock on the blue book on the table at the right. The book opens and its pages turn to a pressed orange flower; tap the flower.
- Lift the loose floor slab in front of the table at the right, next to the table's left leg. A grey stone disc lies underneath; tap it.
- Important clue: take the dreamcatcher down from the wall above the sleeper. The sleeper has a pencil-sketch dream: a large creature and a small figure among stones, then the small figure at the round door of the stone house. The creature wakes up. Sheriff: 'Don't be afraid. I come in peace.' Creature: 'You're not the first one this week.' Sheriff: 'Really? For the record, I'm Sheriff...' Creature: 'I don't know what "sheriff" means, but my name's Milto.' Sheriff: 'The other "alien," as you call it, was it a child?' Milto: 'He was smaller than you, so most likely, yes, he was a child.' Sheriff: 'Do you know where he is?' Milto: 'Let's go down to the cellar and see what we can find for you.' The map appears and the game continues in the cellar workshop.
Cellar Workshop
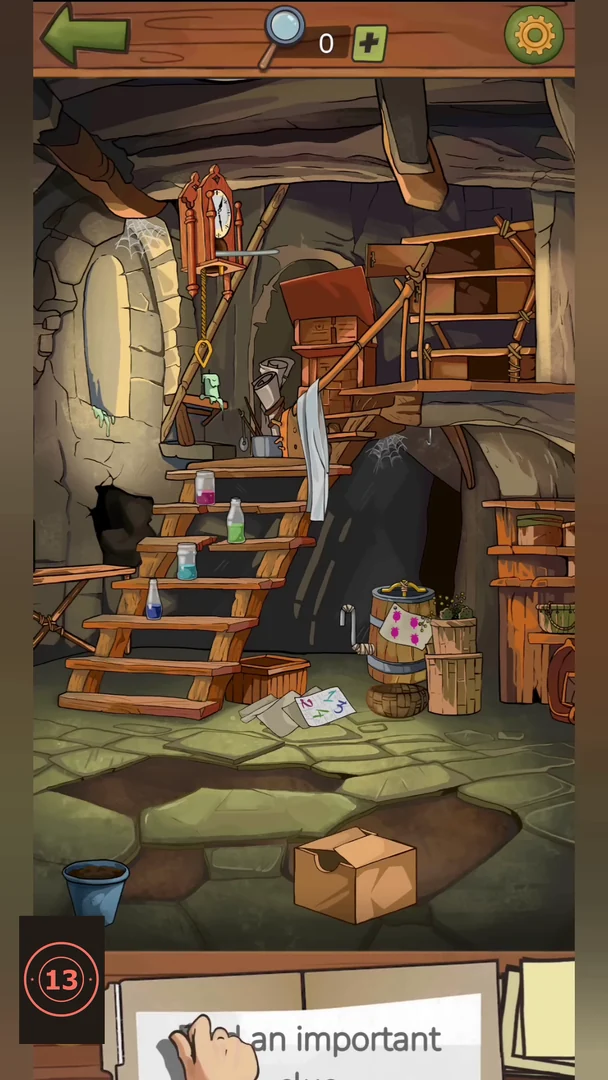
Milto takes the sheriff down to a cluttered workshop under the stone house, with wooden stairs, a cuckoo clock and a barrel. The checklist has nine items: beetle drawing, green plant, stone bird, green book, jar of yellow liquid, treble clef, chair, pink potion flask and green lizard. Then Milto offers a disguise as the important clue.
- Gather the four torn paper scraps lying around the floor (one leaning on the bottom of the stairs, one in the centre, one near the potted plant and one near the stool) and drag them together in the middle of the floor. They form a picture of a beetle; tap it.
- Tap the small green sprout in the blue pot at the bottom left.
- Pull the ring-shaped weight hanging under the cuckoo clock at the top left. A stone cuckoo slides out on its perch; tap it.
- Take the hammer lying on the floor at the left and drag it to the cracked wall left of the stairs. The wall breaks open; tap the green book inside the hole.
- Move the white towel hanging over the stair rail to find a gold key behind it. Drag the key to the small cabinet on the top-right shelf. The cabinet opens; tap the jar of yellow liquid.
- A playing card with four black splotches hangs on the barrel at the right. Four pink berries fill it. Three lie in the open: on top of the top-right shelf, on the side table at the left and in the basket by the barrel. The fourth is locked in the middle compartment of the top-right cabinet, just below the yellow-jar compartment: take the separate GREY key lying on the lid of the cardboard box at the bottom of the room and drag it to that compartment's keyhole. It opens and shows a berry. Drag each berry onto the card. Each black splotch turns pink. This prepares the card for the pink flask below.
- Drag the papers out of the box at the foot of the stairs. One is a note with coloured numbers: 1 teal, 2 pink, 3 blue, 4 green. Four singing bottles stand on the stairs (pink at the top, then green, teal and blue at the bottom). Tap them in the note's order: teal, pink, blue, green. A wrong order resets the bottles. A treble clef rises out of them; it is collected.
- Find the blue chair back hidden behind the basket to the right of the barrel and drag it onto the wooden stool at the bottom right. The stool becomes a chair; tap it.
- Drag the small brass scales hanging in the dark archway under the stairs onto the barrel with the pink card. The empty glass flask beside the barrel fills with pink potion; tap it.
- Tap the small red chest of drawers on the upper landing (near the cuckoo clock). Its lid lifts and a green lizard is clinging to the inside; tap the lizard.
- Important clue: Milto comes in with a box. Milto: 'I have local clothing and accessories in this box to help you blend in and avoid drawing attention.' 'What can you offer?' An Exchange window opens with a hooded cloak at the top and the sheriff's hat, handcuffs and revolver below. Put an item in the empty slot and press Exchange. The hat and the handcuffs are refused ('I don't need this junk'); offer the revolver. Milto: 'Amazing! I have long dreamed of weapons from your world!' The sheriff now wears the hooded cloak. Sheriff: 'How do I look?' Milto: 'It would be enough! I suggest starting by looking for a boy from the market.' 'The market is very close from here! Hurry up, he is not safe in our world.' 'And lastly, don't catch Waldo's eye, he'll figure you out right away.' 'He is the head of the security service.' Sheriff: 'After everything I've seen, I'm not afraid of any Waldo!' 'Thanks for everything Milto. You saved me.' The map opens with the Market and the Grand Clock Tower.
Market
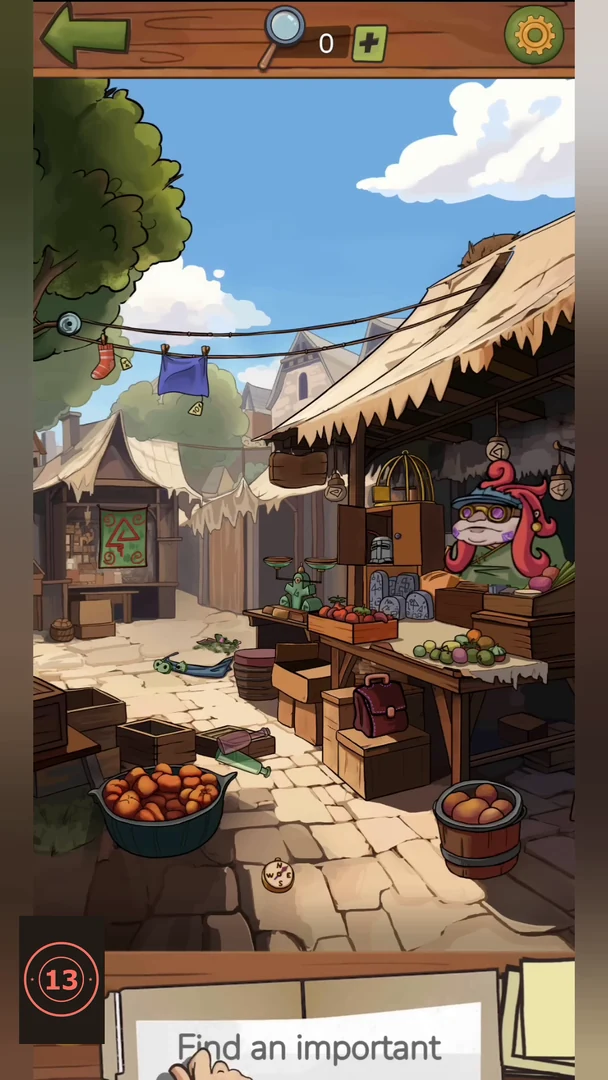
Choose Market on the map. Wearing the hooded cloak, the sheriff thinks: 'A strange market in a strange world! I feel terrible in this outfit.' 'I need to quickly find Joe and get out of here.' 'Let's see if we can find his tracks.' The checklist has nine items: purple kite, purple pyramid, dagger, red banner, round glass flask, spyglass, spotted underpants, glowing fruit and purple coins. Then help the merchant to earn his map.
- Tap the purple pyramid standing on the merchant's front table.
- Tap the purple kite flying in the sky above the roof.
- The big basket of orange fruit at the bottom left also holds a few odd fruits. Pair each odd fruit with the same kind of fruit elsewhere in the market; the pair glows in the same colour and both disappear: the green leafy vegetable with the one in the crate at the stall, the green round fruit with the one on the crate at the far left, the yellow pear-shaped fruit with the one in the barrel at the bottom right, and the orange spiky fruit with the one on the merchant's table. When only orange fruit is left, a dagger lies in the basket; tap it.
- Tap the green banner hanging on the house at the left. It turns over to show the red banner; tap it.
- Drag the crowbar lying on the path (right of the big basket) to the closed wooden crate just above the basket. The lid comes off and bottles tip out; tap the round glass flask.
- Turn the pulley wheel at the left end of the clothesline (on the tree). Washing slides along the line into view: a sock, a blue cloth, spotted underpants and a ring of keys. Tap the spotted underpants.
- Drag the ring of keys from the clothesline to the gold birdcage hanging at the stall. The cage opens and the red creature sitting on the roof flies away. A spyglass is now visible on the roof where it sat; tap it.
- Tap the small reddish fruit in the tree at the top left. It swells and glows; it is collected.
- Pull the blue cloth off the heap on the path left of the stall. A small green creature sits on it; tap the creature. It moves aside and purple coins are left on the cloth; tap them.
- Important clue: talk to the merchant. Sheriff: 'Good afternoon, do you happen to have a map of the city?' 'I'm not from around here and I'm a bit lost.' Merchant: 'Odd, you're only the second person this year to ask for a city map!' Sheriff: 'And who was the first?!' Merchant: 'A few days ago, a boy was asking about the Clock Tower, so I gave him a map.' 'It costs 10 genzels. Pay and it's yours!' Sheriff: 'Unfortunately, I don't have any money with me.' Merchant: 'Then why are you wasting my time? Leave!' Sheriff: 'I apologize. I really need that map.' 'Can I perhaps offer some other form of compensation or help you with something?' Merchant: 'Well, there is one thing. I have two little sons.' 'After work today, I plan to take this basket of fruit to them.' 'And I swear by Waldo, I won't know how to divide it equally.' 'Help me out, and the map is yours.' Sheriff: 'I'll try my best!'
- Balance the scales: six fruits wait on the shelf (a big red artichoke-like fruit, a small green sprout, a yellow spotted fruit, two red pepper-shaped fruits and a green spiky fruit). Drag them onto the two pans until the beam is level. Solution: left pan = red artichoke-like fruit + green sprout + yellow spotted fruit; right pan = green spiky fruit + both red pepper-shaped fruits. The pans glow when balanced. Merchant: 'Thank you! I couldn't have managed without your help.' 'As promised, here's the map.' Sheriff (thinking): 'This map will guide me to the Clock Tower. I hope I'll find Joe there.' The map opens with the Grand Clock Tower.
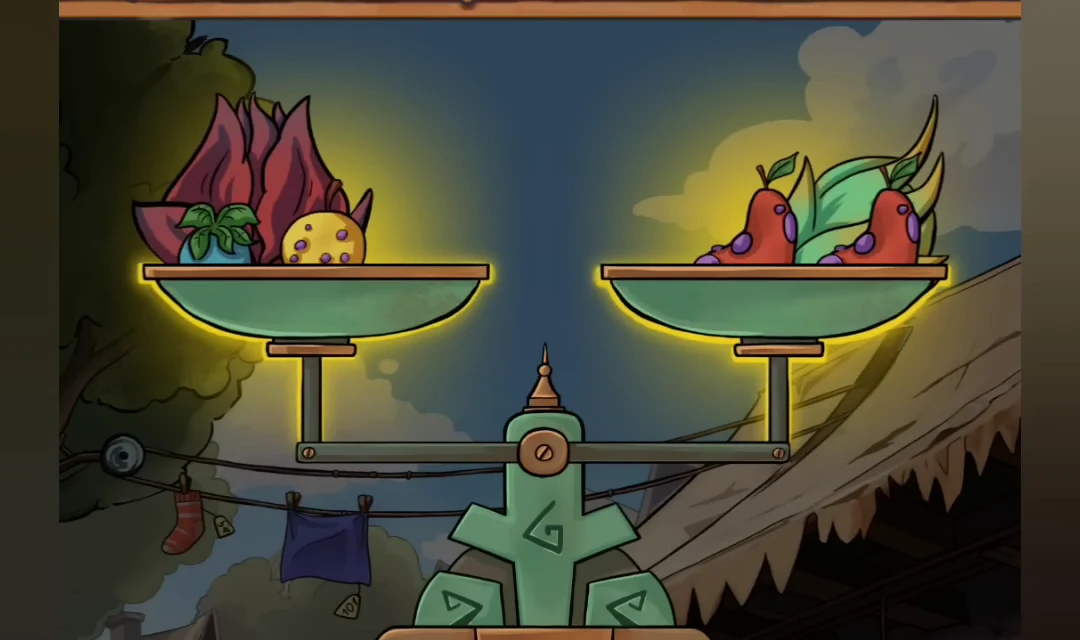
Balanced: artichoke-like fruit, sprout and yellow spotted fruit on the left; both peppers and the spiky fruit on the right.
Grand Clock Tower
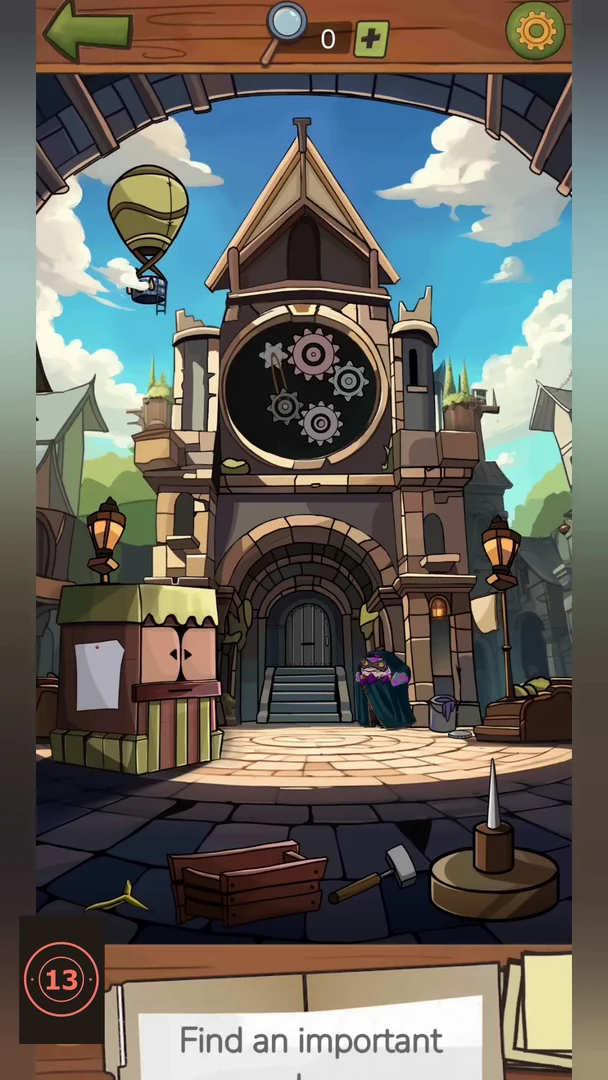
Choose the Grand Clock Tower on the merchant's map. The sheriff thinks: 'Joe wanted to head to the Clock Tower. We need to trace his steps.' 'The guard won't let me enter without a ticket.' A hooded guard stands by the tower door. The checklist has nine items: black-and-white spiral, purple bell, round wooden shutter, purple flower, purple lizard, paper with a rune symbol, bucket of crumpled paper, carved wooden goblet and the clock face. Then get a ticket from the kiosk as the important clue.
- Three loose gears are needed later. A grey gear lies on the ground just behind the right side of the ticket kiosk, another grey gear sits at the left edge of the big clock face (by the left turret), and the large pink gear is in the wooden crate in the lower left. Drag all three onto the ledge directly below the big clock face. They wait there for the clock puzzle.
- Tap the stack of old notices pinned to the ticket kiosk on the left several times to tear the top sheets off. Crumpled paper falls to the ground and a sheet with a rune-like symbol is revealed. Tap that sheet.
- Drag the log with the red X (lower left) onto the metal spike of the wooden stand on the right so it stands upright, then drag the chisel lying on the ground onto the log. The chisel carves it into a wooden goblet; tap the goblet.
- Drag the crumpled paper balls lying on the ground beside the kiosk into the empty metal bucket in front of it, then tap the full bucket.
- Watch the small hot-air balloon drifting around the tower. When it floats beside the roof gable, tap the black-and-white spiral on its side.
- A purple lizard keeps peeking out of a crack in the paving just left of the spike stand, beside the hammer. Tap it while it is visible.
- Tap the grey metal pail standing to the right of the guard. Its lid pops off and drops to the ground, showing purple paint inside.
- Take the paintbrush lying on the bottom step in front of the tower door, dip it into the open purple paint pail, then drag it onto the orange bell hanging in the small tower to the right of the clock. The bell turns purple; tap it.
- Tap the closed purple bud growing from the box/chest to the right of the guard. It opens into a purple flower; tap the flower.
- Pull the metal spearhead off the top of the small tower to the right of the clock and drag it onto the cobweb-covered round window in the roof gable above the clock. The spearhead cuts the web away; tap the round wooden shutter that is revealed.
- Tap the big clock face. It swings open like a door, showing the gear mechanism: a fixed star-shaped gear with a pendulum at upper left, one grey gear already mounted at lower middle, and empty pegs. Drag the THREE gears from the ledge onto the empty pegs so the teeth link up: the large pink gear on the top-middle peg, the light grey gear on the right peg, and the small dark gear on the left peg next to the star gear (the arrangement in the screenshot). When it is right, the clock closes and its coloured pointer segment advances from 2 to 5. Tap the clock face to take it.
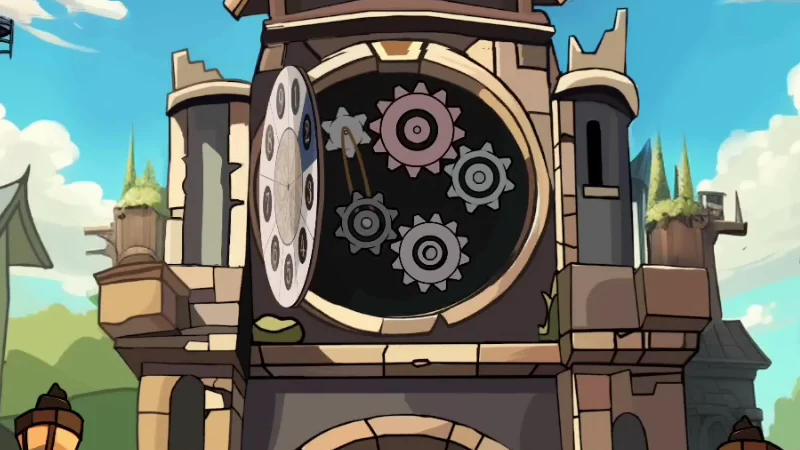
Working gear layout: large pink gear top middle, small gear right, small dark gear left beside the star gear; the lower-middle grey gear was already in place. - Important clue: the ticket kiosk's shutters open and a ticket appears in its window; take it. The guard asks whether the sheriff has a ticket. Sheriff: 'Yes, here it is. I just got it from the ticket kiosk.' After further questions the sheriff says: 'I'm from a neighboring village.' 'I've come to admire the local attractions for a few days.' The guard throws back his hood: 'Don't try to deceive me. No one has ever outsmarted Waldo!' 'You're not from our world. You're the second monster I've caught this week.' 'You're in deep trouble!' The map then shows the Dungeon.
Dungeon
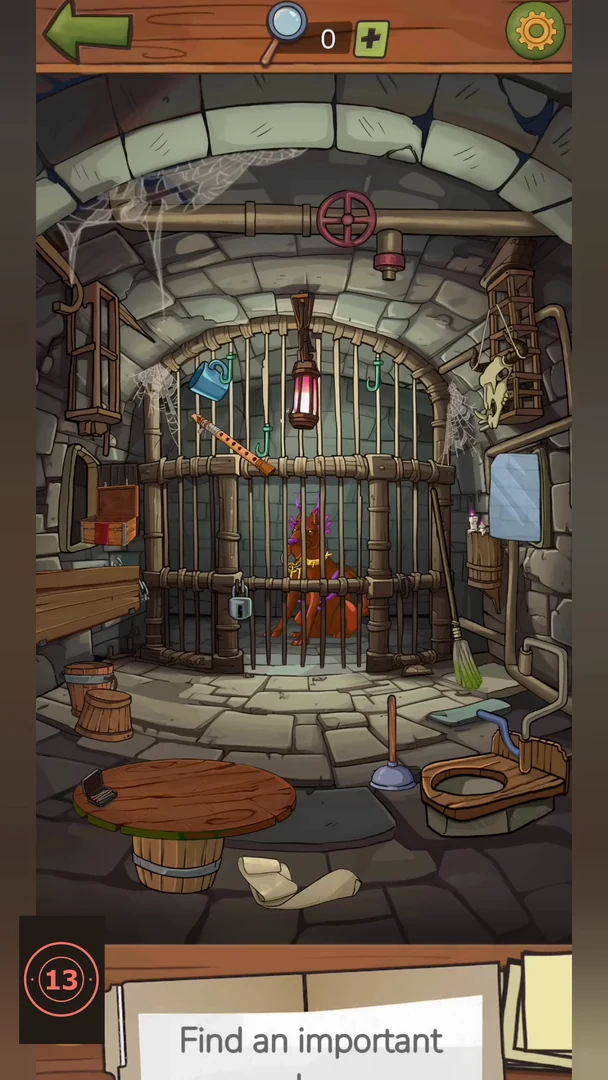
The sheriff wakes in a cell: 'Where am I?' Waldo, outside the bars, accuses the sheriff of being a monster from another world and says the boy will be punished. Sheriff: 'Waldo, don't harm the child! If you must, punish me instead.' Waldo leaves his dog on guard: 'Don't try anything foolish.' The checklist has nine items: yellow horn, pair of candle stubs, green bucket, frying pan, coiled rope, black mug, cardboard tube, crumpled map and a picture of a bottle and cup. Then open the rune box and escape the cell as the important clue.
- Look at the animal skull hanging on the cage at the upper right. A yellow curved horn appears in its mouth; tap it.
- Take a match from the matchbox on the left edge of the round table and light both candles on the table. Wait for them to burn down, then tap the two candle stubs.
- Drag the blue mug from the table to the wooden bucket by the bars to pour water into it. Then dip the mop leaning on the bars into the bucket, wipe the green slime puddle on the floor with it and put the mop back into the bucket. The bucket turns green; tap it.
- Tap the frying pan hanging on the upper-left wall, left of the lantern.
- Pull the plunger out from behind the small wooden bucket under the chained bench on the left and drag it onto the wooden toilet at the lower right. The plunger pulls a coiled rope out of the toilet; tap the rope.
- Drag the blue mug from the table up to the green hooks on the cage bars and hang it on the hook to the LEFT of the lantern. A black mug-shaped shadow appears on the stone wall above it. Tap that black shadow to collect the black mug. (If you first hang the mug on the hook right of the lantern, a shadow also appears there, but in the recording it was not collected; the player moved the mug to the left hook.)
- Drag the toilet-paper roll on the floor in front of the table to unroll it completely. Tap the empty cardboard tube left at the end.
- Tap the wooden bench hanging on chains at the left. Its seat drops and a crumpled map is revealed on it; tap the map.
- Tap the tall mirror on the right wall. It turns round to show a framed picture of a wine bottle and a cup; tap the picture.
- Important clue: a red-topped wooden box appears on the ledge left of the cell; tap it to open its rune lock. Four rune blocks sit in the top row and four matching runes are painted along the bottom (left to right: looped '4' rune, bell rune, an empty middle column, hook rune, Y-triangle rune). Move each block down into the bottom slot above its matching rune. The wooden bar with arrows blocks the columns beneath it; slide it left or right to open the column you need. One working order: hook rune into the fourth slot, looped '4' into the first slot, Y-triangle into the fifth slot and the bell into the second slot.
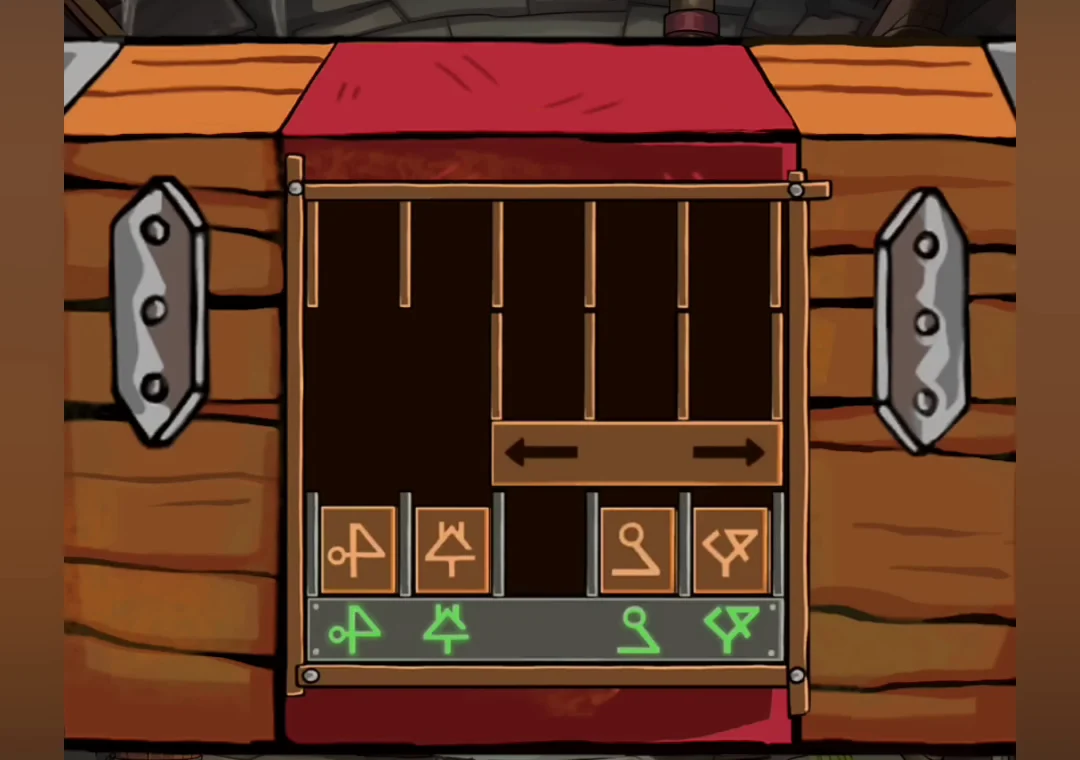
Solved rune box: each block sits above its matching green rune; the middle column stays empty. - Take the flute from the box and play it in front of Waldo's guard dog. The dog lies down and the key drops from its collar. Drag the key to the padlock on the cell door to open it. Sheriff: 'I've finally escaped!' The map then shows Death Square.
Death Square
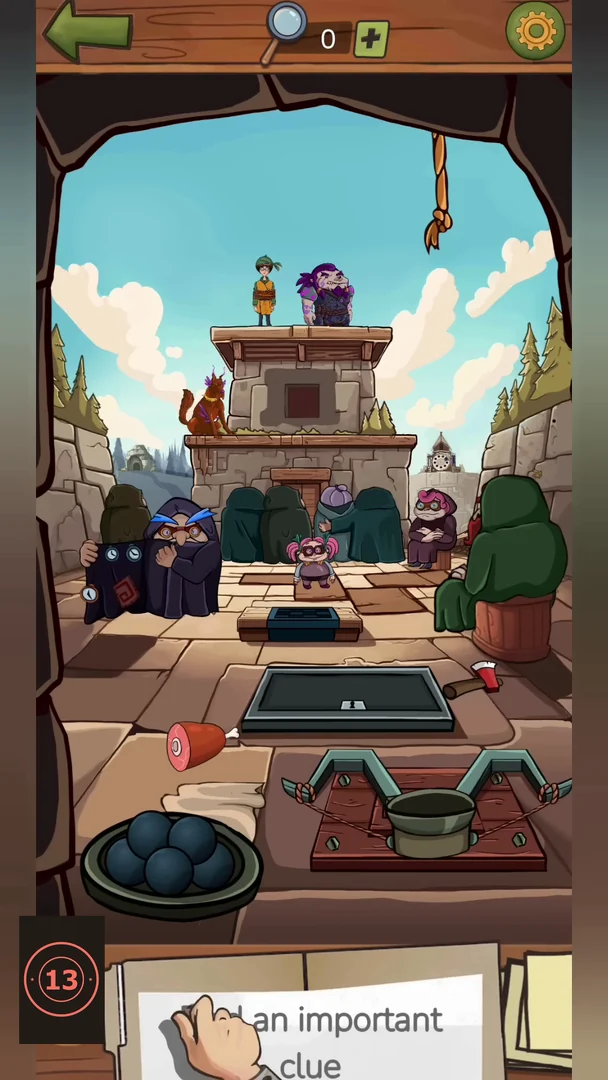
Choose Death Square on the map. The boy and the purple troll stand on top of a stone platform while hooded townsfolk watch. The sheriff's first thoughts are skipped too quickly to read. The checklist has nine items: red boot, teal feather, goggles, barred window shutter, black zigzag symbol, stump with a cobweb, orange sparkles, blue amulet and red horseshoe magnet. Then open the trapdoor as the important clue.
- Tap the red boot lying on the big grey trapdoor in the middle of the square.
- Pull the cloth off the pot of cannonballs at the bottom left (you need the cannonballs later). Watch the blue peacock flying over the square: when it lands on the hanging rope at the top right and flies off, it drops a teal feather there. Tap the feather.
- Pull the hanging rope at the top right. A pair of goggles drops down on its end; tap them.
- Take the orange spiral coin from the trapdoor and give it to the merchant in the dark cloak on the left. He opens his cloak: it is lined with clocks and has a red square-spiral patch. Remember the patch pattern; it is the answer to the tile box later.
- Tap the black zigzag symbol carved into the stone wall on the left edge of the square, above the merchant.
- Drag a cannonball from the uncovered pot into the basket of the catapult at the bottom and fire it. It knocks the barred window shutter off the stone platform; tap the shutter.
- Lift the lid off the tree stump at the left to start a web puzzle. Seven points (top, upper left, upper right, centre, lower left, lower right, bottom) are joined by ten lines: the centre connects to all six outer points, plus top-upper right, top-upper left, upper left-lower left and lower right-bottom. Trace every line exactly once without lifting your finger. Start at the top or upper-left point, for example: top, upper right, centre, lower right, bottom, centre, lower left, upper left, centre, top, upper left. The stump is then covered with a cobweb; tap it.
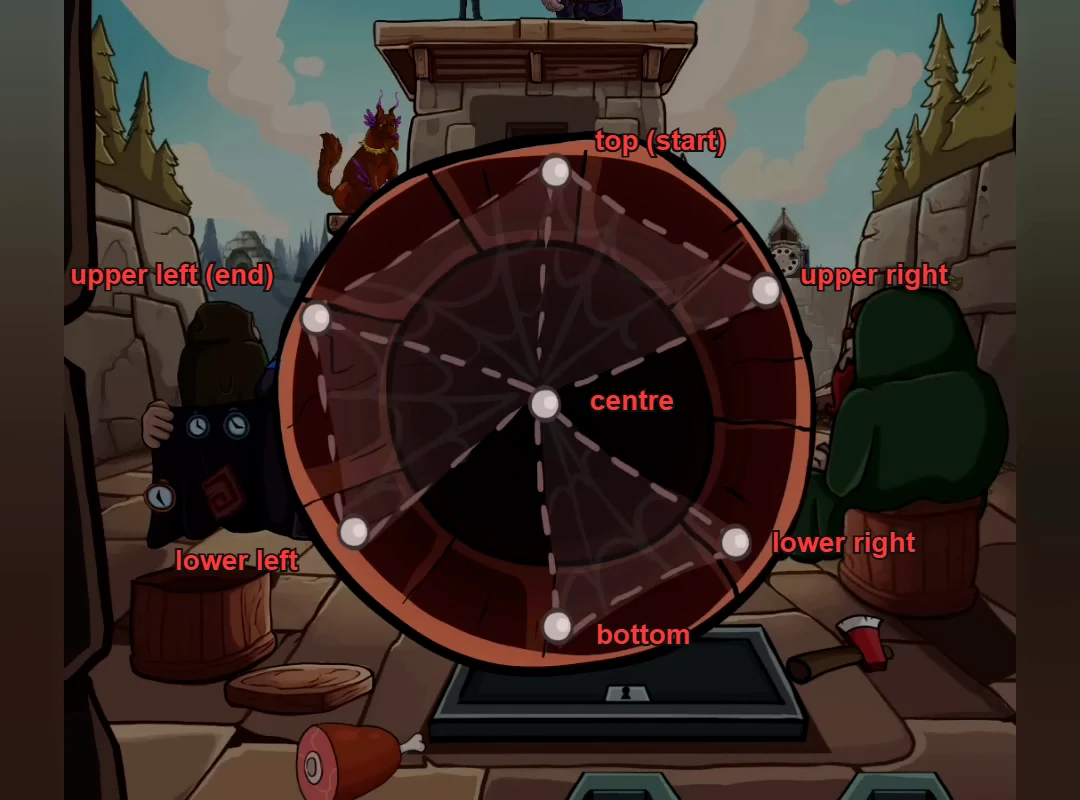
The seven points and ten lines. Start at the top and finish at the upper left (route in the step text). - Orange sparkles appear near the distant clock tower on the right side of the square; tap them.
- Tap the small dark tile box behind the trapdoor to open a 4x4 line grid. Draw the same square spiral as the patch on the merchant's cloak: along the top edge from left to right, down the right edge, along the bottom edge from right to left, up the left edge to the channel between rows 2 and 3, right along that channel to the channel between columns 2 and 3, then down to the bottom edge. The box opens; tap the blue amulet.
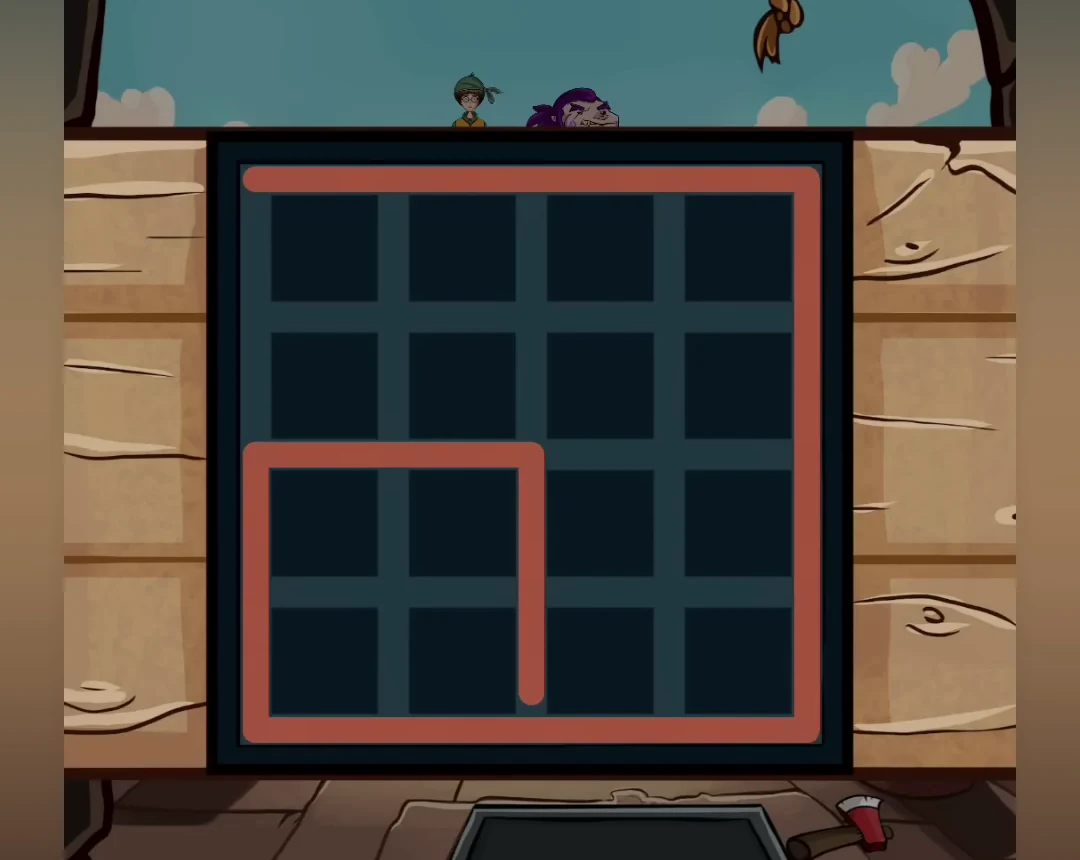
Completed spiral: after the outer edges and the left edge up to the middle line, go right two cells, then straight down. - Drag the red axe lying to the right of the trapdoor to the figure in the green hood sitting on the tub. A red horseshoe magnet appears; tap it.
- Important clue: the old man in the green hood greets the sheriff. Sheriff: 'Waldo is about to do something terrible.' Old man: 'Keep your voice down! There's a passage to the tower here in the square. Take this key and open the hatch.' He adds: 'Afterwards, you can go through the tunnel to the park. I'll be waiting for you there.' Drag the key to the keyhole of the trapdoor to open the hatch.
Tower Interior
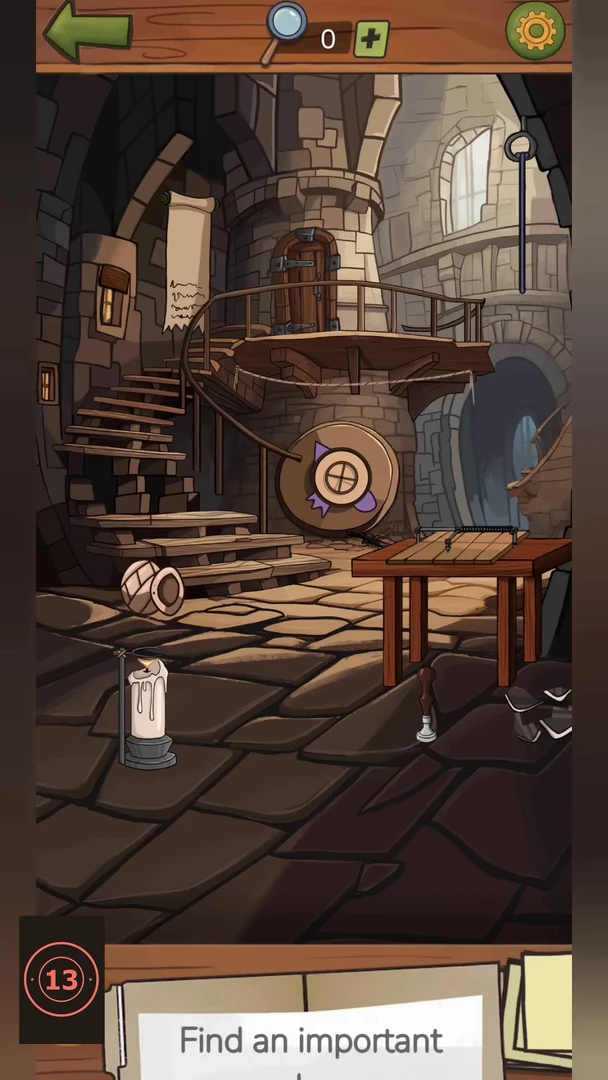
After the hatch in Death Square is open, the map leads to the hall inside the tower. The sheriff thinks: 'Milto was right! There's a staircase that leads to the tower.' The staircase is missing steps. The checklist has nine items: sealed letter, quiver of arrows, deer trophy, blue fish, purple crystal, purple paper, red claw marks, green pouch pendant and green book. Then solve the template press as the important clue.
- Take the spoon of melted red wax from the top of the white candle on the left and pour it on the envelope on the floor. Then press the wax seal stamp standing on the floor beside the table onto the wax. Tap the sealed letter.
- Tap the quiver of arrows leaning against the left end of the table.
- Tip over the clay jug on the left side of the floor. A blue fish slides out; tap it.
- Pull the glass case hanging on a long rope at the right down to the floor. It breaks and leaves a purple crystal at the bottom right; tap the crystal.
- Look at the long paper notice hanging on the tower wall at the upper left. Red claw marks appear on it; tap them.
- The red deer head mounted above the tower door has no antlers. Drag two green antlers onto it: one appears from the left side of the tower top and the other sticks out of the tower wall to the right of the door. The finished deer trophy is the shield item; tap it.
- Tap the purple paper pinned at the upper right of the round target under the balcony.
- Drag the small yellow symbol plate hanging to the right of the deer head onto the dark green book lying on the floor at the bottom left. The symbol appears on the cover; tap the book.
- Drag the throwing knife hanging on the wall left of the round target up to the rope under the balcony and cut down the bundle of teal feathers. The green pouch hanging beside it can now be taken; tap it to collect the pendant.
- Important clue: a template press opens. The tray at the top holds four grey templates (left to right: a sloped shape that is tall on the left and slopes down to the right; a V-notch shape with two uprights; a house shape with a pointed roof; a step shape that is low on the left and tall on the right). Drag a template onto the guide on the left and the saw cuts the wooden block on the right into the same outline; each new cut is made on what is left of the block. Templates go back to the tray and can be used again. The two outlines at the bottom must be filled. Left outline: sloped template, then house template. Right outline: step template, then house template, then V-notch template. The two finished wooden pieces appear on the table; drag them onto the gaps in the staircase. The stairs are complete and the sheriff climbs to the door at the top: 'All is ready! We have never been so close to our goal. Let's go!'
Tower Platform
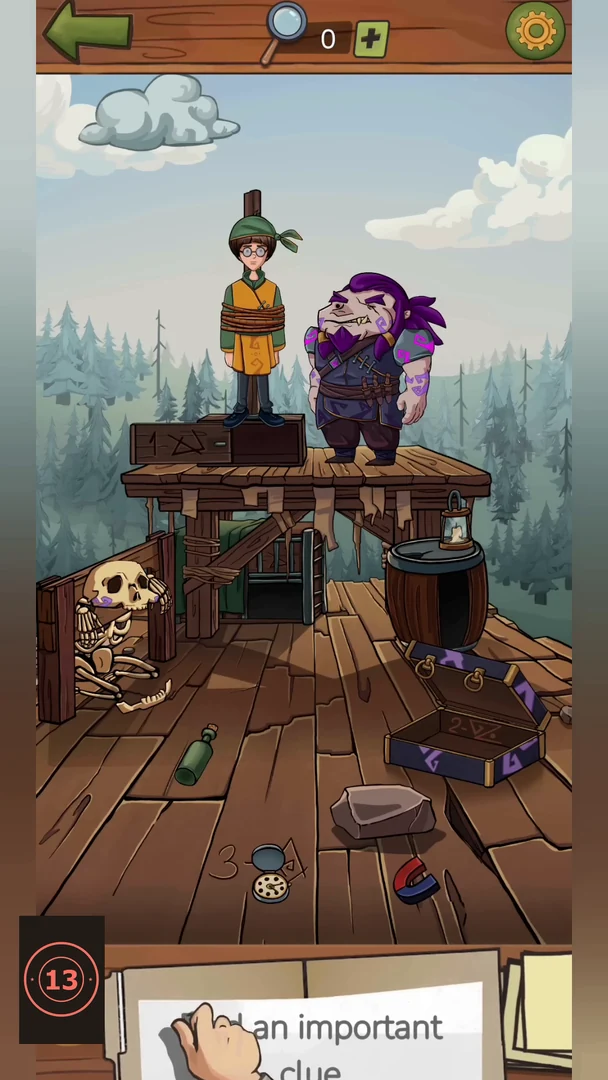
After the stairs in the tower are repaired, choose the new location next to Death Square on the map. On a wooden platform high above the forest, the boy is tied to a post on a locked box and the purple troll stands guard. The sheriff, still wearing the green hood, says: 'Waldo, release the boy.' Waldo replies: 'You again? Your time's up, and so is your little friend's.' The sheriff answers: 'We'll see about that.' The checklist has nine items: small dark tower, purple glowing spider, lightning bolt, wooden figure, brown pointed hat, chains with rope, purple creature in a bowl, crescent moon and key. Then beat the troll in a fist fight as the important clue.
- Tap the small dark tower far away in the forest at the upper left of the scene.
- Drag the hacksaw lying on the floor at the bottom left up to the small wooden figure stuck on top of the post above the boy's head. The saw cuts the figure off; tap it.
- Push the grey rock on the right side of the floor to the left. A dark bar lying in the gap between the planks underneath can now be used: drag it to the front of the barrel under the lantern to break its planks open. Tap the brown pointed hat inside the barrel.
- Watch the sky at the top right: a white crescent moon appears among the clouds. Tap it.
- Tap the padlock on the front of the box the boy stands on. It has three windows; tap each window to change its symbol. The code is carved in three places, each marked with its position number: '1' is carved on the front of the box itself (a crossed, angular symbol); '2' is carved inside the purple chest on the floor (a triangle joined to a Z with a dot); '3' is carved in the floor at the bottom, partly hidden under the pocket watch (drag the watch aside to see a diamond with a small spiral inside). Set the windows, left to right: crossed symbol, triangle-Z with dot, diamond with spiral. The lock opens and a drawer in the box can be opened.
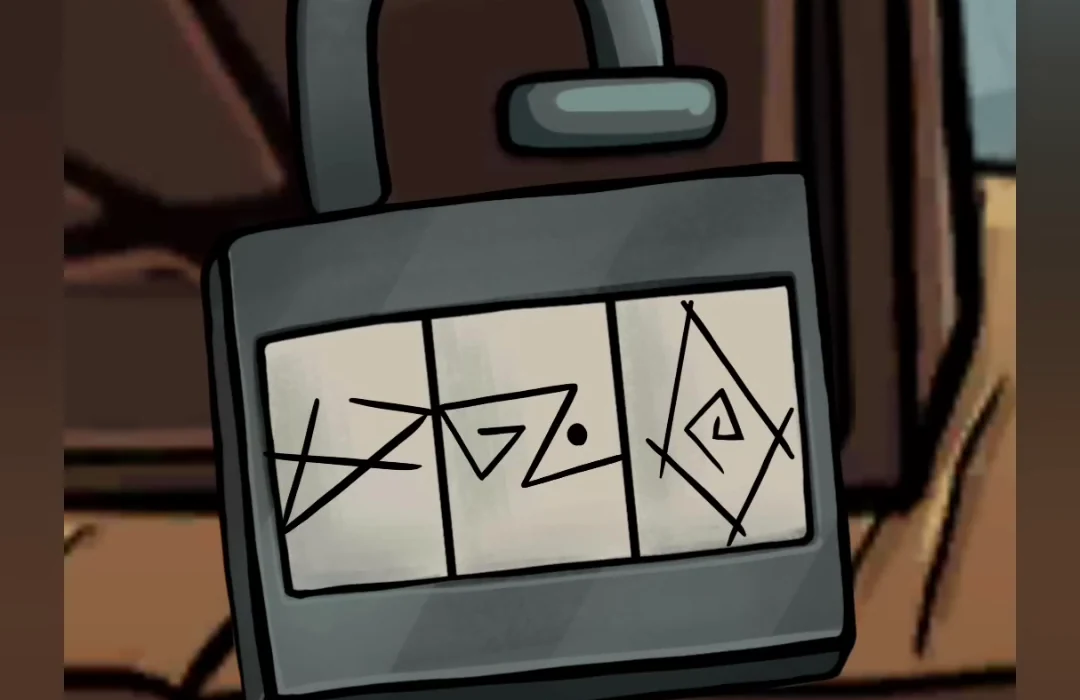
Correct padlock setting, left to right: crossed symbol, triangle-Z with dot, diamond with spiral. - Drag the grappling hook from the box drawer down to the coil of rope on the floor in front of the barrel. Tap the hook and rope (the chains with rope on the checklist).
- Open the purple chest with the spiral pattern on the right side of the floor. Drag the red-and-blue horseshoe magnet from inside it to the crack in the floor just right of the grey rock. The magnet pulls out a key; tap the key.
- A lightning bolt flashes from the grey cloud at the top left of the sky. Tap it.
- The little purple creature with shining eyes sits behind the bars under the platform. Let it out: it walks to the green bowl of red food on the floor and sits in it. Tap the creature in the bowl.
- Drag the white-and-purple feather lying in the middle of the floor to the skeleton's skull on the left. Tickled, the skeleton moves its hand and a purple glowing spider crawls out; tap the spider.
- Important clue: the troll says: 'Come over here if you're brave enough. I'll throw you down from this tower.' A fist fight starts. The troll's purple health bar is at the top right and yours (red) at the top left. Tap the fist button at the bottom right to punch the troll; tap the green shield button at the bottom left to raise your fists and block his punches. If you do not block, his fist hits the screen and your bar drops. Keep punching and block his swings until his purple bar is empty. The troll is knocked out, the boy's ropes fall off and the sheriff thinks: 'We need to free Joe and leave this place, now.' After a short conversation the boy says: 'Let's go before Waldo recovers!' The map opens with the Tunnel as the next location.
Tunnel
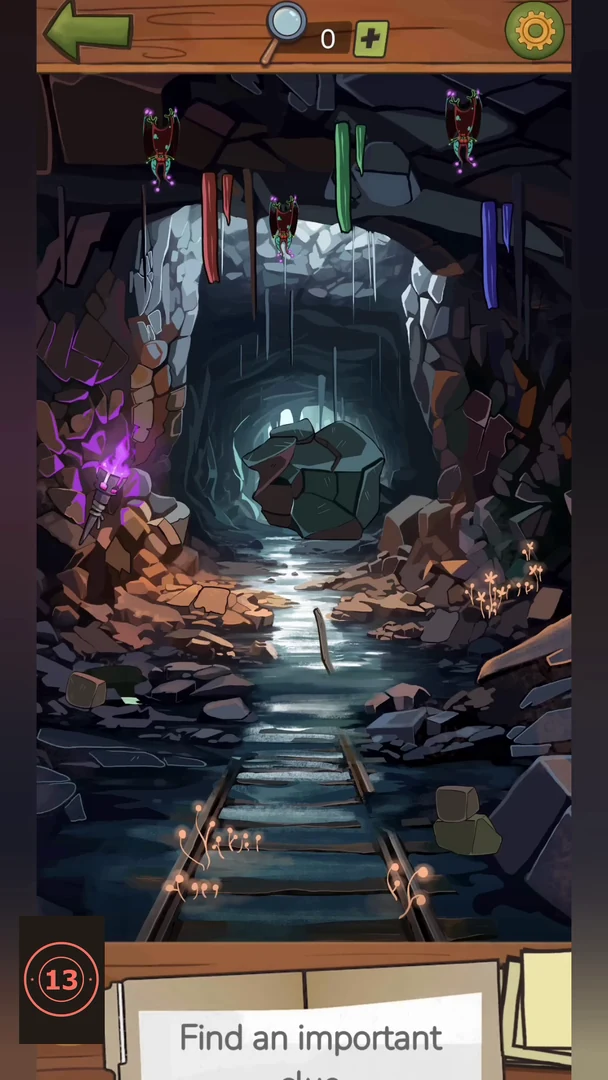
After the fight, choose the Tunnel on the map. The sheriff and Joe talk on the way: the sheriff says 'I can't believe that all this is actually happening.' and asks Joe why he went through the portal alone. The sheriff ends with: 'Do you see the huge stone barrier in our way? We need to somehow remove it from our path. Look around, maybe you'll find something useful.' The checklist has nine items: purple pendant, wheel, yellow boot, teal mushrooms, orange star, stack of stones, bucket of coloured stalactites, green fish and purple crystal. Then set up the explosive as the important clue.
- The purple pendant is broken in two. One half lies on the rocks at the bottom left beside the rails, the other on the rocks at the lower right. Drag the left half to the right half; they join into a whole pendant. Tap it.
- Move the stick lying in the stream in the middle of the tunnel. A wheel is revealed in the water; tap it.
- Tap the yellow boot on the rock ledge at the right, above the wooden bucket.
- On the left bank, a brown stone lies on a pale green pool. Move the stone aside to uncover teal mushrooms and tap them.
- Tap the bat hanging from the ceiling at the top right. It drops an orange star; tap the star.
- Coloured flat stones lie on the railway sleepers. Stack them on the olive flat stone at the lower right of the rails, from bottom to top: orange-rust, green, mauve, the brown pointed stone, and yellow on top. Tap the finished stack.
- Drag the red, green and blue stalactites hanging from the ceiling down into the wooden bucket at the right, next to the glowing mushrooms. Tap the bucket full of coloured sticks.
- Drag the green net lying at the lower left to the green fish that keeps leaping out of the stream. The net catches the fish; tap the catch.
- Drag the purple torch burning on the left wall to the block of ice at the top left. The ice melts and leaves a purple crystal; tap it.
- Important clue: Joe says: 'Sheriff, I found something. It looks like an explosive, but it needs activating.' The sheriff answers: 'Don't touch it, Joe. Let me figure this out.' and 'Perhaps this will help us open the way to the park.' A stone tablet with a purple crystal at the top and bottom appears, crossed by ten rotating pipe pieces in three columns and four rows (the right column has pieces only in rows 2 and 3). Tap a piece to turn it 90 degrees clockwise. Lit pieces are connected to the bottom crystal. Make one channel from the bottom crystal to the top crystal: row 1: left piece joins right and down, middle piece joins left and up (to the top crystal); row 2: left joins up and right, middle straight across, right joins left and down; row 3: left joins right and down, middle straight across, right joins up and left; row 4: left joins up and right, middle joins left and down (to the bottom crystal). Example: from one observed starting layout that is 2 taps on each left-column piece, 1 tap on the middle pieces of rows 1, 2 and 3, 3 taps on the middle piece of row 4, 1 tap on the right piece of row 2 and 2 taps on the right piece of row 3. The fuse lights, the sheriff says: 'The explosive's set; we need to place it near the stone quickly.' The explosive is placed at the barrier and blows it apart. The map then shows the Park as the next location.
Park
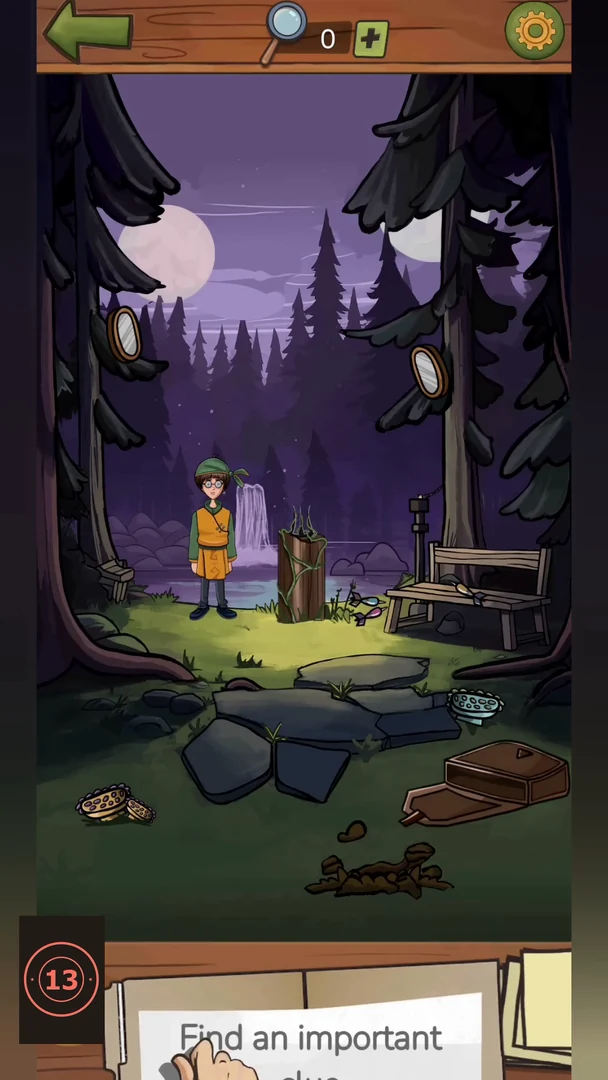
After the tunnel, choose the Park on the map. The sheriff says: 'It looks like we managed to break away from the chase.' 'We need to leave this place. We can't hide here forever.' Joe answers: 'We need the moonstone to open the portal. Milto should be here any minute.' 'I hope he can help us with this.' The sheriff adds: 'And we'll also need to properly camouflage the laboratory. We don't want others opening this Pandora's box!' Joe: 'Let's not get ahead of ourselves! For now, we need to escape!' 'We'll deal with the rest later.' The checklist has nine items: red ribbon, herbarium book, glass jar, pan pipes, target, star constellation, signpost, clay jug and knife. Then open the portal home as the important clue.
- Near the top of the tall tree on the right (above the oval mirror on its trunk), a red ribbon is half hidden in the branches. Move the branch aside and tap the red ribbon.
- Tap the open book lying on the bench at the right. It opens as a herbarium with grey plant shadows on both pages and pressed plants below it. Drag each plant (leaves, a lupine, grass, daisies, a star flower, a blue feather leaf and others) onto the shadow with the same shape. When every shadow is filled, the book closes on the bench; tap it.
- Tap the bundle of sticks by the bench at the right. Six wooden logs tied with a purple cloth appear. Swap the logs until they stand in order of height, tallest on the left and shortest on the right. The bundle becomes a set of pan pipes on the bench; tap it.
- On the tree trunk behind the bench hangs a paper target with arrows stuck in it. Pull the arrows out; the clean red-and-white target is then highlighted. Tap it.
- Tap the stars in the sky. In the close-up, drag the four bright stars into the Y-shaped constellation shown on the checklist: one at the upper left, one a little lower at the upper right, one in the centre where the arms meet and one straight below it. The stars join with lines; back in the park, tap the constellation.
- Drag the wooden board with a red X lying on the ground at the left onto the empty post next to it. Open the brown leather case lying on the ground at the lower right; a nail comes out. Drag the nail to the sign, then drag the hammer lying on the grass under the big tree at the left to the nail to fix the sign. Tap the signpost.
- A broken clay jug lies at the bottom of the scene. Drag the white glue tube lying at the left (near the roots of the big tree) to the jug, then drag the missing clay shard from the open leather case onto the crack. Tap the mended jug.
- Look at the water behind the rocks, between the tree stump and the bench: a glass jar is floating there. Pull it out and tap it.
- The flat stones at the front have a knife-shaped outline. Drag the blue blade lying on the grass by the foot of the stump into the outline, then drag the wrapped handle from the lower left onto it. Tap the finished knife.
- Important clue: Milto arrives: 'Here I am! Sorry for the delay. I had to make sure I wasn't being followed.' 'By the way, I brought what you need.' 'You know I have a lot of stuff in my cellar!' The sheriff thanks him: 'Thank you! We owe our lives to you!' Milto: 'Perhaps someday you will return the favor! Now hurry up.' 'You have very little time.' Drag the pink moonstone from Milto's hand to the top of the tree stump in the middle. The moon rises; moonlight falls on the oval mirror on the right tree. Turn the mirrors so the beam goes from the right mirror to the mirror on the left tree and from there down onto the moonstone. A portal opens above the stump. The sheriff says goodbye ('It's been an extraordinary journey, but we must leave now.' 'Goodbye, Milto!'), Milto answers 'Farewell, my friends', and they step through. The map shows Sweet home as the final location.
Sweet Home (Ending)
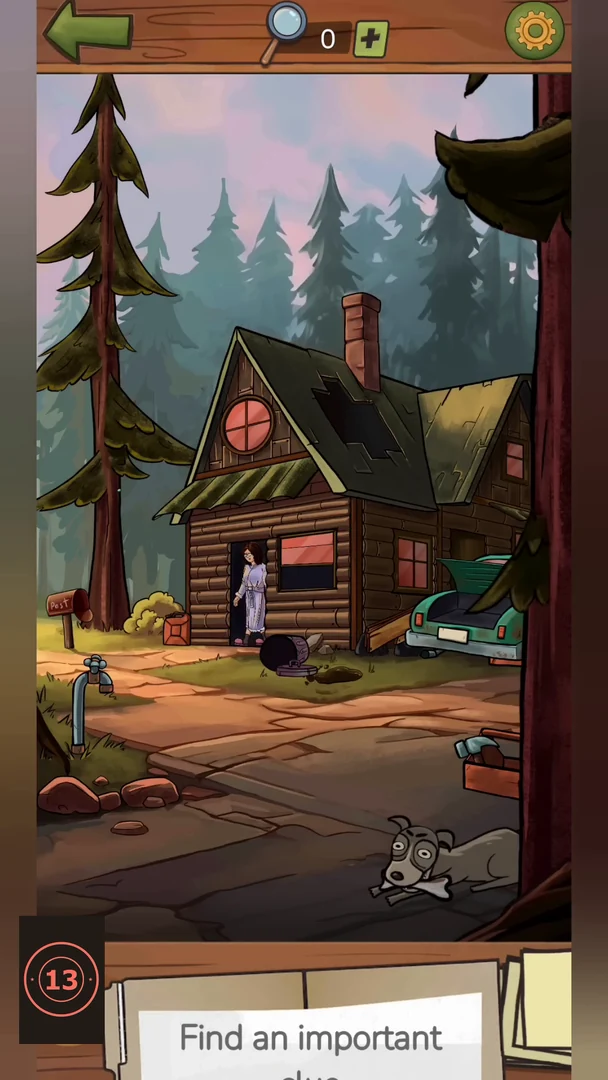
After the portal in the park, choose Sweet home on the map. It is the last location of Part 3: Joe's log house in the forest, with a green car on the right, a dog lying in the front, a toolbox at the right edge and a crow on the chimney. The checklist has nine items: orange squirrel, pizza box, rooster weathervane, telescope, birdhouse, grey cat, pie, flower and sneaker. Then watch the ending as the important clue.
- At the top of the tall pine on the left, an orange squirrel sits in the branches. Tap it.
- Tap the trunk of the green car; it opens and there is a shovel inside. Drag the shovel to the X mark on the ground between the trash can and the car. It digs a hole and finds a bone. Give the bone to the dog lying at the bottom right; it drops its toy. Next, drag the orange funnel lying on the ground in the middle to the fuel filler at the back right of the car. Then drag the red jerrycan from beside the yellow bush at the left corner of the house to the funnel. With fuel in the tank, the car moves to the right and stays partly in view at the right edge, uncovering a pizza box on the ground by its rear bumper. Tap the pizza box.
- Tap the grey trash can in front of the house. It tips over and a golden rooster figure walks out. The rooster flies up to the empty weathervane on the roof; tap the completed rooster weathervane.
- Take the hammer from the red toolbox at the right edge of the screen and drag it onto the wooden boards nailed across the roof. Each time, one board falls off and the hammer goes back. Repeat until all boards are gone. A telescope stands in the hole in the roof; tap it.
- Tap the birdhouse hanging on the left pine. A close-up shows the birdhouse with green outlines for four missing pieces, with the loose pieces lying around it. Drag each piece onto its outline: the hanging hook at the top, the red roof, the wooden perch peg and the brown base board underneath. When all four are in place, the finished birdhouse hangs back on the tree; tap it.
- Tap the crow on the chimney. It flies away and the large pine branch at the top right moves up, uncovering a grey cat asleep on the right side of the roof. Tap the cat.
- Tap the big front window to the right of the door. It slides up and a pie is on the sill; tap the pie.
- Drag the grey watering can at the bottom left to the outdoor water tap on the pipe at the left and fill it. Then drag the full can to the small green sprout in the middle of the yard and water it. A white flower grows; tap it.
- Drag the chimney brush (a long pole with a dark bristle head, lying on the ground at the bottom left) up to the chimney and push it in. A sneaker pops out on top of the chimney; tap it. This completes the checklist.
- Important clue: the ending plays. Joe runs to the house, where his mother waits at the door. Joe calls out to his mother. Mother: 'Oh my God, Joe! Are you alright?' The sheriff: 'He just got a bit lost in the forest. Everything's okay now!' and 'No need to thank me! Joe is a wonderful boy - so brave and curious.' 'Maybe a tad too curious for his own good!' 'Just ensure he doesn't venture into the forest by himself again.' Mother: 'I promise, I'll be watching him closely from now on!' Then glowing portals open in the sky above the house. The sheriff thinks: 'What... How can this be? We sealed off the lab!' The story ends with 'To be continued...'.