Joe in the Library
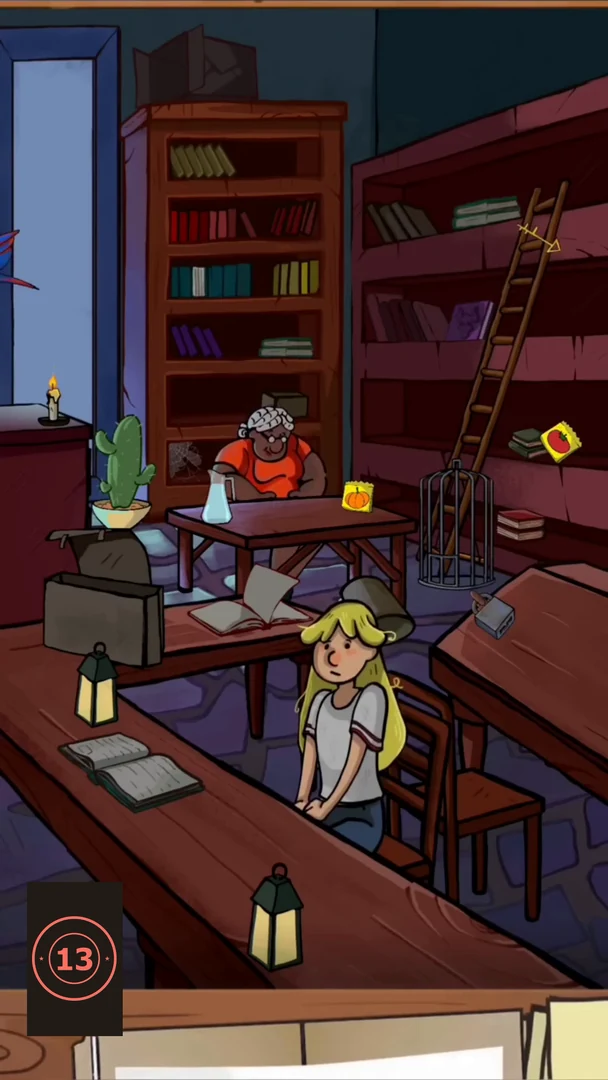
In the 2023 version of the game, the story jumps back in time after the sheriff steps through the portal, and you play as Joe himself. In a later 2025 version the portal led straight to Part 3 and these Joe levels did not appear, so they may have been moved or removed in current versions. Joe searches the library at night while the librarian works at her desk and a girl sleeps at the front table. The checklist has nine items: woman's portrait, ink-stained paper, colourful painting, white bust, magnifying glass, Marathon chocolate bar, purple flower, orange book and skull notepad. Then find the important clue.
- You now play as Joe. He thinks: 'I love books so much. I'll try to find something interesting in this library.' Tap the small white notepad standing on top of the tall bookcase in the middle. It opens a torn page from Hamlet with five gaps and eight loose word scraps. Drag the right words into the gaps: 'To be' (first gap), 'Question' (end of line 1), 'mind' (line 2), 'Fortune' (line 3) and 'Sea' (line 4). 'Dont', 'dark' and 'feature' are decoys. The page then burns away, and a notepad with a skull drawing appears on top of the bookcase. Tap it.
- Drag the small blue inkwell at the back of the slanted desk on the right onto the sheet of paper lying on that desk. Ink spills over it. Tap the ink-stained paper.
- Drag the yellow seed packet with the green cactus picture (on the right wall shelf beside the ladder) onto the pot on the left end of the librarian's desk. A cactus grows. Then drag the glass water flask from the librarian's desk over the cactus to water it. A purple flower blooms on top. Tap it.
- Tap the unlit lantern at the left end of the front table to light it. The open book on the desk behind it then turns its pages to a sepia portrait. Tap the portrait.
- Tip over the metal waste bin standing beside the middle desk. The clatter wakes the girl sleeping at the front table, and a Marathon chocolate bar appears on the table in front of her. Tap it. Then tap the magnifying glass that rolled out of the bin by her right shoulder.
- Move the empty chair to the right of the girl. A colourful painting lies under it. Drag the painting into the empty, crooked frame on the right wall above, then tap the framed picture.
- Drag the red-handled cutter lying on the librarian's desk up to the dark box on top of the tall bookcase. The box opens and an orange ball of yarn tumbles out and down to the librarian's desk, where an orange book appears. Tap the orange book.
- A white cloth appears by the lantern at the front right of the near table. Drag it up to the white bust at the top right and wipe off the yellow mark on its face. Tap the clean bust.
- Find the important clue: tap the blue parrot on the ladder. It flies away and leaves a small key on the ladder. Drag the key to the padlock on the slanted desk at the right. The lid opens to show a red book. Joe thinks: 'I wonder why this book was locked in a drawer? I must bring it out so that the librarian does not notice anything. I'll have to read it carefully at home!'
Joe's Attic Room
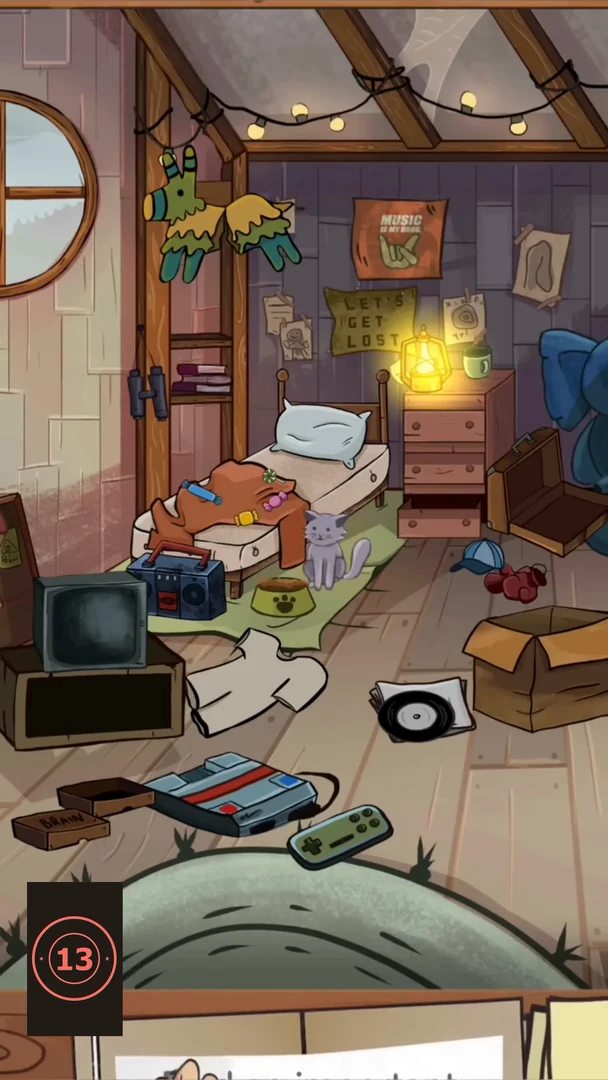
The map takes Joe home to his own attic room. The checklist has nine items: candy cane, Rubik's cube, grey mug shadow, brown sock, underpants, blue book, lightning-bolt sparks, pink flag and toy fish. Two of them come from the TV game console on the floor.
- Joe thinks: 'I love my room! There is always something to do here!' Drag the orange GAME cartridge from the TV stand into the grey console on the floor. The controller appears. It is the same ball-and-blocks TV game as in Part 1. The white ball moves forward by itself over scrolling green blocks. To make it hop over the blocks, tap the round buttons on the right side of the pad. In a phone playthrough that shows touches, the player tapped those right-hand buttons again and again (short taps, mostly on the upper ones) until the pink flag appeared. This time the TV only says: 'Thank you! But your flag is in another cartridge'.
- Open the brown BRAIN box from the TV stand (it lies on the floor in front of the console). A blue book is inside. Tap it.
- Move the white T-shirt lying in the middle of the floor. Underpants are underneath. Tap them.
- Take the papers and the vinyl record out of the cardboard box on the right. A cassette tape is under them. Drag the cassette into the blue boombox beside the bed. Lightning-bolt sparks burst from the boombox. Tap them.
- Open the top drawer of the bedside chest. It holds a second orange cartridge. Drag it into the console and play the TV game again the same way (tap the round buttons on the right side of the pad to make the ball hop). This time the pink flag appears on the TV once you reach it. Tap the flag.
- Hit the green piñata hanging at the top left with the baseball bat that appears beside the bed. Sweets fall onto the bed, among them a candy cane. Tap it.
- Open the bottom drawer of the bedside chest and drag the cat-food box into the yellow pet bowl. The sleeping cat jumps down to eat, leaving a blue toy fish on the bed. Tap the fish.
- Open the brown suitcase standing by the bedside chest. A cap, boxing gloves and a brown sock tumble out. Tap the sock.
- Tap the oil lamp on the bedside chest to light it. The green mug next to it now casts a dark shadow on the wall. The checklist card is this grey mug shadow: tap the shadow.
- Tap the Rubik's cube on the rug at the front a few times. Each tap turns it until the faces are a single colour each (green top, red front, yellow side). Then it is collected. Joe then thinks about the book he took from the library: it describes a secret laboratory in his own city that studied meteorite stones and their link to parallel worlds, and it even has a map. Even if it is all fiction, he will try to find the place.
The Street Outside the Arcade
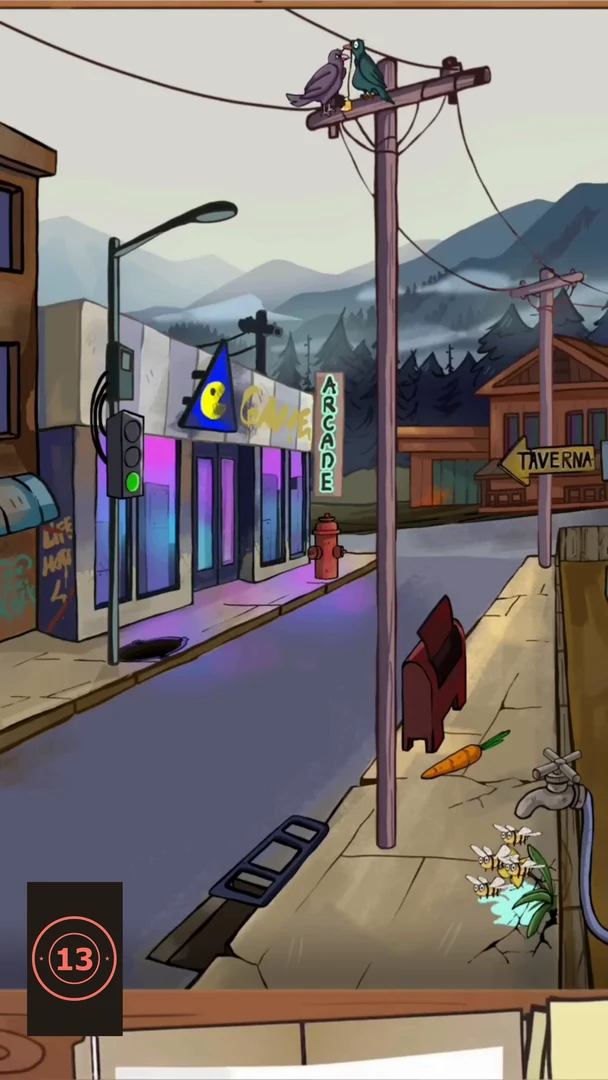
Joe stands on the street opposite the arcade. He thinks: 'Today is Wednesday. And every Wednesday, Phil and I hang out at the arcade club. He's probably already there. But I have other plans. I have to find the place described on the map. I'll have to lie to Phil. I am not yet ready to reveal the whole truth. It may be dangerous.' A pickup truck keeps driving past with a different load each time, and a helicopter keeps flying over with a POST box. The checklist has nine items: beehive, beer mug, cat, hearts, umbrella, parachute crate, manhole cover, rat with a carrot and apple.
- Wait for the pickup truck to drive by with a crate of green apples in the back. Loads change on each pass: a tarp, apples, lemons, potatoes or carrots. While it passes, tap one of the apples. The apple pops out and is collected.
- Tap the ginger cat sitting on the pavement at the bottom of the screen.
- Pick up the metal tap handle lying on the pavement near the pole and drag it onto the water tap on the right. Water runs onto the little plant, which blooms into a yellow flower. The bees around the hive fly down to the flower.
- With the bees away at the flower, tap the beehive hanging on the building at the upper left.
- Wait for the truck to come by with a load of carrots. Drag a carrot from the truck to the grey rat sitting next to the red mailbox. The rat takes the carrot and is collected as 'rat with a carrot'.
- Watch the helicopter: it drops a POST box as it crosses the screen. Drag the black parachute bag with the white parachute symbol from the arcade-side pavement up onto the falling box. The parachute opens and the crate floats down. Tap it.
- Tap the red fire hydrant next to the arcade. It sprays water over the boy in the red cap (Phil), who opens his blue umbrella. Tap the open umbrella. Phil then crosses the street.
- A goose and her gosling stand on a manhole cover at the kerb by the traffic light. When the traffic light changes from red through yellow to green, they walk across the road. Tap the uncovered manhole cover.
- Pick up the rope with a little yellow heart tied to it from the pavement at the bottom. Drag it up to the green bird on top of the telephone pole. The purple bird on the street lamp then flies over to join it, and red hearts appear above the pair. Tap the hearts.
- Tap the STOP sign above the ONE WAY arrow on the right. It turns into a beer-mug tavern sign with a TAVERNA arrow. Tap the beer mug. Joe then talks to Phil. Phil promises 'You will be delighted!' Joe answers: 'Sorry, Phil, today you have to play without me. I'm busy, sorry. I have to help old Billy clean the garage. I'd love to, but you know Billy, you can't convince him.' Phil asks whether the cleaning could move to another day, then gives in: 'That's for sure. Okay, this time I forgive you! But keep in mind, you pay next Wednesday!' The map then opens with the next location.
The Abandoned Laboratory
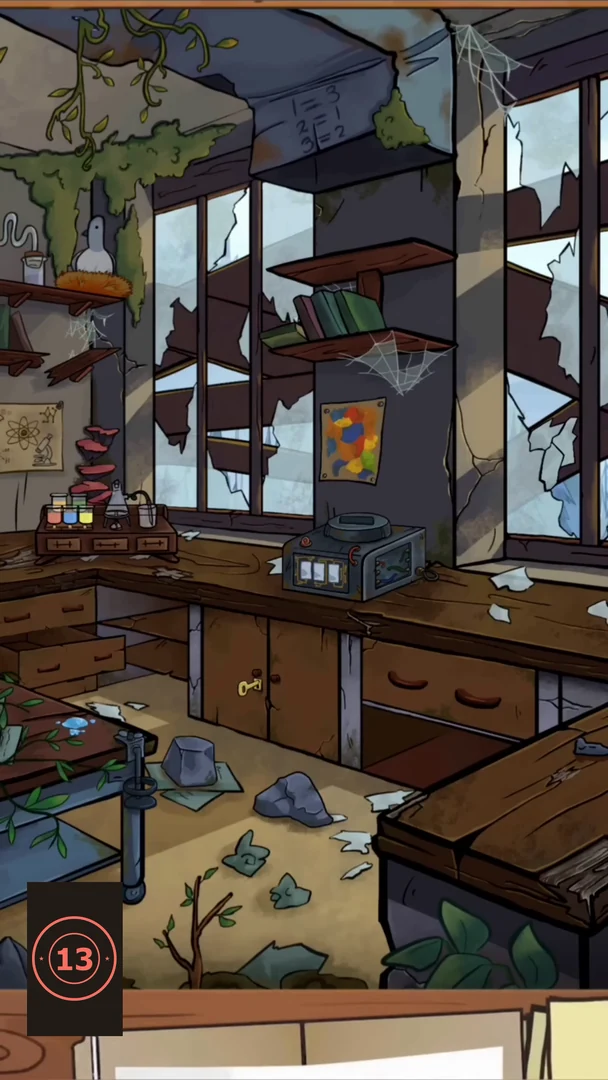
Choose Laboratory on the map. Joe thinks: 'Abandoned laboratory, everything as described in the book! I can't believe my eyes.' The checklist has nine items: purple flask, blue beaker, green dinosaur, WANTED poster, egg, red crystal, purple mushrooms, orange flower and snake. The purple flask comes from a colour-mixing puzzle that needs five coloured test tubes from around the room. Afterwards, open the locked metal box on the counter to find the important clue.
- A bird sits on a nest on the shelf in the upper-left corner. When it lifts off the nest, an egg is revealed. Tap the egg.
- Water drips from a leak on the left. Take the empty glass beaker from the shelf under the left counter and place it under the drip. When it fills with blue water, tap the beaker.
- Open the top drawer of the cabinet below the left counter and take the pink crystal shard out of it. Drag it to the broken window on the right, where a red crystal is stuck in the glass. The pieces join into a glowing red crystal. Tap it.
- Tap the orange flower on the vines hanging at the top left of the room.
- Collect the five coloured test tubes and put each one into the empty rack on the small cabinet at the back-left of the counter. Green: lying on the floor near the roll of tape, in the middle. Orange: on the high wall shelf at the top left. Yellow: in the middle drawer under the right counter. Blue: pick up the metal rod lying on the counter and use it to lever the grey rock on the floor aside; the tube is under it. Red: it is held in the rusty clamp on the corner of the left table. Pour the black bottle with the radiation sign over the rust, then take the red tube out.
- On the dark pillar to the right of the colourful poster, a torn paper hangs folded over. Unfold it to show a WANTED poster, then drag the roll of tape from the floor onto it to stick it up. Tap the WANTED poster.
- Tap the colourful poster on the pillar to look at it: a map of coloured patches with a flask drawn in the corner. Then tap the test-tube rack to open the mixing station with a large empty flask over a burner. Drag the tubes onto the flask one at a time in this order: green, red, yellow, orange, blue. The mixture turns purple. Tap the purple flask.
- Take the scissors with green handles from the right counter and drag them to the vines hanging over the plant shelf in front of the window. Cutting the vines reveals a green dinosaur on the shelf. Tap it.
- Watch the dark gap above the hood over the window: two eyes peek out. A snake comes out. Tap it.
- Pick up the metal rod again and use it to pry open the stuck drawer at the far left under the counter. Purple mushrooms grow inside. Tap them.
- Important clue: tap the metal box on the counter (the one with three number windows). First connect its three wires. The note written on the ceiling beam says 1=3, 2=1, 3=2. Drag the red wire (left 1) to right socket 3, the green wire (left 2) to right socket 1 and the blue wire (left 3) to right socket 2. A red lamp lights on the box. Then set the three number wheels from 4 2 3 to 5 3 7. Pull the handle up and tap the glass cap: it holds a glowing purple meteorite. Joe thinks: 'Meteoritic stone. The book says that it has super strength.' 'Somewhere here, they were supposed to conduct experiments with parallel worlds.' He decides to find that place. The map opens and points to a new place above the laboratory.
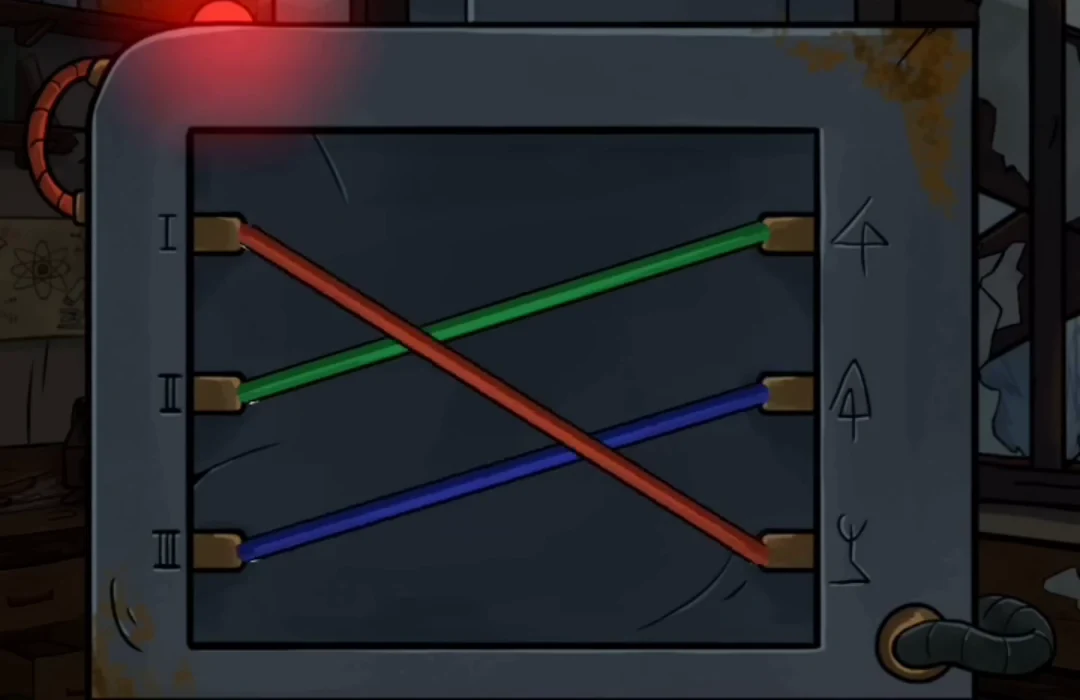
Solved wiring: red 1 to 3, green 2 to 1, blue 3 to 2 (right sockets counted from the top), matching the 1=3, 2=1, 3=2 note.
The Hidden Room Under the Laboratory
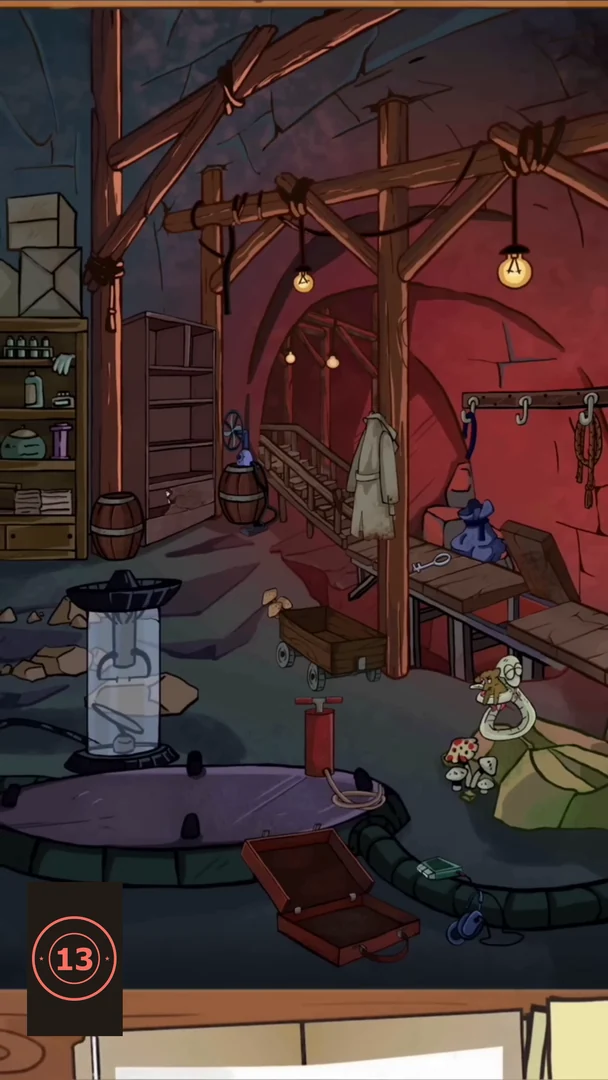
After the meteorite clue, choose the new place on the map. Joe arrives in a red underground room and thinks: 'Have they ...', 'Maybe they themselves were afraid of all this and canned the lab?' and 'If you don't know, you need to figure it out!' A board with seven symbol tokens must be solved first. Then the checklist has nine items: N.3, grey mushrooms, black hat, green bottle, blue balloon, centipede, pocket watch, red hearts and green petri dish. The closing clue is a cassette with Margaret's portal instructions, which ends Joe's story.
- Symbol board puzzle: the board has eight round slots joined by lines: top-left, top-right, middle-left, middle-right, lower-left, lower-right, bottom and the centre. Seven slots hold tokens with symbols; the centre starts empty. Tapping a token next to the empty slot (along a line) slides it there. Each token must end beside its own matching symbol painted on the board. Final layout: top-left = circle with crossed legs, top-right = 'F-o' sign, middle-left = circle with a stem, middle-right = circle with a horn and slash, lower-left = 'No' sign, lower-right = cross over a circle with a stem, bottom = 'A over O' sign, centre empty. From the starting layout, a short solution is to tap these slots in order: middle-left, bottom, lower-left, centre, lower-right, bottom, middle-right, top-right, centre, middle-left, bottom, middle-right, centre, top-left, middle-left, bottom, lower-left, centre. When everything is right, the tokens turn orange. A skip button is also available.
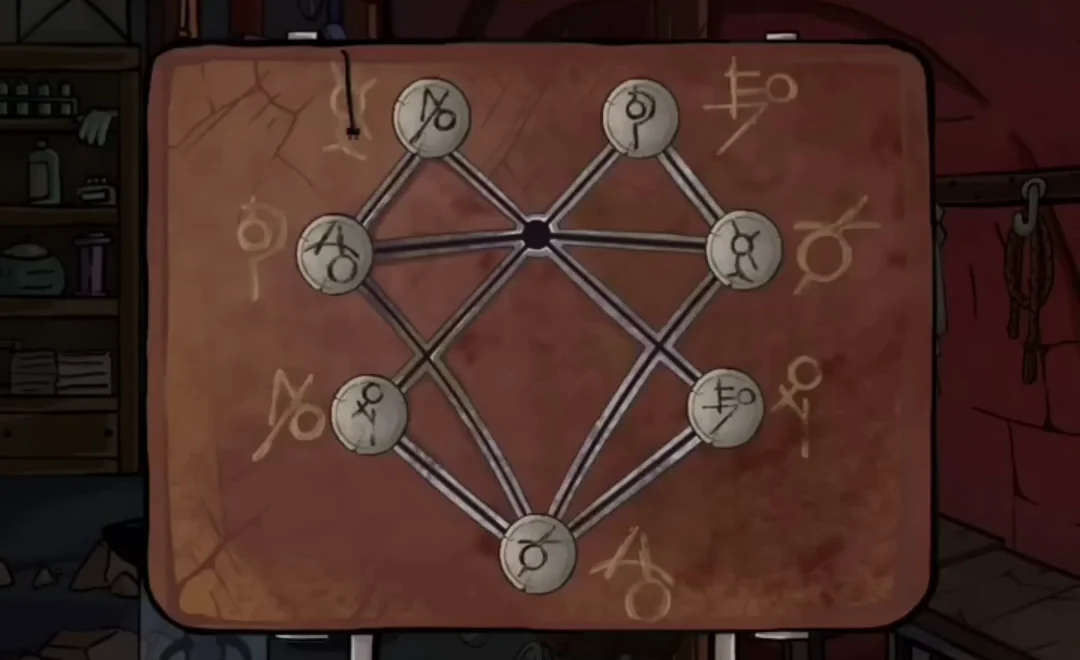
Starting layout. Each token must end next to the painted symbol that matches it; the centre slot stays empty. 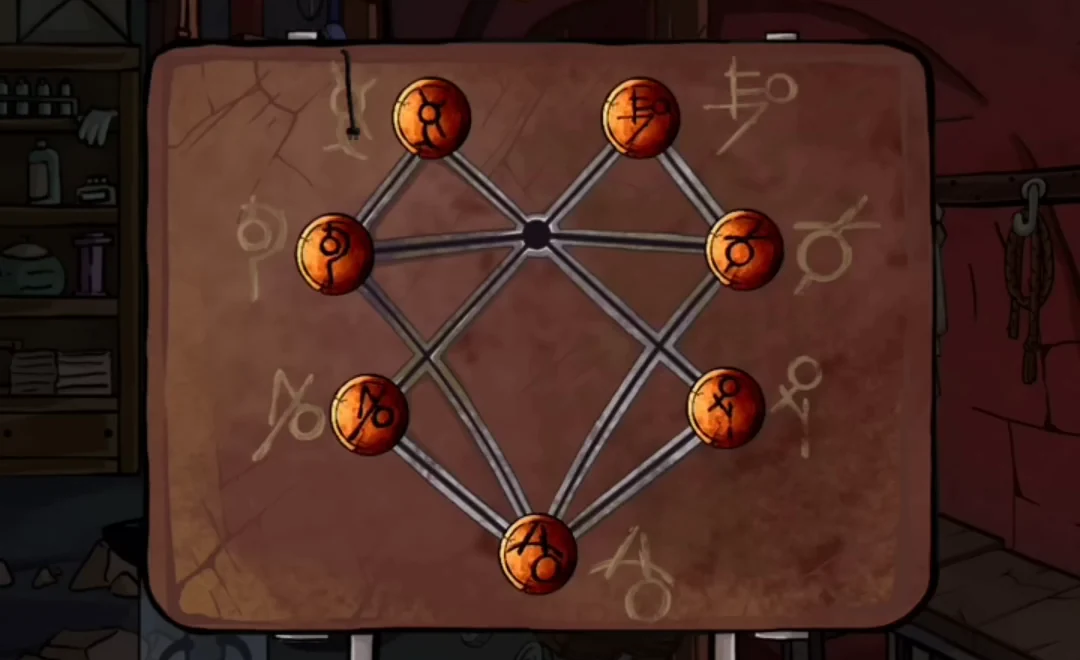
Solved board: every token sits beside its matching symbol and turns orange. - An open brown suitcase lies on the floor at the bottom, in front of the round purple platform. Tap the green petri dish inside it.
- A small mouse runs along the top wooden beam from left to right. Catch it and drag it down to the white snake coiled on the green rock on the right. The snake hugs the mouse and red hearts float up. Tap the hearts.
- A long beige coat hangs on the hook rail on the right wall. Drag the coat off its hook (to the left, onto the wooden post). A black hat is hanging on the hook behind it. Tap the hat.
- Tap the small barrel on the floor at the left, in front of the shelves. It turns round and shows 'N.3' painted on its side. Tap the 'N.3'.
- A wooden cart lies tipped over behind the glass cylinder; it is missing a wheel. Take the grey wheel from the top shelf of the open bookcase on the left and drag it to the cart. The cart stands up and shows a green bottle. Tap the bottle.
- A red hand pump hangs high on the back-left wall near the shelves. Drag it down onto the purple platform. Then drag the flat blue balloon lying on the platform to the pump and pump it (tap the pump) until the balloon is full. Tap the blue balloon.
- Take the meat cleaver lying on the floor next to the green rock (under the snake) and drag it to the blue sack hanging from the hook rail on the right. The cleaver cuts the sack down and grey mushrooms grow out of it. Tap the mushrooms.
- On the lower shelf of the open bookcase on the left there is a dusty cobweb. Switch on the small blue fan standing on the barrel next to the bookcase. Its wind blows the cobweb away and reveals a pocket watch. Tap the watch.
- On the wooden walkway on the right, tap the loose plank just right of the small key. It flips up and a centipede is underneath. Tap the centipede.
- Important clue: after the checklist is complete, a cassette tape appears at the broken board at the bottom of the left bookcase (between the two barrels). Drag it to the small green tape recorder lying on the floor by the hose at the bottom right. Margaret's recorded voice says: 'To open a portal, you first need to put an asteroid stone in the device.' 'Next, turn on the laser...' 'Finally, enter the code that you will find on the attached paper.' Joe thinks: 'Oh my God, I'm one step away from falling into a parallel world.' 'But before that, I need to hide this code in a safe place.' 'It's too dangerous to leave it in plain sight. Well, good luck to me!' This ends Joe's story.