Local Police Station: Sheriff's Office
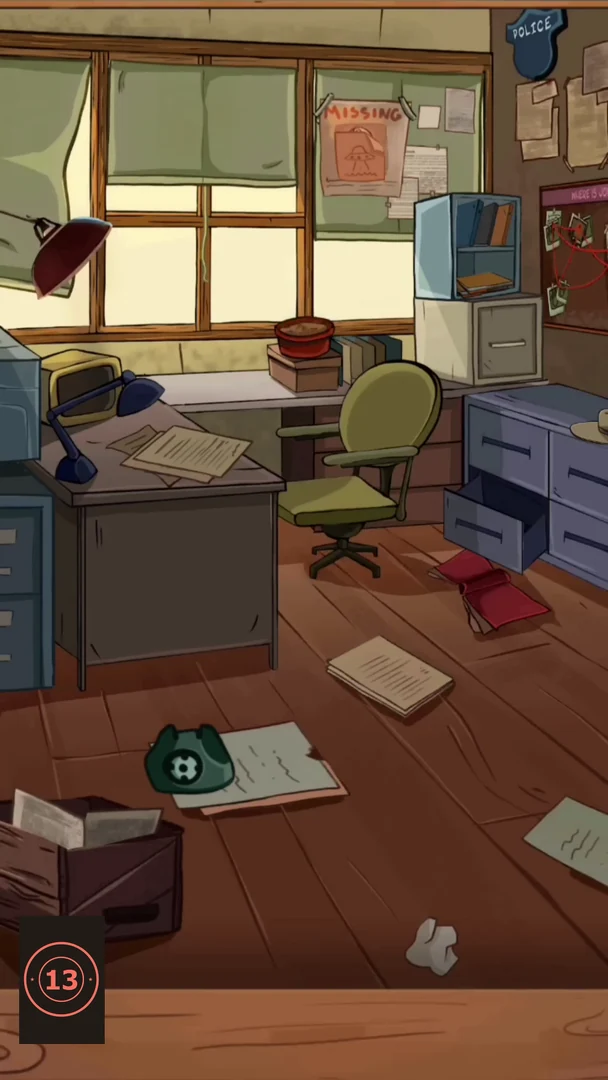
Sheriff Jones introduces the case. This tutorial scene teaches tapping, opening, dragging and hints. Find the six items on the checklist at the bottom of the screen.
- After Sheriff Jones's introduction, tap the star-shaped sheriff's badge pinned to the POLICE banner at the top right of the office.
- Tap the top drawer of the blue filing cabinet on the right to open it, then take the revolver inside.
- Double-tap the sheet of paper on the desk to crumple it and drag the paper ball into the black waste bin on the floor. Then tap the waste bin itself to collect it.
- Slide the hat on top of the blue cabinet to the right and take the handcuffs underneath. (The tutorial demonstrates this with the hint button.)
- Tap the ringing green telephone on the floor. Joe's mother asks for news about her son, and the telephone card is ticked.
- Tap the green plant in the pot on the window ledge to collect it. The sheriff mentions the flyers posted all over town, and the map opens.
Joe's Home: Backyard
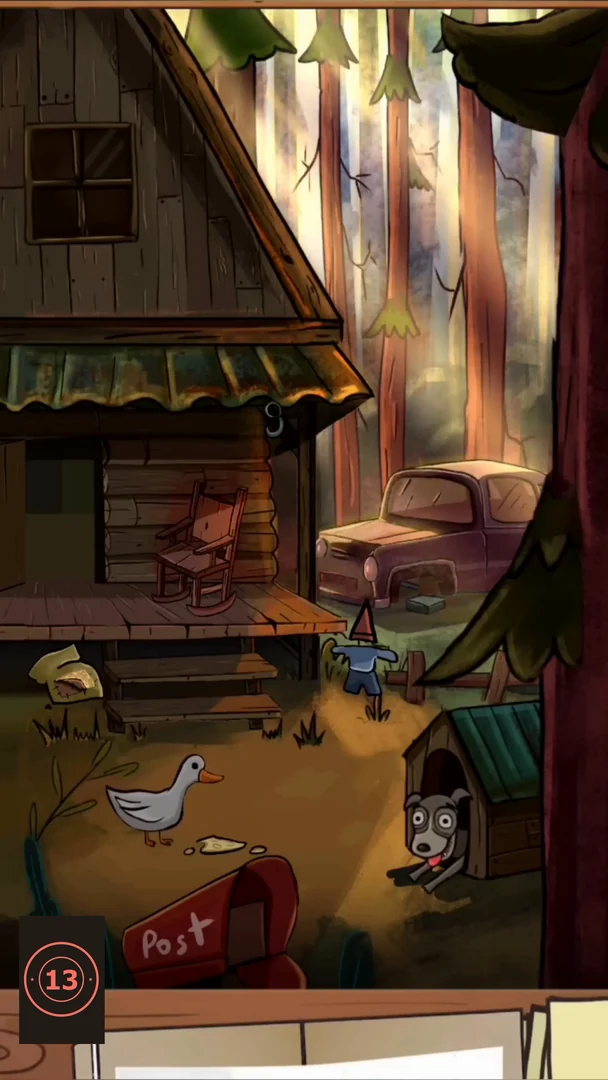
Choose Joe's home on the map. Find the nine items on the checklist; several only appear after you interact with the yard.
- On the map, choose Joe's home. In the backyard, tap the wheel hub resting on the block under the front of the old truck.
- Tap the grain sack beside the porch steps to spill feed on the ground. The duck eats it and lays an egg; take the egg.
- Tap the dark open doorway of the cabin, left of the rocking chair. Take the blue boot that appears.
- Tap the fluffy sheep head on the little scarecrow by the porch to collect the sheep.
- Tap the red POST mailbox at the bottom of the scene to open it and take the envelope.
- A straw hat hangs on the top corner of the rocking chair with a green round object under it. Tap the green object under the hat: the hat and the object disappear together, and the matching item-list card (a green round shape with a black curved shape above it) is ticked.
- Watch the tall tree trunk at the top right edge: when the squirrel peeks out, tap it.
- Tap the dog in the kennel so it drops its bone, then take the bone.
- Drag the unlit lantern from beside the scarecrow up to the hook under the porch roof. Once it lights up, tap it to collect it. The sheriff wonders who was there, and the map opens.
Joe's Home: Living Room
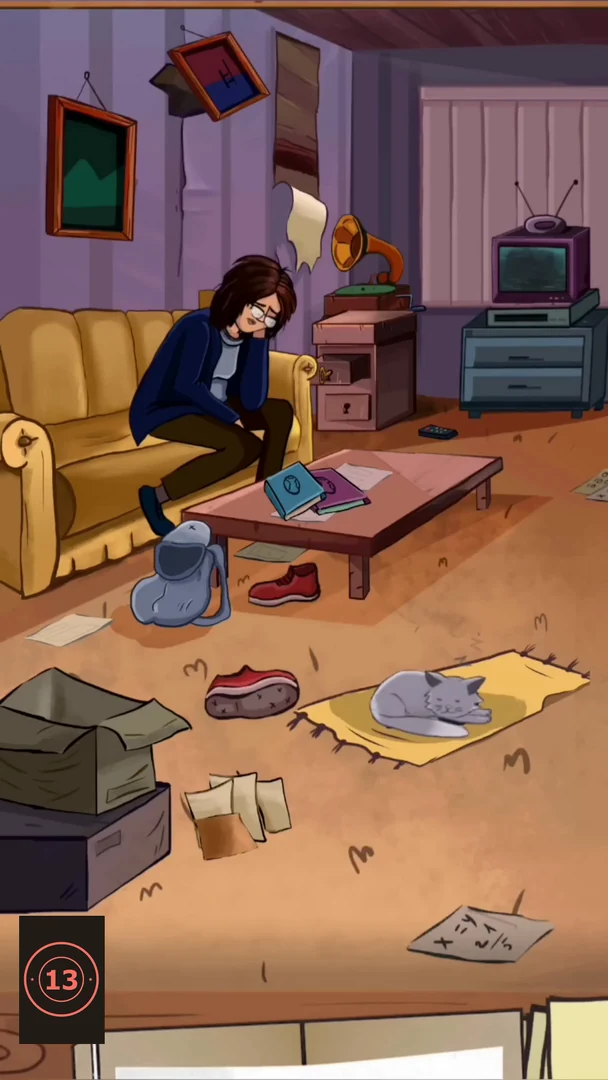
Joe's mother lets the sheriff search the living room. Find the nine items on the checklist (scroll the bar to see them all), then find the important clue that replaces the list.
- Choose Joe's home again on the map. After Joe's mother agrees to the search, tap the round green moon in the dark landscape painting at the top left. It is the green circle card on the checklist.
- Tap the brown American football lying on the floor between the right arm of the sofa and the little pink chest of drawers.
- Tap the red book hanging over the right end of the coffee table. It drops open on the floor; take it for the open-book card.
- Tap the gramophone on top of the pink chest of drawers. When music notes float out of the horn, tap the notes.
- Tap the round wall clock above the gramophone.
- Tap the top drawer of the pink chest of drawers to open it and take the framed photo inside.
- Tap the small red-and-blue picture at the top of the wall. It tilts and a dollar bill falls from behind it; take the bill.
- Tap the papers sticking out of the open cardboard box at the bottom left. Papers spill out, including a note with a question mark; take it.
- Tap the grey backpack at the foot of the sofa. Take the white mask that peeks out of it.
- The checklist is replaced by a request for an important clue. Tap the sleeping cat on the yellow rug so it gets up, then take the videotape it was lying on. Joe's recorded message plays on the television (he found something strange and is not sure it is safe to use), the sheriff reacts and the scene ends.
Joe's Home: Joe's Attic Room
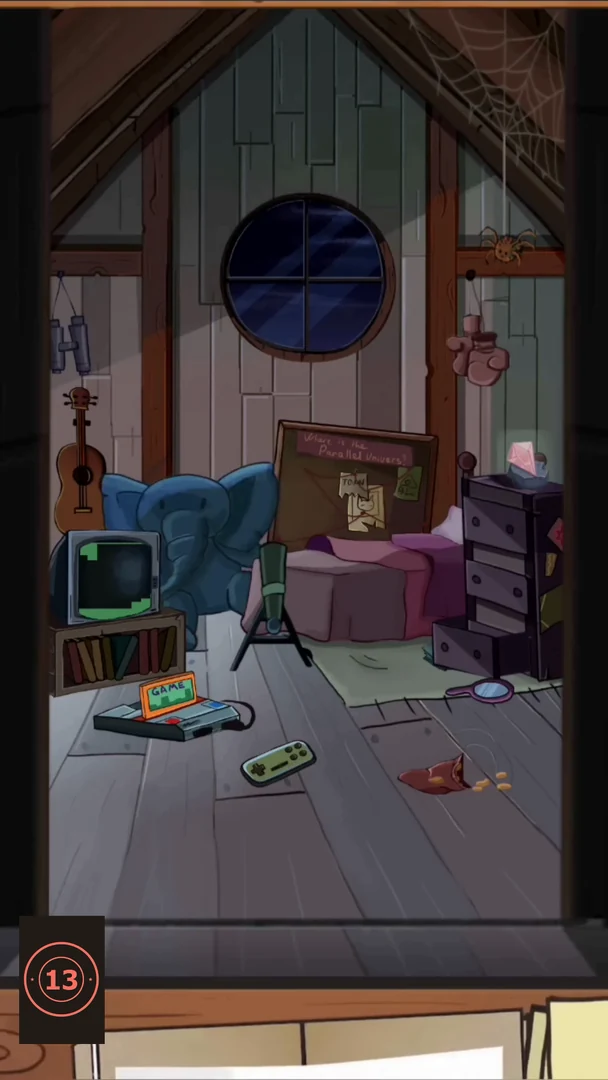
Back on the map, choose Joe's home once more to search Joe's attic bedroom. Find the nine checklist items, including a small TV game, then use the moonlight to reveal the room's secret.
- On the map, choose Joe's home (the sheriff's portrait marks it). In the attic, tap the second drawer of the dark chest of drawers on the right to open it, then tap the dart inside. It flies into the dartboard on the wall, ticking the dartboard card.
- Tap the floor under the foot of the bed, just right of the telescope. A sock slides out; take it.
- Open the top drawer of the dark chest of drawers. Tap the orange GAME cartridge inside; it flies into the games console on the floor and the TV switches on.
- Tap the game controller on the floor to open the large game pad. The white ball moves forward by itself over scrolling green blocks. To make it hop over the blocks, tap the round buttons on the right side of the pad. In a phone playthrough that shows touches, the player tapped those right-hand buttons again and again (short taps, mostly on the upper ones) until the pink flag appeared. Then tap the pink flag on the TV. The separate round fast-forward button at the lower right of the screen was not used, so what it does is not shown.
- Tap the telescope in front of the bed. It swings up towards the window and a little star appears at its base; tap the star.
- Tap the dark red bag on the floor at the bottom right. Coins spill out with a loaf of bread; take the bread.
- Tap the cobweb in the top right corner. The spider lowers itself on its thread and a gold coin shows in the web; tap the coin.
- Tap the stick-figure doodle on the right side of the dark chest of drawers.
- Tap the small cat peeking out between the right end of the bed and the chest of drawers.
- Tap the drawing of a hand pinned to the left of the poster board above the bed.
- A beam of moonlight now shines through the round window onto the floor. Drag the hand-held magnifying glass from the floor on the right into the bottom of the moonbeam. The lens bends the light into a purple ray towards the wall above the chest of drawers; move the lens until a dark purple portal opens there. The sheriff wonders what that was and decides to look for answers at Joe's school; the map opens with School unlocked.
School: Joe's Classroom
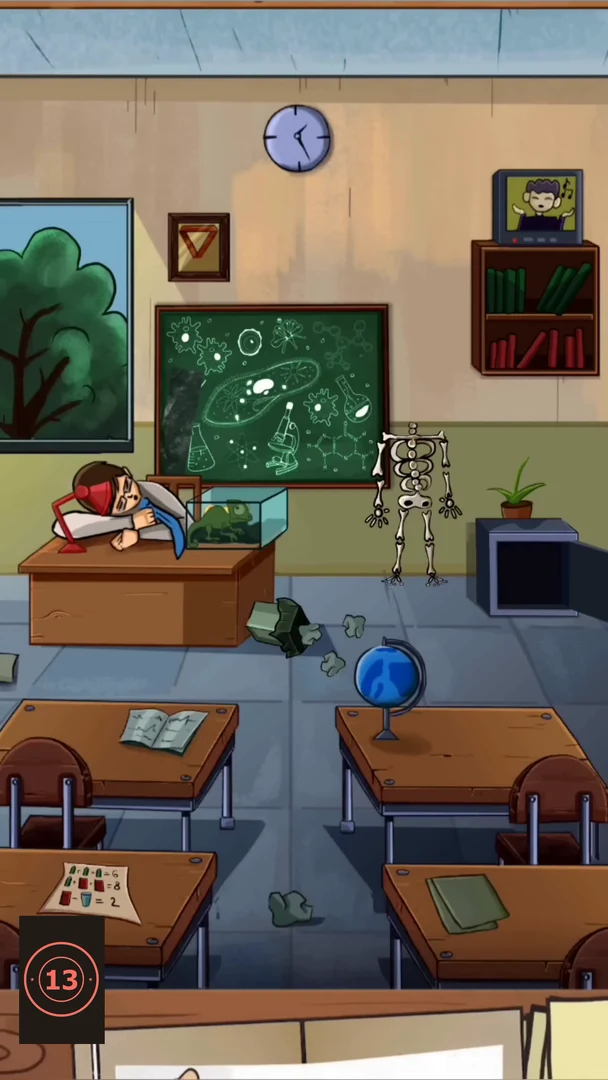
Choose School on the map. The sheriff searches Joe's classroom while a student sleeps at the front desk. Find the nine checklist items (a safe with a picture-maths code is part of the list), then find the important clue on the chalkboard.
- Choose School on the map. In the classroom, tap the blue globe on the middle desk; it spins and brings the paper hand drawing stuck to it to the front. Tap the drawing to collect it.
- Tap the sheet of paper on the front left desk to read the picture sum: three pencils = 6, one pencil + two books = 8, one book − one cup = 2. So pencil = 2, book = 3 and cup = 1.
- Watch the bookshelf under the TV at the top right: when a black cat appears on the shelf, tap it.
- Tap the framed medal on the wall above the chalkboard's left corner. The orange medal drops out of the frame; it is the orange-triangle card.
- Tap the small grey safe on the cabinet right of the skeleton. Its three wheels are labelled pencil, book and cup; tap each wheel until it shows 2, 3 and 1 (code 231). The safe opens; take the blue DIARY inside.CODE231
- Tap the potted shrub on the floor beside the teacher's desk. It tips over and a magnifying glass lands next to it. Leave it there for now; you need it later.
- Tap the TV remote on the right-hand middle desk. It switches on the TV above the bookshelf, where a singer in a red bow tie appears. Tap the bow tie: it jumps out of the TV and lands on the skeleton's neck, ticking the skull-with-bow-tie card.
- Tap the little 'Z' letters floating above the sleeping student at the front desk.
- Drag the glass of water from the window ledge at the left onto the small potted plant on top of the safe cabinet. The plant blooms; tap the flower.
- Tap the blue bird sitting on its nest in the tree outside the window. It flies away; tap the nest with the egg.
- Pick up the magnifying glass from the floor and drag it over the green notebook on the front right desk. The lens shows a note reading 'There'; release to collect it. This completes the checklist.
- Important clue: the student wakes and shines his red desk lamp on the glass terrarium. When the chameleon climbs up, take the yellow sponge that was hidden under it and rub it over the chalkboard. The science drawings wipe away to reveal a drawing of 'Fort JOE' among trees. The sheriff thinks it looks like Joe's and decides to head for the forest; the map opens.
Forest: Fort Joe
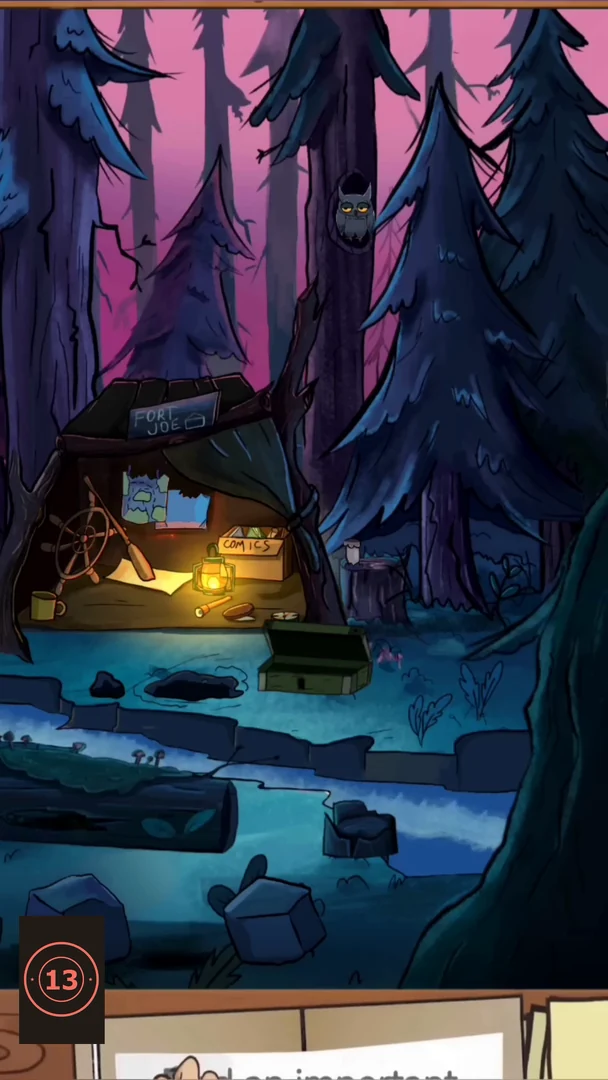
Choose Forest on the map. The sheriff finds Joe's secret hideout, Fort Joe, at night. Find the nine checklist items (shell, spotted mushroom, skunk, bat, squirrel, mushroom cluster, sailboat, walkie-talkie and worm), then find the important clue.
- Choose Forest on the map. Inside Fort Joe, tap the purple clam shell on the shelf beside the drawings at the back of the hideout. It opens; tap it again to collect it.
- Tap the bat hanging upside down from a branch above the fort's roof. It opens its eyes; collect it.
- Look at the top right of the picture: a dark squirrel silhouette sits on a branch against the pink sky. Tap it.
- Tap the cluster of purple mushrooms growing on the tree trunk in the top left corner.
- Drag the shovel lying beside the lantern in the fort onto the dark X on the ground in front of the fort. The sheriff digs up a green box; tap it to open it and take the walkie-talkie inside.
- Tap the big purple spotted mushroom on the tree stump just right of the fort.
- Two eyes glow inside the hollow log in the lower left. Drag the green flashlight from the ground on the right of the clearing into the open right end of the log. The light knocks the end off and a skunk walks out; tap the skunk.
- Tap the little rowing boat on the river to the right. A blue sail rises on it; tap the sailboat to collect it.
- Watch the ground between the rocks at the bottom of the scene. When a pink worm wriggles up, tap it. This completes the checklist.
- Important clue: tap the owl in the hole of the tall tree at the top. It flies down to the stump and a strip of green arcade tickets falls from its hole onto the ground by the box; tap the tickets. The sheriff decides Joe spent hours at the arcade, and the map opens.
Arcade
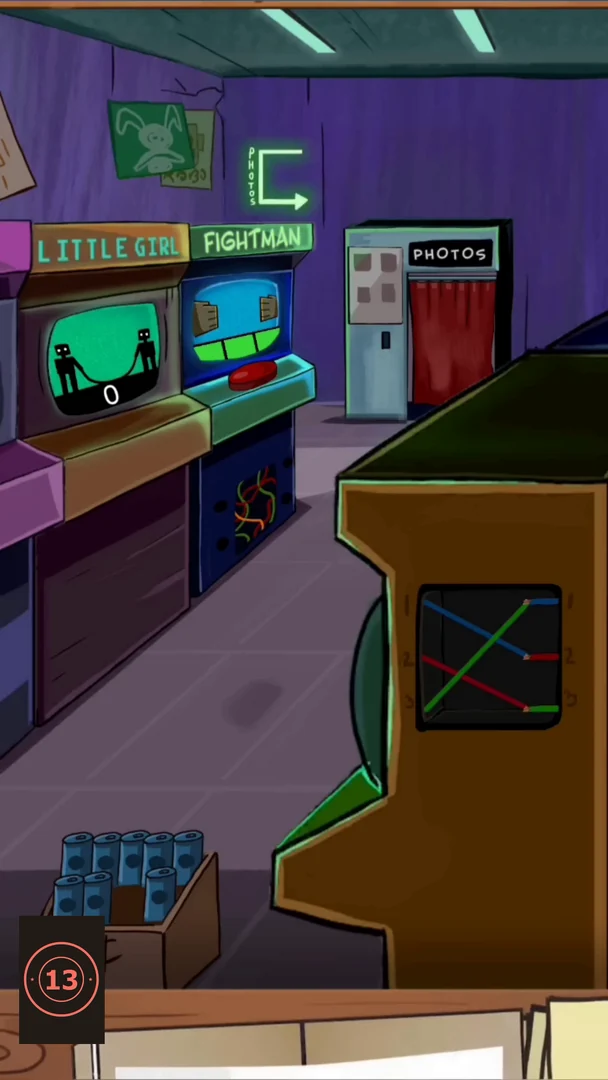
Choose the Arcade on the map. The checklist has nine items (cup with straw, blue can, the Little Girl figure, ARCADE sign, knocked-out box face, mushroom poster, planet poster, purple spiral poster and glowing robot eyes). Most come from playing with the arcade machines.
- Play the FIGHTMAN cabinet (blue screen, red button, middle left). The two gloves punch the box-shaped fighter until it is knocked out with X eyes; the knocked-out box face is ticked off.
- Play the LITTLE GIRL cabinet (green screen, far left): two figures swing a rope and the counter starts at 10. Tap to make the girl jump each time the rope swings under her feet. Each clean jump lowers the counter by one; a miss turns the number red and adds one back. At 0 the girl appears holding a flag and is ticked off.
- Pick up the screwdriver from the floor on the left and drag it onto the screwed blue panel under the FIGHTMAN cabinet. The panel comes off, showing coloured wires and a drinking straw. Drag the straw into the red cup on the floor, then tap the cup with its straw.
- Tap one of the blue cans in the 3¢ crate at the bottom left.
- Tap the faint mushroom picture on the front of the LITTLE GIRL cabinet (lower left). It lights up pink and is ticked off.
- At the top left of the wall, tap the pink PLANET poster tucked beside the rocket poster. It comes forward and is ticked off.
- Tap the dark ROBO face on the big brown cabinet in front. Its panel opens, showing a wiring board with three wire ends on each side (rows 1, 2, 3; blue, red, green) and a hanging plate that reads 1=2, 2=3, 3=1. Connect the wires by number, not colour: drag left 1 (blue) to right 2, left 2 (red) to right 3 and left 3 (green) to right 1. The robot's eyes glow green; tap them.
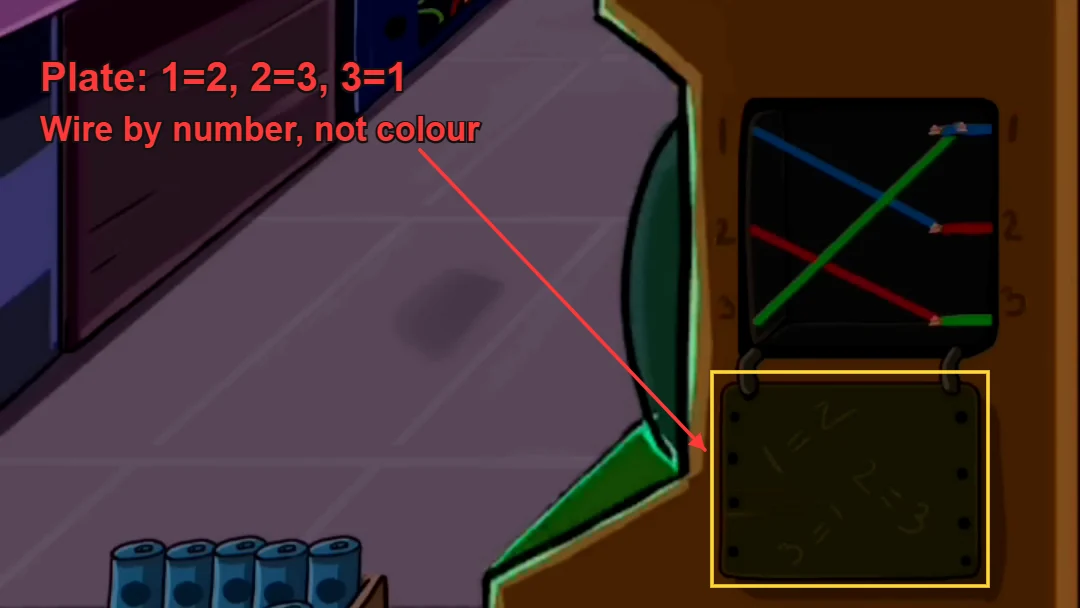
Solved wiring board. The plate below (1=2, 2=3, 3=1) tells you which numbered ends to join. - Look at the blank square poster on the wall to the right of the ARCADE sign. When it shows a purple square spiral, tap it.
- Tap the unlit R in the ARCADE sign at the top. The whole sign lights up and is ticked off, which completes the checklist.
- Important clue: the green arrow sign beside the PHOTOS booth lights up and the booth's red curtain opens. Tap the photo strip on the small table inside. The sheriff recognises Joe's friend Phil, son of the town midwife, and decides to talk to him. The map opens.
Fest
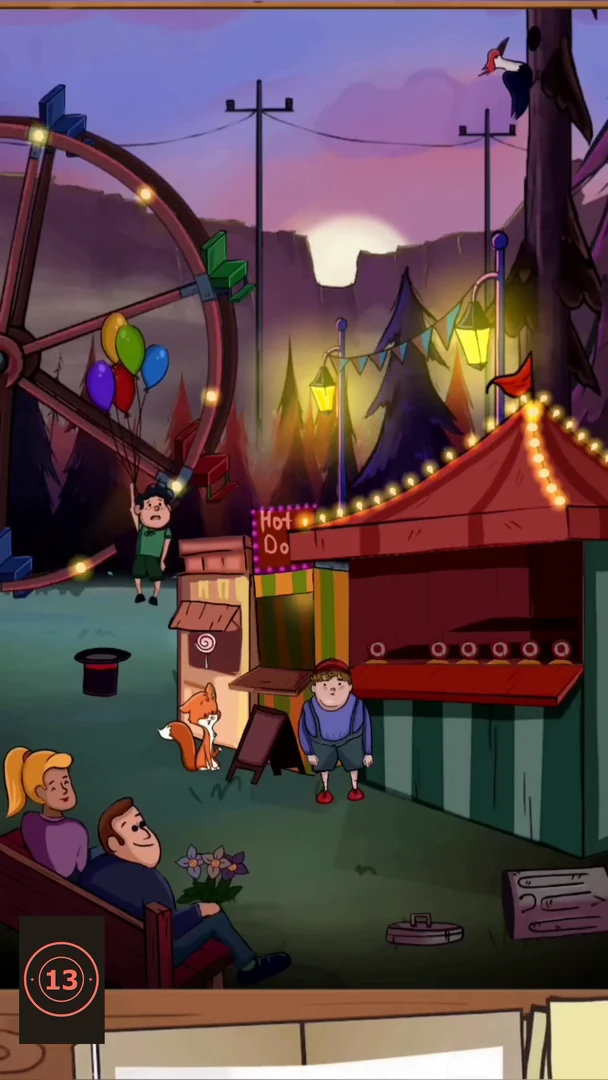
Choose Fest on the map to look for Phil at the evening fair. The checklist has nine items: flame, pink worm, teddy bear, white bunny, clown mask, donut, firework rocket, hot dog and heart. Several need small chains of actions; finish them all to unlock the conversation with Phil.
- Pick up the green banknote lying on the grass in front of the bench and drag it to the counter of the Hot Dog stand. A hot dog appears on the counter; tap it.
- Tap the small orange flame on top of the brick post at the left of the Hot Dog stand.
- Gather the loose balloons for the boy in the green shirt on the left: the red balloon drifting in the sky, the blue balloon at the top right by the lamp post and the yellow balloon by the right side of the striped stall. Each one joins the bunch he is holding.
- Look at the brick post again: once the flame is gone, a striped firework rocket rises out of it. Tap the rocket.
- Tap the rifle lying on the counter of the shooting gallery (the long red counter with rows of round targets). You get three shots (3/3 at the lower right). Tap each of the three wooden ducks as they move along the counter; each hit shatters a duck. When all three are hit, a teddy bear in green overalls appears as the prize; tap it.
- Turn the Ferris wheel on the left. When a gondola carrying a clown mask comes round on the right side of the wheel, tap the mask.
- Watch the woodpecker at the top of the tall tree on the right. When it pulls a pink worm out of the trunk, tap the worm.
- Take the blue-handled scissors lying on the roof of the striped tent and drag them to the purple flowers in front of the stall. The flowers are cut and gathered into a bouquet. Drag the bouquet to the man on the bench. He gives it to his date, red hearts float up beside her; tap the hearts.
- Turn the Ferris wheel again until a green balloon comes free at the top of the wheel, and add it to the boy's bunch. With five balloons he floats up into the air, revealing a black top hat where he stood. A white bunny pops out of the hat; tap it.
- Tap the metal trash can at the lower right. It tips over and a pink donut rolls out onto the grass; tap the donut. This completes the checklist.
- Important clue: the shutter of the small kiosk left of the Hot Dog stand flips open, showing a swirl lollipop. Give the lollipop to Phil, the boy in blue overalls in front of the stall. The sheriff talks to him: Joe had been acting strange and said he was busy with something important, and he was working part-time with old Billy. The sheriff decides to visit old Billy, and the map opens (a rate-the-game box may appear over it).
Oldman's House: Front Yard
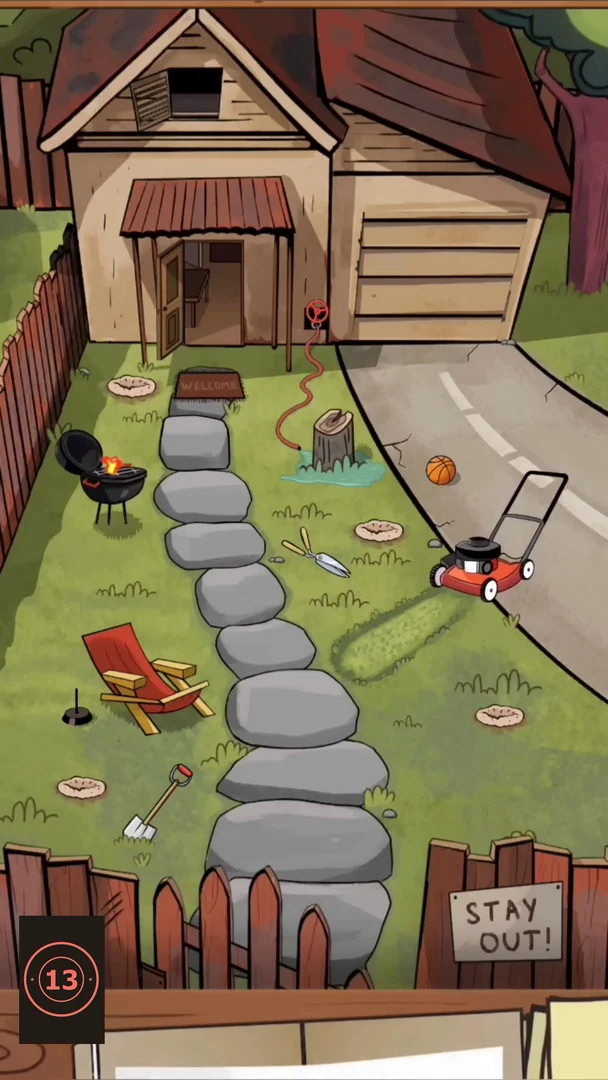
Choose Oldman's house on the map to visit old Billy. The sheriff never liked him and needs to get inside. The checklist has nine items: axe, pizza box, boomerang, umbrella, twig, garden gnome, pocket watch, beaver and roast ham. Most of them come from small chains of actions around the yard.
- Tap the red axe stuck in the top of the wooden fence on the far left, beside the house.
- Drag the closed blue umbrella leaning against the right corner of the house down to the red deck chair. It opens over the chair; tap the open umbrella.
- Look at the roof: a pizza box is lying where the two roofs meet, to the right of the attic vent. Tap it.
- Open the gate in the front fence (where the stepping-stone path meets the fence; it has a ring handle). A garden gnome is hiding behind the fence post to the left of the STAY OUT sign. When it steps out, tap it.
- Drag the orange leaf blower (lower right, beside the path) up to the top of the driveway in front of the garage. It blows away the pile of leaves on the driveway and uncovers a red-and-white boomerang; tap the boomerang.
- A beaver keeps popping up from the dirt holes scattered across the lawn and ducking back down. Tap it while it is showing (it may take a few tries).
- Drag the green fuel can standing by the left fence onto the black barbecue grill. The grill lights up. (You will need the fire later.)
- The red lawnmower on the right is missing parts. Move the big stepping stone beside the deck chair to find a mower wheel and drag it to the mower. Move the next stone up the path to find a black engine cover and drag it to the mower too. The repaired mower drives across the lawn and cuts the long grass, uncovering a pocket watch; tap it.
- Tap the attic vent at the top of the house. It swings open, showing a red valve wheel. Drag the wheel to the water pipe on the house wall, next to the garage, where the red hose is attached. Water runs out of the hose by the tree stump and a twig grows out of the stump; tap the twig.
- Move the WELCOME mat in front of the door to find a small key. Drag the key to the padlock on the front door. The door opens; drag the ham hanging inside onto the lit barbecue grill. When it is cooked, tap it. This completes the checklist.
- Important clue: the garage door rolls up and reveals a dark car parked inside. The sheriff thinks: 'Finally, let's go in...' and the map opens. Oldman's garage is next.
Oldman's House: Garage
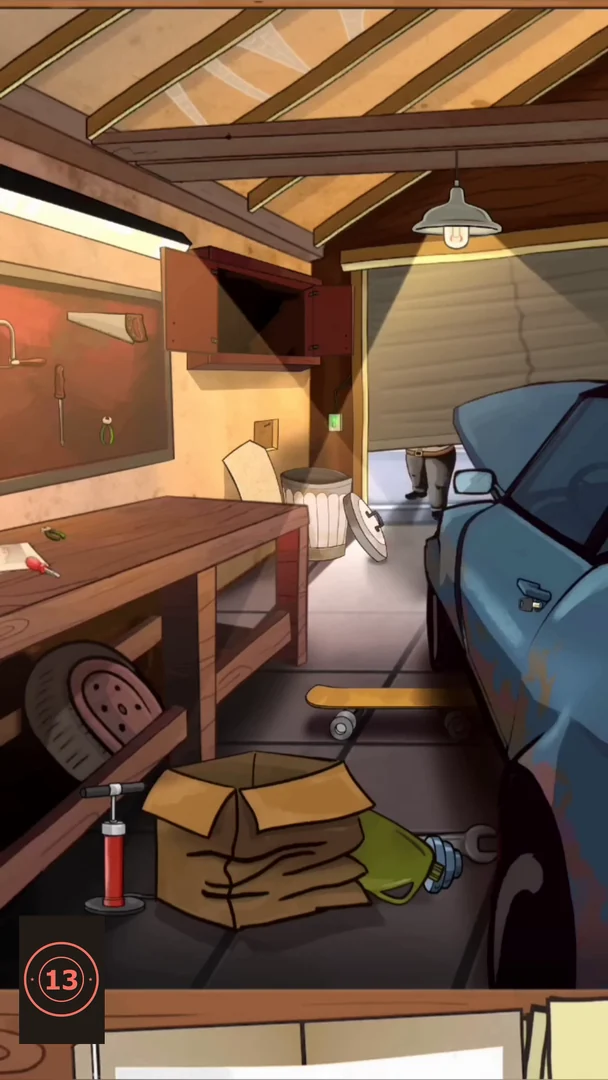
Choose Oldman's house on the map again to search old Billy's garage for traces of Joe. The checklist has nine items: hammer, gloves, warning sign, baseball, red energy drink, model airplane, rifle, raccoon and mouse. Completing it ends Part 1.
- Tap the hammer hanging on the pegboard on the left wall.
- Tap the pair of work gloves lying on the floor just left of the big cardboard box.
- Tap the warning sign stuck on the metal trash can.
- The model airplane on the workbench is missing a wing. Open the upper wall cabinet, drag the glue bottle onto the plane, then drag the green wing from the cabinet onto the plane. Tap the finished airplane.
- Pull the skateboard out from under the car. A baseball is lying on it; tap the ball.
- Find the broom under the workbench (its bristles stick out on the middle shelf). Drag it up to the cobweb on top of the wall cabinet. The broom sweeps the web away and reveals a rifle lying on top of the cabinet; tap the rifle.
- Tear down the 'Garage' poster on the wall beside the fire extinguisher. A small car key is hidden behind it. Drag the key onto the car's driver door. The door swings open and a red energy-drink can is in the door pocket; tap it.
- Tap the raccoon sitting on the ceiling beam at the top of the scene.
- Drag the fire extinguisher from the wall to the front of the car and spray. A mouse runs out from under the car; tap it. This completes the checklist.
- Old Billy walks in carrying his rifle: 'Who's there? Get out of here, or I'll smash your head.' The sheriff tells him to put the gun down. Billy denies ever laying a finger on Joe, and the sheriff decides: 'We'll figure this out at the police station.' Part 1 is complete. Older versions then showed a card offering Part 2 as a purchase; a later update made Part 2 free, so you can carry straight on.