Central Police Station: Interrogation Room
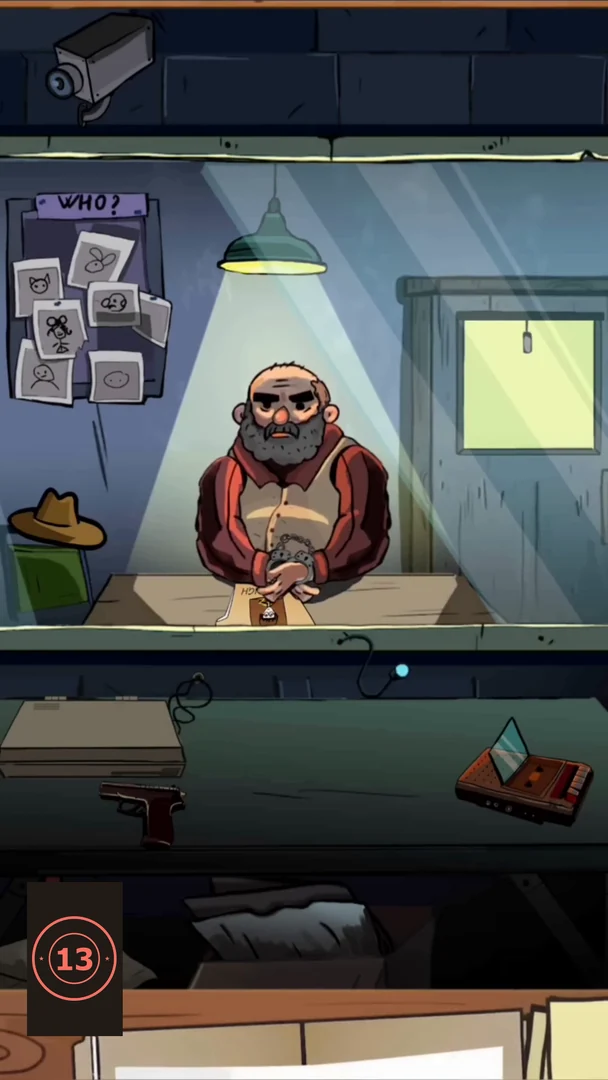
Part 2 follows Part 1 (early versions sold it separately; it is now free). It opens with old Billy handcuffed in the interrogation room; the scene scrolls up and down. Most of the nine checklist items are things that happen in the room rather than objects lying around: the fly, the mug, the hat from the window silhouette, Billy's '!' and sparks, the 10:10 counter, the cassette, the camera showing 22 and the closed case folder.
- Tap the fly buzzing around Billy's head.
- Tap the dark mug on the table to Billy's left (your right).
- Tap the window blind on the right wall so the window lights up. A person's silhouette keeps passing outside. When the silhouette with a cap walks by, its cap flies off; tap the cap.
- An exclamation mark pops up over Billy's head; tap it while it is visible.
- Scroll down to the desk. Tap the two digits of the black counter (0 0) on the right until it reads 10 10, matching the checklist picture.
- Tap the cassette recorder at the right of the desk. The lid opens and the cassette pops out; tap the cassette.
- Scroll to the top and tap the security camera in the upper left corner. Its display shows 22; this ticks the '22' item.
- Tap the open case file on the desk. It closes and gets a 'Convicted / Case closed' stamp; tap it again if it is not ticked.
- Tap Billy's head. Little stress lines spark above it; tap them to finish the checklist.
- Important clue: open the grey lie-detector case on the left of the desk and drag its arm cuff onto Billy's arm. The sheriff asks three questions: 'Have you ever cheated on your wife?' (No: LIE), 'Do you always obey the law?' (Yes: LIE) and 'Are you somehow connected to Joe's disappearance?' (No: TRUTH). Billy is telling the truth. He then remembers that yesterday he found Joe's library ticket at his house. The map opens.
Electric Station: Unit 3 Control Room
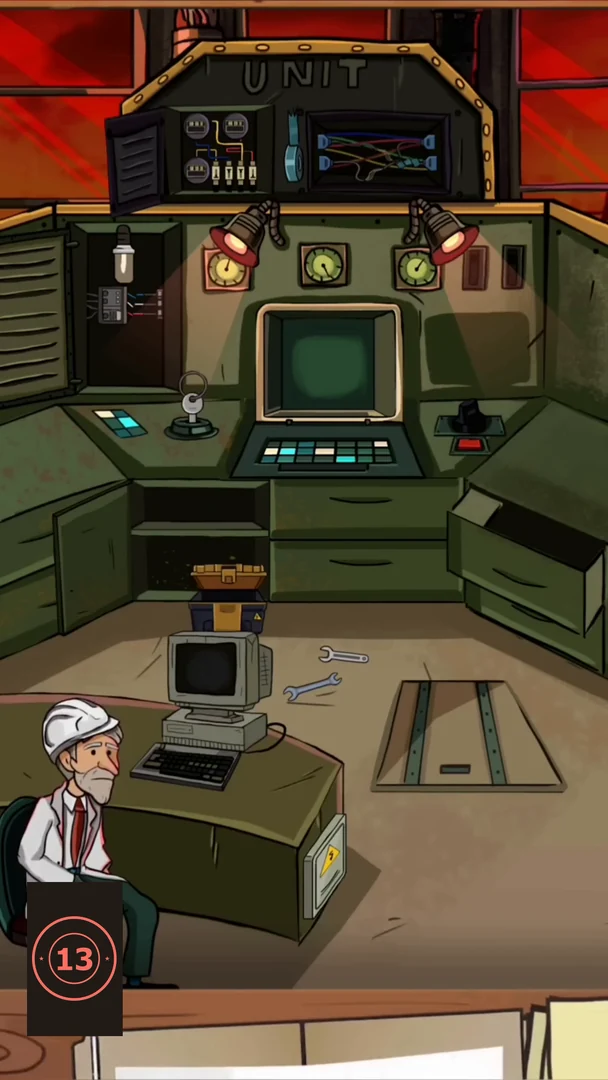
Choose the Electric station on the map. Strange bursts of energy keep appearing in the city, and the sheriff hopes the power-plant workers know why. The control room is dark at first. The checklist has nine items: the green monitor path, the number 3, a red jumper clamp, a power strip, a pair of work gloves, a red gauge, a wrench, a green skull and a meter reading 000. Two mini-games are part of the list: a sliding-tile path on the monitor and a fuse-switch panel.
- The room is dark. Pull down the light-blue lever on the panel at the top of the console. The power comes back on and the room lights up.
- Open the hatch in the floor on the right. Take the lever handle hanging on its ladder and drag it into the empty socket on the console, left of the monitor.
- Tap the monitor to open the sliding-tile puzzle: eight numbered tiles with green line pieces and one empty space on a 3x3 grid. Slide tiles into the empty space until they read 1 2 3 / 4 5 6 / 7 8 with the empty space bottom right; the green line then runs through the red dot. Example: near the end of one solve the grid was 1 2 3 / 4 5 6 / 7 _ 8 and sliding 8 to the left solved it. The left round button restarts and the right one skips. Tap the solved green screen to tick it.
- After the monitor is solved, the drawer under the console opens. Tap the power strip in it.
- Drag the yellow toolbox from the left shelf onto the computer on the desk and open it. Wrenches spill out onto the floor; tap the wrench.
- Open the small metal cover on the upper left of the console to zoom in on the fuse panel: three spinning meters wired to four switches. Set the switches (left to right) to down, up, up, down. The meters stop and the top-left meter reads 000; tap it.
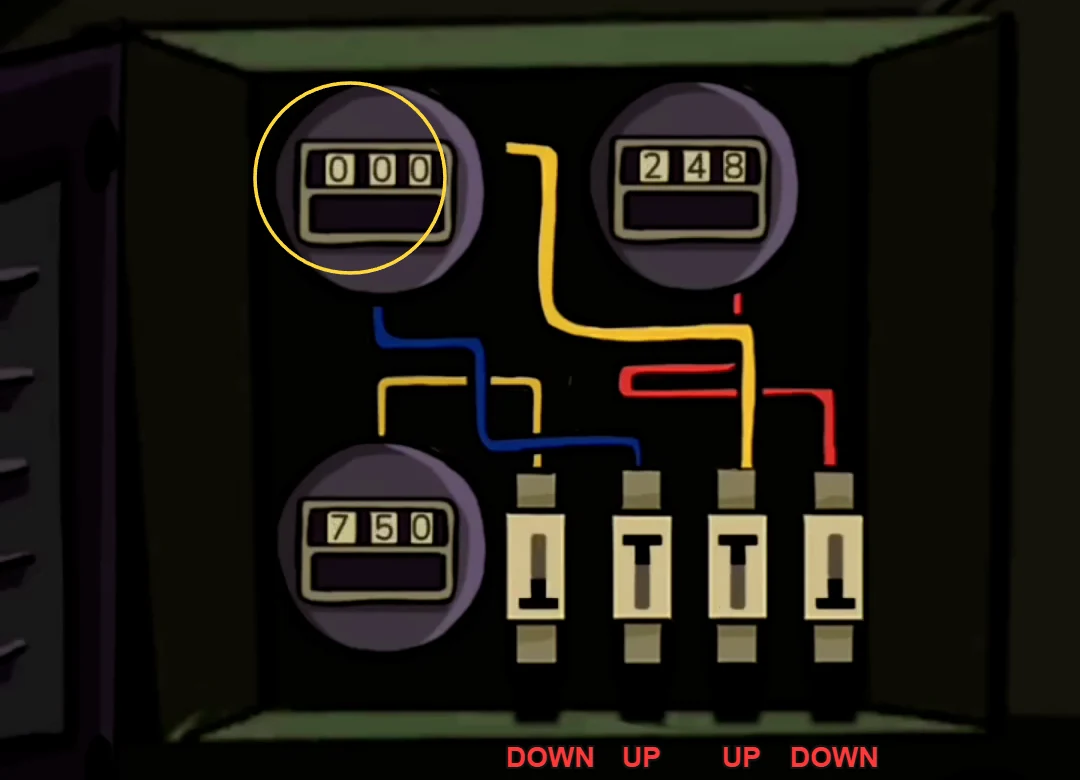
Solved fuse panel: switches down, up, up, down (left to right). Tap the top-left meter once it reads 000. - Tap the gauge to the right of the monitor. Its needle swings into the red; tap the red gauge.
- One brown work glove hangs on the shelf left of the desk. Open the lower right drawer to find the second glove and drag it to the first. Tap the pair.
- Take the pliers from the middle drawer and use them on the lit lamp in the left wall panel. The lamp goes out and a glowing green skull sign appears behind it; tap the skull.
- Open the drawer at the far right of the console. Tap the red jumper clamp inside.
- Tap the number 3 on the 'UNIT 3' sign at the very top of the console. This completes the checklist.
- Important clue: open the small door with the yellow warning sign on the side of the desk. Inside is a note with blocky, stylised digits that read 3 4 2 5. Tap the computer on the desk (it now shows 'Pin 0000') and enter 3425.CODE3425
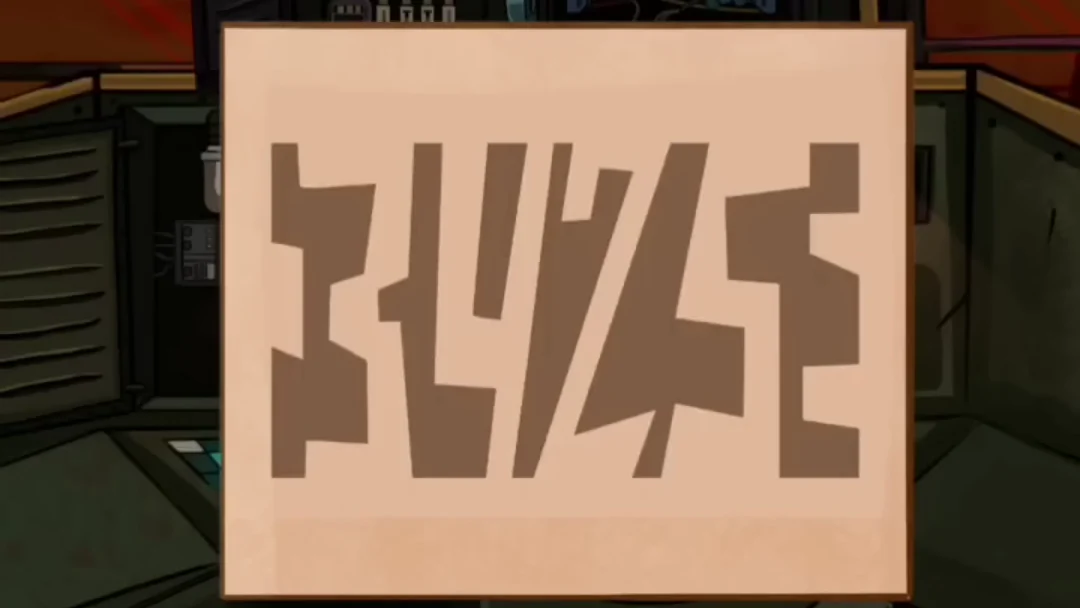
The note inside the desk door: the blocky shapes are the digits 3 4 2 5, the computer PIN. - The sheriff greets Simon, the worker: 'Good day, Simon. What the hell is going on in the city? Flashes and lightning everywhere.' Simon doesn't know what's going on, but says that somewhere nearby there is a source of huge energy. The sheriff decides to keep investigating, and the map opens.
Library: Secret Book Room
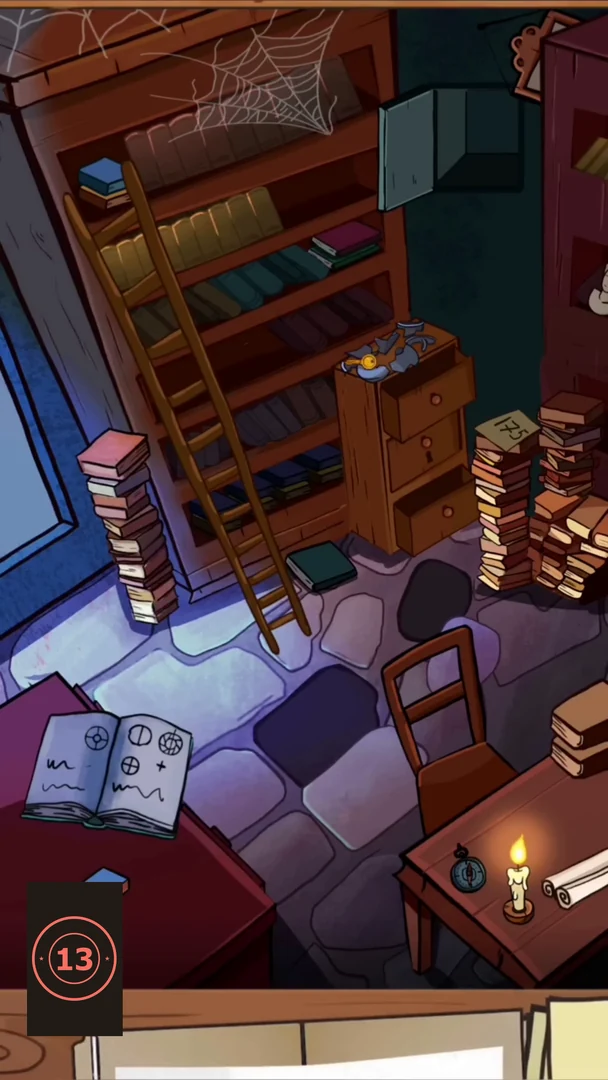
Choose the Library on the map. Joe's library card shows he borrowed a strange book, and the sheriff wants to find out which book it was and why Joe needed it. The book room is dark at first and scrolls a little sideways. The checklist has nine items: a heart, a compass symbol, an envelope, a projector, a grey folder, a newspaper, a gold camera, a stack of coins and a sheet of grid paper.
- Take a match from the matchbox on the red table at the bottom left and drag it to the candle on the small desk at the bottom right. The candle lights the corner of the room.
- Tap the small heart carved into the side of the chest of drawers below the blue vase.
- Tap the newspaper lying on the desk next to the candle.
- An envelope is tucked on the seat of the chair at the desk. Tap it.
- Two loose floor stones hide tools. Tap the stone just above the chair to find a brush, then the large stone to the left of the chair to find a hammer.
- Drag the hammer to the blue vase on top of the chest of drawers. It breaks and a dirty gold camera is inside. Drag the brush over it to clean it, then tap the gold camera.
- The bottom drawer of the chest of drawers now opens. Tap the grey folder inside.
- Slide the ladder to the right along the bookcase. A green book drops from the middle shelf and a projector is behind it. Tap the projector.
- Lift the top book off the right-hand pile of books next to the chest of drawers. Tap the sheet of grid paper underneath.
- Move the next book off the same pile. The book underneath has '175' written on it. Slide the bookcase on the right aside to reveal a portrait of a woman, then move the portrait to uncover a wall safe with three number wheels. Set the wheels to 1 7 4: the safe opens at this setting even though the book says 175 (the third wheel stays on its starting 4). If it stays shut, turn the third wheel to 5. Tap the stack of coins inside.
- Turn the pages of the open book on the red table until the page with round symbols appears. Tap the compass symbol (black four-pointed star in a circle) at the top left of the page. This completes the checklist.
- Important clue: a book page with a 4×4 letter grid (M g a r / c t a r / a a G e / i r) and the sum '1234 + 4321 = ?' appears above a safe with four number wheels showing 4444. Tap the wheels to 5555 (1234 + 4321 = 5555). The safe opens and holds a grille with square holes. Drag the grille onto the letter grid and rotate it 90° three times. At each position, the letters showing through the holes are copied to their places on the answer line (a hole over a blank square shows nothing). The name spelled out is Margaret Garcia.CODE5555
- The sheriff notes that many pages are hard to read because of the recent flood and decides to ask about Margaret Garcia. The map opens with Margaret's house as the next destination.
Margaret's House: Kitchen
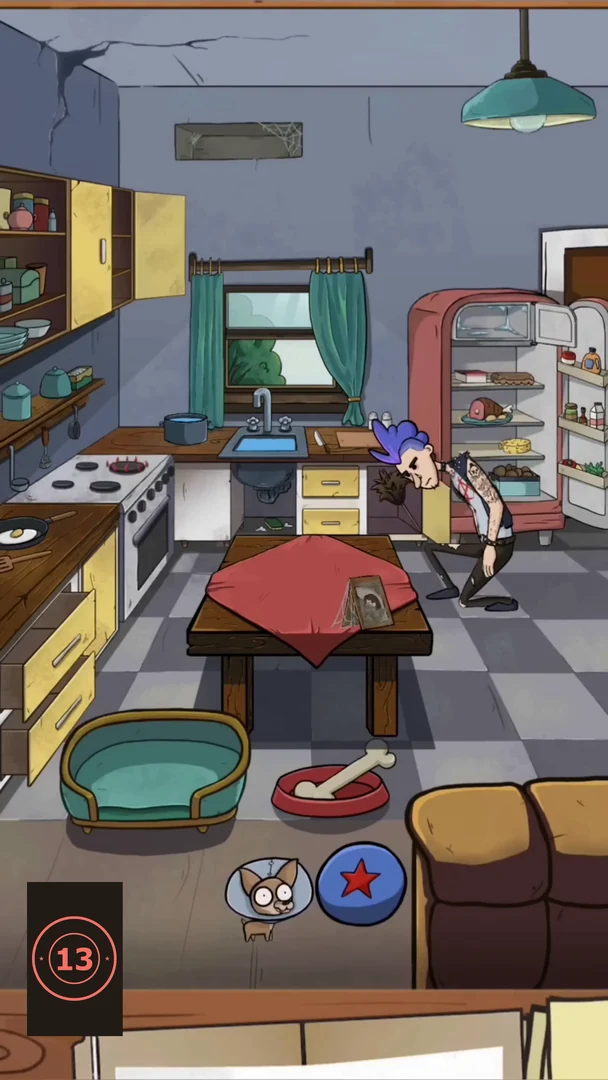
Choose Margaret's house on the map. The sheriff has learned that Margaret Garcia was a local writer who once lived here. A punk with a blue mohawk now lives in the house, and his chihuahua wearing a cone lies in a dog bed. The checklist has nine items: rooster plate, red teapot, blue bottle, rubber duck, cat clock, cockroach, blue hose, fruit bowl and ice cream.
- Drag the red comb piece lying on the table to the rooster plate hanging on the wall, then tap the completed rooster plate.
- Open the cupboard under the counter to the right of the stove and drag the grey kettle onto the lit back burner. Once it turns red, tap the red teapot.
- Open the cabinet under the sink and tap the blue bottle inside.
- Tap the sink faucet. The sink fills with water and a rubber duck floats up; tap the duck.
- Open the lower-left counter drawer, drag the black clock tail (pendulum) from it to the cat clock on the wall, then tap the cat clock.
- Drag the red-handled screwdriver on the floor right of the table to the wall vent grille. The grille comes off and a cockroach crawls out; tap the cockroach.
- Pull the blue ball with a red star from behind the sofa. The dog leaves its bed to go to the ball, revealing a blue hose under the bed; tap the hose.
- Drag an apple from the tree outside the window into the fruit bowl. Then drag the white fridge handle lying on the floor right of the table to the fridge door to open the fridge, drag the banana from the fridge into the fruit bowl and tap the full fruit bowl.
- Drag the empty ice-cream cone from the table into the open freezer compartment. It fills with ice cream; tap it. This completes the checklist.
- Important clue: a framed photo stands on the table. The tenant comes back, picks up the photo and talks to the sheriff: Margaret lived in this house many years ago and wrote her famous novel here, a fantasy novel about supernatural events in this city. After writing it she went crazy and is now being treated in a mental hospital. The sheriff decides to visit her there, and the map opens with the Mental hospital as the next destination.
Mental Hospital: Margaret's Ward
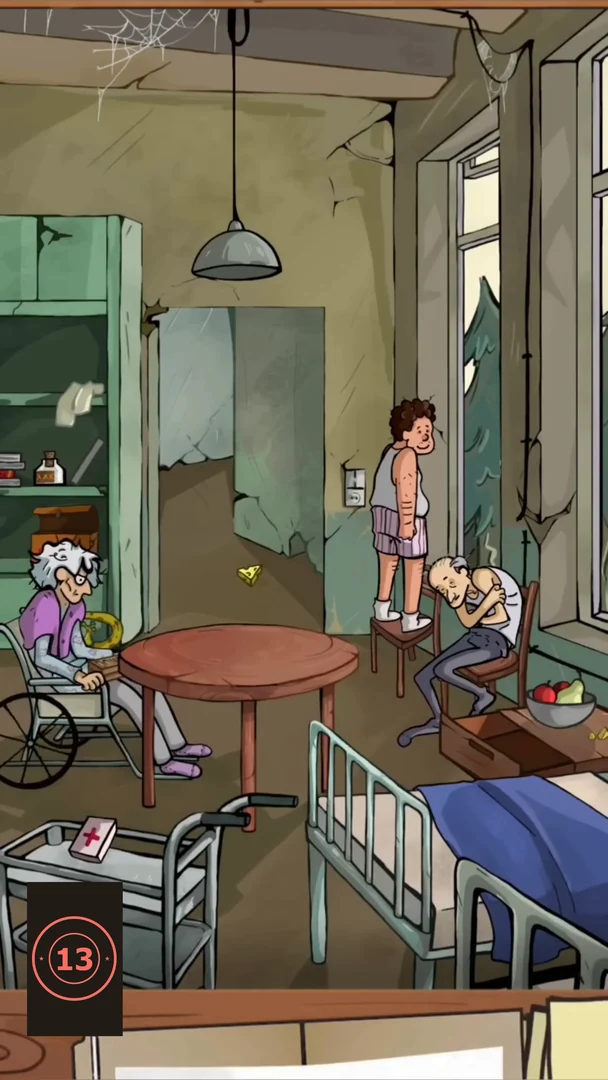
Choose the Mental hospital on the map. The sheriff needs to find Margaret Garcia and ask her about her novel. The ward is lit by one hanging lamp; Margaret sits in a wheelchair at the round table. The checklist has nine items: a mouse, a syringe, green socks, a sleep 'Zzz', a pink sparkle, an orange, a fish skeleton, a light bulb and a newspaper. Afterwards Margaret only talks if you beat her at dominoes.
- Drag the small piece of cheese from the floor at the bottom of the screen into the middle of the room, under the lamp. A mouse runs out to it; tap the mouse.
- Open the brown first-aid case on the lower shelf of the green cabinet on the left and tap the syringe inside.
- A patient in a straitjacket keeps walking back and forth through the lamplight. When she walks past wearing green socks, tap the socks.
- Drag the lizard off the top of the green cabinet to uncover a blue pill bottle. Drag the bottle to the hunched old man on the chair by the window. He falls asleep; tap the 'Zzz' above his head.
- Drag the pink bottle from the top shelf of the green cabinet to the woman standing on a stool by the window. A pink sparkle appears above her head; tap it.
- Smooth out the rumpled blue blanket on the bed in the lower right. An orange lies under it; tap the orange.
- Open the drawer of the bedside cabinet under the fruit bowl and tap the fish skeleton inside.
- Drag the blue-handled wire cutters from the medical trolley in the lower left to the lamp cable running down the wall by the window. The cable is cut and the lamp goes out. Now tap the light bulb in the dark lamp; it comes out of its socket.
- Open the top pane of the window on the right. A newspaper blows in; tap it. This completes the checklist.
- The sheriff greets Margaret. She says she feels bad in the hospital. He tells her that a boy who read her book has disappeared and strange things are happening, and suspects her story is not entirely fictional. Margaret is bored and has nobody to play with: win a game of dominoes against her and she will tell everything.
- Domino mini-game: Margaret's tiles are at the top, yours at the bottom, and the line starts from a 1–1 tile in the middle. On your turn, drag one of your tiles to an open end of the line whose number matches one half of the tile; Margaret then plays one of hers. Example game: three tiles, all played at the left end of the line (the line turns upwards there), were enough for 'You win!' with one tile still left in each hand. Margaret's replies depend on your moves, so simply keep matching numbers. The magnifier button at the bottom right gives a hint and the circular-arrow button at the bottom left restarts the game.
- Margaret keeps her word. Long ago she worked in a secret laboratory that studied fragments of a meteorite. Under certain conditions the fragments opened a portal to a parallel world; everyone was so scared that the laboratory was mothballed and the staff were forbidden to talk about it. The sheriff concludes there must be materials about this lab somewhere, and the next location loads.
FBI Archive
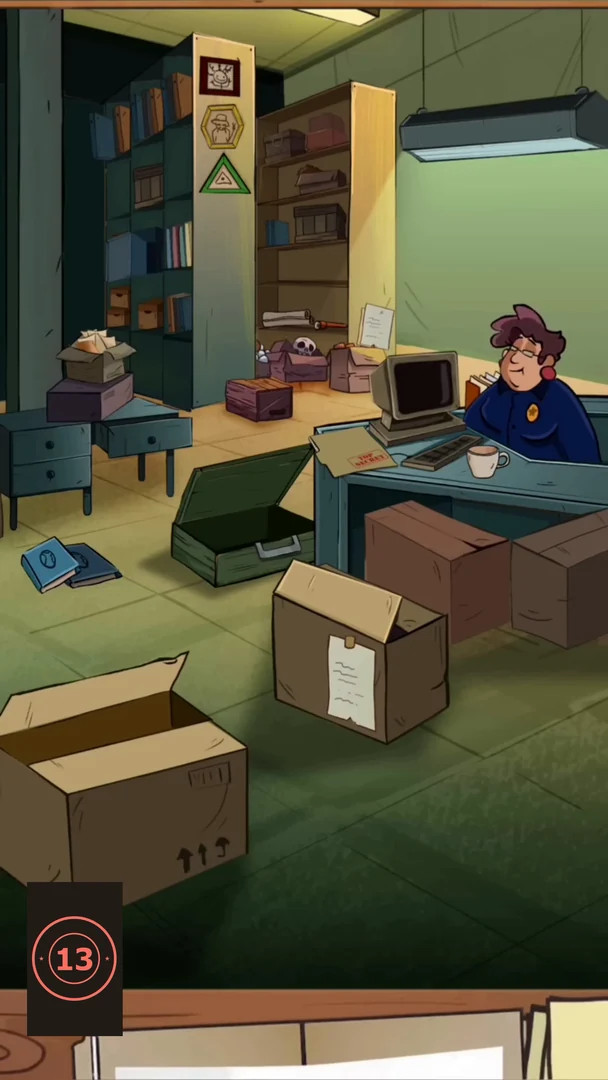
Choose the FBI on the map. Margaret has told the sheriff about the secret meteorite laboratory, and the FBI archive should hold its records. First open the lock on the archive door, then search the room while the guard drinks at his desk. The checklist has nine items: red alarm lamp, stamp, handprint, rifle, fingerprint, photo, tea bag, a small red house and a bundle of papers.
- The sheriff wants to get into the FBI archive and find information about Margaret and the secret lab. Tap the lock box on the wall beside the archive door. It has three gear dials, each with a red needle and a small teal triangle marker. Turn the dials until every red needle points at its marker; the dials appear to be linked, so turning one can move another. When all three needles line up, the yellow lamp on top of the lock turns red and the door opens. The red alarm lamp counts as the first checklist item. A skip button is available at the bottom right of the puzzle.
- In the archive, the guard sits at the desk drinking from a white cup. Pull the tea bag out of the guard's cup on the desk and tap it to collect it.
- A dark handprint shows on the brown box in front of the desk. Tap it to collect it. Margaret's TOP SECRET file opens briefly: it still has an empty photo slot and an empty fingerprint area.
- The pillar left of the right-hand bookcase holds a red square picture at the top and two empty outline slots below it: a hexagon and a triangle. Move the rolled paper off the taped box on the right-hand side of the floor, take the green triangle out of the box and place it in the triangle slot on the pillar.
- Take the yellow box cutter from the top of the blue drawer cabinet on the left and use it to slit the tape on the closed box at the bottom left. The box opens and holds a red stamp; tap the stamp to collect it.
- On the lowest shelf of the right-hand bookcase, a gold hexagon picture (a man in a hat) lies on top of rolled papers. Drag it into the hexagon slot on the pillar. The pillar now shows a red square, a yellow hexagon and a green triangle.
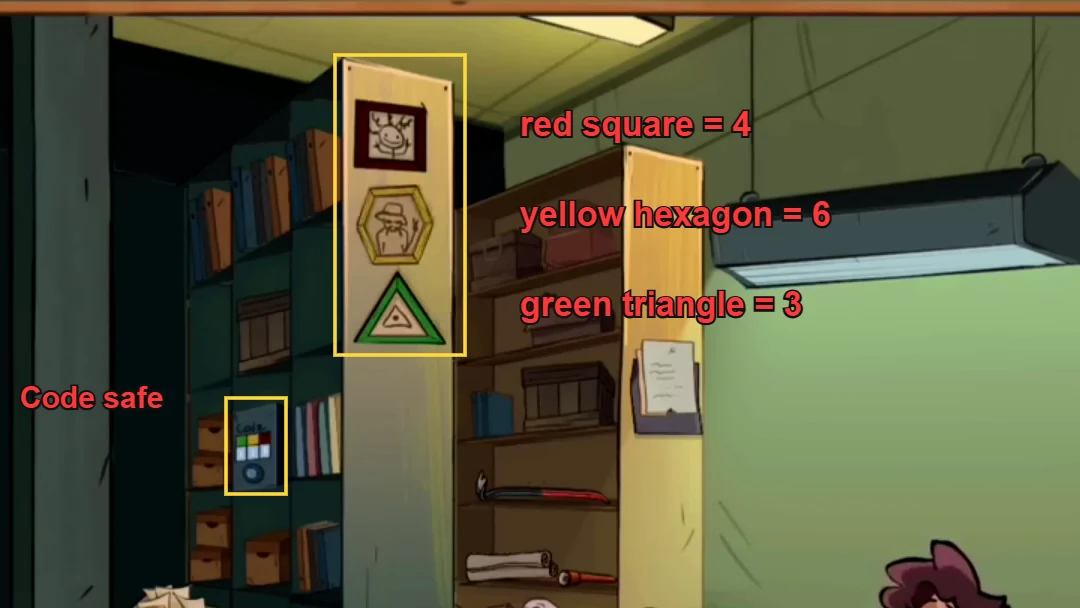
The pillar shapes give the safe code: count the sides of the shape matching each window colour (green 3, yellow 6, red 4). - Open the code safe in the left-hand bookcase. It has three digit windows under a green, a yellow and a red square. The code is the number of sides of the shape with the same colour on the pillar: green triangle = 3, yellow hexagon = 6, red square = 4. Enter 3 6 4. The safe opens and holds a bundle of papers; tap the papers to collect them.CODE364
- Take the crowbar with the red handle from the right-hand bookcase shelf and use it on the closed green case on the floor next to the desk. The case springs open and holds a rifle; tap the rifle to collect it.
- A sheet of paper is pinned to the side of the right-hand bookcase. Pull it down; a photo of a dark silhouette is underneath. Tap the photo to collect it.
- Tap the books on the top shelf of the left-hand bookcase so they tilt out. Behind the right-most book on that shelf, next to the yellow pillar, a small red house is hidden. Tap it to collect it.
- Turn the box on the right side of the floor so its paper label faces you. Pick up the small magnifying glass on top of the blue drawer cabinet at the far left and drag it over the label: a fingerprint shows up. Tap the fingerprint to collect it.
- With all nine items found, Margaret's file opens with her photo and a picture of the laboratory; the fingerprint box stays empty. It reads: name Margaret Garcia; profession Physicist; worked in a Laboratory of Paranormal Activity (013 North Arch Avenue, Archtown) in 1948-1950, which was closed in 1950. The sheriff notes that this is it: Margaret worked as a physicist in a secret laboratory until 1950, and even the address is listed, so they will go there at once. The map then shows the Laboratory as the next location.
Junkyard Outside the Laboratory
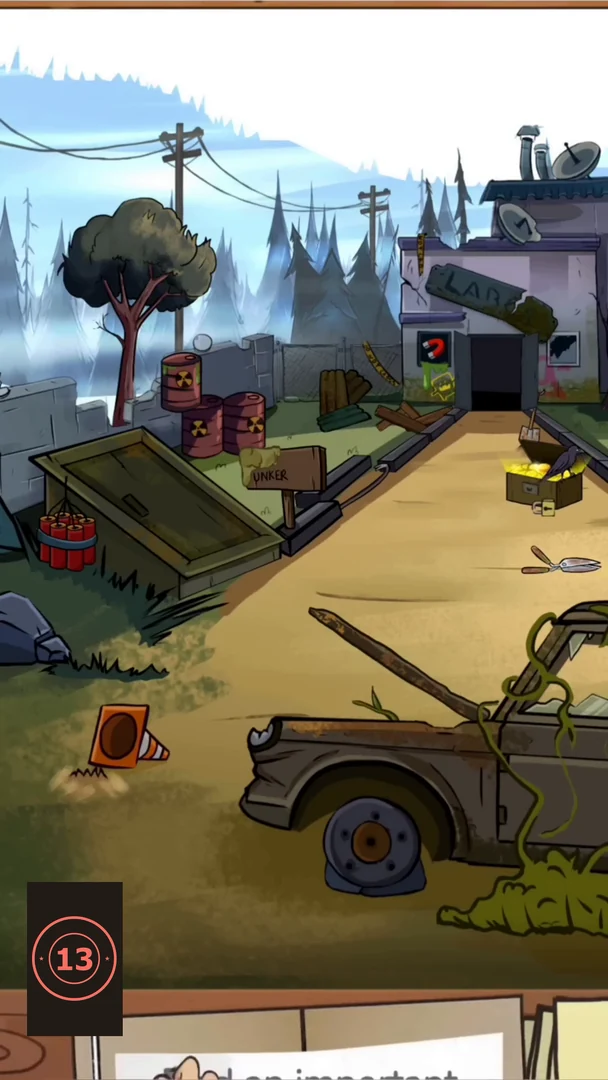
Choose the Laboratory on the map. The address from Margaret's file leads to an overgrown yard in front of a boarded-up LAB building. The sheriff thinks: 'The secret laboratory is somewhere nearby. We must find it.' The checklist has nine items: an orange flower, a down arrow, a worm, a crown, a tire, a goat, a red mushroom, a gas mask and a tin can. Then a radiation gauge helps you find the hidden entrance.
- Drag the orange angle grinder lying on the path to the padlocked chest on the right. The grinder cuts the lock and the chest opens, showing gold.
- Drag the spare tire leaning by the fence behind the barrels (left, near the wooden crates) down onto the car's flat front wheel. Then drag the hedge shears on the right of the path to the vines at the front of the car: a yellow bell falls. Drag the bell onto the goat and tap the glowing goat.
- Move the blue-grey rock to the left of the path. A worm rises from the ground; tap it.
- Pick up the black crowbar lying on the ground at the lower left of the LAB building and drag it to the crossed boards on the left window. The boards come off (a red horseshoe magnet is behind them) and the LAB sign tips down, revealing an orange crown outline at its right end. Tap the crown.
- Use the crowbar on the boards across the LAB door. The door opens and a red tire pump is inside. Drag the pump to the car's front wheel: the tire inflates and sparkles. Tap it to collect the tire.
- A gas mask peeks out from behind the stacked radioactive barrels at the left. Tap it.
- Tap the tree at the top left. A tin can drops out of its crown, lands by the wall and its lid pops open. Tap the tin.
- Tip over the orange traffic cone at the lower left. A red mushroom is underneath; tap it.
- Look at the small wooden sign next to the barrels, which carries the paper with the lab address. Pull off the paper: the sign underneath reads 'BUNKER' with a big down arrow. Tap the arrow.
- Open the car hood (it stays propped up on a stick). An orange flower grows on the engine; tap it. The checklist is now complete.
- Important clue: a 'CIRCUIT CHECK' voltmeter appears at the bottom with a radiation symbol on the scene. Drag the radiation symbol around the yard. The needle rises and the bar above the gauge turns from green to yellow to red as you approach the large green wooden hatch at the left (the one with the dynamite bundle beside it). Release it on the hatch when the bar is red.
- Drag the bundle of red dynamite from the left side of the hatch onto the middle of the hatch. It explodes and opens the hatch onto a stepladder. The sheriff thinks: 'This stepladder probably leads to a secret laboratory. We're going down!' The map then shows the Laboratory.
Margaret's Secret Laboratory
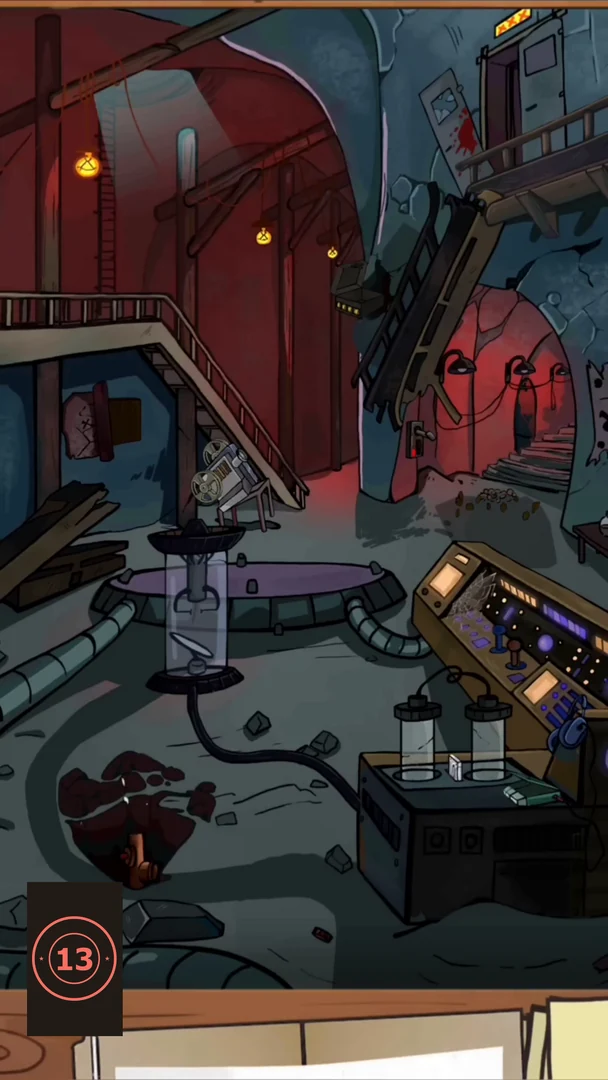
Climb down the stepladder from the junkyard. The sheriff thinks: 'Here is the secret laboratory. I'm sure Joe has been here. Let's try to take a look.' The underground lab has a glass cylinder, a purple pool, a control console, a tunnel and an upper landing. The checklist has nine items: a box marked 213, a blue radioactive barrel, a bat, a gold coin, a fish, a radiation warning sign, a claw, a dark creature and a carved tile. The film projector gives the code you need for the locked box.
- Tap the carved wooden panel on the blue wall at the left, under the stairs. A two-part board opens: the top half holds loose carved pieces, the bottom half is an empty frame. Drag pieces into the bottom frame so that their carved lines join into one picture of a creature with a spiral tail at the lower left, two round eyes at the right and spiky horns at the top right. Pieces snap into place when dropped; several top pieces are decoys and stay unused. When the rectangle is full, the picture glows and the carved tile is collected.
- Take the shovel leaning by the pile of planks at the upper left and drag it to the dark dirt patch on the floor at the lower left. It digs a hole and uncovers a gold coin (and a pipe valve). Tap the coin.
- Pick up the film reel on the floor by the wall switch at the tunnel entrance (right of the stairs) and drag it onto the film projector on top of the machine left of center. The projector shows a short film on the wall at the top right: a countdown, then a man in a lab coat beside the number 4020. Remember 4020.
- Tap the metal door on the upper landing at the top right (red-and-yellow light above it). A pry bar forces it, the door falls aside and a blue radioactive barrel stands in the doorway. Tap the barrel.
- Drag the orange pipe wrench lying on the floor at the bottom right to the valve uncovered in the hole you dug. Water shoots up and throws out a fish. Tap the fish.
- Drag the red-handled knife lying near the black machine (bottom center) to the white mushrooms growing behind the glass cylinder. Cutting them uncovers the small brown box marked 213; it is collected.
- Flip the light switch on the wall at the left side of the tunnel entrance. The tunnel lights go out and a dark hairy creature shows up in the tunnel. Tap it.
- Take the small hammer lying on the floor right of the purple pool and drag it to the rocky wall just left of the leaning ladder (by the tunnel). The rock breaks and a black box with a four-digit lock appears; tap it. Set the wheels to 4 0 2 0 (the number from the film). The box opens; tap the claw inside.CODE4020
- Switch on the big control console at the right (tap it). Its screens light up and a radiation warning triangle appears in the top-left screen. Tap the triangle.
- Drag the red soda can from the top of the console up to the bat hanging upside down from the ceiling at the top center. The bat wakes and spreads its wings; tap it. The checklist is complete.
- Important clue: a cassette tape appears on top of the black machine with the two glass jars. Drag it to the console. Margaret's recording plays: 'I want to try to launch a laser and open a portal to a parallel world. I leave this tape for those who also want to get into a parallel world. To start the laser, you need to find 5 code pictograms. For safety, I hid them in different places.' The sheriff thinks: 'So Joe must be in a parallel world. We need to get him out of there. First, we need to find all the icons to activate the laser.' The map opens with Joe's home backyard marked for the pictogram search.
Pictogram Hunt: Joe's Backyard and the Classroom
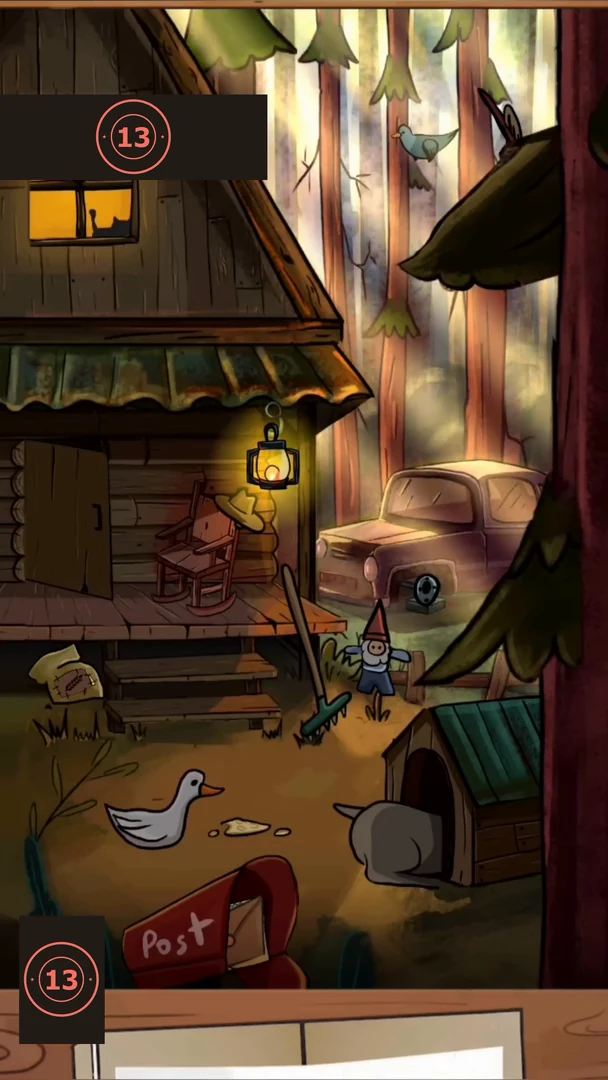
Margaret's tape says the laser needs five code pictograms that she hid in different places. The map marks each location in turn. Each pictogram glows over the scene when you find it, and the sheriff counts how many are left.
- In Joe's backyard the sheriff thinks: 'I need to find the first pictogram here.' Pull the brown envelope out of the red Post mailbox at the lower left. The envelope opens and a red pictogram (a large triangle crossed by a smaller one, shaped like a 4) appears over the house. The sheriff thinks: 'Great, here is the first pictogram. There are four more to find.' The map then marks the School.
- In the classroom the sheriff thinks: 'Joe hid the second pictogram somewhere in the classroom. I'll try to find it.' The teacher now sits at the front desk. A pair of glasses lies on the small table under the flower pot, to the right of the skeleton. Drag the glasses onto the teacher so she puts them on.
- Joe's CHEM Test 1 then fills the screen: graded F with 'See me after class!' and 'NO!' at the bottom. A blue pictogram (a 4-shaped triangle with a small curl on the left) is drawn beside question 2. It lifts off the paper and glows over the blackboard. The sheriff thinks: 'Excellent! There are three left.' The map then marks the Forest.
Pictogram Hunt: Joe's Game Box at Fort Joe
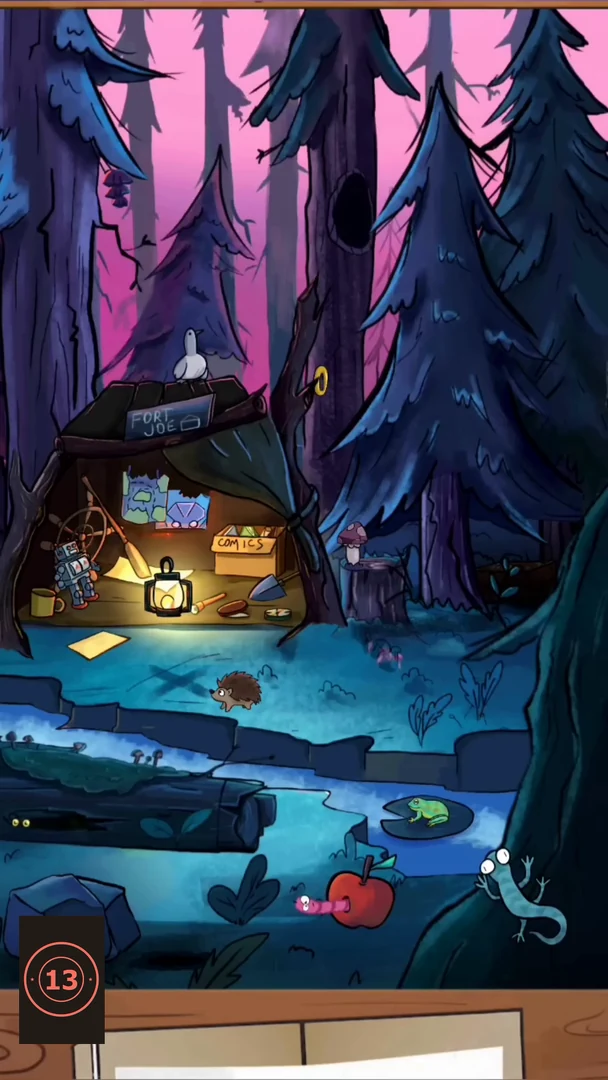
The map marks the Forest. The sheriff thinks: 'I've been here before, but I didn't find any pictogram. I probably didn't pay attention to it.' Light up the dark tree on the right to find Joe's game box, then fill the box with all of its wooden pieces.
- Drag the lit lantern from Fort Joe's hut on the left over to the dark area under the big tree on the right. The light startles a bear, which jumps out, and a small wooden box appears on the bank at the right.
- Tap the small box. It is labelled 'Joe's Game – Confidential, Do not open!'. It opens as a packing puzzle: an empty 5×5 grid in the lid with three fixed blue stones, and nine wooden pieces in the tray below. The round arrow button at the lower left resets the pieces; the button at the lower right skips the puzzle.
- Drag every piece from the tray into the grid so no square is left empty. The stones sit in row 2 column 4, row 4 column 1 and row 5 column 5 (counting from the top left). One finished layout that works: an L piece (two across with one square hanging down on the right) in row 1 columns 1–2 plus row 2 column 2; the L piece with the small arrow in column 3 rows 1–2 plus row 1 column 4; the long three-square plank down column 5 rows 1–3; a two-square upright plank in column 1 rows 2–3; the swirl plank in column 2 rows 3–4; a two-square flat plank in row 3 columns 3–4; the plank with the red cross in column 3 rows 4–5; the L piece with the eye in column 4 rows 4–5 plus row 4 column 5; and the flat plank with the nail in row 5 columns 1–2. The red marks on the pieces then join to form the pictogram.
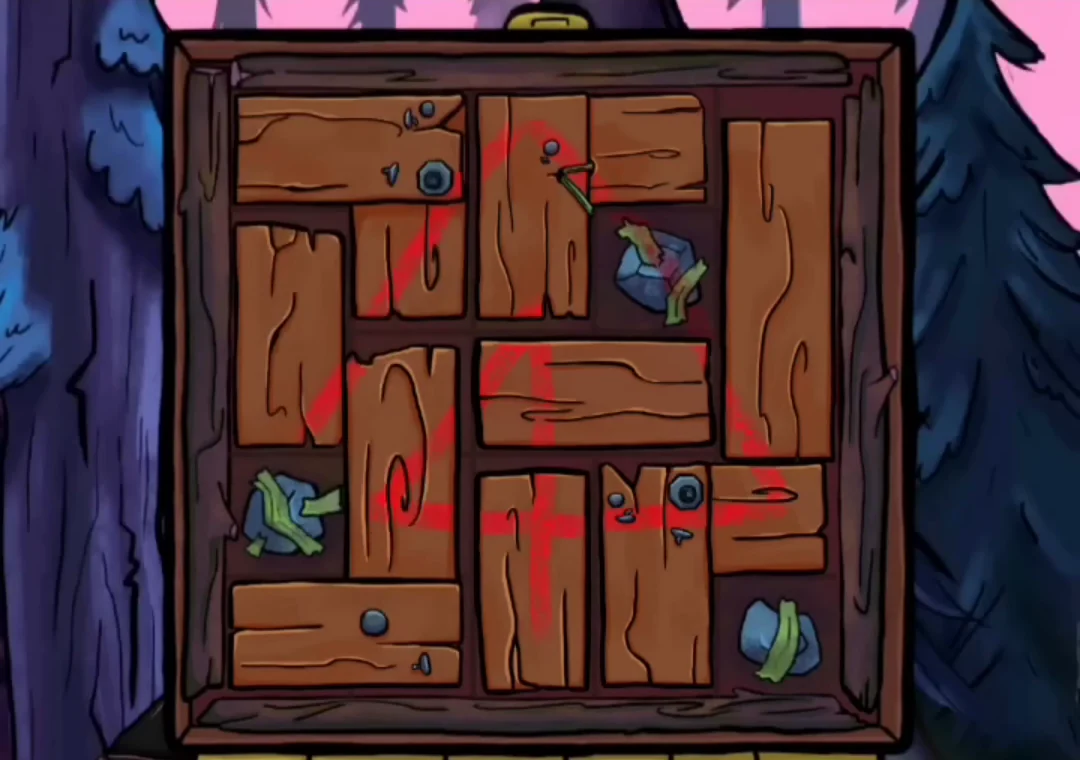
One working layout for the packing puzzle. The red marks join into the pictogram once every square is filled. - A red triangle pictogram with a 4 inside rises over the forest. The sheriff thinks: 'Wonderful! There are only two icons left.' The map marks Fest next.
Pictogram Hunt: The Fortune Teller at Fest
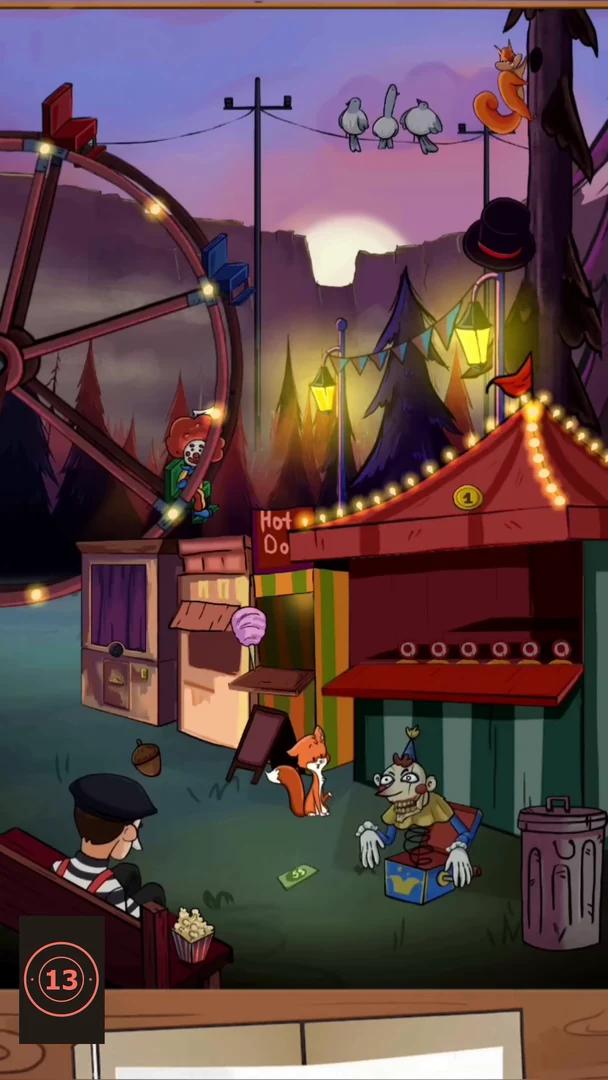
The map marks Fest. The sheriff thinks: 'I need to quickly find the fourth pictogram. There is not much time.' Win a coin at the shooting gallery, feed it to the fortune teller's booth, and steer the coloured ball chains in his machine.
- Tap the shotgun lying on the counter of the red shooting-gallery stall. You get three shots (counter 3/3 at the lower right); tap the yellow ducks as they slide along the back of the stall. When the round ends, a gold coin appears near the street lamp above the stalls.
- Drag the coin down to the fortune teller's purple booth at the far left. The fortune teller appears in the booth window, and his ball machine opens.
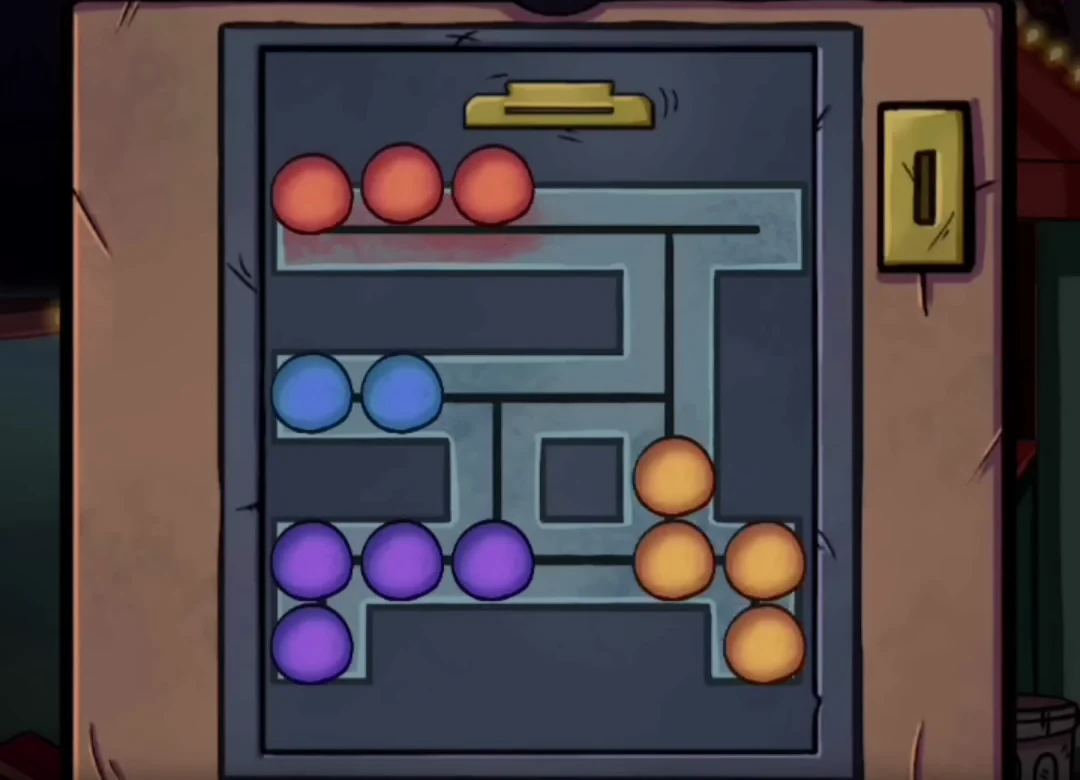
- The machine is a sliding ball-chain puzzle. Each colour forms a chain of balls in the grey channels; drag a chain by one end and the rest follows along the channels. Chains cannot pass through each other. Goal: bring the red chain onto the faint red strip. Stage 1: the red strip is at the bottom right. One way: move the blue chain into the right-hand column and pack the orange chain into the left loop, which frees the middle column. Then lead the red chain down the middle and right into the strip.
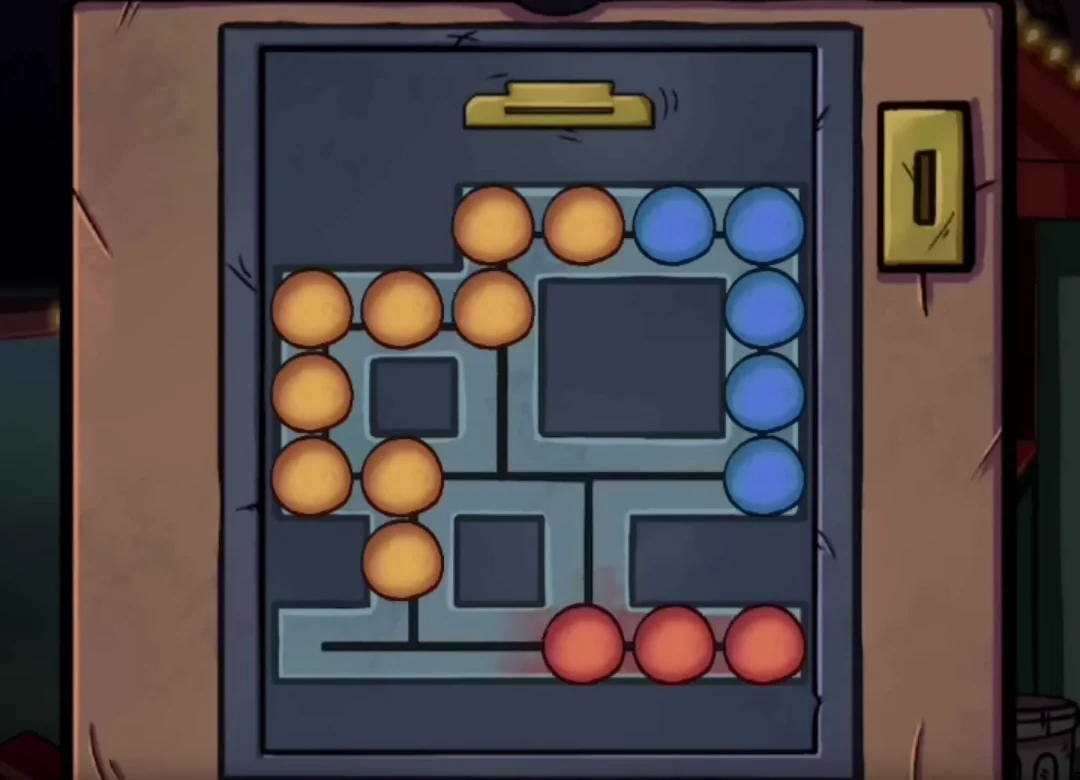
Stage 1 solved: blue in the right-hand column, orange packed to the left, red in the bottom-right strip. - Stage 2 uses a new layout with purple, red, orange and blue chains; the red strip is now at the top left. The orange chain starts along the top row; move it down the right-hand channel to the lower right. That clears the way for the red chain to go up the right side and left along the top into the strip. A card with the pictogram then drops from the slot at the top of the machine.
Stage 2 solved: orange moved to the lower right, red along the top into the top-left strip. - A red pictogram (an upside-down triangle crossed by two diagonal strokes) glows over Fest. The sheriff thinks: 'At last! There is only one pictogram left.' The map marks Oldman's house with a DONE stamp on Fest.
Pictogram Hunt: Old Billy's Garage Typewriter
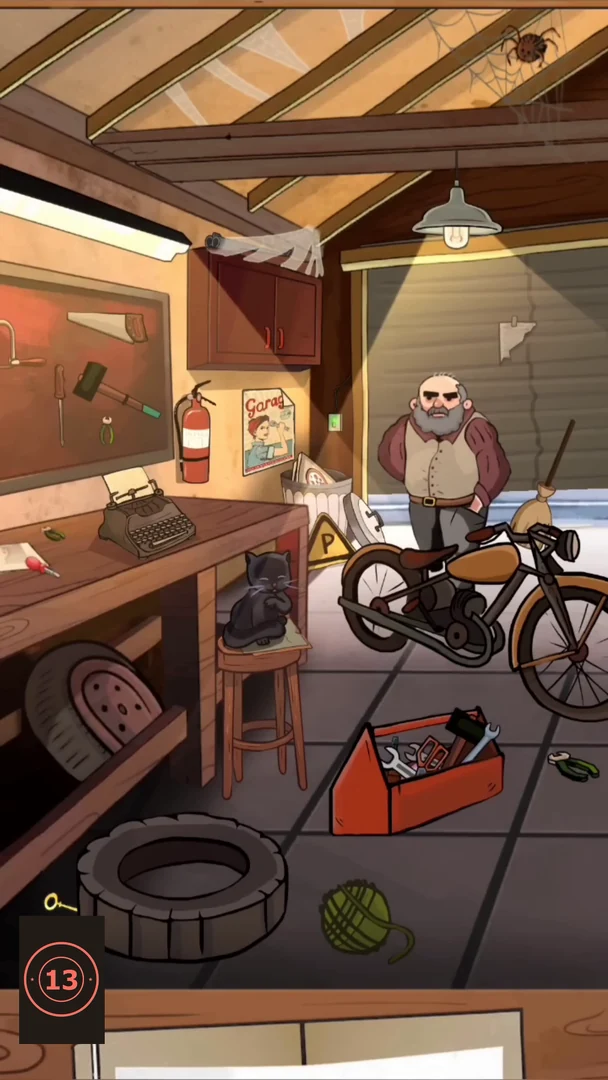
The map marks Oldman's house. The sheriff thinks: 'I'm back in old Billy's garage! I need to find the last pictogram urgently.' Billy now stands by his motorbike. Open the locked box on the wall shelf, complete the Morse code chart and type the message on the typewriter.
- Tap the small wall cabinet at the top left (covered in cobweb) to open its doors; a blue box sits inside. Then drag the broom leaning beside Billy up to the cobweb to sweep it away.
- Empty the red toolbox on the floor: drag the wrench, screwdriver, hammer and other tools out of it. A pink bra lies at the bottom. Drag the bra to old Billy; he hands you a small gold key.
- Drag the gold key to the blue box in the wall cabinet. The box opens and a torn half-sheet of paper comes out. Drag it to the torn paper pinned on the garage door behind Billy to make the page whole. It becomes a Morse code alphabet chart.
- Tap the typewriter on the workbench at the left and type SOS (S O S). The paper rolls up and a red pictogram (a circle on a stick with a slanted line, like a lever) appears on it, then glows over the garage. The sheriff thinks: 'Wonderful! All pictograms are collected. Time to go back to the bunker.' The map then marks the Laboratory.
The Laser Lock and the Portal
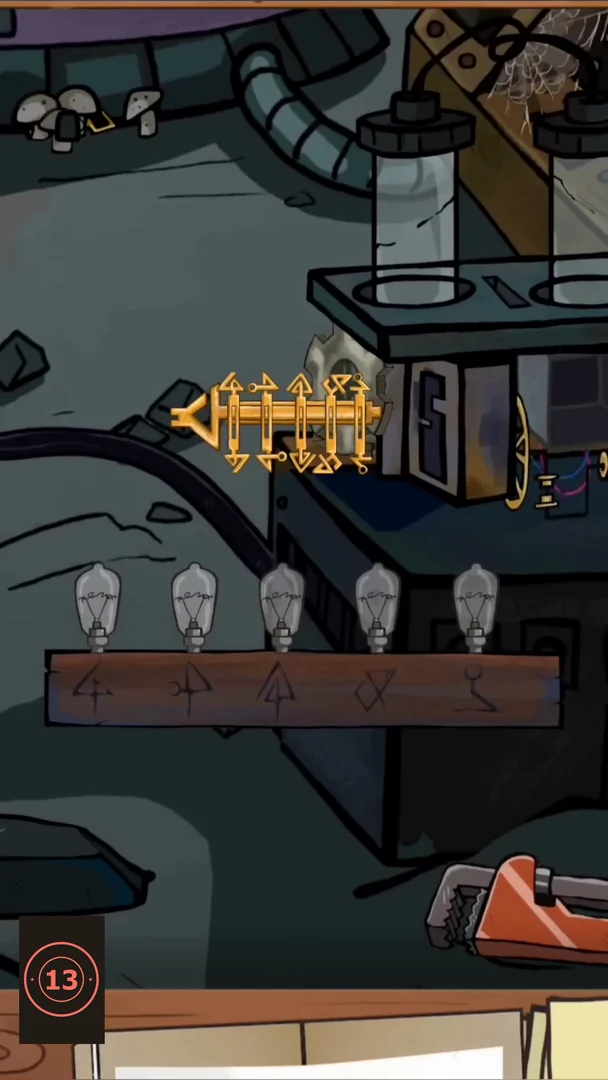
The map sends you back to the secret laboratory. The sheriff thinks: 'All the pictograms are in place. It's time to turn on the laser.' A gold key sits by the lock on the laser console, above a board with five bulbs. Under the bulbs are the five pictograms you collected.
- Tap the gold key beside the laser console to zoom in. The key has five bars across its shaft; each bar carries pictogram pieces at its ends and slides up or down. Push the key into the round lock at the right to test it. A bulb lights above each pictogram whose bar is set correctly, and the key then comes back out.
- Leave the bars under lit bulbs alone, change the others and test again until all five bulbs light. Each bar slides between a higher and a lower position (in the example game all five started low). The working setting is: bars 1, 3 and 5 (counting from the head of the key on the left) up, bars 2 and 4 down. When all five bulbs glow, the laser fires through the glass cylinder and a purple portal opens.
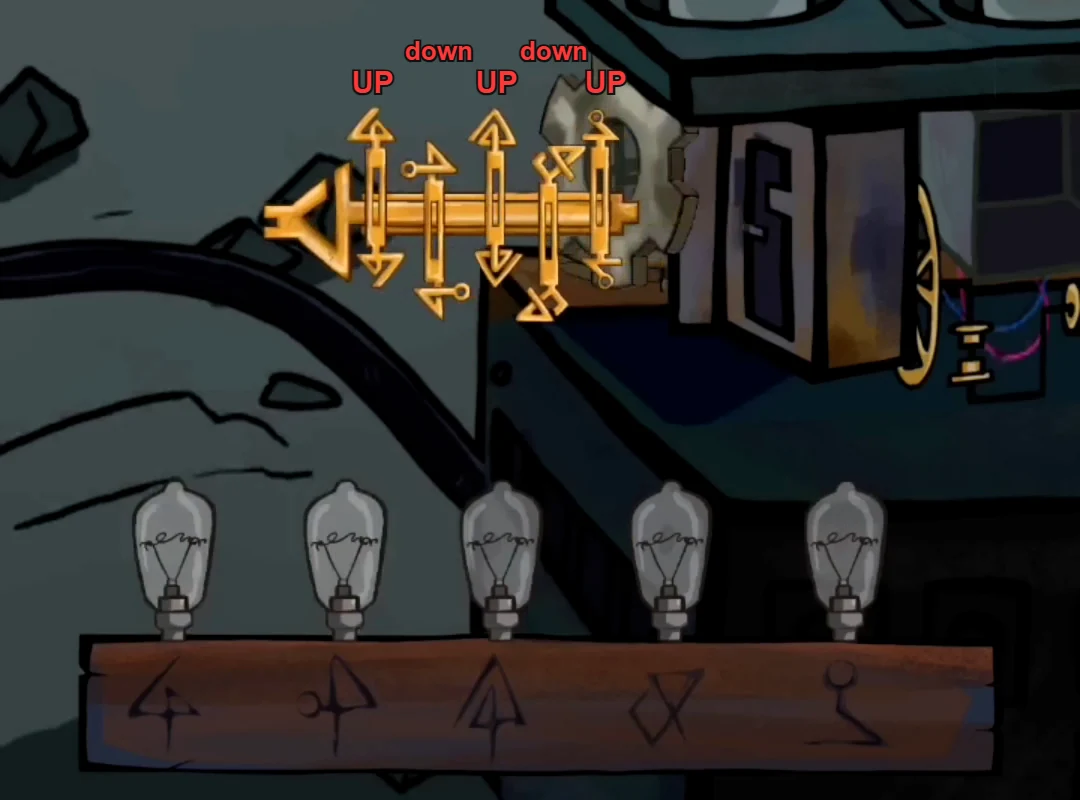
The working key setting: bars 1, 3 and 5 up, bars 2 and 4 down (counting from the key head on the left). Push it into the lock to light all five bulbs. - The sheriff walks up to the portal and steps through it. Part 2 ends there. In the 2023 version, Joe's own story (the next part of this guide) follows immediately. In later versions a 'Congratulations! Part 2 is over. You've unlocked Part 3' card appears instead: tap OK, then tap the Part 3 card in the chapter menu.