The portal house and the wolf gate
A young witch who has joined the Resistance must reach the archwitches' floating castle. She starts in a small house beside the portal, with the task "Approach the Portal". The map is divided into Around the Portal, Road to the Tower, Forest Mysteries and, later, the Flying Castle.
- Take the matches from the table and the lantern beside it. Light the lantern with the matches.
- Go outside to the bridge. The gate up the stairs is locked and needs a clue. Take stone 1 of 3 from beside the gate. Shine the lantern into the hollow tree trunk and take wolf head 1 of 2.
- Go down the path under the bridge to the swan pond. Take bird figure 1 of 2 from the porch of the hut on the far side.
- Follow the boardwalk to the marshy path with a fallen stone head. Take mask 1 of 4 from the boards and rune 1 of 3 from the stone head. Do not step into the water.
- Look at the wrecked boat on the left of the marsh and take bird figure 2 of 2 and the shaped key.
- Back in the house, open the leather bag hanging by the bed with the shaped key and take wolf head 2 of 2.
- Put both wolf heads on the gate to the right of the stairs. Two wheels of picture chips appear, with objects drawn around the board. Turn the wheels and swap chips until every chip sits next to the object that belongs with it: hook and fish, papers and book, chest and ring, cloth and thread, barrel and mug, pouch and coins, lock and key, feather and scroll, anvil and hammer, armour and gauntlet, quiver and bow, crossbow and arrowhead, rocks and sling, cannon and ball, sword and shield, target and darts. Take the Historical Manuscript (1 of 4 in this chapter) and the knife.
- Pull the bag out from under the bed, cut it open with the knife and take the poker. Outside, use the poker on the bird's nest in the tree by the bridge and take eye 1 of 2.
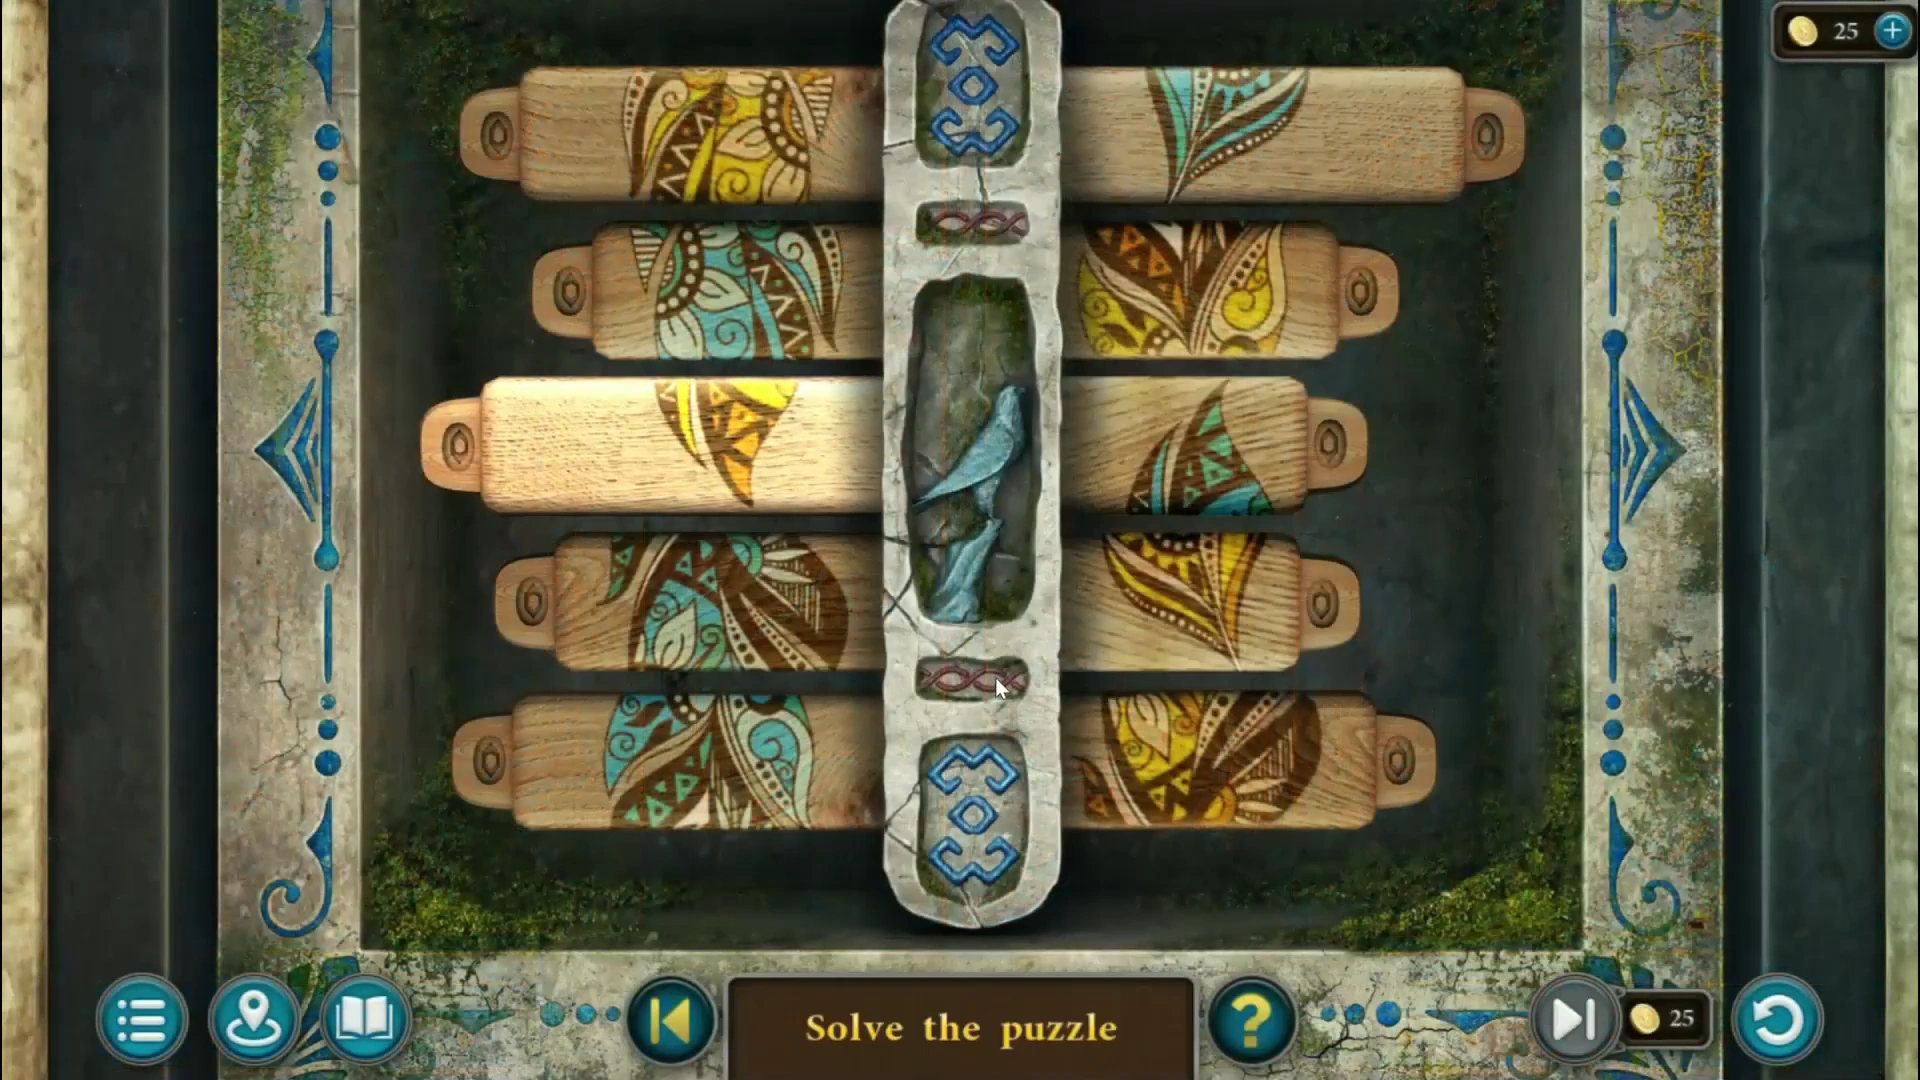
Feather panel - puzzle overview. - Put both birds on the square stone with blue doors beside the bridge stairs. Tap planks to slide them left or right until the five planks on the left form one whole yellow feather and the five on the right form one whole blue feather (see the picture). Take rune 2 of 3 and eye 2 of 2.
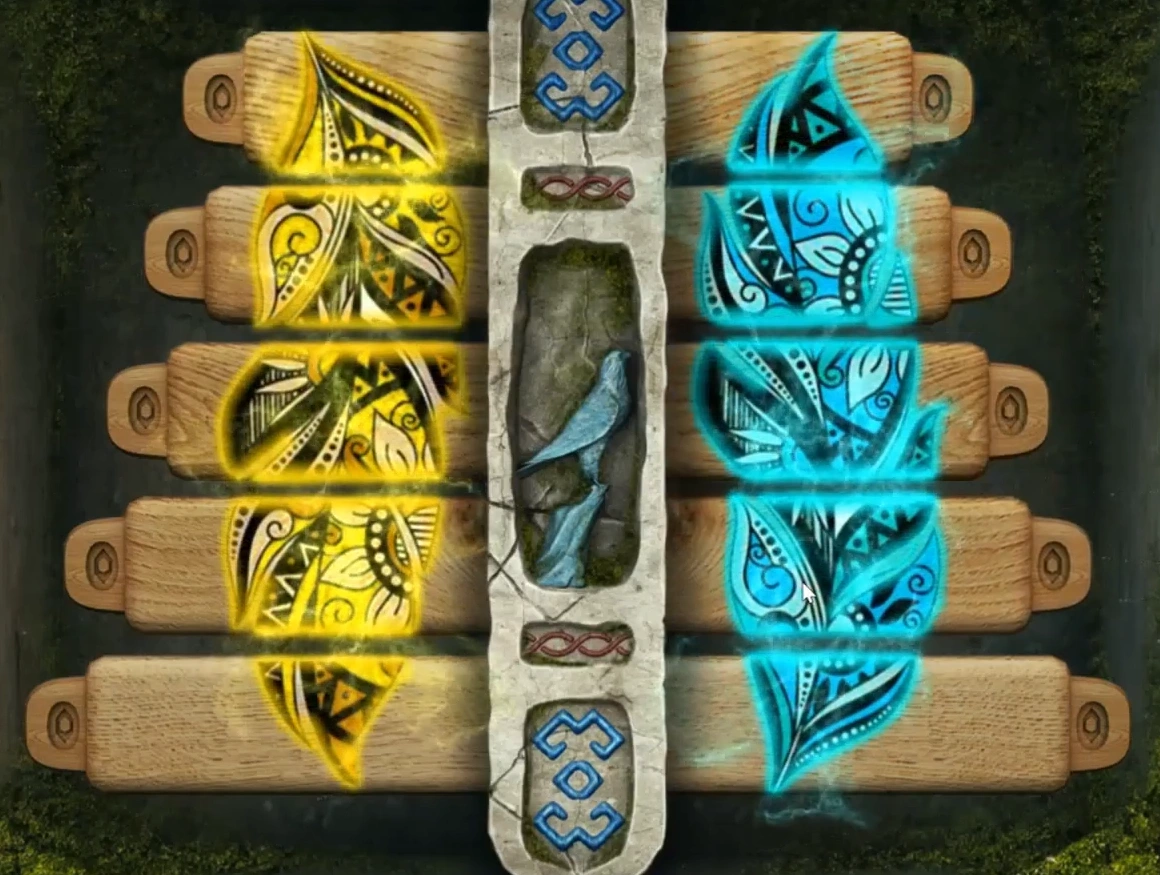
Bird stone solved: one whole feather on each side. - At the swan pond, put both eyes on the two fish carved on the swan boat. Five flies with symbols on their wings sit at the top and five frogs at the bottom: green circle, purple square, lime triangle, blue house and red diamond. Rows of blue balls lie between them. Tapping balls moves them along their rails, and a fly drops down through any gap that opens beneath it. Bring each fly down into the frog with the same colour and symbol. This is a long puzzle, so the guide gives the approach: work on one fly at a time, start with the fly whose frog is closest below it, and use the restart button if a fly drops into the wrong column. Take the hammer, the brush and the arrow from the compartment.
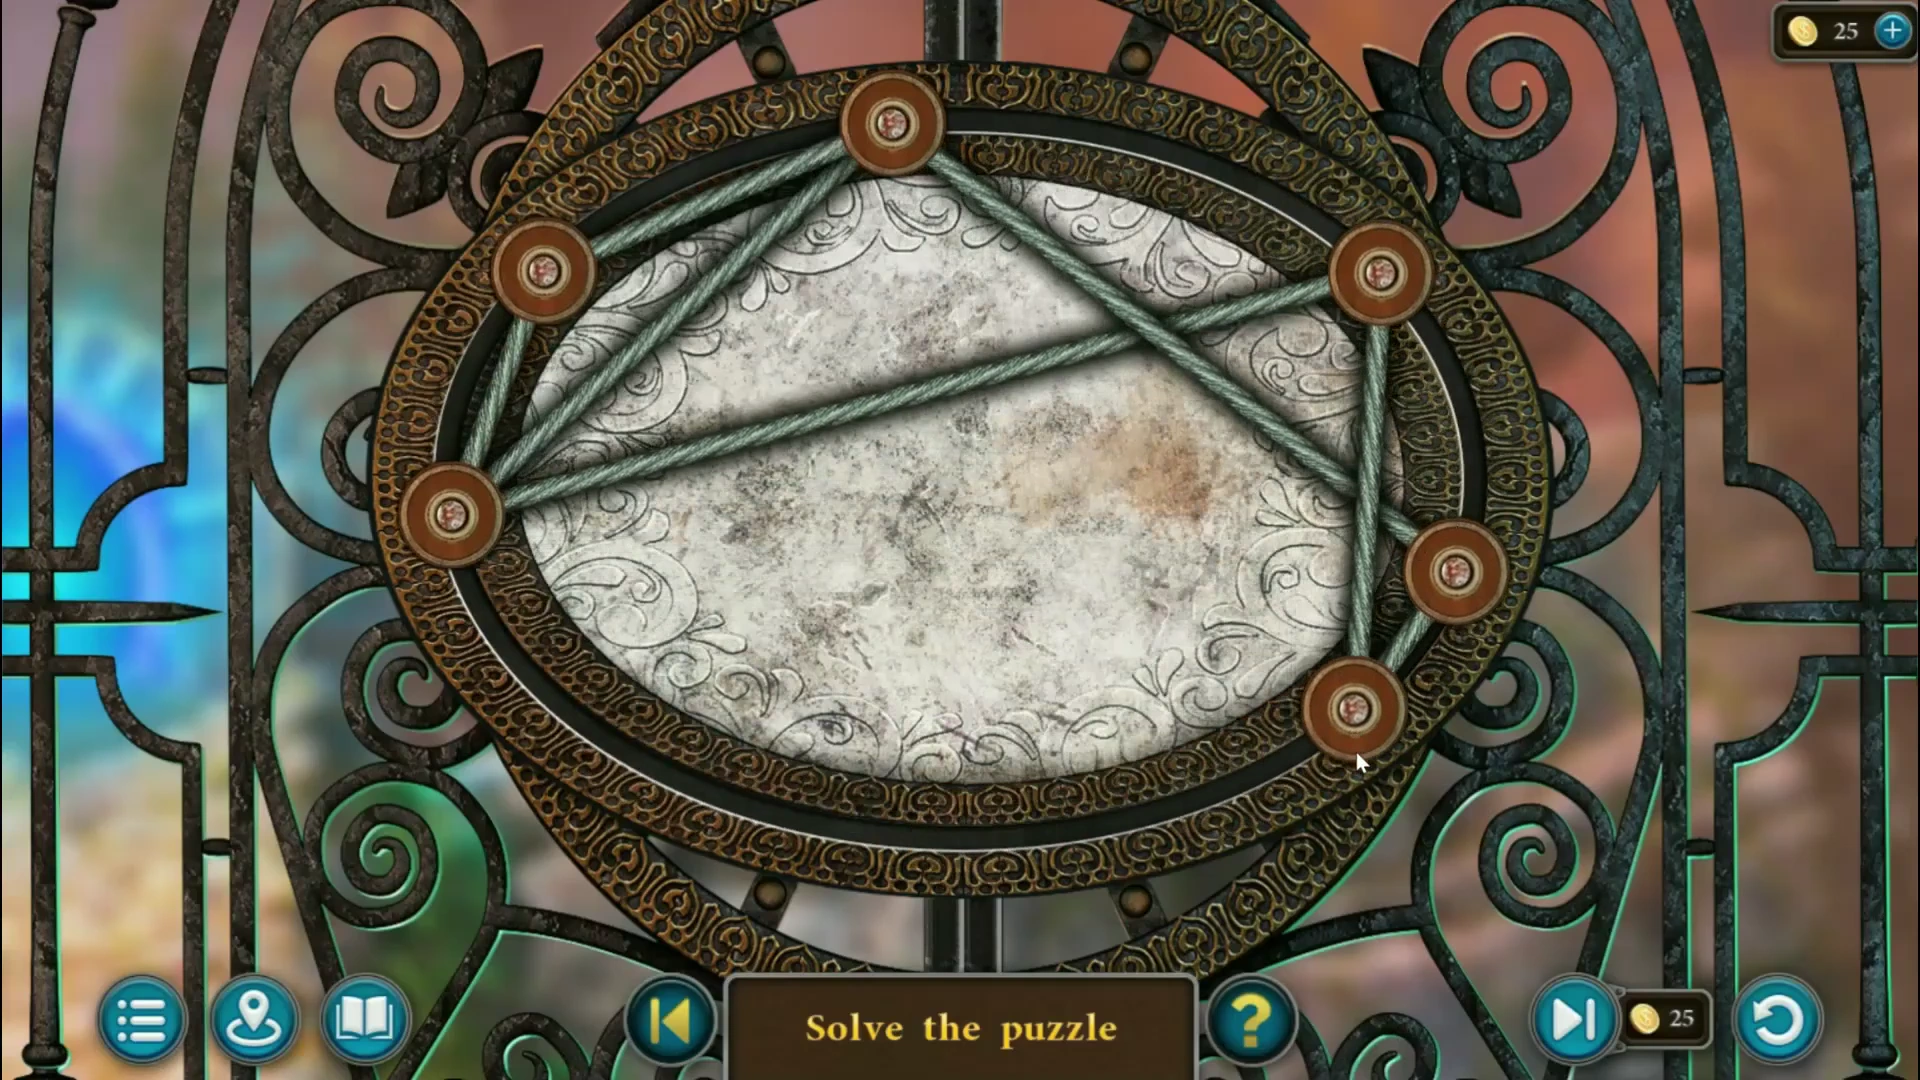
Rope gate - puzzle overview. - Brush the thick moss on the wall under the bridge arch to reveal a pattern of lines. At the locked gate, tap pairs of pegs on the round lock to stretch the ropes between them so they copy that pattern (see the picture). The gate opens to the portal area.
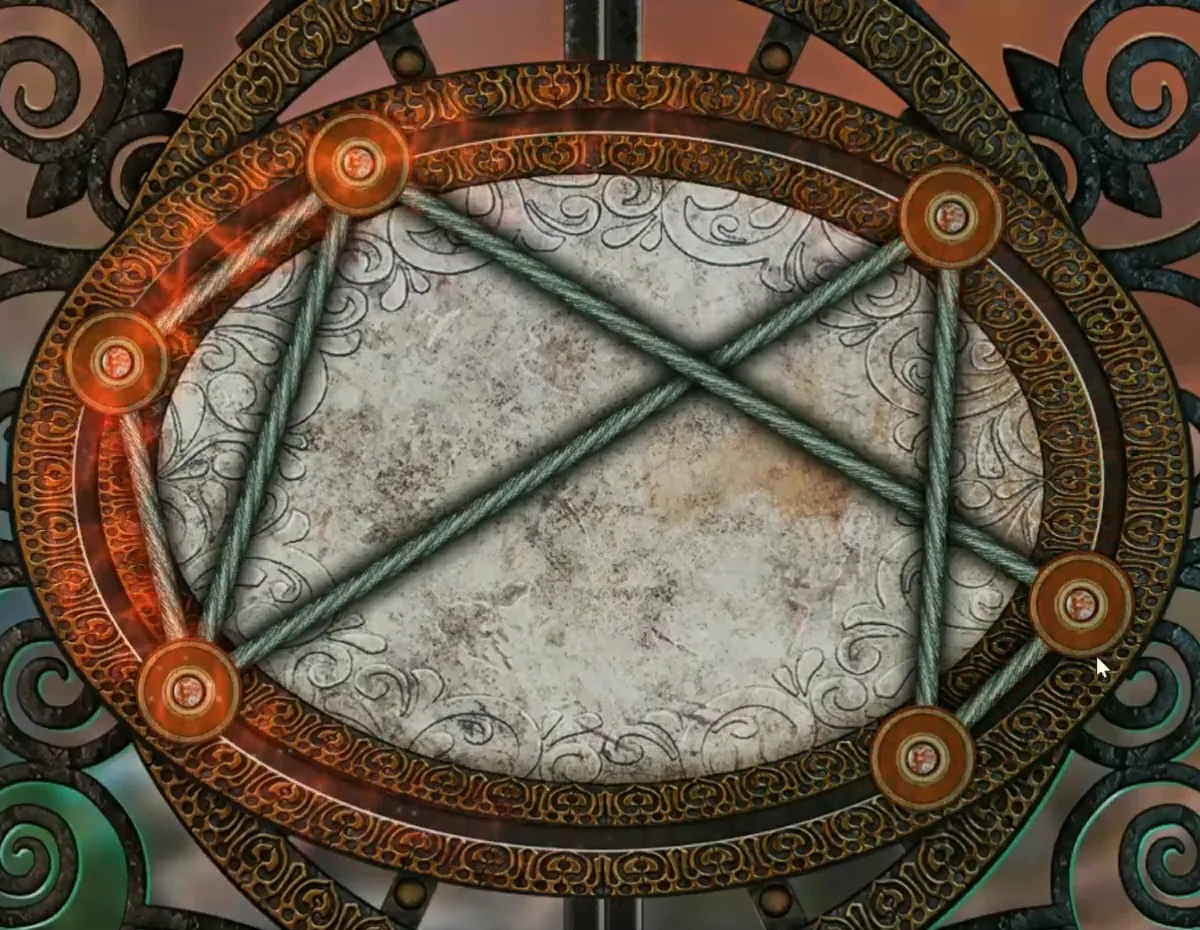
Bridge gate lock solved, copying the moss pattern.
The portal, the snail and the fisherman's hut
A raven-cloaked seeress blocks the portal and tells the witch to find her tower. The new task is "Find Oracle's Castle". The portal area has a dry fountain, a storage door with a feather lock, a cart, a locked grate and a hexagonal rock door.
- Take rune 3 of 3 from the fountain, mask 2 of 4 from the storage room on the right, and stone head 1 of 2 from the cart.
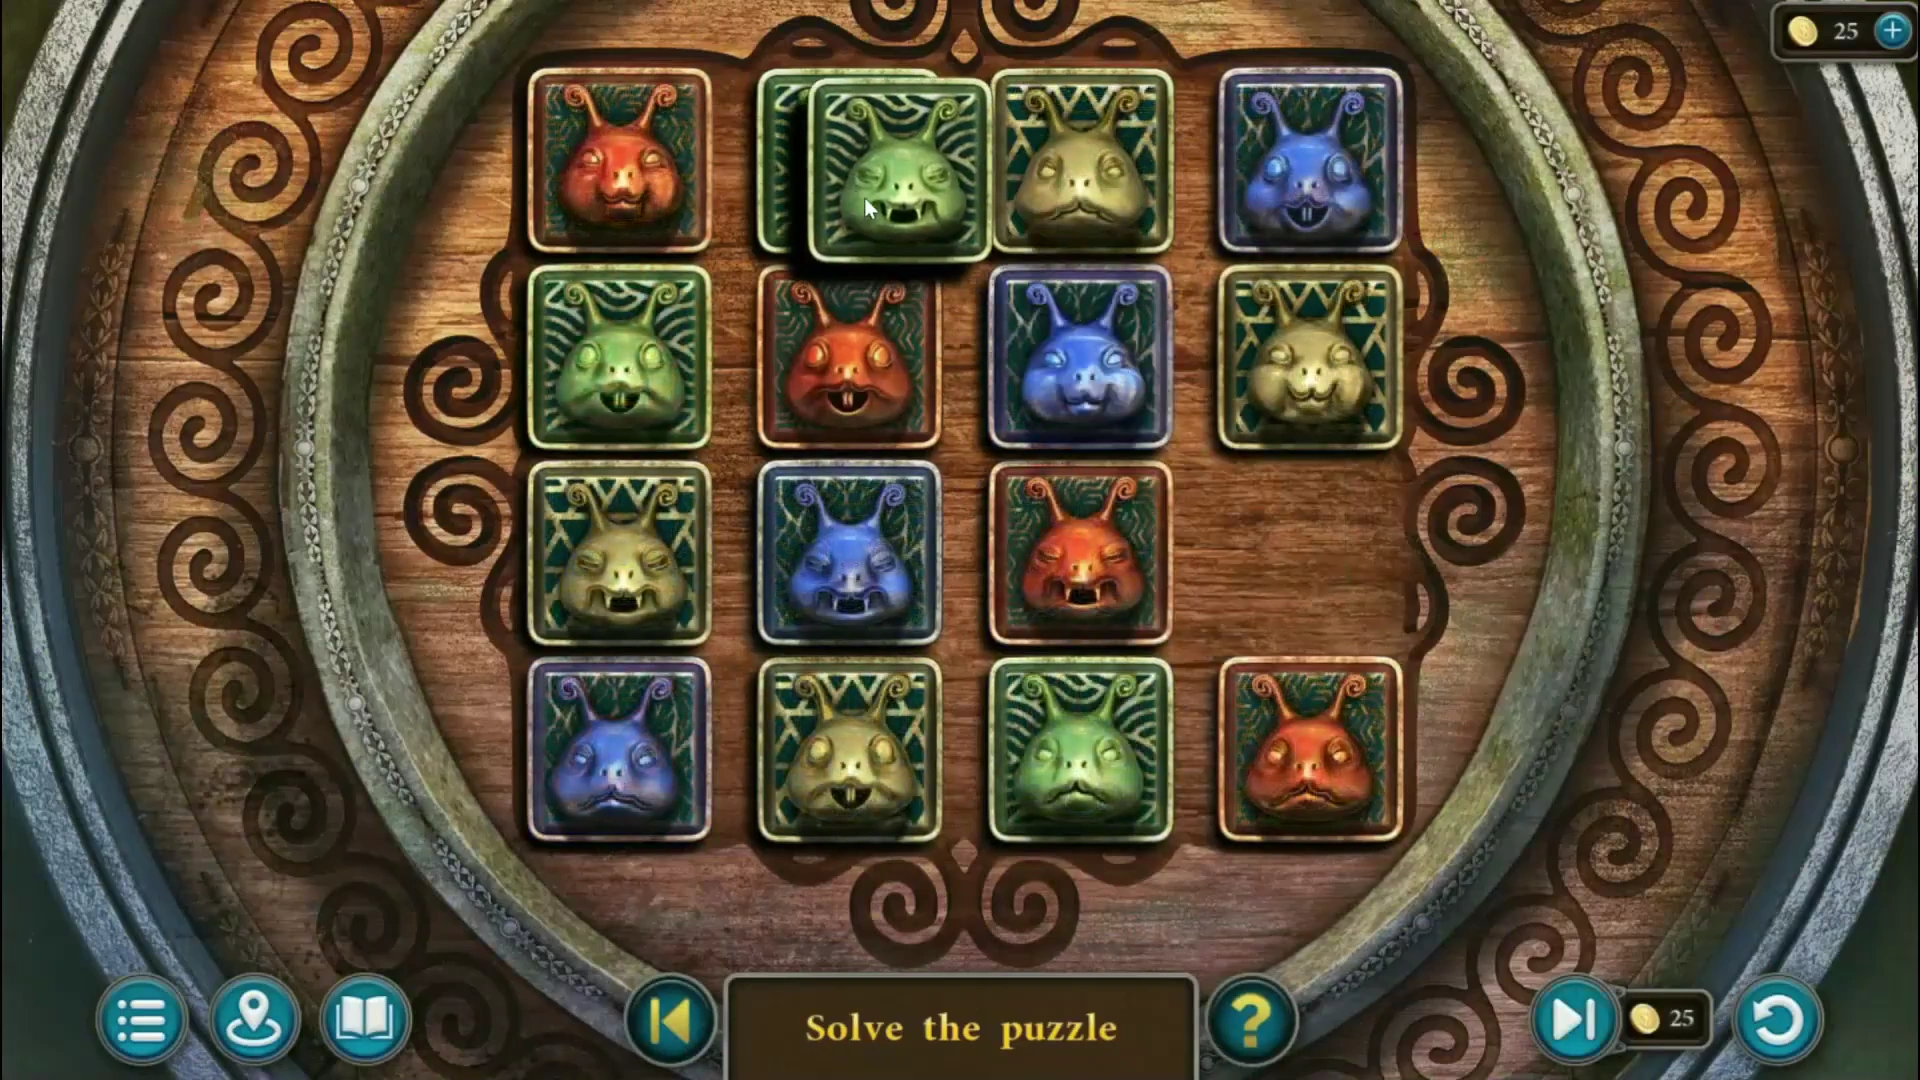
Snail puzzle - puzzle overview. - At the marsh, put the three runes on the snail statue. Arrange the 16 tiles so that no colour and no face appears twice in any row or column (see the picture). Take the faucet and the key.
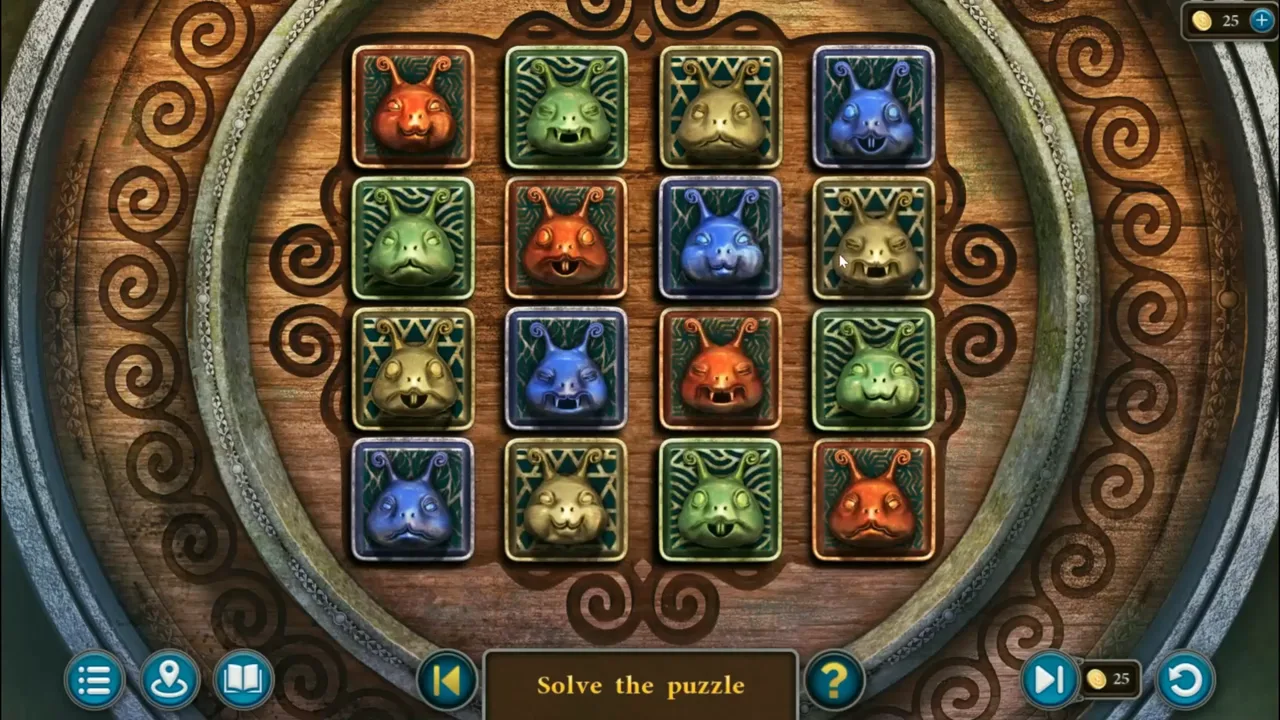
Snail puzzle solved: no repeated colour or face in a row or column. - Fit the faucet to the dry fountain in the portal area and take stone head 2 of 2 from the water.
- Open the hut at the swan pond with the key. The hut is an interactive hidden-object scene: the bar at the bottom shows the objects to find, and several are used inside the hut. Take the thin board standing beside the overturned metal bowl, to the left of the blue-banded chest under the shelf. On the shelf high on the right wall, move the jar of pink grains aside and take the small anchor behind it. Look at the broken ladder on the floor, fit the board as its missing rung and take the drawer handle lying beside it. Fit the handle to the drawer of the desk by the window on the left, open it and take the scissors. Note the eight arrows carved on the desk top. Cut the net over the wicker chest on the right with the scissors and take the rope, then put the anchor in its slot on the small box inside the chest. Tie the ladder with the rope, set it up and climb to the loft. Open the cupboard there and take the wheel and the magnet. Use the magnet on the hole in the floorboards in front of the ladder to pull up a fish.
- Put the wheel on the small box in the wicker chest, beside the anchor. The box lid has eleven slots linked by six circles: eight hold arrow tokens and three are empty. Select an arrow next to an empty slot on the same circle and move it into that slot; arrows keep the direction they point. Copy the desk carving into the four top and four bottom slots and leave the three middle slots empty. Left to right, the top row is down, up, left, down, and the bottom row is right, down, right, down. Use the empty middle slots to move arrows past each other. When the box opens, take the fish. Put both fish into the fish-shaped hollows on the blue-banded chest under the shelf and take the fish trap.
- Set the trap in the water by the steps on the swan pond, where fish swim, and take the fish you catch.
- In the portal house, knock the carved board off the wall with the hammer and take the key and plate 1 of 4. Open the grate at the foot of the castle in the portal area with the key, shine the lantern inside and take plate 2 of 4.
The crocodile, the snake heads and the tower
A crocodile guards the path to the tower beyond the marsh.
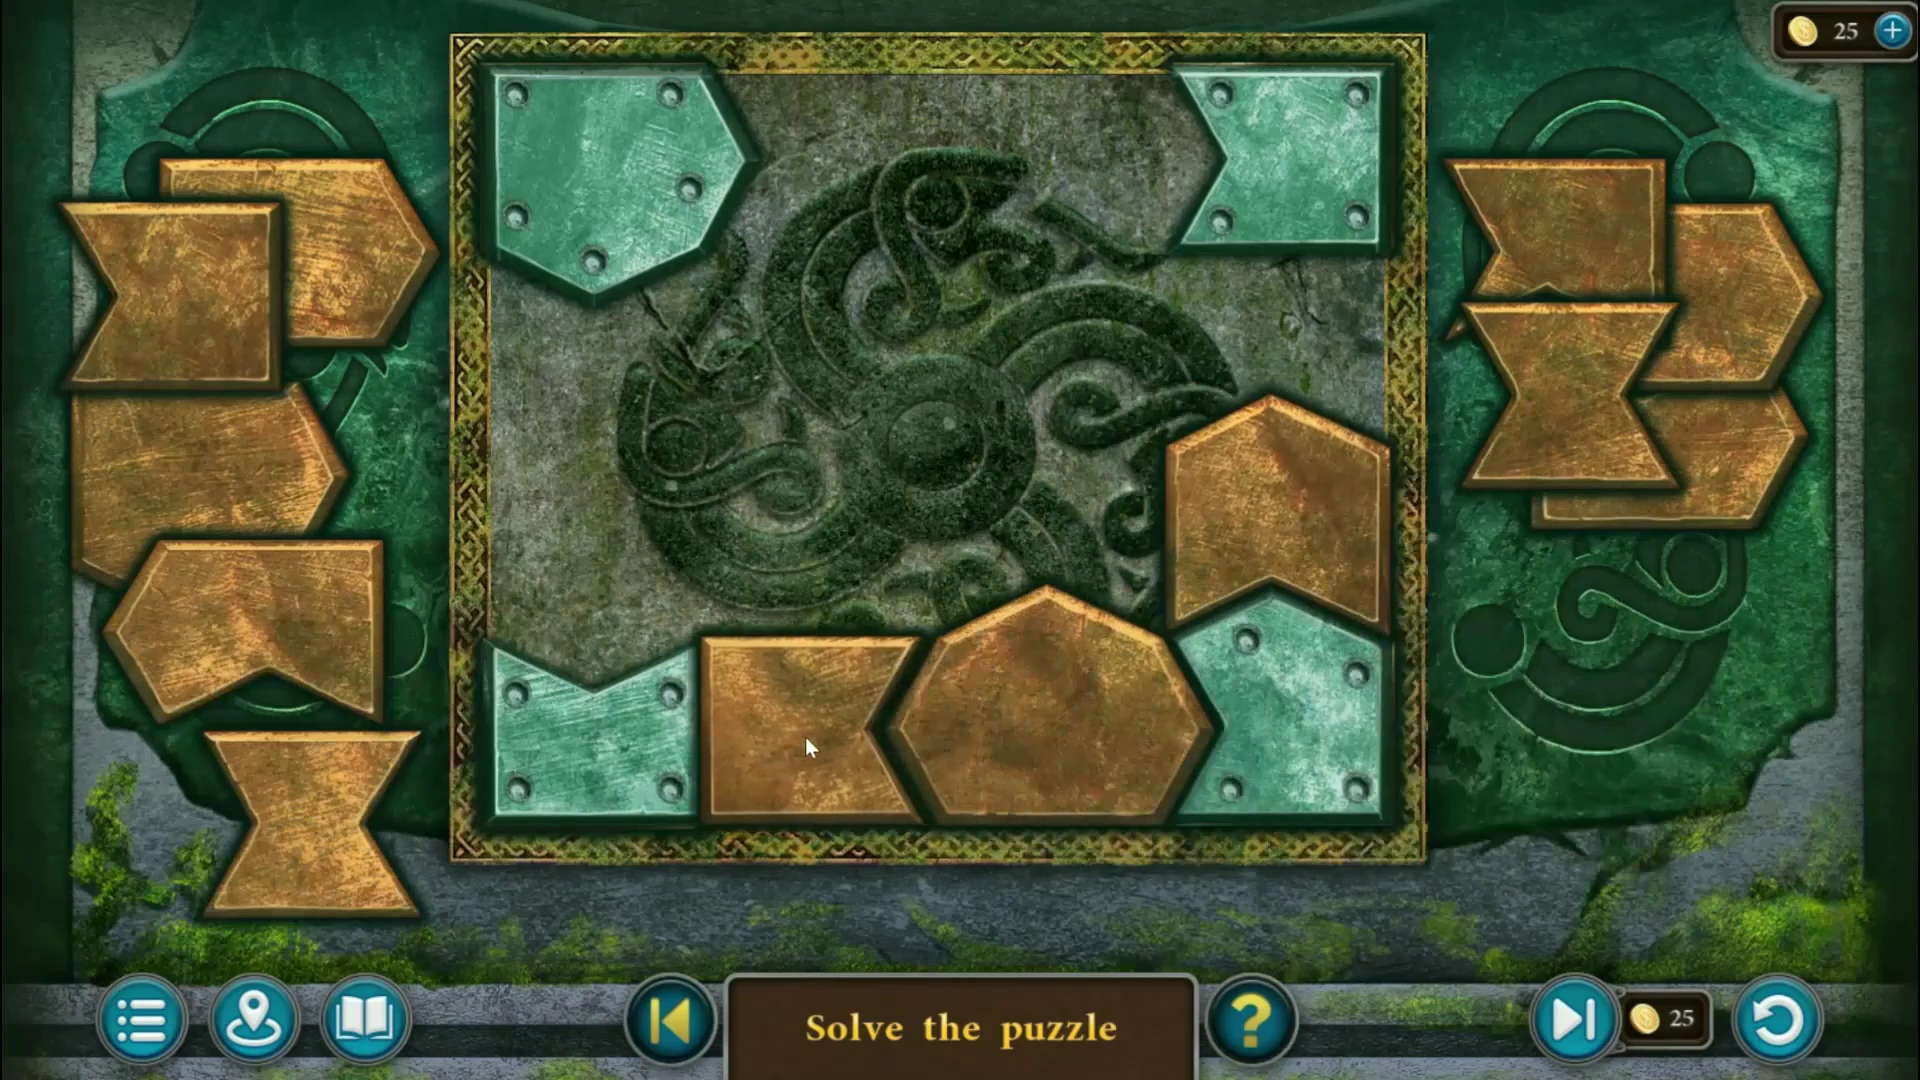
- At the marsh, throw the fish to lure the crocodile away. Put both heads on the forehead of the fallen stone head and drag the gold tiles into the frame, around the fixed teal corner pieces, so that it is filled with no gaps (see the picture). Take feather 1 of 3 and stone 2 of 3 from its mouth.
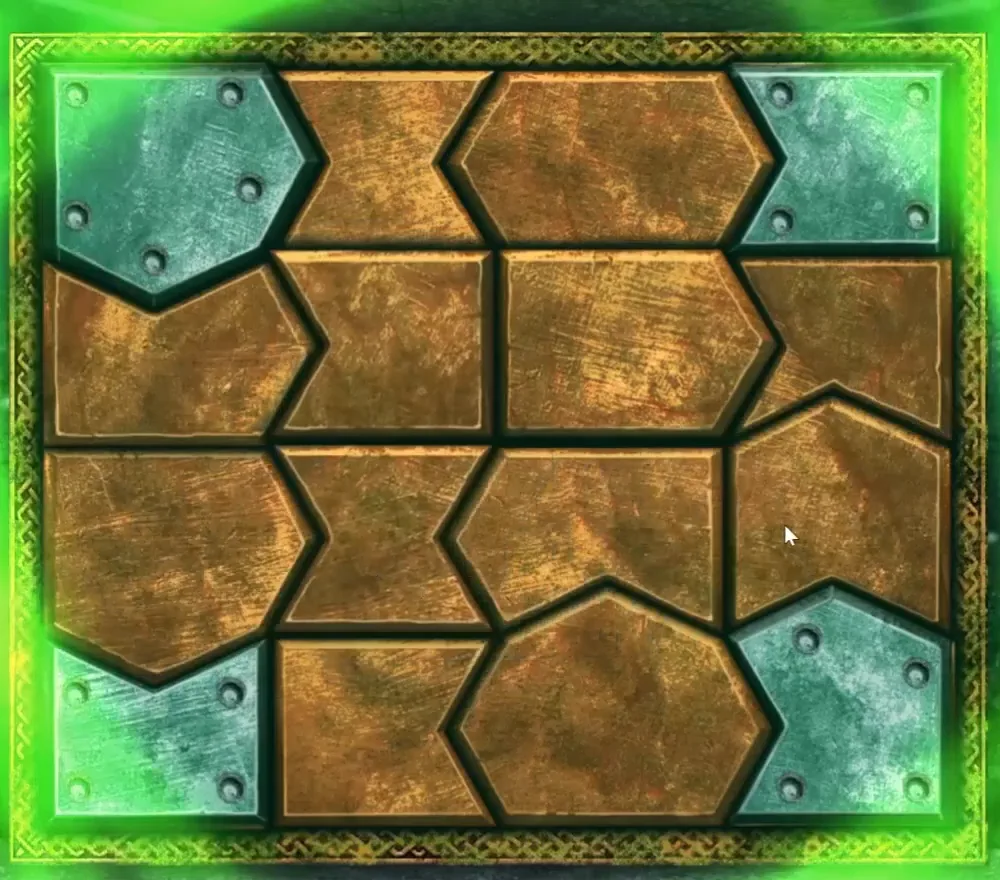
Stone head tiles solved: the frame is filled with no gaps. - Follow the path to the tower. Take the lever lying in the grass under the tree. At the bridge, use it on the barred door under the bridge and take the bow and feather 2 of 3.
- At the tower, shoot the arrow with the bow to cut the rope holding the door, and go in. The seeress explains that the archwitches turn into crows, and that the witch must pass four elemental trials and bring back their shards. The new task is "Learn to Transform".
- Take plate 3 of 4 and feather 3 of 3 from the table on the right, and mask 3 of 4 from the cupboard on the left.
The feather lock, the boat and the puppets
The storage door in the portal area, a working boat and a puppet stall lead to the last plate.
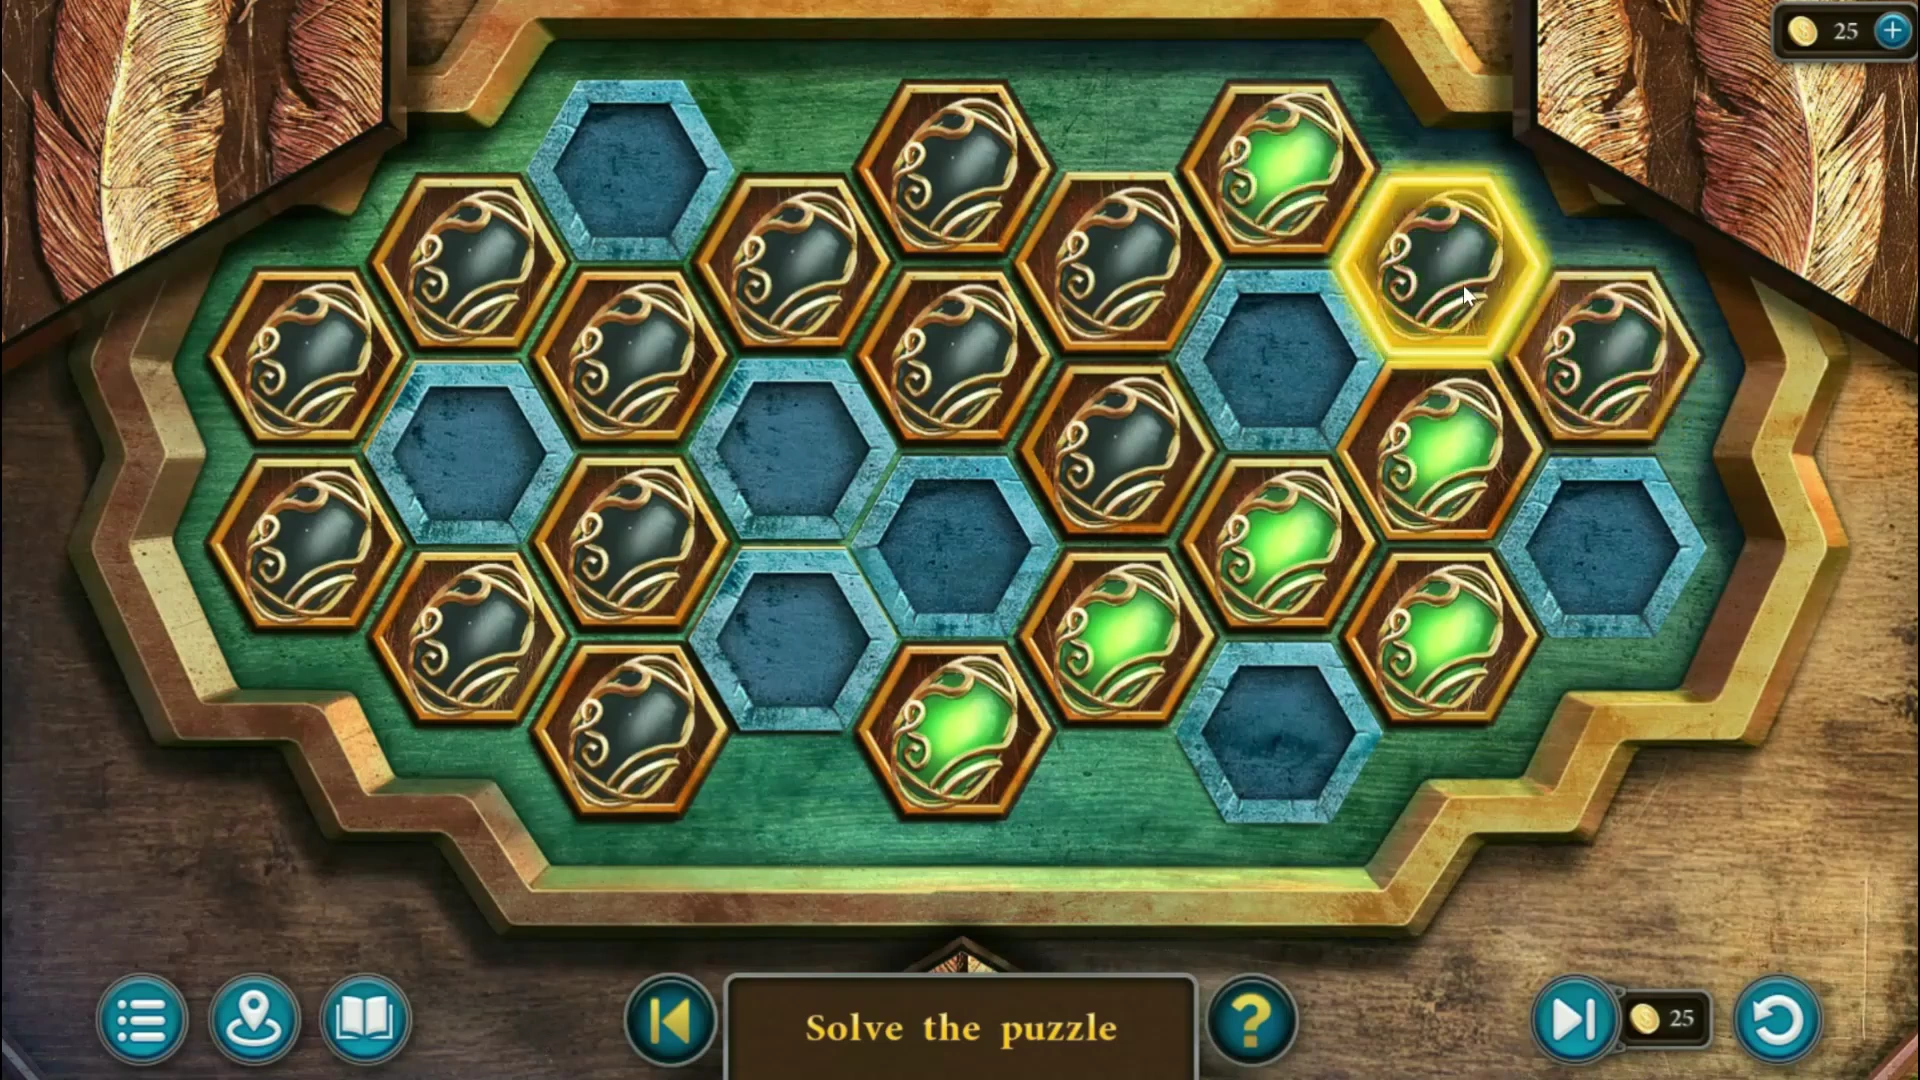
- Put the three feathers on the storage door. Tapping a stone switches it and every stone touching it between dark and lit. Light all twenty stones. Tapping the seven stones circled in the picture, once each and in any order, lights the whole board. Take the net and the hacksaw.
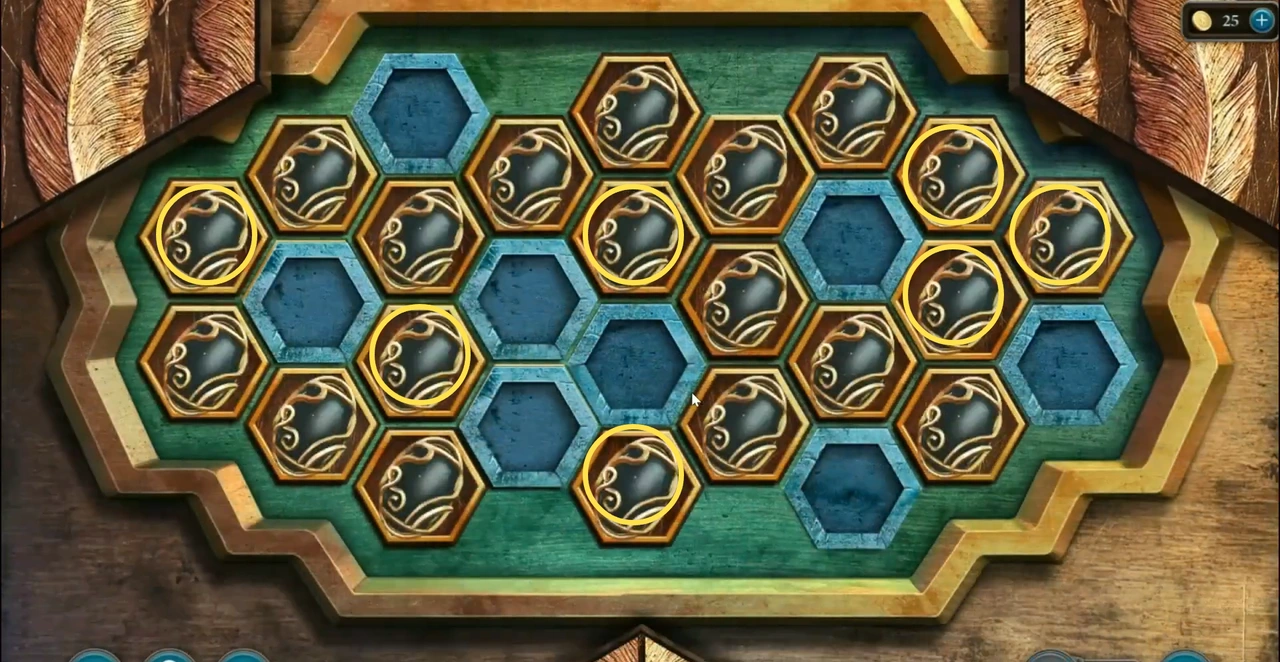
Feather lock: tap these seven circled stones once each to light the whole board. - Saw the oars off the wrecked boat at the marsh with the hacksaw. Put them in the good boat at the swan pond and row across to the Forest Mysteries.
- Take mask 4 of 4 from beside the well in the forest.
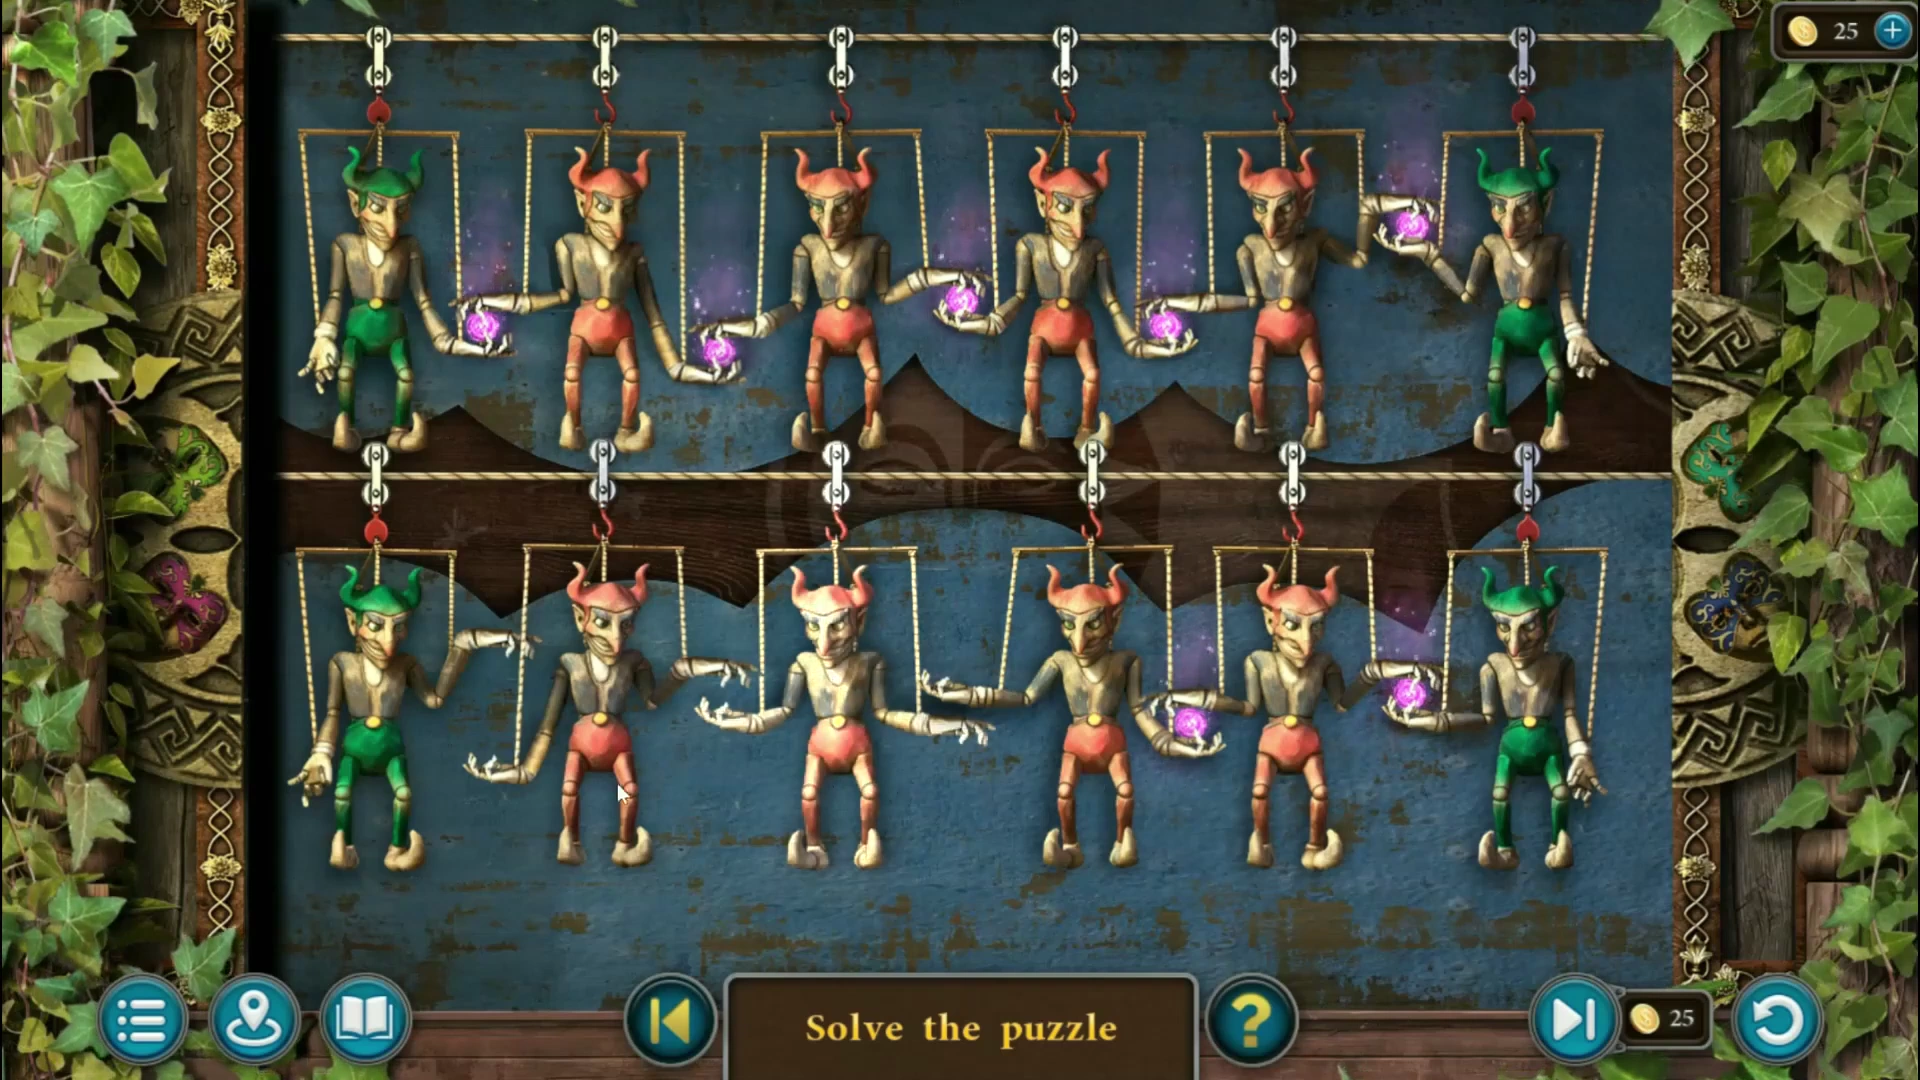
Puppets - puzzle overview. - At the puppet stall in front of the tower, put the four masks in place. Tap a puppet to turn its arms. Turn them until each puppet holds the glowing orb out to the next puppet, so the light passes along both rows without a break (see the picture). Take the bell and the slingshot.
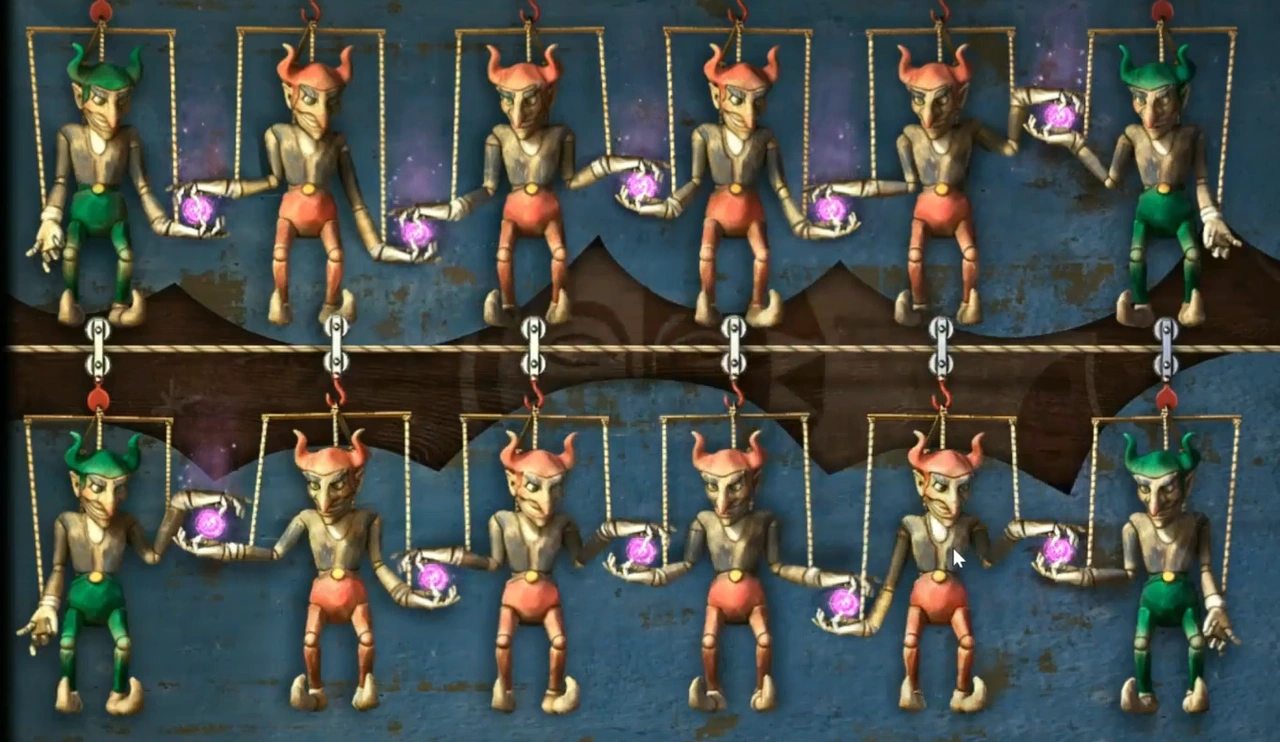
Puppet stall solved: every hand passes the light along. - Hang the bell in the empty bell niche on the left of the portal area. Take plate 4 of 4.
- In the portal house, open the chest with the four plates and take the grappling hook. At the marsh, pull the floating bridge in with the hook and cross to the air trial site.
Grease, the recipe and the fire cave door
The air trial site has a windmill, a river and beehives at the foot of a high cliff.
- At the windmill, take the grease from the mechanism and catch lizard 1 of 2 in the water with the net.
- Cut a cattail from the river reeds with the knife. Light it with the matches and smoke the beehives on the right, then take the butterflies.
- In the tower, grease the lock of the cupboard on the left and open it. Take stone 3 of 3, the oakbrew and the recipe for underwater breathing potion: palecap mushroom, red algae, swamp lily, chatki, oakbrew and mountain dandelion.
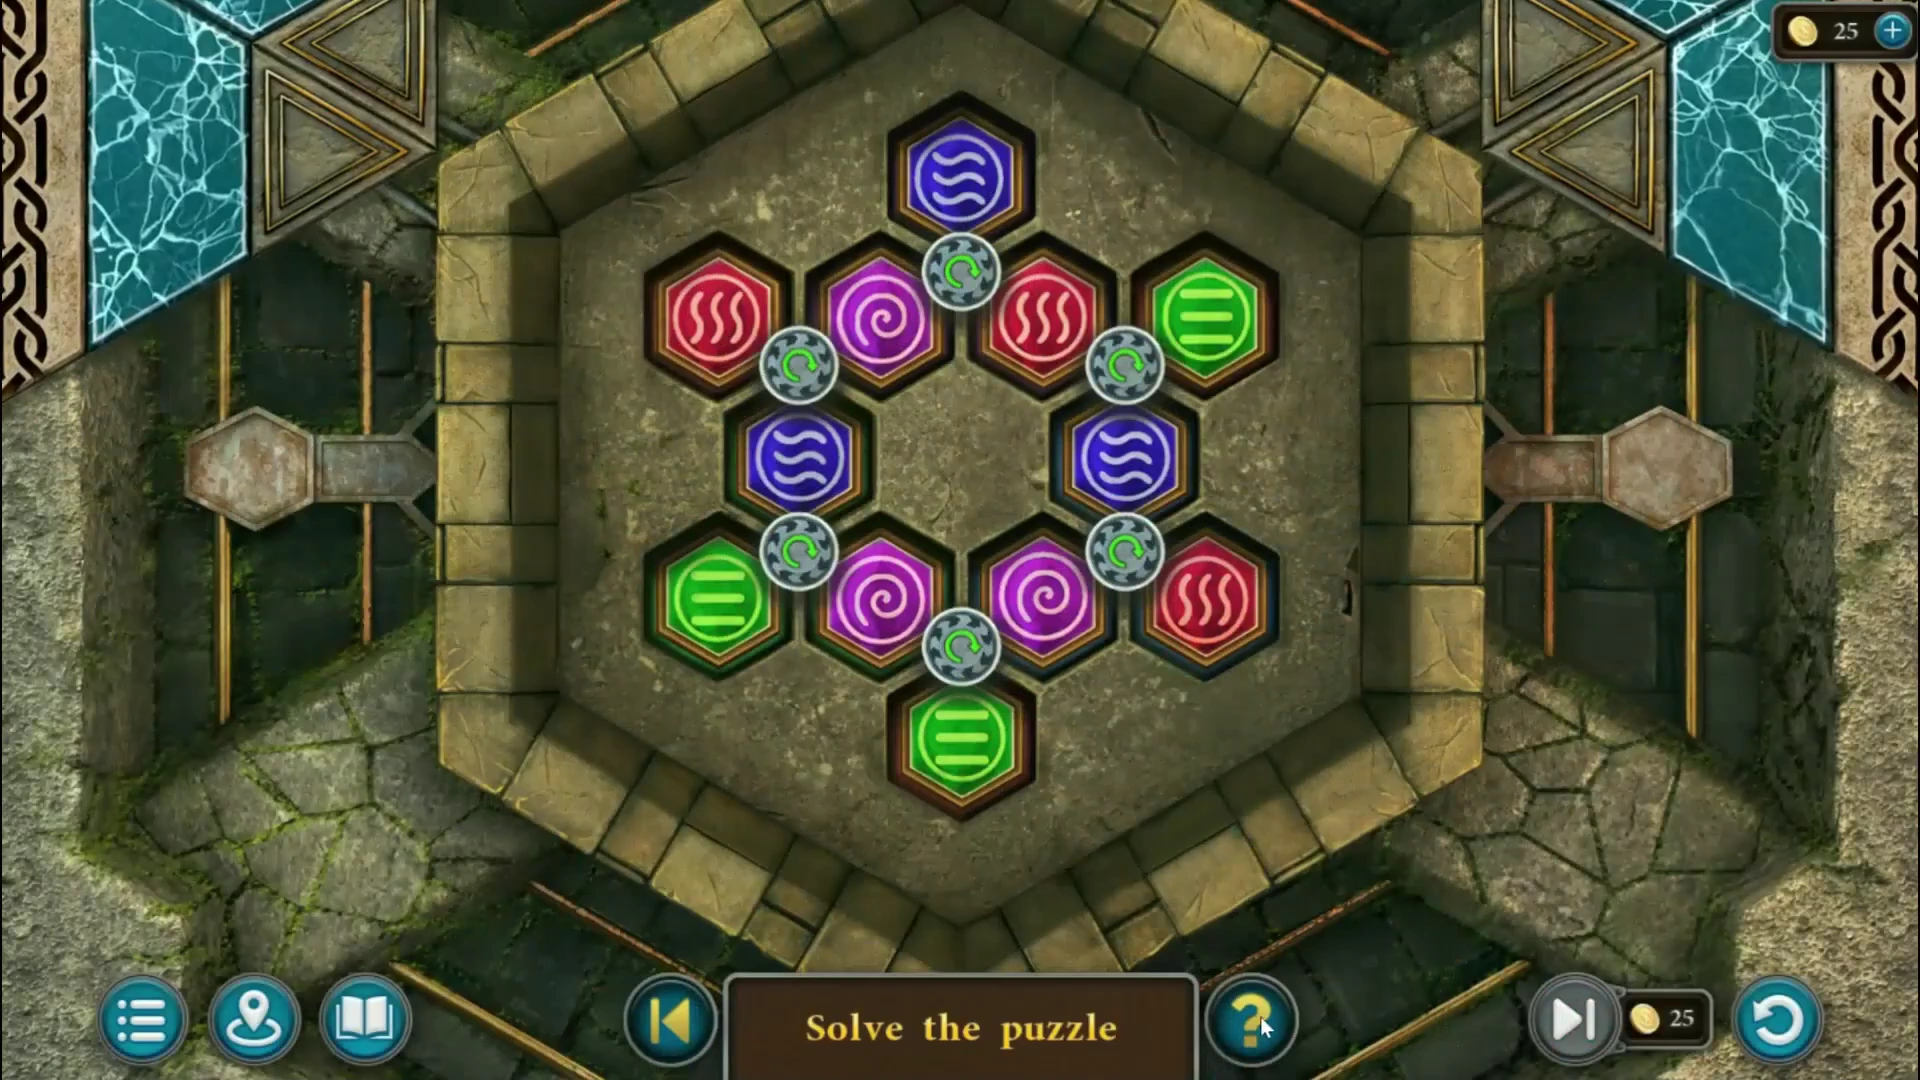
Hexagonal door - puzzle overview. 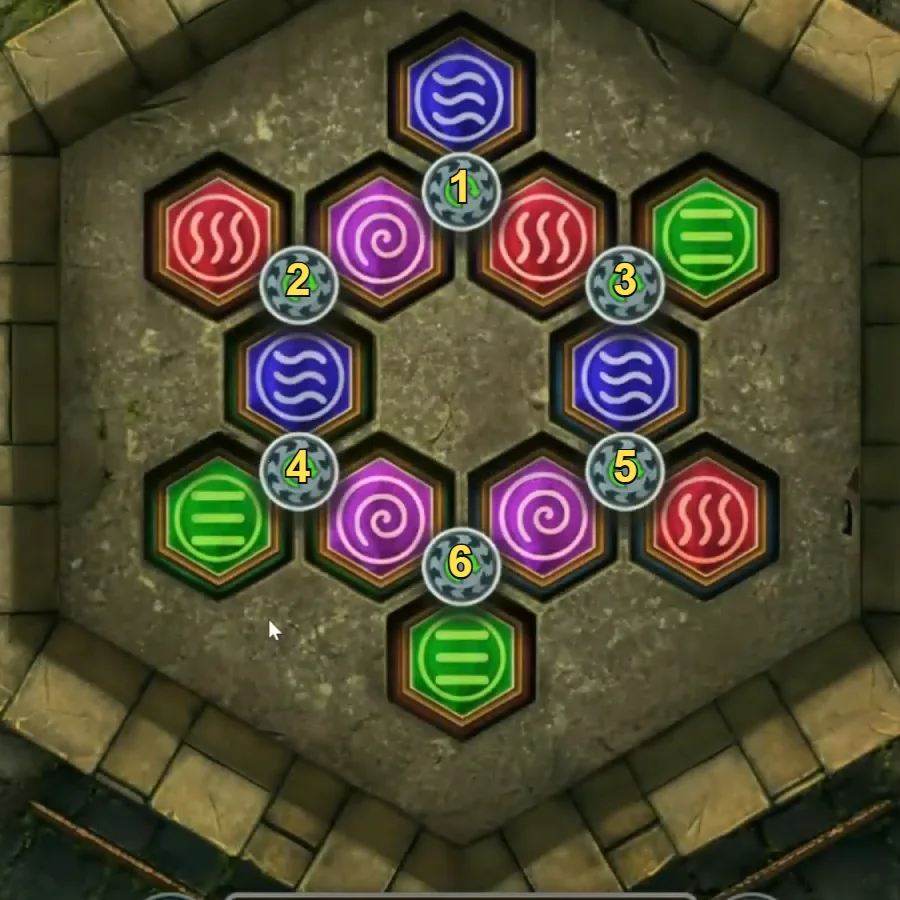
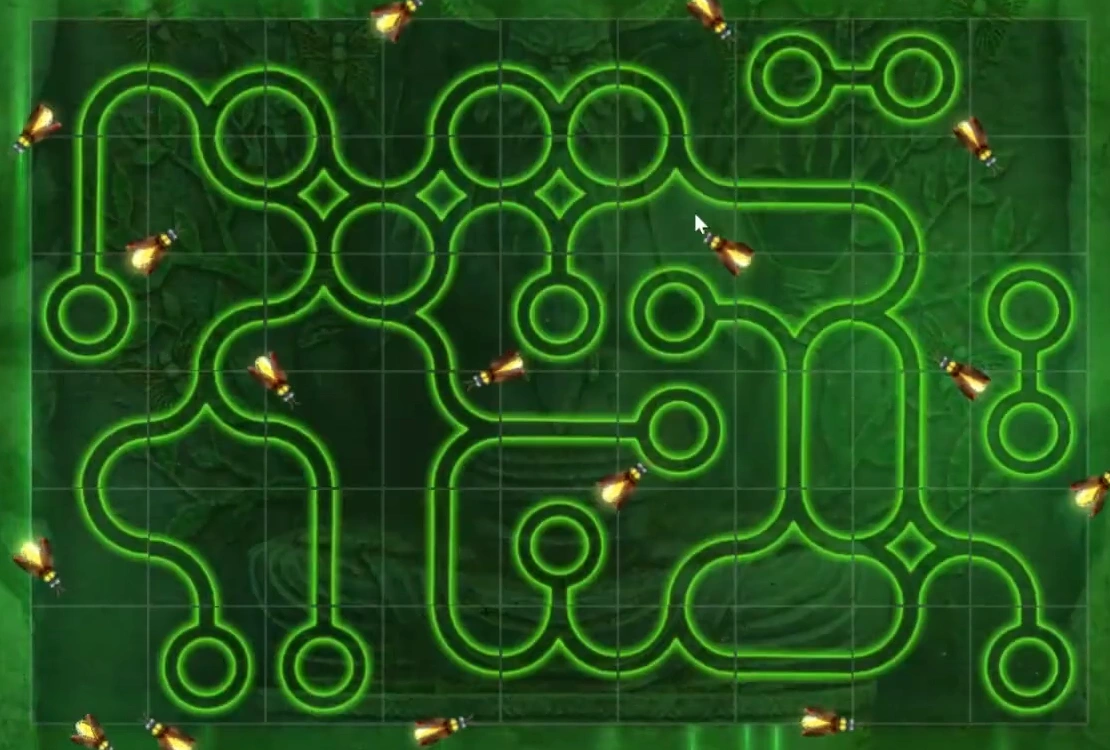
Rock door starting layout, with the six buttons numbered for the tap order. - Put the three stones on the hexagonal rock door beside the portal. Twelve tiles sit around six round buttons, numbered in the picture: 1 top, 2 upper left, 3 upper right, 4 lower left, 5 lower right, 6 bottom. Each tap turns the three tiles touching that button one place clockwise, and each tile's frame shows the colour of the socket underneath it. Put every tile on a socket of its own colour. From the starting layout shown (it was the same in both recordings checked), tap: 3, 5, 3, 1, 5, 3, 6, 4, 5, 3, 6. The finished layout is: purple at the top; red, purple, purple, red in the second row; green on the left and blue on the right in the middle; green, green, blue, blue in the fourth row; red at the bottom. To undo a wrong tap, tap the same button twice more. The door opens to a cave with a sealed portal.CODE3 5 3 1 5 3 6 4 5 3 6
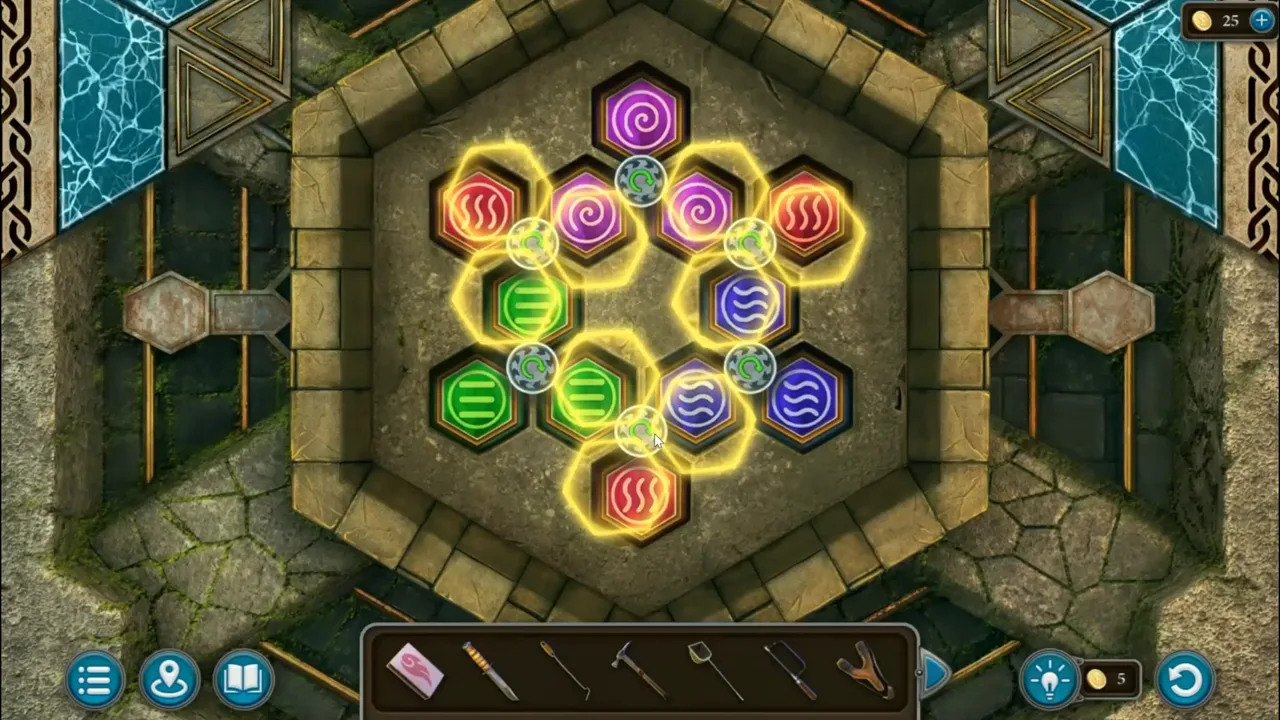
Rock door solved: every tile sits on a socket of its own colour. - In the cave, take mushroom 1 of 3 on the left. Shoot the slingshot at the bats hanging from the ceiling; they fly off and reveal a line pattern. Remember it. The chest on the right has two lizard-shaped slots.
The druid statue, the well and the druidess tree
The Forest Mysteries hold a seated statue, a well, a porcupine, an orange bush and a small door in a tree trunk.
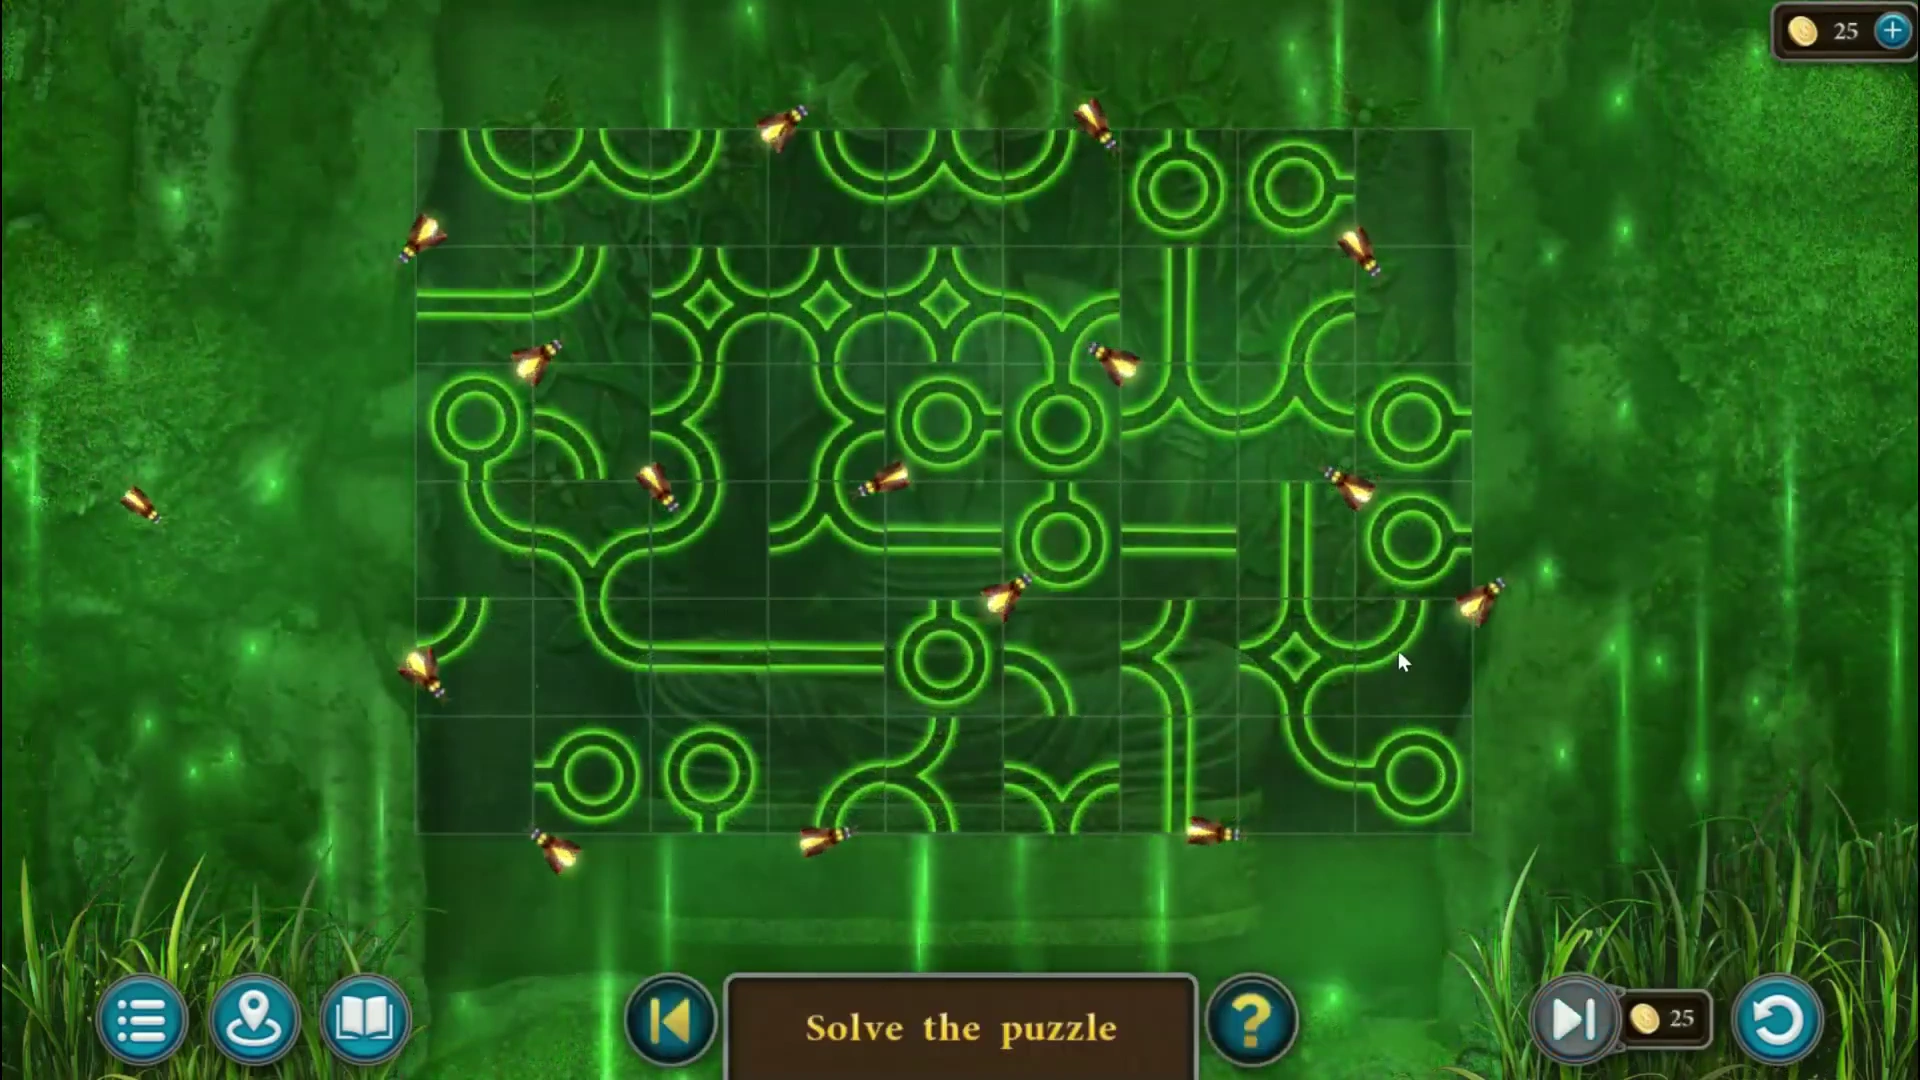
- Put the butterflies on the stone panel beside the seated statue. Tap a square plate to turn it a quarter. Turn the plates until every curved line joins up and all the green patterns form closed loops with no loose ends (see the picture). Take the ladder and lizard 2 of 2.
Druid statue panel solved: every line forms a closed loop. - Lower the ladder into the well and climb down. Take leaf 1 of 3 and the flower from the box, and the Historical Manuscript (2 of 4 in this chapter).
- Look at the three statuettes on the shelf behind the seeress in the tower and remember the pose of the third one. Then put the flower on the chest of the druidess carved into the big tree outside the tower, and set her arms and head to copy that pose. Take half moon 1 of 3 and the sleeping potion.
- Put both lizards on the chest in the fire cave. Move the coloured tokens along the lines of the star until each one rests on the socket of its own colour. Take the paint and the syringe.
- Paint the bat pattern on the round portal door. Nine dots appear in three rows. Draw one continuous line through them in this order: middle left, centre, top middle, top right, middle right, centre, bottom left. This copies the square with a tail that the bats revealed (the same clue appeared in both recordings checked). The portal opens.
- Fire trial: cross the tunnel of flame jets in three short stages. In each stage the jets on the walls fire one after another, then repeat. Watch until every jet you can see has fired and its flame has died away, leaving the path clear, then tap the path straight ahead at once to move to the next stage. After the third stage, walk through the ring of fire and take the fire shard from the statue at the end.
The slumber apple and the breathing potion
The porcupine in the forest guards something; the potion ingredients are spread across the map.
- In the Forest Mysteries, tap the porcupine in the small burrow between the tree door and the well. The witch decides to lure it away with bait. Do this first: until she has seen the porcupine, she will not pick an apple.
- Pick an apple from the tree in the portal area. Fill the syringe with the sleeping potion and inject it into the apple.
- Collect the ingredients: cut chatki from the orange bush in the forest with the knife; push the rock off the red algae in the swan pond with the poker; cut a palecap mushroom in the fire cave with the knife; scoop a swamp lily from the marsh with the net.
- Give the slumber apple to the porcupine by the well. Once it is asleep, take half moon 2 of 3 and the detail behind it.
- Open the chest in the cart in the portal area with the detail and take the lever. Fit the lever to the windmill mechanism at the air trial site and climb the stairs that appear. Take the mountain dandelion from the rocks at the top.
- Add all six ingredients to the recipe. In the tower, light the fire under the cauldron with the matches, add the ingredients and use the ladle to fill the empty bottle on the right with the breathing potion.
The underwater trial
Stone steps lead down into the swan pond beside the hut.
- Drink the potion at the underwater steps and go down. Cut the chains of the chest on the left with the hacksaw and take the totem part and a mirror.
- Catch a warfi fruit from the tree with strange fruit outside the tower using the net. Underwater, offer it to the eel in the seaweed on the left and take the second mirror and mushroom 2 of 3.
- In the fire cave, break a purple crystal from beside the chest with the hammer. Underwater, use it to light the dark hole between the stone totems and take the third mirror and mushroom 3 of 3. Take half moon 3 of 3 from the stone temple with the red circle.
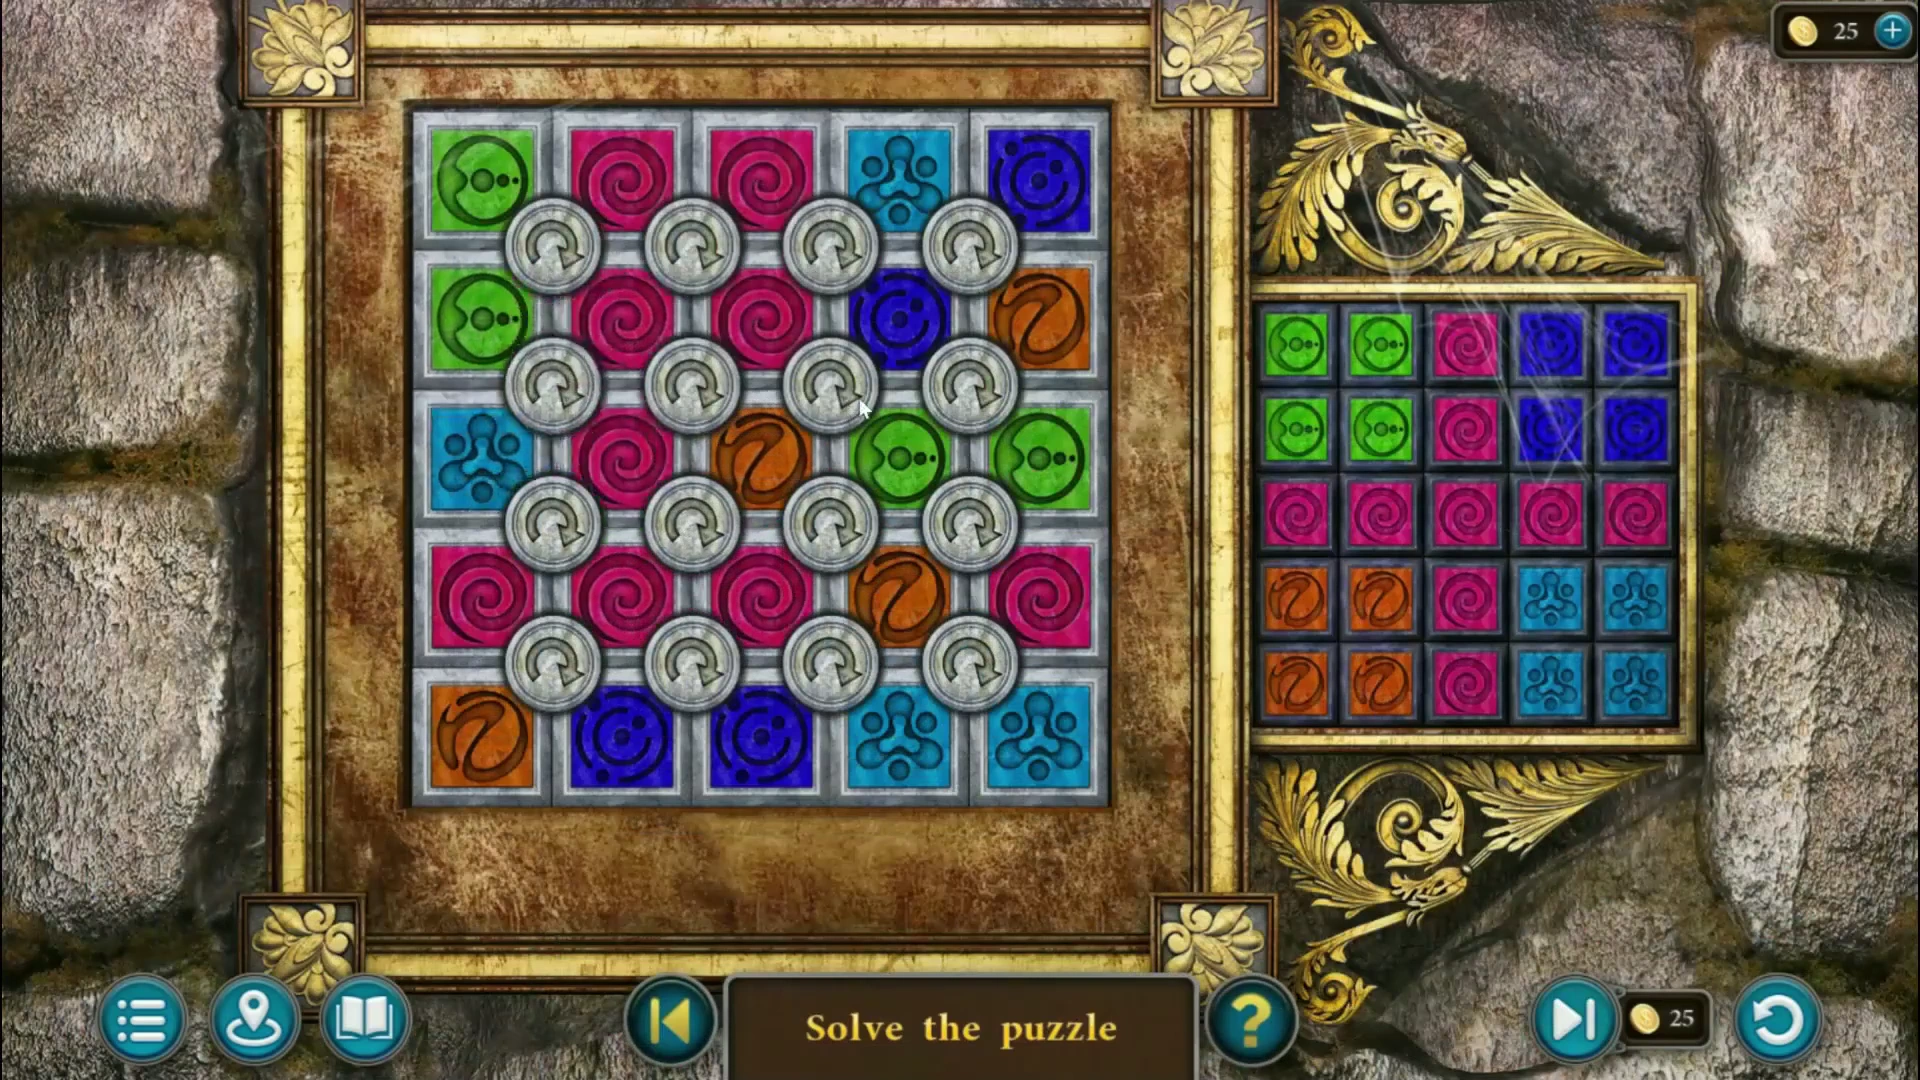
Moon disc - puzzle overview. 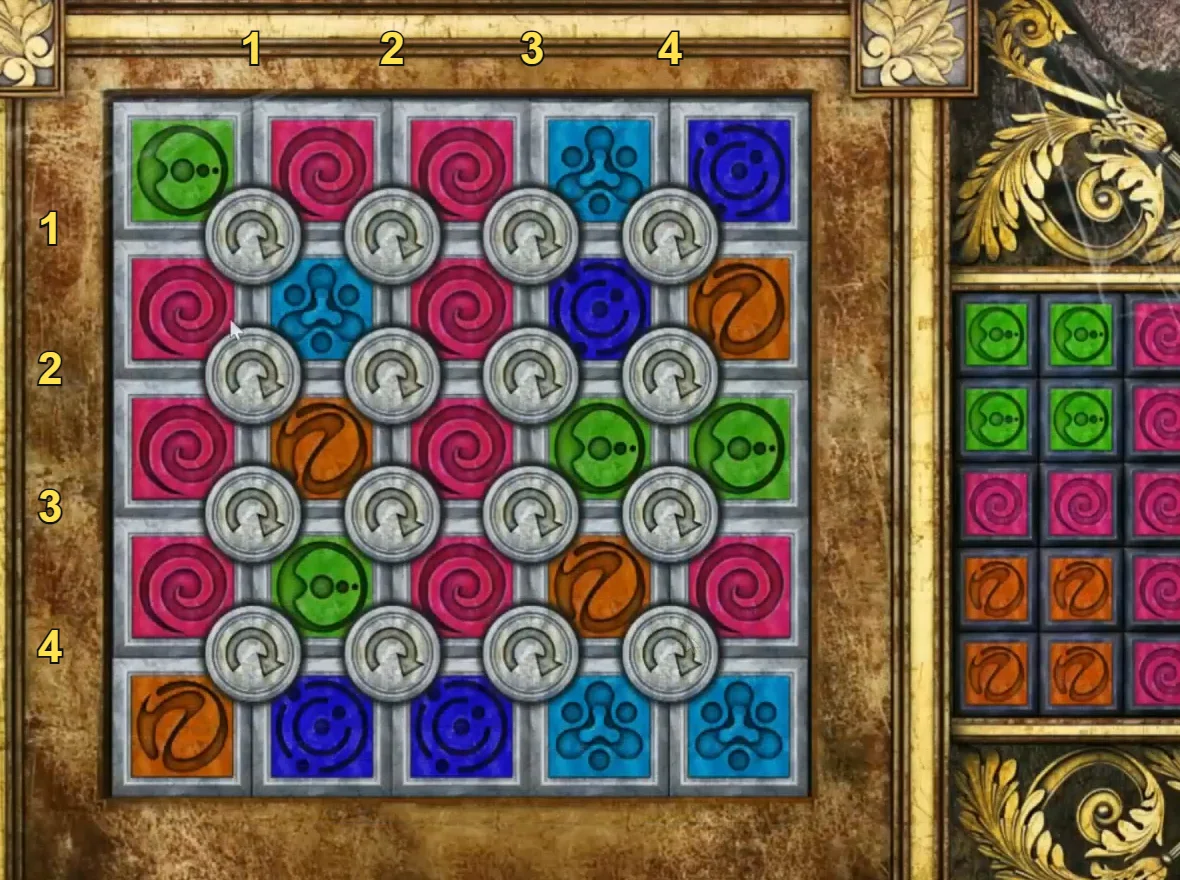
Moon disc starting layout. Button columns and rows are numbered 1 to 4 for the tap order. - In the tower, put the three half moons on the disc above the fireplace. A 5 by 5 grid of tiles appears, with 16 round buttons between the tiles and the target layout on the right. Each tap turns the four tiles around that button one place clockwise. The target is: green in the top-left two by two block, dark blue top right, orange bottom left, light blue bottom right, and pink along the whole middle row and middle column. Name each button by its row and column (both numbered 1 to 4 in the picture, rows from the top and columns from the left). From the starting layout shown (it was the same in both recordings checked), these 22 taps solve it: 3-1, 3-1, 2-1, 3-3, 4-2, 4-2, 3-3, 1-4, 2-3, 3-2, 3-3, 3-3, 3-2, 2-3, 1-4, 2-4, 2-3, 2-2, 1-1, 2-2, 3-4, 3-3. To undo a wrong tap, tap the same button three more times. Take the triple moon and the ornament.CODE3-1 3-1 2-1 3-3 4-2 4-2 3-3 1-4 2-3 3-2 3-3 3-3 3-2 2-3 1-4 2-4 2-3 2-2 1-1 2-2 3-4 3-3
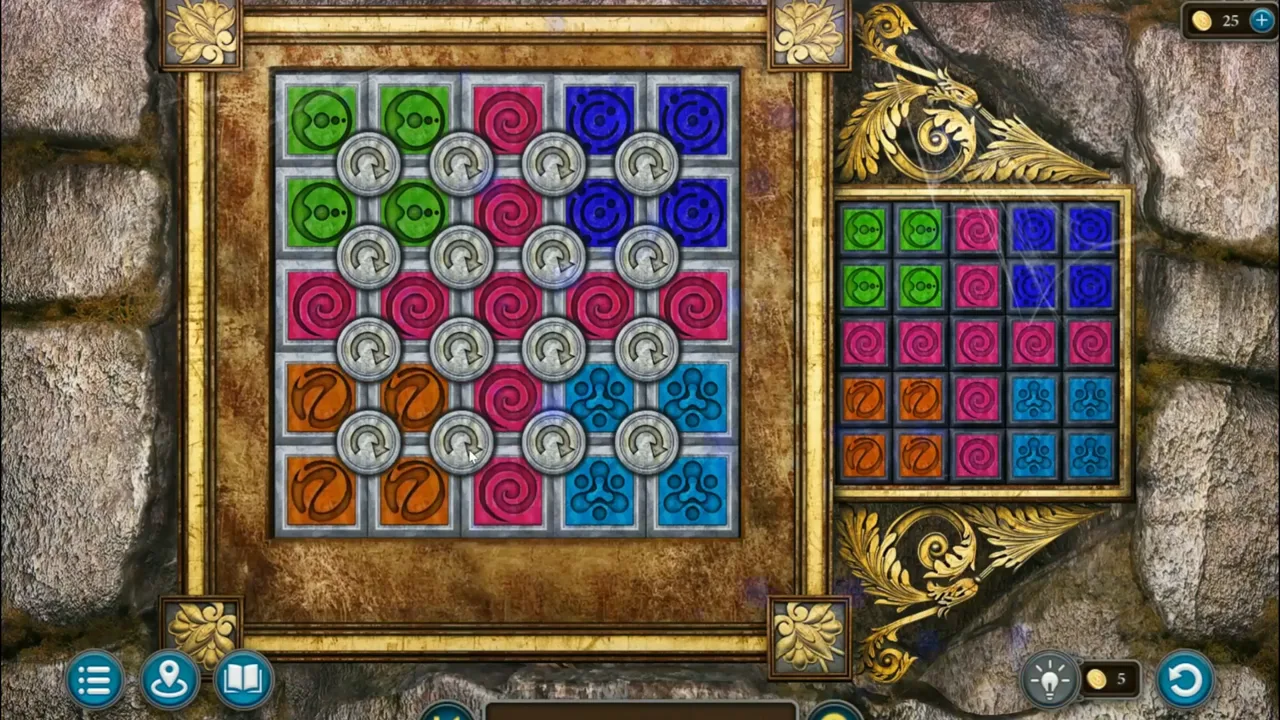
Moon disc solved: the big grid matches the target on the right. - Underwater, put the ornament on the main device and the three mirrors on the stones around it, then follow the light beams to the secret room. Find the 15 scallop shells before your breath runs out. Take the water shard.
The earth and air trials
The last two trials are behind the tree door in the forest and on top of the cliff.
- Put the three mushrooms on the small door in the tree trunk in the Forest Mysteries and enter the Shadow Cave. The cave is a tall maze that scrolls as the witch moves. Tap a ledge or ladder to walk or climb there, and tap a dark hole next to her to go in: each hole is a tunnel that brings her out of a different hole. Ledges are counted from the top of the area you can see. Route from the recording: (1) Go into the hole beside you at the start, top right by the stairs; you come out of the left hole on the ledge below. (2) Climb down the left ladder to the lowest ledge, walk right, climb the middle ladder and go into the hole at its top; you come out at the right end of the lowest ledge. (3) Climb the right-hand ladder and go into the hole at its top; you come out of the left one of the two holes at the left end of the lowest ledge. (4) Go into the hole right beside it, and the view moves down into a blue-grey area. (5) You arrive on a ledge beside a ladder: climb down to the ledge below and go into the hole just left of the ladder's foot; you come out of the pair of holes on the right of that ledge. (6) Walk left to the next ladder, climb down and go into the hole at its foot; you come out of the far-left hole of the ledge above. (7) Climb the left ladder and go into the top-left hole; the view moves down again. (8) You arrive by a ladder: climb down to the next ledge and go into the hole just right of the ladder; you come out of the far-left hole of the same ledge as the view scrolls. (9) Climb down the ladder to your right and go into the hole at its foot; you come out of the left hole of the pair on the right of that ledge. (10) Step into the right hole of the pair; you come out of the far-left hole of the same ledge. (11) Climb down the left ladder to the bottom ledge and go into the hole at its foot; you reappear high up, in the top-right hole of the blue-grey area. (12) Go into that hole; you come out on the bottom ledge just left of the glowing purple crystal. Walk to the crystal and take the earth shard.
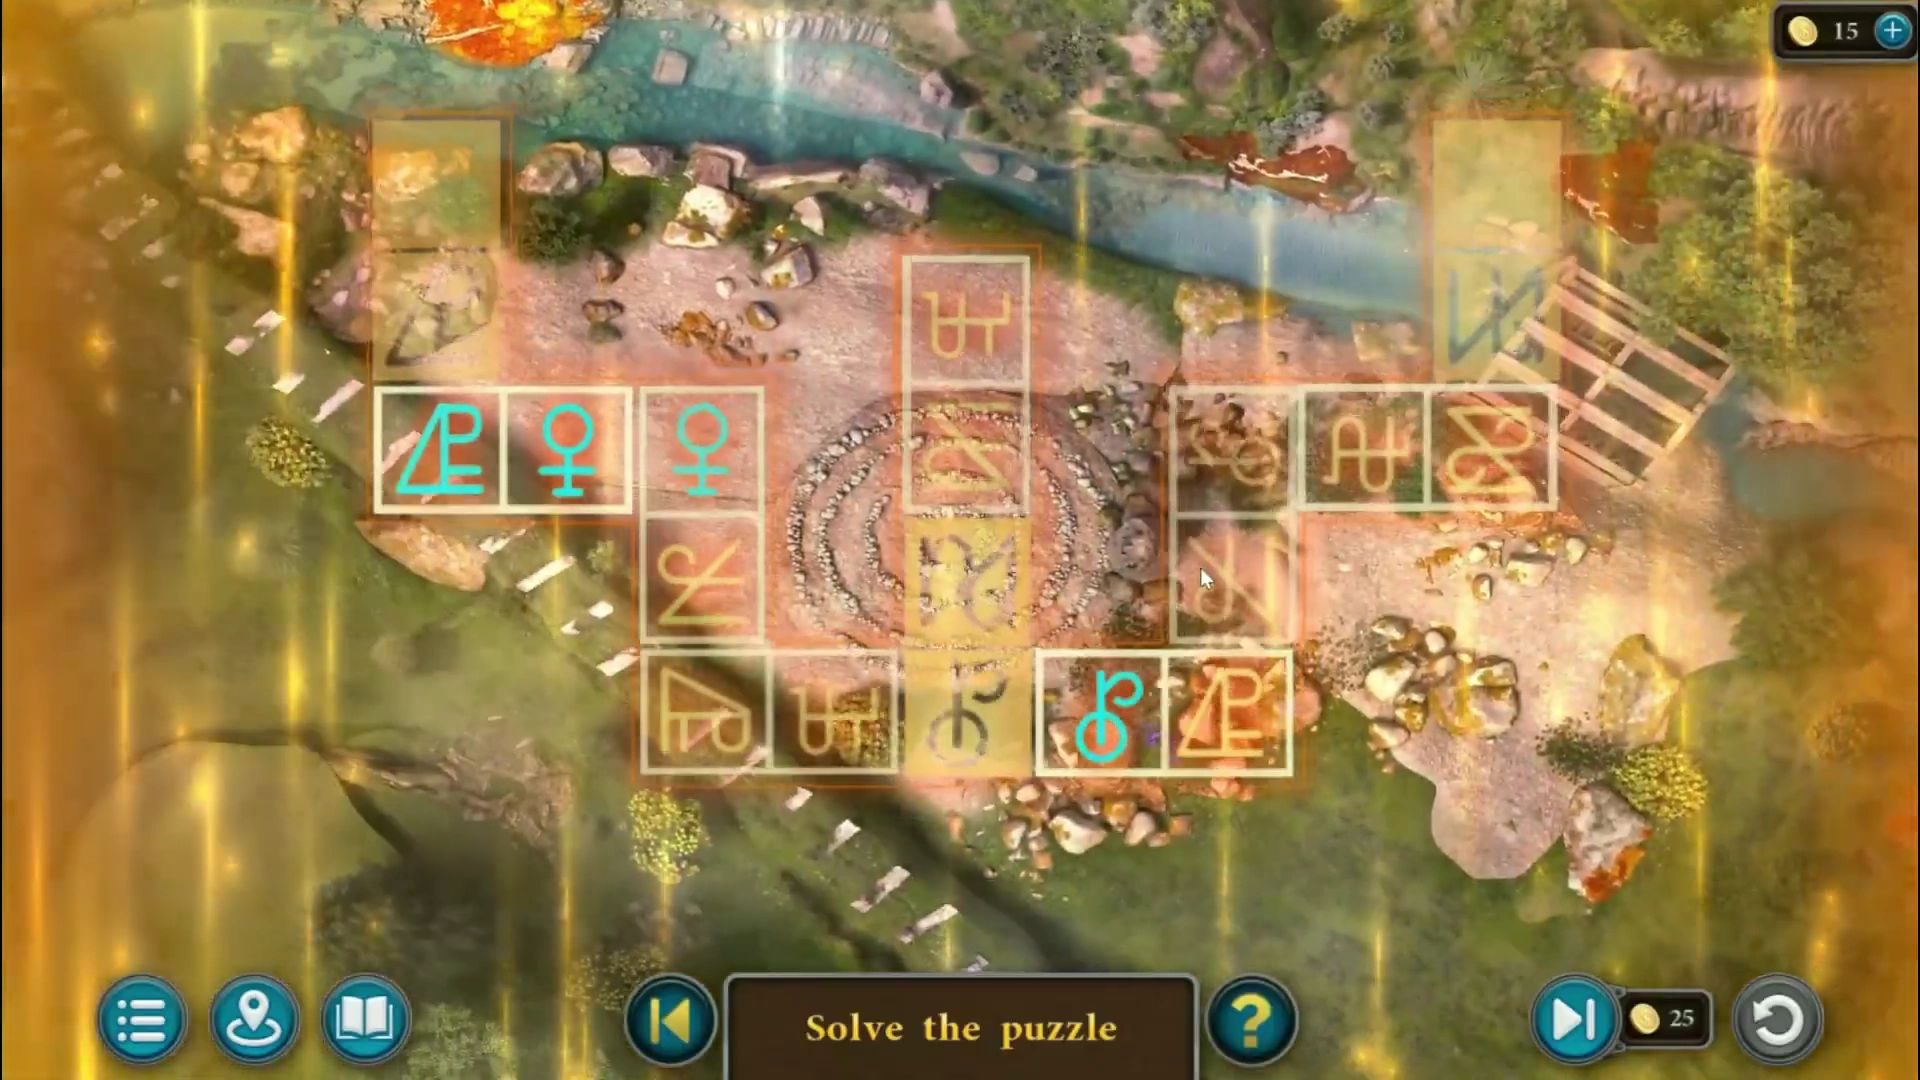
Air trial - puzzle overview. - Climb to the cliff top at the air trial site. Fit the totem part to the stone holding the wings, then select the wings to start the trial. The movable pieces each carry two symbols. Swap pieces between positions; select a piece and use its curved arrows to rotate the symbols as well. At each join between pieces, the symbols facing one another must match, including the joins beside the fixed gold symbols at the ends and in the centre. Start at a fixed symbol, find a piece with that symbol on one end, then rotate it to face the fixed symbol. Follow its other end to choose the next piece, checking each junction as you work around the bends. Matched symbols turn cyan. The picture shows the completed arrangement. After the flight, take the air shard from the stone totem at the bottom of the cliff.
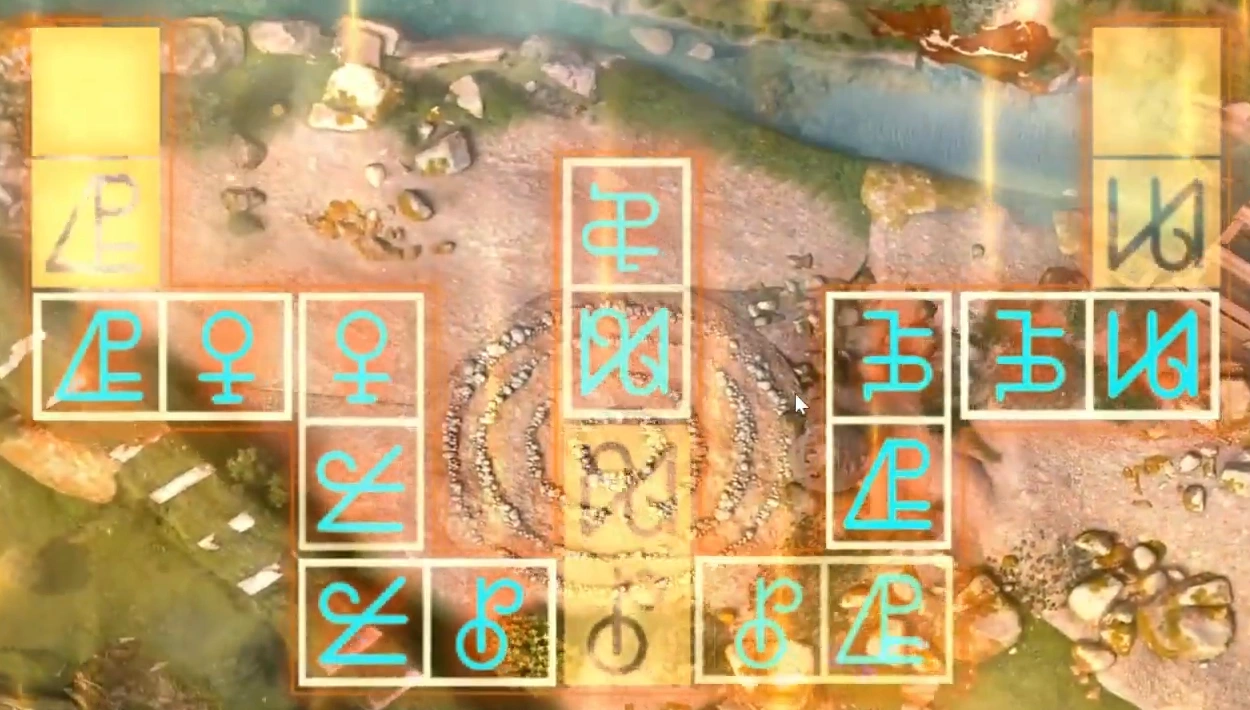
Air trial solved: match the symbols at each join between pieces. - Talk to the seeress in the tower and put the four shards on the device on the table. She teaches the witch to transform into a crow, and the witch flies to the archwitches' floating castle.
The floating castle
The castle gate opens with the triple moon. Inside are a corridor with a gong shield and two statues, a well room where the archwitches gather, and the supreme archwitch's office.
- Open the castle gate with the triple moon. In the corridor, move the vase by the door on the left and take the ring. Open the door at the end of the corridor with the ring; the witch enters the well room and talks to an archwitch. The task is "Activate the Well".
- Take the emblem from the right side of the well and the stone head from the altar. In the corridor, put the head on the headless horse rider statue and take hammer 1 of 2.
- Outside the castle, put the emblem on the glove of the knight in the sewer opening on the right. Take hammer 2 of 2 and the Historical Manuscript (3 of 4 in this chapter).
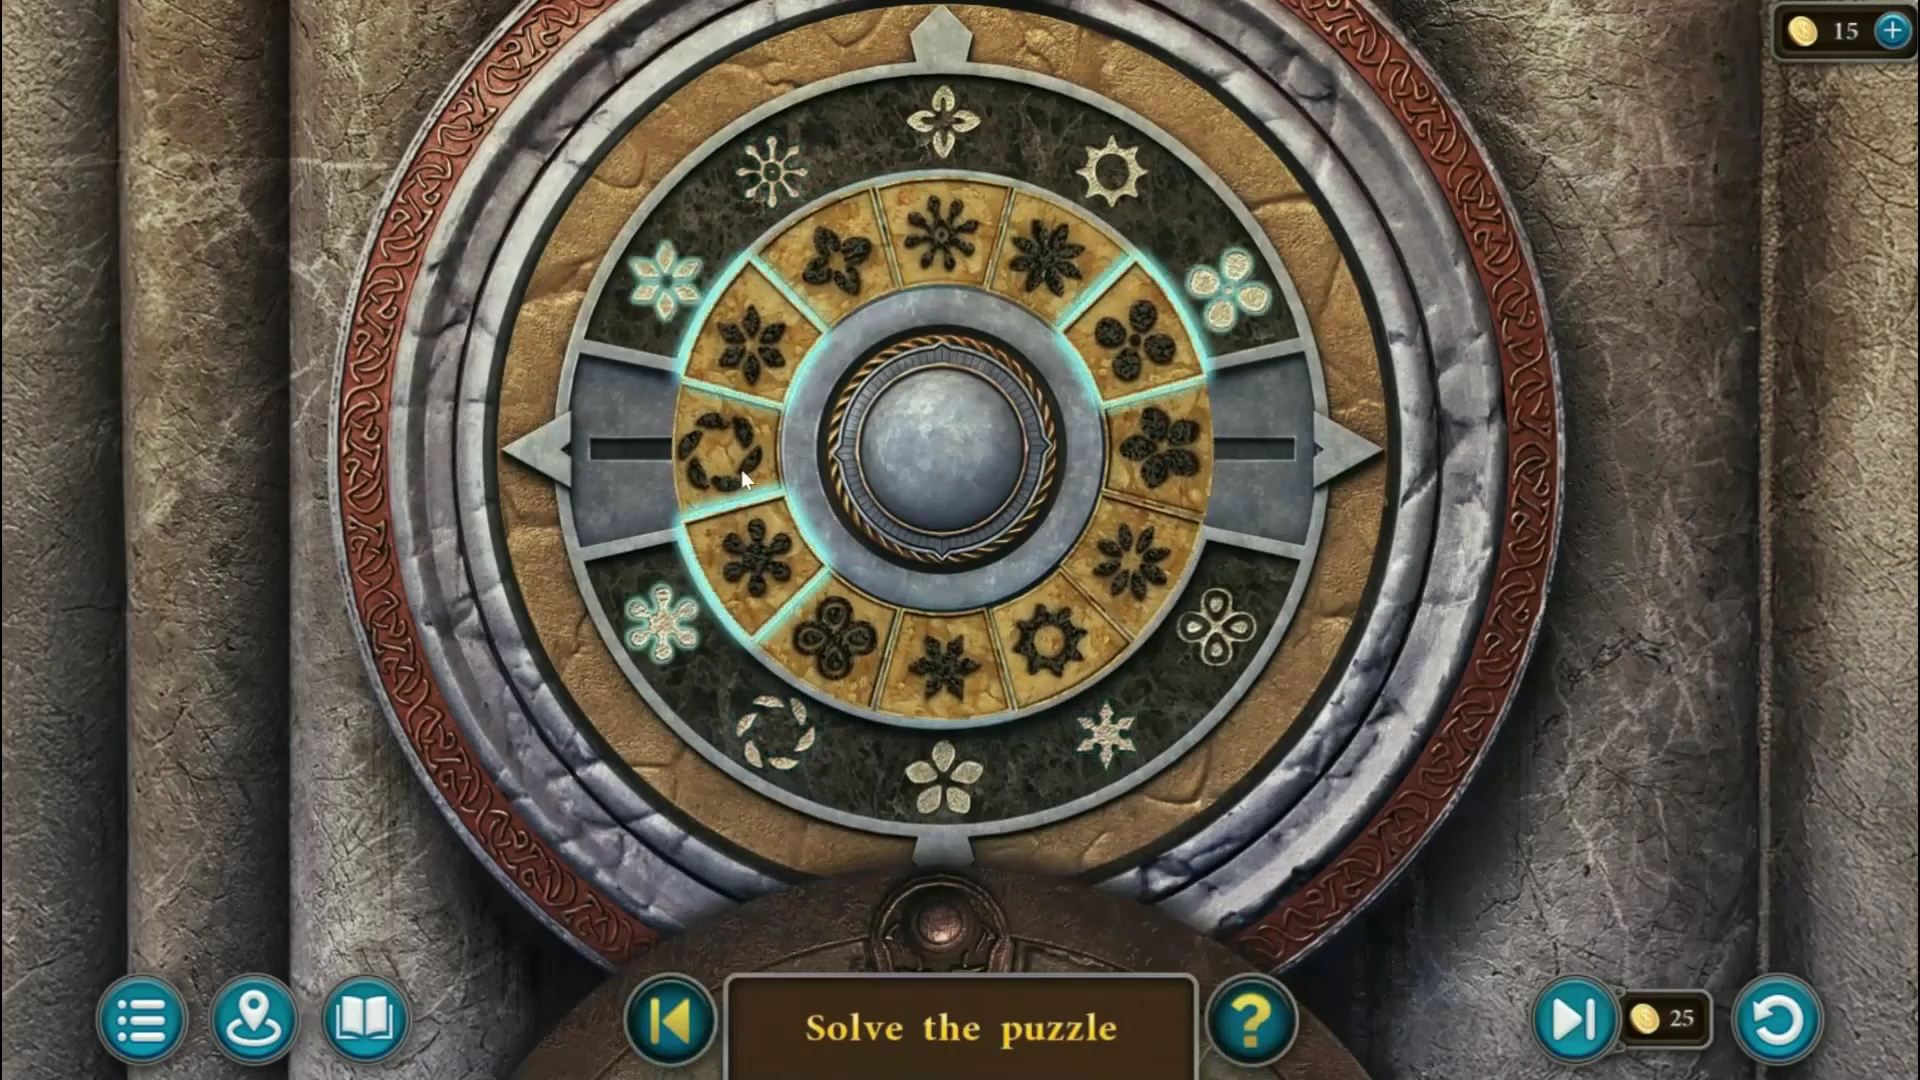
Shield rings - puzzle overview. - Put both hammers on the shield on the left of the corridor. Rearrange the twelve dark symbol tiles on the inner ring so that each of the ten pale symbols on the fixed outer rim has its matching tile beside it. Two extra tiles have no matching outer symbol. Correct matches glow cyan. This is a lengthy rearrangement puzzle, so use the method and target pictures rather than a long tap list. Turn the inner ring to bring a misplaced tile level with one of the storage slots at the left or right. Slide that tile out into the slot, turn the ring to bring a gap to the same side, then slide the parked tile back into the gap. Use the other storage slot when another tile needs to be taken out of the way. Build the same clockwise order as the fixed outer symbols, with the two extra tiles opposite one another. Finally turn the ring to align all ten matches, leaving the extra tiles at the left and right positions without pale symbols. Those two tiles disappear when the puzzle completes, as shown in the solved picture. Take the wing and the pattern piece.
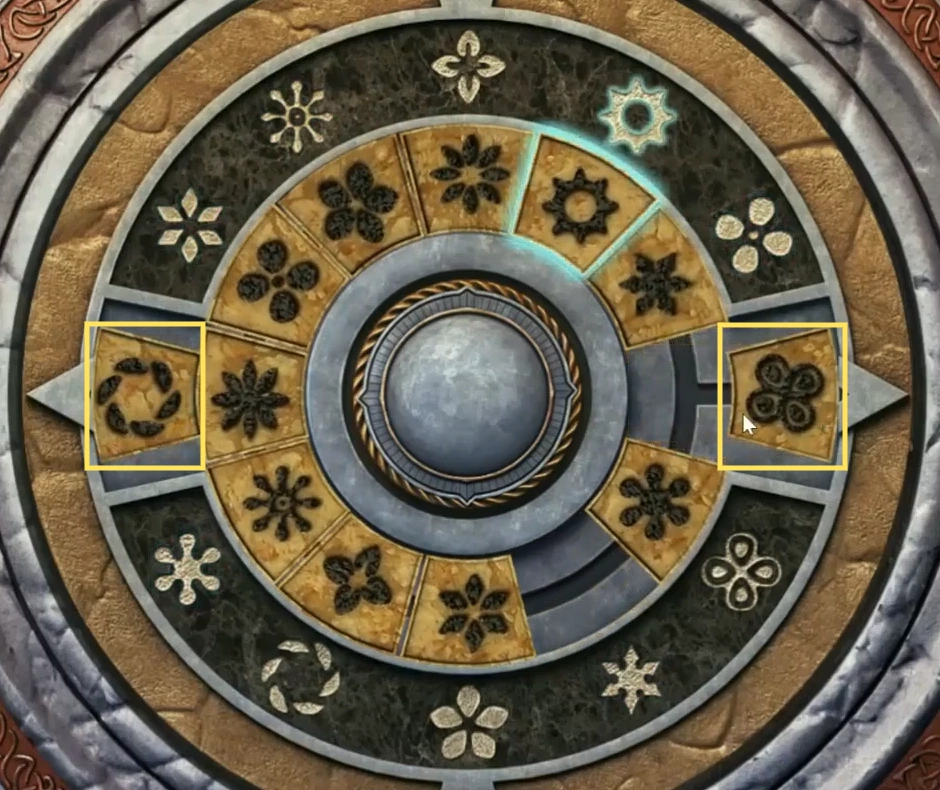
Use the outlined side slots to park tiles while rearranging the ring. 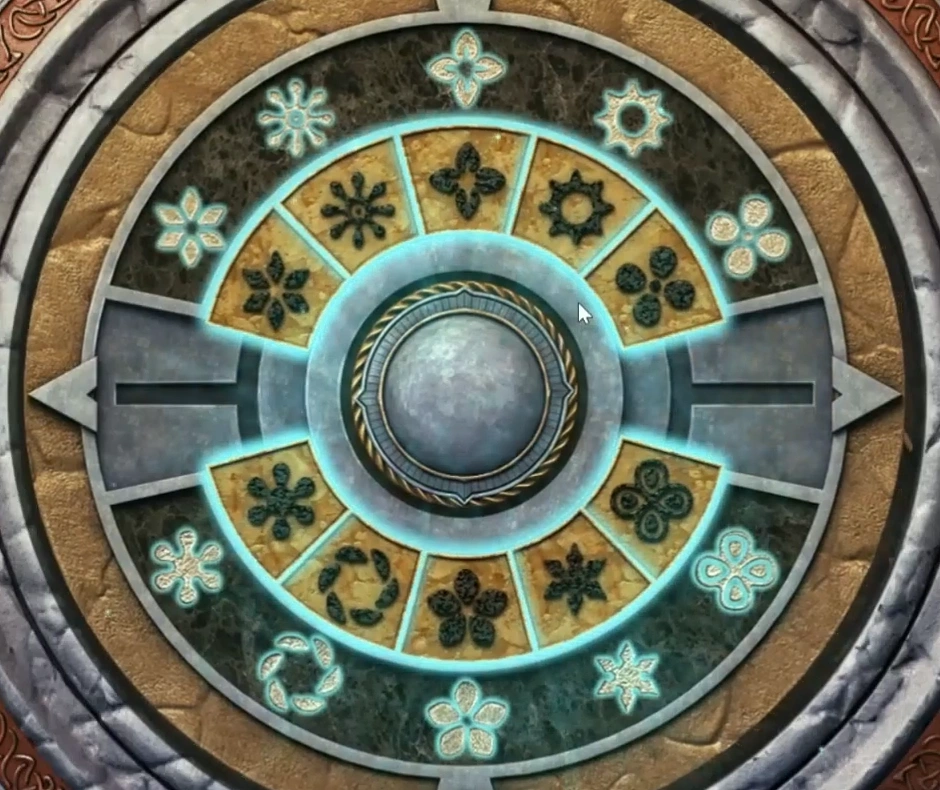
Corridor shield solved. - In the well room, fit the wing to the dragon on the left column and move its wings; take the key. Open the green box on the floor with it and take bas-relief 1 of 2 and another key.
- Open the door on the left of the corridor with the key to enter the office. Take the star from the terrarium and the glove from the desk. Put the star on the box above the fireplace and remove matching symbol pairs until the board is empty. Take leaf 2 of 3 and the tweezers.
- Outside, pull away the purple plants on the left with the glove and take the lever, the silver sphere and leaf 3 of 3. Fit the lever to the window over the entrance to close it, and study the stained glass. Six pictures surround the sun; starting at the upper left and going clockwise, they are a hummingbird, a butterfly, an apple, a flower, a book and a starfish.
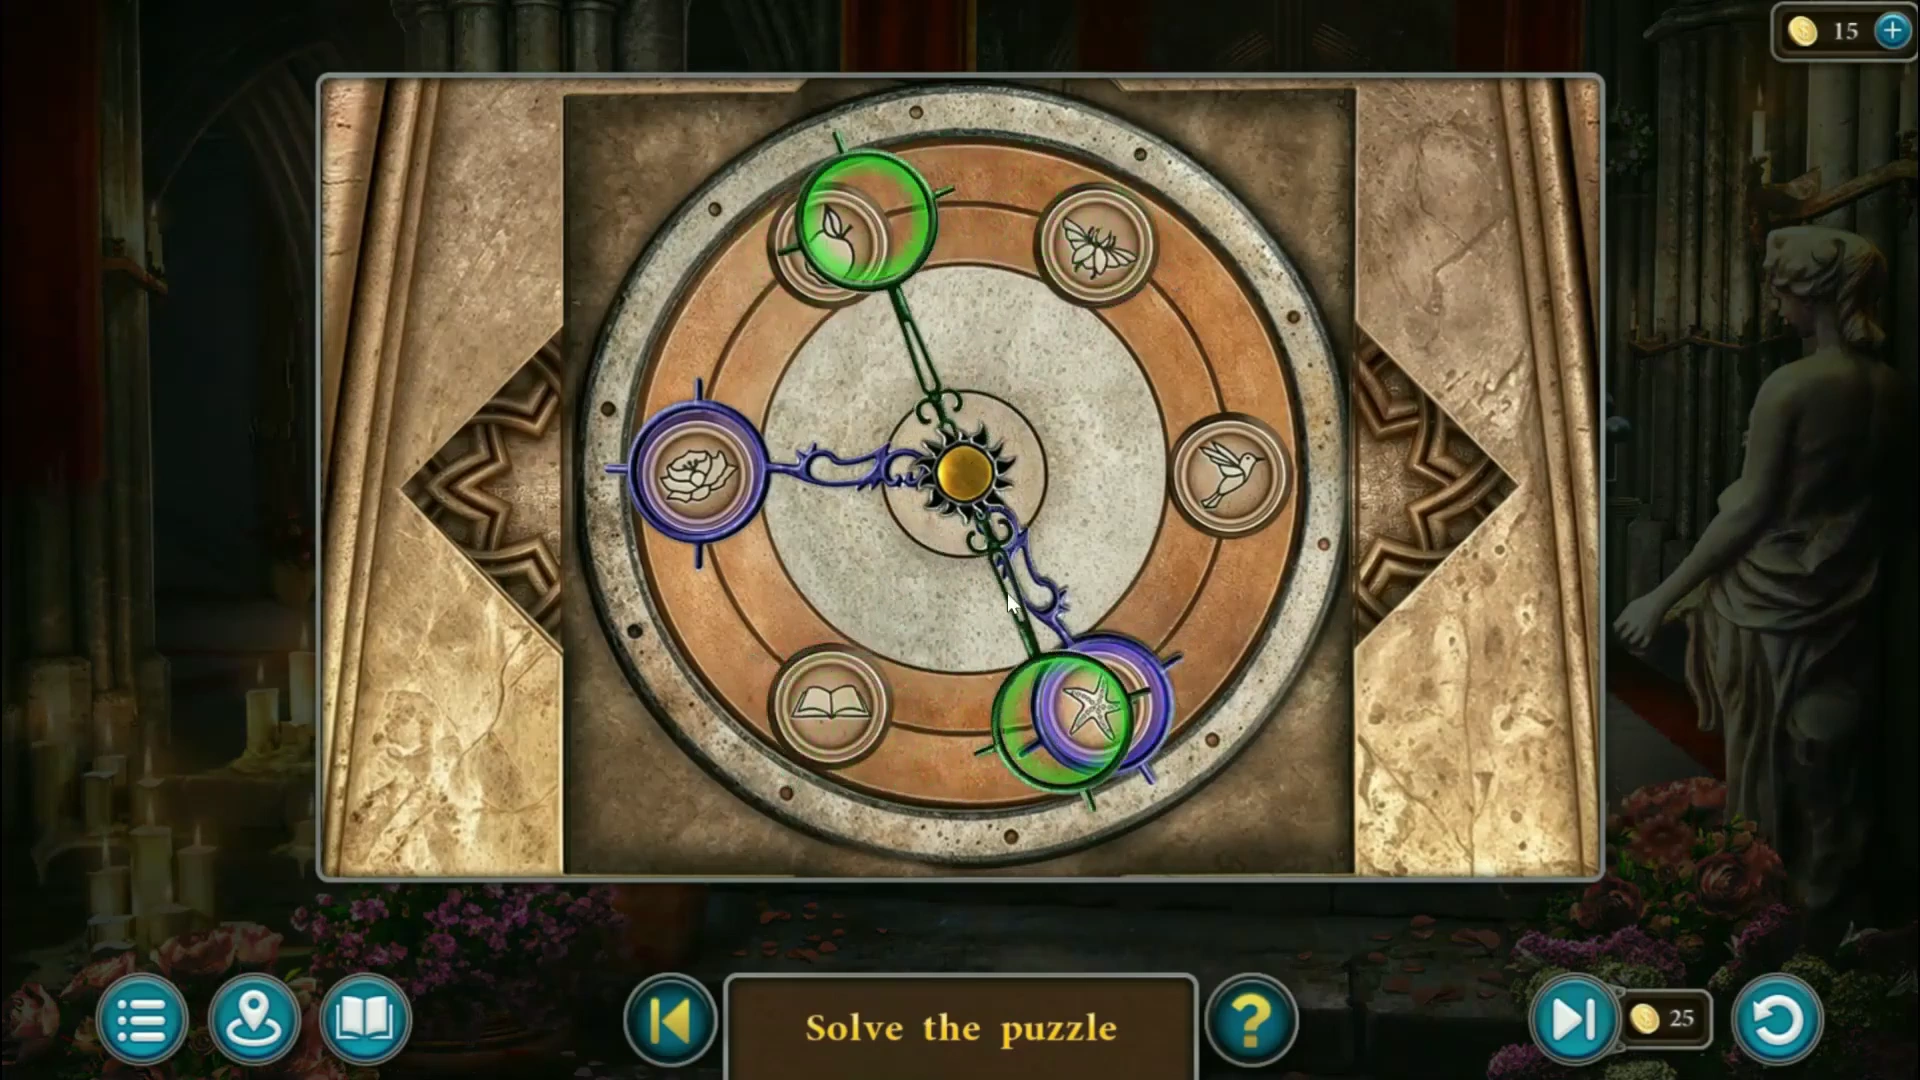
Window symbol lock - puzzle overview. - In the corridor, put the pattern piece on the round lock above the well-room door. The lock holds the same six pictures in a ring around a sun, but mixed up. Rearrange them to match the window: starting at the upper left and going clockwise, hummingbird, butterfly, apple, flower, book, starfish (see the picture). The two hands are tools for swapping pictures. Each has a ring at both ends: the green hand joins two opposite pictures, and the purple hand joins two pictures that are two places apart. Drag a hand around the dial to turn it onto a new pair, then click the picture in one of its rings to swap the two pictures at its ends. A practical approach is to turn a hand onto a wrong picture and the place where that picture belongs, then swap; each such swap puts at least one picture in its final place. The lock opens when all six are in place. Take the book from the niche behind it.
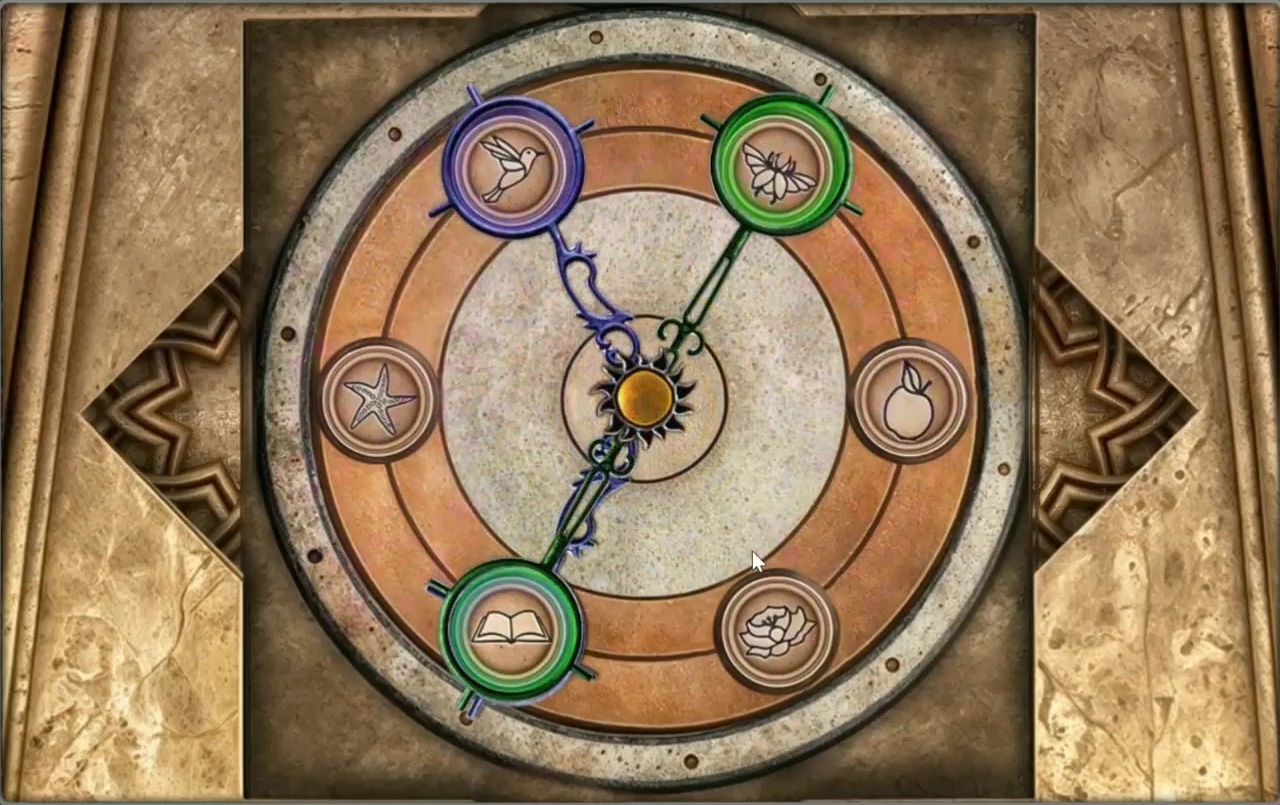
Corridor door lock solved: the pictures are in the same places as on the stained-glass window. - In the well room, pull the key out of the crack in the stairs on the left with the tweezers.
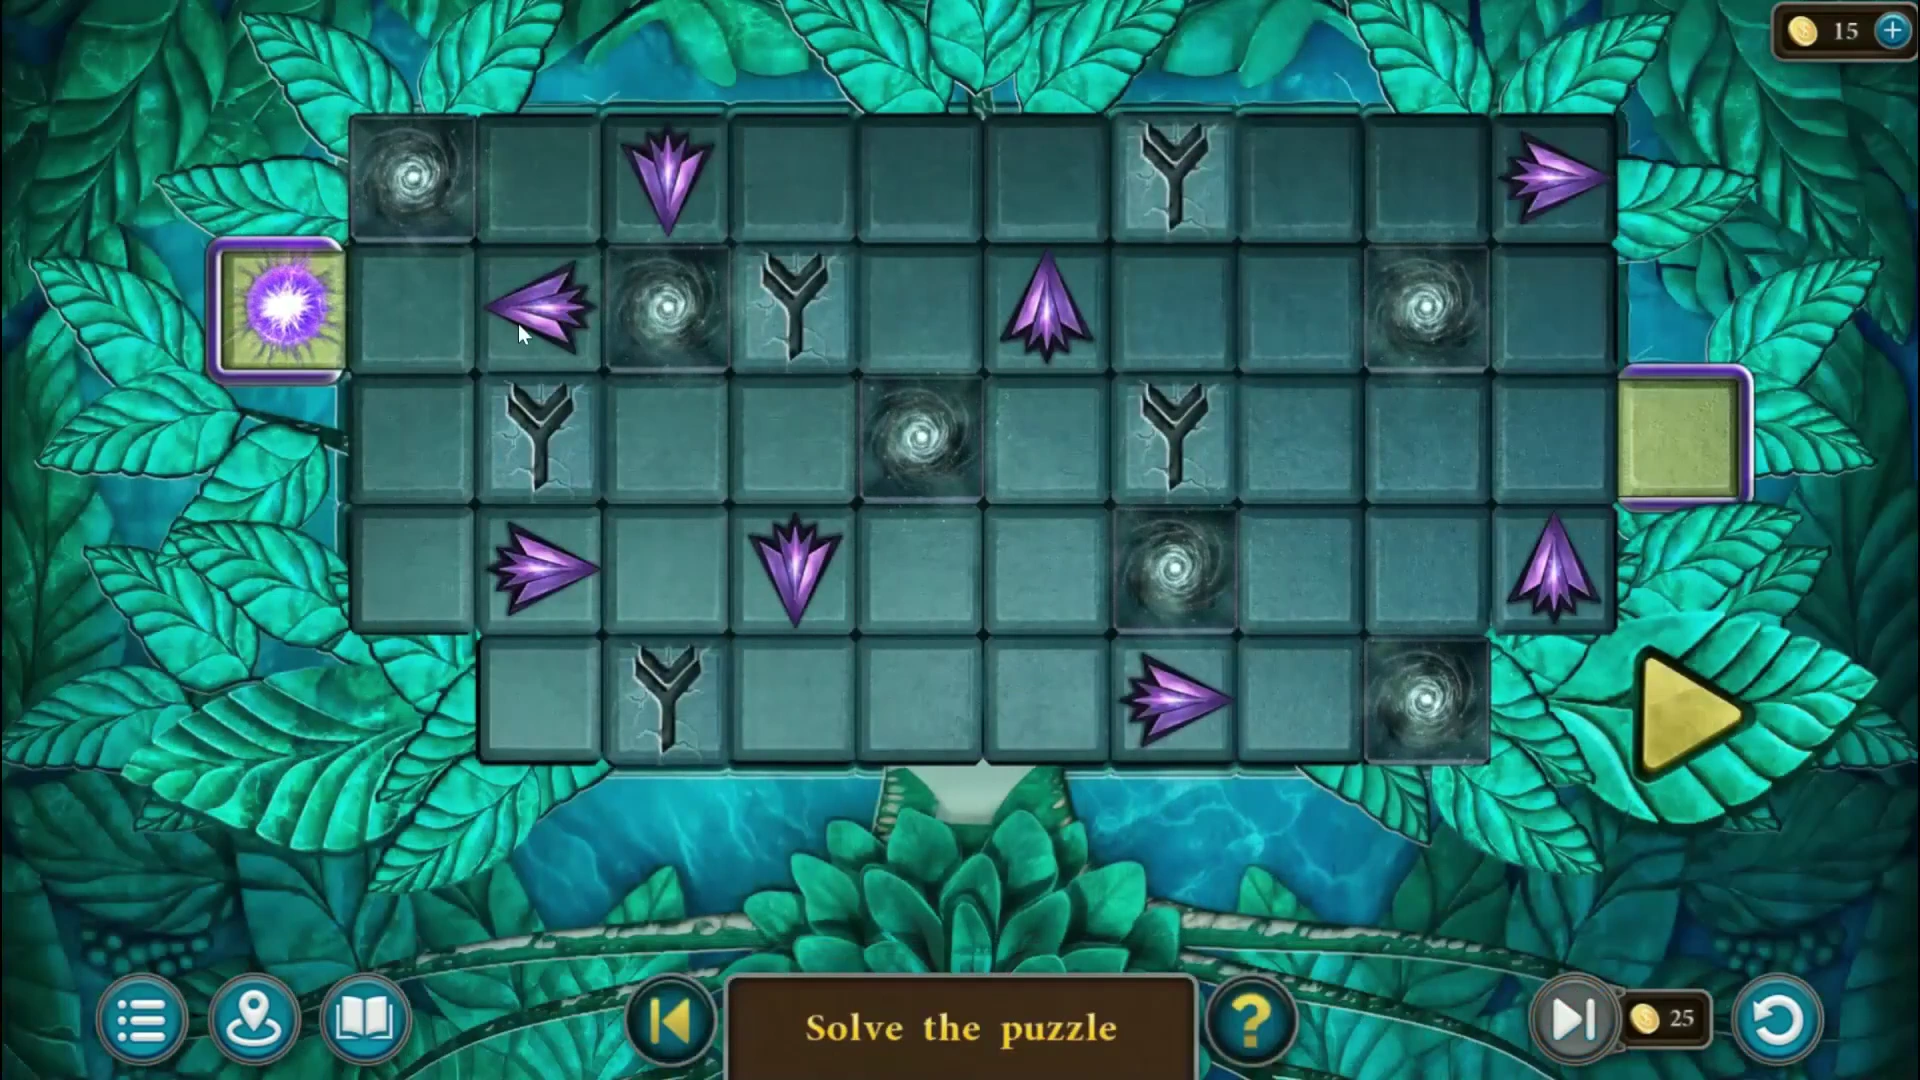
Orb puzzle - puzzle overview. - Outside, put the three leaves on the green box among the plants. Drag the purple arrows to new squares (they keep their direction). When you press play, the orb leaves the left socket, turns wherever it meets an arrow and jumps between the swirl portals. It must pass through all five rune forks, which light up, and reach the socket on the right. The picture shows the layout that worked in the recording; other layouts can also work. Take bas-relief 2 of 2.
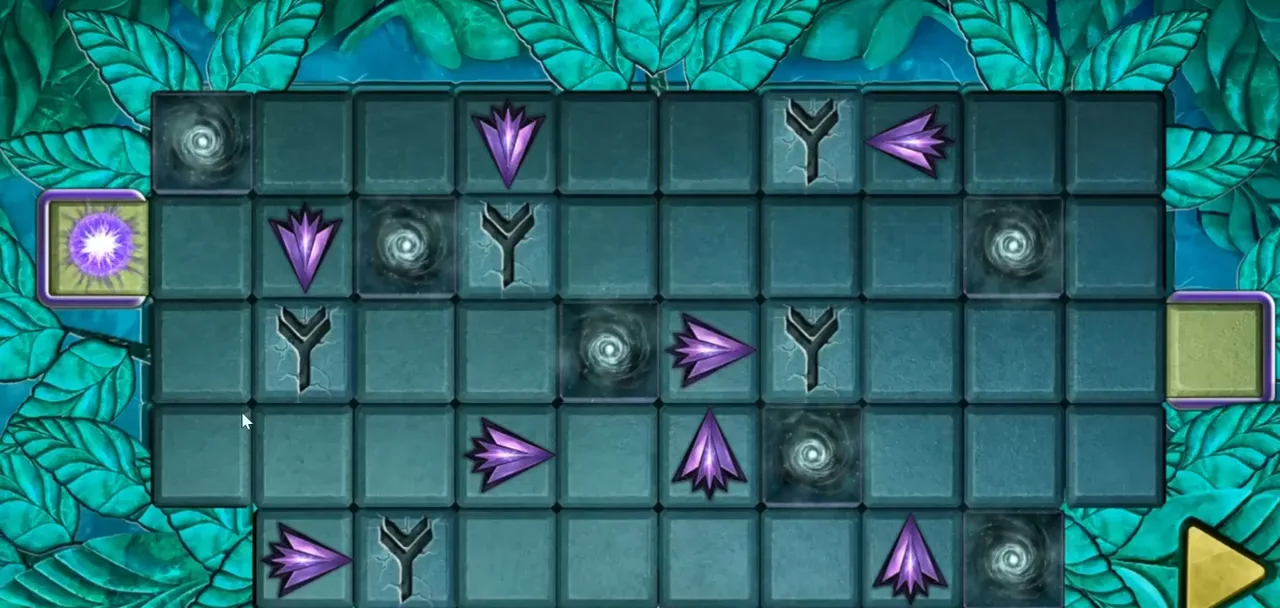
One working arrow layout, from the recording. Other layouts can also work. - In the office, open the birdcage with the key and take the golden sphere. On the planet table in the corridor, put the silver and golden spheres in their places and take the continent.
- Put the continent on the office globe. Take the Historical Manuscript "Possibilities of Magic" (4 of 4 in this chapter) and the pattern.
- In the well room, put both bas-relief halves on either side of the statue. The well activates.
- Put the pattern on the office desk to open its hidden compartment, and place the book there. A glowing sphere covered in pictures appears. Find the 15 symbols listed at the bottom, turning the sphere to see every side. The archwitches are summoned and lose their power, and the ending plays.
Chapter 3 collectibles and morphing objects
Chapter 3 has 8 candlesticks, 7 wreaths, 4 Historical Manuscripts and 15 morphing objects. The manuscripts are in the walkthrough above (wolf gate, forest well, the knight in the sewer and the office globe).
- Candlesticks (8): portal area, bottom-left corner; portal house, on the ground beside the stairs; tower, at the foot of the table on the right; Forest Mysteries, near the door in the tree trunk; fire cave, in the water; underwater trial area, on the right; well room, on the stairs; office, on top of the fireplace.
- Wreaths (7): on the bridge wall above the hollow tree trunk; in the marsh water on the left of the boardwalk; in the water next to the swan boat; in the bushes on the right of the tower; on the ground by the river at the air trial site; on the small floating rock on the left outside the castle; on the right wall of the castle corridor.
- Morphing objects (15): a bunch of herbs hanging by the bed in the portal house; a branch on the bridge wall outside; a wheel across the pond on the road to the tower; a rock beside the hut on the swan pond; between the two doors in the portal area; a pawn shape on the caravan in front of the tower; a flower pot on the left inside the tower; a dream catcher in the tree on the right as you enter the Forest Mysteries; a tree on the right at the air trial site; footprints on the stairs in the fire cave; a painting on the right in the underwater trial area; one of the towers of the floating castle; the flowers at the bottom right of the castle corridor; a column on the right in the well room; and the symbol on the red banner on the left of the office.