Hoops, symbols and the bas-relief
The catacomb door behind the waterfall is sealed. The ice beside it, a sarcophagus with two symbol slots and an empty socket for a bas-relief all need work.
- In the small tent on the right of the Settlement, cut open the sack with the knife and use the scoop to fill the small bag with salt.
- Combine the magnet with the fishing rod. At the pond, fish with it and pull up a small box.
- Open the box in the inventory and set the five quartz crystals in its lid. Take the key and the tweezers.
- At the catacomb door, melt the ice on the left with the salt. Take the pickaxe and hoop 1 of 2.
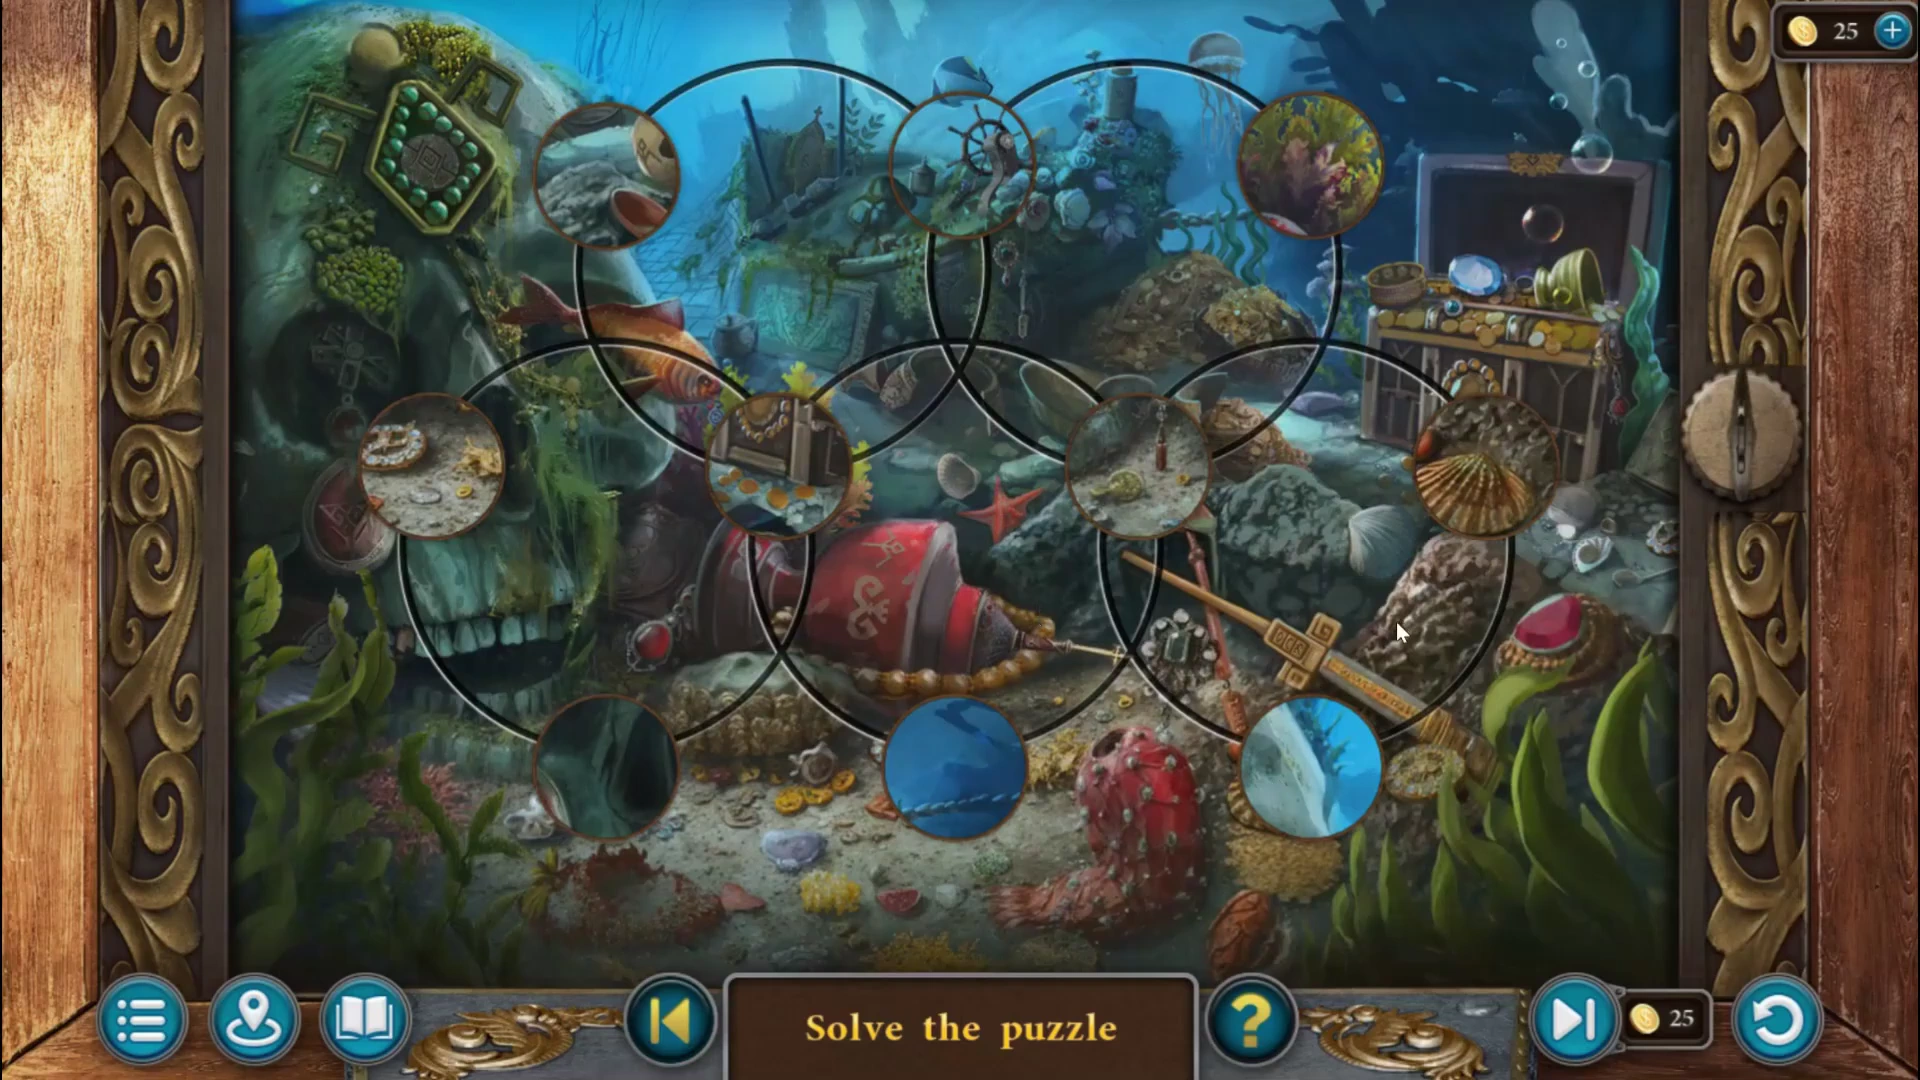
Picture box - puzzle overview. - In the waterfall house, open the wooden box on the shelf with the key. Rotate the overlapping circles until the underwater picture is whole again. Take the empty oiler and hoop 2 of 2.
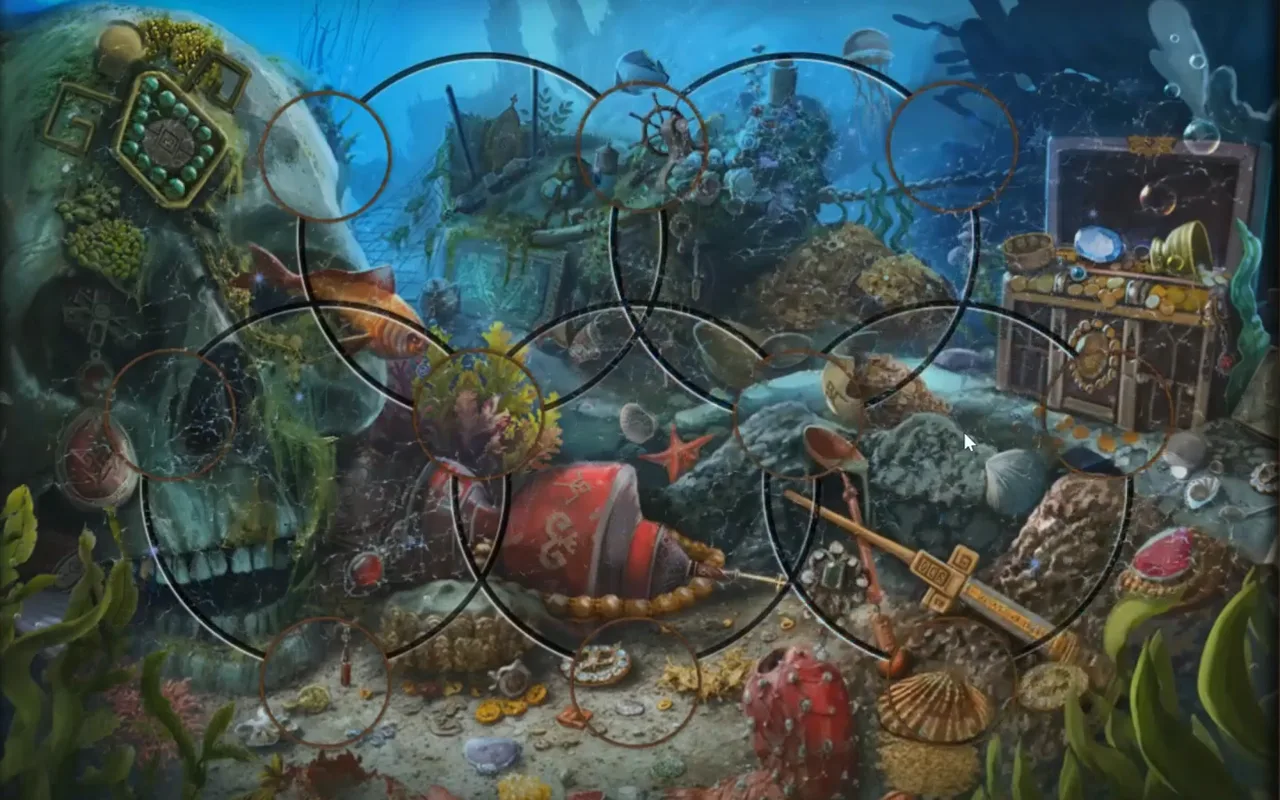
Waterfall house box solved: the underwater picture is whole again. - In the dragon skull clearing, put both hoops on the round shield on the left. One of the 19 discs glows. Find the other disc with the same symbol and tap it: the glowing disc goes dark, and the disc you tapped flips to a new symbol and starts glowing. Keep matching the glowing symbol until only the last glowing disc is left and every other disc is dark. Take star 1 of 2 and symbol 2 of 2.
- At the catacomb door, put both symbols on the sarcophagus on the right and take the lever.
- Fit the lever into the cross-shaped mechanism in the floor and push it. The hanging coal bowl comes down; take flowers 3 of 3 from it.
- In the Settlement, open the round door in the hillside and place the three bunches of flowers in it. The door opens into an old altar room.
- Find all 15 letters G in the altar room. Some are hidden behind small tasks: a sliding panel that forms a large G, a green crystal holder, a purple plant and a small chest. When the counter reaches 15, take the bas-relief from the altar.
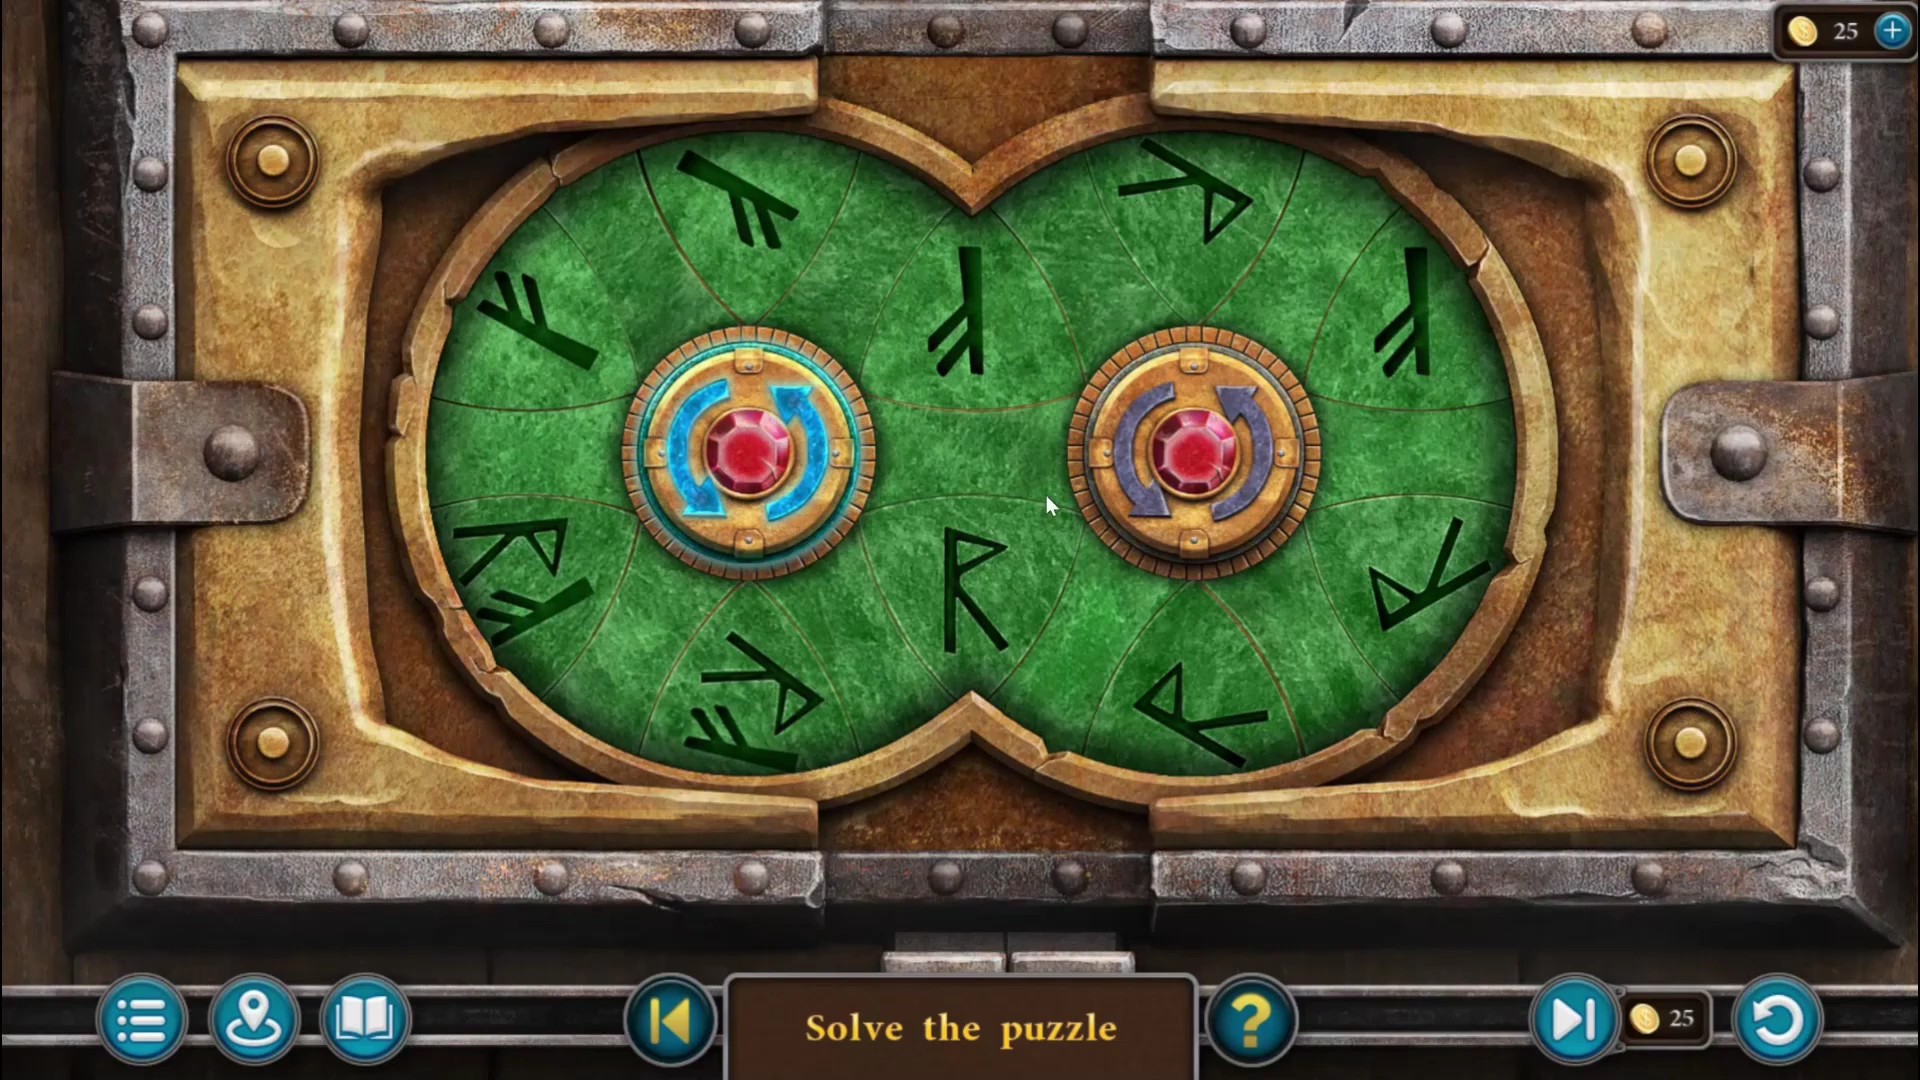
Rune wheels - puzzle overview. - At the catacomb door, place the bas-relief in the socket. Two overlapping rune wheels appear. The curved arrows on a wheel's centre turn that wheel. Each wheel has four outer positions of its own, and the two positions where the wheels overlap, above and below the middle, belong to both wheels, so runes pass between the wheels there. There are three kinds of rune: a branch shape (an upright stroke with two slanting side strokes), an R shape, and a combined rune showing both shapes side by side. Turn the wheels until the four outer positions of the left wheel all hold the branch rune, the four outer positions of the right wheel all hold the R rune, and the two shared positions hold the two combined runes (see the picture). The catacomb door opens.
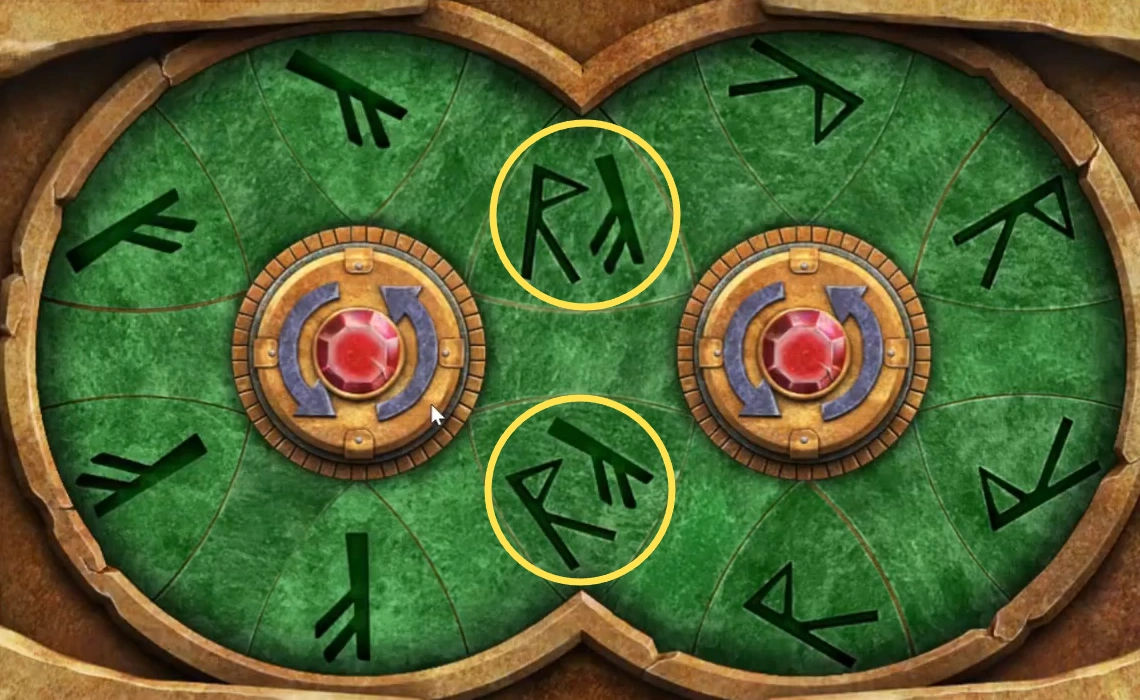
Rune wheels solved: the combined runes sit in the two circled shared positions.
The catacomb entrance and the dead-end room
Inside the catacombs are a barrel, a large stone head with an empty socket on its forehead, a glowing blue doorway and a doorway covered in vines.
- Break the barrel in the corner with the hammer and fill the empty oiler with oil.
- Look into the glowing blue doorway on the right and take triangle 1 of 3 from among the glowing plants.
- Cut the vines over the left doorway with the garden scissors and go through. Lucia calls it a dead end; the room works like a hidden-object scene in which items are used on each other.
- Take the ruby knob from the jewel box on the table on the right and fit it to the empty drawer on the cabinet at the back. Swap the drawer knobs until each one sits on the drawer whose carving it belongs with: quill on the paper scroll, shield on the sword, maple leaf on the tree, grey stone knob on the circle, ruby on the diamond, hammer on the anvil, crescent moon on the three stars, cross on the number 4 and clock on the little house. The middle drawer opens; take the key.
- Pull the lever out of the floor grate, fit it into the slot beside the barred window and pull it. A gear mechanism opens in the floor; it is missing two details. Take the lens lying between the bars.
- Take the pliers from under the spider web on the left. The key turns in the rusty chest on the table only with the pliers: use the key, then the pliers. Take the screwdriver from inside.
- Put the lens on the drawing inside the chest lid. It highlights four drawers: circle, diamond, tree and house. Open those four drawers; a loose brick opens. Take the emblem.
- Put the emblem on the helmet of the armoured guard sitting on the steps; a detail drops out, so take it. Loosen the guard's gauntlet with the screwdriver and take the crossbow.
- Shoot the crossbow at the chandelier bowl hanging from the ceiling and take the second detail when it falls.
- Put both details on the floor mechanism and take the tile it pushes up. Back at the catacomb entrance, fit the tile into the slot on the wall beside the barred gate; the gate opens.
The catacomb maze
Behind the gate is a mini-game titled "Find a way to reach the next hall": a network of rooms joined by doors. The goal is a double door with a diamond pattern and nine keyholes, so you need all 9 keys (the counter at the bottom shows how many you have; keys are kept until that door). The route below follows the recording. The right-hand door and the stairs in the first room lead to a crystal cavern with two levers, a mine room with three green slots and a dining room with a fireplace; none of them holds anything you need.
- In the first room (stairs in the middle, an arched door on each side), take key 1 from the base of the big pillar on the left. Go through the lit arched door on the left into a room with a glowing red floor and a stone pillar. A glowing gap in the floor blocks the small arched doorway on the left of this room. Drag the two loose boards lying in the room, one on the floor at the left and one leaning on the right, across the gap to make a crossing; you will need it later.
- Go through the iron-studded door on the right into the ivy room. The round socket on the right wall is broken: drag the stone pieces from the rubble beside it into the circle until it is whole, and a passage opens in the middle of the room. Go through to the room with a mossy stone block. Fit the green striped stones lying around into the two star-shaped holes on the block; take key 2.
- Back in the ivy room, pull the boards off the doorway on the left, behind the yellow ivy, and go through to the room with an iron double door and a covered urn. Tap the green gem on the urn's lid and take key 3 from inside. The iron door opens; go through to the room with a stone bridge over lava.
- In the lava bridge room, collect three keys. Go through the broken opening on the right to a mossy cave and take key 4 from the vines at the top right, then come back. Go through the blue-lit door on the left into a flooded room, open the grate in the floor and take key 5, then come back. Take key 6 from the iron bowl in the bottom-left corner of the lava bridge room.
- Walk back through the iron-door room and the ivy room to the red-floor room. Cross the boards over the gap and go through the small arched doorway on the left into a mine room with a cart on rails. Pull aside the hanging cloth on the timber frame and take key 7. Go forward into the tunnel; this first leads to a cave-in. Search the debris and take key 8. Back at the fork in the tracks, turn the crank of the rail switch beside the tracks, then go forward again to reach the end of the line. Lift the red cloth on the bench and take key 9.
- Return to the lava bridge room (mine room, red-floor room, ivy room, iron-door room), cross the bridge and go through the door at the back. Put the nine keys into the double door with the diamond pattern and go through into the Catacombs Hall.
The Catacombs Hall and the nest room
The hall has a statue standing in water, a stone table with a box, a cart track and a passage to a room with a huge nest and slime-covered walls.
- Go into the nest room and take triangle 2 of 3 from the bottom-left corner of the slime.
- In the hall, open the mechanism box to the left of the stairs and take the pattern from inside. Replace the broken gear with your gear, oil it and turn the handle; a cart rolls in on the track.
- Cut the cart's tarp with the knife. Take the key, the pincers and sphere 1 of 6.
- In the nest room, open the red chest beside the fallen warrior on the left with the key. Take eye 1 of 2 and the corkscrew.
- Return to the large stone head at the catacomb entrance and place the pattern on its forehead. A panel of raised and lowered silver discs appears with four small dot panels on each side (number them 1 to 4 top to bottom on the left and 5 to 8 on the right). Each side panel flips the discs marked by its dots. Lower every raised disc in three rounds. In the recording the rounds were solved with: round 1: 5, 6, 8; round 2: 5, 8; round 3: 1, 3, 6, 8. If your discs differ, compare each panel's dots with the raised discs. Take star 2 of 2 and sphere 2 of 6.
- In the hall, look at the statue in the water and take triangle 3 of 3 from beside it.
- Put both stars on the statue's plaque. Tap a gold block and then one of its arrows: it slides until the edge, a copper block, another gold block or an already lit circle stops it, and every circle it crosses lights up. Light all the circles. Call the gold blocks A (bottom row, next to the copper block in the corner), B (upper middle) and C (lower middle). The recording used this order: A left, up, right, down, right, up, left, up, right, up; B up, left; C left; B down, right; C down, right, up, left, down, left. Use the replay button to start again if a block gets stuck. The statue opens: take the Historical Manuscript (4 of 4 in this chapter), the stone symbol and sphere 3 of 6.CODEA: L U R D R U L U R U; B: U L; C: L; B: D R; C: D R U L D L
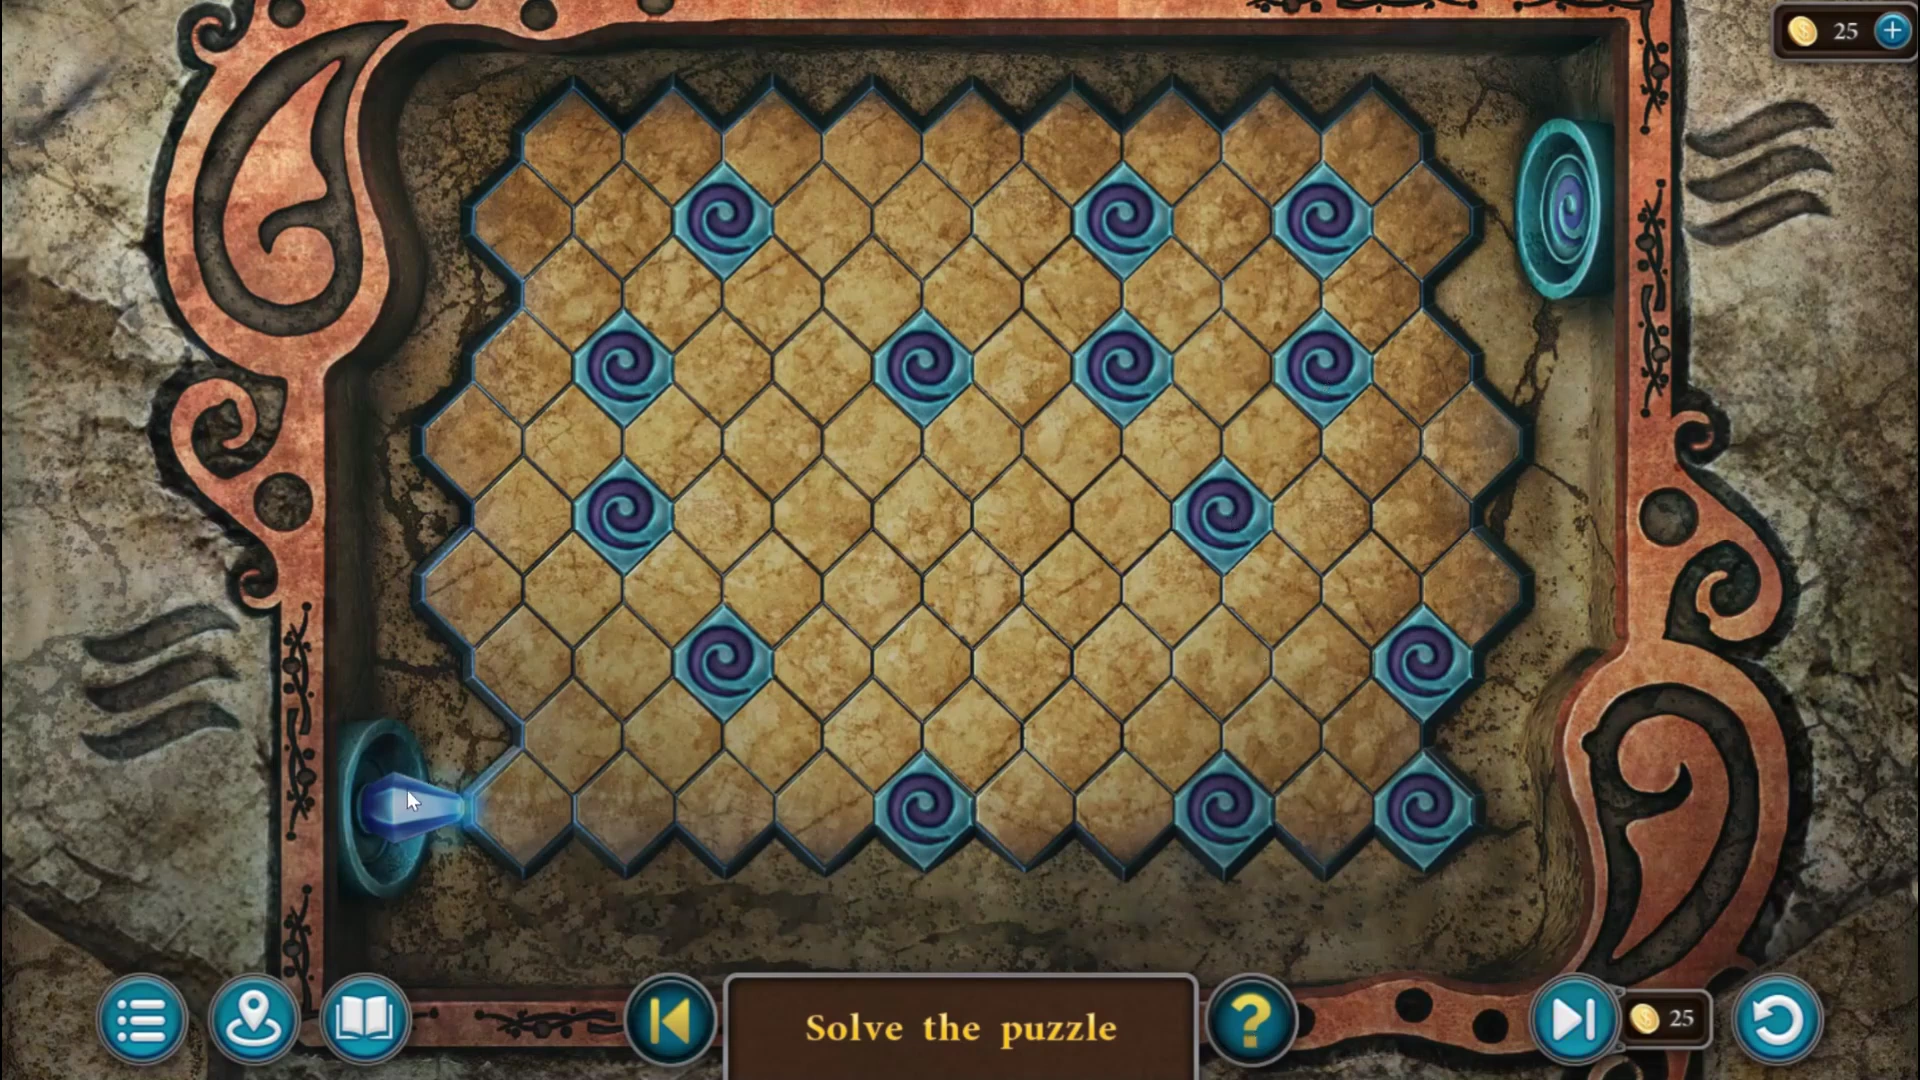
Light beam puzzle - puzzle overview. - In the nest room, put the stone symbol on the totem. Light leaves the emitter on the left and travels in straight lines, turning only at spiral tokens. Drag tokens to new spaces until the beam passes through every token and reaches the receiver at the top right (see the picture). Take the wrench and eye 2 of 2 from the drawer.
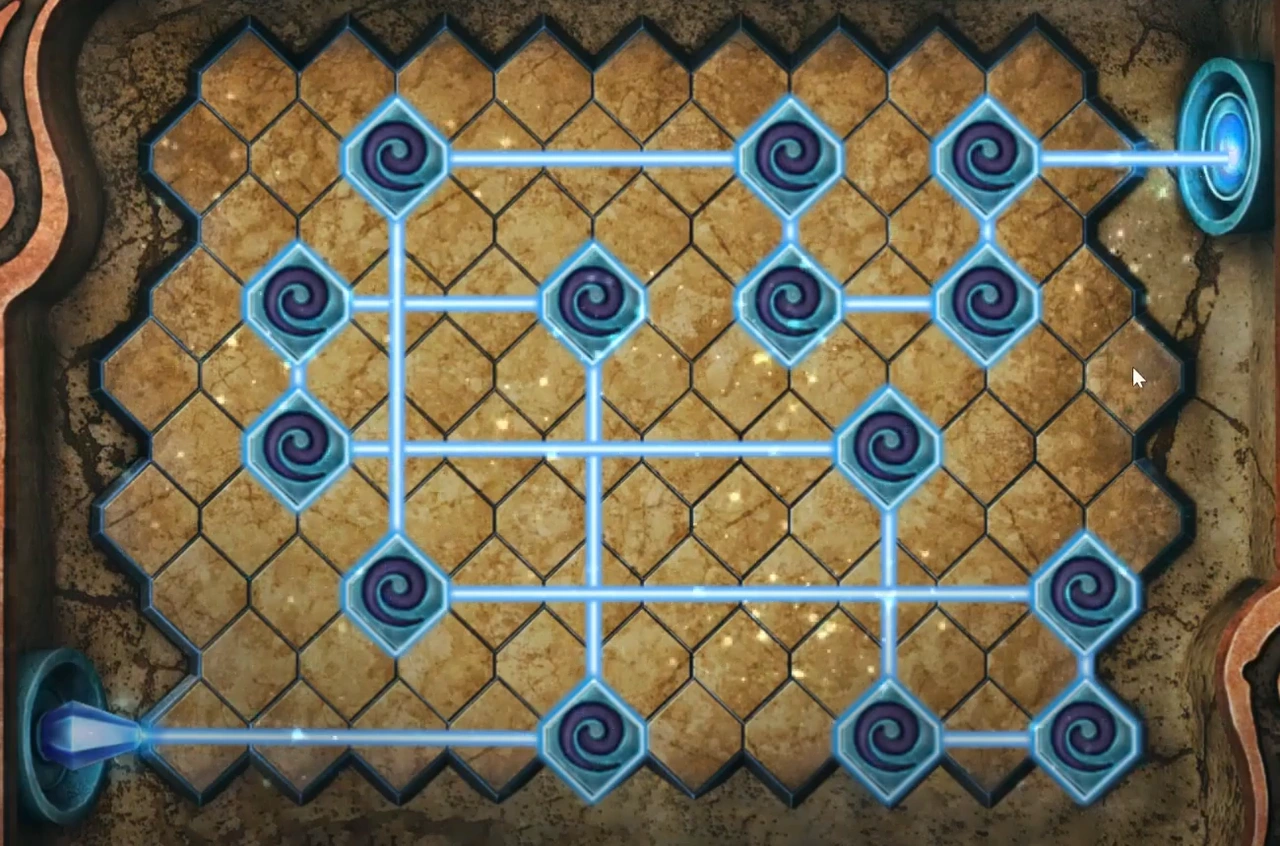
Nest-room totem solved: the beam passes every token. - In the hall, open the round hatch in the floor with the wrench and take the signet ring.
- Press the signet ring into the box on the stone table. Take rune 1 of 4 and sphere 4 of 6 from the book inside.
- Travel to the tree house in the Magical Forest. Pull the cork from the glass bottle on the table with the corkscrew, then use the tweezers to take sphere 5 of 6 out of it.
- In the dragon skull clearing, open the stone chest on the hill with the three triangles and take sphere 6 of 6.
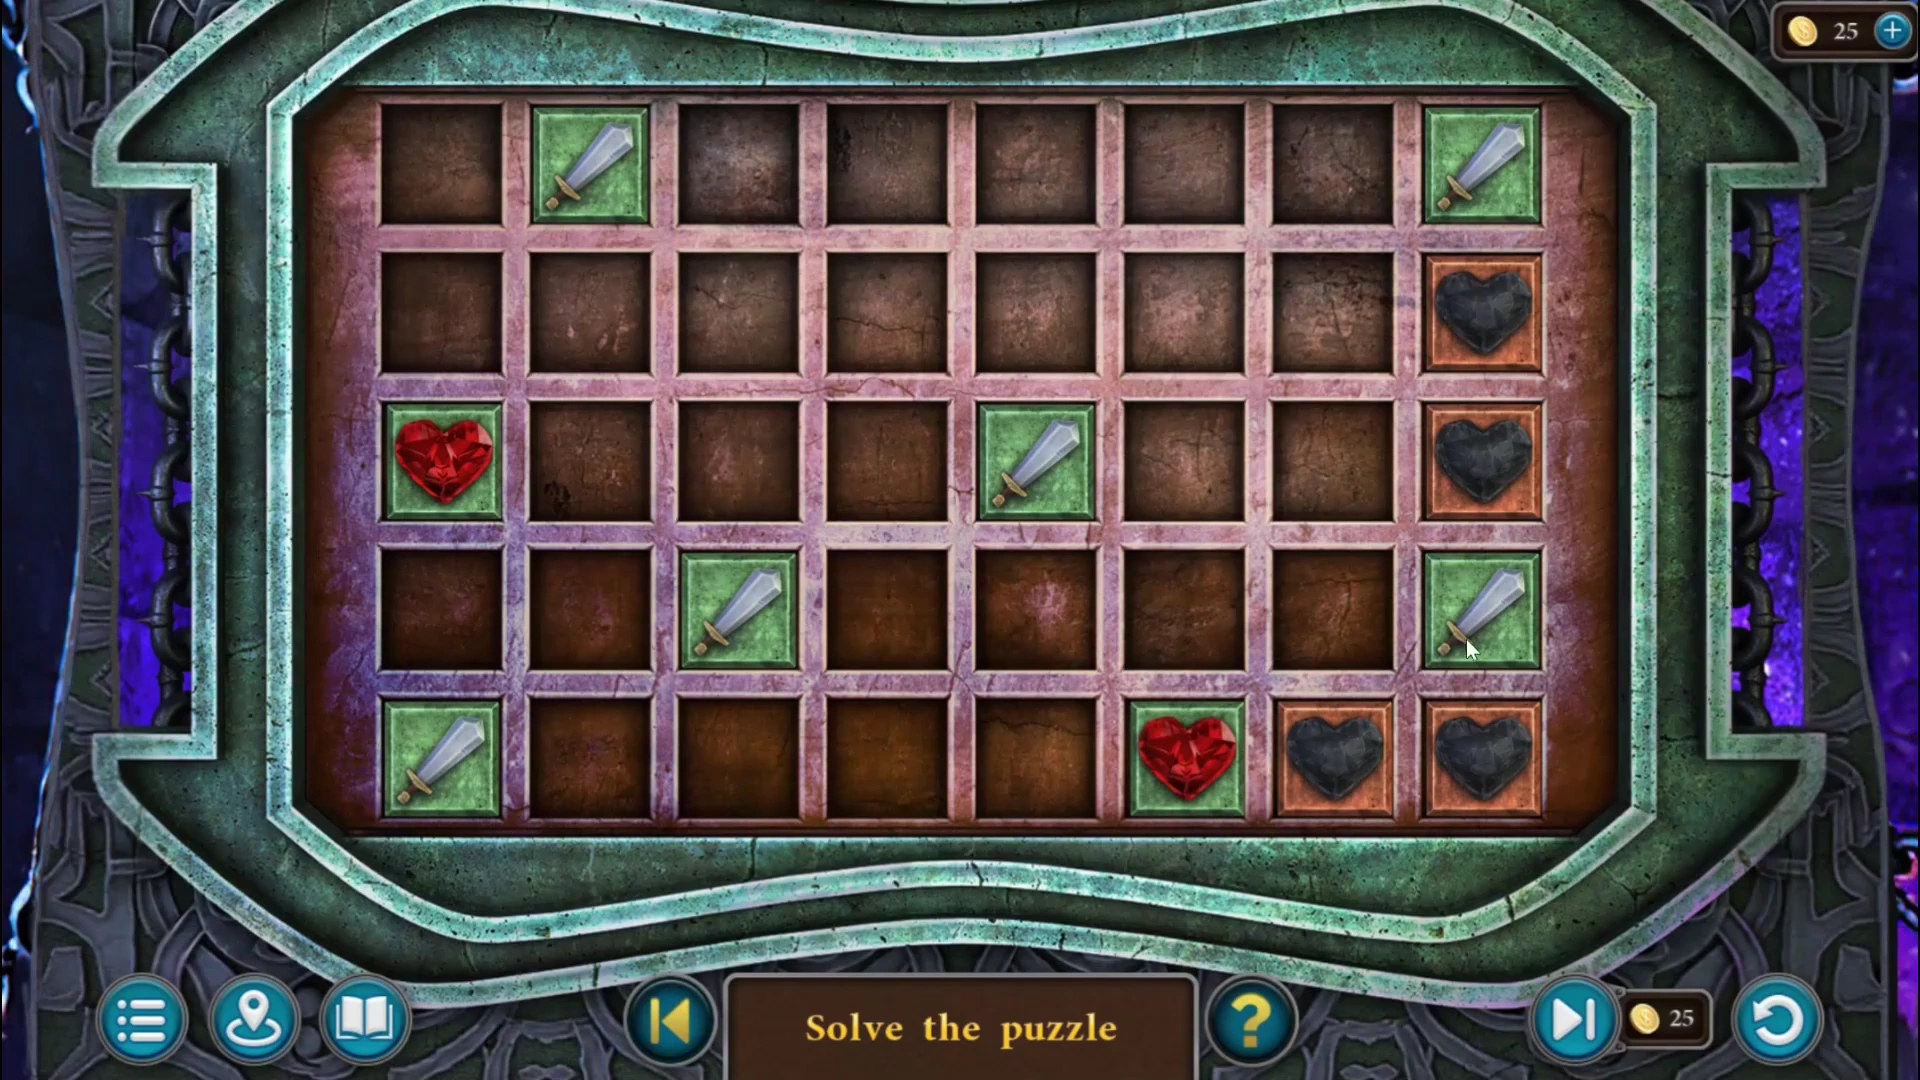
Heart lock - puzzle overview. - In the nest room, put the six spheres on the round metal panel at the top of the stairs. On the 8 by 5 grid that appears, the swords stay put and the six hearts slide: tap a heart and then an arrow, and it slides until the edge, a sword or another heart stops it. A heart turns red when no sword is directly above, below, left or right of it (a sword touching only at a corner is fine). Make all six hearts red. Counting rows from the top and columns from the left, these nine slides work from the starting layout: heart in row 1, column 1 down (it stops in row 4); heart in row 1, column 3 down; heart in row 2, column 8 left; heart in row 3, column 8 left, then the same heart down; heart in row 4, column 1 up; the heart now in row 3, column 3 left; heart in row 5, column 2 right; heart in row 5, column 8 left. Any arrangement with no heart touching a sword works; these slides finish in a different safe arrangement from the recording's, which the picture shows. A secret passage opens.
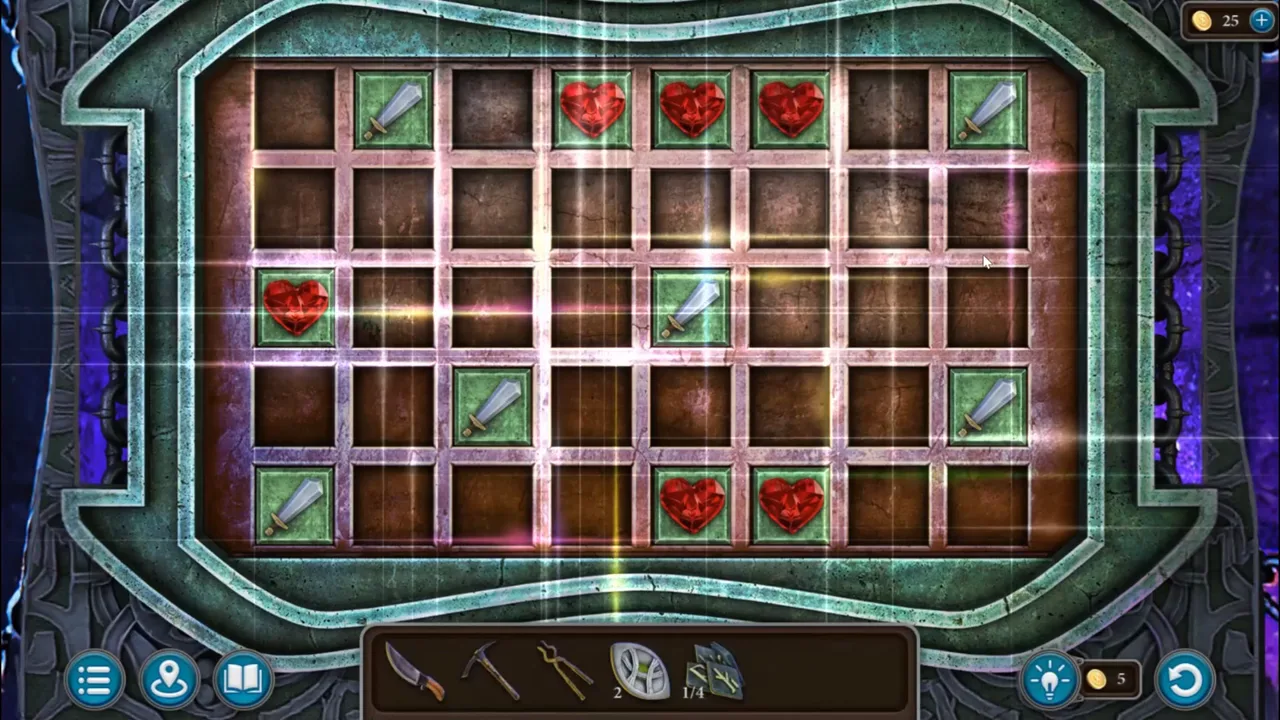
Nest room panel solved in the recording: no heart touches a sword. Other arrangements that follow the same rule also work. - Cut through the dense slime over the passage with the knife (the pincers do not work). A cutscene follows: the werewolves rescue Lucia, and she lands in a crystal cave. The new task is "Get Out of the Trap".
The crystal cave and the artifact room
A broken rope bridge crosses the lava in the crystal cave. The artifact rests behind a protective field in the room beyond.
- Break the crystal lying on the rope with the pickaxe and take the rope with the hook. Throw it across the lava to pull the fallen bridge back up, then cross to the artifact room. The task becomes "Take the Artifact".
- Use the pincers in the crack in the stairs on the left and take rune 2 of 4.
- Put both eyes into the stone head that has none. Its mouth opens; take the red fire stone symbol.
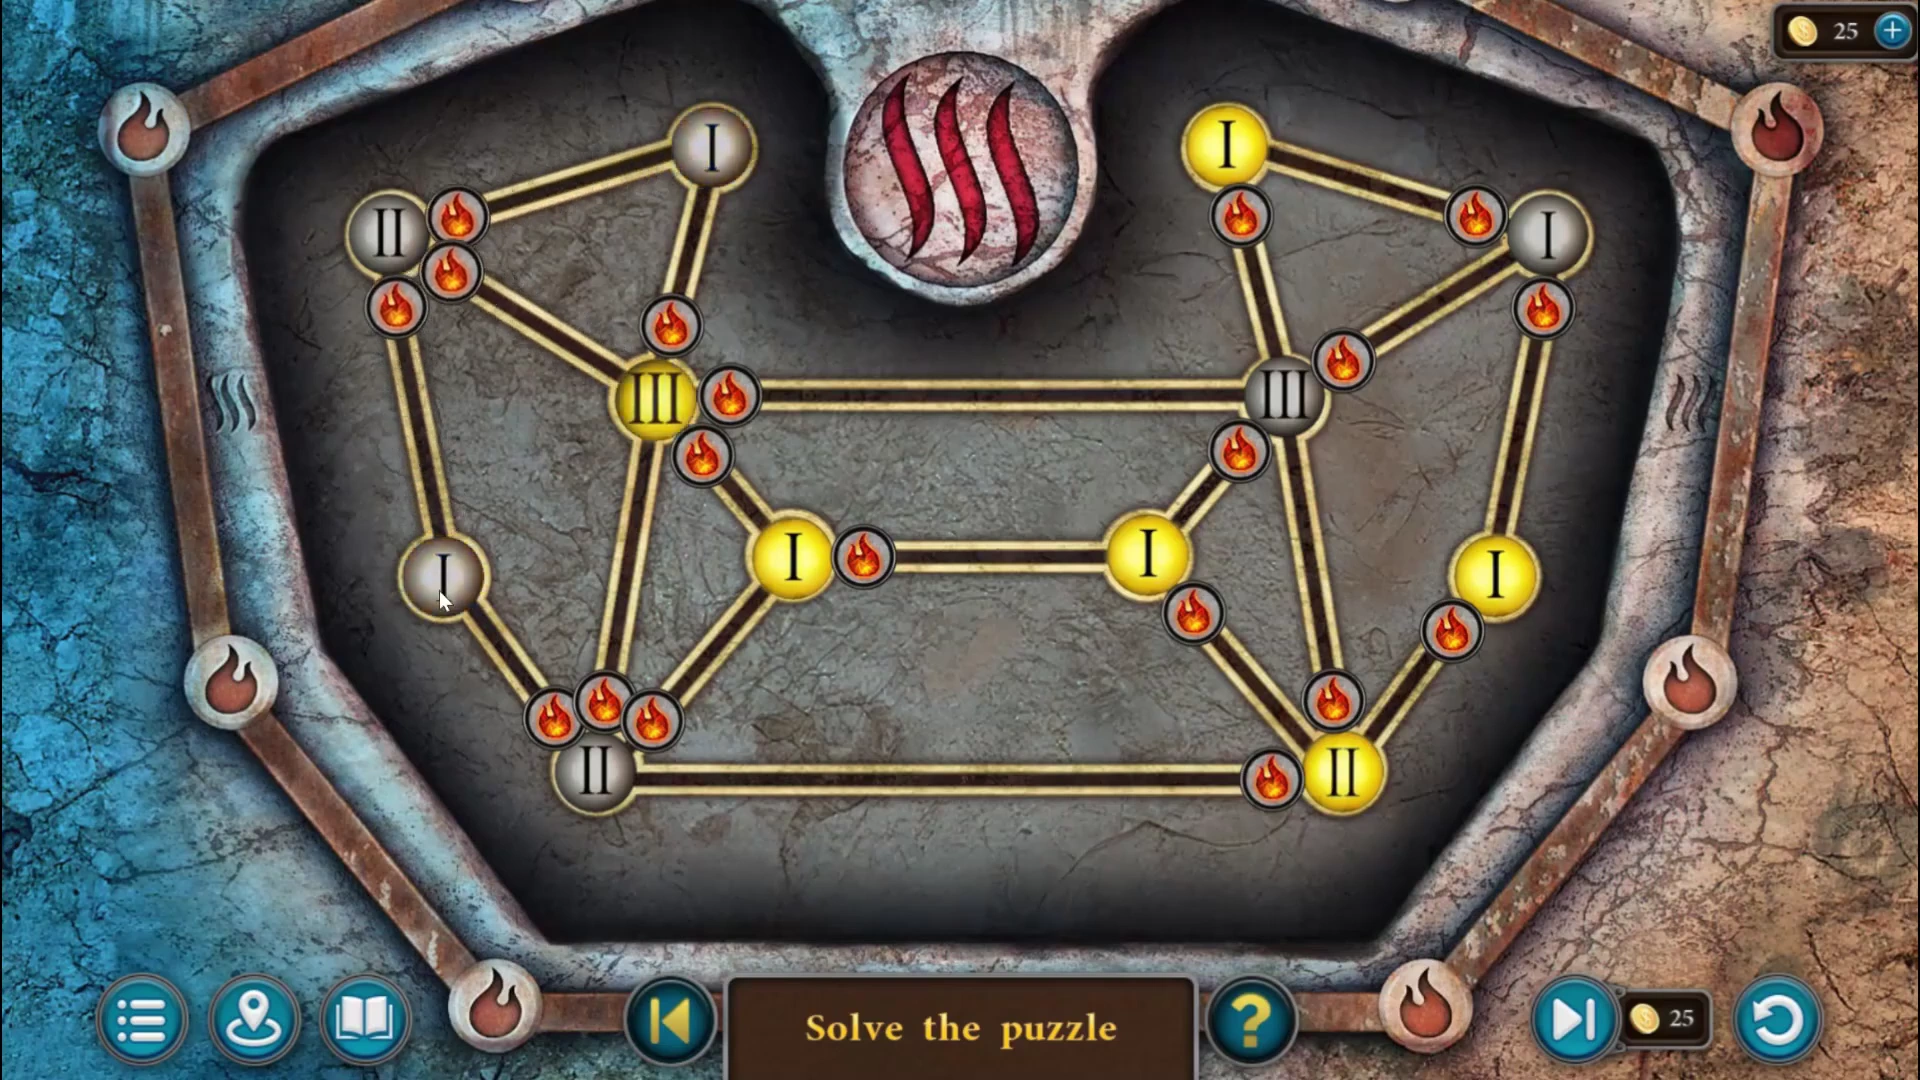
Fire totem - puzzle overview. - In the crystal cave, put the fire symbol on the totem. Tap the lines to move their small flame markers between nodes. A node lights up when the right number of flames sit next to it (shown by its Roman numeral). Light every node; the picture shows the finished board. Take rune 3 of 4 from the drawer.
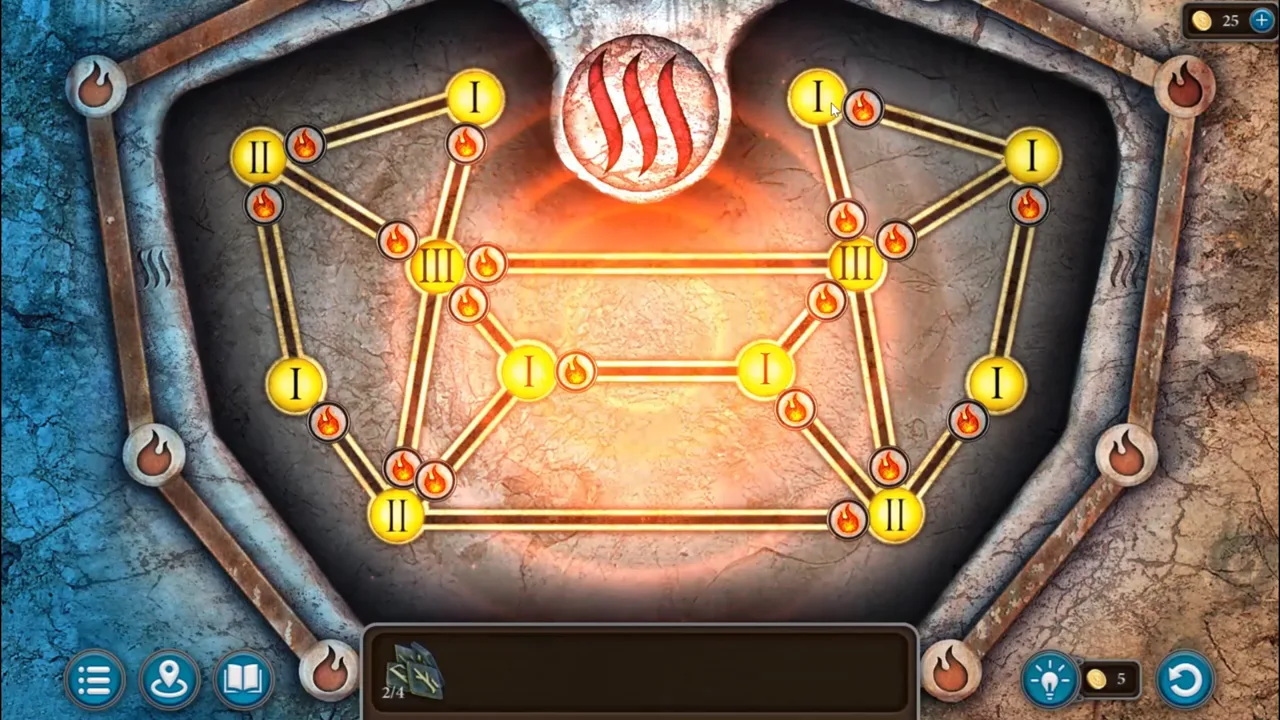
Crystal cave fire totem solved: every numbered node is lit. - In the artifact room, look through the grate on the left and take the ram's head.
- In the nest room, put the ram on the chest held by the warrior on the right and take the cross.
- In the crystal cave, put the cross on the box in the mining cart and take the hacksaw.
- In the artifact room, cut the grate on the left with the hacksaw and take rune 4 of 4.
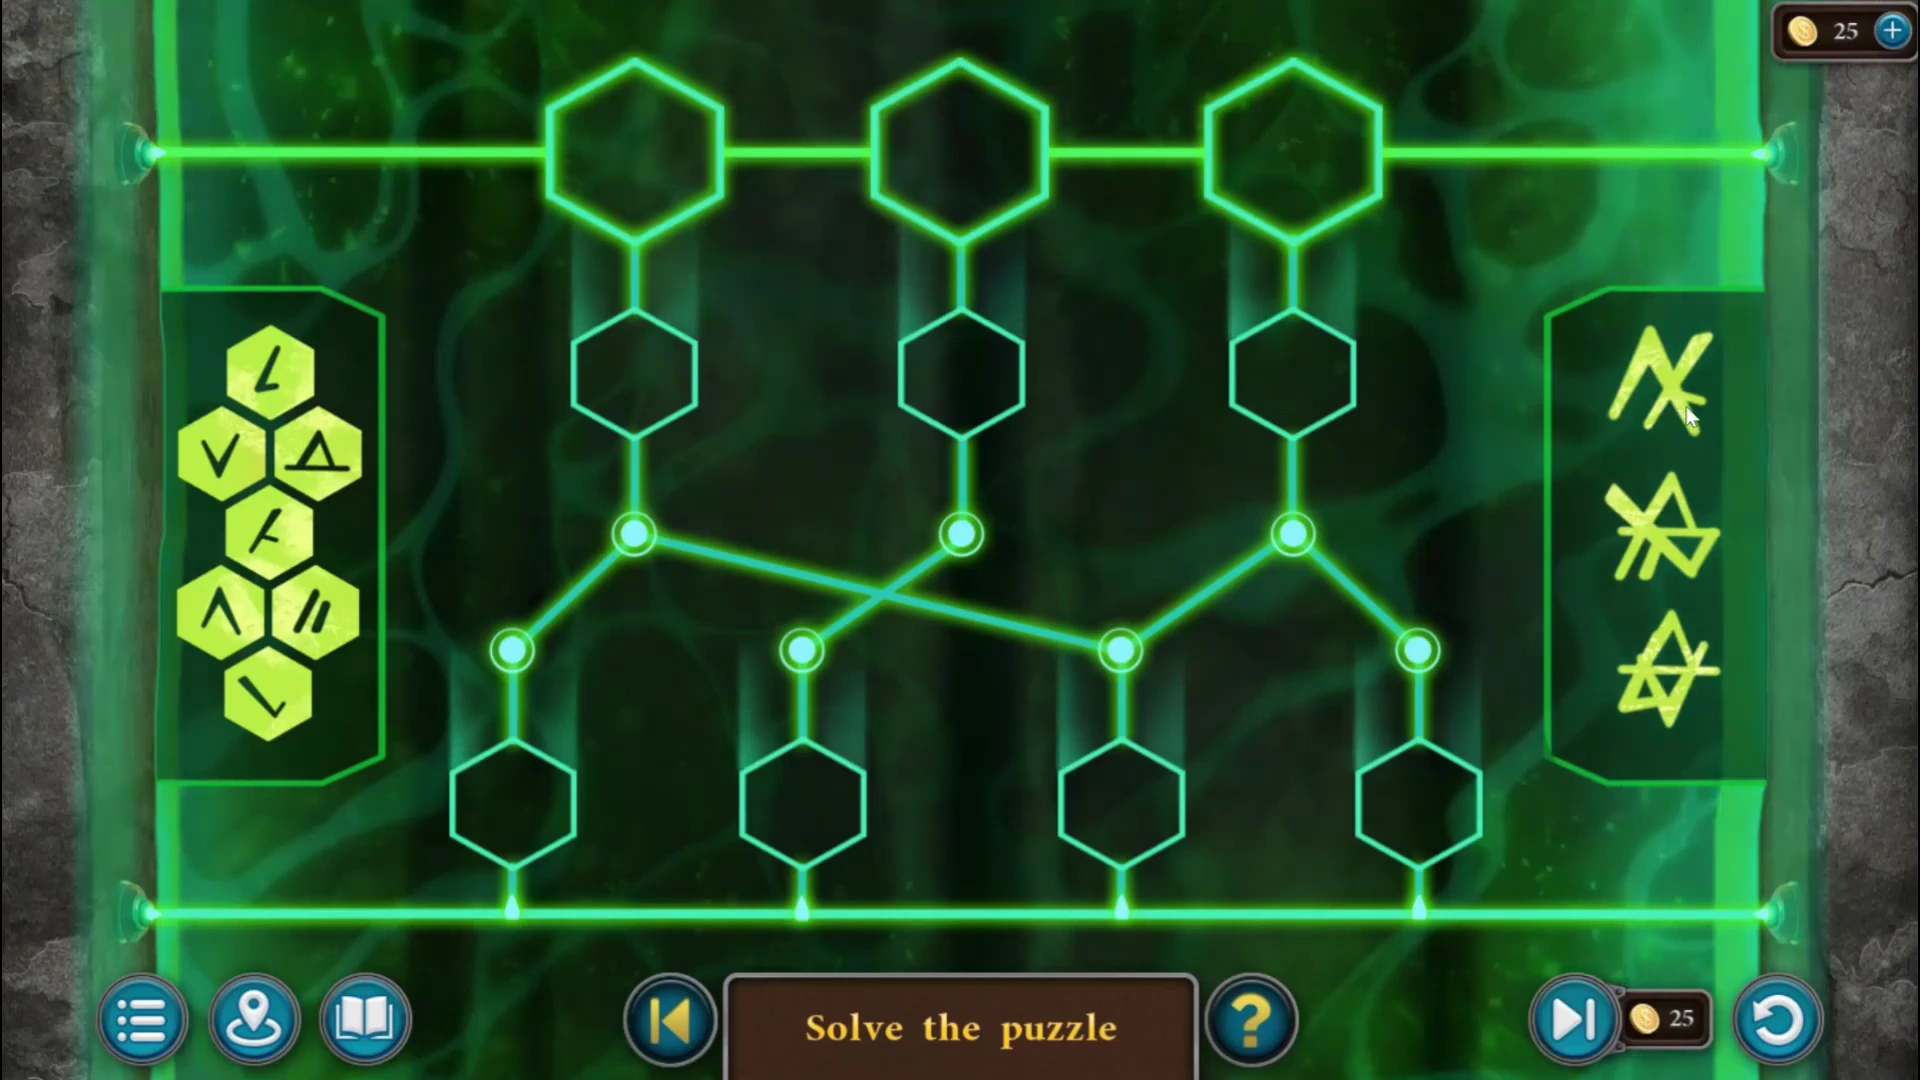
Green door - puzzle overview. - Use all four runes on the green door at the back to open its puzzle. It has seven rune tokens on the left and seven empty hexagonal slots: four along the bottom and three in the middle row. Drag a token into each slot; a placed token can be moved again. Each of the three hexagons at the top combines the tokens joined to it by the glowing lines. The goal is for the three top symbols to be the same three as on the panel on the right, though not in the panel's order. Fill all seven slots as in the picture. Bottom row, left to right: the double stroke, the caret, the triangle and the V. Middle row, left to right: the wide tick (a short stroke down into a longer one rising to the right), the leaning F (a slanted stroke with a short crossbar) and the small angle (a slanted stroke standing on a short flat base, like a leaning L). The protective field drops.
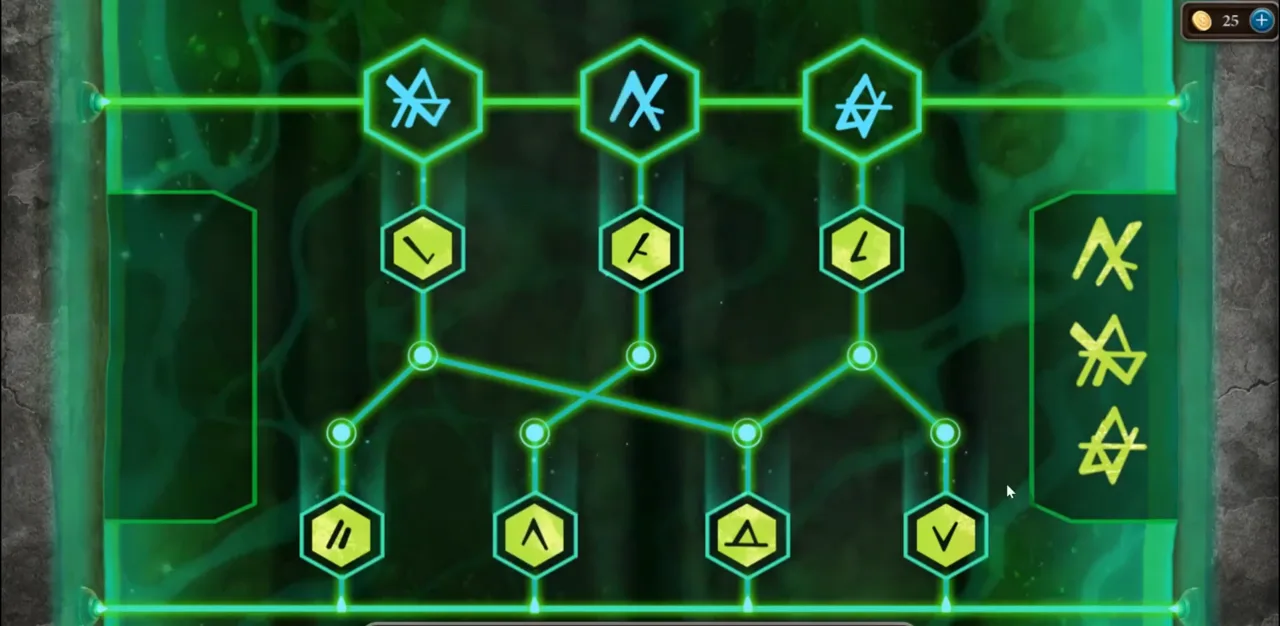
Green door solved: all seven slots filled; the top symbols match the panel on the right in a different order. - Take the artifact. A creature attacks as Lucia escapes, and the chapter's story ends. The game offers to continue exploring for collectibles before you move on to the next chapter.
Chapter 1 collectibles and morphing objects
Chapter 1 has 7 mushrooms, 8 mugs, 4 Historical Manuscripts and 15 morphing objects. A morphing object is a small item that keeps changing shape; tap it while it is changing. The counter at the bottom of the screen, labelled "Collected in this chapter", shows how many of each kind you have found in the whole chapter; it does not show what remains in the current location. You can collect everything after the story ends by choosing to continue exploring. The four manuscripts are covered in the walkthrough above (tent desk, boat hatch, middle of the pond and the hall statue).
- Mushrooms (7): Settlement, on the ground in the bottom-left corner near the tent entrance; inside the tent, on the upper-left shelf; bridge, on the ground on the right by the red rock; waterfall, on the ground on the right of the shore; pond, on the right among the flowers; dragon skull clearing, on the right; crystal cave, next to the fire totem stone.
- Mugs (8): beach, between the rocks to the right of the broken boat; waterfall house, on top of the shelf on the right; tree house, on the table; catacomb door, by the left column; catacomb entrance, beside the big stone head on the right; Catacombs Hall, on the left near the glowing eggs; nest room, beside the chest on the left; artifact room, beside the head with blue eyes.
- Morphing objects (15): the flags on top of the main tent in the Settlement; inside the tent, the small bag on the floor under the table on the right; the bush under the first part of the bridge; the barrel on the left of the beach; the window grate of the waterfall house; inside the house, one of the logs on the top shelf; the symbol on the far stone in the pond; the birdhouse on the left tree by the dragon skull; the yarn ball on the left in the tree house; the star symbol above the catacomb door; two leaves in the ivy on the left at the catacomb entrance; the stone pyramid on the right of the Catacombs Hall; a small metal detail on the right of the nest room; the cart on the far left of the crystal cave; and a piece beside the head with red eyes in the artifact room.