The settlement, the stable and the bridge
Lucia starts in the werewolves' settlement on the island, with the task "Talk to Drevolets". The map button at the bottom left travels between the Settlement, the Surrounding area (bridge, beach and waterfall), the Magical Forest and, later, the Catacombs. Inventory items marked with a small plus can be opened or combined.
- In the Settlement, open the stable on the right. Tap the pile of hay to put it in the trough; while the horse eats, take the bag hanging from its saddle.
- Go down the path to the bridge. Open the wooden chest in front of the bridge and take the horseshoe lying beside it. Open the bag in your inventory, use the horseshoe on its clasp and take the key and the slingshot.
- Tap the broken middle of the bridge and take horse figurine 1 of 2 from the planks. The purple stone pillar at the start of the bridge and the chest with two horse-head slots both need items you will find later.
The tent: trapdoor, fireplace and ring lock
The large tent on the left of the Settlement holds the first Historical Manuscript and the knife.
- Enter the tent. Move the rug on the floor, open the trapdoor with the key and take the handle and butterfly token 1 of 2.
- Put the handle on the fireplace door at the back right, open it and take butterfly token 2 of 2 from inside.
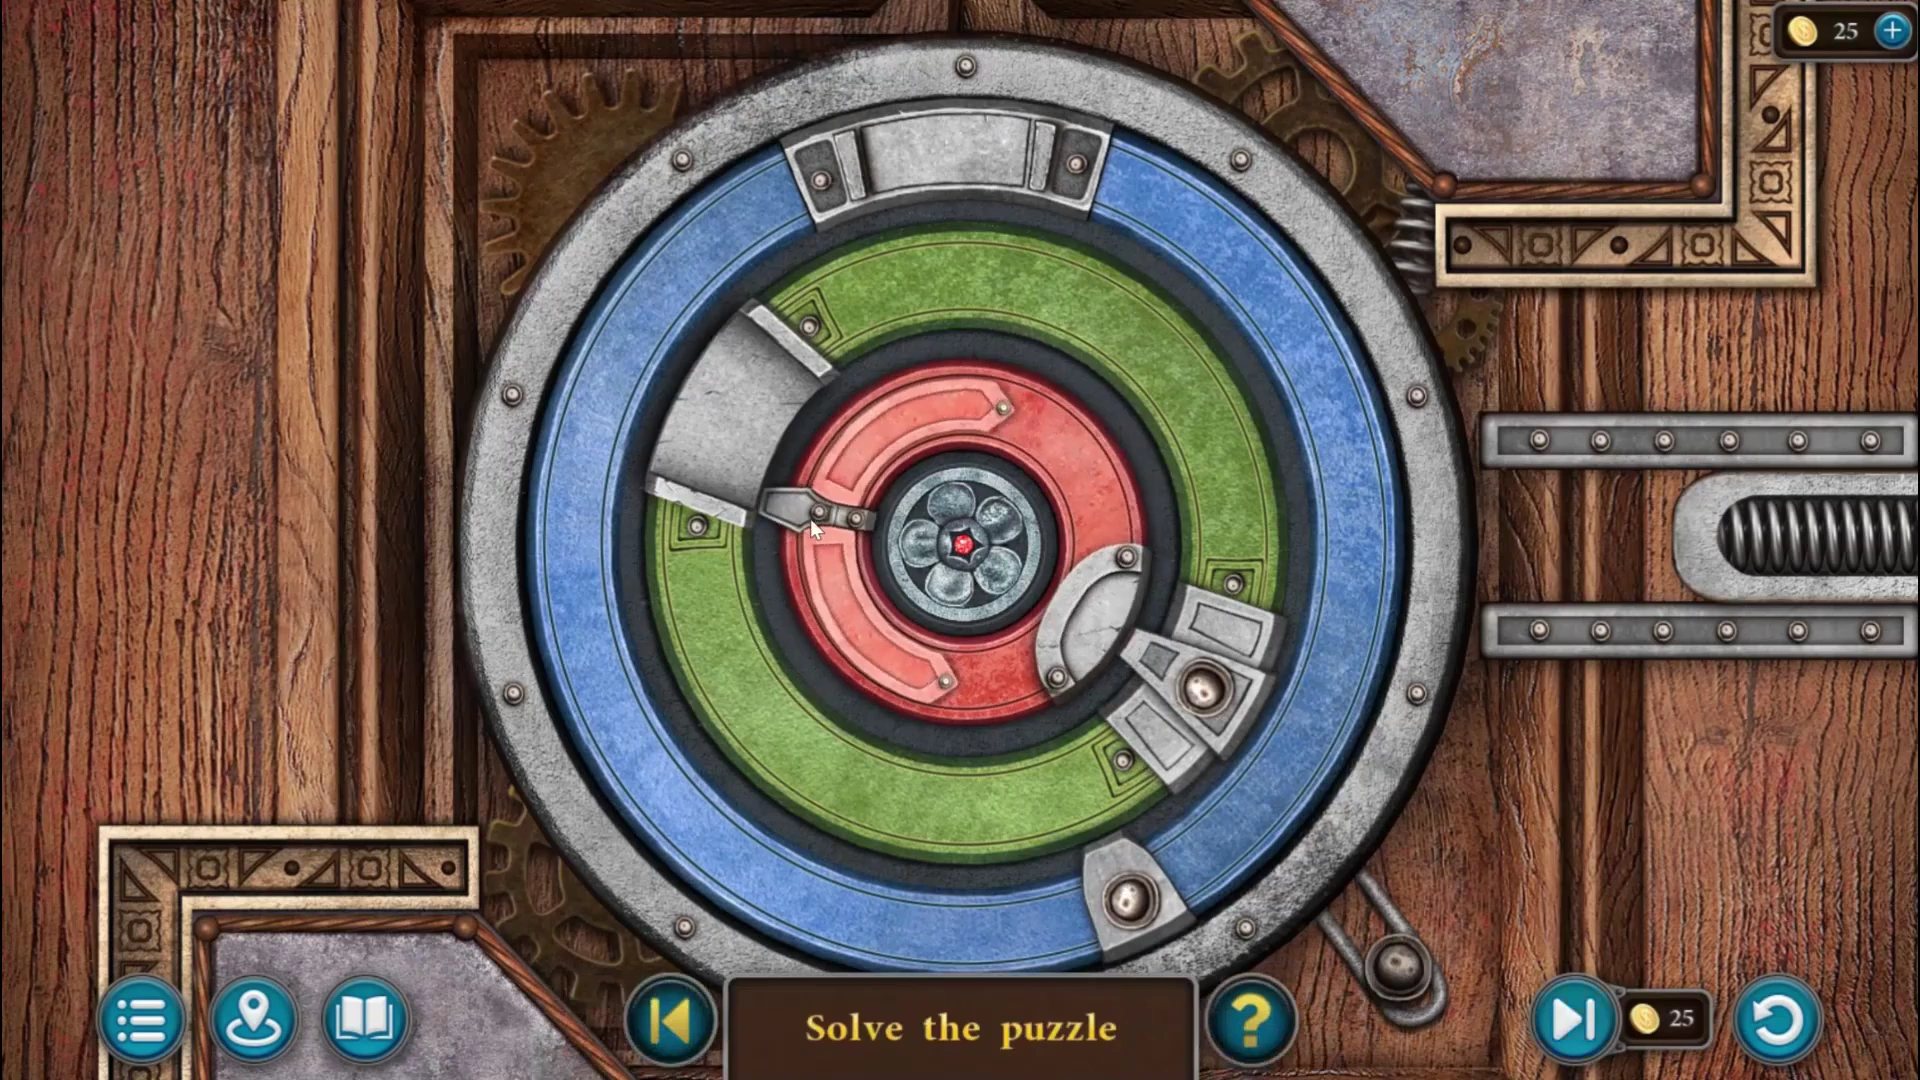
Ring lock - puzzle overview. - Place both butterfly tokens on the cupboard doors at the back to reveal a ring lock. Turn the blue, green and red rings until the grey open section of every ring faces the spring bolt on the right (see the picture). Turning one ring can drag a neighbouring ring with it, so check all three before you finish. Take the lockpick.
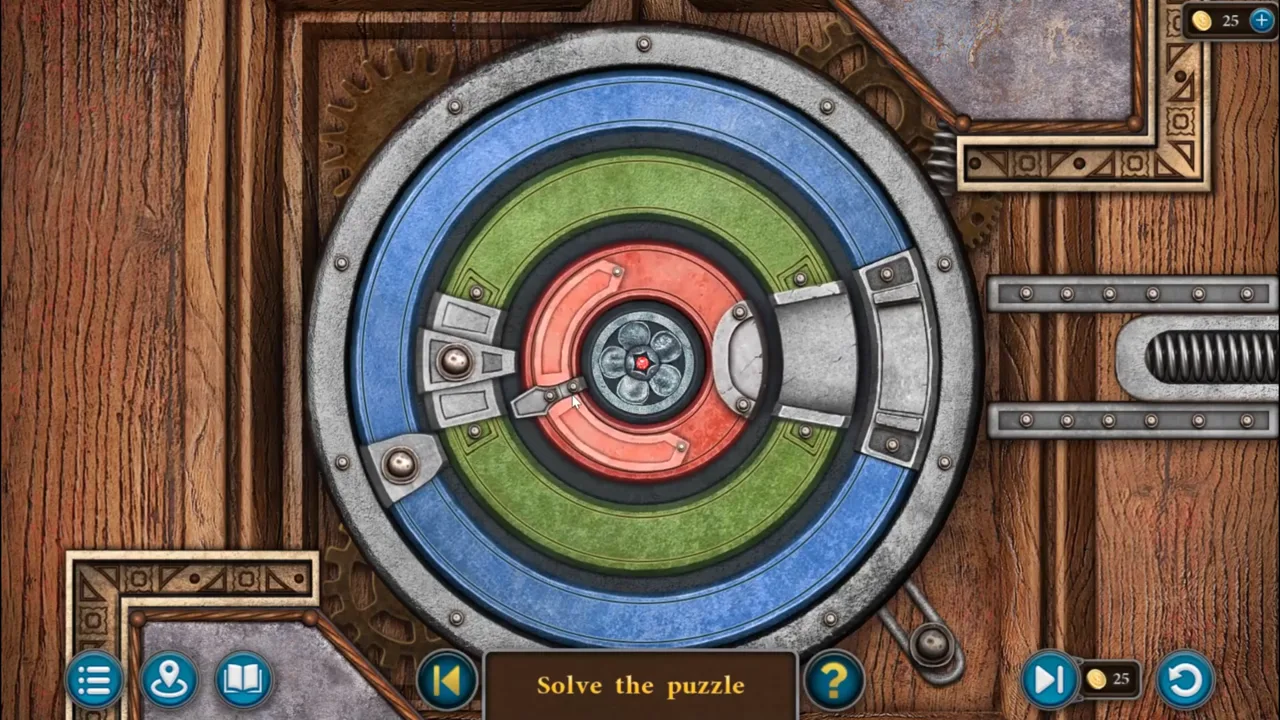
Ring lock solved: all three grey gaps face the bolt on the right. - Use the lockpick on the purple lantern hanging on the left and take the detail from inside it.
- Fit the detail to the desk drawer on the left. Open it and take the Historical Manuscript (1 of 4 in this chapter) and the knife.
The waterfall house and the horse chest
From the bridge, follow the path down to the beach and along the shore to the waterfall house.
- At the waterfall, open the fishing net hanging on the left and cut it with the knife to free the handle (a mallet head on a stick).
- Open the house door with the lockpick.
- Return to the bridge. Tap the square wooden post cover at the near end of the bridge, fit the handle, open it and take board 1 of 2.
- Go inside the waterfall house. Pull back the green cloth on the far wall and take horse figurine 2 of 2.
- At the bridge, put both horses on the chest in front of the bridge. Take shell 1 of 3 and the wire cutters.
- Back in the waterfall house, cut the chain on the metal cupboard on the right with the wire cutters. Take the fishing rod and the green stone symbol.
The settlement totem
The carved totem in the middle of the Settlement opens with the green stone symbol.
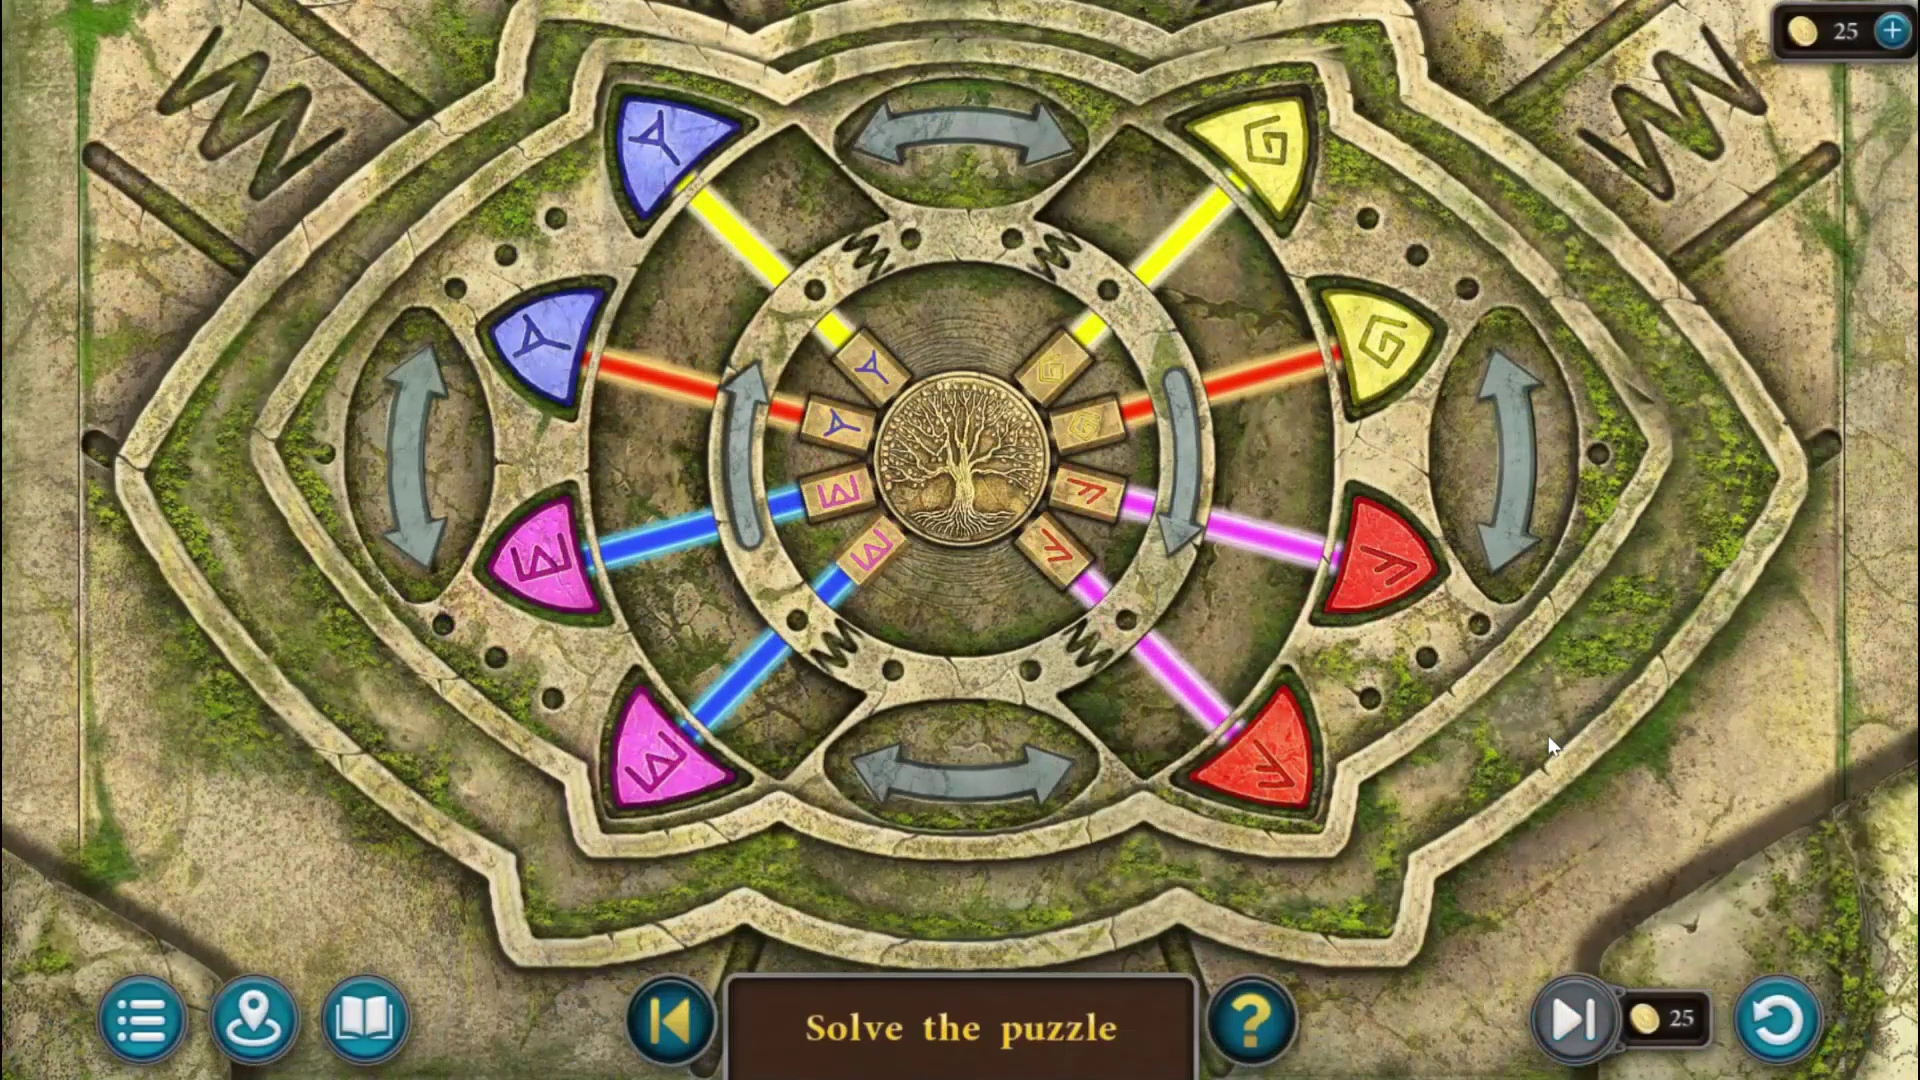
- Place the stone symbol on the totem. Eight coloured stones sit around the edge in pairs: blue at the upper left, yellow at the upper right, red at the lower right and pink at the lower left. A coloured line runs from each stone to a rune tile beside the centre. The controls move the lines; the stones and rune tiles stay put. The double arrow at the top swaps the two top lines, and the double arrow on the right swaps the two right-hand lines. The two curved arrows on the ring beside the centre each move four alternate lines one step clockwise, to the next-but-one position: the left curved arrow moves the lines at the top-right stone, the lower stone on the right, the bottom-left stone and the upper stone on the left; the right curved arrow moves the other four. Give every line the colour of its own stone, so each runs in one colour to the matching rune tile (see the picture). From the starting board in the recording, four presses solve it: left curved arrow, top double arrow, right curved arrow, right double arrow. Take the hammer and flowers 1 of 3 from the compartment that opens.
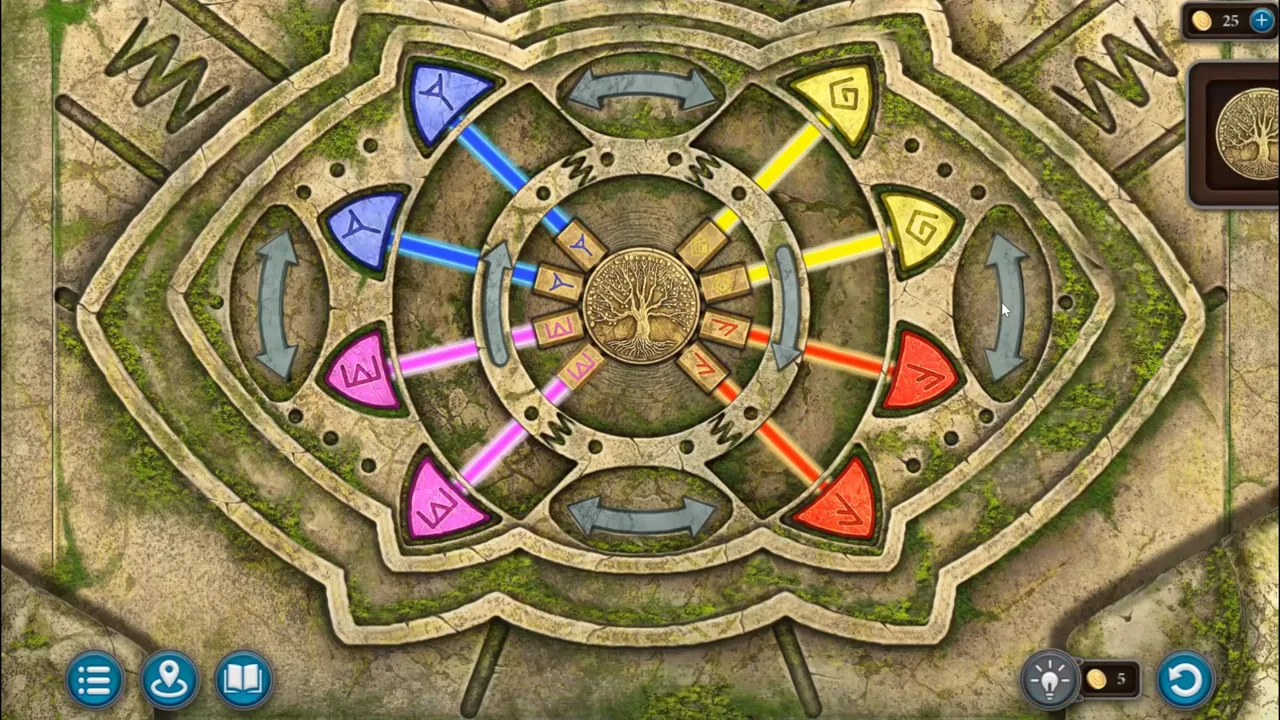
Settlement totem solved: every line matches the colour and rune of its stone.
Boards, nails and the bridge pillar
Collect the second board, the nails and a second stone symbol, then repair the bridge.
- At the beach, use the hammer on the side of the broken boat to pull out the nails.
- At the waterfall, check the mossy rock wall between the house and the waterfall and take the steering wheel part from the vines.
- Inside the house, pull the red cover off the crate on the floor, break the crate with the hammer and take the crab trap and the matches.
- Light the candle at the top of the stairs on the right with the matches, look down the stairs and take board 2 of 2.
- Cut open the leather bag hanging on the wall with the knife and take quartz 1 of 5.
- At the bridge, tap the dark hole in the rocks below the path (it was covered by leaves). Light it with the matches and take quartz 2 of 5 and wrapped stone 1 of 2.
- At the waterfall, break the ice block in the stream with the hammer and take the purple stone symbol.
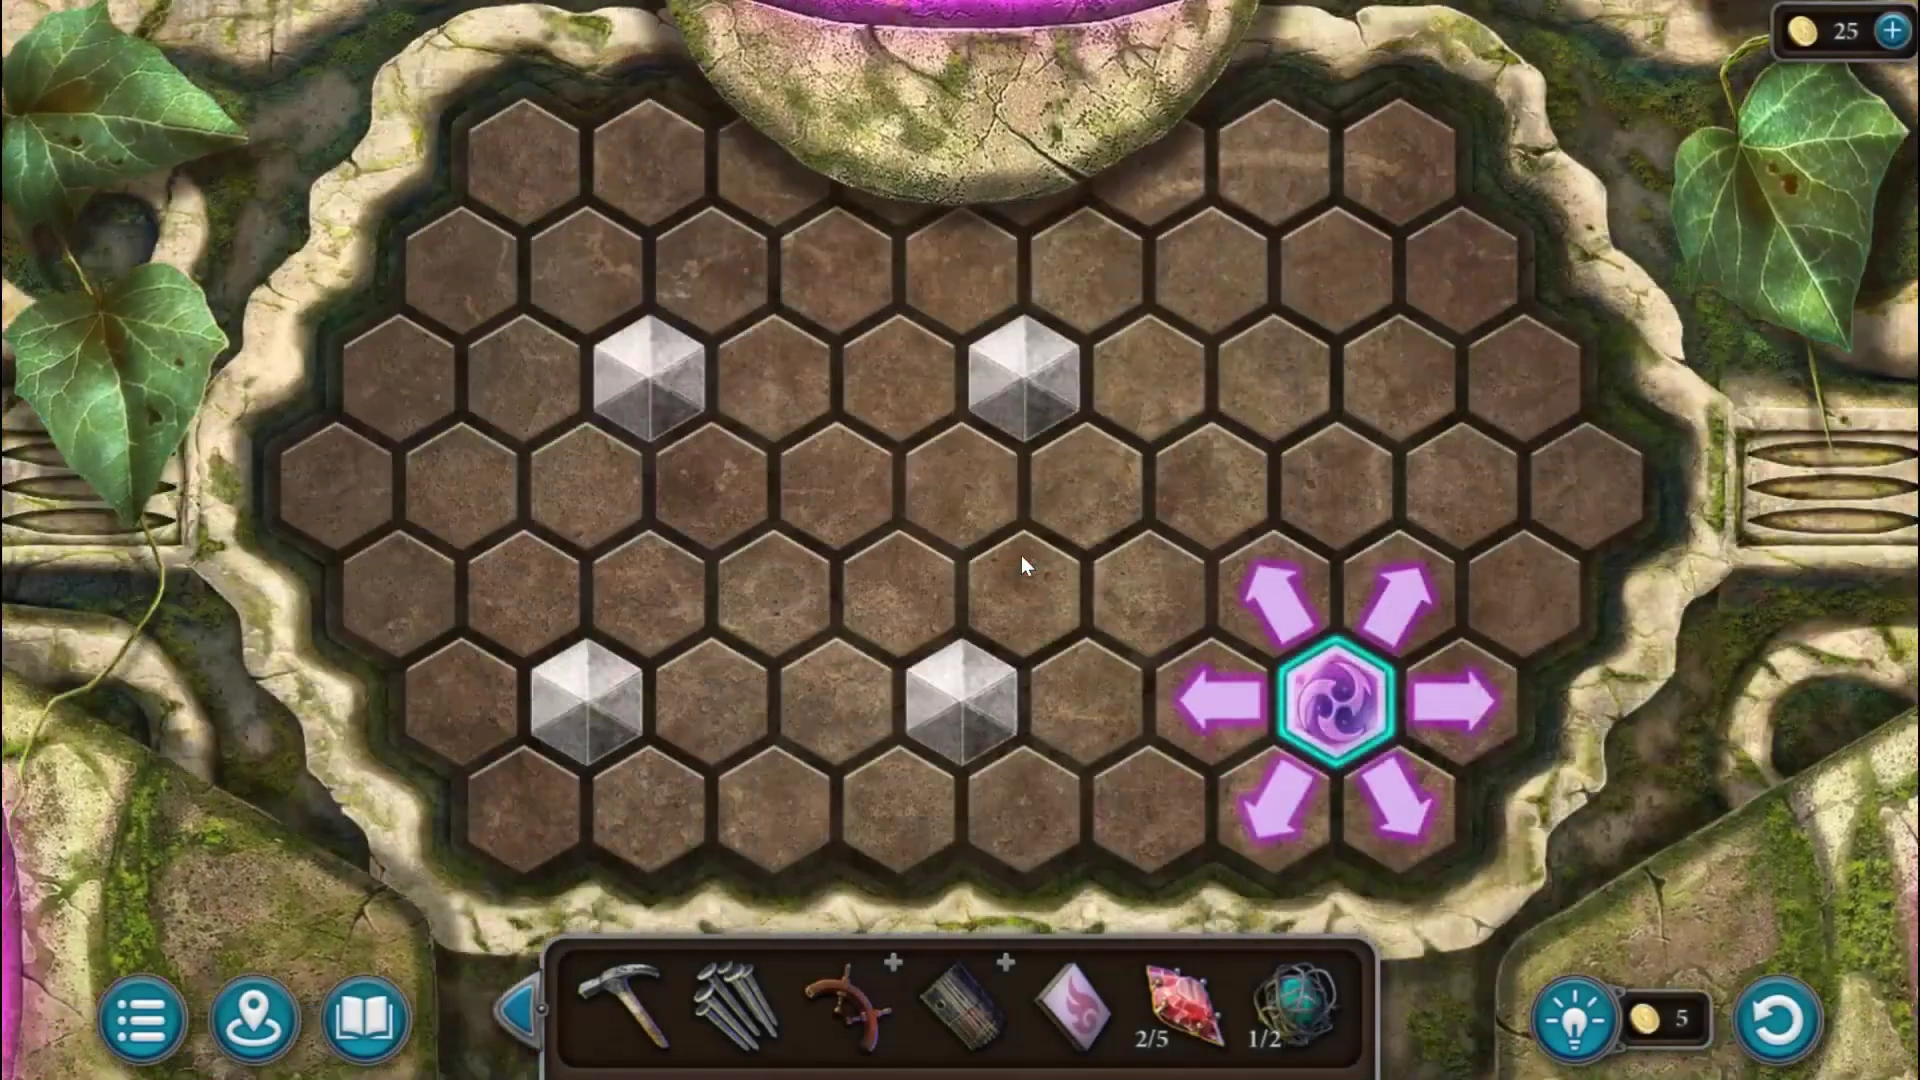
Bridge pillar - puzzle overview. - Place the purple symbol on the stone pillar at the start of the bridge. The starting layout can differ, so use the blocks and starting tile on your own board. Tap the glowing tile to show its six direction arrows. An arrow sends it straight until the edge, a grey block or a previously filled cell stops it; every brown cell crossed becomes purple. Fill all the brown cells without trapping the tile. Before each move, trace where it will stop and check which unfilled cells you can reach from there. Clear narrow pockets while their entrances are still open, and use grey blocks and the ends of filled lines as stopping points for the next turn. Avoid cutting off a patch of brown cells behind a filled line. If no arrow reaches the remaining cells, use the restart button and change the earlier turn that closed off that area. The picture shows one completed example; your grey blocks may be elsewhere.
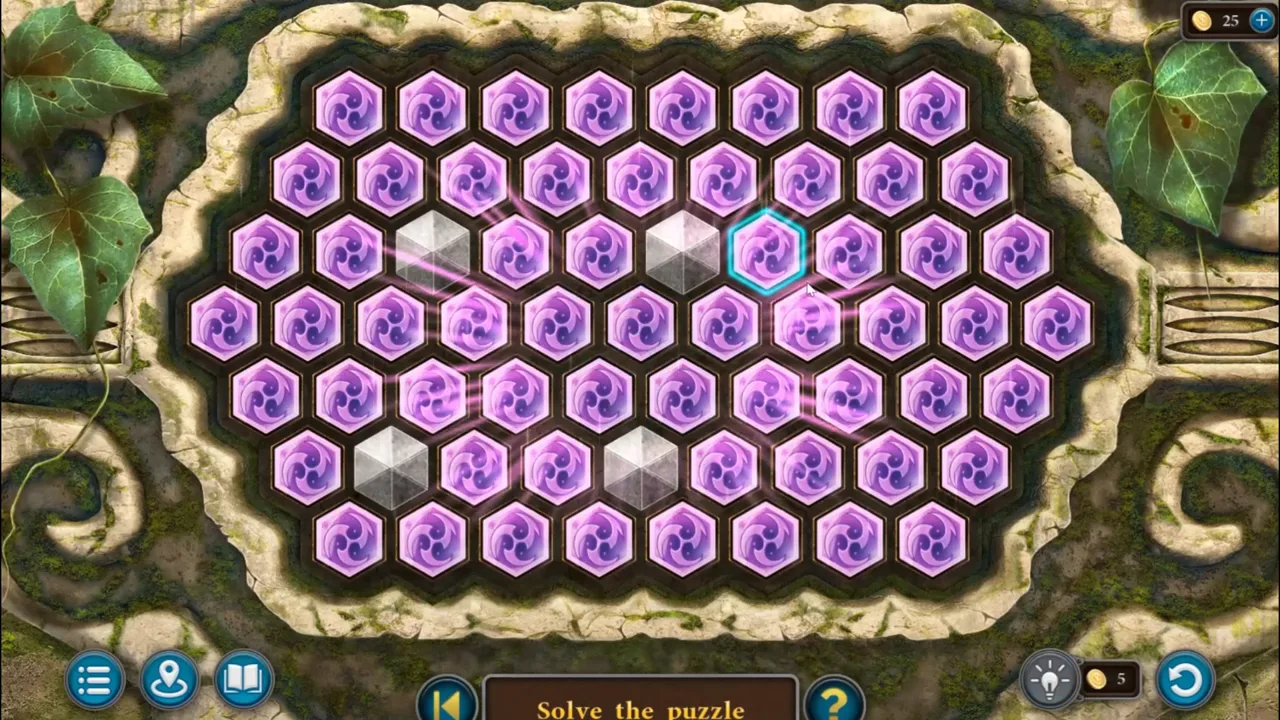
Example completed bridge pillar; the grey blocks may differ in your game. - Take shell 2 of 3 and flowers 2 of 3 from the pillar.
- Tap the gap in the bridge. Lay both boards across it, then fix them with the nails and the hammer.
Skimroot's recipe
Across the bridge is a pond in the Magical Forest. Drevolets, an old tree creature, is asleep at its edge.
- Talk to Skimroot by the pond. He explains that Drevolets is asleep and gives you a potion recipe: loamcap mushroom, egg, blueberries and purple moss. The task changes to "Wake Drevolets Up".
- Open the stone table at the near edge of the pond and take shell 3 of 3. The table itself needs a leaf, which you will find later.
- Open the purple bush on the right of the pond. Burn the dry grass with the matches to scare the snake away, then take the second steering wheel part and cut some purple moss with the knife. Combine both wheel parts in the inventory to make the steering wheel.
- At the beach, fit the steering wheel to the hatch on the broken boat. Open it and take the Historical Manuscript (2 of 4 in this chapter), the magnet and the key.
The shell statue and the beach cave
A stone statue on the beach has three shell-shaped hollows.
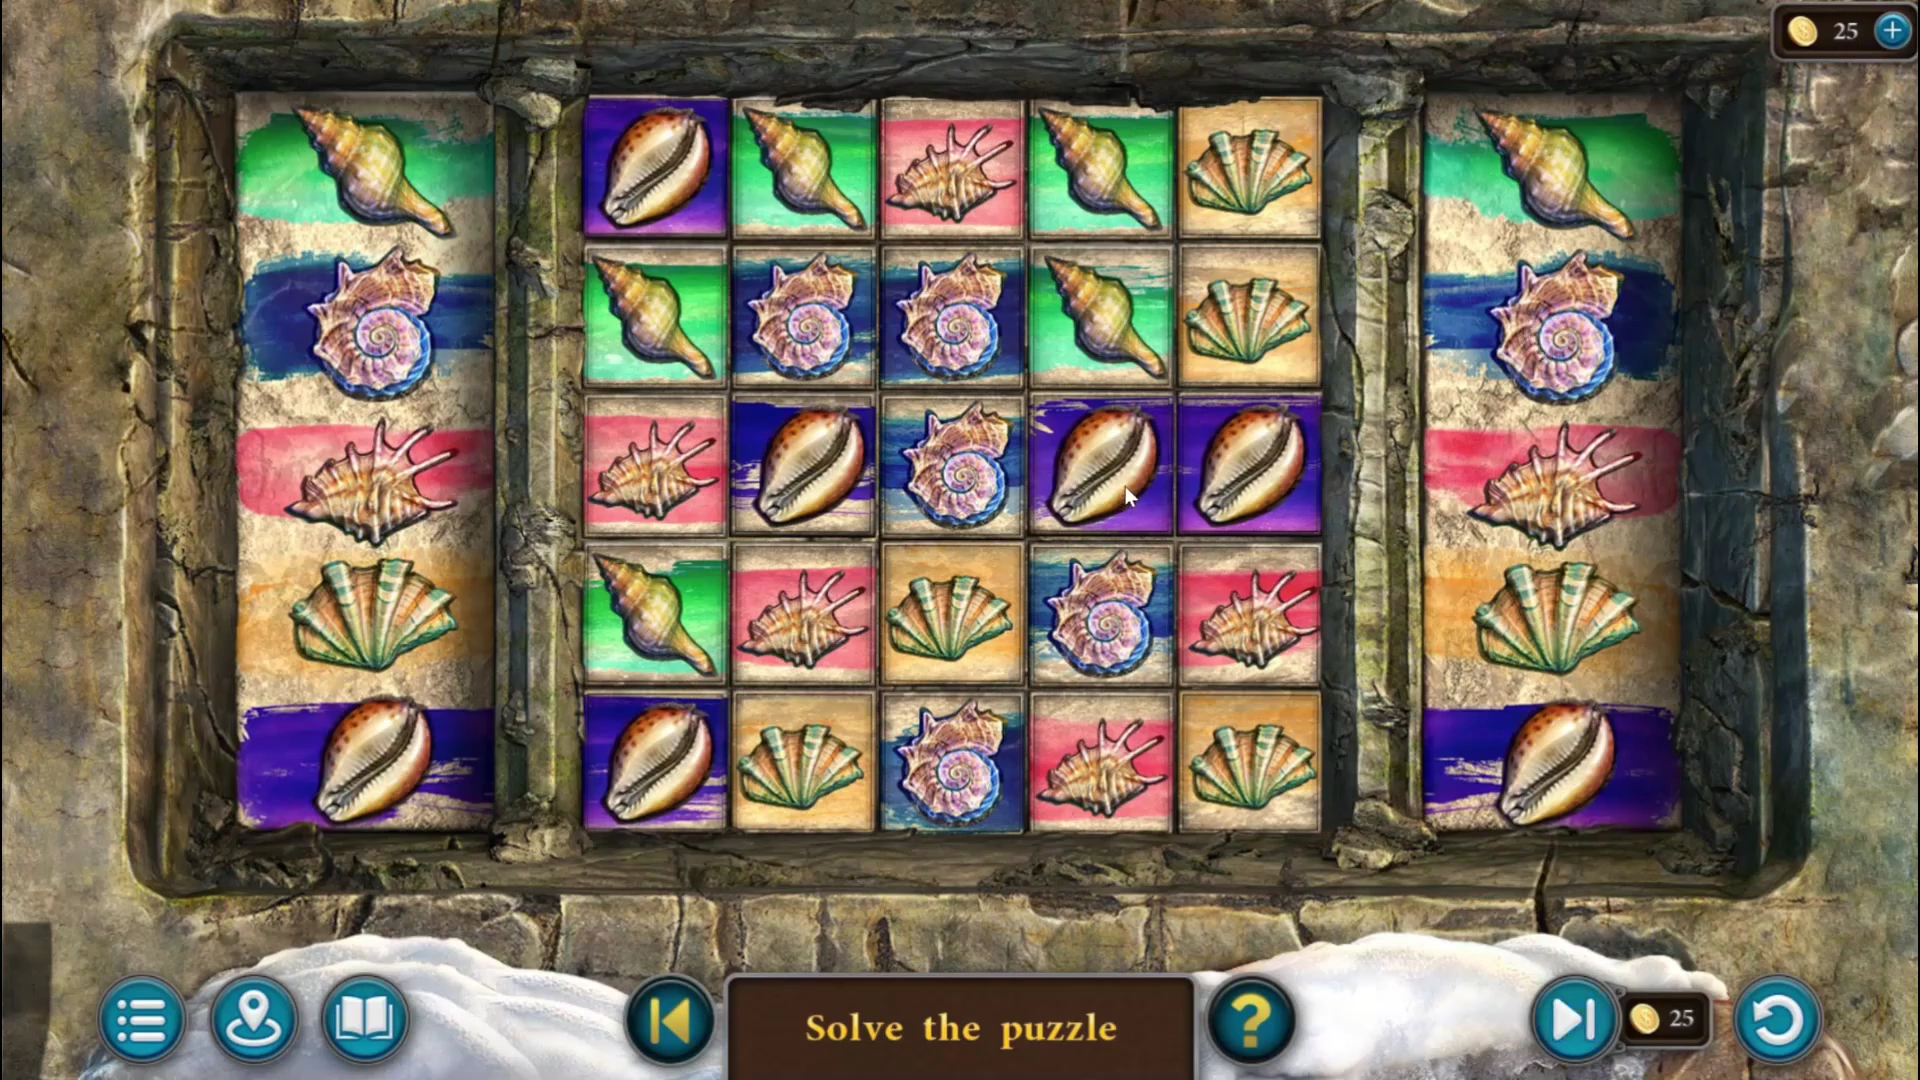
- At the beach, place the three shells in the hollows of the statue. A grid of shells appears between two fixed columns. Slide the movable columns up and down until each row contains only the kind of shell shown at both of its ends (see the picture). The statue moves aside and opens a cave.
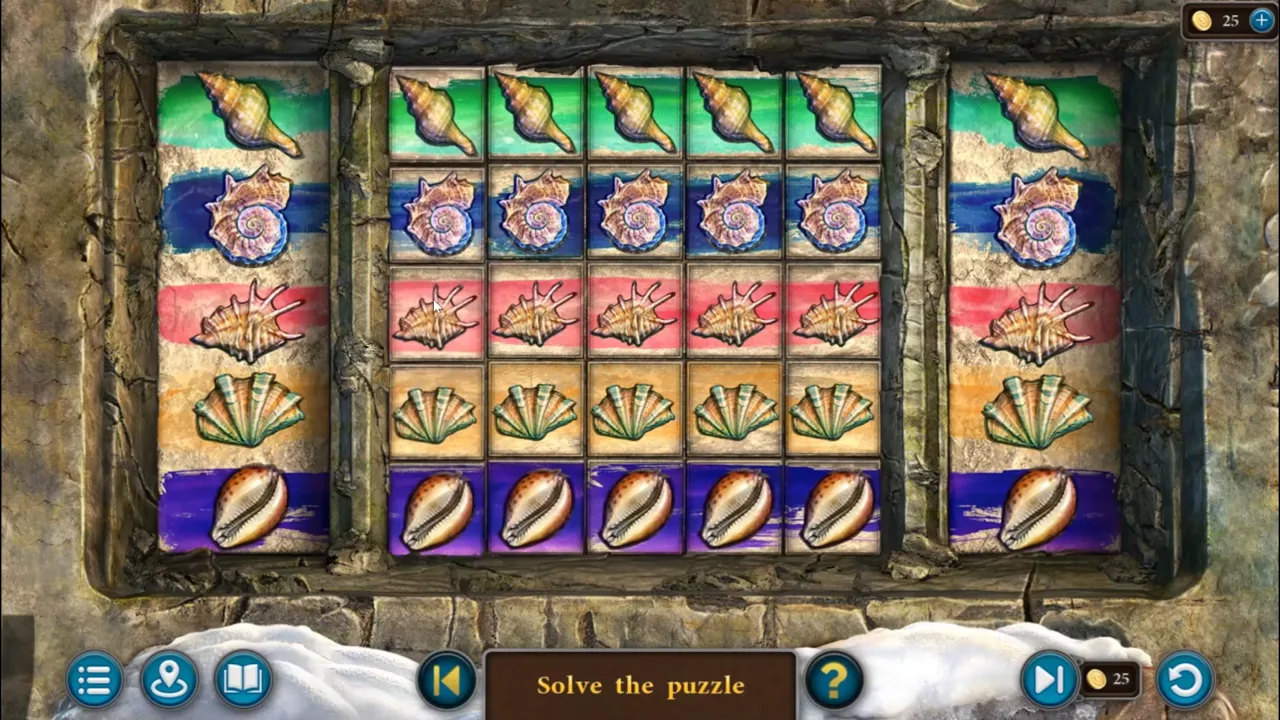
Shell statue solved: every row matches the shells at its two ends. - Enter the cave and find the 16 items shown in the list at the bottom of the screen. When the list is complete, the pike pole is added to your inventory.
- Back on the beach, use the pike pole on the nest on the cliff ledge on the left and take an egg.
The dragon skull and the tree house
From the pond, follow the forest path to the clearing with a huge dragon skull. A small tree house sits under the big tree on the right.
- In the dragon skull clearing, break the skull's fangs with the hammer and take the leaf and wrapped stone 2 of 2.
- Enter the tree house. Cut the orange loamcap mushrooms growing on the posts with the knife.
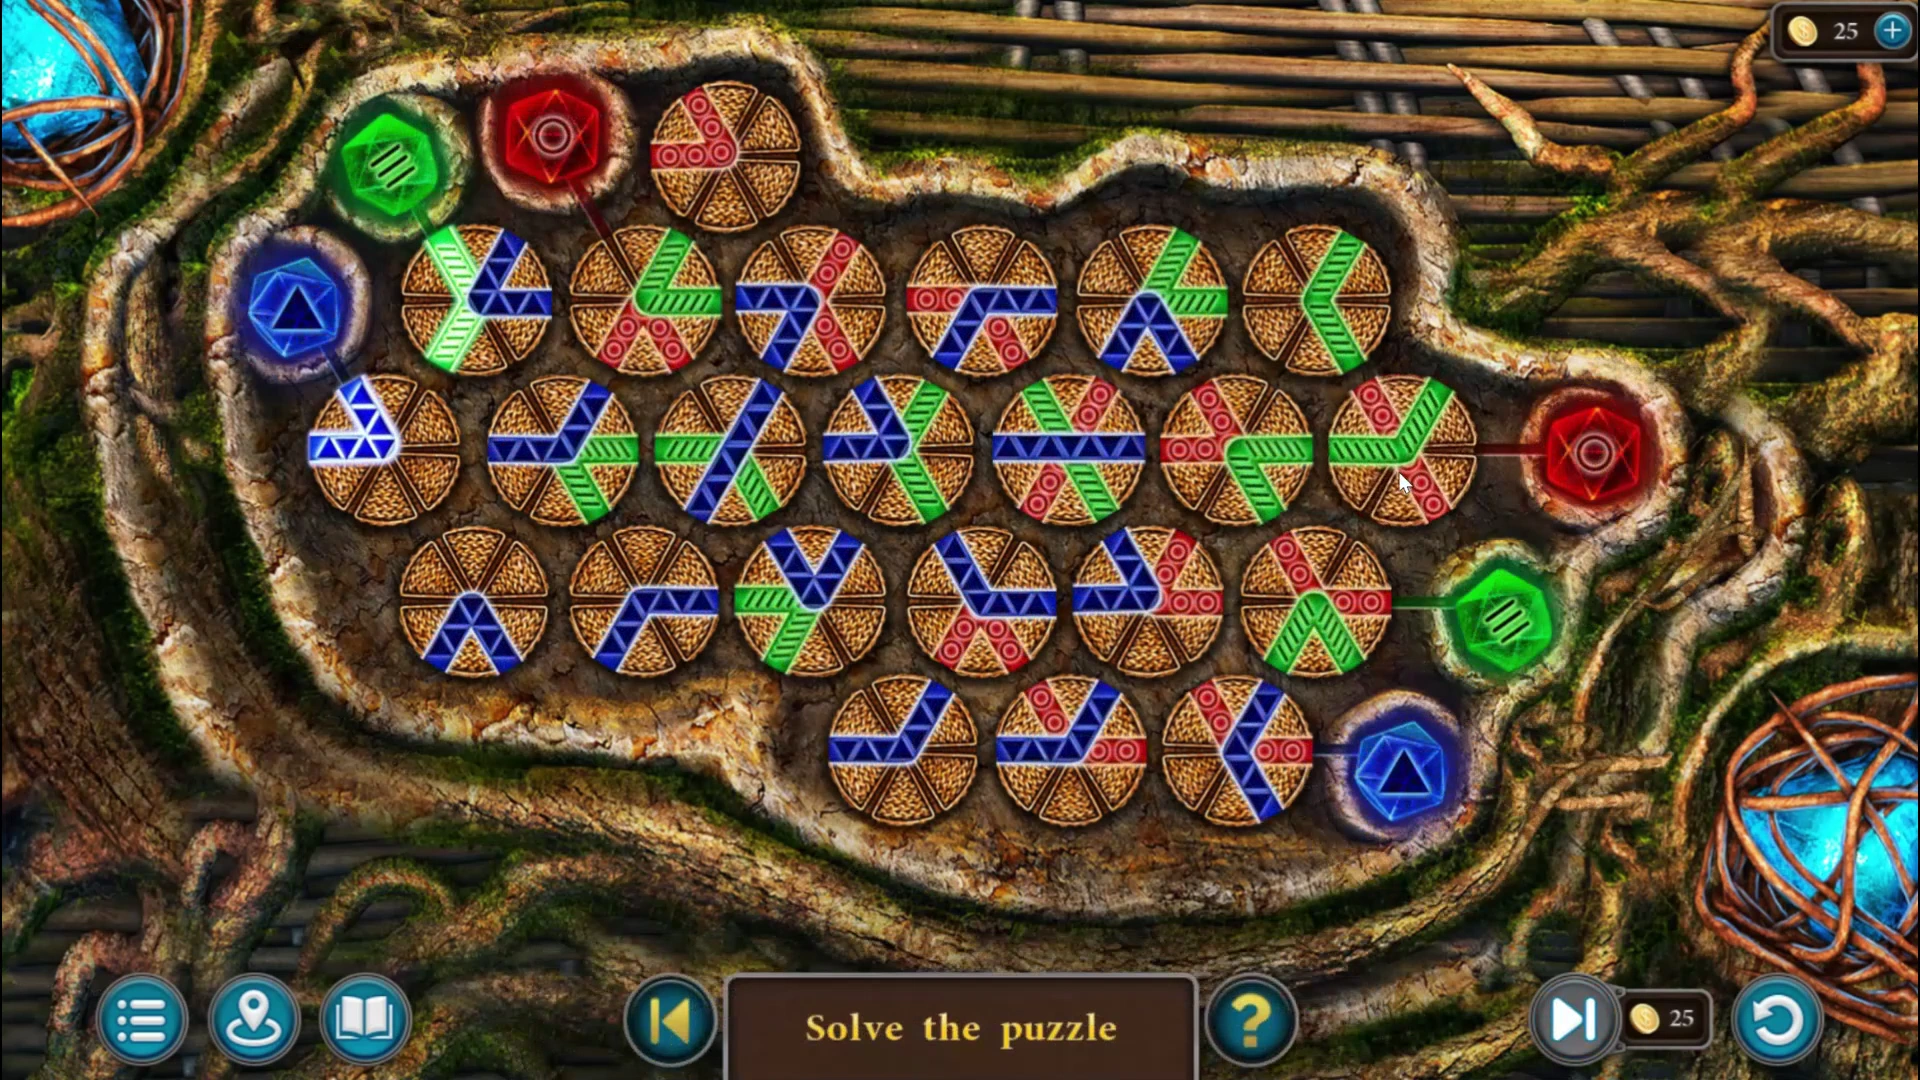
Tree house basket - puzzle overview. - Open the basket by the hammock and put both wrapped stones in it. Tap a round tile to turn it. Turn the tiles until each colour forms one unbroken line between its two matching crystals on the rim: blue, green and red (see the picture). Take quartz 3 of 5 and the glove.
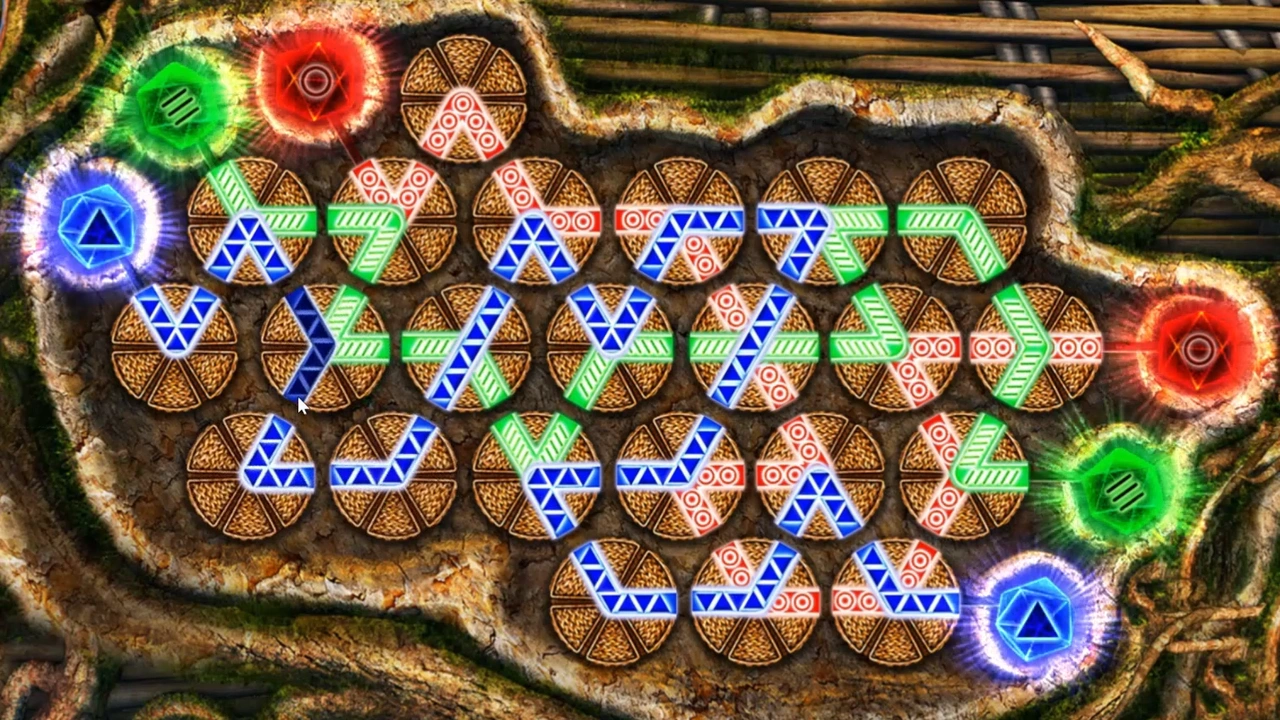
Tree house basket solved: each colour joins its two crystals. - Back in the clearing, shoot the slingshot at the branch tied with red ribbons and take the rabbit figure that falls.
- In the tree house, put the rabbit on the wall clock on the right. It opens; take the gear.
- Back in the clearing, use the glove to move the stinging lilac ivy and take the garden scissors from underneath.
The bee puzzle and the pond totem
The stone table by the pond takes the leaf from the dragon skull.
- Put the leaf on the stone table by the pond. Guide the bee along the lattice to the flower. Each arrow moves the bee one square, and it can only move where the lattice continues. The two curved buttons turn the lattice with the bee on it; the rocks and the flower stay where they are. The left-hand button turns the lattice clockwise and the right-hand button turns it anticlockwise. From the starting position, press: down, right-hand button, up, up, left-hand button, down, left-hand button, left-hand button, right, right-hand button, left, down, left-hand button, left-hand button, up, up. Stepping stones rise out of the pond.
- Cross the stepping stones to the small totem in the pond. Open it and take quartz 4 of 5 and the fish.
- Historical Manuscript (3 of 4 in this chapter): it lies on the stone in the middle of the pond, reachable once the stepping stones have risen. The recording collected it on a final sweep; you can take it now.
Ingredients and the potion for Drevolets
Collect the blueberries, then cook the potion at the Settlement fire pit.
- In the waterfall house, use the pike pole to pull down the ladder to the loft. Open the chest there with the fish and take the shovel and symbol 1 of 2.
- Open the round tin on the shelf with the key from the boat and take the crab bait. Put the bait into the crab trap in your inventory.
- At the beach, put the baited trap among the rocks and take the crab you catch.
- Give the crab to the ferret hiding in the hollow log at the bottom of the beach rocks. Take the brush and the blueberries it leaves.
- At the waterfall, clean the mossy rock wall with the brush. A ring of round symbols appears; remember it (it is needed at the altar).
- Open the recipe and add the loamcap mushrooms, egg, blueberries and purple moss. In the Settlement, light the fire pit with the matches and add the ingredients to the pot to cook the potion.
- Pour the potion over Drevolets by the pond. He wakes and tells Lucia about the Ancients' two artifacts, the Gmuri catacombs and a tribute at the waterfall altar. He gives her a key. The new task is "Unseal the Gate".
The waterfall altar
The tribute to the ancestors opens the way to the catacomb door behind the waterfall.
- In the tree house, dig the mound of dirt with the shovel and open the chest with Drevolets' key. Read the note "A Tribute to Ancestors" and take the jade dust and quartz 5 of 5.
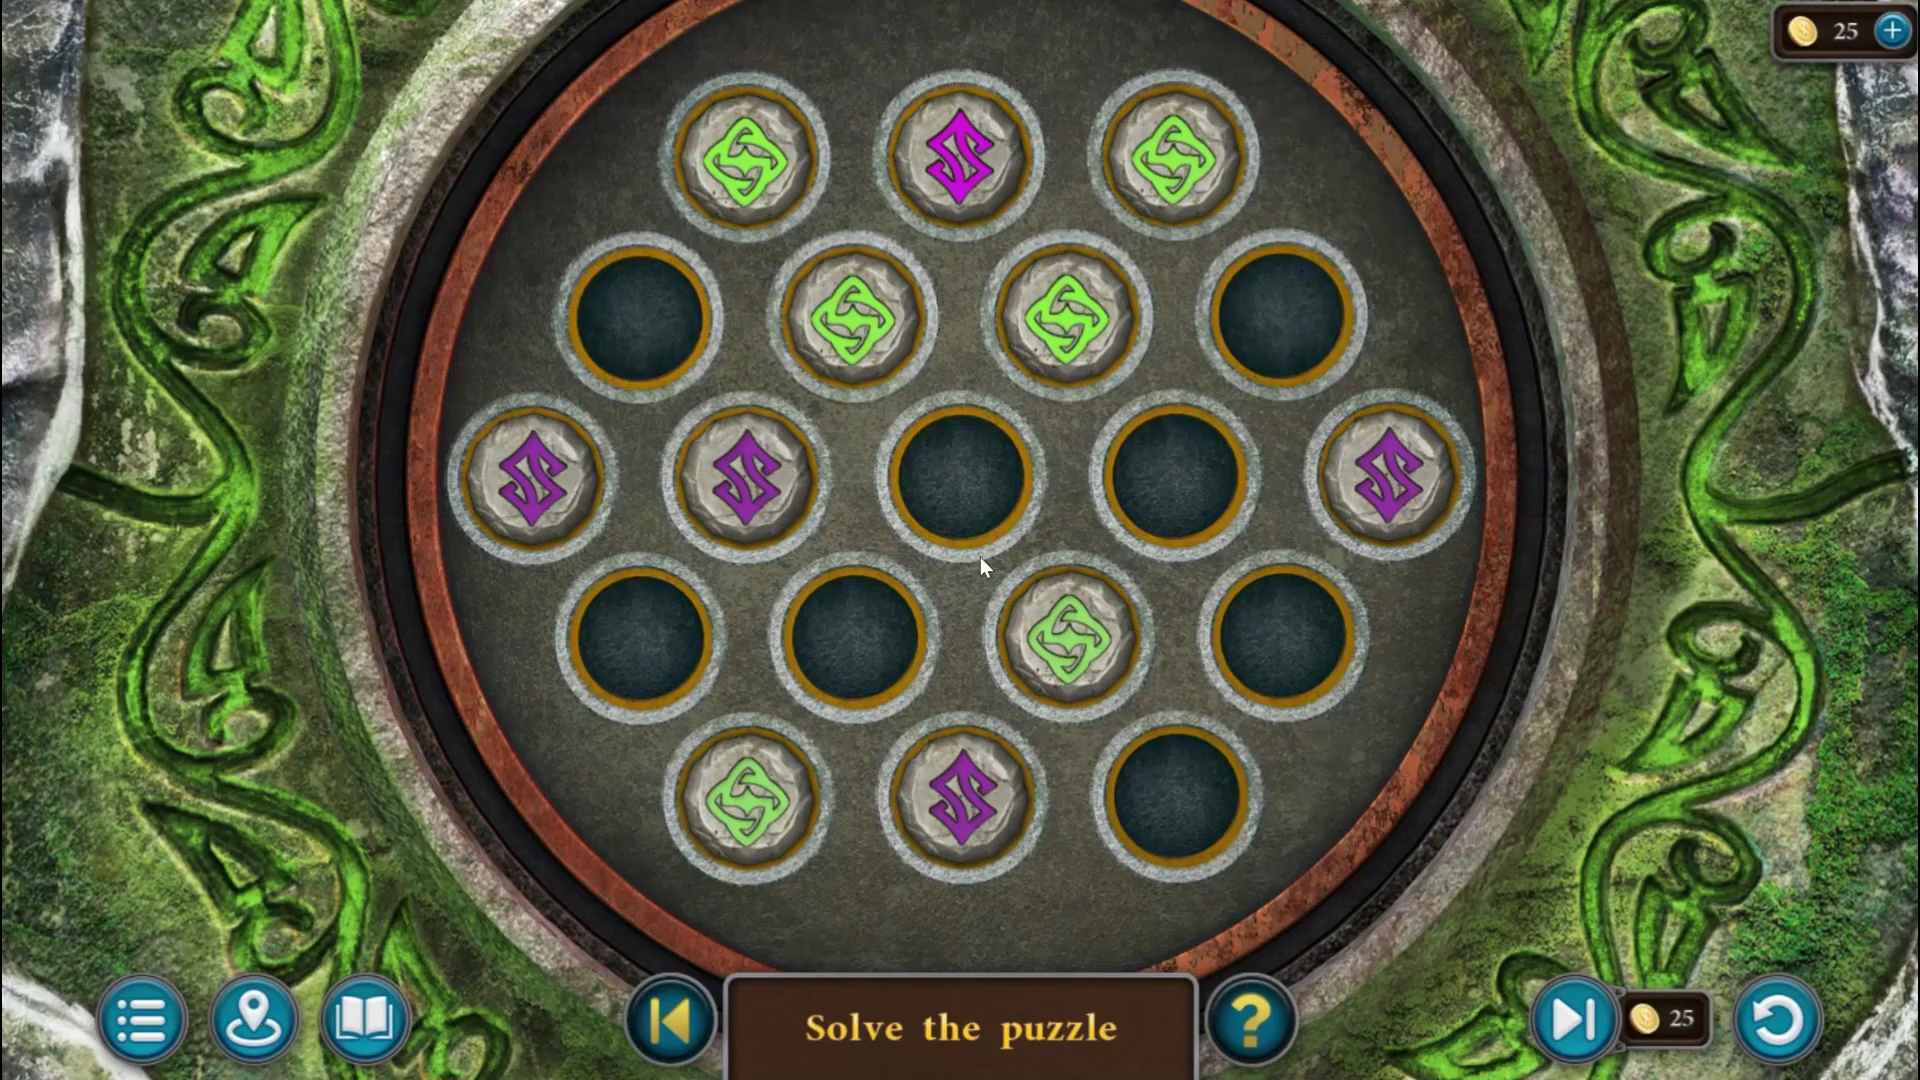
Waterfall altar - puzzle overview. - At the waterfall, open the stone altar in the water. Pour jade dust into both bowls and light them with the matches. The round board has 19 holes holding green and purple symbol tokens, and the tokens cannot be placed freely. Tapping a hole that has six holes around it turns those six holes one step clockwise, carrying their tokens and gaps with them; the tapped hole itself does not change. Make the board match the pattern from the mossy wall, with tokens and empty holes in the same places (see the picture). Build the pattern a few holes at a time. Once part of the board matches, tap holes whose rings stay clear of it, and use a hole next to an unfinished area to cycle a token into a gap. Six taps on the same hole return its ring to where it started, so five more taps undo a wrong one. A hidden path opens to the catacomb door and the task becomes "Get Inside the Mountain".
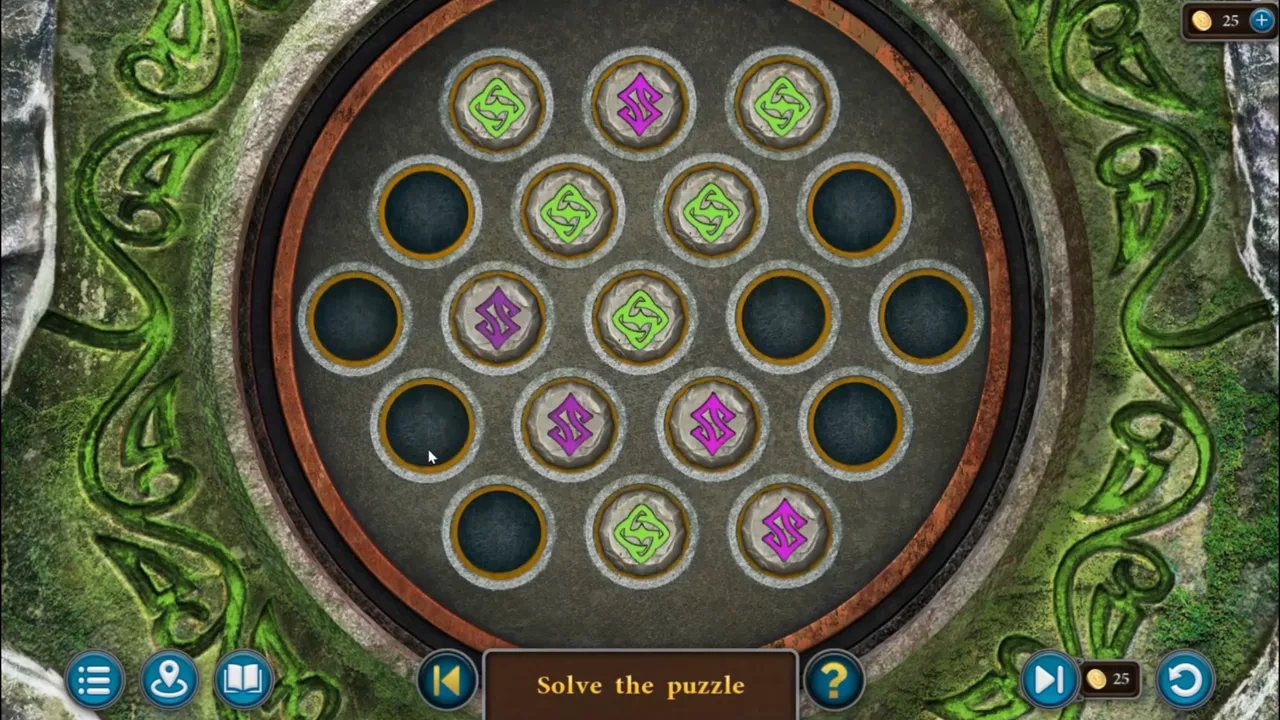
Waterfall altar solved: the tokens copy the pattern from the mossy wall.