The Mansion: jars, fingers and the ghost room
Choose the Mansion. You arrive in a kitchen with a stove and a board game on a low table. To the right are a hallway, then a room with a fortune-teller machine and a little girl playing with stones, then a crystal room with a giant crystal. The double door on the left of the kitchen leads to the ghost room once you have its key.
- Read the letter in the envelope on the small round table at the front left of the kitchen: the witch is looking for her cat, the exorcist chases the ghost, and only the dragon's arrival lets them succeed. It is the clue for the board game.
- Look behind the red curtain to the right of the kitchen window and take the screwdriver handle from the floor.
- Go right into the hallway. Hidden shadow 8 of 9: lift the loose floorboard on the right side of the floor.
- Open the bottom drawer of the chest of drawers in the hallway and take the red key.
- Go right into the fortune-teller room. Open the grey cupboard on the right and take the pot.
- Go right into the crystal room and take the empty perfume bottle from the small table at the front left.
- Hidden shadow 9 of 9: look out of the crystal-room window and tap the nearest gravestone.
- In the kitchen, count the items in the four jars on the shelf: 5 eyes, 4 fingers, 7 teeth and 3 ears.
- In the fortune-teller room, open the cabinet with two dial panels marked with an eye, a finger, a tooth and an ear: set eye 5, finger 4, tooth 7, ear 3. Take the pink quartz, the note with fingers and the firework rocket.CODE5-4-7-3
- Unlock the double door on the left of the kitchen with the red key and enter the ghost room.
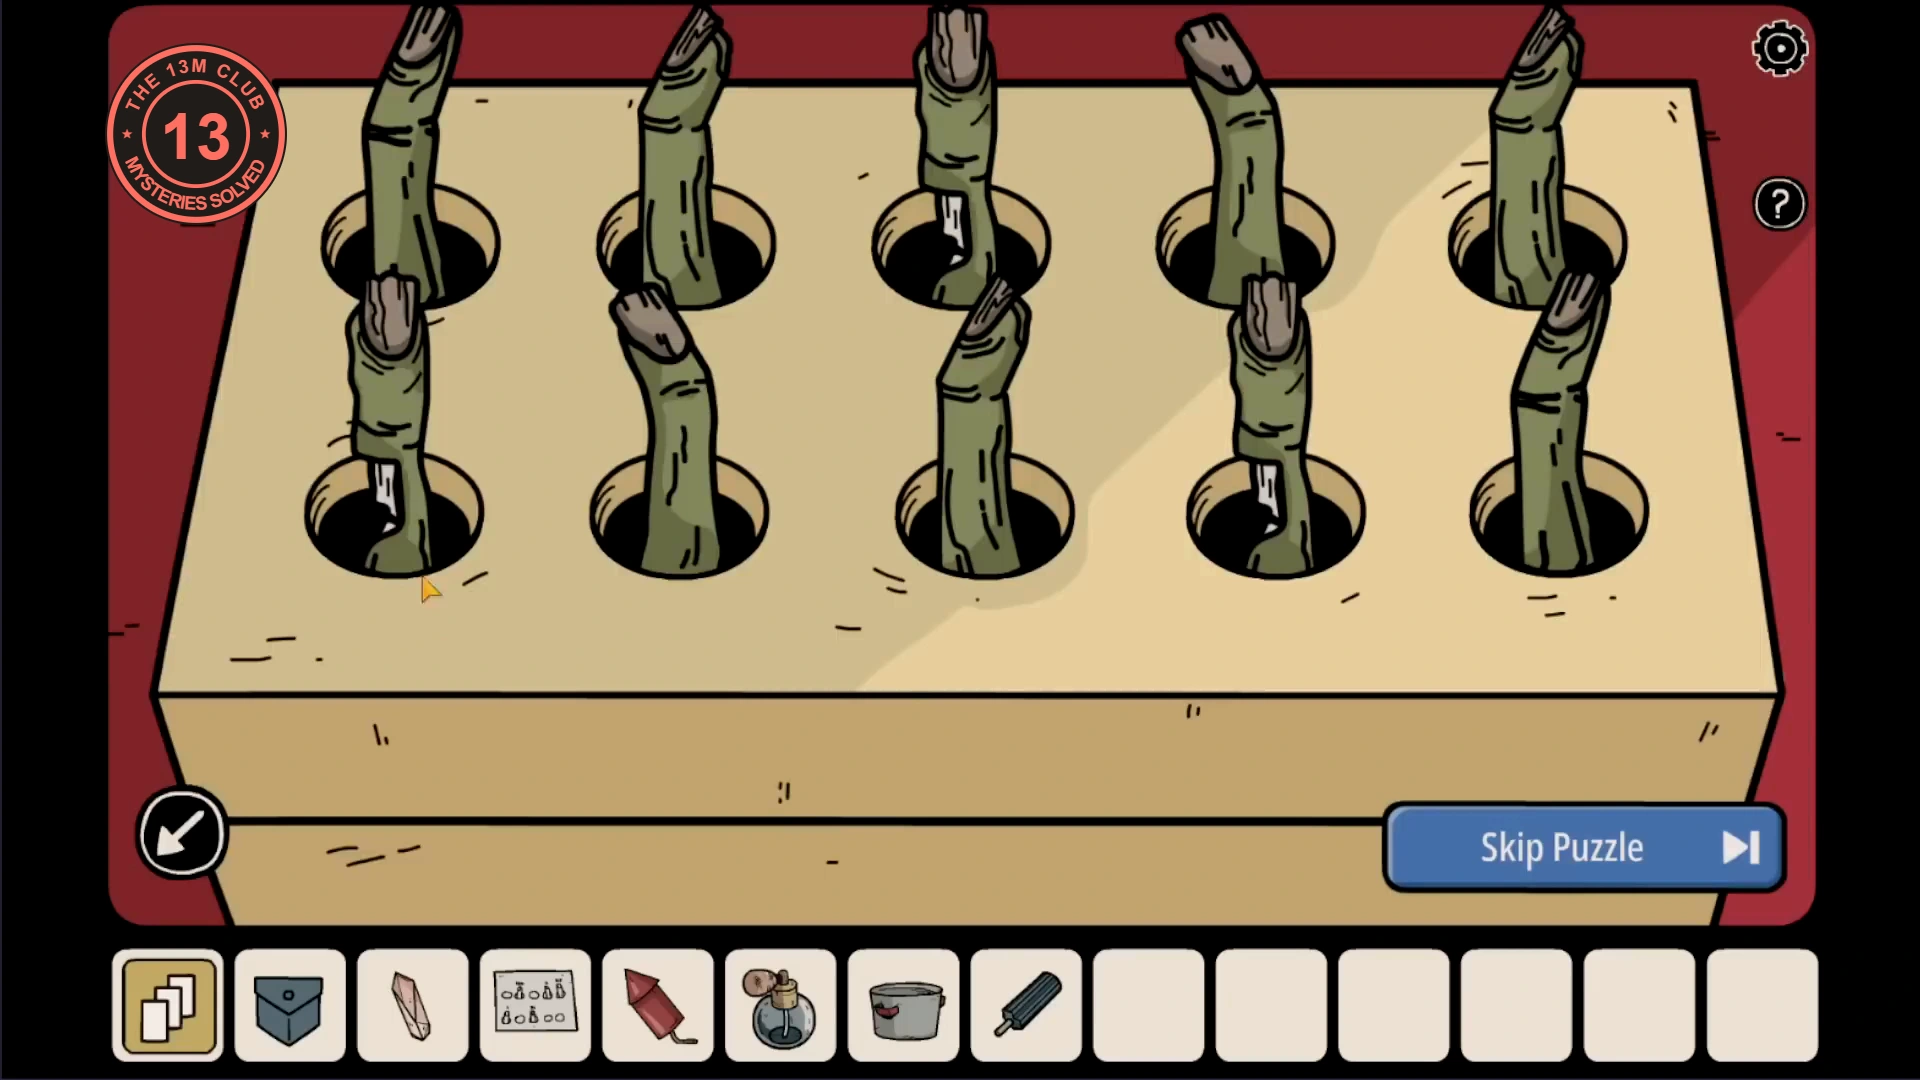
- Read the finger note: its two rows of drawn fingers carry tally marks from 1 to 5. Its top row matches the back row of the finger box on the table and its bottom row the front row. Press the box's fingers in tally order: front row first finger, back row fourth, front row third, back row fifth, back row second; the picture numbers them. A wrong press pops them all back up. Take the small key, the adhesive tape and the screwdriver bit.
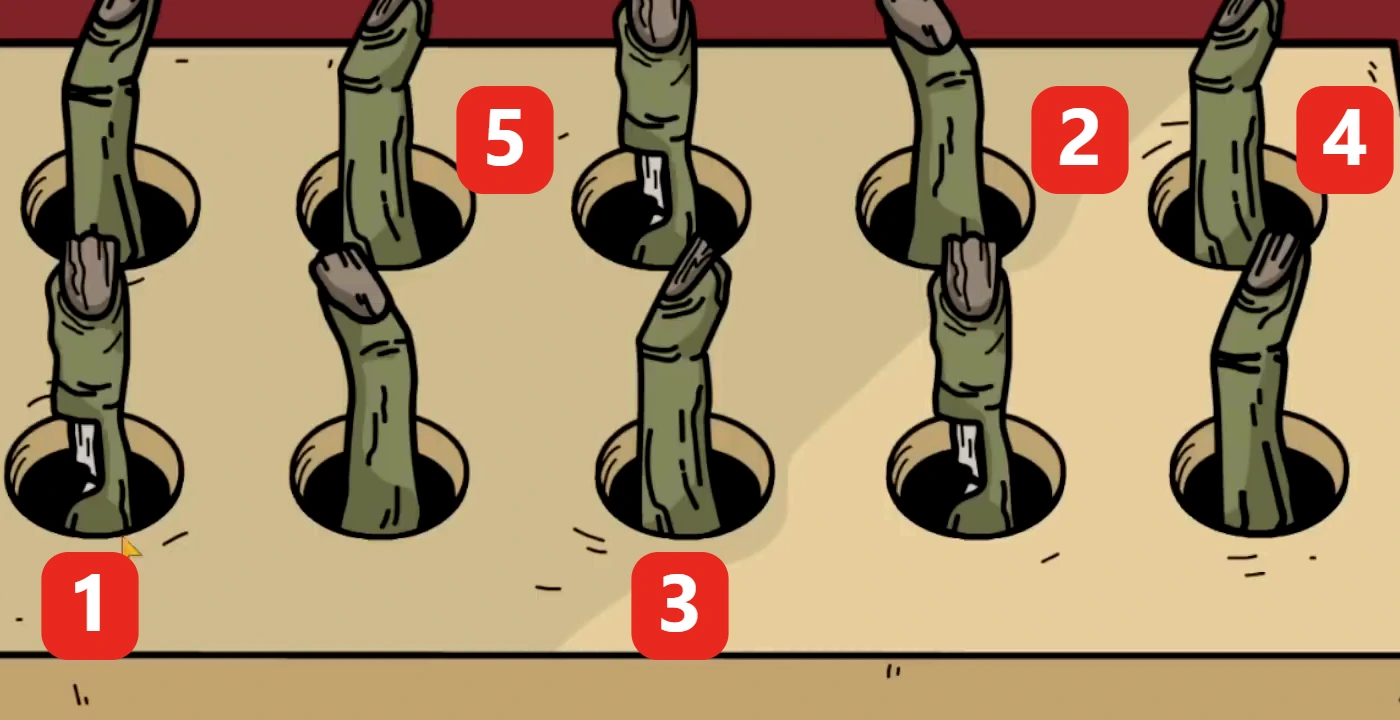
Press the fingers in the numbered order. A wrong press resets them. - In your inventory, combine the screwdriver bit with the handle (the screwdriver is still broken) and stick the adhesive tape onto the firework rocket.
- Look into the boarded-up fireplace on the left of the ghost room and take the voodoo doll behind the boards.
- Lost soul, Sarah: play her mini-game and find seed packet (top shelf, centre), scissors (tool box, right), trowel (in the potted plant, centre left), garden gnome (bottom-right corner, by the hose), butterfly (on the hat, top left), bird figurine (on the pot, centre), toothbrush (tool board, top right), snail (on the bucket, bottom left), ladybird (on the roses, left) and apple (under the table, between the sacks).
The Mansion: mirror, rocket and a phone call
A portrait and a mirror complete a symbol code. The rocket then uncovers a phone number, and the voice on the line gives directions for the picture in the hallway.
- Unlock the frame of the duck portrait on the right wall of the ghost room with the small key and swing it aside. The wall behind shows four half-drawn symbols.
- Look into the mirror on the left wall of the ghost room: its marks and the reflected half-symbols combine into four complete symbols, a plus with dots, a vertical line with dots, a bracket with a dot and a double T.
- In the fortune-teller room, stick the taped rocket on the cracked wall at the top right.
- In the hallway, open the top drawer of the chest of drawers with the four mirror symbols in the same positions (see the picture). Take the matchbox and the oil.
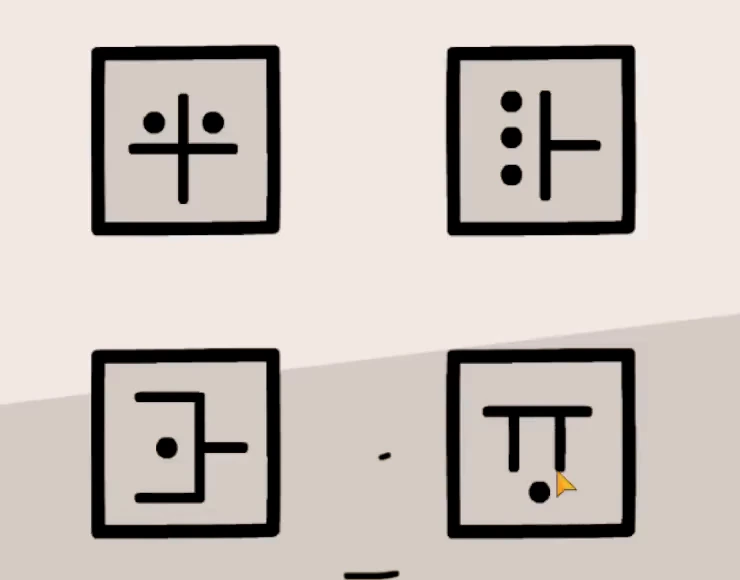
Hallway drawer set to the four symbols completed in the mirror. - In the fortune-teller room, light the rocket with the matches. The blast uncovers a phone number on the wall: 469-2209.
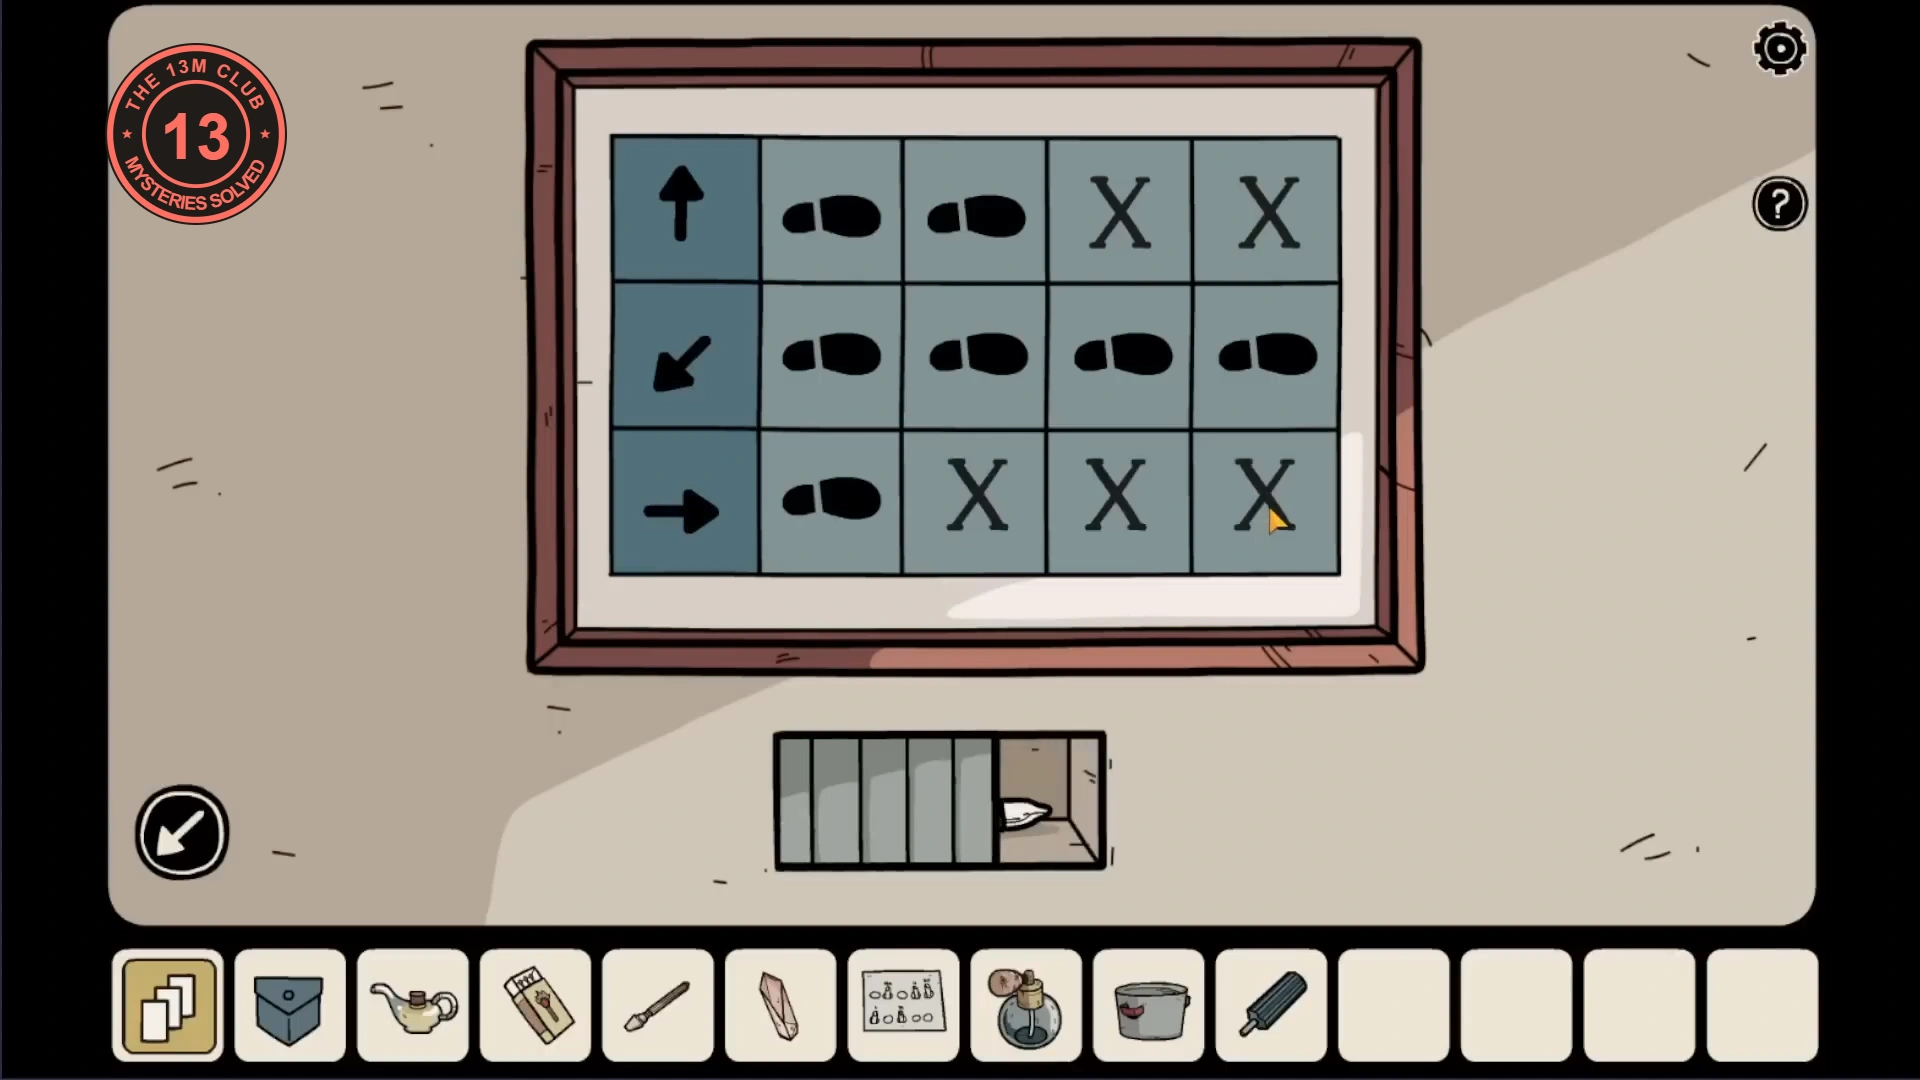
- Lift the receiver of the phone on the hallway wall and dial the number. A voice gives directions: go north two steps, then southwest four steps, then east one step.CODE4692209
- On the framed grid on the left wall of the hallway, tap the arrows in the first column until they point up, down-left and right (top to bottom). Then tap footprints to turn the extra ones into X: keep 2 footprints in the top row and mark the last 2 with X, keep all 4 in the middle row, and keep 1 in the bottom row with the last 3 marked X. A drawer opens: take the extra-strong glue.
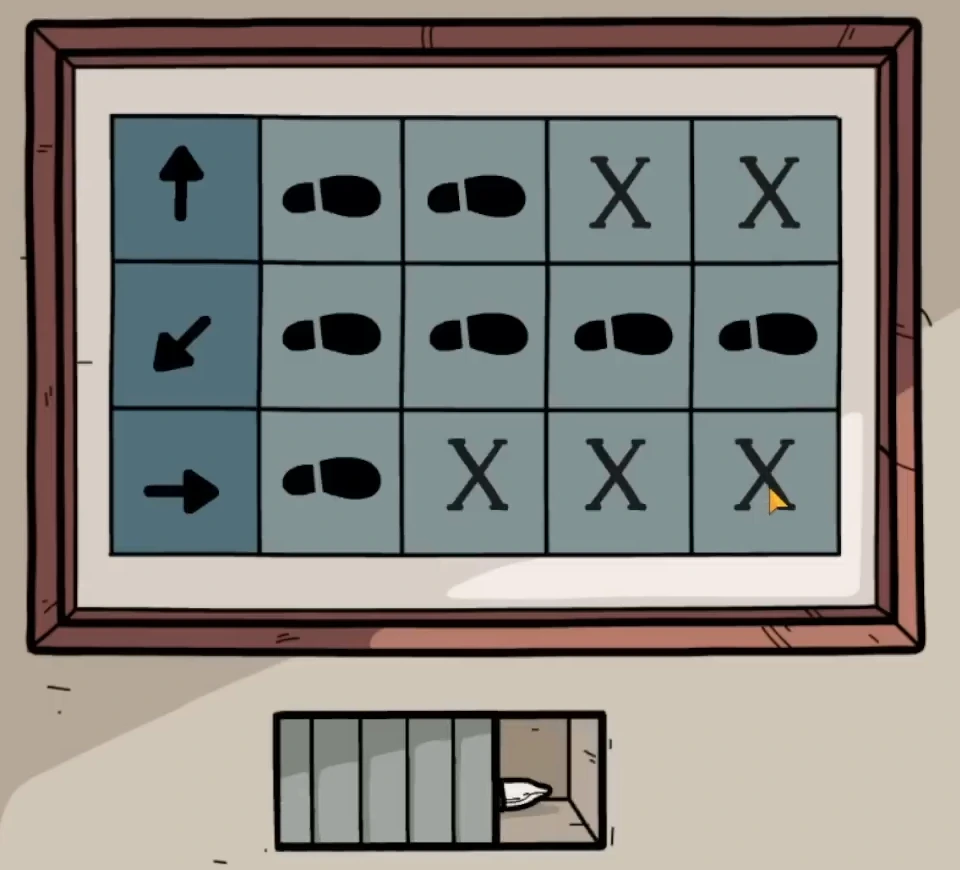
Hallway path picture solved. - Fix the broken screwdriver with the glue.
- Undo the screws of the metal grille low on the right wall of the hallway with the screwdriver. Behind it are a statue's arm and a voodoo doll: take both.
- Lost soul, Isa: play her mini-game and find coin (on the table, left), ballet shoe (on the vase, centre left), flower brooch (on the curtain, right), ballerina doll (reflected in the mirror), hand mirror (in the open drawer, bottom centre), spoon (in the brush cup right of the mirror), beige dripping lump (side table on the left, behind the photo), playing card (under the white cloth, right), red bow (top-left shelf) and treble clef (on the note stuck to the mirror).
The Mansion: statue, three quartzes and the board game
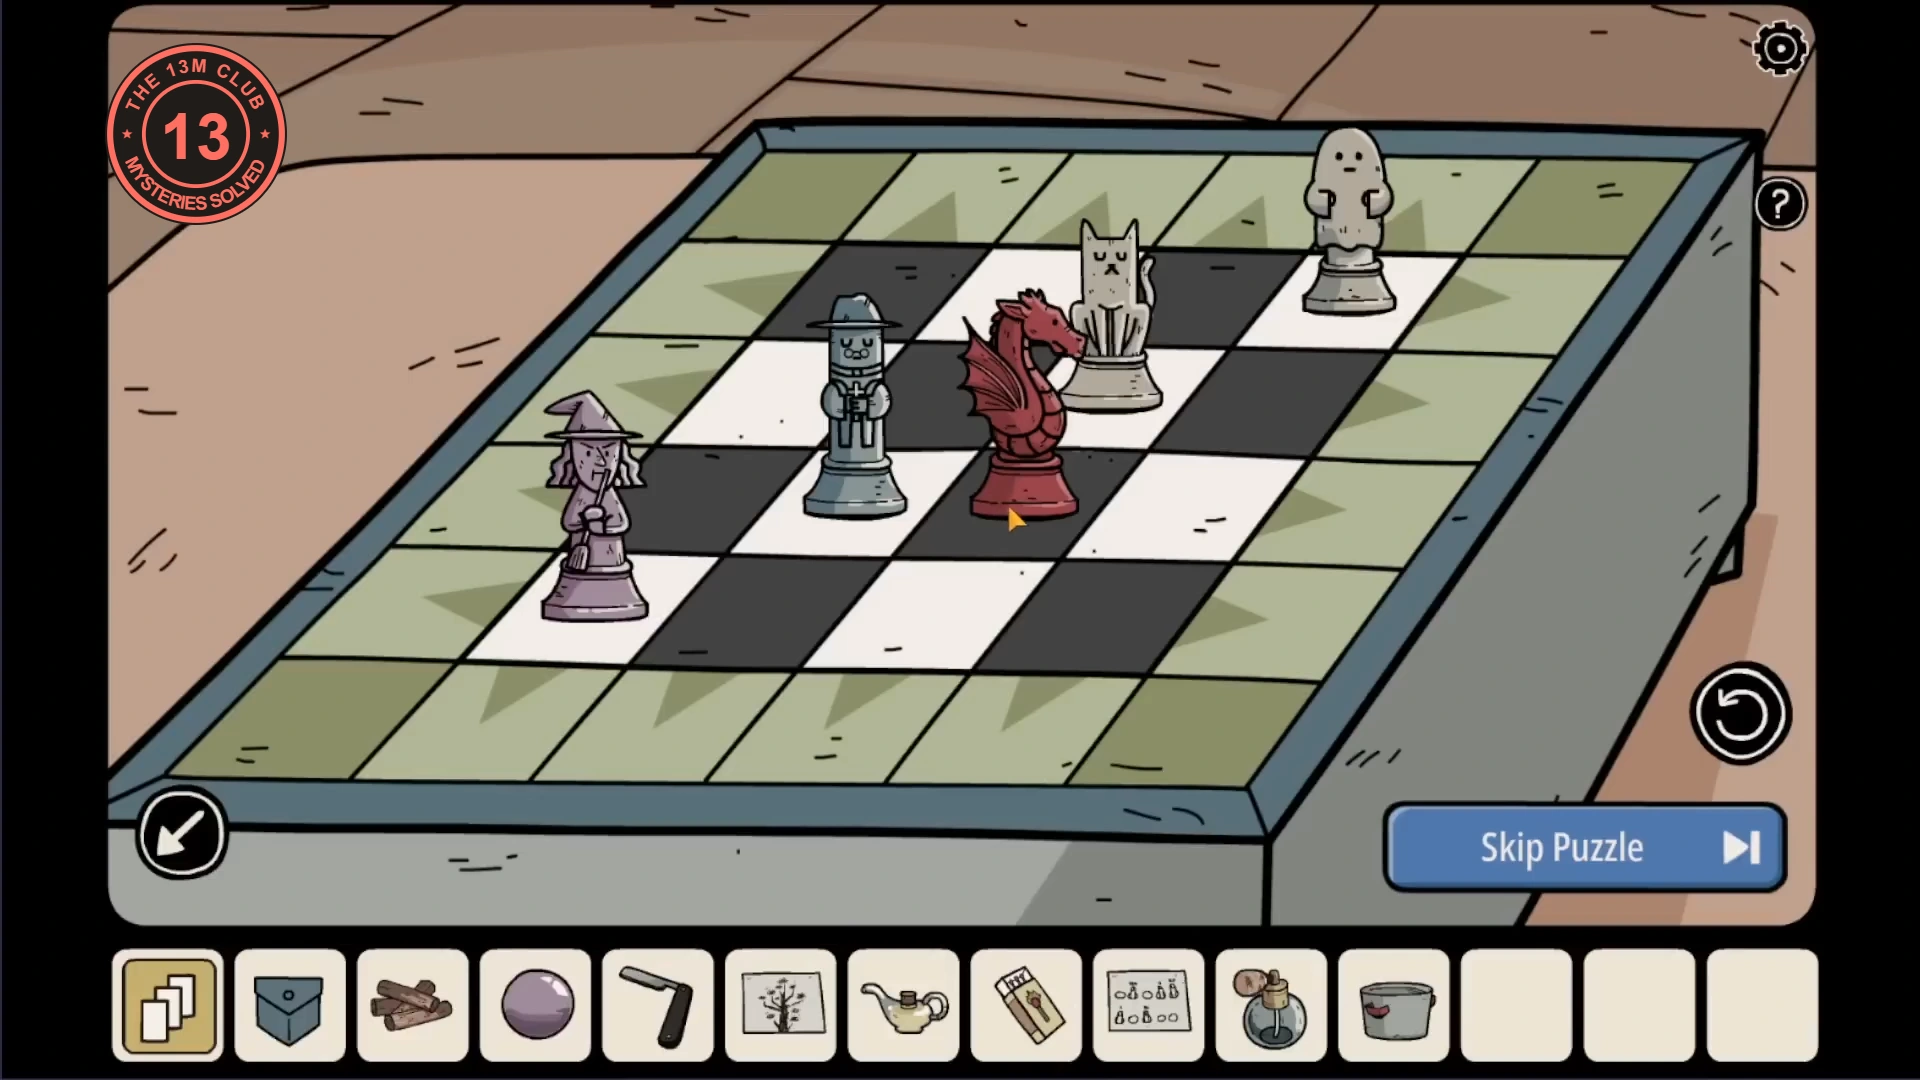
The statue, the eye tree and the girl's stones lead to two more quartzes. Once the crystal is complete, the blue chest gives up the dragon for the board game in the kitchen.
- In the crystal room, attach the arm to the metal statue. Its four hands change gesture when you tap them.
- In the ghost room, look at the four hands drawn on the wall above the blue chest: a pointing finger (top left), an open hand (top right), an OK sign (bottom left) and horns, with the index and little fingers raised (bottom right).
- Set the statue's hands to the same gestures in the same positions. Its chest opens: take the second quartz and the tree note.
- The tree note marks four eyes of the eye tree painted on the crystal-room wall with 1 to 4 tally marks. Tap those eyes in that order (1, the small eye at the upper right; 2, the lower-left eye; 3, the upper-left eye; 4, the lowest eye on the right) and count how often each one blinks: 3, 5, 2 and 4 times (see the picture).
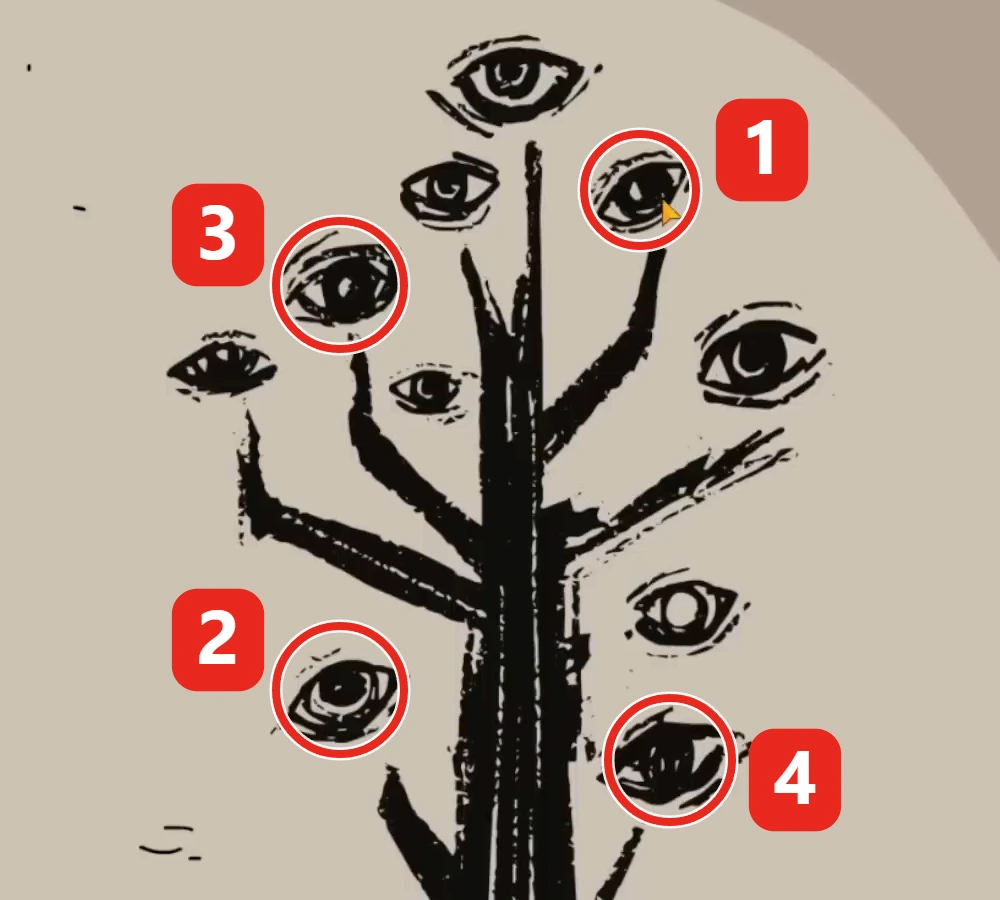
Tap the eyes from 1 to 4. They blink 3, 5, 2 and 4 times. - In the hallway, open the green box at the front left by setting its four tiles to the blink counts. Take the crystal ball and the straight razor.CODE3-5-2-4
- In the crystal room, cut open the plush dog with the razor and take the box of crayons from inside.
- In the fortune-teller room, give the crayons to the girl. She paints her eight rune stones in different colours and gives you the one she couldn't paint: the third quartz. Note which rune has which colour.
- In the crystal room, put the three quartzes into the slots of the stone pedestal. The giant crystal flashes red, green, blue, then yellow.
- Match the flashes to the girl's stones: red is the bow-tie rune, green the F-shaped rune, blue the diamond on a stem and yellow the diamond on crossed legs. In the ghost room, set the blue chest's padlock to those runes in that order (see the picture). Take the firewood and the dragon figurine.
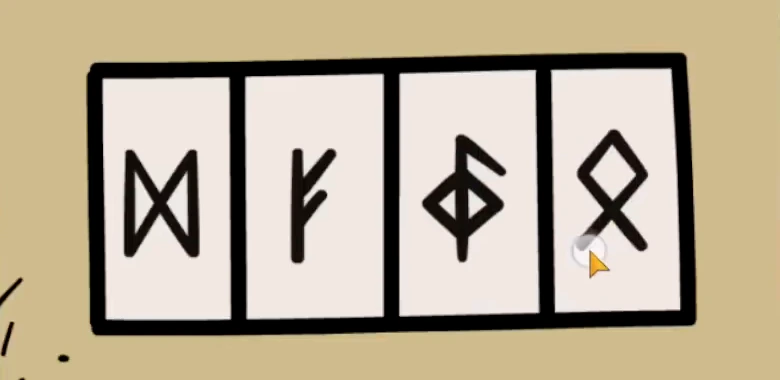
Blue chest runes in the crystal's flash order: red, green, blue, yellow. - Open the board game on the kitchen table only once you have the dragon. A short demonstration moves the pieces by itself; wait for it to stop. The rules: swipe the priest (blue) or the witch (purple) one square at a time. The ghost copies every priest move and the cat copies every witch move, in the same direction. A piece leaving one edge of the 4 x 4 playing area comes back on the opposite edge. A copying piece stays put if its next square is taken, and a hunter that moves onto its target catches it.
- After the demonstration, counting rows from the back and columns from the left, the ghost is in row 1, column 4; the cat in row 2, column 3; the priest in row 3, column 2; and the witch in row 4, column 1. Put the dragon on the empty square to the right of the priest (row 3, column 3), as in the picture.
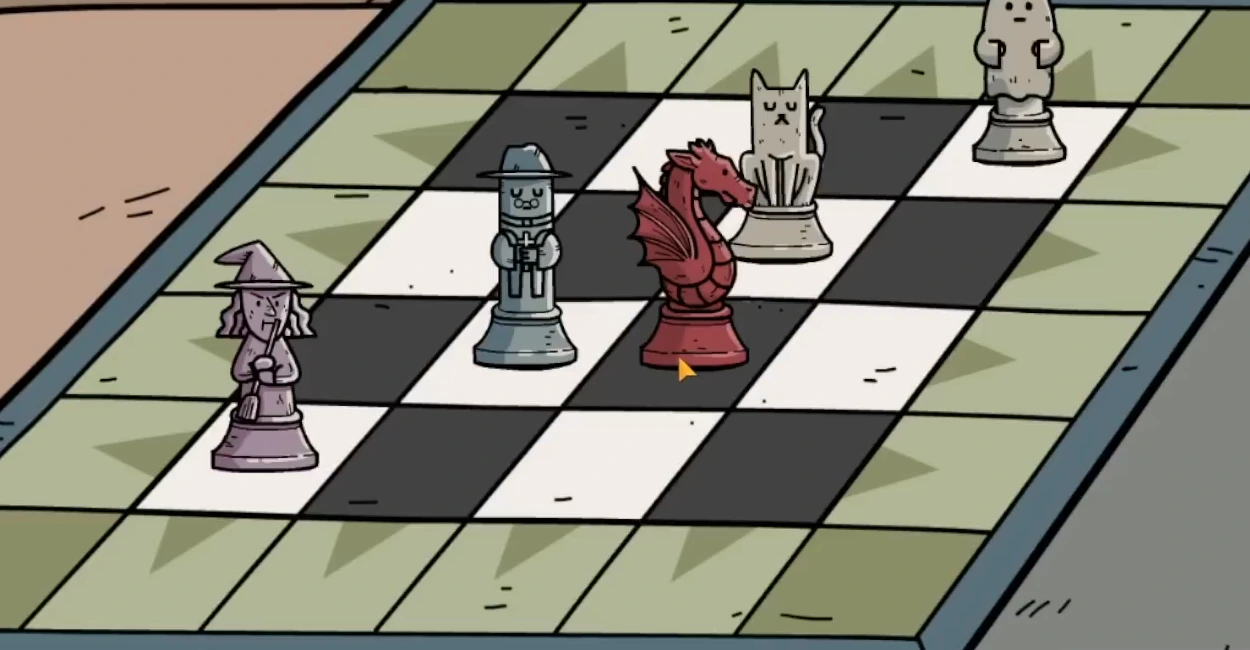
Starting position for the moves in steps 12 and 13, with the dragon in place. - Move the priest down, down, left, left, left, up, right, up, up, up, left, right. On the last move he catches the ghost.
- Move the witch down, down, right, down, left, left. On the last move she catches the cat, and a drawer opens: take the gardening glove. If your pieces started elsewhere, use the dragon and the other figures as walls: whenever the ghost or the cat bumps into one, its hunter gains a square. Bring the hunter next to its target and move onto it. The puzzle also offers a Skip Puzzle button.
The Mansion: black rose perfume
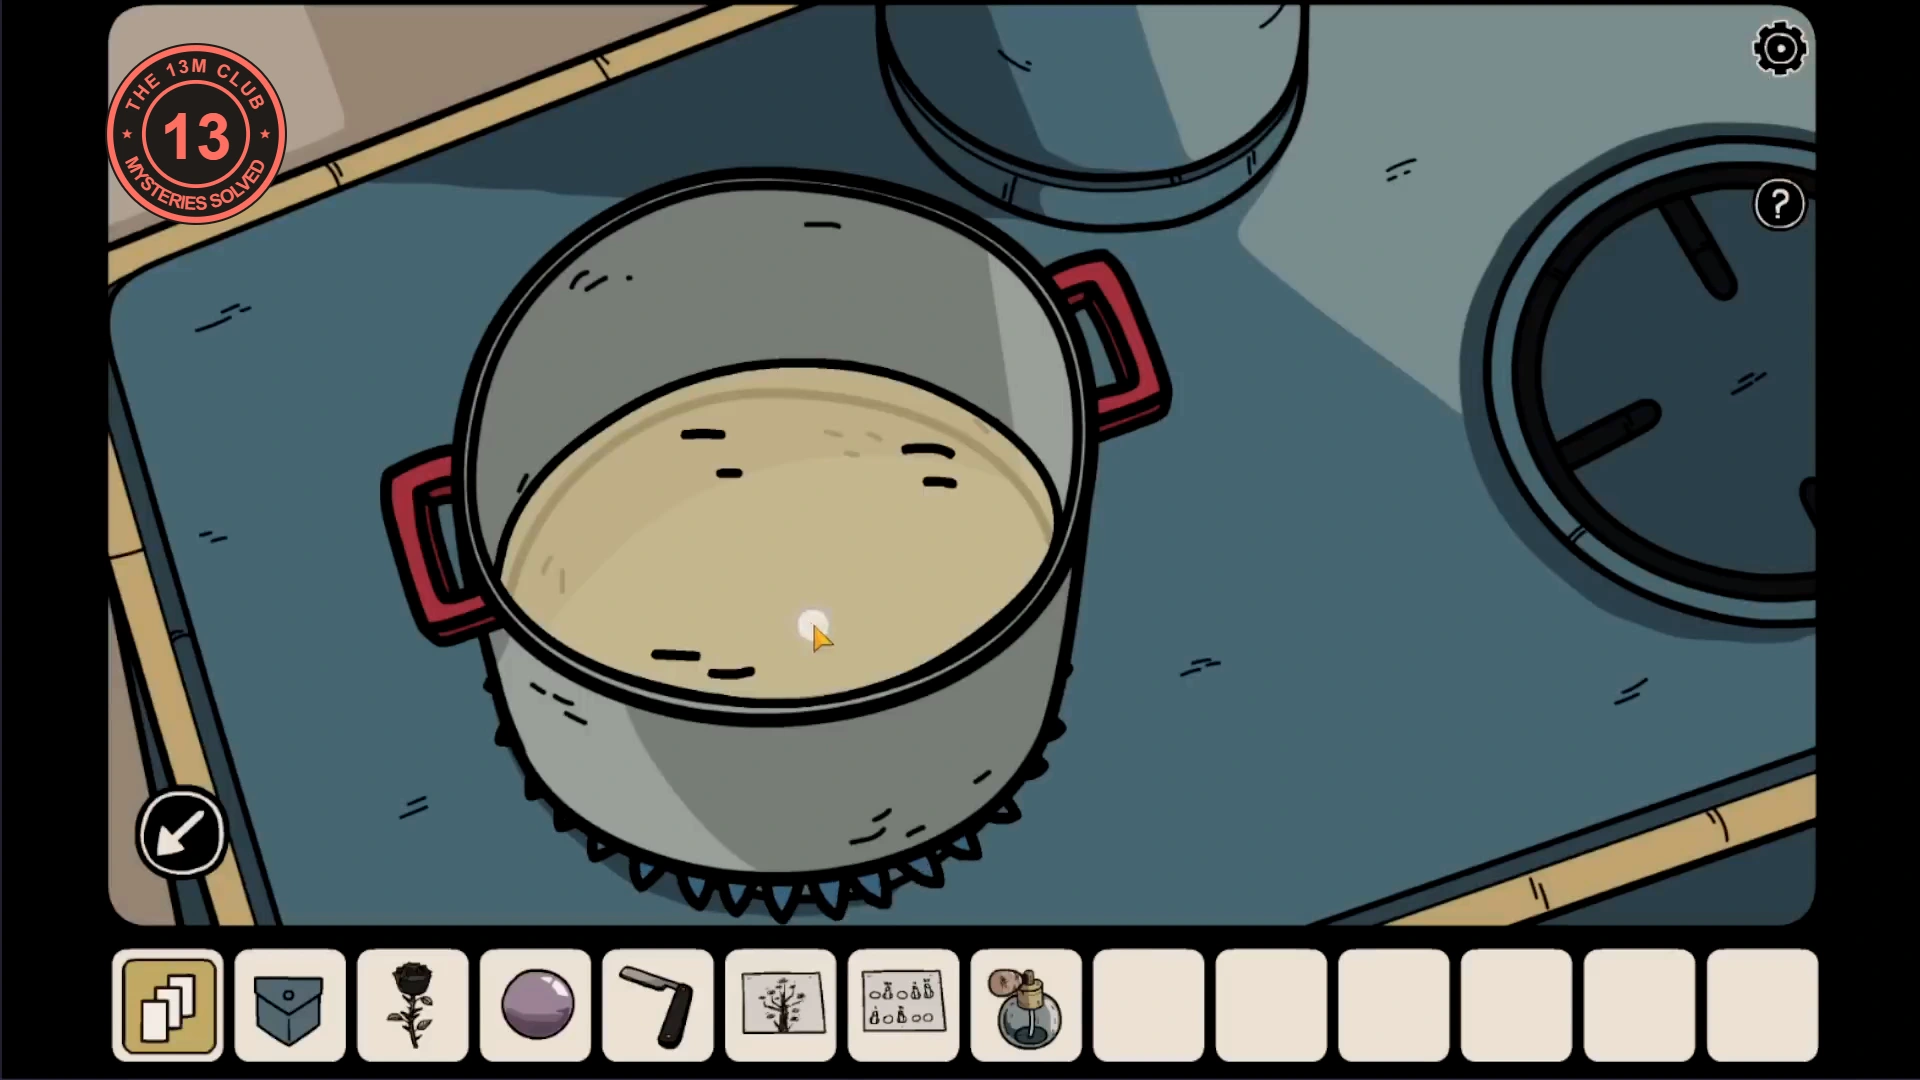
The ghost lady in the ghost room wants a black rose perfume. Brew it on the kitchen stove and she leaves a ticket for the fortune-teller machine.
- In the hallway, use the gardening glove on the black rose by the window and take it.
- At the kitchen stove, put the firewood in the firebox and light it with the matches. Put the pot on the hotplate, pour in the oil and add the black rose. Fill the empty perfume bottle from the pot to get black rose perfume.
- In the ghost room, give the perfume to the ghost lady. She vanishes and leaves a fortune-teller ticket: take it.
- In the fortune-teller room, put the crystal ball on the machine and insert the ticket. A pattern of red and white diamonds appears in the ball (see the picture). Open the memories menu and return to the Unknown Place.

Crystal-ball pattern for the exit-room safe.
Opening the great door
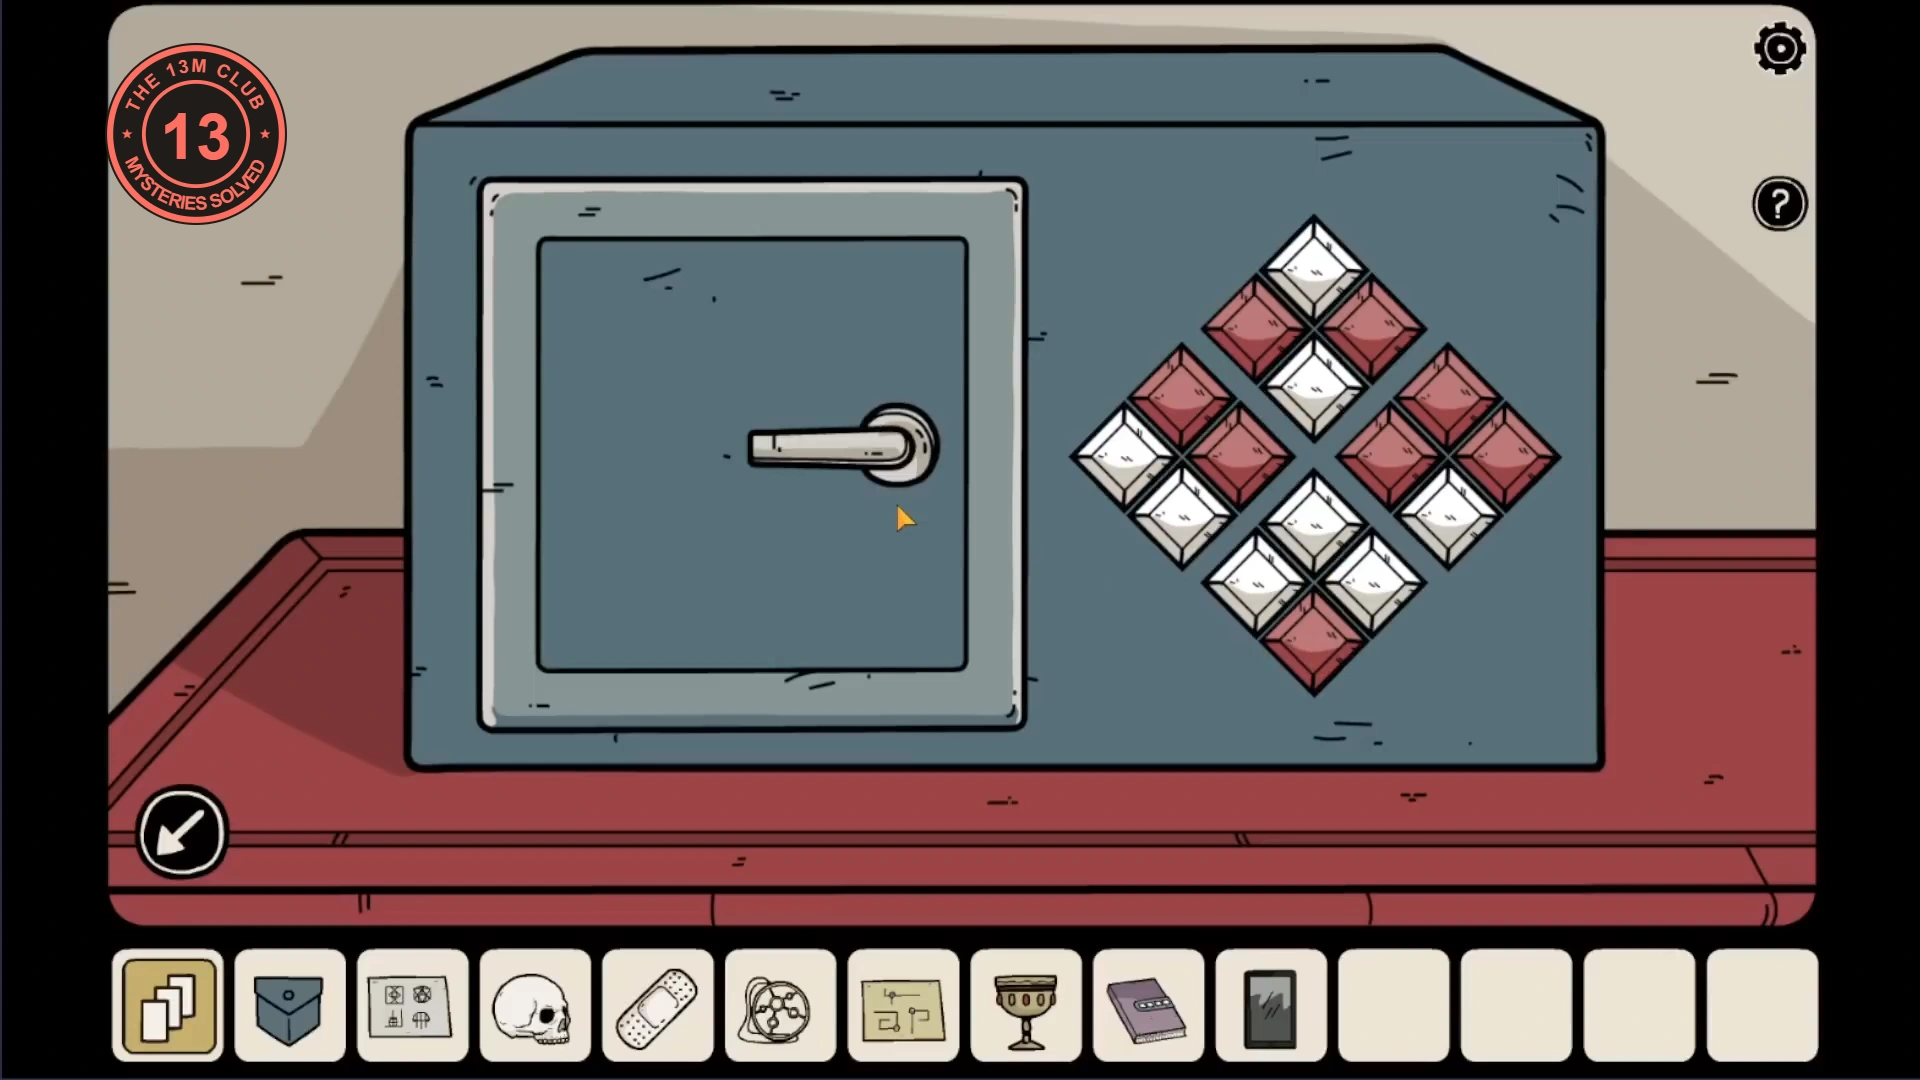
Everything left to do is in the exit room: one more safe, a wounded bat and the four relics.
- Open the small teal safe on the red sideboard in the exit room. Its 16 diamond buttons form four small diamonds (top, left, right and bottom), each with a top, left, right and bottom button. Tap buttons until the red ones match the crystal ball: the left and right buttons of the top diamond; the top and right buttons of the left diamond; the top, left and right buttons of the right diamond; and the bottom button of the bottom diamond. All others stay white (see the picture). Take the bat wing.
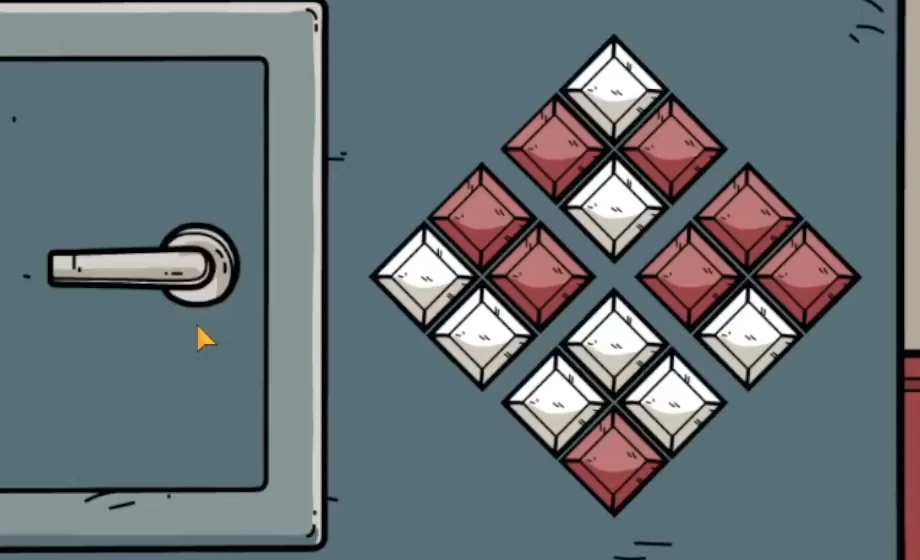
Exit-room safe set to the crystal-ball pattern. - Put the adhesive bandage on the bat wing, then give the mended wing to the bat hanging from the left chandelier. It drops the crown, the last relic: take it.
- Place the four relics in the niches around the great door as drawn in the notebook: skull top left, medallion top right, crown bottom left, goblet bottom right.
- The door opens and the main ending plays. If your copy includes the premium content, the premium chapter begins straight after the ending.