Waking up in a locked house
Lucian wakes in a room with an aquarium on a red table and a tall wooden wardrobe. This guide calls it the starting room. The doorway on the right leads to the clock room, with a cuckoo clock, a maze painting and a round table.
- In the starting room, open the drawer of the red table under the aquarium and take the mobile phone.
- Go right into the clock room. A voodoo doll sits on the floor between the doorway and the left-hand potted plant: take it.
- Lost soul, Erika: open Additional challenges (first inventory slot), choose Erika and tap Play. Find the 10 items: rolled scroll (left middle shelf, lying on a box), ring (upper-left shelf beside a candle), key (on the paper pinned above the stacked books), quill (in the ink pot beside the tall candle), wine glass (right middle shelf), brush (top-right shelf, on the open book), die (lower shelf left of centre), padlock (on the chest, bottom left), pocket watch (on the floor right of centre) and button (bottom-right corner). Her story plays and her soul is freed.
- Hidden shadow 1 of 9: tap the right-hand potted plant in the clock room (beside the tall candle stand) to part its leaves. A small shadow creature appears and is added to your collection.
- Open the pizza box on the round table. The inside of the lid shows a phone unlock pattern and a red scooter app icon. Take the slice of pizza.
- Open the phone from your inventory and draw the lid's pattern on the 3 x 3 dots: bottom-left, middle-left, bottom-centre, top-centre, top-right (an N with a tail to the right). Open the red scooter app, tap the third place in the list (the pizza shop marked OPEN) and read its last order: the total is $52.94.
- Return to the starting room. Open the lower drawer under the wardrobe and take the small key, then open the upper drawer and take the purple notebook.
- Open the notebook from your inventory and enter the receipt total without the decimal point. Read every page: two spreads of arrows and dots (the switch-box solution) and a page of four arches showing a skull (top left), a medallion (top right), a crown (bottom left) and a goblet (bottom right). Those four relics open the exit door at the very end of the game.CODE5294
- Unlock the grey house-shaped box on the wall to the right of the aquarium with the small key. Inside is a 4 x 4 grid of switches and fixed dots, and every switch starts pointing up. Flip switches until the grid reads, row by row from the top and left to right: row 1 down, dot, down, up; row 2 dot, up, dot, down; row 3 up, down, dot, dot; row 4 dot, up, up, down (see the picture). A tray opens below the box: take the small fishing net.
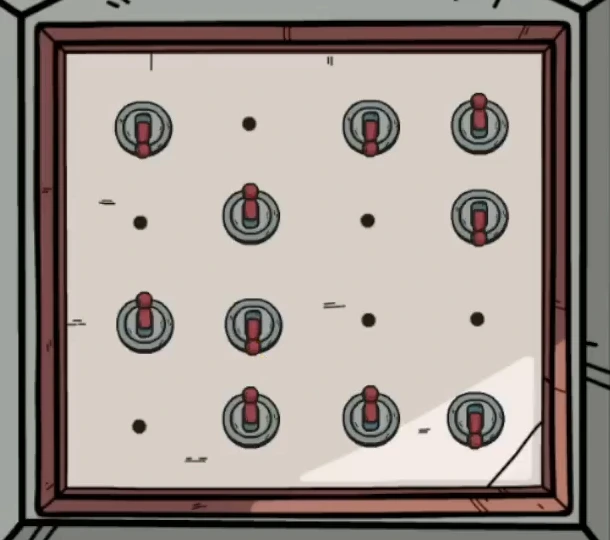
Solved switch box: each red lever points up or down; the dots never change. - Drop the pizza slice into the aquarium. While the fish crowd around it, use the fishing net to lift the yellow key out of the gravel.
- Unlock the wardrobe with the yellow key and search the jacket's chest pocket. Lucian finds a photo of a bar and remembers being there. The photo goes into his jacket pocket, the second inventory slot, which now opens the memories menu.
The Bar: magician, stage and briefcase
Tap the jacket pocket and choose the Bar. From the bar room, the magician's room is to the right, the stage room is through the red-curtained doorway at the back of the magician's room, and the game room is to the left of the bar room.
- In the bar room, tap the menu on the counter and take the note it gives you: a layout of small components, needed later for the claw machine.
- Take the voodoo doll from the shelf behind the bar, to the right of the bartender.
- Lost soul, Marco: in Additional challenges choose Marco and play. Find spyglass (bottom-left corner of the desk), anchor (lying on the map), shark figurine (top-left corner), drawing compass (bottom right), message in a bottle (between the hourglass and the lantern), conch shell (top-right shelf), lighthouse figurine (left of the open clam shell), leather satchel (right side of the desk), knotted rope (hanging above the ship's wheel) and tin mug (beside the coffee pot).
- Go right into the magician's room. Hidden shadow 2 of 9: lift the seat of the red bench against the right wall; a shadow is curled up inside.
- Talk to the magician on his bench and answer Yes when he offers to show you a trick. He performs it with the portrait behind him and then gives you a paintbrush.
- Go through the red-curtained doorway at the back of the magician's room into the stage room. Dip the paintbrush into the inkwell on the small table at the front to get a brush with ink.
- Hidden shadow 3 of 9: pull aside the red curtain hanging at the right-hand end of the stage.
- Look under the front edge of the stage and take the X-ray film.
- Open the panel on the right wall of the stage room: a frame of 12 cross-shaped valves with coloured dots around its border. Tap valves to rotate them until every coloured arm meets an arm of the same colour and every border dot meets an arm of its own colour (see the picture). Take the football player figurine that drops into the tray below.
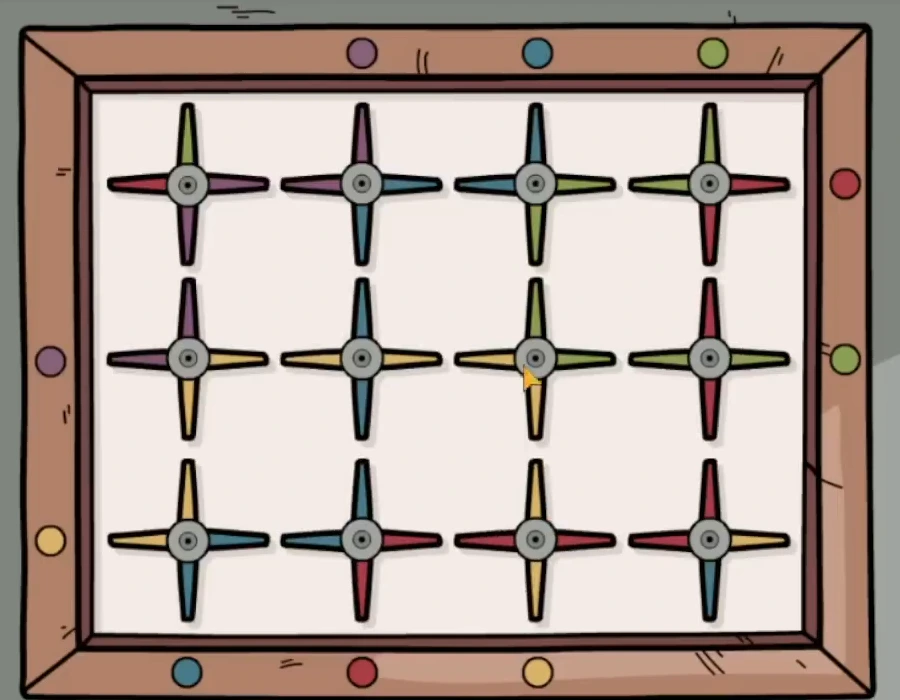
Valve frame solved: every arm meets an arm or a border dot of the same colour. - Read the four flags hanging behind the clown. Red: A-1, B-1, C-1, C-2. Yellow: A-1, A-3, B-2, C-2. Blue: A-1, A-2, A-3, B-2. Green: A-2, B-1, B-3, C-2. On a 3 x 3 grid with rows A to C from the top and columns 1 to 3 from the left, each flag lights four squares.
- In the bar room, examine the briefcase on the front table. Its four 3 x 3 panels sit under coloured dots: yellow, green, red, blue. Light each panel with its flag's squares: yellow, both top corners, the centre and the bottom middle; green, a diamond around the centre; red, the whole left column plus the bottom middle; blue, the whole top row plus the centre. Take the plug and the chisel.
- Go left to the game room. Study the tactics board on the wall, then put the football figurine into the empty slot on the table-football game. Swap figures until the rods match the board. Ignoring the goalkeepers and reading each rod from top to bottom, the rods from left to right are: red-blue-blue, blue-red, red, blue, red-red, blue-red-blue (see the picture). A ball rolls out: take it.
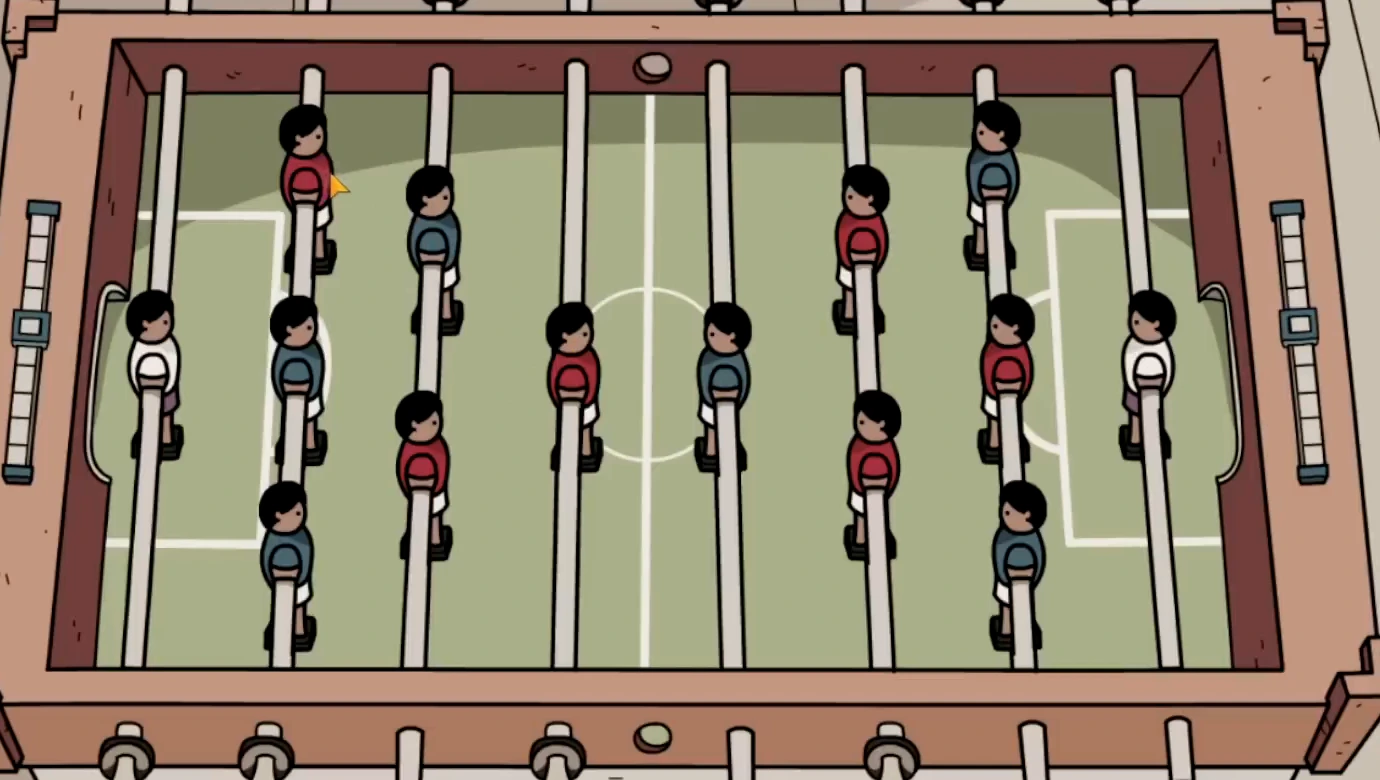
Finished table-football line-up. The white goalkeepers do not change. - Tap the chair at the round table at the front of the game room to pull it out, and take the voodoo doll from its seat.
- Lost soul, Lucy: play her mini-game and find theatre ticket (under the desk calendar, bottom left), conch shell (top-left shelf), rubber stamp (left shelf beside the framed picture), hourglass (top-right shelf), envelope (on the papers, bottom right), pencil (in the cup with the quills), ink bottle (on the books in front of the typewriter), paper crane (hanging from the line at the top), glasses (beside the coffee mug) and spool of thread (on the shelf under the lamp, right).
The Bar: the owl's eye, the clown and the hexagon game
A painted ball becomes a false eye, the owl's real eye unlocks a painting, and a shadow show gives the order for a drawer. The magician's handkerchief then reaches a key inside an X-ray.
- Combine the ball with the brush with ink in your inventory to paint a false eye.
- In the stage room, examine the owl statue on the left. Use the chisel to prise out its red eye, then put the false eye in the empty socket.
- On the stage, look at the wall socket beside the lamp: fit the plug onto the loose cable end, then push it into the socket. The lamp has power but no bulb yet.
- In the game room, put the owl's red eye into the empty setting at the top of the large painting. Four red symbols appear on the canvas.
- Open the small chest below the painting by setting its tiles to the four symbols, left to right: a striped diamond, a triangle inside a triangle, a double S and a circle with a line through its top (see the picture). Take the light bulb.
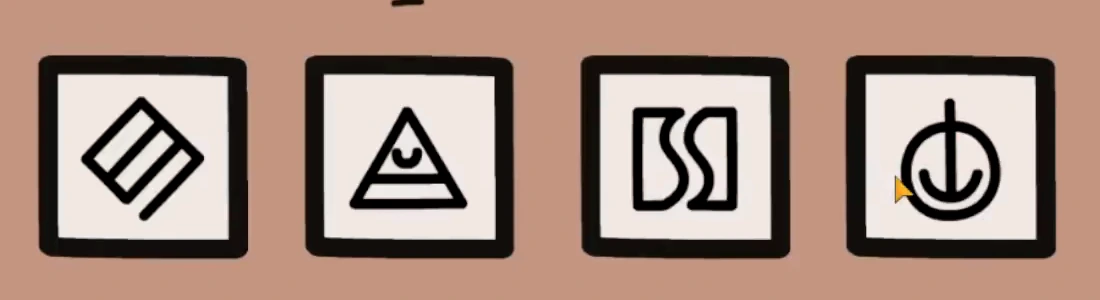
Small chest set to the four red symbols from the painting. - Put the bulb in the stage lamp. The clown makes four animal shadows in this order: horse, bull, rabbit, parrot.
- In the magician's room, read the animal book on the round table. Every animal in it has a symbol beside it.
- In the stage room, open the upper drawer of the red cabinet on the right: set its four tiles to the symbols of the horse, bull, rabbit and parrot, in that order (see the picture). Take the lemon.
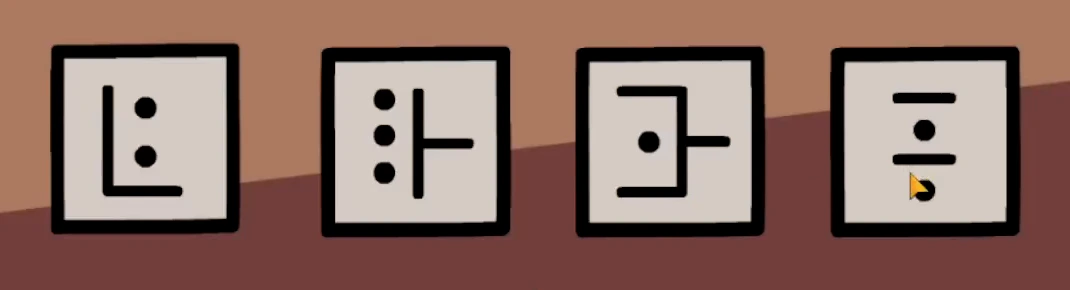
Red cabinet drawer set to the horse, bull, rabbit and parrot symbols from the animal book. - Give the lemon to the man at the table on the left of the bar room. He squeezes it into his drink and leaves his knife on the table: take the knife.
- In the magician's room, use the knife on the portrait behind the magician to cut it out of its frame. Talk to him and ask to see his trick again: with the painting gone he is caught off guard, so take his magic handkerchief.
- On the right wall of the magician's room, put the X-ray film in the light box, plug its cable into the socket beside the box and flip the switch on its left. The film shows a key inside a skeleton: use the magic handkerchief on it to pull the key out.
- Unlock the padlocked chest to the left of the magician's bench with this key. Take the mechanical claw and the note with a hexagon diagram.
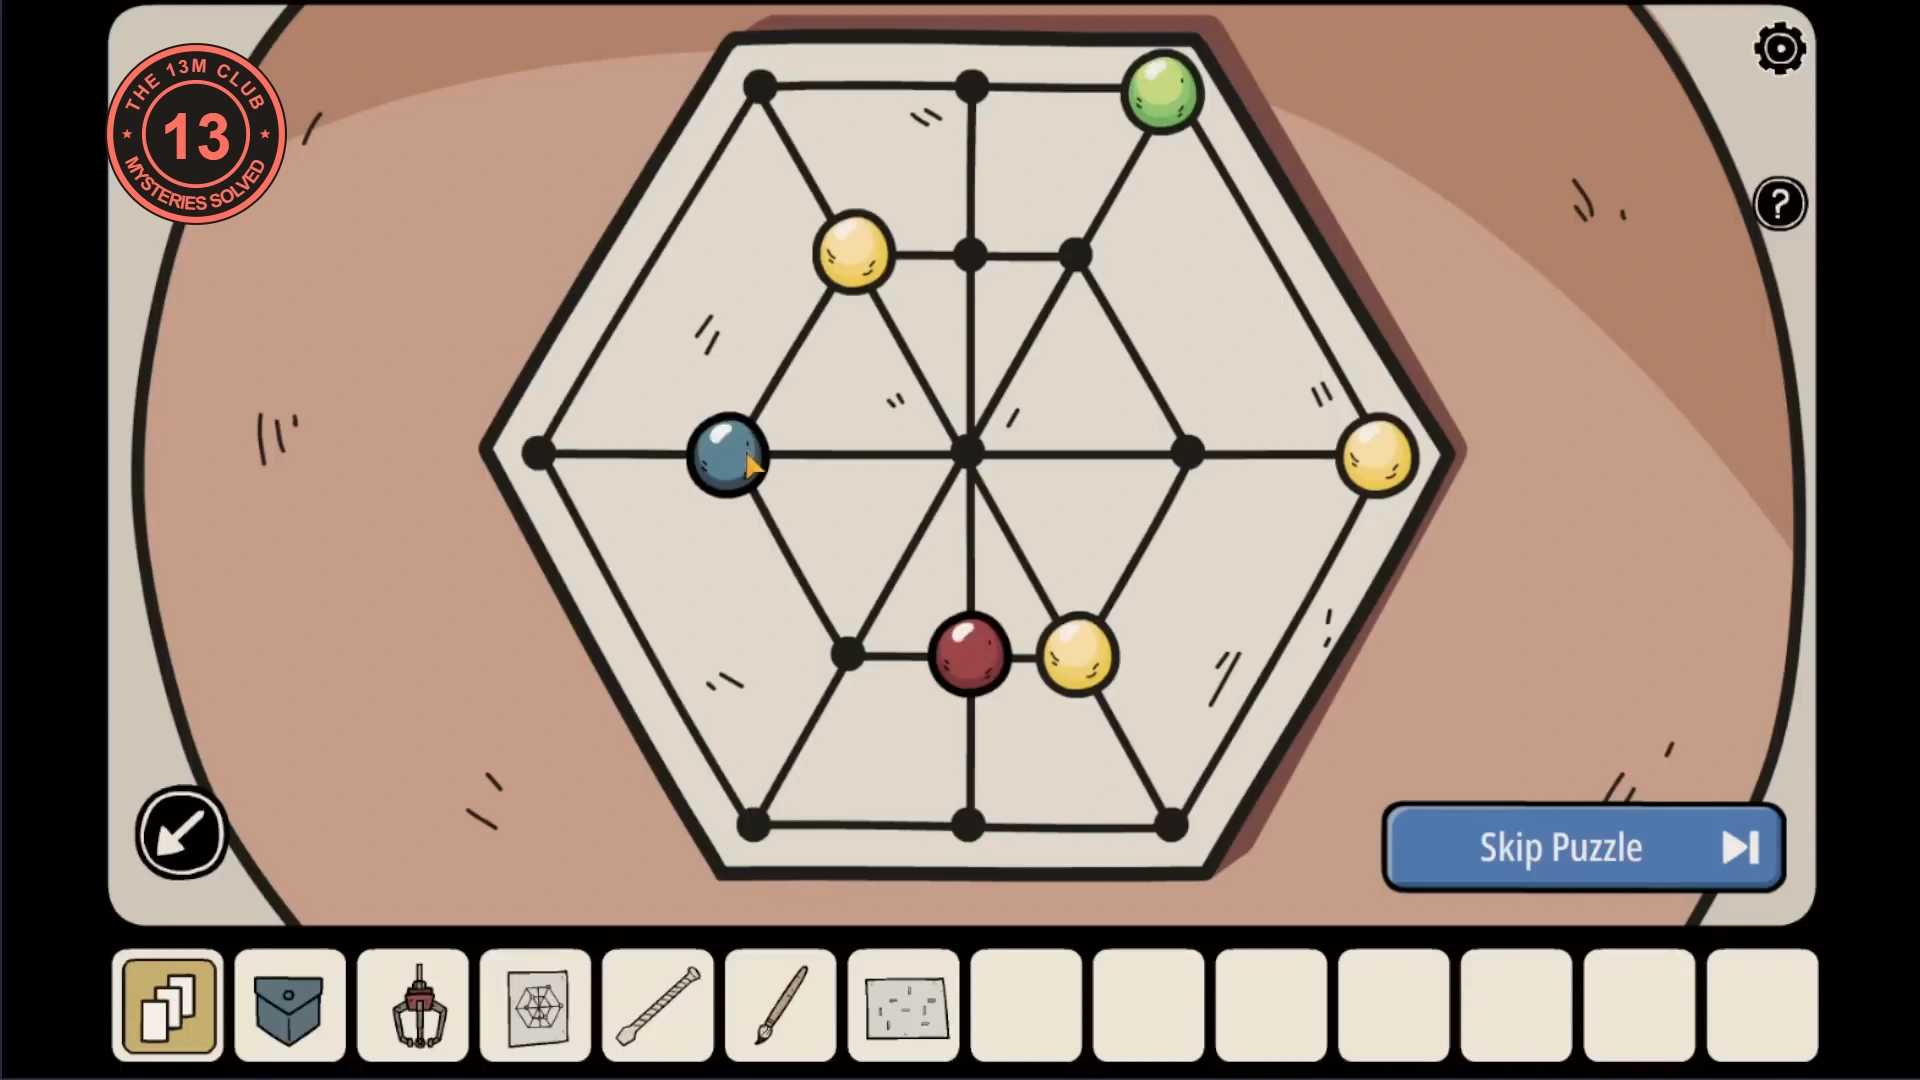
- In the game room, talk to the man in the turban at the hexagon board and choose Play. His three yellow pieces stay where they are. Move your pieces to the points marked on the note: green to the top-right corner of the outer hexagon, blue to the left point of the inner ring, and red to the lower point just left of the bottom yellow piece (see the picture). He admits defeat and gives you the claw-machine key.
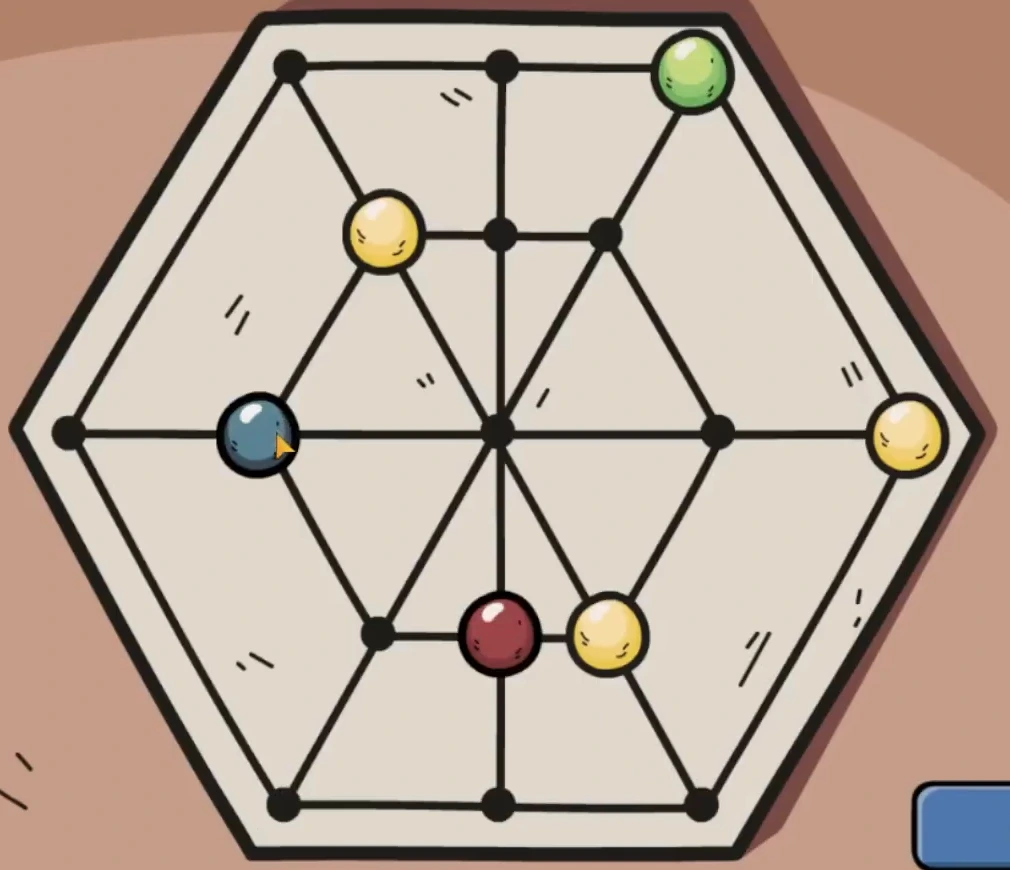
Winning position for the hexagon game.
The Bar: the claw machine
The claw machine in the game room needs its circuit fixed and a claw fitted before it will give up the teddy bear the bartender wants.
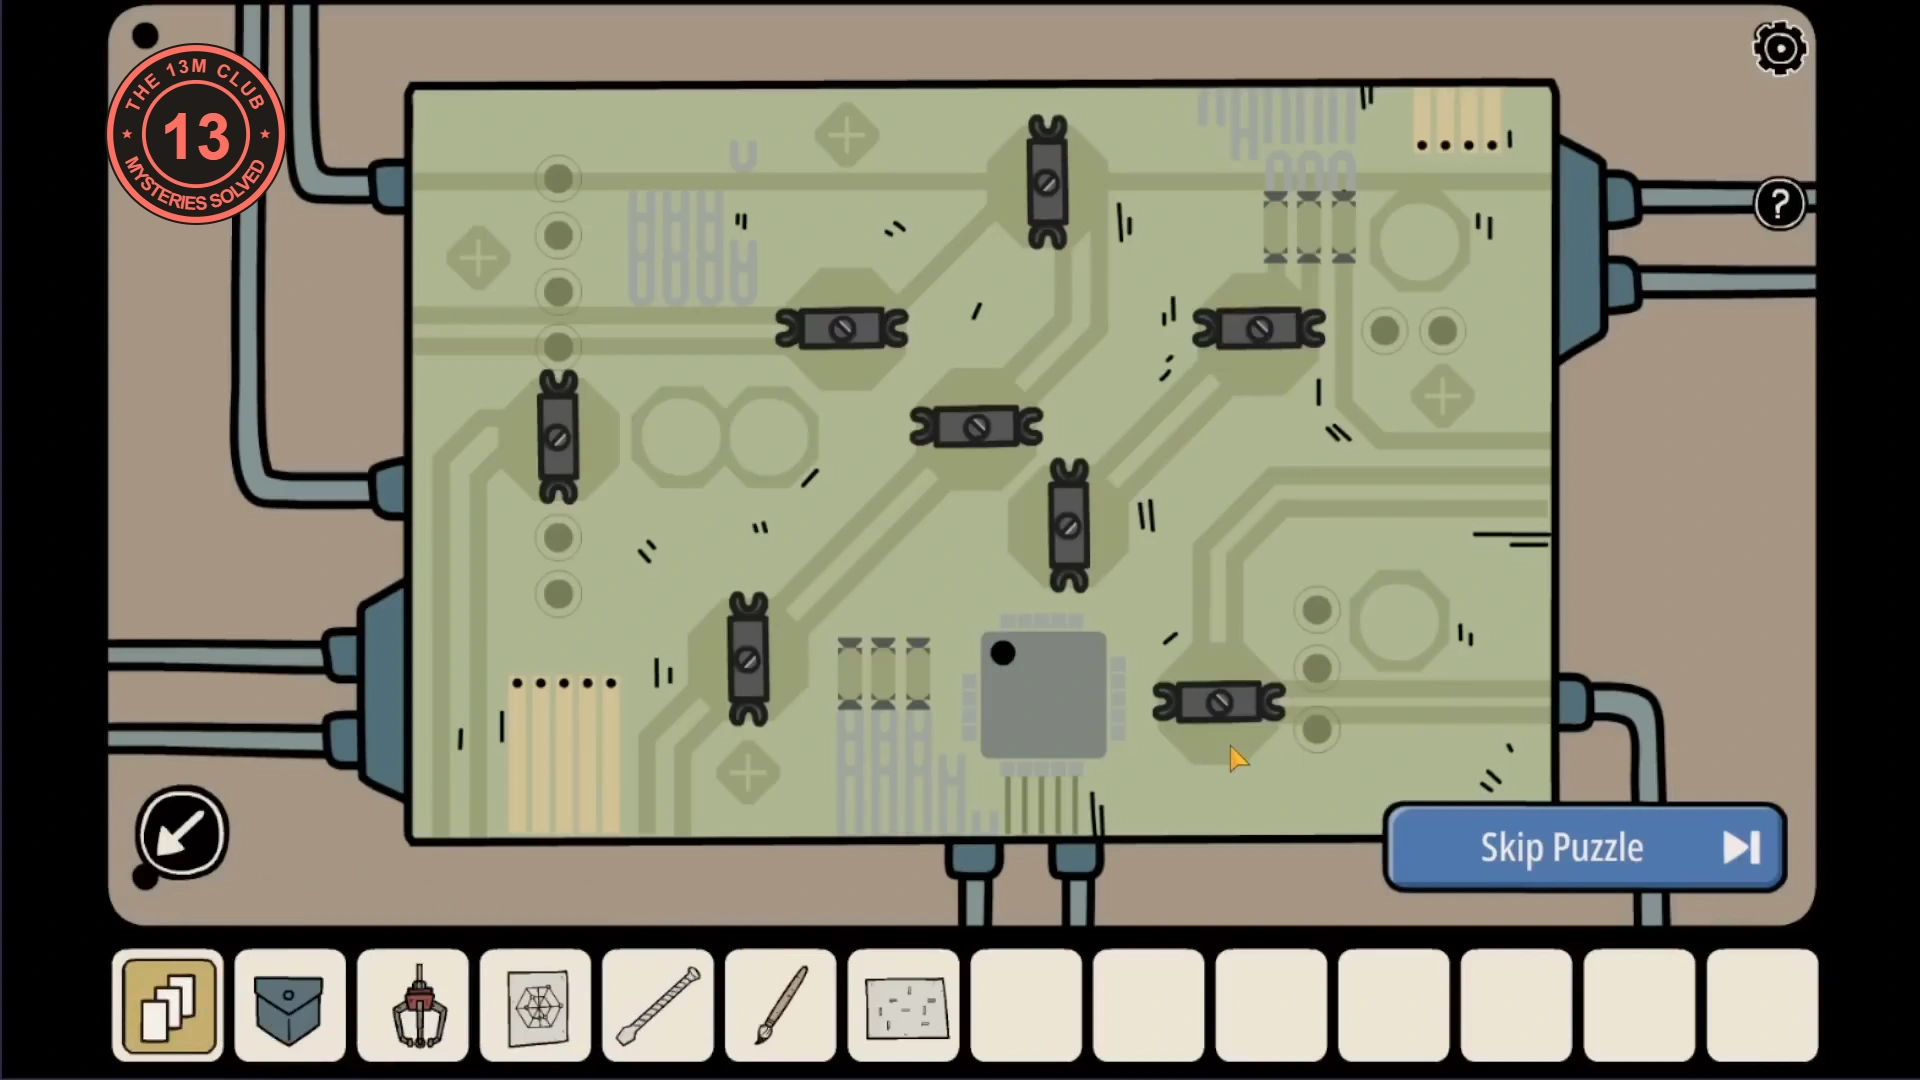
- Unlock the panel on the front of the claw machine with the claw-machine key. Open the menu note from your inventory and tap the small black components on the circuit board to turn them until the board matches the note (see the picture). A message says that the machine's mechanical arm has been activated.
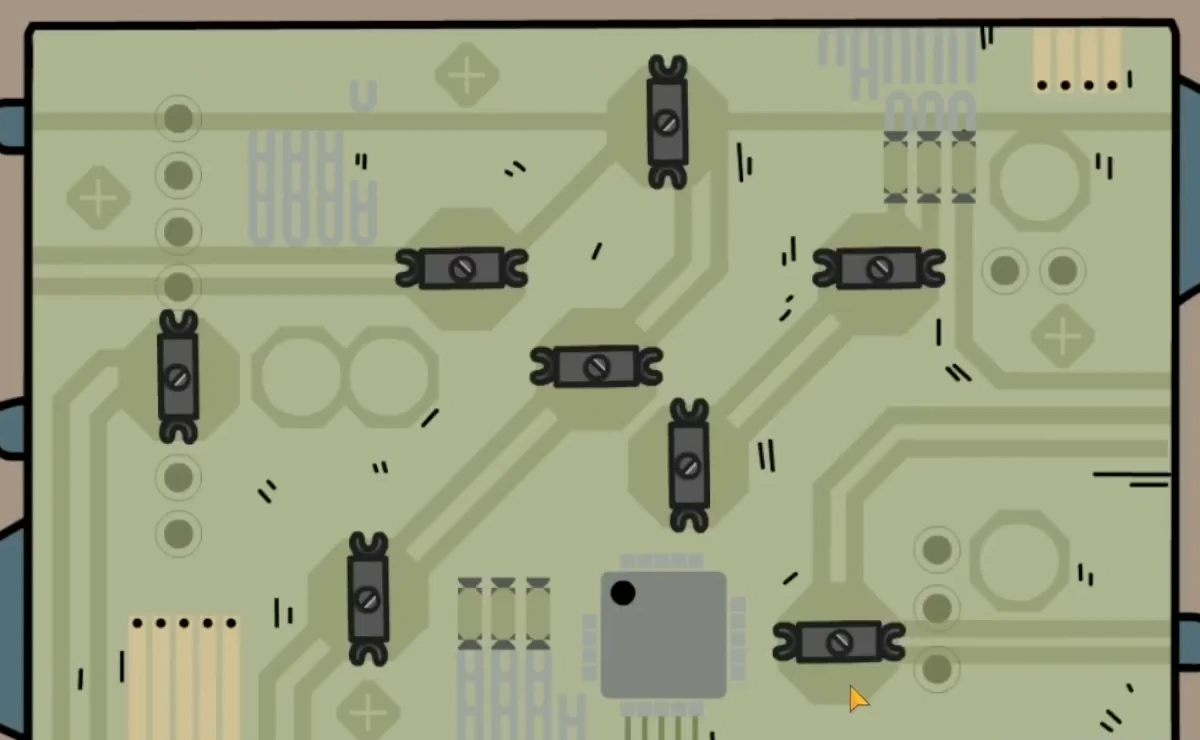
Claw-machine circuit solved: copy the direction of each component. - Attach the mechanical claw to the arm. Use the arrow button on the right to move the claw over the teddy bear, then pull the lever to grab it. Take the teddy bear.
- Give the teddy bear to the bartender. He pours you a drink: drink it, then note the four symbols on the bottom of the empty glass. Open the memories menu and return to the Unknown Place.
Back home: the goblet, the clock and the trapdoor
The symbols from the glass open the first relic box. A clock, a woodpecker and a maze then lead to the trapdoor in the clock room.
- In the starting room, open the teal box on the pedestal beside the left door: set it to the four symbols from the glass (an X over a chevron, two opposed arrows, an S with a bar and a split circle; see the picture). Take the golden goblet, the first relic, and the gear.
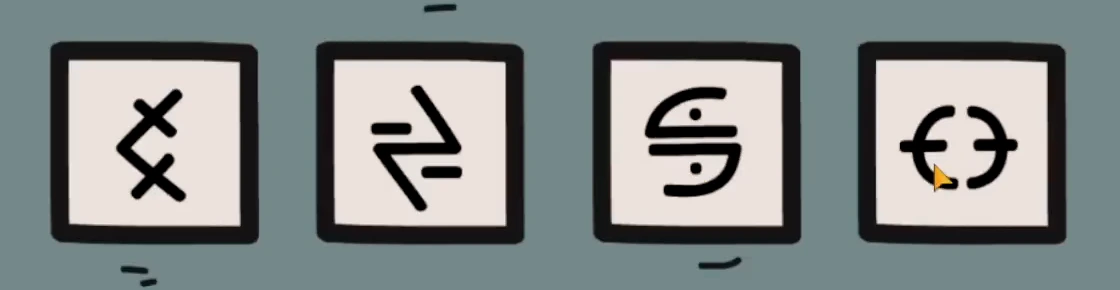
Teal relic box set to the four symbols from the bottom of the glass. - In the clock room, pull back the red curtain at the right edge. Behind it is a boarded window painted with a red sun (top), a yellow moon (middle) and a blue star (bottom).
- Fit the gear into the cuckoo clock beside the left doorway. Turn its three coloured hands so that red points at the sun, yellow at the moon and blue at the star on the clock face. A wooden woodpecker pops out: take it.
- In the starting room, put the woodpecker on the large red-tree painting. It pecks a hole in the trunk: take the note from the hole, a map of the maze painting.
- In the clock room, slide the three tokens through the maze painting above the desk to the places marked on the map: the three-dot token to the top-left corner, the striped token to the branch on the right edge, and the trefoil token to the lower-left junction (see the picture). A drawer opens below the painting: take the metal ring.
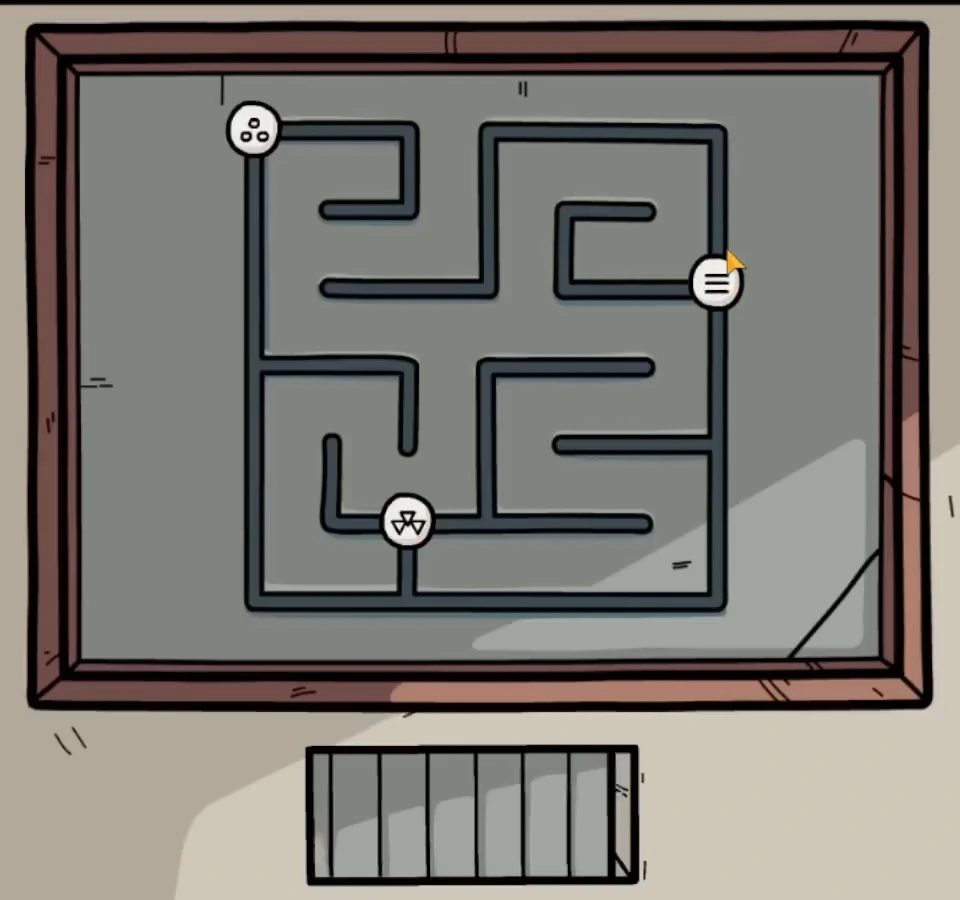
Tokens in place on the maze painting. The drawer below then opens. - Fix the metal ring to the trapdoor in the front right of the clock-room floor and pull it open. A crow hands Lucian a note and he remembers a garden: the Garden now appears in the memories menu.