Shooting Gallery: Silhouettes
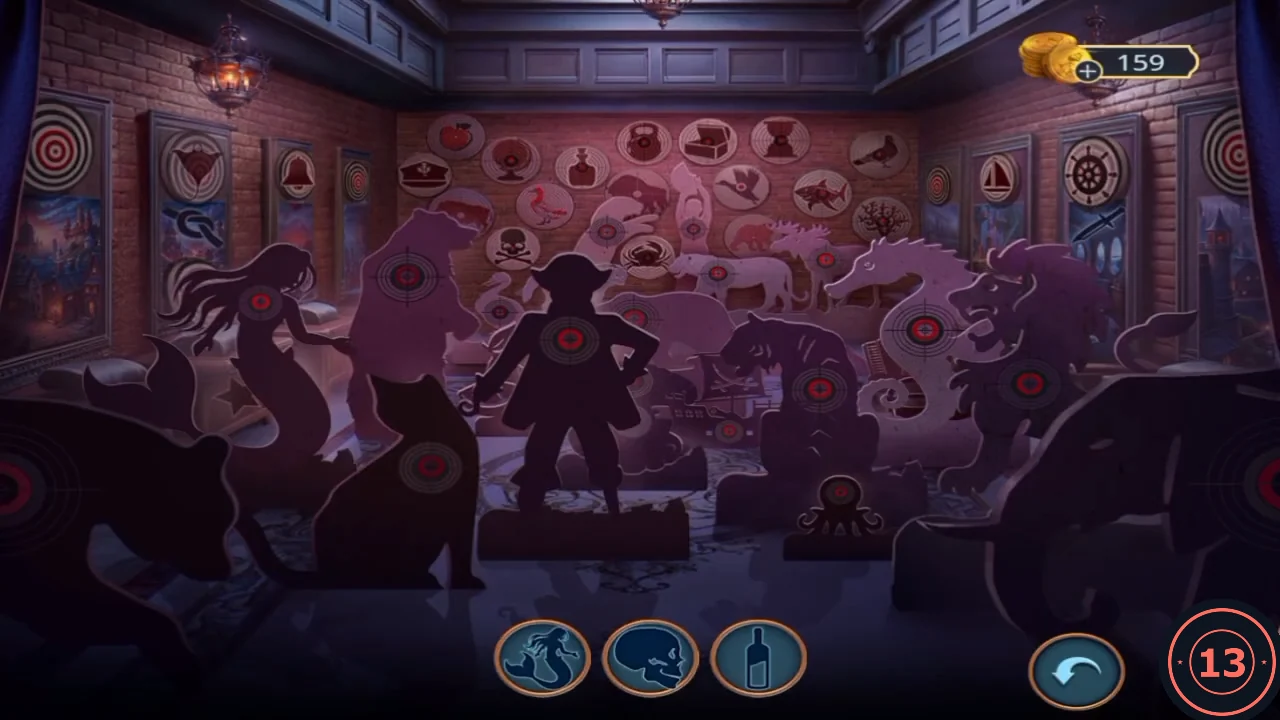
Shoot the targets whose silhouettes appear in the three slots at the bottom. Each hit target is replaced by a new silhouette.
- The slots start with Mermaid, Skull and Bottle; each hit adds a new silhouette (Crab, Sailboat, Treasure chest, Swordfish, Pirate figure, Pirate ship, Manta ray, Octopus, Seahorse). The view pans slightly, so use these landmarks: MERMAID – the mermaid cut-out at the far left. SKULL – the skull-and-crossbones plate on the back wall just left of the big pirate captain's hat. CRAB – the plate on the back wall just right of the pirate's hat. SAILBOAT – the small plate on the right wall, left of the ship's-wheel plate. TREASURE CHEST – the top row of the back wall, between the kettlebell and hourglass plates. BOTTLE – the upper-left part of the back wall, between the goblet and kettlebell plates. SWORDFISH – the red swordfish plate on the back wall right of centre, right of the flying-bird plate. PIRATE FIGURE – shoot the big pirate captain cut-out in the centre; it falls, revealing lemon-slice and pearl-clam cut-outs and fully exposing a small pirate-ship cut-out that was partly behind his coat. PIRATE SHIP – that ship cut-out, low in the middle just left of the tiger. OCTOPUS – the small cut-out on the floor at the front centre, in front of the tiger. SEAHORSE – the large seahorse cut-out right of centre, between the tiger and the lion (an accordion and bucket appear behind it). MANTA RAY – the top plate of the leftmost wall panel, above the rope-knot and flag plates.
- You receive the MINI-BAR HANDLE, and the Bull's-Eye achievement ("Shoot at the range") appears.
Mini-Bar, Plant Pot, Fire Hose Box and Roulette
The mini-bar handle from the shooting gallery starts a chain of items across the lounge and the deck.
- Put the mini-bar handle on the carved cabinet door on the right of the lounge. Take the orange-handled PICK from the shelf inside.
- Go out to the deck. Zoom in on the plant pot beside the seagull's chair and dig with the pick to find a small metal CYLINDER.
- Zoom in on the red wall box to the right of the door. Insert the cylinder into its lock, then take the COTTON wad and the purple STRAP next to the fire hose.
- Use the strap on the basket in the luggage pile, then take the X-shaped SPINNER handle.
- Open the lighter in your inventory and add the cotton. It still needs fuel.
- Put the spinner on the hub of the roulette wheel in the lounge. The wheel spins and a compartment opens; take the crystal GOBLET.
Shooting Gallery: Riddles
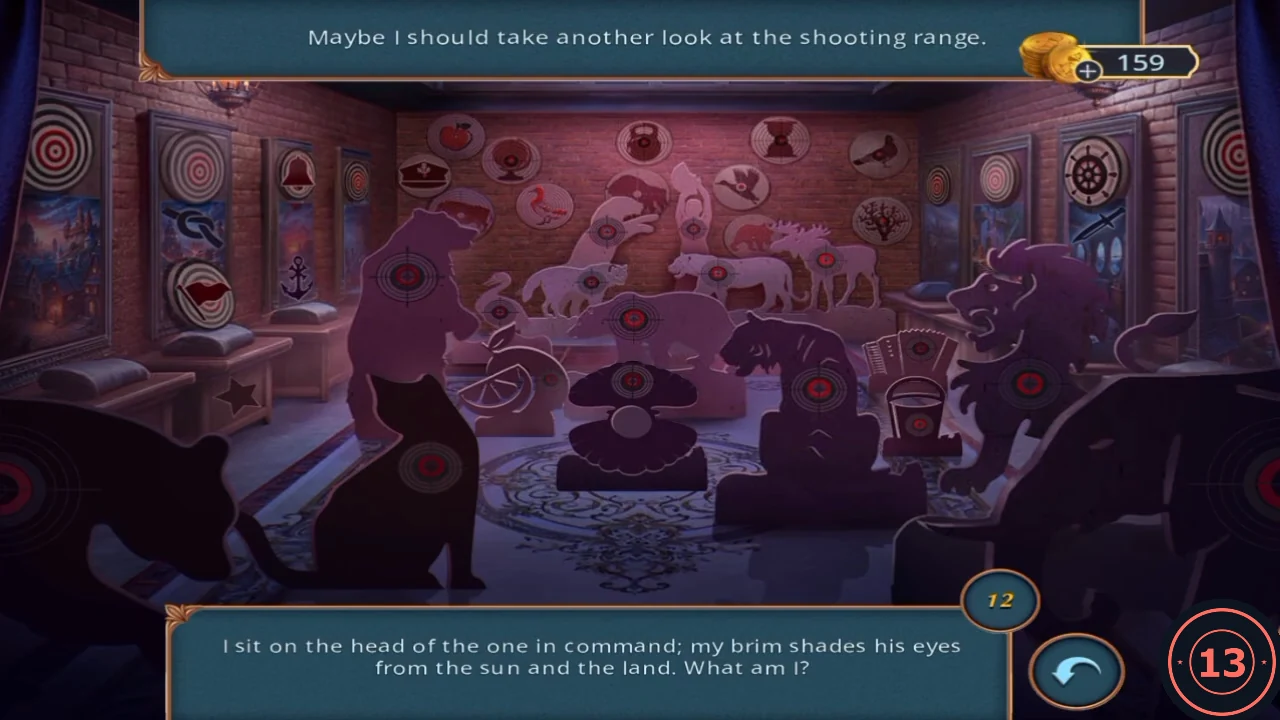
Thomas takes another look at the shooting range. This round shows riddles instead of silhouettes; shoot the target that answers each one. There are 12.
- Riddle answers and where the targets are: 1 brim that shades the commander's eyes = captain's hat (back wall). 2 waves in the wind showing who is on board = flag (left wall panel). 3 sets the course, turns left and right = ship's wheel (right wall panel). 4 treasure hidden in a shell = pearl in the clam (front centre). 5 holds you steady in rough seas = anchor (left wall panel). 6 ties things strong and tight = rope knot (left wall panel). 7 carries water with a handle = bucket (front right). 8 plays a tune when squeezed = accordion (right). 9 yellow jacket, beautiful and acid = lemon (left-centre cut-out). 10 shines above to guide sailors = star (box at front left). 11 rings out to call the crew = bell (upper-left wall panel). 12 sharp and swift at your side = sword (right wall panel under the wheel).
- You receive the COFFEE POT.
Coffee, Roller Skate and the Dock Satchel
The coffee pot from the riddle round opens the mini-bar drawer. The roller skate then gets the crate on the docks out of the way.
- At the mini-bar cabinet, set the goblet on the counter and fill it from the coffee pot. A drawer opens; take the teal HANDLE PIECE (2/3) and the ROLLER SKATE.
- Return to the docks. Put the roller skate under the crate left of the pier so it rolls aside. Take the red-handled OIL SQUEEZER LEVER lying beside the leather satchel it uncovers.
- The satchel has a round lock with three holes ("I need three hooks!"). Insert the gold three-pronged fork, open the satchel and take the blue engraved KEY.
- Pick up the gold ANCHOR piece (1/2) glinting by the pier post.
Captain's Desk Drawer and the Fish Plaque
The blue key from the dock satchel opens the Captain's desk drawer in the cabin.
- Go back to the cabin and open the desk drawer's gear padlock with the blue key. Read the note "Unsinkable, you say?", signed C. Rey, about the maiden voyage, and take the grey FIN.
- Put the fin on the fish in the compartment behind the mosaic picture. Its mouth lights up; take the gold FISH EMBLEM.
Oil Press Gear Repair
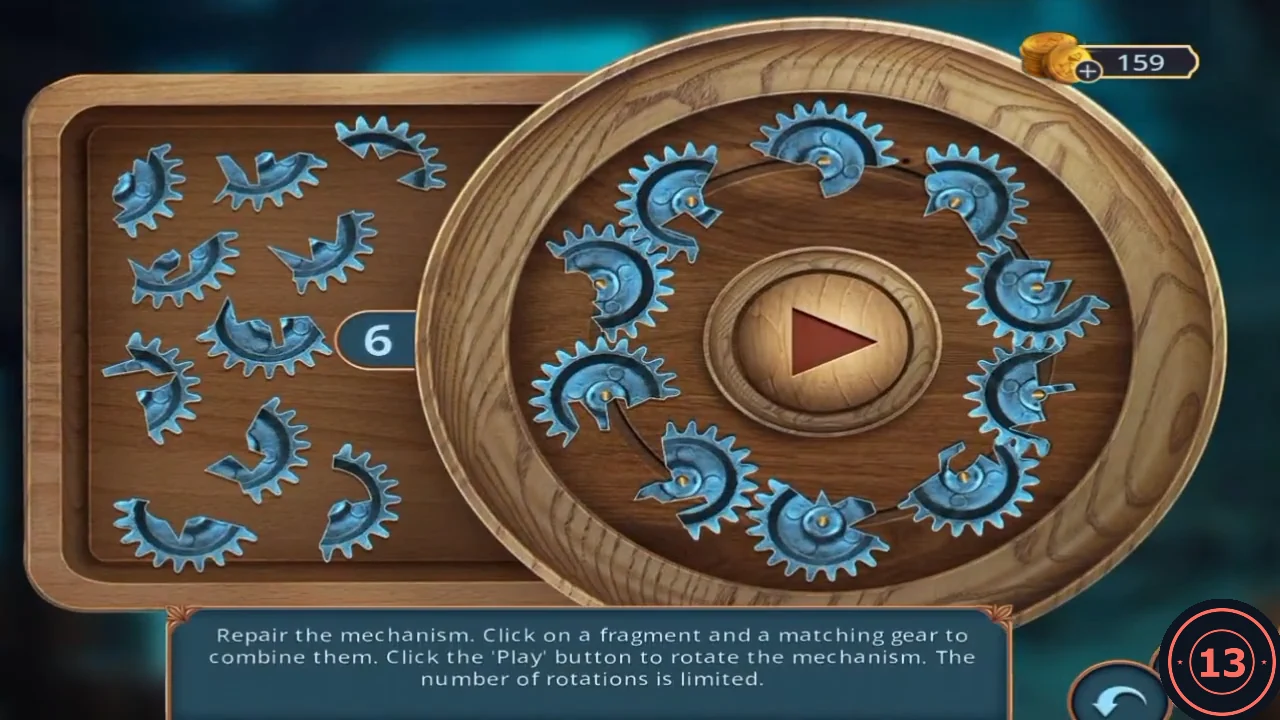
Put the oil squeezer lever on the barrel press on the left pier, which already holds the gold bolt, to start this puzzle. Click a loose fragment, then the broken gear whose gap matches it. "Play" turns the wheel, and you have only 6 turns.
- Return to the docks and put the oil squeezer lever on the barrel press.
- The fragment tray covers part of the wheel. Before each Play, fill every broken gear you can reach. Then press Play so other broken gears come into reach, and repeat. The recorded player used all six turns, placing the last fragment after the final turn. What happens if you run out of turns is not shown.
- The press works; take the ANCHOVIES.
The Seagull, the Photo and the Handbag
The anchovies from the oil press chase the seagull off its chair on the deck. This chapter contains a dialogue decision.
- On the deck, put the anchovies on the arm of the seagull's chair. The seagull flies off and uncovers a red handbag. Take the PHOTO of a dark-haired young woman; its back shows four symbols.
- Charles recognises Frederick's wife. Choose "Maybe the Captain knew about the ship's defect but kept quiet?" (35 coins, +1 point, Speak up) or "No idea." (free, 0 points, Don't speak up). The story continues the same way.
- Put the gold fish emblem on the handbag's fish-shaped clasp and take the sail piece marked "3". Both sail pieces (2/2) are now collected.
Red Briefcase Number Lock
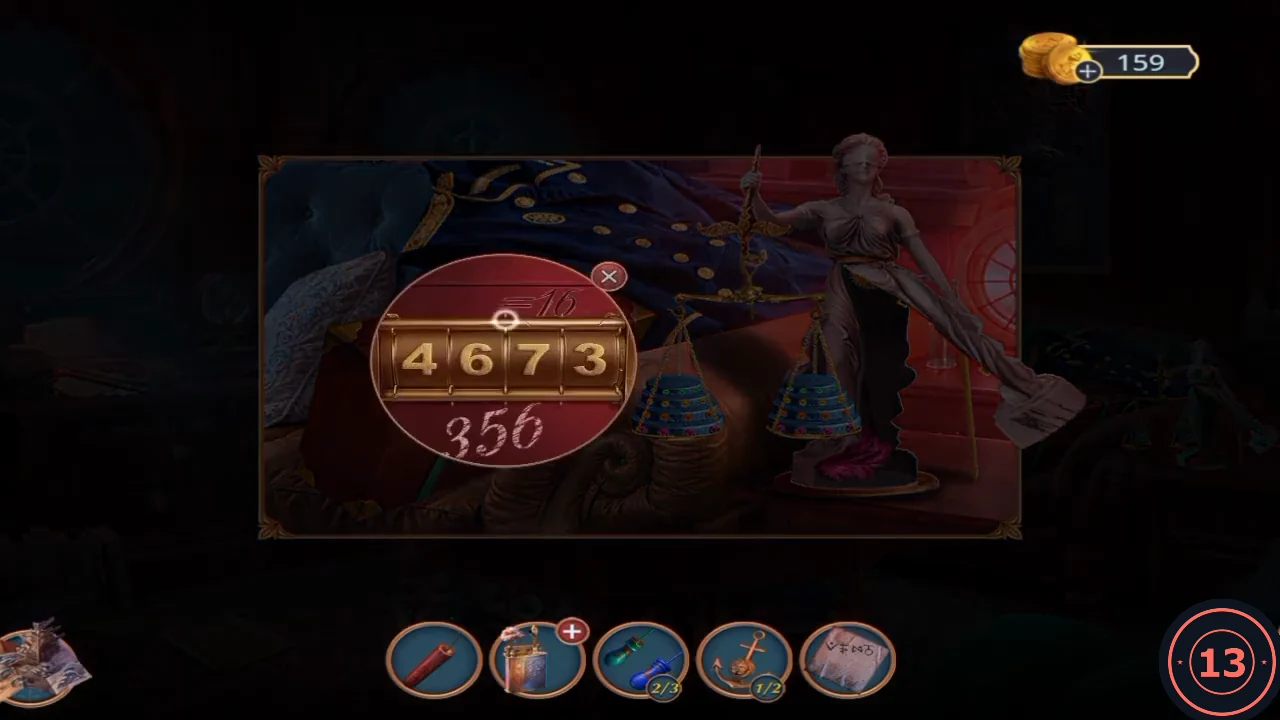
The red briefcase beside the Lady Justice statue in the cabin has a lock that is missing parts.
- Place the two sail number wheels in the lock. The four wheels then read 4673.
- Read the clue painted on the case: "=16" above the wheels and "356" below. The first three digits are 3, 5, 6, and all four must add up to 16, so the last digit is 2. Set the wheels to 3562.CODE3562
- Take the second ANCHOR piece (2/2).
Ship Replica Pistons
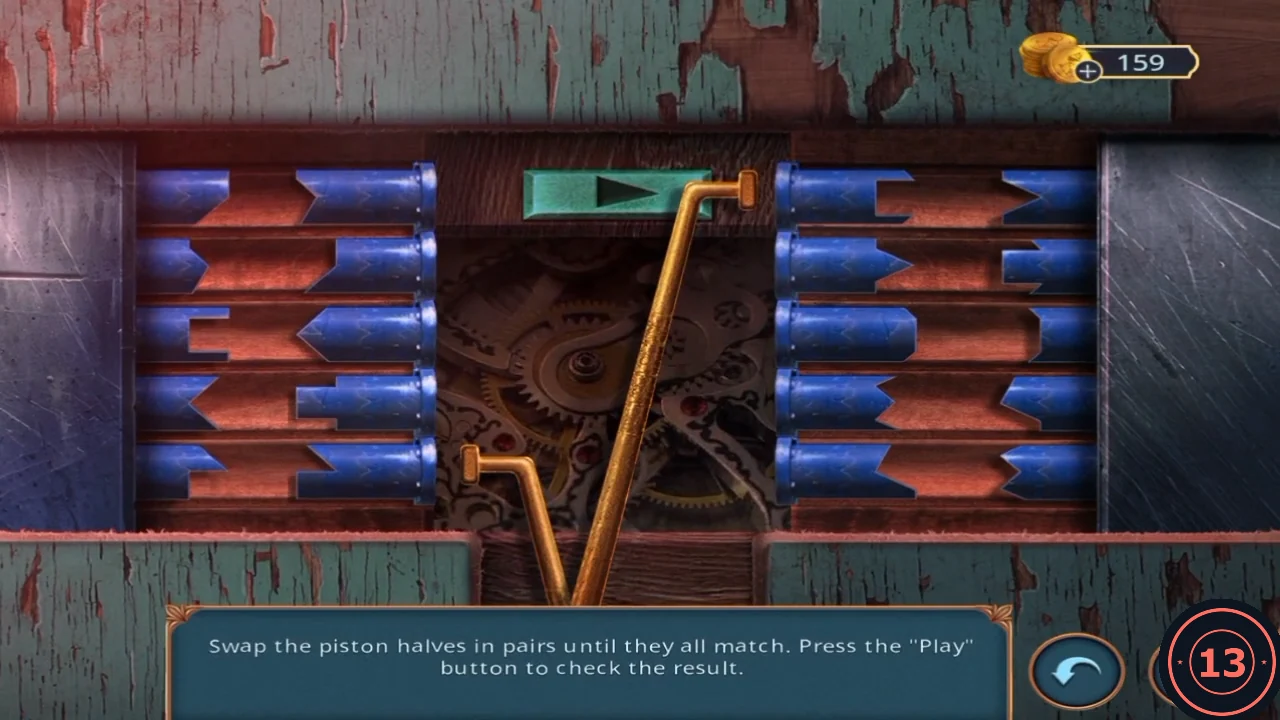
There are ten rows, five on each side. Each row has a fixed outer piston and a movable inner piston. Click two inner halves to swap them. "Play" sends the arm down to check the rows in order, and it stops at the first mismatch.
- Place both anchor pieces on the ship replica in the cabin. They complete the row of anchors and the bow panel slides open.
- Swap inner pieces until each inner tip fits its outer tip exactly, like two interlocking puzzle pieces. Press Play to find the first wrong row, fix it, and check again. The recorded player used about eight checks.
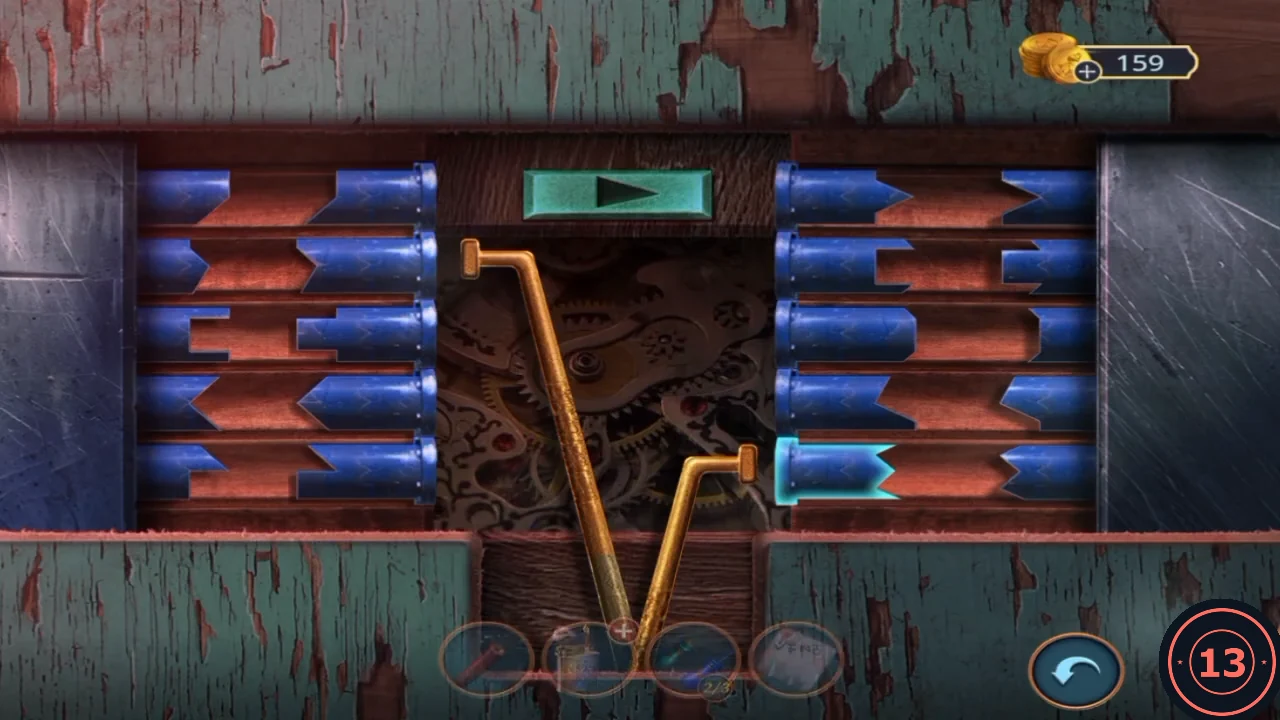
Solved: every inner tip fits its outer tip. - Read the Captain's diary page about the engine fault he kept quiet. The Sunken Lies achievement ("Study a model of a sunken ship") appears.
Deck Suitcase Rune Lock
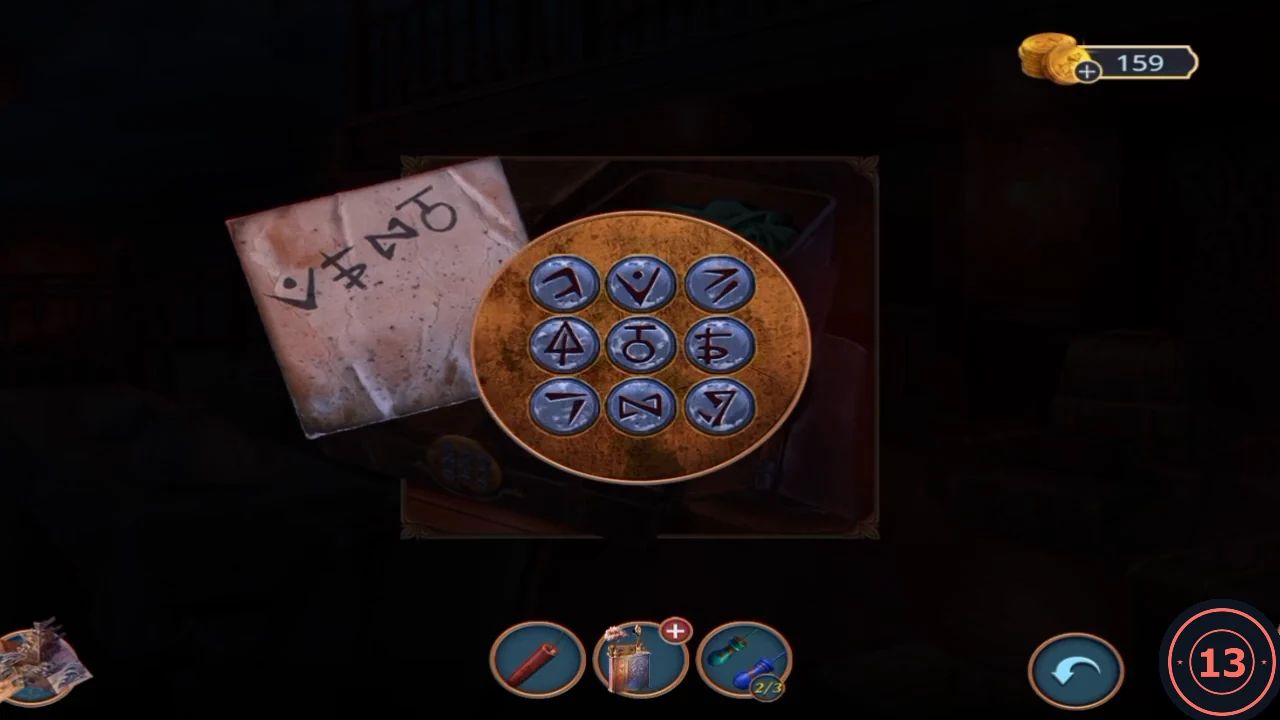
The leather suitcase on the luggage pile on the deck has a 3x3 keypad of runes. The back of the woman's photo shows the order.
- Press, in order: top-centre (V with a dot), middle-right (crossed slanted glyph), bottom-centre (bow-tie shape), centre (circle with a short stem and a horizontal bar above it). This matches the photo's symbols from left to right.CODETop-centre, middle-right, bottom-centre, centre
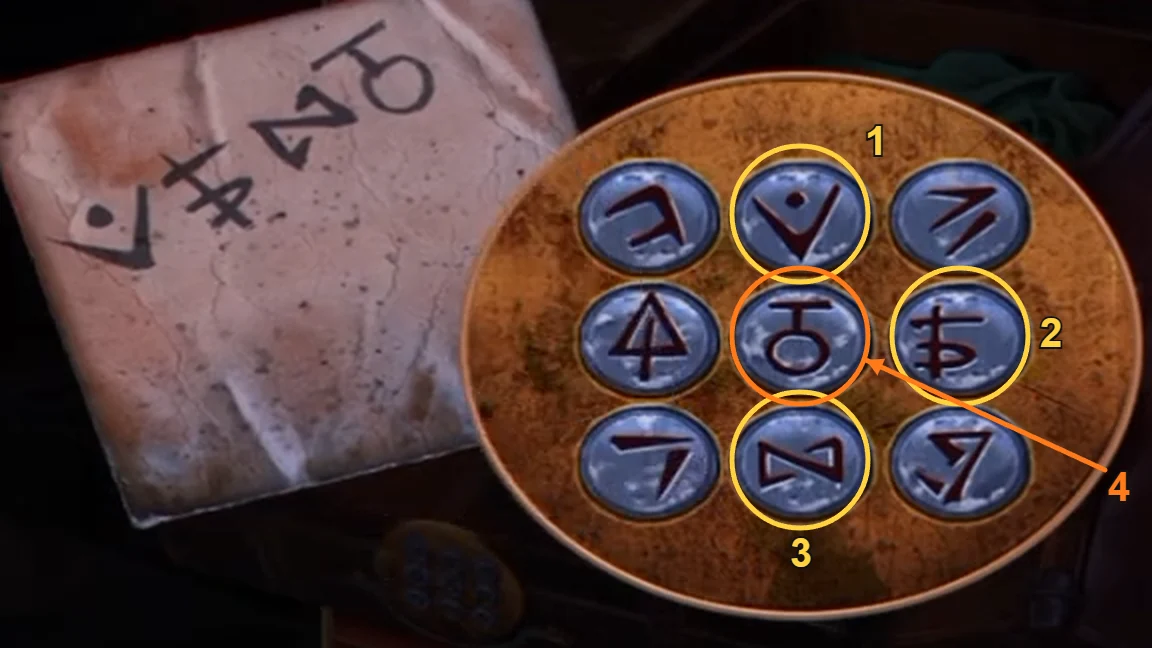
Press order matching the photo from left to right. - Take the long ornate NEEDLE from the suitcase.