PUZZLE
Brick wall tile puzzle
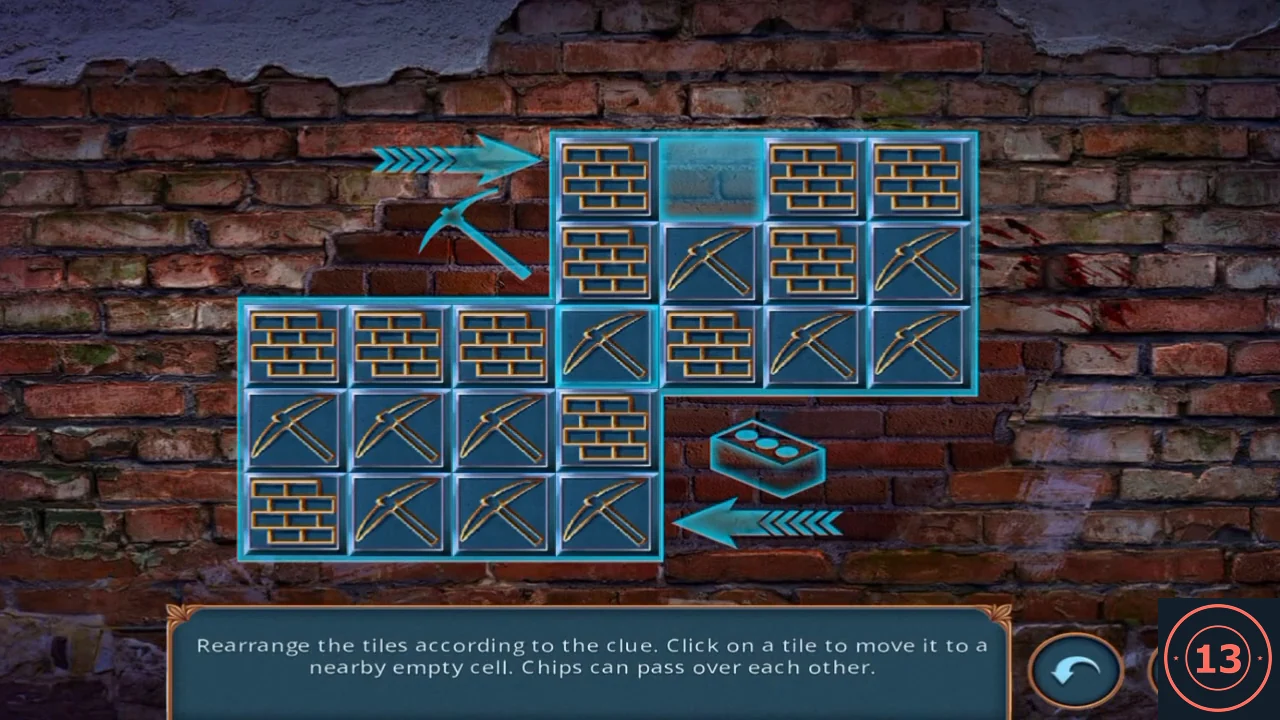
Break through the new sewer wall to find Lewis.
- Open the BROKEN POLE (+) and add the PICK HEAD to make a PICKAXE.
- Use the PICKAXE on the new brick wall in the sewer.
- Number rows 1-5 from the top and columns 1-7 from the left: rows 1-2 use columns 4-7, row 3 uses all seven, rows 4-5 use columns 1-4. Clicking a tile moves it into the empty cell, either from the next cell in the same row or column, or by jumping straight over one tile from two cells away (this is what "Chips can pass over each other" means). No diagonal moves. Goal: pickaxes fill rows 1-2 and row 3 columns 5-7, bricks fill row 3 columns 1-3 and rows 4-5, and the empty cell ends at row 3, column 4; the wall breaks as soon as this layout is complete. The recording's starting layout (B brick, P pickaxe, _ empty) was: row 1 B _ B B; row 2 B P B P; row 3 B B B P B P P; row 4 P P P B; row 5 B P P P. From that layout this 44-click sequence solves it (row-column of the tile to click): 1-6, 3-6, 3-4, 5-4, 5-3, 3-3, 4-3, 4-4, 2-4, 1-4, 3-4; 3-3, 3-5, 1-5, 1-7, 1-6, 3-6, 3-4, 5-4, 5-2, 3-2, 4-2; 4-1, 3-1, 3-3, 3-5, 1-5, 1-4, 3-4, 5-4, 4-4, 2-4, 2-6; 3-6, 3-4, 3-2, 4-2, 4-4, 2-4, 3-4, 3-2, 3-3, 3-5, 3-4. The player in the recording solved it by trial and error in about 75 moves, so this shorter list was worked out from the same start and rules. If your start differs, use column 4 and row 3 as the crossing: send pickaxes up through column 4 or right along row 3, and bricks down column 4 or left along row 3, jumping over tiles that are already in place.
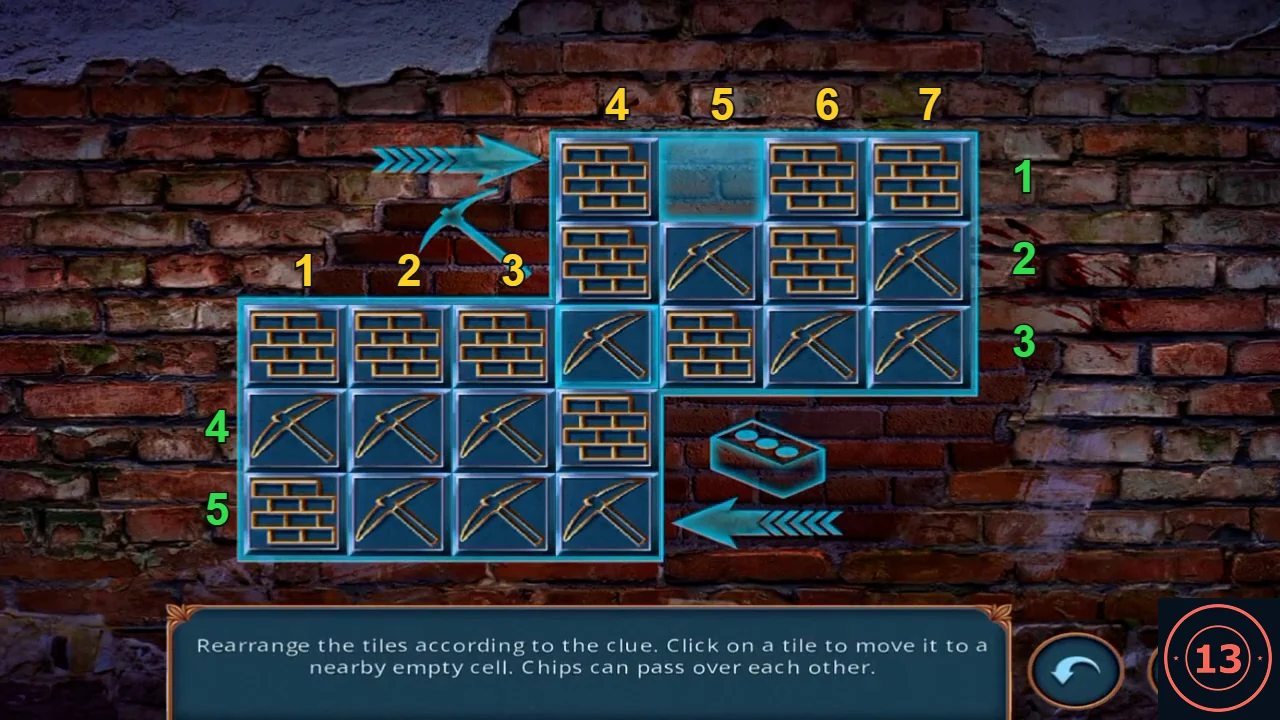
The recording's starting layout with the row and column numbers used in the click list. 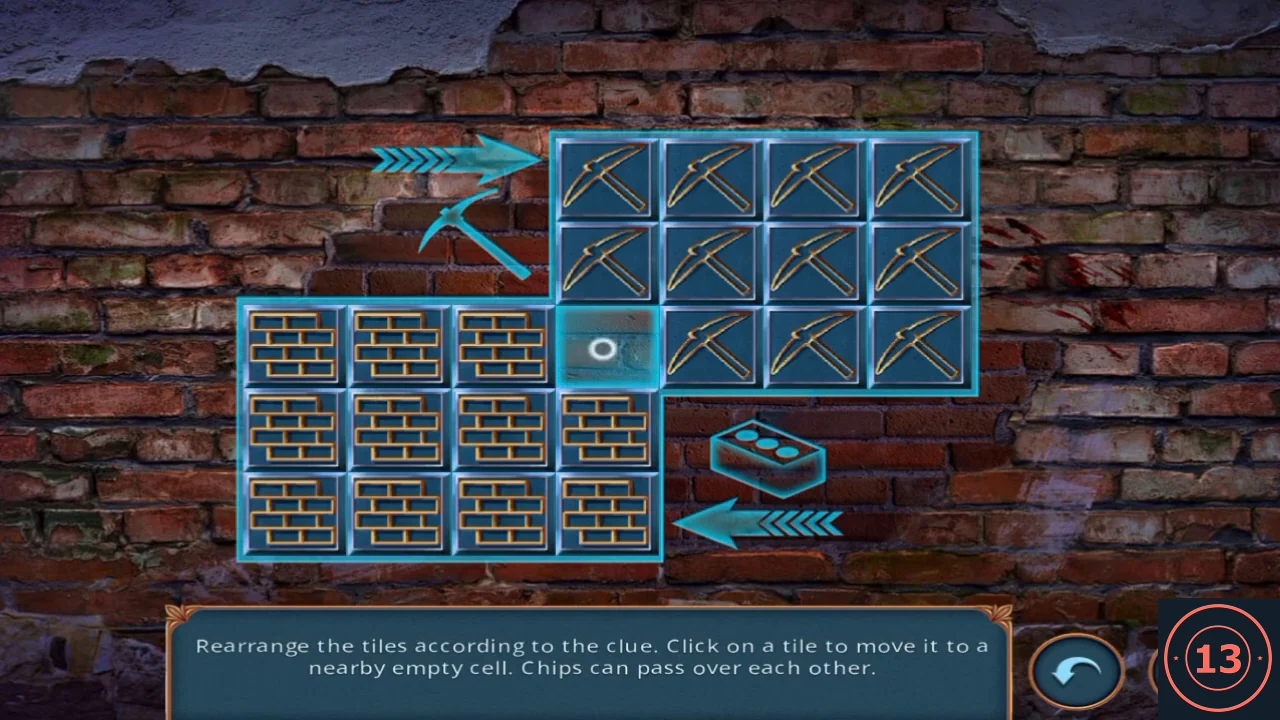
Solved layout: the empty cell ends at row 3, column 4 and the wall breaks. - Behind the wall you find Lewis and his note: Silas has been pocketing the crew's cut. Task Find Lewis is complete.
CHAPTER 6
The rusty satchel
Open the satchel in the hold.
- Return to the hold. Use the RUST REMOVER on the satchel slot (the brush scrubs it), then put the ANCHOR AMULET in the anchor-shaped slot.
- Take the PISTOL (+) and the SYMBOL NOTE. The card beside the bag shows a bird with only one wing.
PUZZLE
Office safe key-path puzzle
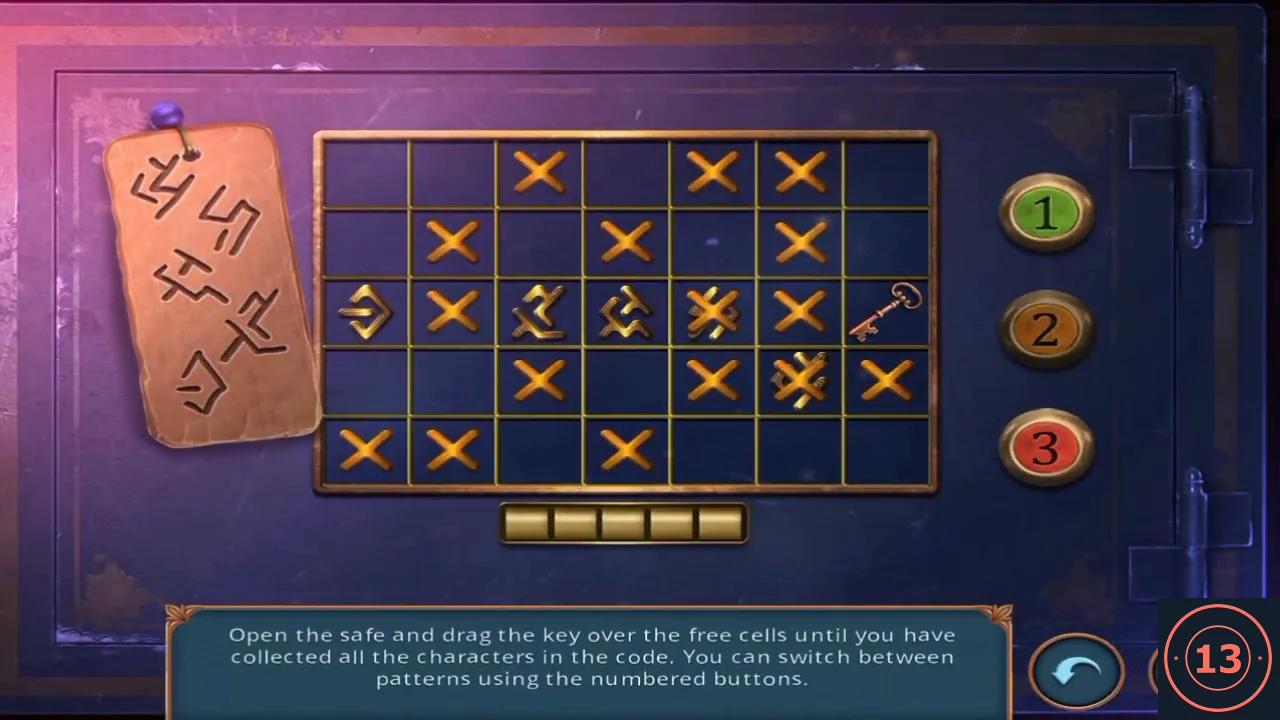
Drag the key over free cells to collect the five code symbols, switching patterns with the numbered buttons.
- In the office, put the SYMBOL NOTE on the small wall safe.
- The key may only enter cells without an X in the current pattern (buttons 1, 2, 3). Recording path, rows from the top and columns from the left, key starting at R3C7: pattern 1, R4C7 then R4C6; pattern 3, R3C6 then R3C5; pattern 1, R3C4; pattern 2, R3C3 then R2C3; pattern 3, R2C2, R3C2, R3C1.
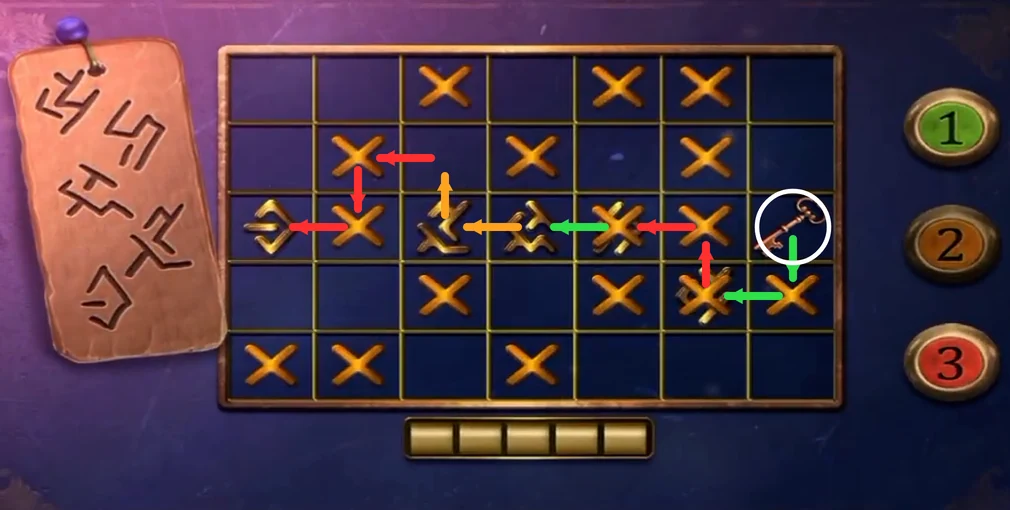
The recording's key path; arrow colours show the active pattern button (green 1, orange 2, red 3). The X marks shown belong to pattern 2.
CHAPTER 6
Gunpowder, feather and the golden wing
Use the safe contents to find the second model ship.
- Take the GUNPOWDER and the RED FEATHER from the safe.
- At the globe, sweep away the cobweb with the RED FEATHER and take the GOLDEN WING.
- Open the PISTOL (+) and add the GUNPOWDER.
- In the hold, put the GOLDEN WING on the one-winged bird card by the satchel. A floor hatch opens; take the model ship piece for SHIP 2/2.
- Use SHIP 2/2 on the checkerboard box on the bench.
PUZZLE
Ship docking puzzle
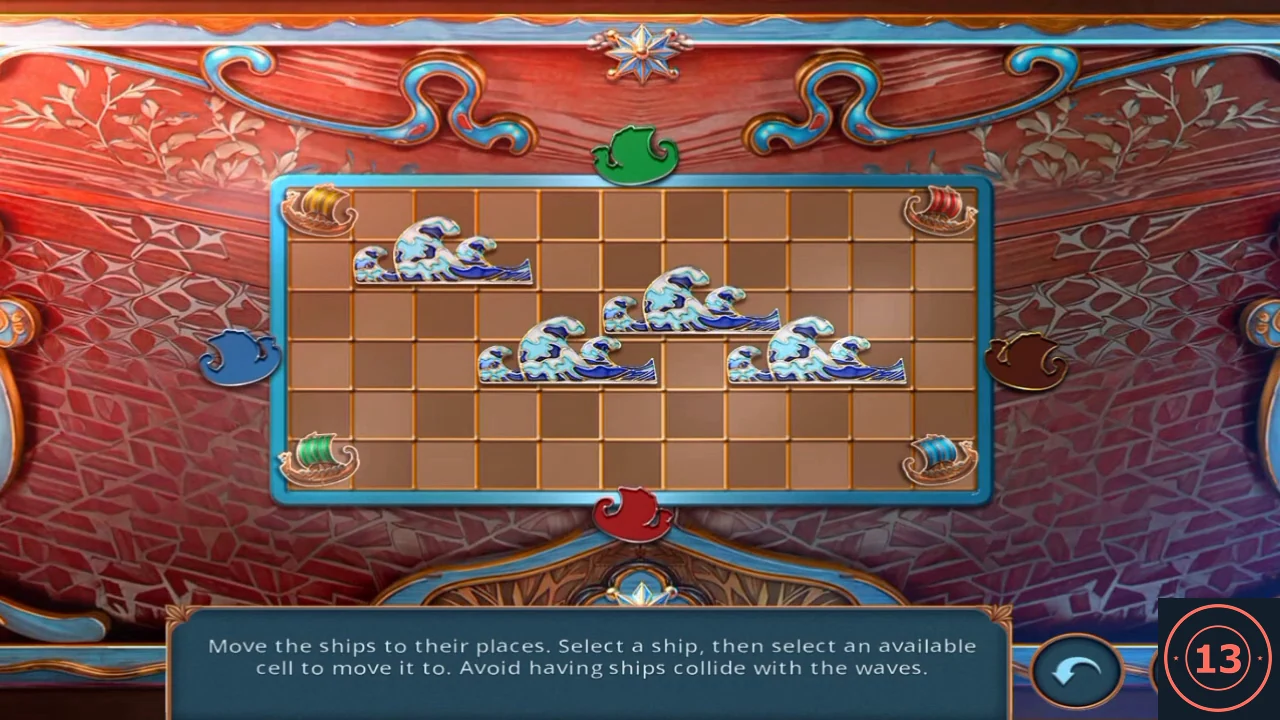
Sail each ship to its matching dock without hitting the waves.
- Select a ship; yellow circles show cells up to two squares away. After every move the four waves shift one step. A ship next to its own dock sails in. Recording moves (rows 1-6 from the top, columns 1-11 from the left): red R1C11-R3C11-R5C11-R6C10-R6C8-R6C6 (docks at bottom centre); blue R6C11-R6C9-R6C7-R6C5-R6C3-R5C2-R4C1 (docks left); yellow R1C1-R3C1-R5C1; green R6C1-R4C1-R2C1-R1C2; yellow R5C1-R6C2-R6C4; green R1C2-R1C4; yellow R6C4-R6C6; green R1C4-R1C6 (docks top centre); yellow R6C6-R6C8-R6C7-R6C9-R6C11-R4C11 (docks right).
- Take the DRIED FISH from the opened box.
PUZZLE
Book press pin lock
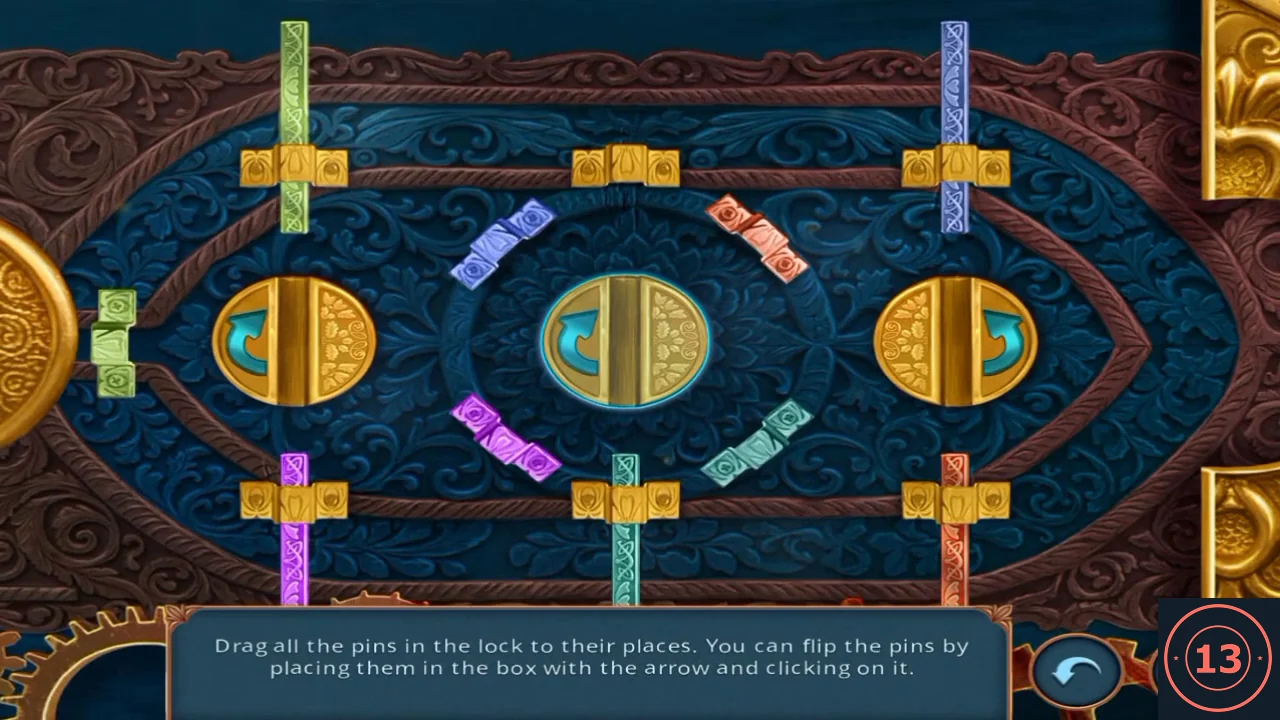
Feed the octopus for the golden key, then seat every pin in the press drawer lock.
- On deck, give the DRIED FISH to the octopus on the rail. It slides away; take the GOLDEN KEY.
- In the office, use the GOLDEN KEY on the gold lock plate of the book press drawer.
- Drag a pin onto one of the three gold turntables and click it to turn the pin, then drag it along the grooves. Seat the blue, orange, purple and teal pins diagonally in their matching inner brackets and the light-green pin horizontally in the left-end bracket. Recording order: purple, teal, blue, orange, green.
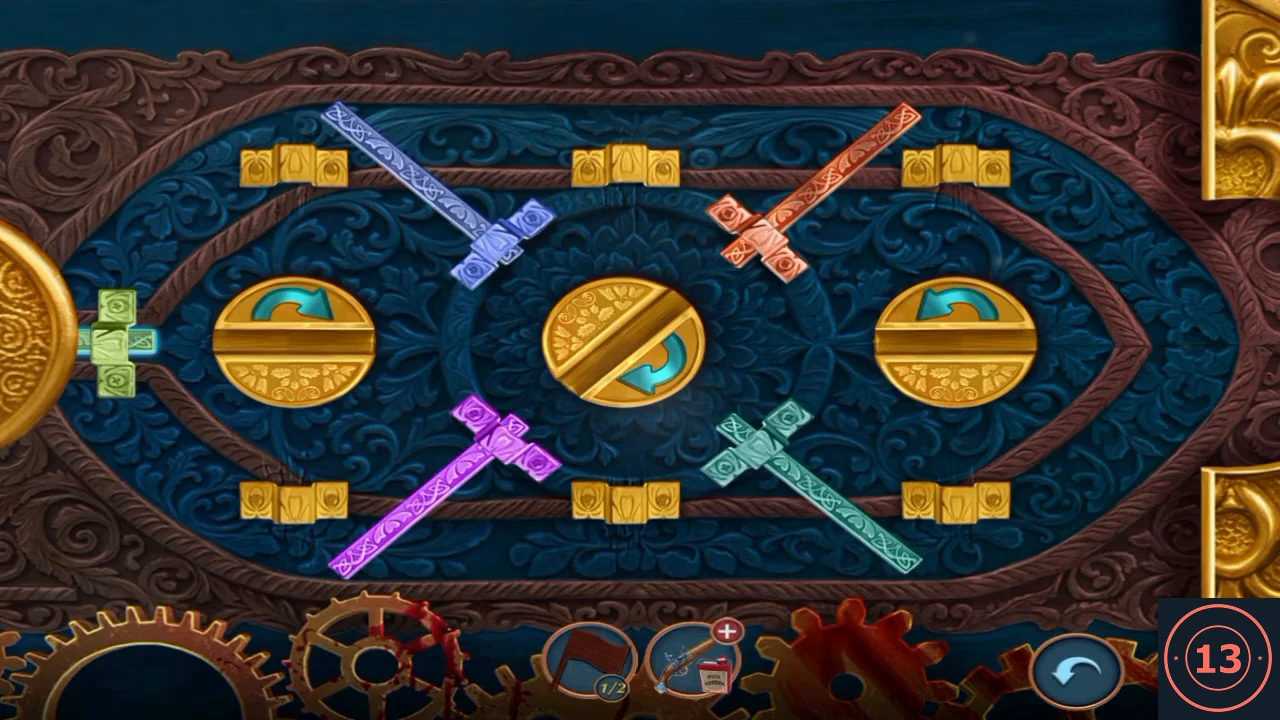
Solved: every pin seated in its brackets.
CHAPTER 6
The globe and the murder list
Complete the flags to open the globe.
- Take the LEAD BALLS and FLAG 2/2 from the drawer.
- At the globe, use the FLAGS on the London and Paris markers. Take the MURDER LIST from the opened globe. Task complete; Silas appears with a gun.
- Open the PISTOL (+) and add the LEAD BALLS, then use the PISTOL on Silas.
PUZZLE
Trap Silas
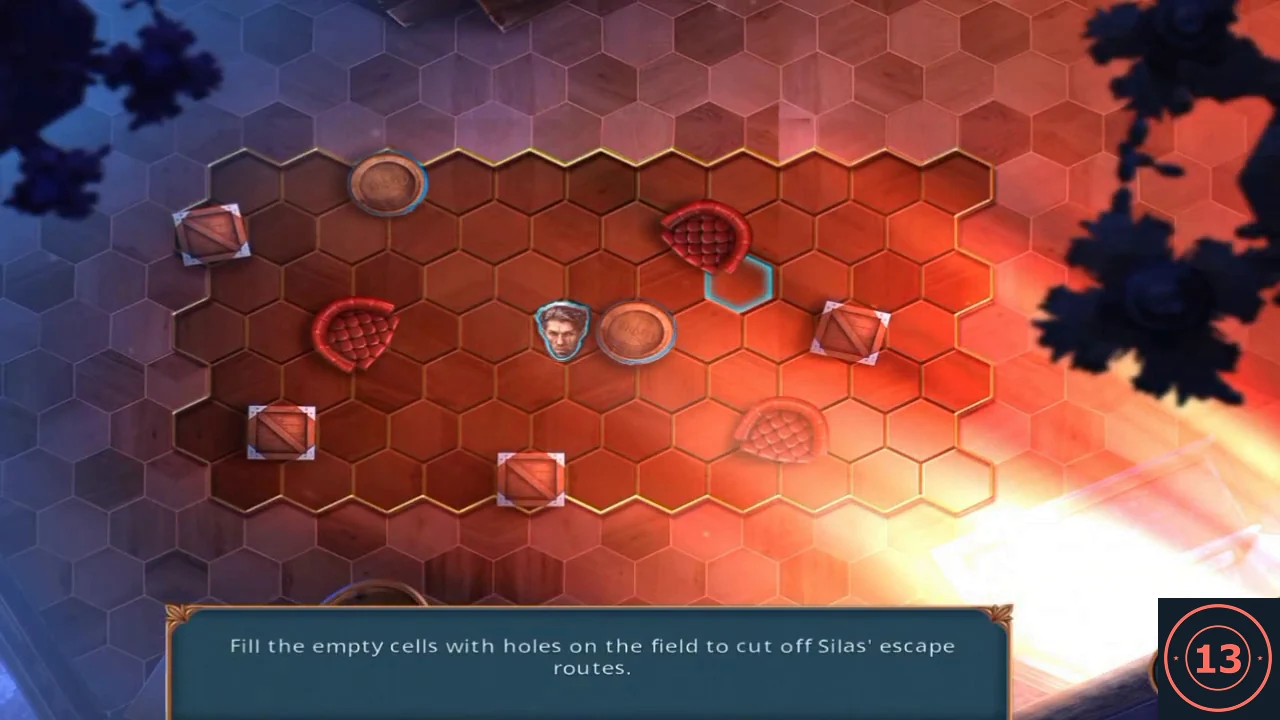
Shoot holes in empty cells until Silas has no escape route.
- Each shot makes a hole in an empty cell, then Silas moves one cell. Crates, nets and barrels already block his path. Build a ring of holes on the side he is heading towards, using the obstacles as part of the ring, until he cannot move. His moves react to yours, so there is no fixed sequence.
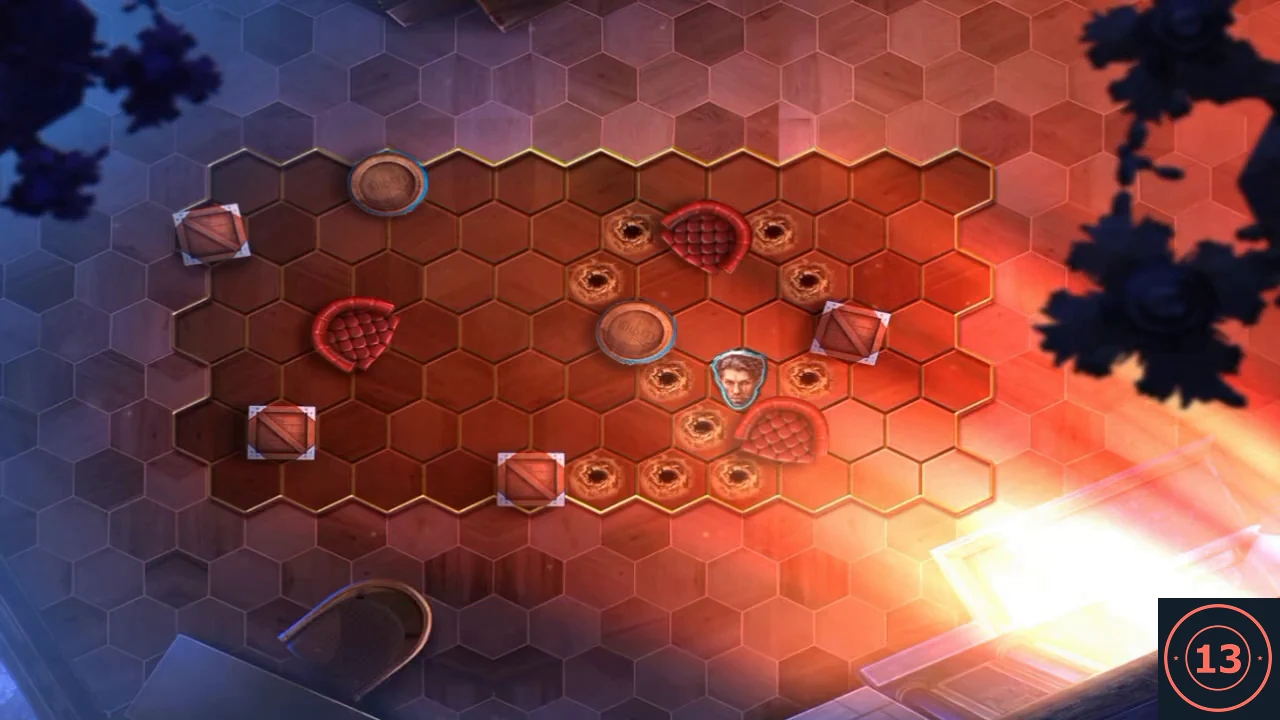
An example of Silas trapped; your ring will depend on his moves.
ENDING
Decision points and the ending
Your dialogue choices earn stars that decide which outcome card you reach.
- After the trap the Decision Points screen lists your five choices, worth up to 13 stars: Encourage George 1 (the 35-coin line in the attic), the pier choice 2 or 4 (Sneak up close 2; the 35-coin option 4), Suggest an idea 1 (the 35-coin lantern line), Stay confident 1 (the 35-coin line before boarding) and Find Lewis 6 (the key option at the guard). Free options are worth 0. On this screen the labels Follow Michaels and Strike him appear swapped compared with the in-game buttons, where Strike him was free and Follow Michaels cost 35 coins. Outcome cards are marked 0, 4 and 10 stars; the recording finished with 7 of 13 stars and received the 4-star card. The 0-star and 10-star cards are not shown.
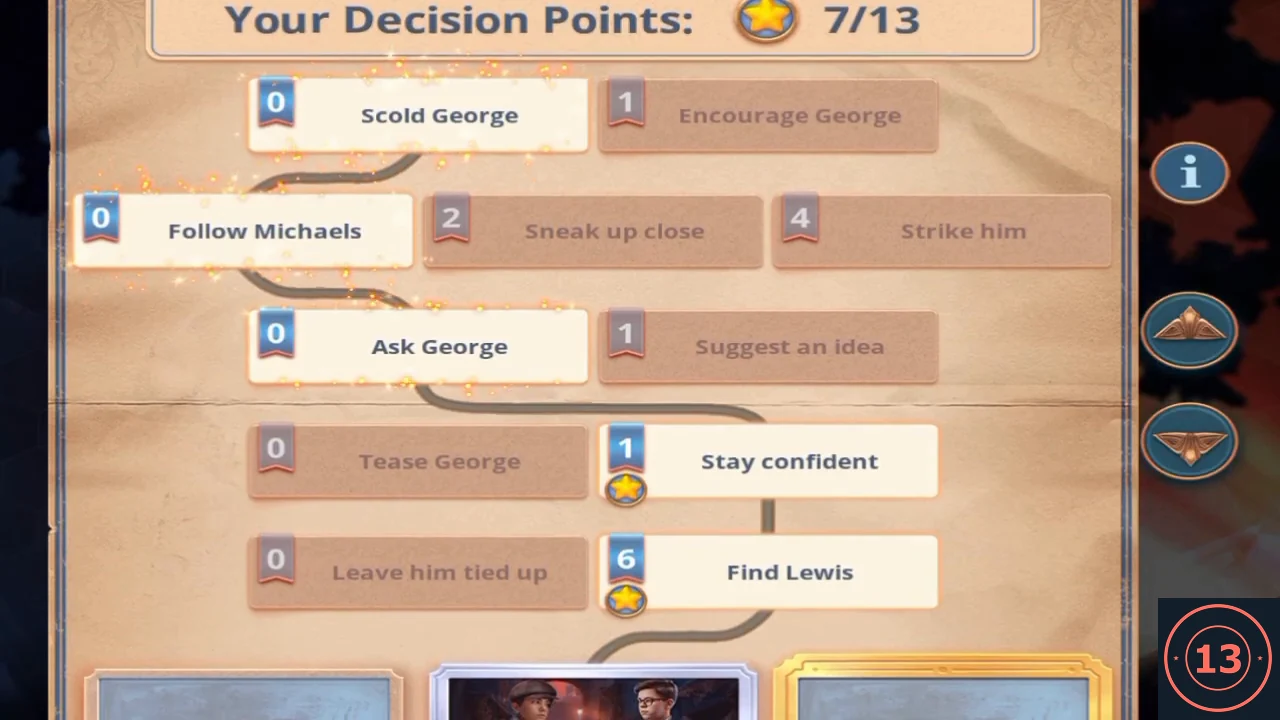
The Decision Points screen at the end of the recording (7/13). 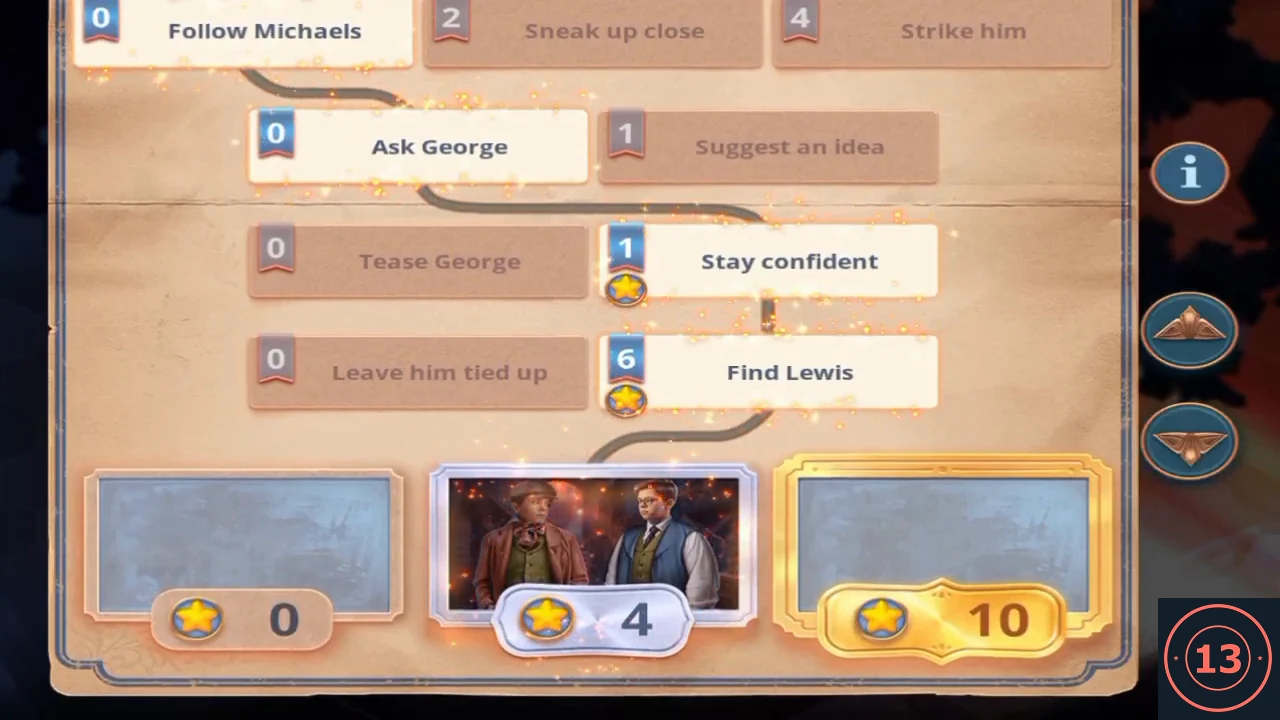
Outcome cards: the recording reached the 4-star card. - Silas falls into the hole and is arrested. The constable thanks the detectives, and the young thieves learn they no longer need to steal.