CHAPTER 1
The attic hideout
Task: make a disguise for a stakeout. Collect the parts of a clothespin and open the dresser.
- At the left table (newspaper and blue album), take the NEEDLE and the SPRING.
- Open the dresser under the bookshelf: take the BOOT and CLOTHESPIN HALF 1/2 lying on the tied books.
- At the sewing machine, take CLOTHESPIN HALF 2/2 from the machine bed and fit the NEEDLE onto the machine.
- Open the SPRING (+) in inventory and add both clothespin halves to make a CLOTHESPIN.
- Use the CLOTHESPIN on the floral lock of the dresser. Take the three items in the drawer: the GREEN CORD, the rolled dark FABRIC and the WIND-UP KEY.
- Go to the sewing machine and lay the FABRIC across the machine bed. The machine still needs thread and a pattern.
- Go to the doll on the swing and insert the WIND-UP KEY into the music box to start the button puzzle.
PUZZLE
Music box button puzzle
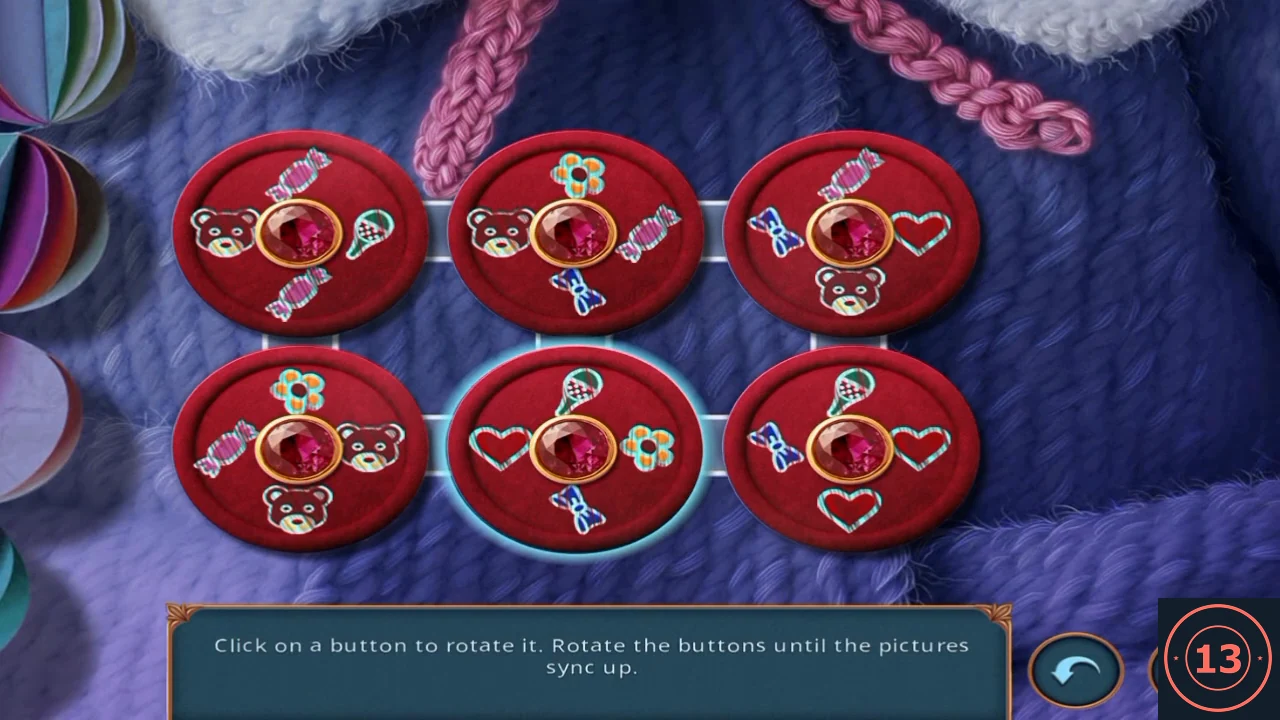
Clicking a button turns it 90 degrees clockwise. Turn the six buttons until every pair of touching edges shows the same symbol.
- Solved arrangement seen in the recording (top, left, right, bottom edge of each button): top-left candy, racket, bear, candy; top-middle flower, bear, candy, bow; top-right heart, candy, bear, bow; bottom-left candy, bear, flower, bear; bottom-middle bow, flower, heart, racket; bottom-right bow, heart, racket, heart. The starting rotations may differ, so match the symbols rather than counting clicks.
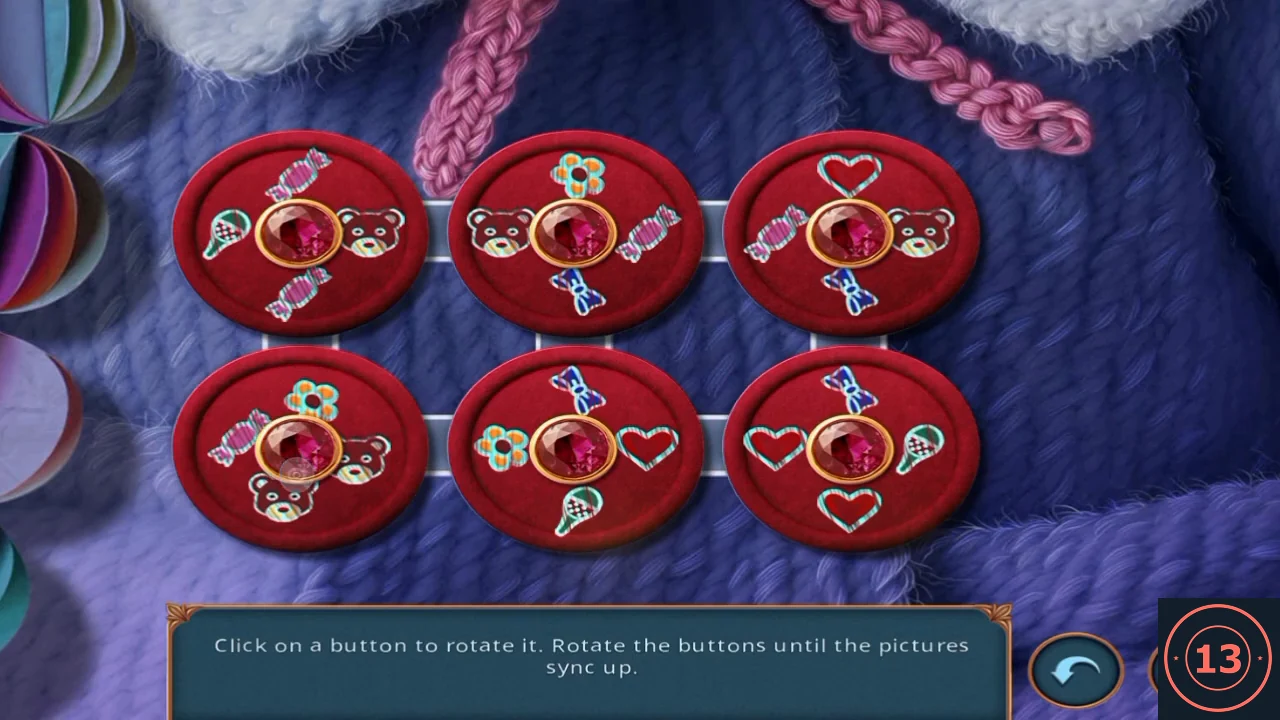
Solved: every pair of touching edges matches. - Take the PINS, the BLUE THREAD spool and the SEWING MACHINE AMULET from the box.
PUZZLE
Blue album and the arrow-stitch puzzle
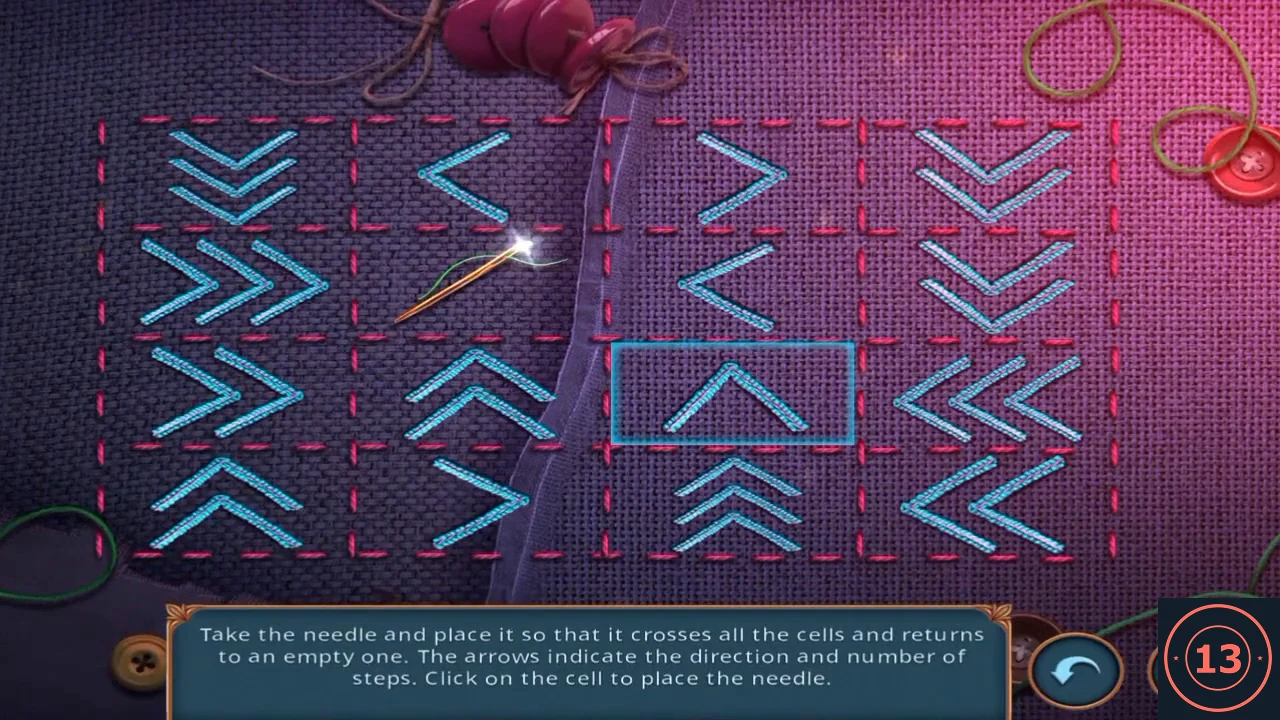
Open the album for the sewing pattern, then guide the machine needle over every square.
- Put the SEWING MACHINE AMULET into the lock on the blue album. Take the PATTERN; a PENCIL is also added to your inventory here.
- At the sewing machine, with the FABRIC already laid on the bed, put the BLUE THREAD on the spool pin and lay the PATTERN on the fabric.
- Each square shows an arrow direction and distance. Click the square in row 3, column 2 (the double up arrow) as the starting square: the needle then follows the arrows through all 15 arrow squares and finishes on the empty square in row 2, column 2.
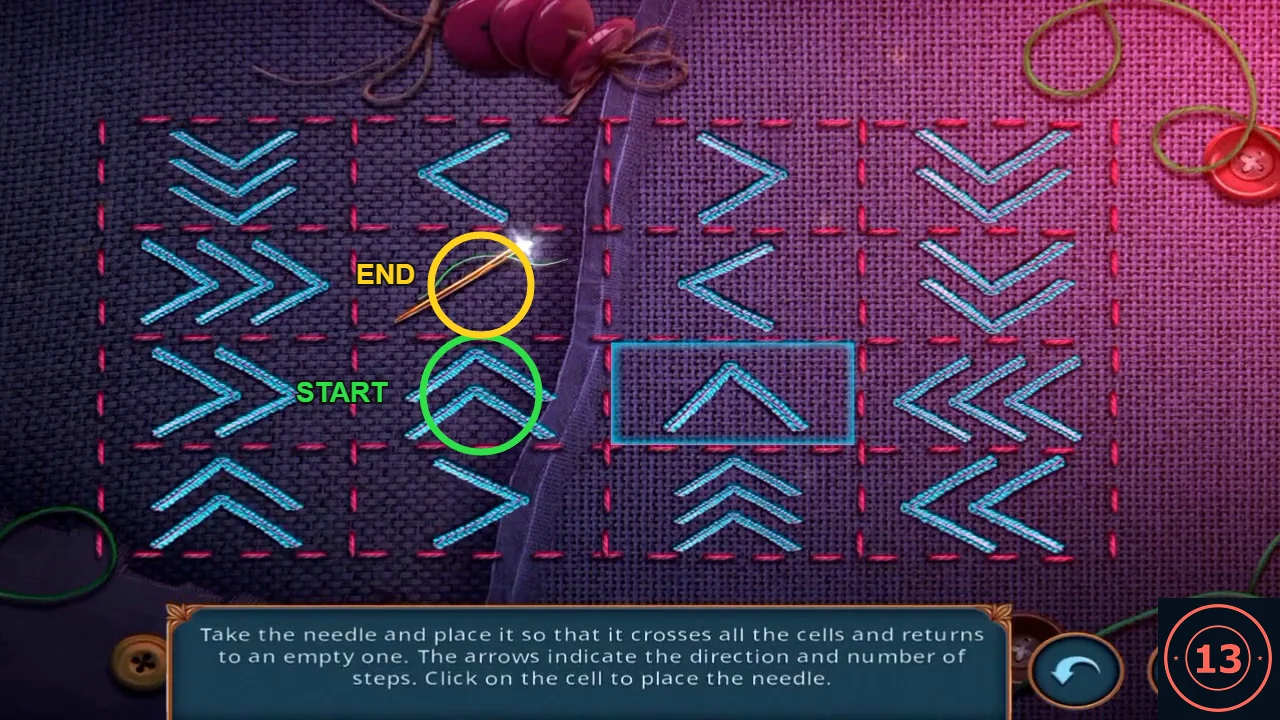
Start on the double up arrow in row 3, column 2; the needle finishes in row 2, column 2. - Take the CLOAKS. In the following conversation you choose between "Spy detectives... I love it!" (35 coins, +1 star) and "Stop fooling around. Let's go before there's a new victim!" (free). The recording took the free option.
CHAPTER 2
The port pier
Find where the thieves meet and get past the stacked crates.
- Open the covered rowboat close-up and take the red HAND NET.
- At the left of the dock (bucket on the carved stone), take the WOODEN PLANKS and then the bucket of RESIN.
- Use the PENCIL on the carved stone. The stone itself is too heavy to move.
- At the notice board, wrap the GREEN CORD around the bare knife tang, then take the KNIFE. Read the note: the gang gathers at their lair at midnight.
- At the rowboat, cut the tarp rope with the KNIFE, open the tarp and take the blank PAPER.
- Place the PAPER on the carved stone to make a SYMBOL RUBBING (pillars, flames, chalice, crosshair, umbrella).
- Place the SYMBOL RUBBING on the crate wall left of the pier (green crosshair mark) to start the crate puzzle.
PUZZLE
Crate path puzzle
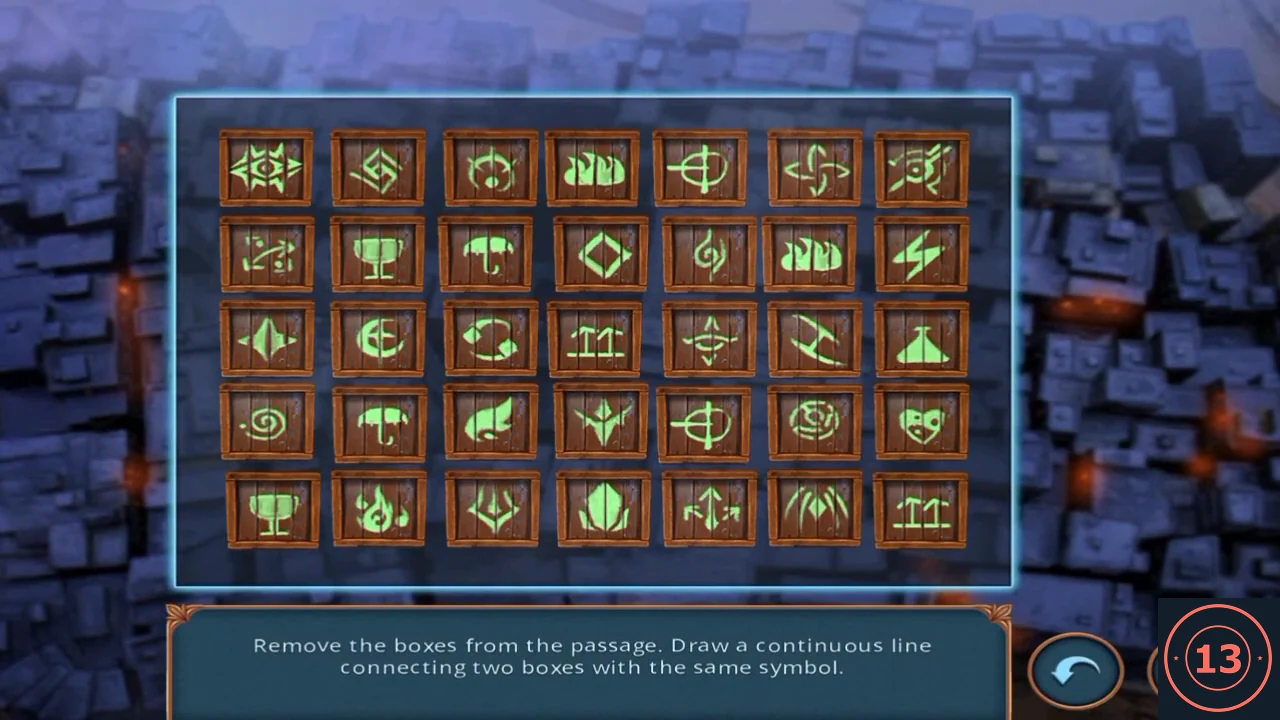
Draw one continuous line between the two crates of each rubbing symbol so the passage clears.
- Using rows 1-5 from the top and columns 1-7 from the left: chalice R2C2-R2C1-R3C1-R4C1-R5C1; umbrella R2C3-R3C3-R4C3-R4C2; flames R1C4-R2C4-R2C5-R2C6; crosshair R1C5-R1C6-R1C7-R2C7-R3C7-R4C7-R4C6-R4C5; pillars R3C4-R4C4-R5C4-R5C5-R5C6-R5C7.
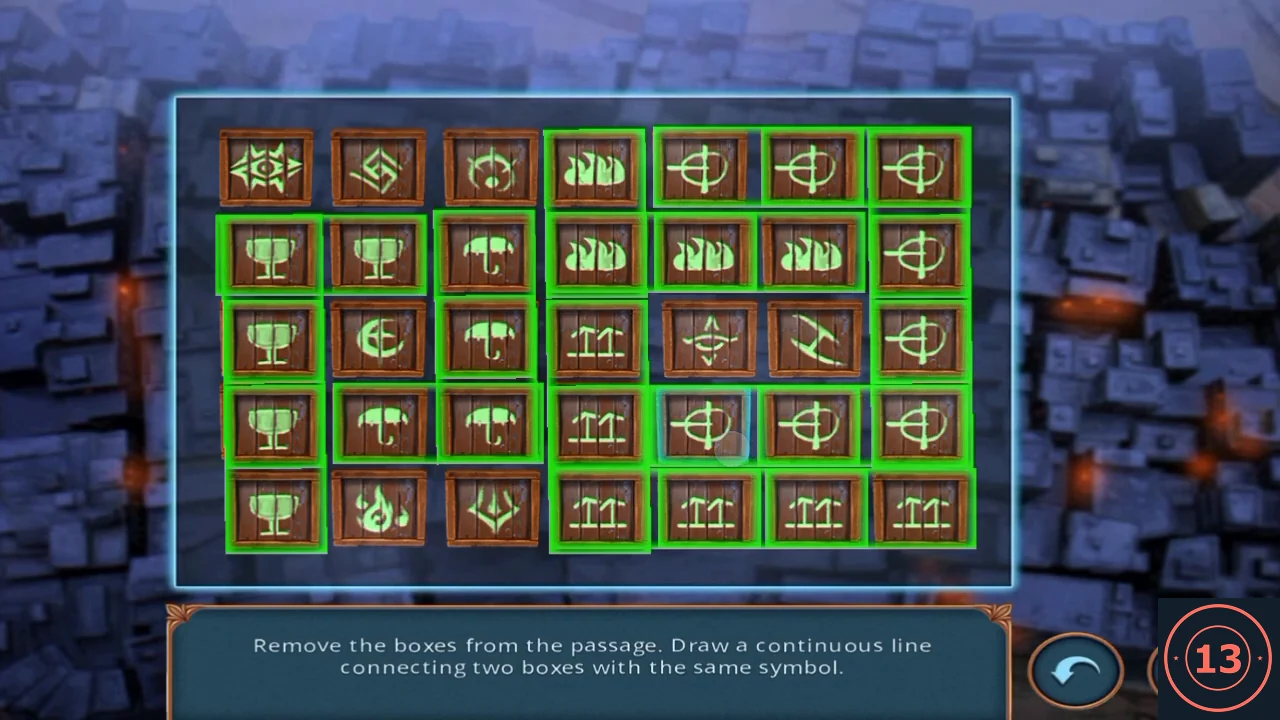
All five symbol paths as drawn in the recording. - Michaels collects the loot. Choose "Strike him" (free), "Sneak up close" (25 coins, +2 stars) or "Follow Michaels" (35 coins, +4 stars). The recording chose Strike him; the detectives then follow Michaels into the alley.
CHAPTER 3
The alley ladder
Repair the ladder to reach the workbench.
- At the fire pit, take the RED TAPE from the carved chest lid. The chest has a seven-symbol lock you solve later.
- At the ladder frame on the scaffolding, add the WOODEN PLANKS, then the PINS (nails), then use the BOOT to hammer them in.
HIDDEN OBJECTS
Workbench hidden-object scene
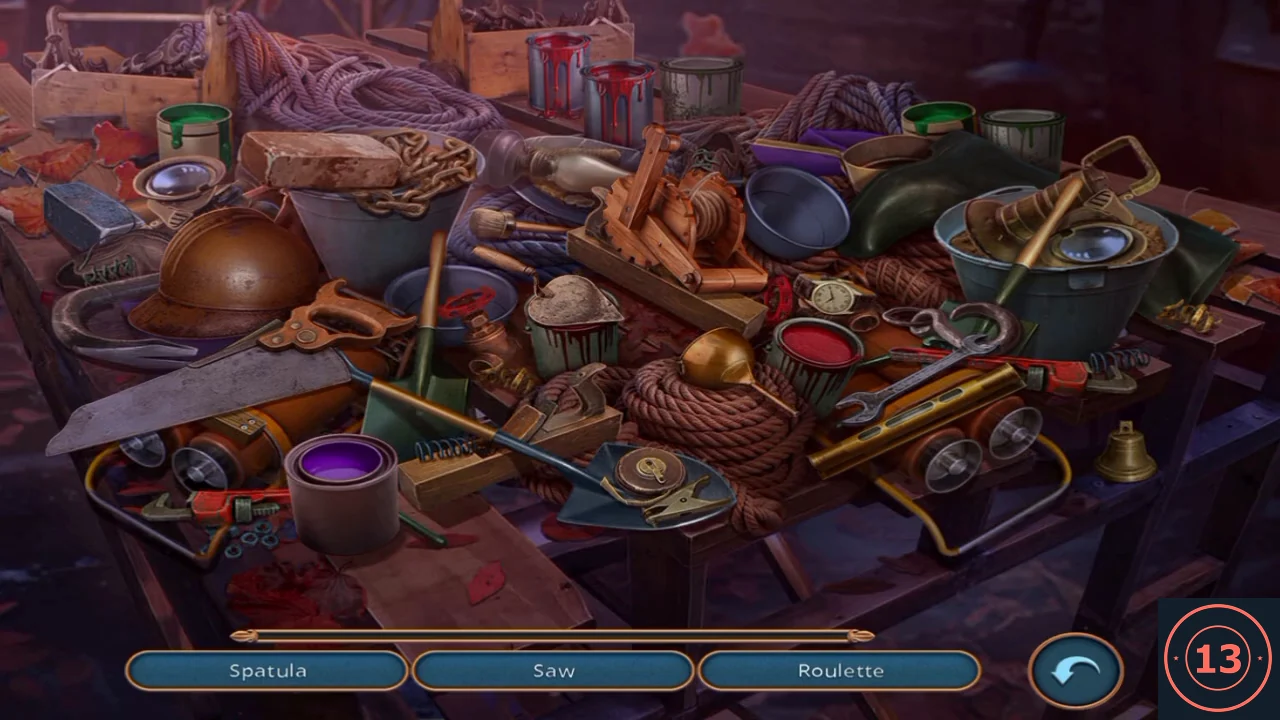
Find the 12 listed items on the workbench.
- Find: saw, level, tape measure, purple paint, hook, boot, chain, manual winch, lamp, helmet, sledgehammer and spatula. The reward is ACID.
CHAPTER 3
Setting the trap
Open the gate, darken the alley and catch Michaels.
- At the gate at the end of the alley, take the UMBRELLA and the SPECTACLES hanging on the chain.
- Use the ACID on the chain to open the gate. In the conversation choose "Let's blow out the lantern." (35 coins, +1 star) or "Any suggestions, partner?" (free). The recording chose the free option; the plan is to cover the lantern with tar.
- Open the UMBRELLA (+) and add the RED TAPE.
- Use the RESIN on the lantern on the right wall to put out the light.
- Use the HAND NET on Michaels.