Old Wing
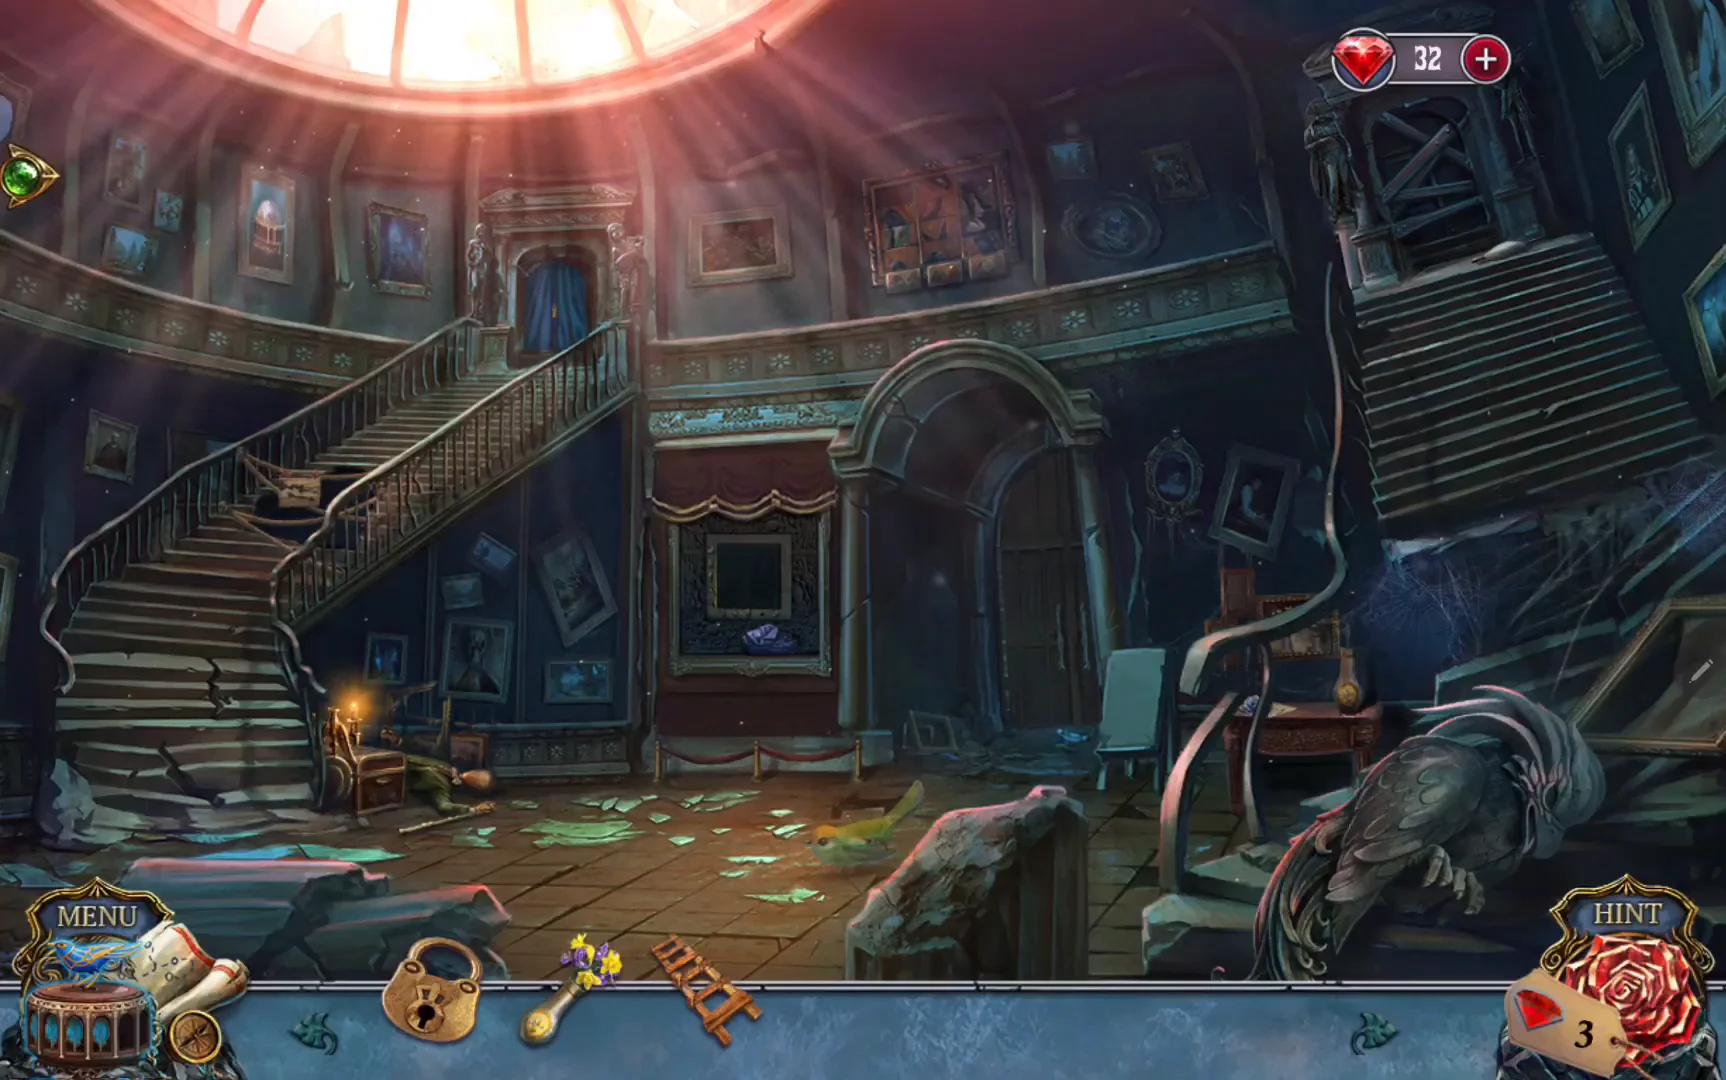
Repair the stairs, defeat Dorianna's painting and free Anna Van Garrett.
- On the console table, take the blue rose PAPERWEIGHT. The picture above the table shows two vases, so put the VASE OF FLOWERS on the empty coaster. Then sort the flowers to match: move the purple flowers into the right-hand vase and leave the yellow flowers in the left-hand one. A drawer opens: put the HEART PADLOCK (it is labelled Small lock) in the padlock-shaped slot of the little golden cage inside. Read the POSTCARDS that appear, because their numbered key drawings are the clue for a later lock. Take the POSTCARDS and the HAIR COMB.
- Take the BLUE CLOTH lying beside the empty frame in the centre of the back wall, and the CANE with the gold eagle head from the mannequin's hand at the foot of the left stairs.
- Wipe the dusty chest with the BLUE CLOTH to reveal its winged lid, then take the BELTS from the chest.
- At the broken stairs, use the HAIR COMB on the rope barrier to remove it and take the NAILS from the gap. Lay the LADDER across the missing steps and tie it in place with the BELTS.
- Click the damaged triptych on the wall and take the SWAN FIGURINE from its lower right panel; you restore the triptych later. Go up the repaired stairs and pull the golden rose tassel on the blue curtain to enter the Baron's bedroom.
- Defeat the winged Dorianna painting by collecting 15 of each of the three required tokens. New tokens appear when a counter runs from 5 down to 0, you can remove a counter by connecting it with neighbouring tokens, and the tokens reset every three moves. The layout can vary, so there is no fixed move list. Take the FEATHER KEY.
- Place the FEATHER KEY on Charlie's music box and use the MAGIC SPHERE Charlie gives you on the painting. Anna Van Garrett's ghost asks for the handkerchief she embroidered for Albert.
Baron's Bedroom and Secret Room
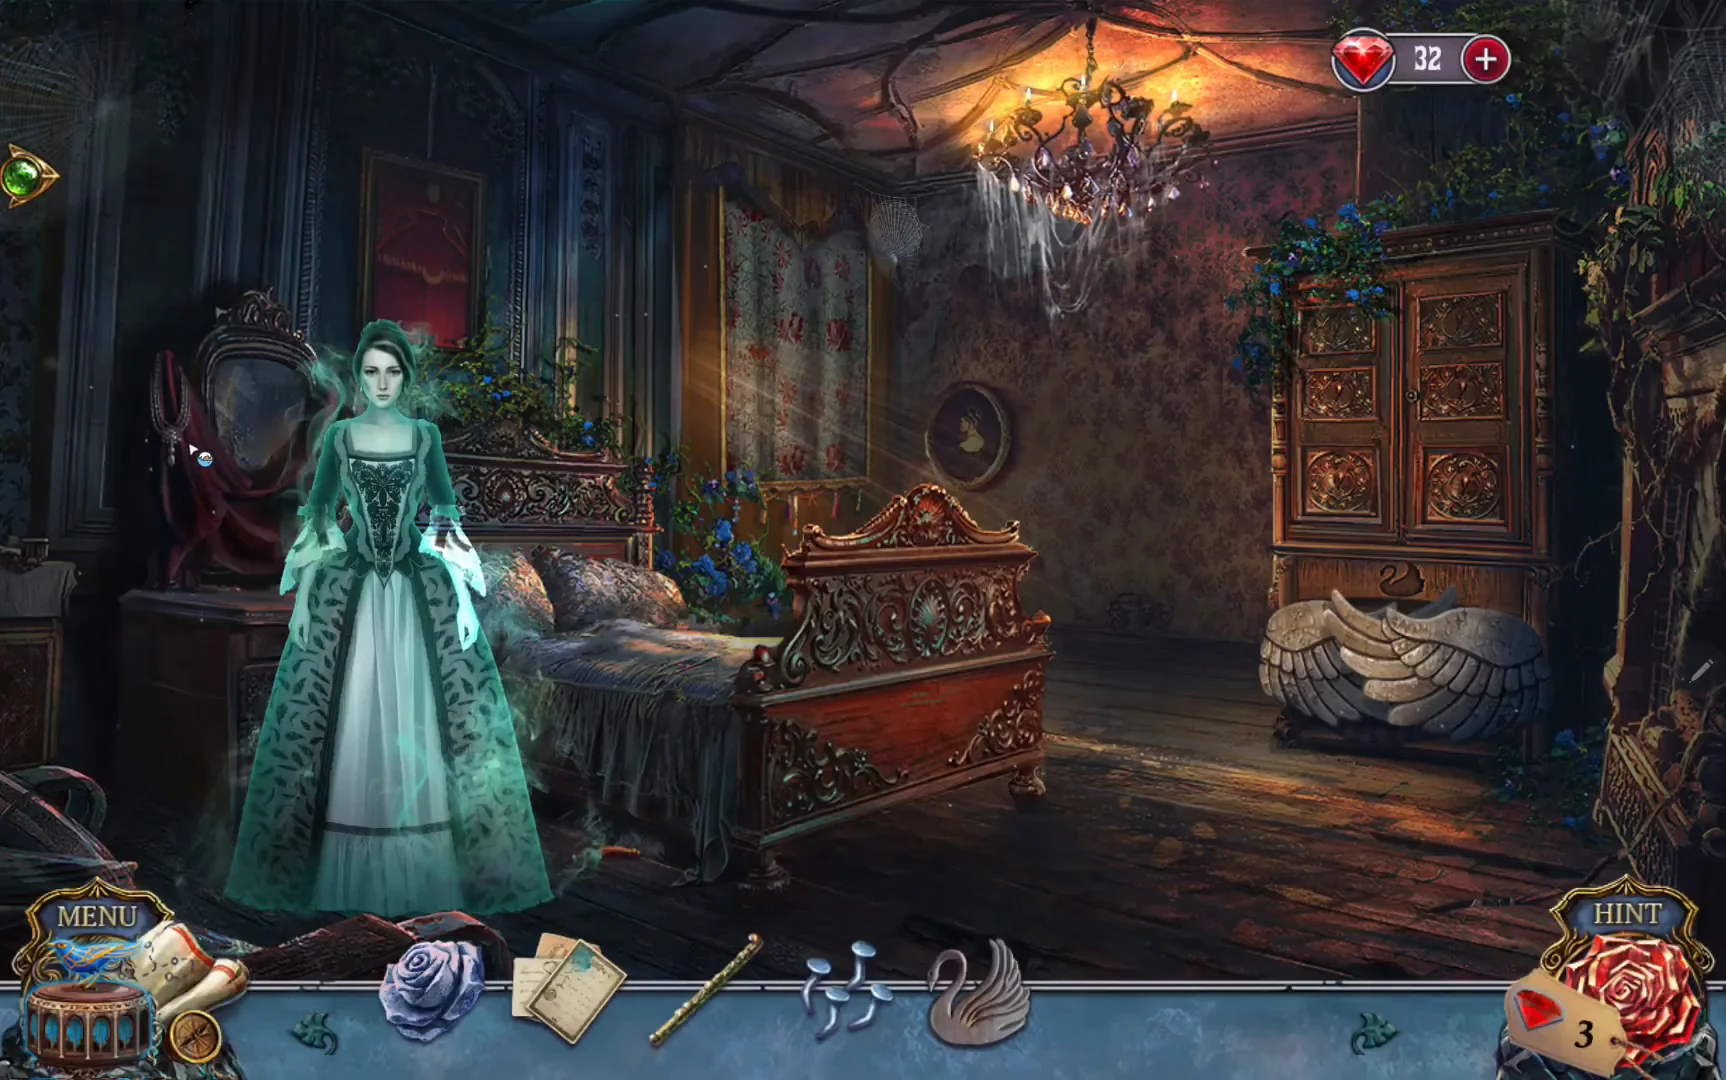
Find Anna's handkerchief, open the Baron's safe and recover his journal.
- Click the floor beside the foot of the bed, under the hanging bedcover. In the close-up of the parted blue drapes, take the ORANGE TASSEL from the floor. Put it on the bed valance. Pulling one tassel moves several loops at once, and the goal is to have the bottoms of all the loops level in one row. From the starting position, pull the tassels in this order: crystal, crystal, purple, purple, orange, green, crystal, green, gold, purple, purple, orange, green, green, crystal. The pink tassel is not needed. If your loops already differ from the start, pull one tassel at a time, watch which loops it moves, and work toward the solved picture.CODECrystal, crystal, purple, purple, orange, green, crystal, green, gold, purple, purple, orange, green, green, crystal
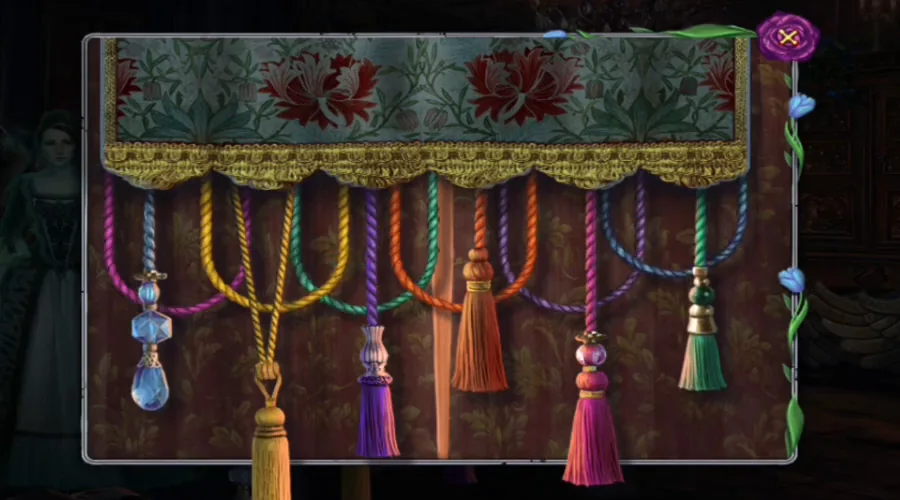
Solved: the loop bottoms line up in one row. Only the blue loop at the far right stays a little higher in the accepted position. - Open the window curtains and take the pointed tool lying on the sill. The window hinge is loose and some nails are missing: put the NAILS on the hinge and hammer them in with the PAPERWEIGHT. The window opens and sunlight shows the keyhole on the wall.
- Put the SWAN FIGURINE in the swan-shaped recess of the stone wings box at the foot of the bed. The wings open; take the ORNATE KEY from the shelf and use it in the golden keyhole on the wall. The hidden door opens to the stairs up to the tower.
- In the secret room, look at the sketchbook on the desk and take the GLUE POT (glue 1/2) standing behind it. Add the missing POSTCARDS to the table and drag the cards so the white route line runs unbroken. It starts at the white dot on the castle card at the upper left, passes through the wax-seal card at the bottom centre and ends at the red X on the card marked The edge of the world.
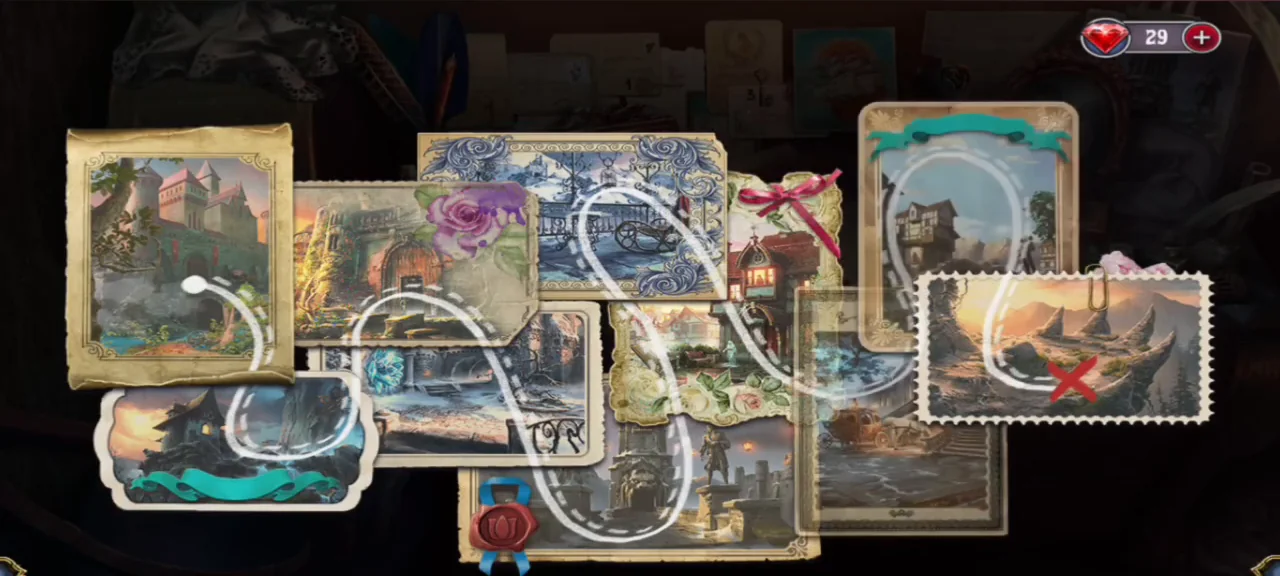
The postcards with the white route line running across them. - In the secret room, take the GOLDEN FEATHER from the base of the globe stand. At the desk, the drawer below is locked with five keys and cannot be opened yet. Take Anna's HANDKERCHIEF lying on top of the roll-top cabinet at the upper left of the desk.
- The roll-top cabinet has no handle: attach the GOLDEN FEATHER as its handle, open the cabinet and take the CLOCK HANDS.
- Go to the balcony grille, read the falcon note and take the COWL hanging there. Look at the chandelier, take the purple HEXAGON pendant from beneath it, then put the COWL on the bird tangled inside; this calms it and opens the knot puzzle. Choose two knots at a time to swap them until none of the lines cross. The bird flies off and the grate opens.
- Open the circular wall lock behind the grate and put the purple HEXAGON in the socket at its centre; the controls do not work until it is in place. Press the arrows to spin the circle and select each outer piece when it matches the inner piece. Take the Baron's POCKET WATCH from behind the lock.
- Take the PAINTBRUSH lying on the mantel; it completes the GLUE (2/2). Attach the CLOCK HANDS to the mantel clock, then put the Baron's POCKET WATCH beside it. Click the clock hands to set the mantel clock to the watch's time, about 11:55: the short hand at XII and the long hand at XI. The watch's dial is tilted, so read it carefully. The clock face opens: take the FIVE KEYS.
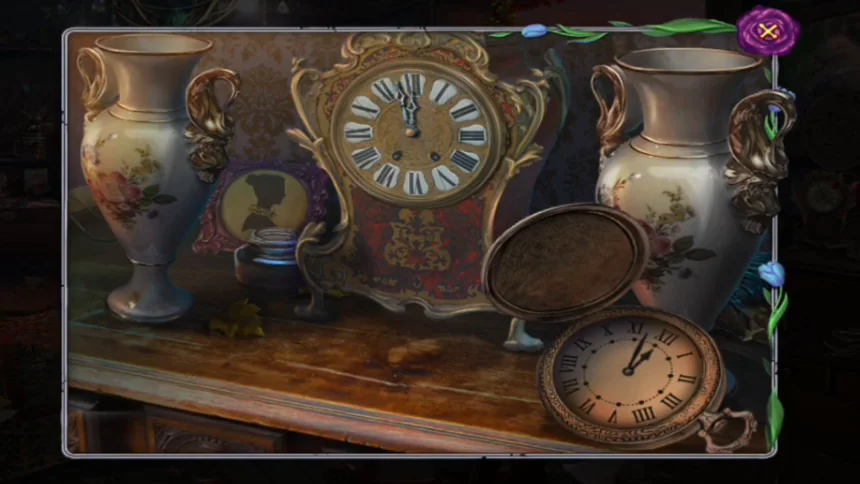
The accepted time, about 11:55: short hand at XII, long hand at XI. The Baron's pocket watch below it has a tilted dial. - At the desk drawer lock, place the keys in the order given by the POSTCARDS, each in the hole with the same colour and pattern: red flower key in the red hole, gold sun key in the gold hole, blue key in the blue hole at the top, white heart key in the heart hole (key 4 on the postcard) and green key in the green hole. A key in the wrong hole gives the message Oops! Wrong keyhole. The drawer opens.
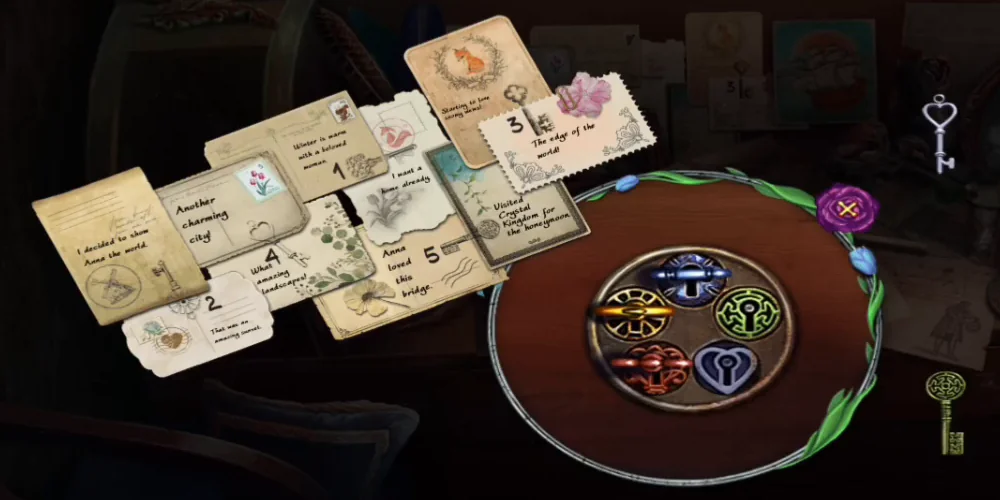
The numbered postcards give the order; each key goes in the hole of its own colour and pattern. - Restore the picture on the signet ring by swapping tiles, then take the RING.
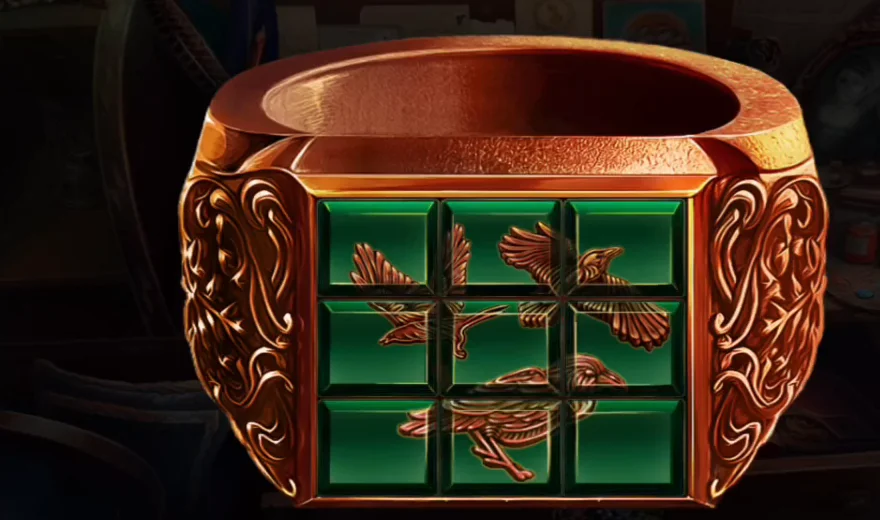
Solved: the picture on the signet ring is complete. - Look at the embroidered landscape picture on the wall by the balcony. Use the SEAM RIPPER (the pointed tool from the bedroom windowsill) on the stitched willow at the upper left and take the THREADS.
- Give the HANDKERCHIEF to Anna. She tells you about the Baron, hands you the THISTLE MEDALLION and becomes a painting again.
- Open the close-up under the hanging bedcover and clear the cobwebs from the embroidered box with the CANE. Put the THISTLE MEDALLION in the thistle-shaped socket. The safe opens: take the purple pincushion with needles, which is SEWING KIT 1/2.
- Open the embroidery basket and find all the pairs of identical thread skeins to get the rest of the SEWING KIT (2/2).
- Use the SEWING KIT on the embroidery picture and click each motif shown in the tray at its place in the picture (blue flowers on the bank, willow sprig, caterpillar, berries, water lily, blue butterfly, pink rose, red flower). Take the RIDDLE.
- Put the RIDDLE on the globe and press the flower icons that appear on the sketch: rose, hops, morning glory and ivy (not wheat). Take the round BLUE GEM. Put the signet RING in the square slot, then take the blue HEART GEM and TRIPTYCH PIECE 1/2 from the opened compartment.
- The swan music box in the bedroom already holds one gem. Put the round BLUE GEM in the empty hole, read the note and take the FIGURINE. Keep the HEART GEM.
- At the bedroom chest of drawers, put the FIGURINE on the dress silhouette of the bottom drawer. The bottom drawer opens: take the lady figurine and put it on the lady silhouette of the middle drawer. In the middle drawer read the Baron's last will, take the RED CORD and put the gentleman figurine on the top silhouette. Take the CIRCULAR PARCHMENT DIAGRAM from the top drawer.
- Put the PARCHMENT DIAGRAM on the dial of the landscape painting and find the listed symbols; some appear only after you rotate the dial. The last item opens a compartment with the JOURNAL.
Rotunda
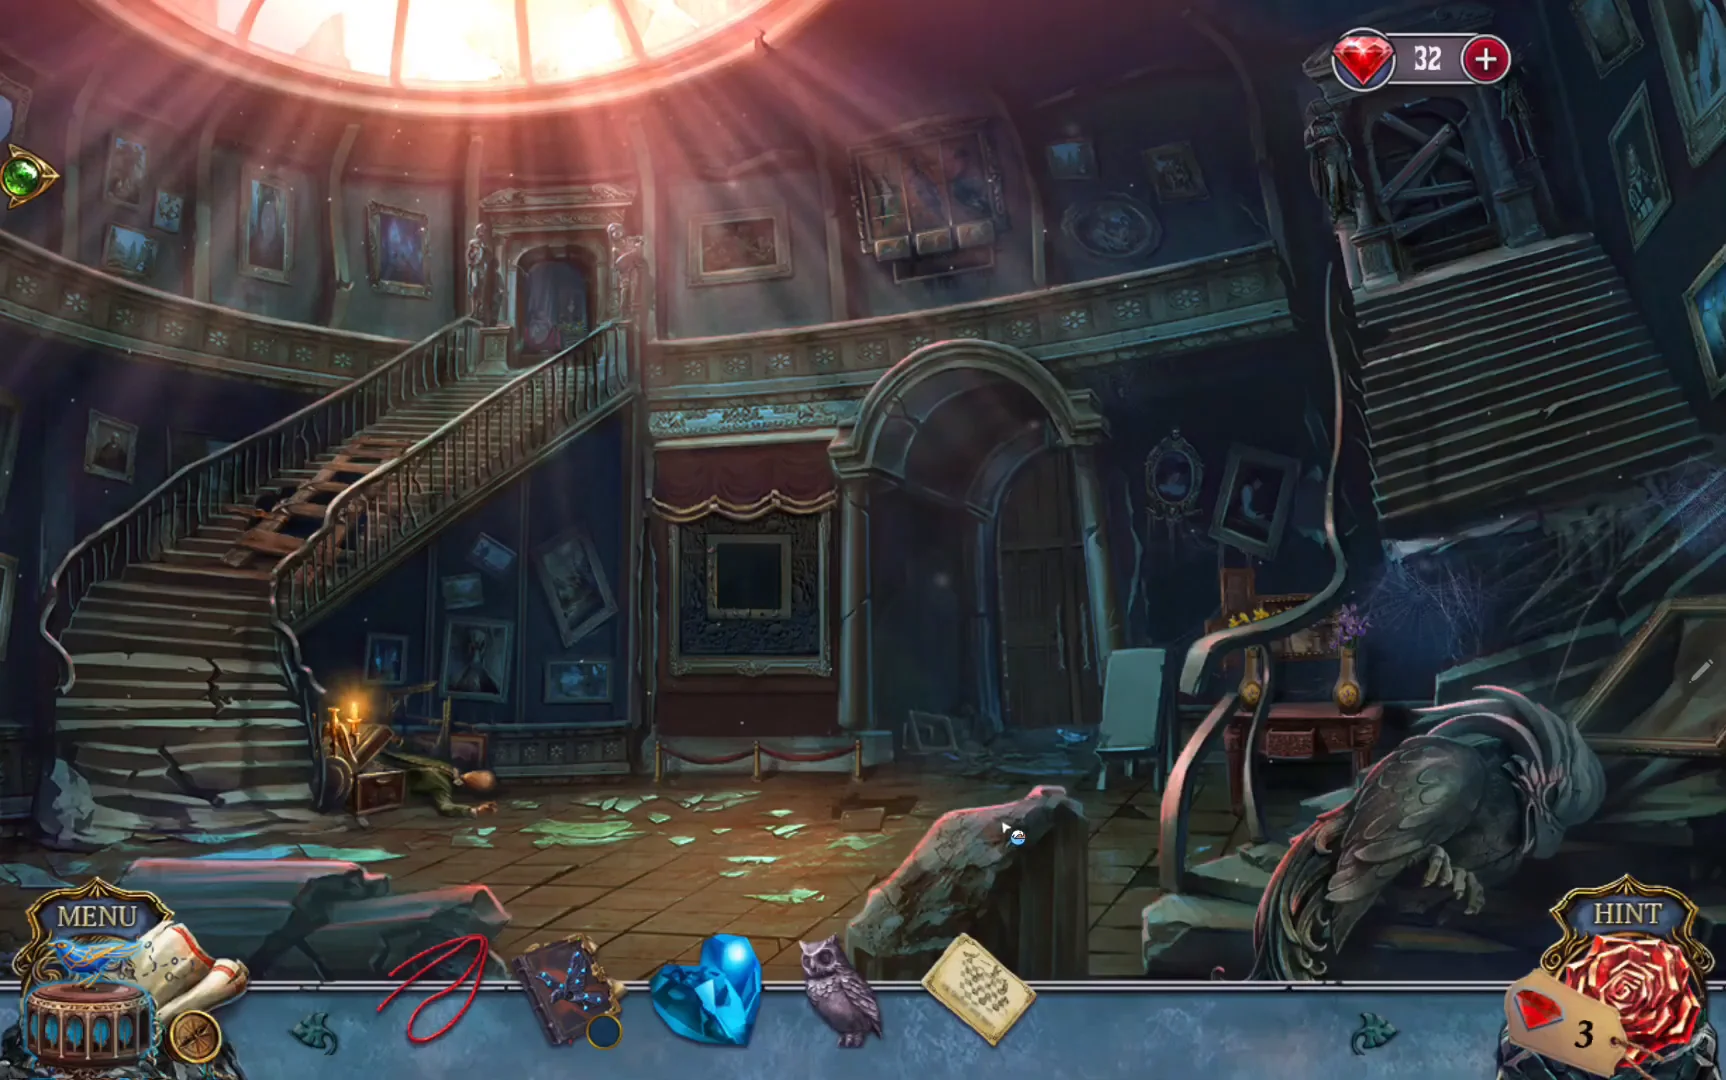
Restore the triptych, read the Baron's journal and open the door to the library.
- Go back down to the Old Wing hall and click the open chest with the mannequin. The painted board inside is broken, so use the GLUE on the crack and take TRIPTYCH PIECE 2/2.
- Put both TRIPTYCH PIECES in the wall frame and swap the parts so each column matches the attributes beneath it: rainbow and ring for the swallow, palette and rose for the raven, dagger and book for the black swan. Take the bird chess rules and the OWL LEVER, a small owl figure.
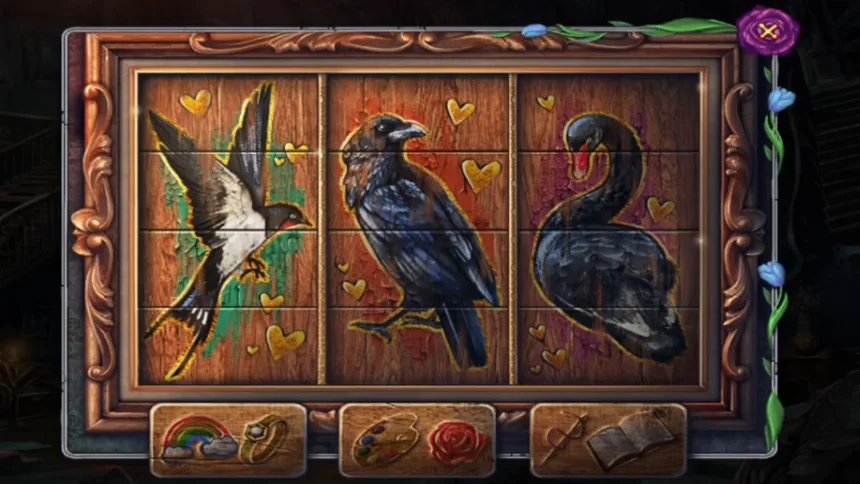
Solved triptych: swallow, raven and black swan above their attribute plates. - Put the HEART GEM in the heart cut-out of the JOURNAL. Drag the loose gems onto the raven, then click a placed gem to rotate it. Each gem has its own spokes, and every spoke must meet another line. Use the solved picture as your target for where each gem sits and which way it faces. Read the journal and take the TILE DIAGRAM.
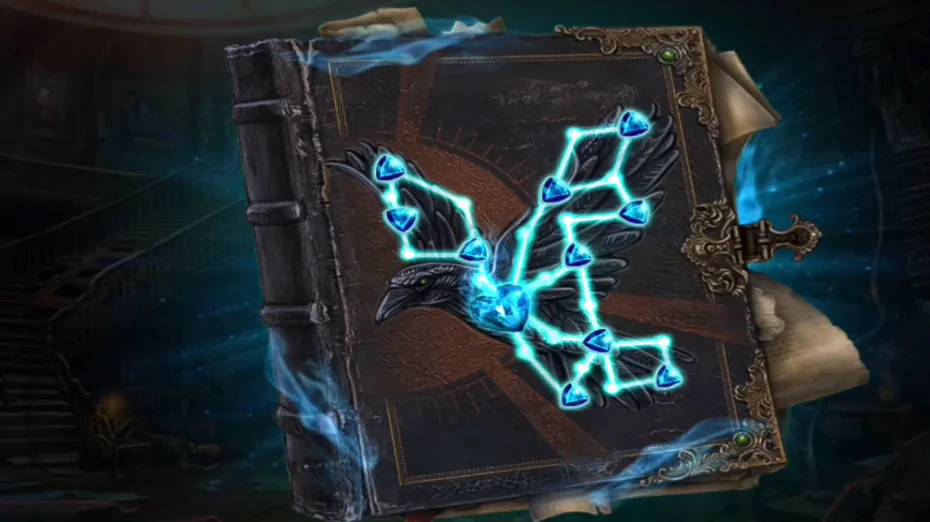
Solved: every line connects and the raven picture is complete. - At the arch door panel, put the OWL LEVER in the empty slot in the bottom row of birds, then attach the TILE DIAGRAM. Each bird lever on the left slides its row by one tile, and each bird lever at the bottom slides its column by one tile. A new tile comes in at the far end, and it is not always the one that just left, so colours change as you go. The diagram holds three patterns, and you make them one at a time: a hollow purple diamond, a green T (the whole top row plus the middle column) and a red X (both diagonals). Each pattern gets a tick as soon as it is complete and keeps it when you break the pattern up for the next one. All other tiles can be any colour. There is no short fixed sequence for this board, so work column by column: press a column's lever until the colours you need sit at the right heights, finish the columns you can, then use row levers for the last few tiles. Keep any tile that already fits by working on the other lines. The pictures show one accepted board for each pattern.
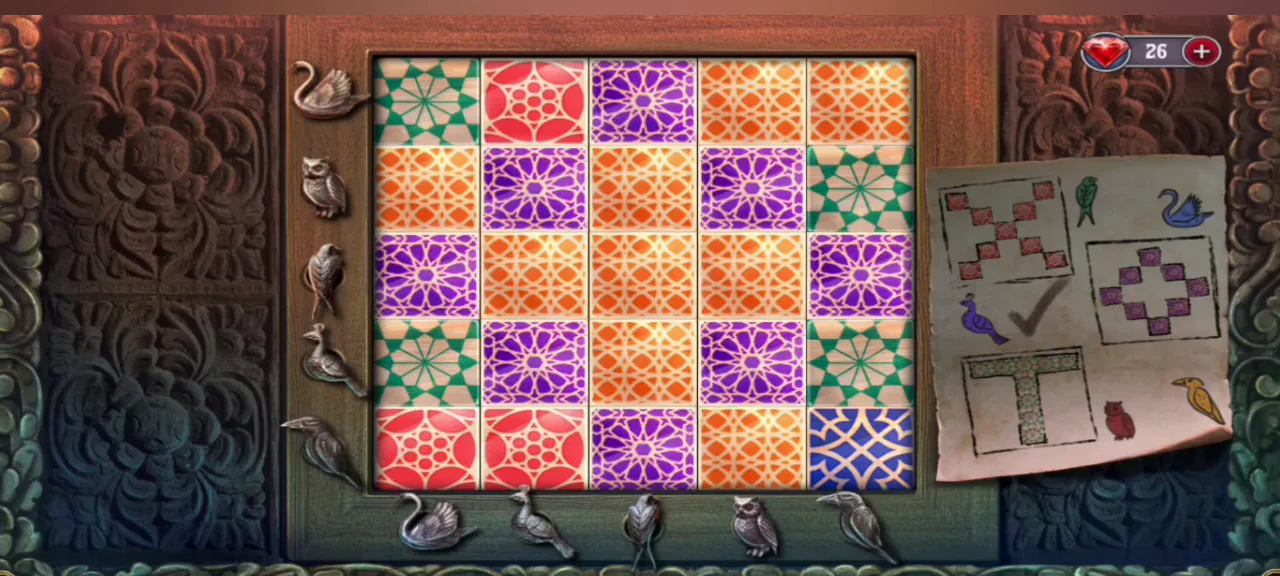
First pattern accepted: the hollow purple diamond. The tick on the diagram stays when you move on. 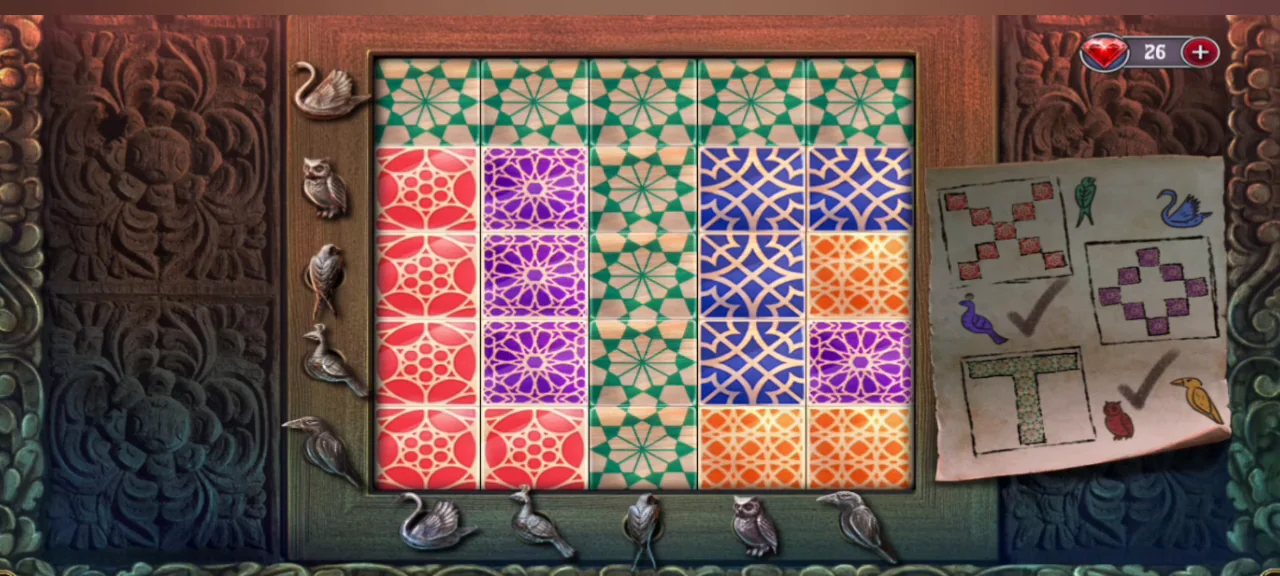
Second pattern accepted: the green T, made of the whole top row and the middle column. 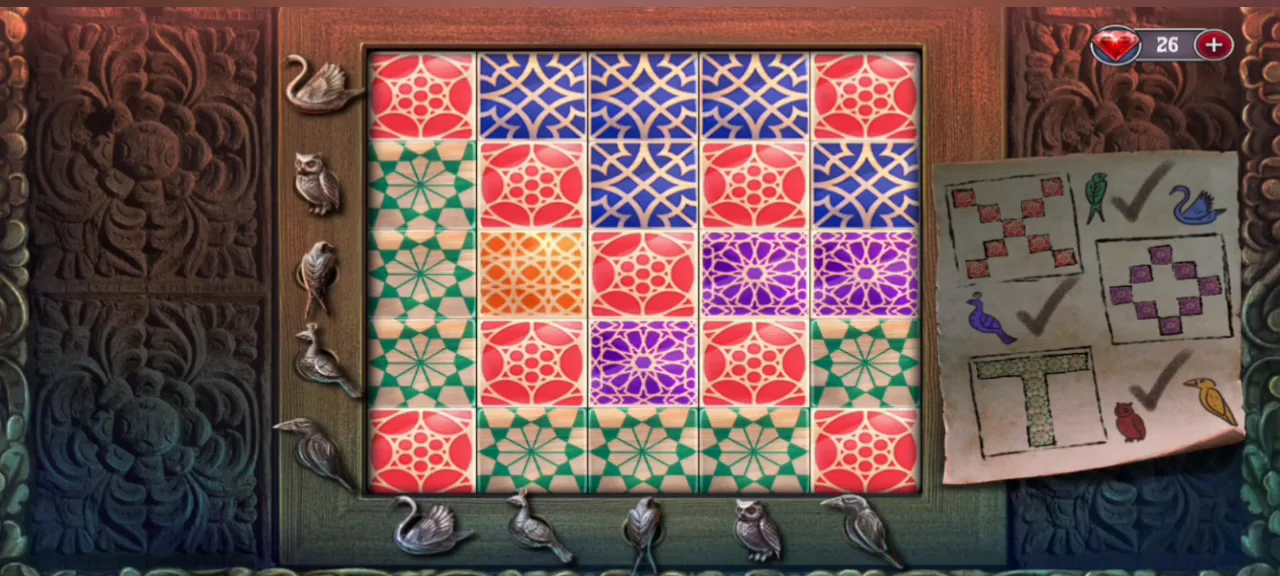
Third pattern accepted: the red X runs along both diagonals. The other tiles do not matter.
Library
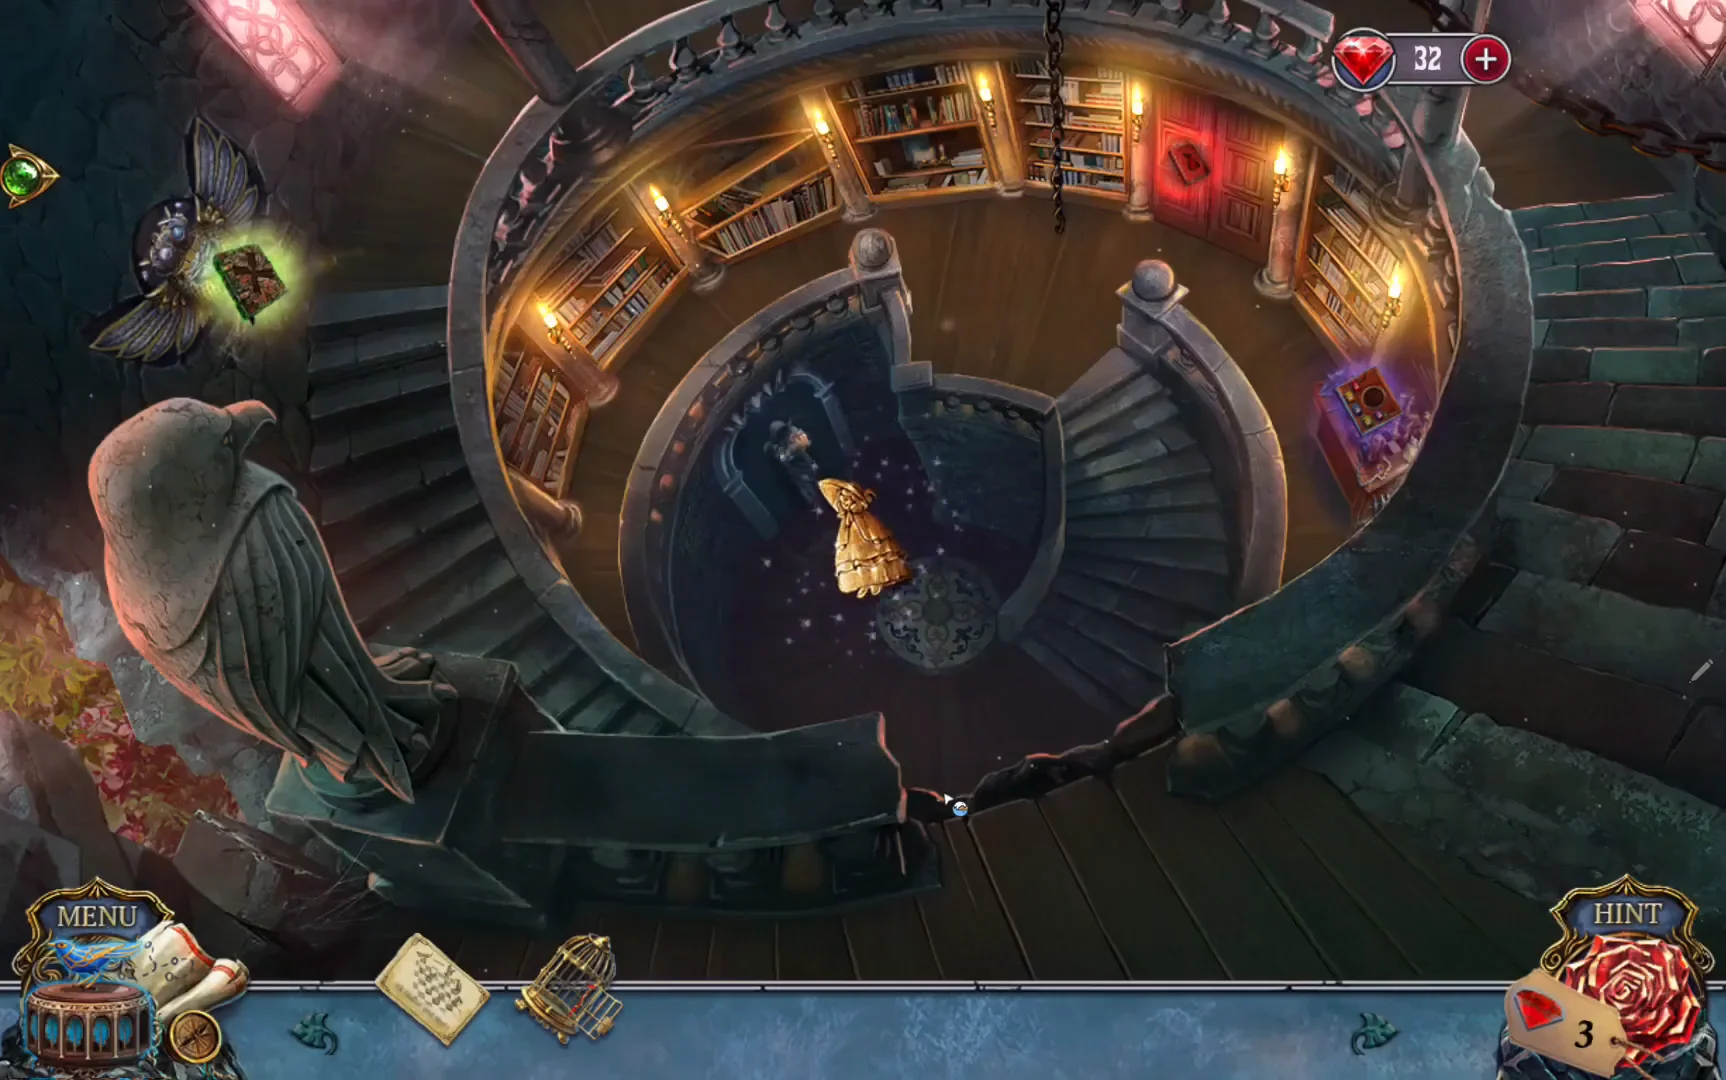
Catch the three flying books, stamp them and open the way down to the alchemy laboratory.
- Take the GOLDEN GIRL FIGURINE from the floor near the door scratches.
- Read the note in the golden birdcage on the library stairs, repair the cage with the RED CORD from the bedroom chest of drawers, and take the CAGE.
- Put the GOLDEN GIRL FIGURINE in the dress silhouette of the red book on the stand and drag the picture pieces into place. Catch the red book with the CAGE and take the WINDMILL SAIL.
- Put the WINDMILL SAIL in the green flying book and play the stacking puzzle. Drag a column of tokens from the supply on the right onto an empty hex. When you place a column next to one with the same colour on top, tokens move between the two by themselves. A stack of 10 matching tokens clears and adds to the counter; reach 125. The frosted hexes numbered 20, 30, 40 and 50 open when the counter reaches their number. The supply is random, so there is no fixed solution. Place each new column beside a stack with the same top colour, gather one colour at a time into a group of ten, and keep some hexes empty so the board does not fill up. Catch the book with the CAGE. The mechanical owl's GOGGLES fall off; take them.
- Take the amber CRYSTAL from the small stand on the shelf by the window and put it in the mechanical owl's empty left eye. Both eyes light up: take the PALETTE that appears.
- Put the PALETTE in the brown flying book and swap the five owl tokens to follow the palette colours: red at the top, then yellow, blue and green down the left side, purple at the bottom right. When the owls are right, use the CAGE on the book to catch it.
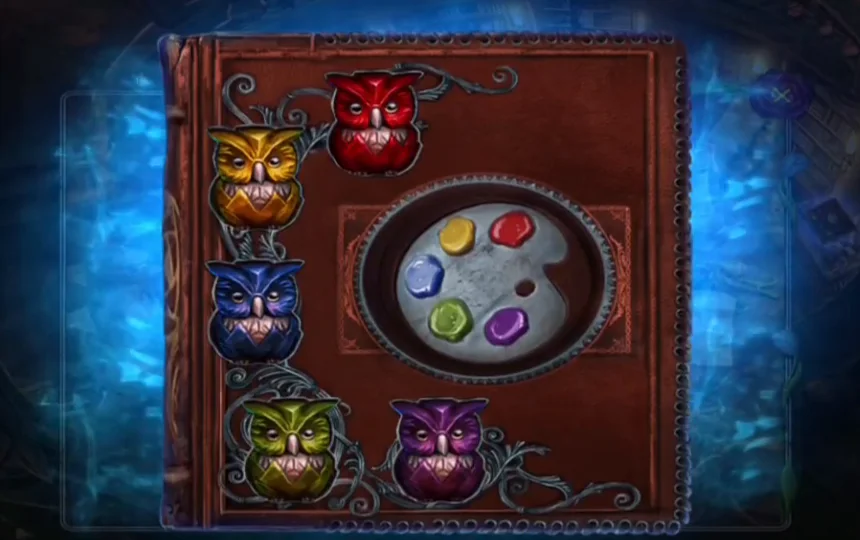
Solved owl tokens following the colours of the palette. - Open the chess-table hidden-object scene and click each item as its silhouette appears in the bar, which shows five at a time and refills. Nine are plain finds: the small green bird on the front of the table at lower left, the raven at the back of the board, the blue eagle on the board, the silver peacock statue at the left, the dark red knight in the middle of the board, the blue bird beside the red rook at the front, the pale crowned piece at the back, the small easel among the books, and the gold four-leaf clover at lower right below the candle. Three need an extra click. Butterfly: click the thin silver tool lying on the left of the board; it breaks the hourglass at the top left, and the butterfly comes out for you to click. Paper bird: click the square yellow paper on the right of the board so it folds into an origami bird, then click the bird. Last item: click the handwritten letter at the top right and read it; when it is gone, click the small dark round-topped ornament standing where it was. Completing the bar gives you the BOOKPLATE.
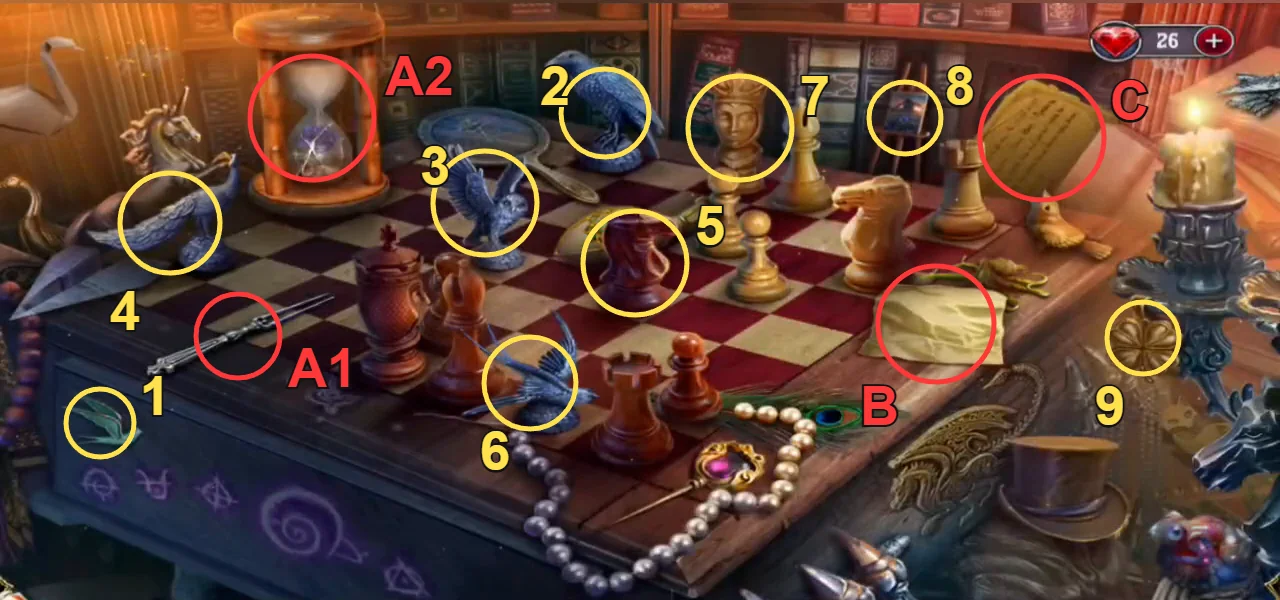
Yellow 1 to 9 are the plain finds in the order the step lists them. Red: A1 silver tool, which breaks the hourglass A2 to free the butterfly; B yellow paper; C letter hiding the last item. - Put the BOOKPLATE in the stamp stand and the caged books on the shelf. Stamp each book with its colour: green triangles get the green stamp, blue squares the blue stamp, red circles the red stamp.
- Swap the book spines until the rose-and-vine pattern is continuous. Take the BAS-RELIEF from the compartment behind the stamp stand.
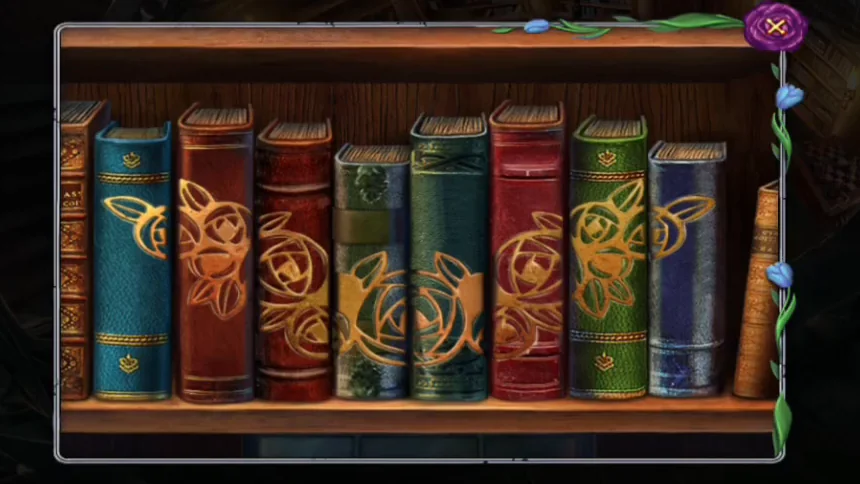
Solved: the rose-and-vine pattern runs across the spines without a break. - At the hooded statue, take METAL FLOWER HANDLE 1/3. Pick up the spare lit candle from the pair on the right and use it to light the row of candles, then put the BAS-RELIEF in the right slot. Press the buttons under the reliefs in this order: crown (second button, under the roses), heart (first button, under the lilies), horseshoe (fourth button, under the sunflower panel), sun (third button, under the round relief). Enter the floor hatch.CODEcrown, heart, horseshoe, sun
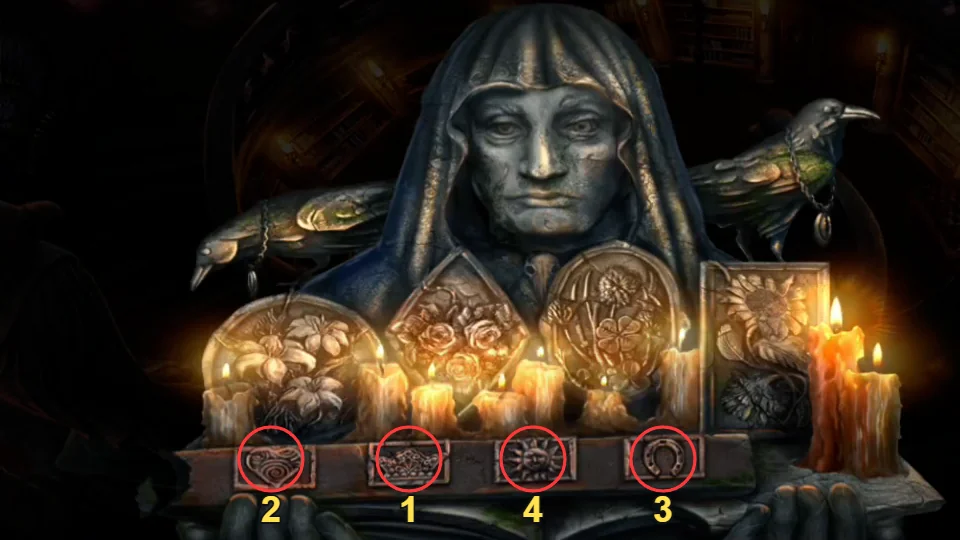
The relief buttons in the order to press them: 1 crown, 2 heart, 3 horseshoe, 4 sun. Left to right they are heart, crown, sun, horseshoe.
Alchemy Laboratory
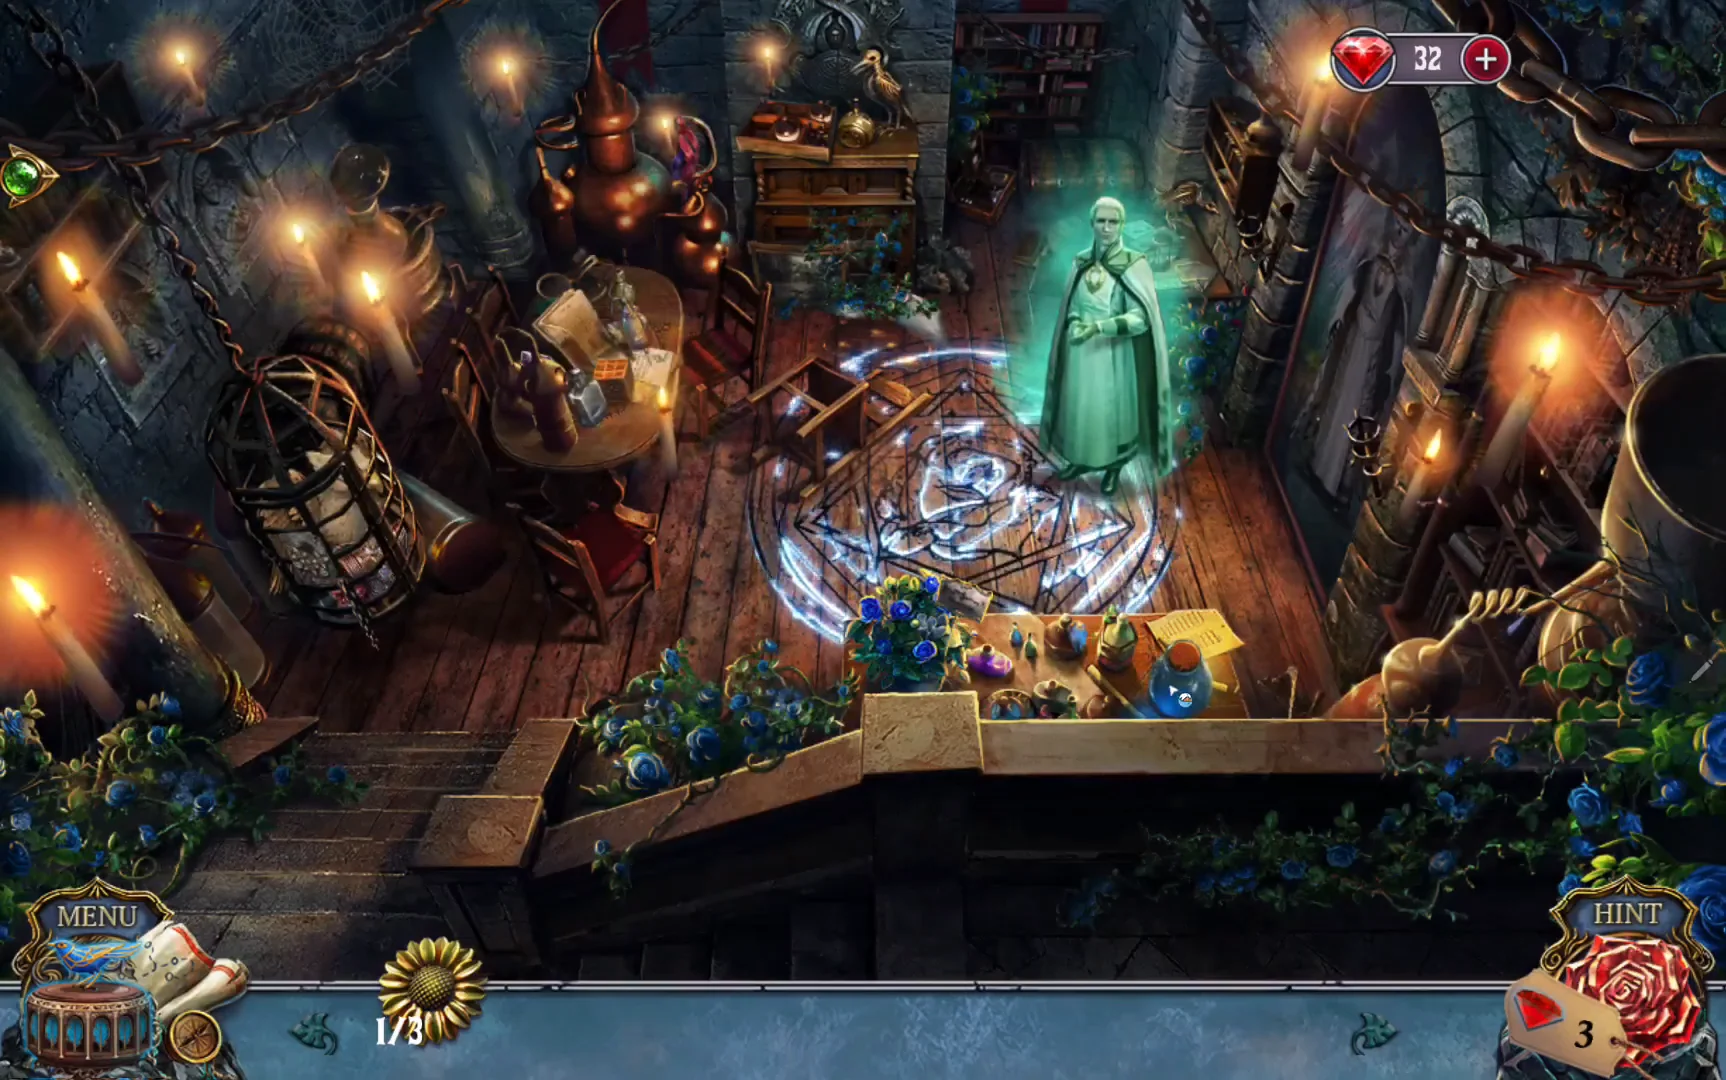
Stop the blizzard, defeat Rainier's painting, bring the alchemist his experiment journal and recover the dagger, then return to the library for the last flower handle door.
- Dorianna conjures a blizzard from a snowy-village painting. Use the GOGGLES and play the snowflake solitaire: click a snowflake, then the empty point beyond a neighbour that looks different. It jumps there and the neighbour disappears. There are three boards, and one snowflake must remain on each. Below, row 1 is the top row of points and points are counted from the left of their row, including empty ones. Board 1: row 3 point 1 to row 1 point 1; row 1 point 1 to row 3 point 3; row 4 point 3 to row 2 point 3; row 2 point 3 to row 4 point 1. Board 2: row 4 point 2 to row 4 point 4; row 2 point 1 to row 4 point 1; row 2 point 2 to row 4 point 2; row 4 point 1 to row 4 point 3; row 4 point 4 to row 4 point 2. Board 3: row 1 point 2 to row 3 point 2; row 3 point 1 to row 3 point 3; row 4 point 4 to row 2 point 2; row 1 point 1 to row 3 point 3; row 3 point 4 to row 3 point 2; row 4 point 1 to row 4 point 3; row 4 point 3 to row 2 point 1. The pictures show each board before its first jump.
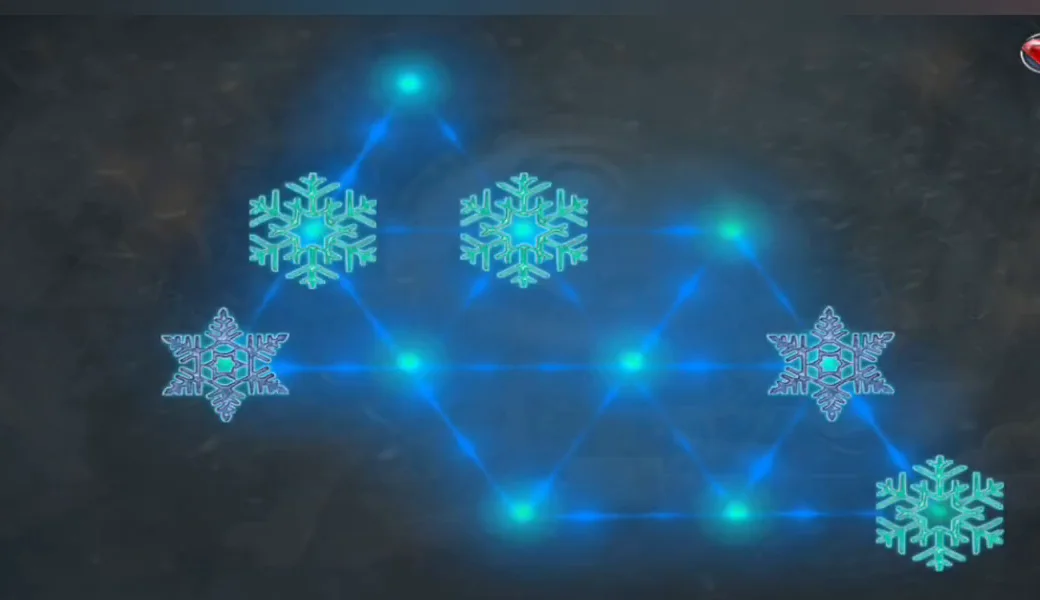
Board 1 before the first jump. 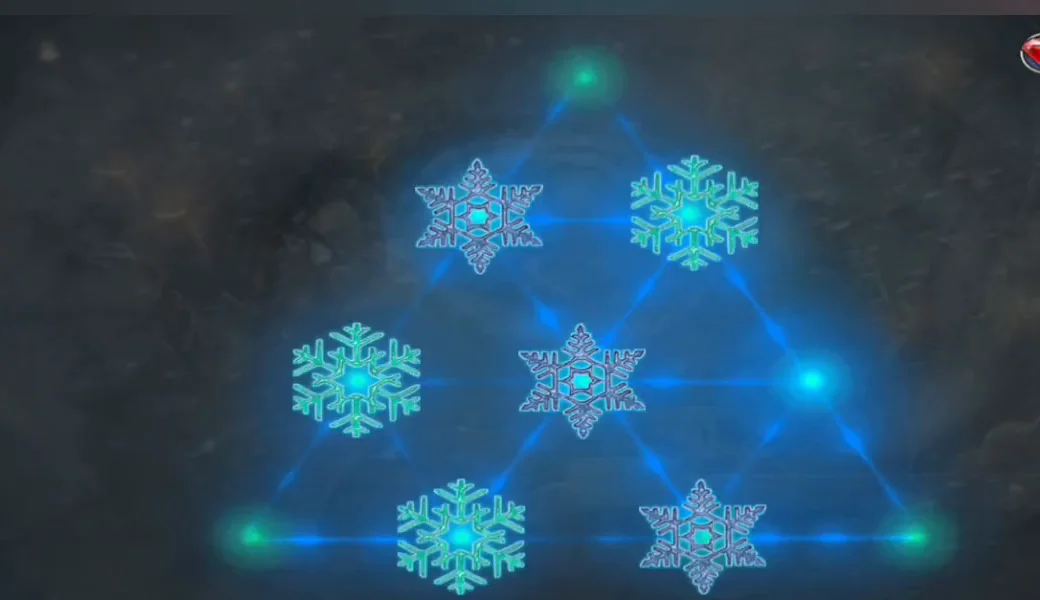
Board 2 before the first jump. 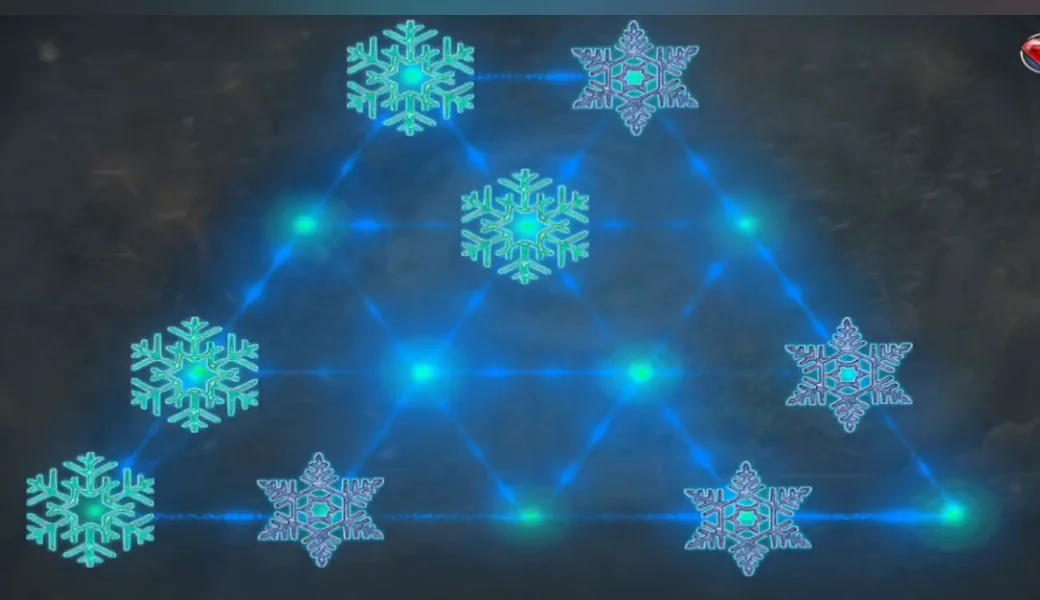
Board 3 before the first jump. - Defeat the painted alchemist (the winged figure). Match lines of tokens before the counter tiles run out and collect 15 of each of the three required tokens. The layout can vary, so there is no fixed move list. Take the FEATHER KEY.
- Place the FEATHER KEY on Charlie's music box. Charlie explains Rainier's magical paints and gives you the MAGIC SPHERE; use it on the bird-human figure. Rainier's ghost asks for the records of his experiment.
- Examine the griffin cage and take the RED STONE. Then open the close-up of the left lab desk and take METAL FLOWER HANDLE 2/3 lying in front of the open book.
- Read journal Experiment #404 on the desk, then put the RED STONE in the box of wishes and beat the box at tic-tac-toe by making a line of three biscuits. One example win is centre, top-left, bottom-left, then top-right for the diagonal; if the box plays differently, block its line first. Take the BISCUIT.
- Give the BISCUIT to the mouse on the framed picture on the floor and take the PINCERS.
- Use the PINCERS on the blue rose pot to pick the BLUE ROSE safely.
- Return to the library and put the BLUE ROSE in the mechanical owl's compartment. Open the strapped book and take the EXPERIMENT JOURNAL and the SUN emblem.
- Give the EXPERIMENT JOURNAL to Rainier. He explains how the Baron painted a new portrait every year, then vanishes and reveals another hiding place. Read the note found there; a KEY falls out of it.
- Remove the grates over the chest one at a time; a grate cannot be removed while another lies on top of it, so always take the top layer first.
- Open the ornate chest with the KEY and take the DAGGER and the round MEDALLION from the cloth roll.
- Use the MEDALLION on the locked desk drawer. Read the note about what is hidden behind the game, look at the cracked magnifier (it needs an intact lens) and take the FLOWER DIAL.
- Put the FLOWER DIAL on the griffin cage lock. Eight small symbols sit in the middle of the lock, and the petal next to each one must carry that symbol. Pressing a gold flower centre turns its four petals one place counter-clockwise. Pressing a gray button swaps two petals that face each other: top-left swaps the left petal of the top flower with the right petal of the left flower; top-right swaps the bottom petal of the top flower with the top petal of the right flower; bottom-left swaps the bottom petal of the left flower with the top petal of the bottom flower; bottom-right swaps the right petal of the bottom flower with the left petal of the right flower. From the starting position, press: top flower; gray top-left; left flower 3 times; gray bottom-left; left flower; gray top-left; right flower 3 times; gray top-right; top flower 3 times; right flower 3 times; gray top-right; top flower 3 times; gray top-right; right flower; gray bottom-right; bottom flower twice; gray bottom-right; bottom flower twice; top flower 3 times; gray top-right; top flower twice.CODETop; gray TL; left x3; gray BL; left; gray TL; right x3; gray TR; top x3; right x3; gray TR; top x3; gray TR; right; gray BR; bottom x2; gray BR; bottom x2; top x3; gray TR; top x2
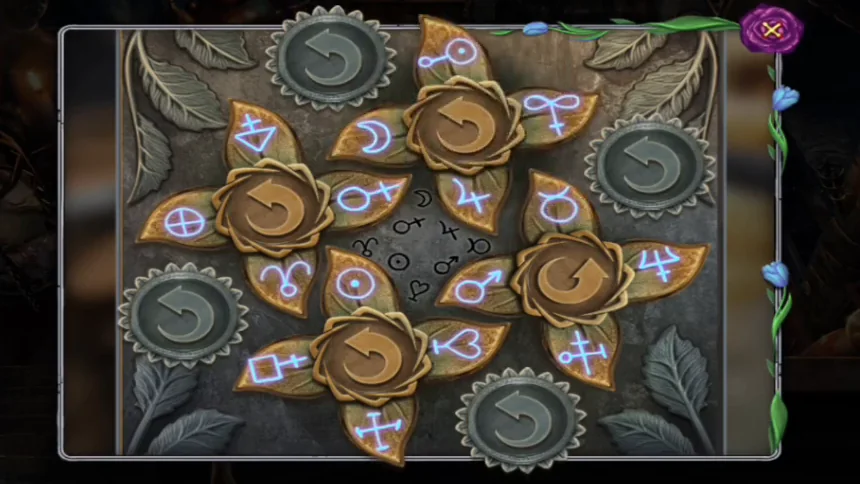
Accepted lock: each inner petal carries the small symbol beside it in the centre of the lock. - Take the satchel from the opened cage and put the SUN in its left slot. Read the notes inside and click the right-hand page to take the MEMORY SPELL; you need it later. Take the MAGNIFYING LENS from the satchel and the copper rose METAL FLOWER HANDLE 3/3 from the cage.
- Put the MAGNIFYING LENS in the empty magnifier frame on the lab desk to make the MAGNIFYING GLASS.
- In the library, use the MAGNIFYING GLASS on the chess table. Move the glass over the board to find the 13 hidden snail symbols; each one stays visible once found, and the counter in the instruction bar drops. The picture shows all 13. Take the KEY from the drawer that opens.
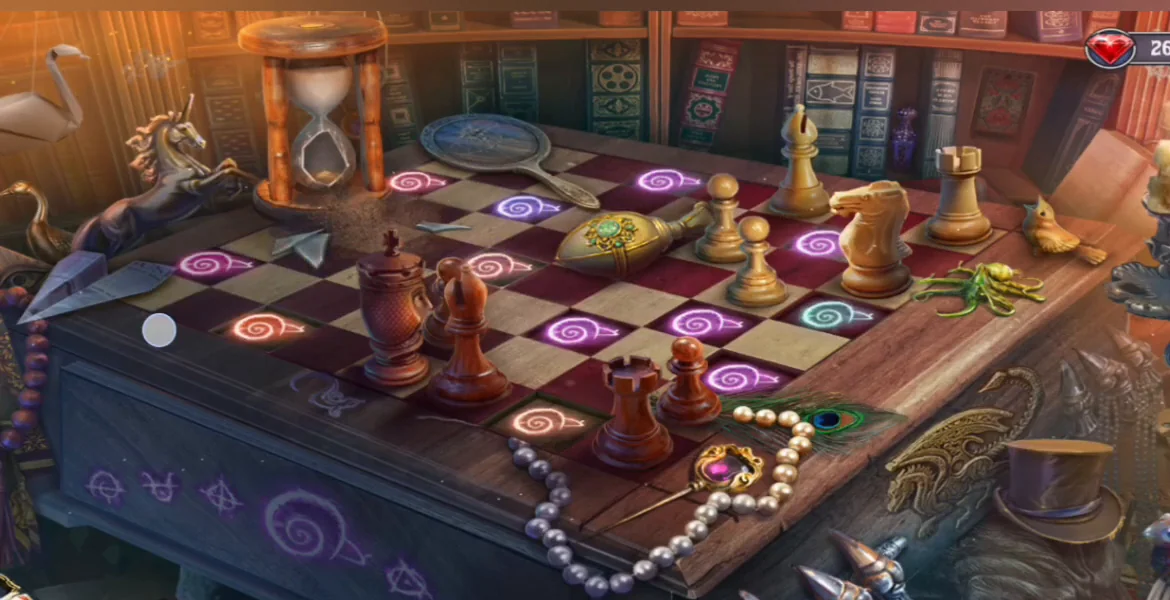
All 13 snail symbols revealed on the chess table. - At the round flower door in the library, use the KEY in the bottom keyhole and insert the three METAL FLOWER HANDLES.
Winter Garden and Astronomy Tower
Reach Casper in the tower, destroy his cursed portrait, restore his memories and open the dungeon door in the magnolia garden.
- In the conservatory with the cherry tree, take the PRUNING SHEARS from the fountain rim. In the garden, cut the ivy on the tower wall with them and take PIPE 1/2 from the window frame behind it. Push the window and climb into the tower.
- Use the MEMORY SPELL on the enchanted Casper. Then find the 12 pairs of his good memories: identical objects drift around him; select both items of each pair.
- Take the TRAY. Katrina appears; take the KEY RING she holds out in her hand.
- Open the noticeboard on the right-hand wall of the observatory and read the note about Dorianna's father. Take PIPE 2/2 from under the ribbons, then pull off the free ribbons (green, purple, yellow, blue) one at a time and take the STREAMERS.
- In the garden, use the TRAY to reflect sunlight onto the purple sun plant. Put the PURPLE FLOWER in the swan planter so the bees fly to it.
- With the bees gone, use the STREAMERS on the purple flower in the swan planter. The flower lifts away and uncovers the open peacock fan. Click its feathers to fold them together until the fan is closed, then take the PEACOCK FAN.
- In the conservatory by the cherry tree, open the flower wind chime and fit PIPE 1/2 and PIPE 2/2 into it. Wave the PEACOCK FAN at the repaired chime. A blue bird lands.
- Read the note about budgies and wind chimes, then take Katrina's locked travel paint box from beside the tree. Katrina gave you the key for it on the KEY RING.
- Examine the paint box in the inventory and unlock it with the KEY RING. Read the recipe list and her diary, then swap the lid tiles to restore the fairytale castle picture and take the PAINT REMOVER.
- Use the PAINT REMOVER on Casper's portrait on the easel and take the golden CHEST PART monogram that comes free. Casper is freed and collapses in Katrina's lap. Talk to Katrina and take the PURPLE HEART she gives you.
- At the potion shelf in the observatory, place Katrina's recipe list (GUIDE) beside the bottles. Click the chalk powder pot, the oxidant flask and the flower paint bottle on the shelf so each is crossed out on the list, then click the star-patterned bowl that appears so it fills with glowing blue paint. Light paint gets a green tick; take the LIGHT PAINT.
- Fill the swan planter lantern in the garden with the LIGHT PAINT; its beam reveals a floor grate. Look through the grate and take the AXE.
- In the observatory, read the notes on the trunk, then chop the damaged floorboard with the AXE. Take Albert's sketchbook and pull the PIN out of its strap to release the clasp. Read the pages and take the COIN. Use the COIN to unscrew the telescope eyepiece and take the COLOURED LENSES.
- At the garden grate, drag the decoder into the square slot in the middle of the right-hand side. Four L-shaped pieces block it. The two you need to move are the marbled blue L at the upper right and the blue star L at the lower right. Move the pieces in this order: 1) marbled L right to the wall; 2) star L right to the wall; 3) decoder up, then right along the top until it stops against the marbled L; 4) star L back left, and marbled L down into the lower right corner; 5) decoder right into the top right corner; 6) star L up into the top row beside the decoder, then marbled L left, which clears the right side under the decoder; 7) decoder down into the slot. Take the DECODER.CODEMarbled L right; star L right; decoder up, right; star L left; marbled L down; decoder right; star L up; marbled L left; decoder down
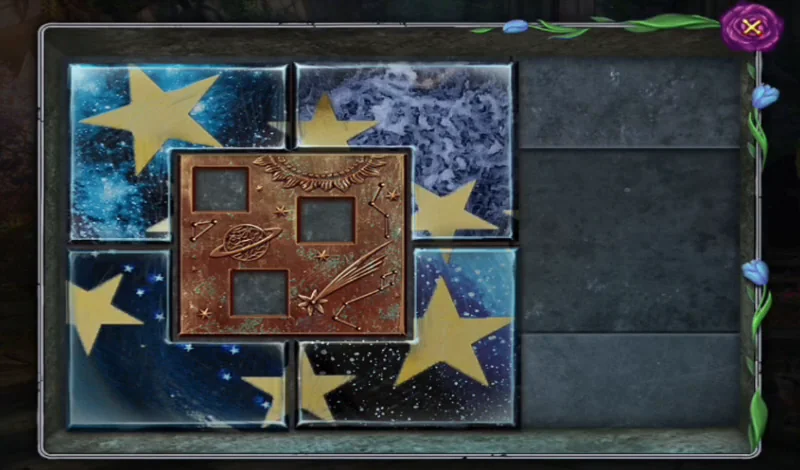
Starting layout. The target slot is in the middle of the right-hand side. - In the observatory, look at the picture on the left wall with the star map pinned over it. Lay the DECODER on the star map and take the CONSTELLATION SKETCH. Then restore the birds picture: drag the vertical strips up or down and swap them until the blossom branch is continuous, with the blue jay at the top left, the bullfinch at the lower left, the blue tit in the middle and the cardinal on the right. Take the oval PORTRAIT 1/2 from the compartment.
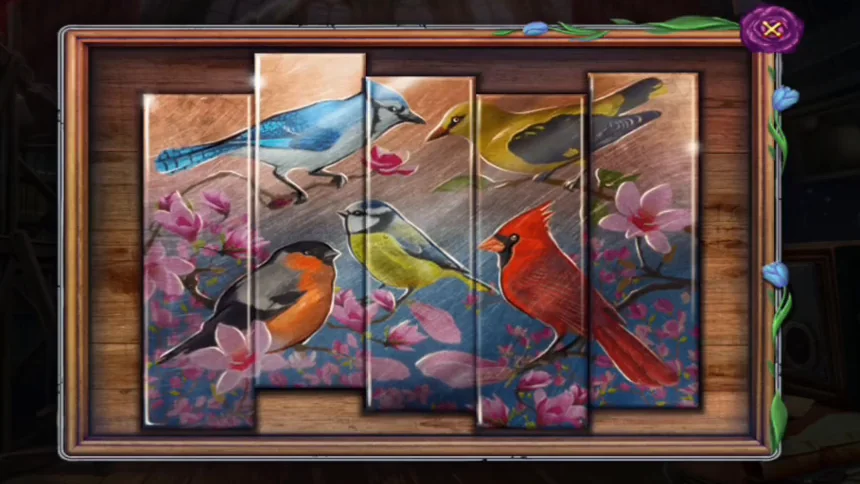
Accepted picture: blue jay top left, bullfinch lower left, blue tit middle, cardinal right. - At the observatory wall safe, read the note and click the spiral dial on the left; it projects blue symbols of a palette, a rose and a bird. Put the CONSTELLATION SKETCH on the safe and press the paper to see its other patterns. Rotate the three star discs to the constellations that fit the blue symbols. The safe opens: take the CHEST.
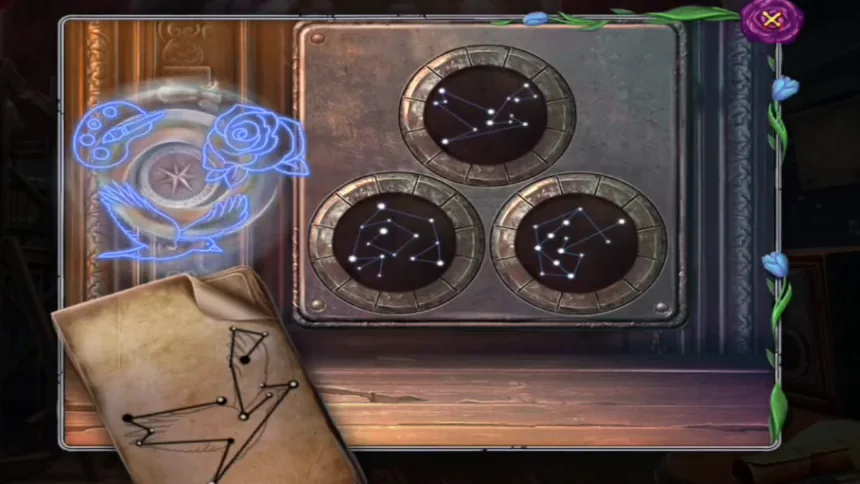
The three star discs in their finished positions. - Examine the CHEST in the inventory and fit the CHEST PART into it. Read Katrina's note, then take the MEMORABLE THINGS 1/3 from inside.
- Put the DAGGER on the cloth and add the COLOURED LENSES (crystals) to its hilt. Swap the crystals until each one matches the colour of its rose-shaped setting: green at the top, then purple, yellow, blue, and red on the pommel. Take the CHARGED DAGGER; it joins the set as MEMORABLE THINGS 2/3.
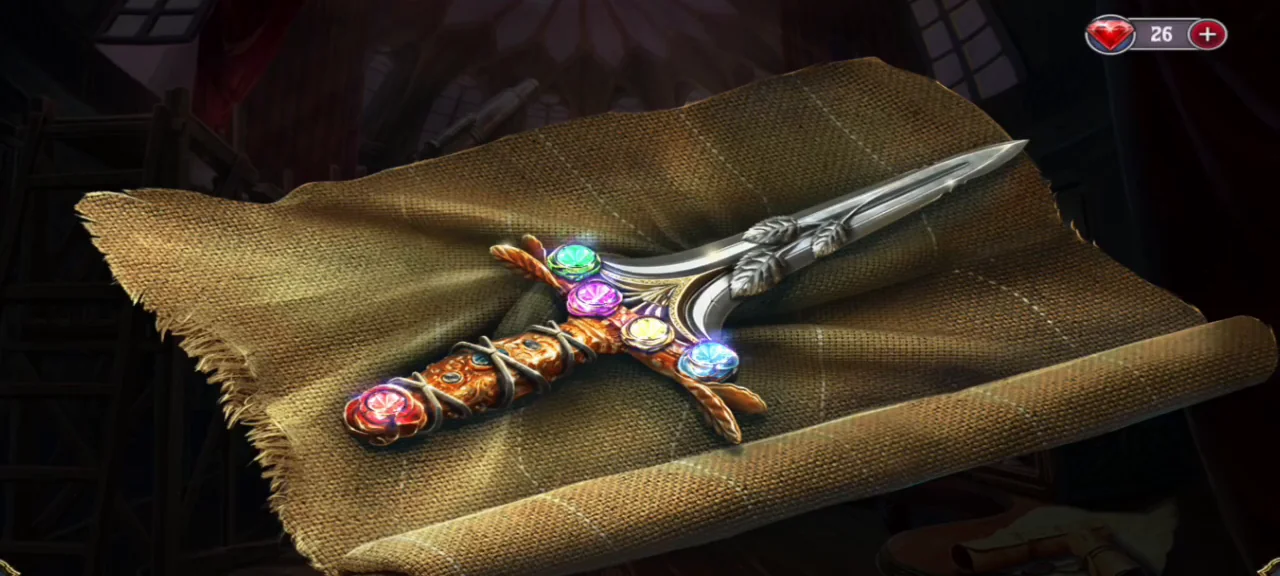
Solved: each crystal matches its rose setting. - Open Katrina's paint box by the easel at the lower left of the observatory. Put the PURPLE HEART on its drawer, open the drawer, read Casper's letter and take it: MEMORABLE THINGS 3/3. Give all three to Katrina. In the memory scene, drag the green eye along the bar at the top. The solid blue objects slide over the pale outlines at different speeds. Stop as soon as an object sits exactly on its outline, for example the portrait on the empty easel or the ribbon at the man's collar. It locks, and one green word in the narration turns white. Clear every green word in all three narrations. Casper then returns the DAGGER. Take the second oval PORTRAIT piece (2/2) from Katrina's hand.
- At the mossy iron door in the magnolia garden, scrape the moss off with the DAGGER and put the completed oval PORTRAIT in the gap it leaves. Click each of the two overlapping circles to rotate it until the picture of the five women is upright and whole.
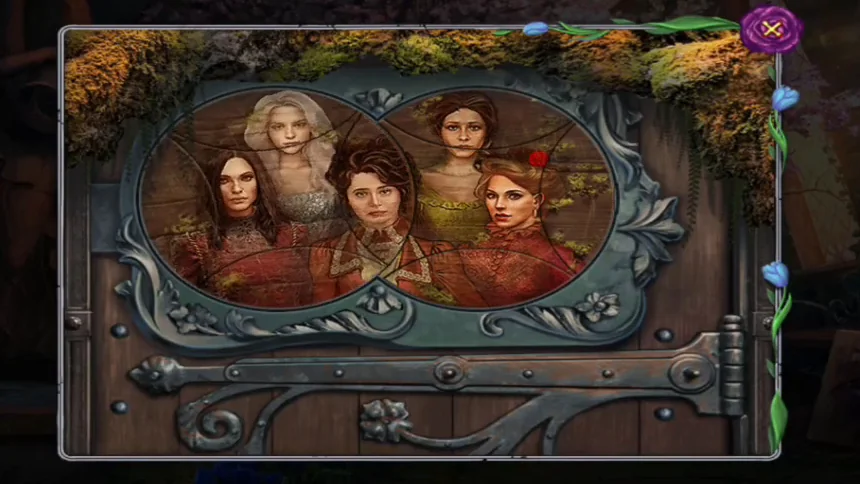
Solved: the two circles show the upright picture of the five women.
Crystal Cave and the Blue Chamber
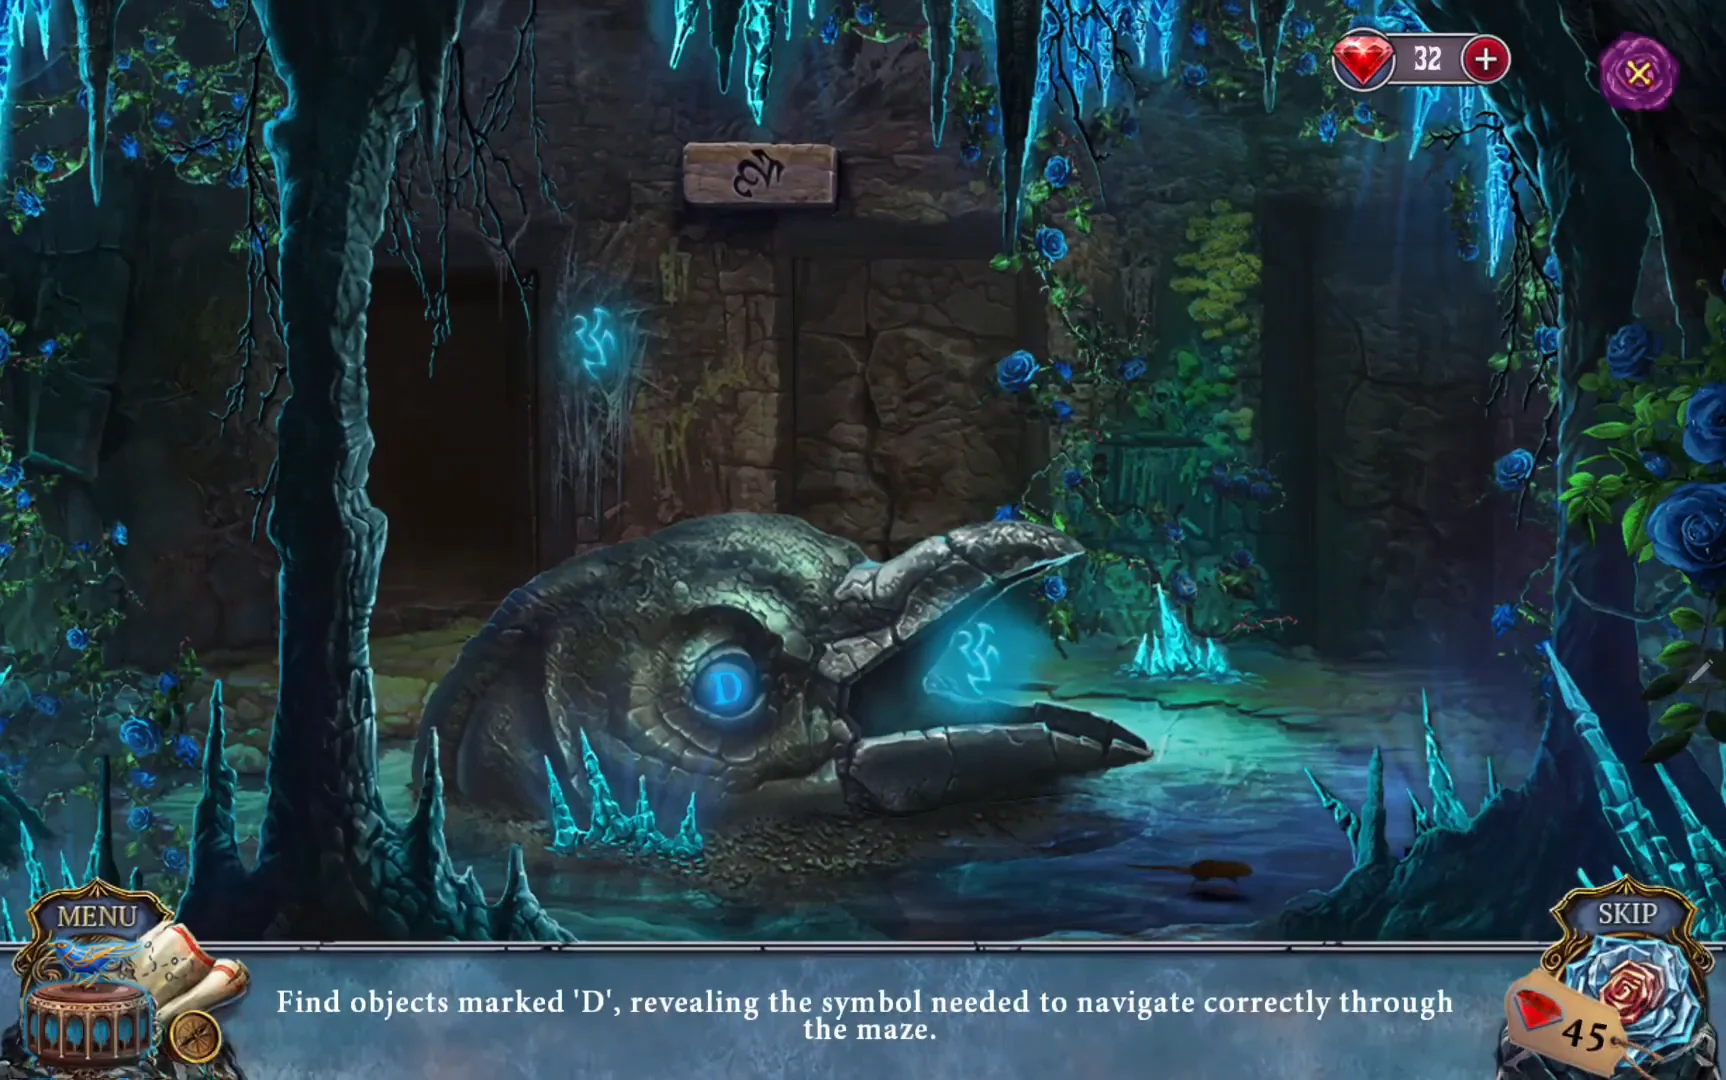
Find the way through the crystal cave, collect the five ghosts' rings and open the cursed portrait's box.
- Before going in, take the round PORTRAIT medallion 1/2 lying in the opened doorway; you need it at the sketch board later. In each cave chamber, click the object marked D (raven head, well, dead tree, skull mound box). A coloured symbol appears; take the exit marked with the same symbol. Always follow the symbol you see. Example from one playthrough, which may differ from yours: left door, right, lower left, then left door.
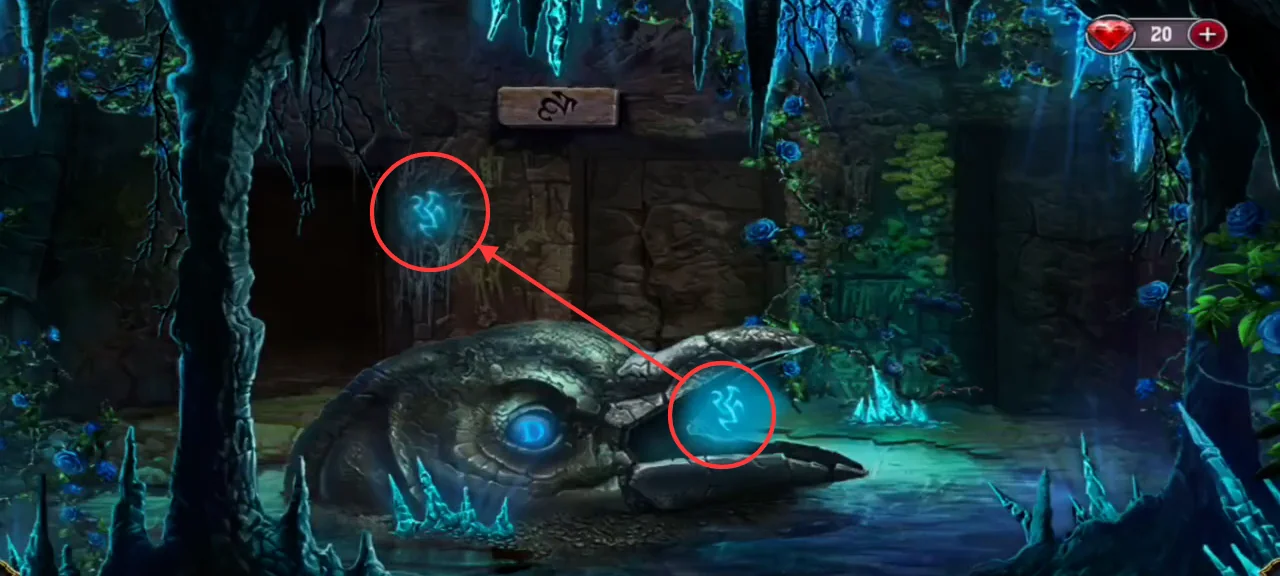
Click the object marked D. The symbol it shows also appears on one exit: here, the door on the left. - Find the 13 portrait parts in the antechamber hidden-object scene and watch the counter in the bar. The Baron's marriage records show he was married seven times; these are his wives' portraits. One part sits under a huge spider on the table below the large portrait: take the glass dome from the table to the right of the round box and put it over the spider to release the part. After the last part, the bar asks for a BOW: click it at the front of the left-hand table, by the carved wooden box, and it flies to the box under the large portrait. The freed wives then give you the BLUE BIRD figure.
- In the corridor, zoom into the sketch board of young Dorianna and take the KEY hanging on its left hook. At the red armchair, place the BLUE BIRD figure on the raven seal of the leather pouch, take the FLINT from inside and take the bird figure back. Open the sewing chest on the side table with the KEY: read the card (flowers the Baron gave Helen on their first date) and lay the flowers on the armchair. Tie the loose stems with the cloth strip from your inventory and take the BOUQUET.
- Use the BOUQUET to sweep the cobwebs off the feather-carved door at the end of the corridor. The feathers match Charlie's music box, and Charlie opens the door to the Blue Chamber. In the dark chamber, use the FLINT on the candelabrum to light it. Uncover the easel (the portrait is aging instead of Dorianna), take the UMBRELLA from the floor and take the curved FRAME PIECE lying on the lid of the rainbow box on the table.
- Click the heart lock above the roll-top desk. Place the BLUE BIRD figure in the empty raven outline at the top right of the lock. Then jump hearts over hearts of the opposite colour: select a heart, then the empty space beyond its neighbour along a line. Name the points like this: top, upper left, upper right, far left, centre, far right, lower left, lower right, bottom. Round 1 has one blue heart on upper left and red hearts on centre and far right: jump blue from upper left to lower right, then red from far right to bottom. Round 2 has one blue heart on top and red hearts on upper left, centre, lower left and lower right: jump blue from top to far left, far left to bottom, bottom to far right, then far right to far left. Take RING 1/5 from the opened cabinet.CODERound 1: UL to LR; FR to B. Round 2: T to FL; FL to B; B to FR; FR to FL
- Open the book panel on the desk and select two tiles to swap them. The accepted layout is: top row green axe, yellow crown, red rose; middle row green axe, yellow crown, green axe; bottom row green axe, red rose, yellow crown. Read the book: only powder made from Crystal Kingdom crystals can stop the rose curse.CODEGreen, yellow, red / Green, yellow, green / Green, red, yellow
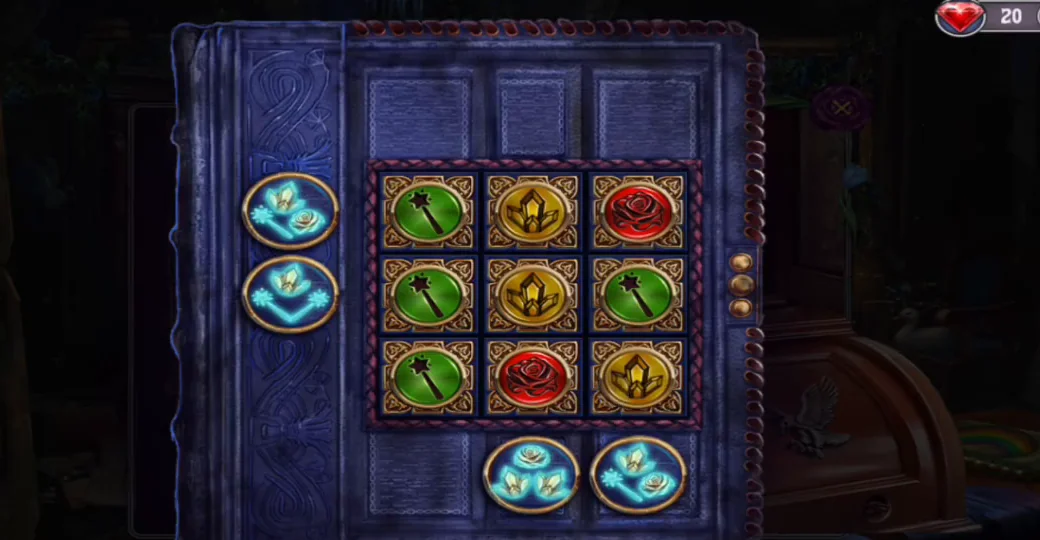
The accepted tile layout, just before the book opens. - After reading the book, take the crank HANDLE lying on top of the books, fit it to the side of the roll-top and open it; take the MORTAR. In the corridor, fit the FRAME PIECE into the round frame in the pile of picture frames, then take the second round PORTRAIT medallion (2/2) and RING 2/5. Place both medallions on the empty hooks of the sketch board; its doors open to Dorianna's grumpy teddy bear. Take RING 3/5 and the silver item the bear holds. Use the silver item on the bat hanging from the chandelier to scare it off, knock the hat off the chandelier with the UMBRELLA and take the HEART KEY from its green bow.
- Unlock the rainbow box on the Blue Chamber table with the HEART KEY, then press the cover buttons until they show the rainbow order. Take the CHARCOAL stick from inside the box. Open the papers on the tabletop by the portrait and take RING 4/5 lying on them. Read the torn journal page and the Baron's letter, then rub the letter with the CHARCOAL to reveal 9823, and take the letter.CODERed, Orange, Yellow, Green, Blue, Indigo, Violet
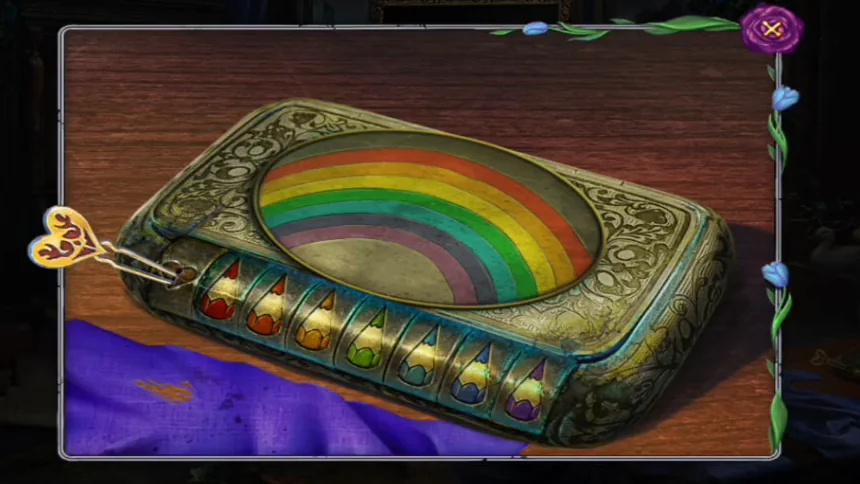
Solved: the seven cover buttons run in rainbow order. - At the red armchair heart lock in the corridor, rotate the circles to 9, 8, 2, 3 and take the last RING (5/5). The wives thank you and tell you the crystals are in the box.CODE9823
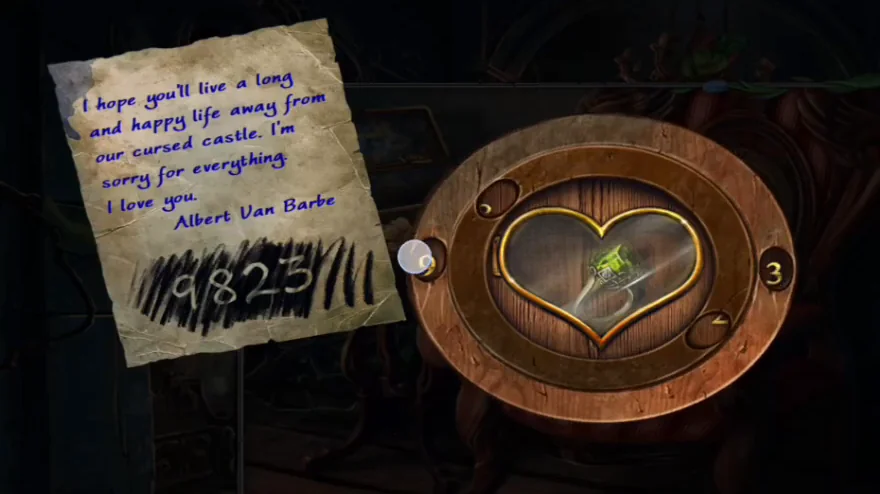
The code on the rubbed letter, next to the armchair's heart lock. - Play the Blue Chamber hidden-object scene and find everything on the list: phoenix, scissors, crown, heart, mask, perfume, squirrel, crystal, watch, coins and bead. Two entries need a small puzzle first. Click the pocket watch in the open blue box on the right-hand table, then click its rings to rotate them until the woman's portrait is whole and upright; the lens breaks away and the watch counts as found. Click the carved box in front of the large portrait and swap its five picture strips until they form one continuous portrait; the lid slides open, and the blue crystals inside count as the crystal. The last entry is easy to miss: the phoenix is a tiny pale bird on the wall just above the gold frame of the left-hand portrait, under the dark oval frame. When the list is complete, you receive the CRYSTAL.
- Grind the CRYSTAL in the MORTAR to make the CRYSTAL POWDER.
- Use the DAGGER on the portrait on the easel. It fails: cursed roses spring up around the portrait, the vines catch the dagger, and it leaves your inventory. The objective becomes Defeat the cursed roses.
- Use the CRYSTAL POWDER on the cursed portrait and move the roses onto the sprouts of their colours. Select the centre rose, then an arrow to move it; roses next to each other connect and move together. From the starting layout, press the arrows in the order listed below. The final Up lifts the whole group onto the sprouts and the puzzle ends.CODEUp, Left, Left, Down, Right, Down, Down, Right, Left, Up, Left, Left, Up, Right, Right, Up, Up, Up, Down, Right, Right, Right, Left, Left, Down, Down, Down, Right, Left, Up
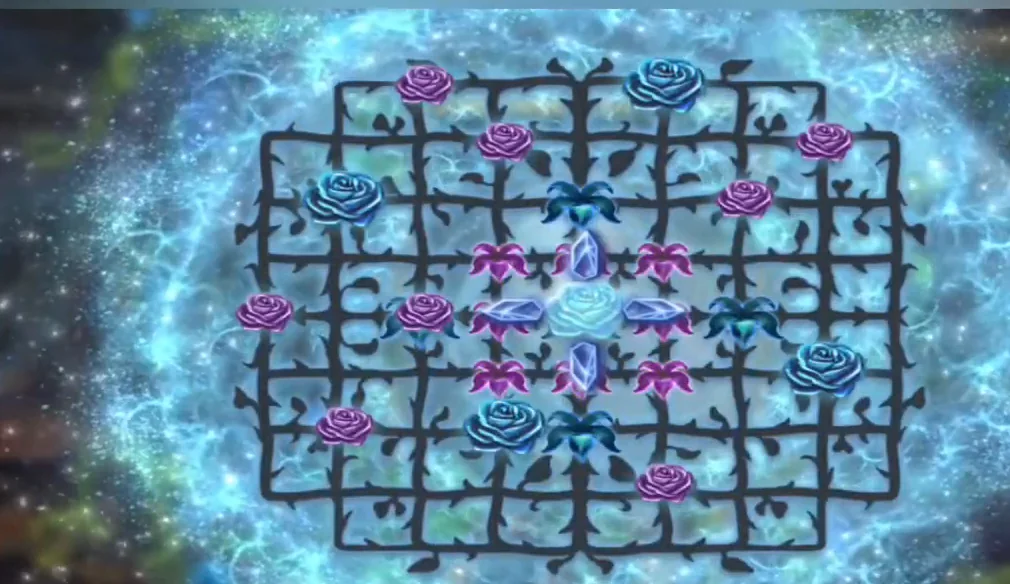
The rose puzzle at its starting layout. The listed arrow presses begin from here. 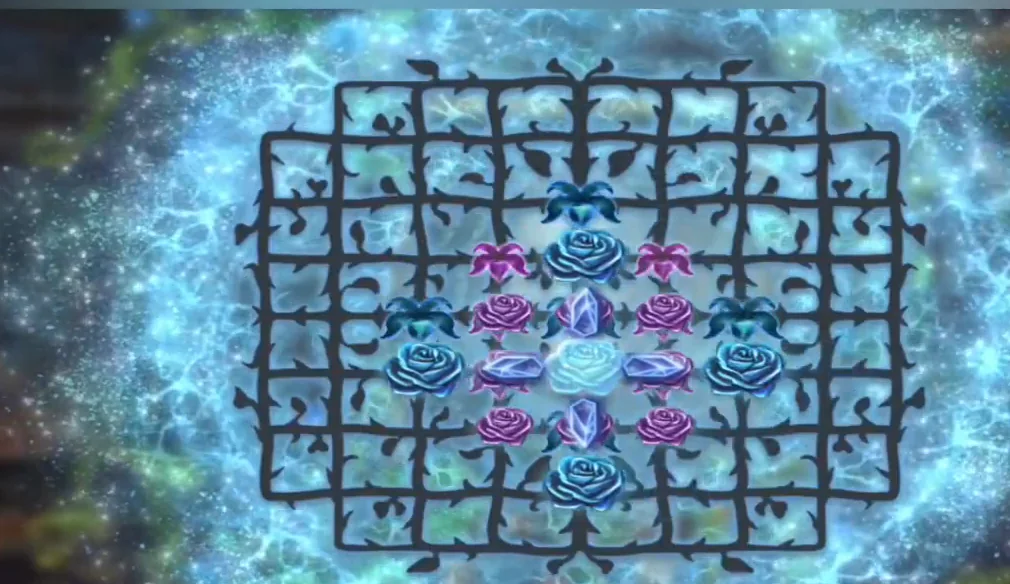
One press left: every rose is one row below its sprout. The final Up lifts the whole group onto the sprouts and the puzzle ends. - The dagger now lies glowing on the floor at the foot of the easel, beside the fallen rods. Click it to take the DAGGER back.
- Use the DAGGER on the portrait again. Dorianna bursts in.
Dorianna's Choice and the Final Battle
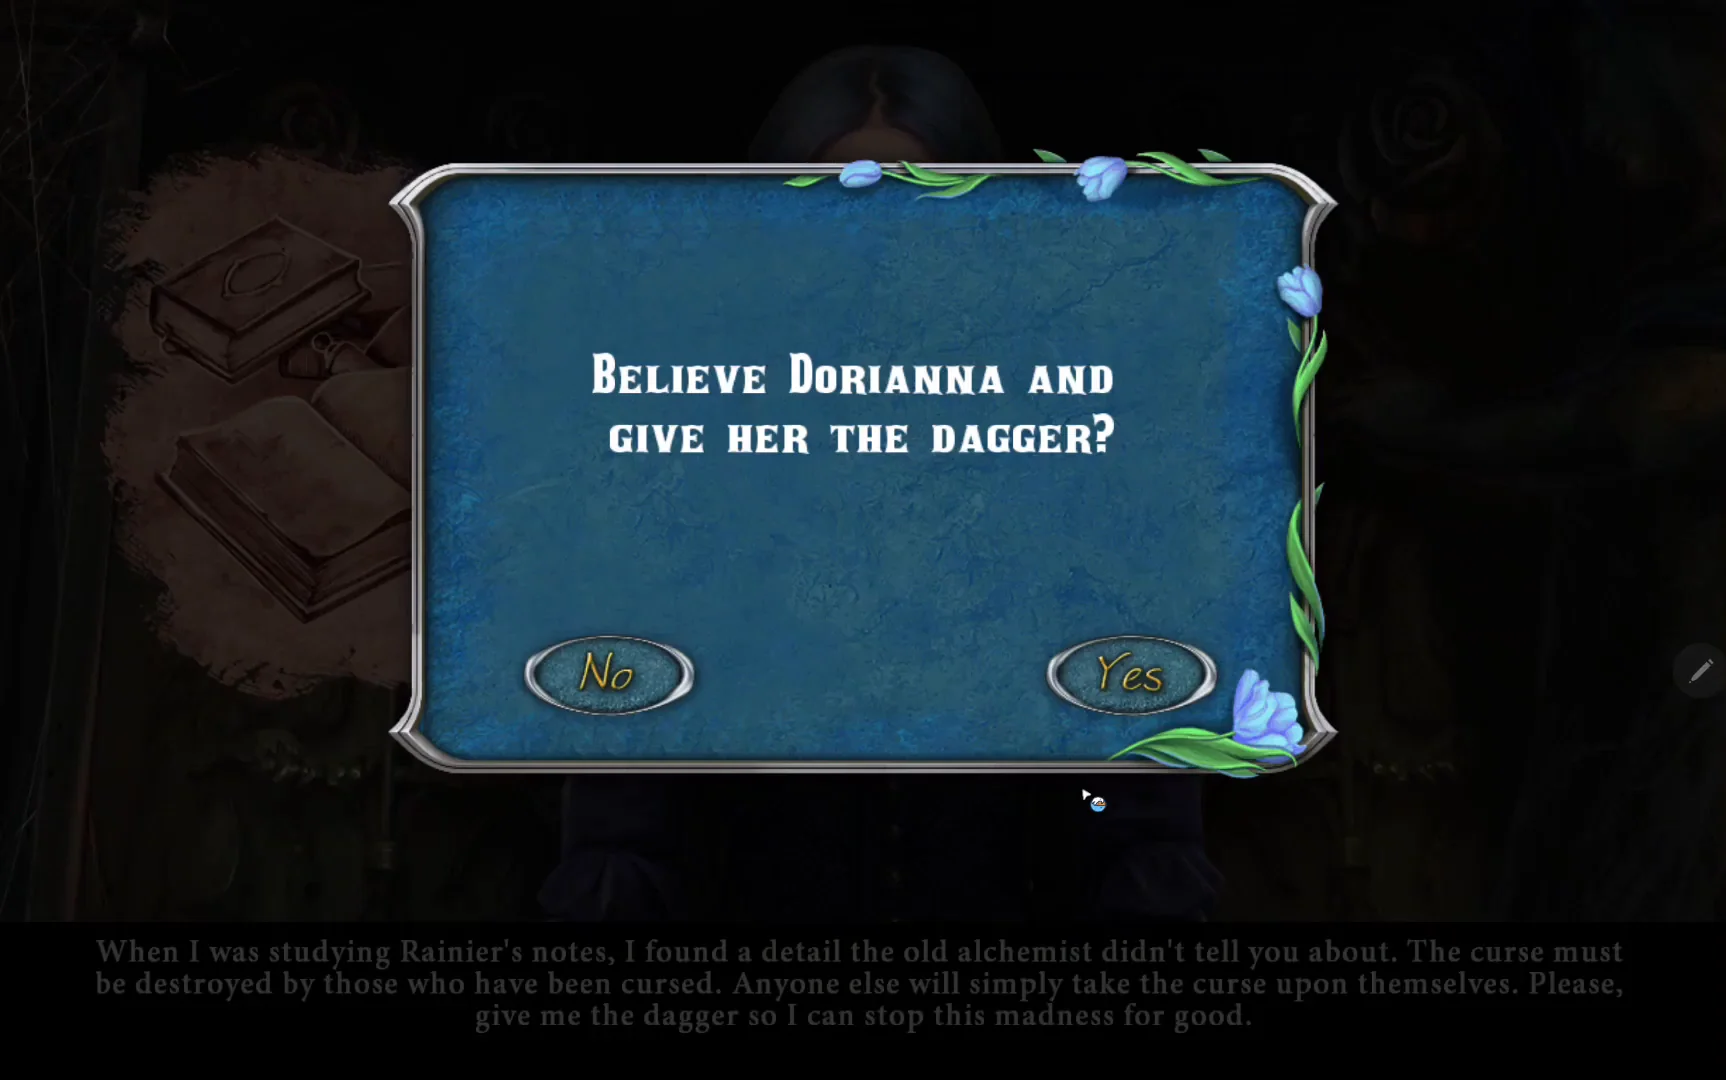
Whatever you answer, Dorianna attacks and you must win the last three boards.
- Dorianna claims the curse must be destroyed by the cursed and asks for the dagger. Answering Yes or No to "Believe Dorianna and give her the dagger?" leads to the same result: "You made the wrong choice!", then the final battle.
- Three boards follow. Every numbered tile starts one line, and its number is how many cells the line covers after that tile, not counting the tile itself. Select a tile to preview its line, then draw it through empty cells, turning at right angles where needed. Lines may not cross, and no cell may stay empty. Below, rows are counted from the top row of the board and columns from the left end of the widest row. Board 1 (tiles 5, 5, 3): from the upper 5: up, left, down, left, down. From the lower 5: left, down, right, right, up. From the 3: up, left, up. Board 2 (tiles 4, 8, 7, 8): from the 4 in the top row: left 4 cells. From the 7: left, down, right 3, up, left. From the 8 in the bottom row: up, left, up, up, right, down, right, up. From the middle 8: up, right, down, right, up, right, down, down. Board 3 (tiles 12, 10, 10, 16, 6): from the 16: down, right, up, up, left, left, down, left, up, left, down, left, up, left, down, left. From the 12: down 3, right, down, right, up, up, left, up, up, right. From the left-hand 10: right, down 3, right, up 4, left. From the right-hand 10: down, down, right, right, up, left, up, up, left, up. From the 6: up, left, up, right, up, up.CODEBoard 1: 5 up,left,down,left,down; 5 left,down,right,right,up; 3 up,left,up
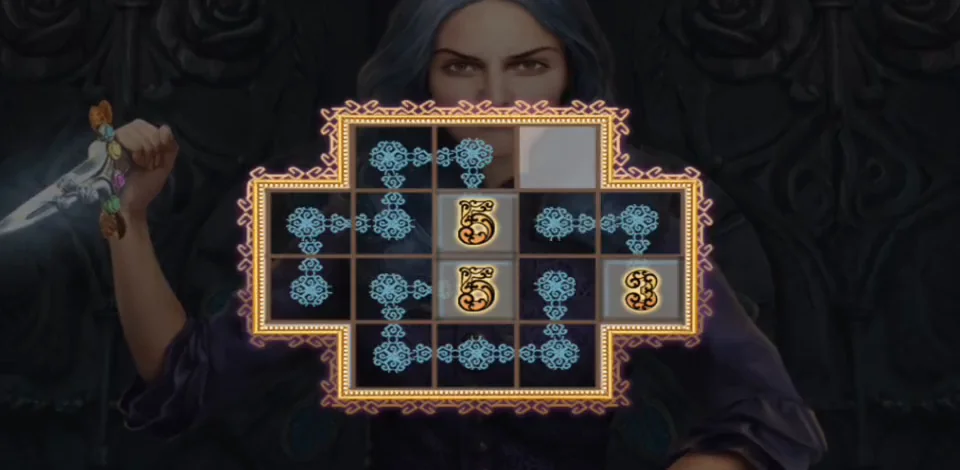
Board 1 with one cell left, at the top right, for the 3 line. 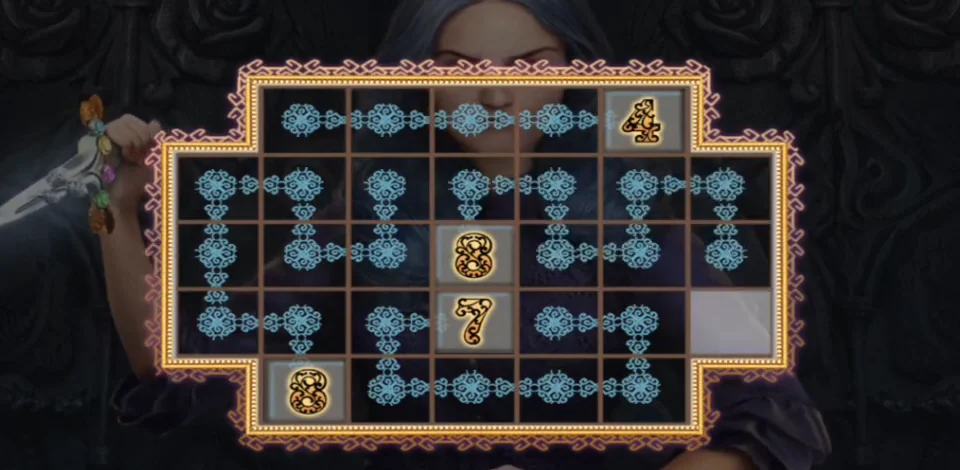
Board 2 with one cell left, at the right, for the middle 8 line. 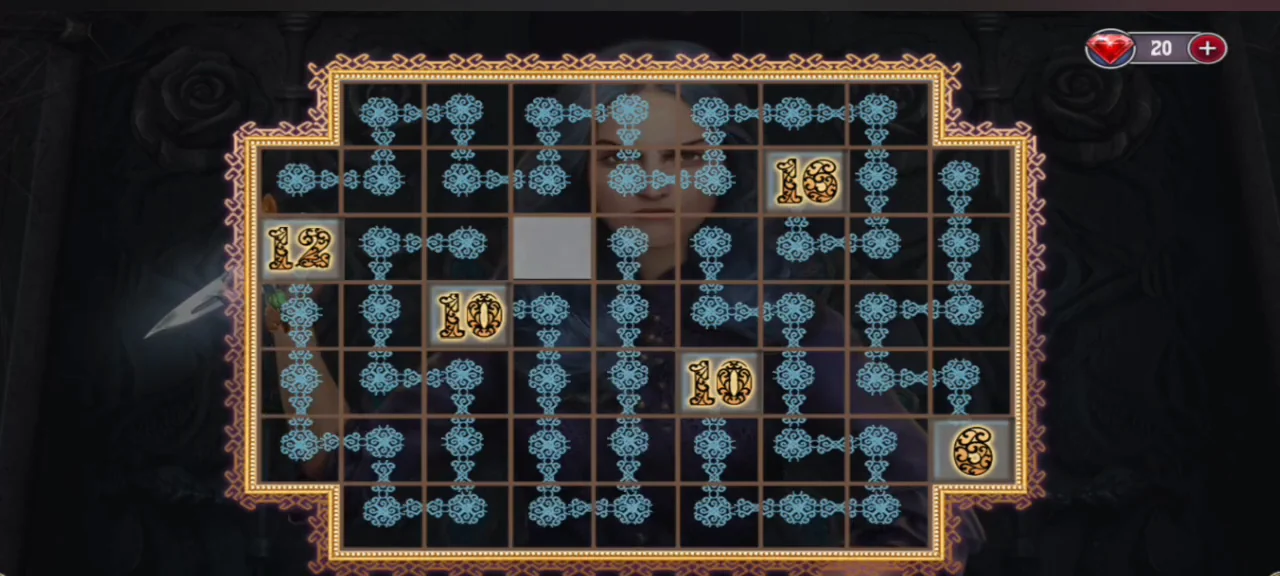
Board 3 with one cell left: the last cell of the left-hand 10 line, in row 3. - The portrait is destroyed, Casper and Katrina thank Alex and the game returns to the menu, where the bonus chapter becomes available.
Hidden Characters and Objects, Part 2
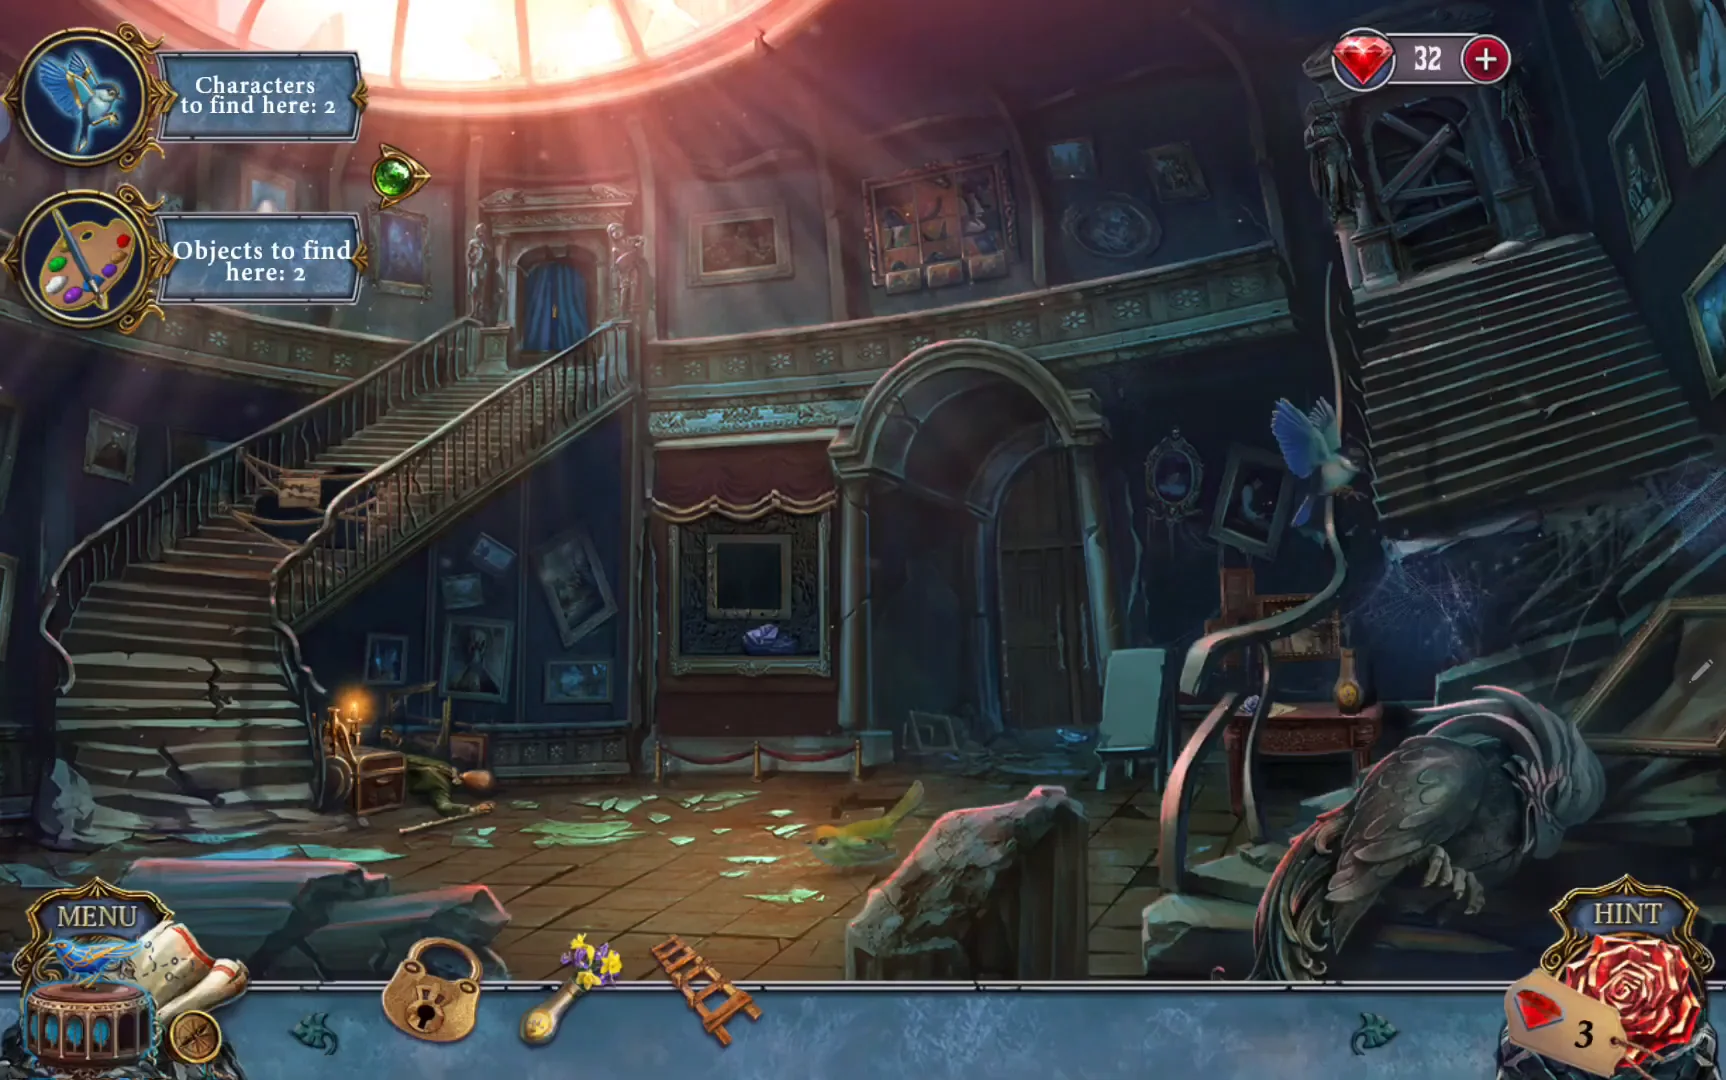
The same top-left counters track the collectibles in the second half of the castle. Objects change shape here too, so go by the position.
- Old Wing. Characters: the blue bird fluttering by the cobwebs just right of the small table on the right, and the green-and-yellow bird on the floor in the middle, just above the broken stone slab. Objects: the middle framed picture (a domed building) on the upper-floor gallery wall at the left, and the small pale item on the top step of the right staircase, below the boarded door.
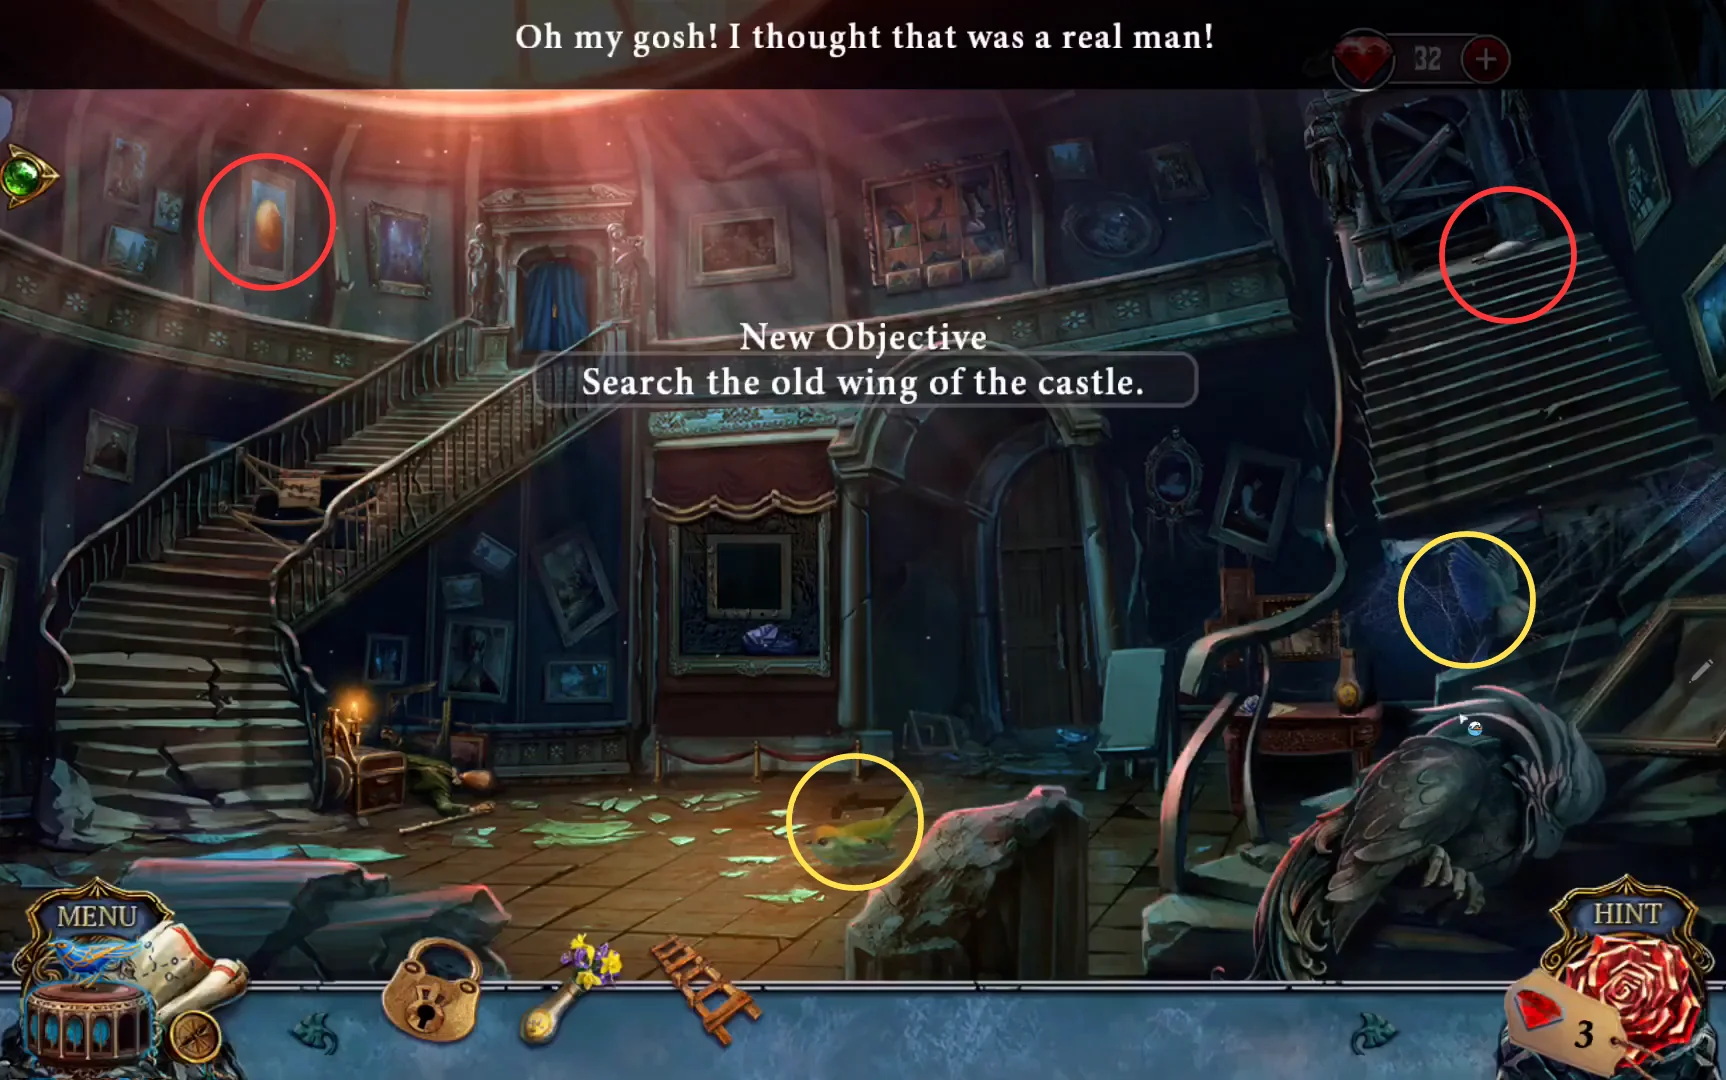
Old Wing. The upper-left circle is the domed picture. Yellow circles mark characters, red circles mark objects. - Baron's Bedroom. Characters: the yellow bird on the ceiling beam at the top left, above the bed, and the red bird that appears on the carved front of the bed frame. Objects: the candelabrum standing on top of the tall wardrobe, and the dark beaded necklace hanging on the left side of the mirror.
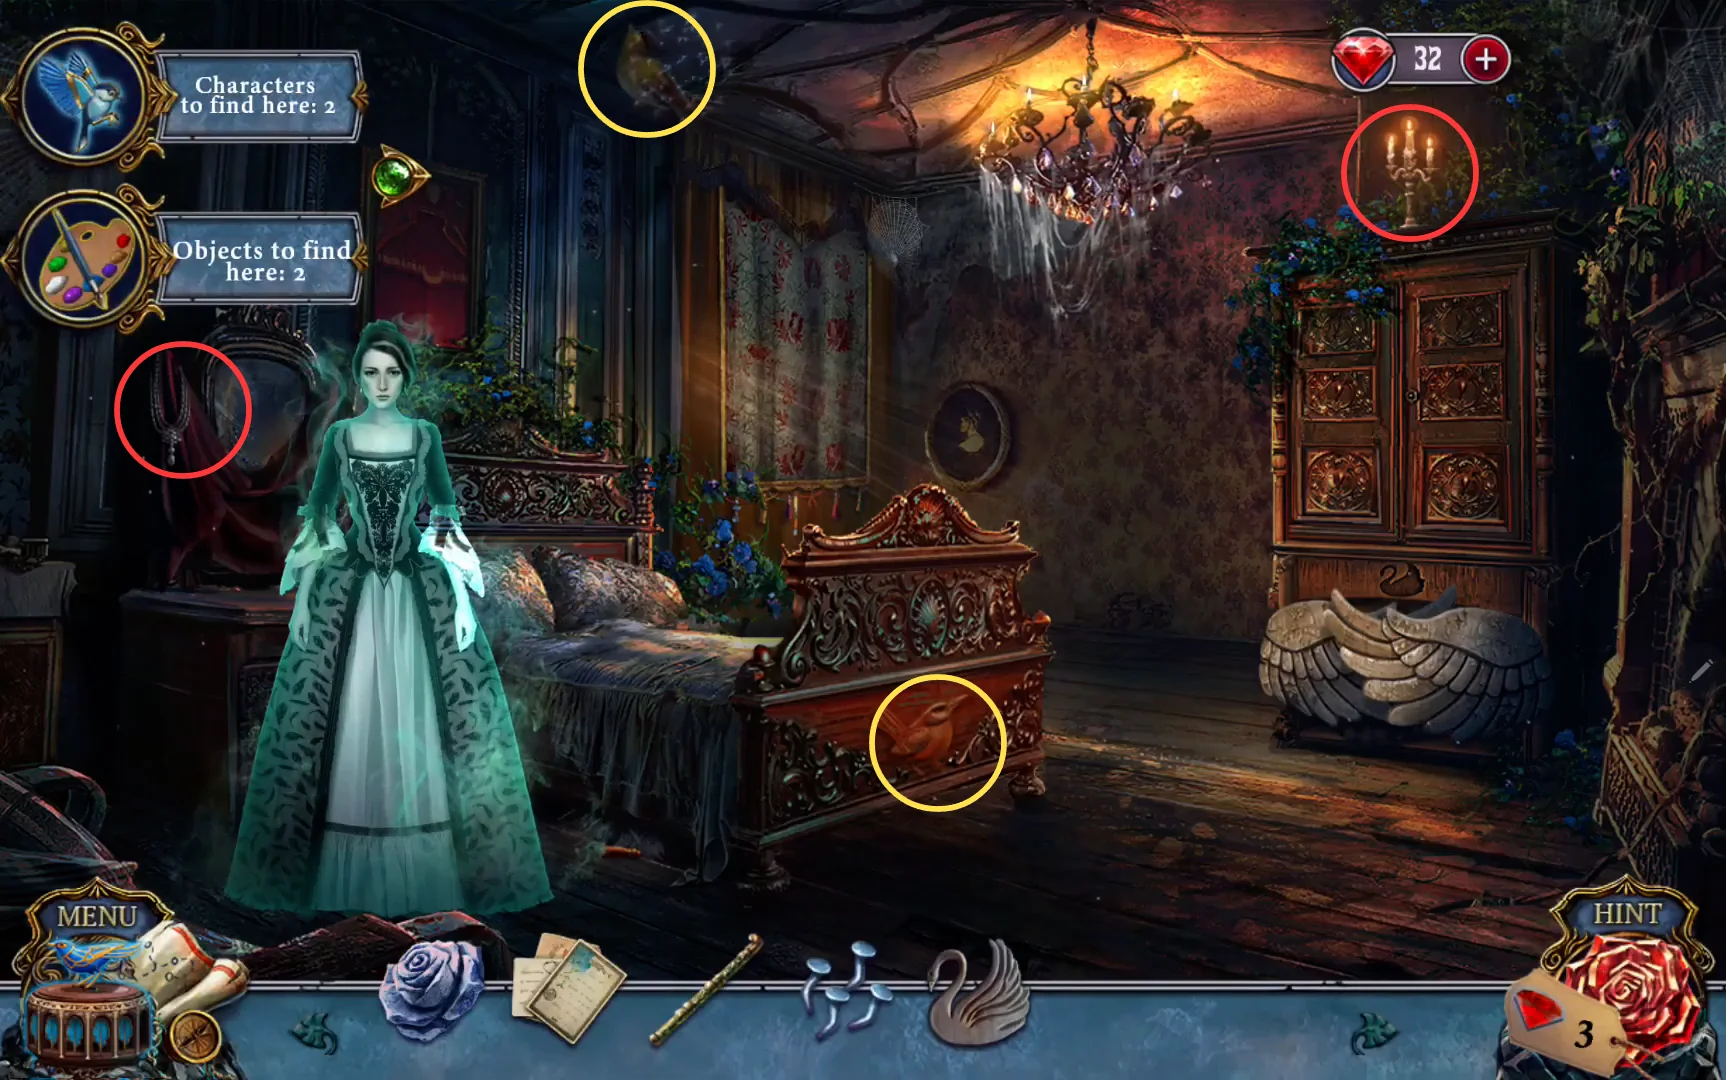
Baron's Bedroom. The red bird comes out at the bed foot. Yellow circles mark characters, red circles mark objects. - Secret Room. Characters: the small bird perched on the top left corner of the tapestry frame on the right wall, and the bird on the little shelf high on the wall above the desk at the left. Objects: the loose papers or red book lying on the floor at the left edge of the rug, near the green armchair, and the sketch on the easel (its picture changes; if it does not respond, try again on a later visit).
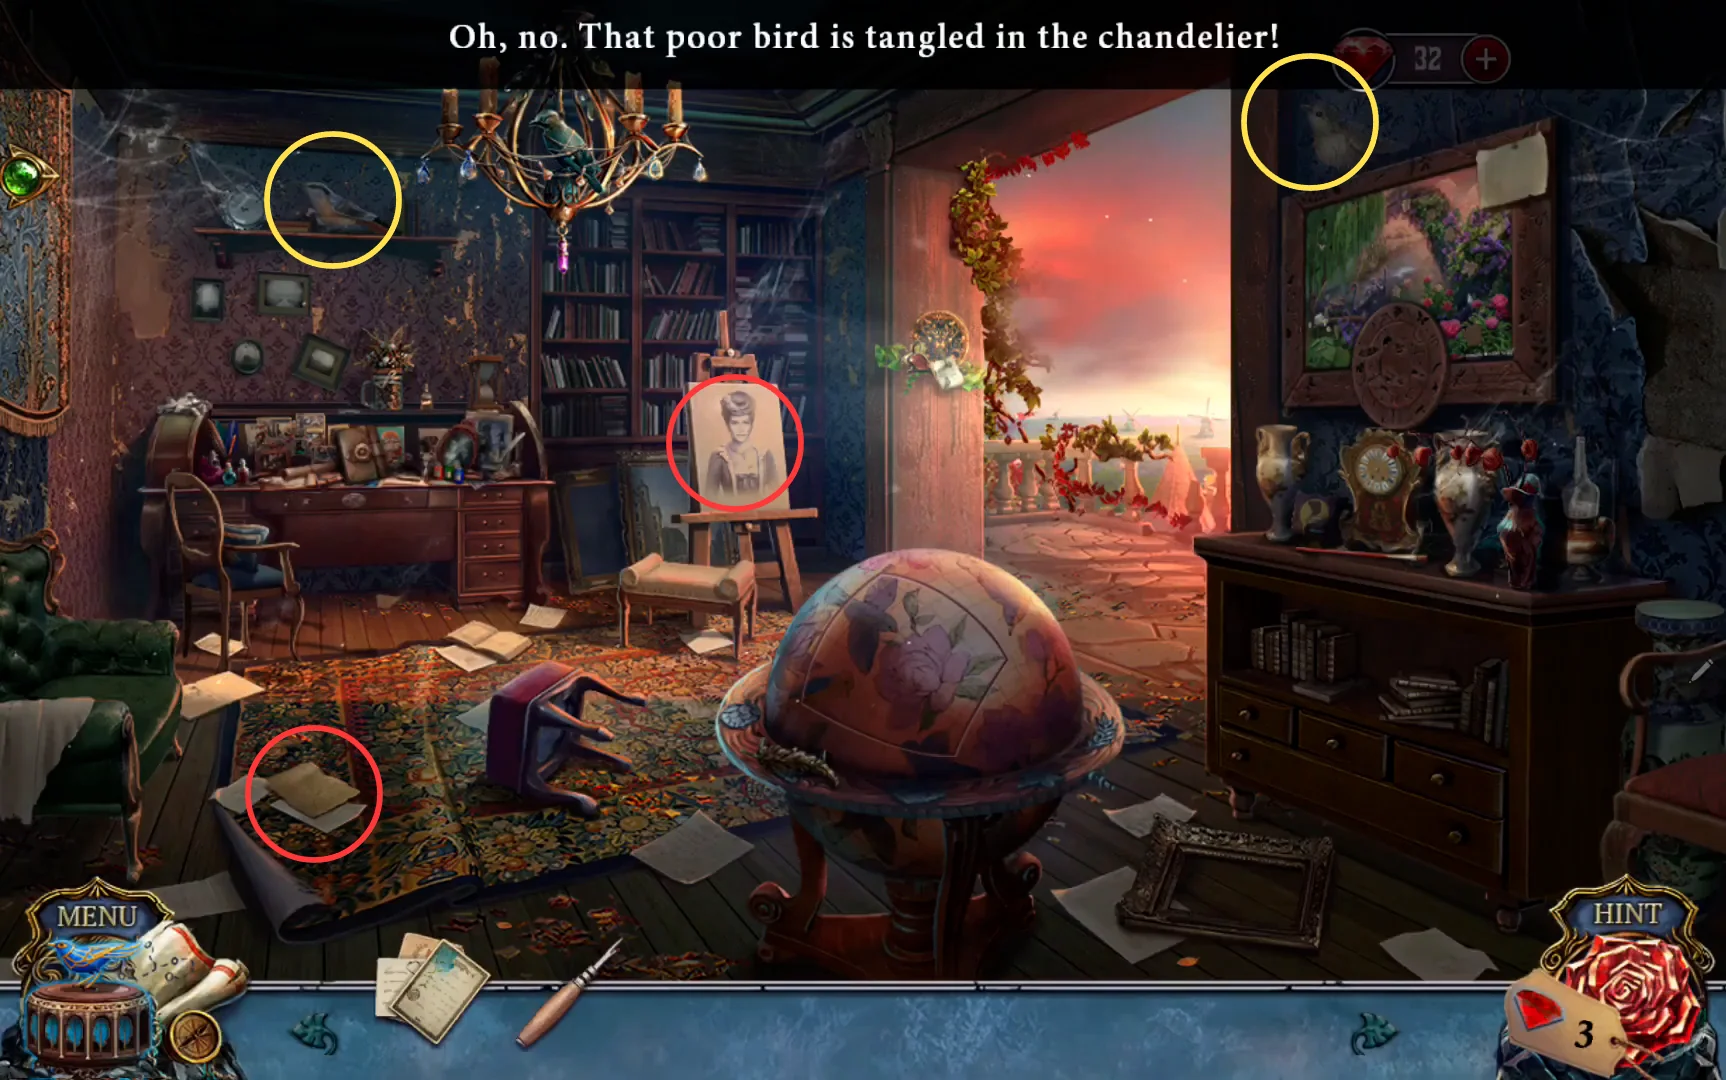
Secret Room. The rug spot shows loose papers here and a red book at other moments. The bird in the chandelier belongs to the untangling puzzle and is not a collectible. Yellow circles mark characters, red circles mark objects. - Library. Characters: the red-brown wren on the stone railing just right of the big owl statue at the lower left, and the blue bird on the railing at the right, beside the purple book box. Objects: the painter's palette lying on the floor at the top left, right of the winged lamp near the pink window, and the scattered blue petals on the steps of the right staircase.
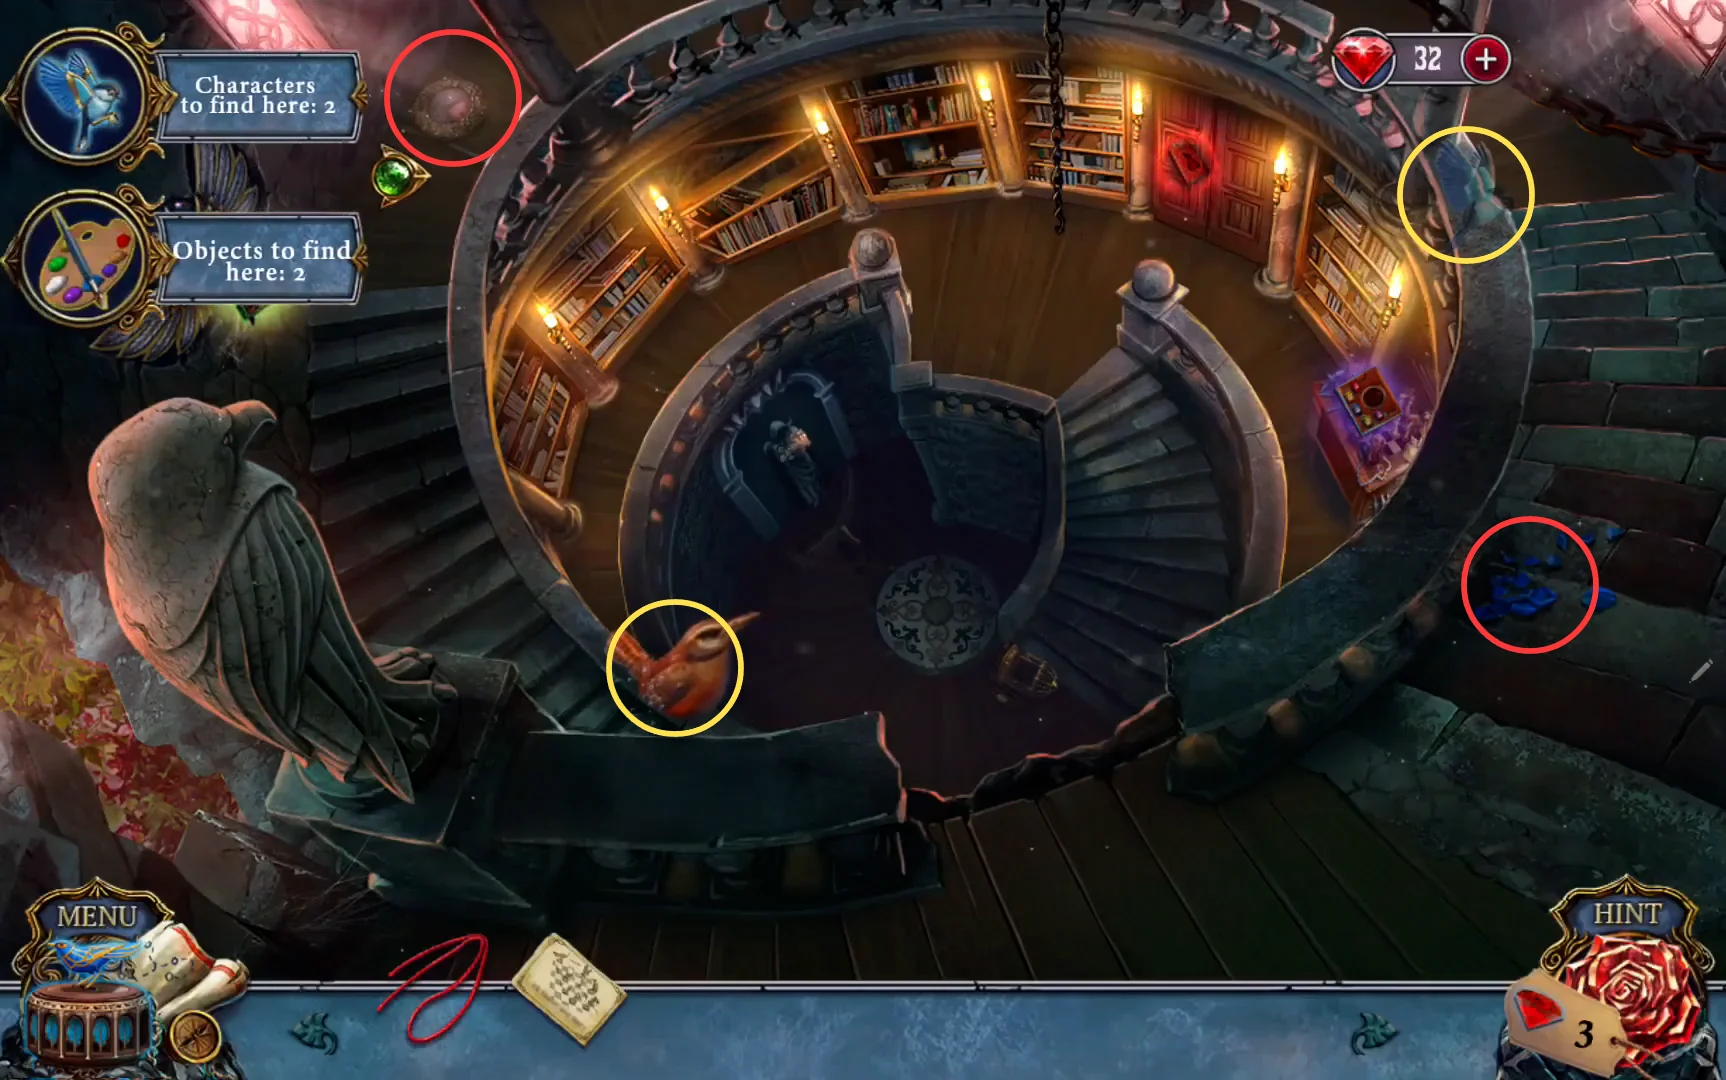
Library. The blue bird lands on the railing inside the upper right circle. Yellow circles mark characters, red circles mark objects. - Alchemy Laboratory. Characters: the green bird on the railing of the stairs at the lower left, and the yellow bird high at the top right, among the chains above the right-hand candle. Objects: the item on top of the copper still at the left side of the cabinet at the back (a coiled copper pipe or a purple ribbon), and the blue vessel on the front table with the blue flowers (a water bowl or a flask).
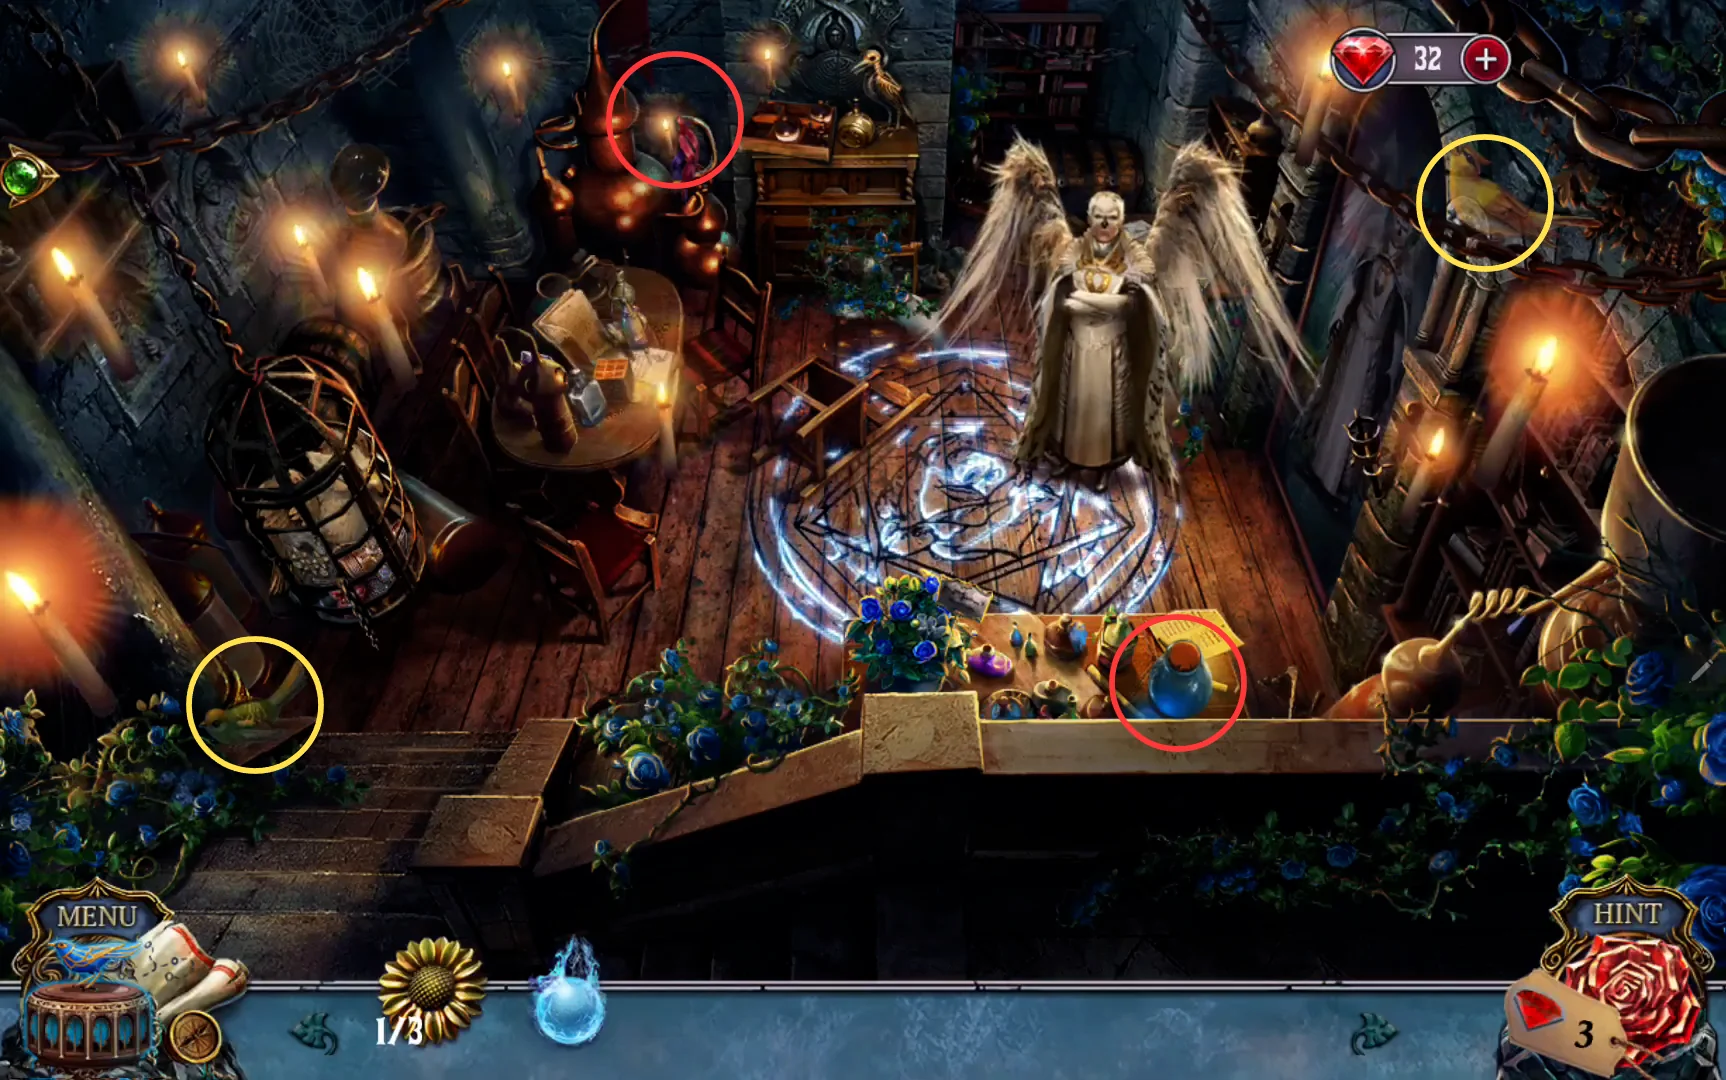
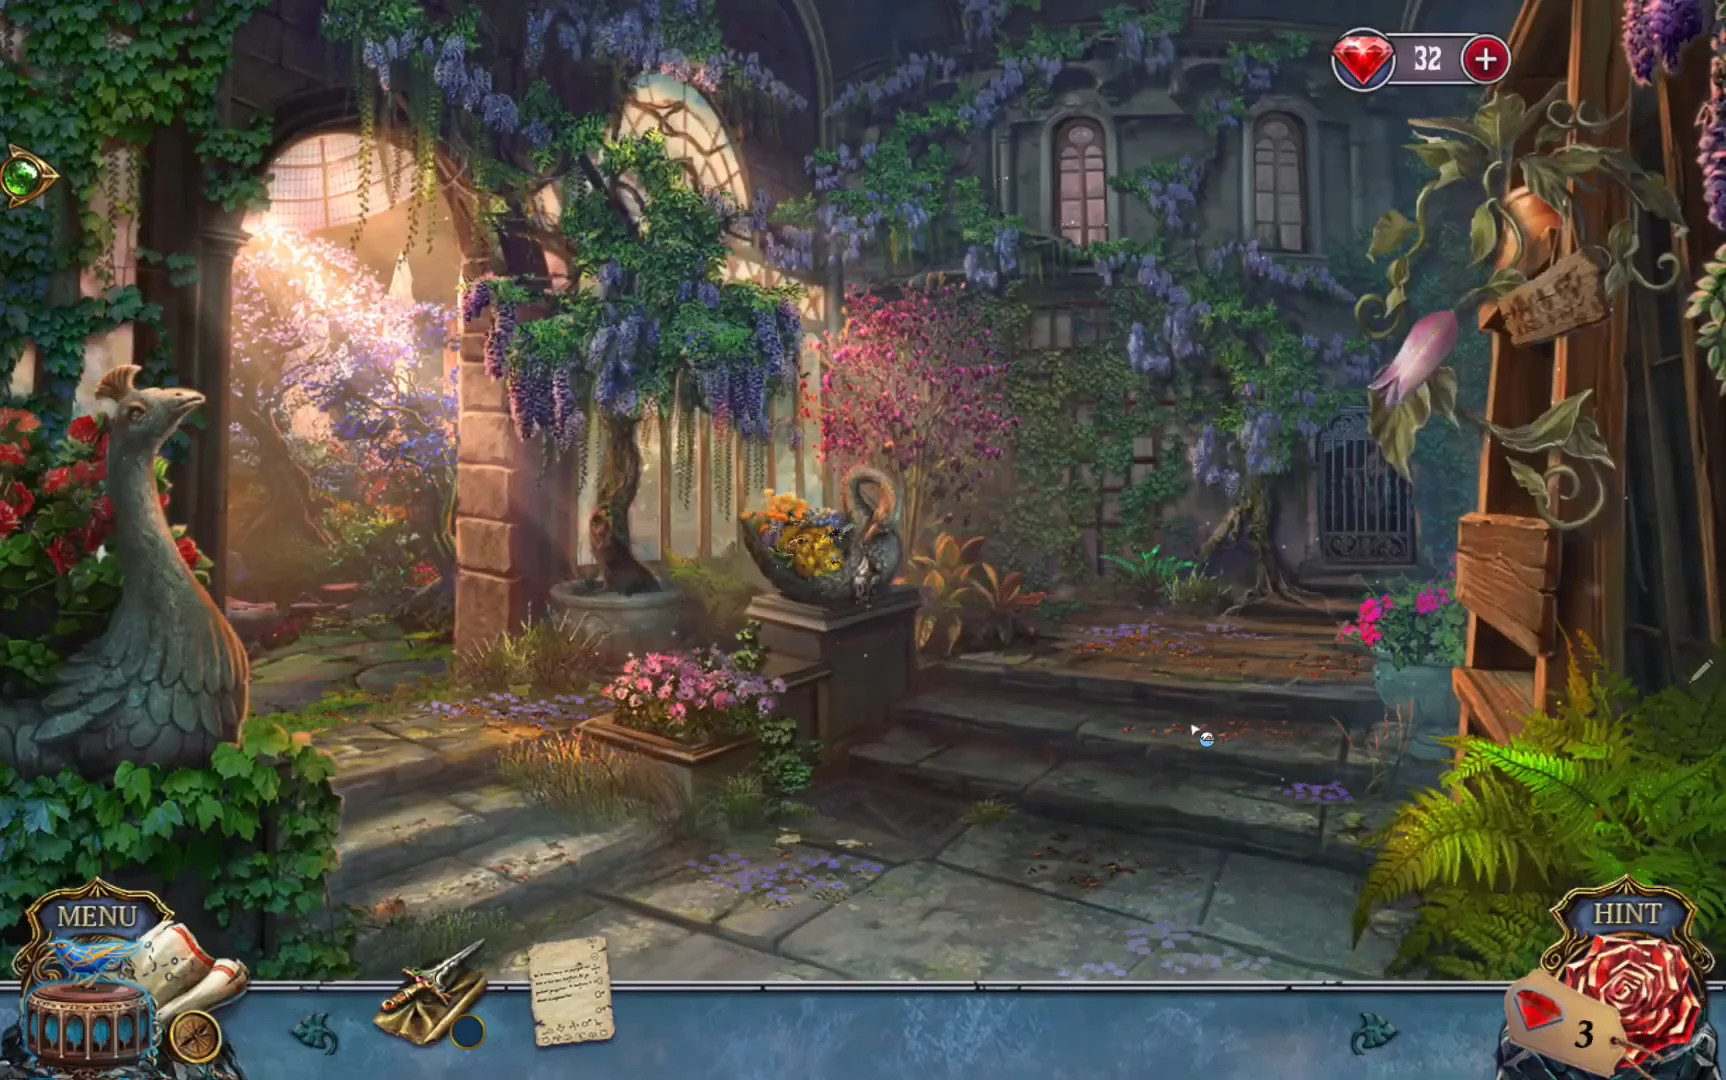
Alchemy Laboratory. The still spot shows a purple ribbon here and a coiled copper pipe at other moments; the front table vessel shows a flask here and a bowl at other moments. Yellow circles mark characters, red circles mark objects. - Winter Garden courtyard. Characters: the small bird on the first step at the right, by the pink flowers, and the brown bird on top of the wisteria tree at the left. Objects: the crumpled purple cloth on the stairs at the left, and the white flowering bush under the windows at the back right. Astronomy Tower. Characters: the blue bird on the red curtain at the top right, above the star map, and the small brown bird sitting on the wooden scaffolding at the left. Objects: the small parchment chart pinned to the top right corner of the star map, and the paintbrush with blue paint on the floor in front of the scaffolding.
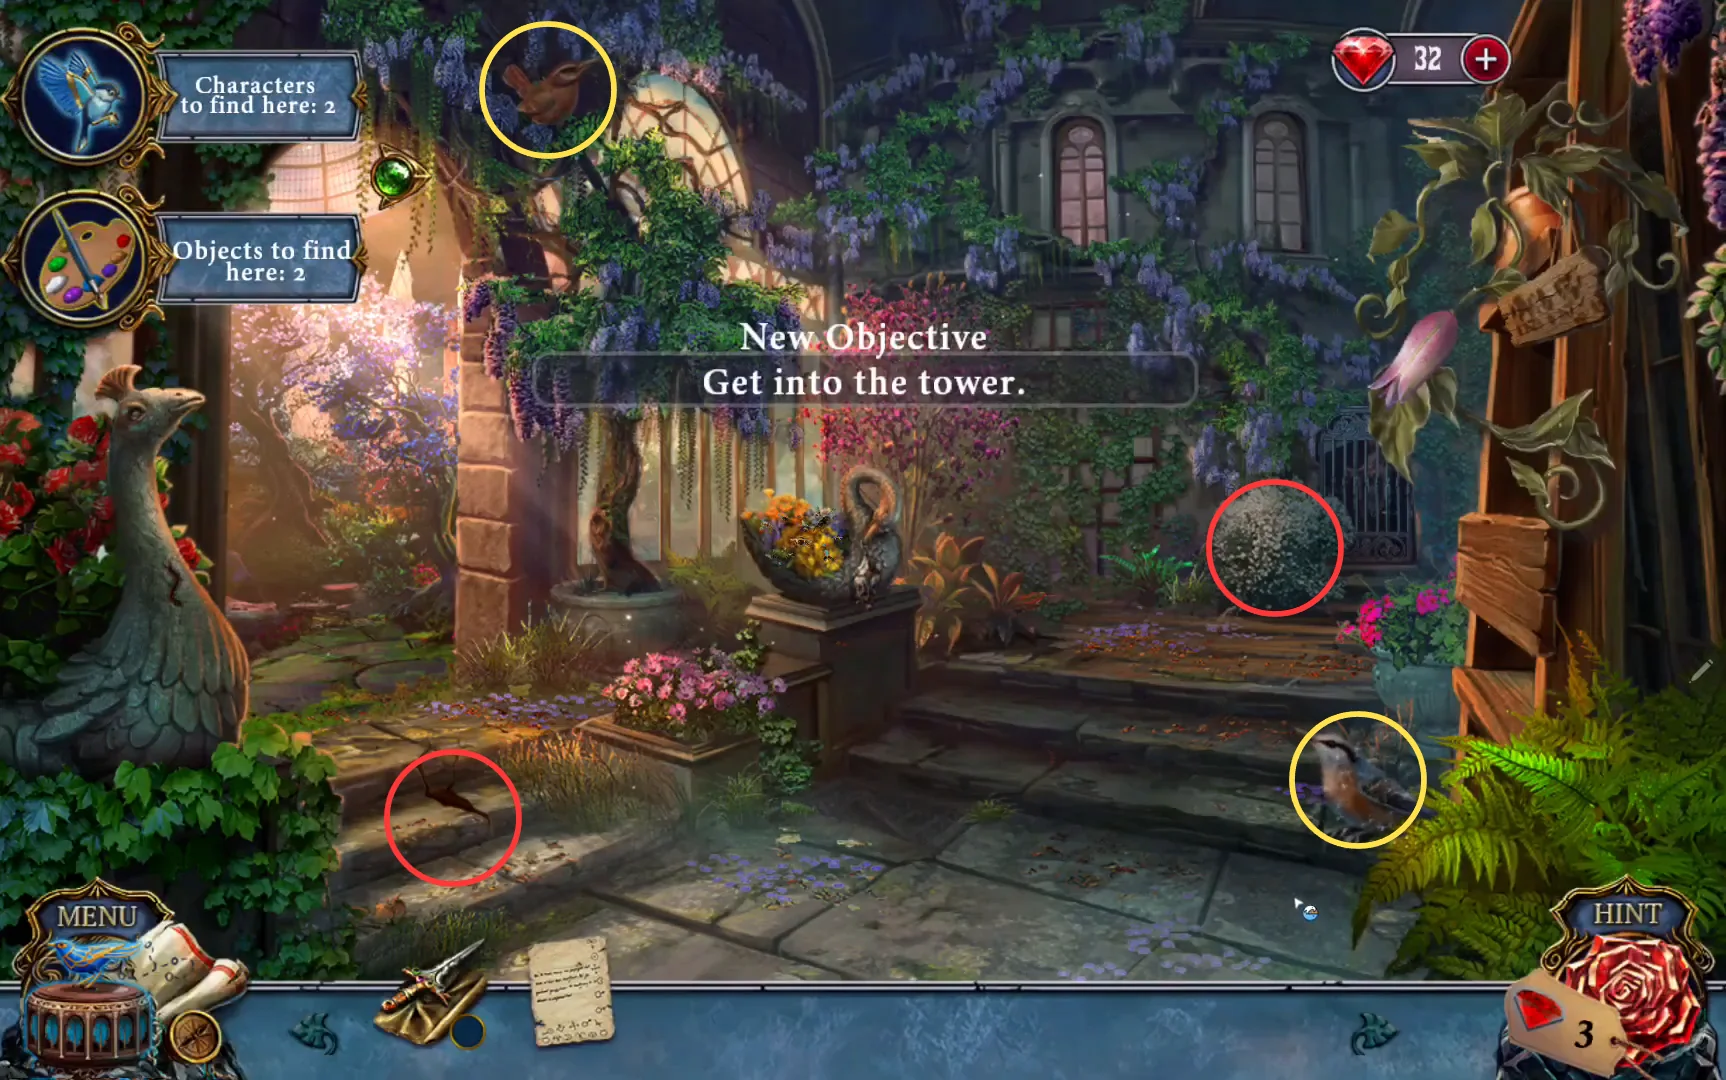
Winter Garden. The purple cloth lies on the stairs inside the left circle. Yellow circles mark characters, red circles mark objects. 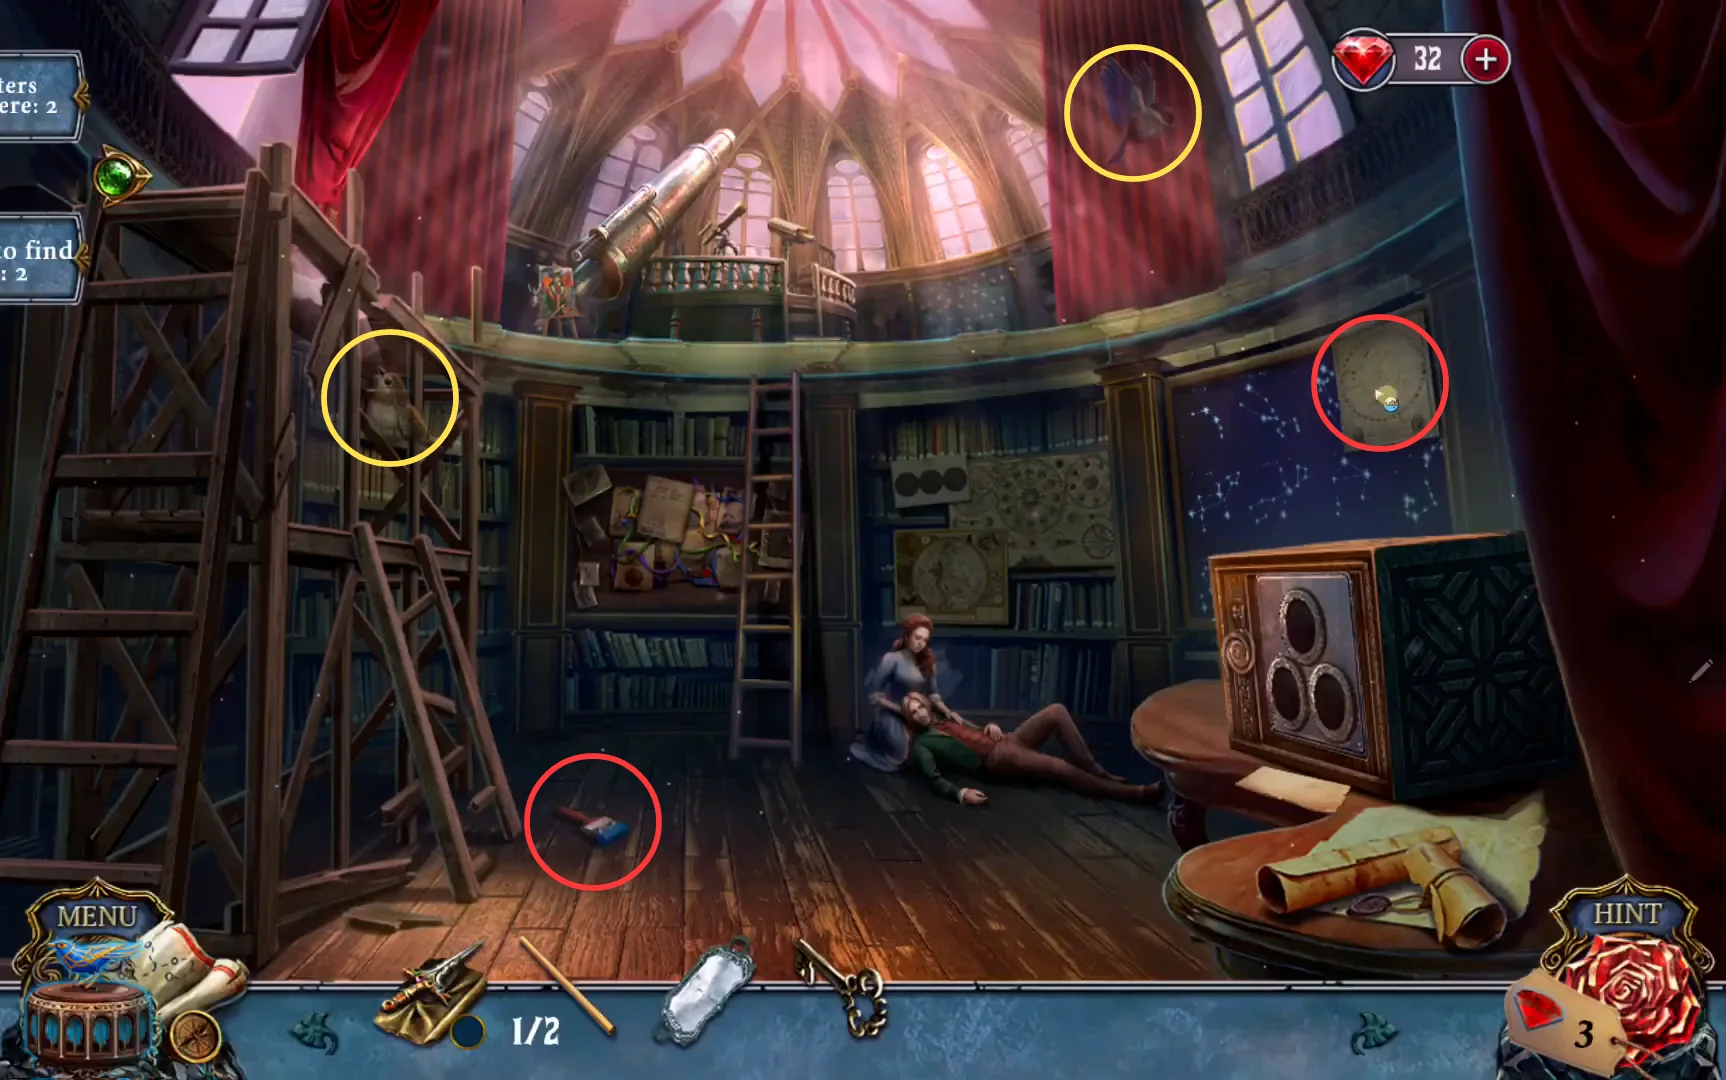
Astronomy Tower. Yellow circles mark characters, red circles mark objects. - Blue Chamber corridor (the hallway with the broken mirror). Characters: the brown bird on the wall at the top right, above the pictures along the corridor, and the green bird on the branch left of the broken mirror. Objects: the twisted tree root lying across the carved face on the right wall, and the dark curled ornament in the arch above the broken mirror. Blue Chamber room (with the portrait on the easel). Characters: the white duck on the blue chair at the right, and the blue bird on the wall left of the glass cabinet. Objects: the small figurine on the top left corner of the glass cabinet, and the blue drape hanging in the top right corner above the blue chair.
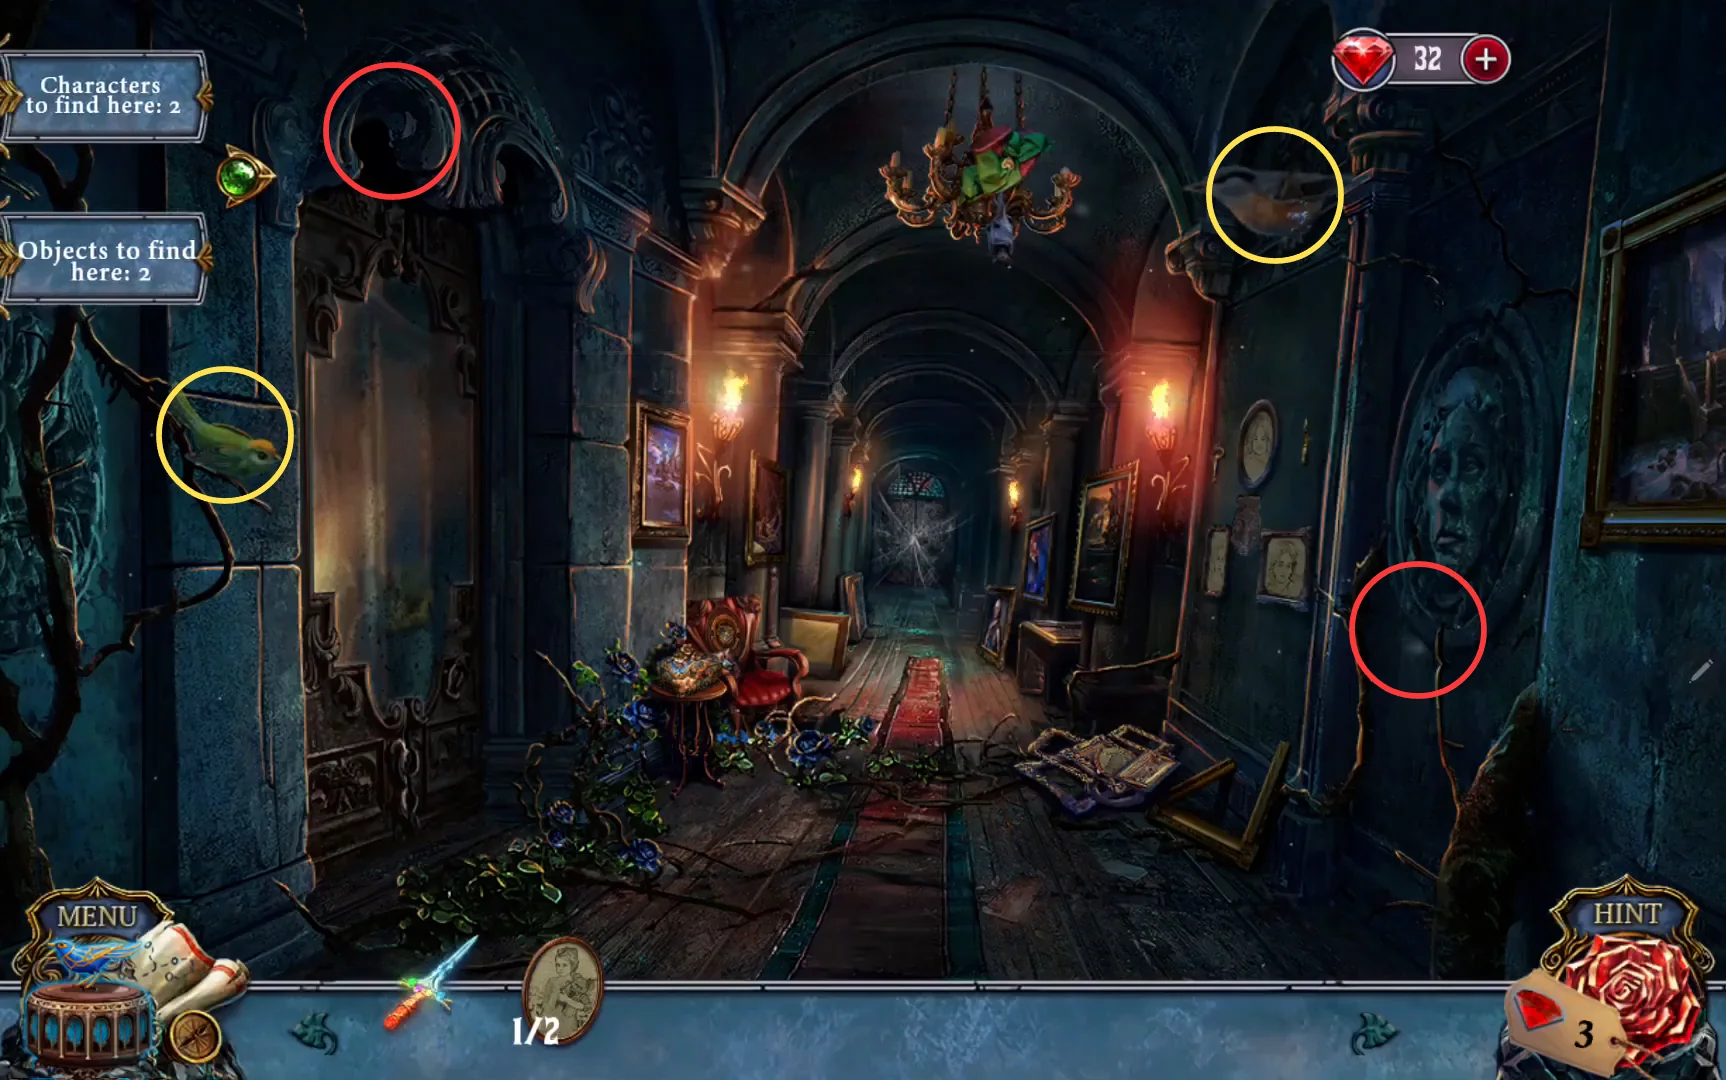
Blue Chamber corridor. Yellow circles mark characters, red circles mark objects. 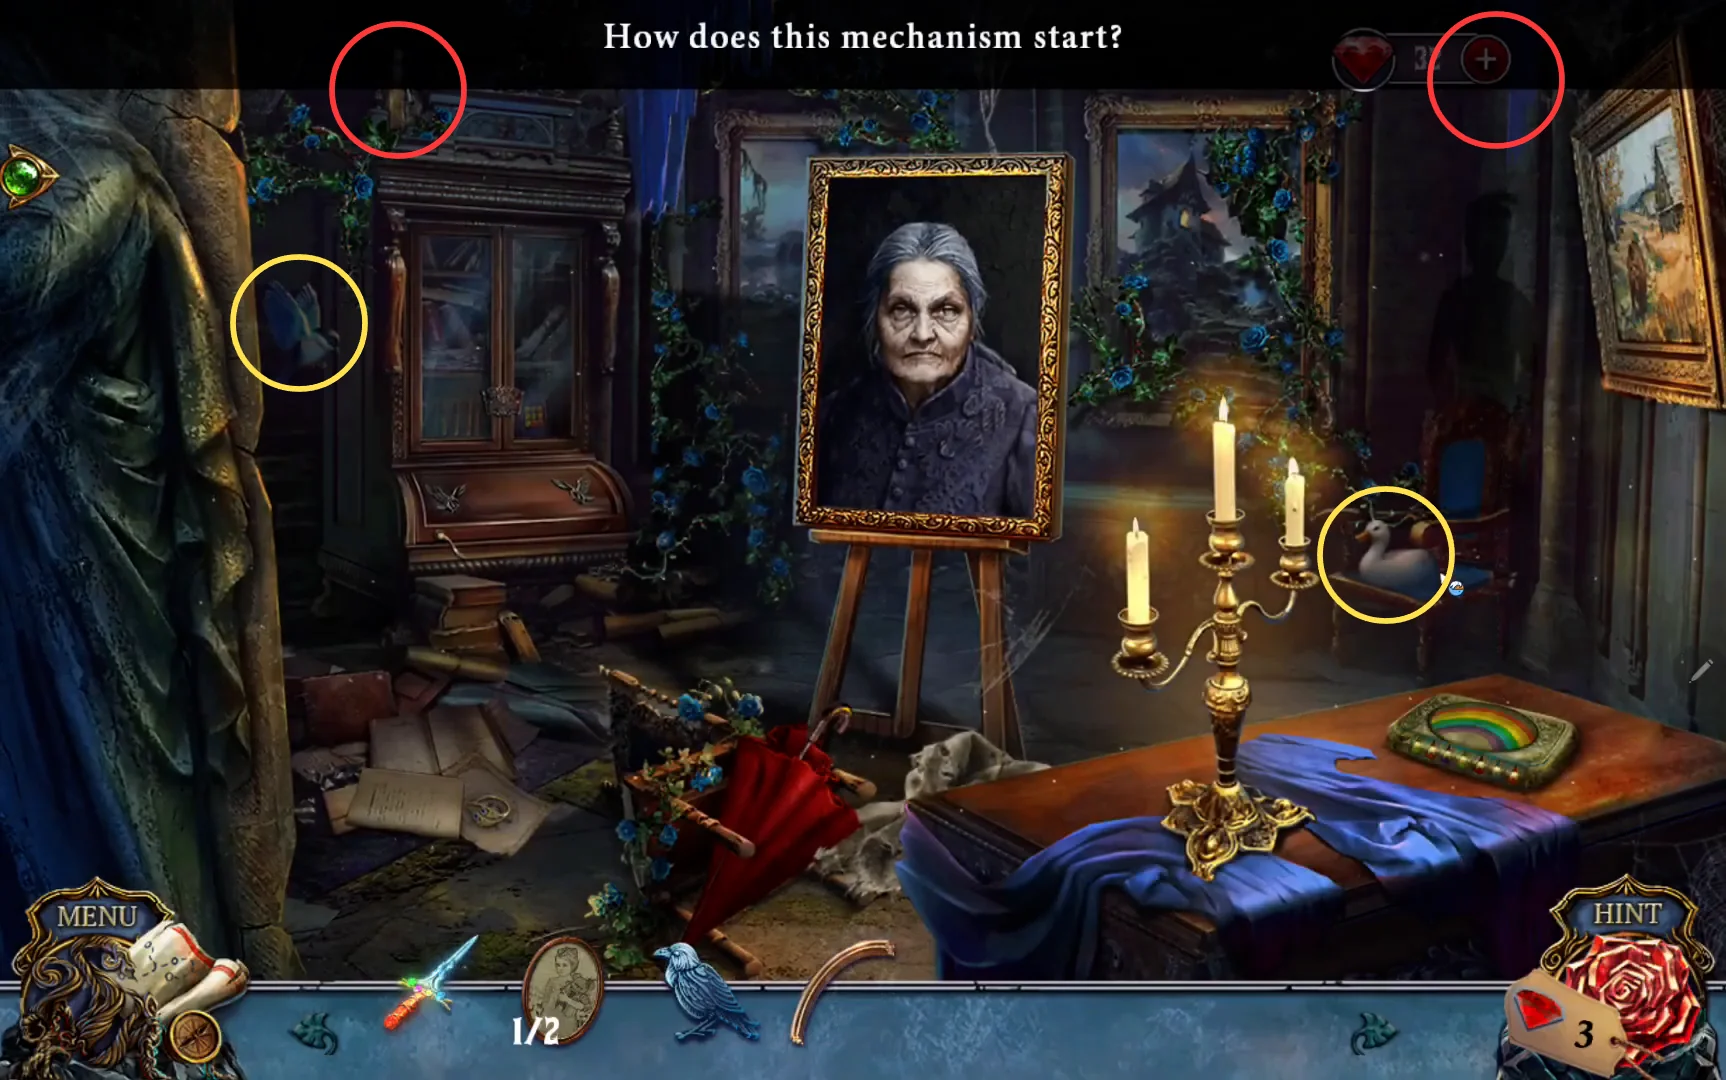
Blue Chamber room. The blue bird is faint against the wall inside the left circle. Yellow circles mark characters, red circles mark objects.