Bird's Nest Castle Grounds
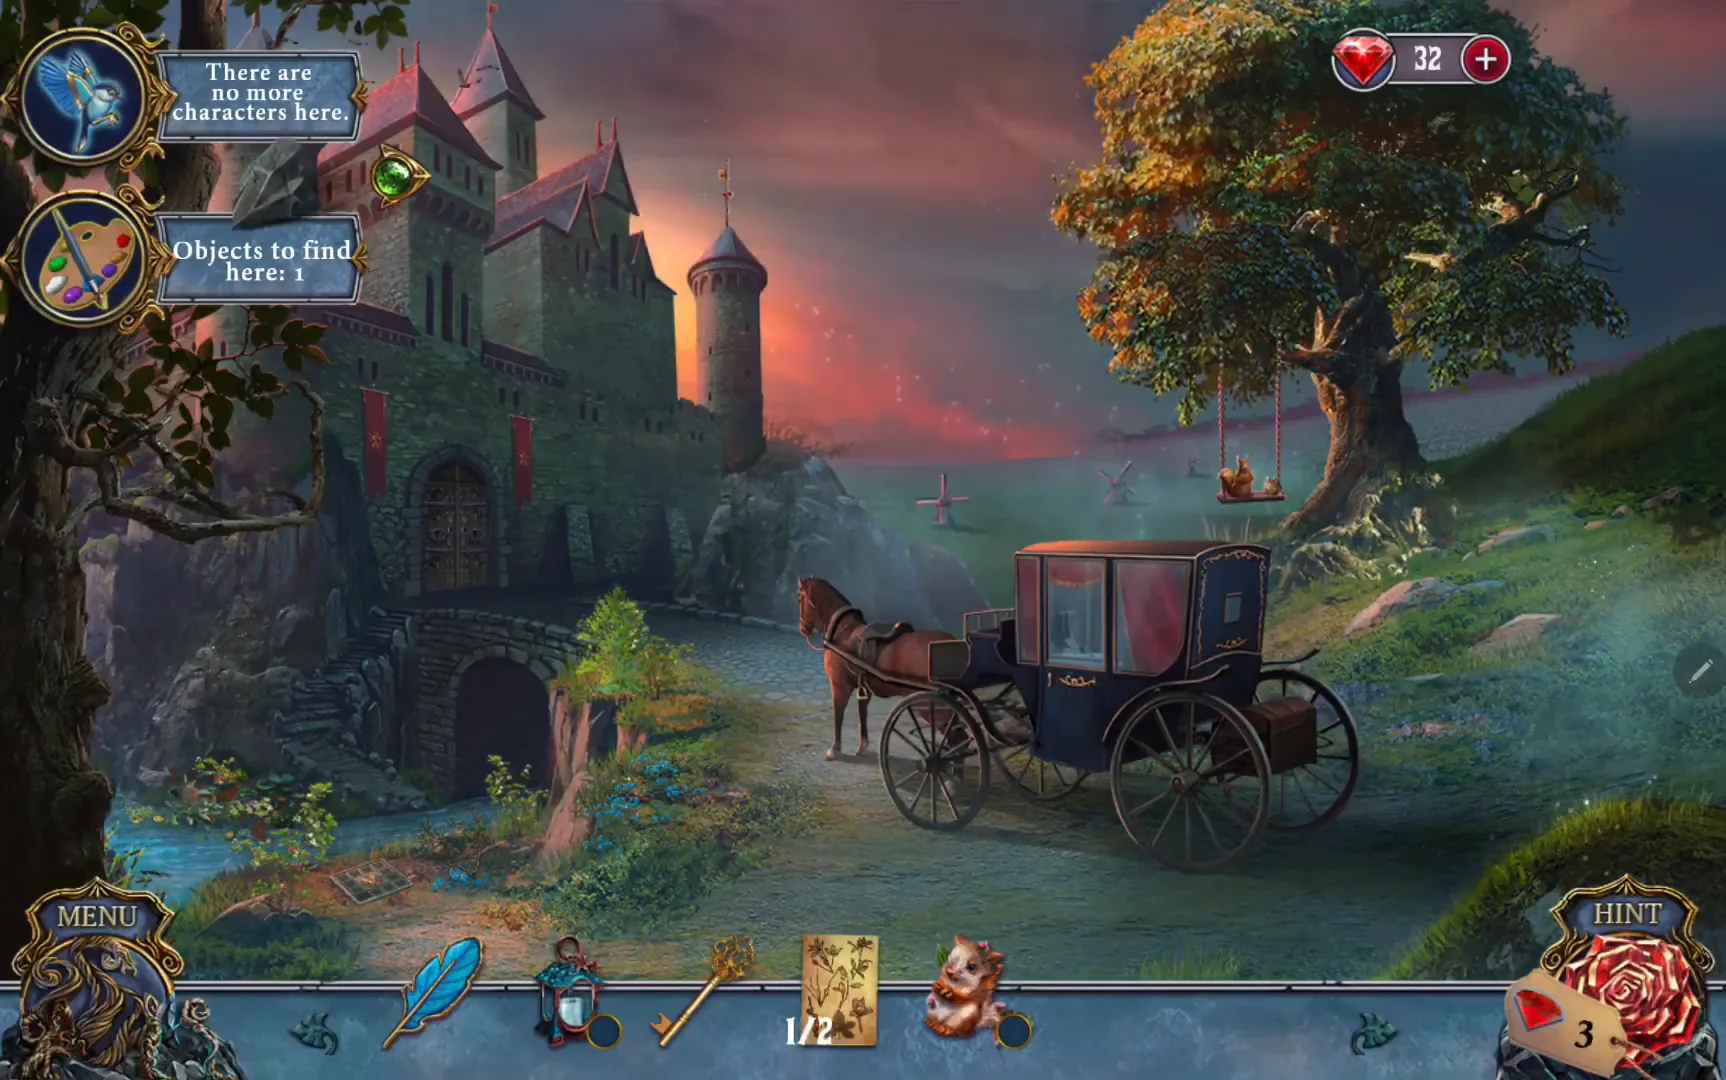
Alex arrives at the castle after Katrina's letter. Collect the tools at the riverbank and carriage, then open the music box to meet Charlie and unlock the gate.
- At the riverbank left of the road, take the LITTLE SQUIRREL toy and the herb-list card (1/2). Note the stone tile frame and the thorns; you will come back to both.
- Open the carriage door and take the CANDLE and the COMB.
- In the inventory, use the COMB on the LITTLE SQUIRREL to brush out the burrs.
- Give the cleaned squirrel to the tree swing on the right and take the LIGHTER.
- Click the sparkles in the water below the bridge to play the hidden-object scene. Red-listed items need an extra action. HAZELNUT: click the reddish shape among the leaves of the central plant to bring it out. ACORN: click the mouse in the pumpkin; it runs off and leaves the acorn behind. PEAPOD: click the ducklings to open the close-up, then click the loose peas around them one by one to fill the empty pod beside them, and take the pod. Once the list is cleared, the mother duck leads her ducklings away and the BAG they were sitting on is your reward.
- Examine the LANTERN in the inventory: clear the vines, take the KEY, place the CANDLE inside and light it with the LIGHTER to get the LIT LANTERN.
- Shine the LIT LANTERN into the dark carriage interior and take the LETTER OPENER.
- At the gate, read the note, then use the KEY on the lock. A ghost seals the gate with vines. Take TILE 1/2 from the vines.
- Return to the riverbank, cut the thorns with the LETTER OPENER and take TILE 2/2. Place both TILES in the stone frame.
- Slide the tiles until the centre picture is complete; correct tiles lock in place. The target picture is what matters here, so this guide does not list individual slides.
- Drag the rings until the eagle medallion picture is whole. When the medallion opens, read the note and take the MUSIC BOX.
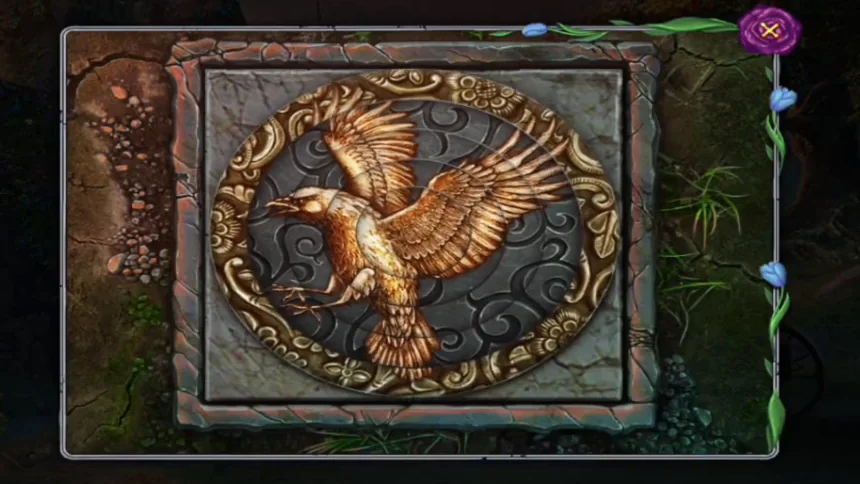
Solved: the rings line up and the eagle is whole. - Open the BAG in the inventory, look at the bird card and take the CLOCKWORK BIRD. The pocket stays locked for now.
- Put the CLOCKWORK BIRD on the MUSIC BOX; Charlie wakes and introduces himself. Now use the blue FEATHER that came with Katrina's letter at the start of the game (it has been in your inventory all along) on the music box. Charlie tells the Baron's story and produces a bag of MAGIC DUST: take it. From now on, Charlie's music box sits in the icon at the left end of the inventory bar, and he says each feather key you bring him can break a spell.
- Open the gate close-up and use the MAGIC DUST on the vines. They dissolve and the way into the castle grounds opens.
Castle Entrance
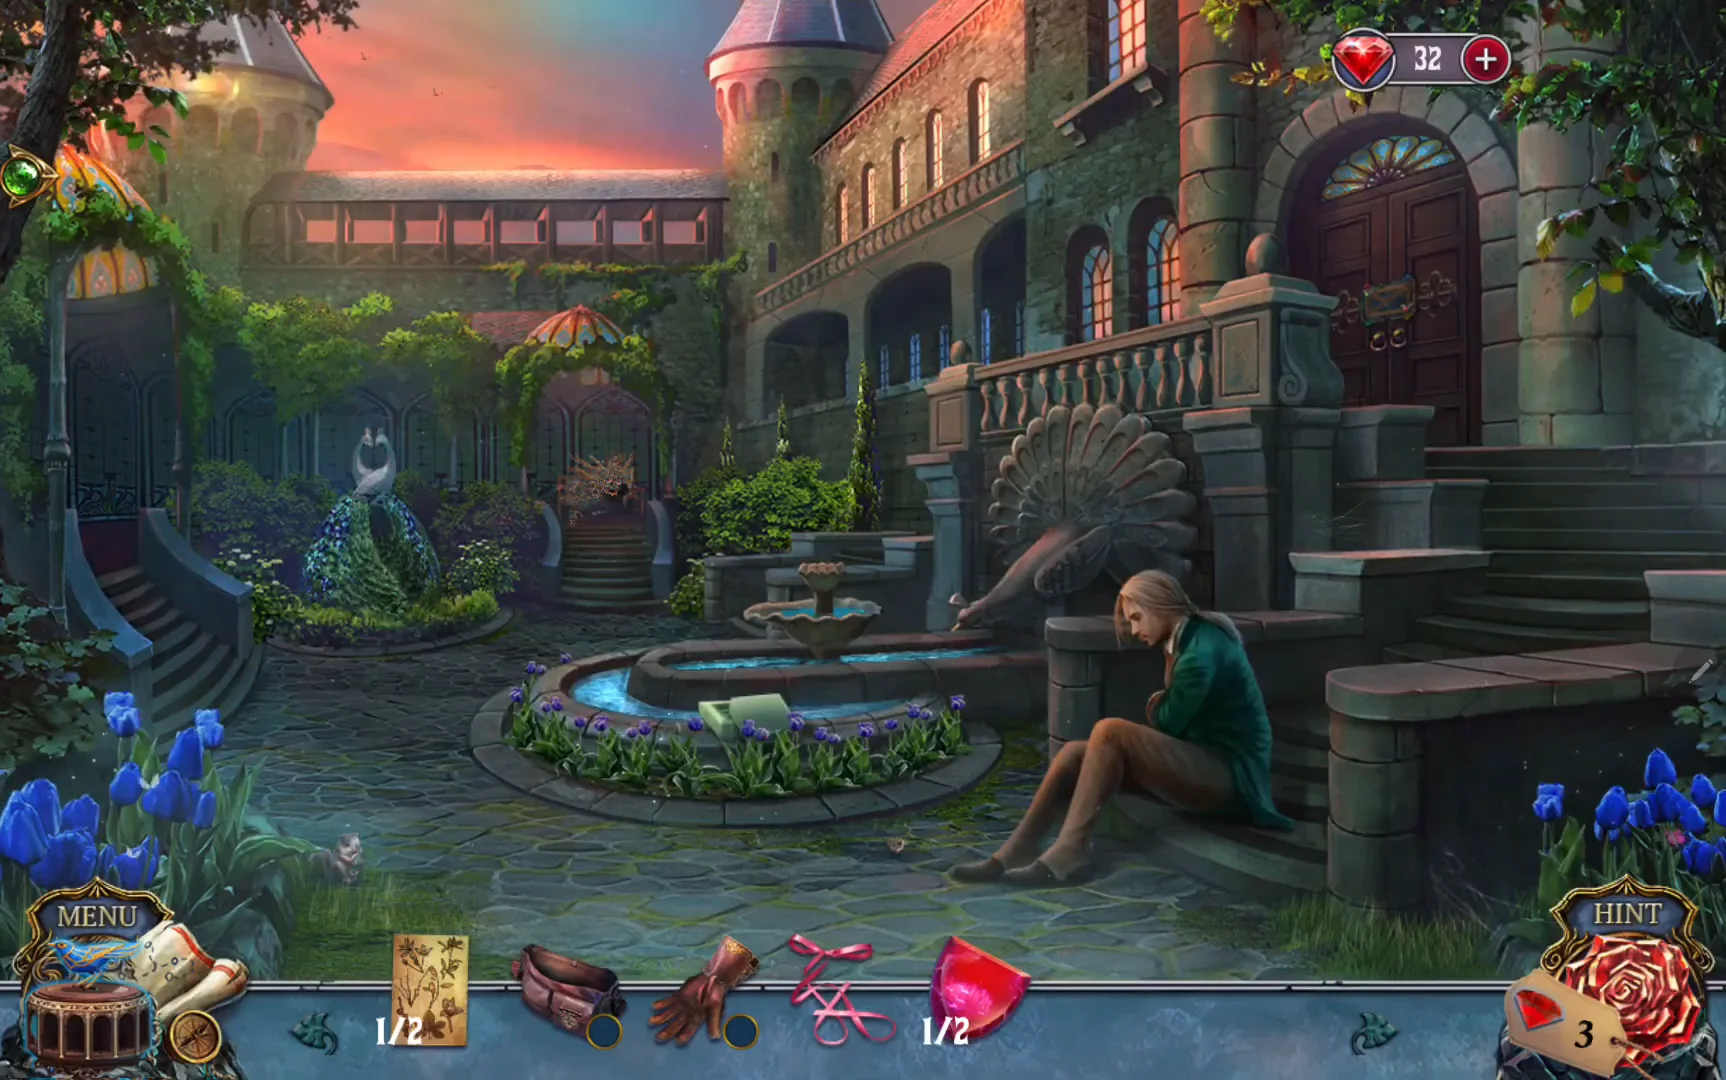
Casper is attacked by a living bush painting. Clear it, treat his wound and open the castle door.
- At the fountain, open the green box and take the RIBBON and HEART GEM 1/2.
- Take the GLOVE near Casper and tie the RIBBON to it in the inventory.
- Use the glove on the living painting and guide it along the thorny stems from flower to flower. There are 20 flowers, each one can be visited only once, and all of them must go. Follow the numbered order in the image below: start on the lowest flower at the far left, work through the lower left and up the left edge to the top-left corner, come back across the upper left and down through the middle to the bottom, go out to the far right, up the right side, and finish on the flowers at top centre.
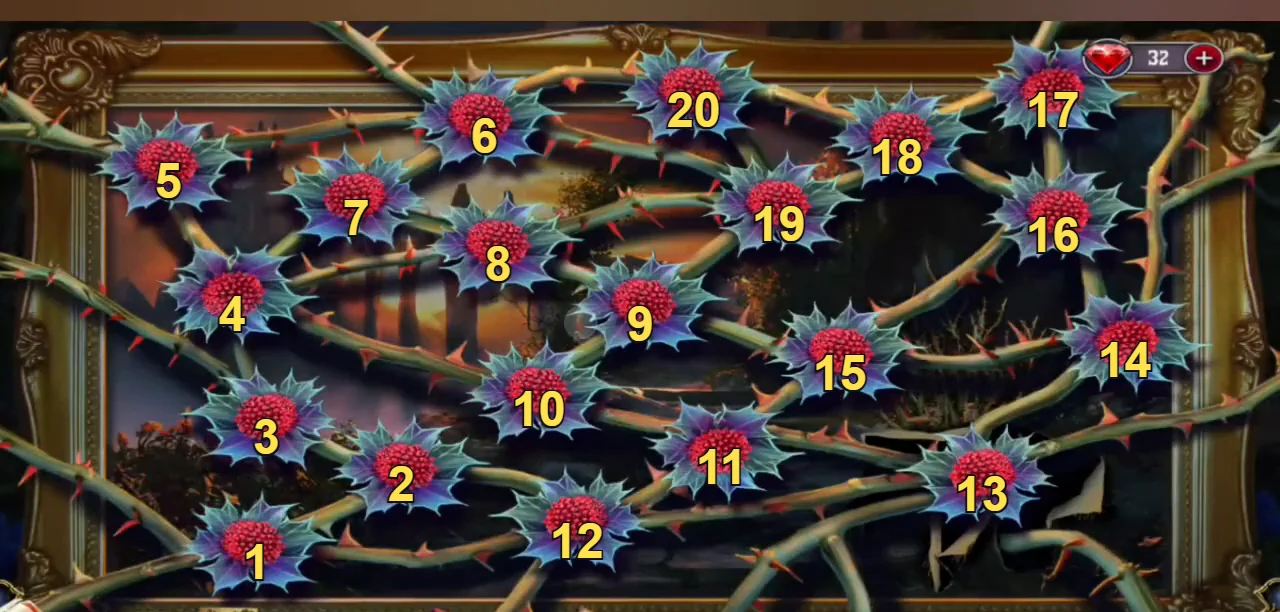
One route that clears all 20 flowers: follow the numbers from 1 to 20. - At the bench, take the CUP and the MAGNIFIER (it completes the herb list, 2/2) and read the note about ants disliking strong smells.
- Use the HERB LIST on the hedge and find all 7 herbs to get HERBS. Pick up STAR 1/3 near the hedge as you go.
- At the stone shelf, take the HOOK and HEART GEM 2/2.
- Put both HEART GEMS on the jar lid on the bench, open it and take the MINT and the NUTS.
- Give the NUTS to the squirrel in the tulip bed left of Casper and take the FIRST-AID CLASP.
- Use the MINT on the ants at the stone shelf, then stack the stones into five piles by shape, smallest to largest from the left. Take the CASKET.
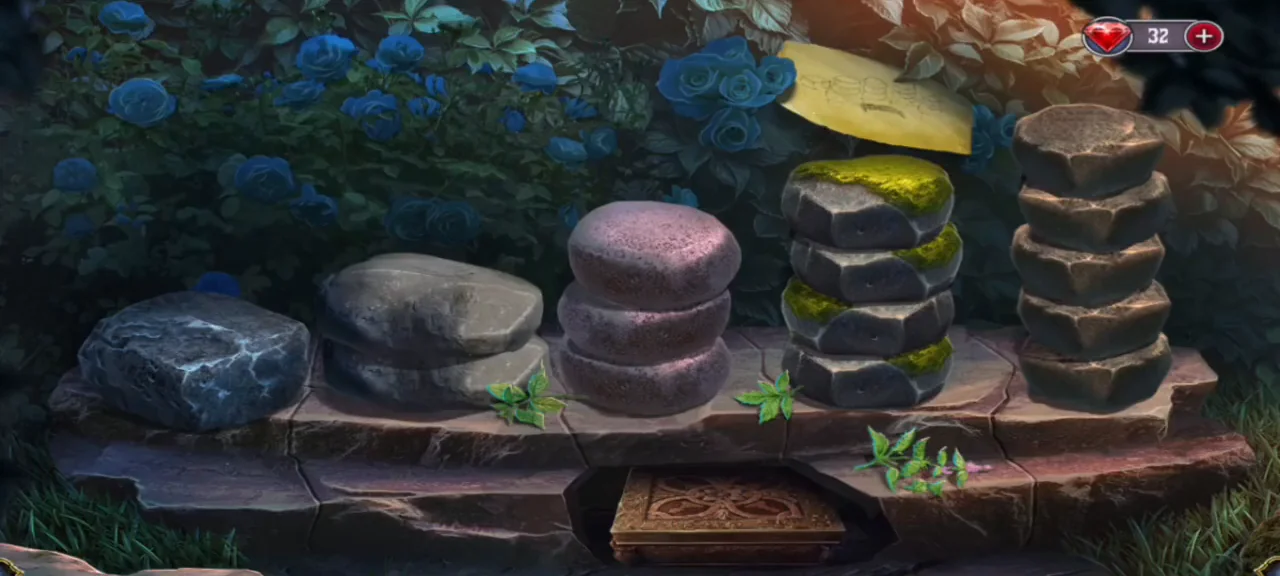
Solved: five piles sorted by stone type, growing from left to right. - Open the BAG in the inventory and use the FIRST-AID CLASP on the locked pocket to get the FIRST-AID KIT.
- Examine the FIRST-AID KIT and read the remedy: the herbs go in the bottle. Click the bandage to unroll it and lay the cotton on it. Put the HERBS into the ointment bottle, then click the bottle to pour the ointment over the bandage and make the COMPRESS. Herbs placed on the bandage are refused, so use the bottle.
- Give the COMPRESS to Casper. After the talk, take BIRD EMBLEM 1/2 from the ground near him.
- Open the CASKET in the inventory, read the will and take the GRIMY BIRD EMBLEM.
- Fill the CUP at the fountain, then wash the GRIMY BIRD EMBLEM in the fountain water to get BIRD EMBLEM 2/2.
- Place both BIRD EMBLEMS on the door on the right terrace, then slide the four birds so each reaches the corner of its own colour: blue top right, yellow bottom right, green bottom left, red top left.
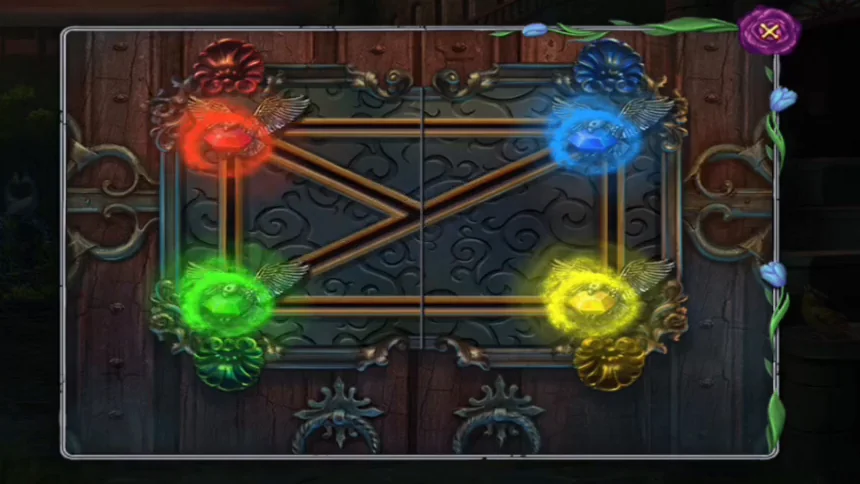
Solved: every bird has reached the corner of its colour and the corners glow. - Inside, the sorceress painting attacks. Draw lines through three or more matching adjacent tokens, in straight or diagonal directions, until you have collected 15 of each required token. The token layout can vary, so there is no fixed move list; longer lines collect more at once.
Lobby
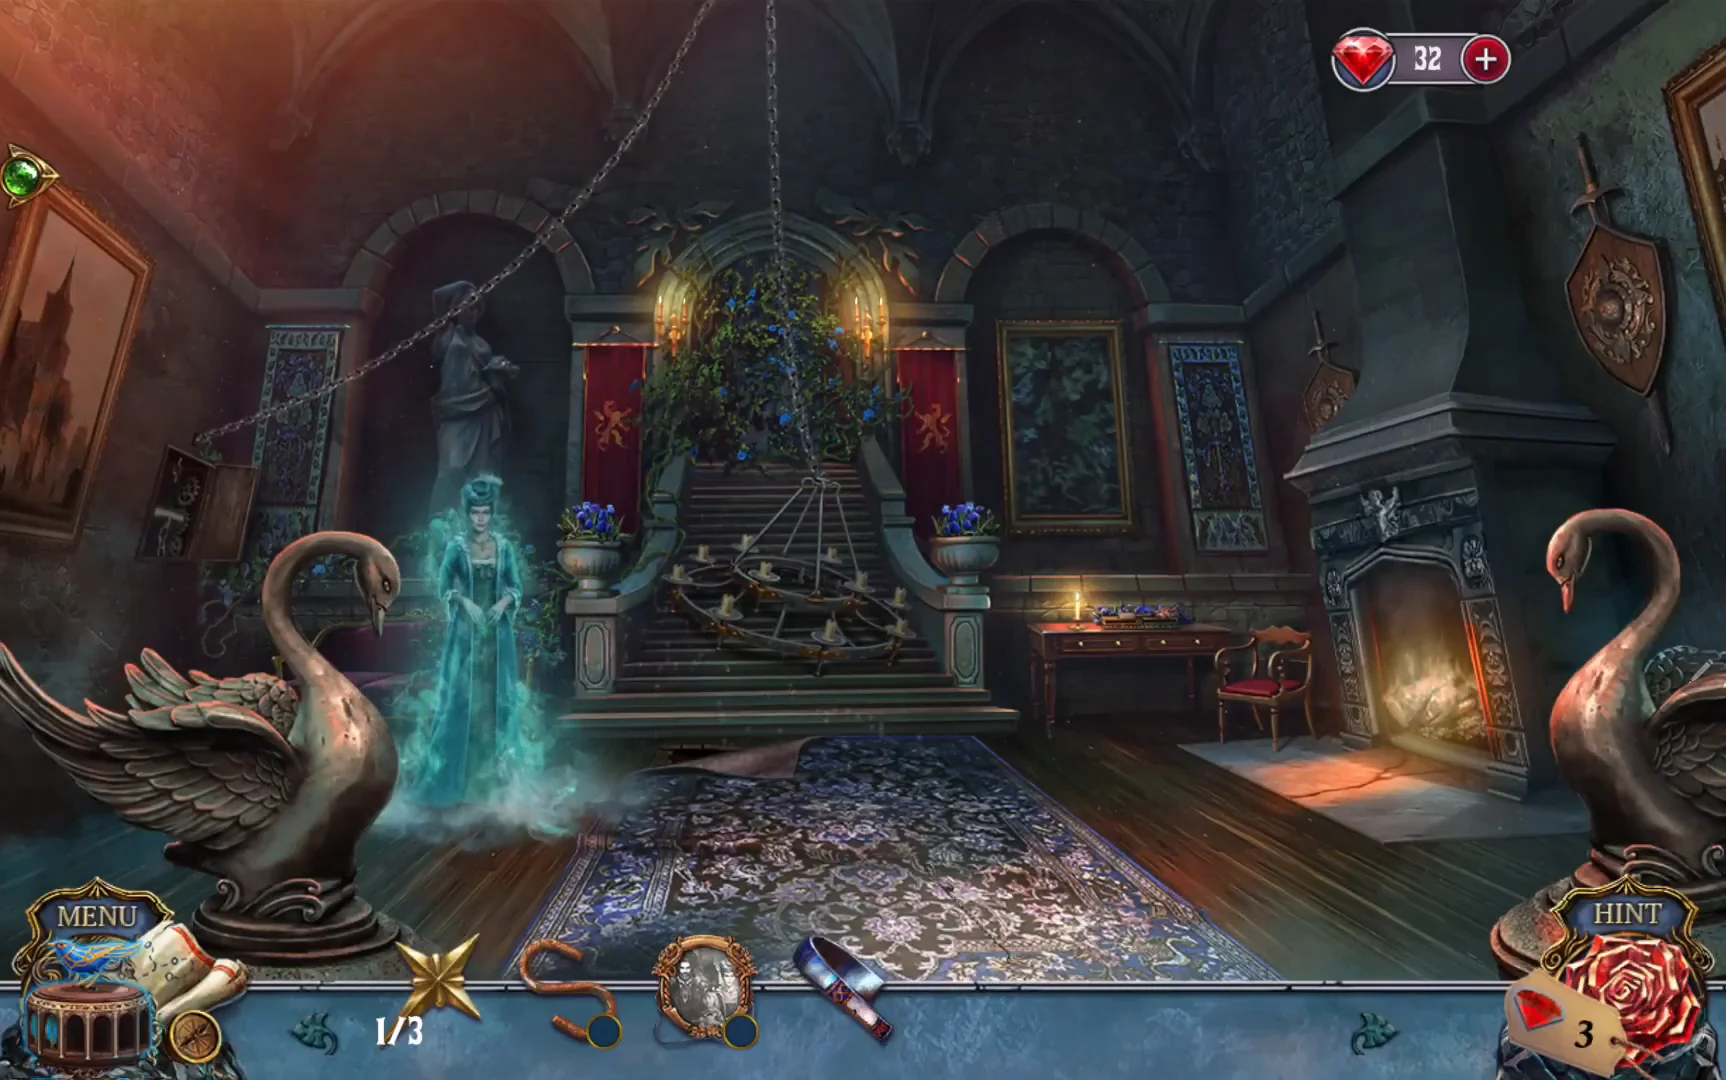
Free Helen, the Baron's first wife, by finding her wedding ring, then open the way to Katrina's workshop.
- The defeated painting drops a blue FEATHER KEY. Click the sparkling Charlie icon at the left end of the inventory bar and give him the feather. After he tells Helen's story, a MAGIC SPHERE appears on the music box: take it. Back in the lobby, use the MAGIC SPHERE on the sorceress painting to break the curse and free Helen's ghost. She asks for her wedding ring.
- Take the round PORTRAIT FRAME from the right corner of the hearth, then pour the CUP OF WATER on the fire. Take the striped SHOULDER ARMOR from the wet logs and the FIRE POKER leaning on the left side of the fireplace.
- By the left swan, lift the corner of the carpet and look under the broken floorboard. The star is out of reach: use the FIRE POKER to pull out STAR 2/3.
- Open the closed album on the table and take the KNITTING NEEDLE stuck in the ball of red yarn on its cover. In the inventory, examine the PORTRAIT FRAME and turn it over. The edge of the backing is loose: use the KNITTING NEEDLE to pry it off, then take STAR 3/3 from behind it.
- Place the 3 STARS in the album on the table, then find 4 tulips, 4 rings and 4 dolls across its pages. The last page gives the WEDDING RING.
- Give the WEDDING RING to Helen. She warns you about Katrina and returns to her portrait.
- Open the bag on the left sofa. The strap shows the Roman numerals IV VII III IX; enter 4739 on the lock and take the SOLVENT and the PAPER.CODE4739
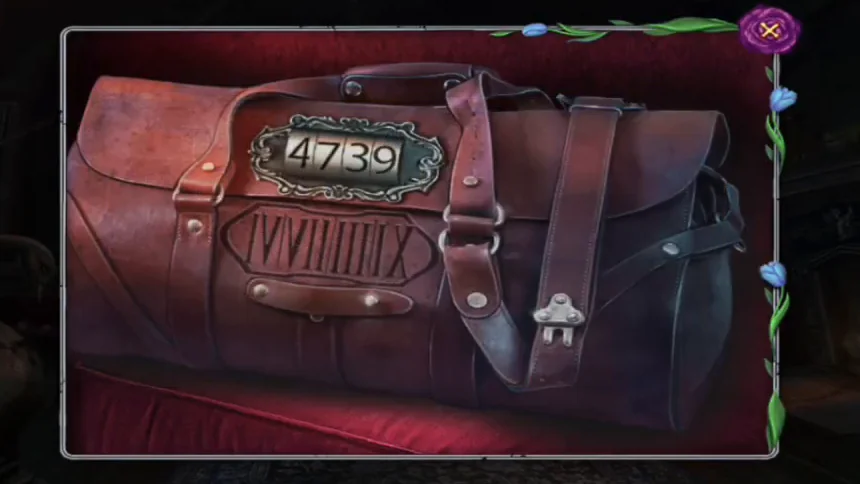
The strap's Roman numerals IV VII III IX give the code, shown here entered as 4739. - Use the SOLVENT on the rusty HOOK in the inventory to clean it. Open the small wall mechanism by the stairs and use the clean HOOK to join the two loose ends of the chain. Then pull the yellow lever on the left of the mechanism: the chain winds up, the chandelier rises and the passage to the hallway is clear.
Hallway to Katrina's Workshop
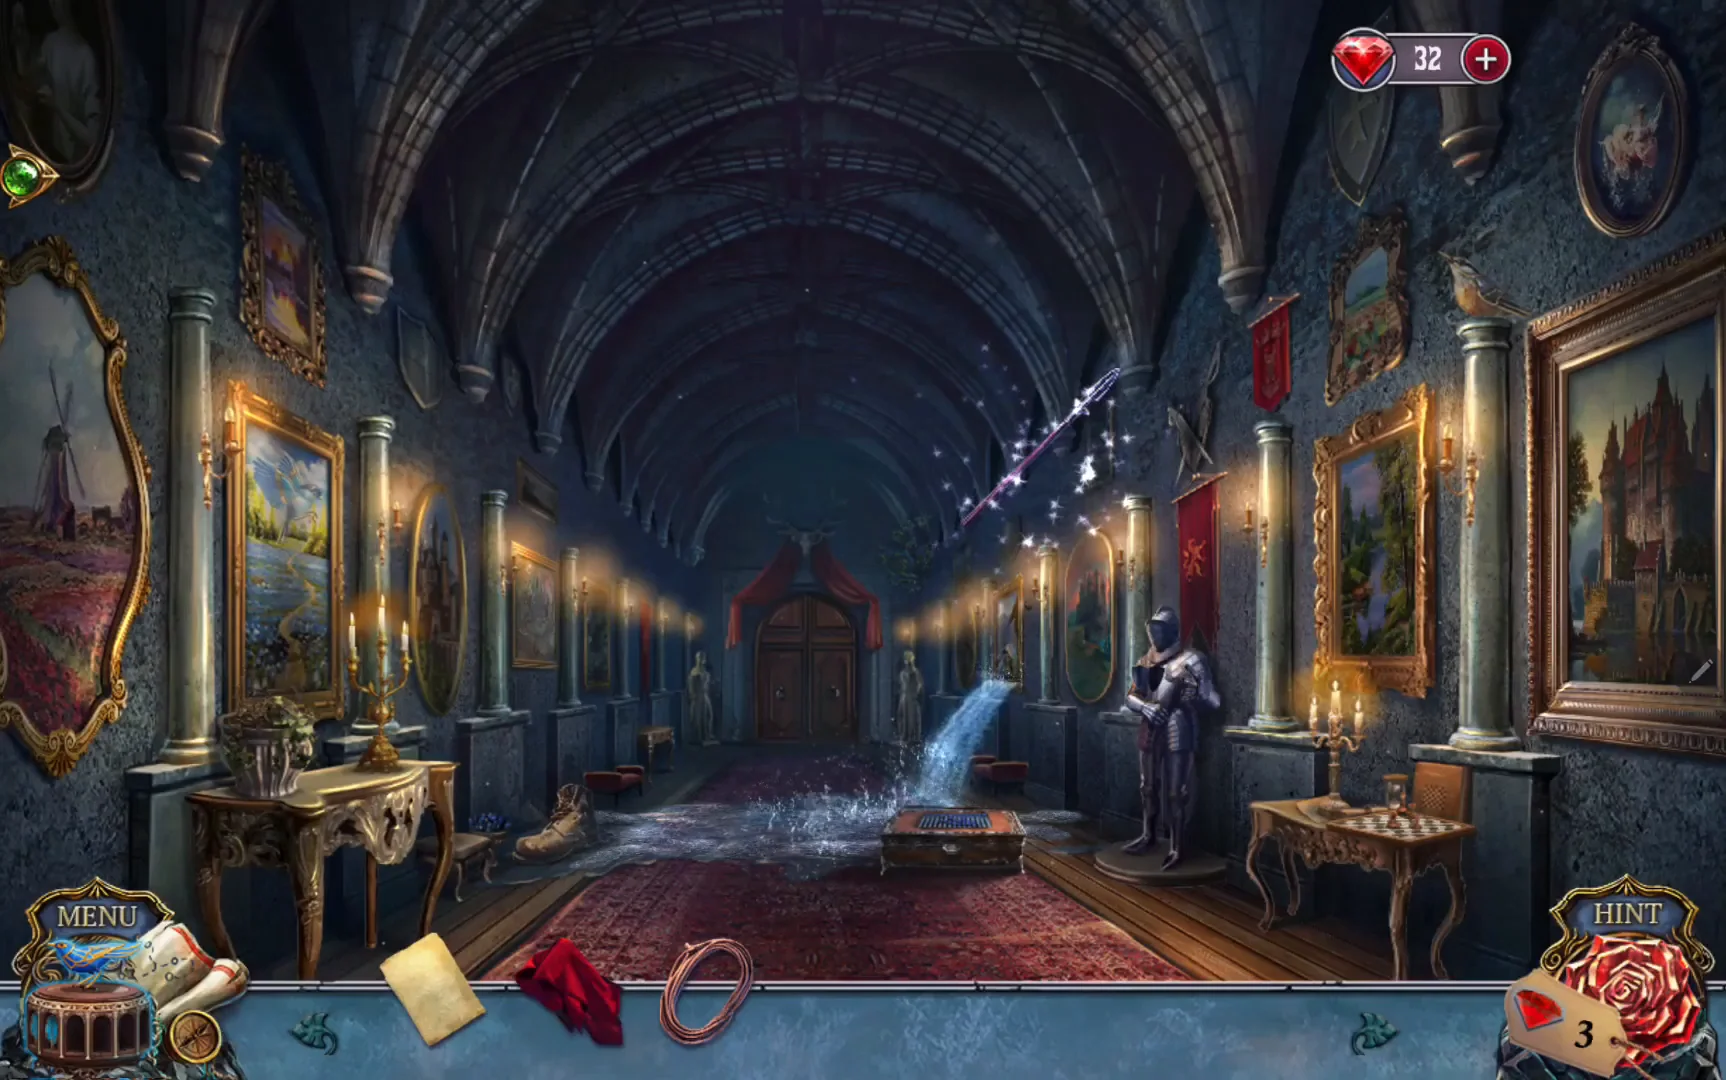
Stop the flooding from the burst painting so you can reach the workshop.
- Take the PEG BOX lying in the water.
- At the burst painting on the right wall, between the far door and the armour, take the COAL from the wall shelf.
- At the armour, pull off the red cloak to get the CLOTH and take the ROPE.
- Put the SHOULDER ARMOR on the armour's left shoulder and take the SPEAR.
- Pry the plaster off the cracked fresco on the left wall with the SPEAR. Use the COAL to connect the dots from 1 to 11 in order to draw a tulip.
- Put the PAPER on the drawing to copy it as the TULIP SKETCH.
- Combine the TULIP SKETCH with the PEG BOX in the inventory; the pegs form a tulip and the box opens. Take the CHESS PIECE.
- Put the CHESS PIECE on the empty front-left square of the chess table by the armour. Five separate carved pieces now stand on the board: click one piece and then another to swap them, until they match the marked squares in the open book. The layout that opens it: front left, the broad rose; back left, the small lily; back centre, the tall closed bud; back right, the rose on the spiral stand; front right, the small tulip bud. The board opens: take the GROWTH FORMULA.
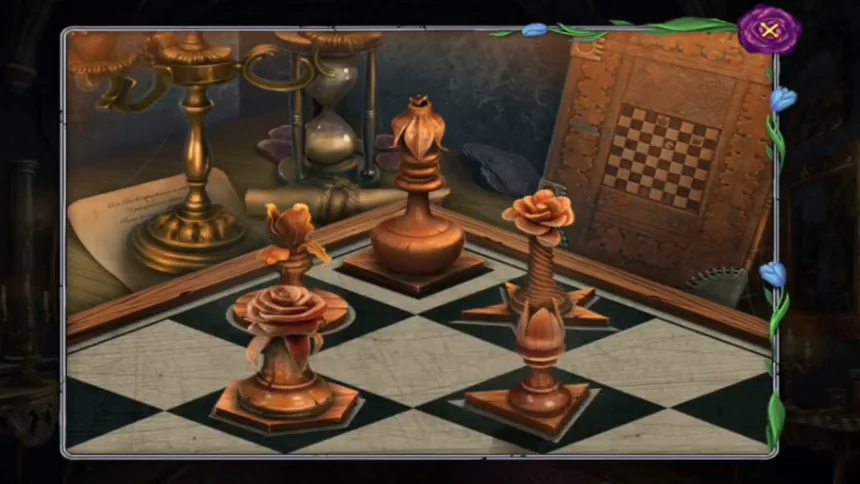
The five-piece layout that opens the board, with the book's diagram behind it. - Pour the GROWTH FORMULA on the withered roses on the left table and take the PAINTING FRAGMENT.
- Add the PAINTING FRAGMENT to the burst painting and reassemble it. Drag each fragment onto the buttons on the left to rotate it or change its size, then fit it into place. Finishing the picture stops the gushing water and gives you WOODEN DECORATION 1/3.
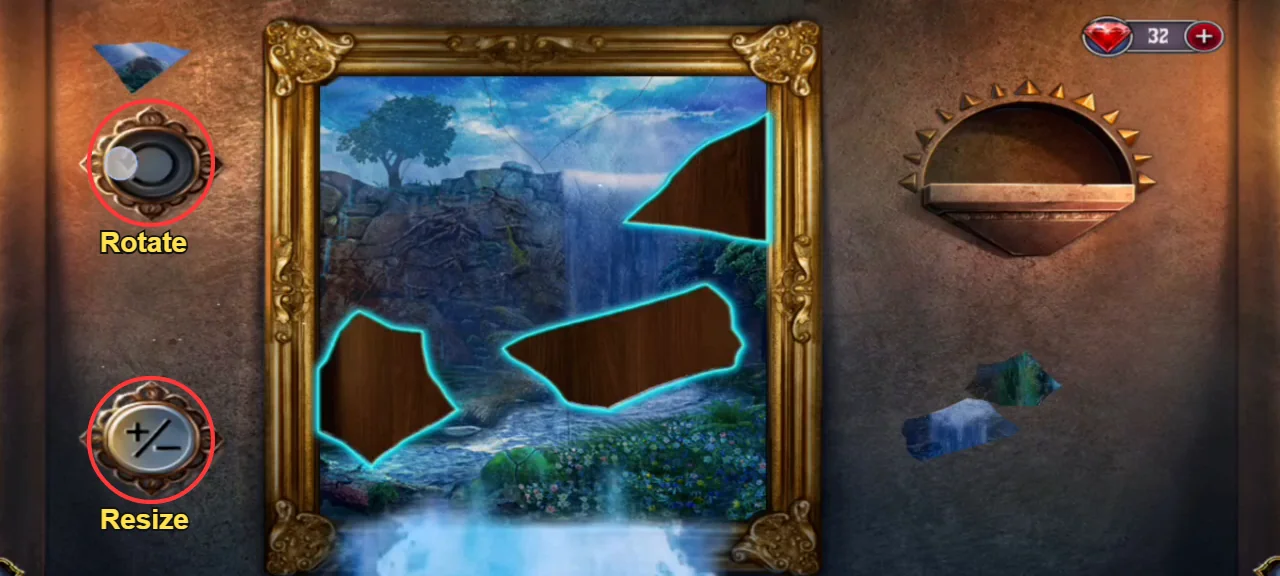
Drag a loose fragment onto the marked buttons to rotate or resize it, then drop it into its gap. - The floor is still too wet to reach the door, so use the CLOTH on the water to mop it up. Then go through the door at the end of the hallway into Katrina's workshop.
Katrina's Workshop
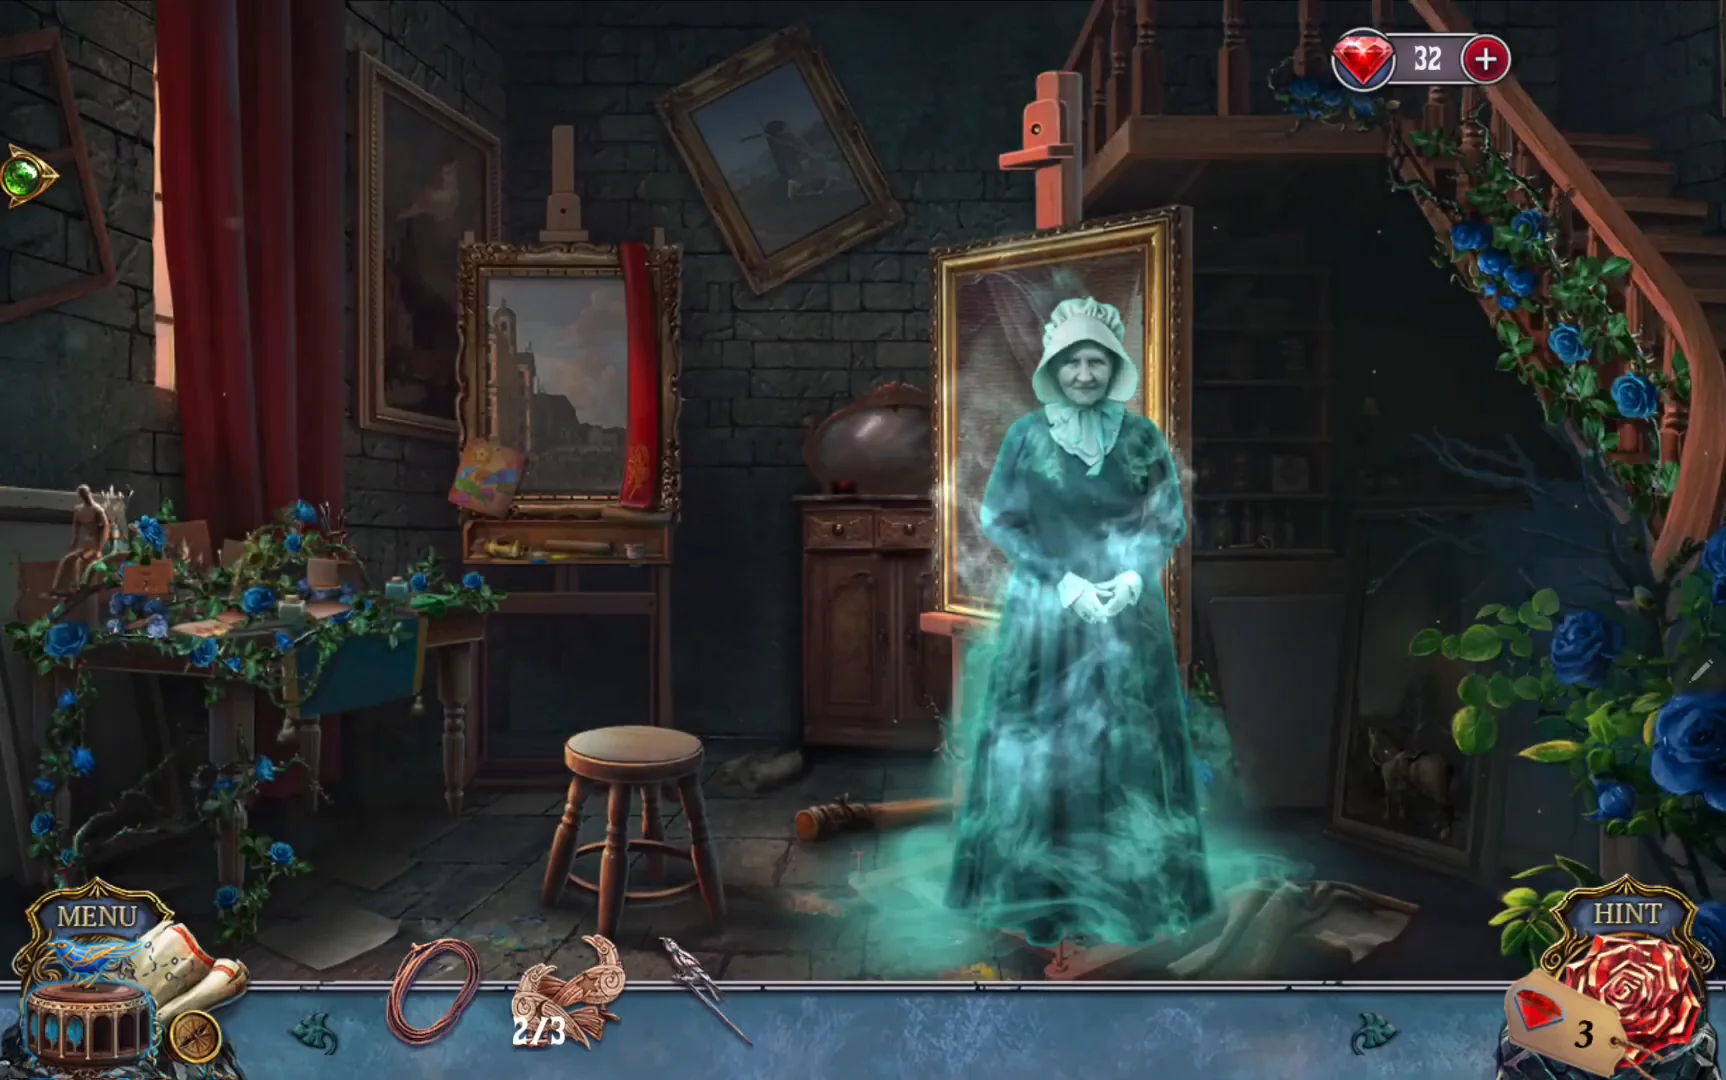
Defeat the governess painting, help Esther, and find Katrina's diary. Keep the lit torch you make here, because you need it in the next chapter.
- Win the battle against the owl-masked governess painting by collecting 15 of each required token. Draw lines through three or more adjacent tokens. When a countdown tile reaches 0, the tokens around it freeze, so clear the area around low counters first. The layout can vary, so there is no fixed move list. You receive a FEATHER KEY.
- Place the FEATHER KEY on Charlie's music box. After the story, Charlie gives you a MAGIC SPHERE; use it on the winged woman. Esther, Dorianna's governess, asks you to find her doll. Take WOODEN DECORATION 2/3, which drops at her feet, and the WOODEN CLUB lying on the floor by the easel.
- At the landscape painting on the small easel, take the OIL, read the rolled scroll lying there and take the red feather TIEBACK hanging beside the frame. Go to the window and tie back the curtain with the TIEBACK. Read the newspaper on the sunlit sill to clear it, then take the silver BARRETTE and WOODEN DECORATION 3/3.
- Put the 3 WOODEN DECORATIONS in the slot under the landscape painting and colour them to match the pinned drawing. Mix colours in the dish where needed and dip the brush in the water to clean it between colours. Take the PAINTED DECORATIONS.
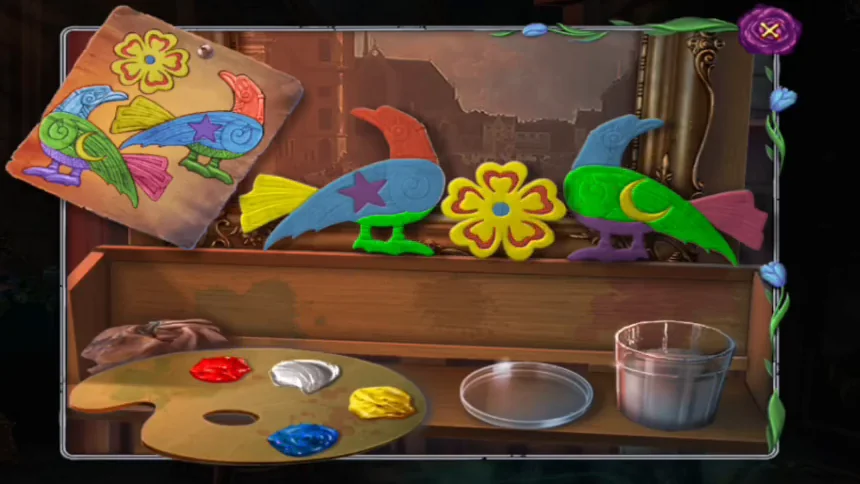
Finished decorations next to the pinned drawing they must match. - In the inventory, examine the WOODEN CLUB and click its burnt end to pull off the old wrapping. Wrap the ROPE around the bare end and soak it with the OIL to make the TORCH.
- Back in the hallway, light the TORCH at a candelabra to get the BURNING TORCH. In the workshop, use it on the unlit candle in the wall sconce under the stairs. Keep the BURNING TORCH.
- The candle lights up the dark area under the stairs. Put the PAINTED DECORATIONS in the recess of the chest beside the teddy bear, then take the DOLL and the SCISSORS.
- At the vanity, take the TIE PIN from the tabletop and put the DOLL on the round red box. Dress it like the reflection in the mirror, using the drawers: gold crown, pearl necklace, yellow dress and white shoes.
- Give the DRESSED DOLL to Esther. She tells you about the secret room and Katrina's diary and offers you a key: take the ELABORATE TOKEN, the round spoked wheel in front of her, before she returns to her portrait.
- Search the craft desk and find all 9 pairs (ink bottles, quill and drawn feather, tree piece and sketchpad, red pencil and floral sketch, brushes, frame corner and wall frame, paint tube and paint box, palette and more). Take KATRINA'S DIARY.
- Examine the DIARY and place the ELABORATE TOKEN on it to start the lock puzzle. Drag each chain by its blue crystal into its matching coloured section. Pass through paint to recolour a chain; overlapping chains mix colours. Make the 5-token chain red, the two 3-token chains blue and the 4-token chain yellow, then overlap blue on red for purple and blue on yellow for green.
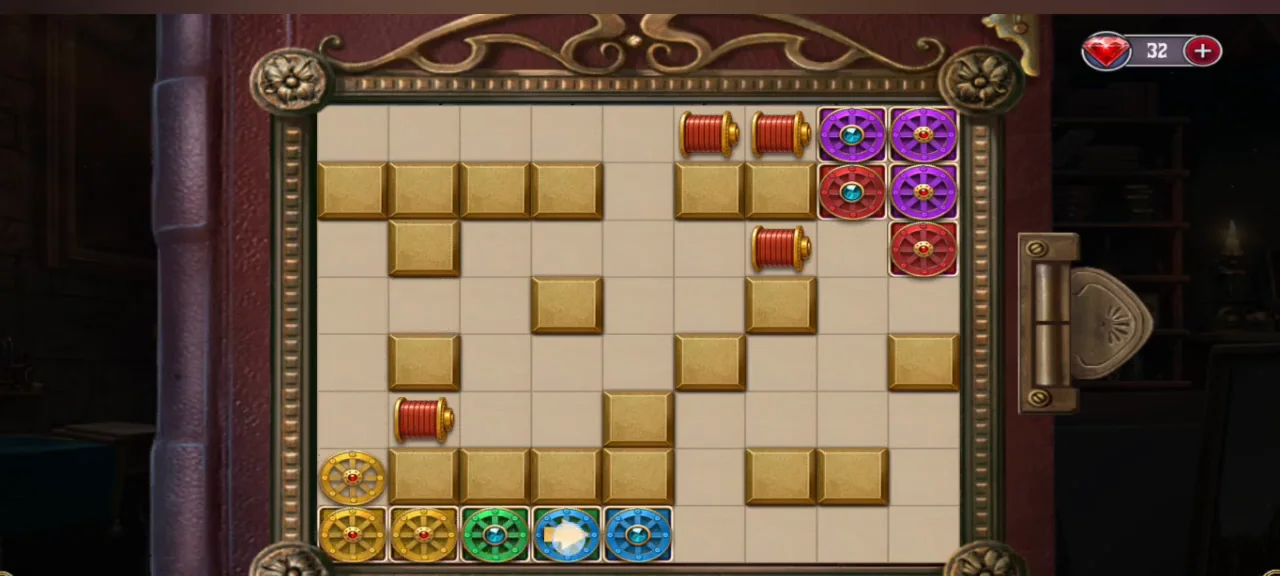
Solved: each coloured section holds a chain of its colour, so the lock opens. - Read the diary, then take the GOLDEN DANCER STATUETTE from the compartment behind its torn right-hand page. Only then speak to Casper, who has arrived in the workshop: he says Katrina is in the dungeon. Follow him.
Dungeon
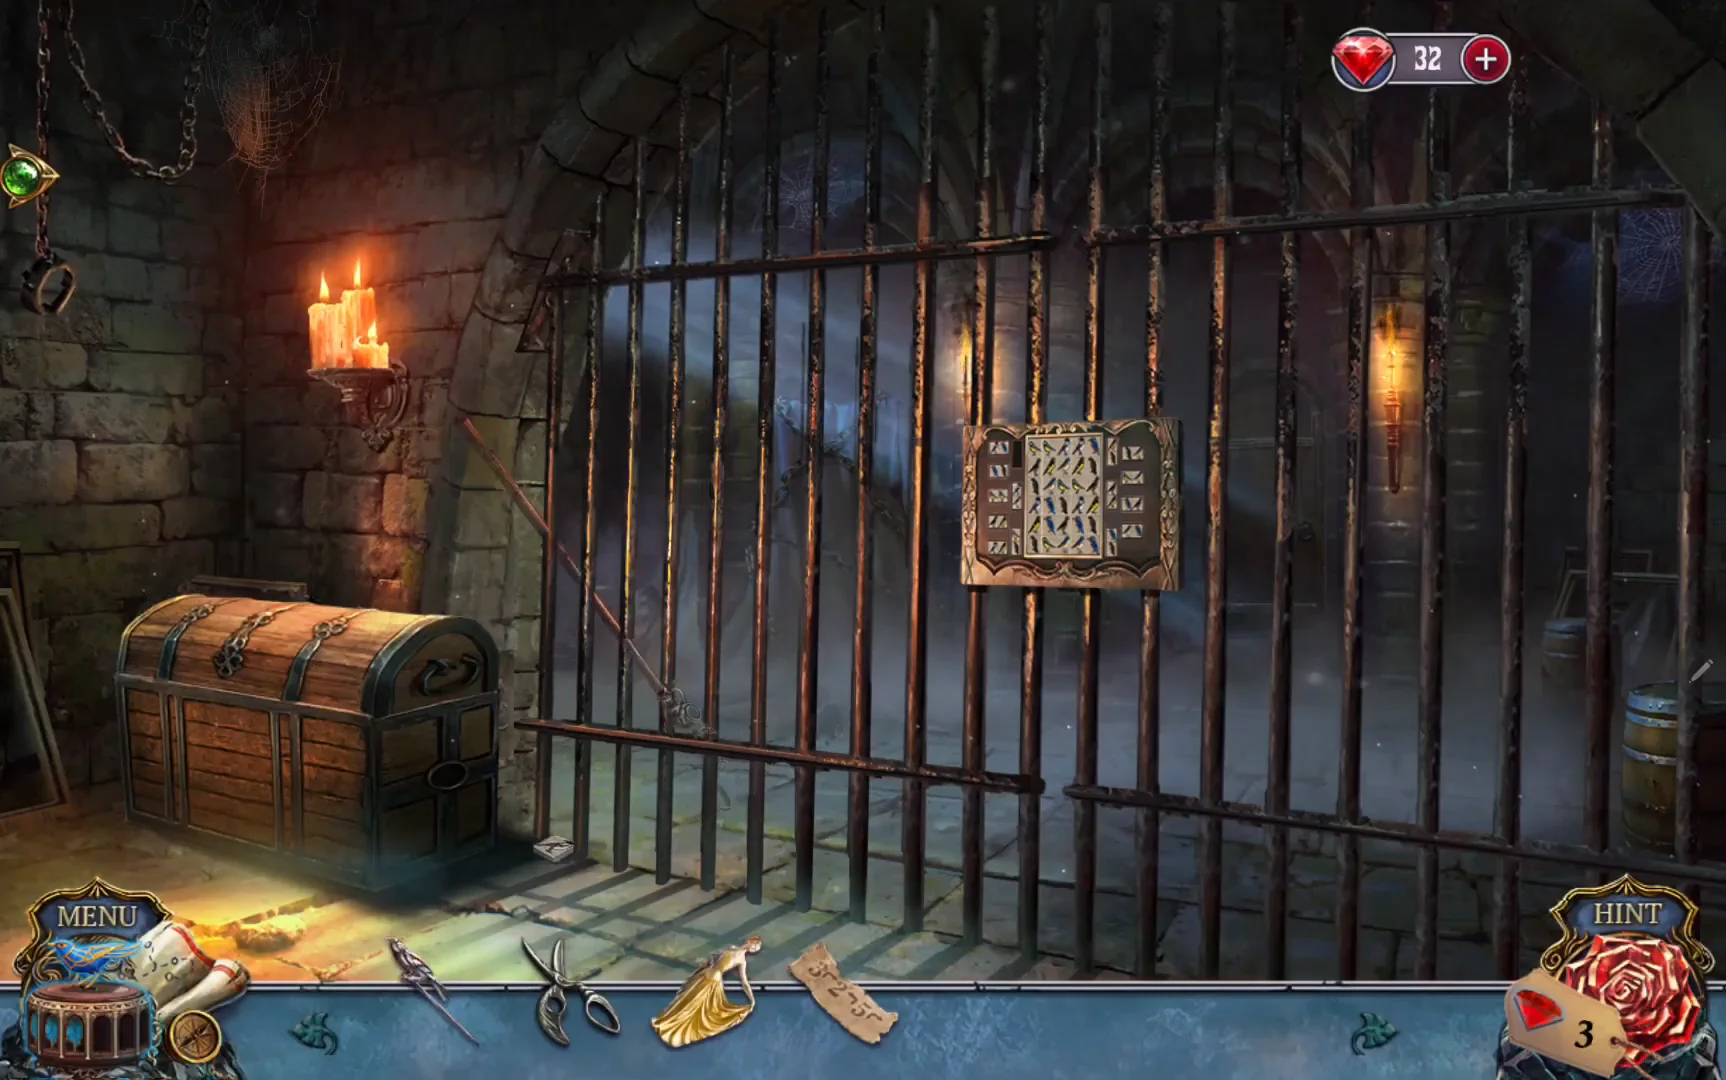
Escape the cell, defeat the Baron's painting and climb out through the well.
- The cell is pitch dark. Use the BURNING TORCH there; a circle of light now follows your pointer. Move the light onto the candles on the left wall and the whole cell lights up. Take the BROOM to the left of the cell door. In the inventory, untie the twine, take the NOTE and attach the BARRETTE to make the STICK WITH HOOK.
- BIRD TILE 1/2 lies outside the cell, just out of reach. Reach through the bars with the STICK WITH HOOK to drag it next to the chest, then pick it up.
- Open the chest on the left. Put the GOLDEN DANCER STATUETTE in the empty bottom-left slot and swap the figures to match the photo snippets: top row yellow, green, light blue, pink; bottom row blue, pink, yellow, green. Take BIRD TILE 2/2.
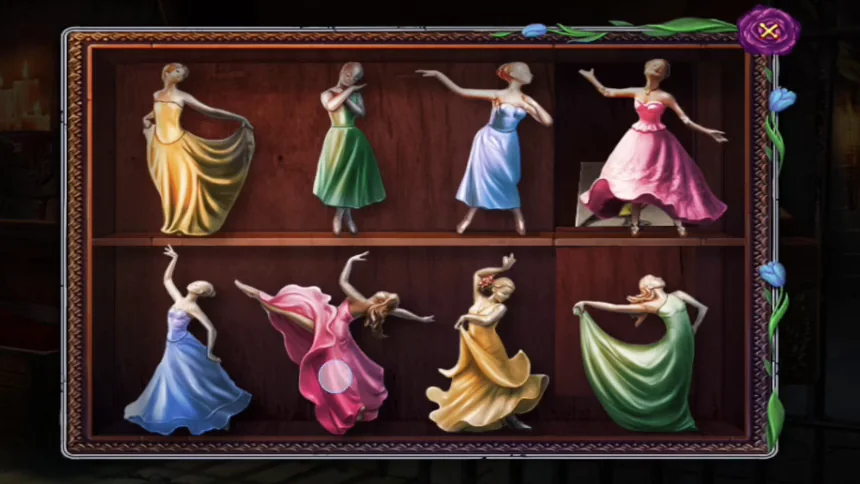
Solved dancer order: top row yellow, green, light blue, pink; bottom row blue, pink, yellow, green. - Put the BIRD TILES on the cell lock. The two-bird tiles around the board are the pieces you place. Click a border tile to select it, then click the matching two neighbouring birds in the central grid: a tile lying flat fits a side-by-side pair and an upright tile fits a pair one above the other, with the birds in the same order as on the tile. Accepted cells darken and the border tile disappears. Place the tiles whose pair appears only once first, because a wrong placement can block the cells another tile needs; keep going until every border tile is gone and the board clears.
- At the large chained painting left of the blocked rear doorway, examine the padlock dial. It has no key, so insert the bird-headed TIE PIN and place the NOTE above it. Clicking a number spins the dial until that number is at the top. In the note's order, click the 3 on the right of the dial, the 2 on the left, then the 5 on the right. The chains release the painting.CODE3, 2, 5
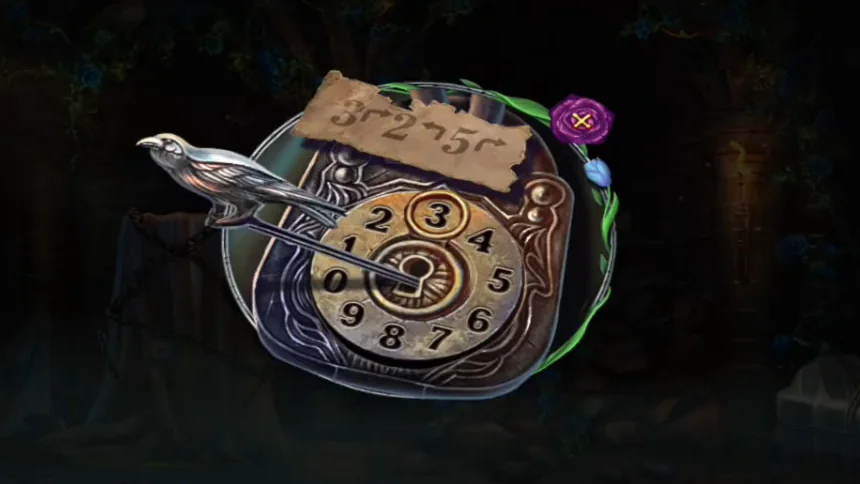
The note reads 3 right, 2 left, 5 right. Here the 3 has already been clicked to the top; the 2 on its left comes next. - Defeat the raven-man painting by collecting 15 of each of the three required tokens before the countdown tiles freeze the tokens around them. The layout can vary, so there is no fixed move list. Take the FEATHER KEY.
- Place the FEATHER KEY on Charlie's music box and, after the story, use the MAGIC SPHERE Charlie gives you on the winged Baron. His ghost asks for the medallion with his daughter's picture.
- Cut the rope around the draped chest with the SCISSORS and take ROPE 1/3. Look at the family picture, pick up the round metal token marked with a triangle from the front of the chest (the METAL SYMBOL TOKEN) and read the order. Then play the silhouette hidden-object scene, which rewards the MEDALLION.
- Examine the MEDALLION in the inventory. It is closed: click its three hanging flower-bud pendants until all three hang level, and it opens to reveal a photograph of Mary, the Baron's daughter. Give the opened MEDALLION to the Baron. He explains Dorianna's plan and returns to his painting.
- At the round stone well cover, take the MOSS blocking the empty slot, then put the METAL SYMBOL TOKEN in that slot. Swap the inner discs so each disc's symbol combines the two outer symbols beside it. The hatch opens and you climb out to the windmill.
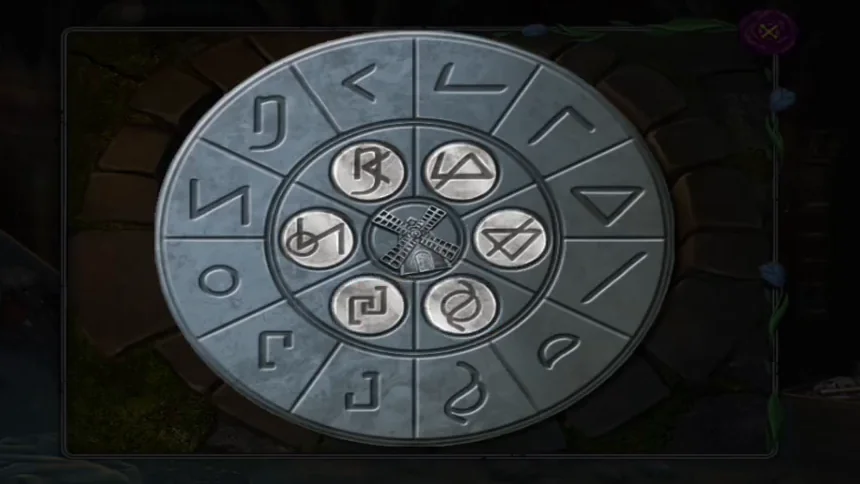
The solved inner discs of the well cover.
Windmill Courtyard
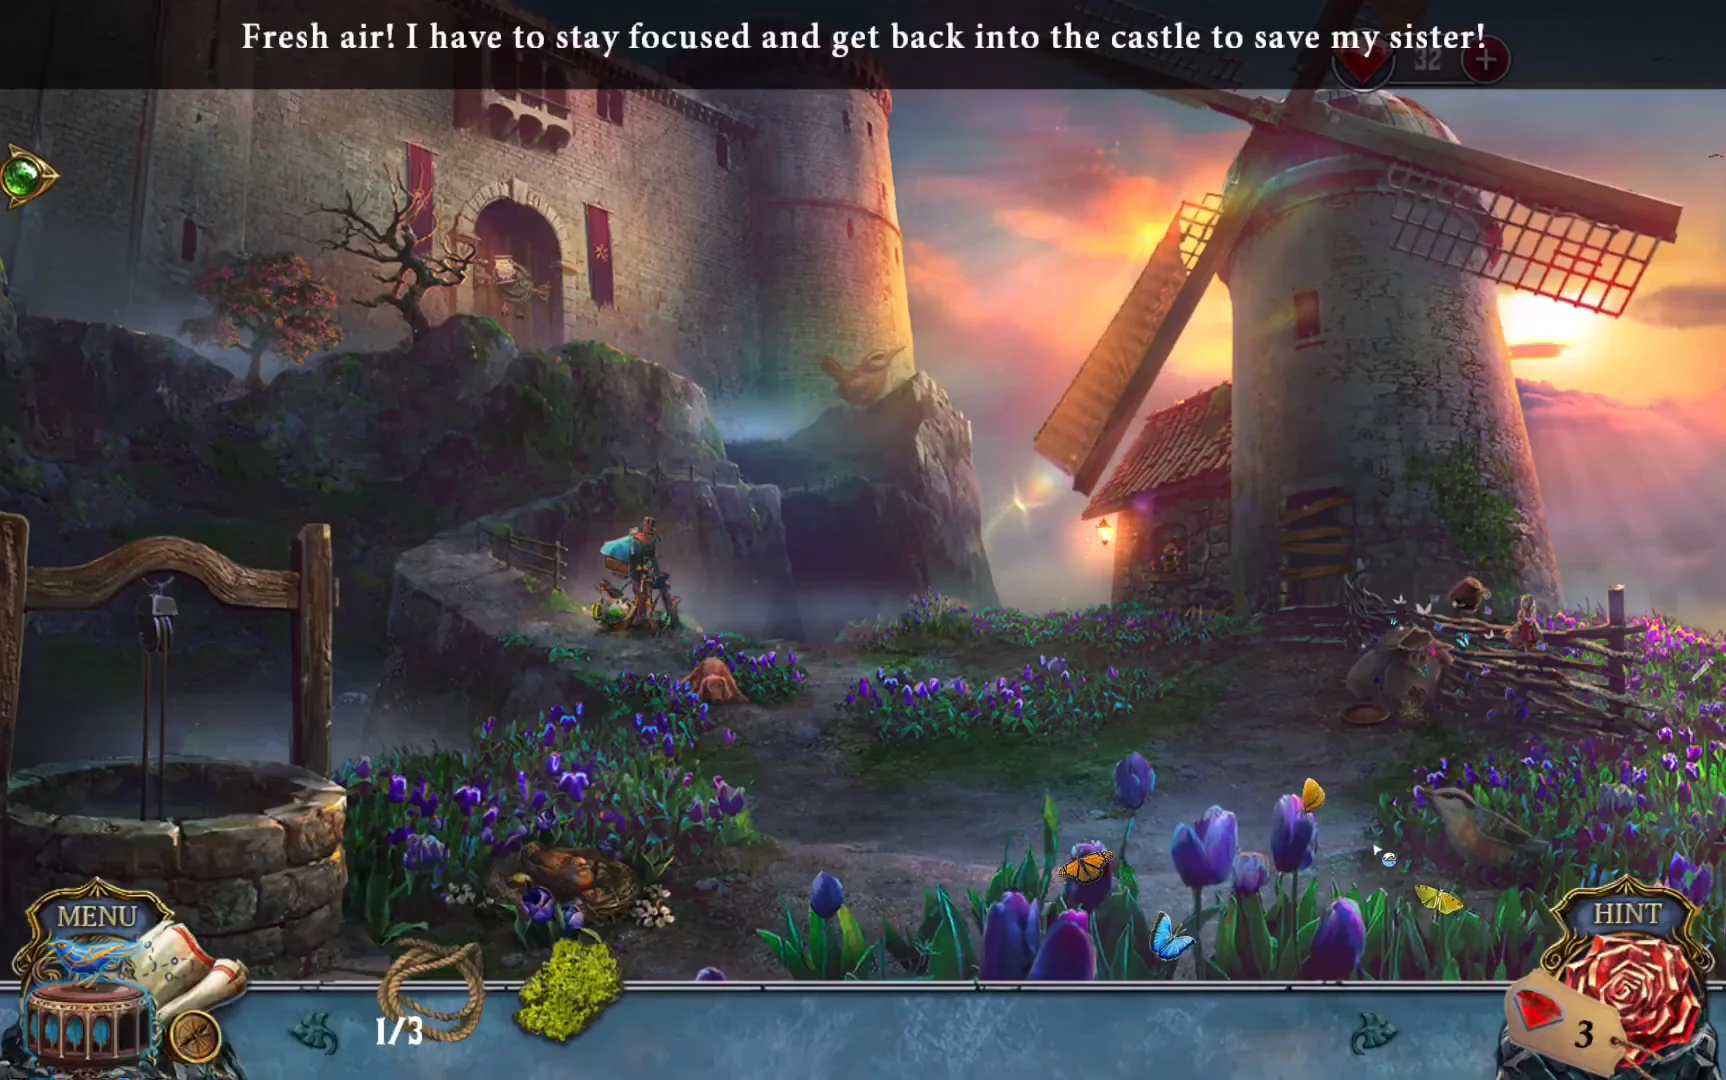
Calm the guard dog, reunite the partridge chicks with their mother and open the gate back towards the castle.
- At the fence on the right of the windmill foreground, read the note about saltbush seeds. Plug the hole in the broken POT on the post with the MOSS and take the POT. Click the front of the rag doll and take the RUNE PLATE.
- Click the dog on the path in the middle of the scene. Alex promises it something delicious and the objective becomes Calm the dog. Then click the windmill window and take PARTRIDGE CHICK 1/3 hiding between the flowerpots on the sill.
- At the partridge nest among the tulips, note that the mother has lost her chicks, and take FEATHER 1/6 from the nest scene.
- At the windmill window, put the RUNE PLATE in the empty socket. Press the buttons in the order carved on the sill: 2, 4, 6, 8, 9 (counting left to right). Use the GOLDEN KEY that drops out on the bird padlock and take the PRETZEL and the FORK from the window.CODE2, 4, 6, 8, 9
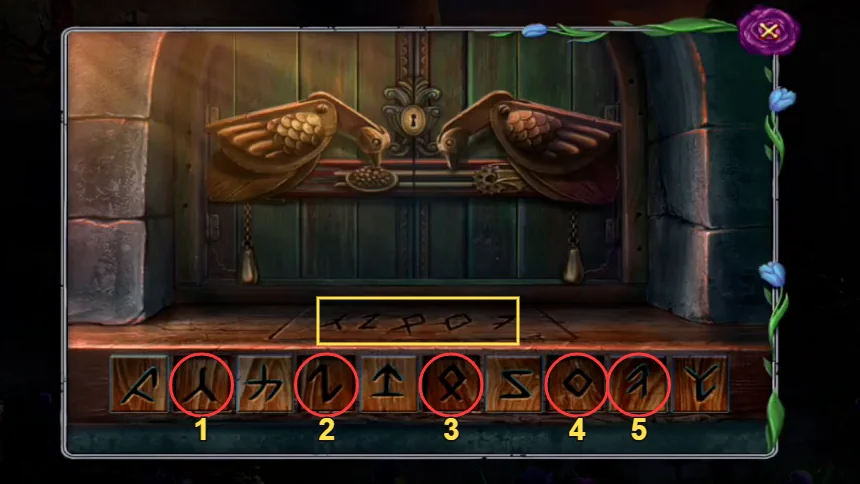
Press the buttons whose runes are carved on the sill, in the carved order: the marked buttons 1 to 5. - Give the PRETZEL to the dog on the castle path.
- At the tulip bed, take the SIEVE from the ground. Then use the POT on the chick to start the trap puzzle: it runs onto a hexagonal grass field. Click grass tokens to remove them, and the chick moves after each one; it can only walk on the remaining grass and you lose it if it reaches the edge. Do not chase it. Remove the tokens a step or two ahead of it, in its running direction, building a ring around it, then close the last gaps. Take CHICK 2/3.
- At the mailbox, centre left on the path below the castle tower, take the blue cloth from its top: this is ROPE 2/3. Click the flag; it snaps off and the mailbox stays shut for now. In the basket below the mailbox, read the milkman's order and take the MILK BOTTLE.
- At the fence basket, scoop up the saltbush seeds with the SIEVE and put them by the basket to lure out CHICK 3/3.
- Give the 3 CHICKS to the mother partridge and take the RED ROSE EMBLEM.
- Put the ROSE EMBLEM on the mailbox and open it. Read the INVITATION and the letters inside, then take the TRIANGLE piece from under them.
- Put the TRIANGLE in the round emblem on the gate. Slide the gear tiles until a chain of gears connects the fixed gear at the top to the one at the bottom; some tiles are locked in place.
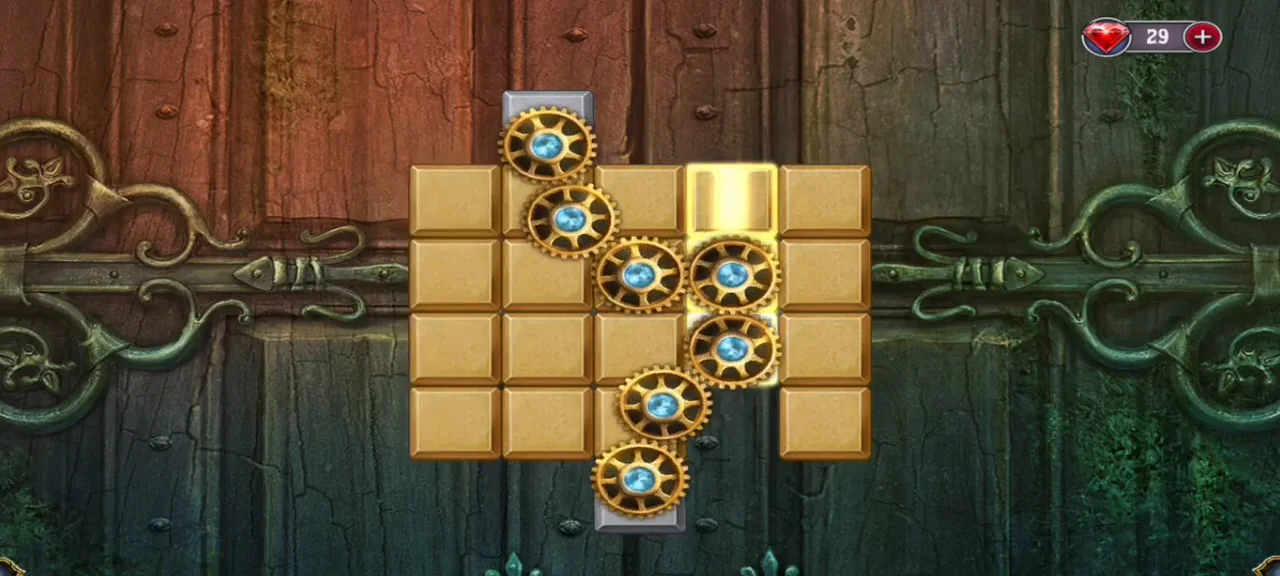
Example of a finished gear chain from the top gear to the bottom gear.
Backyard
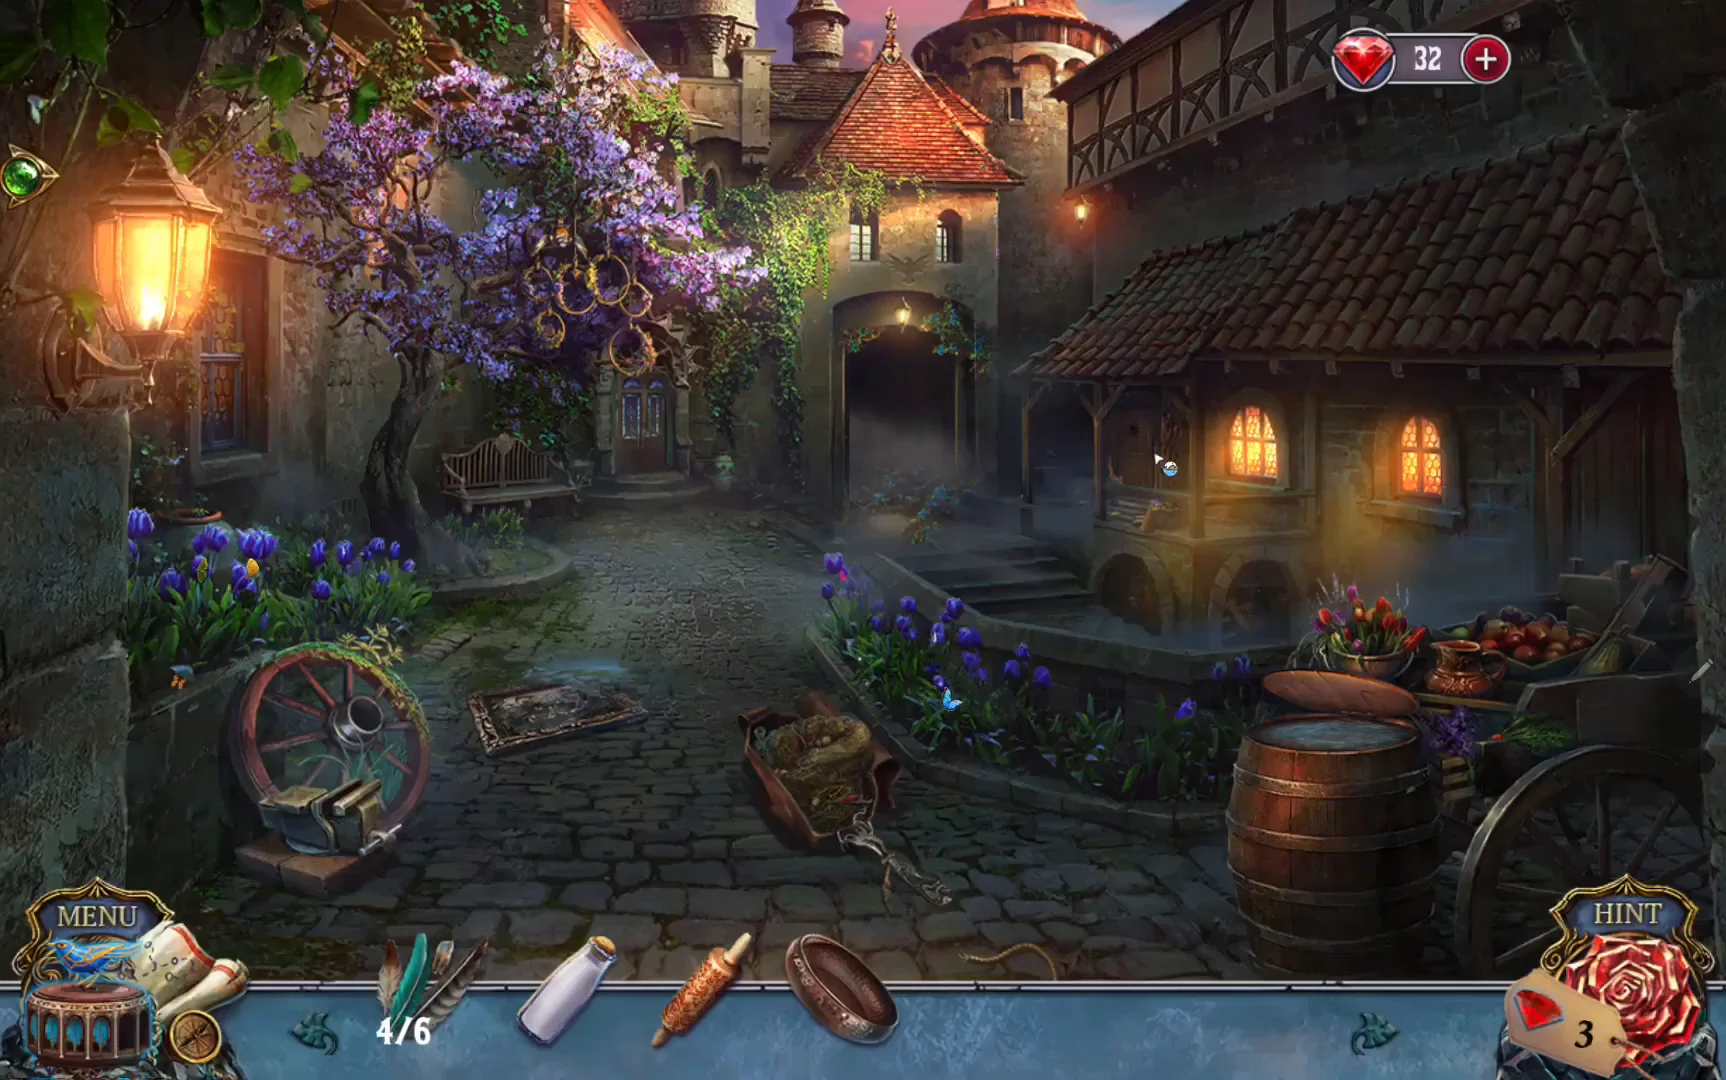
Chase off the seagulls and help Lily, the servant girl's ghost, find her toy bird.
- At the cart, take ROPE 3/3 from the barrel lid; the three ropes join into one long ROPE. Lift the lid and take the ROLLING PIN. At the vise by the old wheel, pick up the green FEATHER 2/6, then put the FORK in the vise and take the BENT FORK. Combine the BENT FORK with the ROPE to make the GRAPPLING HOOK.
- Throw the GRAPPLING HOOK into the courtyard, then move the three sliders to steer the crosshair onto the leather bag lying on the street by the steps. Open the bag, take the SCOOP NET and the LEATHER CUFF and read the manager's order.
- Use the SCOOP NET on the barrel on the cart and catch 6 fish to fill the silhouettes.
- Give each seagull the fish with the symbol it is thinking about (fish symbols can appear mirrored). All six gulls fly away.
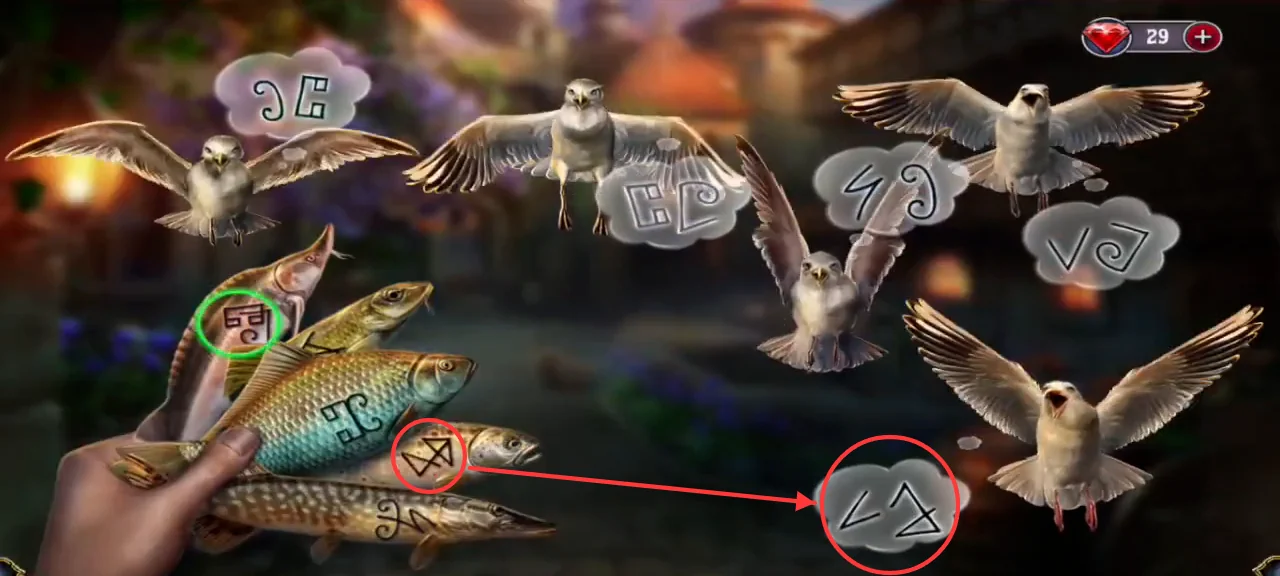
Each gull's thought cloud shows a symbol; give it the fish that carries the same symbol. Marked example: the trout goes to the lower gull. - Before going inside, collect three more feathers in the backyard: FEATHER 3/6 on the framed picture lying on the cobbles, FEATHER 4/6 on the cracked stained-glass window behind the bench under the wisteria, and the yellow FEATHER 5/6 on the stone steps beside the black cat. The cat blocks the door, so place the LEATHER CUFF on the steps as a dish and pour the MILK BOTTLE into it. While the cat drinks, the door opens: enter the Servant's House. Open the wardrobe to find Lily's ghost, who asks you to fetch her toy bird. Take the WIND-UP KEY she offers.
Servant's House
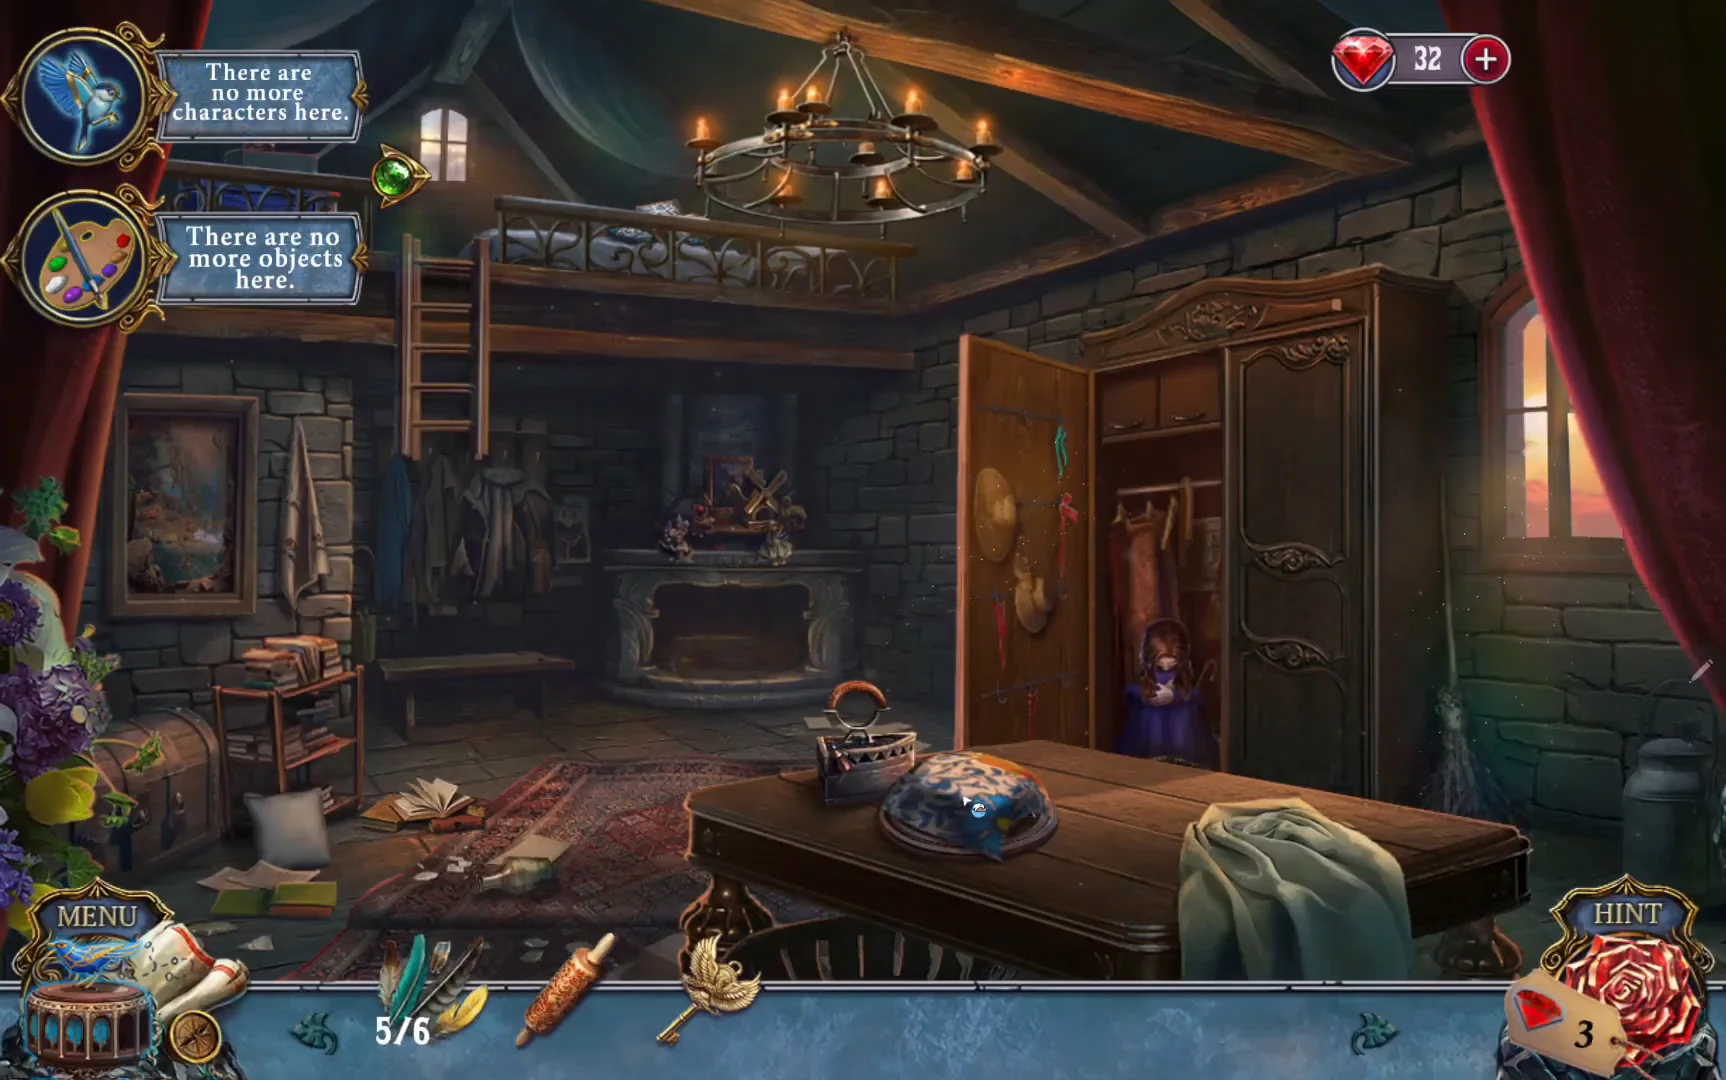
Repair Lily's toy bird, hear her story and find Mary's hidden diary and the way into the Old Wing.
- Open the toy chest by the teddy bear in the left corner and take the SUGAR TONGS. At the doll table, take the RIBBON. On the ironing table, take the flowered PILLOWCASE and then the WOODEN HOOP lying by the small lantern-picture box.
- Open the coal iron on the ironing table. The coals are barely burning: press the bellows button until the flame gauge is full, then use the SUGAR TONGS to pick up a glowing COAL.
- Put the PILLOWCASE on the white cushion lying on the floor at the left to make the FLOWER PILLOW. Under the big table a tile is trapped by a table leg: use the ROLLING PIN as a lever and take TRIANGLE TILE 1/2.
- Put the FLOWER PILLOW on the bed in the loft, and take the white FEATHER 6/6 lying on the pillows. Zoom into the pillows and press one to rotate it. The flower buttons do not light by themselves: turn the pillows until half-flowers on neighbouring edges join into one whole flower, then press that flower's button while it is complete. Its light stays on, so you can rearrange the pillows for the next flower; the four flowers do not have to be complete at the same time. Press the white, red five-petal, red rose and blue buttons this way (purple and orange are not needed). Take the JOURNAL (red book) from the headboard.
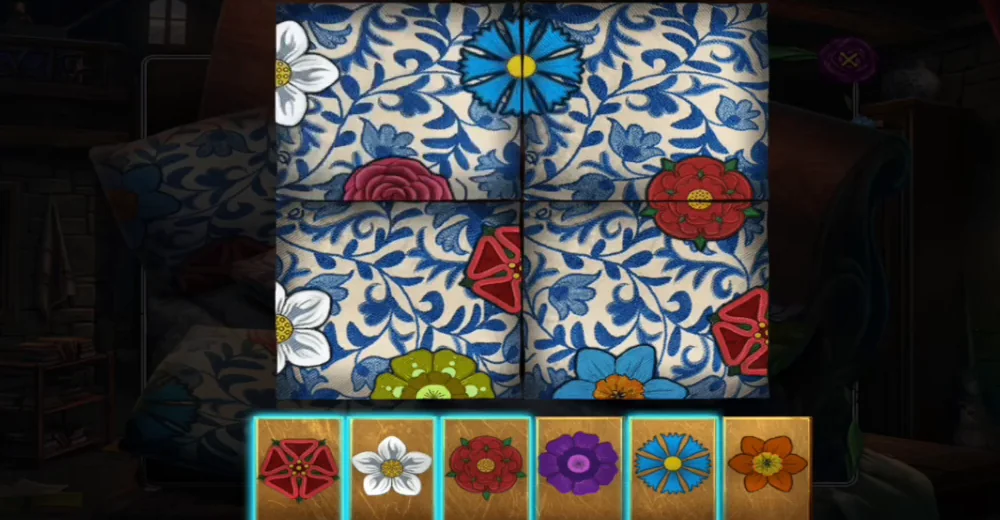
Solved pillows: the red five-petal, white, red rose and blue buttons are lit. - Add the RIBBON to the JOURNAL to get five coloured bookmarks beside the cover. Click two bookmarks to swap them until, from top to bottom, they match the coloured tabs on the spine: red, blue, orange, green, purple. The book opens. Read about Katrina's flower rings and the lemon-juice trick, and take the wreath DRAWING from the page.
- At the doll table, put up the wreath DRAWING, place the WOODEN HOOP and add the flowers held by the four dolls to make the FLOWER WREATH. The sheet left behind is blank: put the HOT COAL in the windmill-shaped kettle stove so its steam reveals the hidden rings pattern, then colour it in with the pencil to get the RINGS PATTERN.
- At the blossom tree in the backyard, add the PATTERN and the WREATH. Place the rings in the right order, then rotate them to match the pattern card. Take the TOY BIRD.
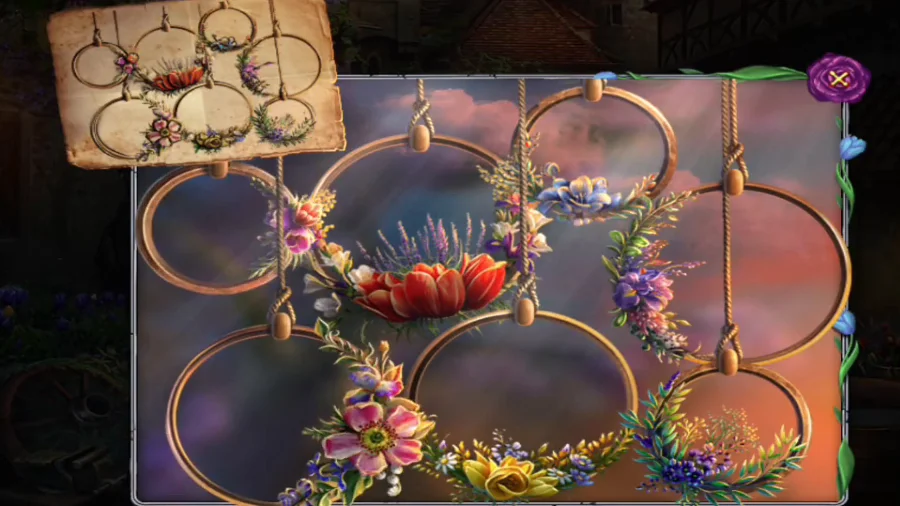
Solved: the rings hang and turn as the pattern card shows. - Repair the TOY BIRD. First remove its OLD SPRING. Use the OLD SPRING on the sewing box as a reference (without it the box only asks what you are looking for), take the clean teal SPRING that matches, and fit it in the bird. Then use the 6 FEATHERS on the wing and place five of them: the long striped grey, teal, yellow, white with a blue edge, and brown-and-white feathers. The small grey feather is the one left over. Insert the WIND-UP KEY.
- Give the bird to Lily and complete her picture story: tap each object named by the underlined words in the illustrations. Lily gives you the DECORATIVE BOX; pick up the oil LAMP that appears on the floor.
- In the dark corner of the backyard barn, take the GOLDEN ROSE from the crate. Put it on the DECORATIVE BOX to open it. Take the HEART PADLOCK from the locket, read Mary's diary and take the HAIRPIN from its last page.
- In the Servant's House, open the small lantern-picture lock beside the iron with the HAIRPIN and take TRIANGLE TILE 2/2. Put both TRIANGLE TILES in the lid of the box on the table and press each tile until its picture fits the lantern-and-irises scene. Take the VASE and the MATCHES from the box and light the LAMP with the MATCHES.
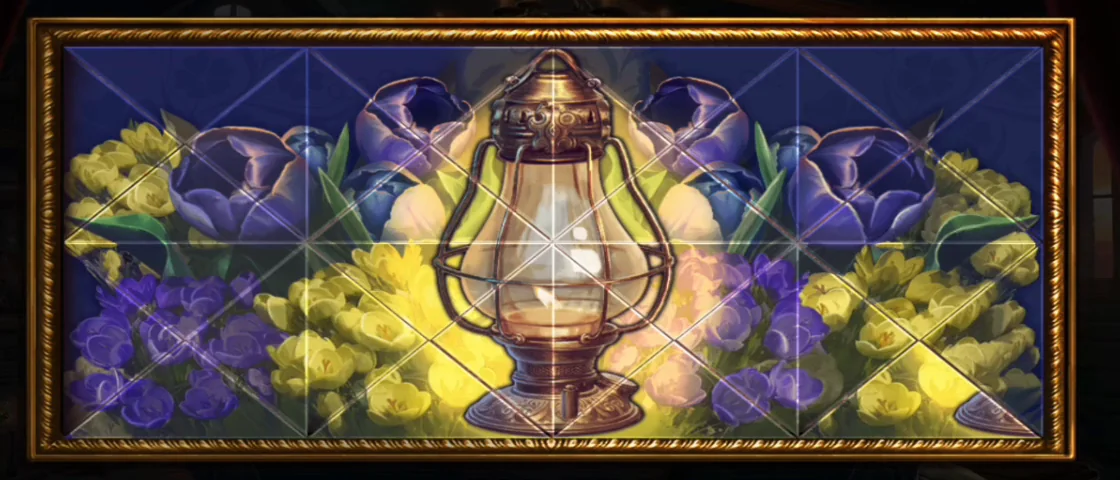
The lantern-and-irises scene that the triangular tiles must form. - Put the lit LAMP in the dark barn corner. Fill the VASE with flowers from the flower basket (keep the VASE OF FLOWERS) and take the hammer-and-wrench TOOL TOKEN hidden in the basket.
- Read the watchman's note. Open the chained padlock with the HAIRPIN and take the LADDER behind the chain. Put the TOOL TOKEN in the matching recess of the leather pouch to open it.
- Take the GLASS CUTTER from the opened leather pouch and go to the cracked stained-glass window behind the bench in the backyard. Use the GLASS CUTTER on the window to cut a hole in it. Alex says he needs a mirror to see the lock. Search the servants' closet hidden-object scene (silhouettes at the bottom) and take the MIRROR.
- Put the MIRROR on the window lock to see the sphere maze. Each arrow moves both spheres at once, and each sphere stops where a wall blocks it, so one can keep moving while the other stays put. They must drop into the two empty slots on the right together. From the starting position, press Down, Down, Up, Right, Right, Right, Right, Up, Up, Right, Right, Down, Down, Down. The window opens into the Old Wing.CODED, D, U, R, R, R, R, U, U, R, R, D, D, D
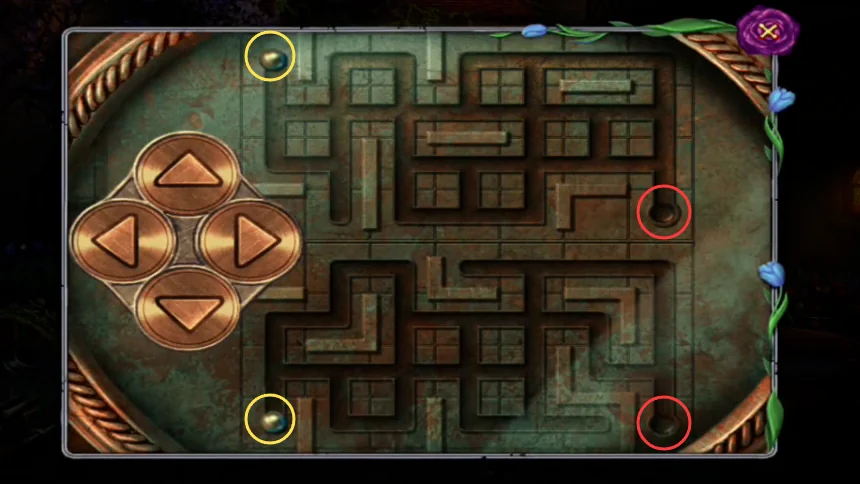
The sphere maze before the first press: spheres in yellow, empty slots in red. The listed presses begin from this position.
Hidden Characters and Objects, Part 1
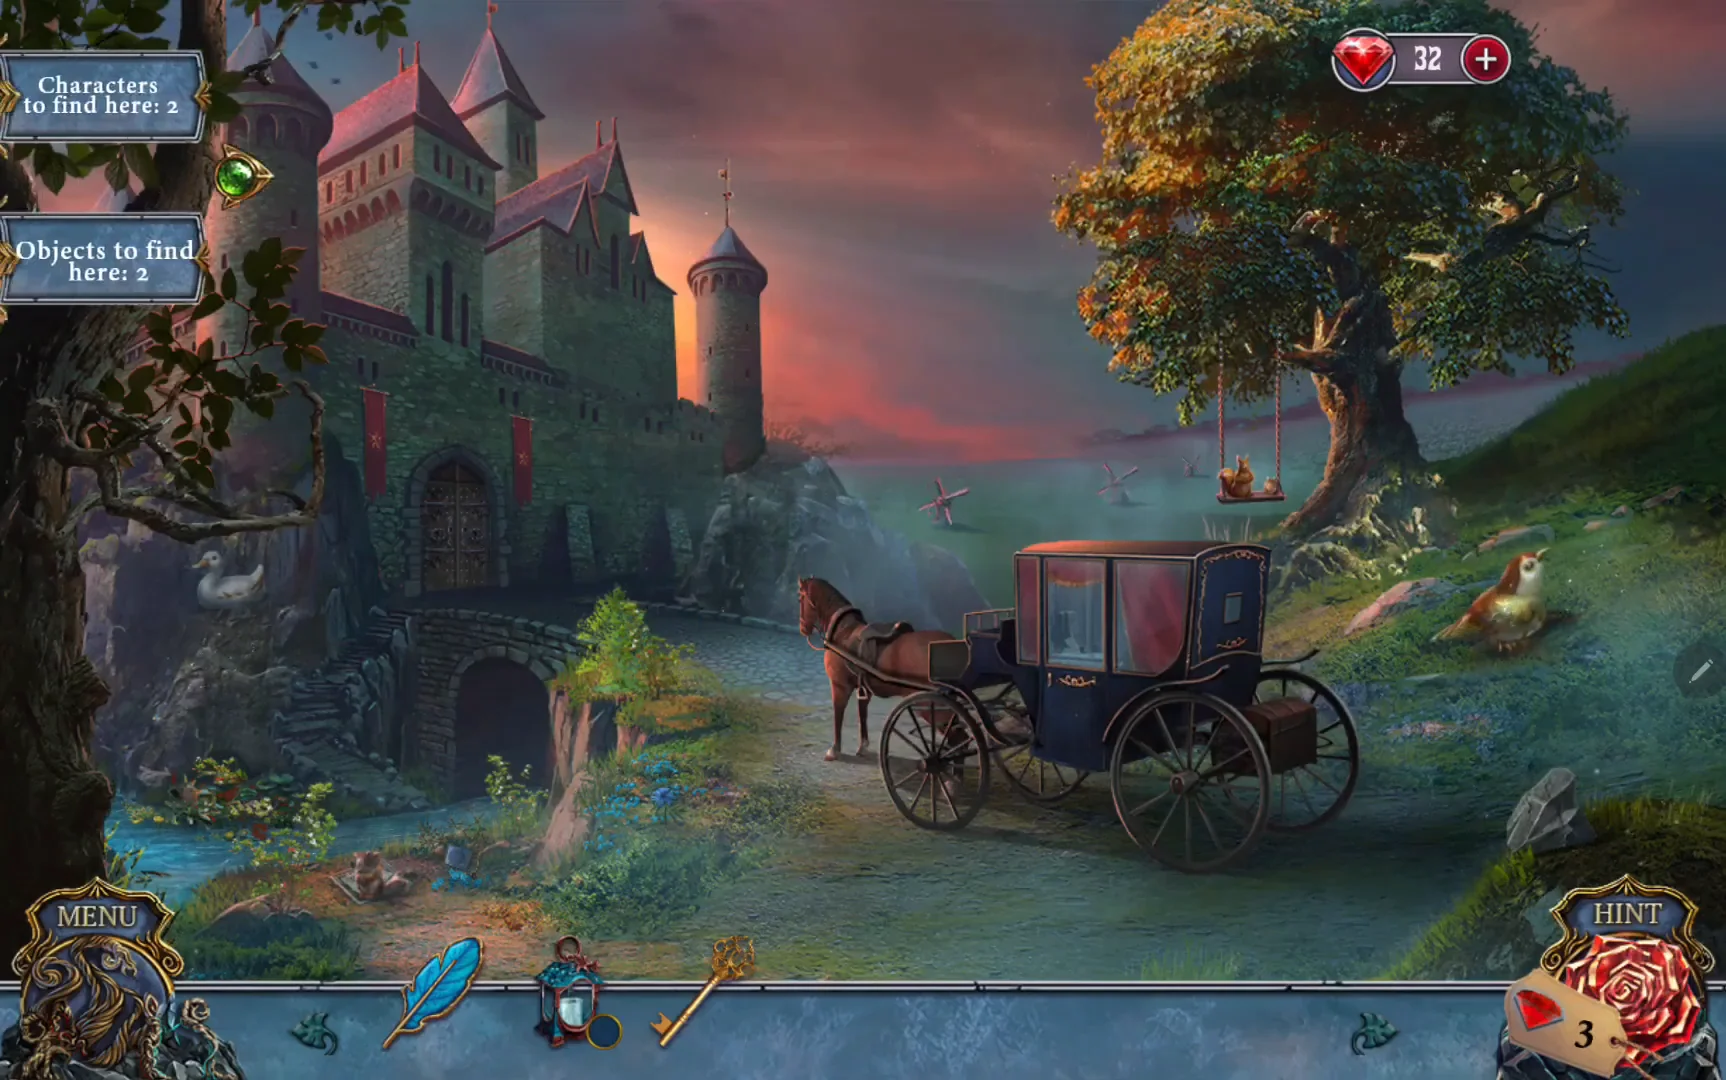
Every area hides optional collectibles: characters (the blue-bird counter) and objects (the palette counter). When you enter a scene, the counters at the top left show how many are left there. Objects change shape from one moment to the next, so go by the position rather than the exact picture, and look again if a spot seems empty; some characters also appear only for a moment. Click each one when you see it; a counter can take a moment to update. You can collect them while you play through the chapters.
- Castle Grounds. Characters: the white duck on the castle wall left of the bridge, and the bird on the ground right of the coach. Objects: the flower on the ground left of the horse (a purple stalk or a blue flower), and the little hill at the right, just above the HINT button (a red snail or a grey rock).
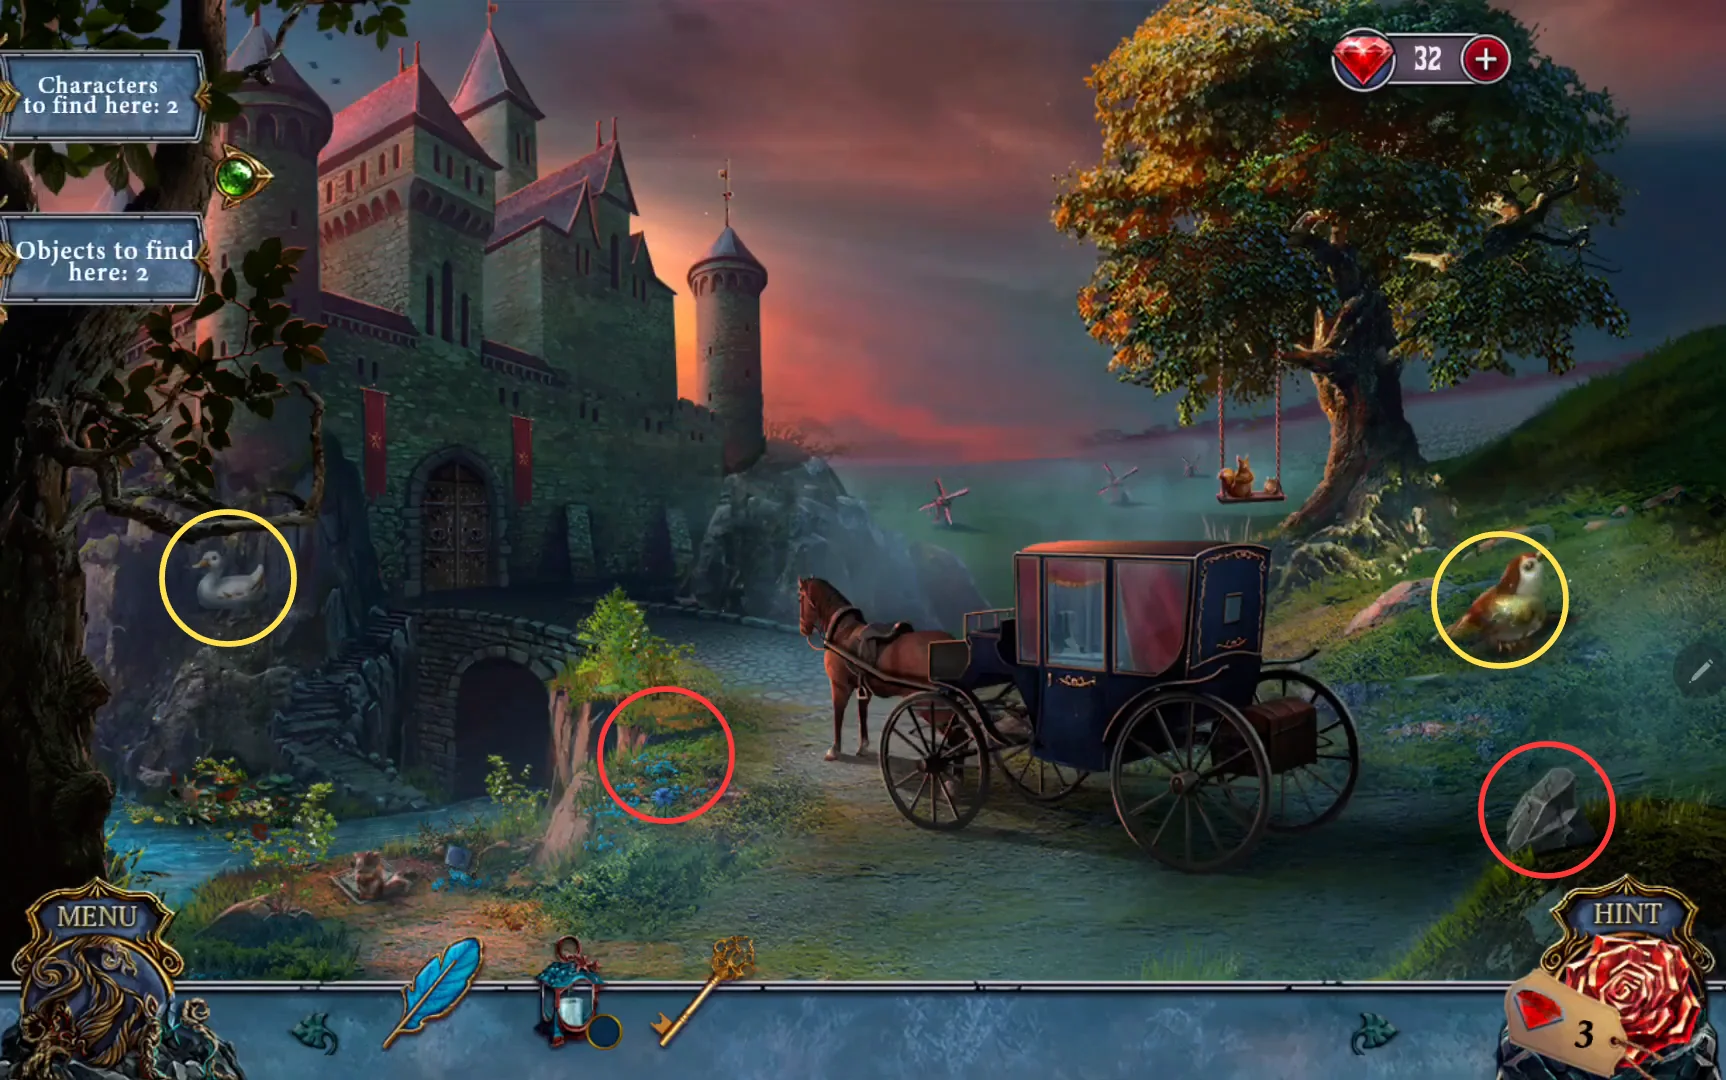
Castle Grounds. The purple stalk spot shows a blue flower in this frame, and the snail spot shows a grey rock. Yellow circles mark characters, red circles mark objects. - Castle Entrance. Characters: the yellow bird on the stone wall right of Casper, and the blue bird fluttering above the living flower bush under the red umbrella arch. Objects: the purple ribbon on the stone railing of the entrance stairs, and the white paw prints on the pavement left of the fountain.
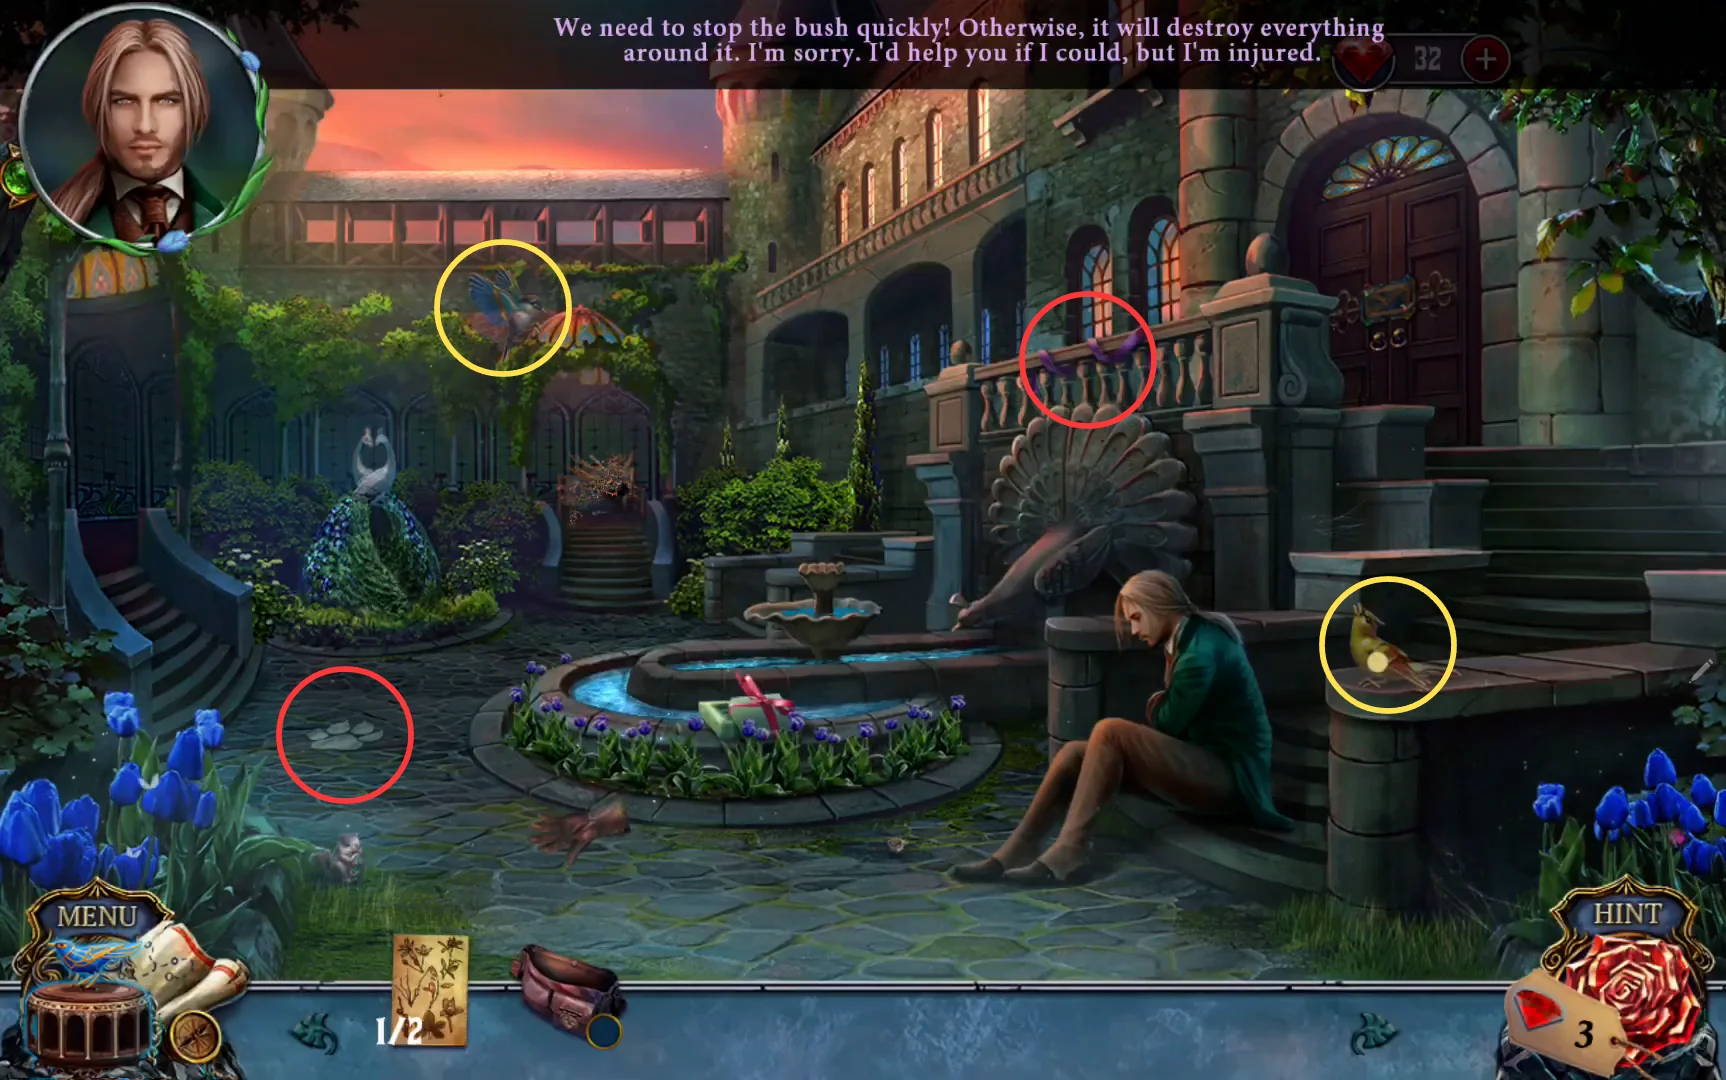
Castle Entrance. Yellow circles mark characters, red circles mark objects. - Lobby. Characters: the green bird above the fireplace, and the orange-red bird perched above the left red banner by the stairs. Objects: the red bow at the top of the wall corner, above the tapestry to the left of the fireplace, and the pearl necklace on the neck of the left swan.
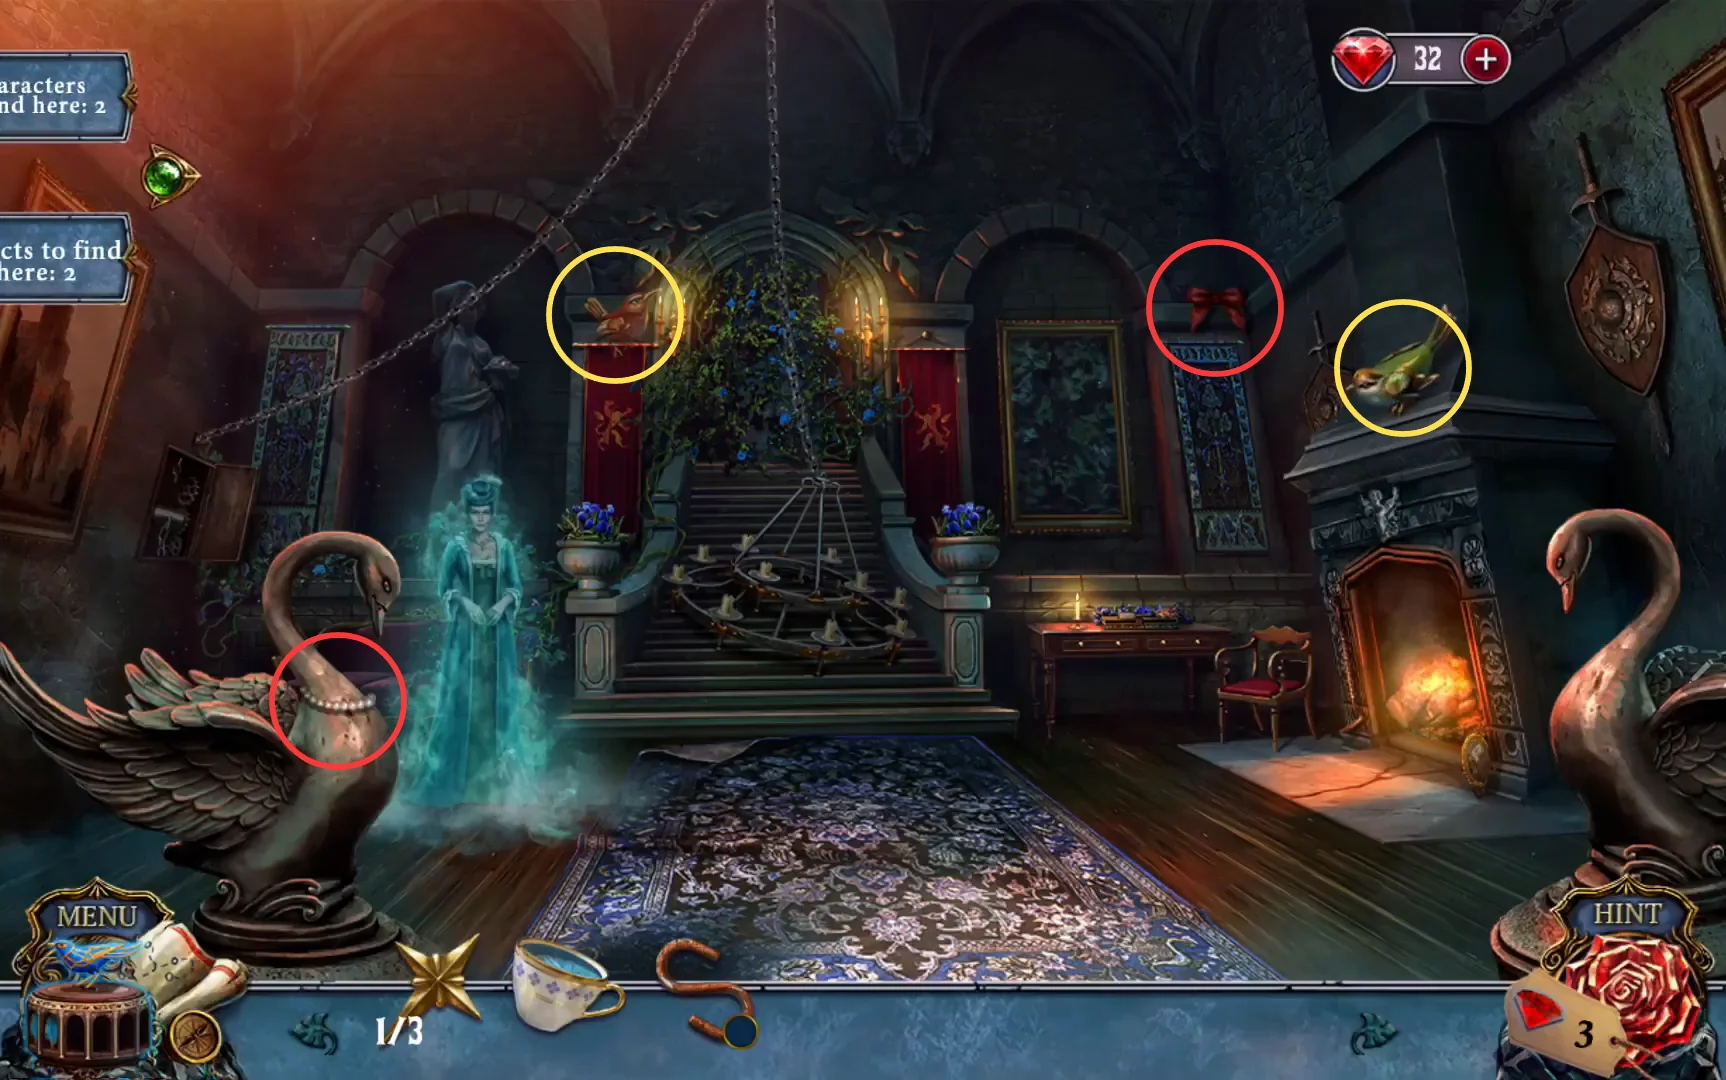
Lobby. Yellow circles mark characters, red circles mark objects. - Hallway to Katrina's Workshop. Characters: the robin on top of the tall column at the right, above the chess table, and the bird camouflaged in the sky of the large gold-framed river landscape painting on the left wall (right of the oval windmill painting); click it and it flies off. Objects: the brown boot on the floor right of the left console table, and the spot high on the wall above the knight armor, left of the small framed picture (an oval mirror or a small red banner).
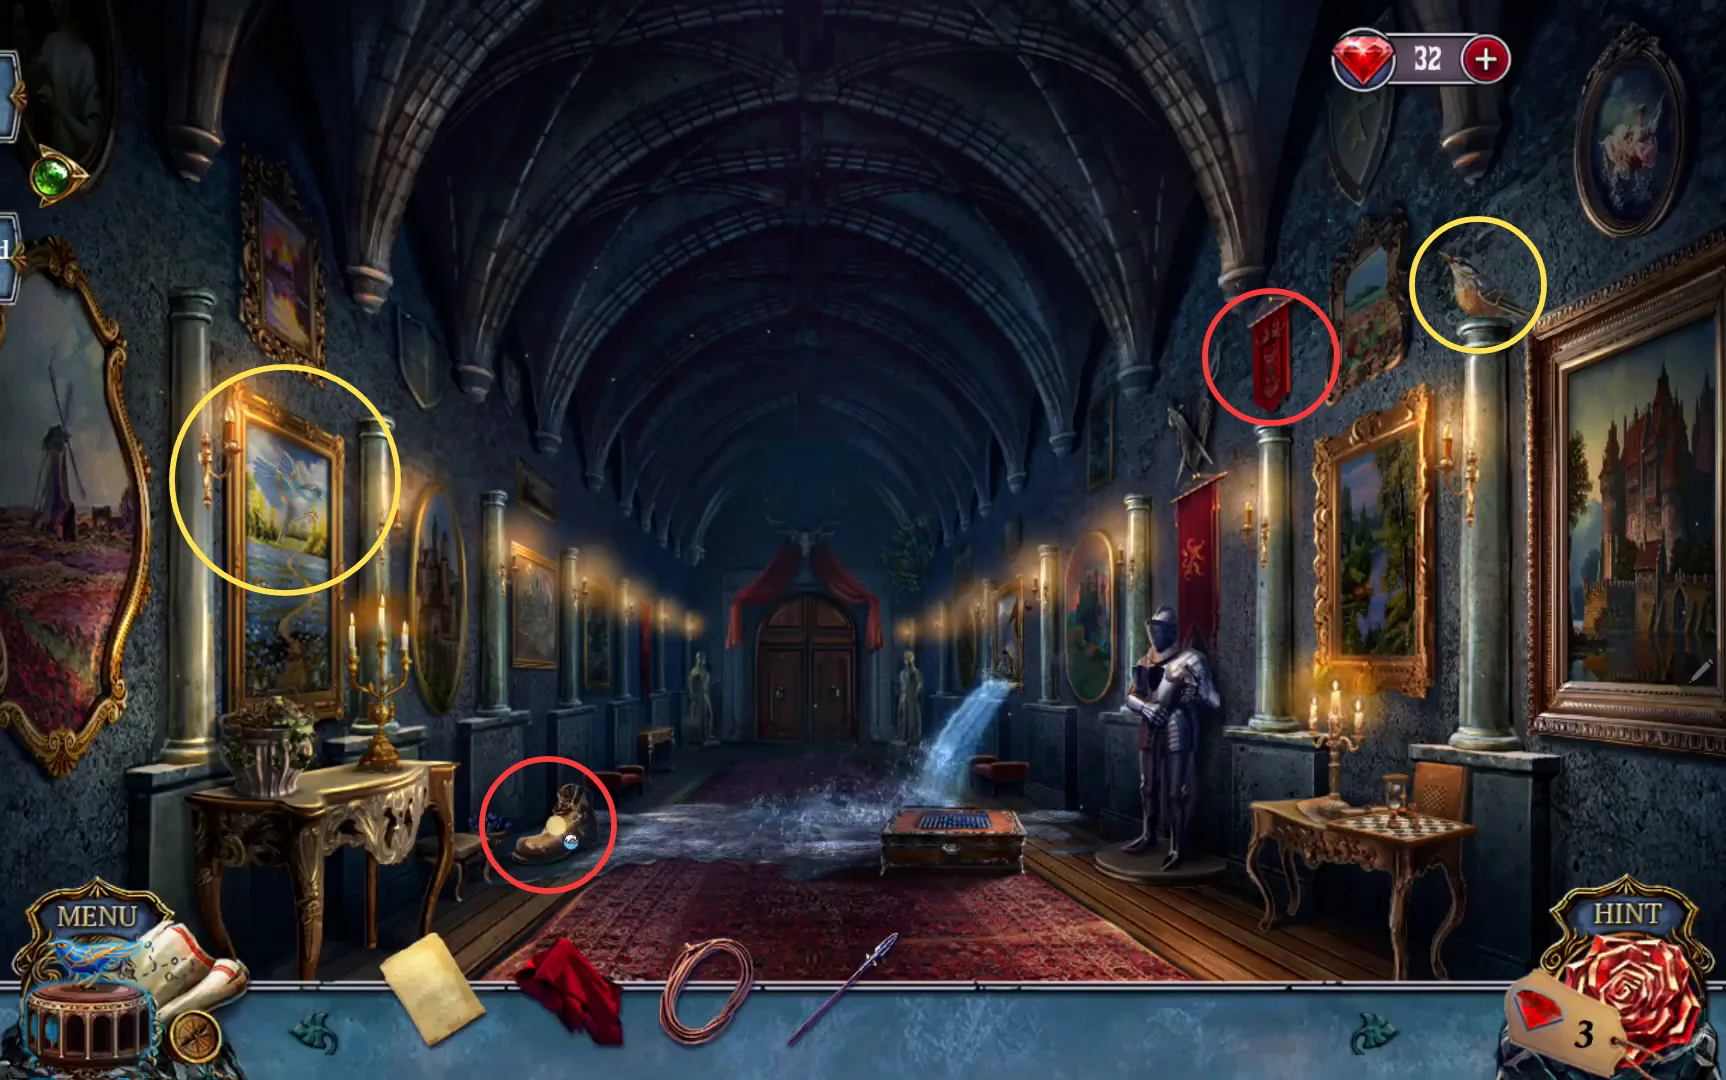
Hallway. The bird in the river painting is camouflaged, so click around the sky inside the large circle. The high wall spot shows a small red banner here and an oval mirror at other moments. Yellow circles mark characters, red circles mark objects. - Katrina's Workshop. Characters: the bird on top of the gilded portrait frame behind the lady's ghost, and the brown bird camouflaged in the dark portrait on the left wall, behind and left of the easel painting, right of the red curtain. Objects: the ornate jewellery box on the floor under the left table, beside the stool, and the small figure on the painting leaning against the wall right of the lady (a tiny white carriage or a horse).
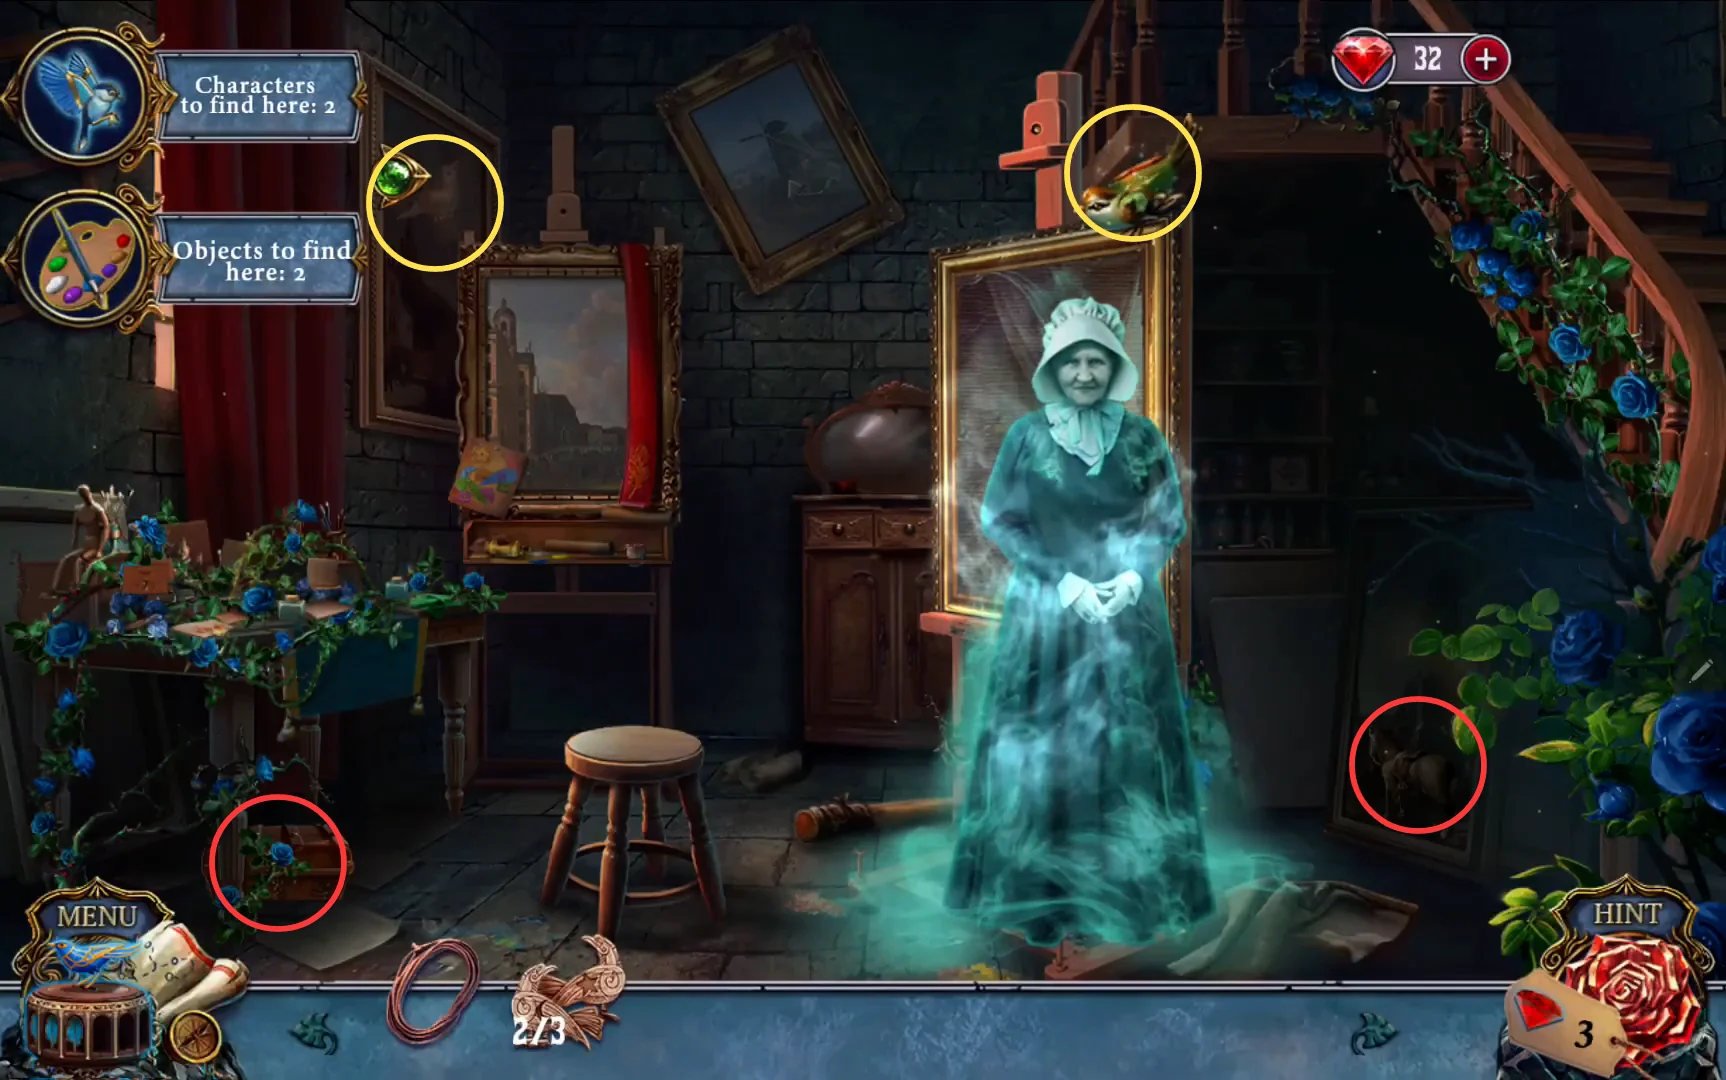
Katrina's Workshop. The leaning painting shows a horse here and a tiny white carriage at other moments. Yellow circles mark characters, red circles mark objects. - Dungeon cell (first scene). Characters: the yellow bird on the bars above the right torch, and the small red bird that appears on the left end of the bars above the broom. Objects: the hook on the wall above the chest, and the cloth or rope hanging at the top right of the bars. Dungeon hall (second scene, after you get through the bars). Characters: the brown bird on top of the vine-covered arch at the top left, and the blue bird in the mist left of the rock pile. Objects: one is among the rocks piled in front of the small barred door, and the other is the small barred grille window in that wooden door at the back, above the rock pile.
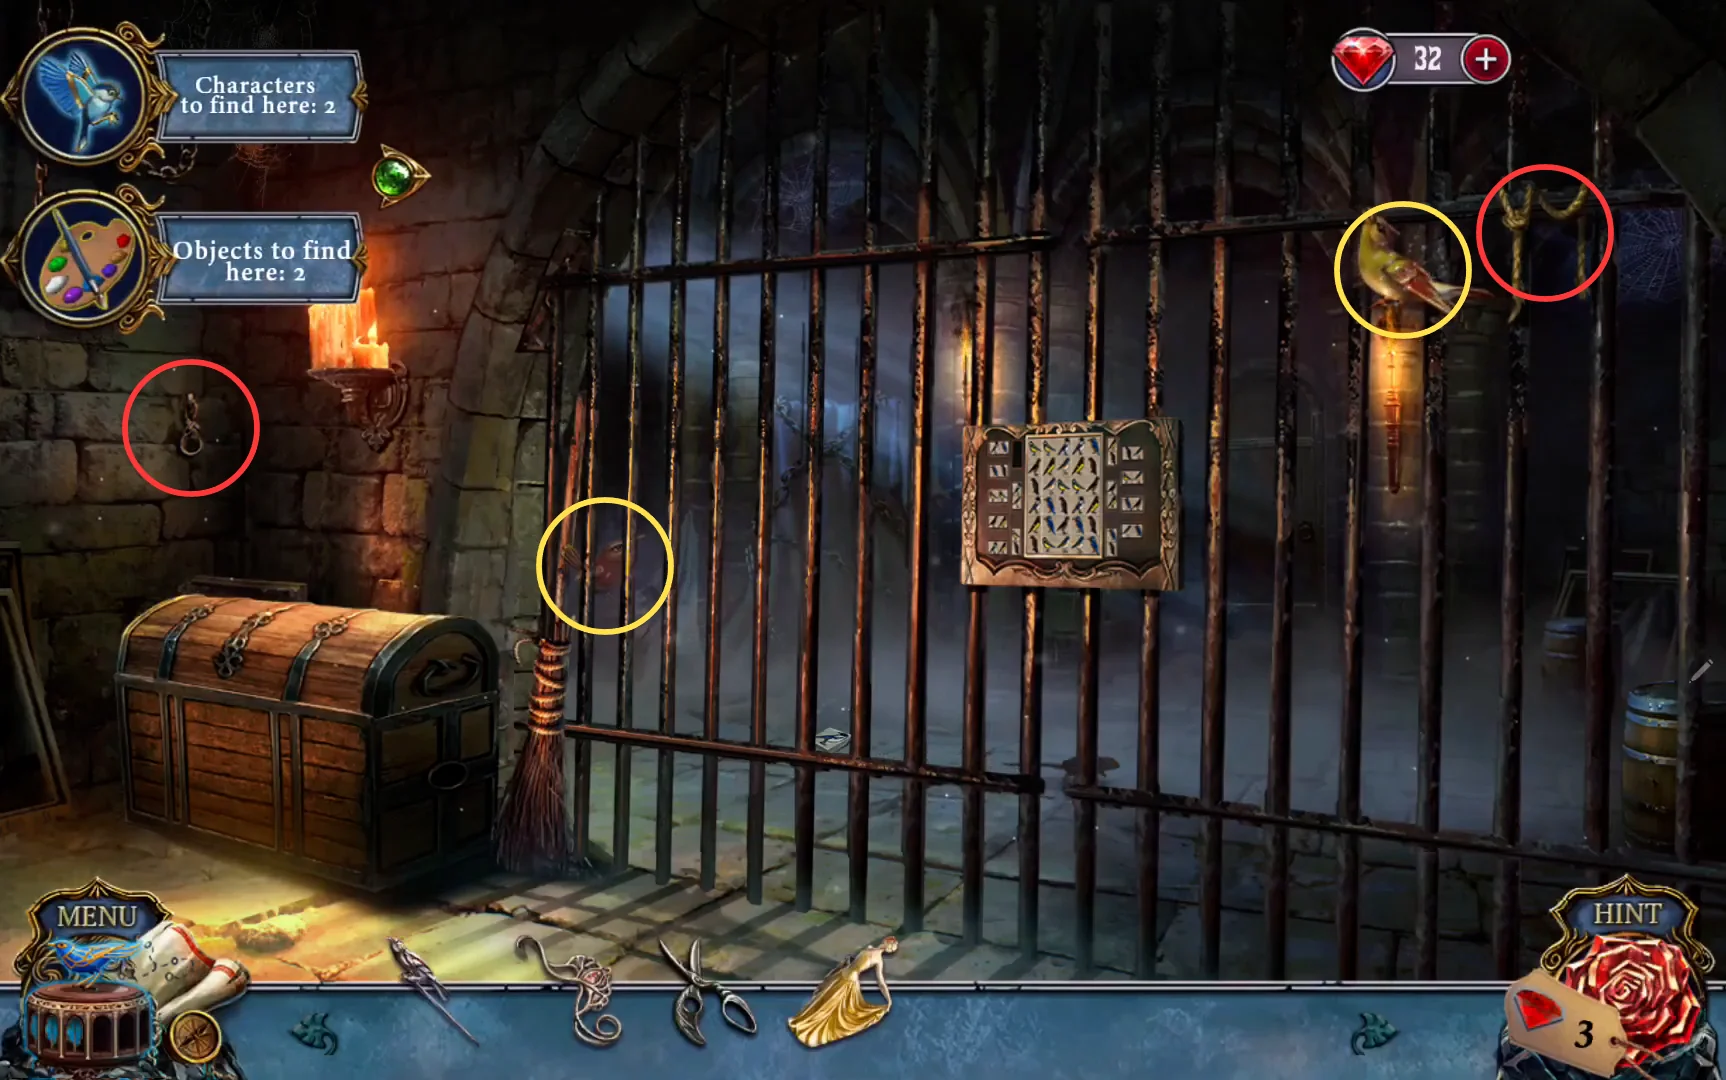
Dungeon cell. The red bird appears at the left circle a little later; the top right object looks like cloth or rope. Yellow circles mark characters, red circles mark objects. 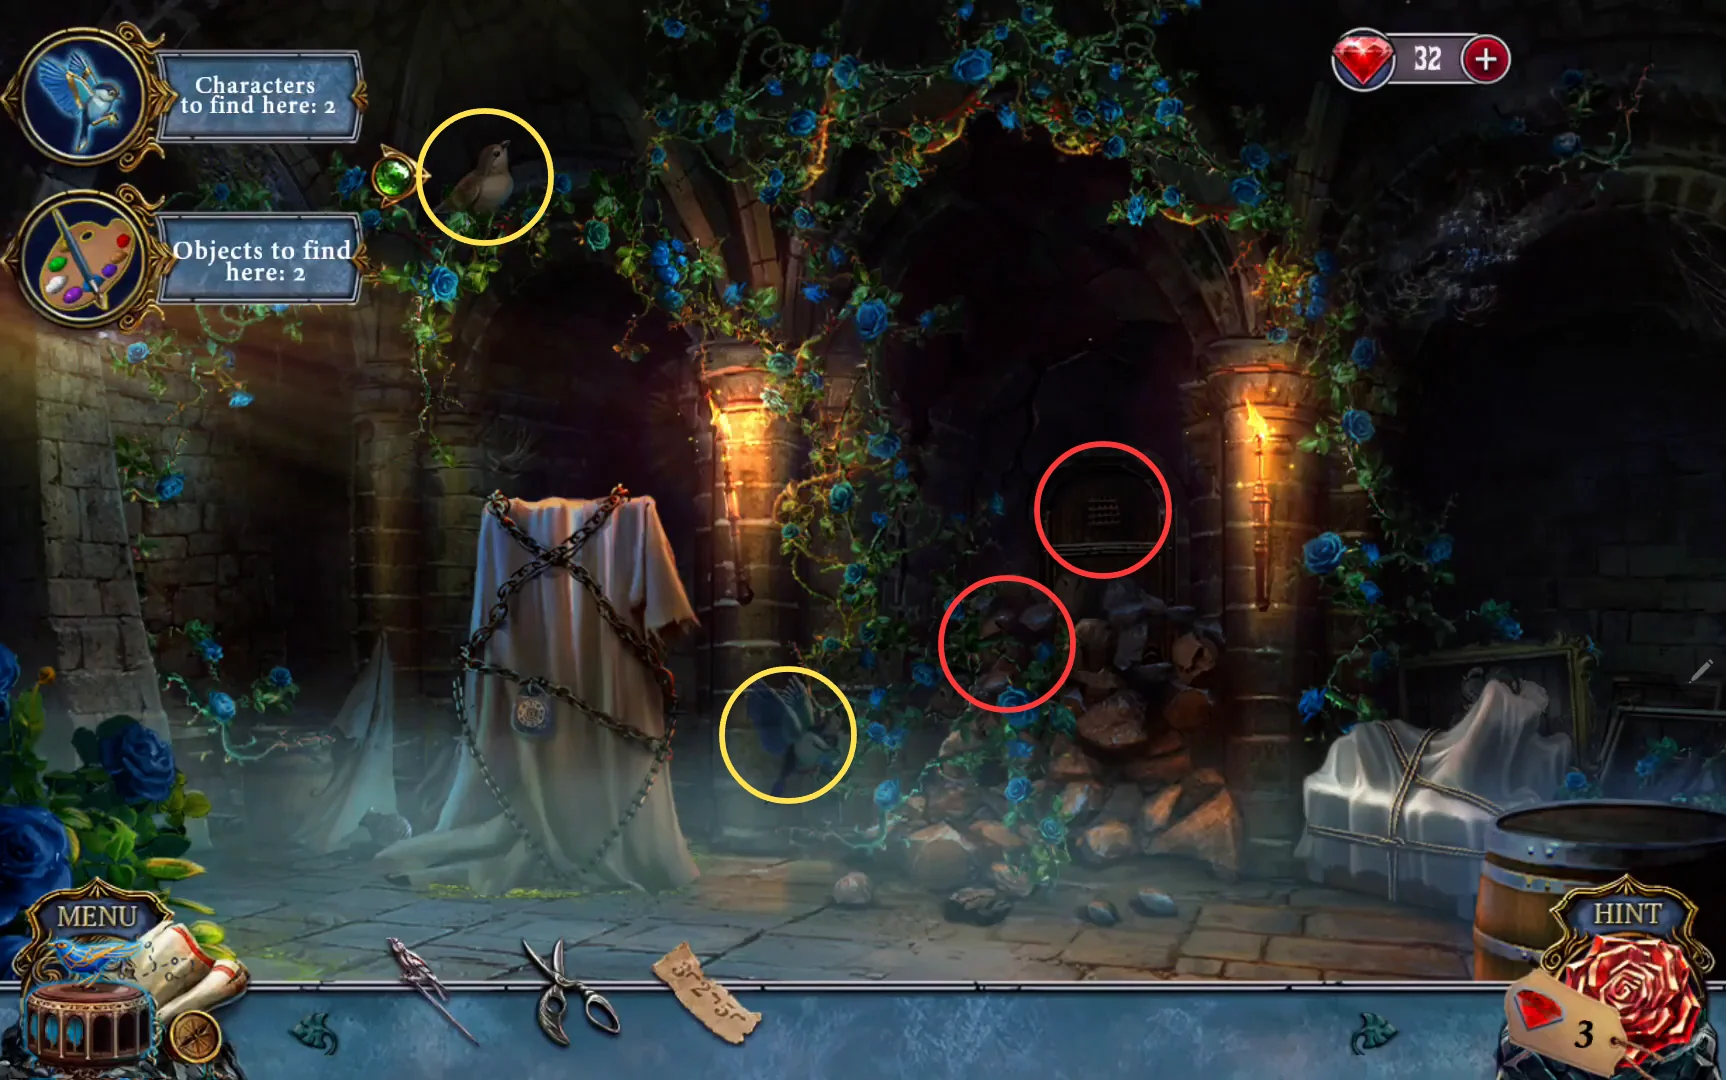
Dungeon hall. Yellow circles mark characters, red circles mark objects. - Windmill Courtyard. Characters: the nuthatch on the ground among the flowers at the right, and the wren on top of the rock at the foot of the castle tower. Objects: the small tree on the cliff left of the dead tree, near the castle gate (it blossoms when clicked), and the climbing bush on the windmill tower wall, right of the striped door and above the fence (green ivy or red roses).
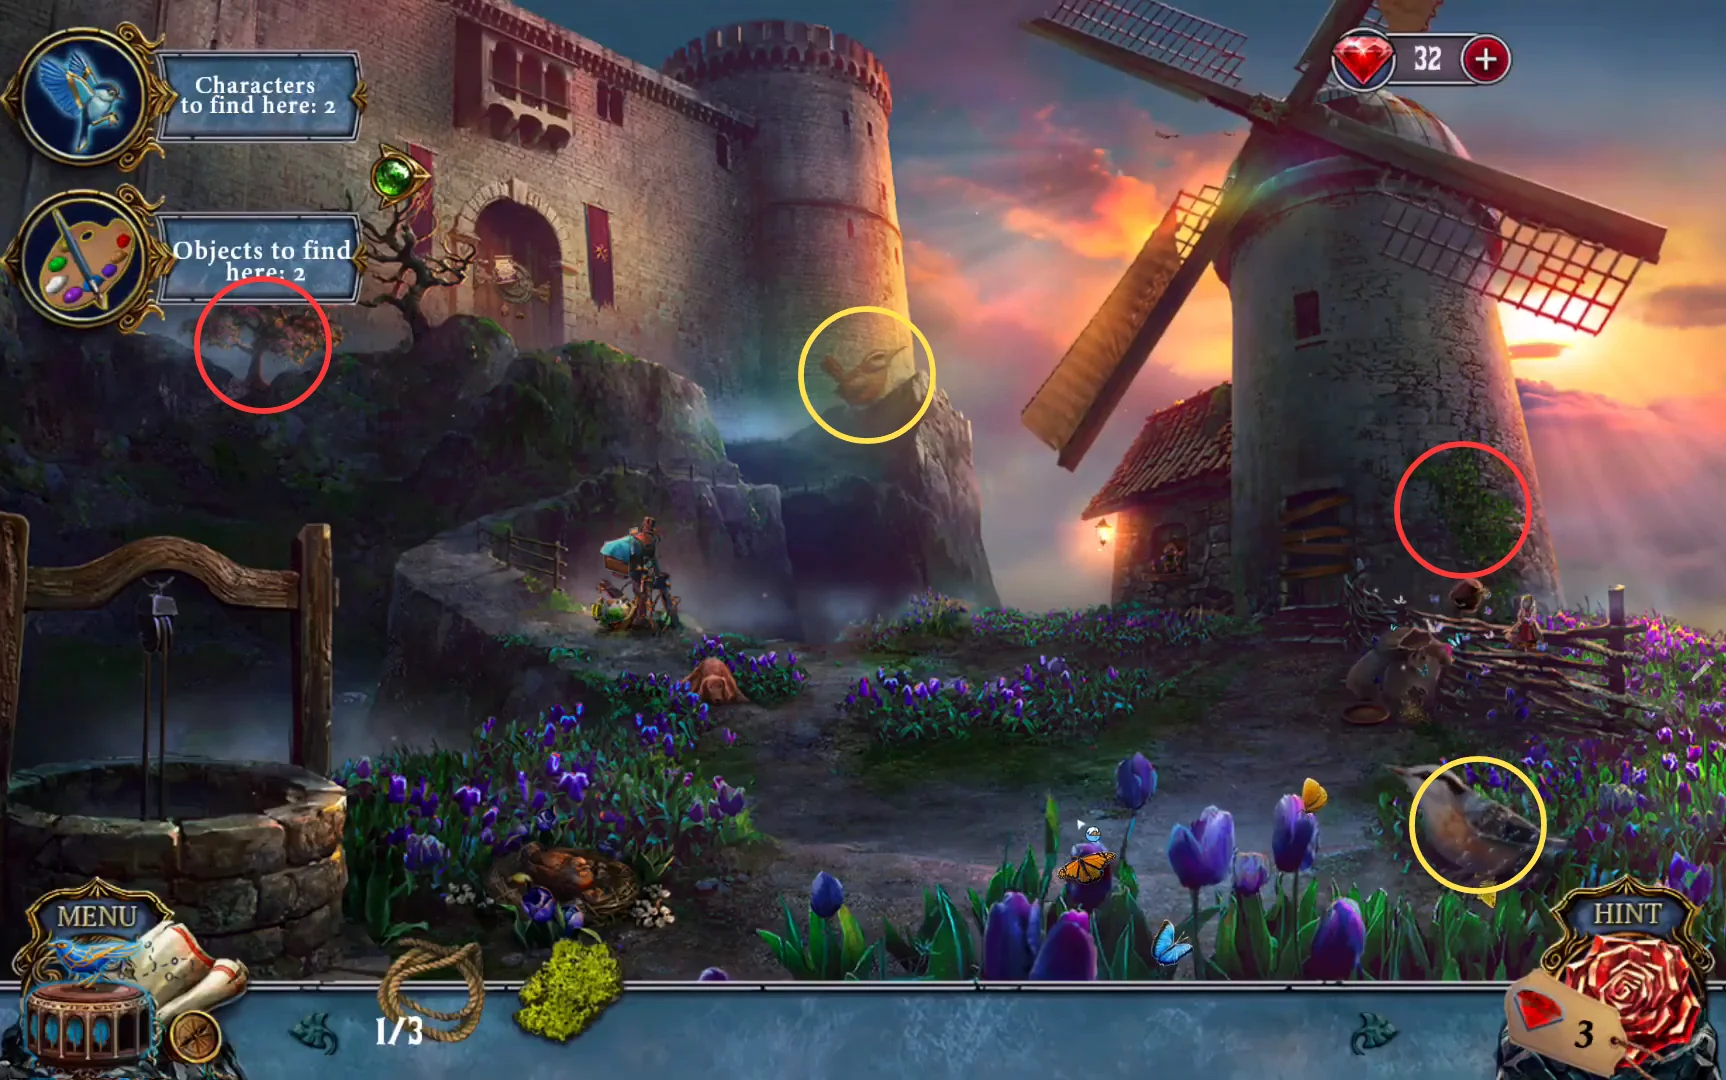
Windmill Courtyard. The tower wall spot shows green ivy here; it is the climbing rose bush when it changes. Yellow circles mark characters, red circles mark objects. - Backyard. Characters: the green bird on the red roof at the top centre, and the yellow bird in the wisteria at the top left, left of the tree trunk near the lantern. Objects: the small white figure on the bench under the wisteria, and the faint wooden slatted panel on the dark wall directly under the half-timbered balcony, right of the orange-roofed house and above the shed roof.
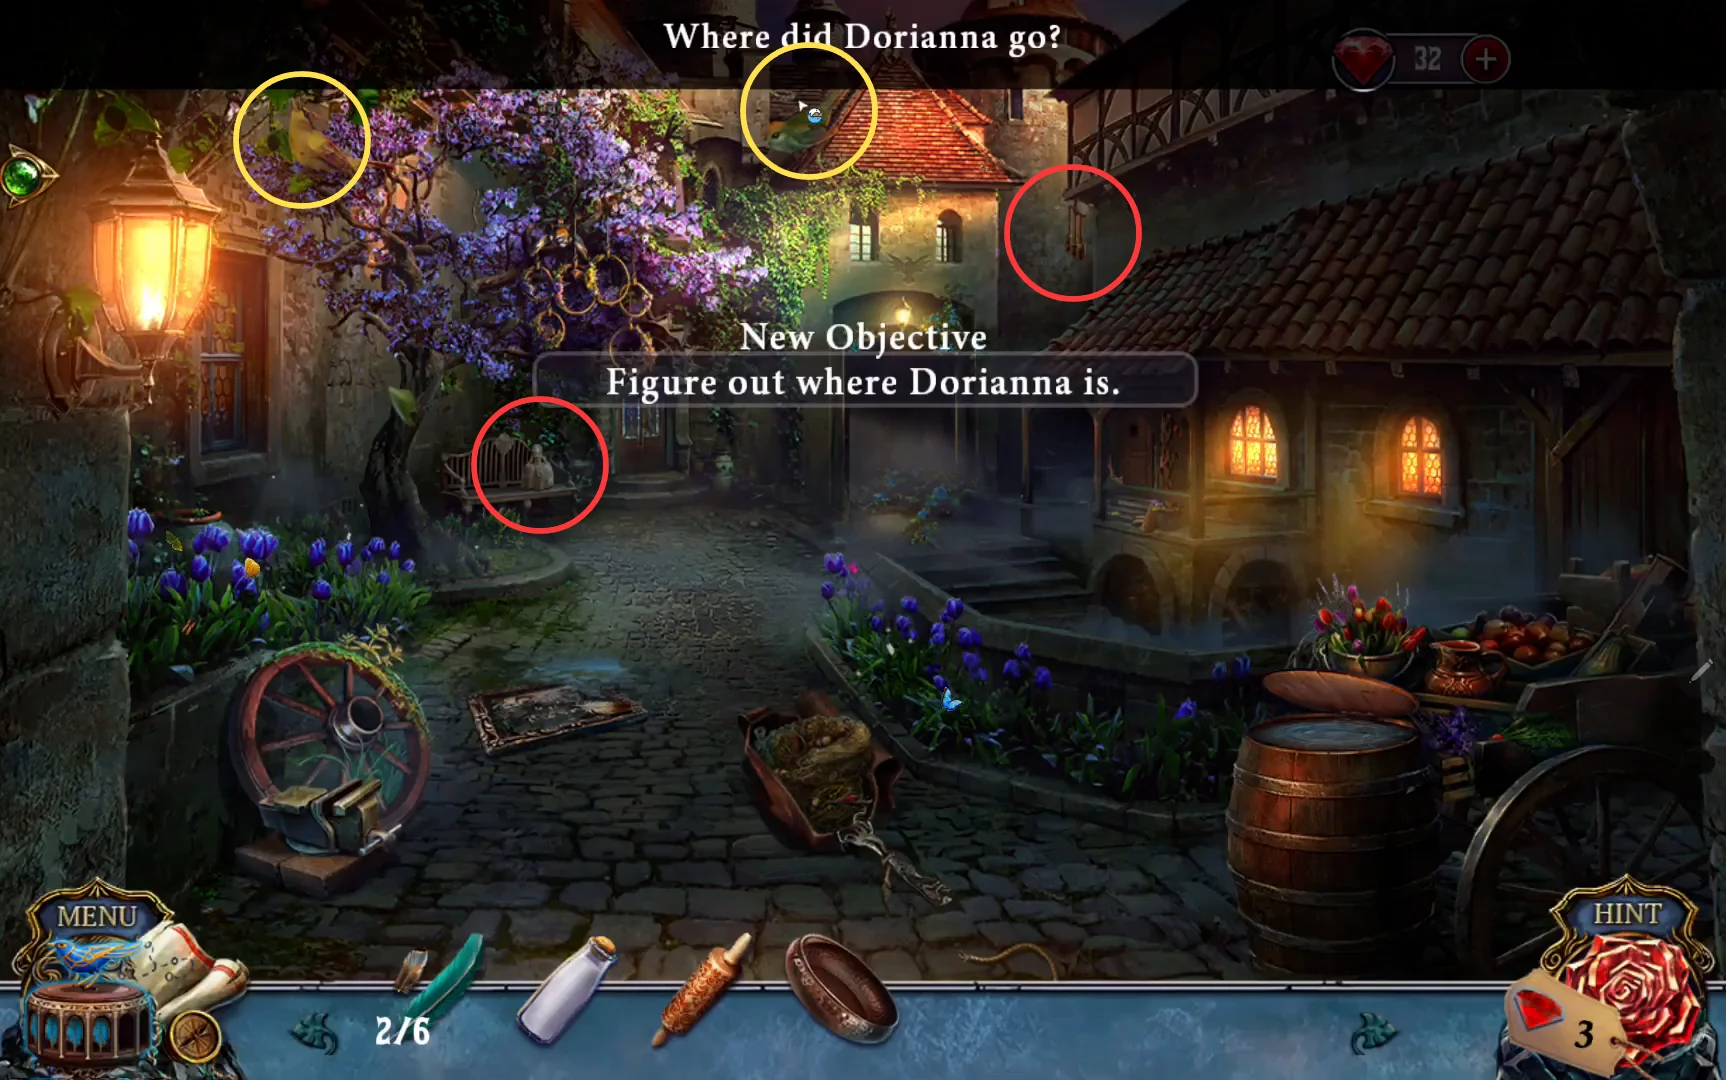
Backyard. The green bird lands at the edge of the red roof inside the top circle. Yellow circles mark characters, red circles mark objects. - Servant's House. Characters: the small brown wren on the roof beam just right of the chandelier, and the sparrow that lands on the far right corner of the big table. Objects: the blue patterned vase sitting on top of the wardrobe, and the small framed picture on the wall left of the fireplace, right of the hanging coats.
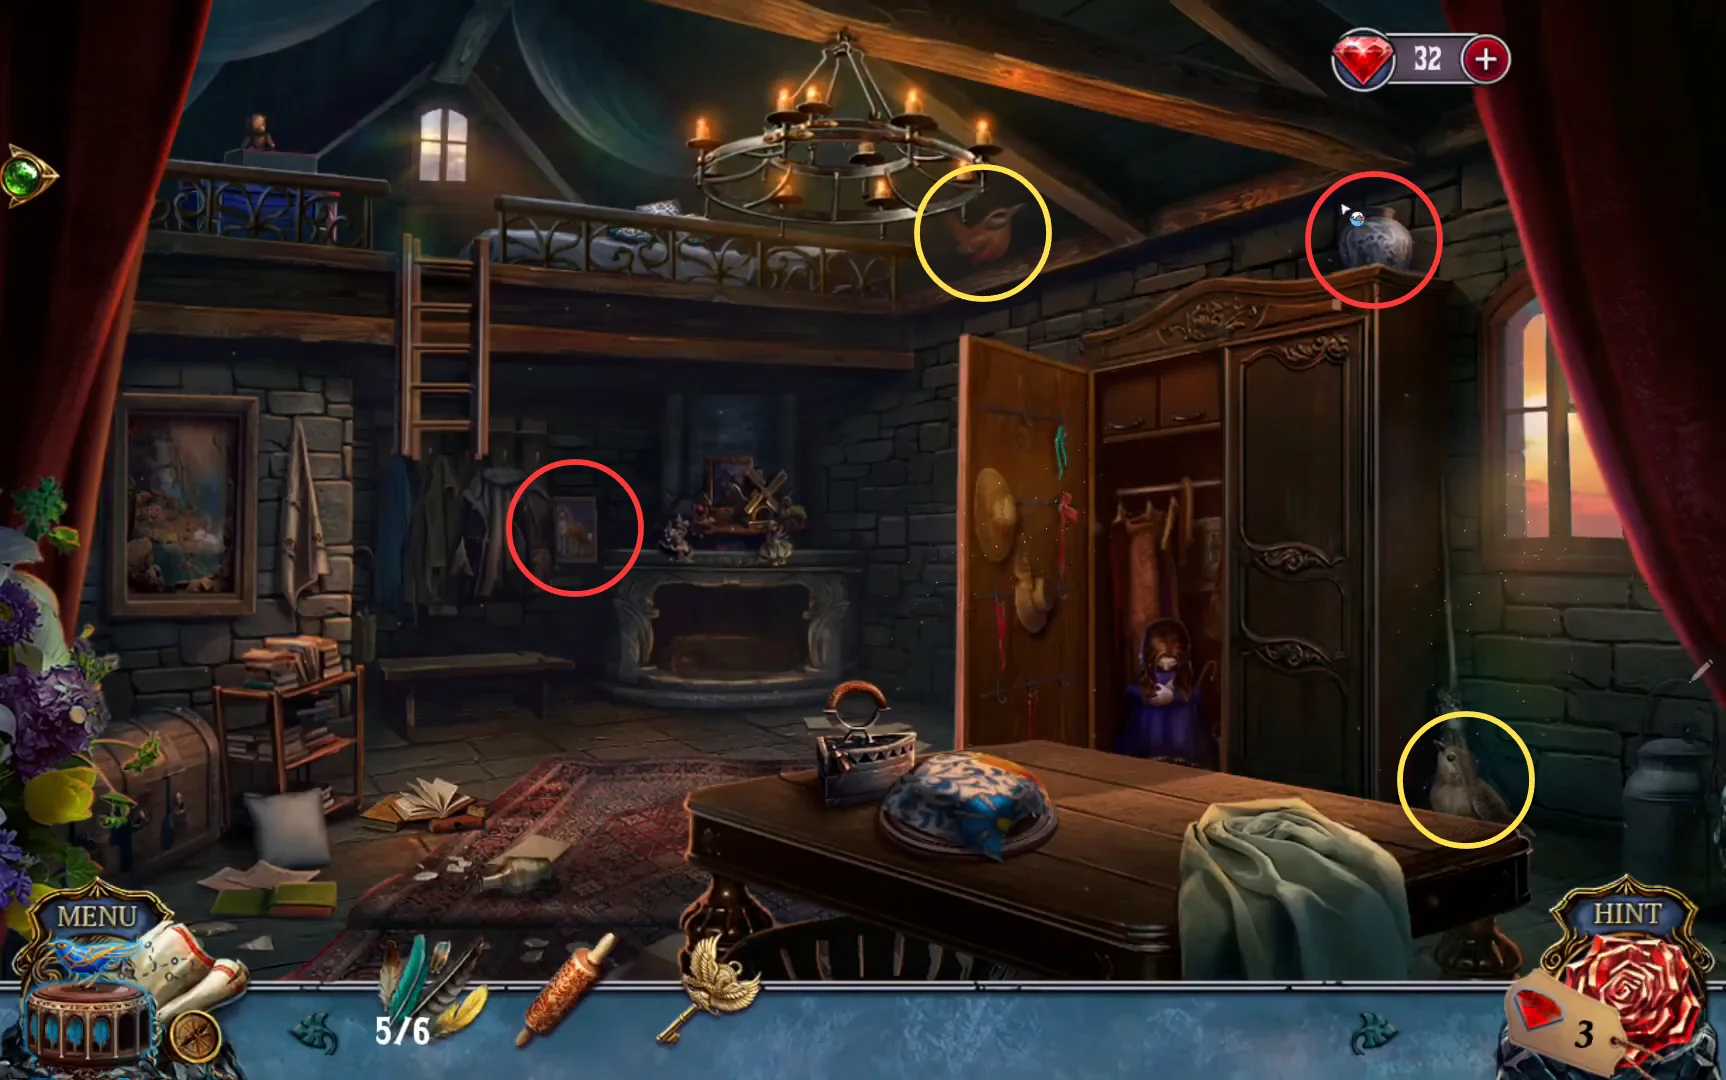
Servant's House. The sparrow lands at the circle on the right corner of the table. Yellow circles mark characters, red circles mark objects.