Ruined Bedroom: Mouse Hole Key
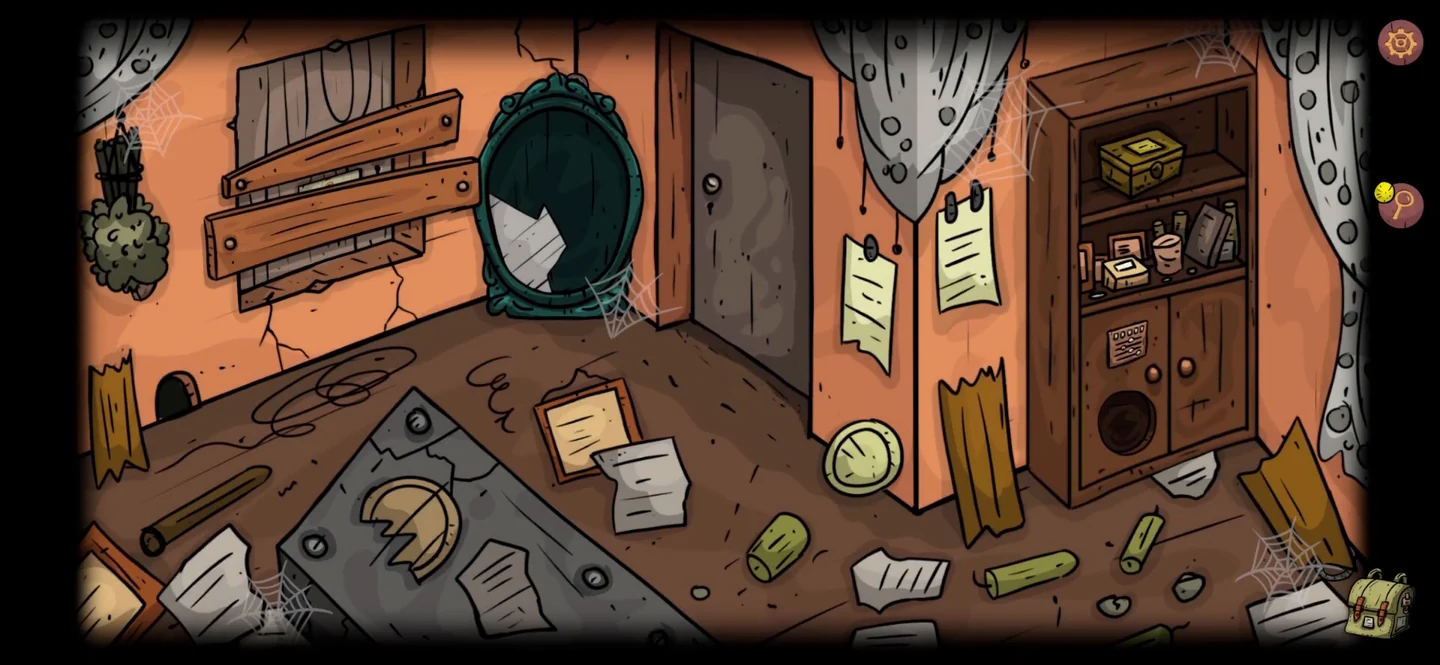
Chapter 3 starts after the memory scene at the end of Chapter 2. On iPhone and iPad, if the final chapter is shown as locked, it can be opened with the in-app purchase Unlock the Final Chapter. The chapter takes place in three connected rooms: the ruined bedroom, the clock room and the study. Several puzzles need items from all three rooms.
- Look at the two drawings in the bedroom, then pick up the small key from the floor.
- Read the notes pinned to the wall. Then pull the dotted curtain aside and look at the paper behind it. It shows four symbols in a single row. The paper stays where it is, so note the symbols from left to right; the bedroom cabinet uses them later.
- Pick up the coiled grey worm from the floor. Give it to the rat in the mouse hole on the left wall, and take the key it leaves.
- Unlock the middle door with the key from the mouse hole and go into the clock room.
Clock Room: Pickups and Floor Chest
The clock room is full of loose items. Gather them all before working on the floor chest and the door to the study.
- In the clock room, collect everything on the floor first. Pick up the mirror shard at the end of the broken planks at the front. Move the open cardboard box to find a torn paper piece. Lift the paper-covered board on the left to find a saw, and take the thin wooden strip lying beside the yellow log. Take the small green key from the torn white scrap at the far left edge of the floor. Open the two-door cabinet on the left and take the blue battery. Finally, look behind the framed drawing near the clock for another torn piece.
- Unlock the green box on the right wall with the small green key and take the blue battery.
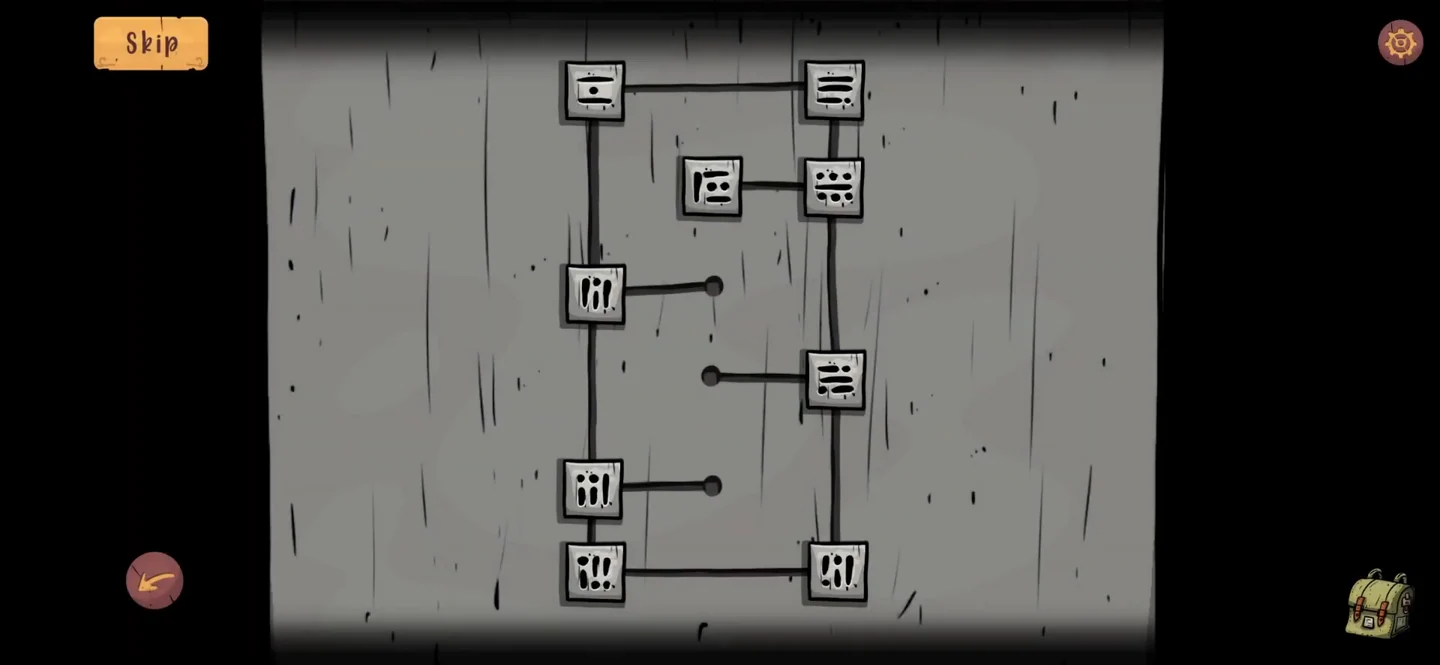
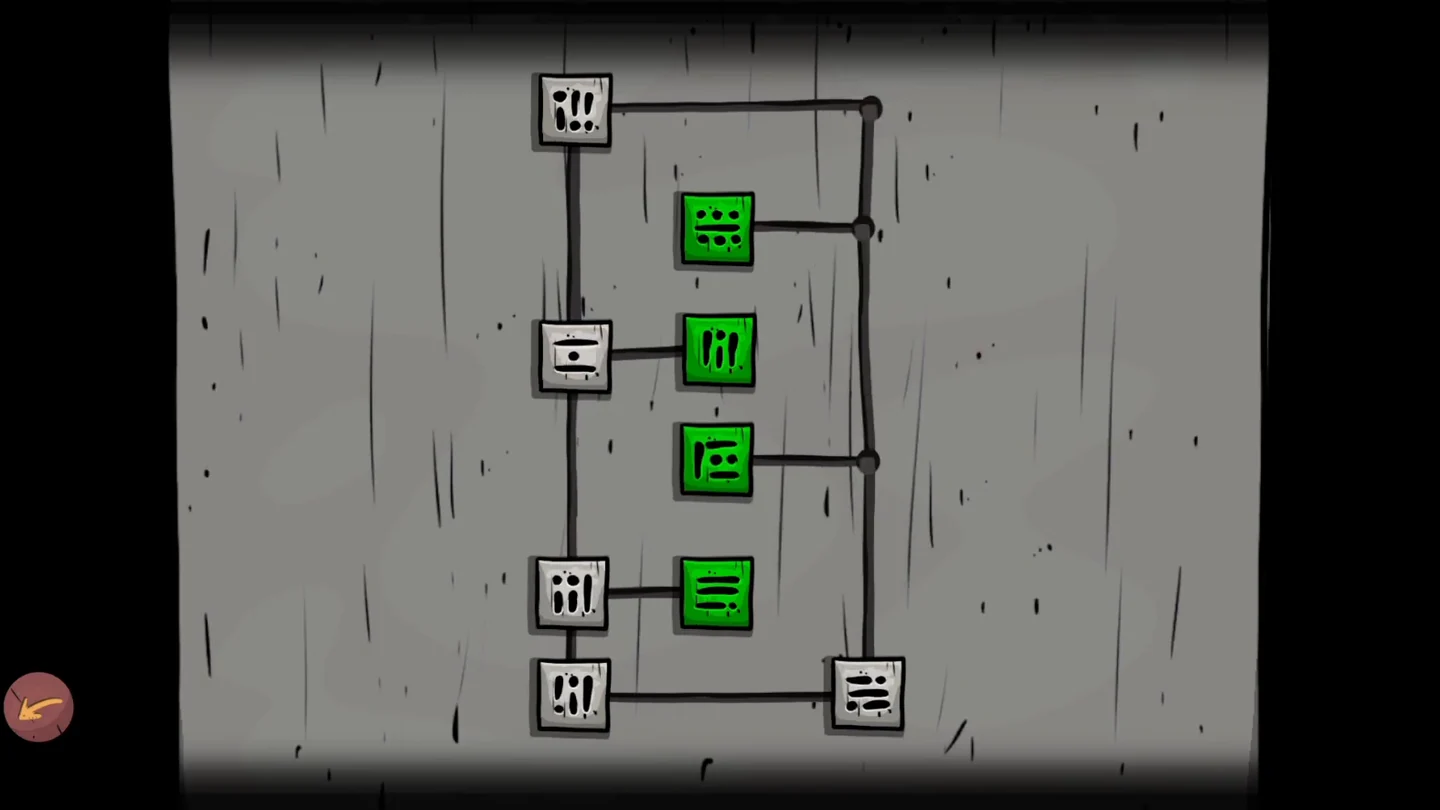
- Tap the chest on the floor. Slide the symbol tiles along the tracks. A tile turns green when it reaches its correct spot. Keep going until all target tiles are green. Take the blue disc.
The finished floor chest. - Tap the lock on the grey wooden door between the cabinet and the clock. Eight carved tiles surround an empty space. Slide the tiles one at a time into the empty space until they form the pattern shown here. This takes a while, so build the top row first. The door then opens: go through to the study.
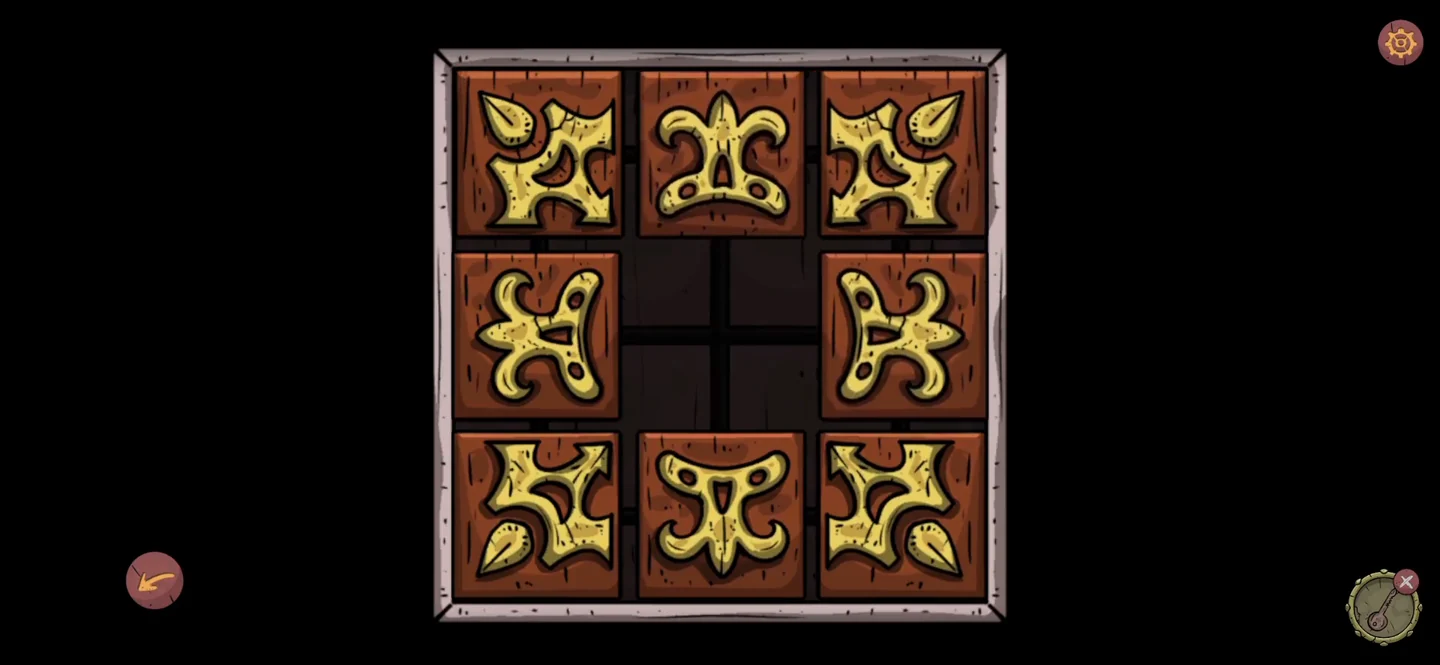
The finished tile lock on the door to the study.
Study: Book, Torn Diagram and Wall Chart
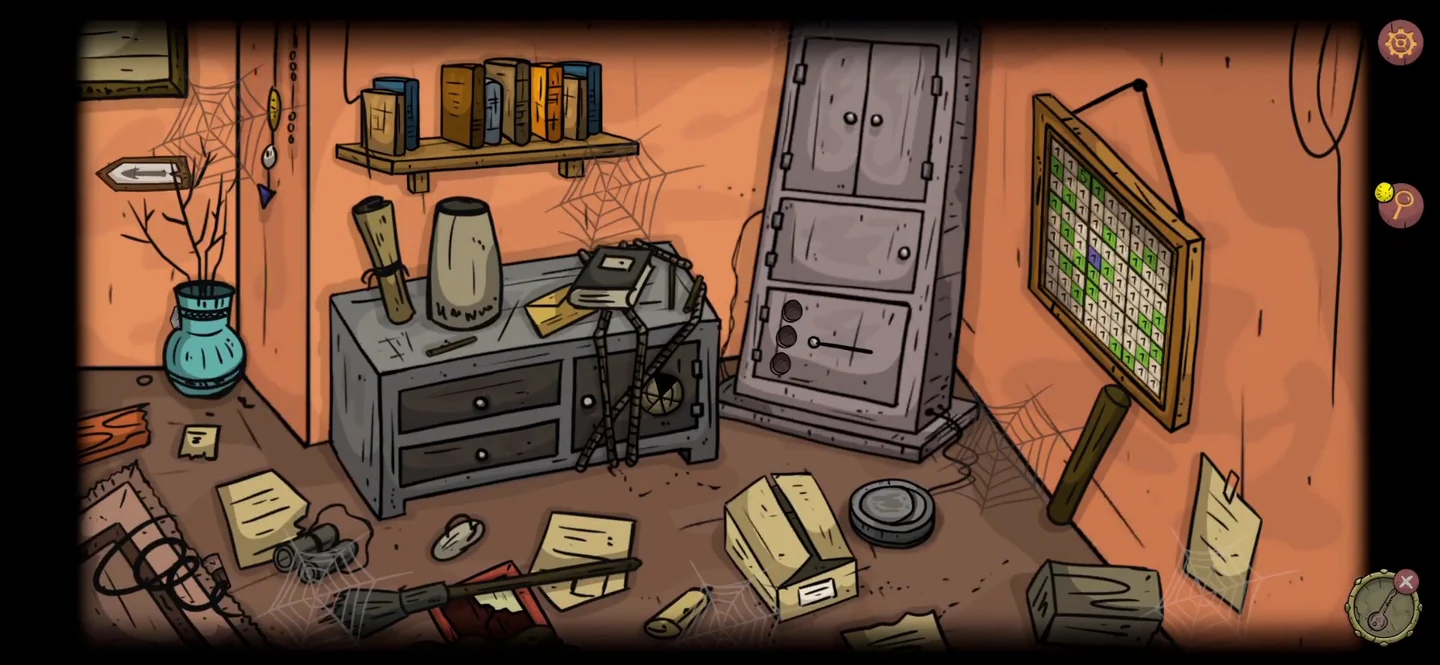
The study holds the clue for the grandfather clock and the chart for the shape board.
- Take the brown book from the cardboard box on the floor and look at the child's drawing of the family.
- Read the small torn note on the floor by the teal vase. It shows three symbols: a spiral, a square and a chevron. This is the order for the locker discs later. Open the lower desk drawer and take the blue chevron disc, then open the upper drawer and take the torn diagram piece.
- Place the torn pieces in the empty frame on the floor to complete the eye and moon phase picture.
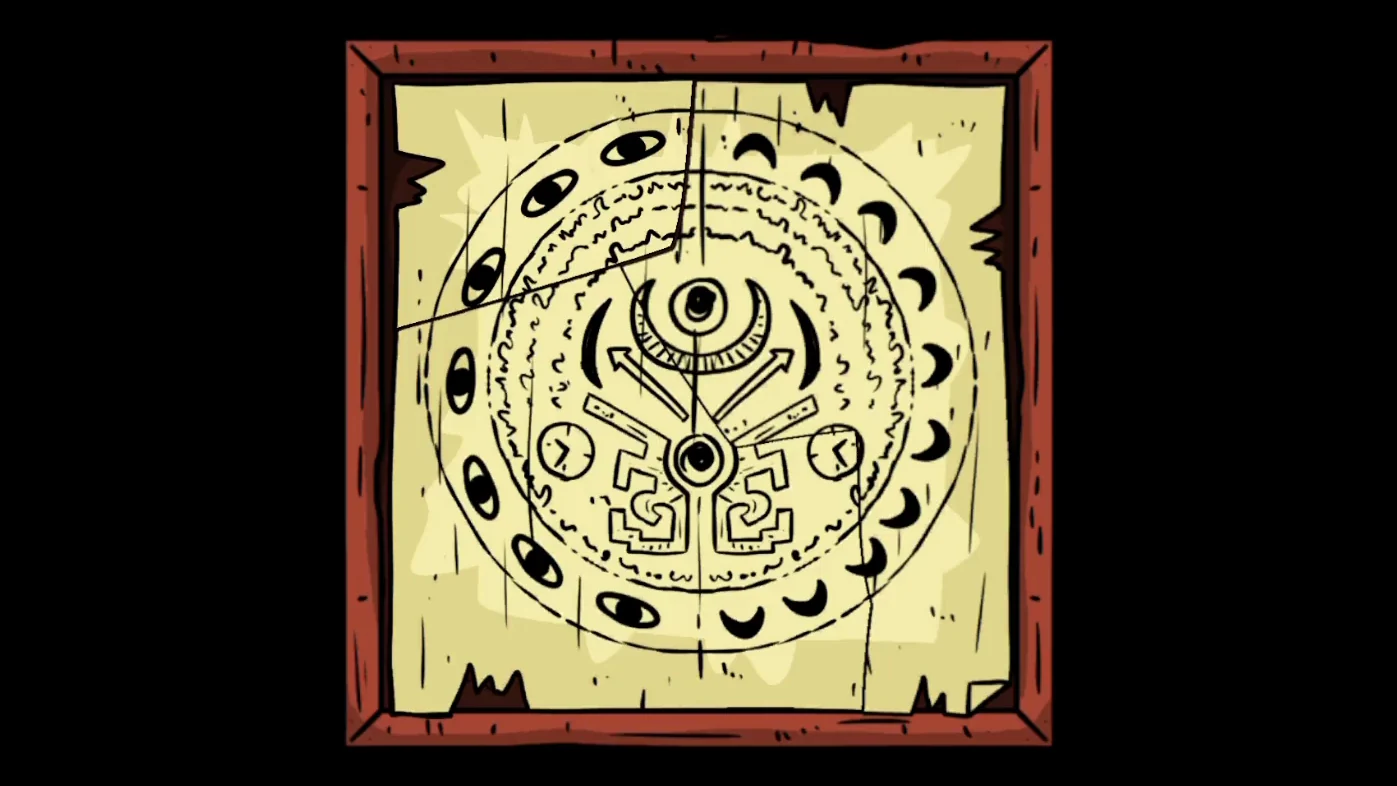
The completed eye and moon picture. - Put the brown book in the gap on the bookshelf above the study desk. This unlocks the paint-can puzzle, which you can open by tapping the books. Then look at the chart of connected shapes on the right wall.
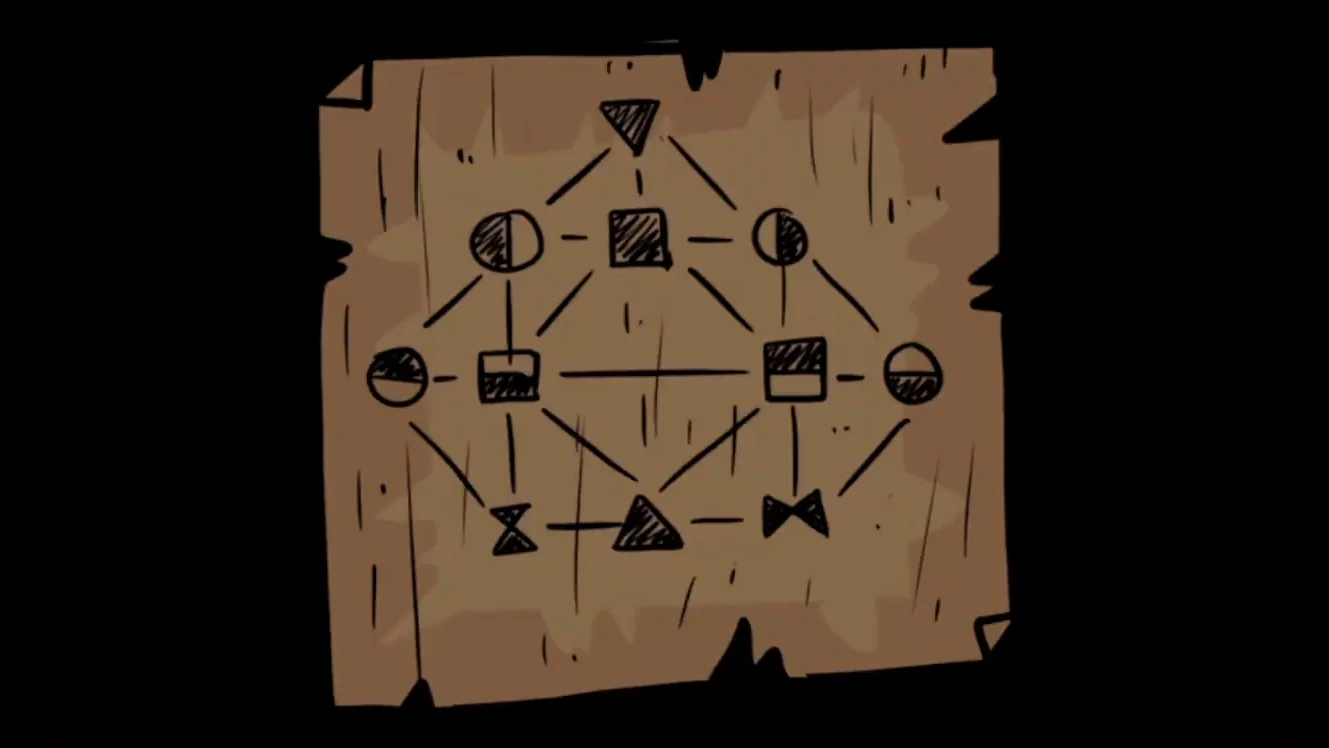
The shape chart on the study wall.
Bedroom Window and Shape Board
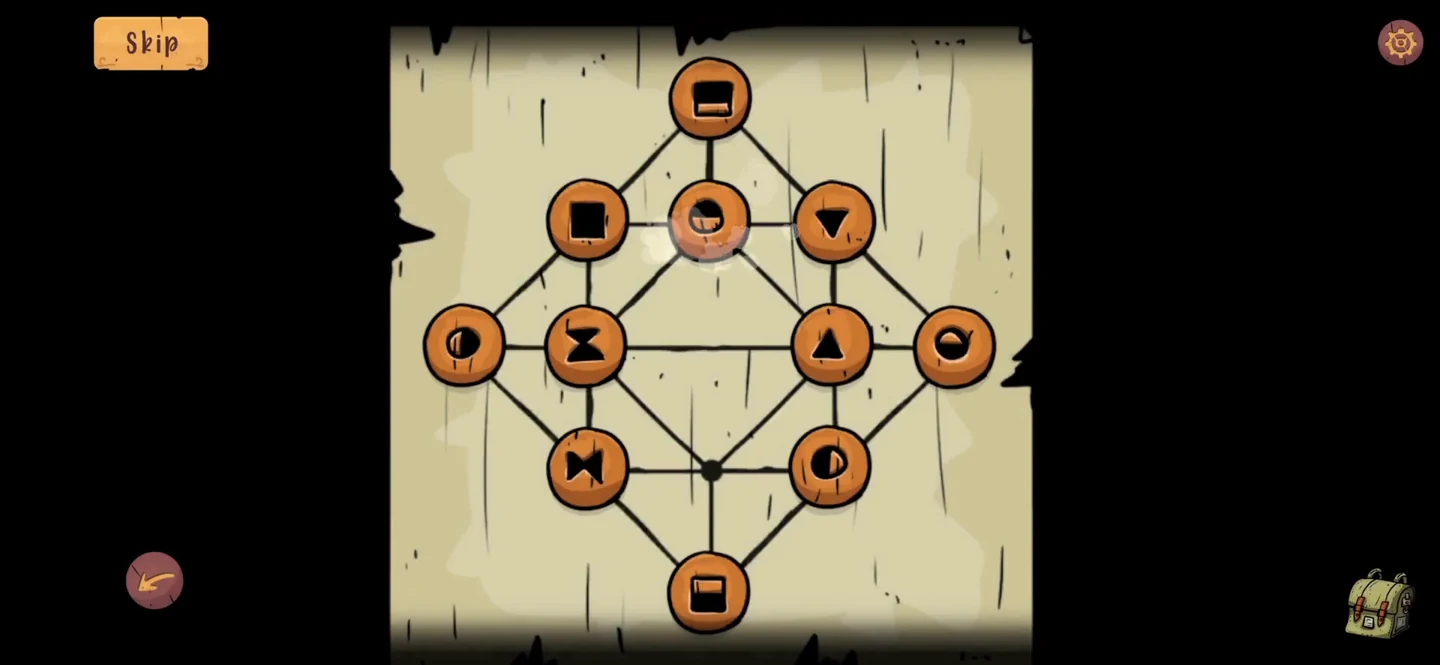
The boards over the bedroom window hide a small cabinet with the shape board.
- Back in the bedroom, use the saw to cut away the boards over the window.
- Removing the boards reveals a small wooden cabinet in the window. Unlock it with the small key from the bedroom floor; the shape board is inside. Slide the round shape tokens along the lines until they match the chart on the study wall. This takes a while: move one token at a time toward its place on the chart, using the free nodes to shuffle the others out of the way, and compare with the finished board shown here. When it matches, take the blue spiral disc from the window cabinet.
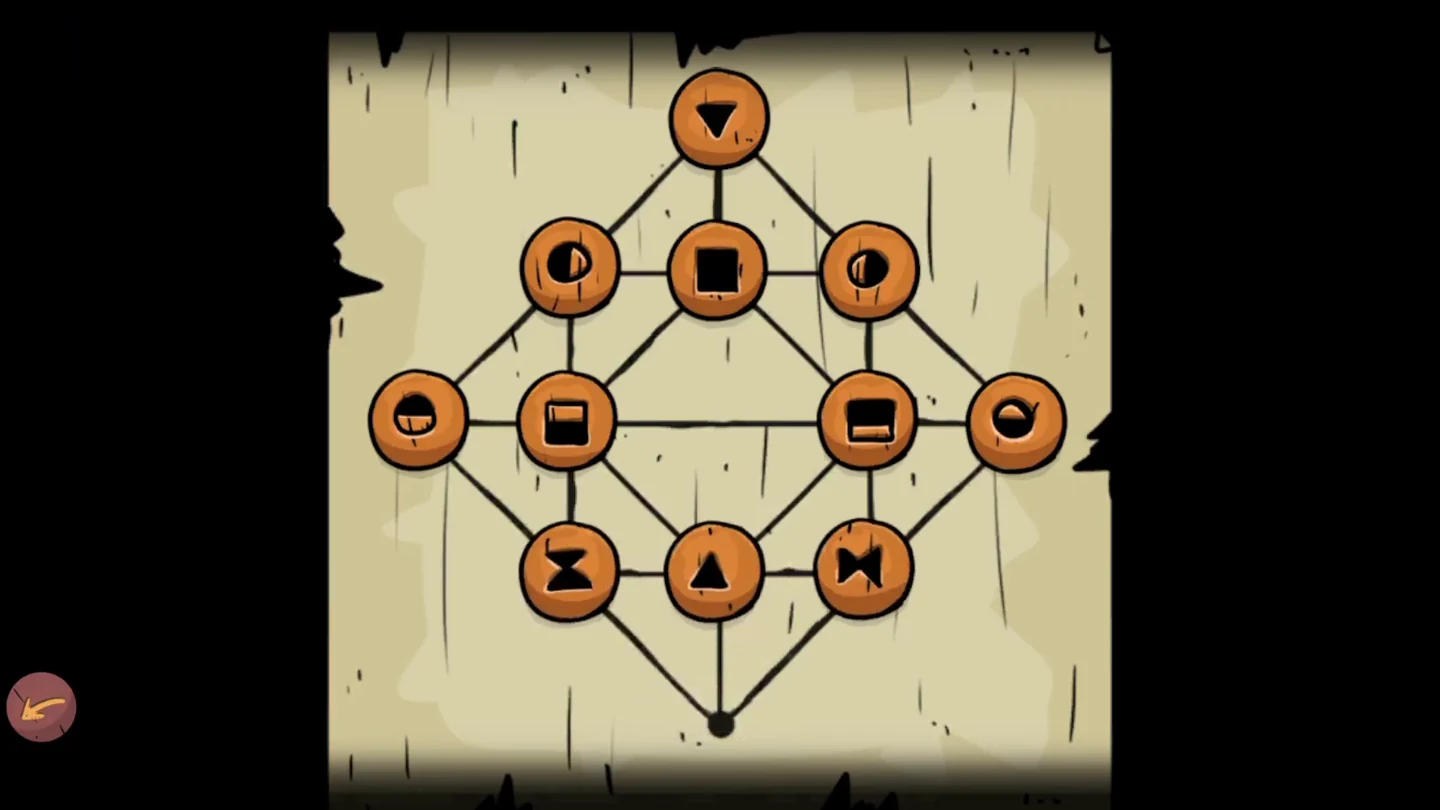
The finished shape board.
Bedroom Number Box
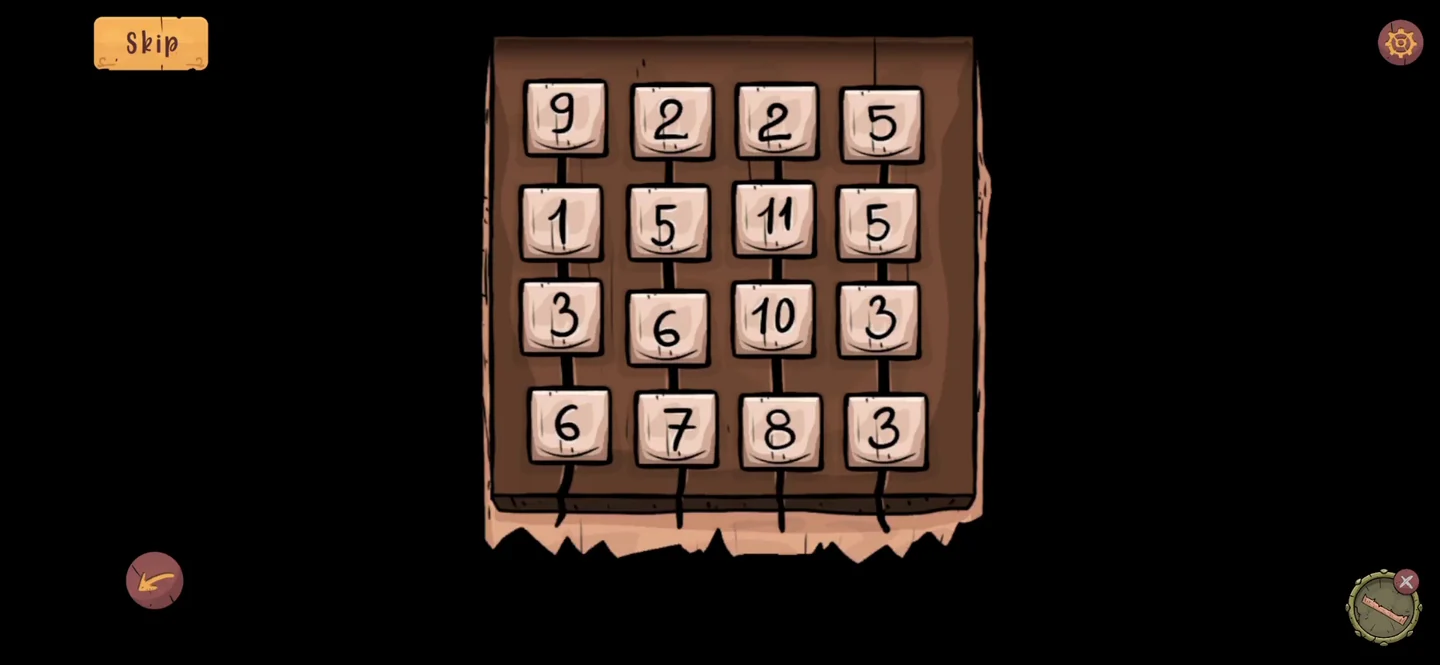
The number box on the bedroom shelf needs the wooden strip from the clock room.
- Open the wooden box with the 4 x 4 grid of numbered tiles on the bedroom shelf, and place the thin wooden strip from the clock room under the grid. It shows the red target numbers 17, 18, 30 and 21. Tap two tiles to swap their numbers until each column adds up to the red number below it. In this example the accepted grid, row by row from the top, was 8 3 2 6, 2 5 11 9, 1 5 10 3 and 6 5 7 3. If your tiles differ, keep swapping until every column total matches. Take the note with a row of symbols.
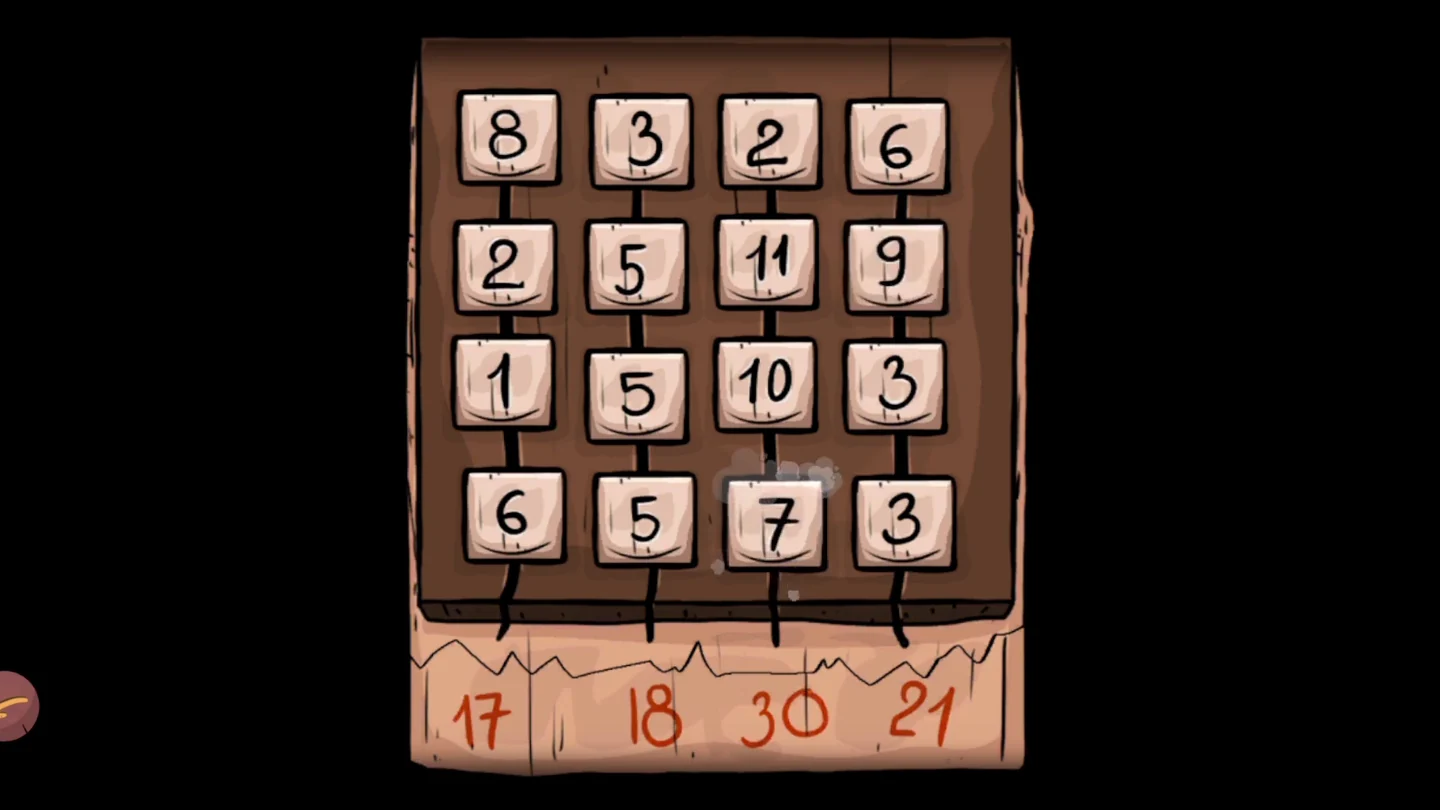
Example solution.
Study Sudoku
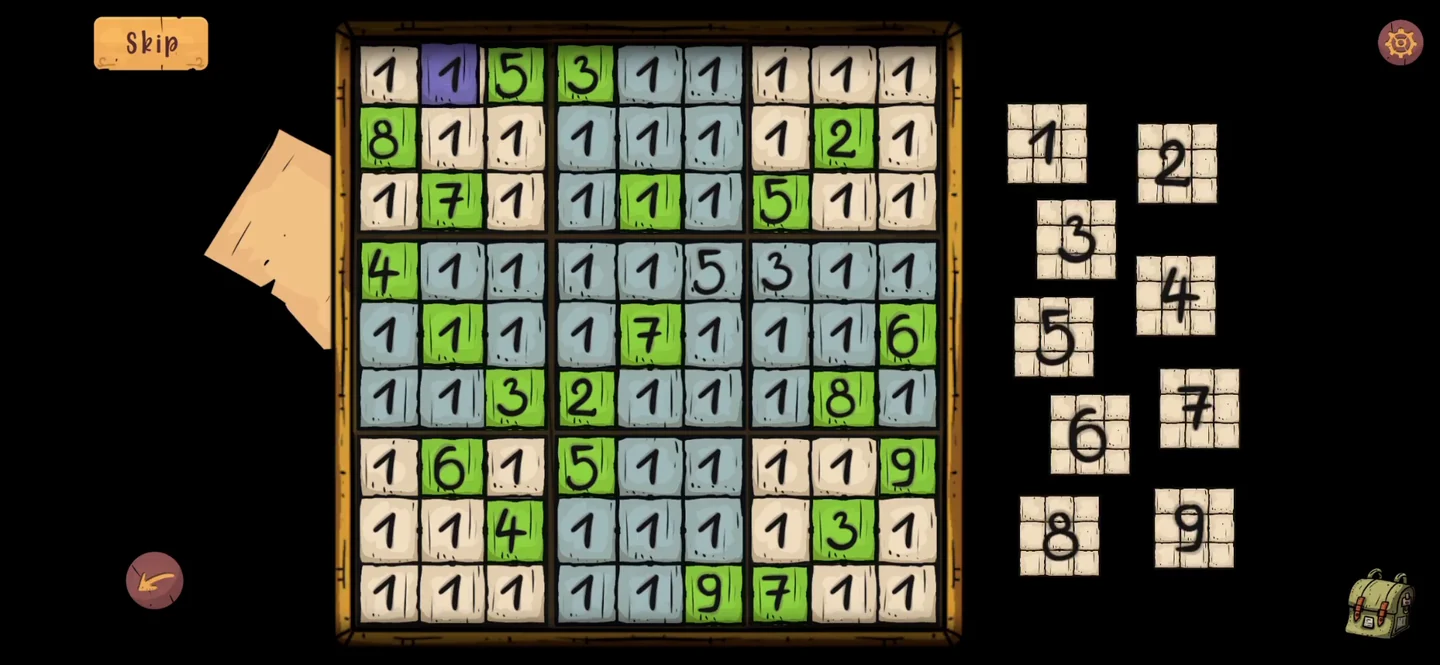
The easel in the study holds a sudoku. Solving it reveals the clue for the mirror safe.
- Tap the easel in the study to open the 9 x 9 sudoku. The green squares are fixed. Most editable squares start at 1, and you can change the numbers in any square without a green background. Tap a square, then pick a number from the panel on the right. Fill the grid so every row, column and 3 x 3 box contains the numbers 1 to 9 once each. The solved grid shown here is the accepted solution; if the green numbers on your board match it, you can copy the remaining numbers from it. When it is complete, a paper appears with four symbols in its bottom row.
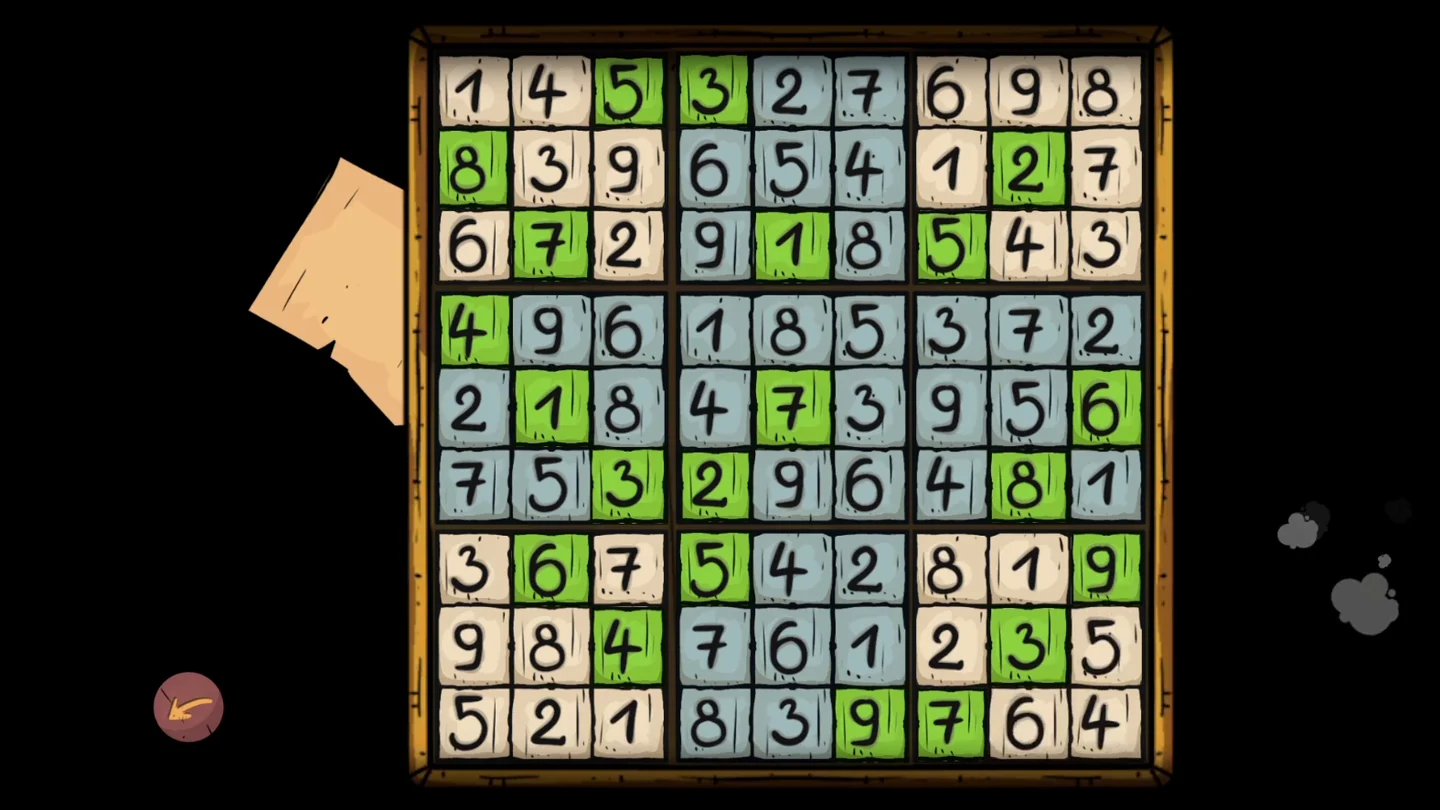
The accepted solved grid. 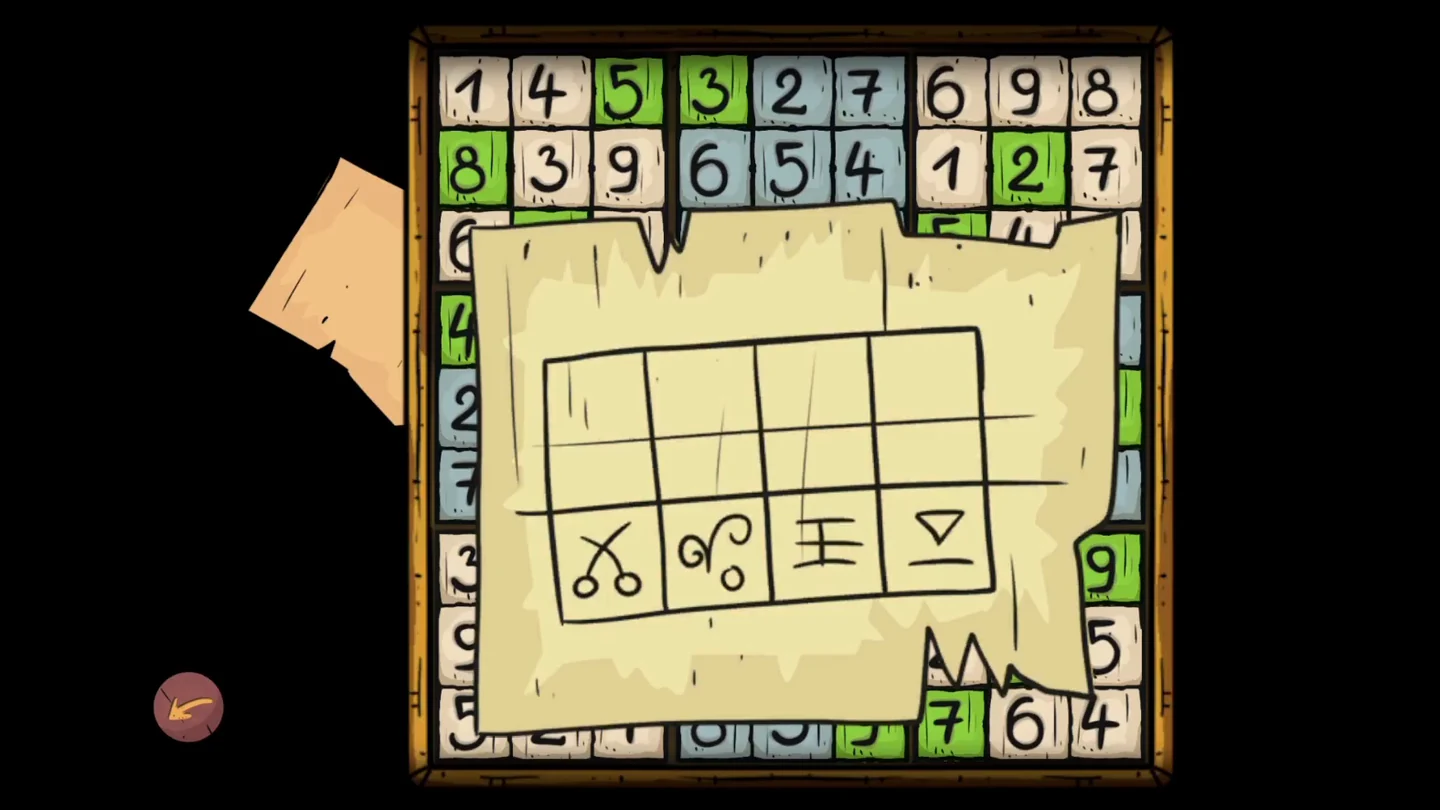
The paper that appears after the sudoku.
Metal Locker and Floor Hatch
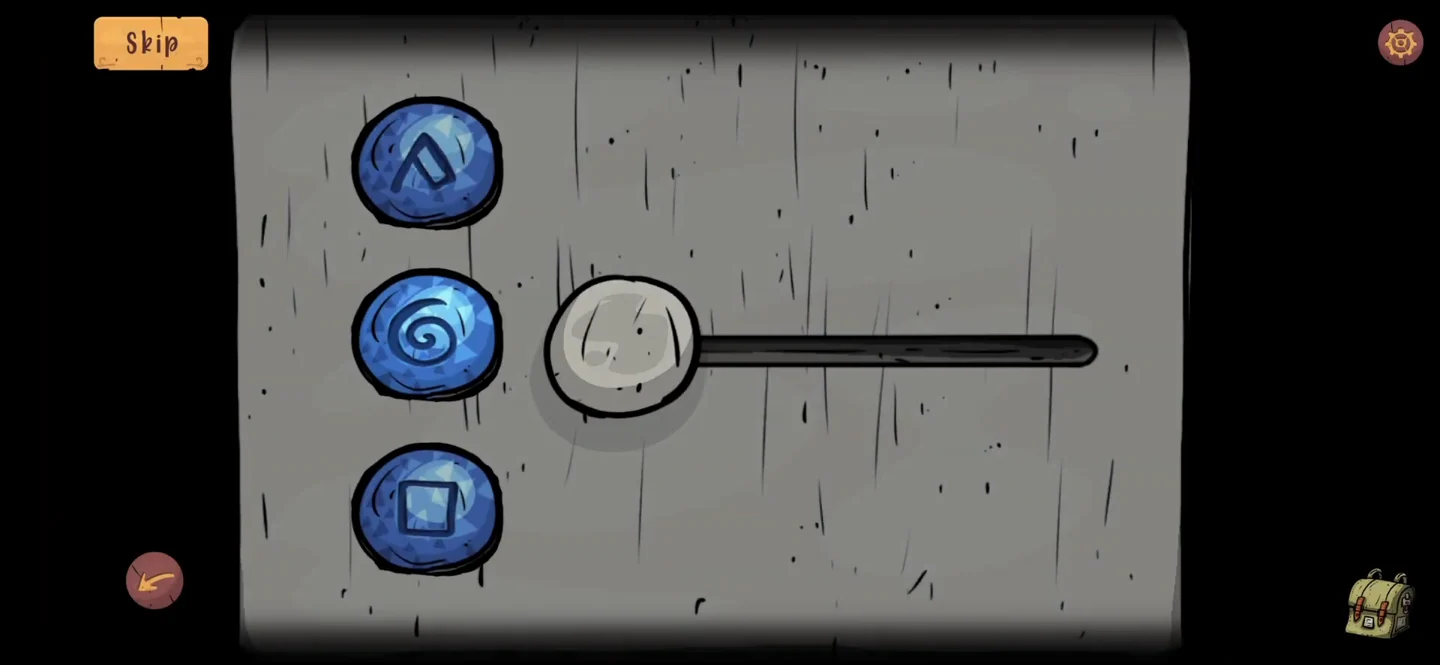
The tall metal locker in the study takes the three blue discs and hides a floor hatch puzzle.
- In the study, first pick up the round wooden dial piece at the end of the coiled black cable on the board in the lower left corner of the floor. Insert the three blue discs into the lower panel of the tall metal locker in the study. Tap a disc to change its symbol; each tap moves it to the next symbol in the order chevron, spiral, square. Set them from top to bottom to match the note by the teal vase: spiral, square and chevron. The slider then moves across by itself.
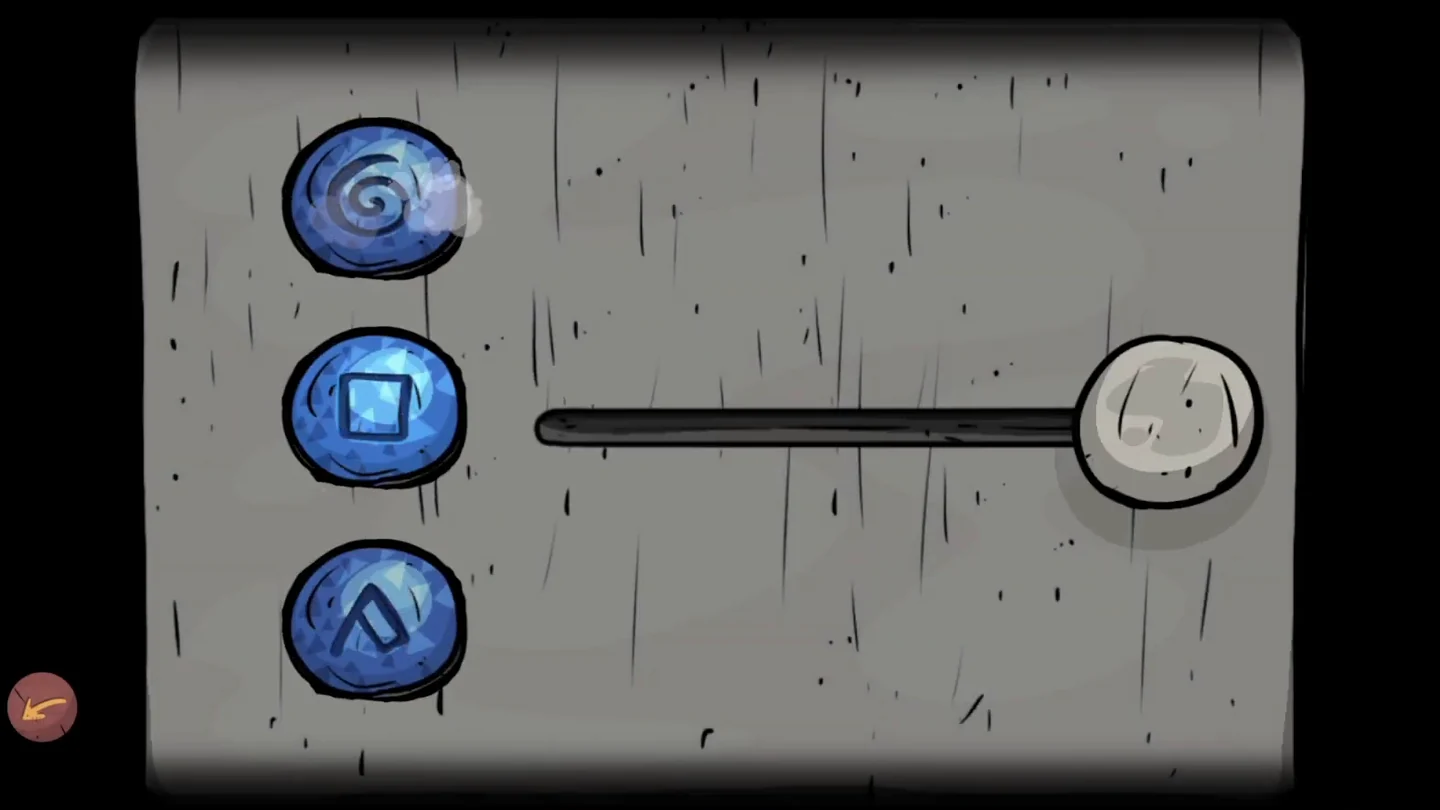
The disc settings that move the slider. - Tap the round hatch in the floor. Slide the symbols along the lines into the arrangement shown here, which leaves the centre empty. Then tap the lower locker door with the three blue discs and slider and take the mirror shard inside.
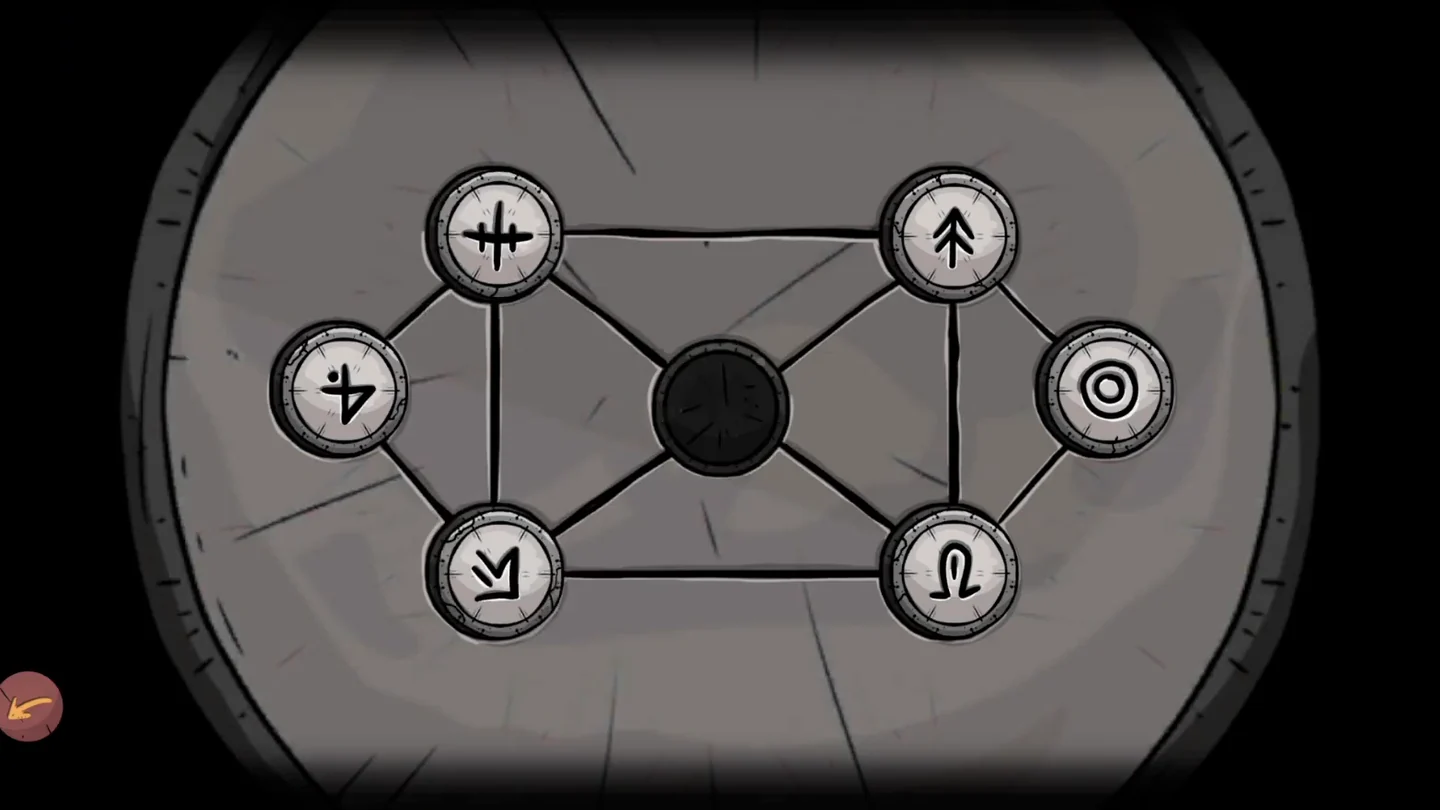
The finished floor hatch arrangement.
Colour Wheel and Bedroom Cabinet
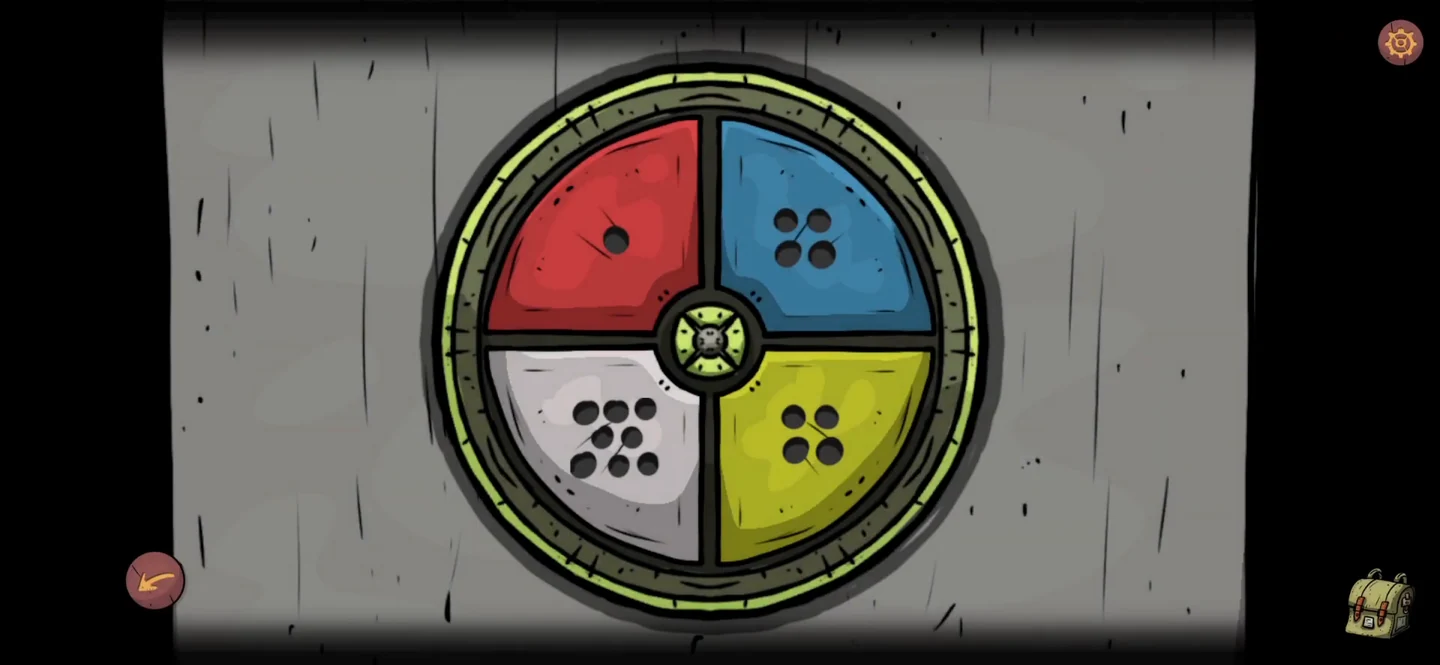
Two more locks give you the last battery and the scroll for the desk safe.
- In the clock room, tap the colour wheel on the cabinet. Each tap on a colour adds a hole to that section. Two clues work together: the green paper with a 2 x 2 grid of numbers in the bedroom, and the small framed picture of four coloured squares on the study wall. Match each number to the square in the same position: blue 6, white 5, yellow 7 and red 8. Set the wheel to those counts. The cabinet opens: take the blue battery.
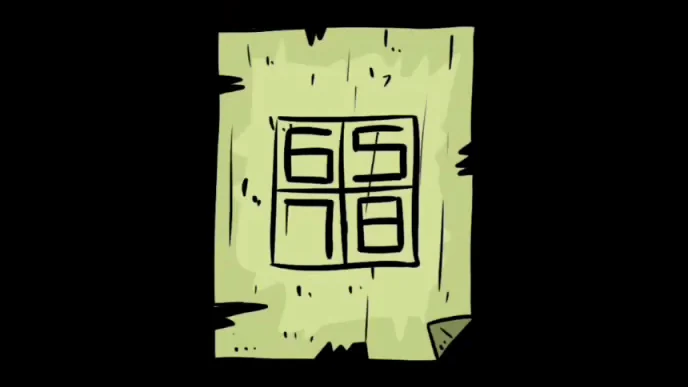
The green number paper in the bedroom. 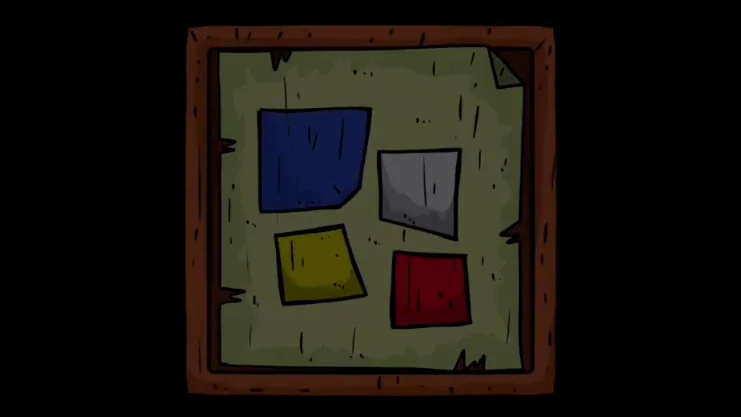
The coloured squares on the study wall. 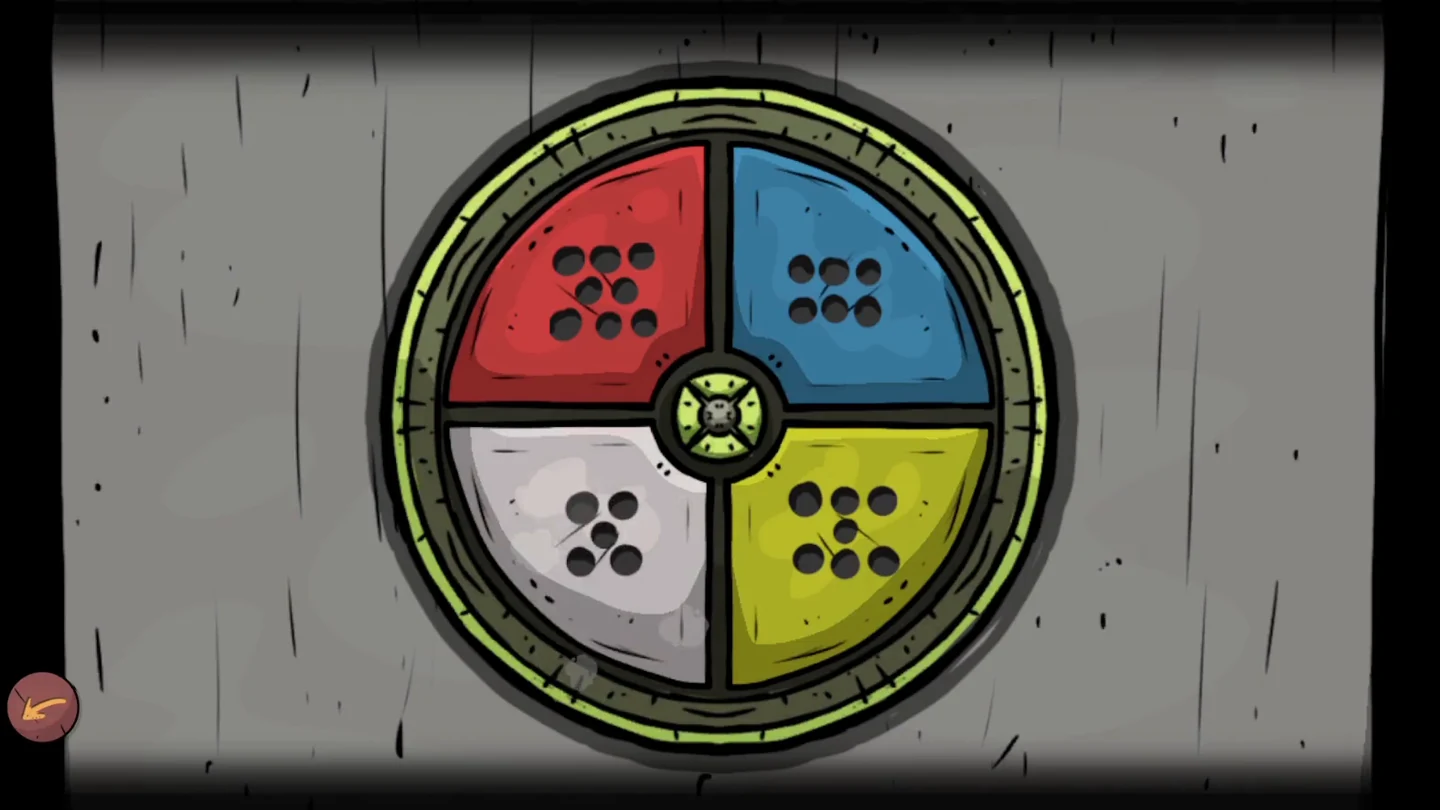
The finished colour wheel. - In the bedroom, put the round dial piece into the lower cabinet. Seven symbols run along the top, with four pointers marked I to IV below them. Use the four symbols from behind the dotted curtain, read from left to right: slide pointer I under the first symbol, II under the second, III under the third and IV under the fourth. Counting the top symbols from the left, this puts I under the 3rd, II under the 1st, III under the 6th and IV under the 7th. Take the rolled scroll.
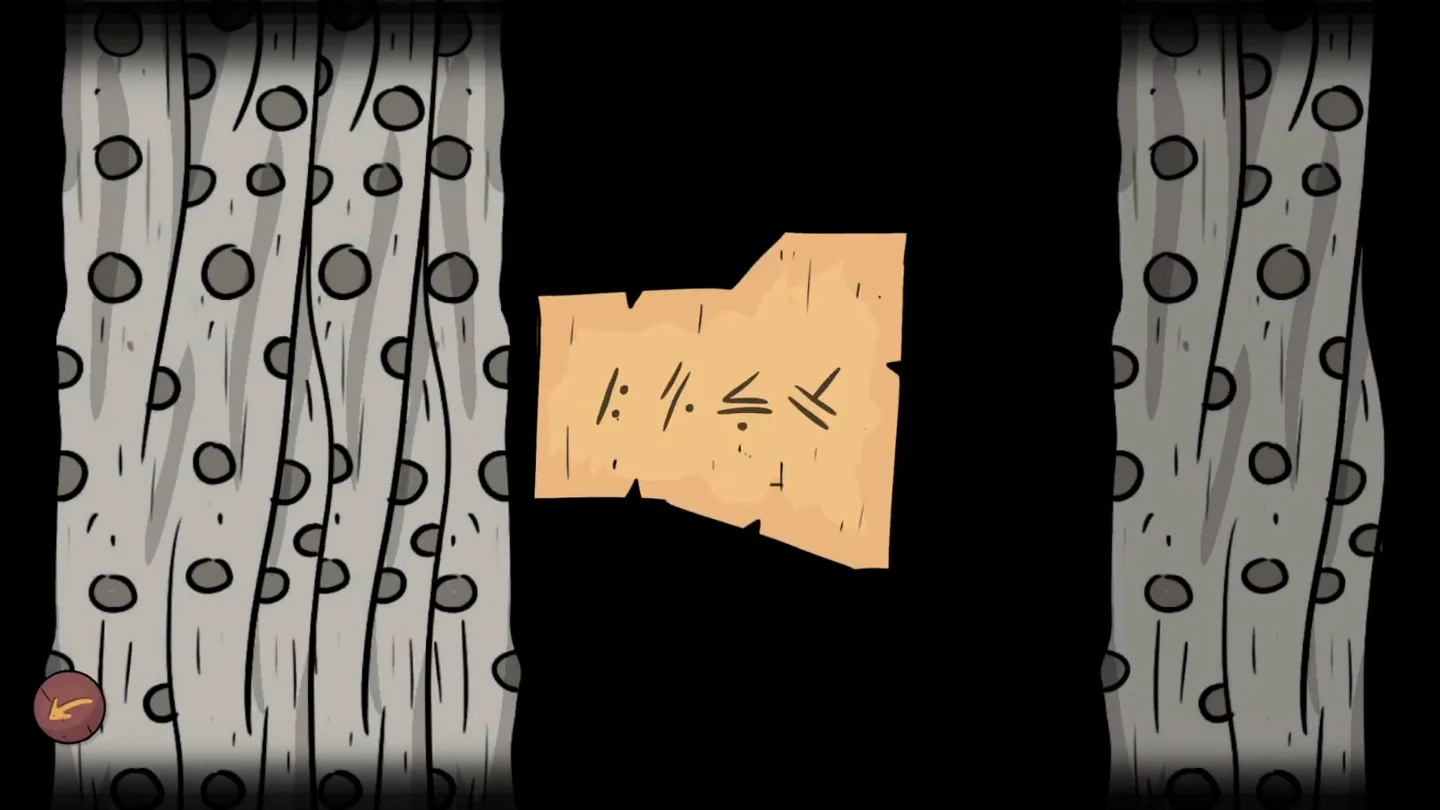
The curtain paper. Read its four symbols from left to right. 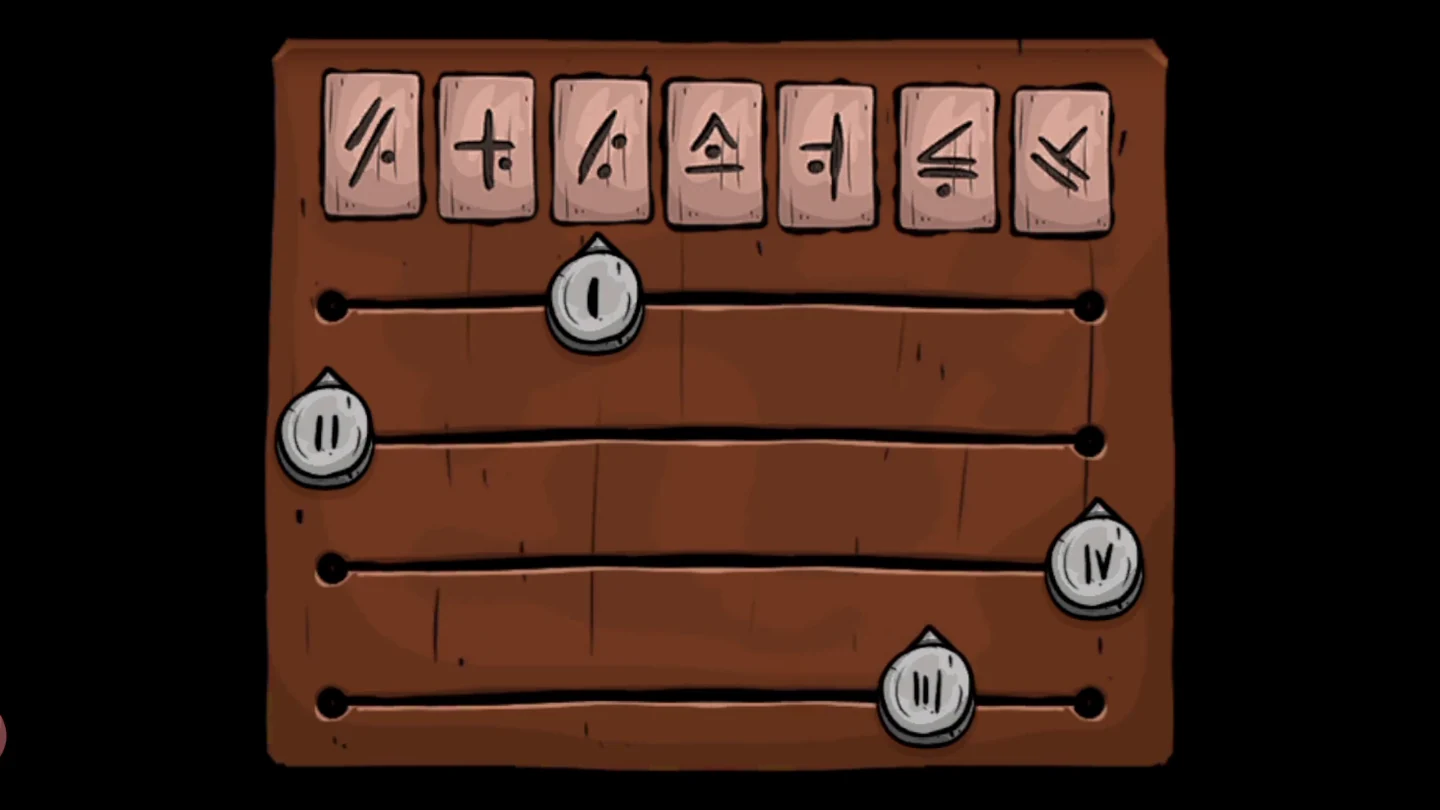
The finished pointer positions.
Mirror Safe
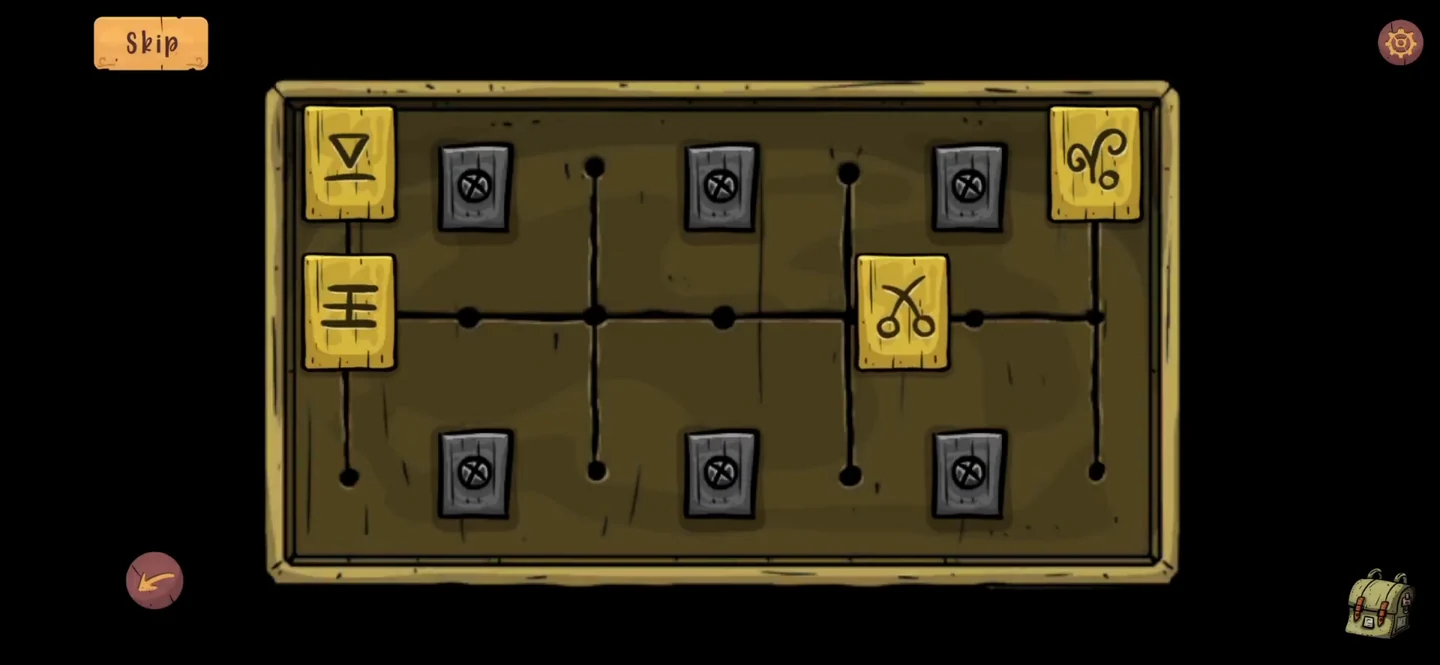
The broken oval mirror in the bedroom hides a sliding tile safe.
- Fit the three mirror shards into the broken oval mirror in the bedroom: the shard from the broken planks in the clock room, the shard from the lower locker door with the three blue discs and slider, and a third shard from the teal vase in the study’s left corner. Once the last shard is in, a safe appears in the mirror.
- Slide the four symbol tiles along the tracks so the bottom row matches the paper from the sudoku: scissors, curl, triple bar and triangle. Take the screwdriver.
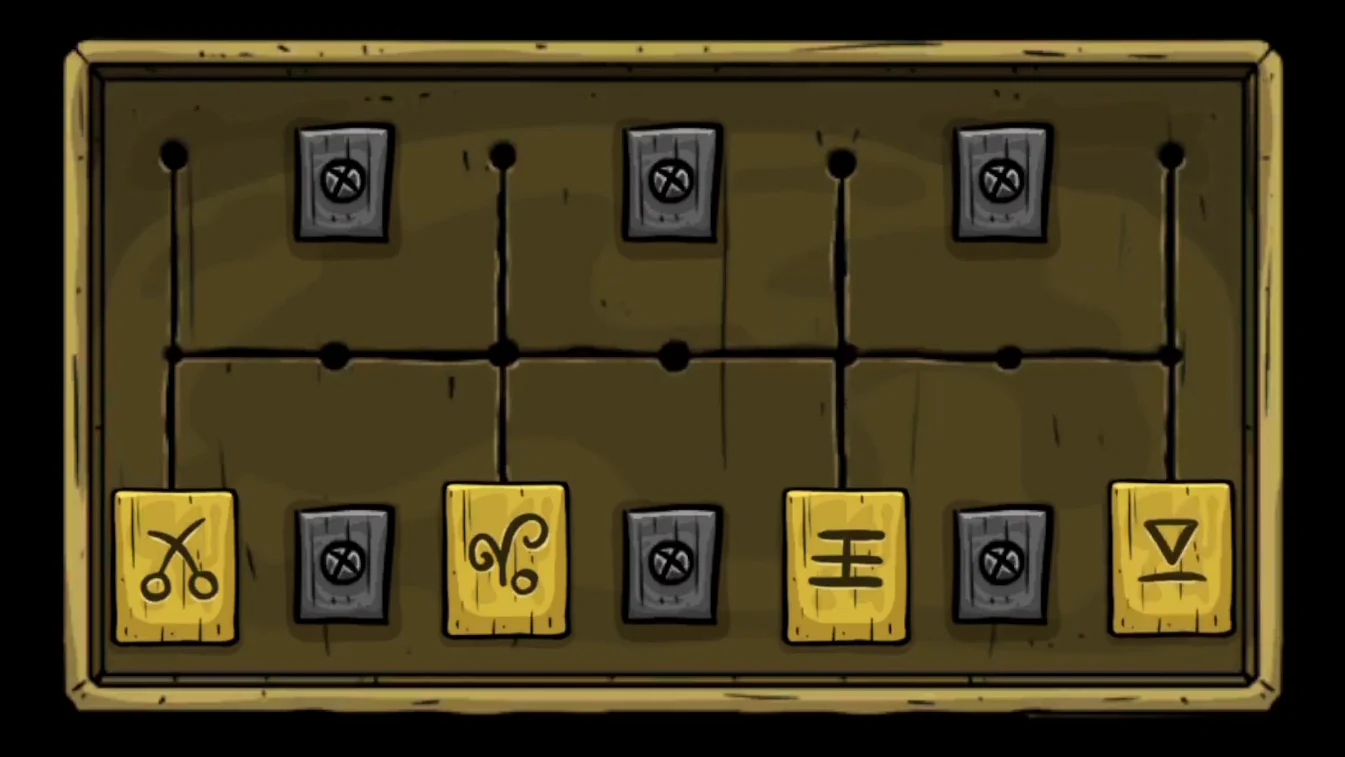
The finished mirror safe.
Grandfather Clock
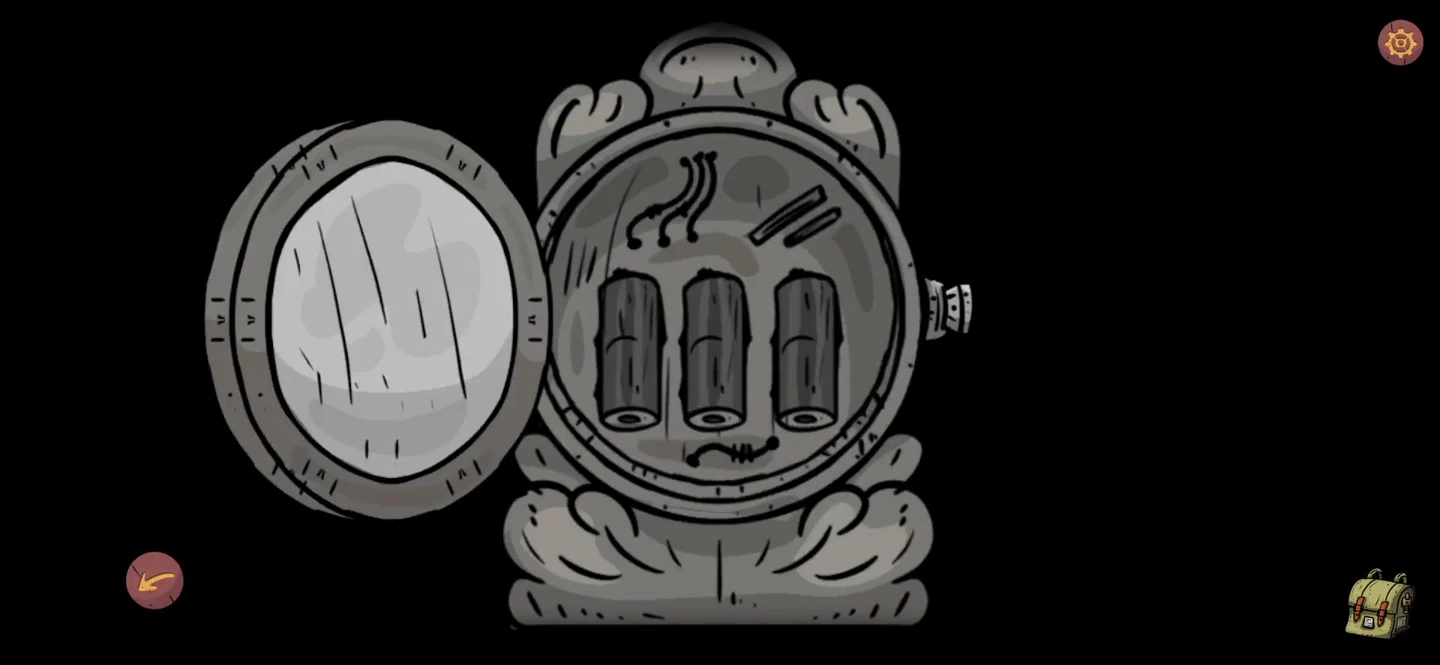
With the screwdriver and all three batteries, you can set the grandfather clock.
- Open the face of the grandfather clock with the screwdriver and insert the three blue batteries. The completed eye-and-moon picture in the study floor frame is the clue for the time. Set the hands to 7:15: the hour hand on 7 and the minute hand on 3. The lower compartment opens: take the scissors.CODE7:15
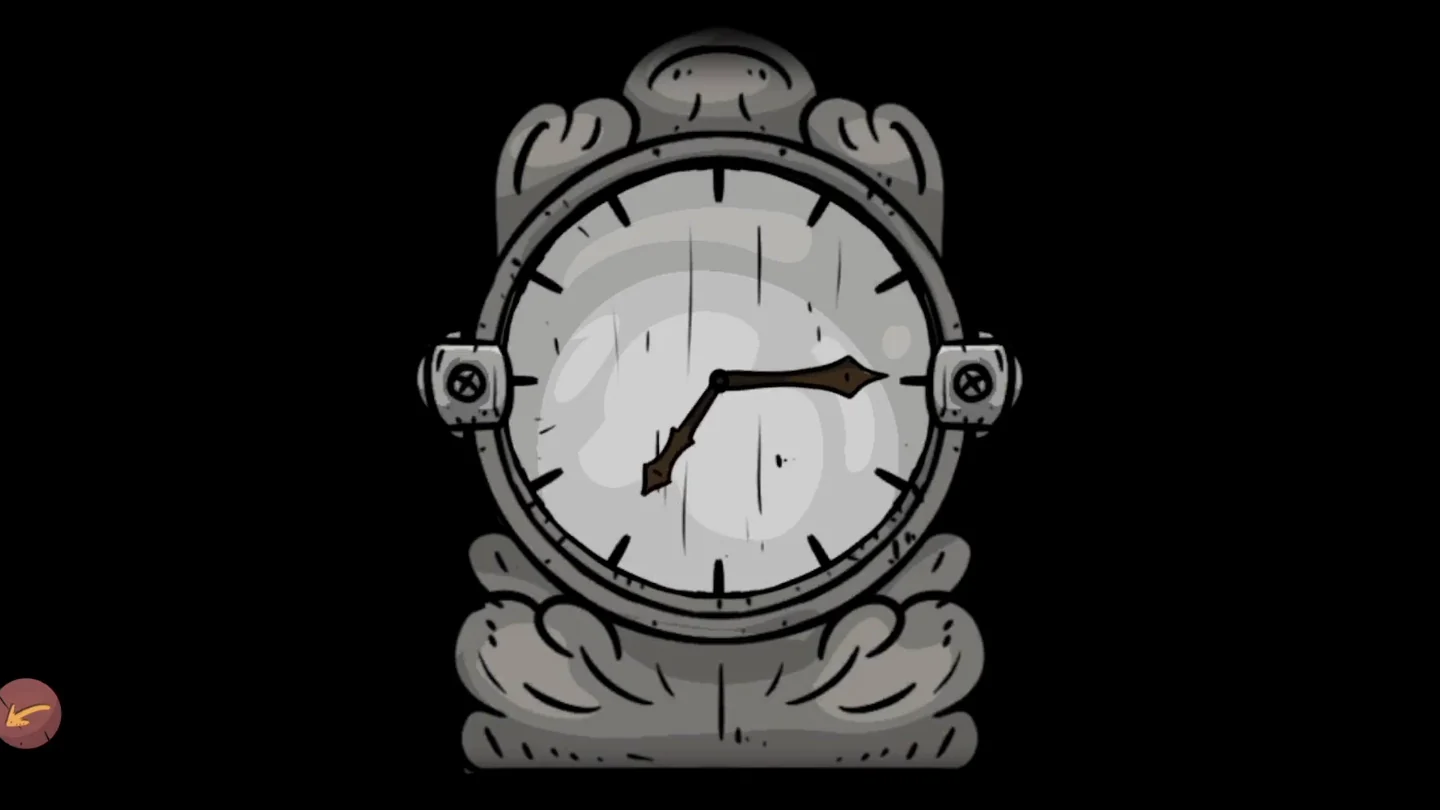
The clock set to 7:15.
Paint Cans and the Desk Safe
The last two puzzles are both in the study. Opening the desk safe reveals the truth.
- Use the scissors to cut the cobwebs and cords covering the safe on the study desk.
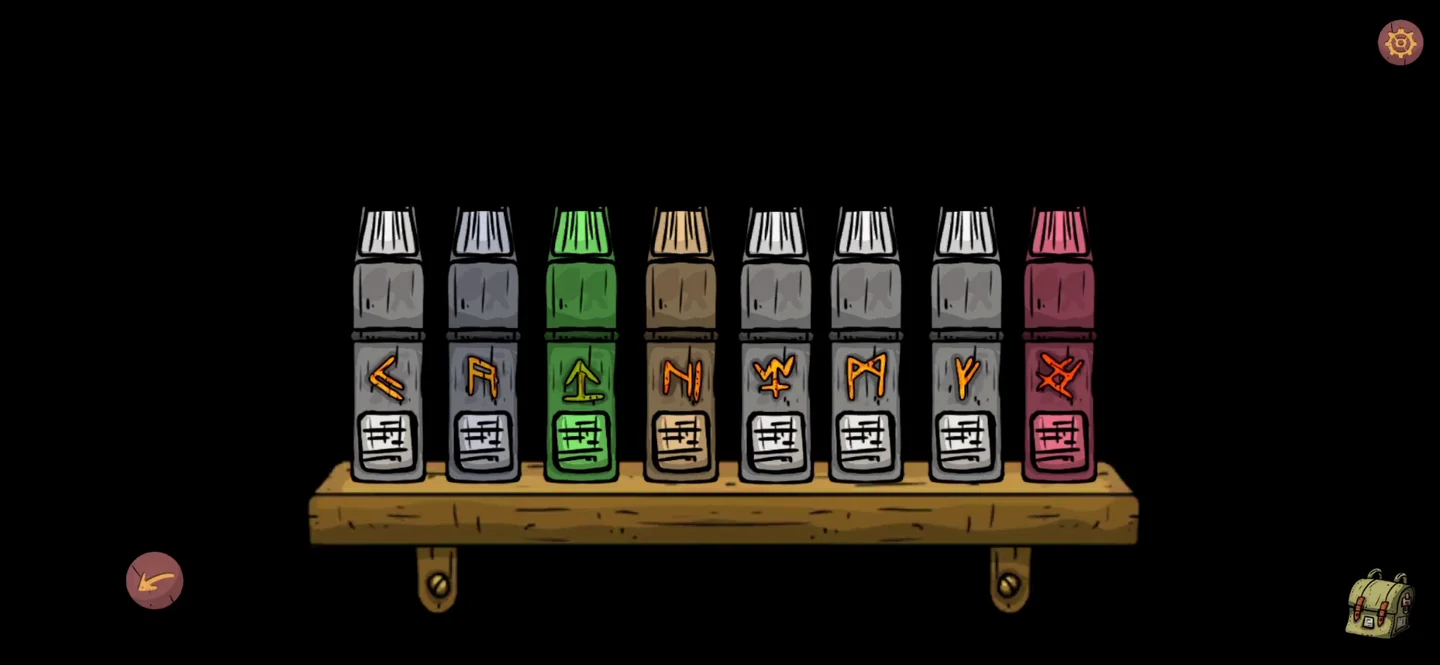
- Once the brown book is in place, tap the bookshelf above the study desk to open the eight-can puzzle. Each can carries an orange symbol. Use the note with a row of symbols from the bedroom number box. Drag a can to a new position; the cans in between shift along. Arrange the cans so their symbols follow the note’s order. In the finished shelf the three leftmost cans are a grey can with a Y-like symbol, a tan can with an N-like symbol and a grey can with an angled chevron. A wooden wedge drops onto the shelf: take it.
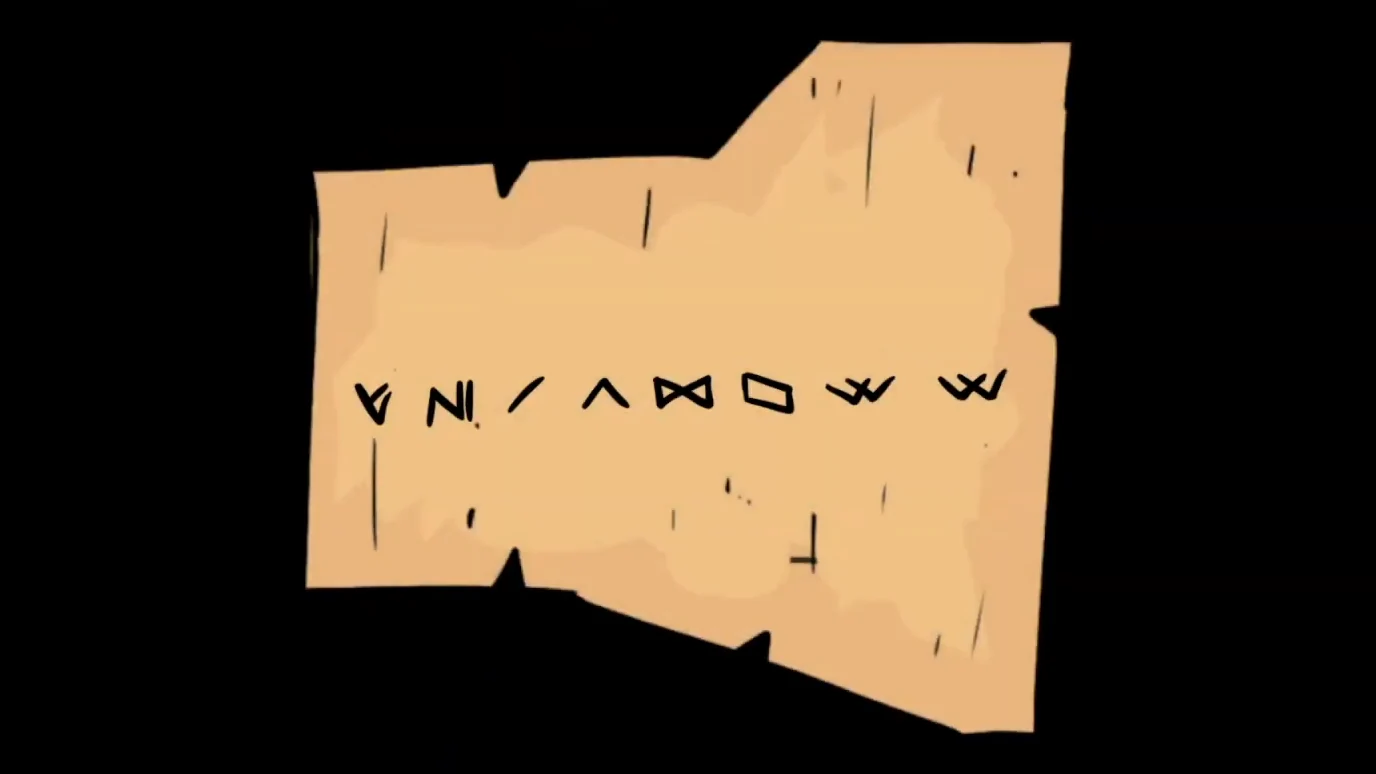
The symbol note from the number box gives the can order. 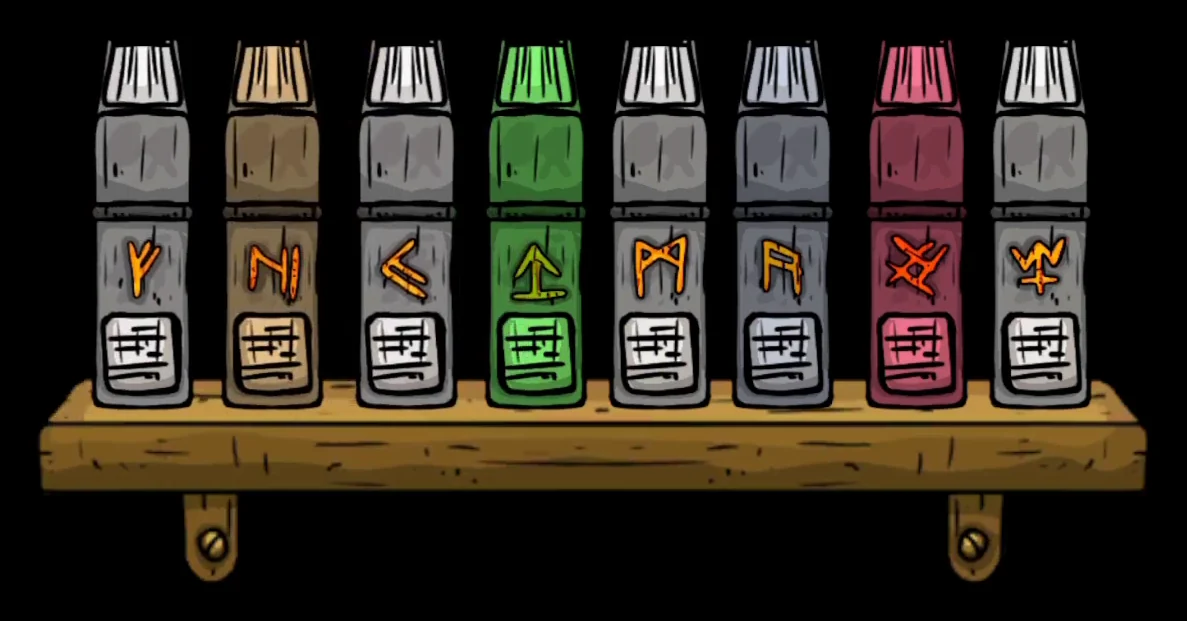
The finished can order. - Put the wedge into the empty slot of the round desk safe. The rolled scroll from the bedroom cabinet pairs each symbol on the outer ring with one inner symbol. Move the inner wedges around the dial until each wedge sits next to its paired outer symbol; a wedge lights up yellow when it is in the right place. When all seven are lit, the safe opens. Tap the medical folder inside to start the ending.
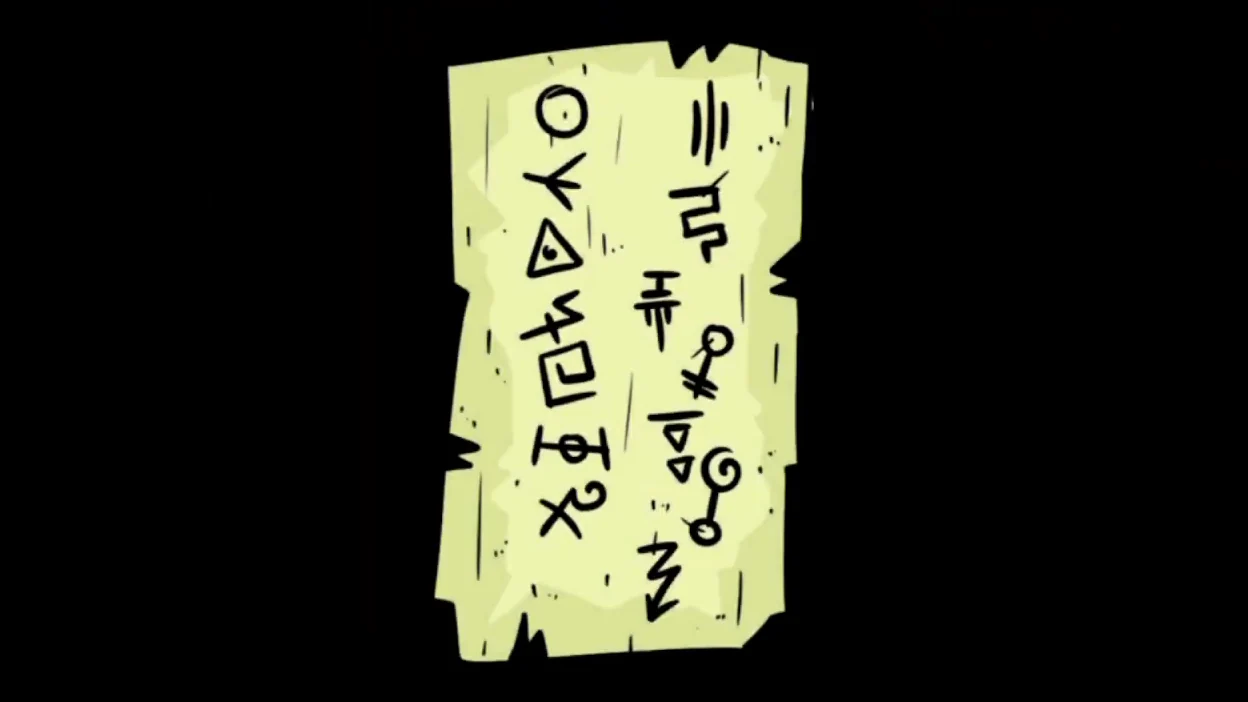
The scroll from the bedroom cabinet. 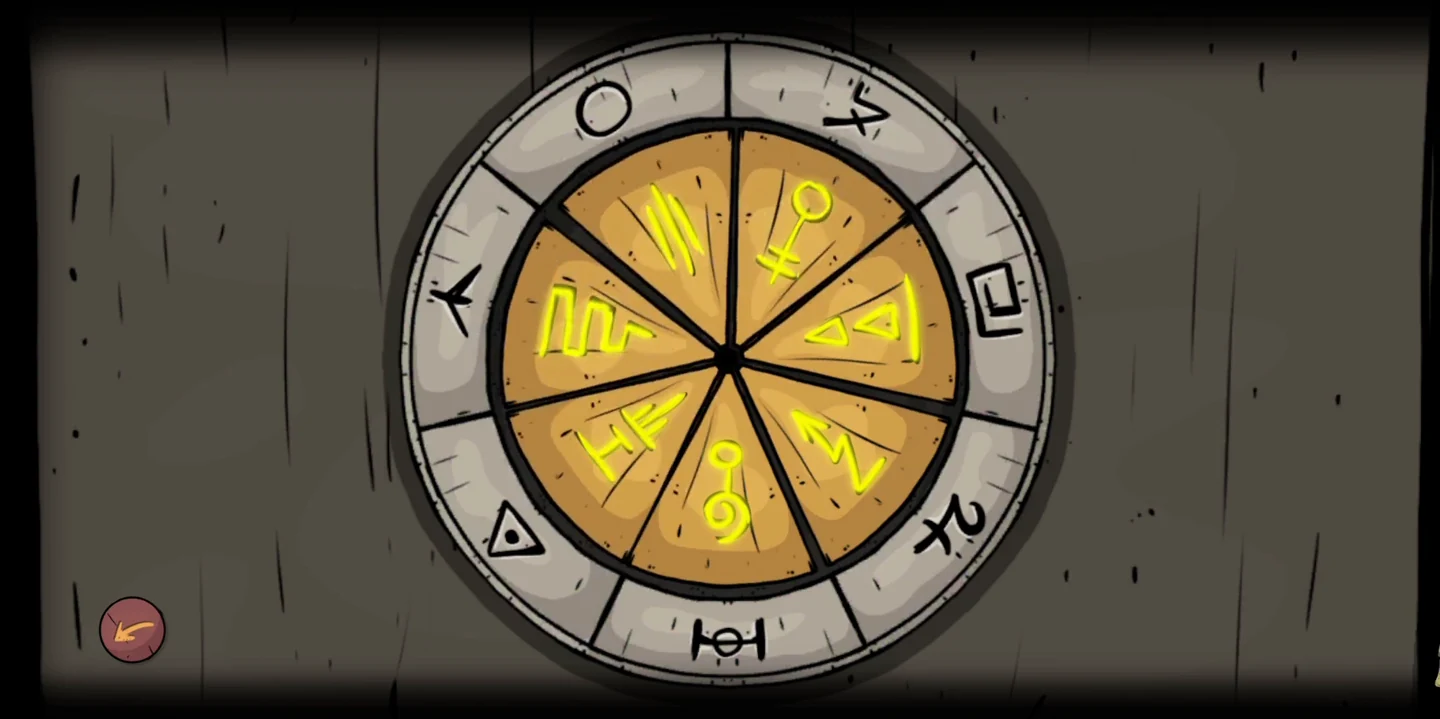
The finished desk safe.
The Truth
The final scenes play once the desk safe is open.
- Read the hospital file and listen to the recording to finish the story. The Thank You screen appears with buttons for the main menu, bug report and more games. There are no extra chapters after the ending.