Front Yard: Barrel Lock and Iron Gate
Chapter 2 opens in the yard outside the house and spreads across three outdoor areas: the front yard, the greenhouse beyond the iron gate and the garden path through the arched door. Expect to go back and forth between them.
- In the front yard, pick up the paper lying by the cart wheel next to the round table. It shows three coloured bars with arrows to Roman numerals. The two arrows cross: the purple bar points to III and the yellow bar points to VI, while the red bar is V. Note the symbol board on the round table, which you will solve later.
- Pick up the pipe handle lying on the ground by the pale plant just to the right of the round table.
- By the doghouse, read the paper that numbers four sea symbols: scallop 1, fish 2, snail shell 3, starfish 4.
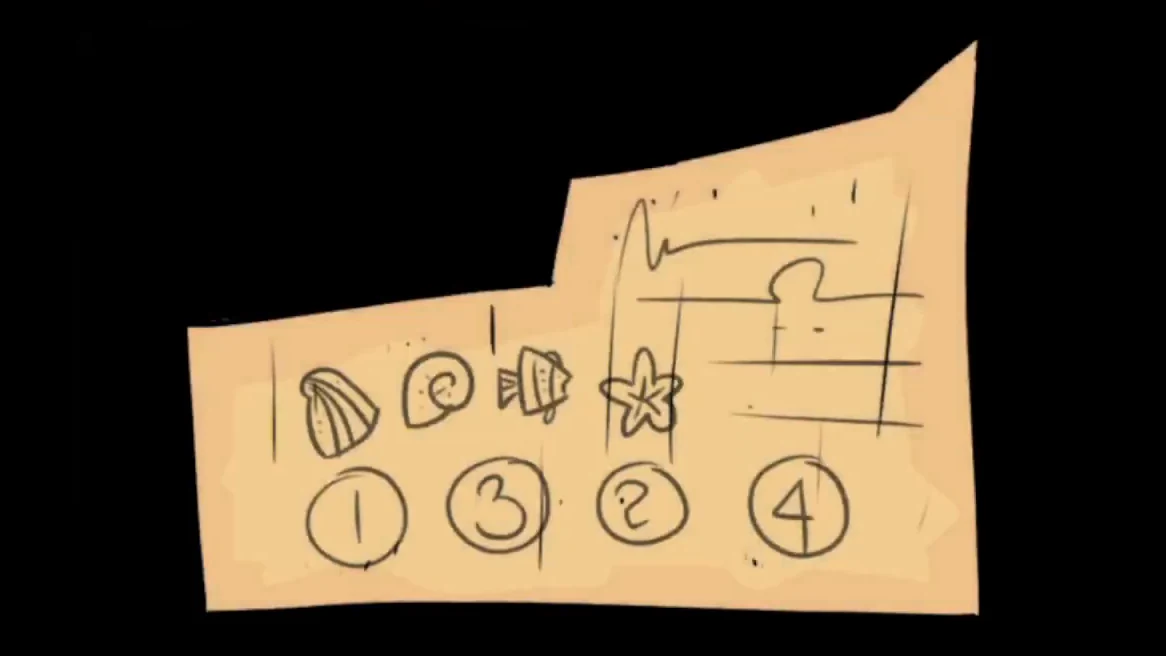
The doghouse paper gives the order of the sea symbols. - Tap the bushes in the upper right corner and clear the leaves to find a paper with a row of slots.
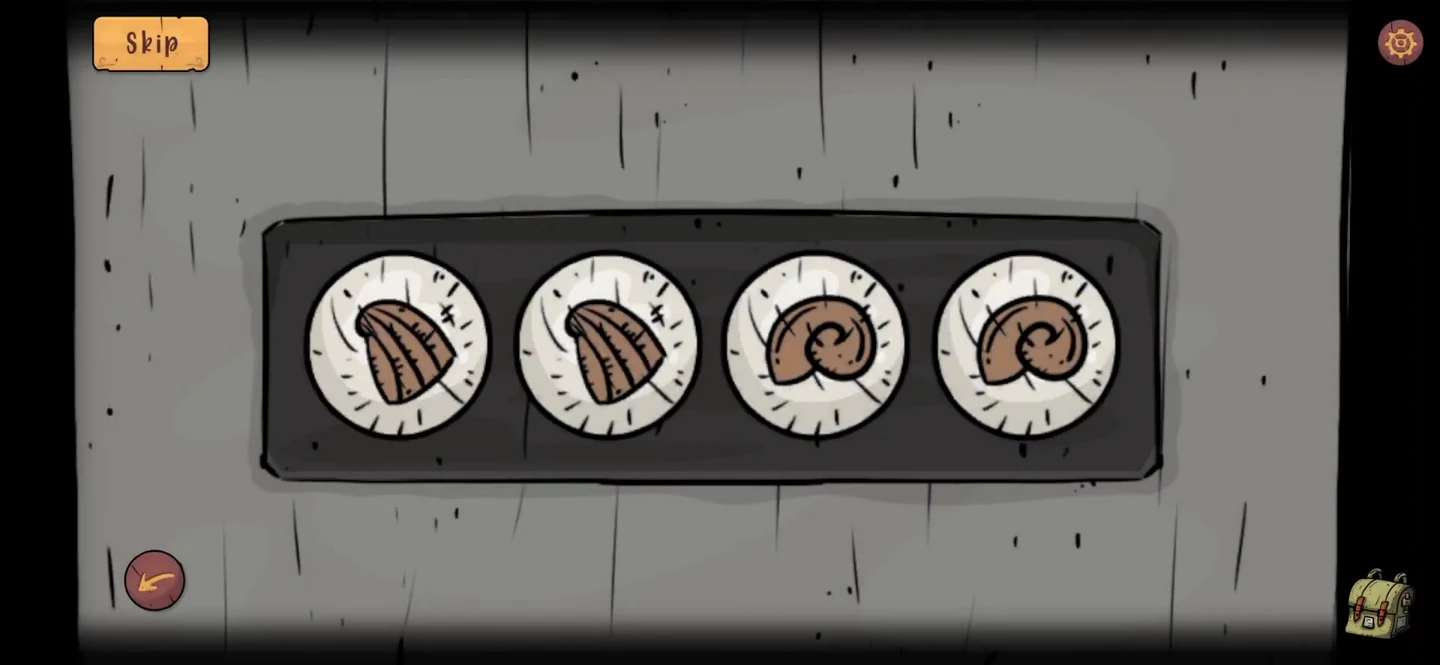
- Open the four-dial padlock on the small barrel by the woodpile. Set the dials to scallop, fish, snail shell, starfish. Take the key from the barrel.
- Unlock the iron gate with the key. Before going through, tap the doghouse to the left of the gate and read the paper pinned at the top left of the maze screen. Note the five small flowers along the bottom of the drawing for a later puzzle. Close the maze and go through the gate into the greenhouse. Return to the doghouse once you find the second pipe handle.
Greenhouse: Mailbox and Fuse Box
Beyond the iron gate is the greenhouse. Pick up the tools here first, then open the mailbox and restore the power to the arched door.
- Open the middle door of the tall wooden cupboard on the left and take the pruning shears. The top door of the same cupboard has a keyhole; you will open it later.
- Take the small knife with an orange handle tucked behind the back wheel of the wooden cart in the greenhouse.
- Search the plants beside the arched door to find a paper showing five sliders and an arrow pointing left.
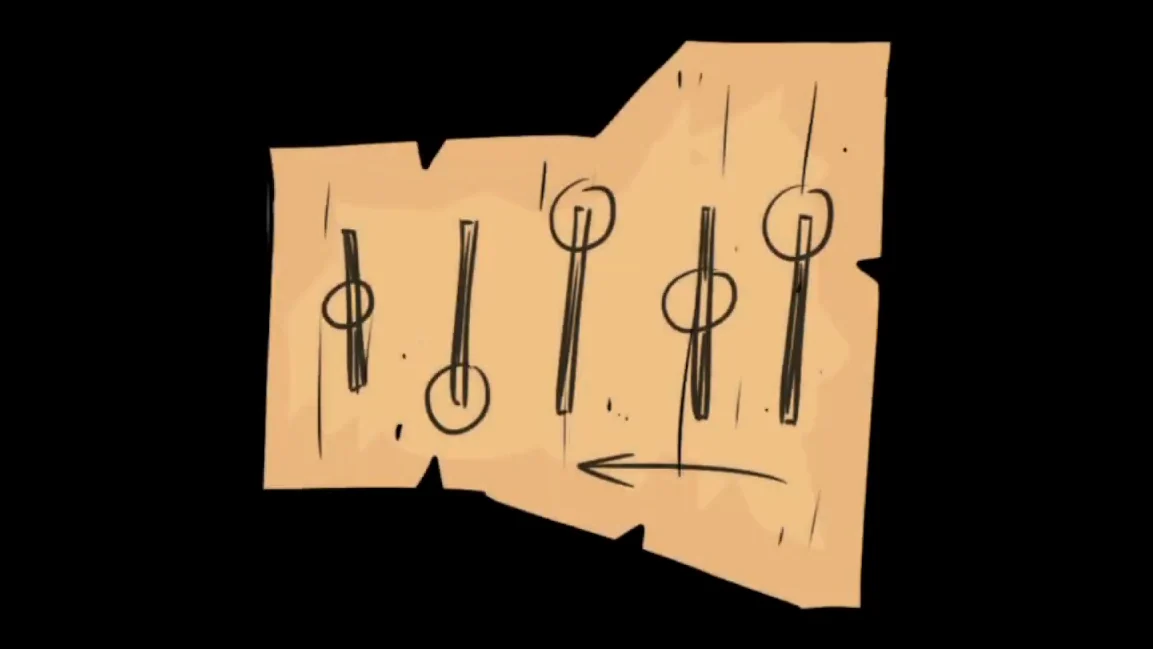
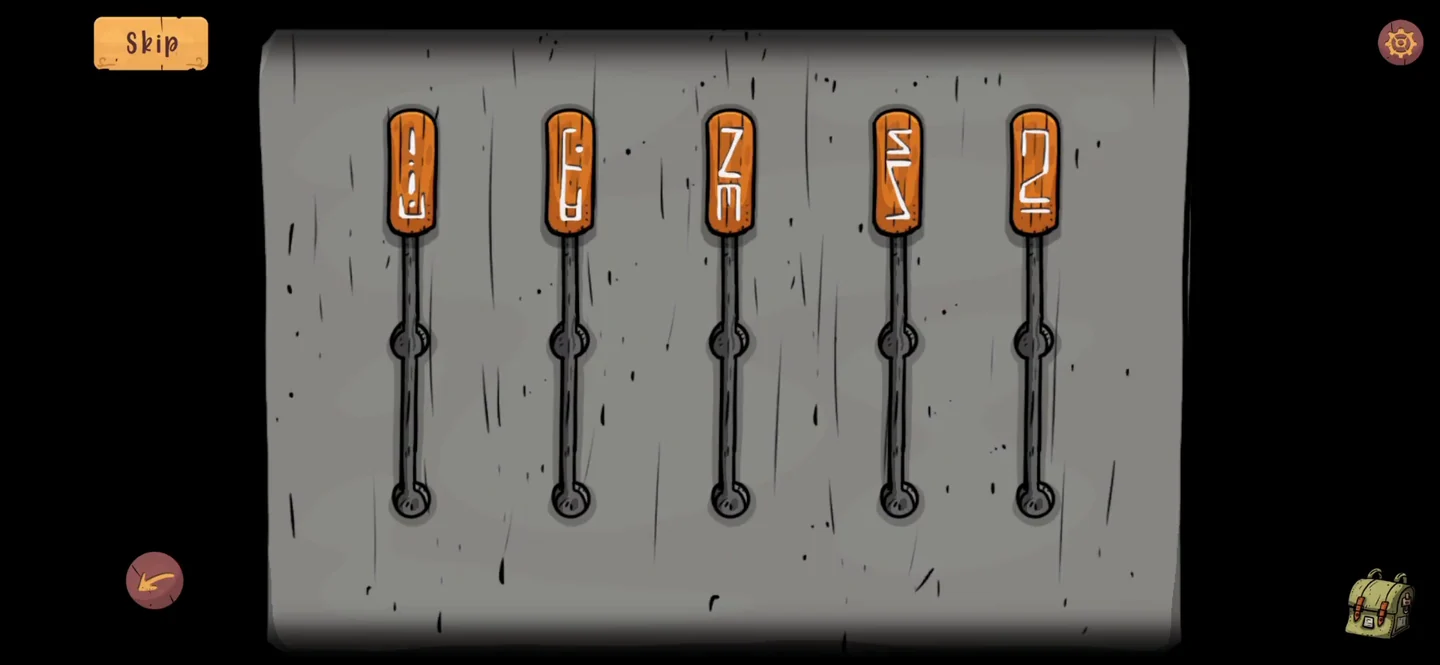
The slider paper. The arrow means it is read from right to left. - Open the red mailbox on the post. The arrow tells you to read the paper from right to left, so set the mailbox sliders to the paper’s slider heights in reverse order. The paper reads middle, bottom, top, middle, top, so the sliders go top, middle, top, bottom, middle from left to right. Take the key.
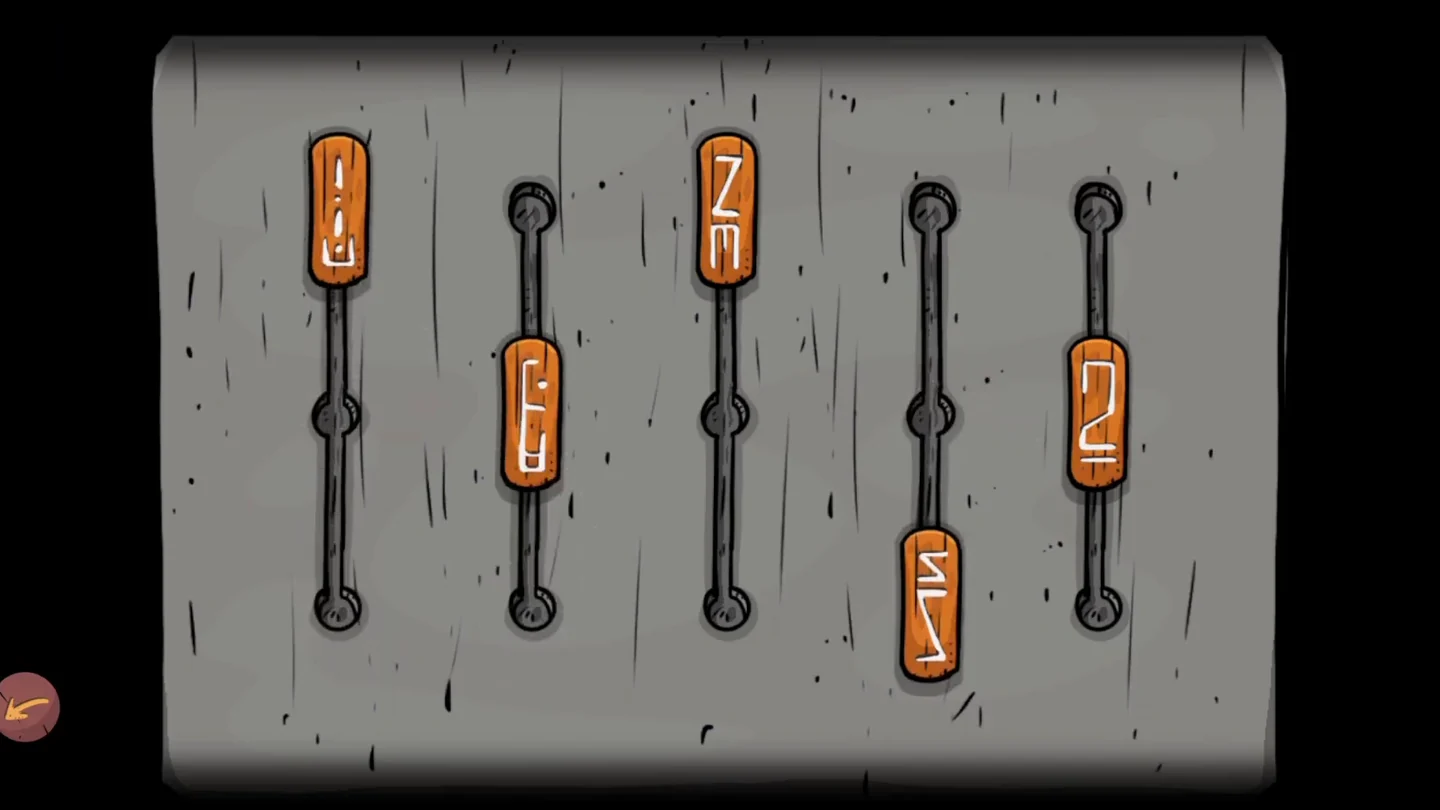
The solution for the paper shown above. - Unlock the grey fuse box beside the arched door with the key. Fit the pieces into the star shape. When the power comes on, the arched door opens.
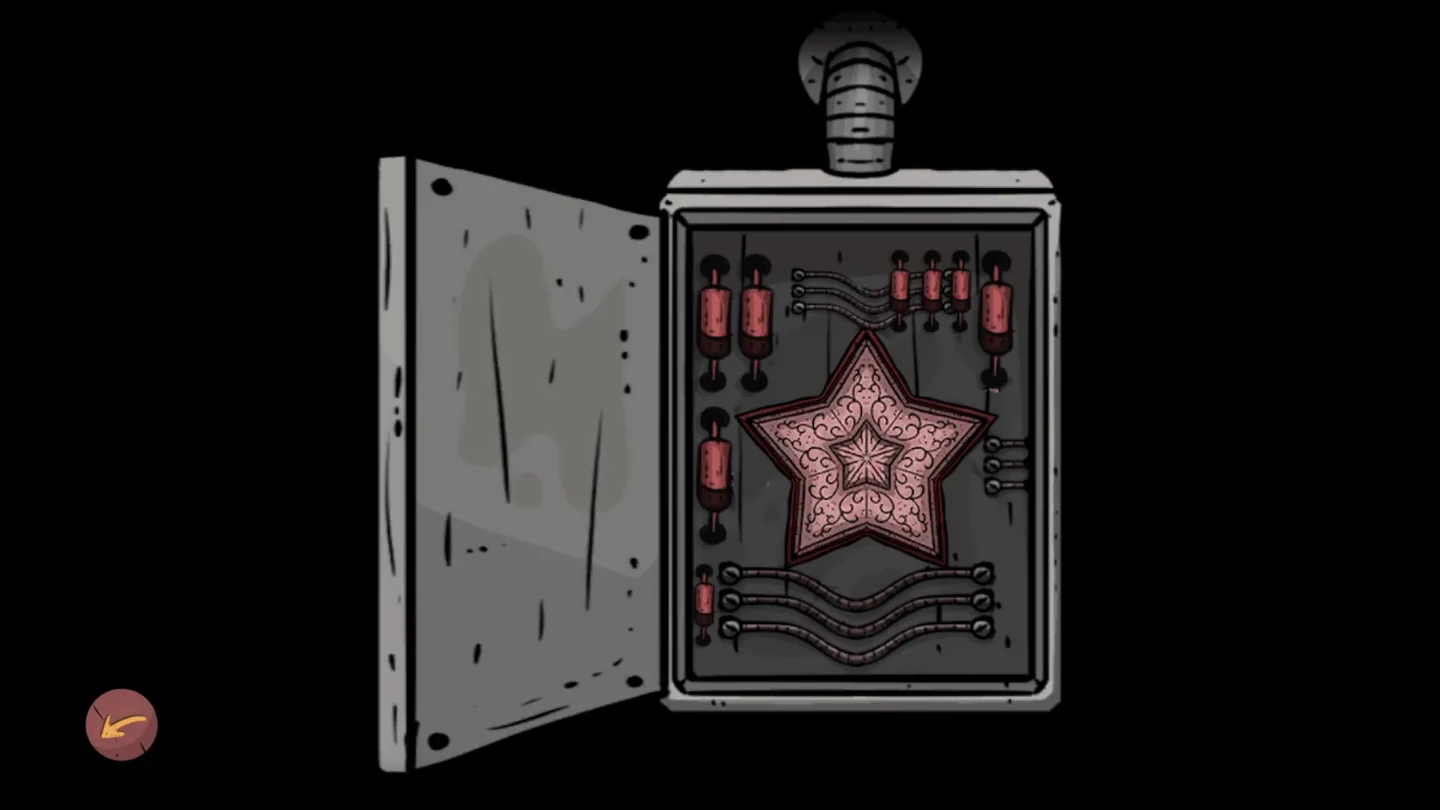
The completed star in the fuse box. - Read the two clues on the greenhouse wall: the framed paper with five flowers and -65, and the board with five round symbols and two empty circles.
Garden Path: Cellar and Clock Chest
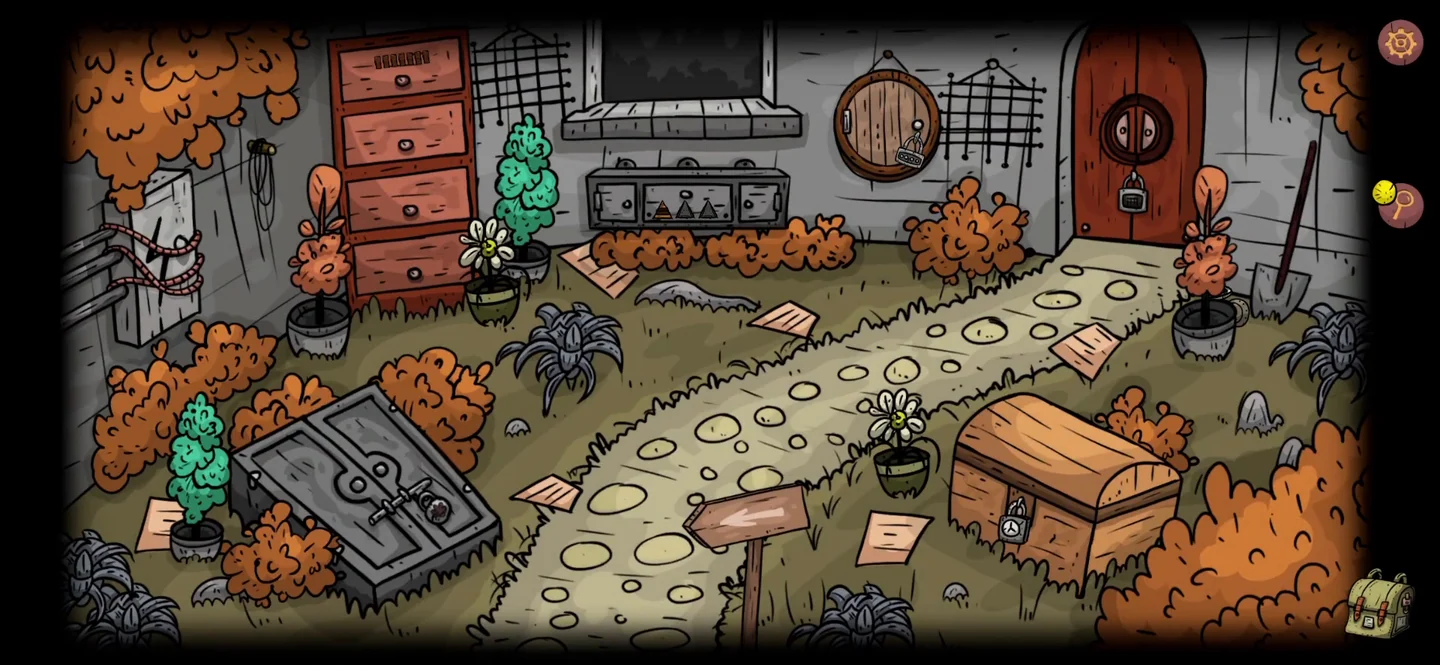
The arched door leads to the garden path, where you find several clues and the first wooden plank.
- On the garden path, pick up the paper on the stones. It shows four pairs of Roman numerals. Also pick up the paper with four square drawings near the cellar doors.
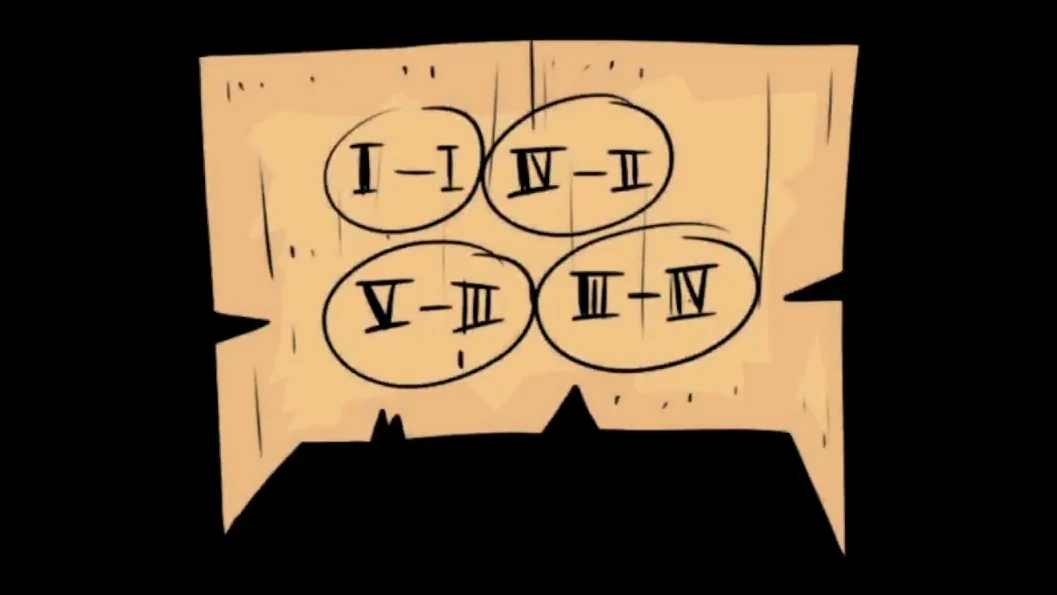
The Roman numeral pairs from the stone path: I-I, IV-II, V-III and III-IV. - Tap the sun face on the cellar doors. Its rays already point outward: tapping a ray lights it and turns the central face. Light all eight rays; the order that worked here was bottom right, left, bottom, top right, bottom left, top left, top and right. When the cellar opens, take the bent furry orange piece. Read the paper inside the cellar too: it shows which flower pattern goes in which compartment of the greenhouse block cabinet. Also check the grey plant pot by the shovel next to the red door and take the second pipe handle hidden in it.
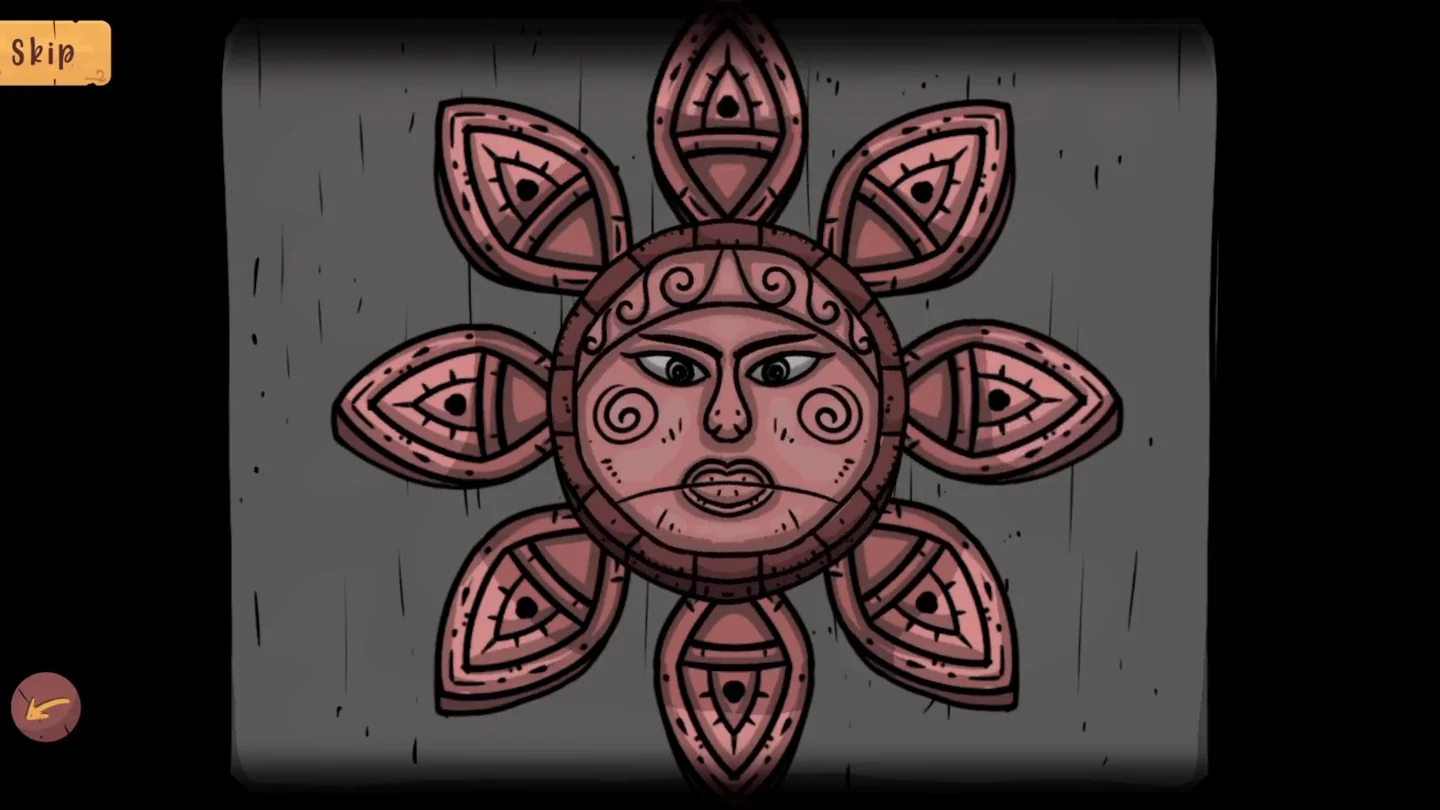
The finished sun face. - Open the bottom drawer of the tall red drawers on the garden path. Inside is a box with flowers painted on its lid, holding a clipboard with a torn map. Note the flowers on the lid too.
- Open the clock lock on the chest on the right side of the path. It has blue, red and yellow hands and the numerals I to VIII. Use the coloured-bars paper from the front yard and follow its crossing arrows: set the blue hand (the purple bar) to III, the red hand to V and the yellow hand to VI. Take the wooden plank.
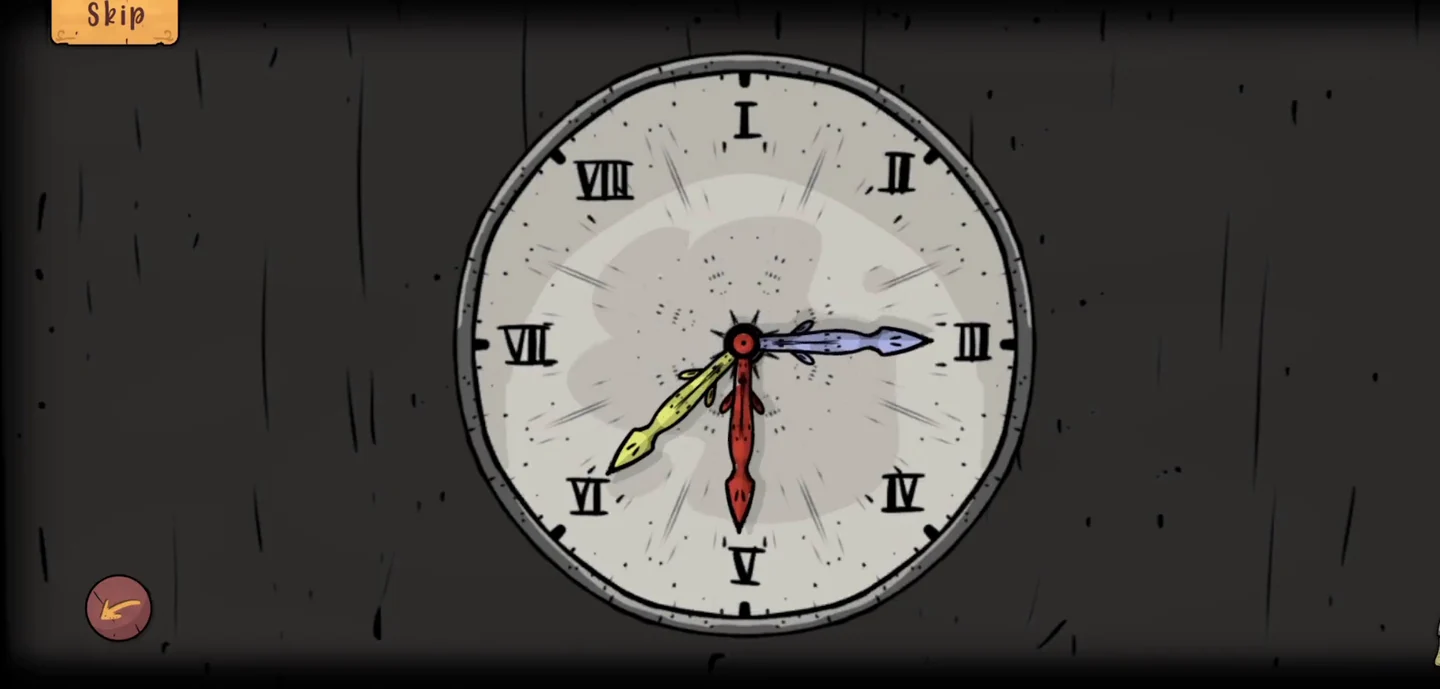
The solution: blue III, red V, yellow VI.
Greenhouse Disc Track and Birdhouse
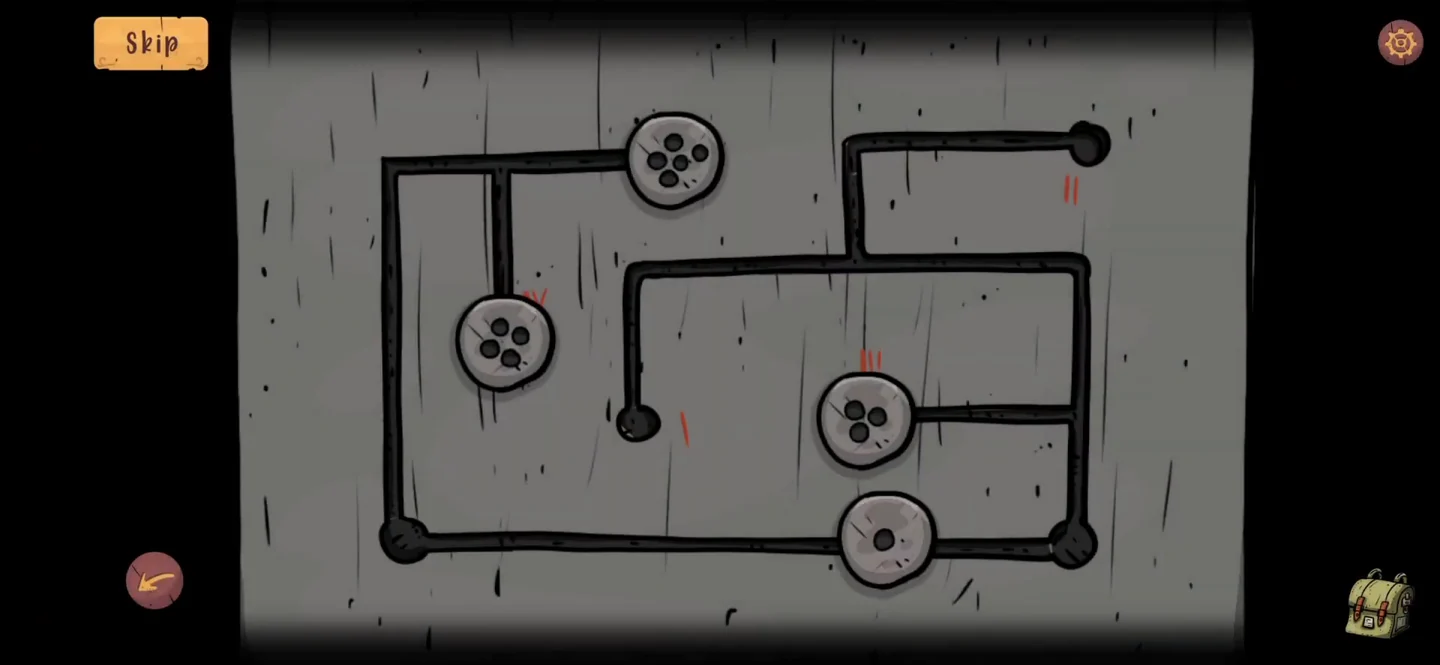
Back in the greenhouse, the stone-path pairs solve the disc track on the wall.
- Back in the greenhouse, tap the track panel on the wall. It holds four discs with different numbers of dots and four red Roman numerals beside the track ends. Use the stone-path paper with four Roman numeral pairs: the first numeral is a disc’s number of dots, and the second is the red numeral where that disc must stop. The pairs are I-I, IV-II, V-III and III-IV, so slide the 1-dot disc to I, the 4-dot disc to II, the 5-dot disc to III and the 3-dot disc to IV. The birdhouse on the greenhouse wall then opens: take the golden key from inside.
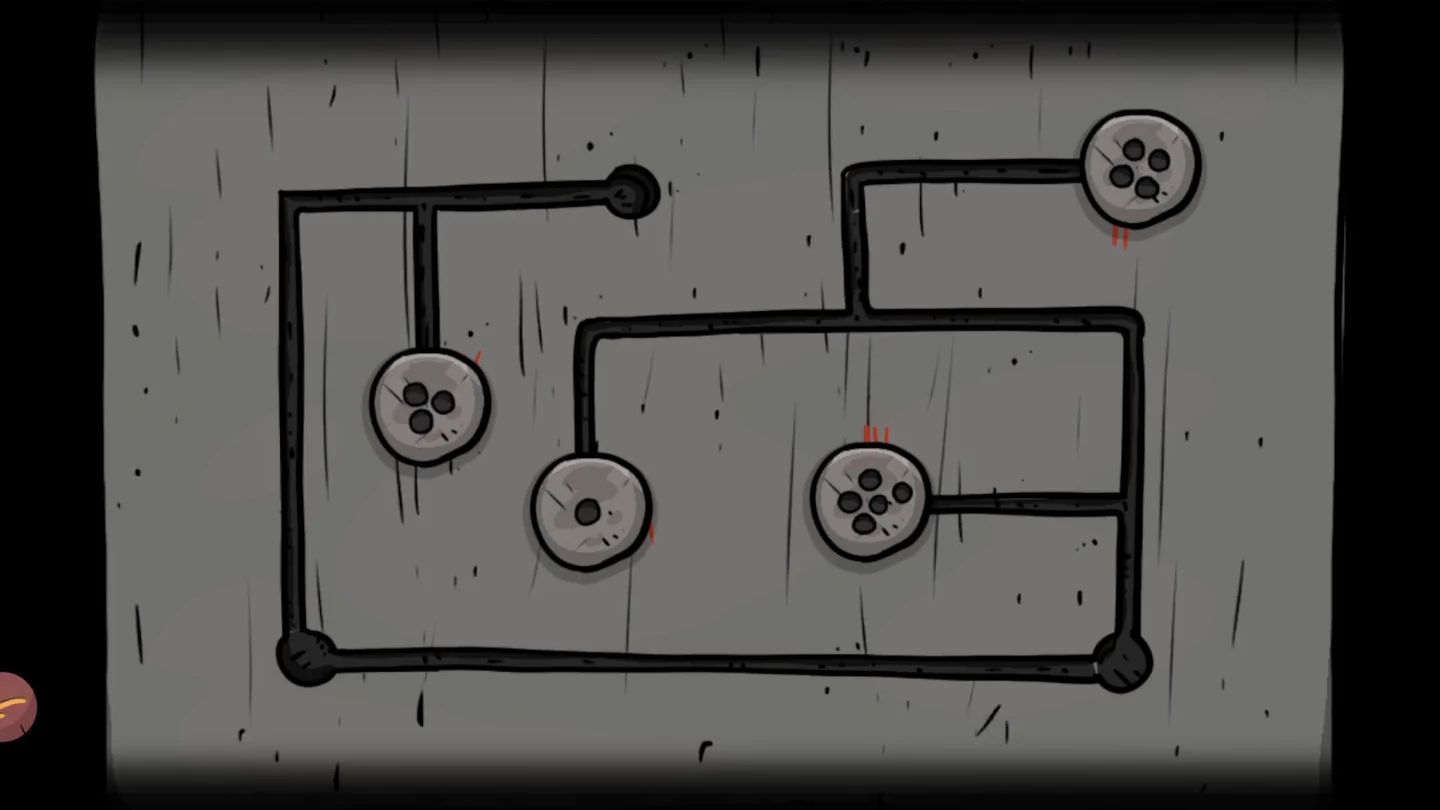
The finished track for the pairs I-I, IV-II, V-III and III-IV. - Unlock the top door of the tall left cupboard, the one with the keyhole, using the golden key. Take the torn map piece from the compartment inside.
Gate Maze and Doghouse
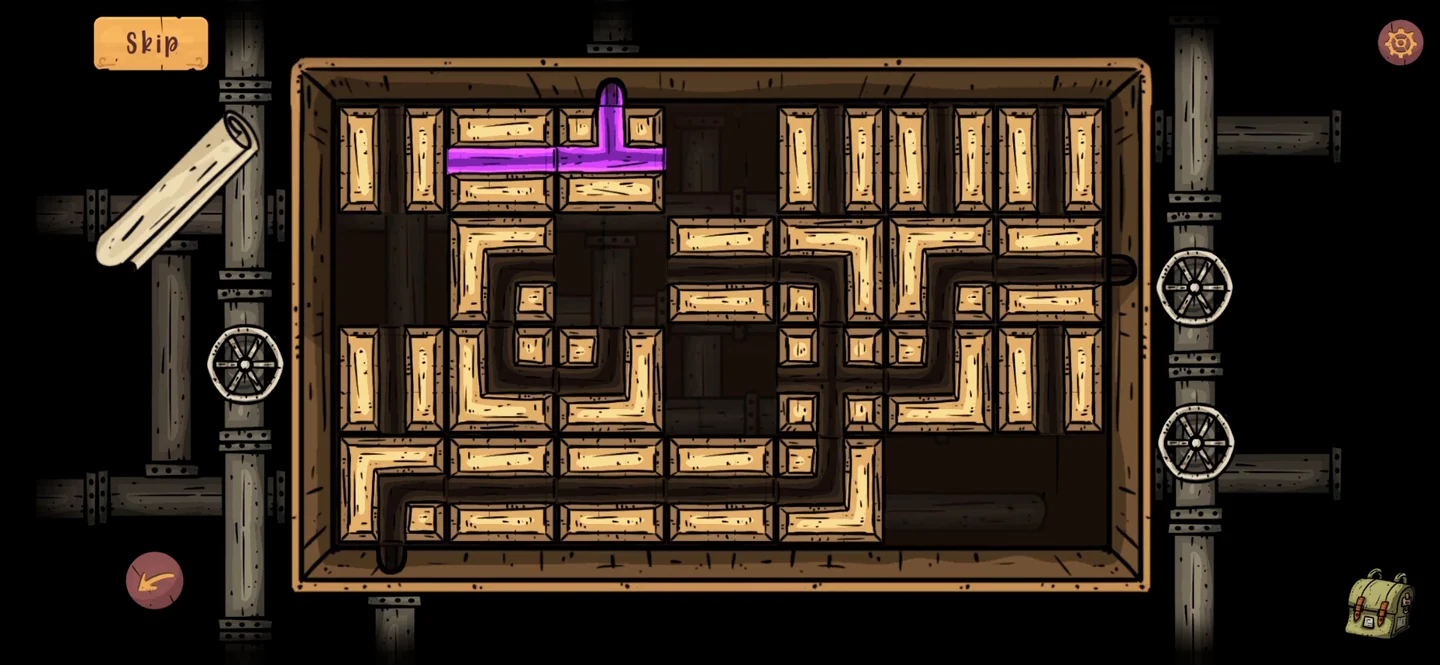
With both pipe handles, return to the doghouse to the left of the iron gate.
- Return to the doghouse to the left of the iron gate and tap it to open the maze, then attach both handles. Slide the wooden parts so the purple flow from the top inlet reaches both outlets, the one on the right side and the one at the bottom left, and then also close the small loop in the middle of the board, as in the solved picture. Lighting both outlets is not enough: the doghouse only opens once the middle loop is closed. Take the green curved piece from inside.
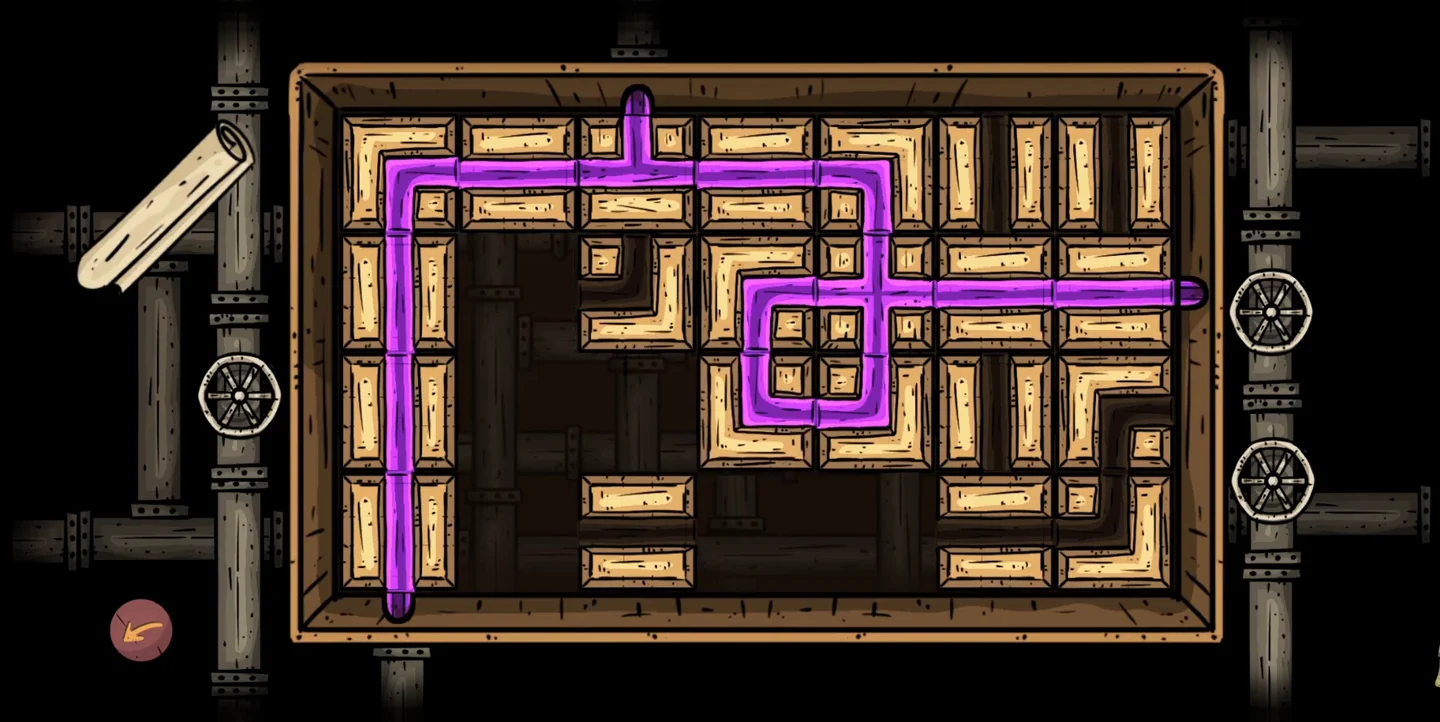
Both outlets lit and the middle loop closed.
Greenhouse Block Cabinet
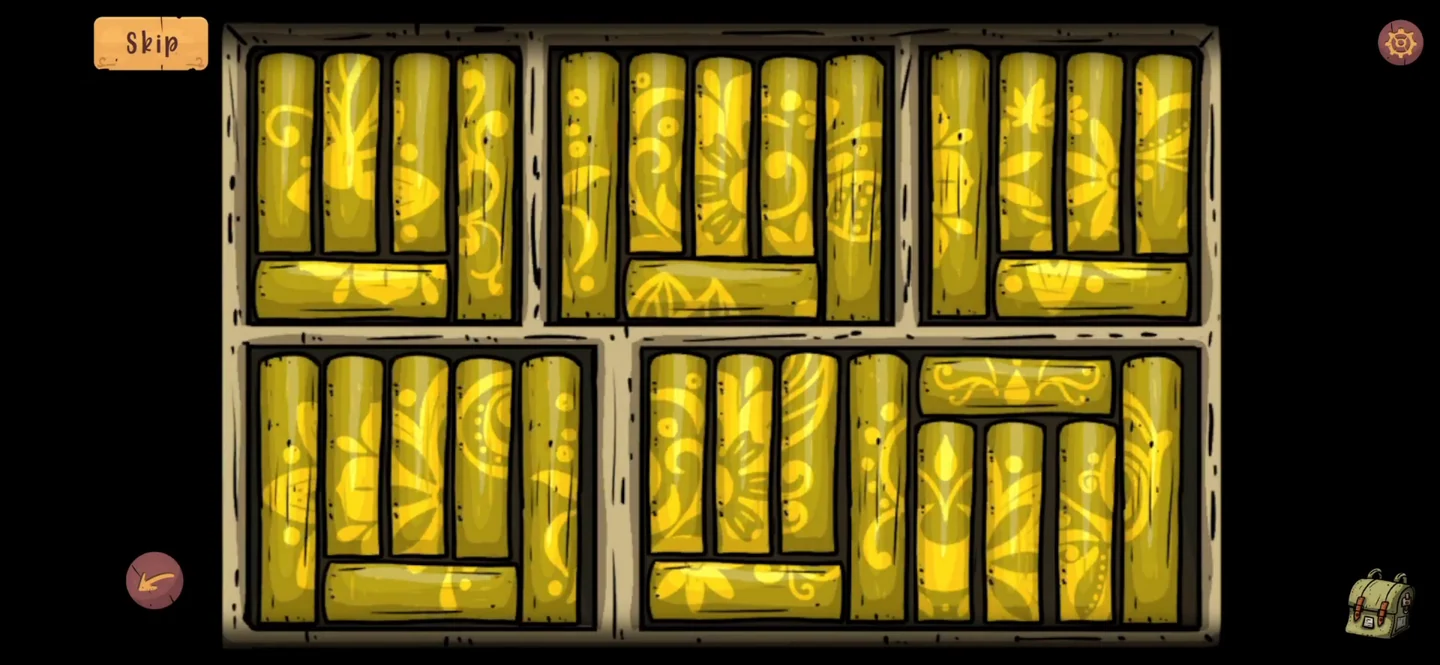
The yellow block cabinet high on the greenhouse wall uses the flower paper from the cellar.
- Tap the yellow cabinet high on the greenhouse wall. It has five compartments of sliding yellow slats: three across the top and two below. The paper from the cellar singles out three flower patterns and shows which compartments they belong in. Slide the slats until those three compartments show their patterns, as in the finished cabinet shown here. This takes several minutes, so the guide shows the finished arrangement instead of every move. When the cabinet opens, take the carved wooden leg.
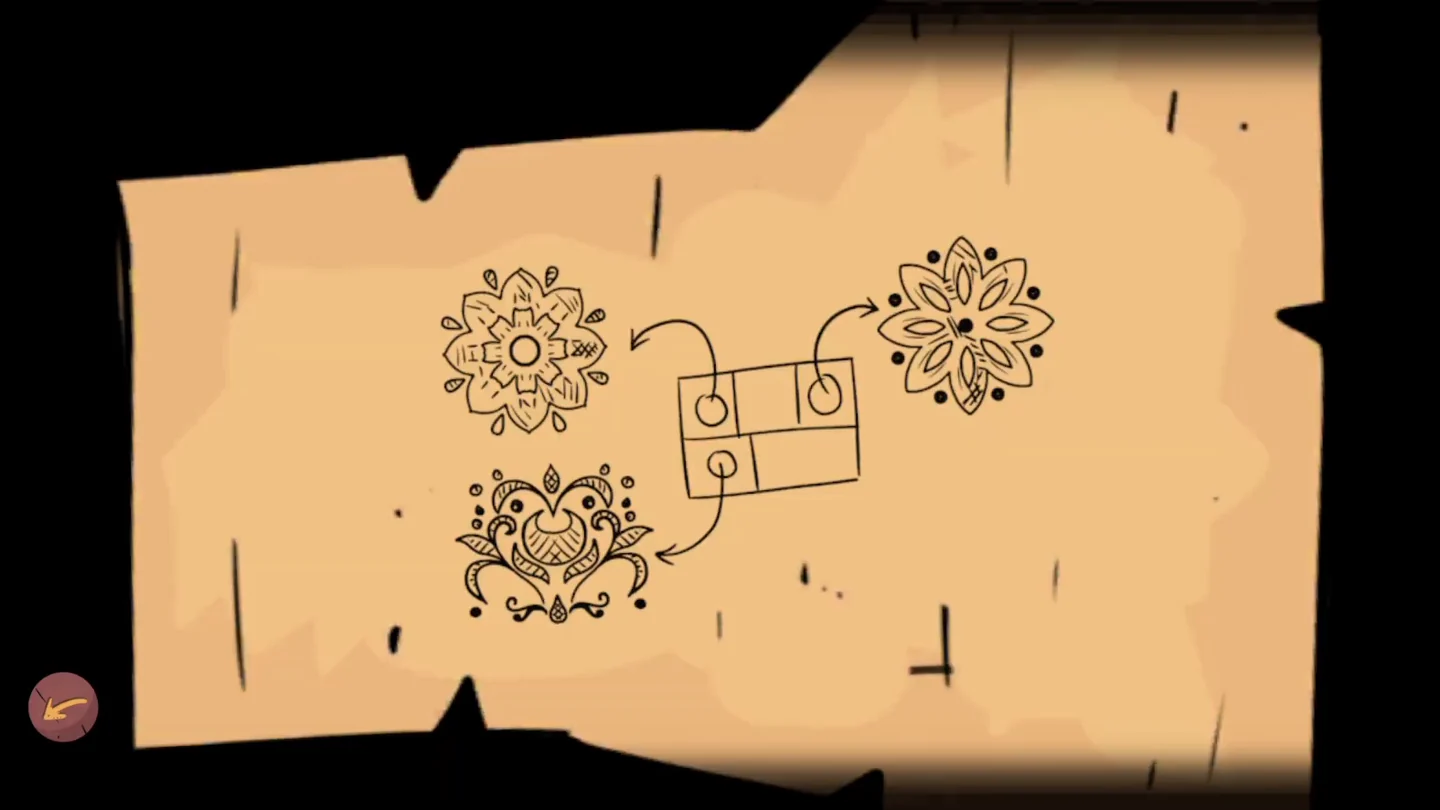
The cellar paper: which flower pattern goes in which compartment. 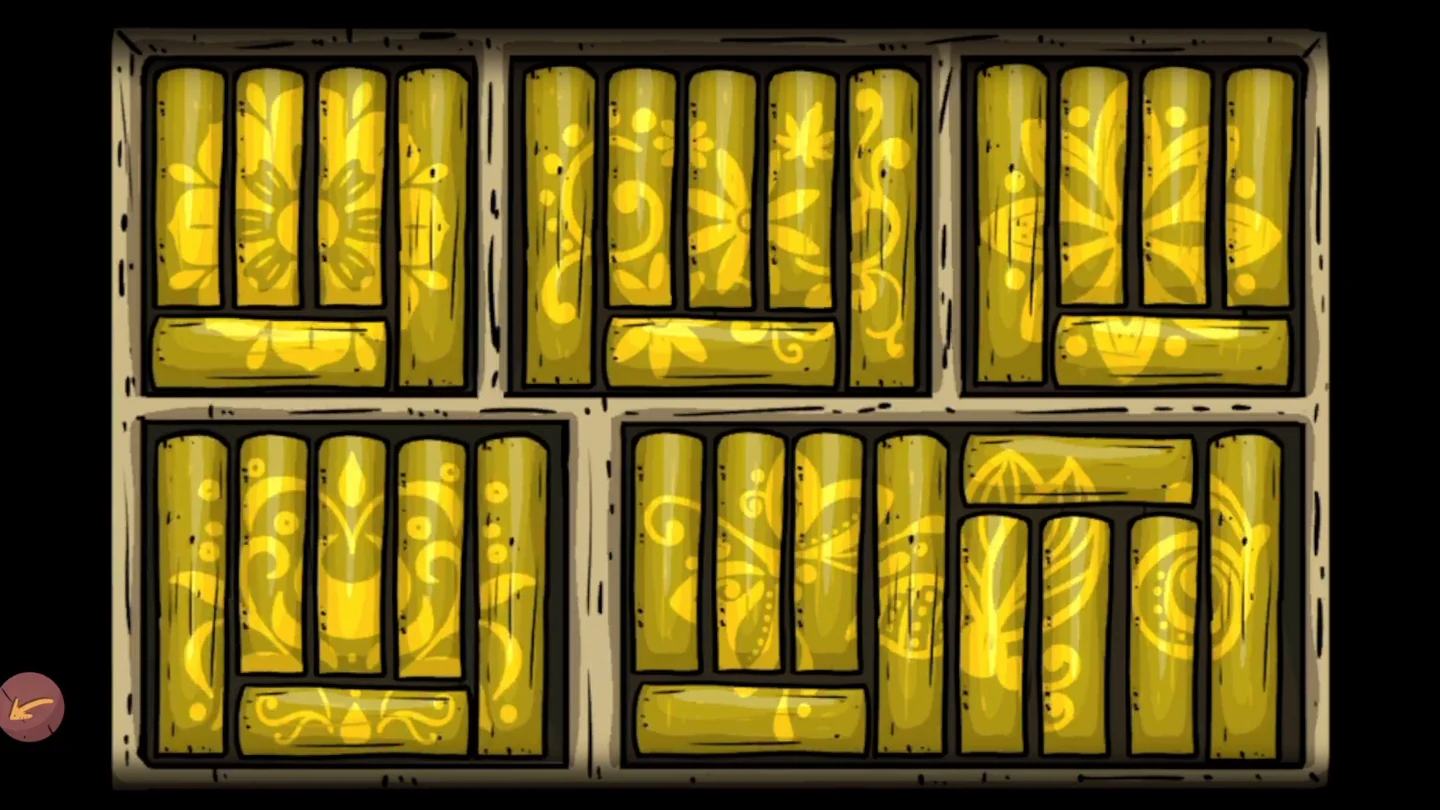
The finished block cabinet.
Round Wall Lock and Wooden Cat
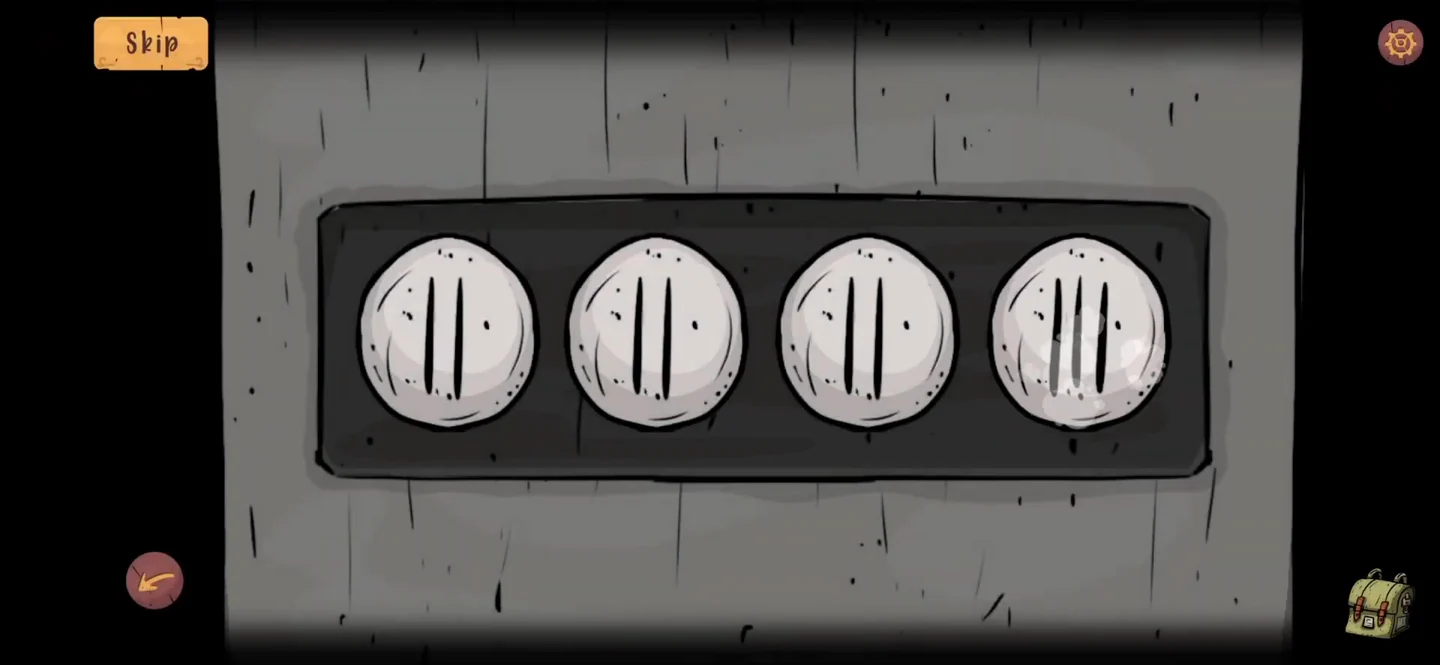
The round lock on the garden path wall holds the wooden cat, which needs the carved leg from the block cabinet.
- On the garden path, tap the round wooden lock on the wall. It has four Roman numeral dials, and tapping a dial moves it to the next numeral. Set the dials to VIII, III, VI and V. The -65 paper gives the last two dials, VI and V.CODEVIII III VI V
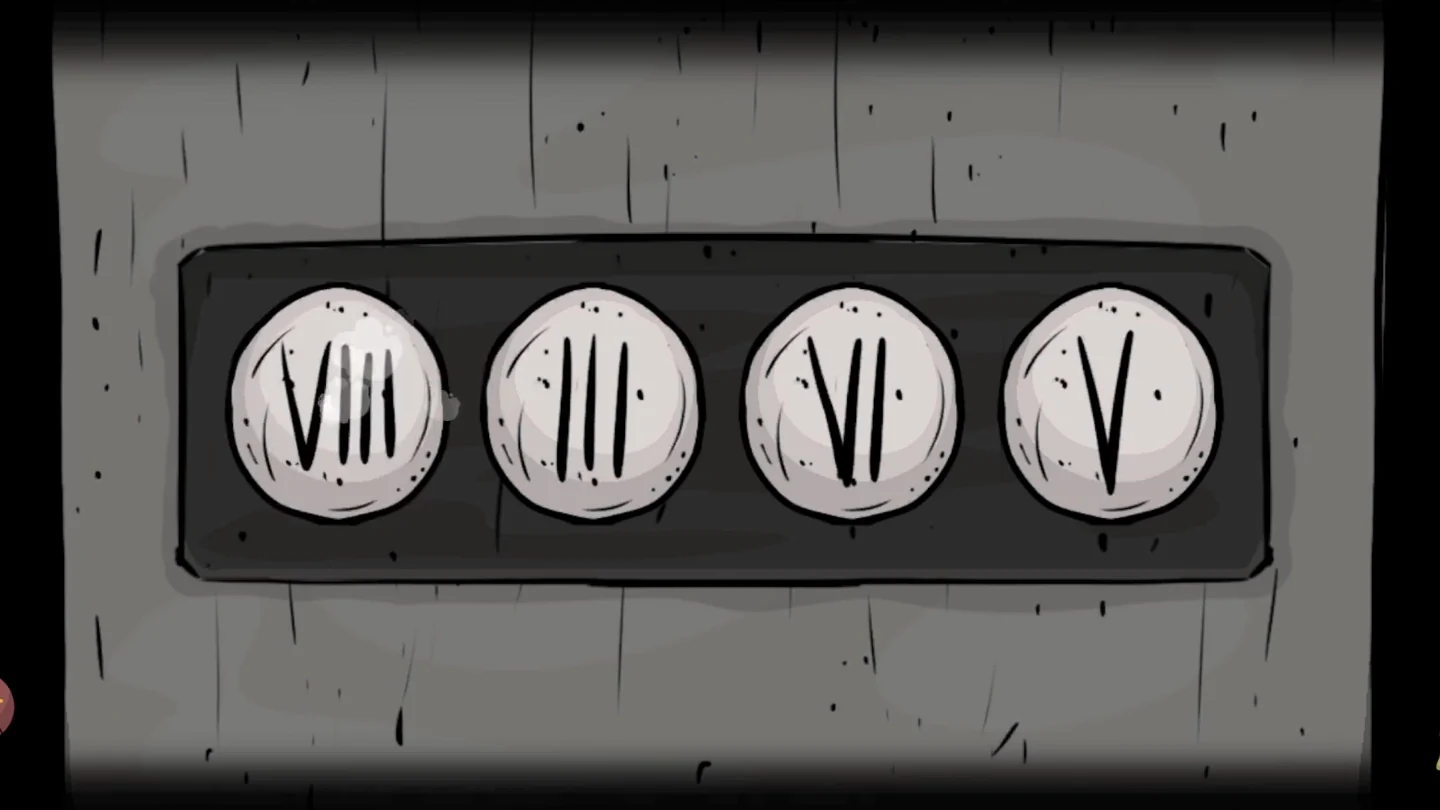
The working combination VIII III VI V. - Fit the two carved pieces to the wooden cat inside. The straight carved leg from the block cabinet restores the short arm on the left as you look at it. The bent furry piece from the cellar fits the missing lower right leg.
Switches and Symbol Tokens
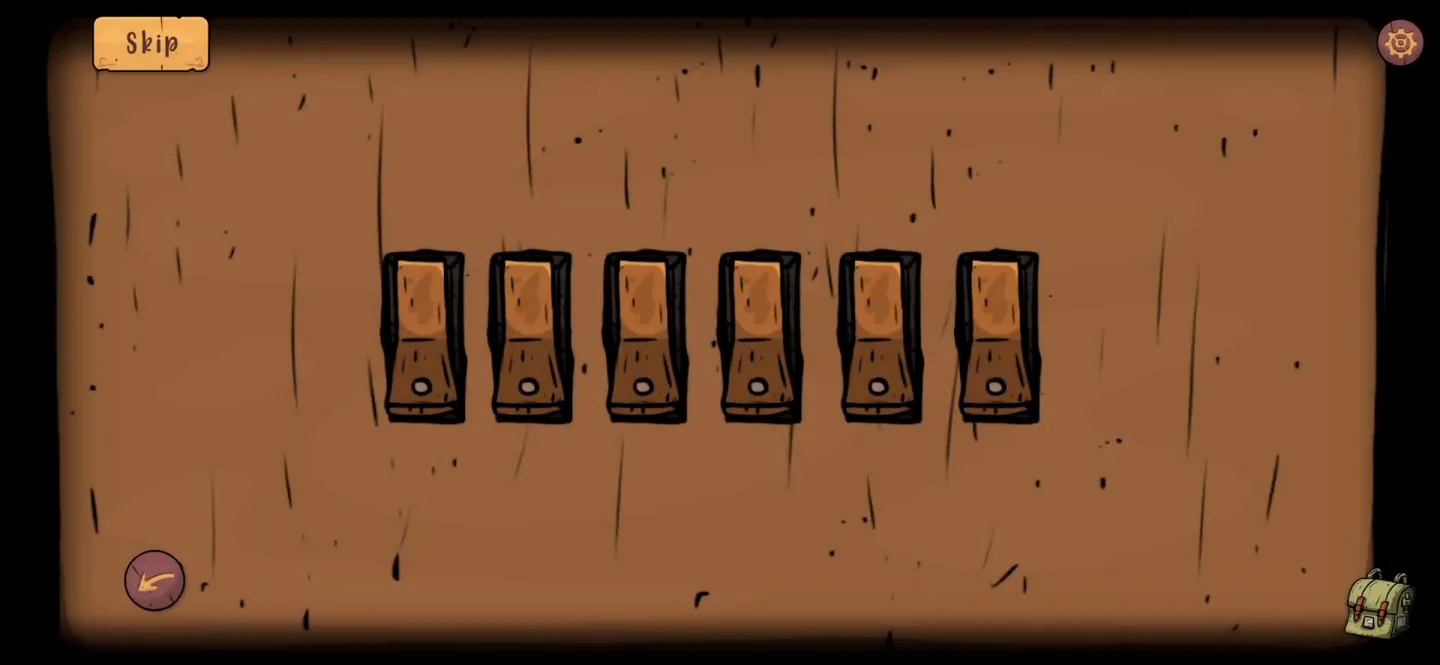
Two more puzzles each give you a plank for the tower under the window.
- Tap the tall red drawers beside the window. Flip the six switches until all of them point the same way. Take the plank from the drawer.
- Go back to the round table in the front yard. Slide the symbol tokens around the circles until they match the symbol board in the greenhouse, with its five symbols and two empty circles. The container opens: take the plank and the long pin.
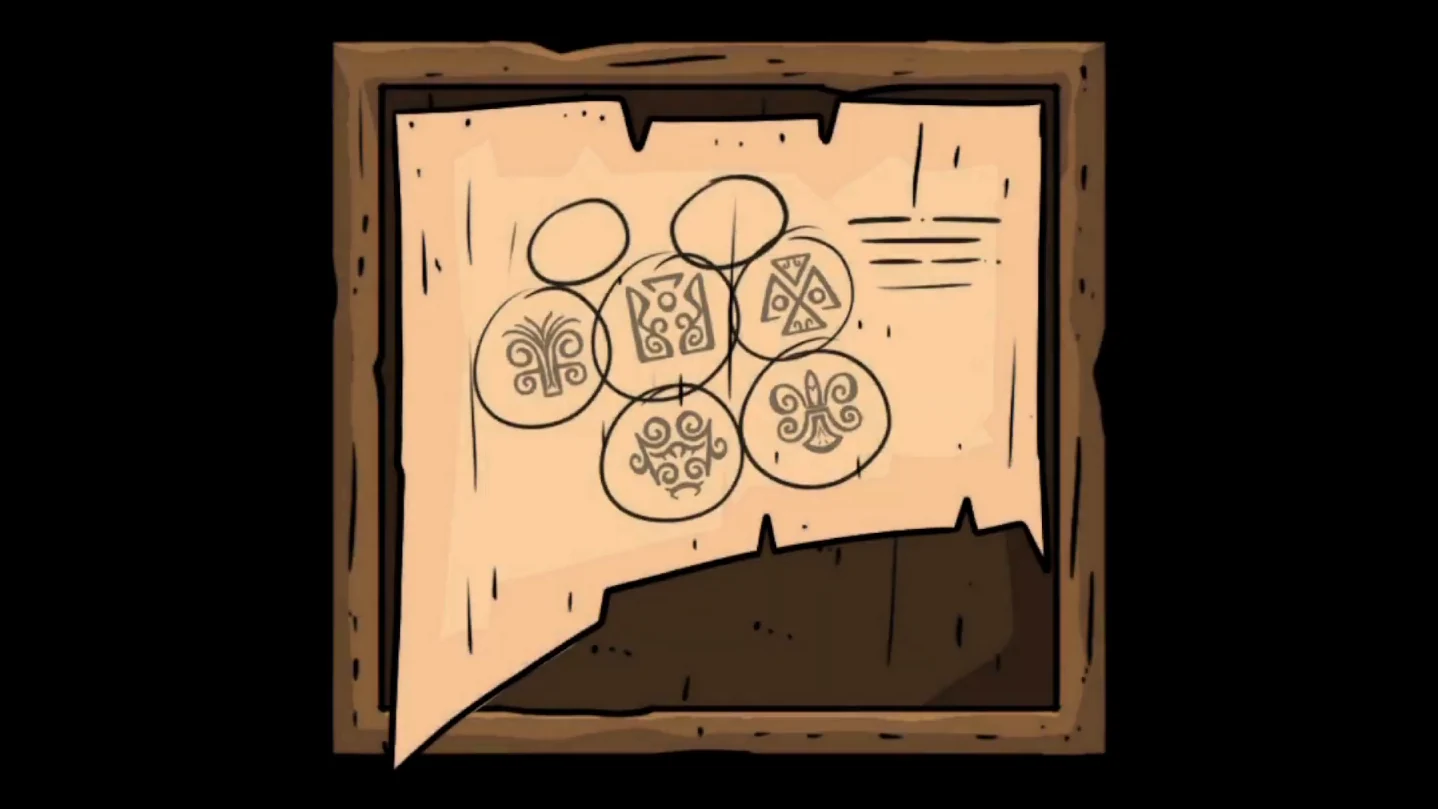
The symbol board in the greenhouse: five symbols and two empty circles give the target layout. 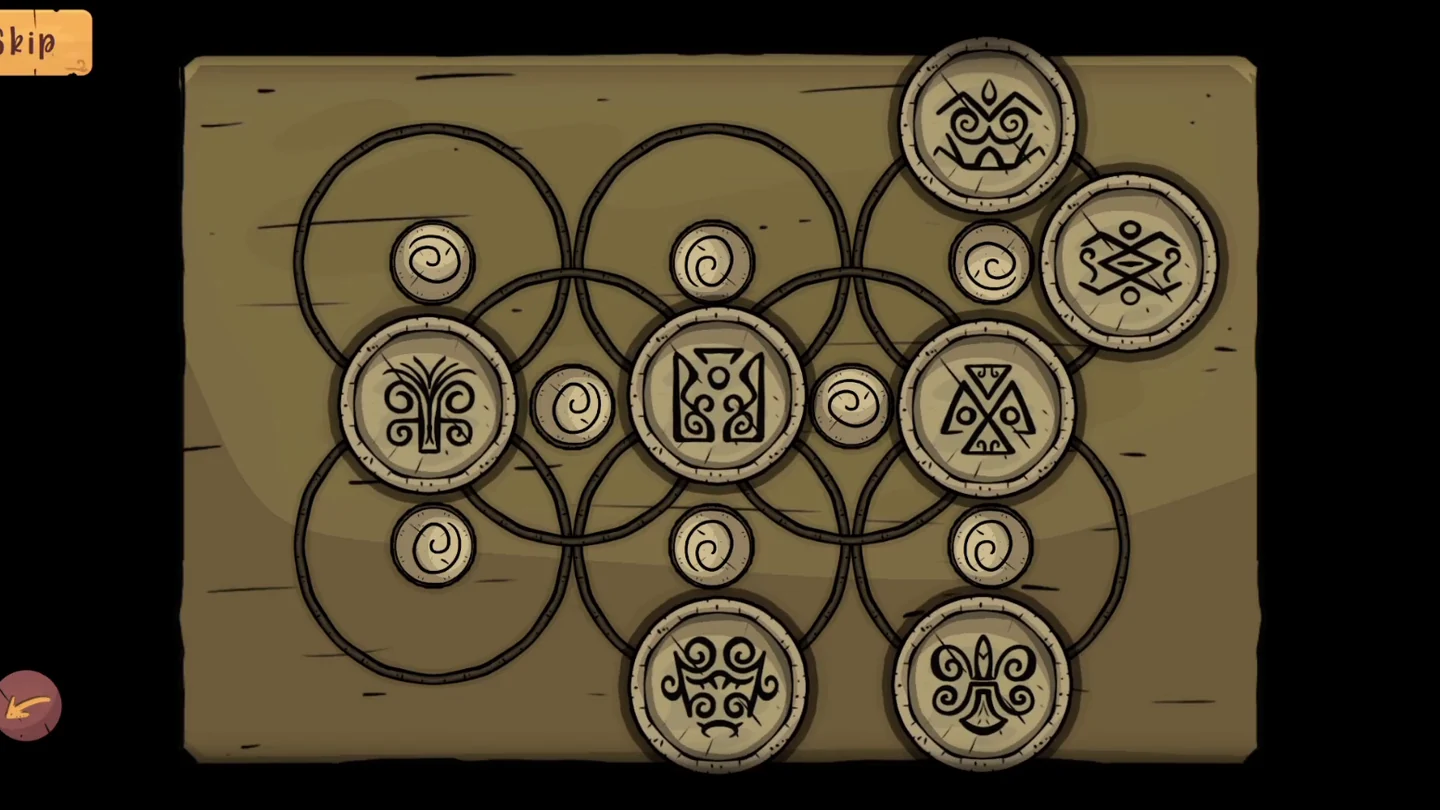
The finished token board.
Greenhouse Wheel Lock
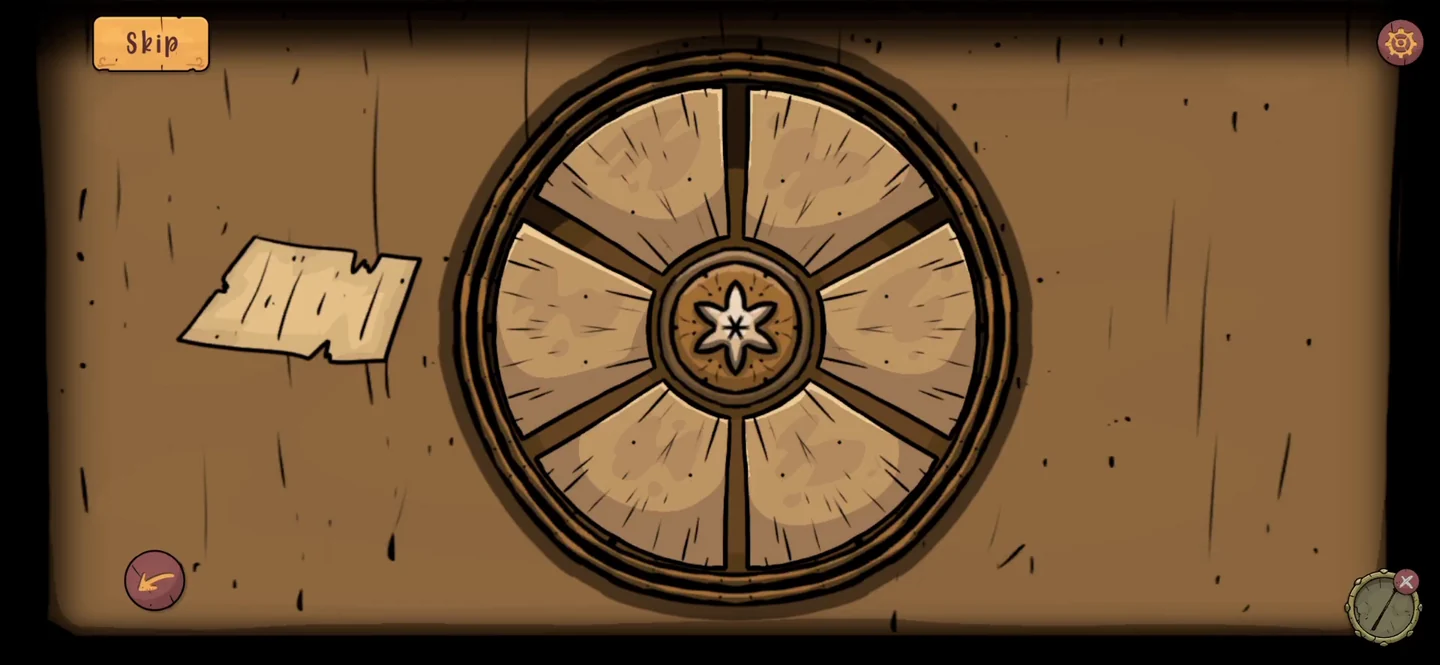
The wooden wheel in the greenhouse’s lower cupboard uses three flower clues found across the chapter.
- Use the long pin on the wooden wheel in the greenhouse’s lower cupboard. The wheel has six segments, arranged like the six petals of the flowers on three clues. Each flower has one dark petal: tap the wheel segment in the same position. Read the clues in this order, flowers left to right: first the framed -65 paper in the greenhouse, then the paper pinned in the doghouse maze by the iron gate, then the flowers on the lid of the box from the bottom red drawer on the garden path. That is 15 taps. In this example they were: top right, bottom right, right, left, bottom left; bottom left, bottom left, bottom right, left, left; top right, right, left, bottom left, top left. The cupboard opens: take the yellow spotted curved piece.
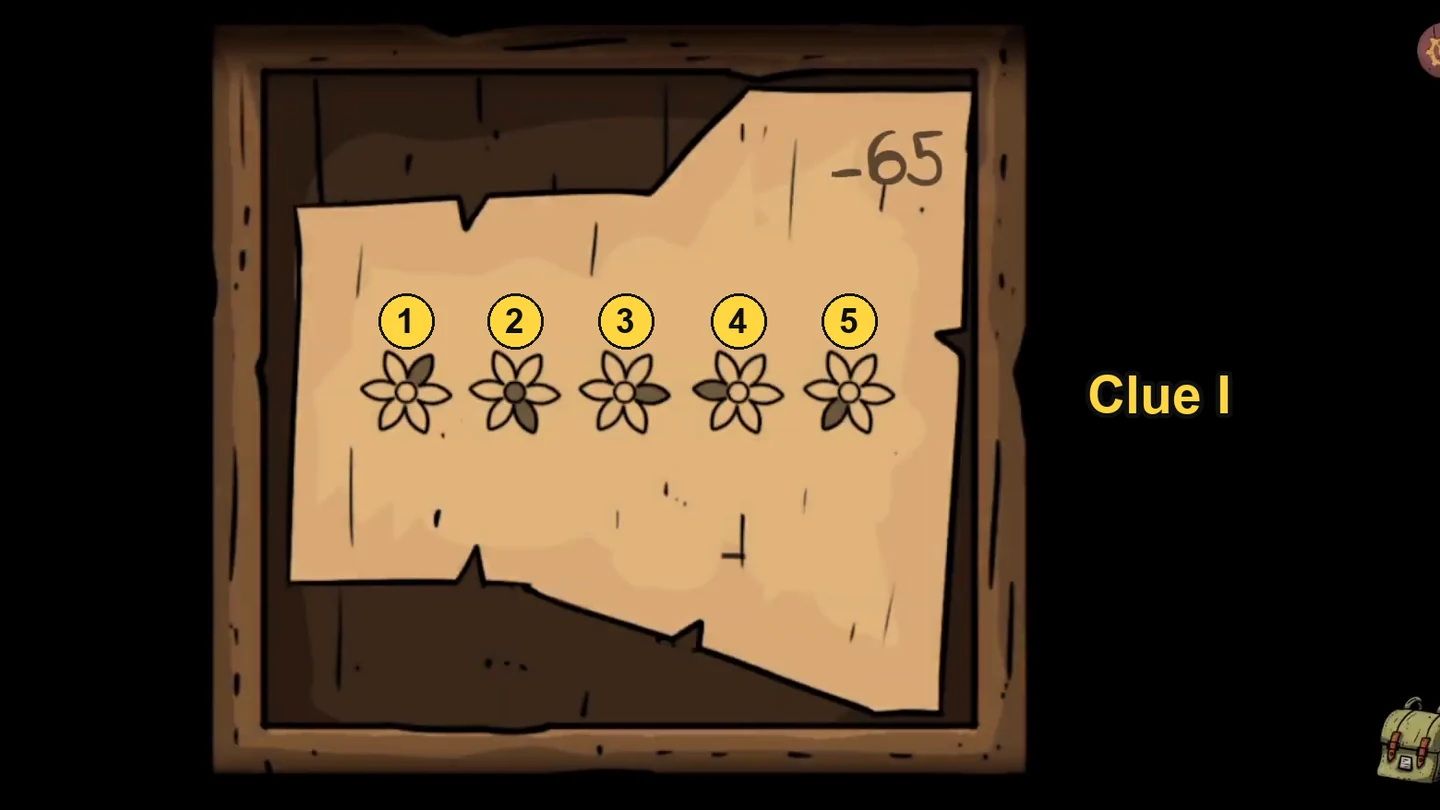
Clue I: the framed -65 paper. Read the dark petals from flower 1 to 5. 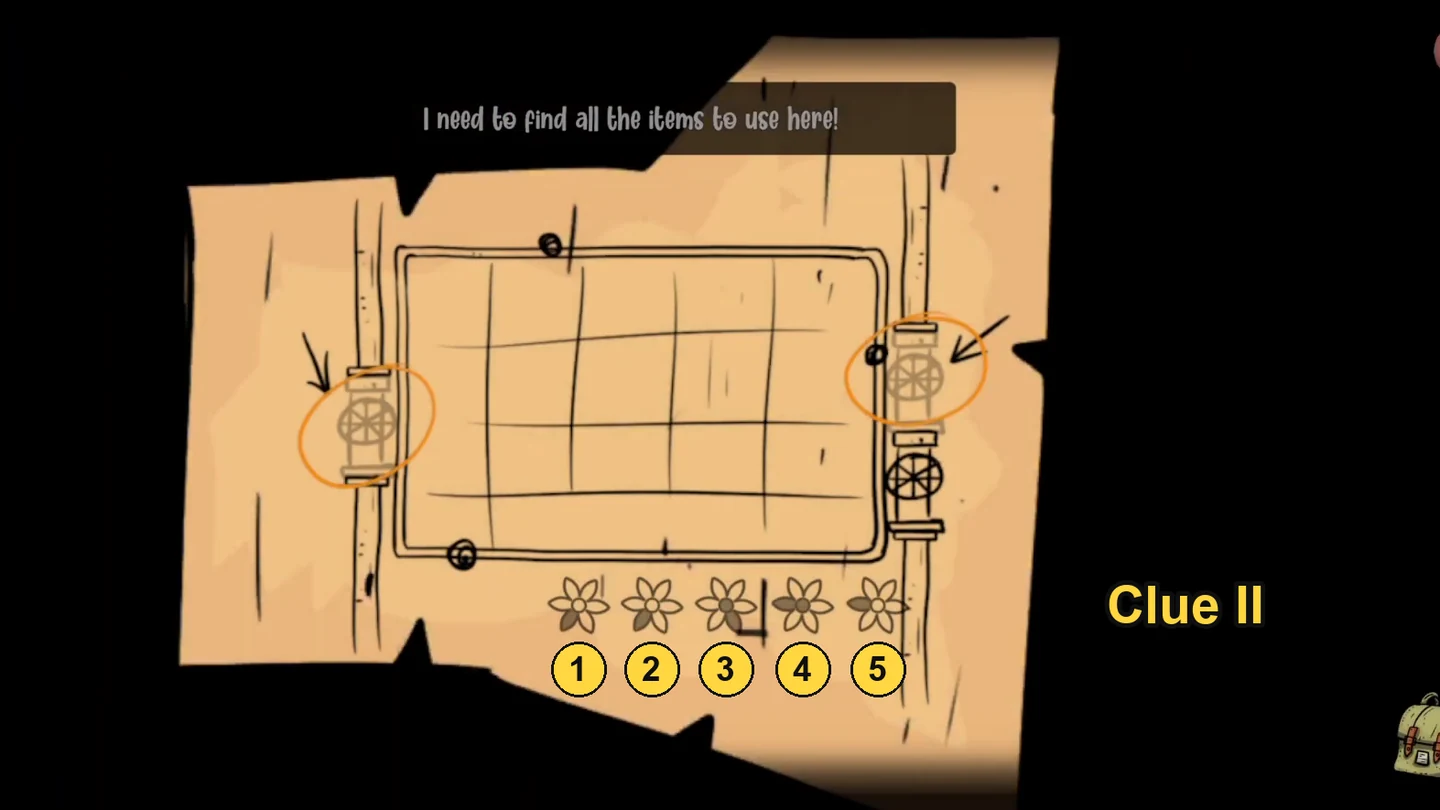
Clue II: the flowers along the bottom of the maze paper. 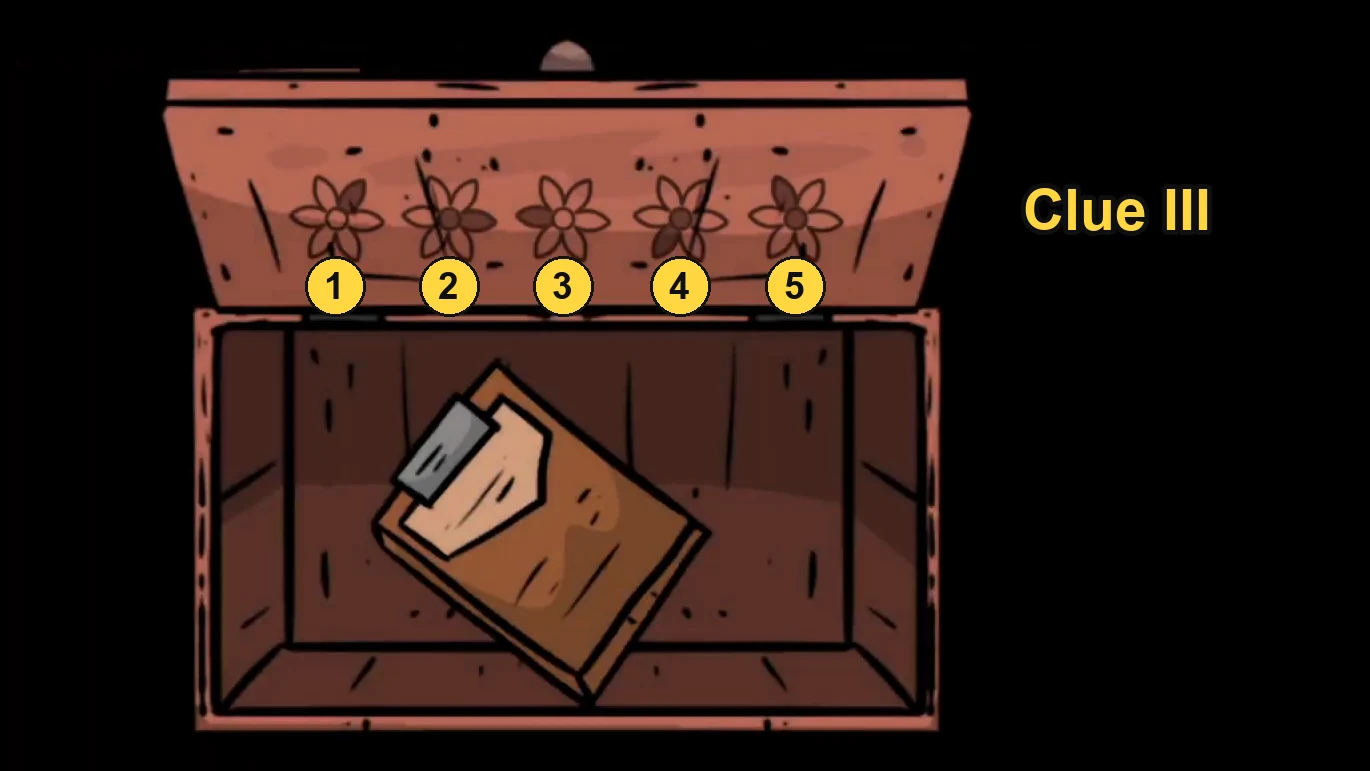
Clue III: the flowers on the lid of the flower box.
Tree Chest Drawing Lock
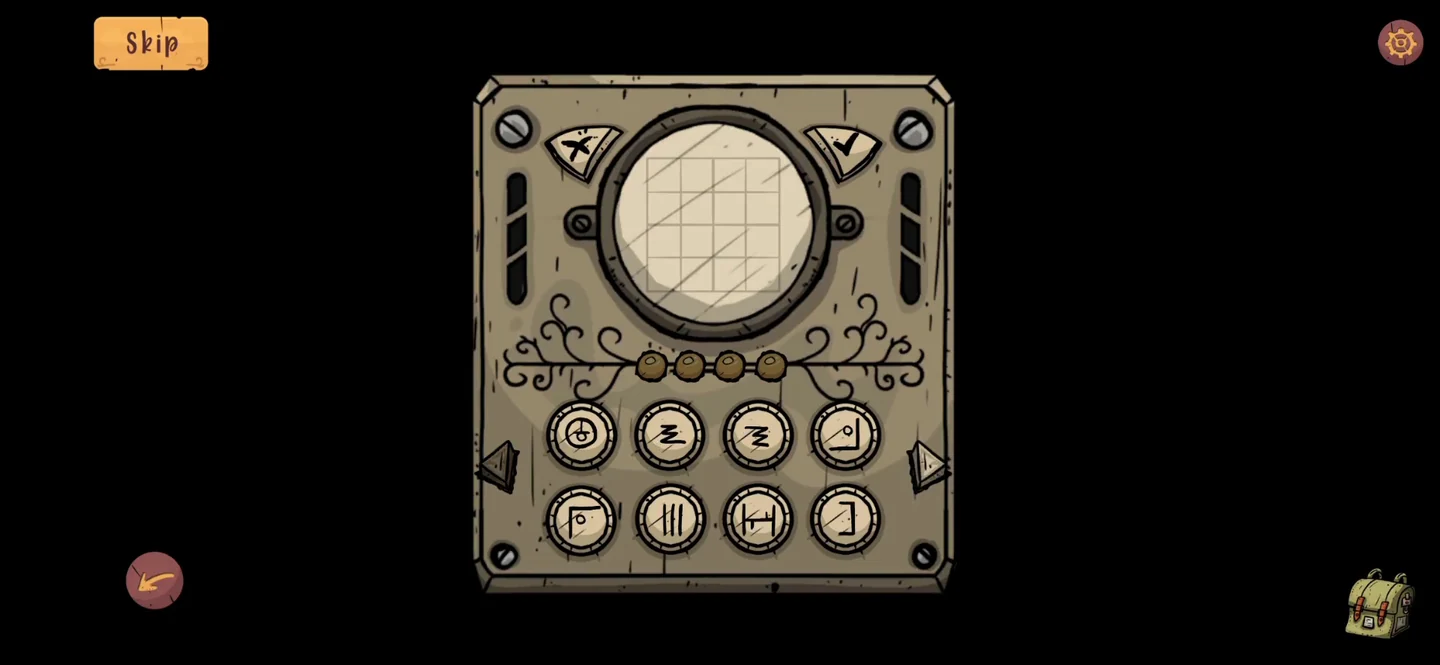
Free the wire box on the garden path, then open the drawing lock on the tree chest in the front yard to get the eye for the wooden cat.
- Use the pruning shears to cut the ropes tied around the wire box on the garden path wall.
- Tap the lock on the chest behind the tree in the front yard. Rebuild the four drawings from the square-drawings paper, in order. Each button adds a line or circle to the screen. Use the arrows for more buttons, X to clear and the tick to submit. A light turns on for each correct drawing. When the chest opens, take the eye.
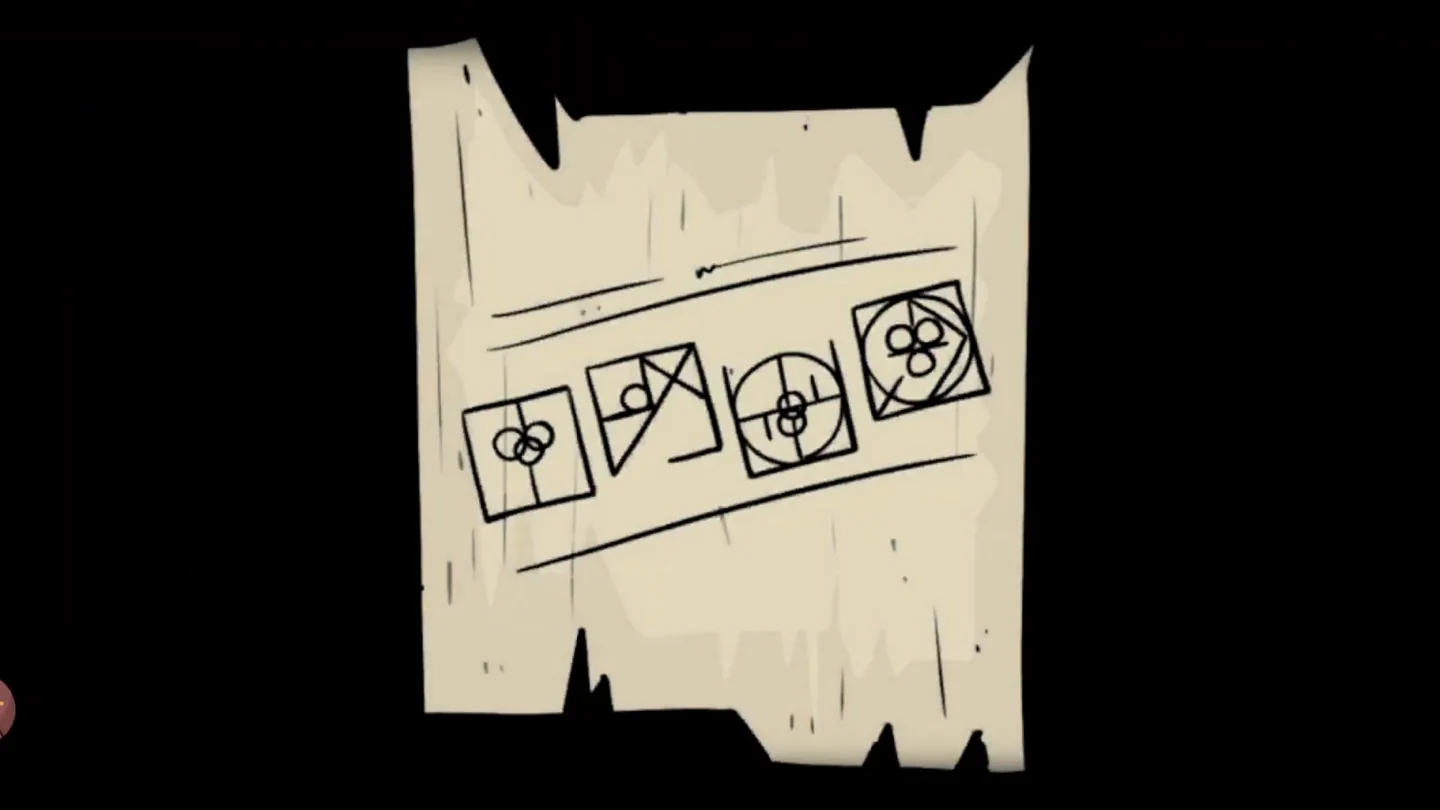
The four drawings to rebuild, in order from left to right. 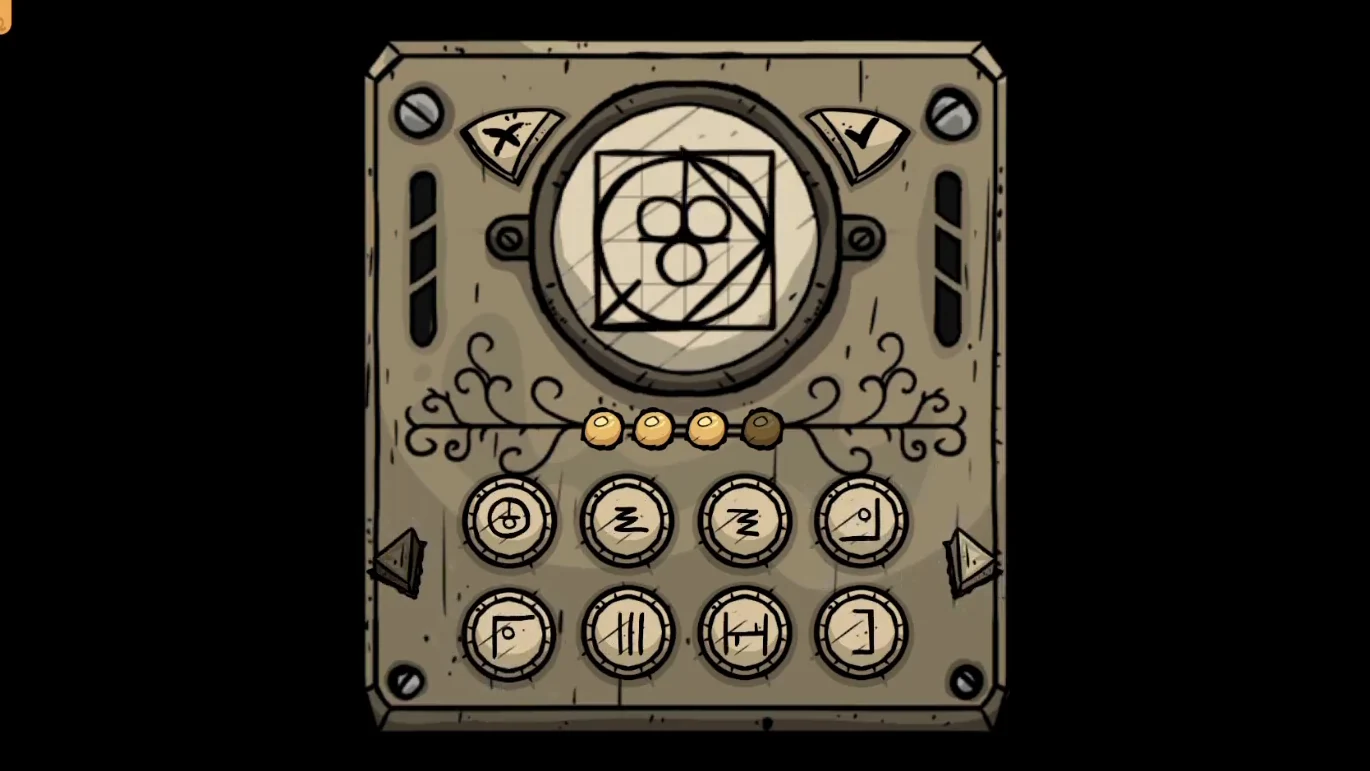
The fourth drawing just before you submit it.
Wooden Cat Pose and Map
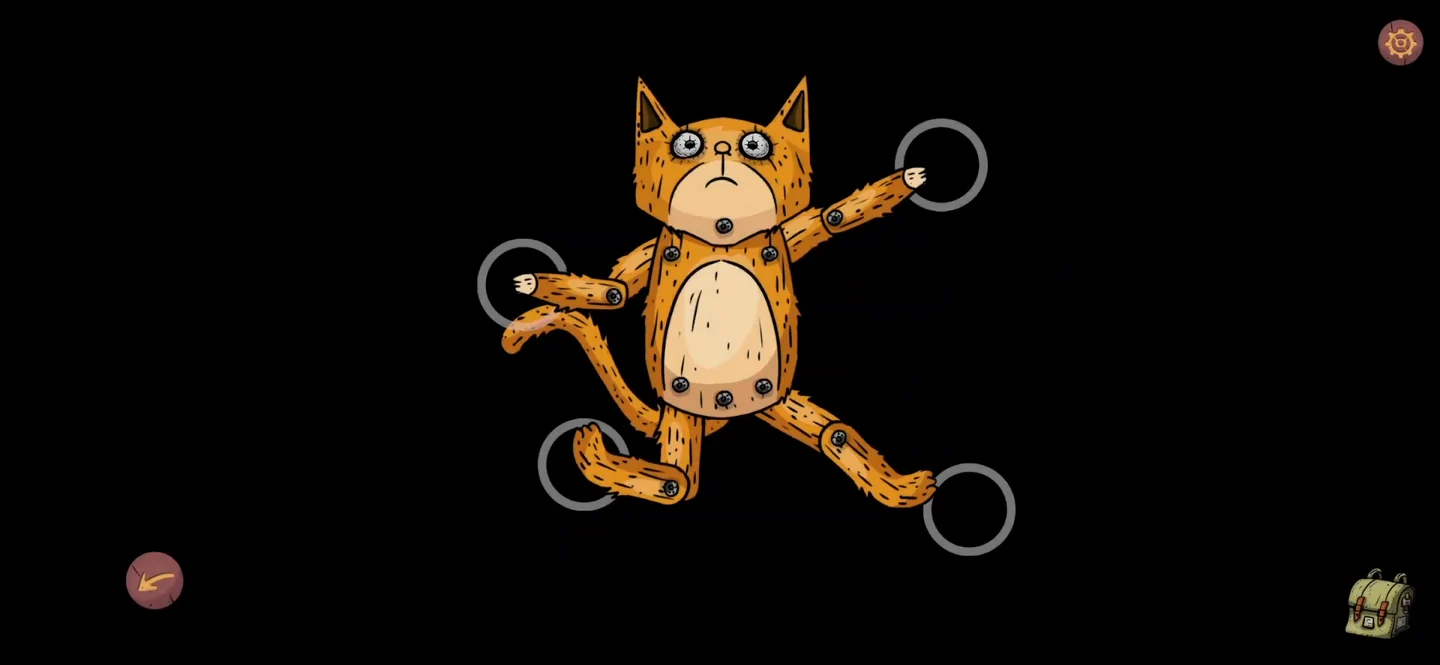
Finish the wooden cat to get the last map piece, then use the completed map to rewire the wire box.
- Put the eye into the wooden cat's empty eye socket. Then move its arms and legs into the pose shown here. Its mouth opens: take the torn map piece.
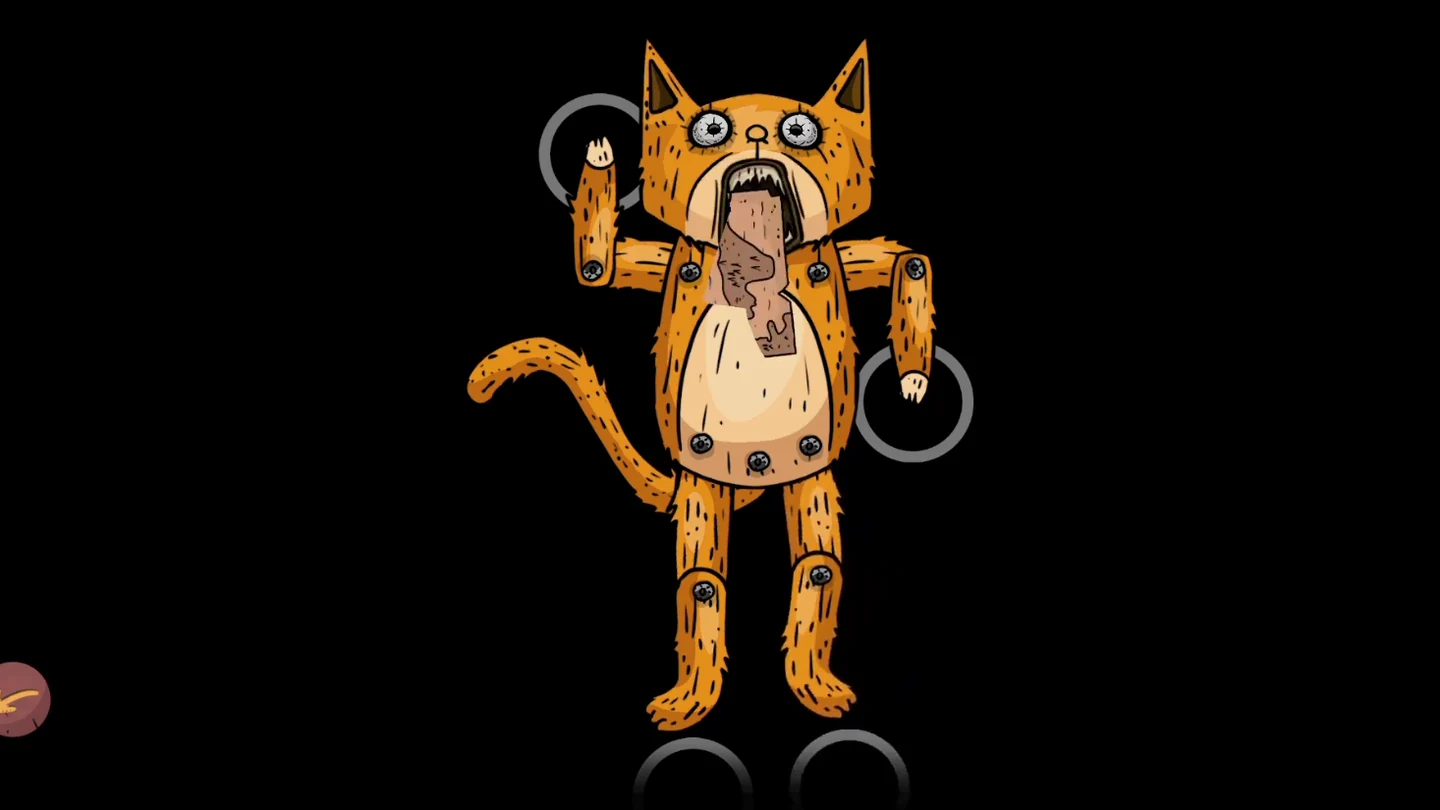
The pose that opens the cat's mouth. - Add both torn map pieces to the clipboard in the flower box. The finished map shows the numbers 1111, 7108, 1308, 2235 and 3506. Each one pairs a left wire number with a right one: 1-111, 7-108, 13-8, 22-35 and 35-6.
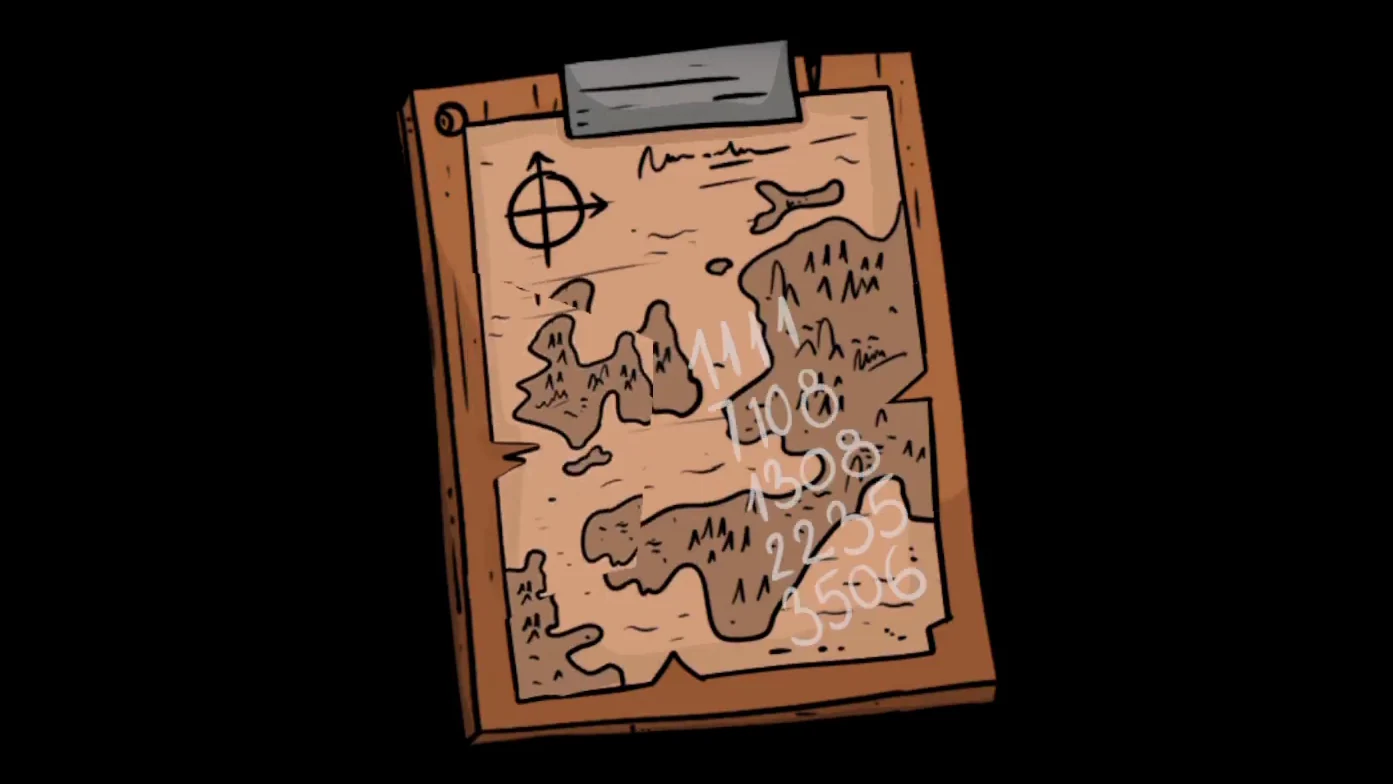
The finished map with the wire numbers. - Open the wire box. Use the knife to cut all the existing wires, then connect 1 to 111, 7 to 108, 13 to 8, 22 to 35 and 35 to 6. Take the plank.
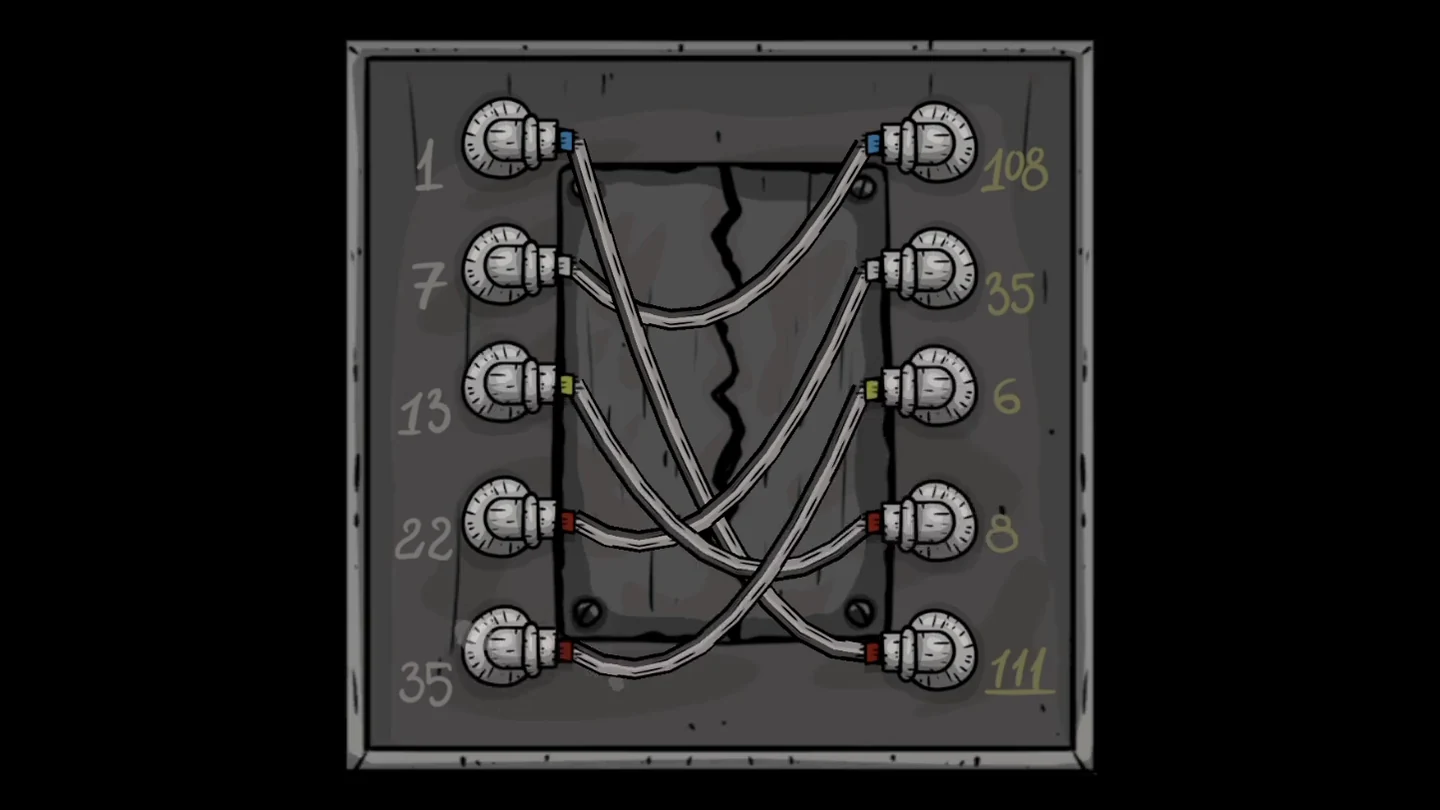
The rewired box.
Plank Tower Under the Window
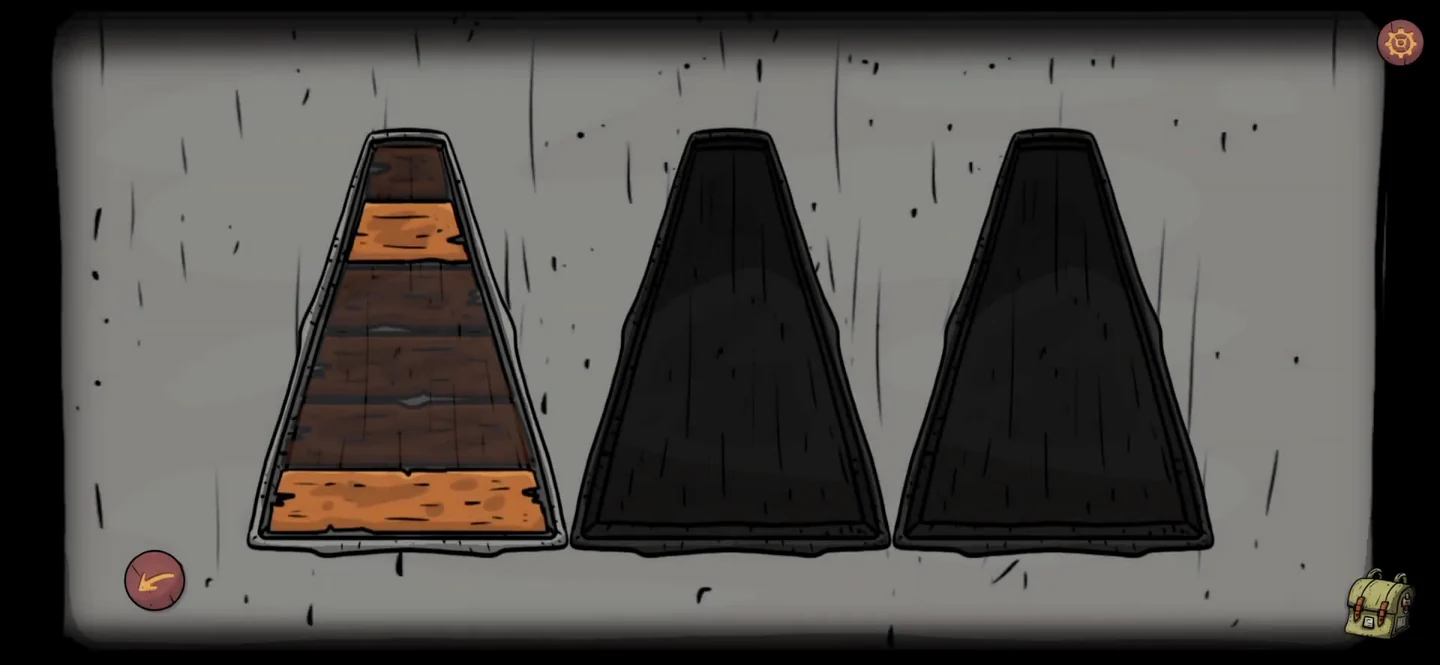
Once you have all the planks, solve the tower under the garden path window.
- Tap the three tapered slots under the window and place all your planks in the left slot, making a stack of six. Move the whole stack to the right slot, one plank at a time, never putting a wider plank on a narrower one. Use this rhythm: on every other move, move the smallest plank one slot along the cycle left → middle → right → left. Its first move is from the left slot to the middle one. On each move in between, make the only legal move that does not involve the smallest plank, between the other two slots. If you start the smallest plank toward the right instead, the stack ends up in the middle slot. Take the yellow curved piece.
Red Door and the Lamp Bars
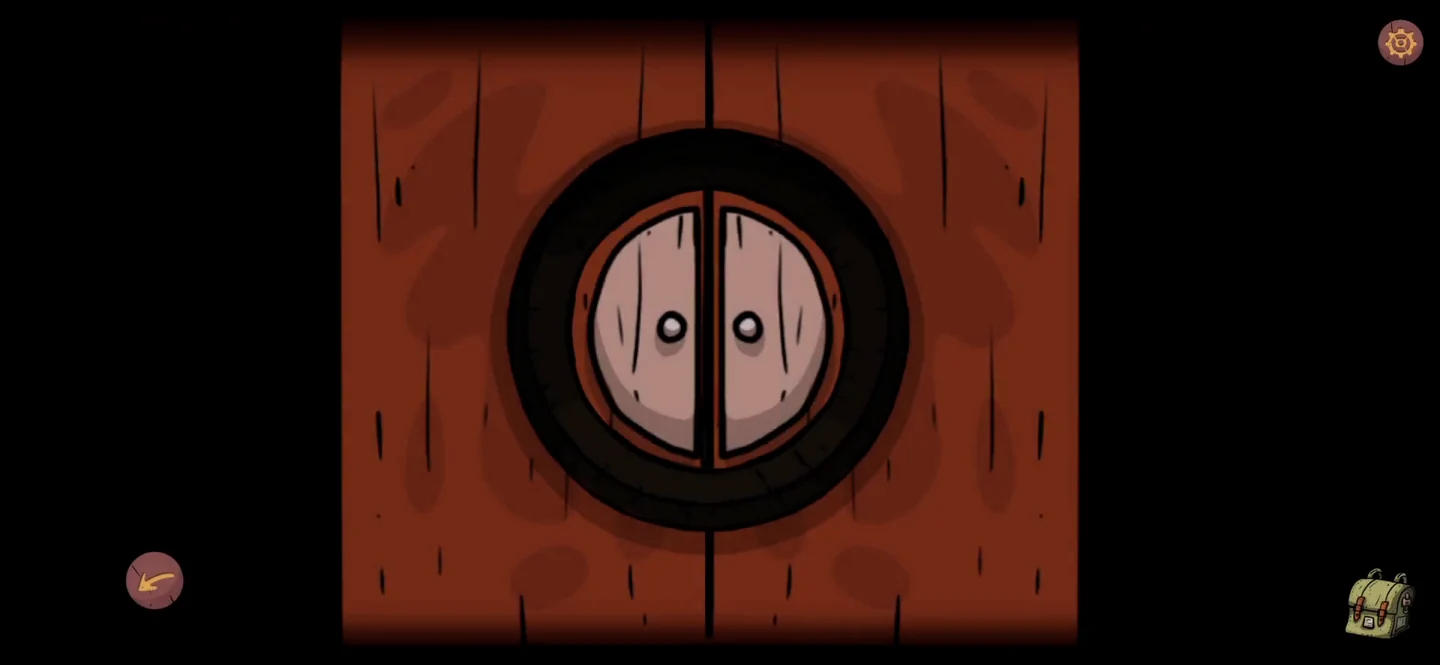
Fit the three curved pieces into the red door on the garden path, then open the lamp puzzle using the padlock below the ring.
- Fit the three curved pieces into the round frame on the red door on the garden path.
- Tap the small padlock below the completed ring on the red door. Slide the horizontal bars until each column has one lamp and every lamp is lit. Then go through the open red door. A memory scene ends the chapter.
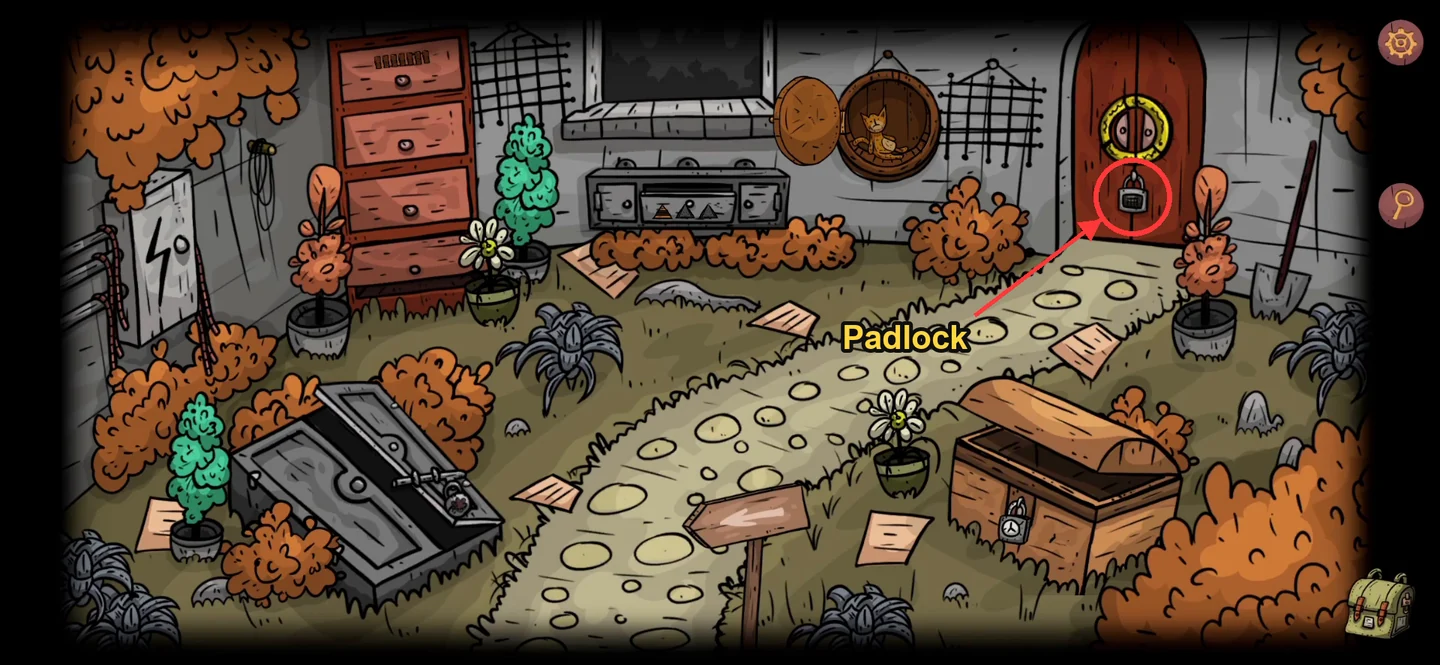
The padlock below the ring opens the lamp puzzle. 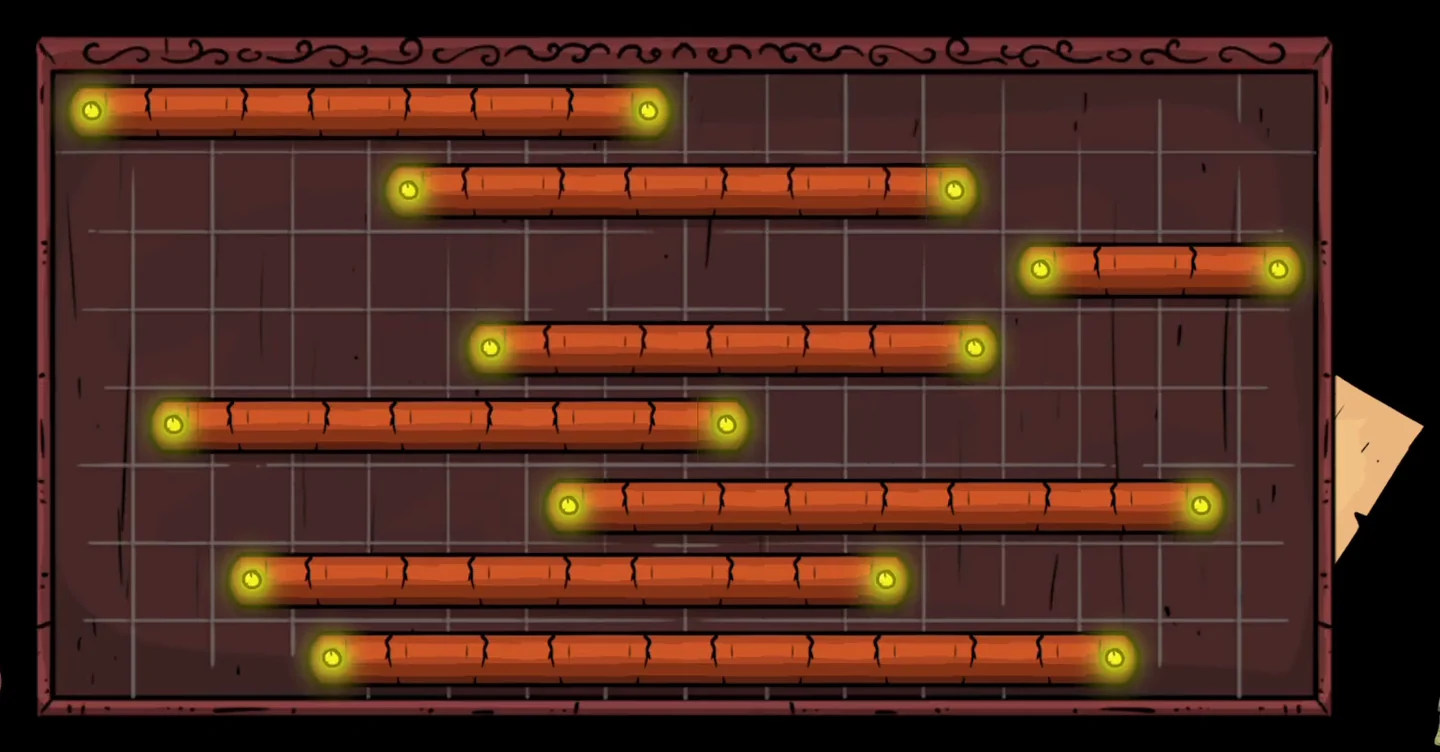
The solved bar arrangement.