CHAPTER 11
Mr. Sunlight's Offer
Dakota arrives in an esoteric shop guarded by a talking cat, Mr. Sunlight.
- Talk to the cat. The three free questions ("You can see me?", "A talking cat... really?" and "What do you know about magic?") are optional and do not count as decisions.
- Decision 2: "Sure! That sounds amazing!" costs 1 key and adds 6 points (Accept Sunlight's offer). "I'm not ready for all of this." is free and adds 0 points (Refuse the offer). This guide follows the accepted offer, which opens the Coven Dimension and is required for the best (10-point) result. This guide does not cover the refusal route.
CHAPTER 12
Coven Hall: First Search
In the Coven Dimension, your task is to explore the history of the Salem witch. Mr. Sunlight sits on the banister.
- Click the fireplace under the stairs on the left and take the torn page (1 of 3).
- Click the pillory on the right. Its padlock is locked for now. Take the first eye and the torn page (2 of 3).
- Click the ritual circle on the floor. Take the skull, the glove and the eye grimoire.
- Return to the fireplace. The logs are hot, so use the glove to take the pair of metal climbing spikes lying on them.
- Click the tree with the eye and use the climbing spikes to climb it. Take the elderberry sprig and the feather duster. The chest in the tree has a skull padlock, so leave it for now. Go back to the shop.
CHAPTER 13
Crystal Ball Puzzle
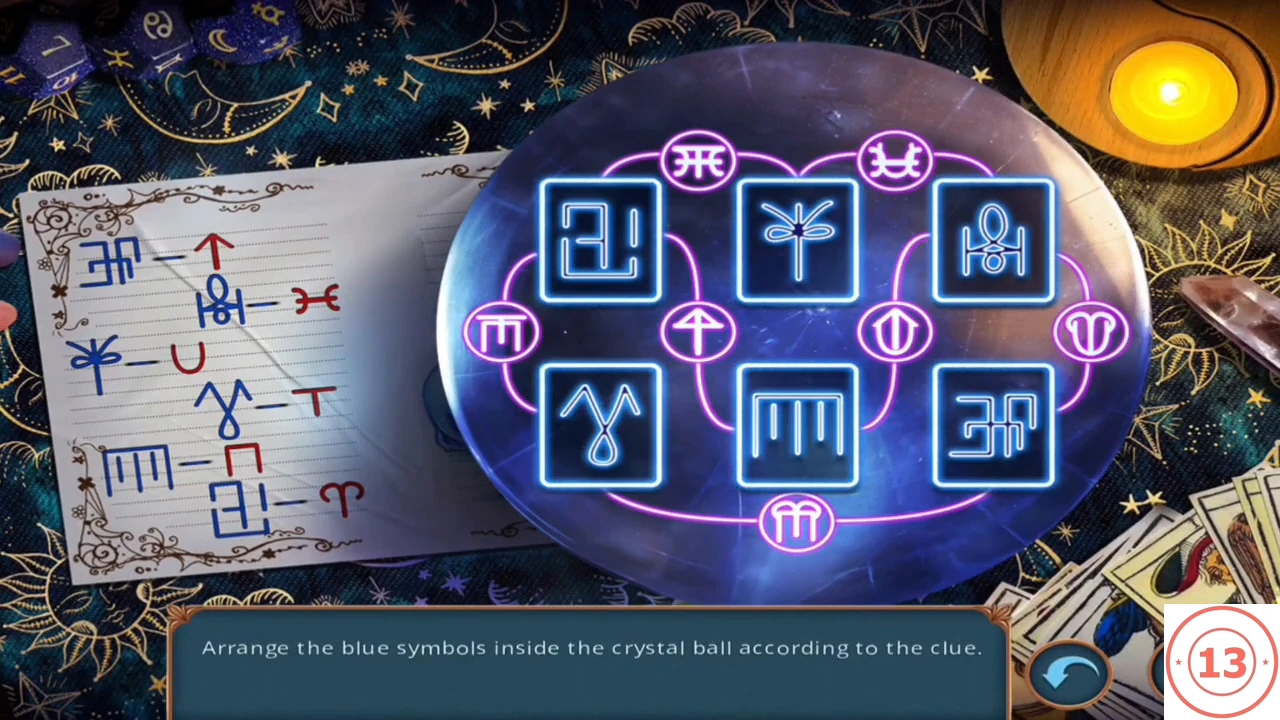
Back in the shop, the crystal ball stand needs an emblem.
- Click the cat scratcher with the briefcase (it is still locked) and take the ram emblem.
- Click the crystal ball on its ram stand and place the ram emblem to start the puzzle.
- Arrange the six blue symbols inside the crystal ball according to the clue note. The note pairs each blue symbol with a red symbol. Each slot sits next to a pink ring symbol, so put every blue symbol in the slot beside its partner. Select two tiles to swap them.
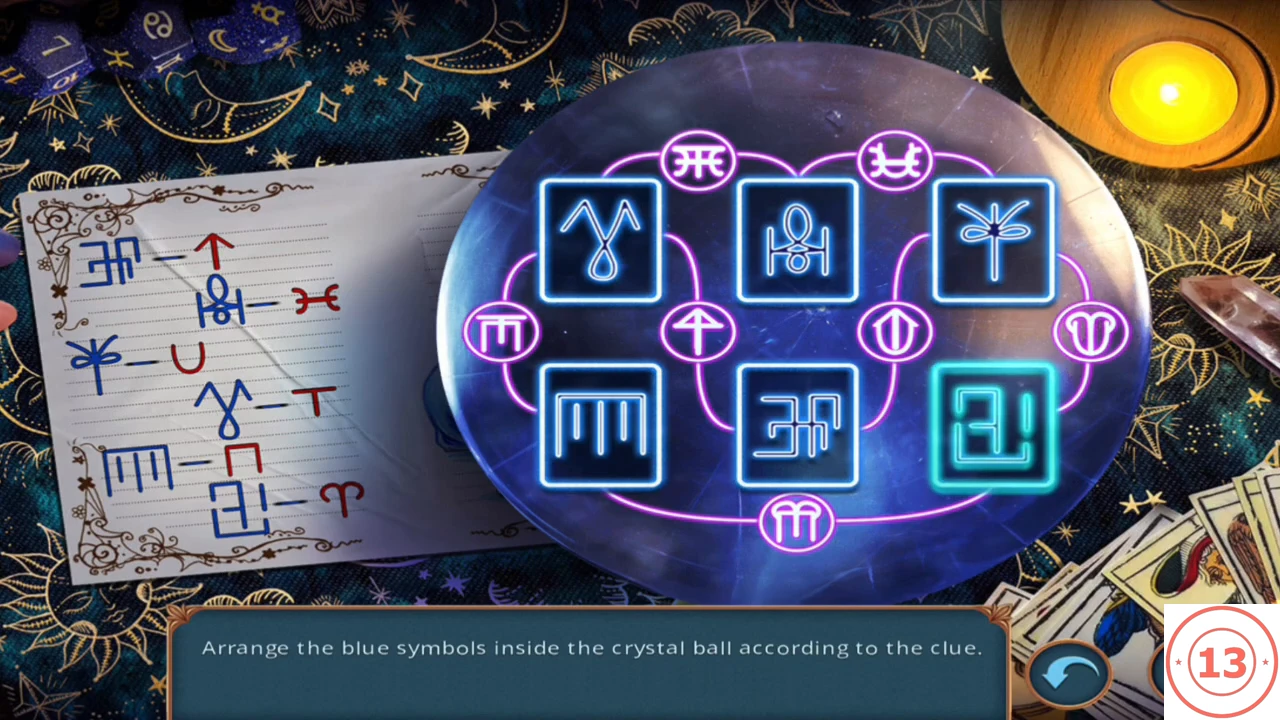
Completed state: each blue symbol sits in the slot whose pink ring symbol matches its red partner on the note. - Take the bottle of yellow oil from the tray that appears.
CHAPTER 14
Enchanted Skull, Tree Chest and Grimoire
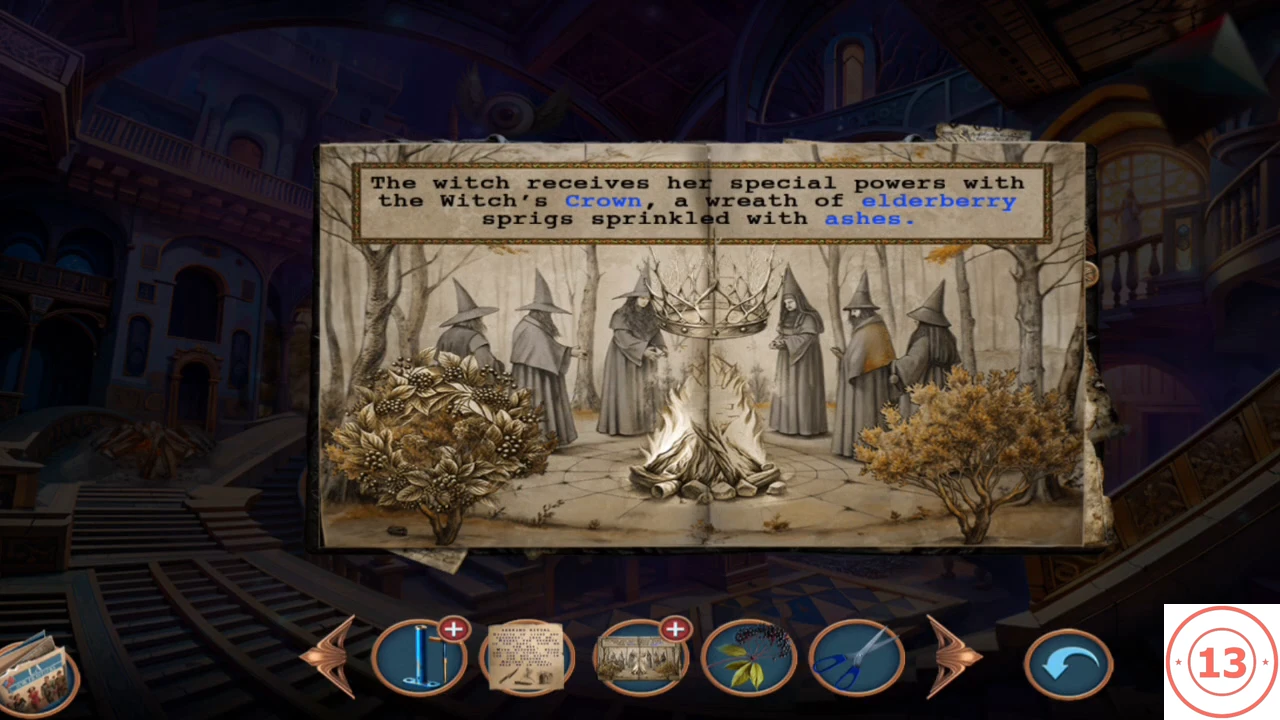
Collect the second eye, open the tree chest and complete the grimoire.
- Click the cabinet on the right side of the shop. Dakota complains about a strong smell, and the door latch is rusted shut. Pour the yellow oil on the latch, open the door and take the shears and the file.
- Inside the same cabinet are cobwebs. Clear them with the feather duster and take the second eye.
- Open the skull in your inventory and insert both eyes to make the enchanted skull.
- Return to the Coven hall and use the enchanted skull on the skull padlock of the tree chest. Take the gold shackle emblem, a horseshoe-shaped gold piece with blue studs.
- Place the gold shackle emblem in the matching slot of the pillory padlock. Take the torn page (3 of 3) and the anchor.
- Open the grimoire in your inventory and insert the three torn pages. The Witch's Crown page reads: "The witch receives her special powers with the Witch's Crown, a wreath of elderberry sprigs sprinkled with ashes." The three blue words are clues. Click the matching pictures below the text: the elderberry bush on the left, the crown above the fire, then the fire for the ashes. Each blue word turns black when its picture is found, and the book closes when all three are done.
- Click the ritual circle on the floor and place the completed grimoire and the elderberry sprig. A spoonful of ashes is still missing. Go back to the shop.
CHAPTER 15
Altar, Key Blank and Satchel
Start preparing the Search Ritual on the shop altar.
- Click the altar table in the right foreground of the shop. Place the Search Ritual page and the knife. The incense and lighter slots stay empty for now. Take the tarot card (1 of 2) and the key blank.
- Open the key blank in your inventory. Add the metal plate as a template, then cut the key with the file.
- Use the cut key on the locked satchel and take the tarot card (2 of 2).
CHAPTER 16
Tarot Table Hidden-Object Scene
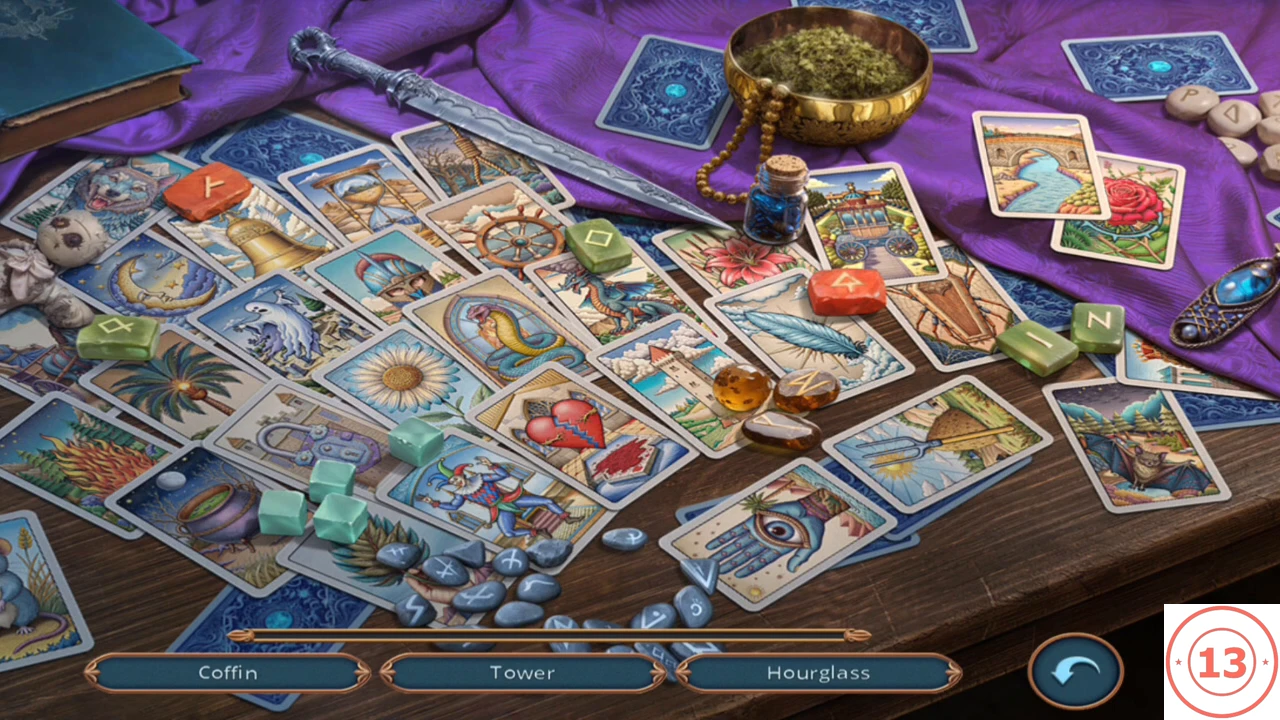
The small table beside the bed has two empty card spaces.
- Click the small table with the purple cloth beside the bed and place both tarot cards to start the hidden-object scene.
- Find the 12 listed tarot pictures. The list shows three at a time: coffin, tower, hourglass, flame, jester, crescent moon, bridge, wolf, rose, pitchforks, lily and snake. The wolf is in the top-left corner and the crescent moon and flame are on the left. The hourglass is near the bell at the top, the lily beside the blue bottle and the jester at the bottom centre. The snake is the stained-glass card in the middle, the tower is beside the amber stones and the coffin is right of the orange rune. The pitchforks are on the right, with the bridge and rose at top right.
- Your reward is the pipe. In your inventory, open the pump body and attach the pipe and the T-handle to build an air pump.
CHAPTER 17
Silhouette Hidden-Object Scene
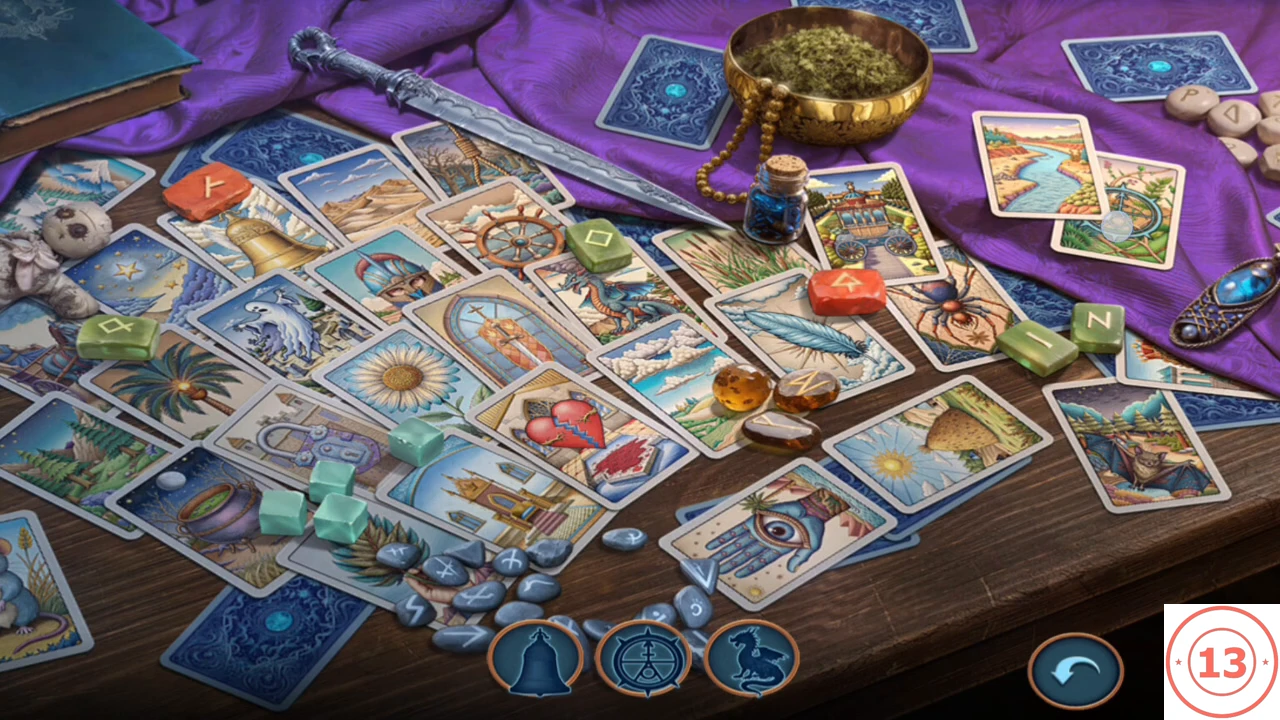
Lift the wicker cat house, then search the tarot side table for the pieces of Sebille's amulet.
- Click the cat scratcher and put the air pump under the wicker cat house to lift it. Take the Morse code book and the lighter.
- Click the sparkling side table to the left of the bed. A tray at the bottom shows object outlines, three at a time. Find each object in the scene whose shape matches an outline. One order that works: bell, wheel-like sigil, dragon, cauldron, noose, feather, ghost, padlock, eye and broken heart. The finds combine into Sebille's crescent-moon amulet.
CHAPTER 18
Briefcase, Spoon and the Witch's Crown
Sebille's amulet opens the briefcase, and the anchor recovers the last ritual ingredient.
- Click the briefcase on the cat scratcher and put Sebille's amulet in the round recess. Take the light bulb and the glue tube.
- Click the glint in the floor crack in the shop and use the anchor as a hook to fish out the spoon.
- Go to the Coven hall fireplace and scoop up ashes with the spoon.
- Put the spoon of ashes in the ritual circle. The grimoire burns with pink flames. Take the Witch's Crown.
CHAPTER 19
Witch's Crown Symbol Puzzle
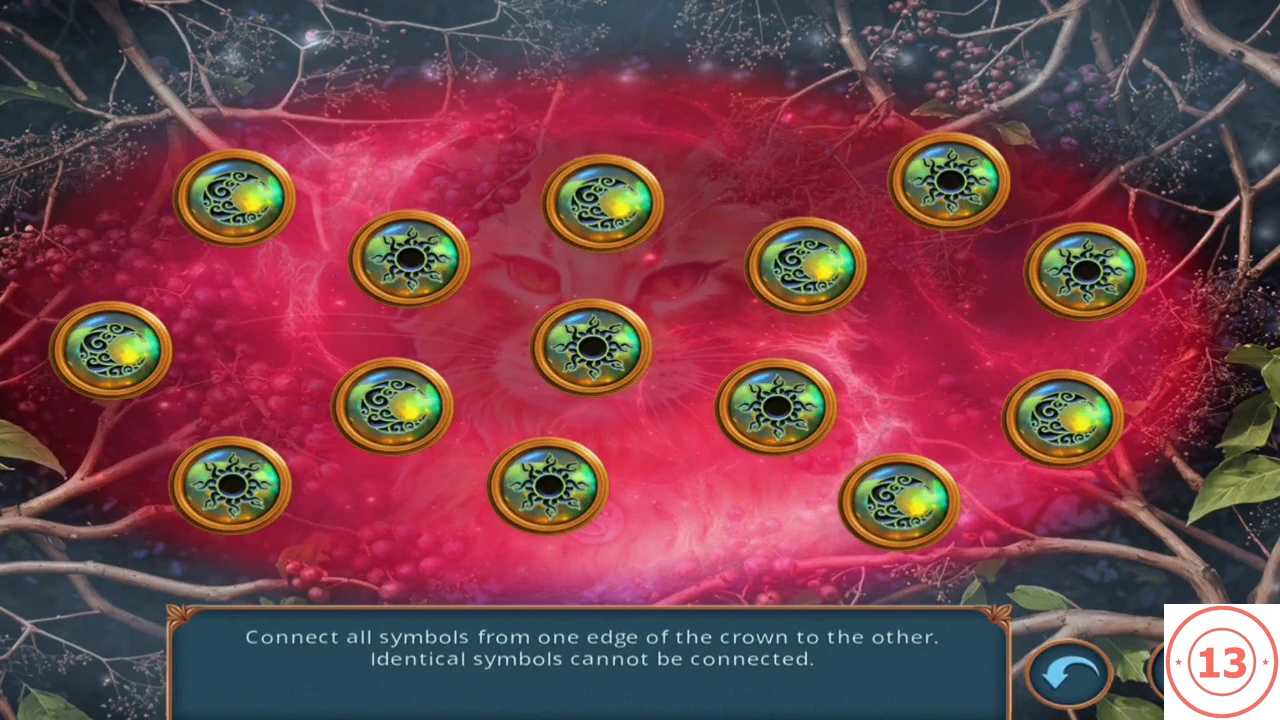
Mr. Sunlight wants to see what you found.
- Give the Witch's Crown to Mr. Sunlight to start the puzzle.
- Connect the symbols in one path from one edge of the crown to the other. A moon may never connect to another moon, nor a sun to a sun, so the path must alternate. One working route: start at the top-left moon and go to the nearby sun. Continue to the left-edge moon, the lower-left sun, the moon right of it and the lower-middle sun. Then take the lower-right moon, the sun above-left of it, the far-right moon and the right-hand sun. Finish with the upper-right moon, the top-right sun, the top-middle moon and the centre sun.
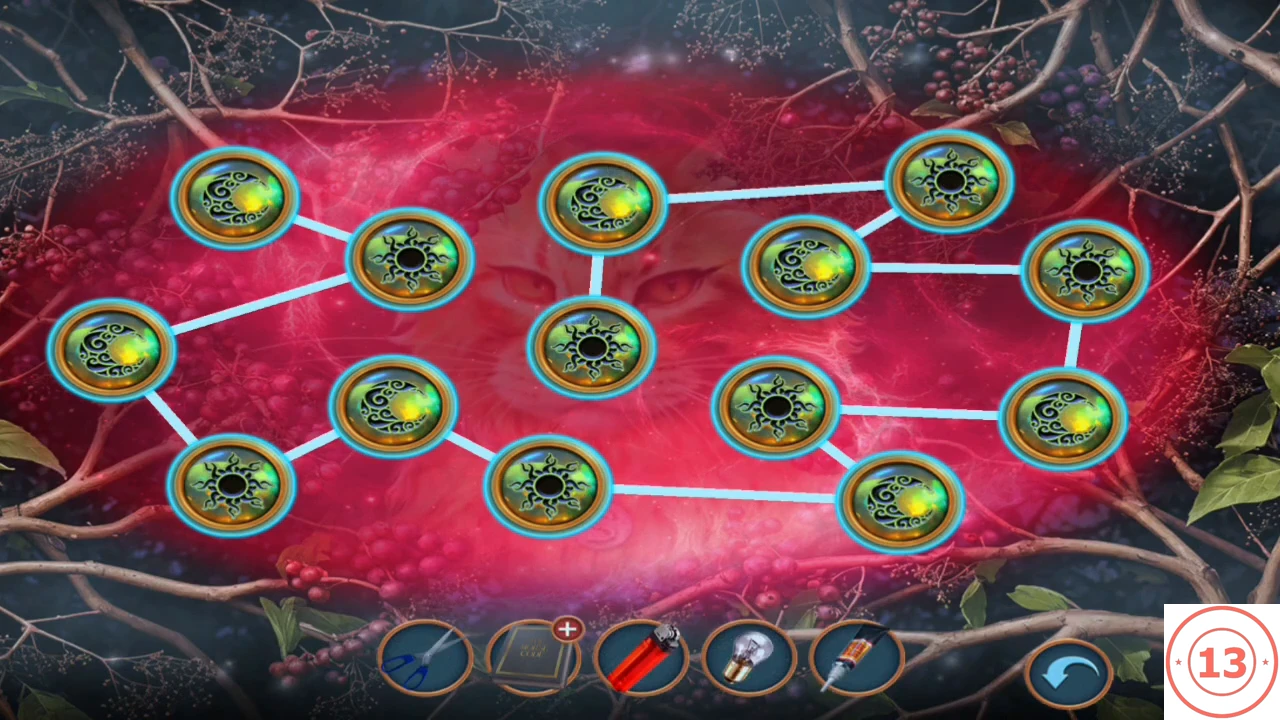
Completed state: one path crosses the crown, alternating moons and suns. - Mr. Sunlight tells Dakota to keep the crown and grow stronger. The task to explore the history of the Salem witch is complete.
CHAPTER 20
Globe Puzzle
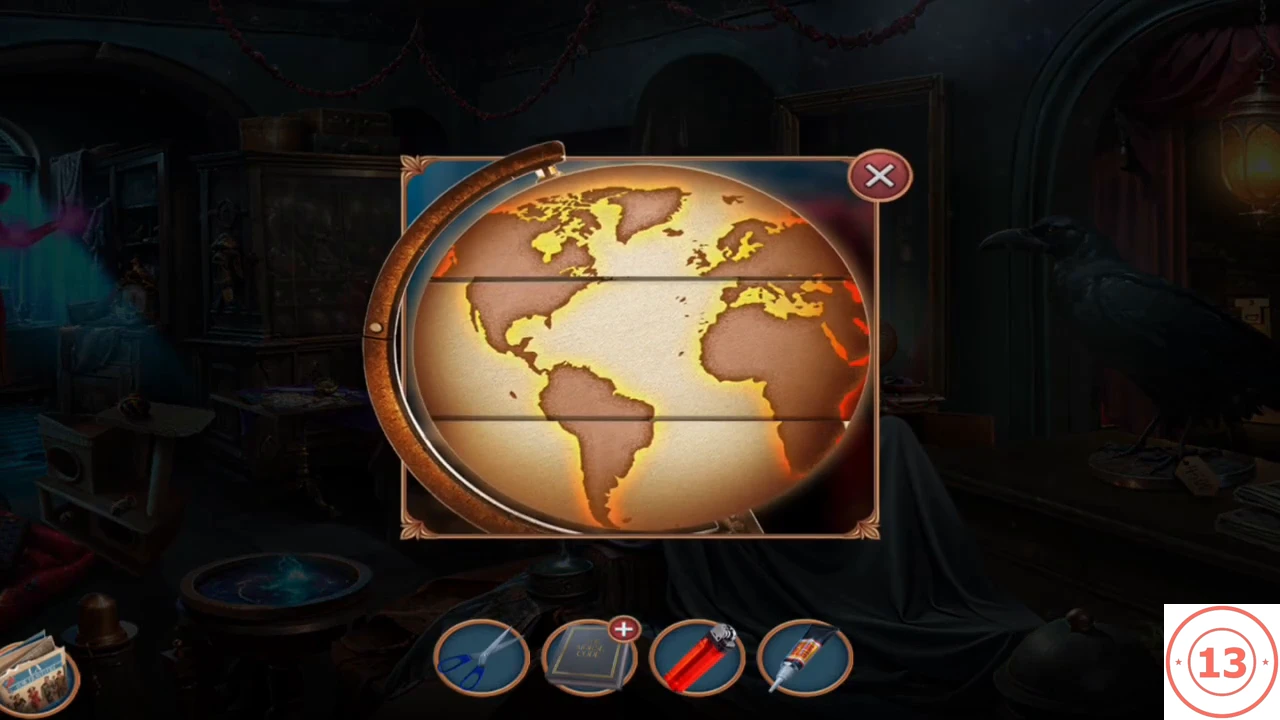
The globe beside the raven is meant to glow from the inside.
- Click the globe cabinet to the right of the bed, next to the raven. Put the light bulb inside to light it.
- The globe has three horizontal bands (top, middle and bottom) that rotate independently. Turn each band until the continents line up into one correct world map.
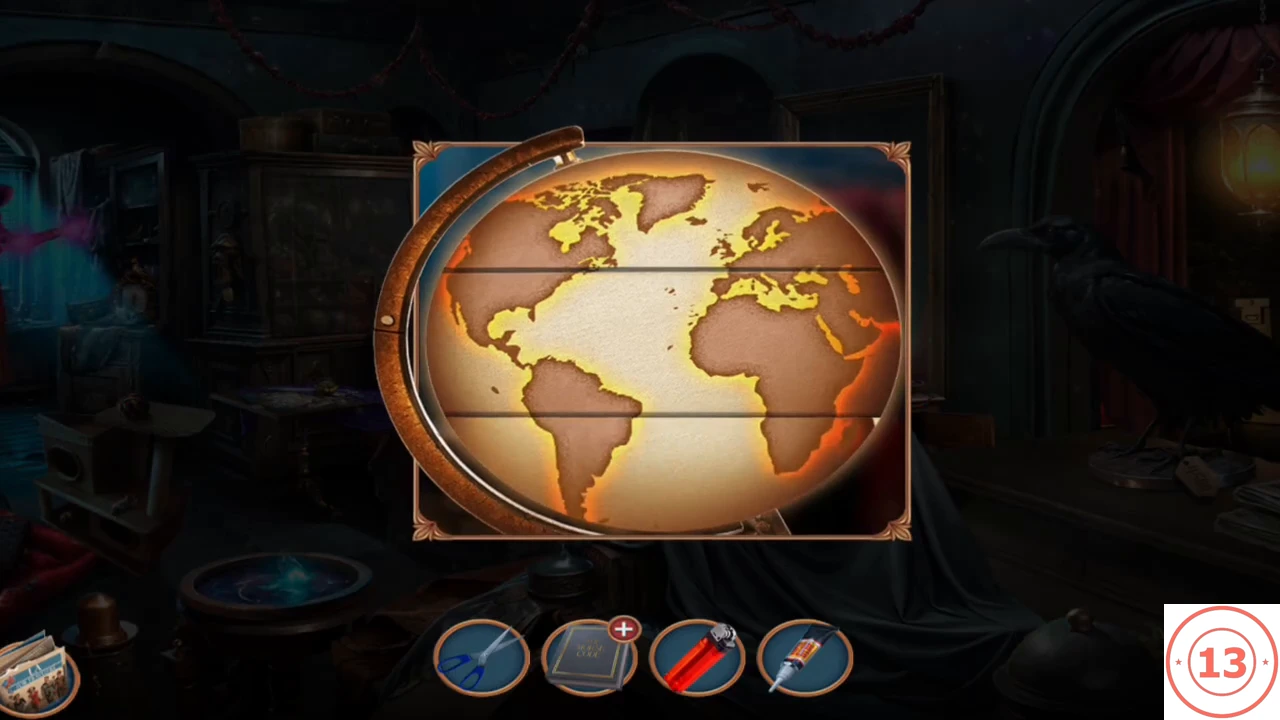
Completed state: the continents line up across all three bands. - Take the incense sticks and the tool roll.
CHAPTER 21
Altar Mirror: Sphere Puzzle and Key Gate
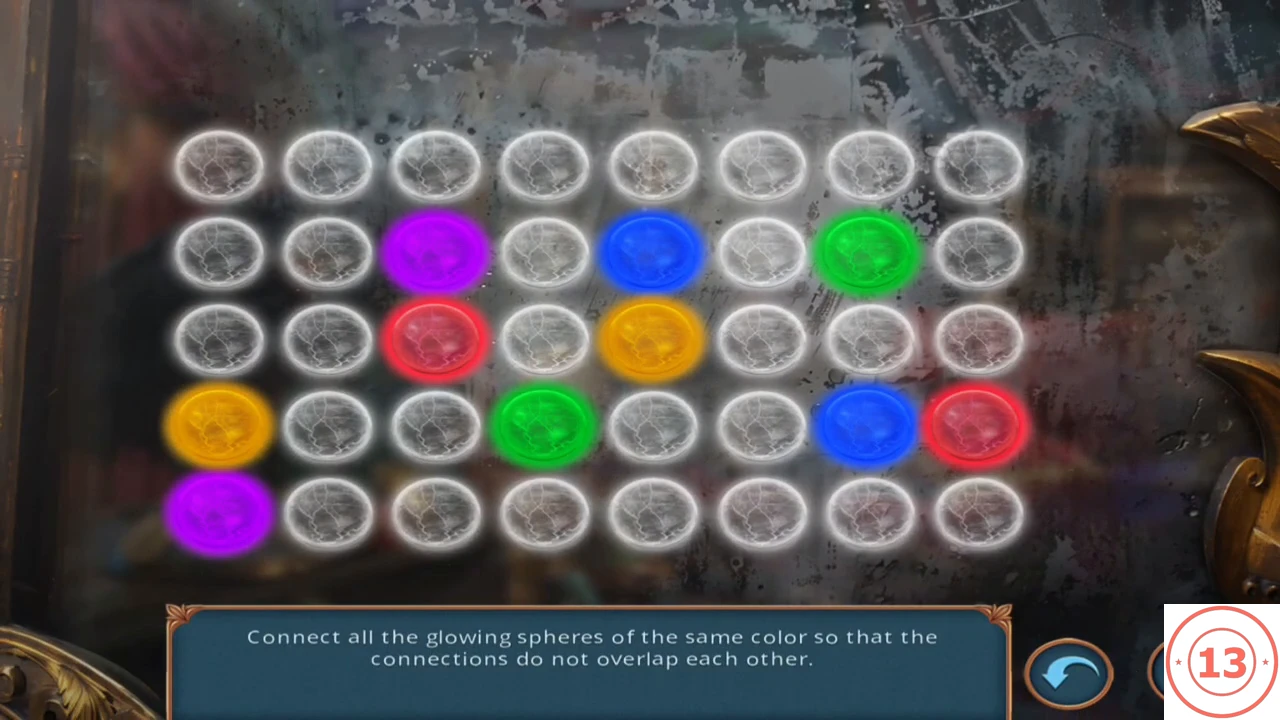
Complete the Search Ritual on the altar.
- Return to the altar and place the incense sticks and the lighter. The mirror shows a sphere puzzle.
- Connect each pair of matching coloured spheres so that no lines cross; the solution fills every cell. Count rows 1-5 from the top and columns 1-8 from the left. Yellow: row 4 column 1 up the left edge to row 1, across row 1 to column 4, down to row 3 column 4, then right to the yellow sphere at row 3 column 5. Purple: row 2 column 3 left to column 2, down column 2 to row 5, then left to row 5 column 1. Red: row 3 column 3 down to row 5, along row 5 to column 8, then up to row 4 column 8. Green: row 4 columns 4-6, up column 6 to row 2, then right to row 2 column 7. Blue: row 2 column 5 up to row 1, along row 1 to column 8, down to row 3, left to column 7 and down to row 4 column 7.
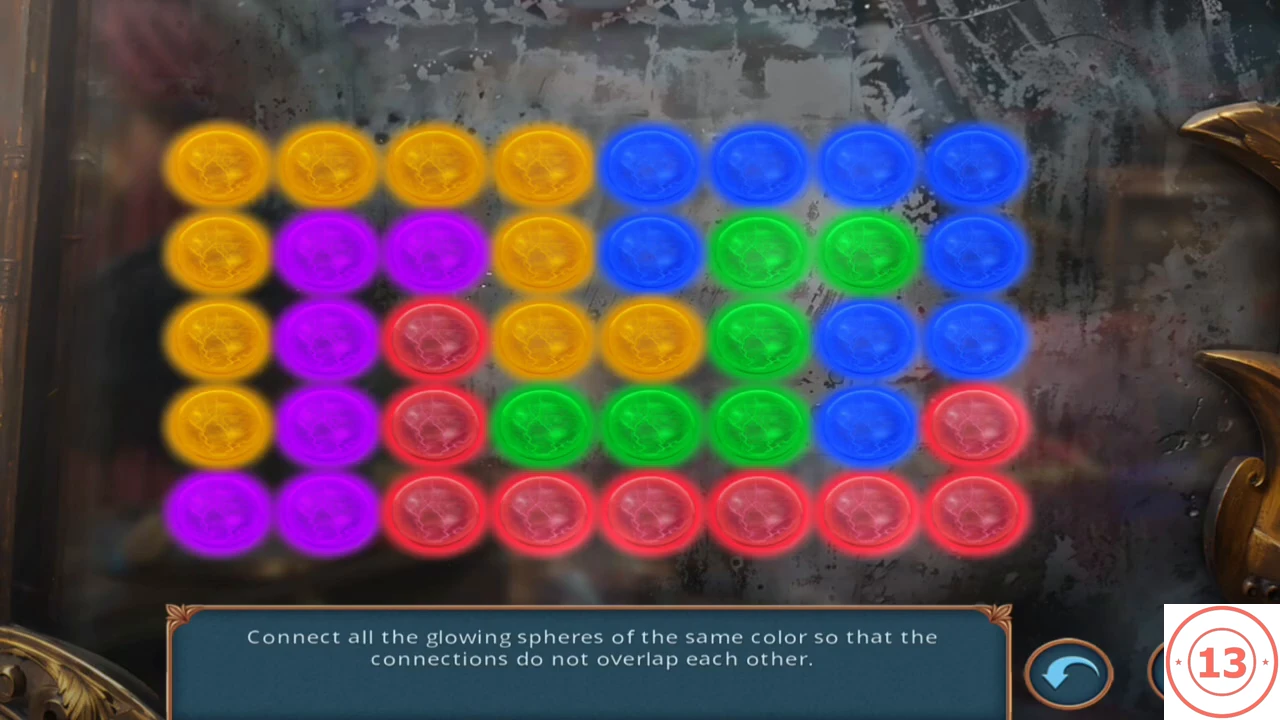
Completed state: the five coloured paths fill every cell without crossing. - A padlock gate appears: "Use the key to continue the adventure." Spend 1 key to continue to the next location. Your own key total depends on your game. If you accepted Mr. Sunlight's offer, this is the second key you spend in the episode.