The path of green trees
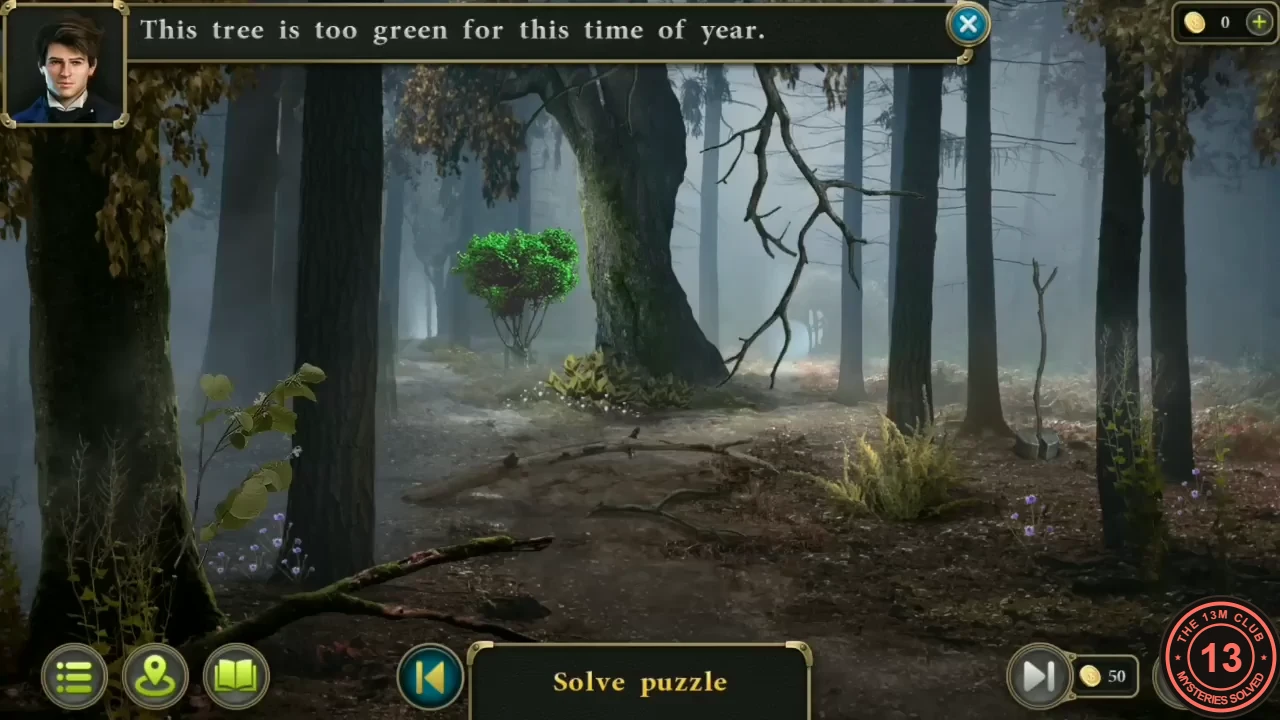
Following the grandfather's notes, the way to the hidden clearing runs through several forest views. In each one, a single tree or bush is still bright green.
- In the Mysterious forest clearing with the mossy stone pedestal, take the path with purple flowers behind it.
- In each view tap the one out-of-season green tree: the bush left of the big oak; the bush on the right among the falling red leaves; the bush in the centre where stones block the path; the fir right of centre at the top of the rocky gully; the fir at the far left of the swampy forest. You arrive at a rope bridge that has sunk into the swamp.
Ten weights for the swamp bridge
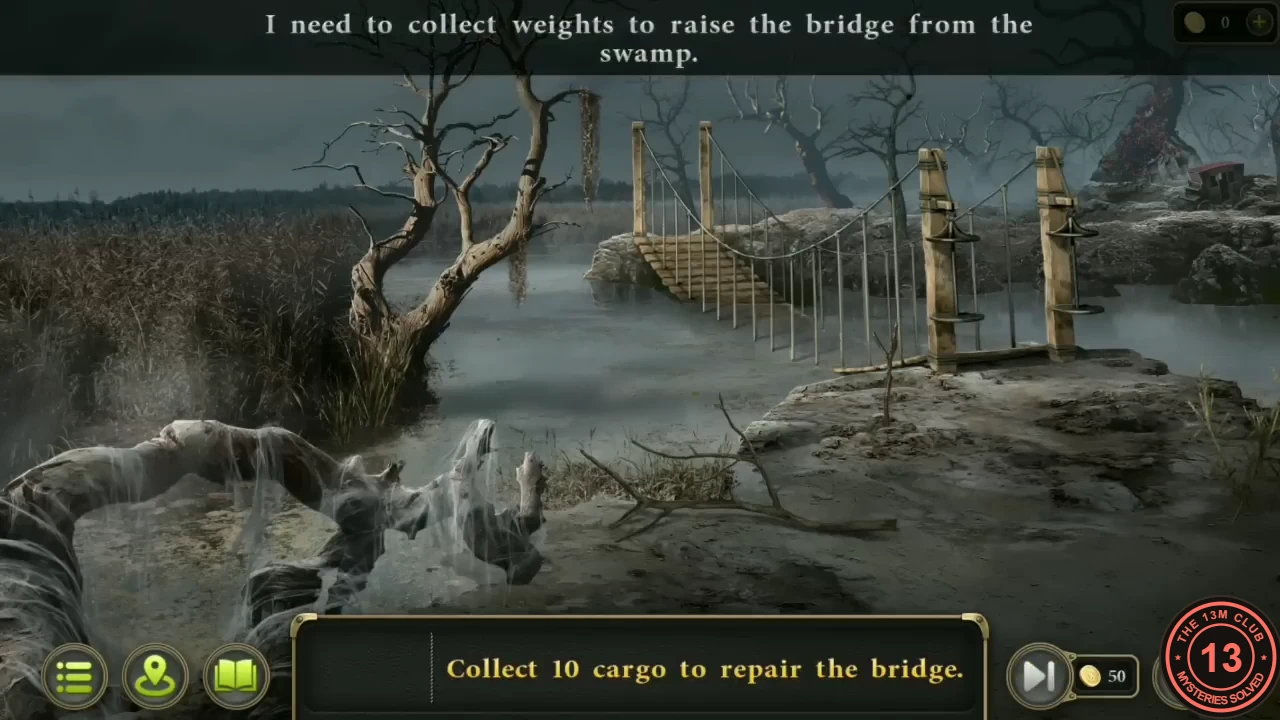
To lift the sunken bridge you must collect ten iron weights from the forest views around it. The counter at the bottom keeps track. Their positions may differ in your game, and some are hidden until you use something lying nearby; in the recording there was never more than one weight in a single view.
- Search every forest view reachable from the bridge, including the side paths. Some weights lie in plain view, but others are hidden behind or inside something and need an object from the same view: move loose stones and other things aside, and look for anything you can pick up and use nearby. At the pond with the big rock, take the loose stone at the left and use it on the big rock to break open its hollow, then take the weight. In the recording the weights were at the foot of the bridge; by the ferns in the first green-bush view; by the large leafy plant on the fern path; behind a stone near the stump in the view with fallen trunks and boulders; beside the path in the view where stones block the way; inside the big rock by the pond; in the red autumn forest; under the fallen mossy tree over the swamp; by the broken stump below a huge dead tree; and in the middle of the swampy forest.
- Hang the weights on the brackets of the bridge posts: the bridge rises. Cross it and watch a hooded priest summon a spectral dog in a stone circle. The task Investigate the ritual opens.
The chest on the carriage at the stone circle
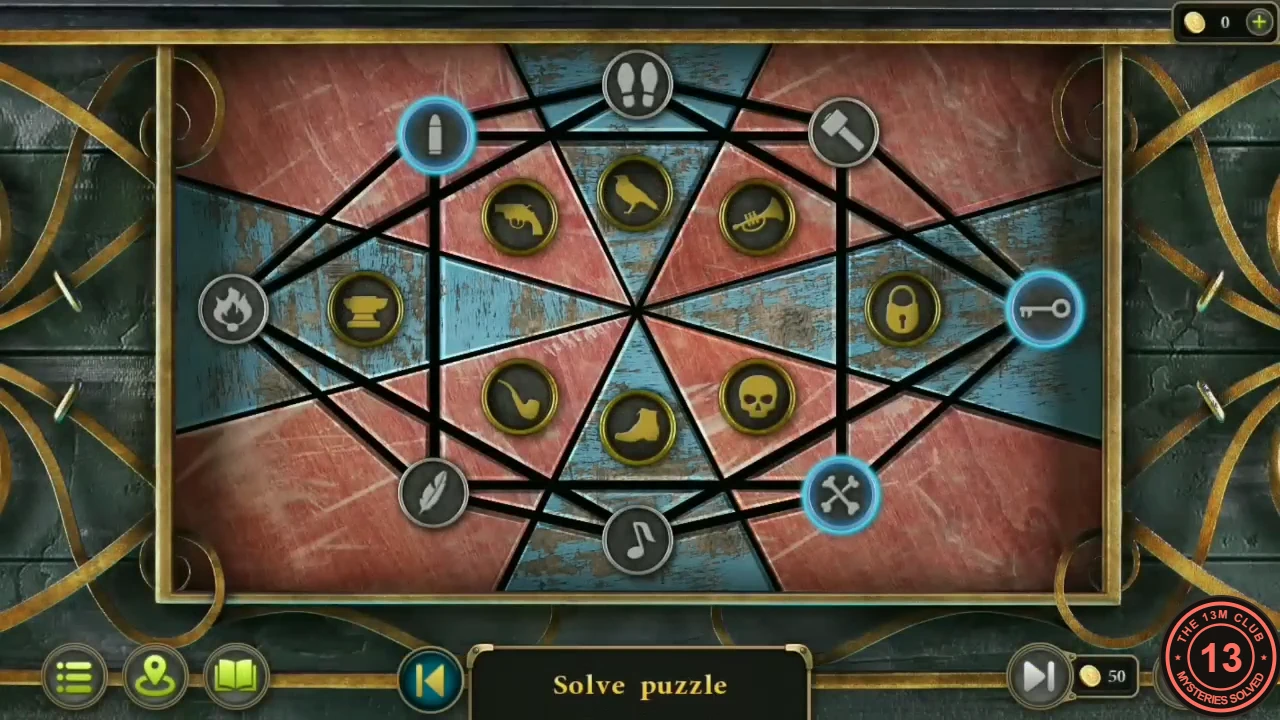
The priest fled from the stone circle, leaving a carriage with a locked chest. The chest lid is an association puzzle with eight tokens moving around a star of lines, and its start can differ.
- Scrape the moss off the stump with the carved face on the left with the Knife: its symbol is copied onto the Clue. Tap the glowing ring on the stone slab (Circle with strange symbols) and take the Figurine from the priest's bag lying near the carriage.
- Force the carriage door with the Crowbar and take the ornate Key from the seat. Use it on the turquoise chest at the back of the carriage.
- Eight gold icons are fixed in an inner ring; each outer token belongs beside one of them: bullet by the revolver, feather by the crow, music note by the trumpet, key by the lock, crossed bones by the skull, footprints by the boot, fire by the pipe and hammer by the anvil. Tapping a token moves three tokens one step round one of the triangles of lines. A token glows blue when it sits beside its icon. Fix one pair at a time and use taps that leave finished pairs alone.
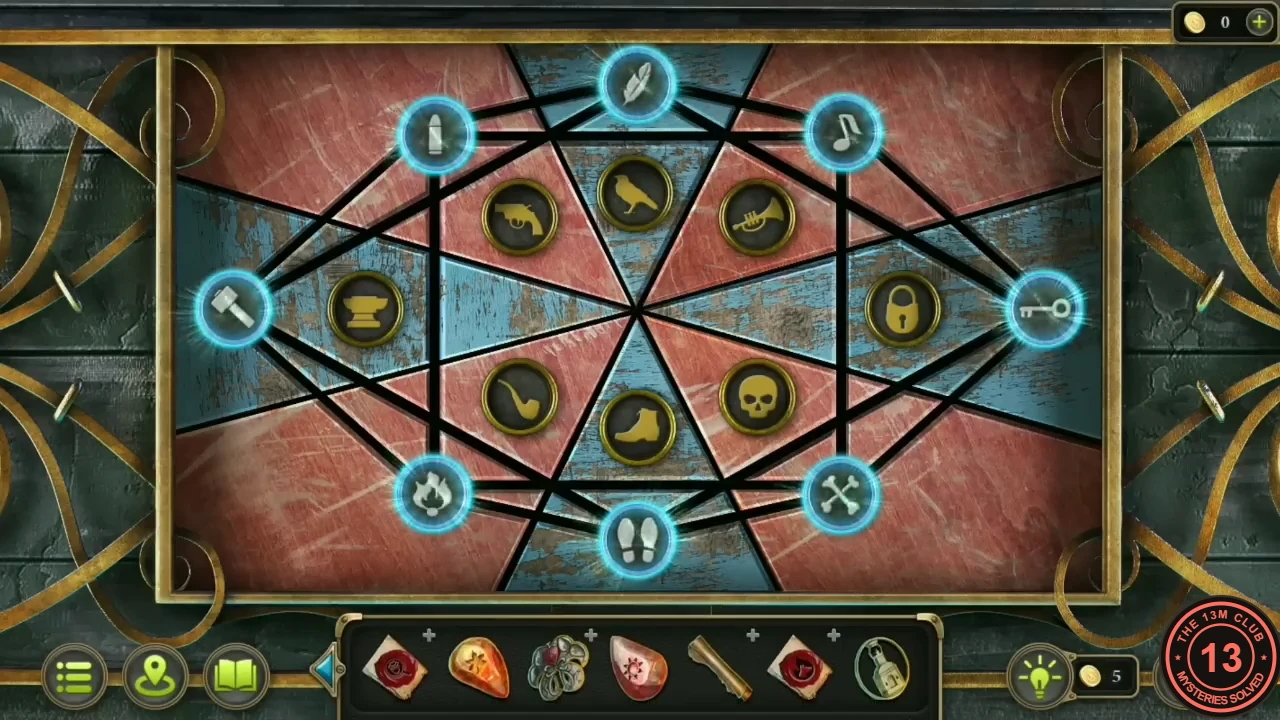
Every token beside its partner: bullet by revolver, feather by crow, note by trumpet and so on. - Take the green-gem Detail and the Garden trowel from the chest.
The town miniature in the temple
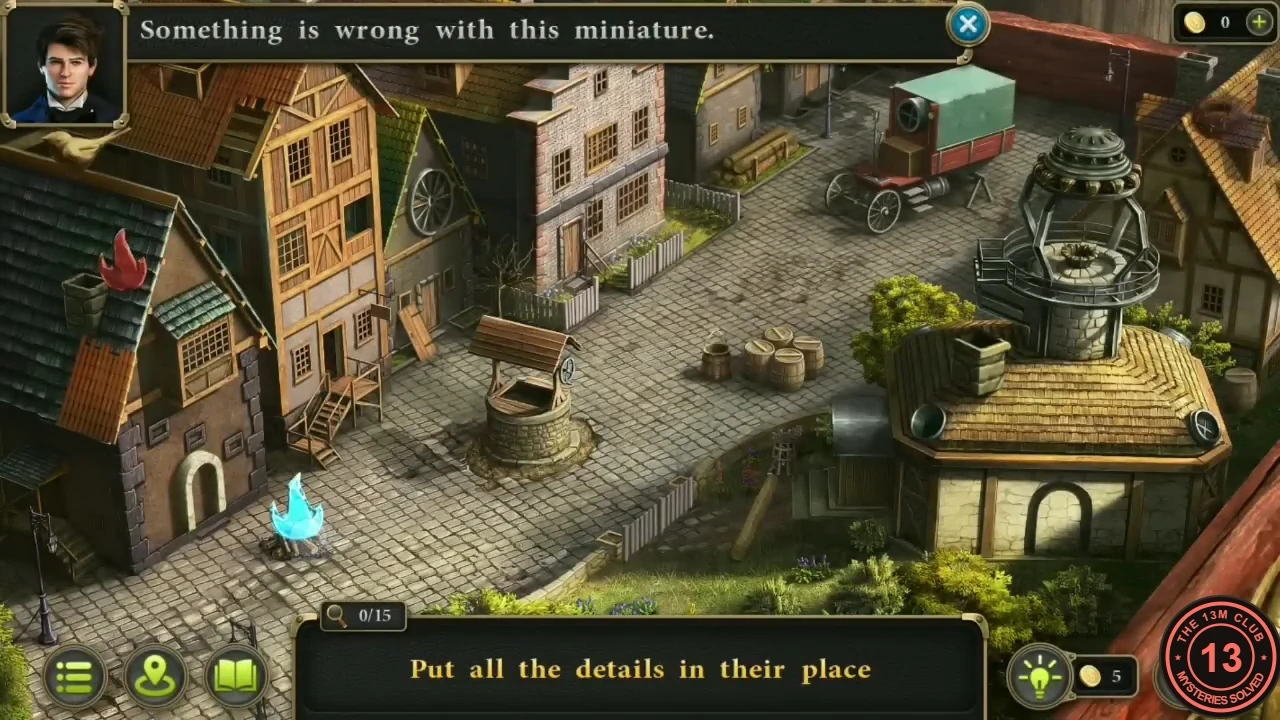
A glass case in the temple holds a model of the town with 15 details in the wrong places. Tap each misplaced detail and it flies to where it belongs.
- In the estate garden, dig in the stone flower urn with the Garden trowel and tap the engraved symbol: the flower urn column of the Clue fills in.
- In Harry's farmhouse, put the Detail into the four-leaf recess on the lid of the big chest and take the Statuette inside.
- In the temple, open the gold lock of the glass case on the left with the Figurine.
- Tap the 15 misplaced details: the blue flame by the campfire (it goes to the brazier on the lantern tower); the red flame on a chimney (to the campfire); the round vent on the covered wagon (to the octagonal roof); the white arched door on the far-left house (to the octagonal building); the yellow bird on a roof (to the nest); the wheel hanging on a narrow house (to the wagon); the loose barrel at the right edge (to the barrel stack); the log on the grass (to the log pile); the loose fence section (to the gap in the fence); the orange roof patch (to the half-timbered house); the door lying in the street (to the doorway at the top of the stairs); the dormer roof (to the empty dormer frame); the small bucket (to the well); the chimney stack on the octagonal building (to the far-left house); and the wooden window by the stepped brick house.
- Take the Signet from the drawer that opens in the front of the case.
The rune arch behind the temple dais
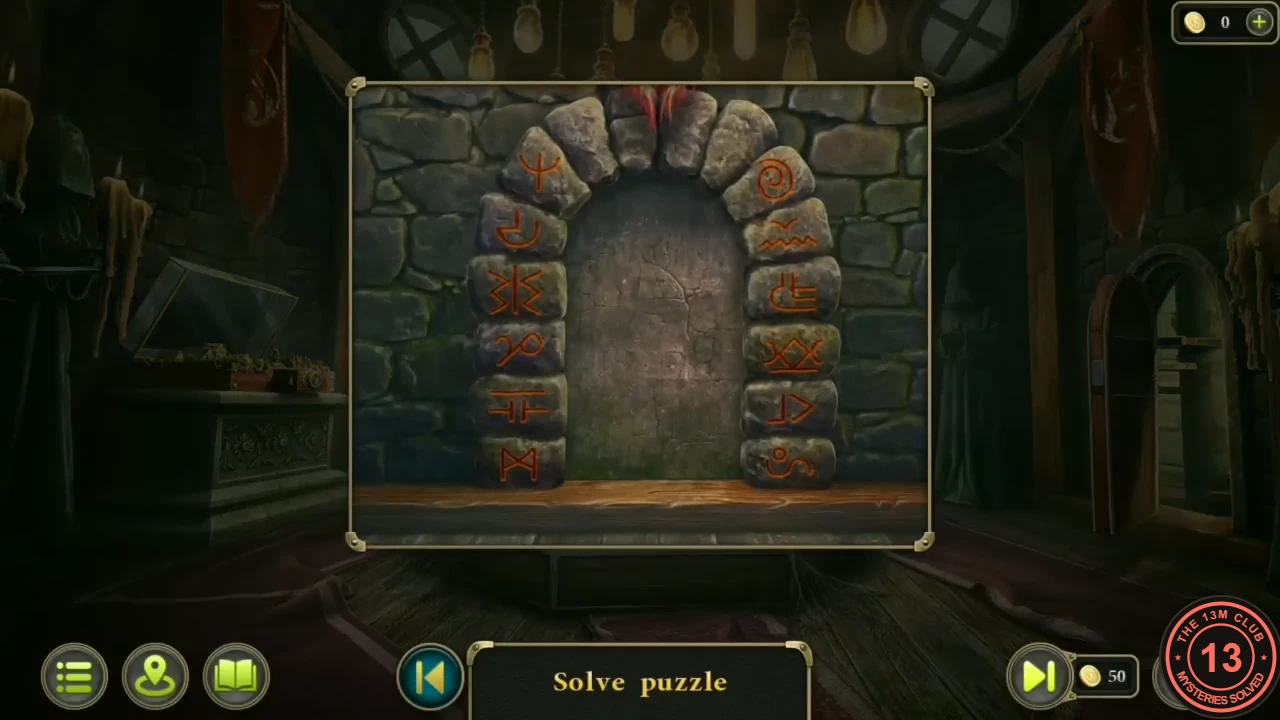
The small bricked arch behind the lectern carries twelve runes. Five of them were drawn in the glowing ritual circle at the stone circle.
- Tap the bricked arch and light the five ritual runes. Counting from the top, they are the third, second and sixth runes on the left side and the fifth and first runes on the right side. Lit runes turn yellow, and the stone door slides open.
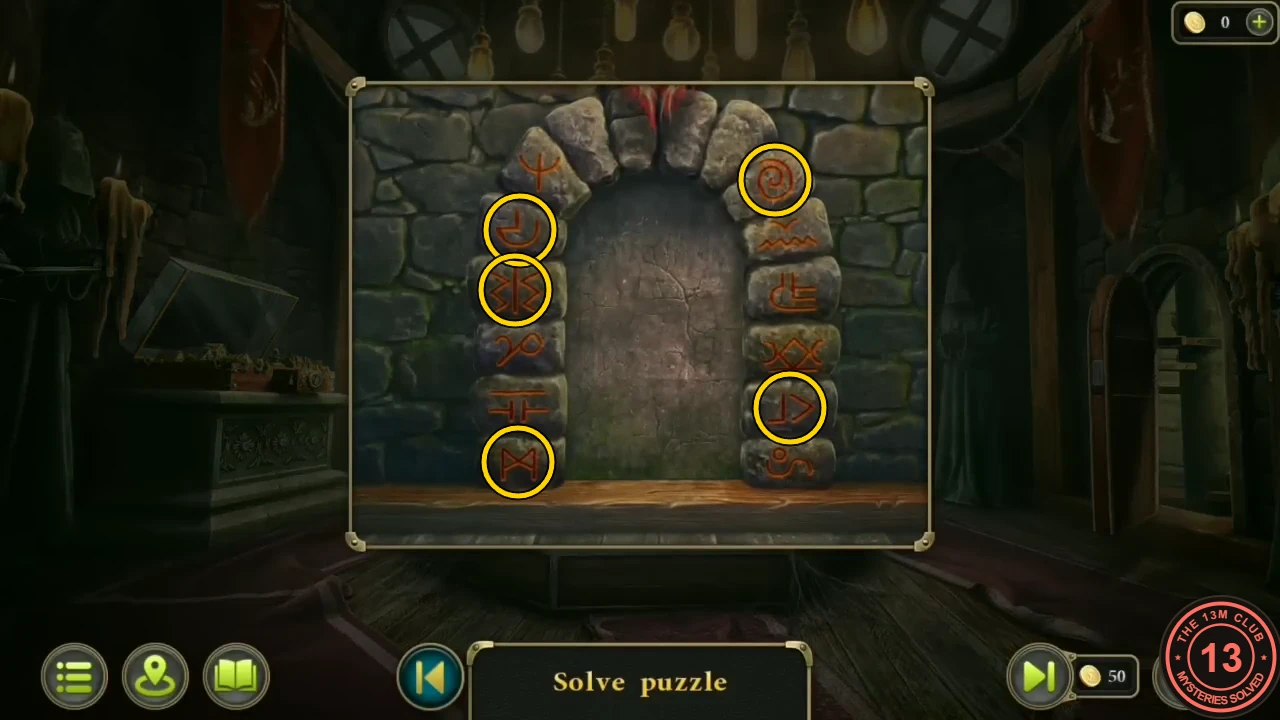
The five runes to light. - Use the Signet on the round lock of the red book in the niche and read the Ritual of protection and tap the page to record it (Ritual of protection and purification, evidence 2/2 of the Strange ritual file). The cleric's ritual was meant to protect the settlement, and Investigate the ritual is complete.
The four seasons pedestal in the forest
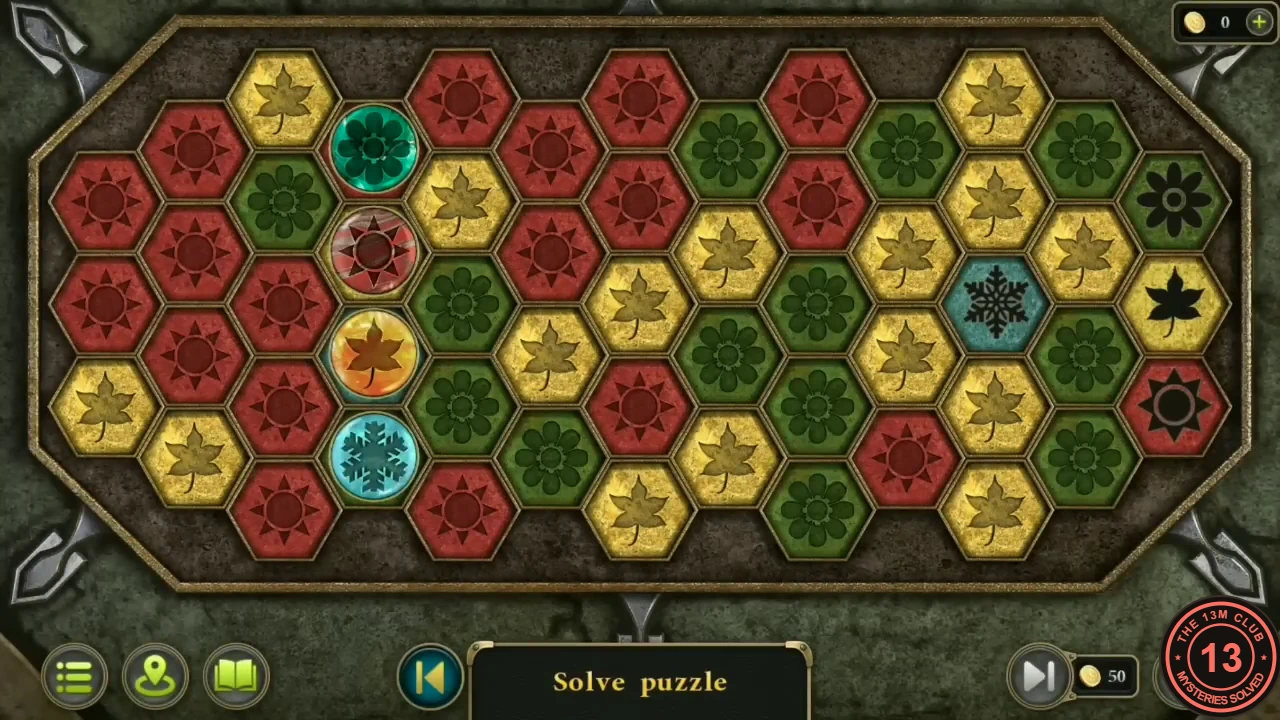
The mossy pedestal in the forest clearing takes the Pendant once all four coloured stones are set in it. The board inside is a path-building puzzle, and its layout may differ in your game.
- In the Count's living room, tap the mantelpiece: a grey dog statue stands at its left end and the right end is empty. Put the Statuette there. The painting above slides up: take the Green stone from the niche.
- At the stone circle, take the Stick lying to the right of the circle and use it on the dead tree with red berries at the upper left to knock down the Blue stone.
- Open the Pendant in your inventory and fit the four stones into its petals: Green stone upper left, Red stone in the sun petal, Orange stone in the leaf petal and Blue stone in the flower petal. Place the completed Pendant in the four-leaf emblem on the pedestal in the forest clearing.
- Four gems (flower, sun, maple leaf and snowflake) must reach their black target symbols: the flower, leaf and sun targets are at the right edge, and the snowflake target is the teal tile two columns in from the edge. Tap a gem and the neighbouring tiles showing its own symbol light up; tap one to move there. The tile a gem leaves changes to the next season: sun becomes leaf, leaf becomes snowflake, snowflake becomes flower and flower becomes sun. Use each move to build the tile another gem needs, bring gems up close to their targets, and finish them one after another.
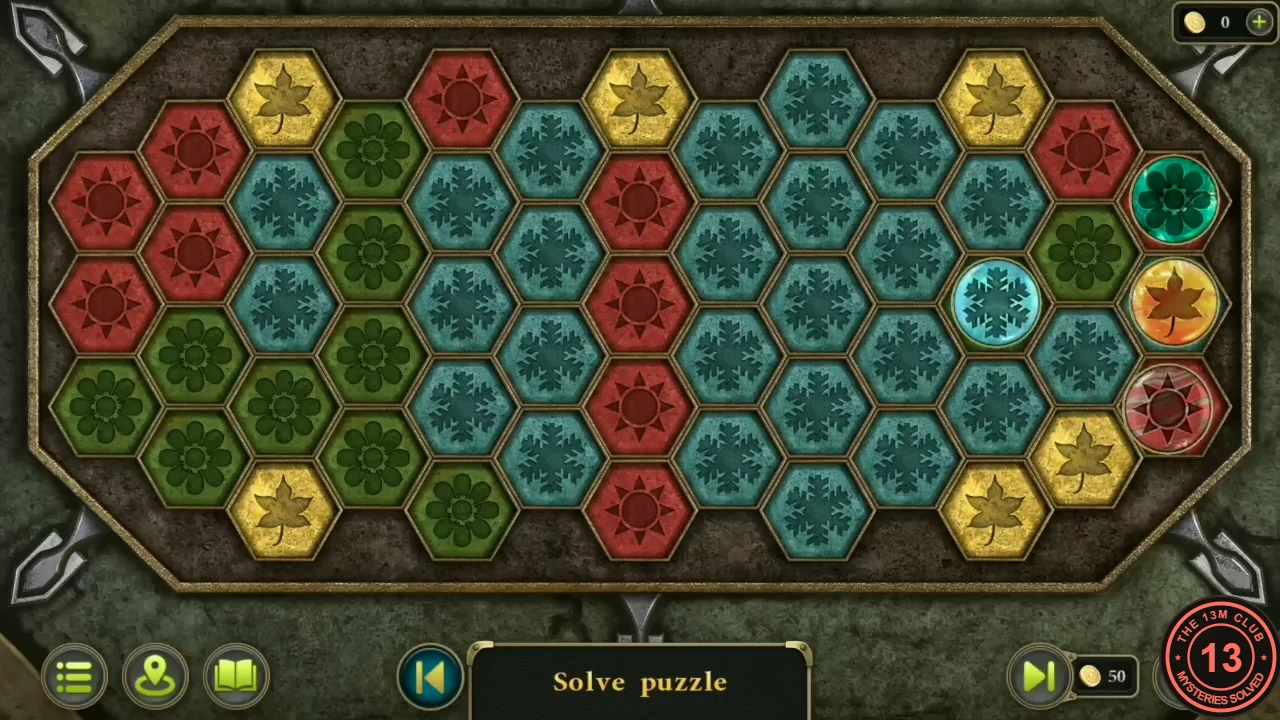
The gems on their targets after the solve. - Tap the carved symbol in the opened pedestal: the small-house column fills and the Clue is complete.
The round vault in the secret room
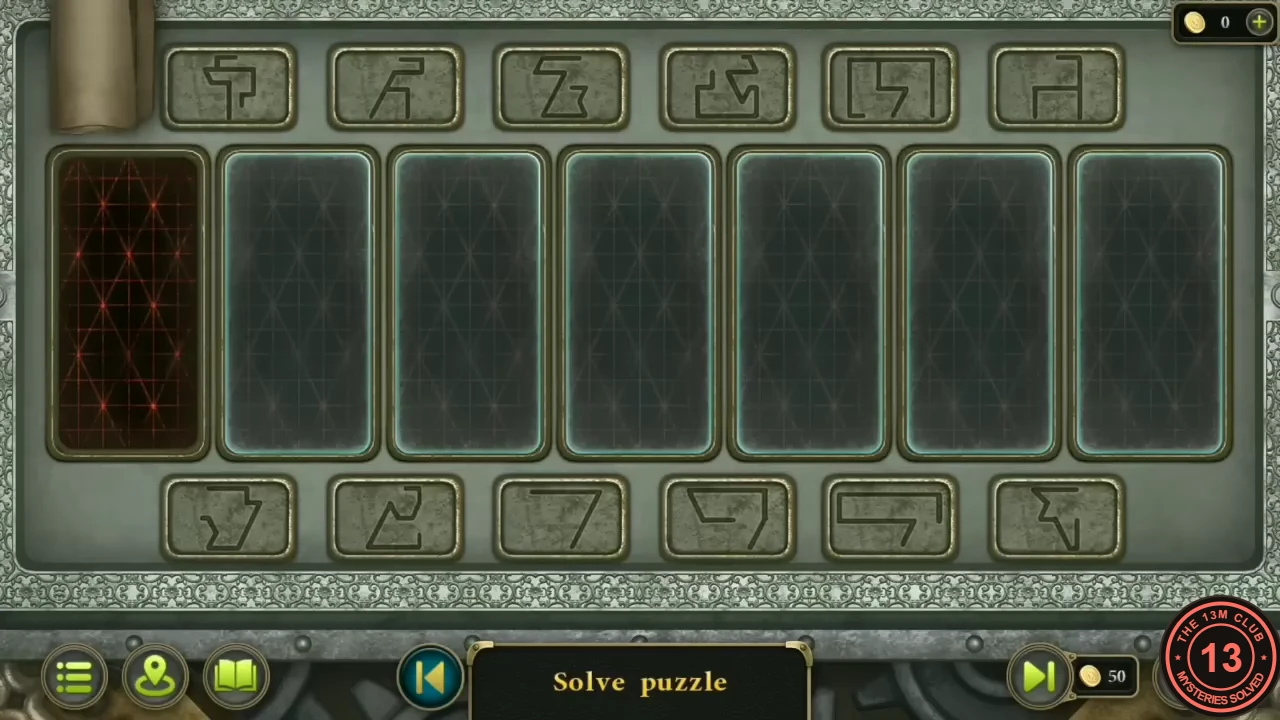
The finished Clue opens the vault's lock: seven tall panels, each rebuilt from three stroke pieces to copy one column of the Clue.
- In the secret room, use the Clue on the round gold vault.
- The active panel glows red. Fill it from top to bottom by pressing three of the stroke buttons (six above the panels and six below) so the pieces rebuild the dotted symbol in the matching Clue column; buttons can be reused. Number the buttons 1 to 6 from the left in each row (T for the top row, B for the bottom row). Solution from the recording, top, middle and bottom piece for each panel: 1: B3, T6, B6. 2: T5, T2, B1. 3: B4, T1, T4. 4: T5, T2, T3. 5: B5, T1, B2. 6: B3, T2, B1. 7: B4, T6, B6.
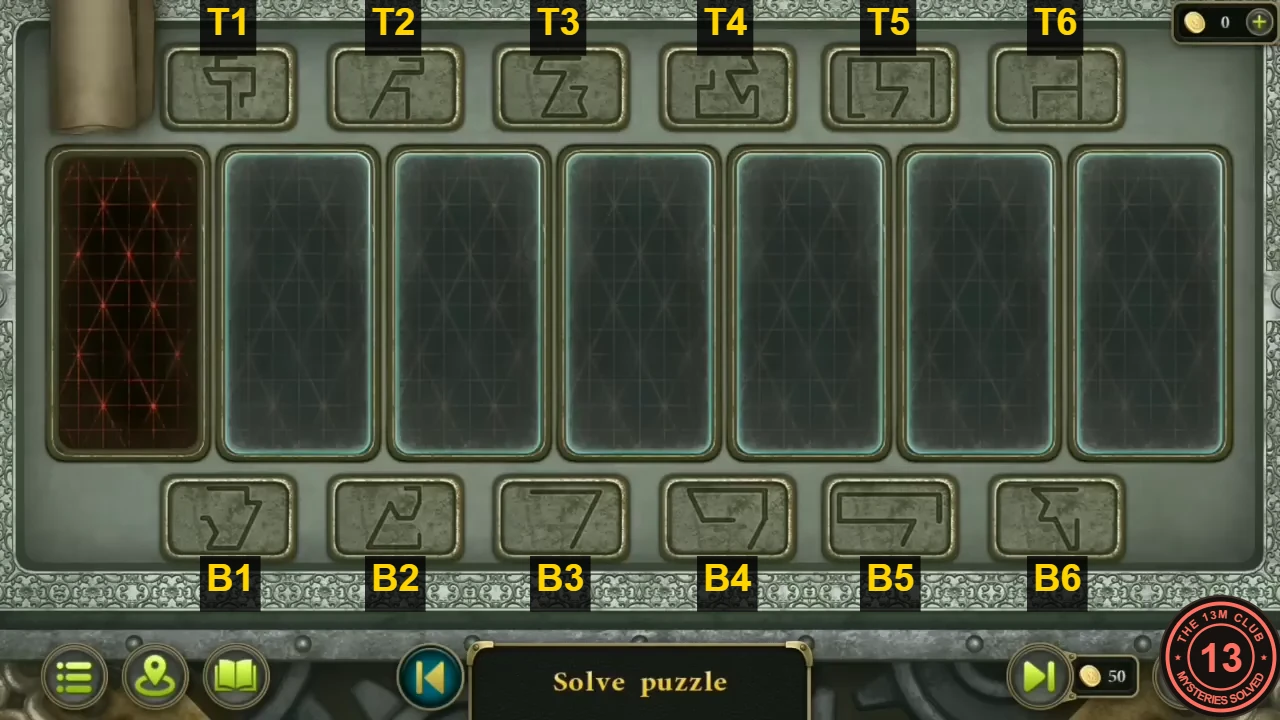
Button labels used in the solution. - Read the red book in the vault: a dangerous cult gathers near an abandoned mine tunnel in the forest, which the grandfather ordered sealed. The task Explore the tunnel opens.
The poison ivy and the mine tunnel
The sealed tunnel lies behind poisonous ivy on the mound at the stone circle. A boulder blocks it, and the dynamite from the mill basement clears the way.
- At the stone circle, tap the red-leaved ivy on the mound at the upper left: it is poisonous. Ask Harry at the farmhouse how to get rid of it. He recommends herbicide injected near the root and gives you the Key to his small shed.
- Unlock the narrow plank shed with the small red roof just right of the red barn at the back of the farmyard, and take the Syringe from the wall and the Lantern.
- At the desk, fill the Syringe from the glass cylinder of herbicide (Herbicide). Inject it at the base of the ivy, cut the dead ivy away with the Knife and hang the Lantern in the tunnel mouth: a large boulder blocks the passage.
- In the mill basement, prise the lid off the crate in the cage with the Crowbar and take the Explosives. Place them at the boulder and light the fuse with the Lighter. After the blast, hang the Lantern again and walk into the tunnel.
- In the underground workshop, cut the rope on the cloth-covered pile on the right with the Knife (Rope) and tap the painted barrels (Herbicide batch). Tie the Rope to the grappling hook on the workbench and use the Rope with hook on the folded ladder in the ceiling trapdoor. Climb up to overhear two men: the Count is staging the monster. The task Collect evidence of the Count's guilt opens.
- The ladder comes up in the Count's gazebo. Take the Ring from the table. In the living room, fit the Ring into the round socket of the glass cabinet to the left of the fireplace and take the Bunch of keys.
- Return to the workshop through the gazebo, unlock the back door with the Bunch of keys and tap the framed plaque on it.
The creature discs on the workshop door
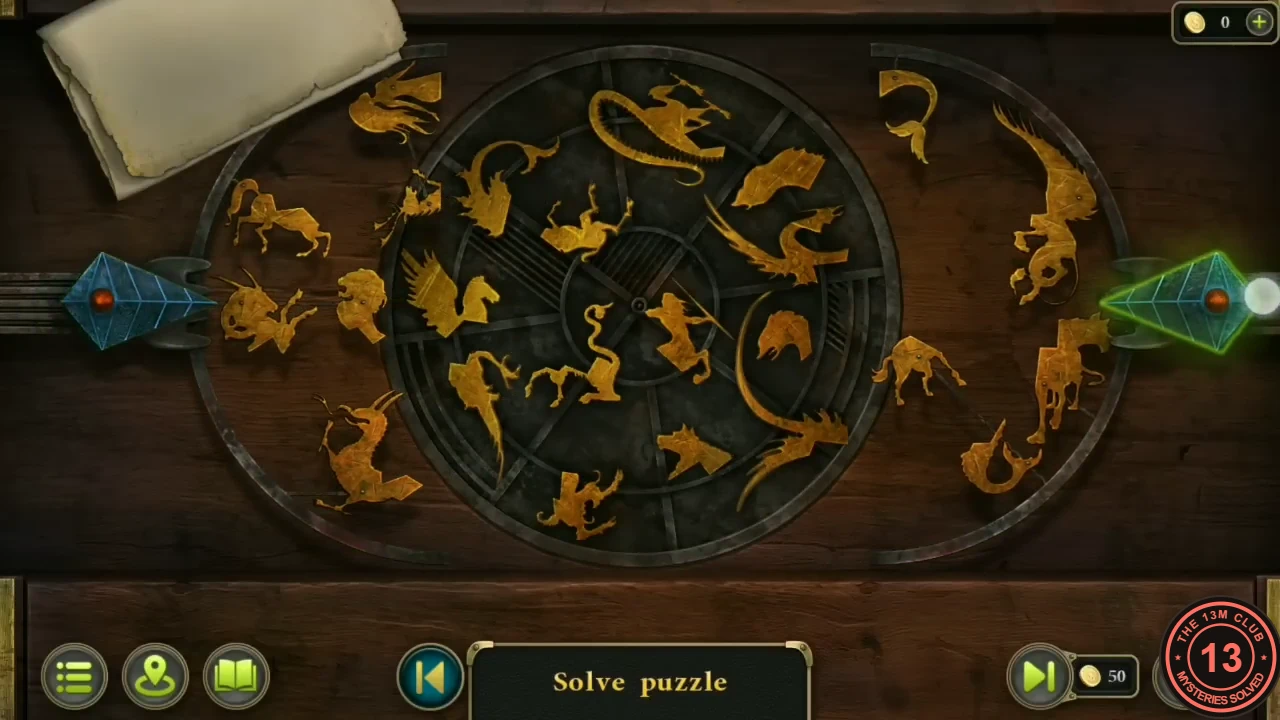
The workshop's back door is locked by a round disc between two sliding half-rings, all covered in fragments of gold creatures. The scroll at the top left lists ten creatures to assemble. This is a long trial-and-error puzzle, so the method is given instead of every move.
- Open the scroll at the top left to see the checklist: griffin, mermaid, horned goat-like beast, centaur, lion, many-headed dog (Cerberus), long serpent-dragon, sea serpent, pegasus and stag.
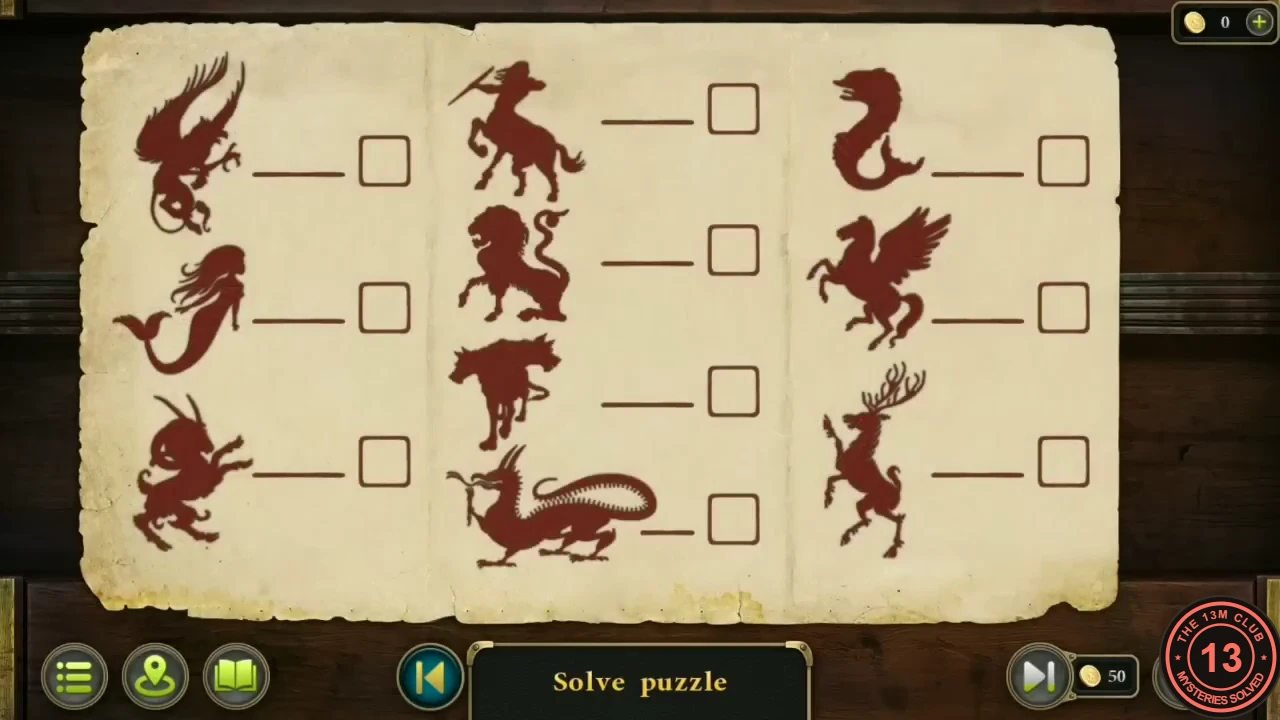
The ten creatures to assemble. - Tap the blue diamond at either end of the rail to push that side's half-ring against the centre disc, or to pull it back; tap the disc to turn it. When the fragments on the disc and an engaged half-ring line up into one of the listed creatures, it is ticked off. Work with one half-ring at a time: engage it, turn the disc step by step while watching for a listed outline, then pull it back and try the other side. The door opens when all ten are ticked.
The attacker's lair and the Count's guilt
Behind the door is the lair where the "beast" was manufactured. Collect the remaining ten clues for the Mystical scam file to close the case.
- Tap the sprayer by the barrels on the left (Herbicide canister), the wolf-head helmet on the red post (Helmet with an animal face), the receipts and notebook on the desk (Land acquisition documents), the whistle on the desk (Dog whistle) and the paw-shaped boots on the floor (Boots with paws).
- Tap the green bottle in the box on the table (Green paint) and the paper in the drawer that opens (Purchase receipts). At the claw stand, tap the hooked bar on the floor (New claw blank) and the clawed glove (Paw prototype). Finally tap the fur hanging on the post on the right (Cloak that looks like animal skin).
- With all twelve clues the case board closes itself: the Count faked the beast to frighten the farmers off land he wanted. There is no suspect to choose. The closing scene shows the case file stamped SOLVED, and Case 2 becomes available.