The study: ring, glass dome, cart and chained wardrobe
The study has a desk on the left, a glass dome on the floor, a bathroom at the back and a medical cart in front of a wooden wardrobe.
- Zoom into the water heater by the bathtub at the back. Take the purple medicine bottle and the red-gem ring from the heater.
- Zoom into the glass dome on the floor. Use the ring to cut a round hole in the glass, then take the alcohol bottle and the caster wheel from inside.
- Attach the caster wheel to the medical cart. The cart rolls aside, revealing a chained wardrobe and Demetrius's note ("My virus is ready for the storm...").
- Pick up the ornate clock hand from the floor (1/2).
- Pour the green skull poison on the wardrobe chain; it dissolves and the doors open. The inside is dark, but you can already take the gold necklace with the red gem at its lower edge.
Desk drawer, Vlad's attack and the heater
The winged emblem on the necklace fits the desk drawer, and reading what is inside triggers the next story scene.
- Zoom into the desk on the left and place the gold necklace on the front of the drawer. The drawer opens; read Demetrius's second note.
- Vlad, transformed, bursts in and attacks. Abraham holds him off and asks you to find a remedy. The task Find Vlad completes and Cure Vlad begins.
- Take the round grey heater knob from the drawer.
- In the bathroom, attach the knob to the water heater and turn it. Hot water melts the ice in the tub; take the brass handle from the bottom.
- Attach the brass handle to the lid of the crate under the glass dome. It will not open yet ("I'll need a couple of things").
Bar fragment hidden-object scene: melted caramel
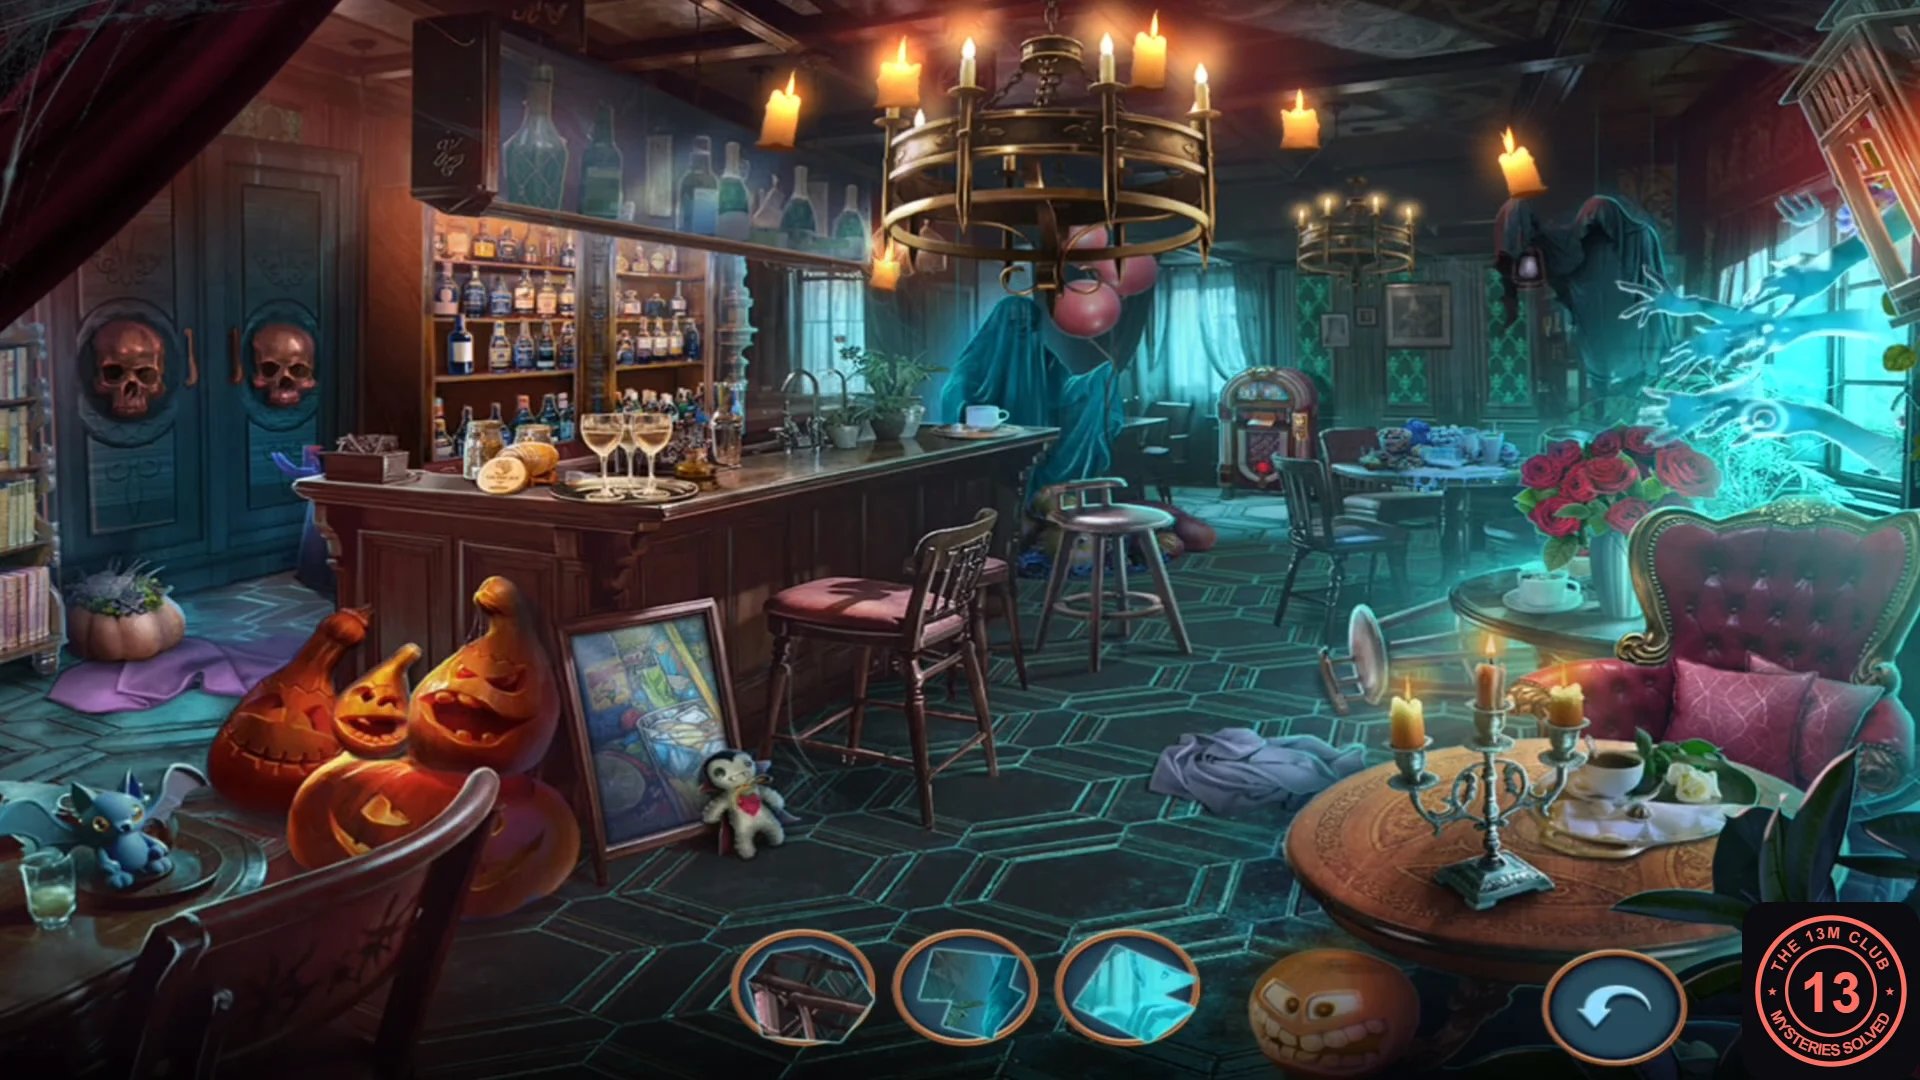
The bar returns as a fragment hidden-object scene. The tray shows three image fragments at a time; tap the place in the scene that each fragment shows, and a green tick marks each find.
- Go back down to the lobby (a ghost flies through on the way) and enter the bar.
- Find all 12 fragments. In the recording they were: bottles on the shelf behind the bar, the shelf right of the bar shelves, the plant and teal curtain on the bar, the teal window by the jukebox, the wall right of the jukebox, the hooded figure at upper right, the ghostly hands on the right, the chair on the right, the front-left of the bar counter, the jack-o'-lanterns, the bar stool and the front-right corner of the bar beside the leaning painting.
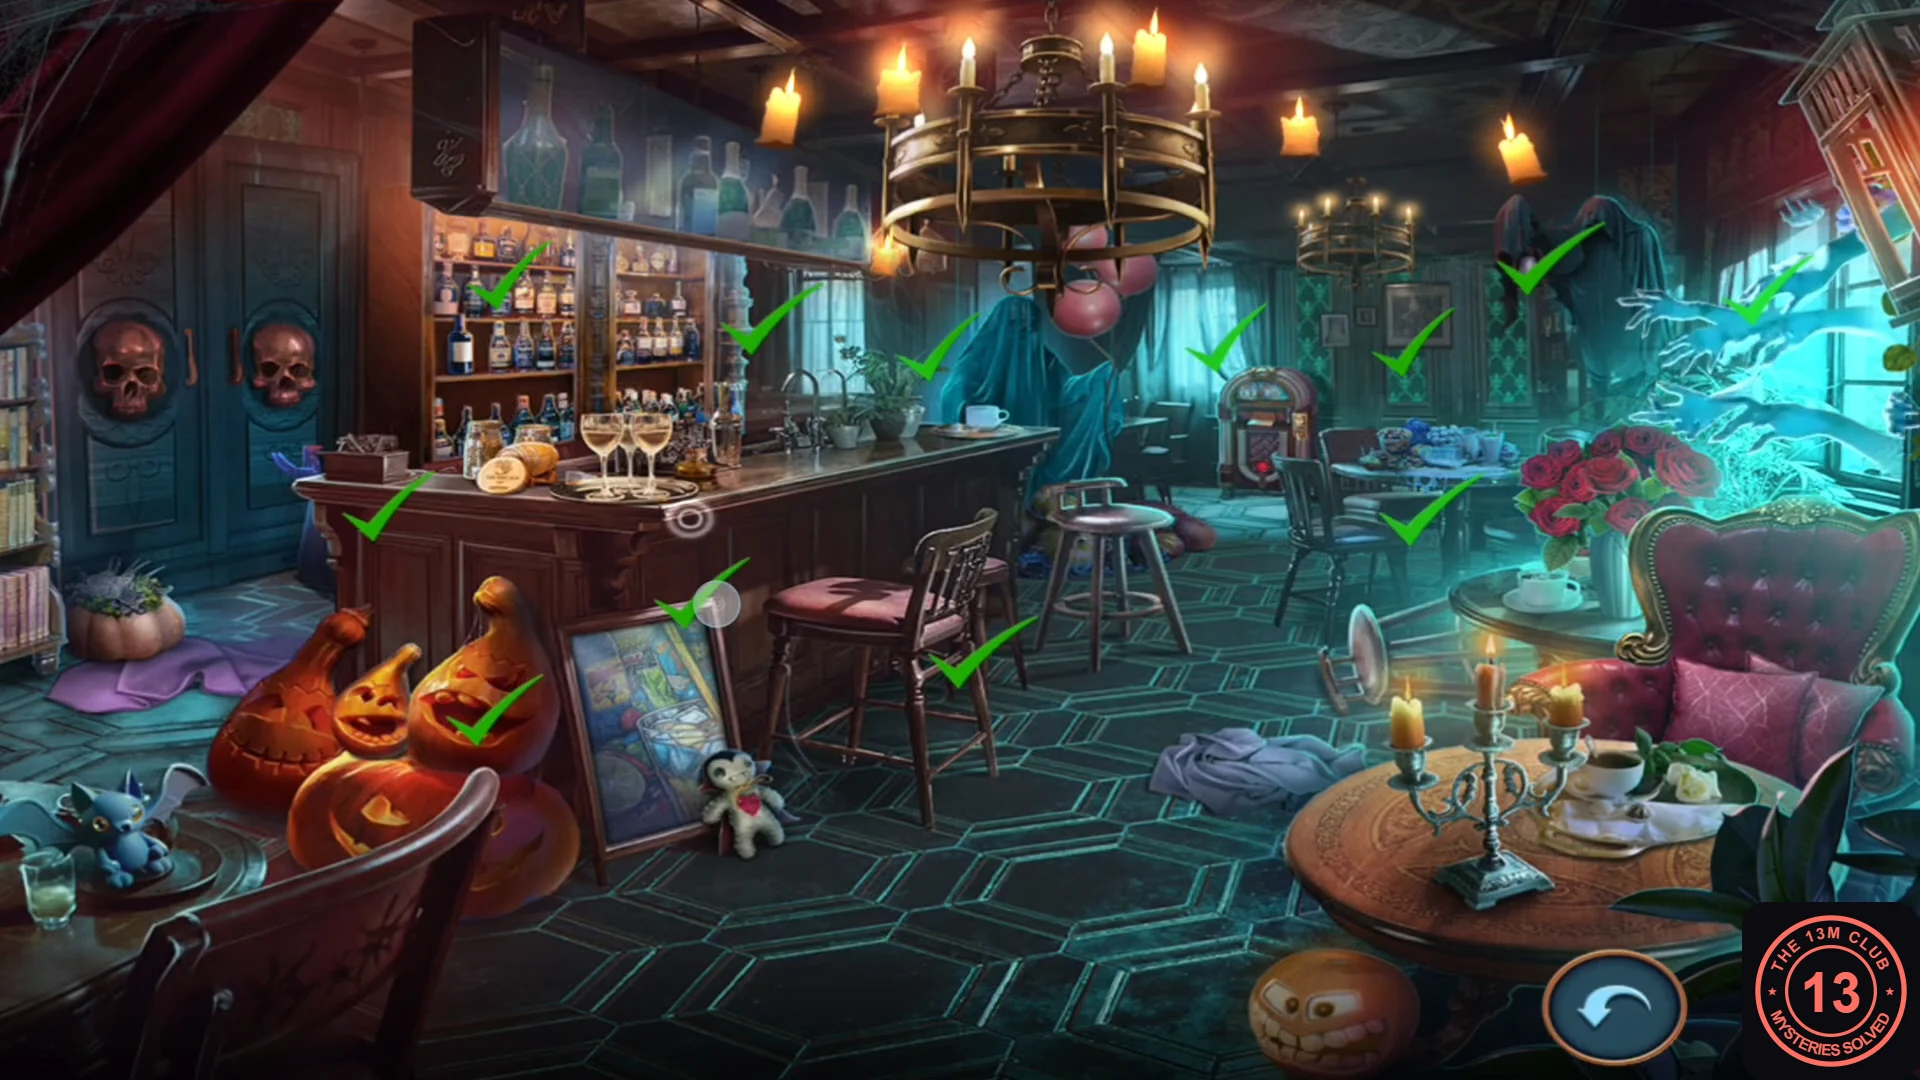
Eleven green ticks on the fragments found so far; the last one is at the front-right corner of the bar beside the leaning painting. - The tray then shows a jar. Tap the jar on the bar counter, right of the glasses, to collect the melted caramel.
Crate, antidote shelf and the clock hands
The caramel glues the crate handle in place, and the crate holds the antidote recipe.
- Back in the study, use the melted caramel on the crate lid around the brass handle, then pull the handle to open it. The caramel jar stays in your inventory.
- Take the antidote recipe and the beige paper roll from the crate, then the box of matches from under the green cloth.
- Use the matches to light the lantern in the dark wardrobe. Place the antidote recipe, the medicine and the alcohol on its shelf.
- Take the second clock hand from the purple cloth on the shelf (2/2).
- In the lobby, zoom into the lowered chandelier and lay the paper roll over the carved gargoyle head ("I think I need to copy this, but how?").
- Zoom into the face of the tall clock and place the clock hands to start the clock puzzle.
Lobby clock puzzle
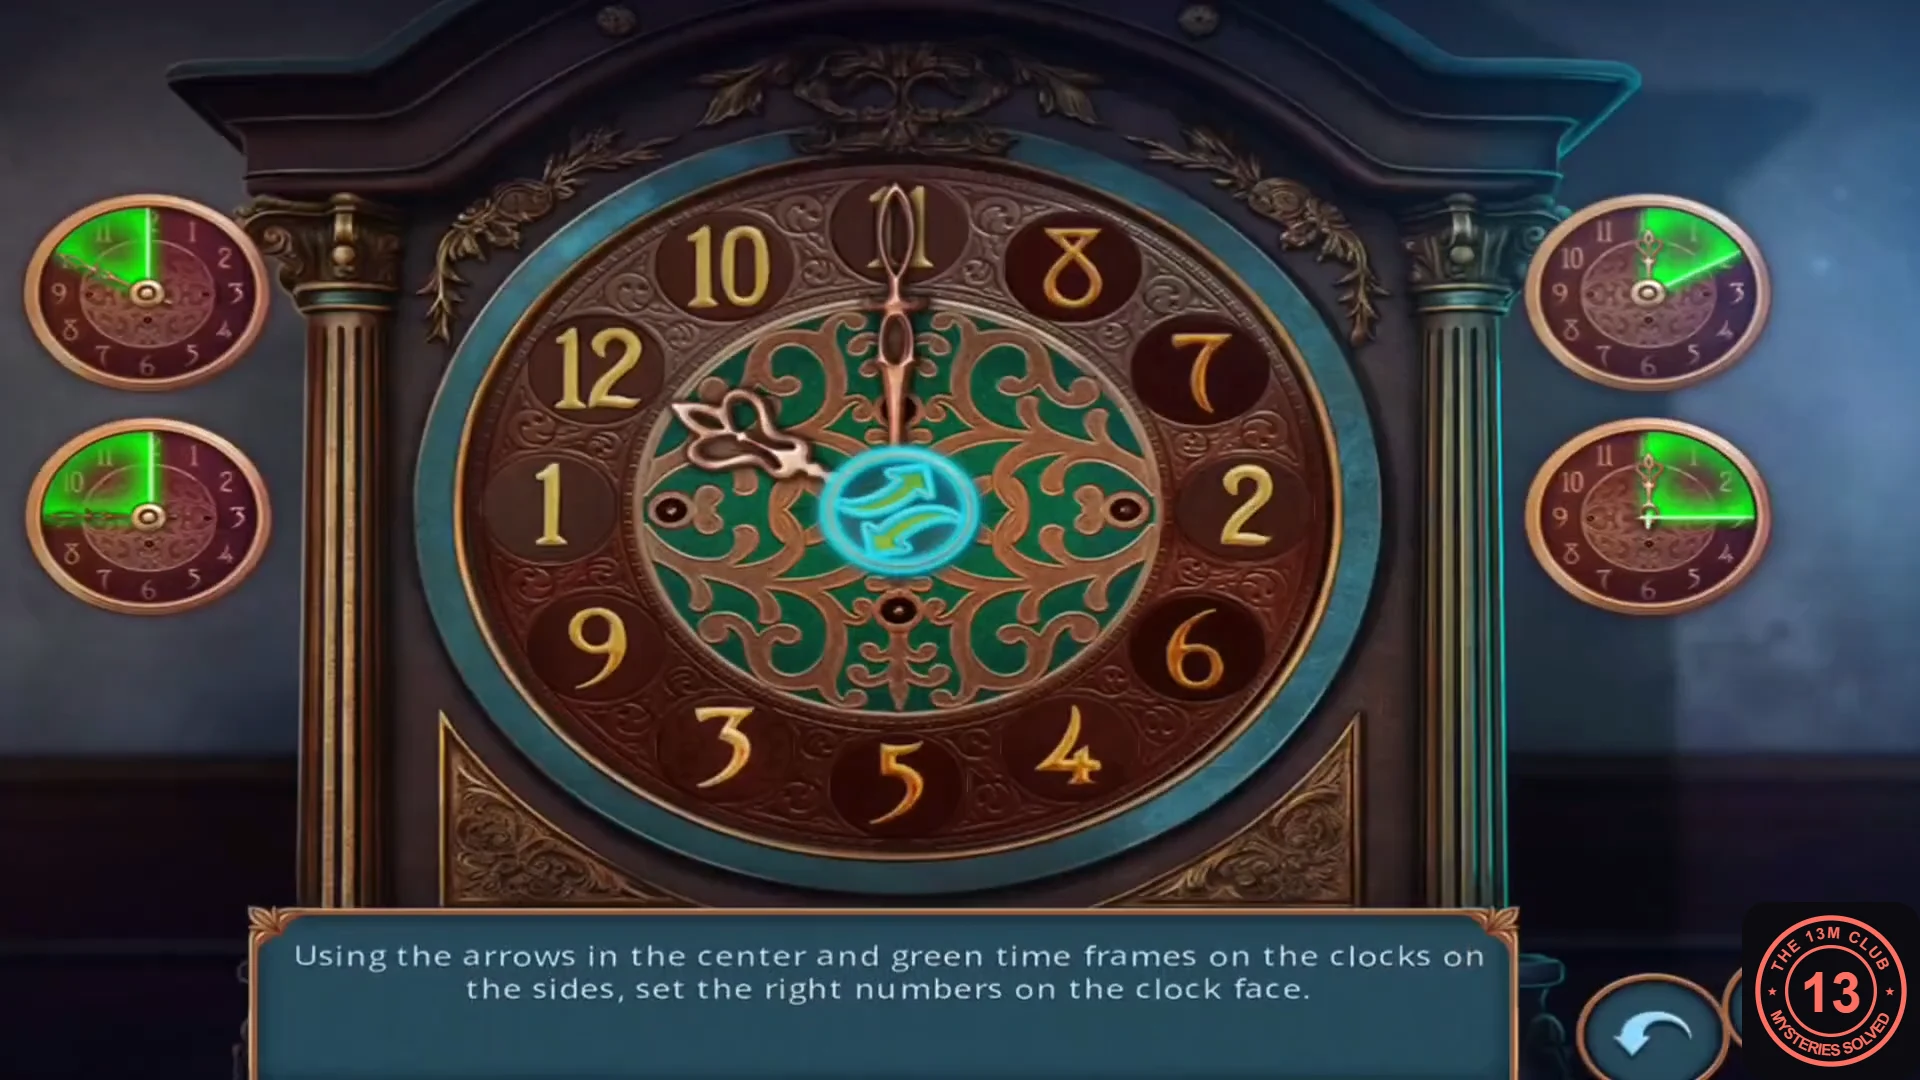
"Using the arrows in the center and green time frames on the clocks on the sides, set the right numbers on the clock face." The numbers on the face start out of order. The recording started with 11, 8, 7, 2, 6, 4, 5, 3, 9, 1, 12, 10 clockwise from the top; your starting order may differ.
- Learn the controls. The face has two hands: a long plain hand and a shorter ornate hand. The two small clocks on the left move the plain hand; the two on the right move the ornate hand. Each tap moves that hand clockwise by the size of the green arc on the clock you tapped: the top clocks move it 2 positions and the bottom clocks 3 positions. The arrow button in the centre swaps the two numbers under the hand tips. A number in its correct place gets a green ring.
- The goal is normal clock order: 12 at the top, then 1 to 11 clockwise. Fix one position at a time: point one hand at a position showing the wrong number, point the other hand at the number that belongs there, then press the arrows. Because 2- and 3-position moves can bring either hand to any position, every needed pair can be swapped directly, so each swap places at least one number for good and you never need to move a green-ringed number (eleven swaps at most). To move a hand just one position, tap its clocks five times in total, such as three 3-steps and two 2-steps (a full turn plus one). Your starting order may differ from the recording, so no fixed tap list is given.
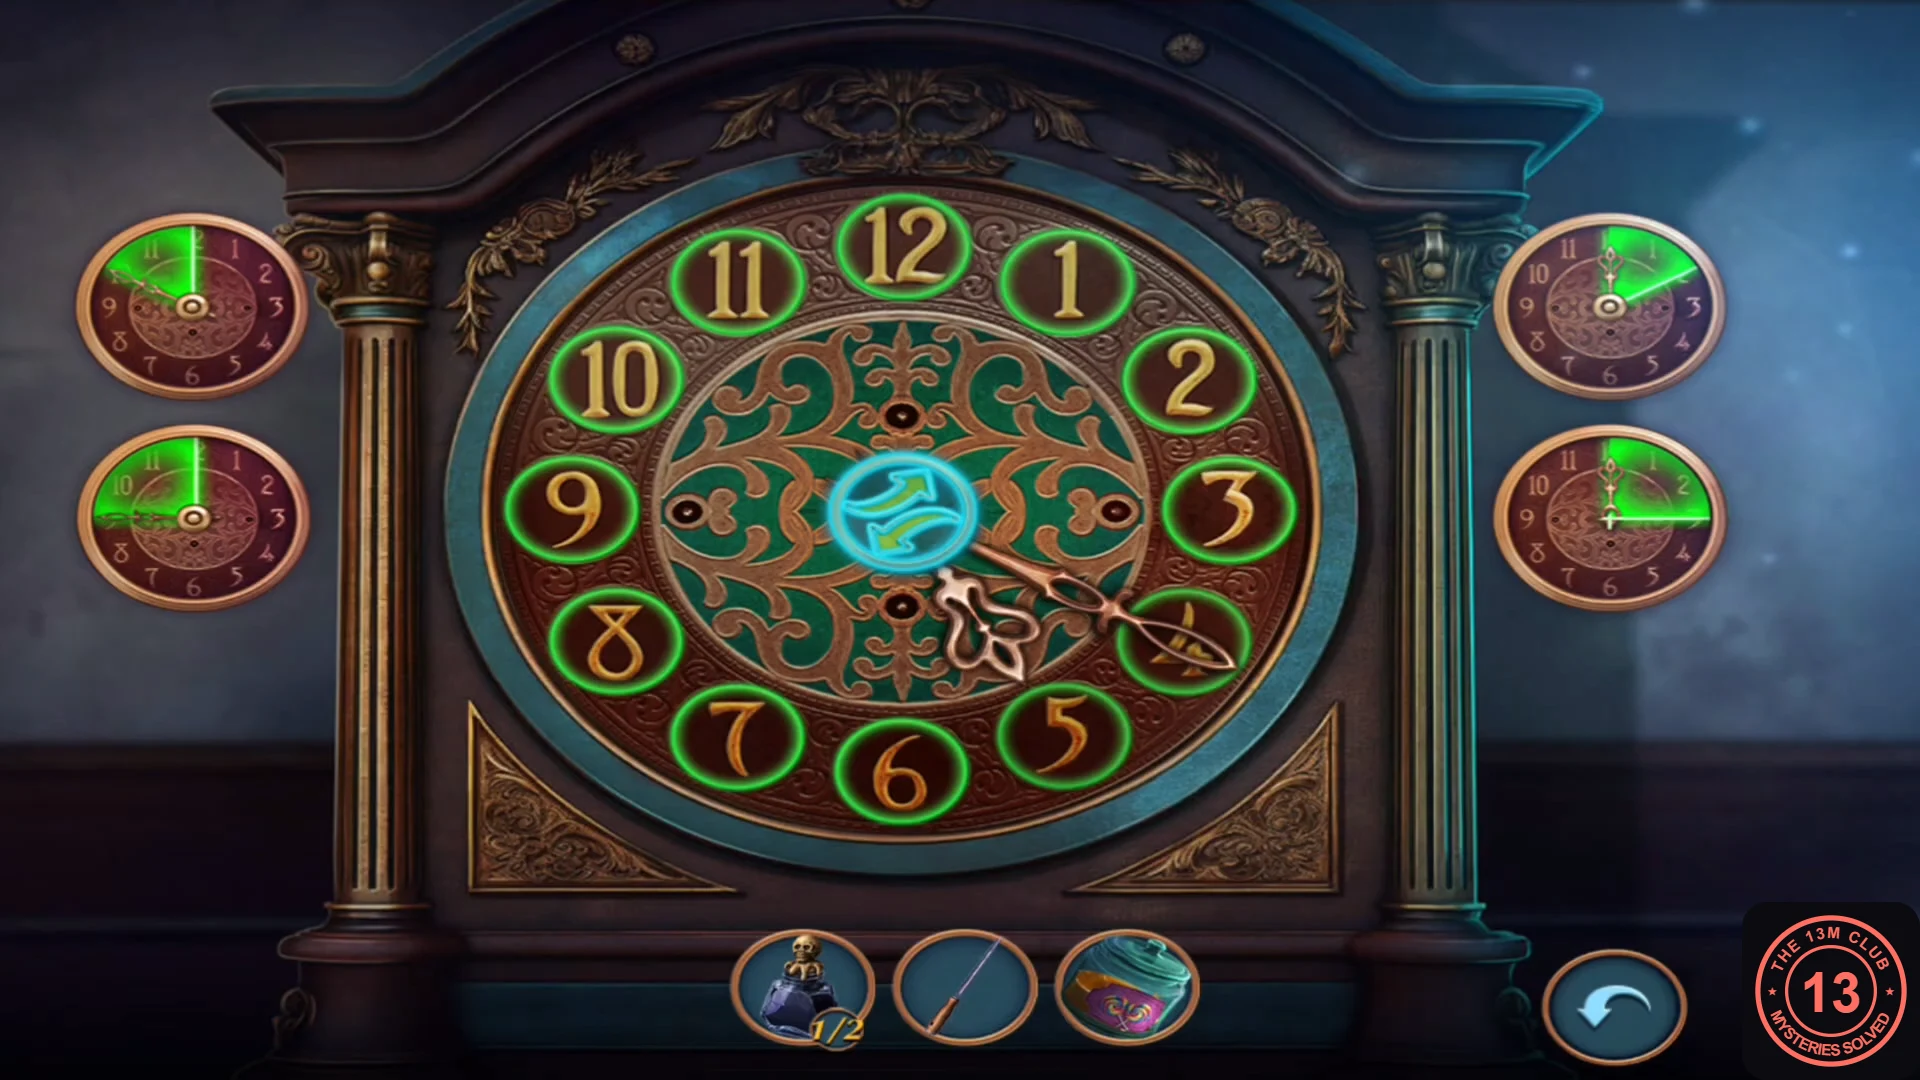
Solved: normal clock order with every number ringed in green. - Take the knife, the blue high-heel shoe and the small gold key template (marked with a plus) from the opened clock.
Hallway cabinet, quill and relief copy
The shoe's heel is the missing piece for the carved hallway cabinet.
- In the hallway, use the blue shoe's heel on the carved cabinet below the portrait. The panel drops; take the spiked shoes, the gold jewelled wand and the red feather.
- Put the feather in the cigar cutter on the skeleton's table. It comes back trimmed into a quill and combines with the skull ink bottle (2/2).
- In the lobby, use the ink and quill on the paper draped over the chandelier gargoyle. Take the copied symbol paper.
- In the hallway, place the symbol paper on the wall safe behind the portrait to start the tumbler puzzle.
Wall safe tumblers
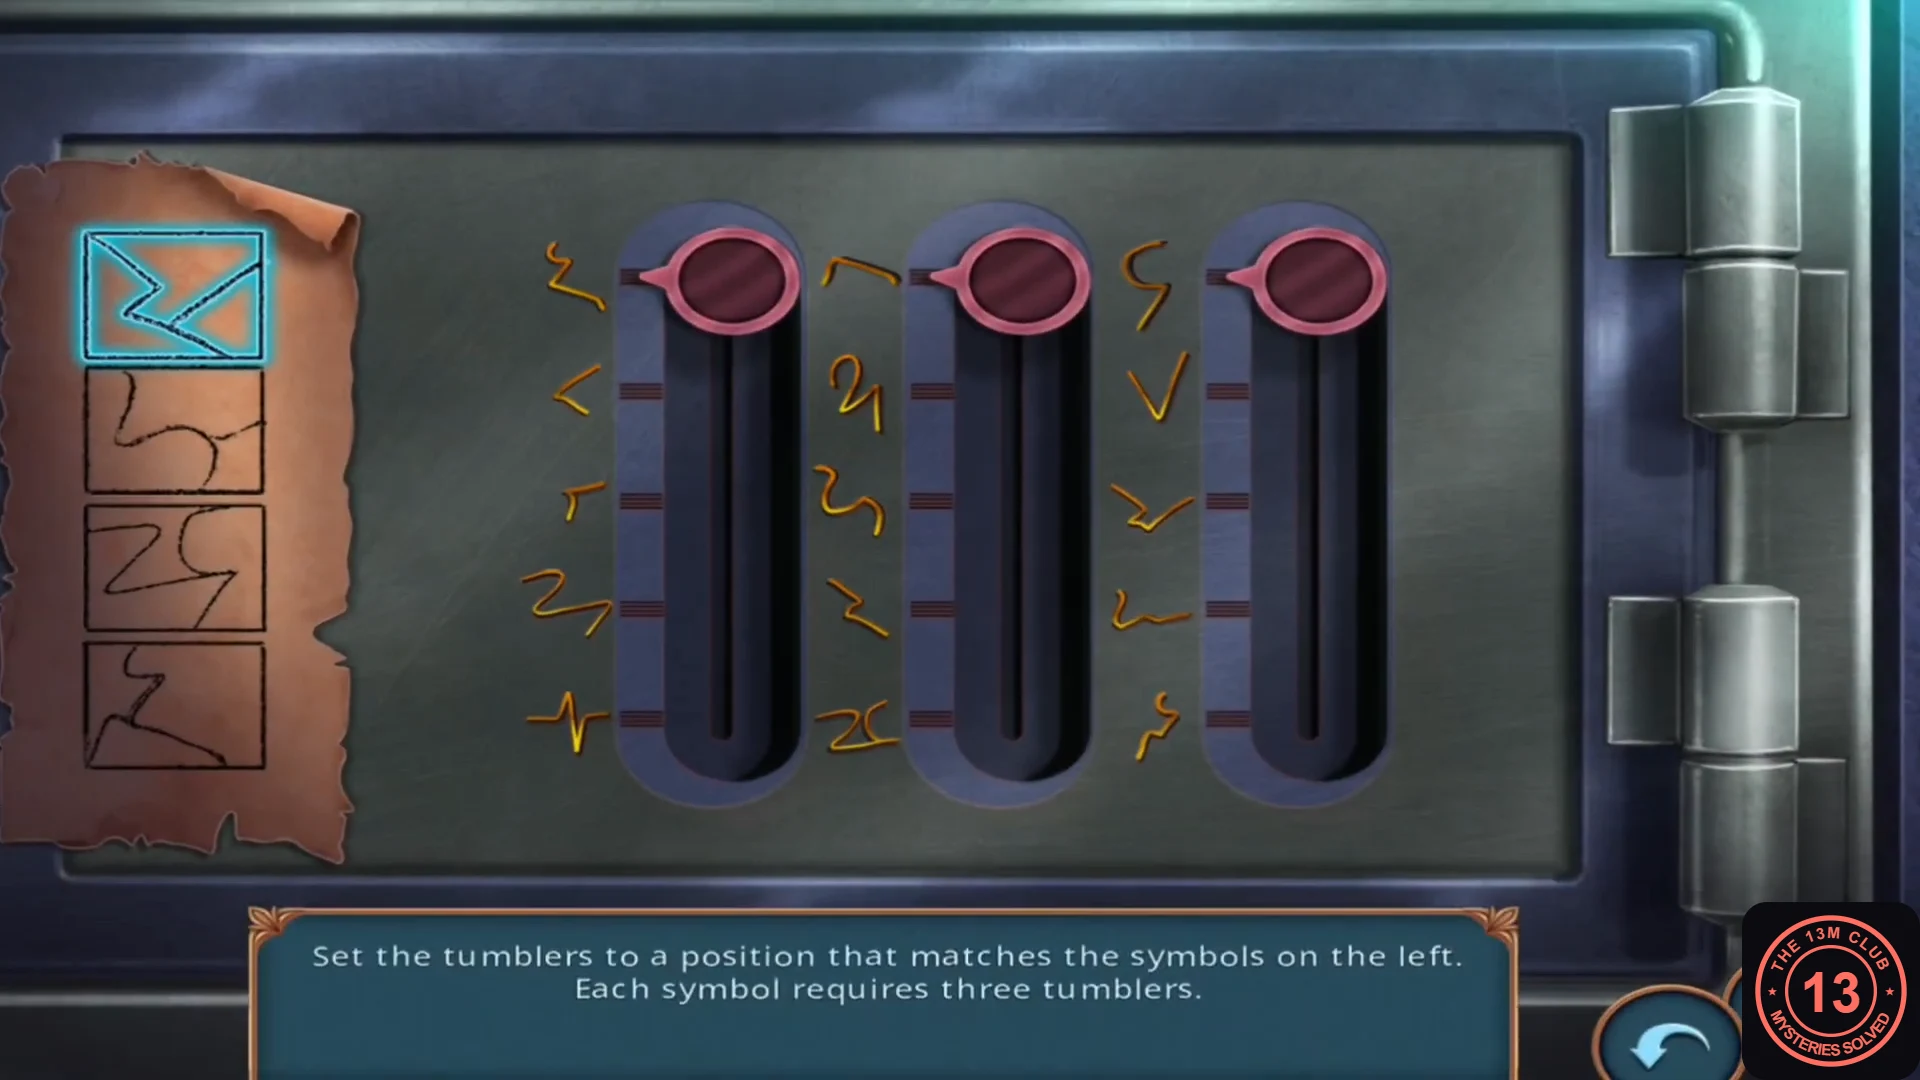
"Set the tumblers to a position that matches the symbols on the left. Each symbol requires three tumblers." There are three vertical tumblers with five stops each. The safe asks for the four symbols one at a time, top to bottom, and frames the current one. In the codes below, 1 is the top stop and 5 the bottom stop, with tumblers listed left to right. Drag the knobs up or down. A symbol turns green the moment all three knobs reach its stops, even while you are still dragging, and the next symbol is then framed.
- First symbol (top): set the tumblers to 2, 4, 3.CODE2-4-3
- Second symbol: set the tumblers to 3, 3, 4. The second symbol starts with a single upright stroke, which is the left tumbler's third stop, not the zigzag at its fourth stop.CODE3-3-4
- Third symbol: set the tumblers to 4, 5, 1.CODE4-5-1
- Fourth symbol (bottom): set the tumblers to 1, 1, 5. The safe opens.CODE1-1-5
- Take the red and gold bat emblem from the safe.
Desk box, key cutting, satchel and the gargoyle's mouth
The bat emblem opens Demetrius's ornate box, and its contents let you cut a key for Vlad's padlocked satchel.
- In the study, place the bat emblem on the lid of the ornate box on the desk. Take the metal plate from inside.
- Open the gold key template in your inventory and add the metal plate to it. Use the thin rod from the chandelier (not the knife) to trace and cut the shape. You get a silver key.
- In Vlad's room, use the silver key on the satchel's gold padlock. Take the metal screw jack from inside.
- In the lobby, use the screw jack in the chandelier gargoyle's mouth to prop it open. Take the wooden flute and the syringe.
Antidote valves, choice 2 and the key gate
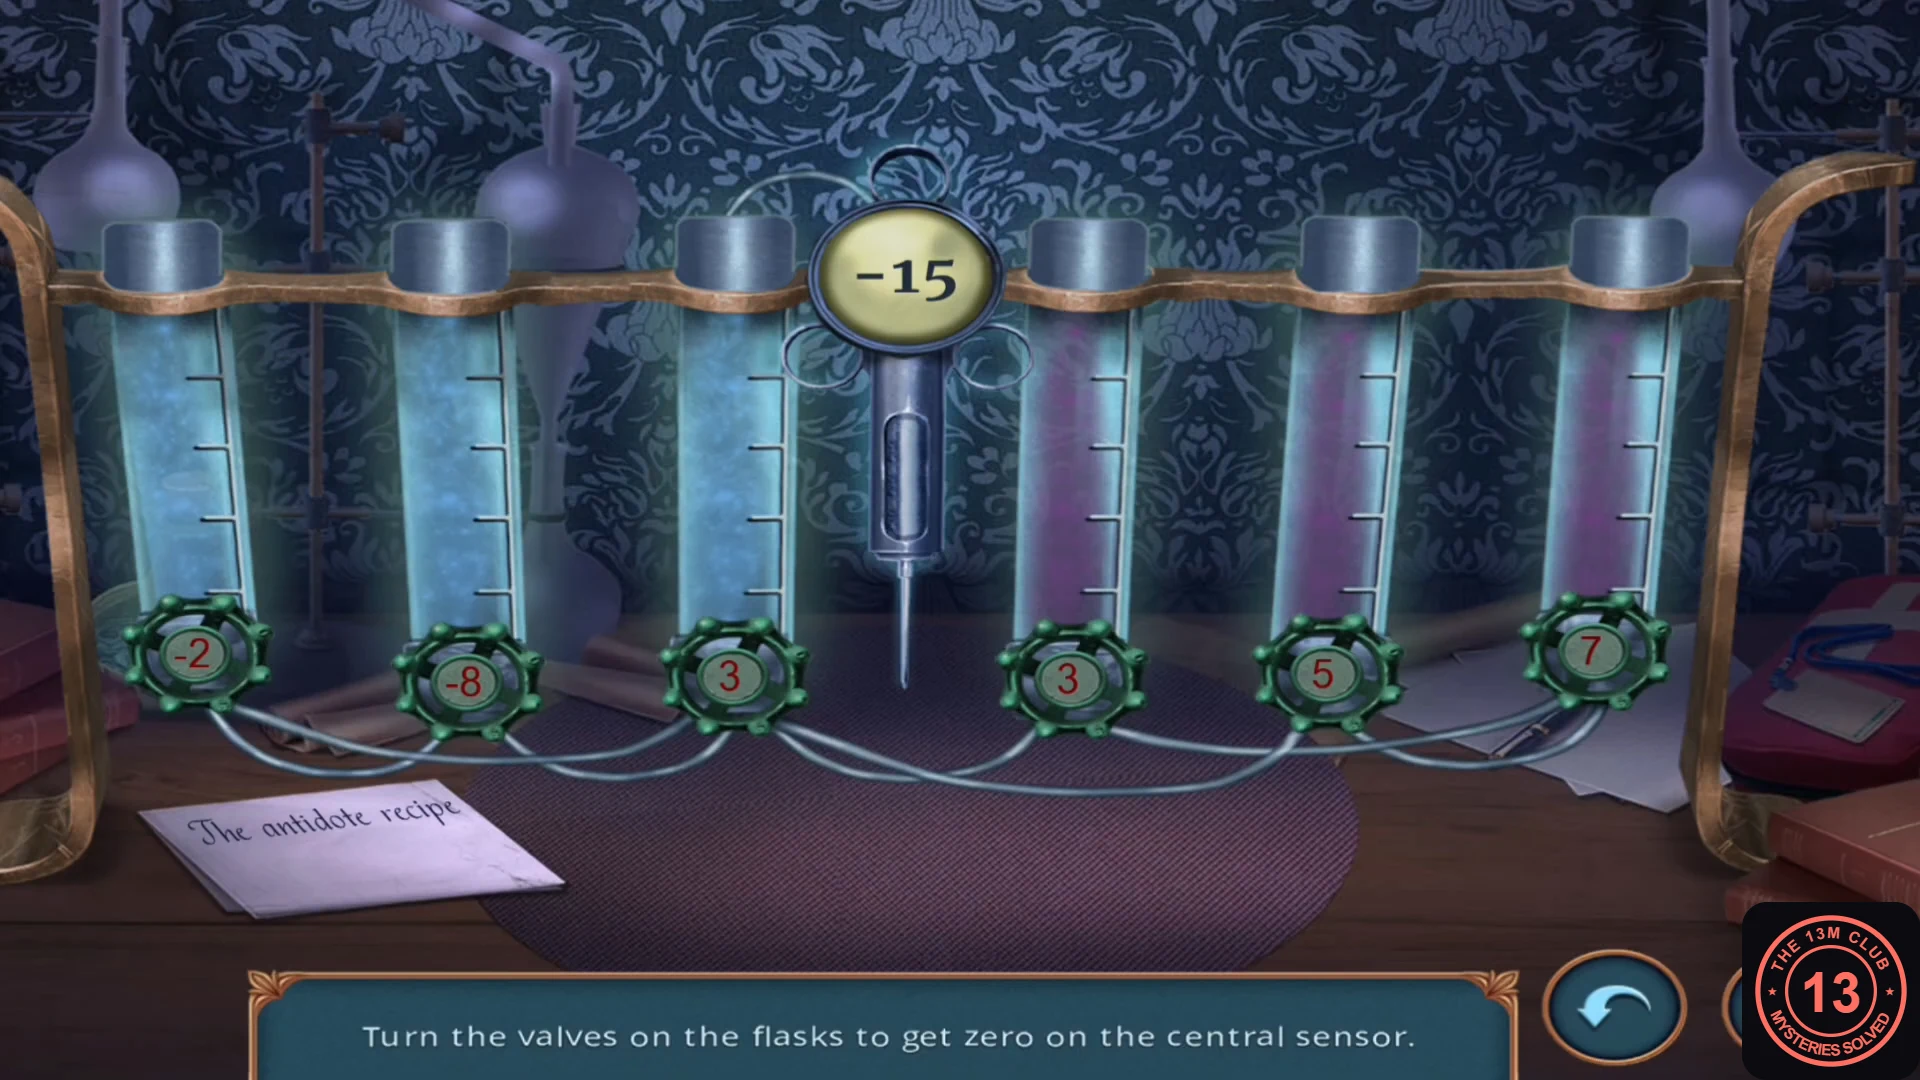
With every ingredient on the wardrobe shelf, the syringe starts the antidote mixing puzzle.
- In the study (Abraham is still wrestling with Vlad), use the syringe on the lit wardrobe shelf. The alcohol and medicine pour in automatically.
- "Turn the valves on the flasks to get zero on the central sensor." The sensor reads -15, and the valves are worth -2, -8, 3, 3, 5 and 7 from left to right. Turn the 5, the 7 and one of the 3 valves (5 + 7 + 3 = 15). The syringe fills with the antidote.CODE5 + 7 + 3
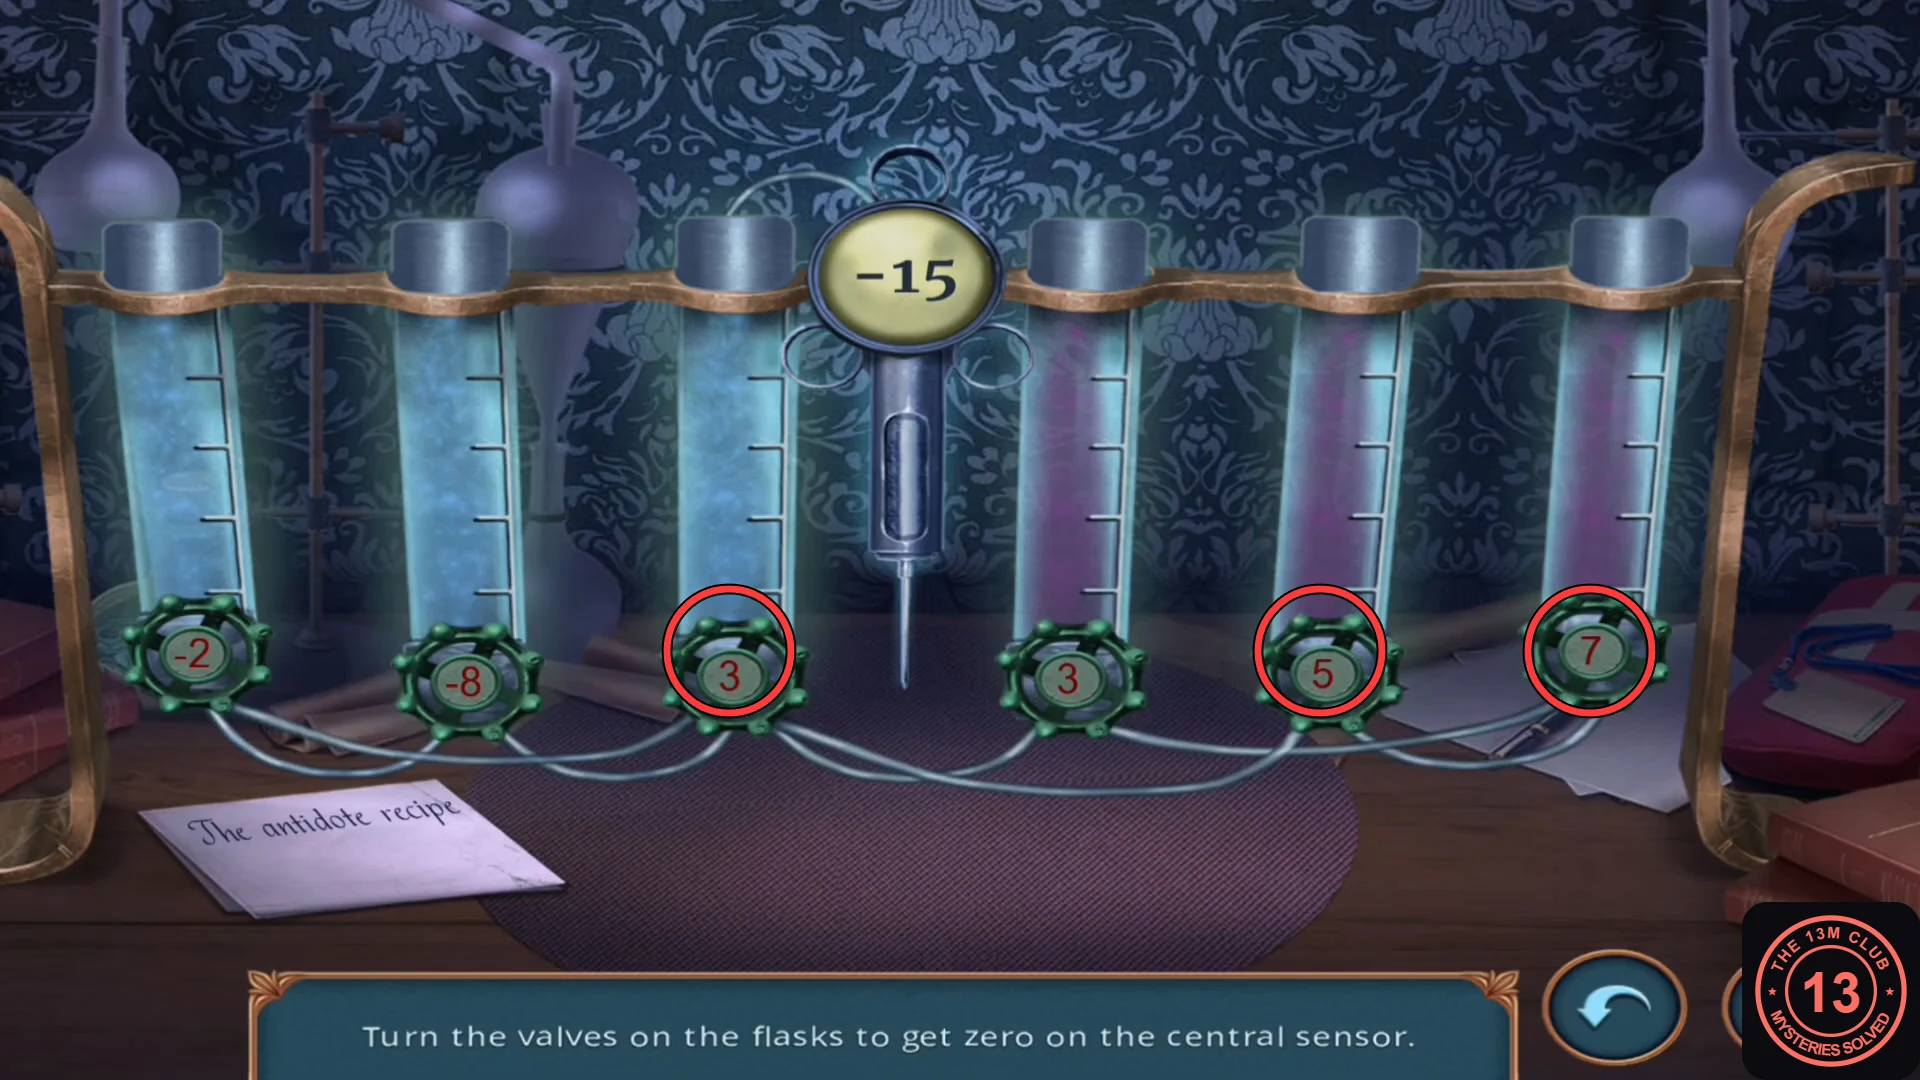
Turn the circled valves: 3 + 5 + 7 brings the sensor to 0. - The antidote is injected into Vlad, who explains that Demetrius's machine on the mountaintop will spread the virus during the thunderstorm. Choice 2: "Are we going to stand here all day?" costs 35 coins and earns 1 point; "I don't think it's as bad as you say." is free and earns none. The recording chose the free answer.
- A Mystery Files padlock screen appears: "Use the key to continue the adventure." Spend one key to unlock the rest of the episode. Abraham heads for the library, Cure Vlad completes and the new task is Get to the mountaintop. You are now in the estate courtyard.