Grandfather clock puzzle
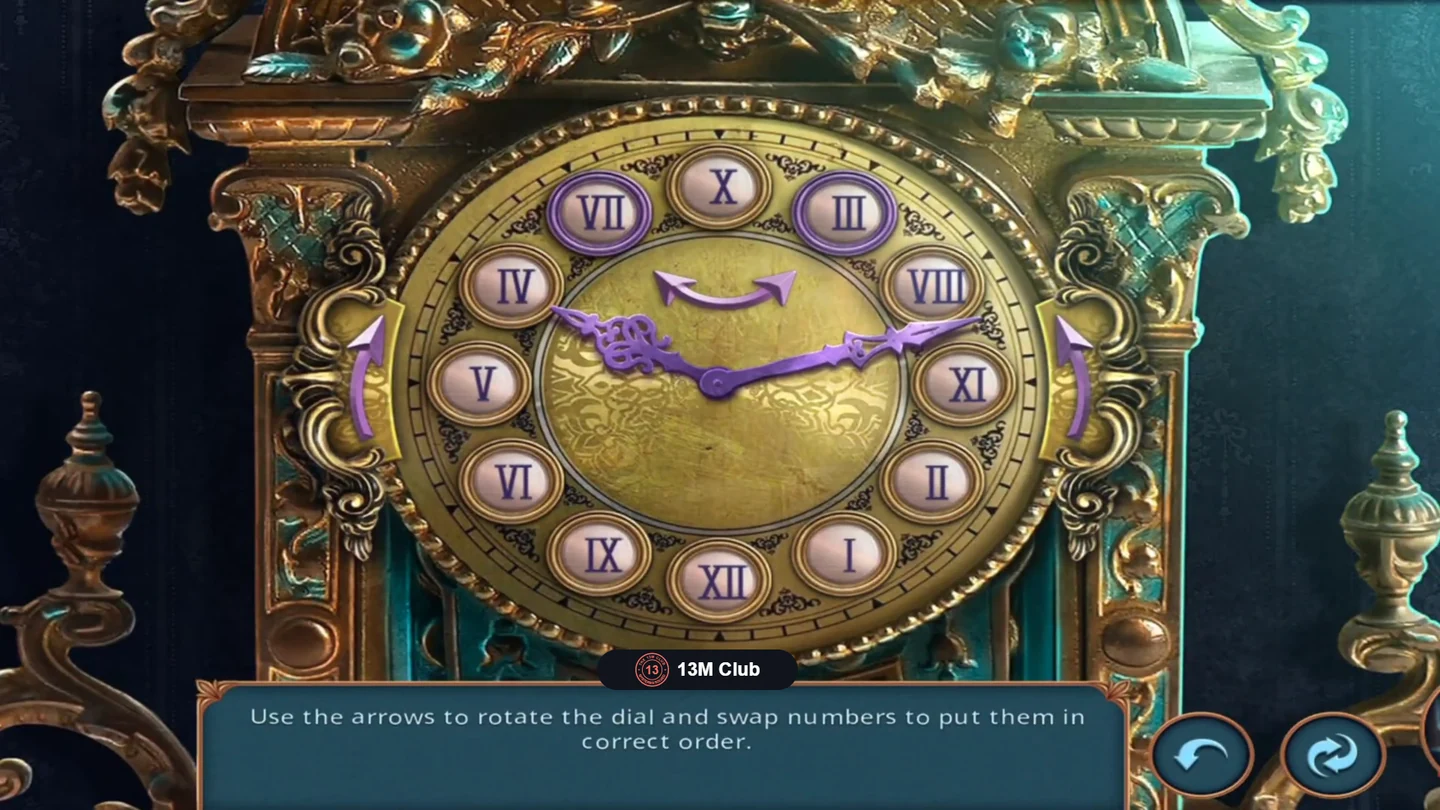
With both hands fitted, the grandfather clock in the museum becomes a numeral-sorting puzzle.
- In the museum, put both Clock Hands on the grandfather clock dial.
- Puzzle: "Use the arrows to rotate the dial and swap numbers to put them in correct order." The purple arrows at the left and right of the dial turn the whole ring of numerals one step. The curved double arrow in the centre swaps the two numerals in the purple-ringed slots at the 11 and 1 o'clock positions (the 12 o'clock numeral between them does not move). Rotate the numeral you need into one ringed slot, swap, and repeat until the dial reads normally: XII at the top, then I to XI clockwise. In the recording the start was, clockwise from the top: X, III, VIII, XI, II, I, XII, IX, VI, V, IV, VII.
- The clock opens and reveals a portrait labelled "Vlad von Graff 1658". The detective joins you; the task "Explore the museum" completes and an achievement banner appears.
The locked lobby door and the pointer lock
The locked door is under the gallery on the right side of the front lobby, near reception.
- Zoom into the door. Slide the Newspaper under it, then push the Bone into the keyhole. The key falls out onto the newspaper; tap it to put it into the lock.
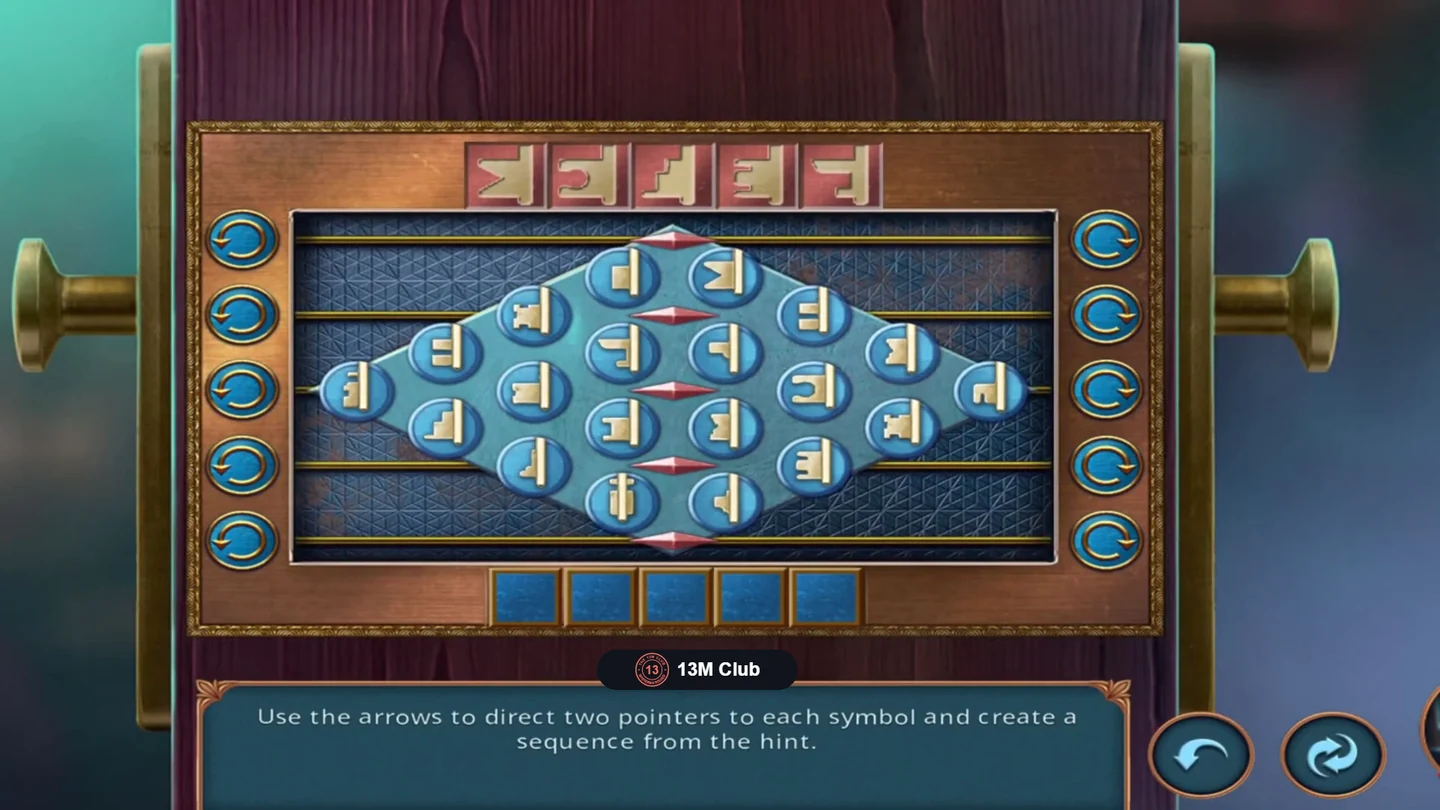
- Puzzle: "Use the arrows to direct two pointers to each symbol and create a sequence from the hint." Five red double-ended pointers sit on five rails; each rail's left button turns its pointer anticlockwise and its right button clockwise. When two neighbouring pointers both point at the same symbol, it glows and drops into the next empty slot at the bottom. Enter the symbols in the order shown by the five hint tiles at the top. The symbols are not named in the game, so match their shapes.
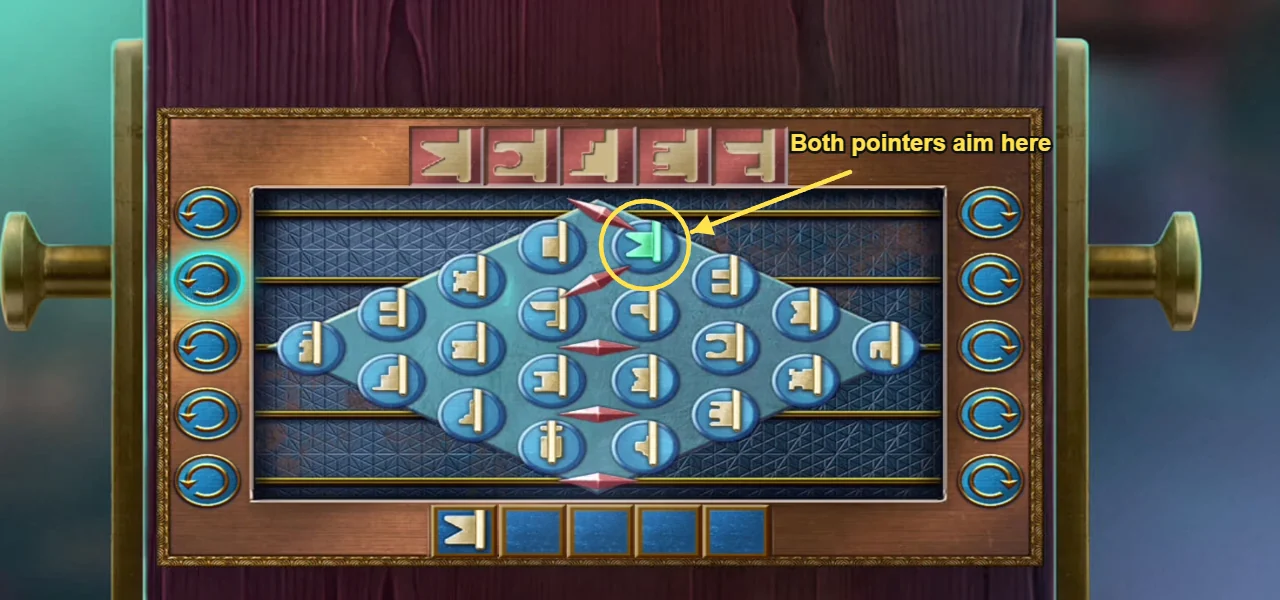
Example: both top pointers aim at this symbol, so it glows and drops into the first slot. 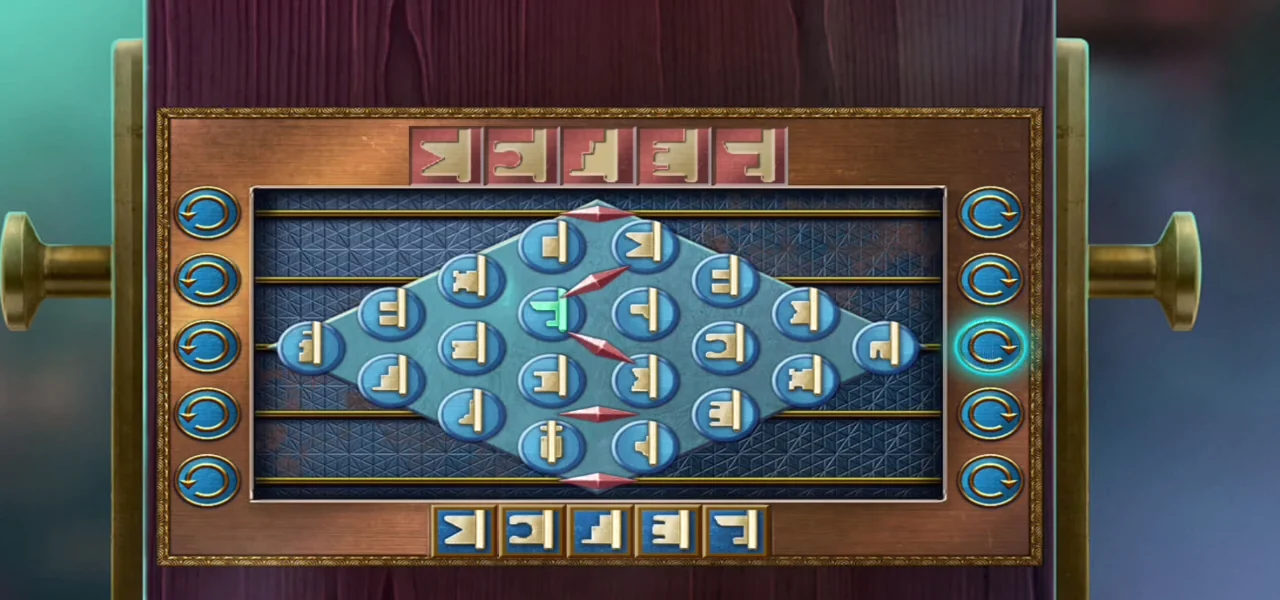
Solved: the bottom row matches the hint tiles. - The door opens and the game asks for a key: "Use the key to continue the adventure." Spend one key to continue. Keys are the app's own currency; if you have none, the screen offers notifications when keys recover.
Vlad's study: the fire and the gargoyle head
The study has a desk with a blue safe, a fireplace with gargoyle statues and a mantel cabinet, and a wall of masks. Coins sparkling in scenes are optional currency.
- Zoom into the fireplace ("I need to put out the fire if I want to get that thing that's burning."). Pour the Skull Mug on the fire. Something remains in the grate, but it is too hot to take by hand.
- Zoom into the floor left of the desk. Take the Feather (blue quill), the Box (a cardboard box with colourful contents) and the grey Gargoyle Piece that was underneath.
- Zoom into the safe on the desk and use the Feather on it ("This safe is certainly in use, so there should be fingerprints on the panel."). The feather stays beside the safe; you need powder later.
- The mantel cabinet over the fireplace has two gargoyle heads with a gap in the middle. In the inventory, attach the Gargoyle Piece to the glued Broken Mask to make a Gargoyle Head, then place it in the middle gap. The heads roar and a puzzle opens.
Gargoyle line puzzle
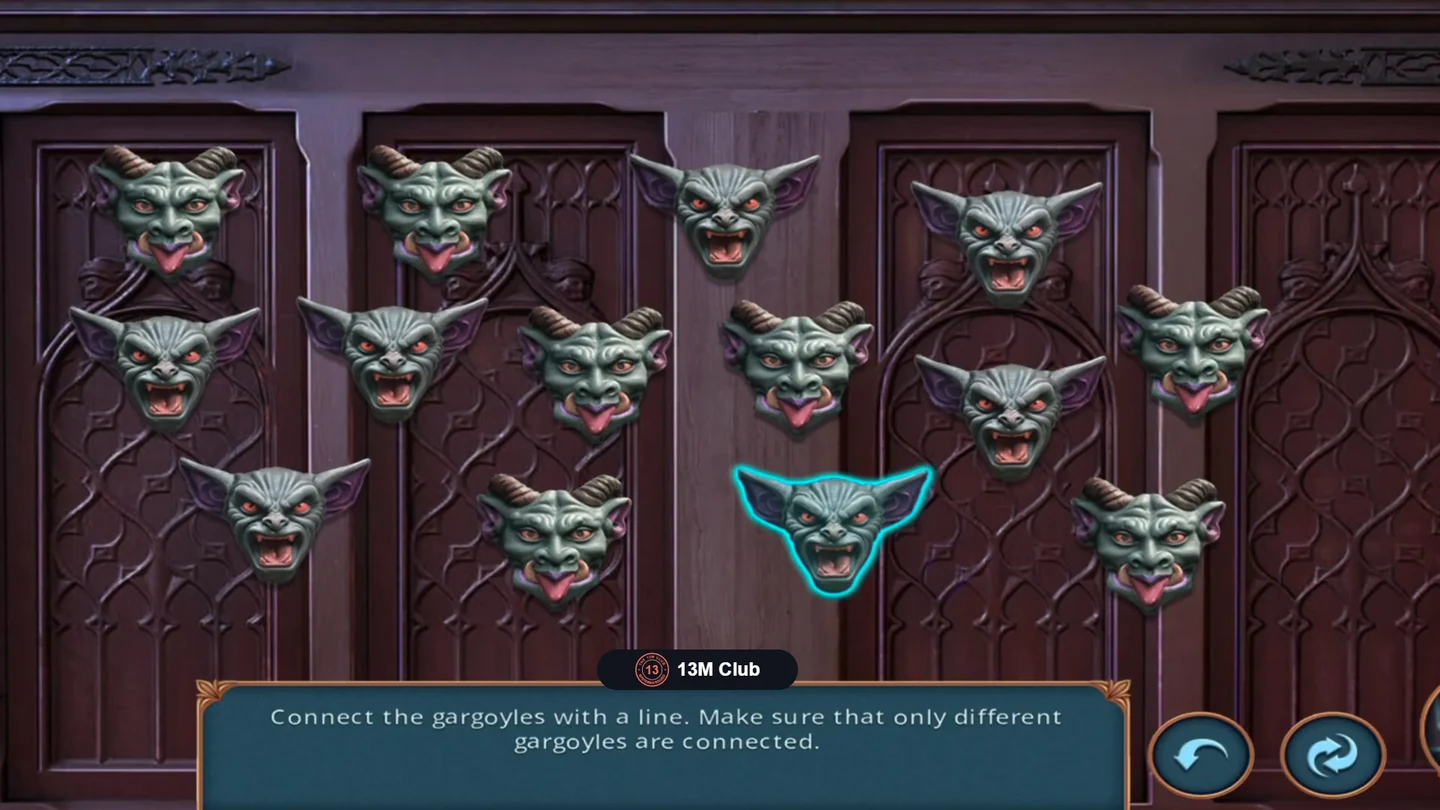
Fourteen gargoyle heads of two kinds: seven with curled horns and seven with large bat ears.
- Puzzle: "Connect the gargoyles with a line. Make sure that only different gargoyles are connected." Tap heads one after another to draw one line through all fourteen, alternating horned and bat-eared each time. The undo button is at the bottom right. Path used in the recording (the layout may differ in your game): left-middle bat, top-left horned, second middle bat, second top horned, top-centre bat, middle horned right of centre, top-right bat, far-right horned, right-middle bat, bottom-right horned, bottom bat right of centre, bottom horned left of centre, bottom-left bat, then the centre horned head.
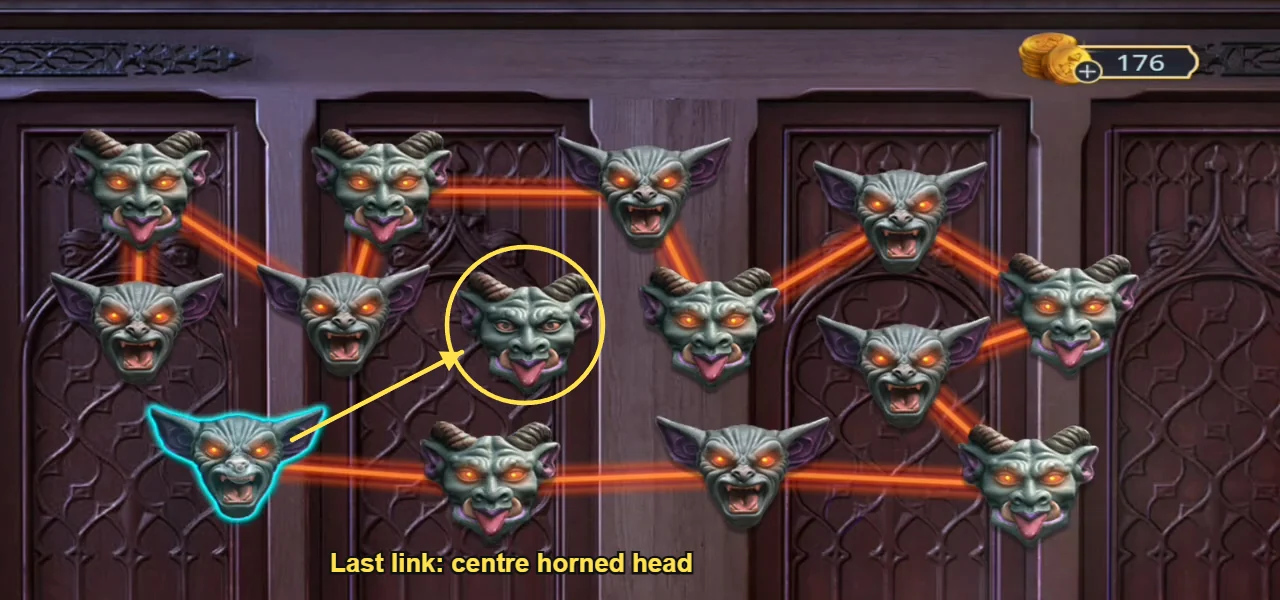
The recording's path one link before the end: finish on the centre horned head. - Take the Tongs from the compartment behind the middle panel.
The fangs, the hidden drawer and Annabelle
With the Tongs you can finally reach the burnt object in the fireplace, and it turns out to open a hidden drawer.
- Use the Tongs on the burnt object in the fireplace to pull out the Fangs (a vampire denture).
- Zoom into the desk safe again and press the Fangs into the fang-shaped holes on the desktop in front of it. A hidden drawer opens and an achievement banner appears. Take the First Aid Kit and the Soda.
- Go to the bar and place the Soda on the counter beside the glass.
- In the stair hall, use the First Aid Kit on Annabelle. When she asks about Vlad, "It is strange. I'll find him." costs 35 coins and gives 1 decision point; "That's because he's a weirdo." is free and gives none (the recording chose the free answer). The wound task completes and the new task is "Find Vlad".
Second decoration pile: the lighter
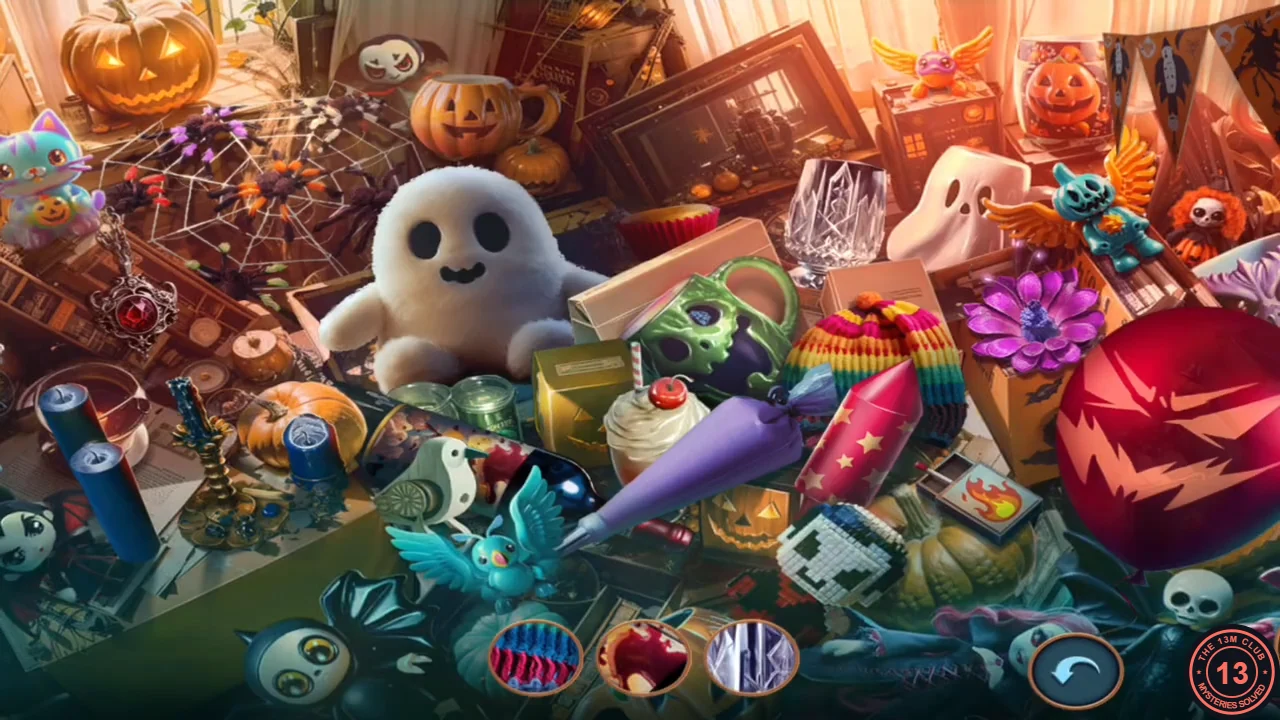
A second pile of decorations sparkles at the lower left of the stair hall. This scene uses a picture list instead of names. This is a good scene for the one-minute achievement "On All Hallows Eve": the recording finished it in about 35 seconds. Read the list in the step below before you tap the pile, and remember that the candles need the matchbox first.
- Tap the sparkling pile at the lower left of the stair hall to open another hidden-object scene. This time the list shows pictures of the objects, three at a time, and each found picture is replaced by the next one until twelve are found. The pictures are close-ups, so match colours and patterns. In the recording's order: the rainbow-striped knitted hat (centre right, behind the red tube with gold stars); the cut-crystal goblet (top centre); the teal imp with orange wings (upper right, beside the white ghost mask); the spider web with its spider (top left); the large red ball with a jagged black pattern (right); the pendant with a red gem hanging on the left; the candles; the magenta flower (right of centre); the red tube with gold stars (centre); the big fluffy white ghost (upper left); the dark glass bottle with a red label lying diagonally behind the white bird (lower centre-left); and the purple icing bag (centre). The candles need an action first: drag the matchbox with the flame picture (centre right, below the star tube) onto the unlit blue candles at the lower left. When they are burning, tap them. A wrong tap only shows "Oops.". At the end you receive the Lighter ("GREAT JOB! You've found: Lighter") and the achievement "On All Hallows Eve" (Finish a HOP in one minute).
The candy pumpkin and the mechanical heart
The Lighter and the Box from Vlad's study set off a small explosion in the stair hall, and its prize wakes a statue in the study.
- In the stair hall, zoom into the hanging stack of carved pumpkins on the upper left beside the stairs. Place the Lighter and then the Box; a party popper from the box is lit and bursts the big candy pumpkin. Zoom into the candy pile on the floor by the stairs and take the Mechanical Heart. Keep the Box.
- In the study, zoom into the gargoyle statue left of the fireplace ("A heartless creature") and put the Mechanical Heart into the hole in its chest. A tile in the hearth floor opens; take the Talcum Powder.
- Use the Talcum Powder on the safe. The feather dusts it over the panel and the hint appears.
Safe dial puzzle
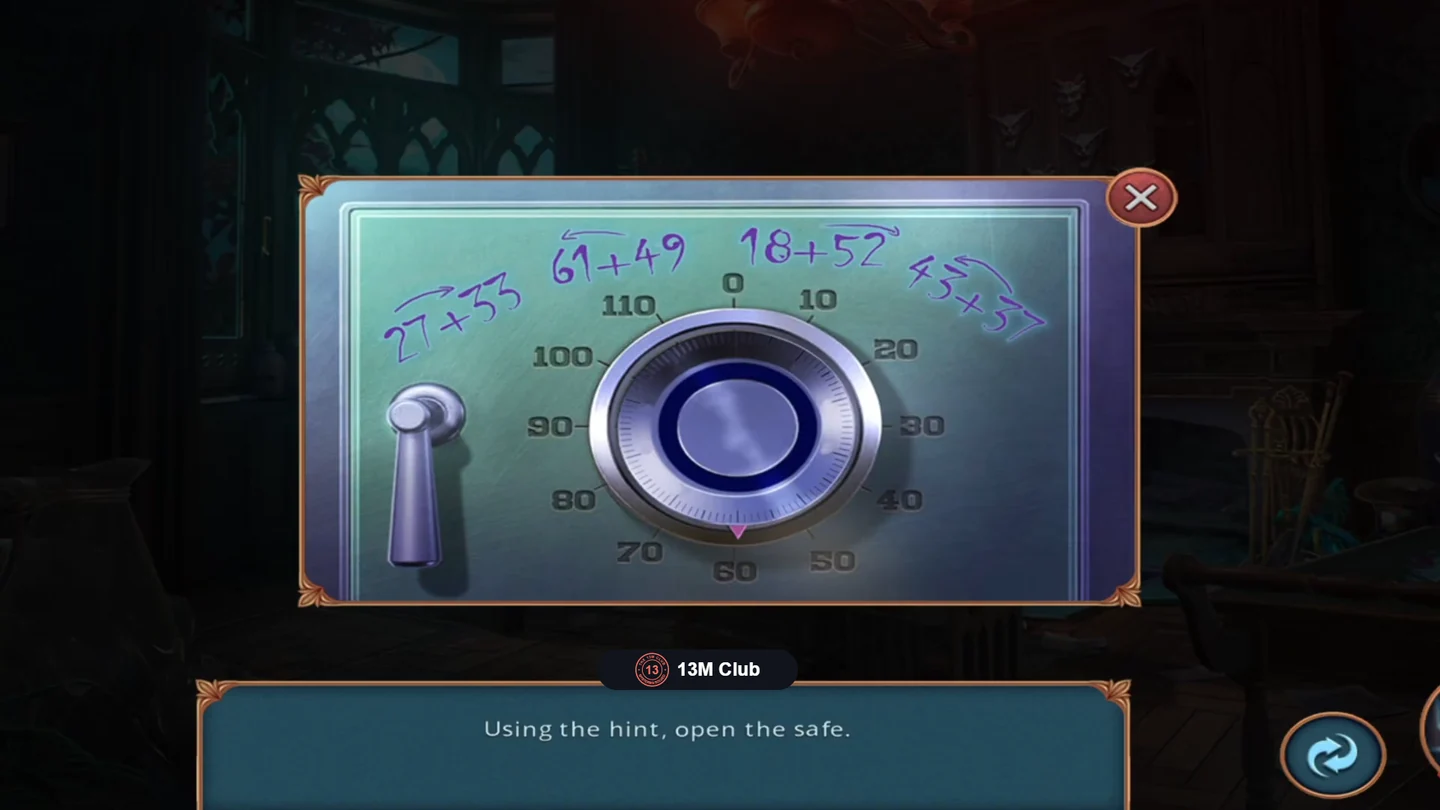
The dust reveals four additions, each with a curved arrow showing a turning direction.
- Puzzle: "Using the hint, open the safe." Add each pair and turn the dial in the direction of its arrow, pausing on each result. Example from the recording: the hints were 27+33, 61+49, 18+52 and 43+37 with arrows alternating right, left, right, left, so the dial goes clockwise to 60, anticlockwise to 110, clockwise to 70 and anticlockwise to 80. If your numbers differ, use the same method with your own sums.CODE60, 110, 70, 80
- Take the red Plastic Bag, the pink packet (chewing gum) and the Striped Staff from the safe.
Mummy pose puzzle
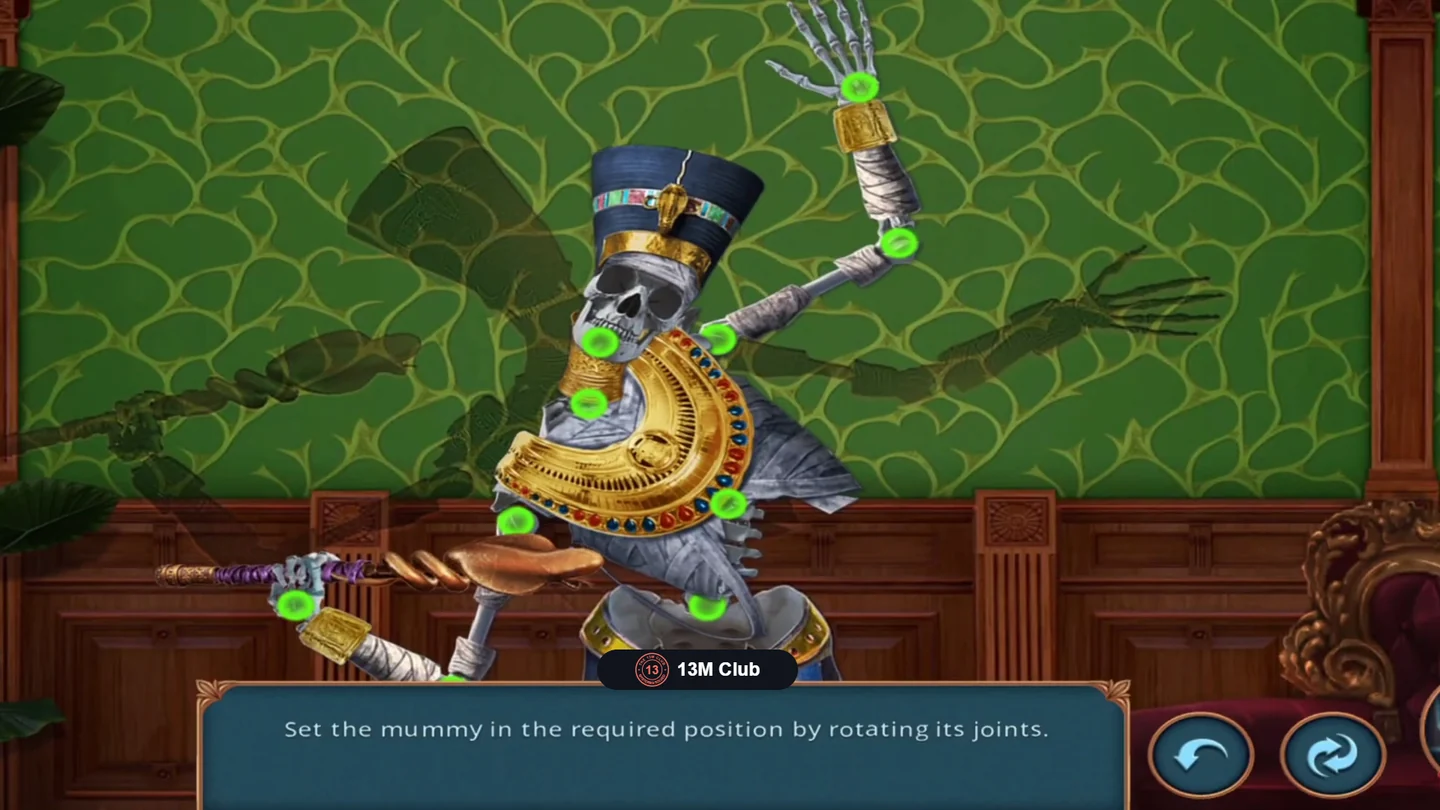
The mummy stands beside the open chest right of the lobby stairs ("This mummy lost all its power along with its life.").
- Put the Striped Staff into the mummy's hand. It glows.
- Press the button on the wall box ("The button won't hold in its place!"), then use the chewing gum on it so it stays down. A puzzle opens.
- Puzzle: "Set the mummy in the required position by rotating its joints." Press on a body part (it glows blue when selected) and drag to turn it around its green joint dot; it rotates smoothly while you drag. Match the mummy to its shadow on the green wallpaper. Target pose (see the solved image below): the upper body leans well to the left and the skull tilts even further left. The staff arm's upper arm points down and to the left with the elbow low, and the forearm rises so the hand is at the far left edge. The staff runs from that hand up and to the right, with its gold snake head ending just left of the skull. The other arm reaches up and to the right with the hand open.
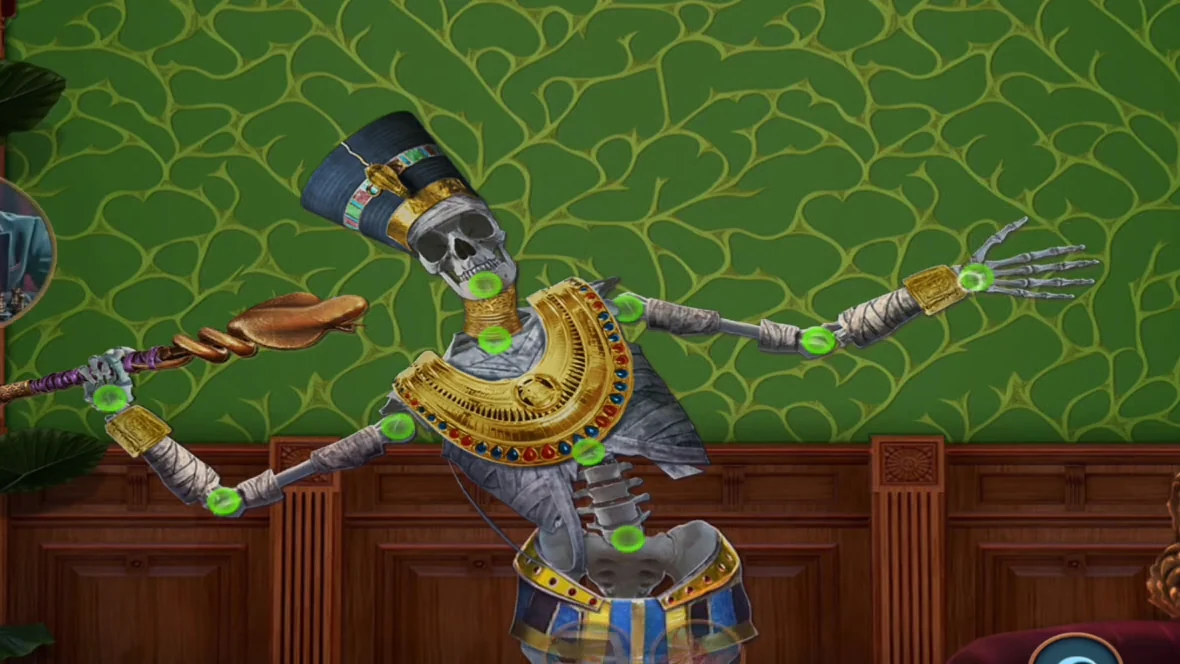
Solved pose: the mummy leans left and now covers its shadow. - Take the reward, a Grabber (a skeleton hand on a stick).
A cocktail for Vlad
The mummy's Grabber reaches what is hidden under the reception sofa; then gather the last cocktail ingredients and serve Vlad his drink.
- In the front lobby, zoom into the red sofa at the left of reception. Use the Grabber under it to pull out a leather bag; it opens and you get the Belt, the Chili Pepper and the Mint.
- At the bar counter, place the Mint ("Now, I need to mix the ingredients together."). Tap the strawberry to drop it into the glass, pour in the soda, add the mint, and take the Cocktail.
- Give the Cocktail to Vlad at his table on the right. He drinks it and slumps over; take the ornate silver Key from the table.
Floor bolt puzzle and the basement
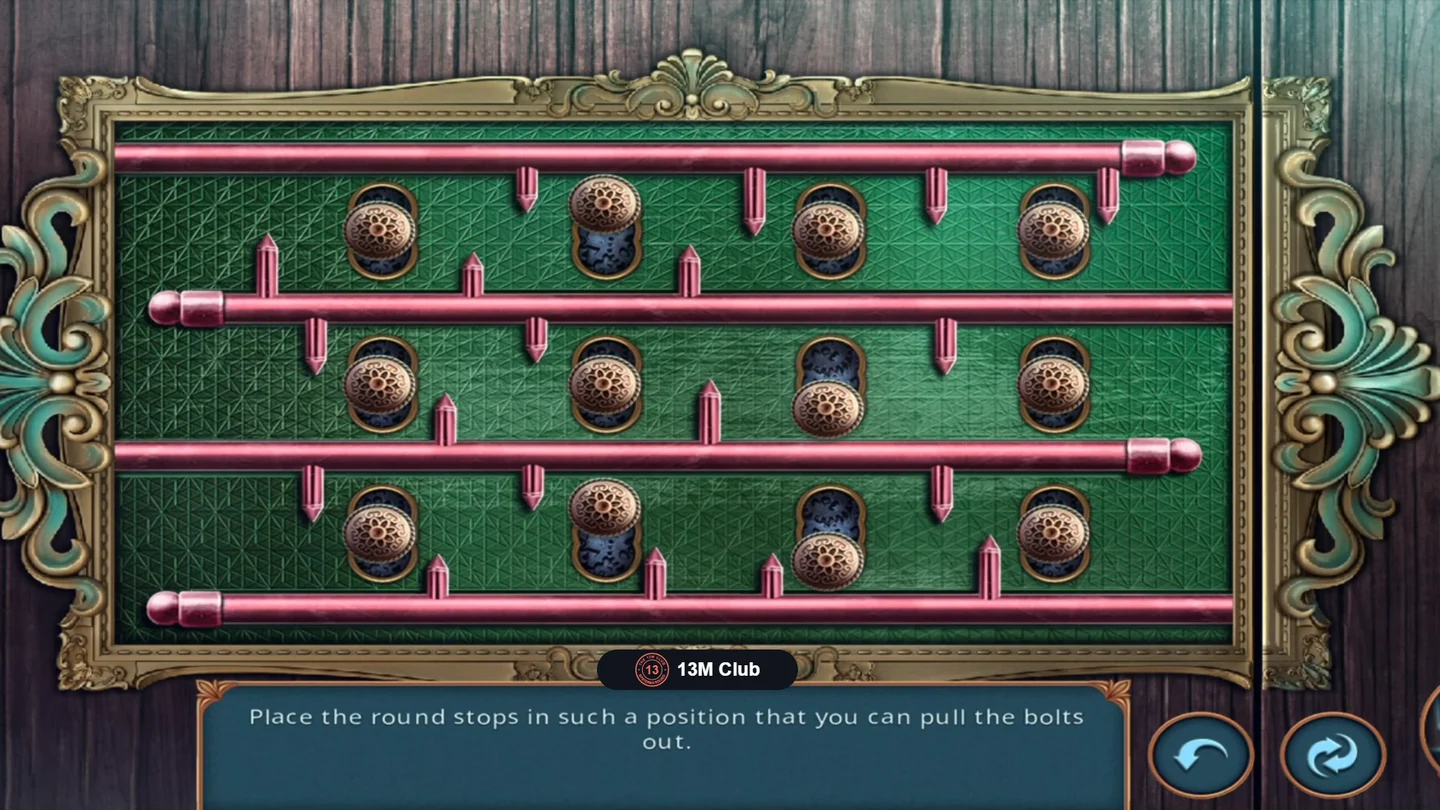
The lock is a metal plate with a keyhole in the parquet floor in front of the study desk.
- In the study, zoom into the floor plate and insert the Key.
- Puzzle: "Place the round stops in such a position that you can pull the bolts out." Four horizontal bolts have pins pointing up or down, and rows of round stops sit between them. Tap a stop to flip it between the top and bottom of its slot; tap a bolt to pull it. If a pin would hit a stop the bolt only wiggles. Before each pull, flip the stops in that bolt's path out of the way of its pins. Order used in the recording: top bolt, bottom bolt, second bolt, third bolt.
- The hatch opens; go down into the basement. The lid slams shut behind you. In the conversation, "I think you're right." costs 35 coins and gives 1 decision point; "Give it a rest! These are just stories!" is free and gives none (the recording chose the free answer).