Into the cellar: the toothed frame and the hexagon panel
You play as Ren again. He climbs down into the cabin's cellar. The entrance has stairs, a wall panel of hexagons with one missing, a locked blue door and an archway on the right. Through the archway is a room with shelves, a brick patch, a locked wooden door, a small broken ladder and a boarded window with a blue curtain. Its arched opening on the left leads to the ladder room, with a ladder, a small blue table, an empty candlestick and a book on a stand. Next to the ladder room are the drawings room, with a toothed wooden frame and drawings pinned to the wall, and a room with a blue table and a blue door.
- In the room with the boarded window, tap the loose brick in the brick patch and take the candle.
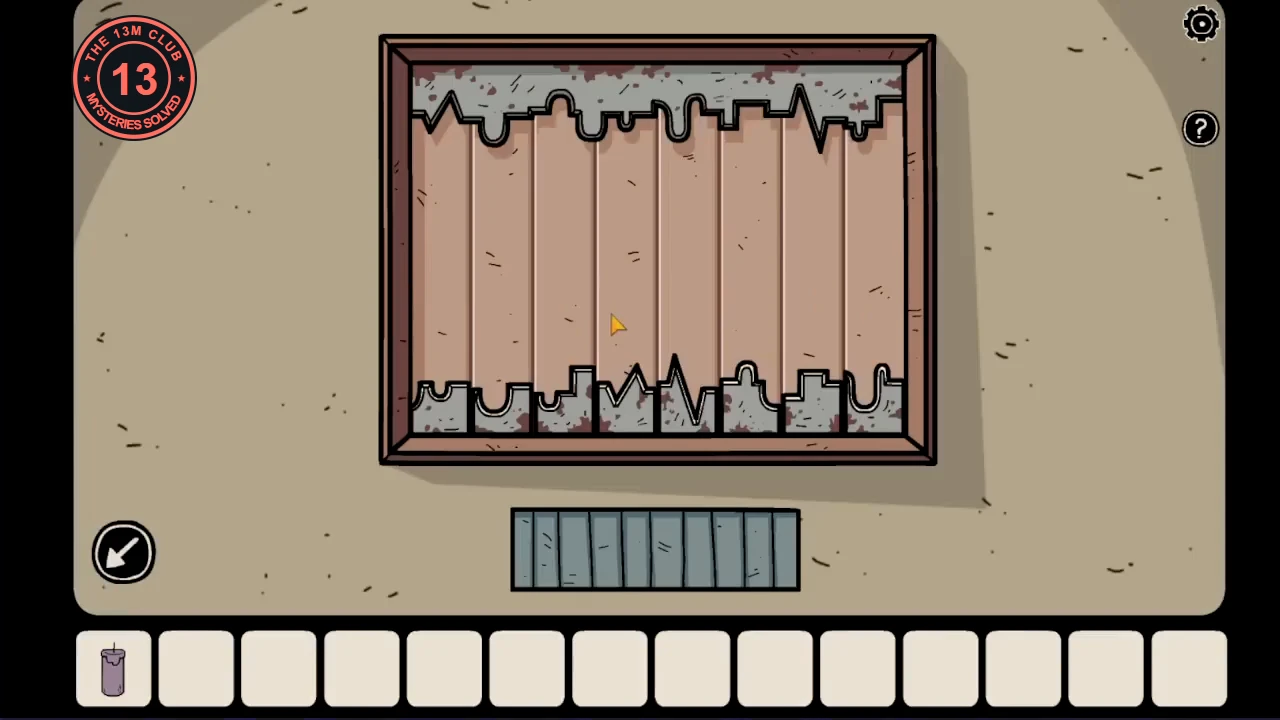
- In the drawings room, look at the wooden frame. Its top edge is a fixed jagged line, and the bottom row is made of eight loose pieces. Tap one piece and then another to swap them. Arrange them so each piece mirrors the part of the edge directly above it, for example a point under a dip. Your pieces may start in a different order, but the target is the same. When every piece fits, the two halves close and the grille below opens: take the red key and the knife.
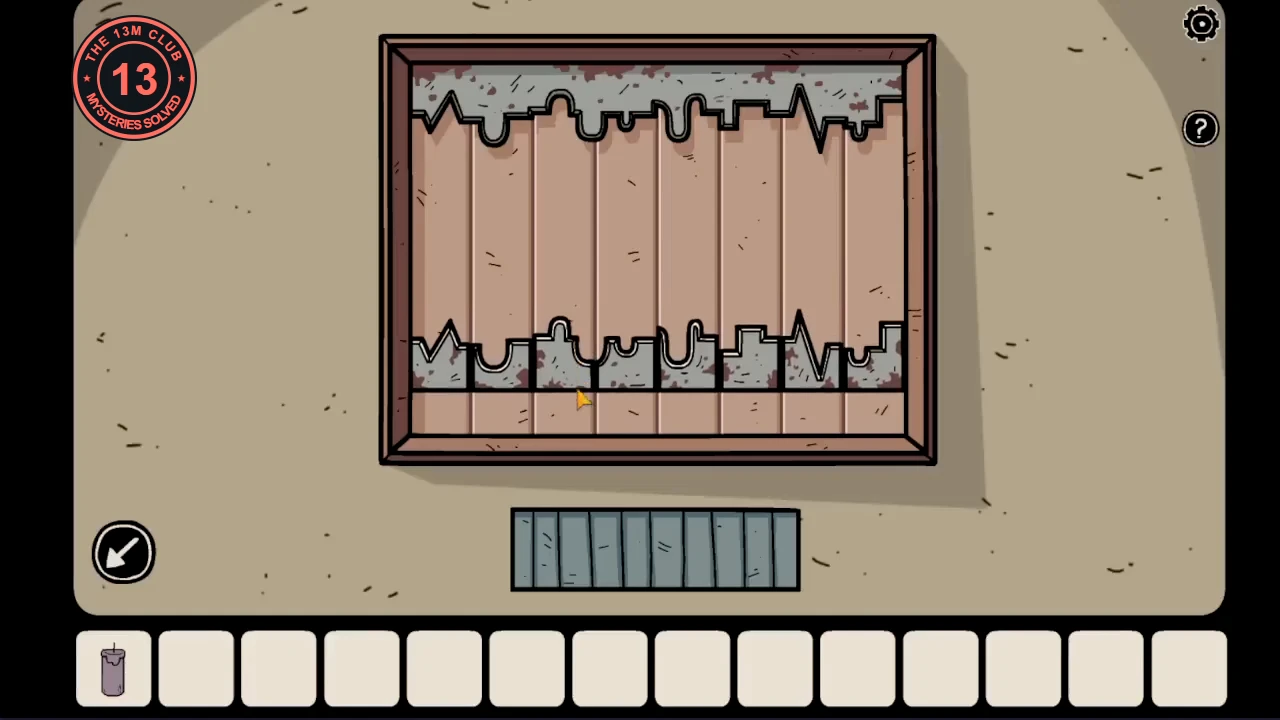
The bottom row in the right order, rising to meet the top edge. - Open the cardboard box on the blue table in the same room and take the bottle of cooking oil.
- Cut a strip of blue cloth from the curtain on the boarded window with the knife.
- Unlock the blue door at the entrance with the red key. In the room behind it, take the hexagonal tile from the desk drawer.
- Put the tile in the gap in the hexagon panel by the entrance stairs. Each hexagon carries a small statue or a crossing, and tapping a hexagon rotates it. Turn them until the coloured lines form three unbroken paths, each starting at a statue whose arm points along it. Red runs from the middle-left statue through the top-middle one to the bottom-middle one. Yellow runs from the top-left statue through the centre to the bottom-right one. Grey runs from the bottom-left statue through the middle-right one to the top-right one.
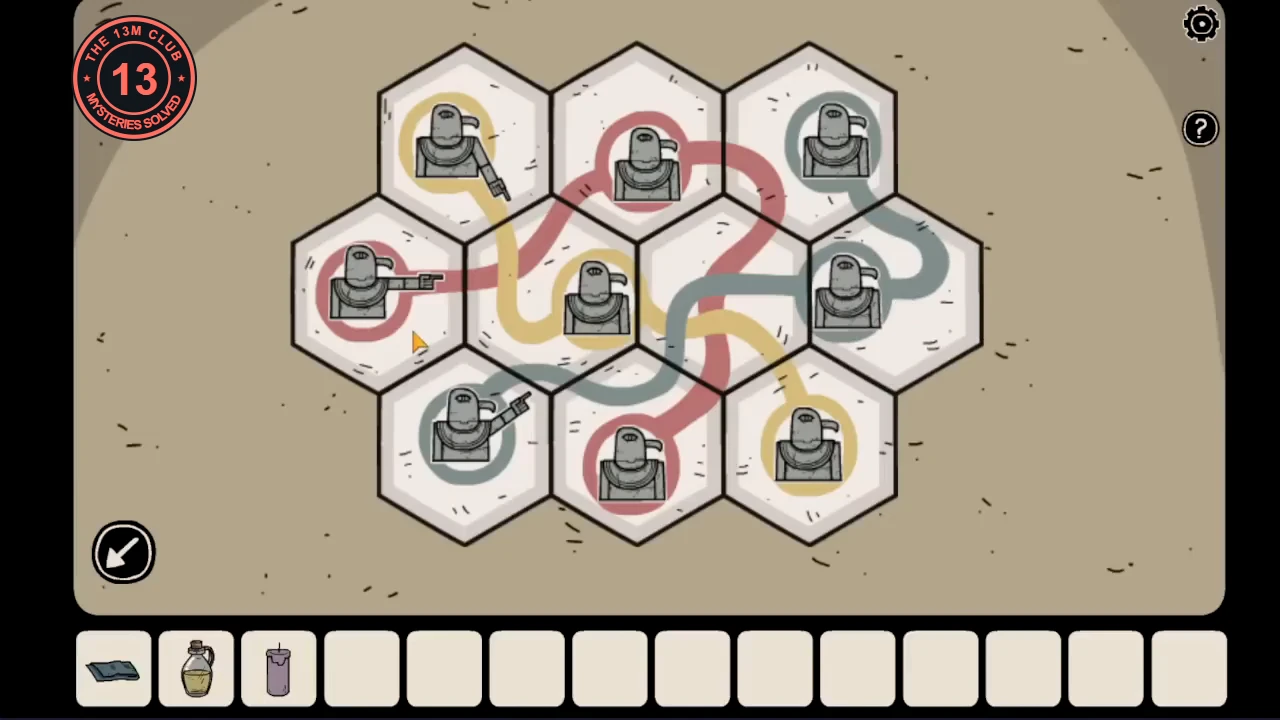
The finished hexagon panel. Each coloured path starts at a statue whose arm points along it.
The statue drawings, the switch box and the pipe tokens
Steps go down from the room with the blue table to the bowl room, which has a pedestal with a bowl and a recipe poster. Its blue door leads to a room with two four-armed statues, a switch box on a small table and a purple monster chewing a stick.
- From the blue table, take the pestle and the purple book. The book's first page is a recipe called Portal to Penumbra: a root, pink salt and page 33, heated in a bowl over a fire. Its next pages show four pipe shapes, each with a round token on it.
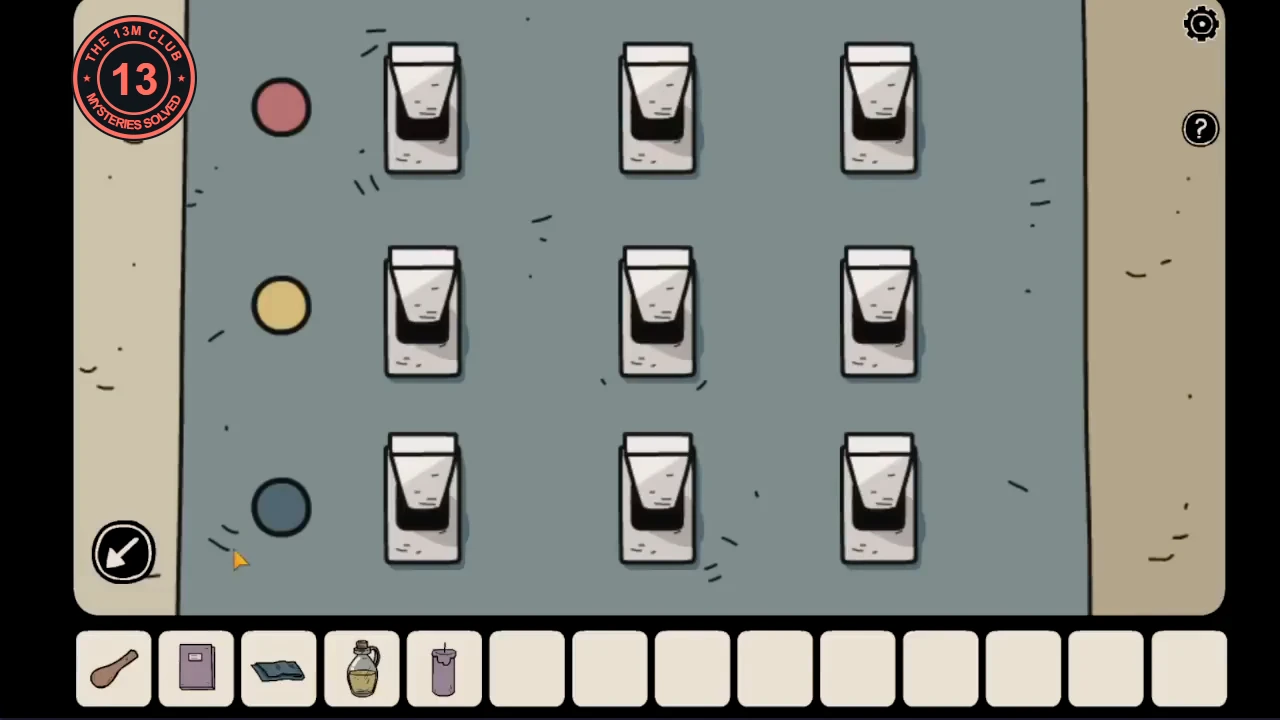
- Go down to the bowl room and read the Pink Salt Formula on the poster: oil, a rose and white salt. Go through its blue door to the statue room. The switch box on the small table has three rows of three switches, marked red, yellow and dark grey, all pointing up.
- Look at the nine drawings on the wall of the drawings room. They are arranged 3 x 3, just like the statues on the hexagon panel. Each one shows the statue twice, once upright and once upside down, with blood on one of the two: blood on the upright statue means up, blood on the upside-down one means down. The hexagon panel's coloured paths tell you which three drawings belong to which row of switches, in path order.
- Set the switches. Red row: down, down, up. Yellow row: up, up, down. Dark grey row: down, up, down. Take the white key and the cross-shaped piece from the box.
- Open the wooden door in the room with the boarded window using the white key. The telescope room has a telescope, a wall panel of four dotted discs and a pipe network on the right wall with five round tokens.
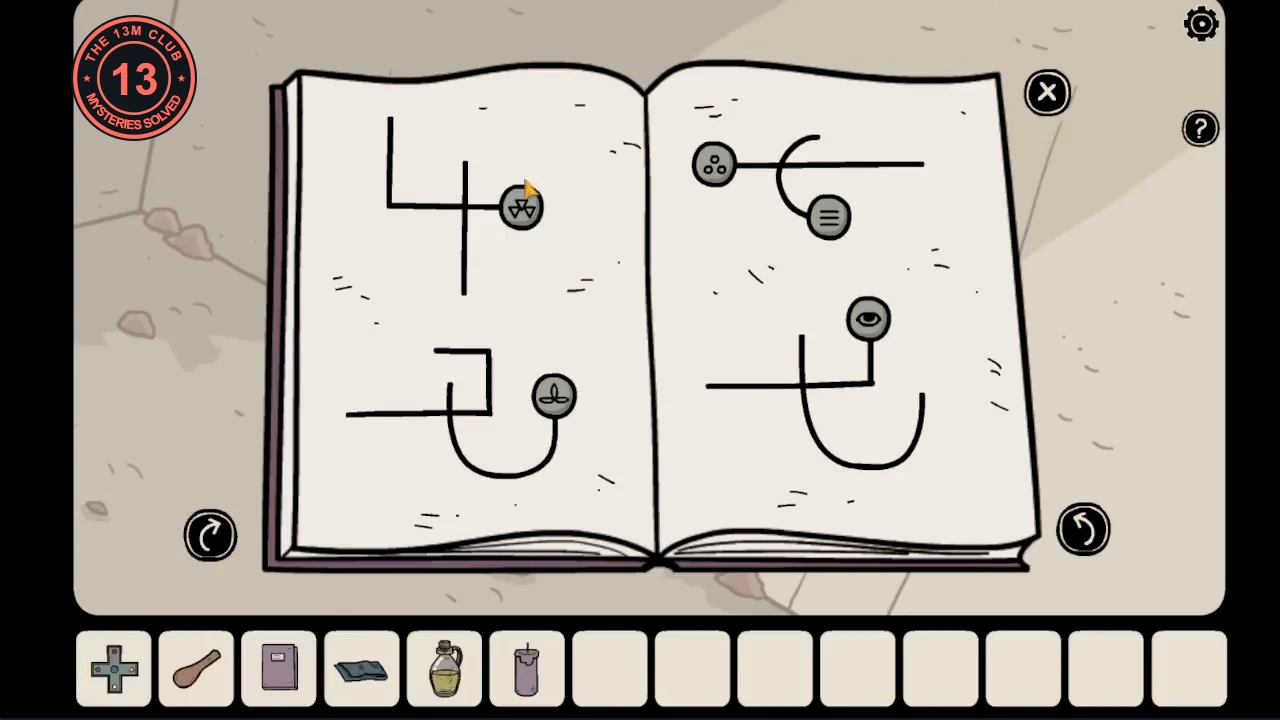
The purple book's pipe drawings, showing where each token belongs. - Compare the pipe network with the purple book's drawings and slide each token along the pipes to the spot its drawing shows: the three-dot token to the left end of the long line under the top arc, the three-line token to the end of the curl below it, the eye token to the top of the short branch in the middle, the leaf token to the top of the right side of the big U-bend, and the triangle token to the right end of the 4-shaped pipe's crossbar. The barred niche low on the right opens: take the shovel and the blue key.
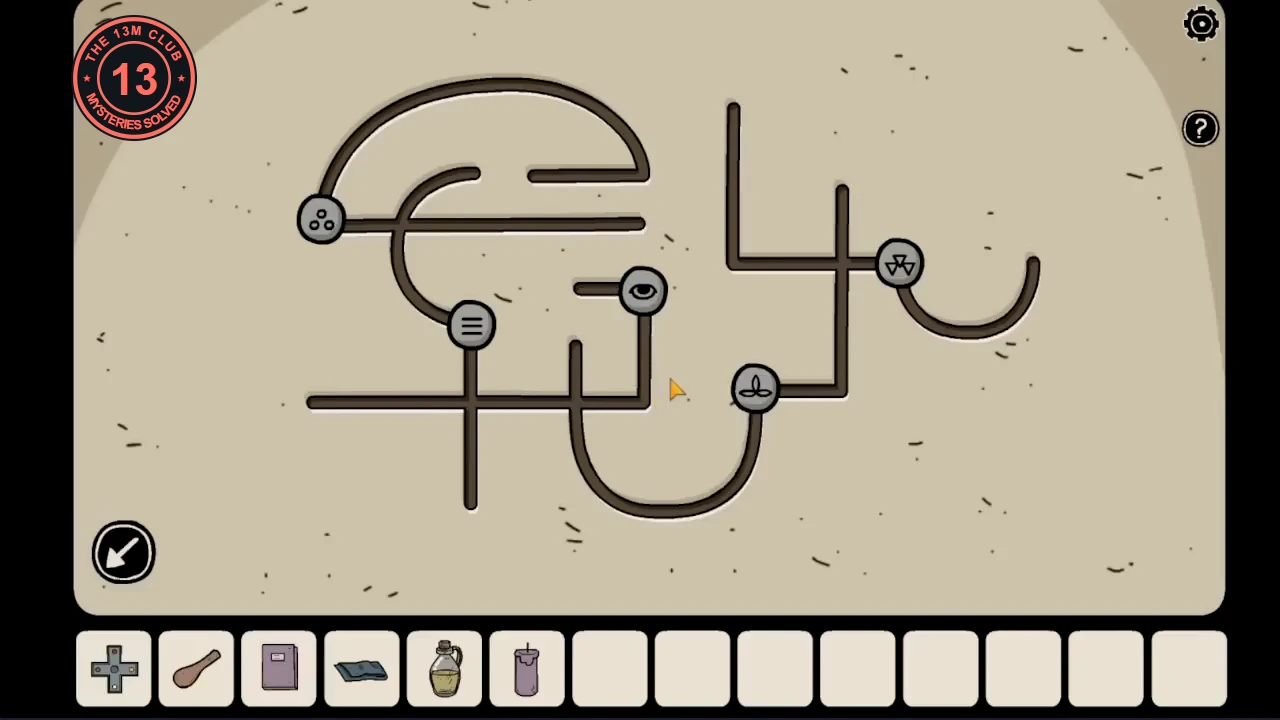
The tokens in their finished positions on the telescope-room wall.
The root, the gate lock, the candle and the crosses
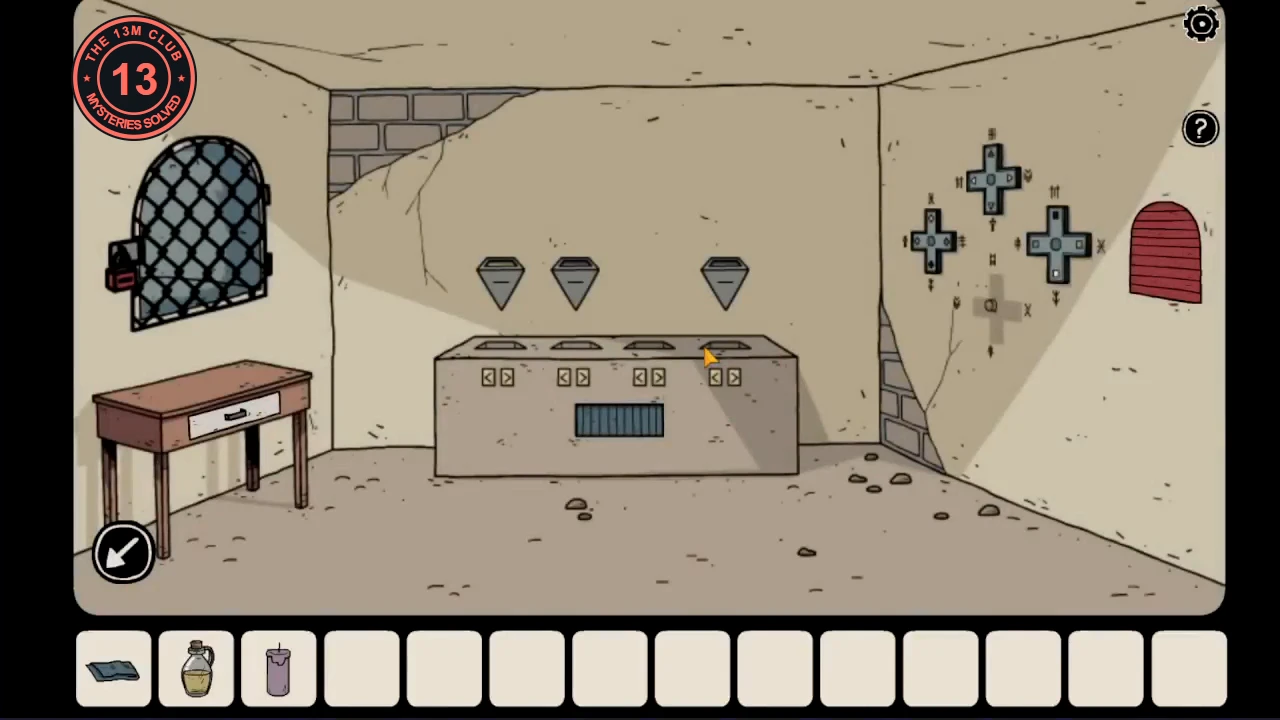
The blue key opens the blue door beside the blue table. The arrows room beyond has two hanging shelves, a red arched shutter, a blue table with a locked red book, five arrow holders on the right wall and a wilted plant in the floor. The room behind the entrance's blue door has a lattice gate with a red lock on the left, three hanging pyramids above a stone block, and a panel of crosses with a red shutter on the right.
- Open the blue door with the blue key. Dig up the wilted plant with the shovel and take the root.
- Optional, hidden shadow 7 of 10: look into the hole left by the plant.
- Read the blue book on the lower hanging shelf: it shows four squares, each turned to a different angle.
- In the room behind the entrance's blue door, the lattice gate on the left has a red lock with four squares. Tap each square to rotate it until all four match the book. A blue flame burns behind the gate: light the candle in it.
- Put the lit candle in the empty candlestick beside the book stand in the ladder room. The light reveals four pairs: a purple diamond with an X-shaped rune, a red circle with a double cross, a teal square with a forked arrow and a white triangle with three stacked chevrons.
- Add the cross-shaped piece to the empty spot on the cross panel. Each of the four crosses carries one shape in four colours and is surrounded by runes. Tap the crosses to turn them until each coloured shape from the candle page points at its rune: purple diamond toward the X, white triangle toward the chevrons, teal square toward the forked arrow and red circle toward the double cross. The red shutter opens: take the jar of white salt and the paper with five arrows.
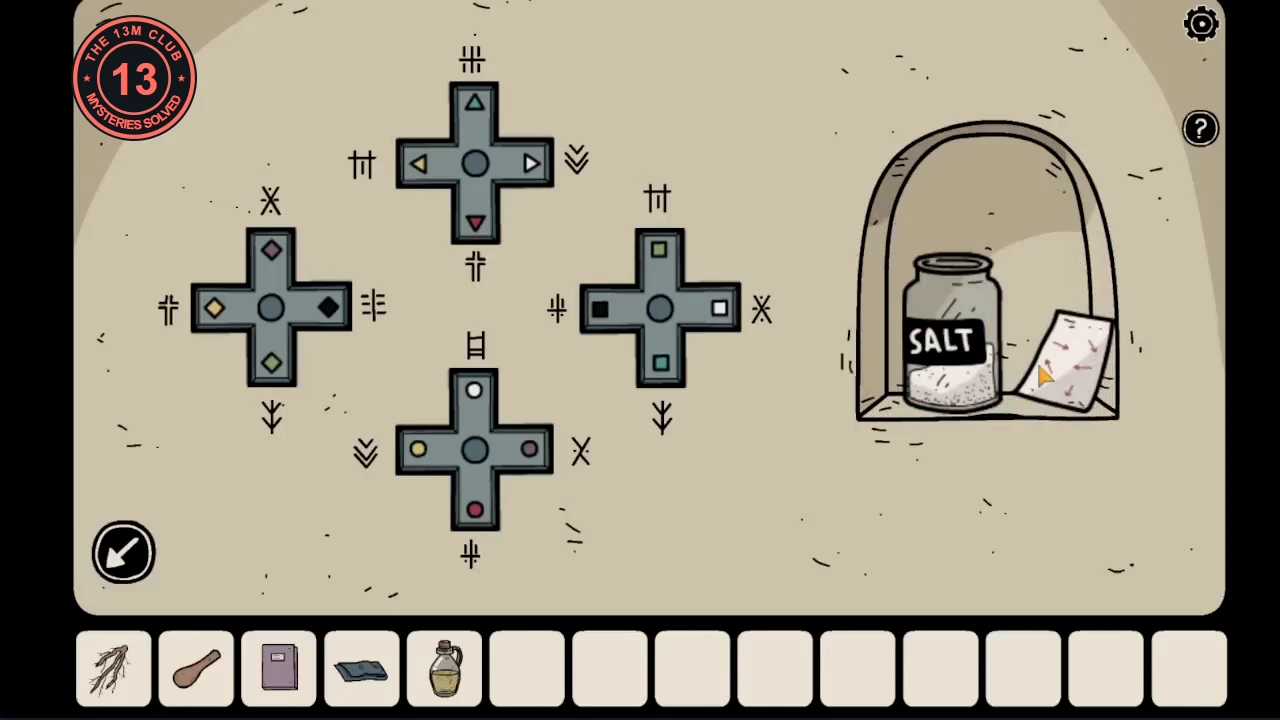
The finished cross panel. Each coloured shape from the candle page points at its rune, and the opened shutter holds the salt and the arrow paper. - In the arrows room, each of the five holders on the right wall holds an arrow. Tap them to turn each one to the direction of the arrow in the same position on the paper. The shutter opens: take the rubber bone and the lens.
The telescope, the torch and the pink salt
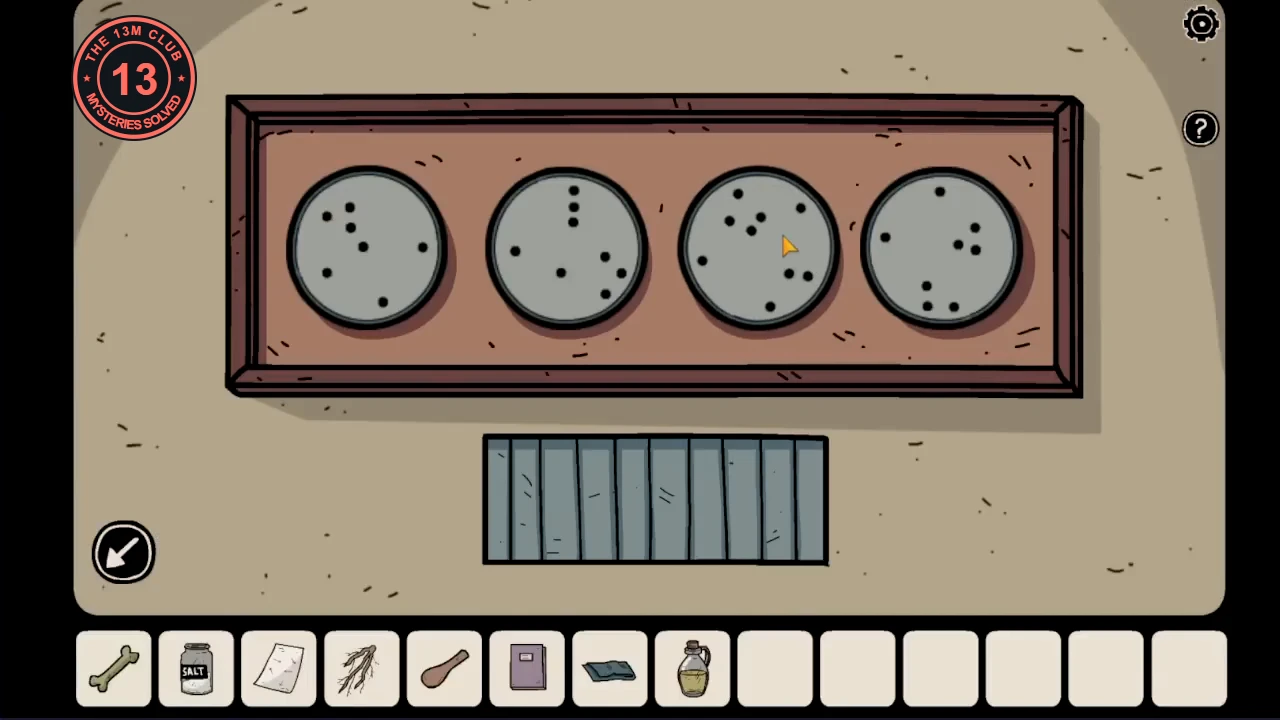
The telescope room's dotted discs copy the star patterns seen through the telescope.
- Fit the lens to the telescope and look through it: the arrows page through four star patterns. Tap each disc on the wall panel to rotate it until its dots match the pattern with the same number: the first pattern for the first disc, and so on. The compartment below opens: take the lighter and the bottle of alcohol.
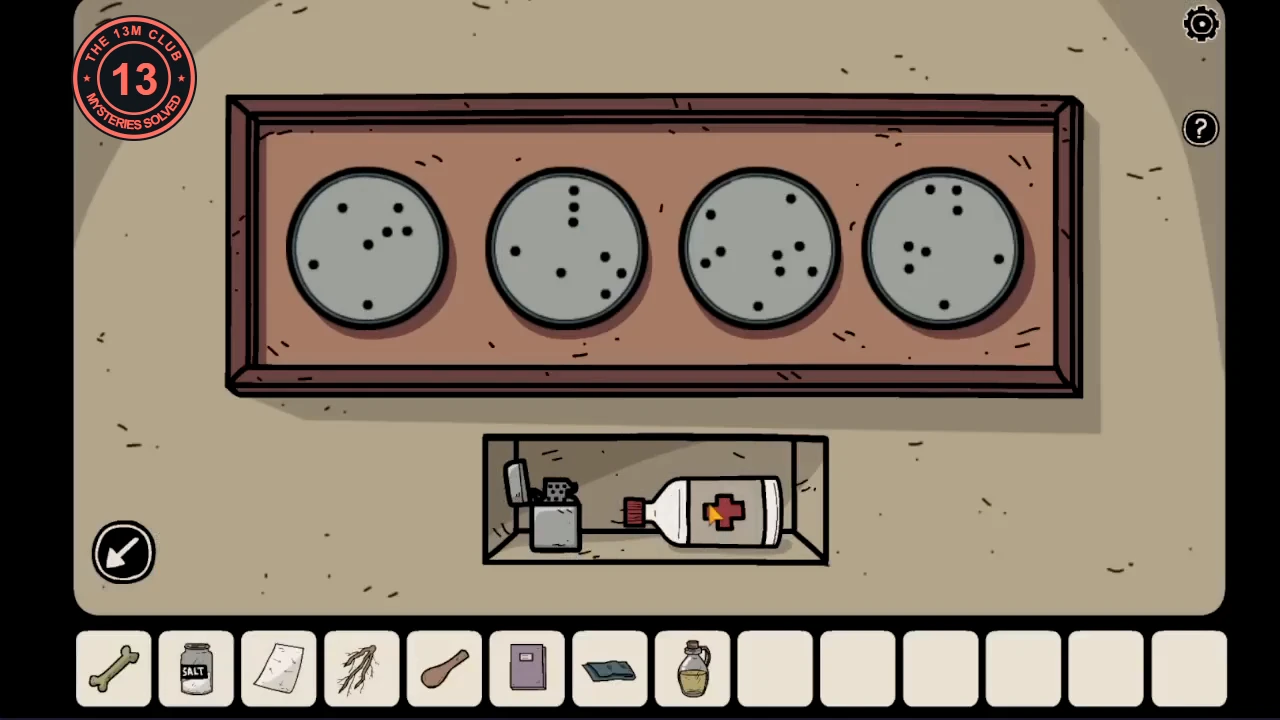
The discs turned to match the telescope's star patterns, with the lighter and alcohol revealed. - Optional, hidden shadow 8 of 10: look through the telescope again; a shadow peers into the view.
- Give the rubber bone to the purple monster in the statue room. It drops the stick it was chewing: take the stick.
- From the bowl room, go down the stone steps into the dark room. Fix the stick in the bracket at the top of the steps, wrap the blue cloth round it, soak it with the alcohol and light it with the lighter.
- With the room lit, open the glass cabinet and take the rose and the small pyramid. Open the red table's drawer and take the paper with coloured triangles.
- In the bowl room, put the cooking oil, the rose and the white salt in the bowl and grind them with the pestle. The salt turns pink.
The four pyramids
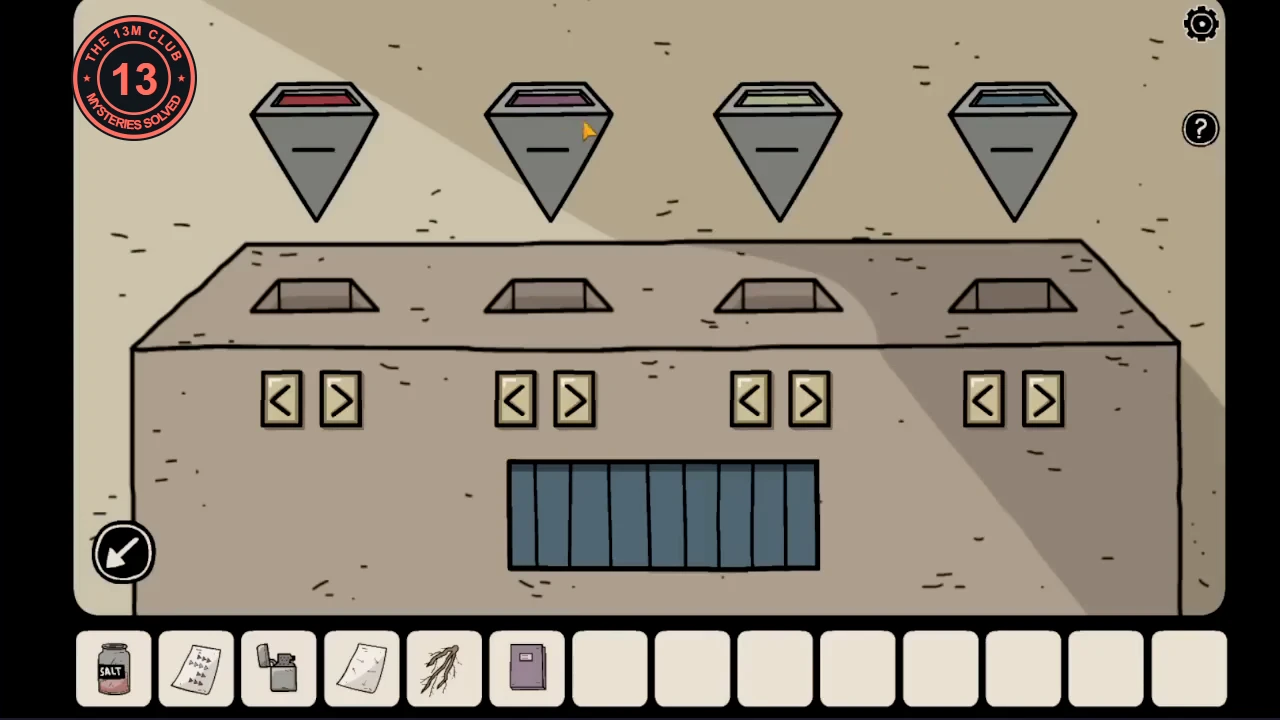
The stone block in the gate room has four slots, with three coloured pyramids hanging above it and room for a fourth.
- Hang the small pyramid in the empty fourth place above the stone block.
- The paper from the dark room shows columns of coloured triangles: red 3, blue 2, green 4, purple 3. Put the pyramids in that colour order from left to right by tapping one and then another to swap them, then use the arrow buttons under each slot to set its number of lines: red 3, blue 2, green 4, purple 3. The pyramids drop into the block and a drawer opens: take the black book.
The statues' hands and the portal to Penumbra
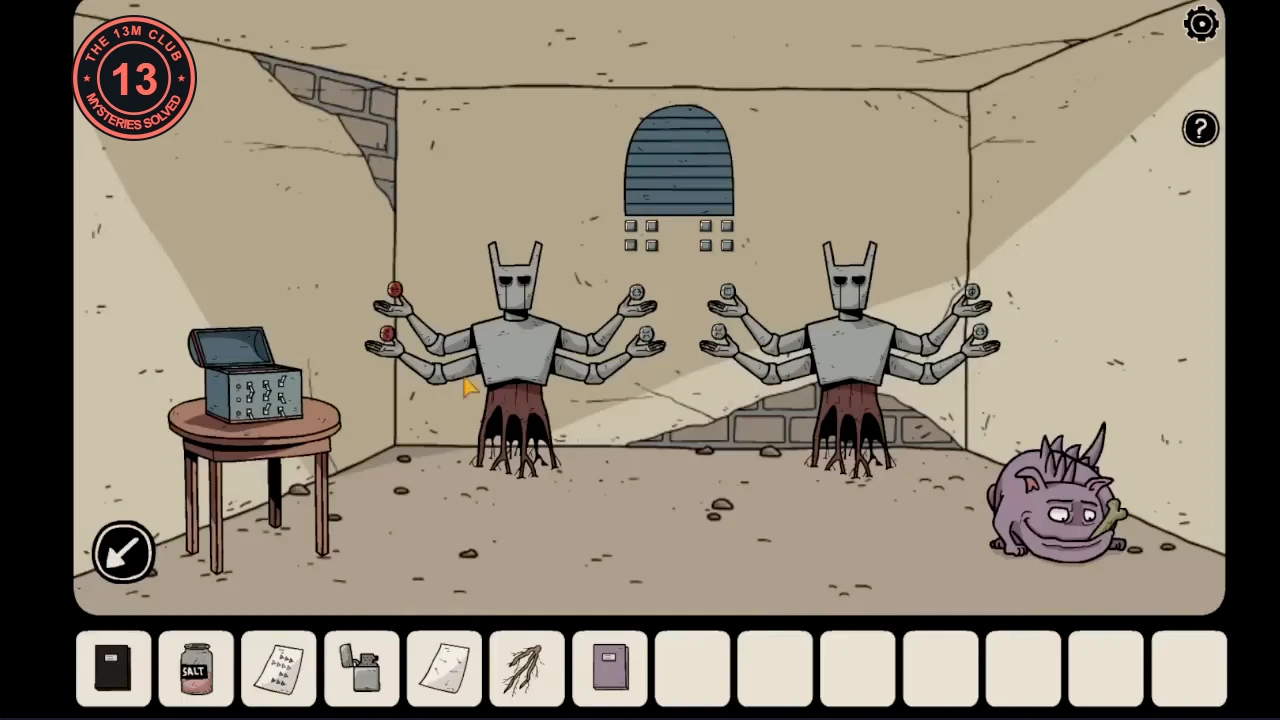
Each four-armed statue holds a rune coin in every hand. The black book says which rune goes where.
- Open the black book. The left page is for the left statue and the right page for the right statue. On each page, the top two runes go in the upper hands and the bottom two in the lower hands, with the left column for the hands on your left. Left statue: upper left, two arrows forming a Z; upper right, brackets; lower left, a double X; lower right, arcs with dots. Right statue: upper left, the double X; upper right, the Z arrows; lower left, the arcs with dots; lower right, an N.
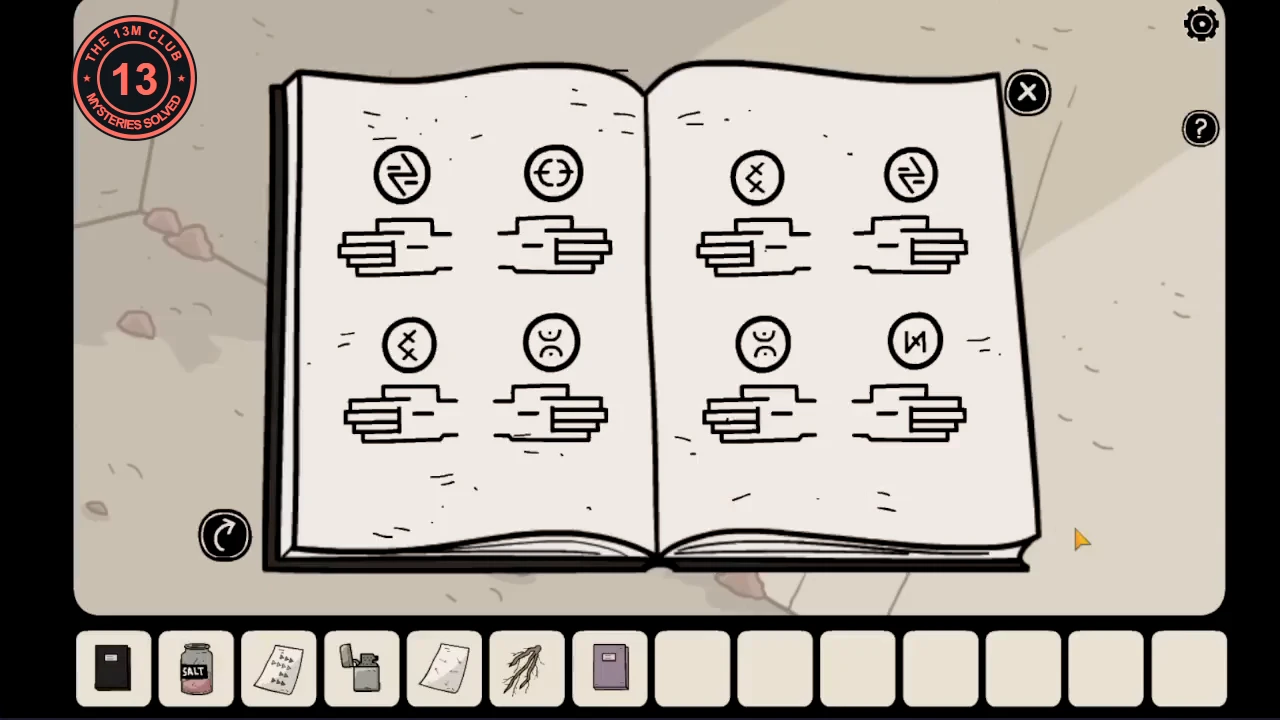
The black book. Left page for the left statue, right page for the right statue. - Tap the coins in the statues' hands to change their runes until both statues match the book. The Z arrows, the double X and the N are on red coins; the other runes are on grey ones. When you are done, the red coins are in both left hands of the left statue and in the upper-left, upper-right and lower-right hands of the right statue.
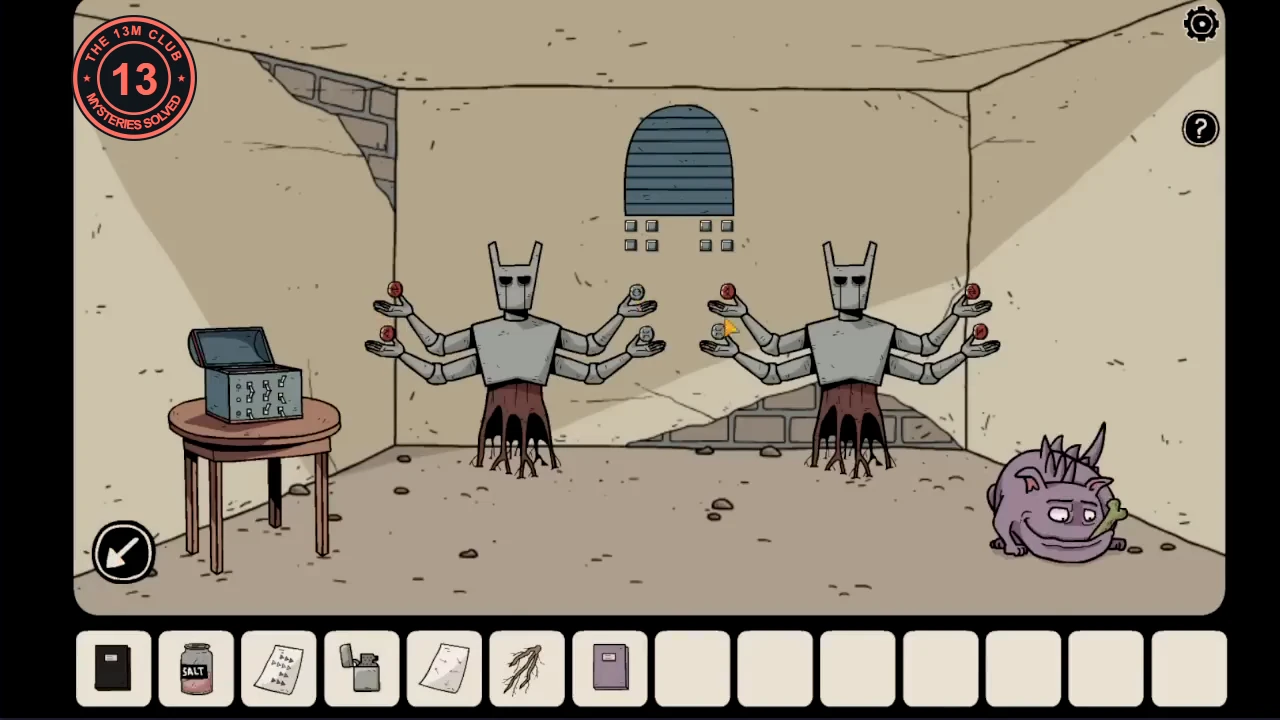
Both statues set as in the book. The red coins show which buttons to light. - The buttons under the blue shutter form two 2 x 2 groups, one for each statue. Light the buttons that match the red coins: in the left group, top left and bottom left; in the right group, top left, top right and bottom right. The shutter opens: take the purple key.
- Unlock the red book on the blue table in the arrows room with the purple key and tear out page 33.
- In the dark room, put the root, the pink salt and page 33 in the pan over the fire pit and light it with the lighter. A portal to Penumbra opens.