Patient monitor: arrow grid puzzle
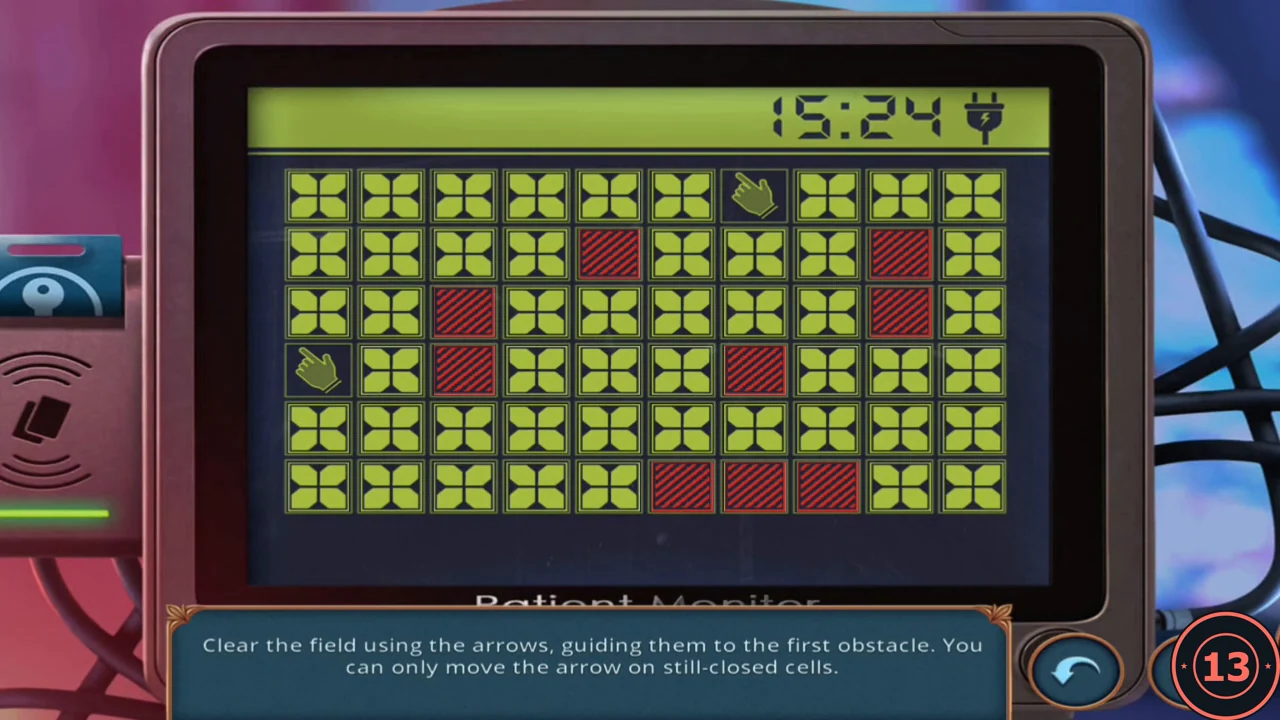
Use the key card on the red patient monitor on the tank rail.
- Open the red patient monitor box on the tank and use the key card on the reader at the left. The light turns green and the arrow grid puzzle starts.
- Goal: "Clear the field using the arrows, guiding them to the first obstacle. You can only move the arrow on still-closed cells." The grid has 10 columns and 6 rows with red obstacle cells. Tap a hand token and choose a direction: it slides over closed cells, opening them, until the next cell is an obstacle, an opened cell or the edge. Example solution, with token A starting at the top (row 1, column 7) and token B on the left (row 4, column 1): A down, right, up, right, down, left, up, left, down; B down, right, up, left, down, left; A left, up, left, down; B up, right. Use the undo button at the lower right if a token gets stuck. This layout is not confirmed to be the same in every game; if yours differs, plan each slide so that no closed cell is left cut off from both tokens.
- Take firecracker 2/4 and the green poison flask from the compartment.
Bird skull and the fishing rod
Travel back to the root ruins.
- Open the base of the tree and use the poison flask on the green bulb. Green smoke dissolves it; take the bird skull.
- Open the altar. The right mossy stone is missing its bird head ("Maybe I should look for your partner?"). Place the bird skull there; the stone splits. Take the fishing rod blank and the black hat (+).
- Open the reel (+) in the inventory and add the rod blank, the coil of fishing line and the fishing hook to assemble a working fishing rod.
Greenhouse: glass cutter and glass pane
Travel to the greenhouse.
- Use the flower spray on the carnivorous plant. It calms down; take the glass cutter from its soil.
- Open the geodesic dome ("I don't have a diamond, so... let's improvise!") and use the glass cutter on the upper-left triangular pane. Take the glass pane.
Root sample
Take a sample of the red root for the microscope.
- In the root ruins open the base of the tree ("I can remove these, I'm sure!"). Place the glass slide and the glass pane on the roots to trap a piece of root tissue, then take the root sample.
- Travel to the greenhouse and place the root sample on the microscope. The molecule puzzle starts.
Molecule puzzle
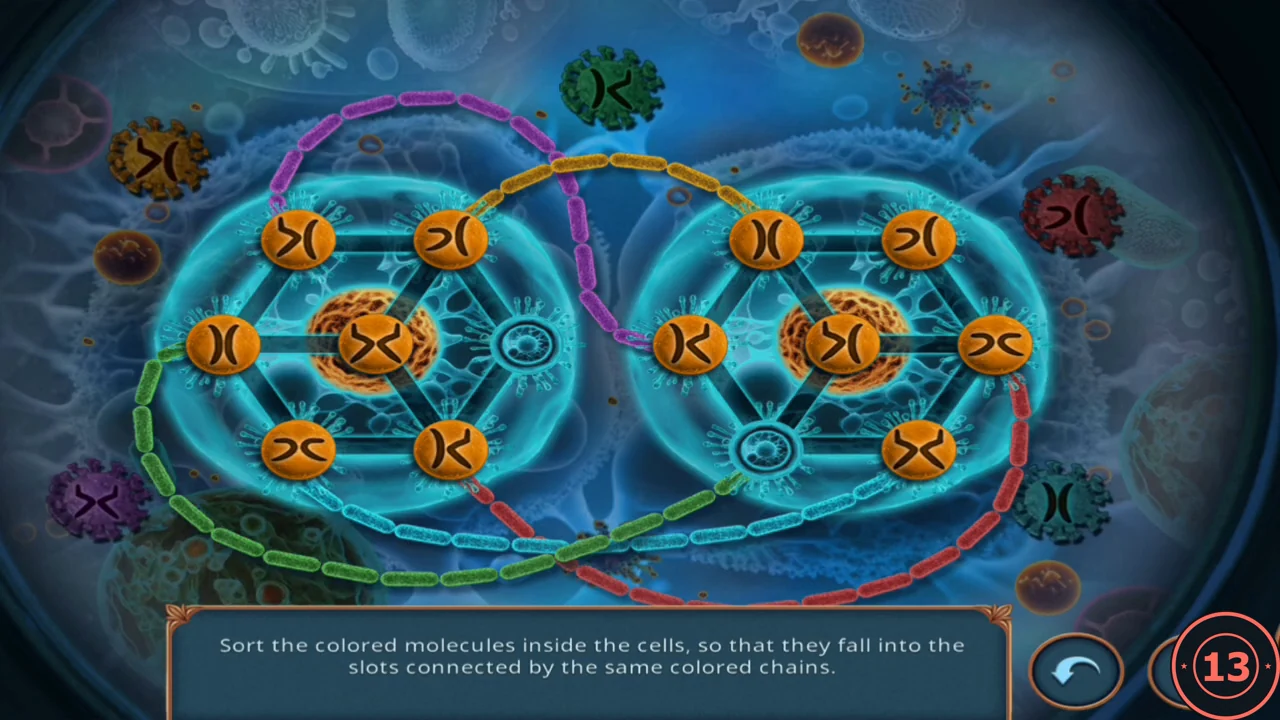
Goal: "Sort the colored molecules inside the cells, so that they fall into the slots connected by the same colored chains." There are two cells. Each has six slots around a hexagon plus a centre spot; six molecules fill seven spots, so one spot is empty. Molecules never leave their own cell.
- Tap a molecule joined by a line (a hexagon edge or a spoke) to the empty spot to slide it there. Coloured chains link one slot in the left cell to one slot in the right cell (purple, orange, green, cyan and red). The coloured virus of the same colour at the screen edge shows which molecule symbol belongs on that chain: put that molecule in both chained slots. The two unchained slots (right side of the left cell, top right of the right cell) take the remaining horizontal-bar molecule, and the centre spots end empty. A correct slot gets a green rim. This is a long sliding puzzle; work one chain at a time and park finished molecules in place.
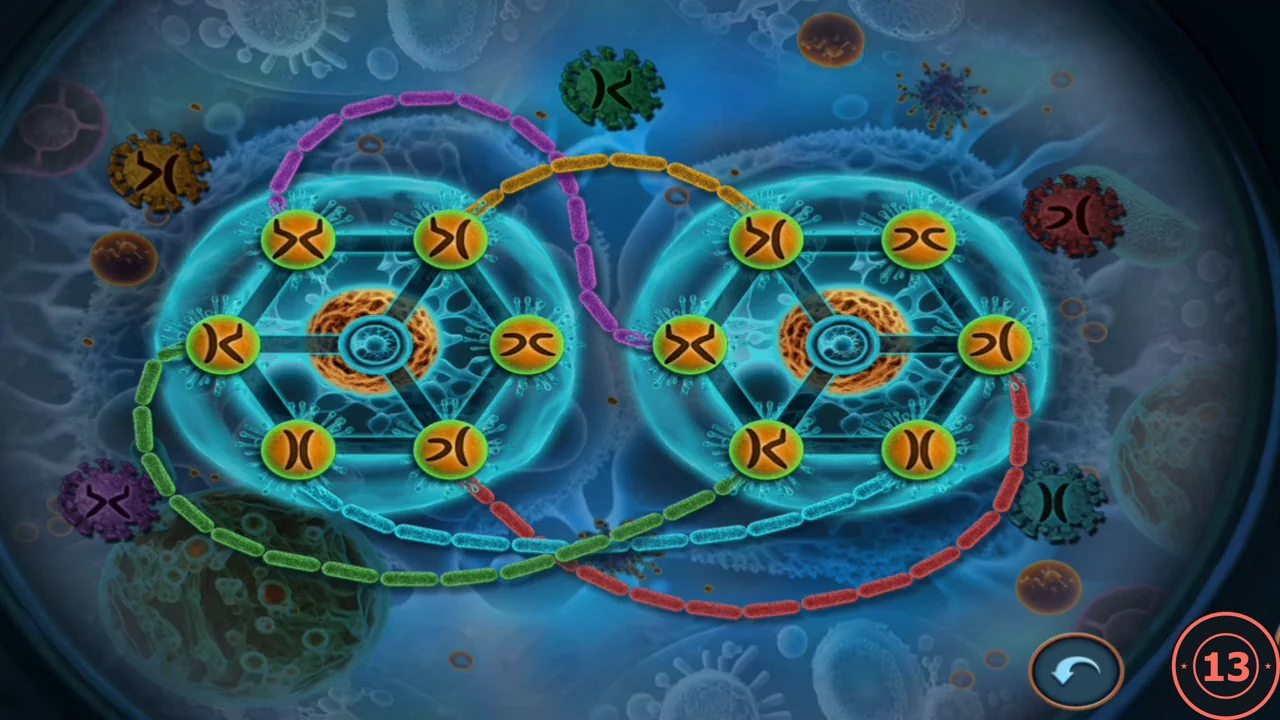
Solved: every molecule has a green rim and both centre spots are empty. - Read the torn note about human stem cells in the rye root, then take the yellow slip labelled RR-551 ("Wonders of genetic science!").
- Open the computer on the desk at the back and place the RR-551 note on the monitor. Open file RR-551 and read Eldred's research journal, entry 551: the rye is linked to human stem cells, spreads up to three miles and is vulnerable to fire.CODERR-551
Fish maze
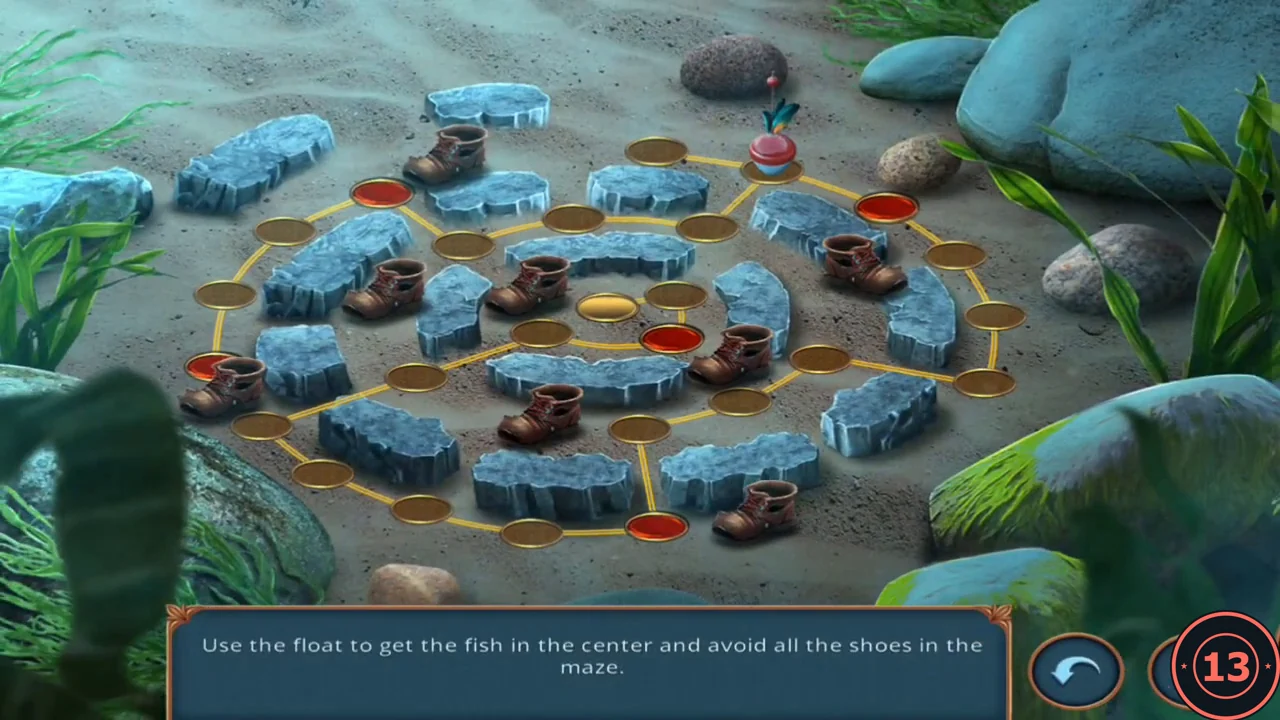
Travel through the root ruins and the lab to the waterfall.
- Open the water by the red flower ("Come here, fishy, fishy!") and use the fishing rod. The fish maze starts.
- Goal: "Use the float to get the fish in the center and avoid all the shoes in the maze." Three rings of round stops are joined by yellow connectors around a gold centre. Tap a neighbouring connected stop to move the float one step. Boots patrol the rings on a timer; stops glowing red are about to be occupied, so wait on a safe stop until the boot passes. One route that works: go clockwise down the right side of the outer ring, cross into the middle ring on the right, go back out to the outer ring at the bottom, head west along the outer ring to the left connector, wait, move into the middle ring and then the inner ring on the left, and enter the centre from the inner ring's upper left. Timing varies, so watch the boots.
The wildcat, the pouch and firecracker 3/4
Trade the fish with the wildcat.
- Open the wildcat's niche on the stone steps and give it the fish. The cat leaves; take the purple pouch of powder and the flower stick.
- Travel to Eldred's lab and open the pipe panel to the right of the tank. Sweep the cobwebs with the flower stick. Read Eldred's note (he hid the safe code among the papers) and take the copper tube.
- Open the black hat (+) in the inventory and add the copper tube and the pouch. The powder is poured through the hat into the tube, making firecracker 3/4.
Matching symbols scene
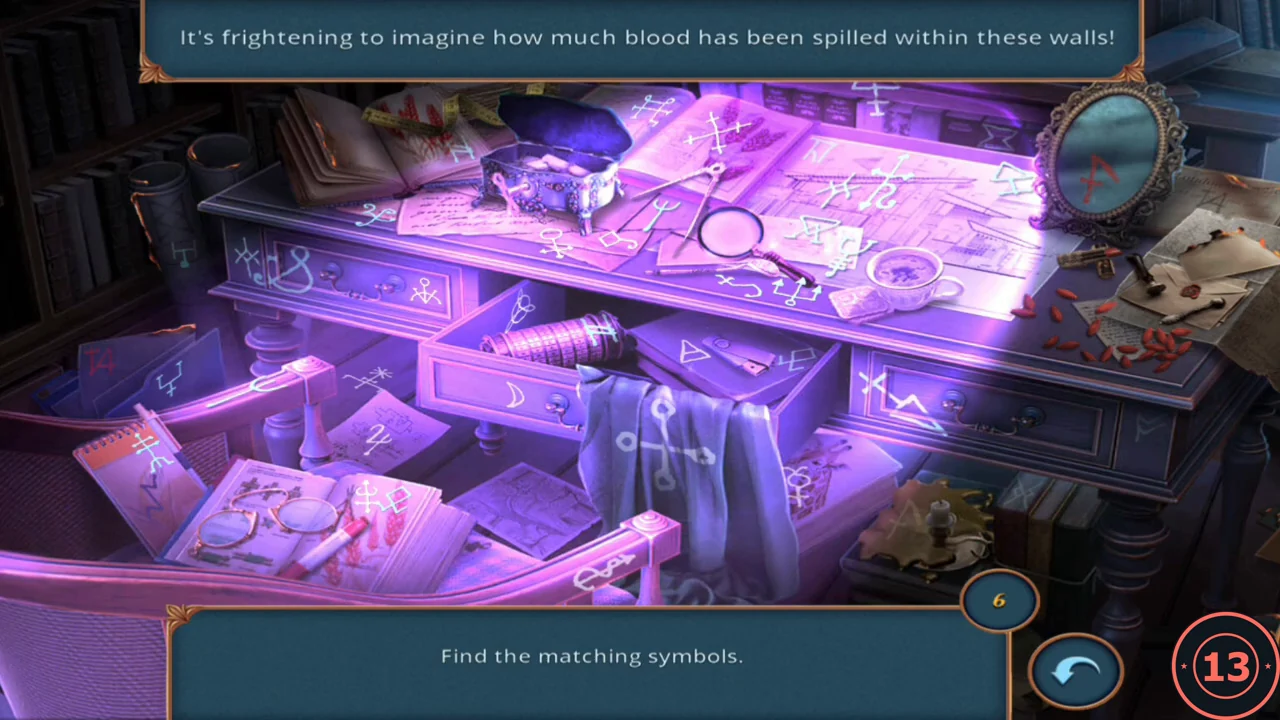
Open the purple-lit desk to the left of the tank. Goal: "Find the matching symbols." Six pairs of glowing runes are hidden around the desk.
- Tap two identical glowing runes to remove a pair. Approximate pair locations: the left drawer front with the top paper right of the magnifier; the centre drawer front with the open notebook at the lower left; the area near the top left of the jewelry box with the drawer row below it; the lower left drawer near the candle with the desk top left of centre; the mirror with the lower right of the desk front; and the shelf edge at the far left with the papers right of the mirror.
- Take the reward: a paper with the code.
Eldred's safe and the firecracker bundle
Open the safe in the right-hand bookcase.
- Place the code paper on the safe and enter V, 4, J, E on the keypad. The safe opens.CODEV4JE
- Read Eldred's note: the new red rye is afraid of fire, but only if the root is damaged and set on fire in several places at the same time. Take firecracker 4/4.
- Open the wick (+) in the inventory and add all four firecrackers to make a firecracker bundle.
Firecracker path puzzle
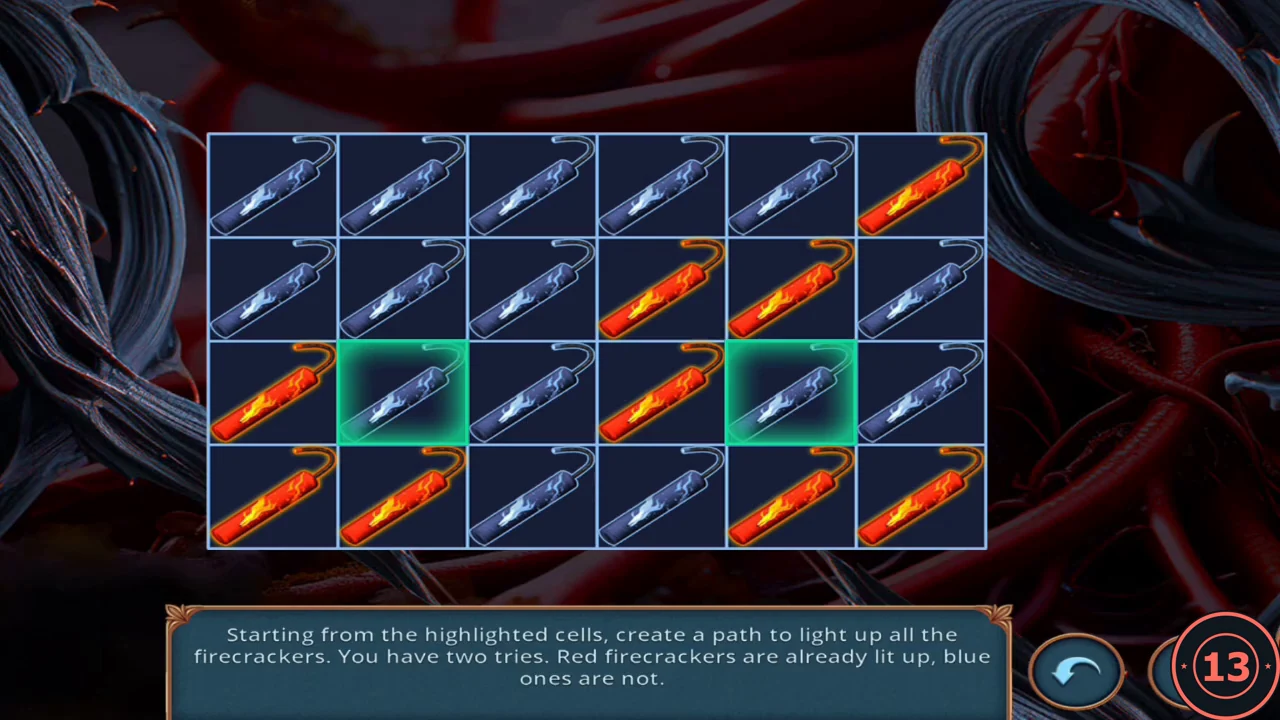
In the root ruins open the roots beside the tied man ("I can remove these, I'm sure!") and use the firecracker bundle.
- Use the firecracker bundle on the roots. Goal: "Starting from the highlighted cells, create a path to light up all the firecrackers. You have two tries. Red firecrackers are already lit up, blue ones are not." The grid has 6 columns and 4 rows; two green cells are the start points.
- Every cell your path crosses flips colour: blue becomes red and red becomes blue. Rows are counted from the top and columns from the left. Example start with red cells at row 1 column 6, row 2 columns 4 and 5, row 3 columns 1 and 4, and row 4 columns 1, 2, 5 and 6. Try 1 from the start cell at row 3 column 5: right, up, left, left, down, down, left, up, up (ending at row 2 column 3). Try 2 from the start cell at row 3 column 2: up, left, up, right, right, right, right, down, left, down (ending at row 3 column 4). After the second try all 24 firecrackers are red. If your starting pattern differs, plan each path so that it crosses every blue cell an odd number of times and every red cell an even number of times.
Decision chart and endings
After the firecracker puzzle a decision chart opens automatically. It shows your Decision Points (6/13 on this guide's route), the five story decisions with their point values, and outcome cards for 0, 4 and 10 stars at the bottom.
- Decision points per option: Decision 1 "No way! It's just business." 0, "Anything for a friend!" 1; Decision 2 "Refuse to talk" 0, "Share your troubles" 1; Decision 3 "End the conversation" 0, "Learn more" 1; Decision 4 "Get scared" 0, "Stop Alice" 2, "Try to wake Alice up" 4; Decision 5 "I don't need it." 0, "I have to see this!" 6. The maximum is 13.
- With 6 points this route unlocks the 4-star outcome card (Alice's portrait). The 0-star card and the gold 10-star card stayed locked. Reaching at least 10 points needs the paid options; for example, the greenhouse key (6) plus "Try to wake Alice up" (4). What the other cards show is not covered here.
Ending
The fuse on the firecracker bundle is lit.
- Alice urges you to leave. The root explodes in several places at once and Eldred loses his powers ("What did you do?! My powers... they're gone.") before crumbling away. His life force was tied to the root, and both are gone. The episode ends on the City Legends: The Root of Revenge, Season 1: Episode 4 title card.