Farmstead Meadow, Barn and Storm Cellar
Across the bridge lies an abandoned farm. Explore the barn, the yard and the storm cellar.
- In the barn, take the pitchfork. Note the rusty mesh tool cabinet and the ivy blocking the ladder to the loft.
- Photograph the pattern on the scarecrow's vest. If your photo album is full, delete old photos from solved puzzles first.
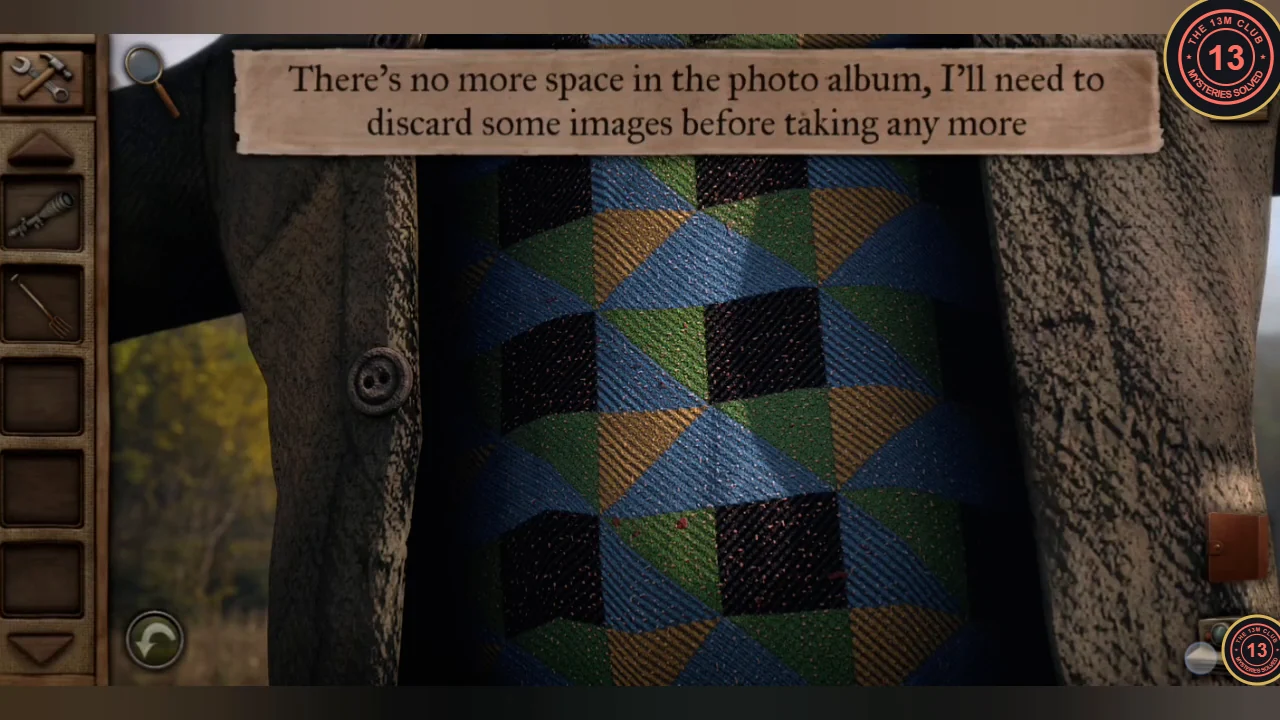
The scarecrow's vest pattern, the clue for the left trunk latch. - Open the farm gate and take the tire from the tire swing.
- Photograph the red pickup's licence plate (S2E3-9Q3F8). Note the picture box under the seat and the smell of fuel from its tank.
- Take the rope from the clothesline.
- Pry open the storm cellar doors with the pitchfork. Photograph the uneven stairs and take the banjo. It is too dark to go further.
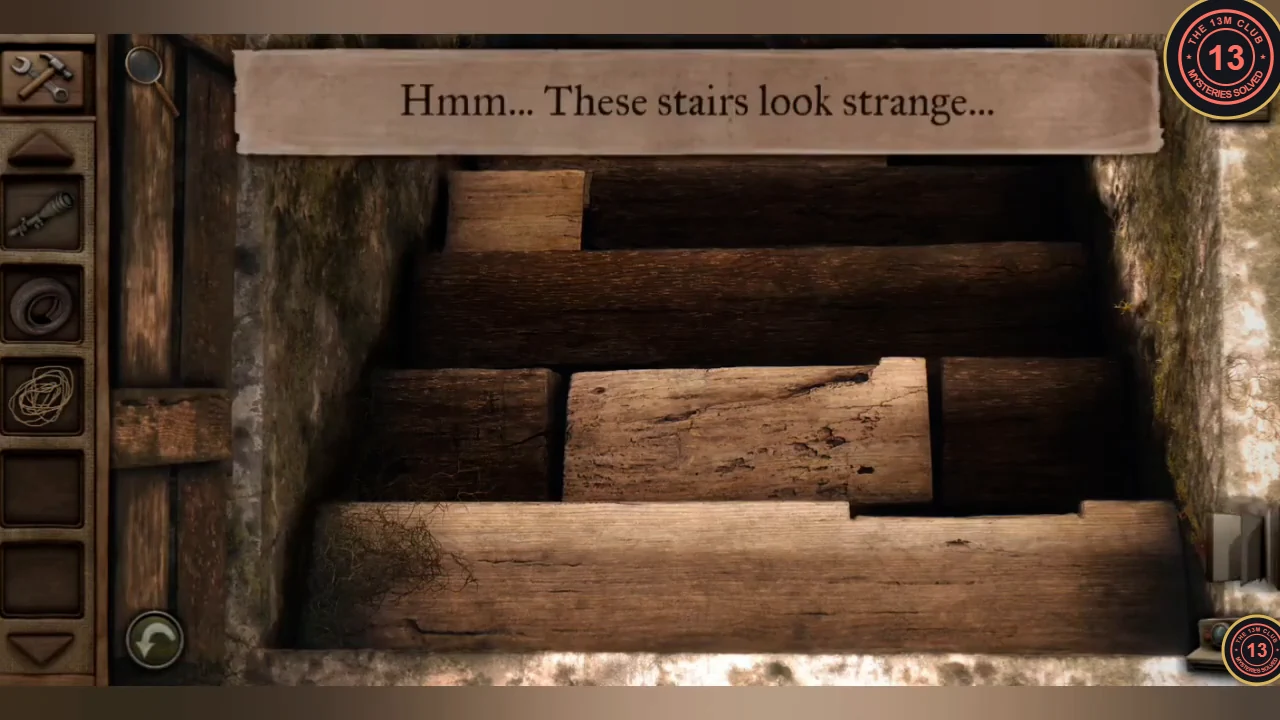
The uneven storm cellar stairs, the clue for the grain silo lock. - Note the mailbox lock, the six-dial lock on the radio tower gate and the dead electrical box at the road gate.
Grain Silo Block Lock and Barn Loft
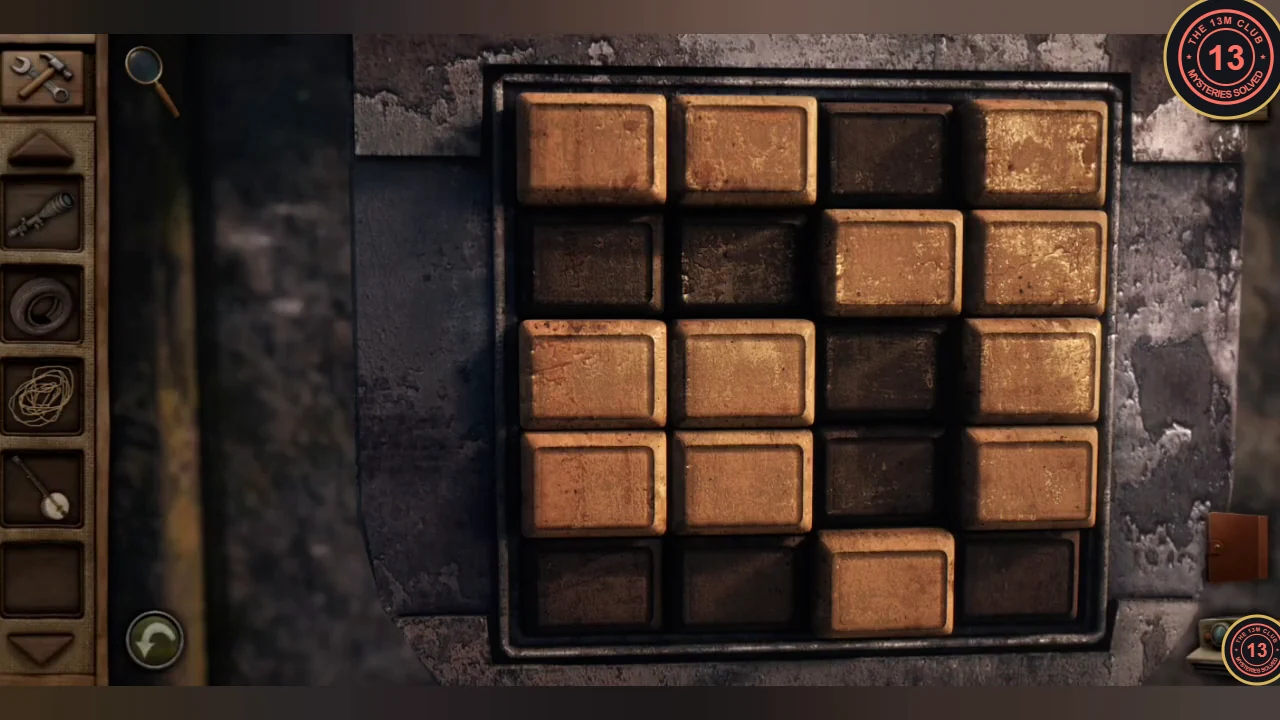
The storm cellar stairs open the grain silo.
- The silo lock is a grid of blocks, four across and five down. Raise the blocks to copy the step pattern of the cellar stairs from top to bottom: row 1 raise blocks 1-3; row 2 raise block 1; row 3 raise none; row 4 raise blocks 2-3; row 5 raise all four. The silo opens.
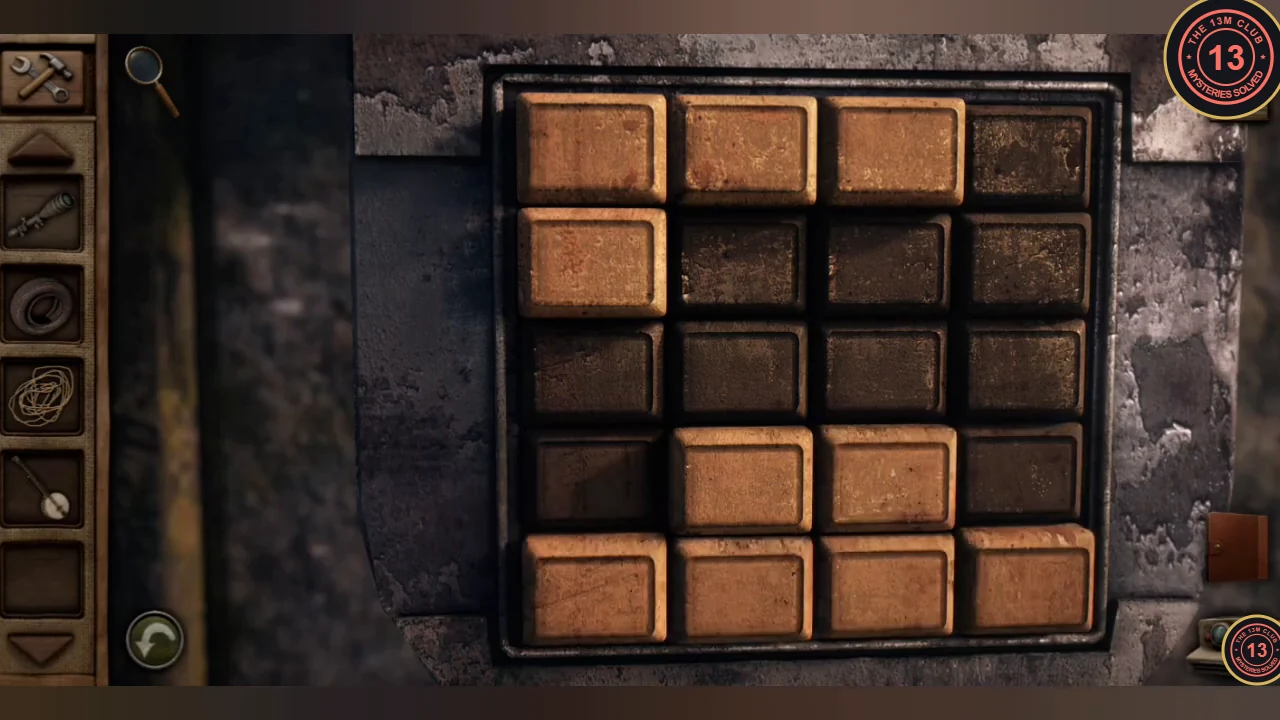
Solved: the raised blocks copy the step pattern of the cellar stairs. - Take the scythe from the silo, cut the ivy on the barn ladder and climb to the loft.
- Take the key hanging on the post and the fiddle from the crate. Note the chest with seven sliders and the pentagon window.
Farmhouse Clues and Trunk Latch One
Open the farmhouse and record the clues in every room.
- Unlock the farmhouse front door with the loft key.
- The blue steamer trunk has three latches. Set the left latch to the scarecrow vest pattern.
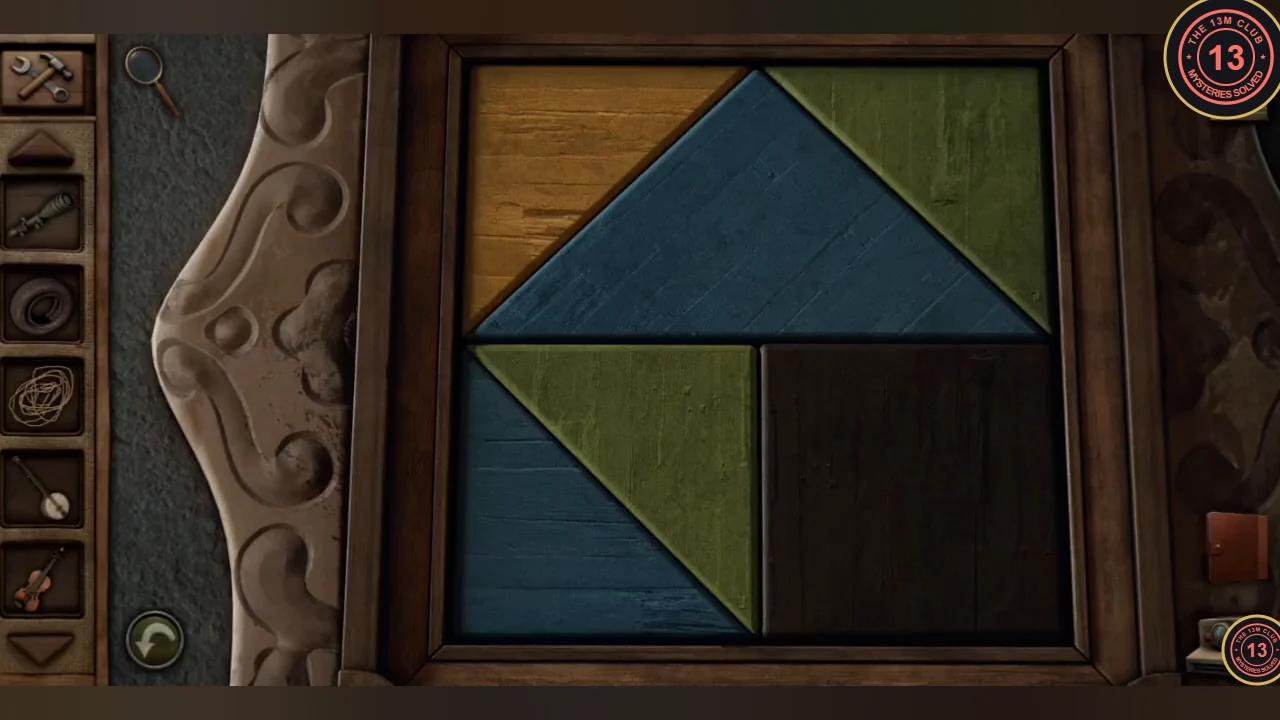
The left latch set to the scarecrow vest pattern. - Note the candle sconce in the foyer. In the bathroom, note the three-candle candelabra (medium, short and tall candles), photograph the round rug and take the horseshoe.
- Note the door with the diamond-shaped window. Take the old crystal ball, then note the wooden candelabra and chessboard in the study, the staircase window and the grandfather clock.
- Go back to the barn loft and photograph its angled window.
Loft Chest Candle Sliders and Mailbox Window Lock
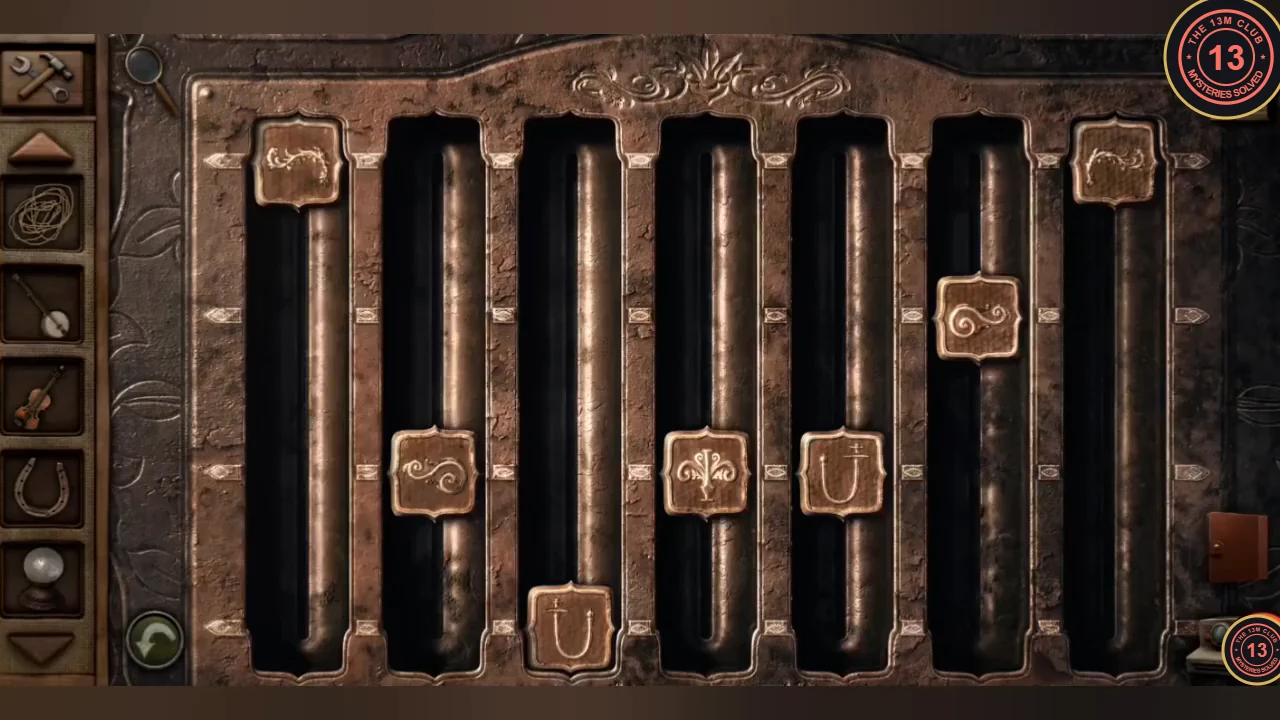
The candle heights open the loft chest and the farm's windows open the mailbox.
- Each of the seven loft chest sliders shows an ornament from one of the farmhouse candle fixtures: the foyer sconce, the bathroom candelabra and the study candelabra. Set each slider to the height of the candle on the matching fixture. The finished positions are: 1 bottom, 2 upper-middle, 3 upper-middle, 4 bottom, 5 lower-middle, 6 top, 7 lower-middle. On Hard the study candelabra's candles were burnt to different heights, and the chest opened with slider 5 at the bottom instead (1 bottom, 2 upper-middle, 3 upper-middle, 4 bottom, 5 bottom, 6 top, 7 lower-middle), so always compare the sliders with the candles in your own game. Take the empty kerosene lantern.
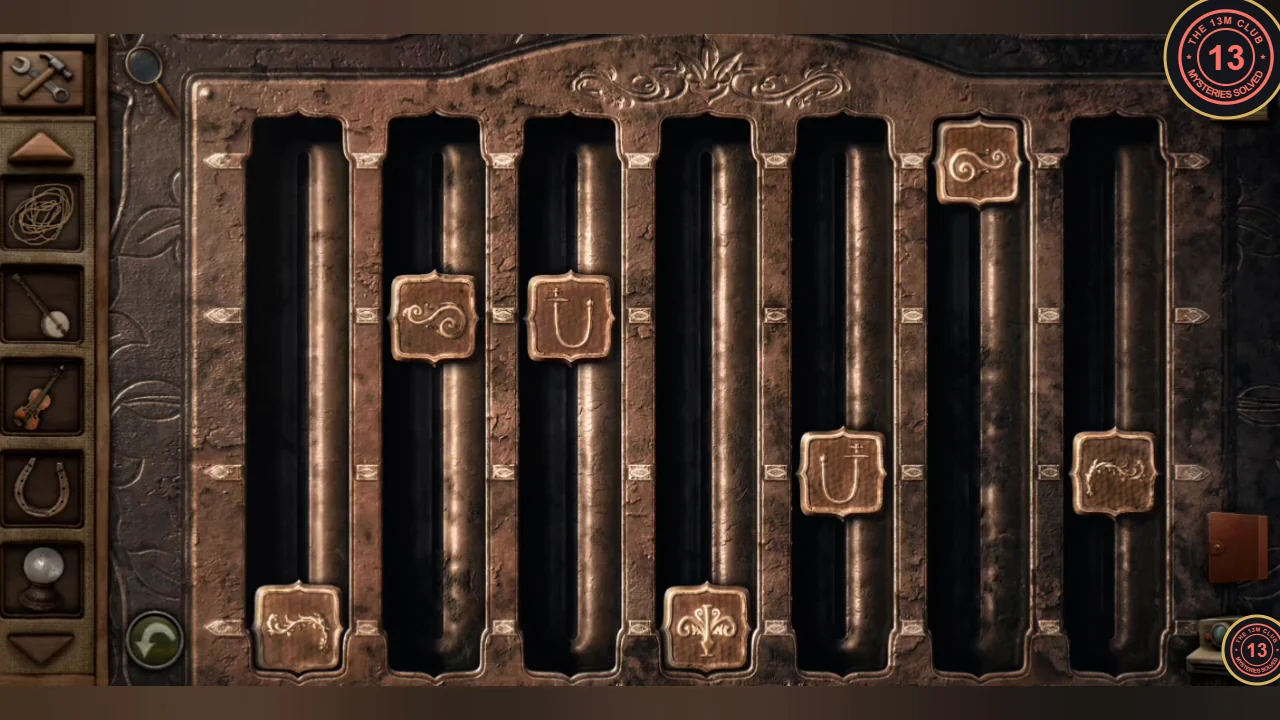
The finished slider heights on Normal. On Hard, slider 5 goes to the bottom instead. - The mailbox has four dials, each showing a frame colour, a window shape and a number of panes. Set them to the farm's windows: dial 1 blue, sloped window, 5 panes (loft); dial 2 dark, diamond window, 3 panes (farmhouse door); dial 3 red, chamfered window, 9 panes (staircase); dial 4 white, pentagon window, 6 panes (loft gable).
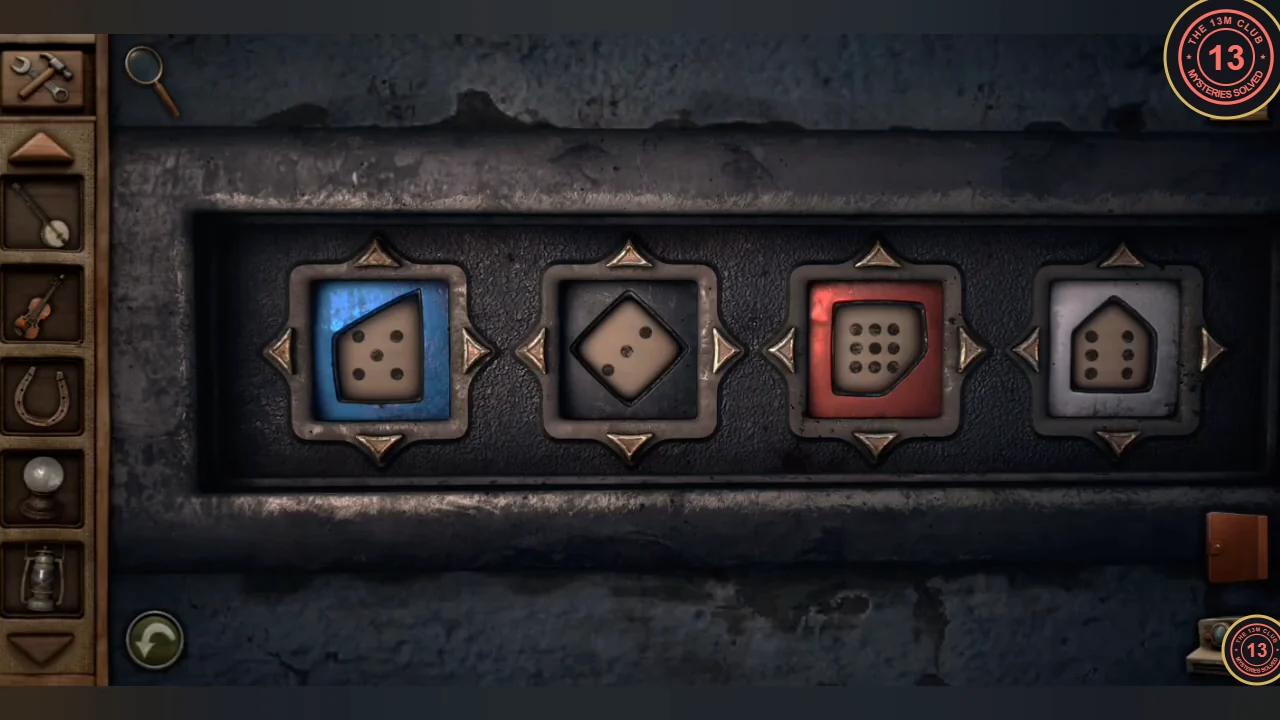
The mailbox dials set to the four farm windows. - Read Jen's letter in the mailbox and take the key.
- Unlock the door with the diamond window. Read the eviction notice, take the antique goblet and photograph the star pot holder and the May 1966 calendar.
Radio Tower Gate Screw Lock
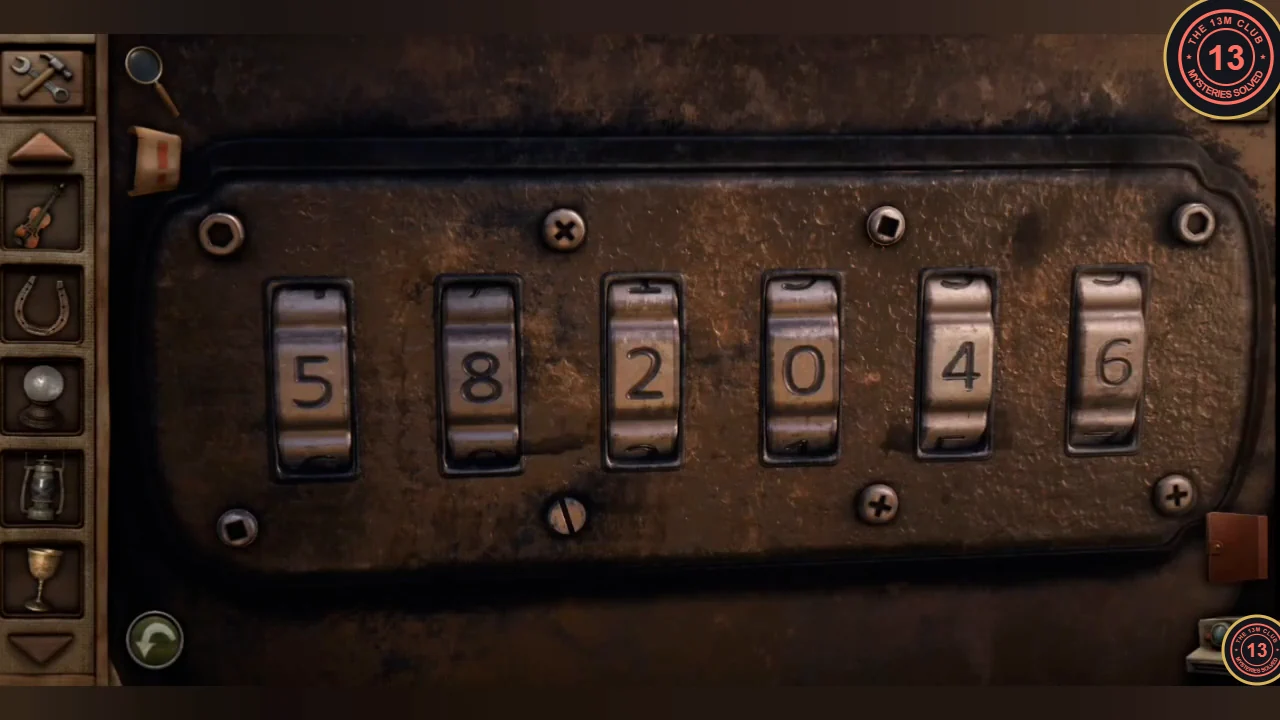
The calendar's symbols match the screws around the tower gate lock.
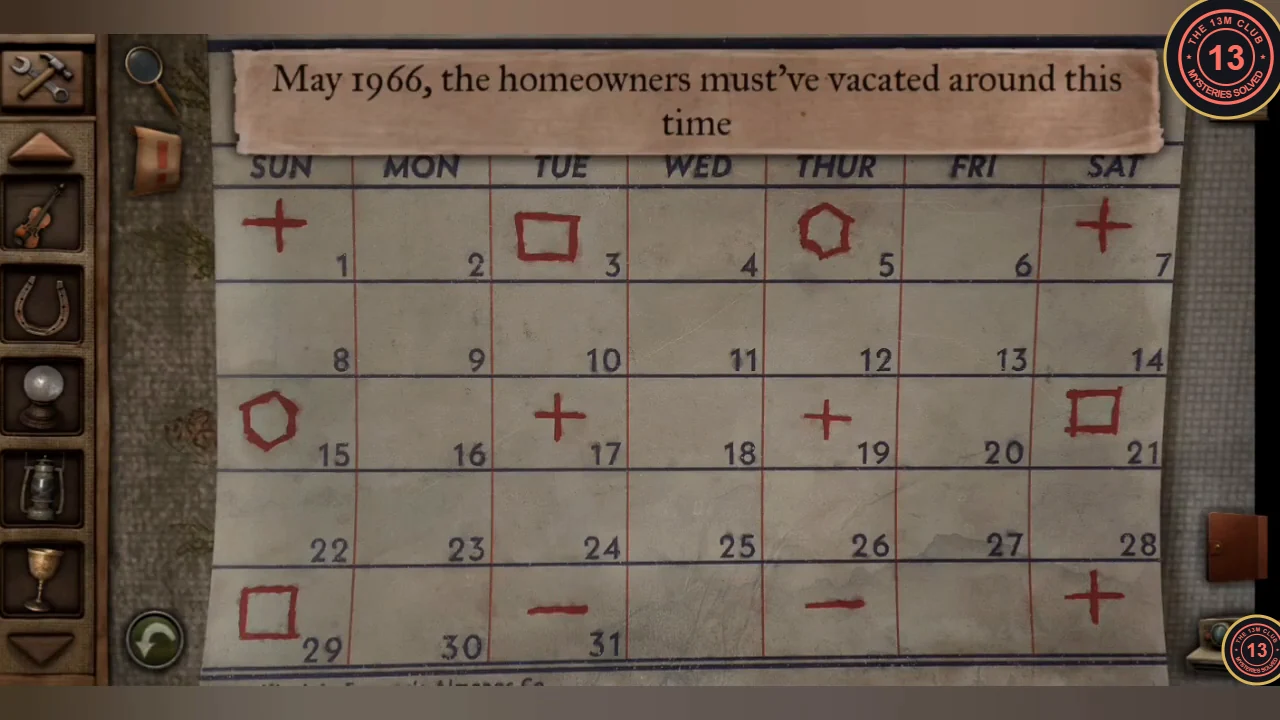
- Each dial on the radio tower gate lock has a different type of screw head beside it. Find each screw type among the symbols on the May 1966 calendar and use that date. Set the six dials to 2 3 2 7 1 1 and open the gate.CODE232711
- Inside the compound, climb the tower (the roof is too far to reach from here). Take the hose from the service truck's fuel tank and the 7.62 mm bullets from the ammo can.
Steamer Trunk, Instrument Wall and Hunting Rifle
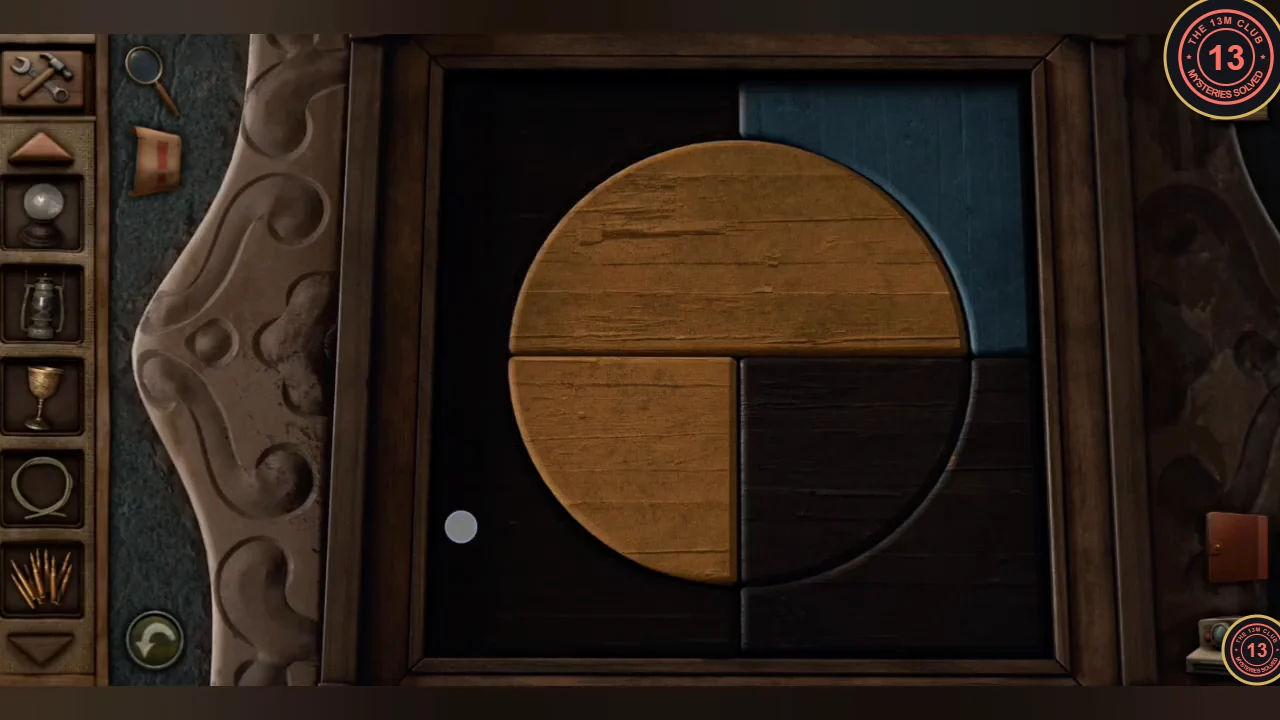
Finish the trunk, hang the instruments and shoot down the weathervane.
- Set the trunk's middle latch to the bathroom rug pattern and the right latch to the star pot holder colours. Take the lyre and the white chess pieces.
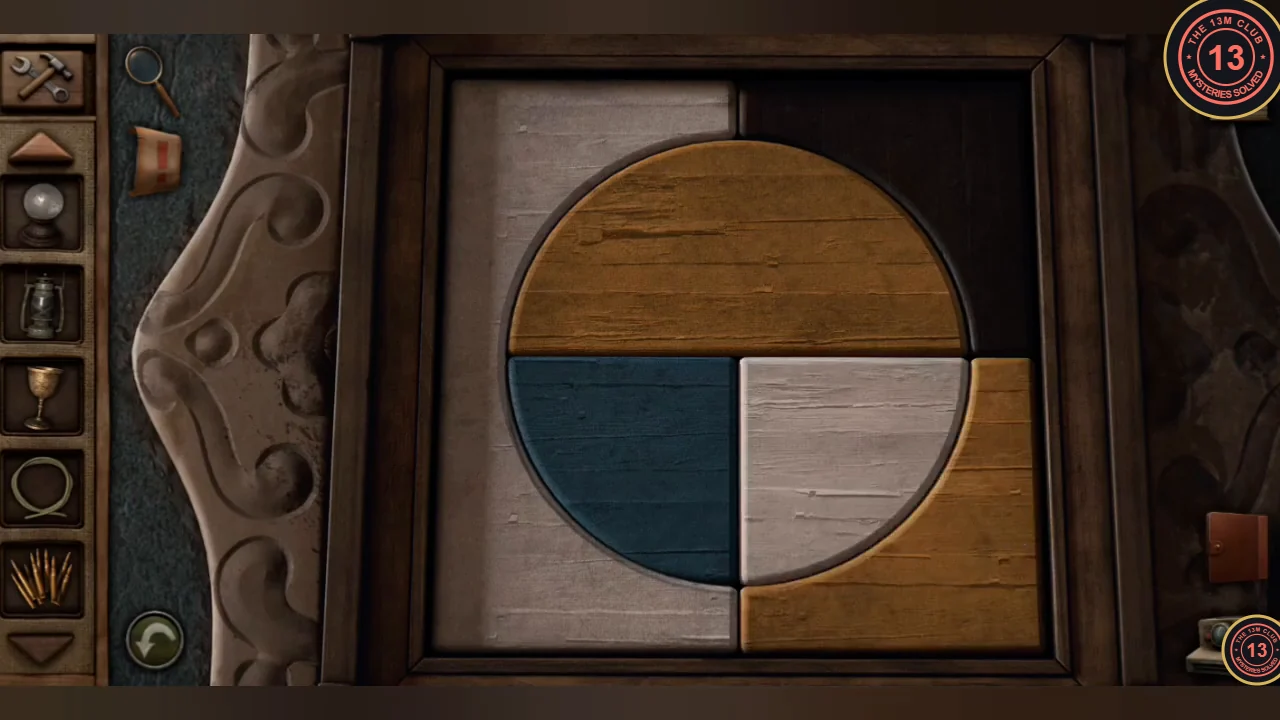
The middle latch set to the bathroom rug pattern. 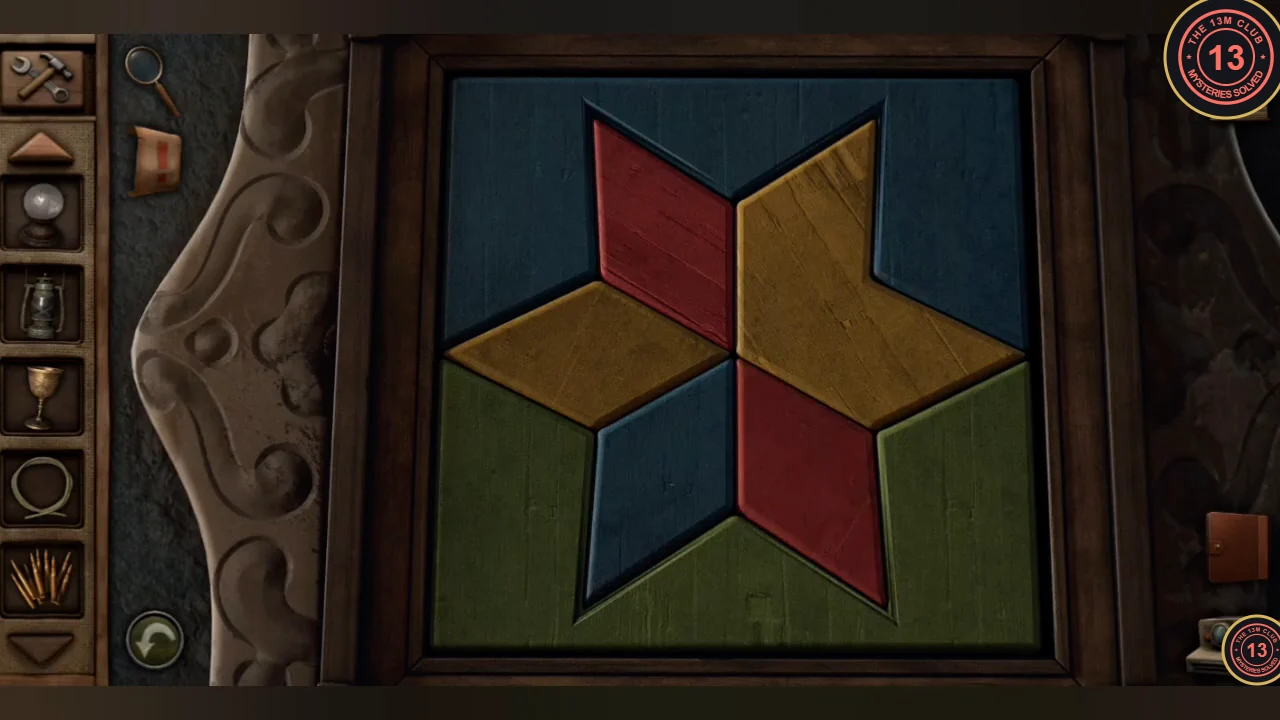
The right latch set to the star pot holder colours. - Place the white chess pieces on the study chessboard. The black pieces stay where they are.
- Hang the fiddle on the left hook, the banjo in the middle and the lyre on the right. The gun cabinet opens; take the hunting rifle.
- Combine the rifle with the rifle scope, then load the bullets. Shoot the weathervane off the roof and pick it up.
Refrigerator Balance Lock and Storm Cellar Chess Clues
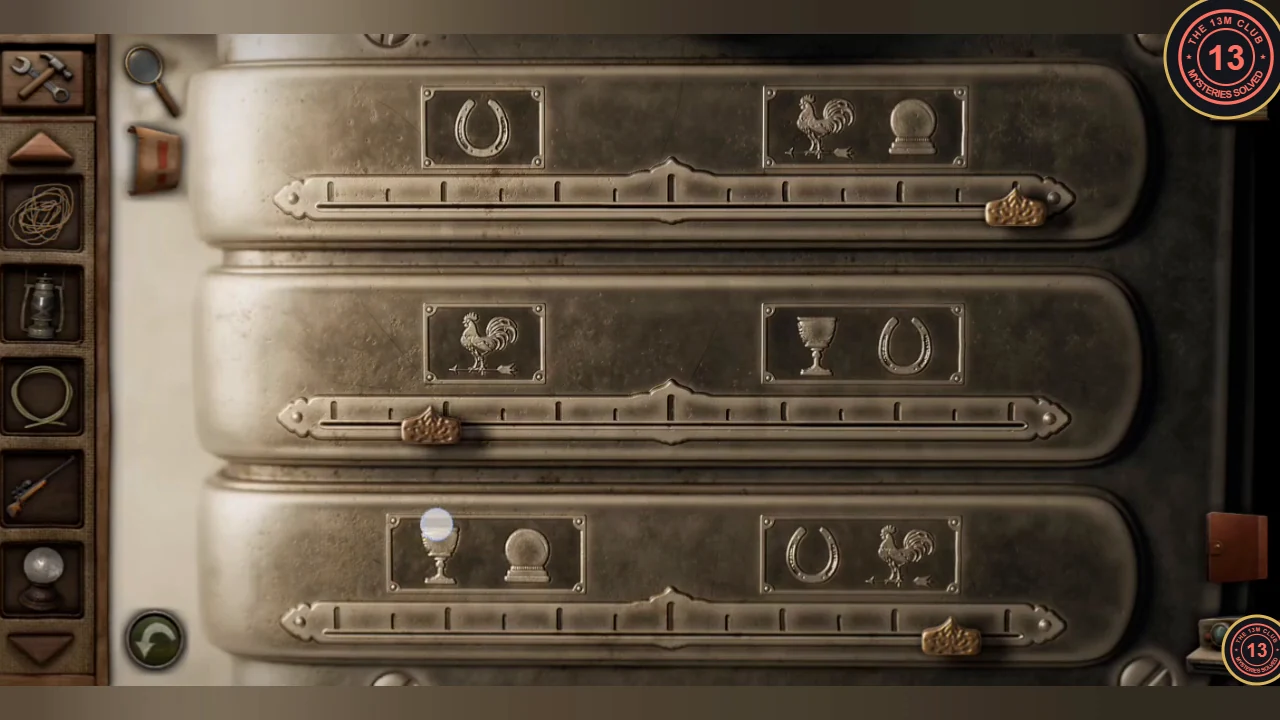
Weigh objects on the kitchen balance to open the refrigerator, then light the storm cellar.
- Each refrigerator slider shows objects on the left and right pans of a balance: row 1 horseshoe against rooster and crystal ball; row 2 rooster against goblet and horseshoe; row 3 goblet and crystal ball against horseshoe and rooster (the rooster is the weathervane). Put the same objects on the kitchen balance and copy where the pointer stops onto each slider: row 1 far right, row 2 three marks left of centre, row 3 two marks right of centre. Take the kerosene.
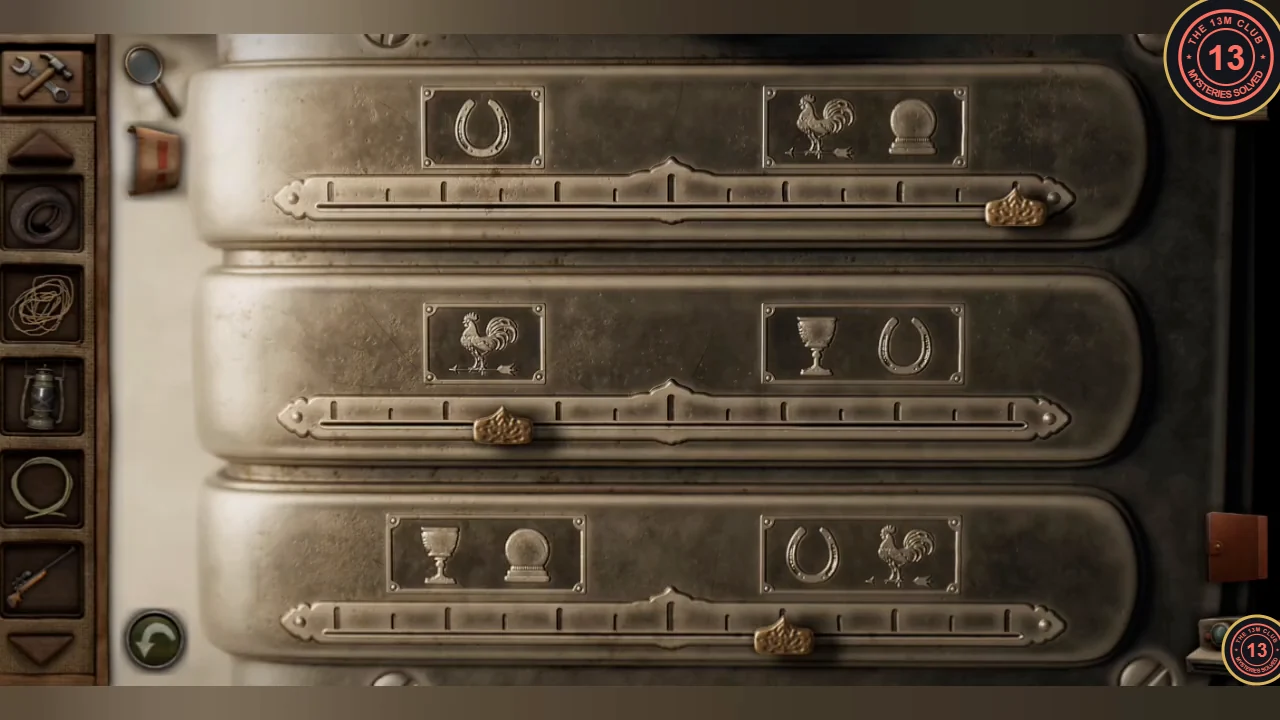
The slider positions copied from the kitchen balance. - Fill the lantern with kerosene and use it to light the storm cellar.
- Photograph the three chess diagrams and the licence plate B6P5-2K2M9. Take the rusty hook and tie it to the rope to make a grappling hook.
- On the study chessboard, move each white piece to the square where it has the same black pieces around it as in its diagram: knight to B3, bishop to G4 and king to E7. These squares are needed for the clock.
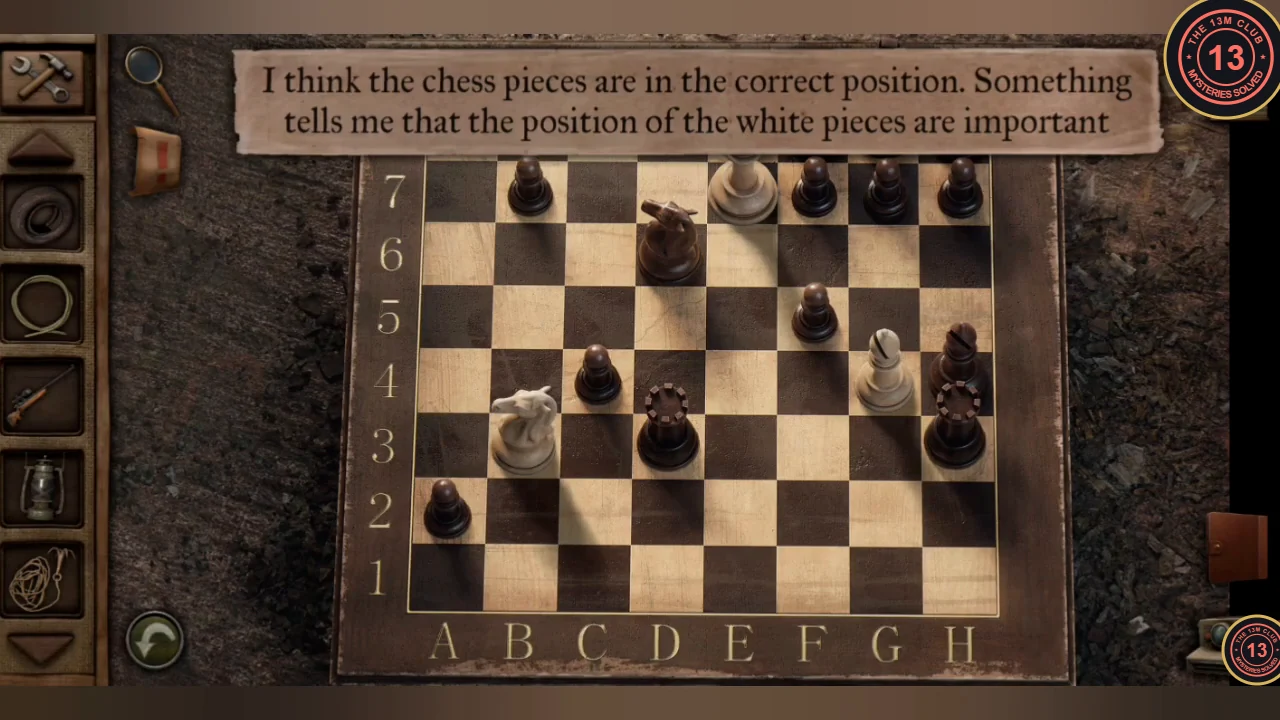
White pieces in place: knight B3, bishop G4, king E7.
Facility Roof and EXIT Door Tile Lock
Reach the facility roof with the grappling hook and open its cabinet.
- Photograph the service truck's licence plate (P3A8-9D5G9). Climb the radio tower and throw the grappling hook onto the satellite dish to cross to the roof. Take the lug wrench and go through the roof hatch.
- The main power switch is dead. Photograph the chalk marks on the board: six circled groups of tally lines, each with loose tally marks around it. On Hard the board is drawn differently: it has no circles, and its groups of tally marks are arranged differently.
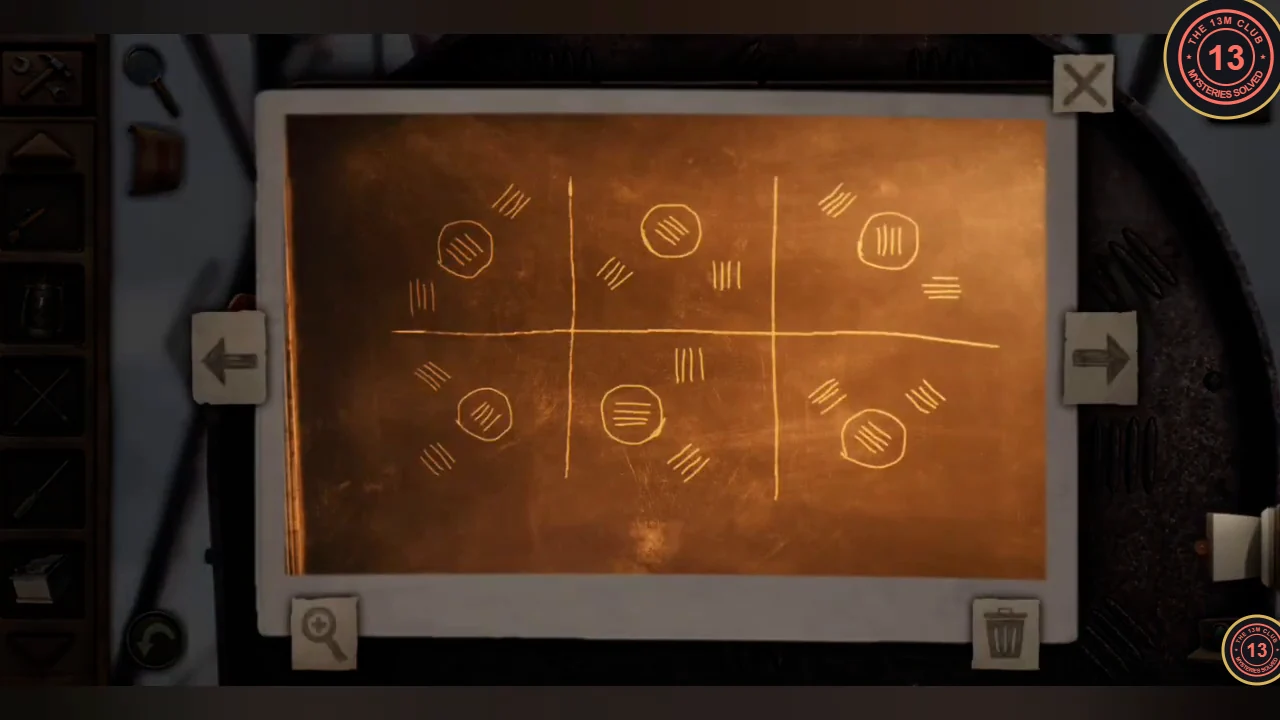
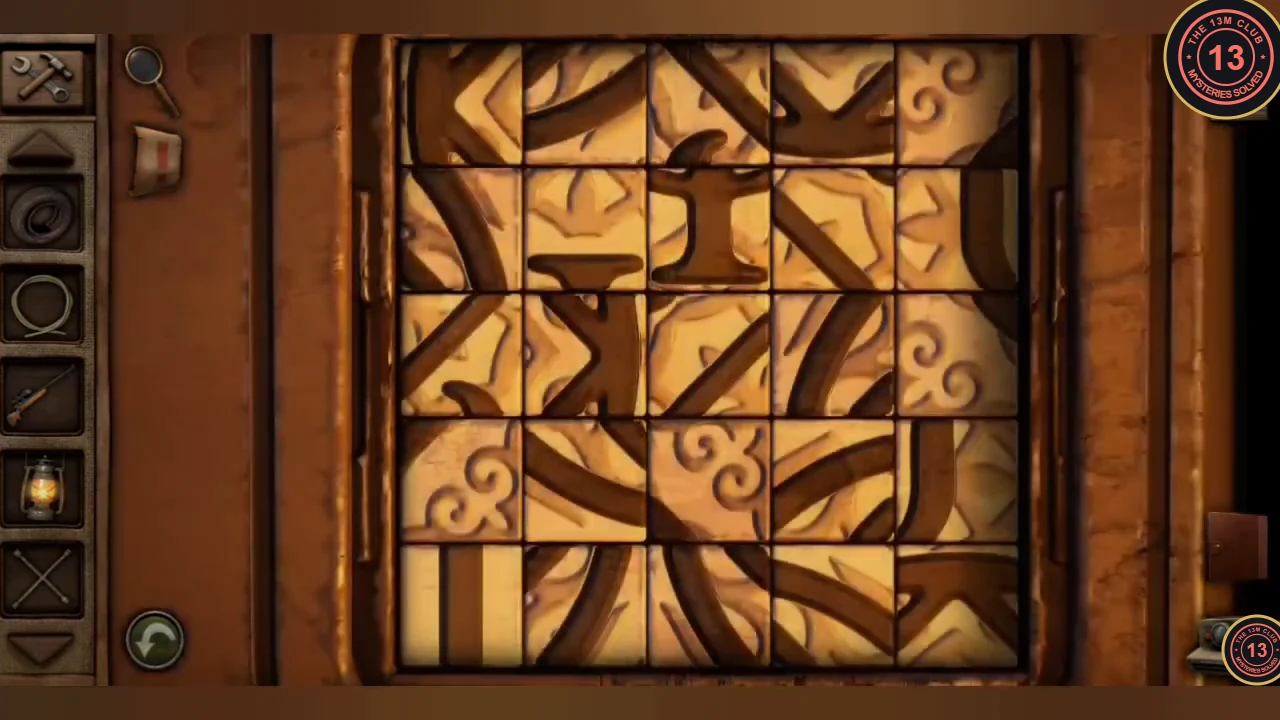
The chalkboard marks on Normal, the clue for the tower hatch. The Hard board has no circles and its marks are arranged differently. - The EXIT door lock is a grid of carved tiles that are in the wrong places. Tap a tile to select it (it darkens), then tap another tile to swap the two. The tiles never turn, so only their positions matter. Swap them until together they form the Ψ (psi) emblem inside a circle and a diamond, as in the finished image below. Place the border and corner pieces of the circle and diamond first, then the pieces of the Ψ in the middle.
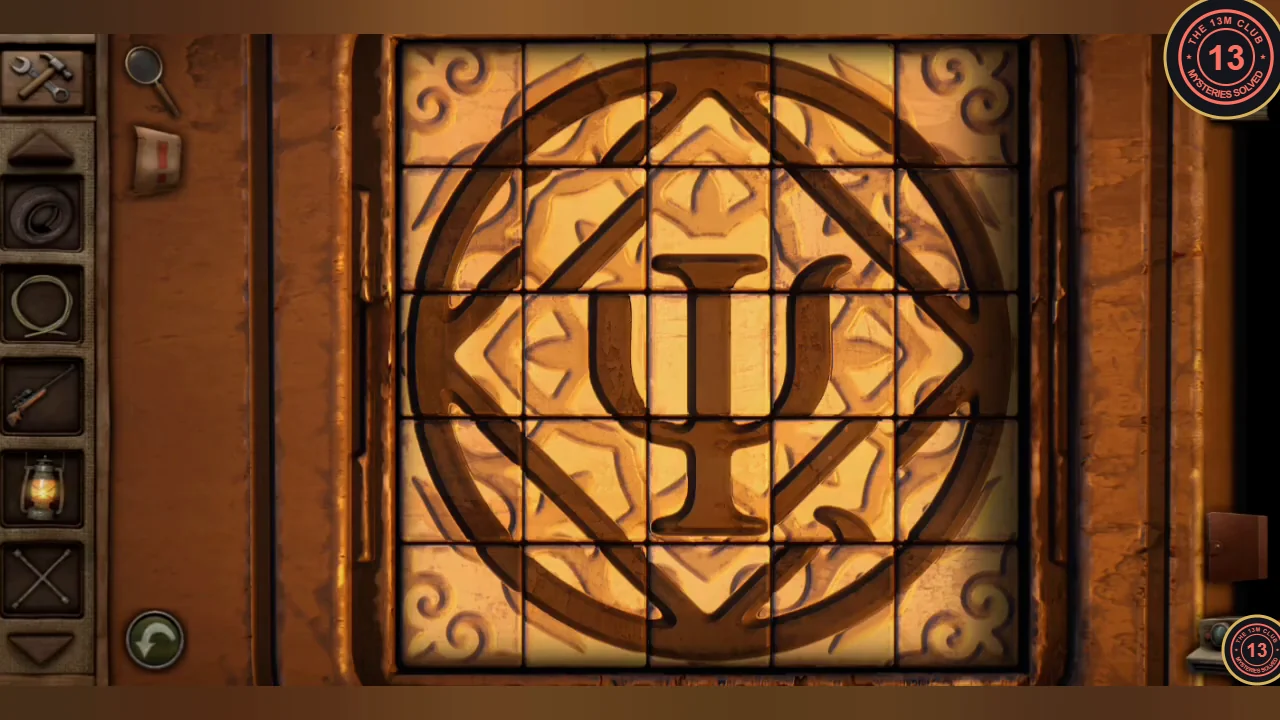
The finished Ψ (psi) emblem. - Take the service truck keys and photograph the anchor and sailboat stamps on the mail and the timetable listing chess squares with times.
Service Truck, Tower Hatch and Power Box
The service truck won't start. Get the battery out and restore power to the facility.
- Unlock the service truck with the keys and take the screwdriver from the glove box. The engine will not start.
- While still in the driver's seat, look at the steering wheel and press the small button with the car-and-open-hood symbol at the bottom left of the close-up. This releases the hood; tapping the hood from outside does nothing until you do. Open the hood, remove the battery bracket with the lug wrench and take the dead battery.
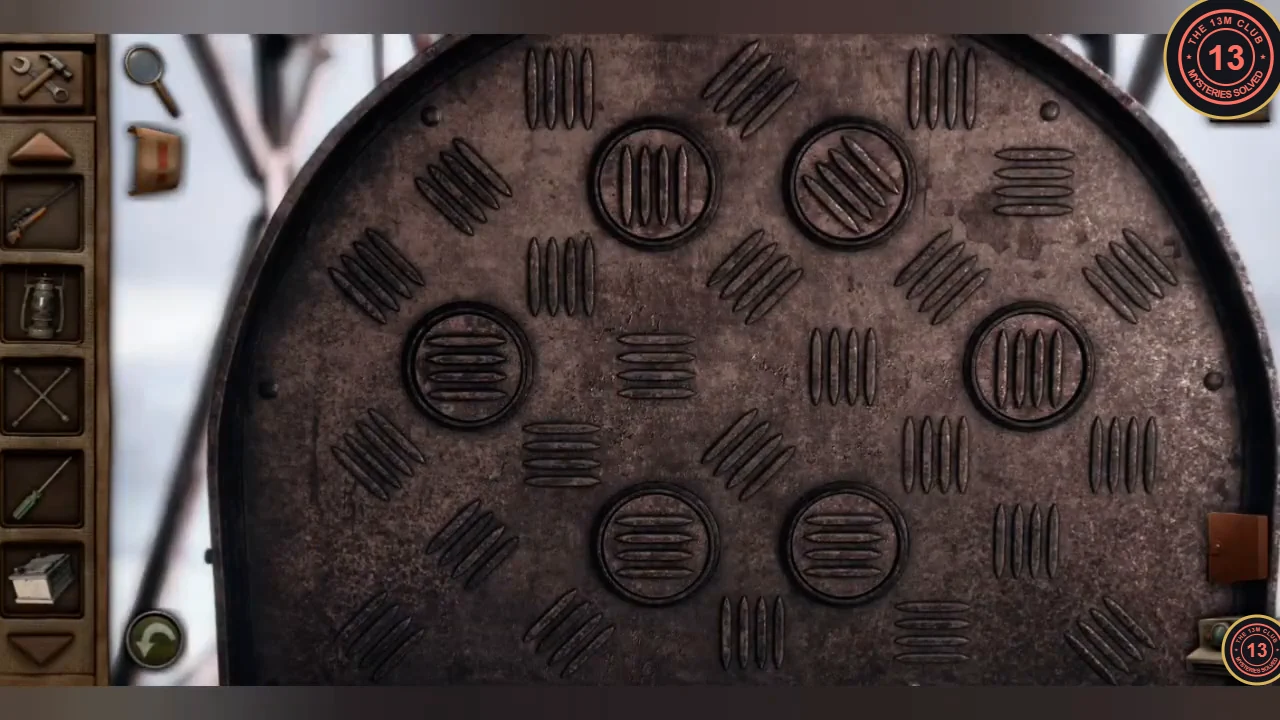
- The round hatch at the base of the tower has six circled discs with lines that turn when you tap them. Each disc matches one circled group on the chalkboard: compare the loose tally marks around them to tell which is which. Turn every disc until its lines point the same way as on the chalkboard; the hatch opens when all six match. The finished hatch has: top left lines sloping down to the right, top right horizontal, far left sloping up to the right, far right sloping down to the right, bottom left sloping down to the right and bottom right vertical. On Hard the chalkboard looks different, but the finished hatch is exactly the same.
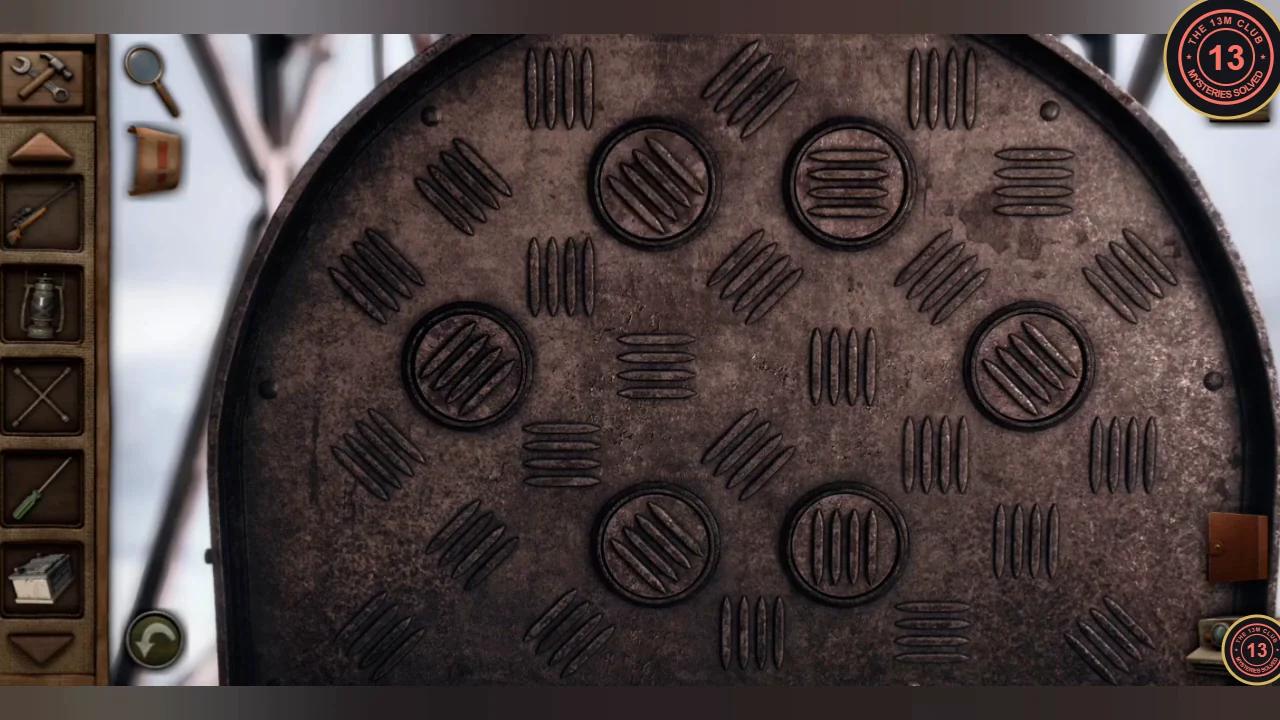
Solved (same on Normal and Hard): top left down-right, top right horizontal, far left up-right, far right down-right, bottom left down-right, bottom right vertical. - Climb inside, open the electrical box with the screwdriver and take the electrical components. Look through the scoped rifle to spot the smokestacks.
- Open the roadside pole box and fit the electrical components so the meter reaches exactly 360 volts, then pull the lever.
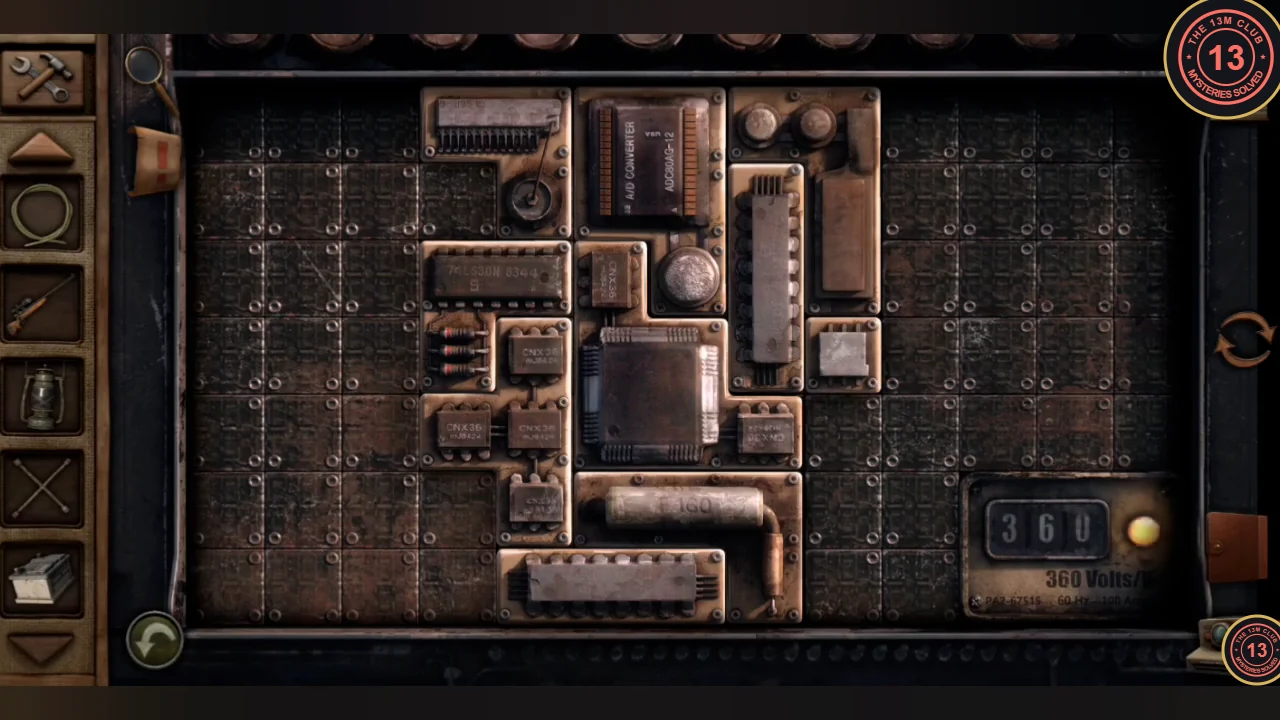
One layout that reaches 360 volts. - In the facility, switch on the primary power control. The lights come on and you can now use the trickle charger.
Truck Picture Box, Gate Controller and Battery Charge
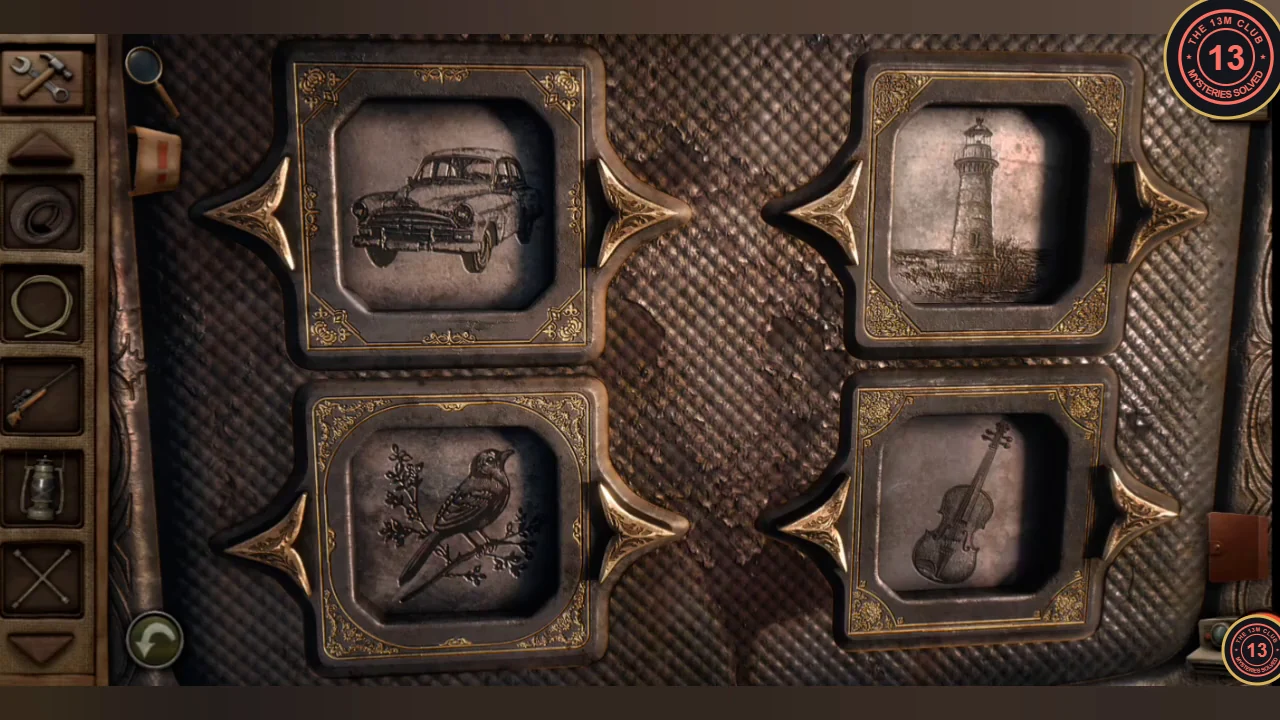
The stamps open the red pickup's picture box and the three licence plates open the compound gate.
- Set the picture box under the red pickup's seat to the corner stamps: sailboat top left, anchor top right, rose bottom left, butterfly bottom right. Take the jumper cables.
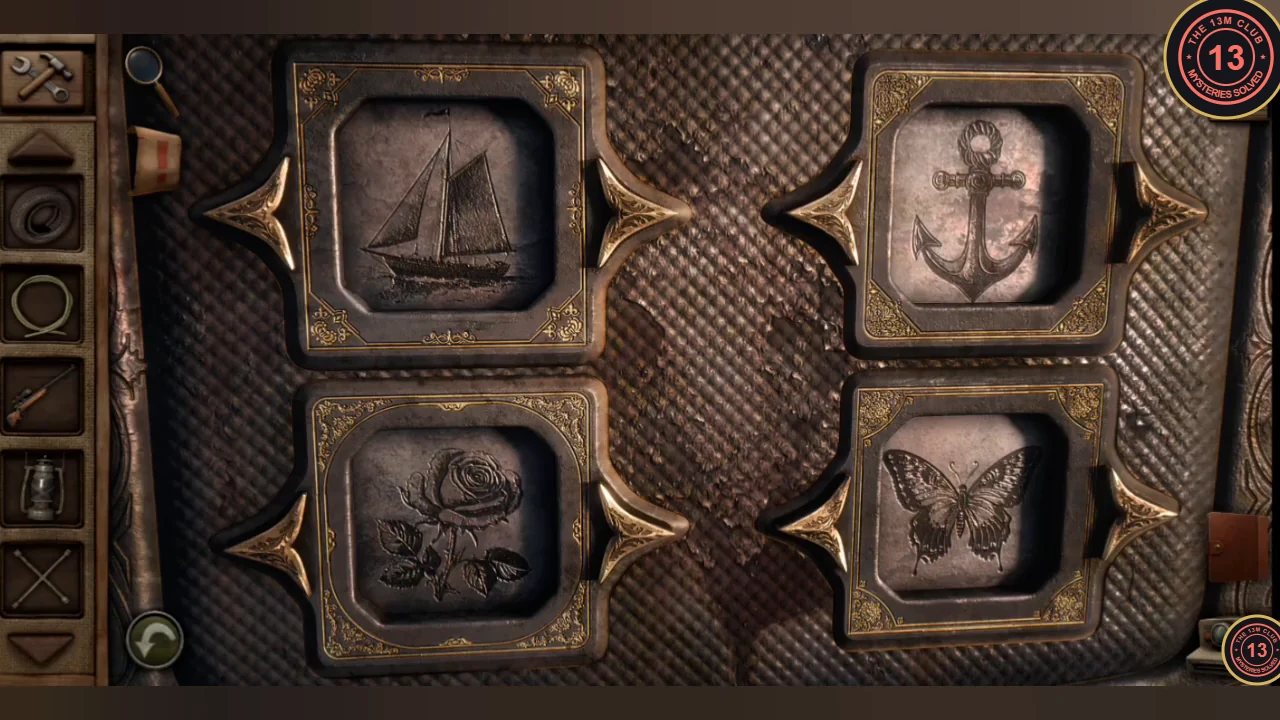
Solved: sailboat, anchor, rose and butterfly. - The gate controller has nine character slots. Each licence plate has some characters underlined, and each underlined character goes in the slot with the same position as on its plate: B6P5-2K2M9 gives B and 6 (slots 1 and 2) and 5 (slot 4); P3A8-9D5G9 gives A (slot 3), 9 (slot 5) and D (slot 6); S2E3-9Q3F8 gives 3, F and 8 (slots 7 to 9). The cursor does not move on by itself: type a character, press the right arrow to move to the next slot, and repeat. The display should read B6A59D3F8; then press OK. The gate opens.CODEB6A59D3F8
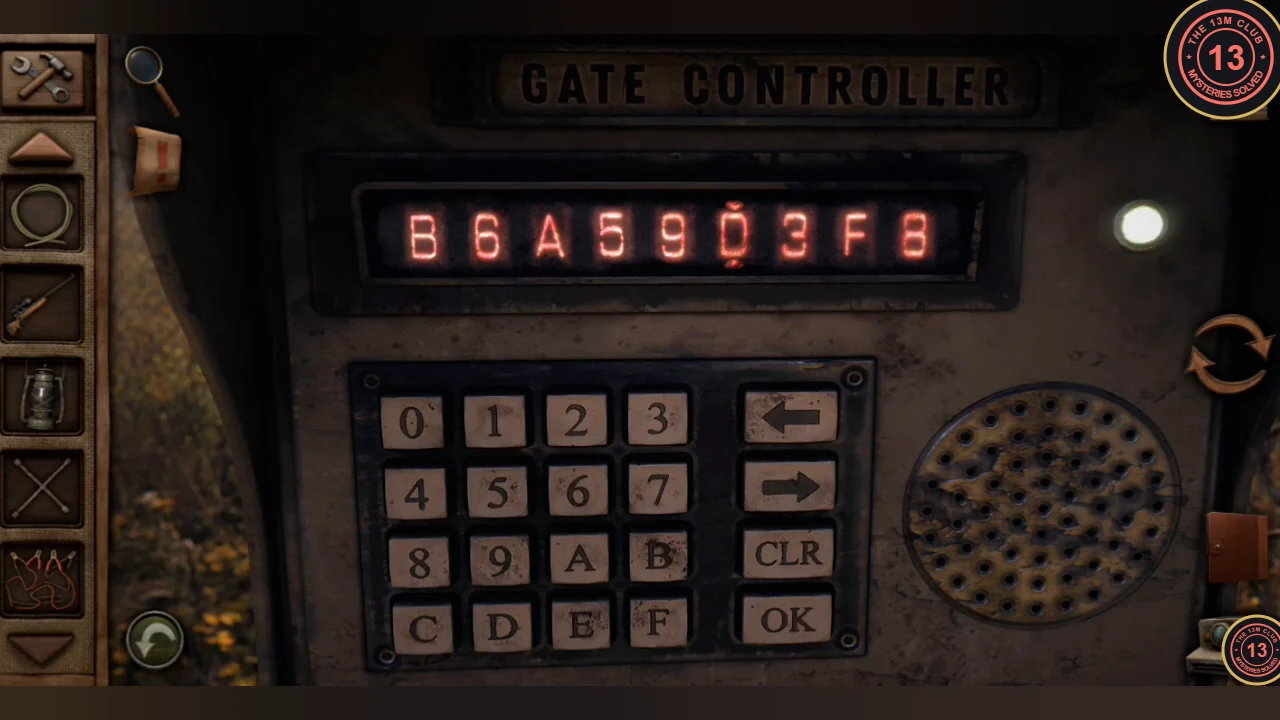
The gate code entered: B6A59D3F8. - Connect the dead battery to the facility trickle charger with the jumper cables. Wait until it is fully charged, then take the battery.
Grandfather Clock and Barn Gear Cabinet
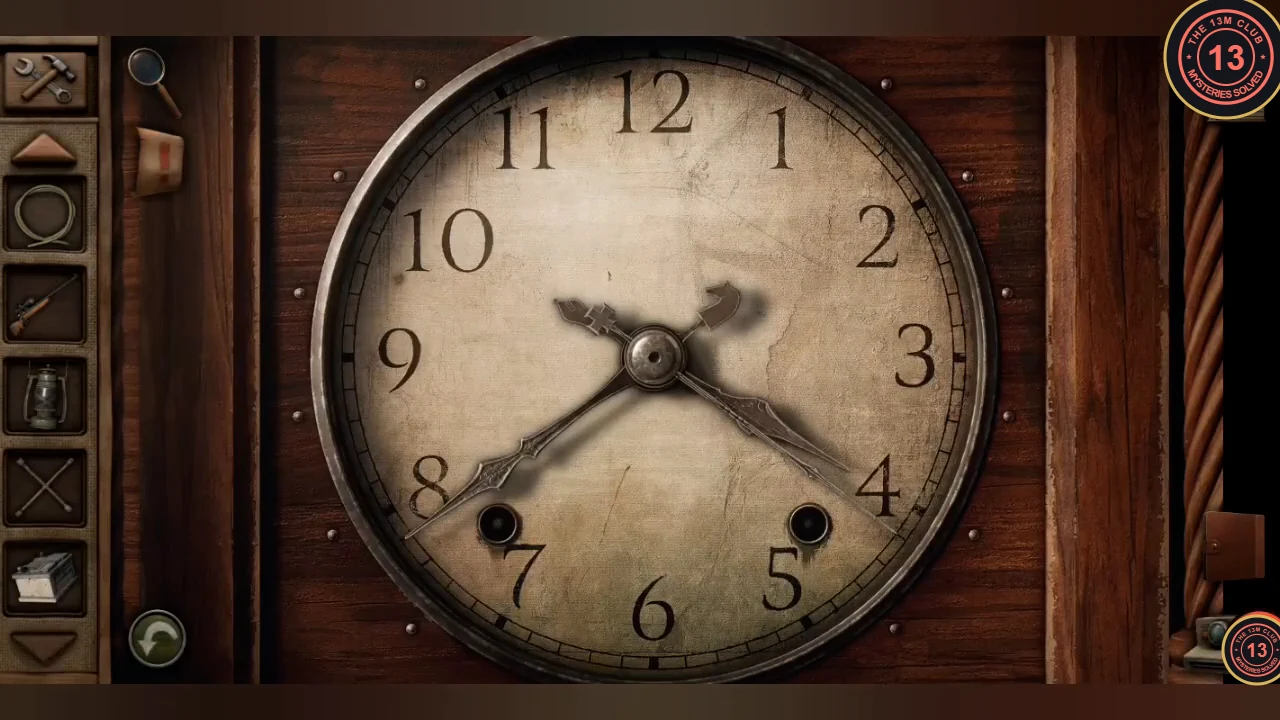
Each clock hand carries a chess piece, which tells you which part of a timetable time to use. Then open the barn cabinet.
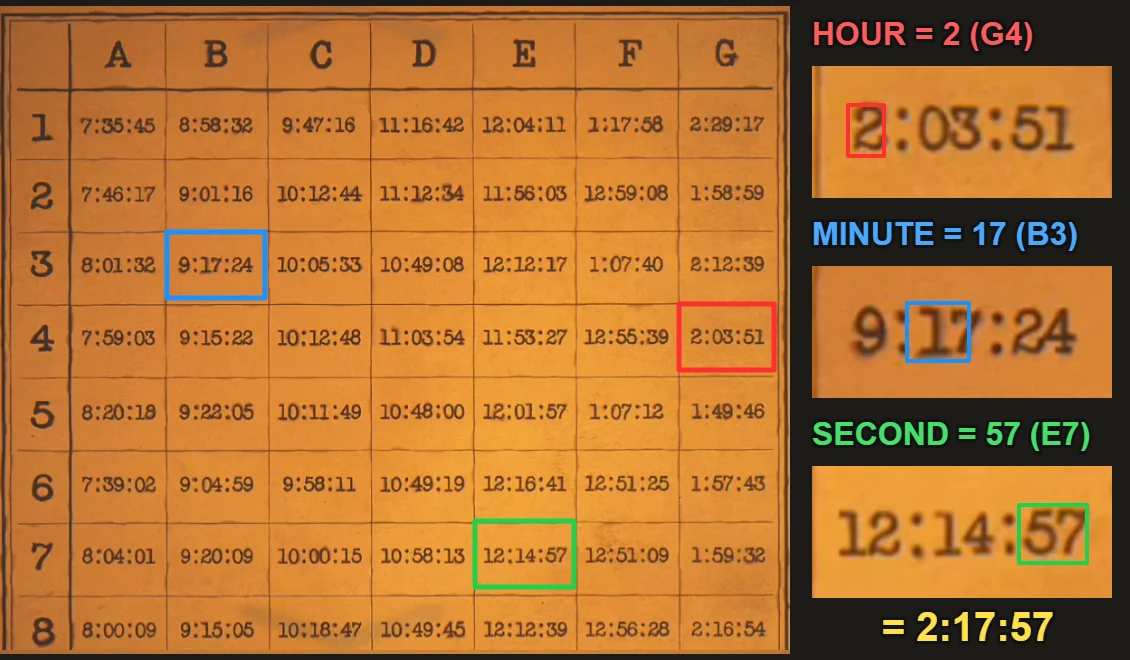
- Look closely at the grandfather clock: the end of each hand has a chess piece on it. Look up the square of that white piece in the timetable and use only the part of the time that belongs to that hand. The bishop is on the hour hand and stands on G4 (2:03:51), so the hour is 2. The knight is on the minute hand and stands on B3 (9:17:24), so the minutes are 17. The king is on the seconds hand and stands on E7 (12:14:57), so the seconds are 57. Set the clock to 2:17:57 and the cuckoo opens; take the small key.
- Unlock the cupboard under the stairs with the small key. Take the watering can and the wind-up key.
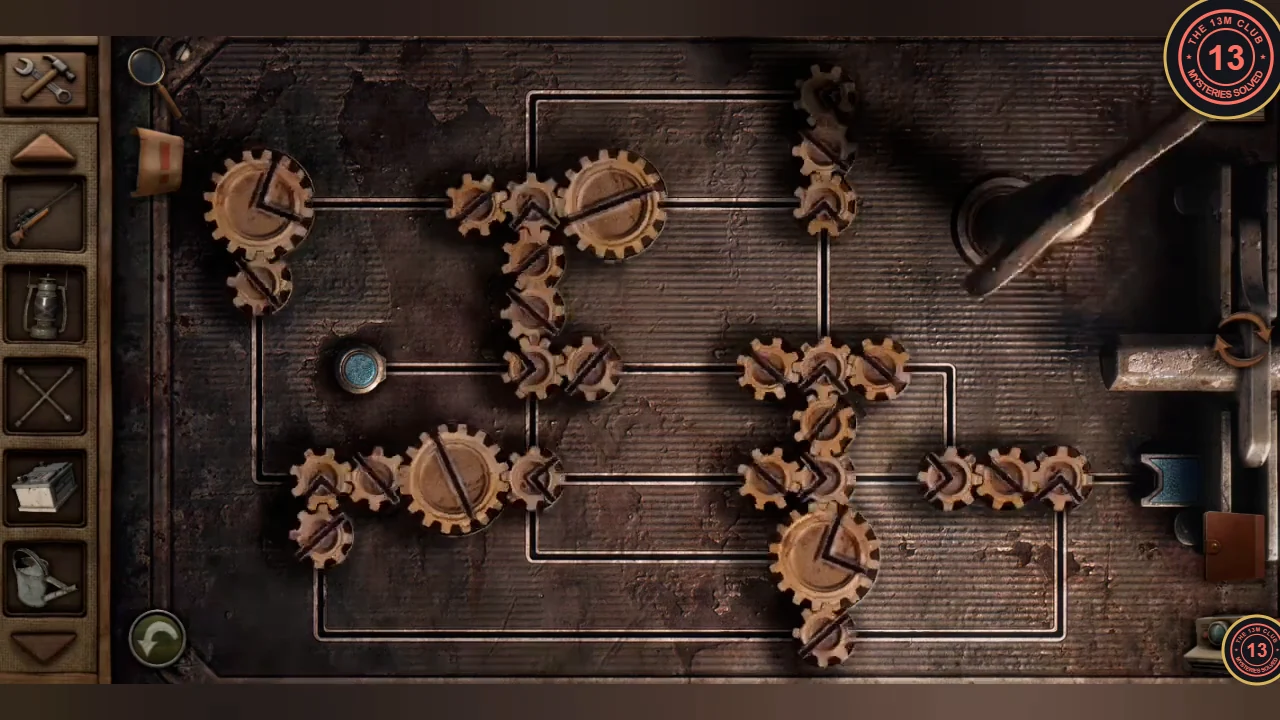
The barn cabinet's gear track puzzle at the start in the recording. - Insert the wind-up key in the barn's mesh cabinet. The gear blocks stay in place: each turn of the key rotates all of them, which opens and closes gaps in the track. Drag the blue token along the lines through whatever gaps are open, and when it is blocked, turn the key and look again. In the recording the token went through the middle and right side of the board, up to the top row, across to the top left, down the left side and along the bottom row to the slot on the right-hand side. When it reaches that slot, the cabinet opens; take the car jack.
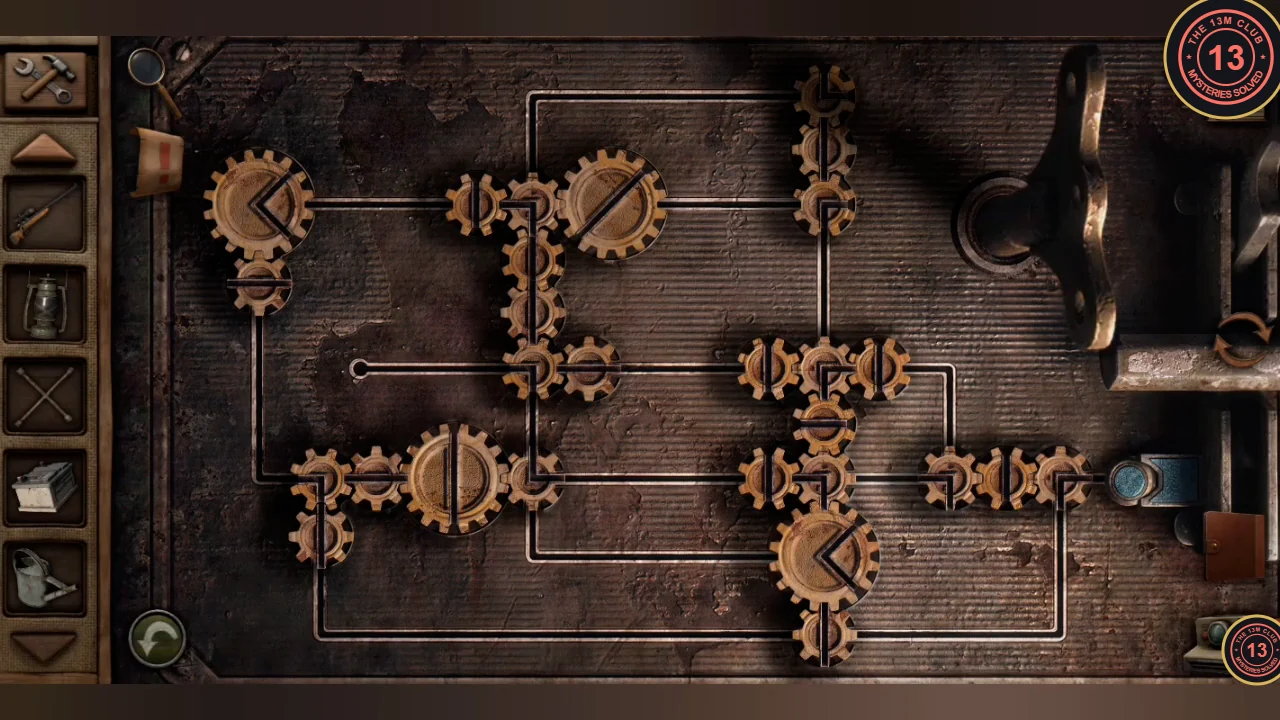
Solved: the blue token has reached the slot on the right.
Repairing the Service Truck
Everything is ready for the escape: fuel, a wheel and a charged battery.
- At the red pickup, use the hose to siphon gasoline into the watering can.
- Jack up the red pickup, remove its wheel with the lug wrench and combine the wheel with the tire from the tire swing.
- At the service truck, jack it up, remove the bent wheel with the lug wrench, fit the new wheel and pour the gasoline into the tank.
- Put the charged battery back, close the hood and start the truck with the keys. The final cutscene begins.
Ending: The Bridge
Chapter 2 ends with a cutscene.
- Ethan drives to a steel bridge, where a voice tells him to leave the truck running and wait for a group of men who are coming to meet him. Ignoring it, he goes to the edge of the bridge while the voice shouts at him to step away from the ledge. The chapter ends with "To be continued...". No bonus chapter or post-game content follows.