Crimson Valley Logging Camp Arrival
Ethan reaches an abandoned logging camp in Crimson Valley. Most of the camp is broken or locked, so start by collecting what you can and noting the obstacles.
- At the creek, take the empty jerrycan beside the shack. The shack is locked, the sluice gate is missing its handle and the wooden flume is broken.
- Outside the sawmill, take the old wooden bucket.
- Inside the sawmill, take the small gear from the drill press; its drill bit is stuck. Note the log conveyor and the empty axle beside the waterwheel.
- In the yard, note the coal crate on the cart, the steam donkey engine, the warehouse doors chained shut, the raised platform with its broken ladder and the log blocking one door.
- Note the four symbols on the outhouse door (crescent, sun, star, crescent) and the padlocked information board outside the bunkhouse.
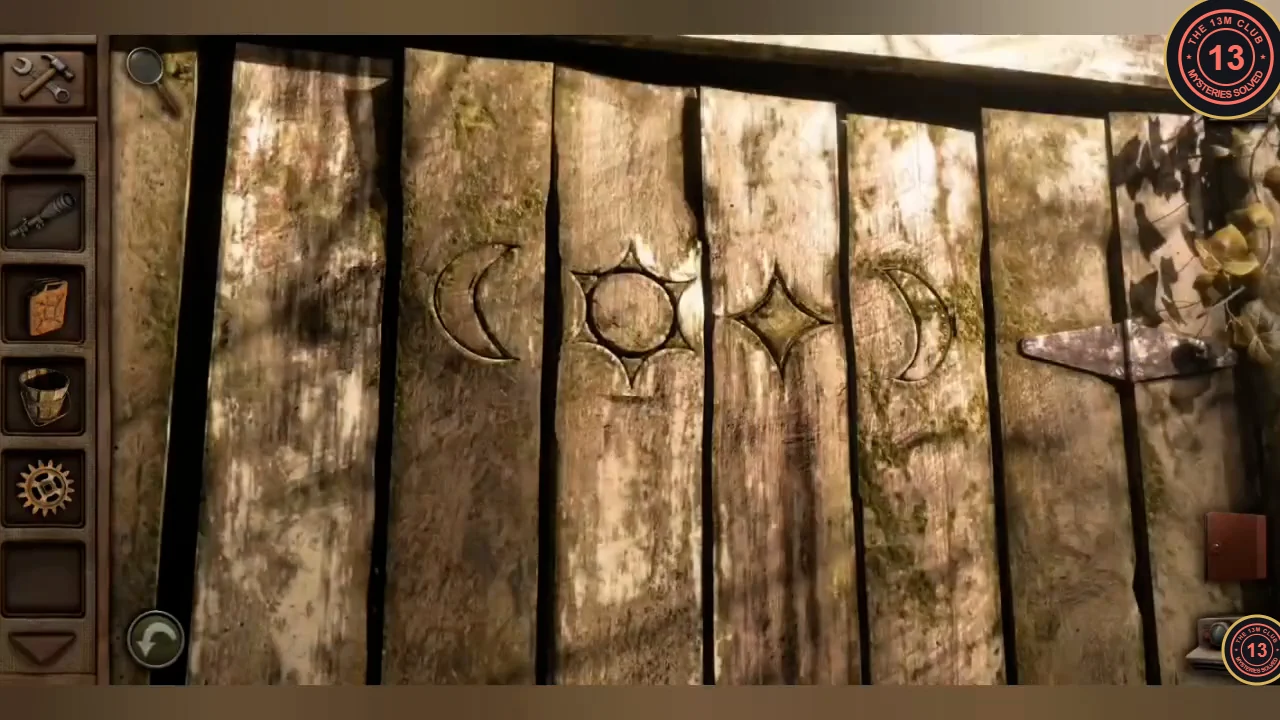
The four symbols carved on the outhouse door.
Bunkhouse Hexagon Box
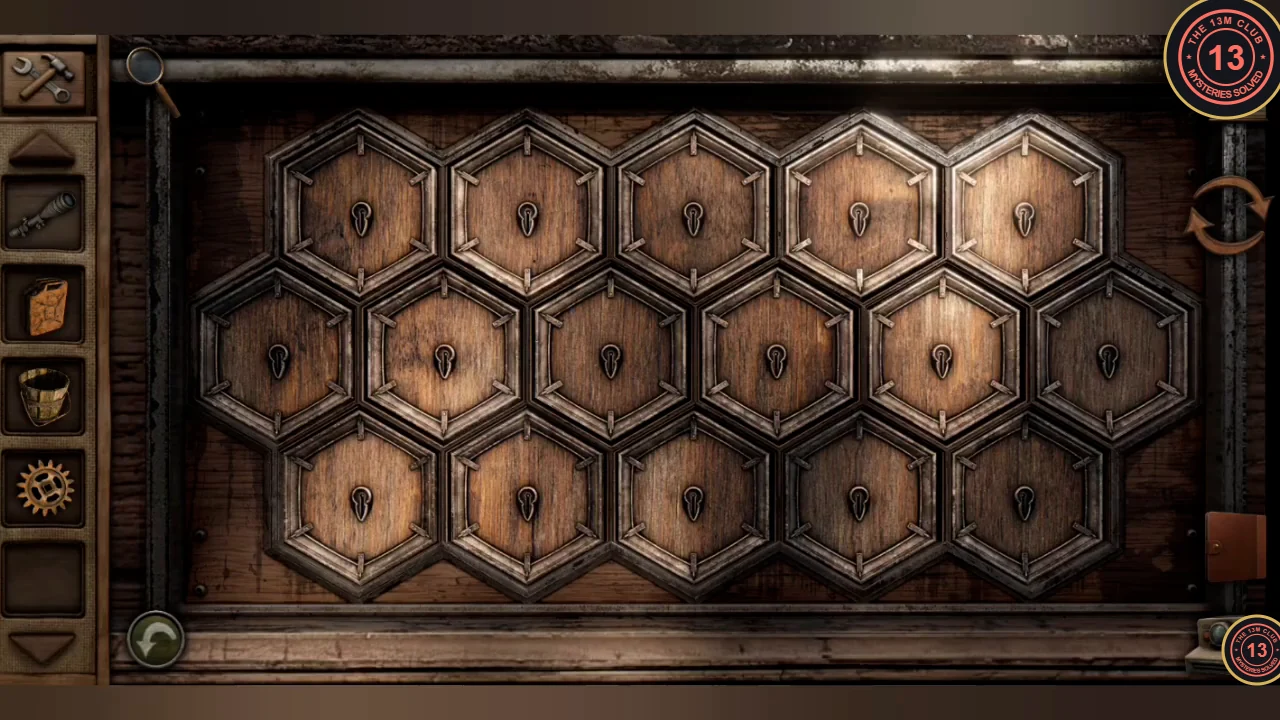
The bunkhouse has a hexagon game box and the camp's card games. The ruined cabin next door has a fire striker.
- Open the hexagon box on the bunkhouse table. Its 16 tiles sit in three rows: 5 on top, 6 in the middle and 5 at the bottom, and they all start lit. Tapping a tile switches it and every tile touching it (lit tiles go dark, dark tiles light up). The box opens when every tile is dark. Counting from the left, tap these six tiles once each, in any order: middle row 2nd, top row 4th, bottom row 4th, middle row 5th, top row 5th and bottom row 5th. If you tap a wrong tile, tap it again to undo it.
- Photograph the domino inside: one half has six pips (five black and one red in the bottom-left corner), and the other half has one blue pip. Take the cribbage pegs.
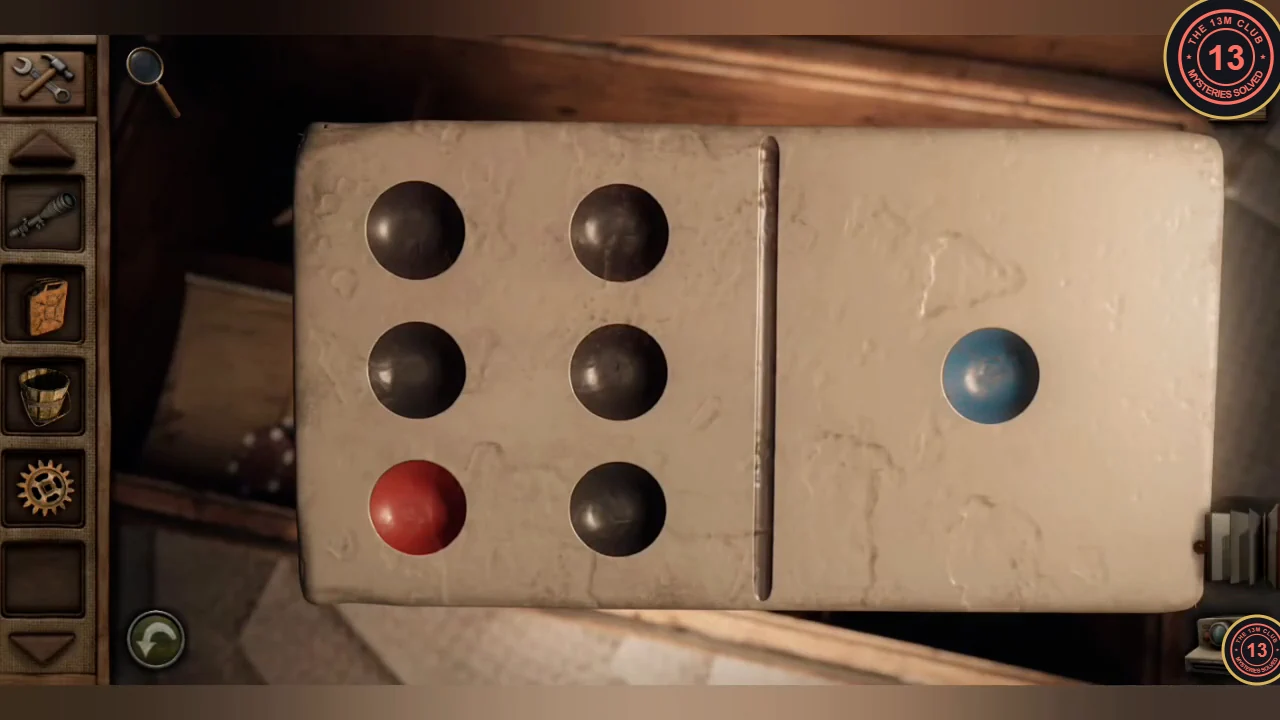
The domino inside the box. Remember the red and blue pips for the cribbage board. - Take the flint from the tin on the side table. Look at the poker hand on the table: one card is missing. The office door at the back is locked.
- In the ruined cabin next door, take the fire striker from the hanging sack. Combine it with the flint to make flint and steel.
Sawmill Block Latch and Cookhouse
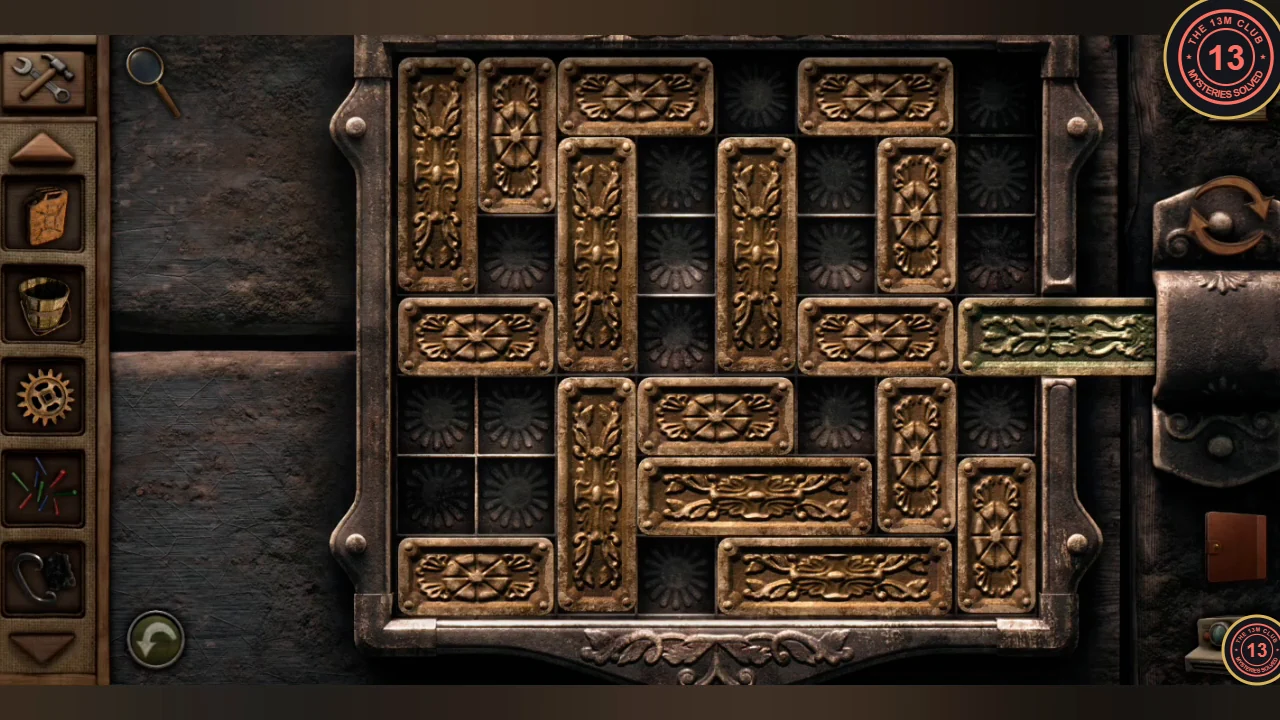
A sliding block puzzle in the sawmill guards a saw, which gets you through the boarded cookhouse door.
- On the sawmill workbench, solve the sliding block latch: move the carved wooden blocks until the long horizontal latch bar has a clear path and can slide out to the left. Clear the bar's row first and move the other blocks up or down out of its way. Take the saw.
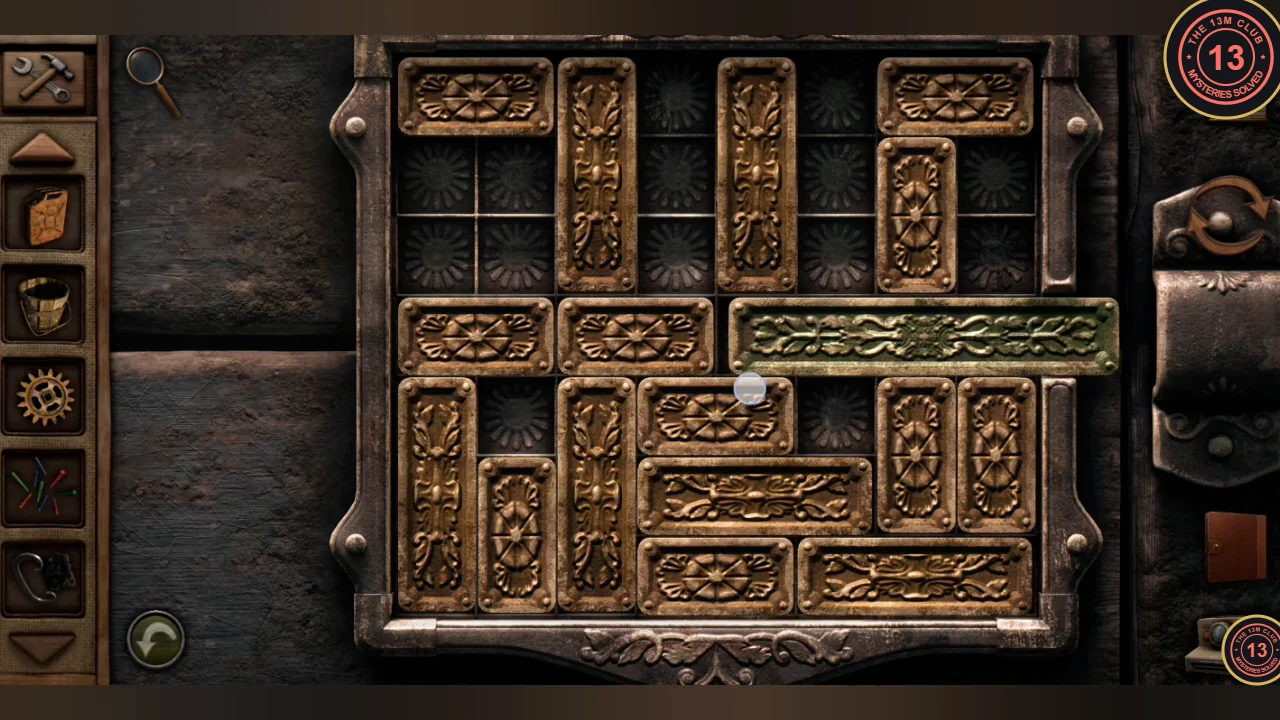
Solved: with its row cleared, the latch bar has slid left out of the latch. - Saw through the plank nailed across the cookhouse door and go inside.
- Note the circles scratched into the left table and the cribbage board. Open the Household Handbook: take the ace of diamonds tucked inside and read the cleaning recipe (water, white vinegar, baking soda and a rag).
- Take the dart from the dartboard and photograph the board's numbers.
- Take the old kitchen rag at the sink. Then tap the counter to the left of the pantry locker and take the container of baking soda; you need it for the cleaning solution later. Note the pantry locker with five star sliders and the year 1964 scratched on it.
Logging Truck Dartboard Code and Camp Office
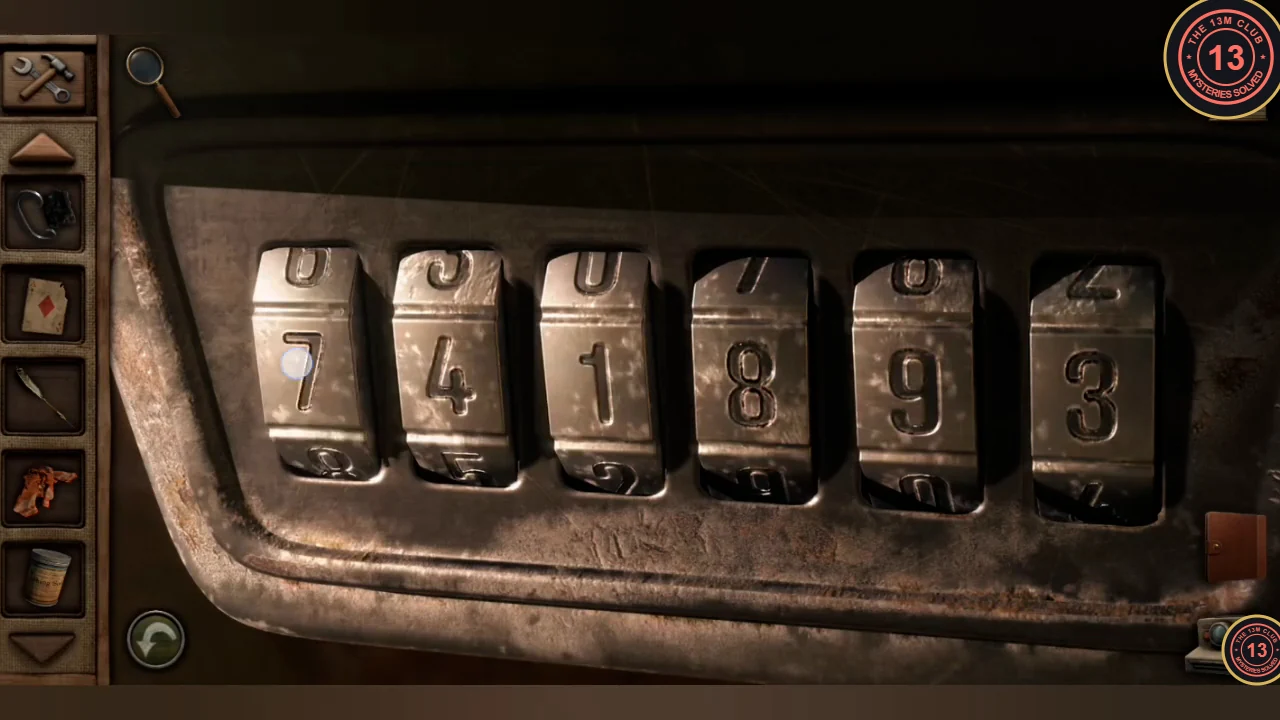
The yellow logging truck has a six-digit lock. The dartboard gives you the missing numbers.
- Read the clue under the truck's door handle: 1 _ 5 _ 10 _ _ 16. This dartboard is not numbered like a standard one. Going clockwise from 1, its numbers are 20, 5, 17, 10, 3, 4, 16, so the blanks are 20, 17, 3 and 4.
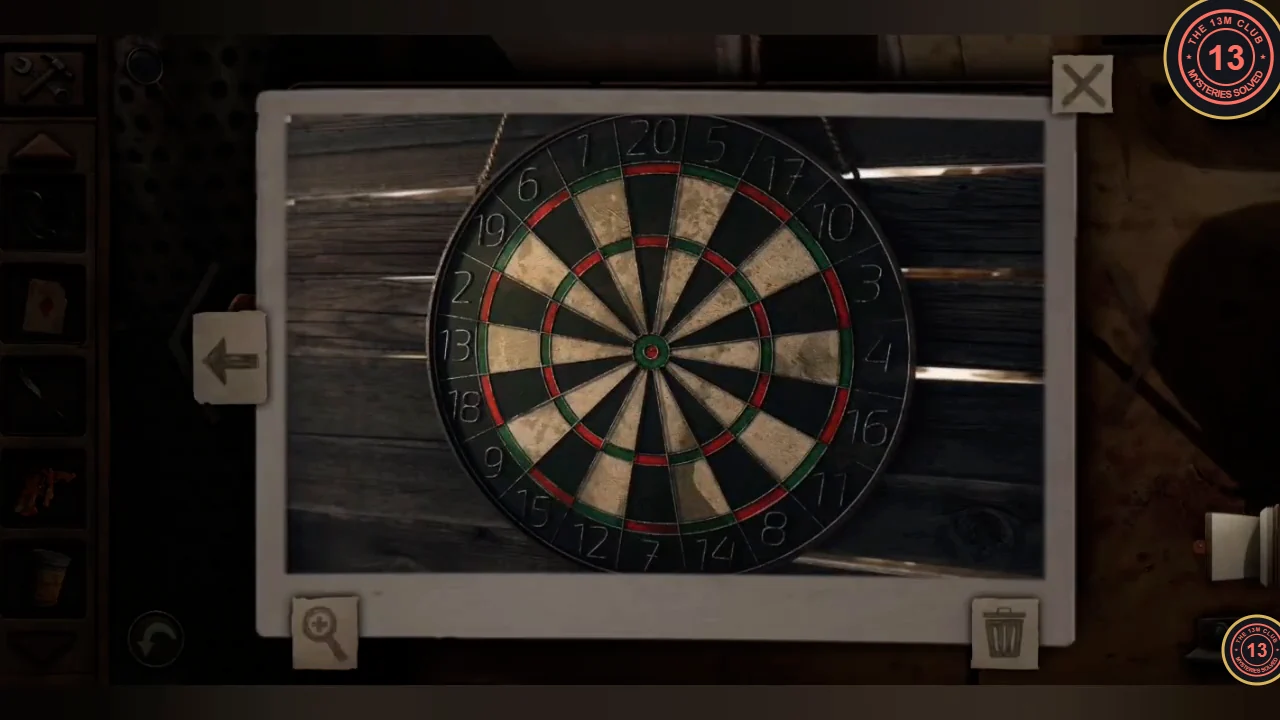
The cookhouse dartboard. Going clockwise from 1: 20, 5, 17, 10, 3, 4, 16. - Set the six dials to 2 0 1 7 3 4 and open the cab. Take the key and photograph the paper with the S shape (green dot at the top, red dot at the bottom).CODE201734
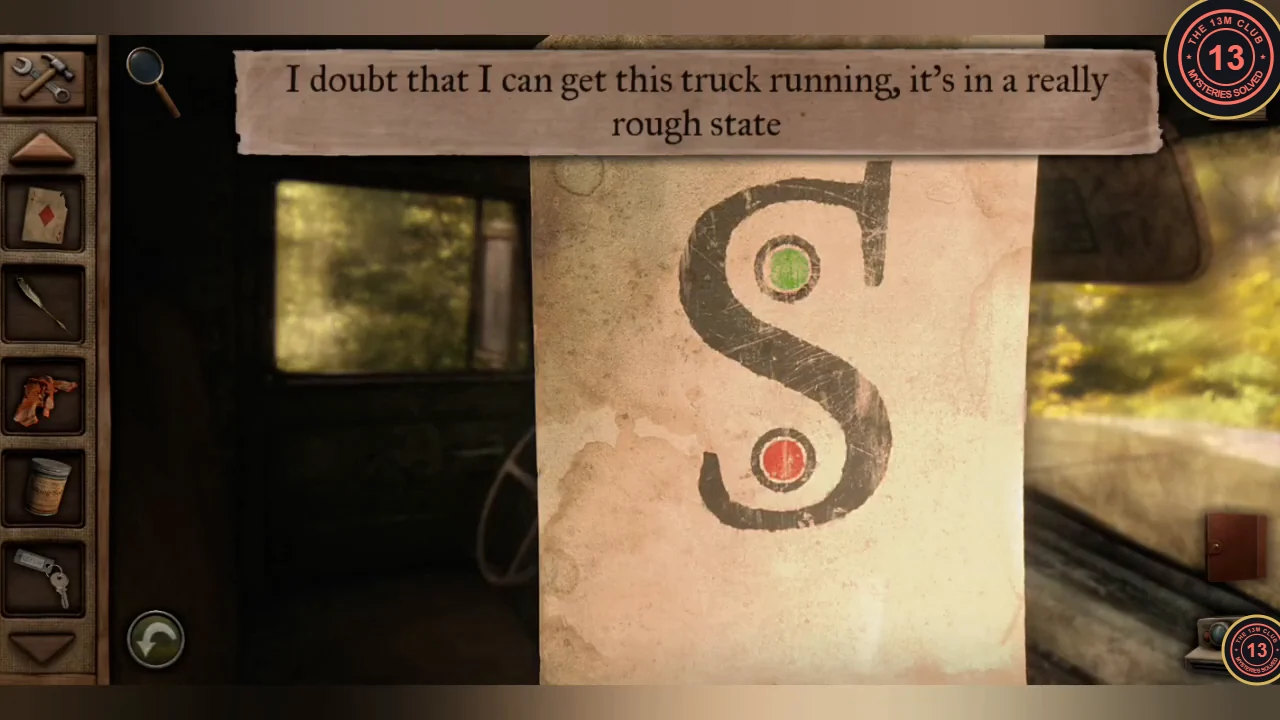
The S paper from the truck cab, a clue for the cribbage board. - Unlock the bunkhouse office with the key and take the key from the glass key cabinet. It is the first of three matching keys for the bridge gate.
- Take the tracing paper above the bunkhouse bed. Note the cribbage book and the chest with 15 round buttons.
Outhouse Symbol Padlock and Information Board
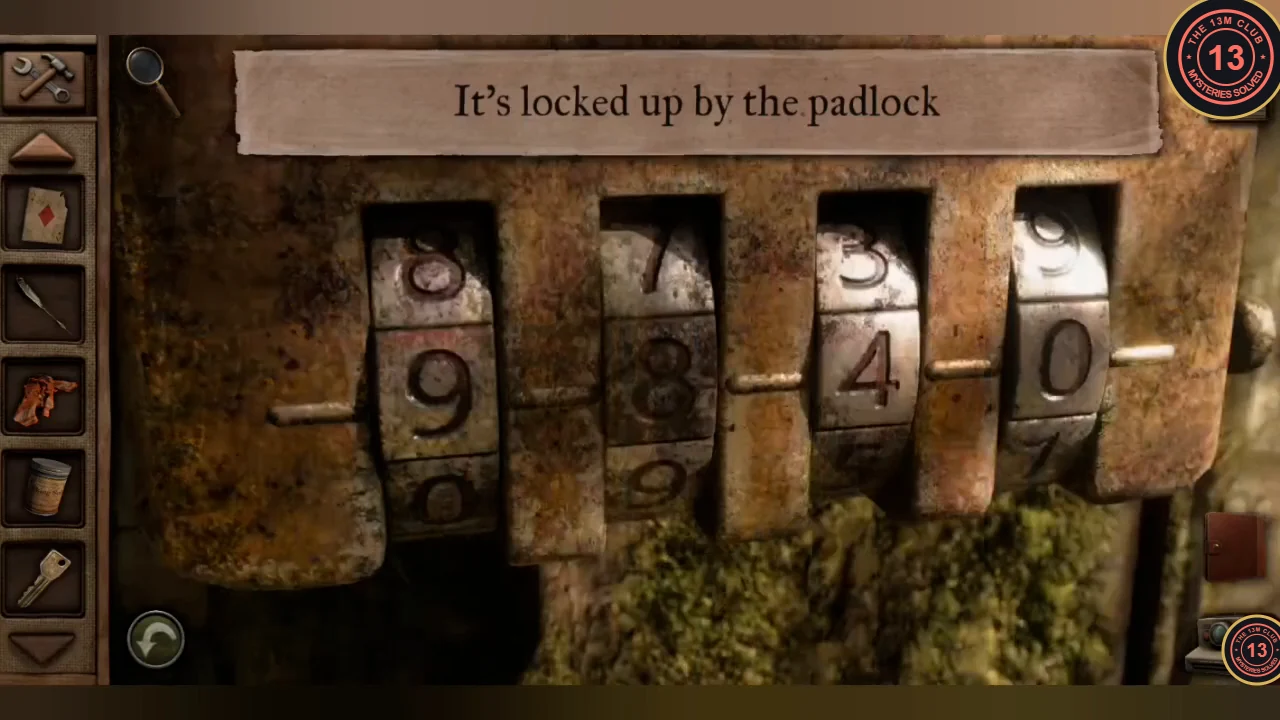
The tracing paper turns the cookhouse table circles into numbers for the outhouse padlock.
- Lay the tracing paper over the circles on the cookhouse table and photograph the combined pattern. Numbers now sit next to groups of circles.
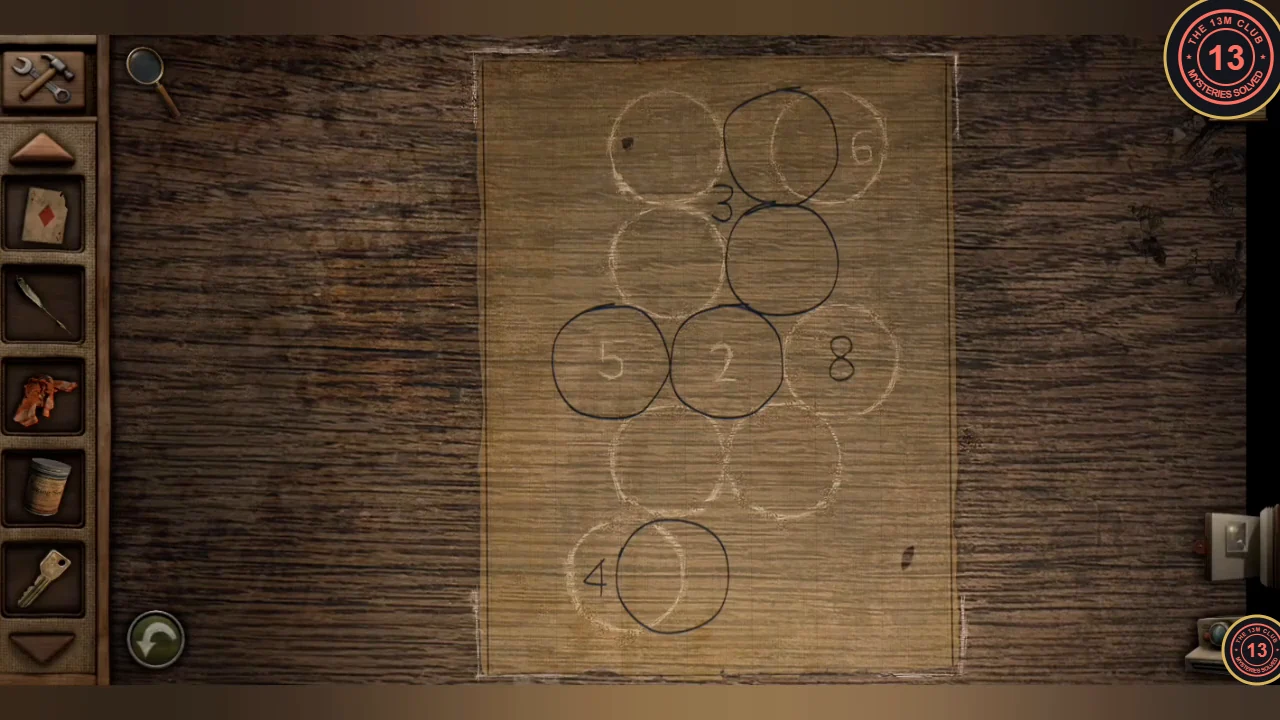
The tracing paper over the table circles. Each number sits beside a shape formed by the circles. - Match each outhouse symbol to the number beside the same shape on the overlay: crescent 4, sun 2, star 3, crescent 6. Set the outhouse padlock to 4 2 3 6.CODE4236
- Inside the outhouse, photograph the circle chart on the door and take the old step ladder.
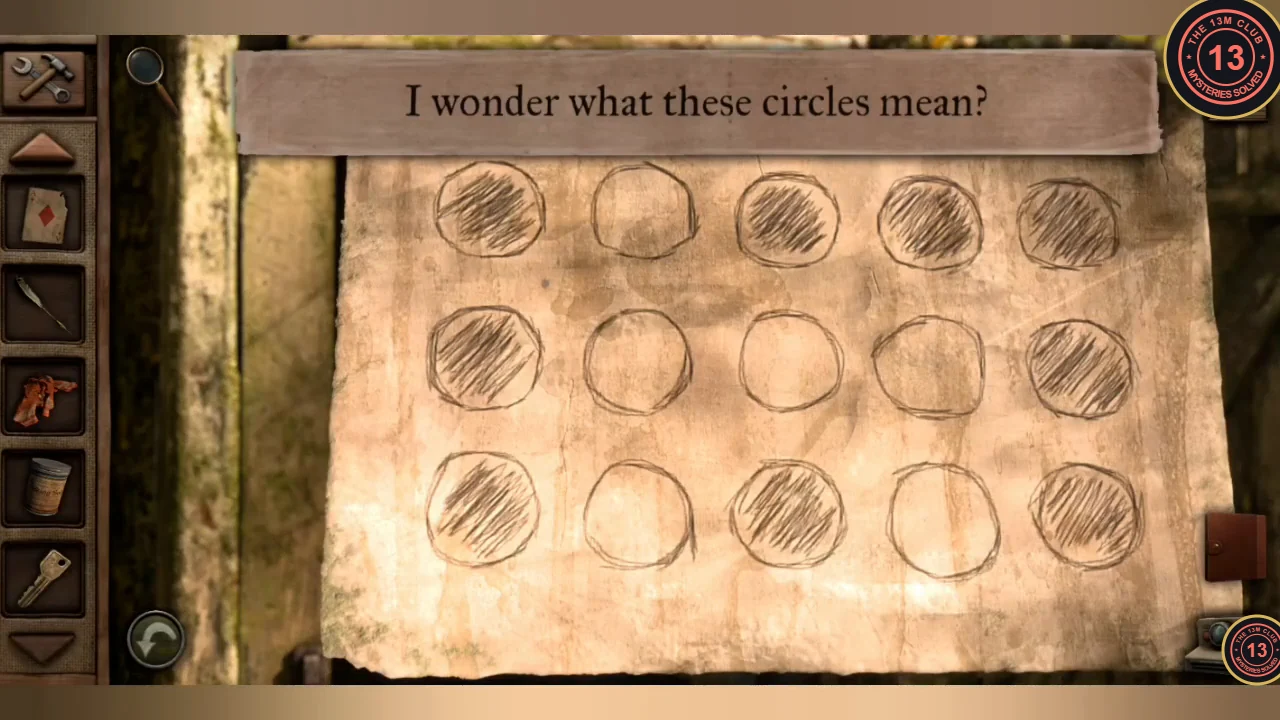
The circle chart inside the outhouse. You need it for the bed chest. - Use the dart as a lock pick on the information board's keyhole. Push each of the four brass pins until its brass end lines up with the seam on the right; the lock turns once all four are aligned. Fix one pin at a time; if one slips, realign it before moving on.
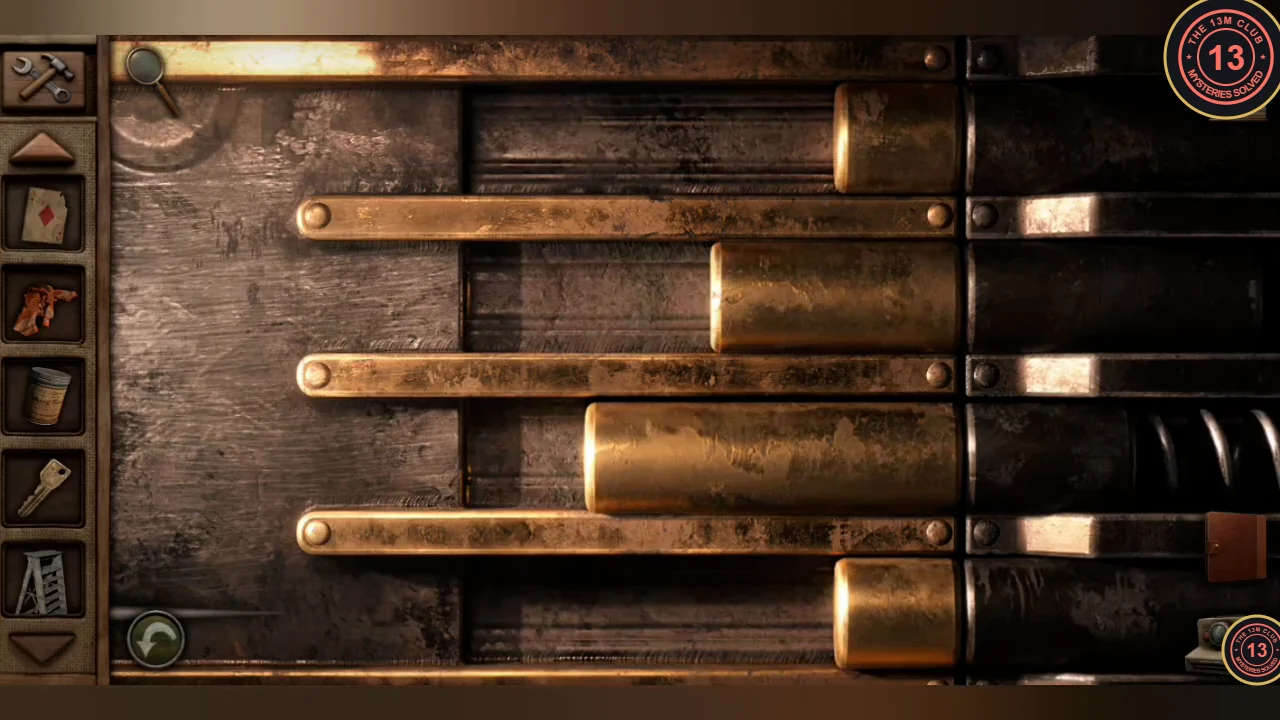
All four pins aligned with the seam, so the lock turns. - Take the old key from the board and photograph the lumber production chart.
Creek Shack, Bed Chest and Pantry Sliders
The old key, the circle chart and the production chart open three more containers.
- Unlock the creek shack with the old key. Take the hand drill (it has no bit) and the crowbar. Note the red cabinet with four buttons; you need another clue for it.
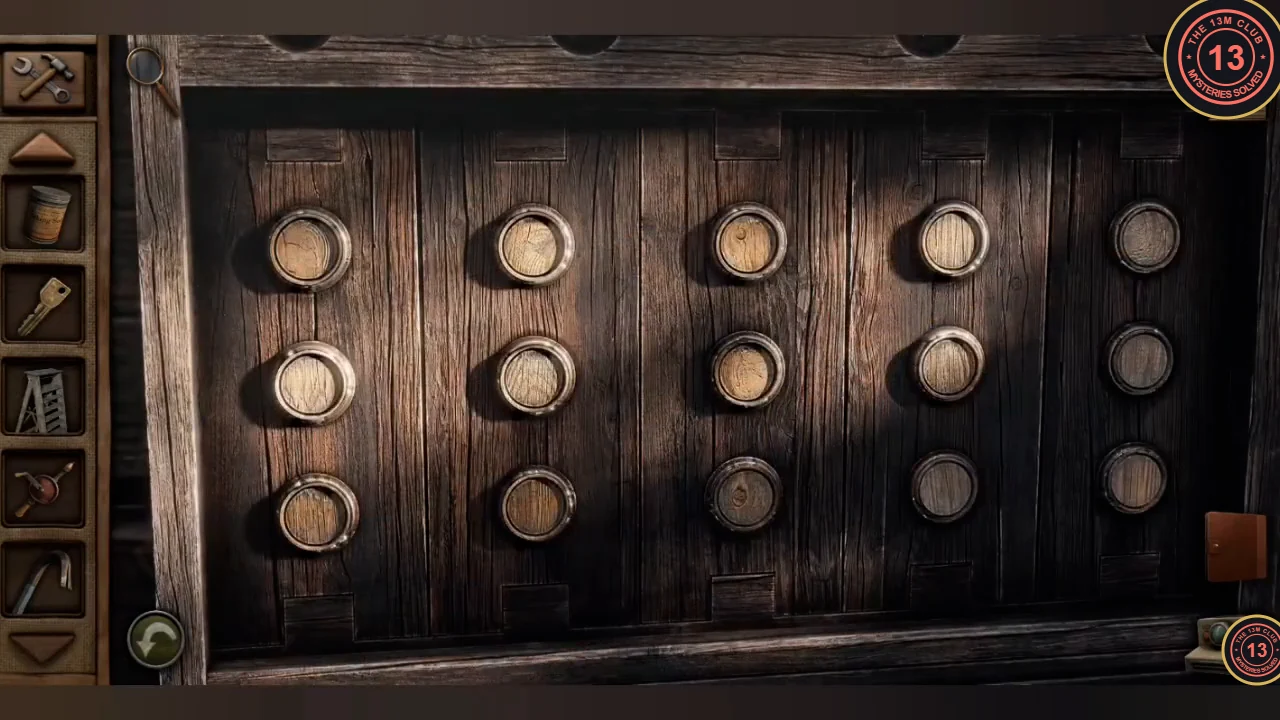
- The bunkhouse bed chest has 15 buttons in three rows of five. Press in the buttons that match the shaded circles on the outhouse chart: top row 1, 3, 4, 5; middle row 1, 5; bottom row 1, 3, 5 (counting from the left). Leave the others out. Take the drill chuck key.
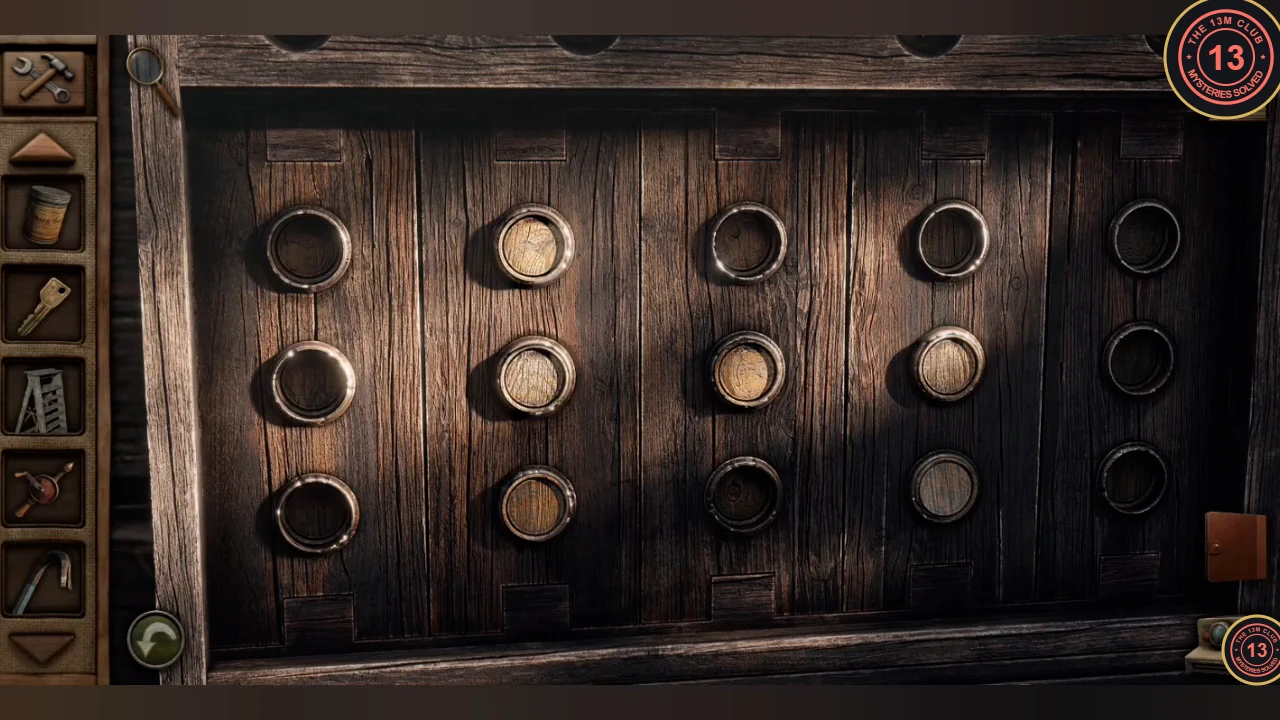
Solved: the pressed-in buttons (dark) match the shaded circles on the outhouse chart. 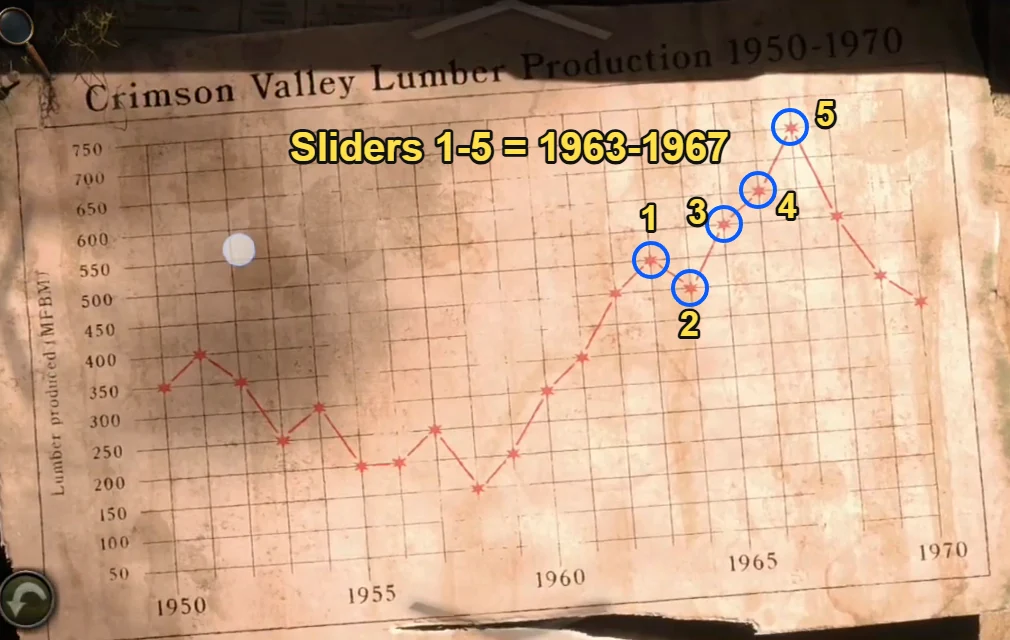
The lumber production chart from the information board. The pantry locker uses the points for 1963 to 1967, ringed and numbered by slider: 1964 (slider 2) is the dip and 1967 (slider 5) is the peak. - On the pantry locker, 1964 is scratched between the first two sliders with an arrow pointing to slider 2, so slider 2 stands for 1964 and the five sliders show the production chart's years 1963 to 1967. Copy the shape of the chart's line for those years: slider 1 low (second lowest, 1963), slider 2 at the bottom (1964, the dip), slider 3 just below the middle (1965), slider 4 just above the middle (1966) and slider 5 at the top (1967, the peak). Take the white vinegar and the gear from the eggbeater.
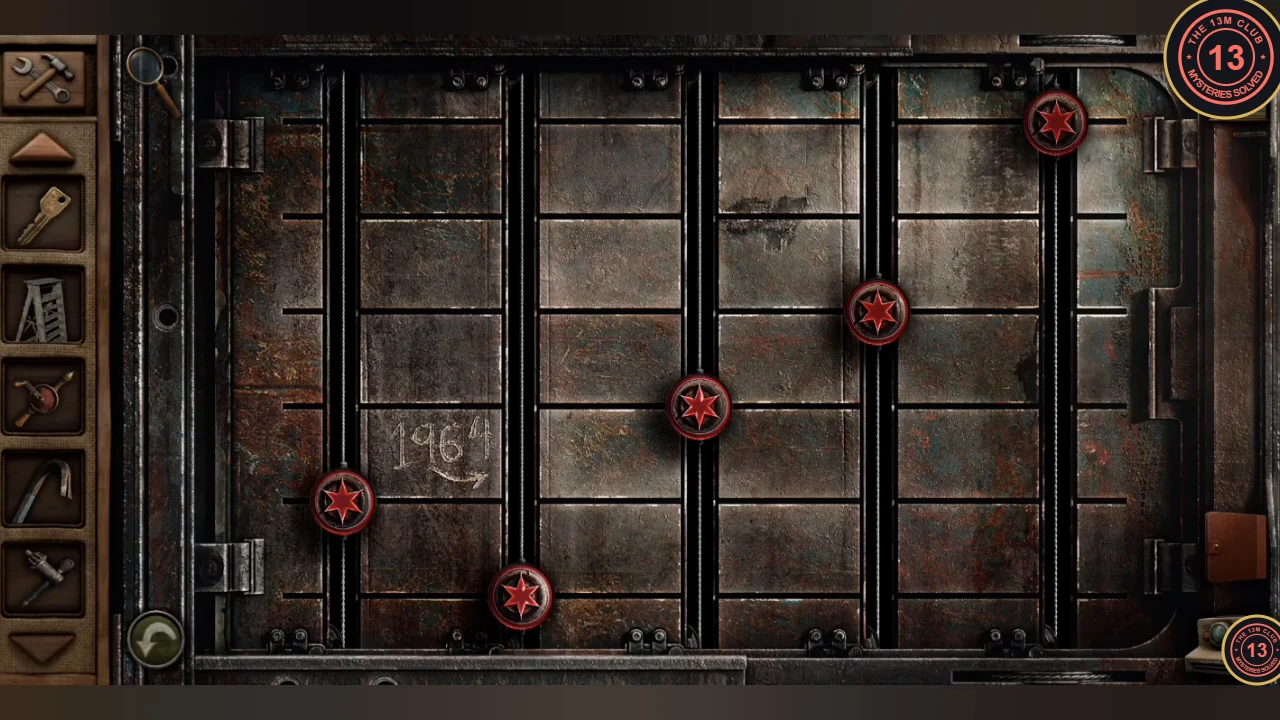
The slider positions that opened the pantry locker (1963 to 1967 on the chart).
Diesel Tank and Crane Gearbox
Drill the diesel tank for fuel and repair the crane's gearbox to get its hook.
- Set the step ladder against the diesel tank tower, climb up and take the small gear lying on the beam under the tank.
- Use the chuck key on the sawmill drill press to free the drill bit, then combine the bit with the hand drill.
- At the cart in the yard, use the crowbar from the creek shack to pry the lid off the coal crate, then take the crate of coal.
- Drill a hole in the diesel tank and fill the jerrycan.
- Pour diesel into the crane's fuel tank. Some diesel is left in the jerrycan for later.
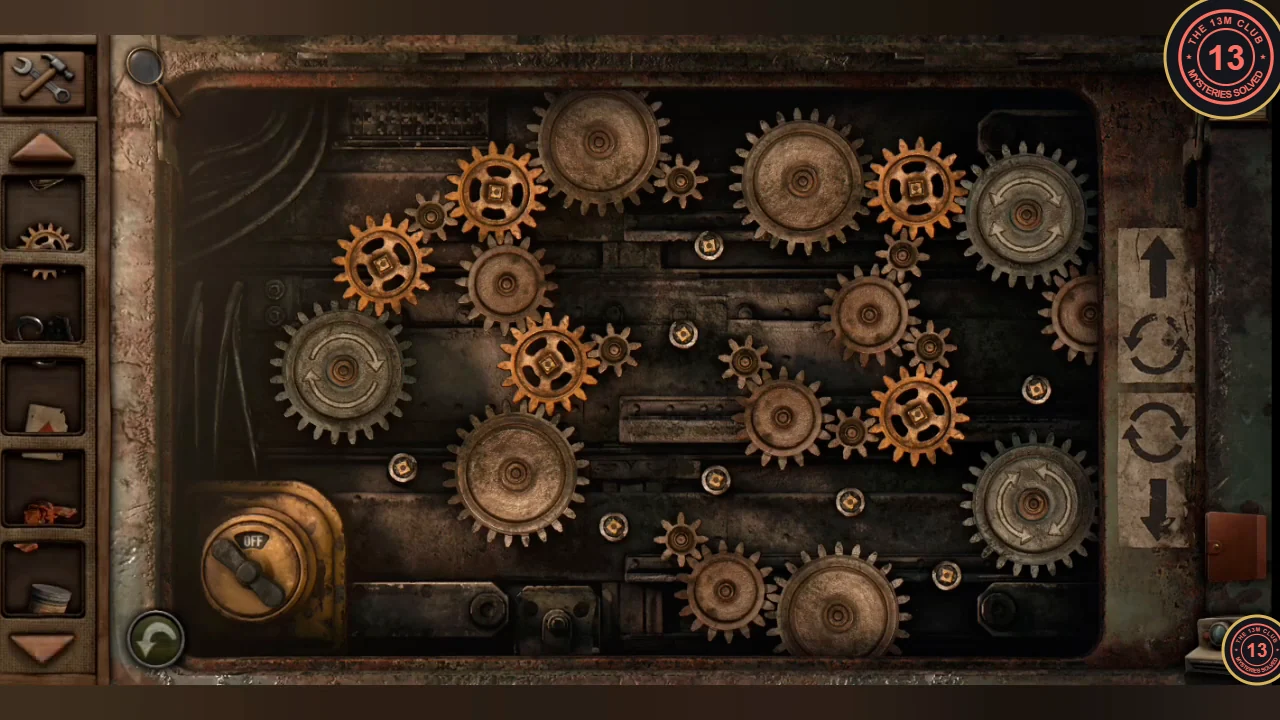
- Open the crane's gearbox and add the eggbeater gear and both small gears. Place them on the empty spots so that all the gears mesh into one connected chain; this section's completed-arrangement image shows the final layout. Then turn the round switch in the bottom-left corner of the gearbox from OFF to ON to start the crane; the gears turn and the switch flips back to OFF on its own. Leave the gearbox and take the crane hook that the crane has lowered.
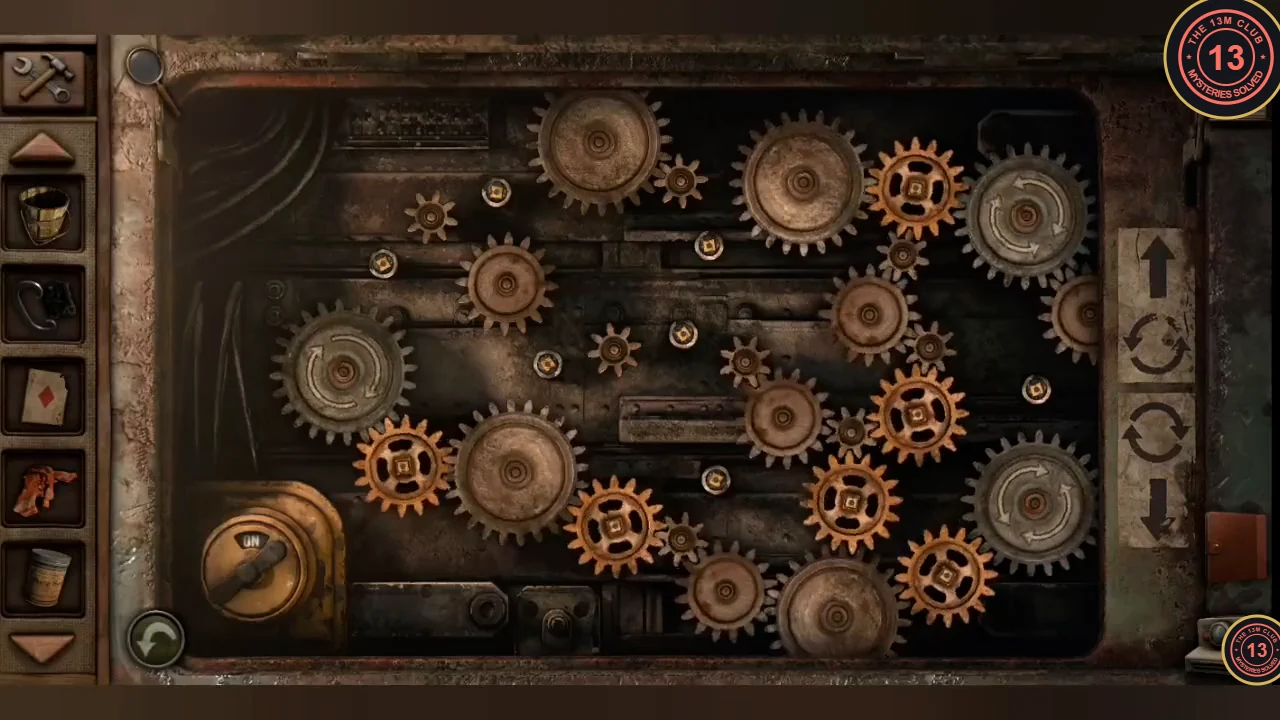
The completed gear arrangement, with the bottom-left switch turned ON.
Steam Donkey Pressure Gauges and Warehouse
Fire up the steam donkey, set its pressure and winch the warehouse doors open.
- Put the crate of coal in the steam donkey's firebox, pour in the rest of the diesel and light it with the flint and steel.
- Fill the bucket with water at the creek by the sluice. In the crafting window, combine the bucket of water with the white vinegar, then combine the result with the baking soda to make the cleaning solution. Use the cleaning solution on the dirty plaque on the engine, then wipe it with the rag so you can read it.
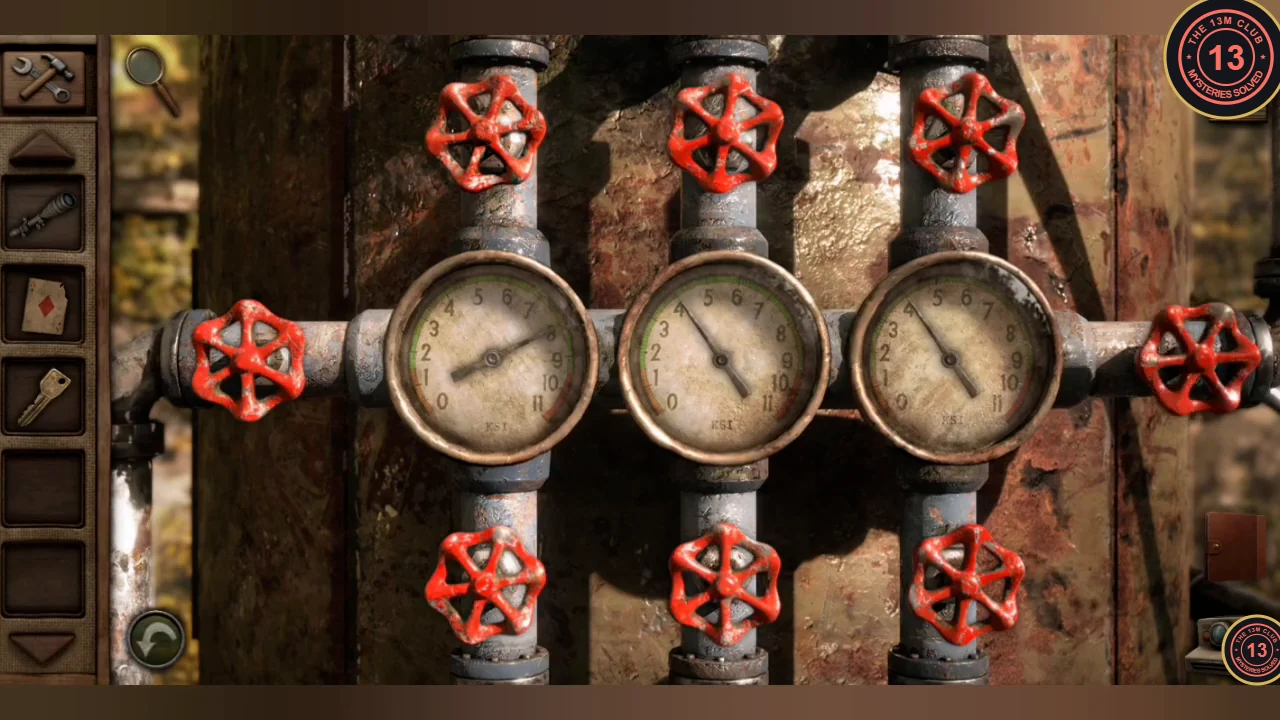
- The plaque asks for 9, 6 and 2 KSI on the three gauges, left to right; all three start at 5. If any pressure leaves the safe range, the gauges reset. Each turn of a valve has a fixed effect: the valve above the left gauge adds 2 to the left gauge, the valve below the left gauge takes 2 off it, the valve above the middle gauge adds 1 to the middle gauge, the valve below the right gauge adds 1 to the right gauge, and the valve on the far right side takes 1 off all three gauges. This order works (gauge readings in brackets): above-left twice (9-5-5), far right twice (7-3-3), below-left once (5-3-3), far right once (4-2-2), above-left once (6-2-2), above-middle once (6-3-2), below-right once (6-3-3), far right once (5-2-2), above-left twice (9-2-2), above-middle four times (9-6-2).CODE9-6-2
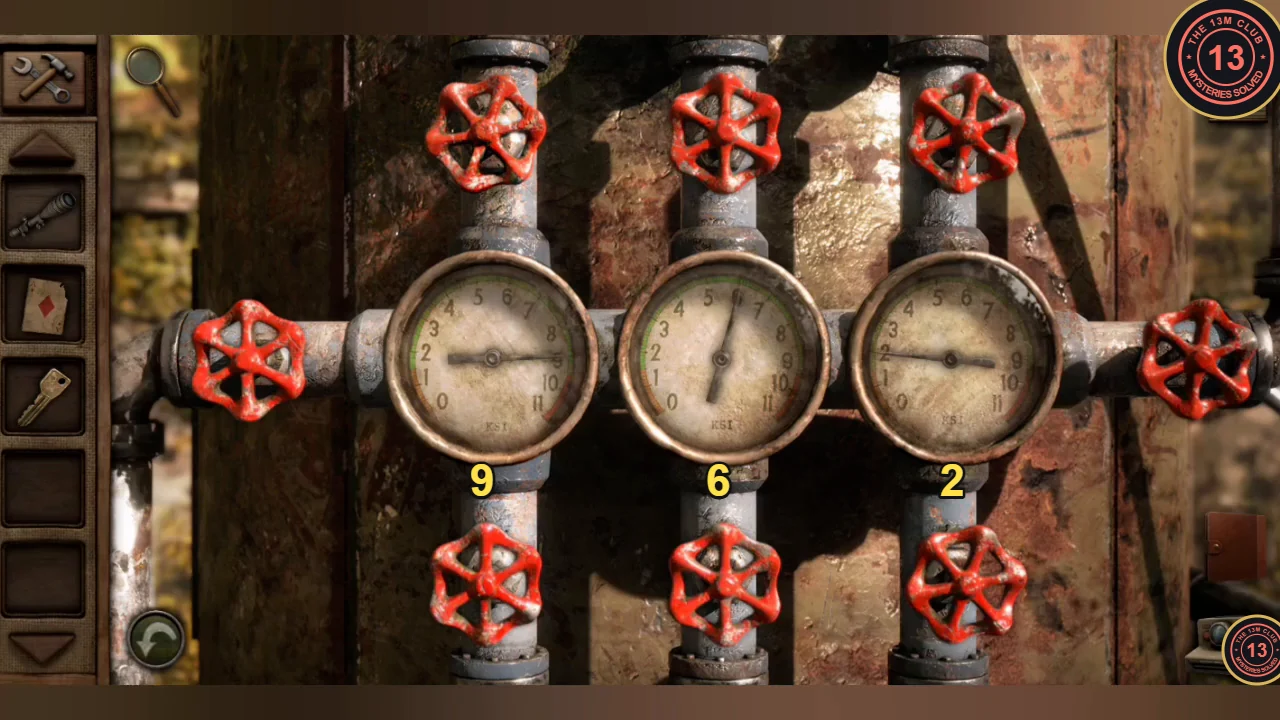
Target pressures set: 9, 6 and 2 KSI. - Hook the warehouse door chain with the crane hook and pull the steam donkey's control arm. The winch tears the doors open.
- In the warehouse take the plywood sheets and the box of nails. Photograph the pegboard (two green pegs and one blue peg on the curved rows) and note the card-slider lock on the red tool chest.
Cookhouse Cribbage Board
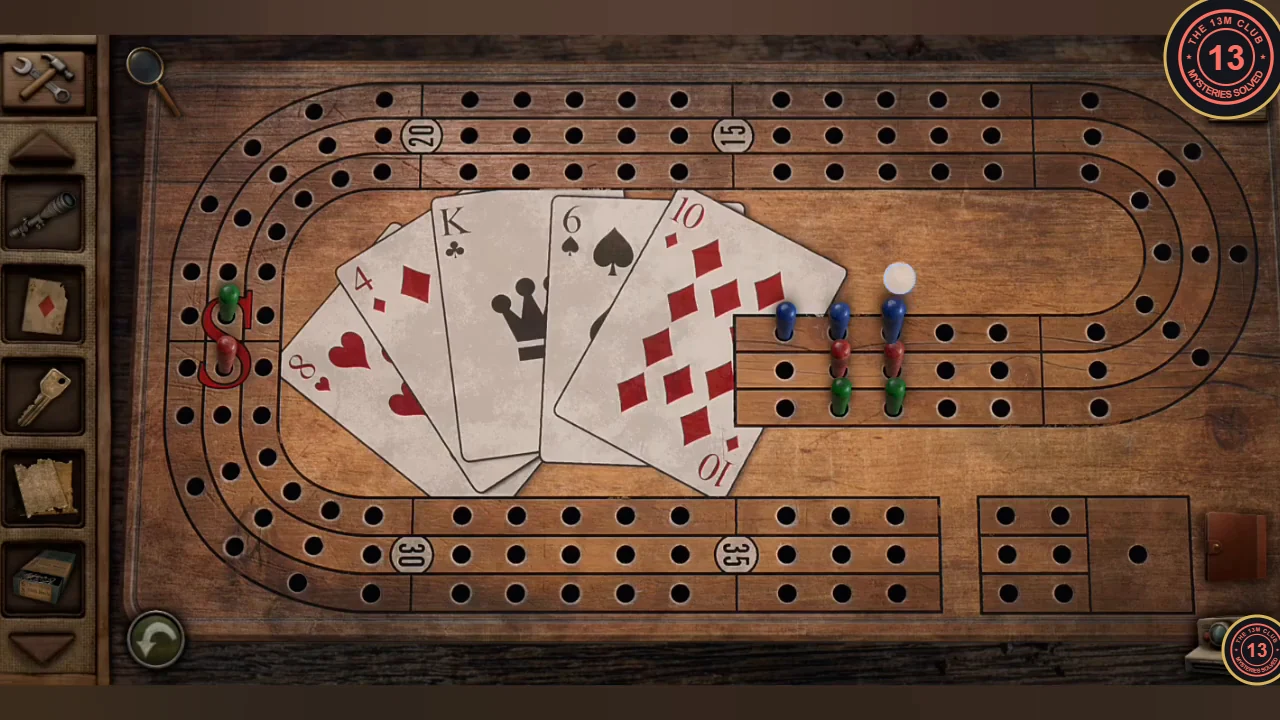
Four clues tell you where the pegs go on the cookhouse cribbage board.
- Walk to the end of the road past the logging truck and photograph the wrecked 15 sign: it has a red dot at the bottom left and a blue dot at the top right.
- On the cookhouse cribbage board, place the pegs as follows. S track: green at the top and red at the bottom (S paper). Hole 15: blue on the outer line and red on the inner line (road sign). Domino corner: red in the bottom-left hole of the six and blue in the single hole (domino). Right-hand curve: the two greens and the blue in the same holes as on the warehouse pegboard. The drawer opens.
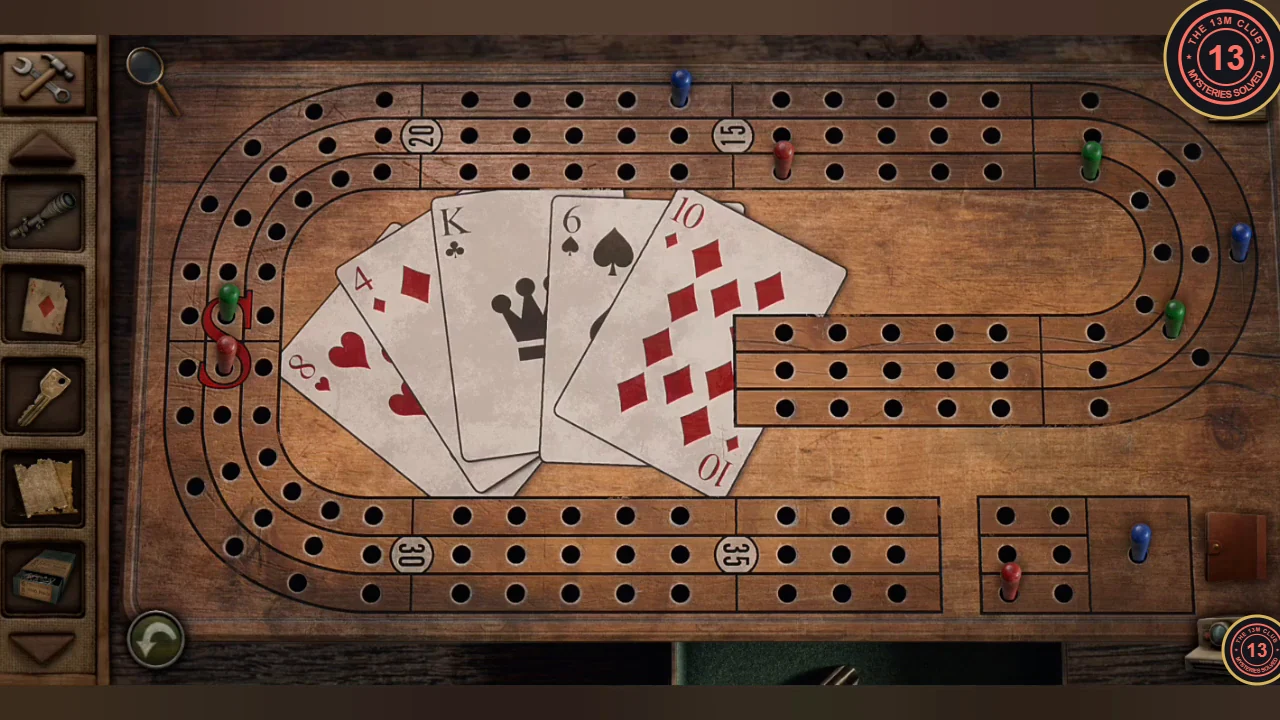
All pegs in place; the drawer opens below the board. - Take the key from the drawer, the second bridge key.
Poker Hand and Warehouse Card Lock
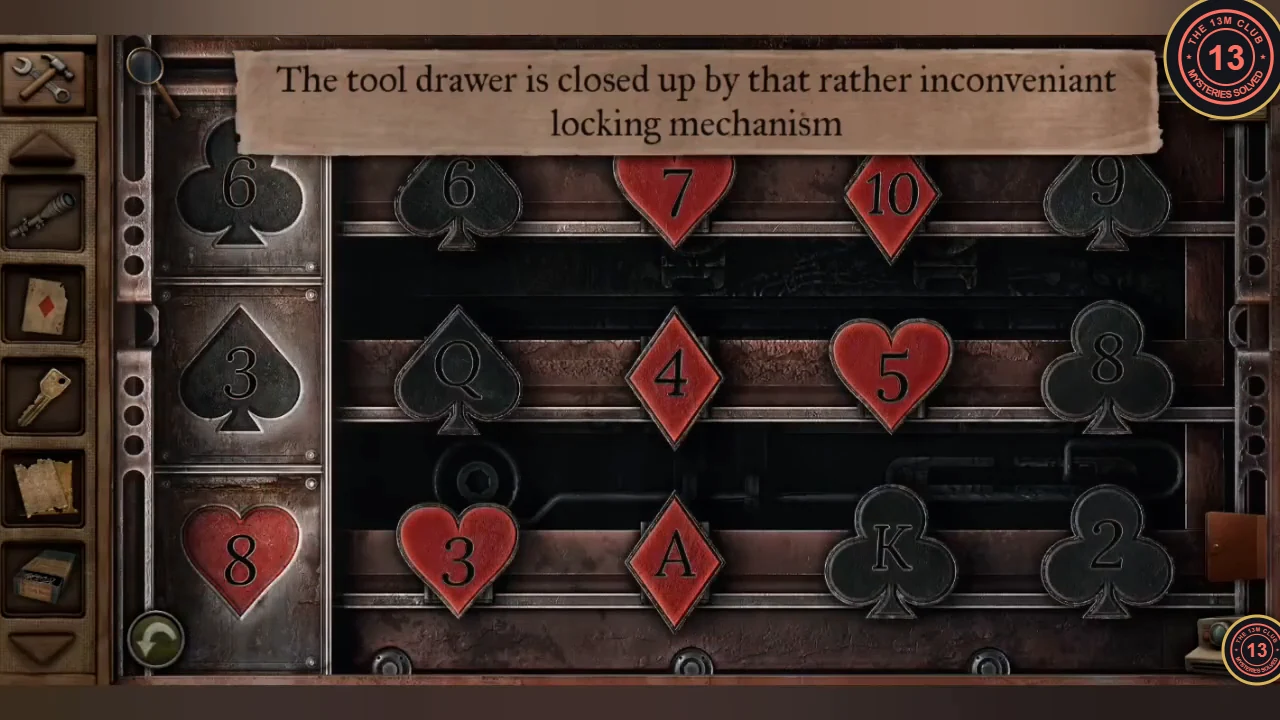
Complete three poker hands on the red tool chest in the warehouse.
- In the bunkhouse, put the ace of diamonds into the gap in the poker hand and photograph it: 3♠ 8♣ 5♥ A♦ Q♠.
- Photograph the cards on the cookhouse cribbage board and the cards on the cribbage book cover in the bunkhouse.
- On the red tool chest the left column is fixed (6♣, 3♠, 8♥). Slide the cards so each row continues one hand. Top row: 2♣ 9♠ 3♥ 7♥ (book cover). Middle row: 8♣ 5♥ A♦ Q♠ (poker hand). Bottom row: 4♦ K♣ 6♠ 10♦ (cribbage board). Take the crank.
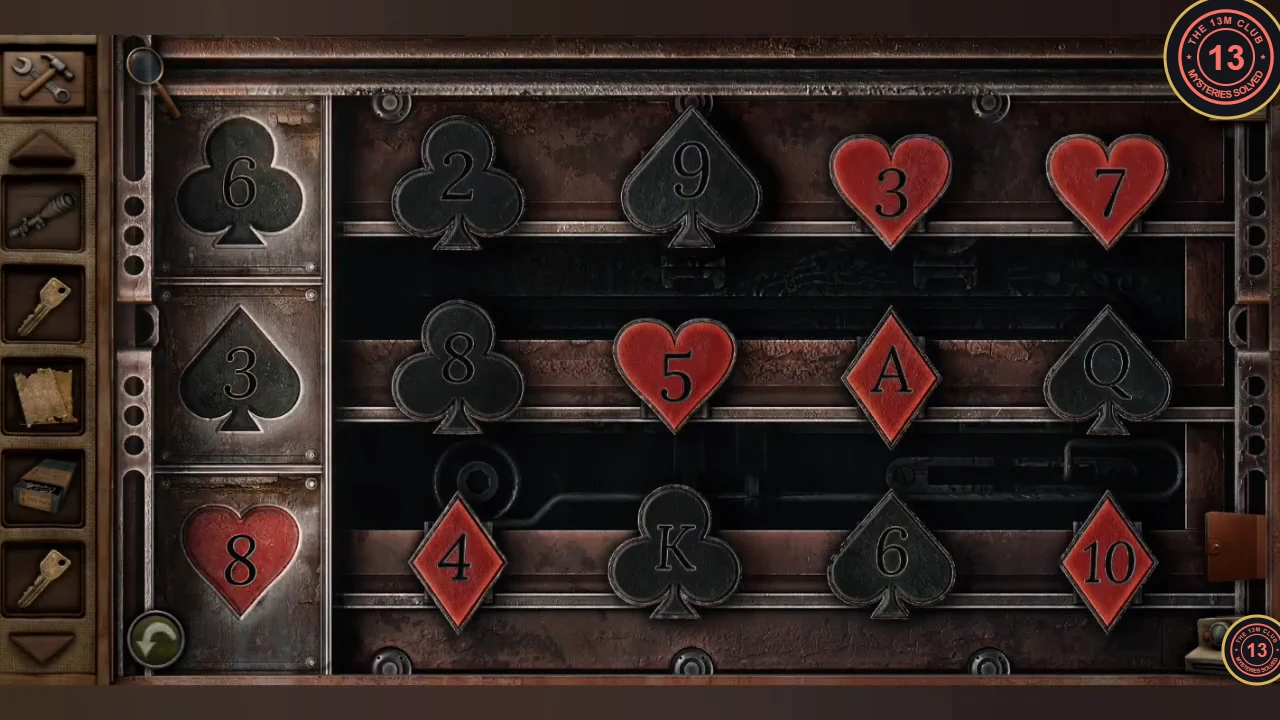
The solved card rows. - Take the ladder from the raised platform in the yard, place it at the warehouse loft and climb up. Take the large metal gear, read the letter and photograph the tic-tac-toe board.
Tic-Tac-Toe Cabinet, Flume and Bridge Gate
Repair the flume, restart the sawmill and collect the last bridge key.
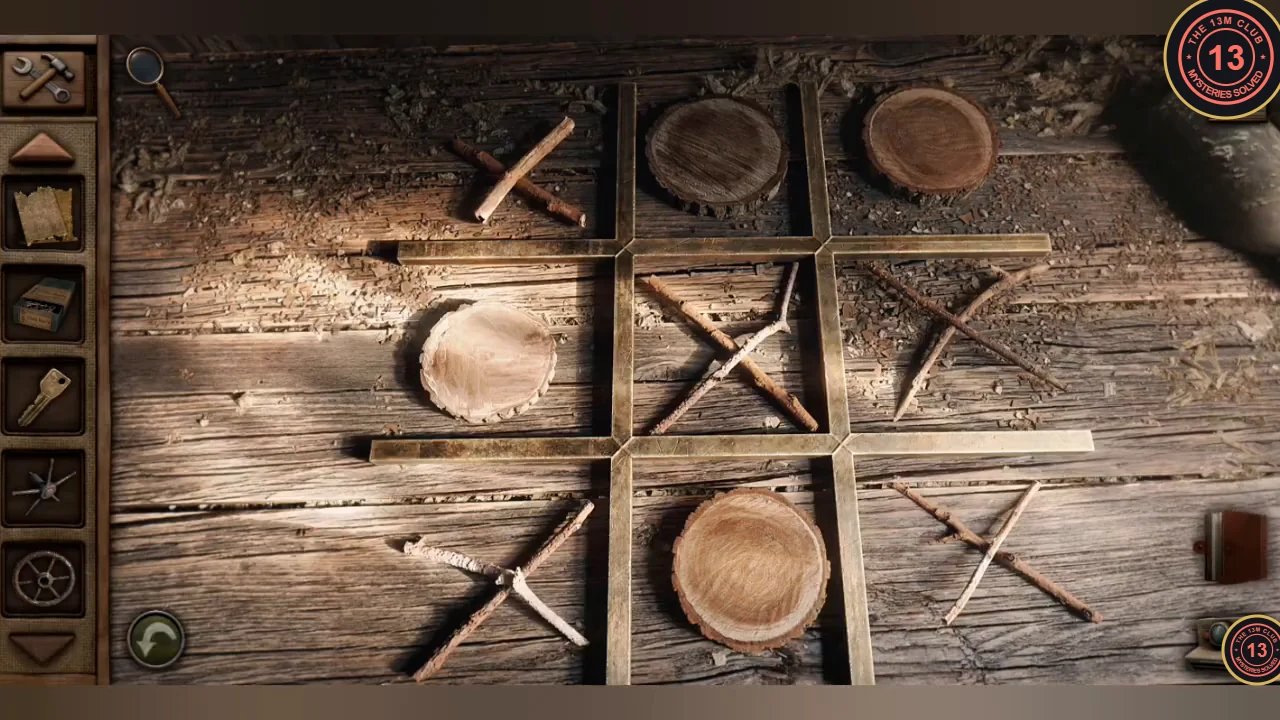
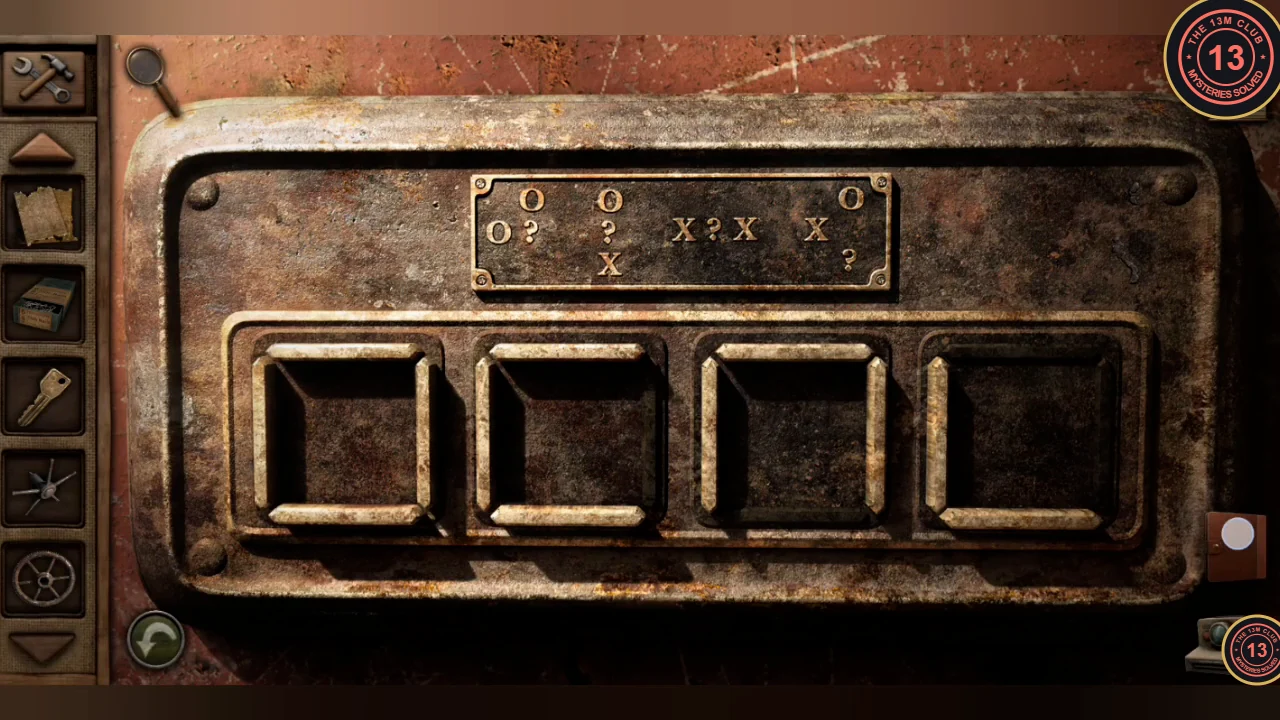
- In the creek shack, read the plate on the red cabinet. Each of its four patterns points to one square of the loft's tic-tac-toe board (row 1: X O O; row 2: O X X; row 3: X O X), giving X, X, O, X. Press in buttons 1, 2 and 4 for the Xs and leave button 3 out for the O. Take the hammer.
- Lay the plywood over the broken flume and nail it down with the nails and hammer.
- Fit the crank on the sluice gate and open it. Water flows down the flume to the sawmill waterwheel.
- Fit the large metal gear on the empty sawmill axle and pull the conveyor lever. Take the key from the window sill, the third bridge key.
- Put the three matching keys into the bridge gate padlock and cross the bridge. Only the rifle scope comes with you to the next area.