The stereo and the tally marks
Alex's cell also has four walls. From the wall where he was chained (the chain wall, with a vent and the square clue), turning right takes you to the stereo wall, then the cell-door wall with the fish bowl and the tally marks, then the bed wall. Switch characters whenever a step names Erik or Alex.
- As Alex, pick up the dart lying on the floor of the chain wall, near the skull. Keep this dart: you need it for the good ending.
- On the bed wall, lift the pillow and take the coin.
- On the stereo wall, open the cabinet doors under the stereo. Tap the toy robot inside, turn it over and open the compartment in its back to take the small battery.
- Examine the stereo. Open its lid and insert the CD, then use the arrow at the top right to view the back, open the compartment there and insert the battery. The display shows HELLO, then TRACK 01.
- Switch to Erik and flip the switch beside the cell door again to turn the cell light off.
- Switch to Alex. On the cell-door wall, use the flashlight on the tally marks: a music note and four blue circles appear. Count only the marks inside each circle, from top to bottom. These are four track numbers. Their order changes between games; in every playthrough checked for this guide the numbers themselves were 2, 5, 7 and 9.
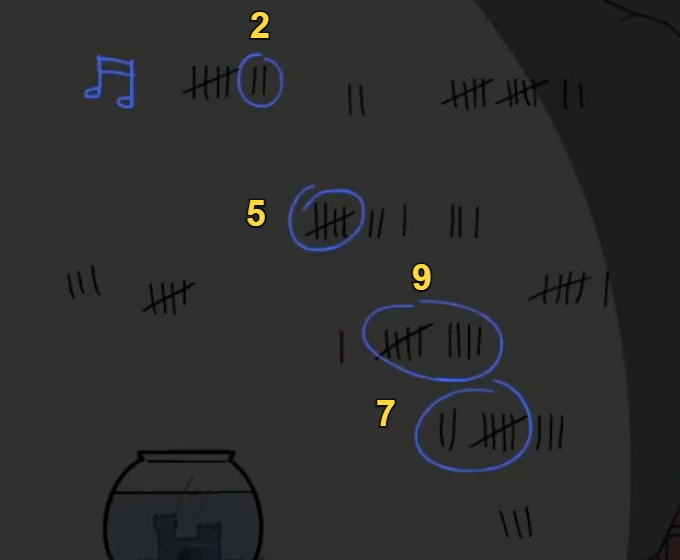
Example (the order changes between games): only the marks inside each blue circle count, read from top to bottom. - Switch to Erik and flip the switch again to turn the cell light back on.
- Switch to Alex and play the four tracks on the stereo in your circle order: the side buttons change the track and the middle button plays it. Listen to each one. Track 2 is a frog croaking, track 5 a ringing bell, track 7 laughter and track 9 a guitar.
- Switch to Erik. On the dartboard wall, the bottom drawer of the shelving unit has four picture tiles. Set them, left to right, to the sounds in your order (frog, bell, smiling face for the laughter, guitar) and the drawer opens: take the paint thinner. For the example tally marks, tracks 2, 5, 9 and 7 give frog, bell, guitar, smiling face.
The paint arrows and the origami bird
Red paint on Alex's bed wall hides an arrow code for the shutter on Erik's dartboard wall, and the puzzle behind that shutter gives the cell's bird something to fetch.
- Combine the paint thinner with the paintbrush to get a brush with paint thinner on it.
- As Alex, on the bed wall, wipe each red paint blot with the brush. Six arrows appear. Read them from left to right across the wall, ignoring how high each one sits. They change between games. Example: left, down, right, right, down, up.
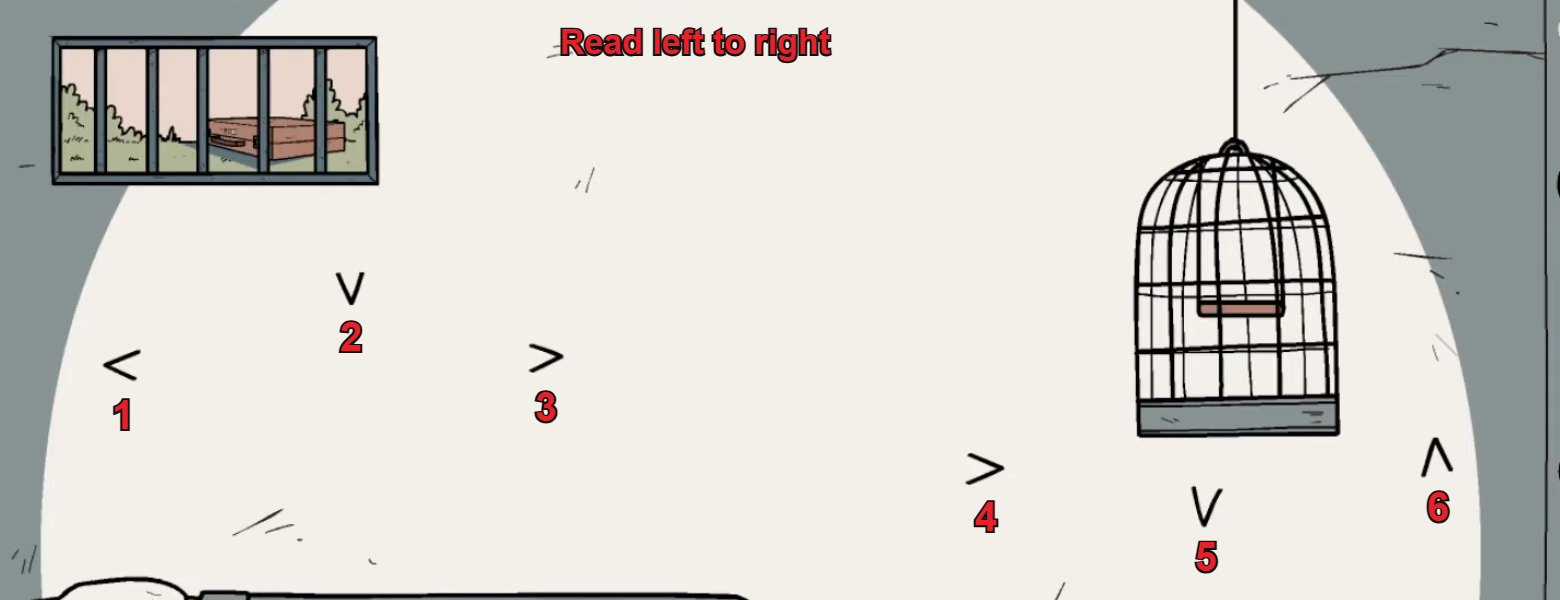
Example (yours will differ): number the arrows strictly from left to right, whatever their height. - As Erik, on the dartboard wall, use the arrow pad to the right of the closed shutter: press your six arrows in order, then OK. The shutter rolls up to reveal a ring puzzle.
- The picture of an origami bird is split across three rings around a fixed centre. Tap a ring to turn it and line each ring up with the centre, working outwards, until the bird is whole. A tray opens below: take the origami bird.
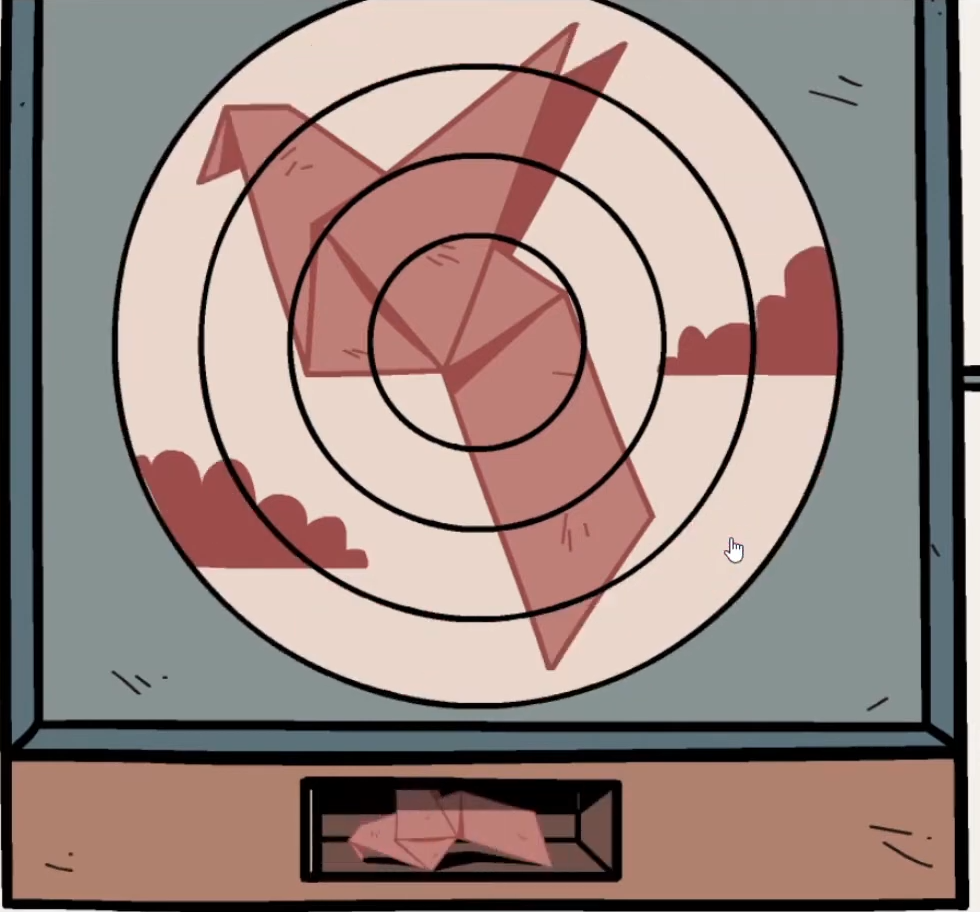
Ring puzzle solved: the bird is whole and the tray holds the origami bird. - As Alex, on the bed wall, put the origami bird in the bird cage. The bird fetches a yellow microscope slide: take it.
The microscope, the origami fish and the drain code
The yellow slide carries a second arrow code, this time for the diamond-shaped pad beside the shutter in Alex's cell. Behind it is a sliding puzzle, and the reward sets off a chain that ends with a briefcase outside the cell window.
- As Erik, on the lab wall, put the yellow slide in the microscope and look through it. Drag the slider on the right until the picture is sharp: a tiny locked chest with six small arrowheads underneath. The point of each arrowhead shows its direction, always one of the four diagonals. Read them from left to right; they change between games. Example: down-left, down-right, up-left, down-right, down-right, up-right.
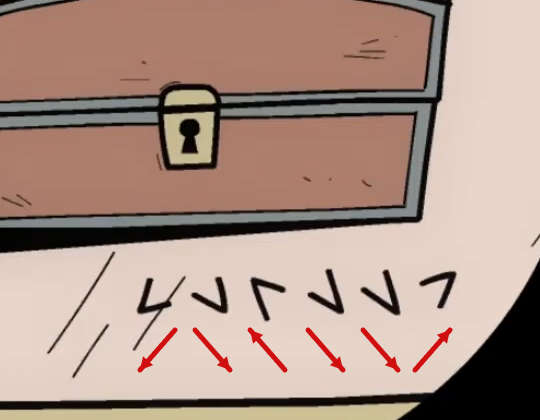
Example (yours will differ): the red arrows show which way each arrowhead points. - As Alex, on the stereo wall, use the diamond-shaped pad to the left of the shutter: press its diagonal buttons in your arrow order, then OK. The shutter opens on a sliding puzzle.
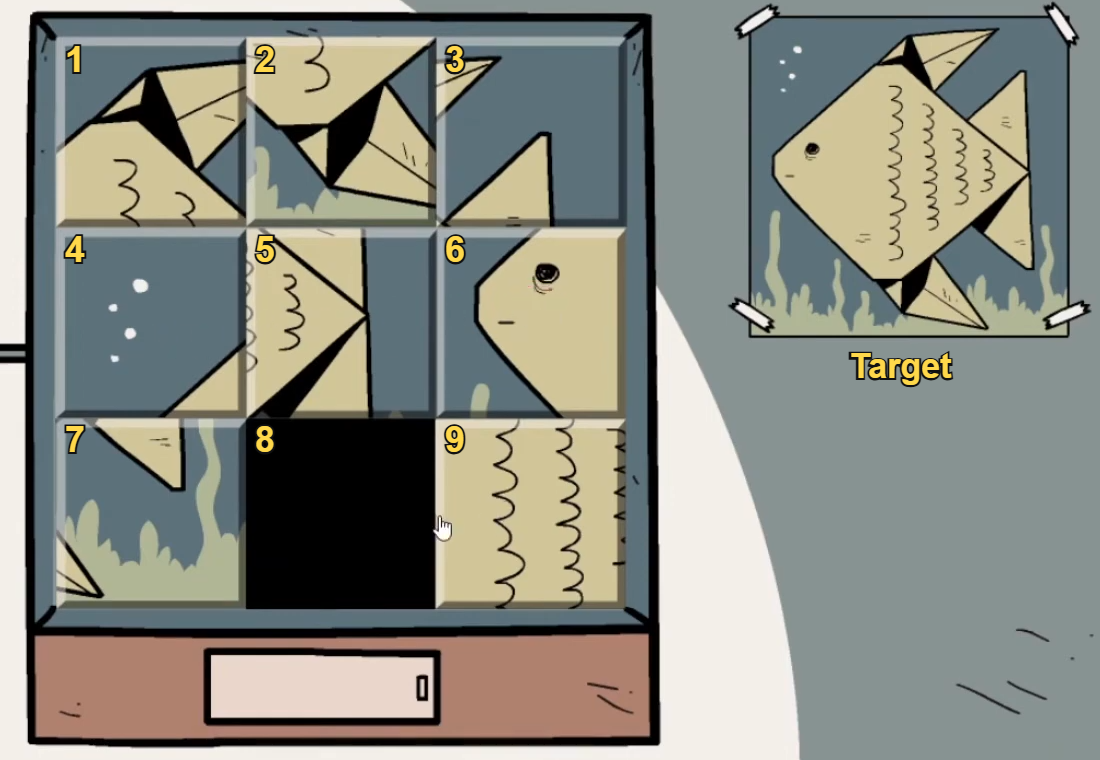
Starting layout seen in both checked playthroughs, with the square numbers used in the tap sequence. The target fish is on the right. - Slide tiles into the empty square to rebuild the origami fish shown in the picture to the right of the puzzle. In both playthroughs checked for this guide the puzzle started from the layout pictured above. Number the squares 1 to 9 from the top left, row by row, and tap the tiles in these positions: 5, 2, 1, 4, 5, 6, 9, 8, 7, 4, 5, 6, 9, 8, 7. If your starting layout looks different, work from the target picture: complete the top row first, then the left column, then cycle the last tiles round the empty square. When the fish is whole, a tray opens: take the origami fish.CODE5, 2, 1, 4, 5, 6, 9, 8, 7, 4, 5, 6, 9, 8, 7
- On the cell-door wall, drop the origami fish into the fish bowl. The fish swims into its castle and brings out a pipe valve: take it.
- As Erik, on the sink wall, tap the tile marked with an X below the sink to expose a pipe. Fit the pipe valve and turn it: water starts running into the drain in Alex's cell.
- As Alex, examine the floor drain on the stereo wall. With the rubbish washed away, four large digits show through the bars. Read them along the drain. They were 8249 in every playthrough checked for this guide; if yours differ, use your own.CODE8249
- On the bed wall, look through the small barred window above the bed. If a monster blocks the view, wait for it to move away. Open the briefcase outside with the four digits and take the scalpel and the pink key.CODE8249
The purple solution and the wardrobe
The pink key leads to a second recipe. Its purple solution dissolves the growth sealing the wardrobe on the cell-door wall.
- As Erik, on the dartboard wall, open the top drawer of the shelving unit with the pink key. Take the second glass and the second recipe sheet, which shows a purple star.
- On the lab wall, place the glass on the juicer table and pour from the bottom stripe of the new recipe upwards: red, yellow, red, blue, yellow. Take the purple strange solution.CODEred, yellow, red, blue, yellow
- On the cell-door wall, use the purple solution on the growth covering the wardrobe; it dissolves. Open the wardrobe, take the empty jar and search the coat to find a magnetic card.
- On the lab wall, slide the magnetic card into the slot on the drawer of the juicer table and take the tweezers from the drawer.
- On the sink wall, tap the arrow at the top of the ladder to look up at the ceiling and catch the buzzing fly with the empty jar.
The spider, the slides and the red key
A spider in the vent of Alex's cell guards a red microscope slide. Lure it away, then use the microscope to reach the seed that brings up the red key from the sink.
- As Alex, on the chain wall, unscrew the vent cover with the coin. A spider sits on its web, with a red microscope slide stuck behind it.
- On the stereo wall, open the cabinet and use the tweezers on the bowl of sugar cubes to pick up a tiny sugar cube.
- At the vent, place the jar with the fly on the floor and open it, then put the sugar cube on the web. The fly goes for the sugar and the spider goes for the fly: take the red slide.
- As Erik, take the yellow slide out of the microscope, put the red slide in and focus it. Cut the bug open with the scalpel, then use the tweezers to take the tiny key inside it.
- Put the yellow slide back and focus on the chest. Unlock it with the tiny key and use the tweezers to take the tiny seed.
- On the sink wall, examine the sink, drop the seed into the plughole and turn on the tap. Roots burst out of the floor under the sink, carrying up the red key: look at the roots and take it.
- On the cell-door wall, unlock the cell door with the red key. Alex walks out and the two prisoners meet.