Breaking free and the first finds
Erik wakes up tied to a chair in the scientist's basement. The basement has four walls; use the arrows at the screen edges to turn. From the wall with the sink and the ladder (the sink wall), turning right takes you to the dartboard wall, then the cell-door wall, then the lab wall. A few things can't be used yet: the hand scanner beside the ladder rejects Erik's hand, the cabinet above the sink is locked, the tap has no water and a red key lies out of reach in the sink's plughole.
- Tap Erik to wake him, then keep tapping the rope around his wrists until he rubs it through and breaks free.
- On the sink wall, open the cardboard box on the bottom shelf of the shelving unit and take the CD.
- Turn right to the dartboard wall. Take the dart from the dartboard, then take the paintbrush from the shelving unit on the right.
- Turn right twice to reach the lab wall. Open the drawer of the right-hand table, under the microscope, and take the flashlight and the transparent sheet.
The photo boards and the symbol box
The red folder on the middle shelf of the dartboard-wall shelving unit tells you which photos on the lab wall to read. Its first spread shows dark squares laid out exactly like the photos on the two boards above the lab tables: the left page matches the left board and the right page matches the right board.
- Open the red folder at its first spread. Select the transparent sheet in your inventory, choose Grab and lay it over the folder, then slide it across both pages. Count the red lines of the diagram that fall inside each dark square: from one to four, that number is the square's place in the order. On the right page the top-left square is 1 and the top-right square is 3; on the left page the top-right square is 2 and the top-left square is 4. This order was the same in every playthrough checked for this guide.
- On the lab wall, look closely at the four matching photos; each hides a small symbol. 1: right board, top-left photo (a man with a horn), a circle with a hooked tail like the male sign, on a book spine. 2: left board, top-right photo (a scientist holding a mug), a cross with a curled tail like the sign of Saturn, on the mug. 3: right board, top-right photo (a bandaged prisoner behind bars), a crescent moon in the lower-right corner. 4: left board, top-left photo (two snakes), a triangle crossed by a horizontal line, in the upper-right corner.
- On the cell-door wall, examine the grey box on the low table. Tap each of its four tiles to cycle through symbols and set them, left to right, to the hooked circle, the Saturn sign, the crescent moon and the crossed triangle. The box opens: take the fuse and the yellow key.
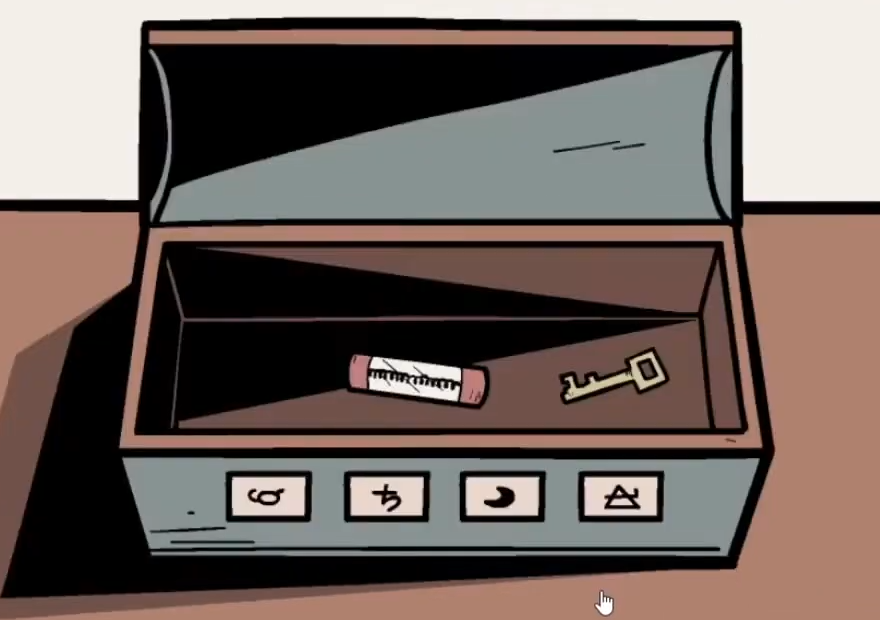
Solved: the four symbols in order, with the fuse and yellow key waiting inside.
The fuse box, the padlock and the prisoner
The fuse box on the lab wall has four lights, each above a pair of buttons. The right buttons make the lights blink, and the blink counts open the padlock on the cell door's window. Both the button pattern and the blink counts change between games, so read your own.
- On the sink wall, unlock the cabinet above the sink with the yellow key. Take the spool of thread and the glass for chemical mixtures.
- On the lab wall, follow the cable down from the fuse box to the small fuse holder near the floor and put the fuse in its empty slot.
- Open the red folder and turn to the page about the patient Chris Ari Arias Gonzales. Tap his photo to turn it over: the back shows two rows of four small squares, with one square shaded in each column.
- Open the fuse box. Working from left to right, press the button in each pair that sits in the same position (top or bottom) as the shaded square in that column of the photo. After each press the light above it blinks red: count the blinks for each of the four lights. Example from one playthrough: 5, 3, 6, 1.
- On the cell-door wall, examine the padlock on the barred window of the cell door. Set its four dials, left to right, to your four blink counts written as Roman numerals (the example gives V, III, VI, I), then open the window.
- Look through the window and talk to the chained prisoner. He is Alex Lauren, who worked with the scientist, Dr. Freyer, until Freyer infected him with a mutant virus. Alex needs an antidote, and his handprint can open the way out, but he turns into a reptile-like creature before he can give you the password he remembers.
- Tap the creature: it traces four shapes in the air one after another, a snake-like S, a circle, a square and a triangle. Their order changes between games, so note yours. Example: S, circle, square, triangle.
- On the dartboard wall, examine the red box on the table under the dartboard. Set its four tiles, left to right, to the shapes in the order Alex traced them. Take the gum, the scissors and the blue key from inside.
Brewing the antidote
The antidote is made from the juice of a paper flower, a feather and an apple, mixed in the order shown on a recipe sheet. The folder's juicer page shows the three ingredients going into the juicers on the lab wall.
- Select the gum and choose Chew, then combine the chewed gum with the spool of thread to make a piece of chewed gum on a string.
- On the sink wall, open the yellow FLOWERS book on the top shelf of the shelving unit and use the scissors on the flower to cut out the paper flower.
- On the cell-door wall, unlock the small box on the wall between the wardrobe and the cell door with the blue key and flip the switch inside. The light comes on in the cell.
- Look through the cell window. On the right-hand wall are four small squares with one to four tick marks on their edges. The number of ticks is each square's place in the order, and the squares' positions correspond to the 3 x 3 buttons of the safe. The layout changes between games.
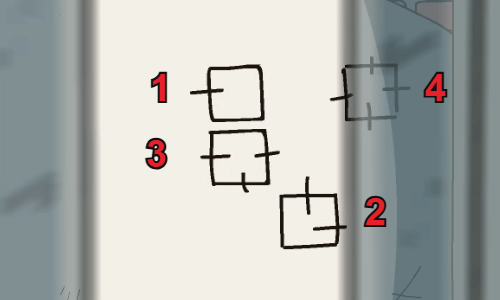
Example layout (yours may differ): count the ticks on each square to get its order, then press the safe button in the same position. - On the sink wall, examine the safe in the middle of the shelving unit and press the buttons in the same positions as the squares, in tick order: the one-tick square first, the four-tick square last. The light turns green and the safe opens: take the apple, the bread and the recipe sheet. In the pictured example the order is top-left, bottom-middle, middle-left, top-right.
- Look through the cell window again and use the bread on the cell floor. A small bird comes for the bread and leaves a feather behind, out of Erik's reach. Use the piece of chewed gum on a string on the feather to pull it out.
- On the lab wall, examine the left-hand table with the three juicers. Each juicer has a coloured tag: put the paper flower in the left (blue) juicer, the feather in the middle (yellow) juicer and the apple in the right (red) juicer. Each one fills the flask below it with liquid of its colour.
- Place the glass for chemical mixtures on the table and look at the recipe sheet: a syringe above a column of coloured stripes. Starting from the bottom stripe and working up, tap the flasks to pour the colours into the glass: yellow, blue, yellow, red, blue. The mixture turns green: take the antidote. The recipe was the same in every playthrough checked for this guide; if your sheet differs, follow it from the bottom up.CODEyellow, blue, yellow, red, blue
- Combine the dart with the antidote to get a dart with antidote. The glass of antidote stays in your inventory: keep it, because you need it again at the very end.
- Look through the cell window and use the dart with antidote on the creature. Alex turns back into a man and thanks Erik. From now on you control both prisoners: tap the face in the first inventory slot to switch between them.