UPPER FLOOR
Binoculars, the totem and the symbol wheels
Two upstairs puzzles in Adria's world use clues from outside and from the red book.
- Travel to Meridia's world and unlock the red chest beside the fireplace with the yellow key. Take the binoculars.
- Travel to Adria's world and go upstairs to the window beside the totem. Open the window, look out and use the binoculars on the group of red trees across the gorge. Five carvings mark the trunks at different heights: claw marks, wings, a paw print, more wings and a wavy line.
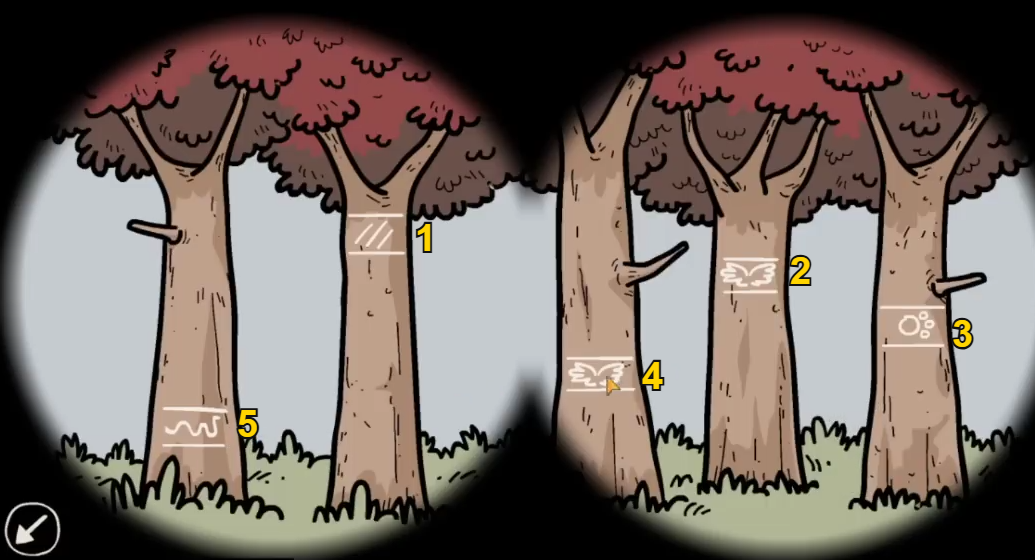
Example: carvings numbered from highest (1) to lowest (5). Set the totem blocks from top to bottom in this order. - Totem puzzle: each of the five blocks turns to show a tiger, an owl, a wolf or a snake. The carvings stand for animals: claw marks = tiger, wings = owl, paw print = wolf, wavy line = snake. Set the blocks from top to bottom to match the carvings from the highest on the trees to the lowest. Example: tiger, owl, wolf, owl, snake. If your carvings differ, apply the same rule.
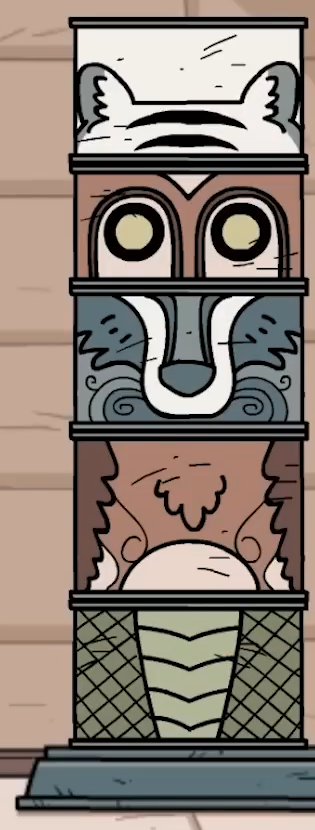
Example totem setting from top to bottom: tiger, owl, wolf, owl, snake. - A panel beside the totem opens. Pull its lever: outside, a heavy weight on a rope is lowered above the well.
- Turn to the wall with the wooden wheels and fit the new wheel into the empty slot at the top left. There are now four wheels with blue, yellow, green and red rims, each surrounded by four marks: a plus, three lines, a small circle and a caret (^).
- Wheel puzzle: open the red book at its chart. Each coloured cross sits in one row (a wheel symbol) and one column (a mark). For each colour, turn the wheel with that rim until the row's symbol faces the column's mark beside the wheel. Example: the blue cross is in the bottom row and the plus column, so turn the blue wheel until that bottom symbol sits next to the plus. The chart differs between games. When all four wheels are set, the compartment left of the wheels opens: take the small statue.
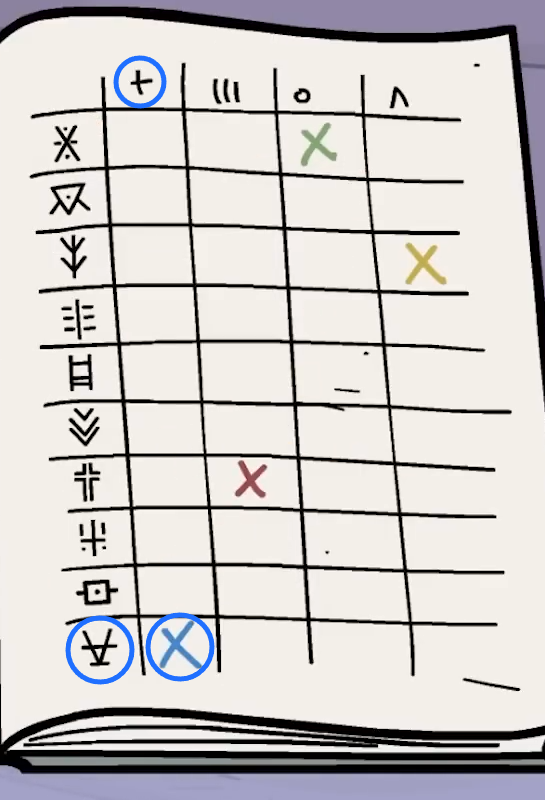
Example chart: the blue cross pairs the bottom symbol with the plus mark. Read the green, yellow and red crosses the same way. 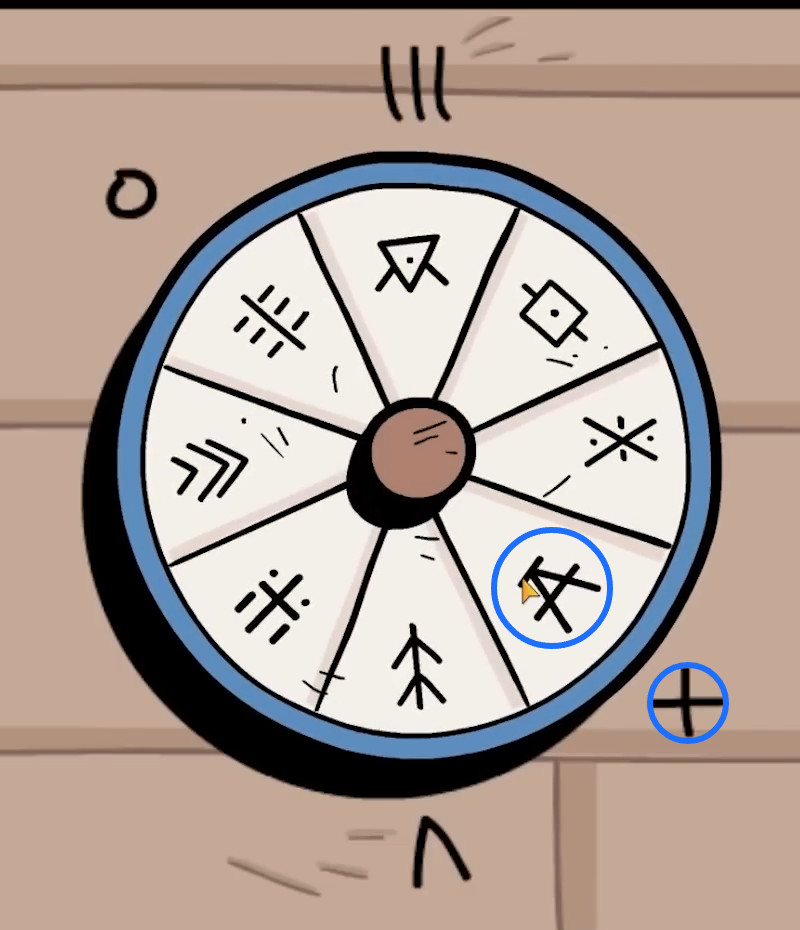
The blue wheel set for the example chart: the circled symbol faces the plus mark.
THE WELL
The well, the pink key and the spell page
Open the well behind Adria's house and trade the statue for the key to the red book on the upper floor.
- Go outside through Adria's white back door and attach the metal hook to the weight hanging above the well.
- Go back upstairs and pull the lever beside the totem again. The weight rises and the hook lifts the stone lid off the well.
- Combine the bucket, the rope and the small statue in your inventory to make a statue in a bucket on a rope.
- Return to the well and use the bucket on it. Adria lowers it; two strange figures at the bottom take the statue and leave a pink key in its place. Take the key.
- Go upstairs to the blue table and unlock the red book with the pink key. One page shows a pendant symbol; another shows the wall of thorns with a spell. Tear out the wall-of-thorns page. Its drawing shows a frog, a flower and a lit candle placed at the thorns.
- Go outside through the back door again. From the well, turn right to the house wall lined with bushes and search the berry bush on the left to take the frog.
MAIN ENDING
Breaking the thorns and escaping the house
You need the frog, the blue flower, the red candle, the lighter, the spell page and the small hammer. The final moment is timed: if you do nothing when the police leave, the game ends with Adria trapped in the house.
- Go to the thorn-filled front door in Adria's front room. Place the frog and the blue flower at the door. Combine the lighter with the red candle to light it, then place the lit candle there too.
- Select the spell page with Grab and tap the vines. Adria reads the spell and the thorns vanish. Tap the daylight outside to step through the doorway.
- An invisible barrier stops Adria at the threshold. Her friends arrive with two police officers, who search the house without seeing her. She realises the locket around her neck, a gift from Meridia, bears the same symbol as the spell book.
- As soon as the officers walk out and the inventory bar reappears, select the small hammer and tap the locket immediately. It shatters, the barrier breaks and Adria walks out to her friends: the escape ending.