ADRIA'S HOUSE
The washroom bottles and the red key
Adria is alone in the front room and thorny vines fill the front doorway. Turn with the arrows at the sides of the screen. The front room has four walls: the blocked front door with a white cabinet beside it, a brown door next to a grandfather clock, a bricked-up arch next to a blue door, and a fireplace with a rocking chair and a red chest.
- Open the brown drawer near the bottom of the white cabinet beside the front door and take the photo. Look at it: the witch is standing in front of a shelf of coloured bottles. Keep the photo for the next puzzle.
- Turn to the wall with the bricked-up arch and go through the blue door into the washroom. Open the wall cupboard above the sink and take the walkie-talkie. The jar of eyes stays where it is.
- Bottle shelf (left of the sink). The bottle colours are arranged differently in each game, so copy your own photo rather than a fixed answer. Tap one bottle (it fades), then another, to swap them. Keep swapping until every shelf matches the photo, bottle for bottle. The cupboard under the shelf opens: take the red key.
- Return to the front room and turn to the fireplace. Pull the white sheet off the picture above it to uncover a portrait of a woman with long dark hair. Adria remembers seeing her in the town square that afternoon. Notice the empty gem setting at the bottom of the frame.
- Turn to the grandfather clock and unlock the brown door beside it with the red key. It leads into the back room.
ADRIA'S HOUSE
The radio, the symbol padlock and the first gem
The back room also has four walls: the staircase (with a padlocked trapdoor at the top and a small padlocked door underneath), a white back door with nine wall candles beside it, a shelf above a blue metal cabinet next to a boarded window, and a white chest of drawers with an old radio beside the doorway you came through.
- On the wall with the white back door, open the top drawer of the small cabinet on the red table and take the batteries. Combine them with the walkie-talkie in your inventory.
- Look at the walkie-talkie and press its channel buttons until it plays a tune instead of silence. Leave it on that channel. Example: channel 04.
- Turn to the wall with the shelf and the blue metal cabinet. Open the cabinet's top drawer for a note that links music with the fireplace. Then take the dark blue book with a triangle on its cover from the shelf above. It is a photo album with empty silhouettes and a page listing four names; you will need it later.
- Turn to the white chest of drawers and examine the radio. Use its knobs to move the needle until the radio plays the same tune as the walkie-talkie. Write down the number above the needle on the upper scale, then the number below it on the lower scale. The station differs between games. Example: 82 on top and 77 below, giving the digits 8, 2, 7, 7.
- Go back to the fireplace in the front room. Select the walkie-talkie with Grab and tap the fireplace while it plays the tune. A skeletal hand reaches down the chimney and gives you a paper with nine symbols in a 3 x 3 grid.
- Decode the radio digits. The chart of tally marks on the wall above the radio is a 3 x 3 grid whose cells hold 1 to 9 marks, counting left to right from the top row. The paper's cells are numbered the same way (see the picture). Turn each of your four digits into the symbol in that cell. Example: 8, 2, 7, 7 gives the triangle with a bar, the circle with an arrow, then the circle with a dot twice.
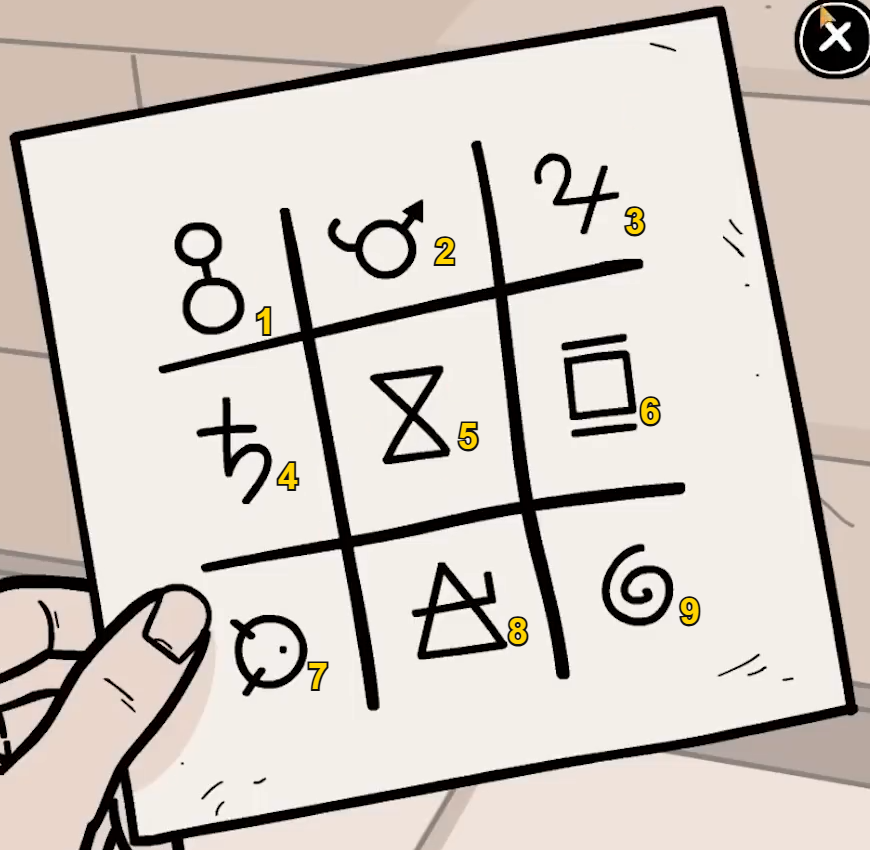
Cell numbers follow the tally-mark chart: 1 to 9, left to right, top row first. Turn each radio digit into the symbol in that cell. - Open the padlock on the white cabinet doors beside the front door: tap each reel until the four symbols appear in your order (upper-scale digits first). The cabinet doors open.
- Examine the red box on the bottom shelf of the cabinet. Its lid holds pairs of buttons with the same number of dots, from one to five. Join each matching pair with a path along the dotted grid; paths cannot cross or share a dot. The completed board is shown below; if your layout differs, follow the same pairing rule. The box opens: take the white gem.
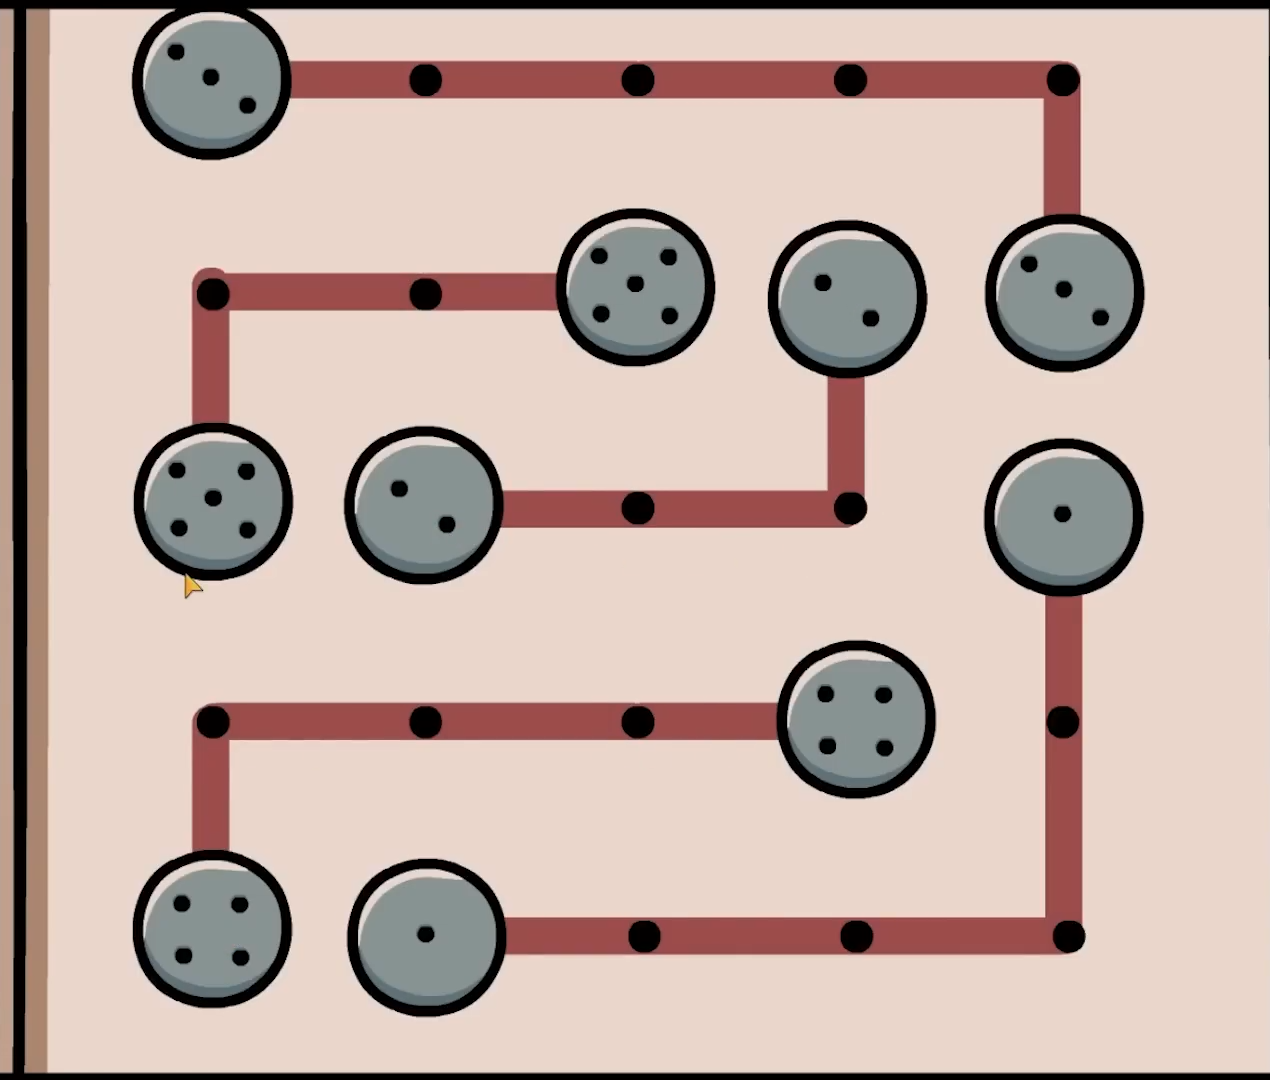
The completed red box: every button is joined to the button with the same number of dots. - Back at the fireplace, place the gem in the empty setting at the bottom of the portrait. Adria is pulled into the painting and arrives in the woman's version of the house.