White stones, the first token and the skeleton's map
The cavern under the house has four views. Arrival: a table with a weighing scale and four marked stones, and the stairs back up to the house. Turn right: a stone coffin below a shuttered panel, a pot and a barrel. Next: a pillar with a bird's nest, three pots, a spiked gate and a skeleton in a cage. Next: a wall with two rows of five scribbled tiles and a lamppost. From here on you move back and forth between the cavern and the house.
- In the coffin view, pick up the white stone on the floor to the left of the coffin.
- In the pillar view, look into the smallest pot on the right and take the token with a strange symbol.
- Look at the paper in the caged skeleton's hand: it maps the lamppost wall as a grid with a red X. Remember where the X is; its position can differ in your game.
- In the lamppost view, pick up the second white stone from the floor.
Coffin block puzzle
The shutter above the coffin hides a 5×5 tray and a set of wooden pieces. Every square must be filled and no pieces may overlap.
- Tap the shutter above the coffin and drag the wooden pieces into the 5×5 tray until it is completely filled. The picture below shows a finished layout.
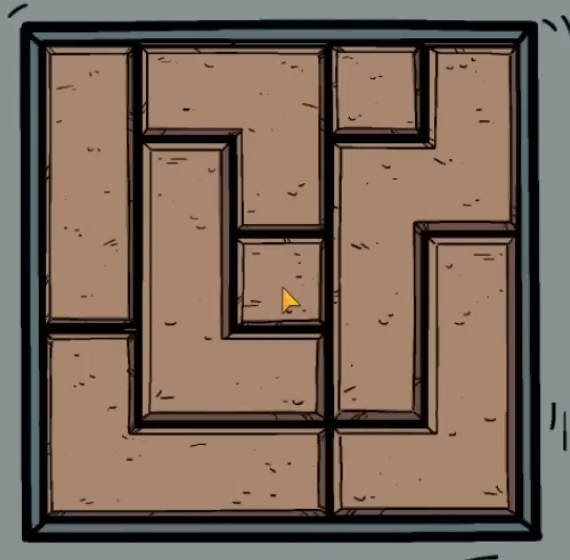
One working solution for the coffin block puzzle. - The coffin opens and a skeletal hand rises. Take the key from the hand and the token from its cuff.
Bird's nest, lamp and fireflies
Lighting the lamppost releases four coloured fireflies; where they land opens the dresser's top drawer in the house.
- Go up to the house and open the left door of the cabinet under the heads with the coffin key. Take the bottle of cleaning alcohol, the photo of a scarecrow and the paper, which is another clue for the panel by the red door.
- Back in the cavern, show the scarecrow photo to the bird on the pillar. It flies away; take the nest.
- At the lamppost, put the nest in the lamp, pour on the cleaning alcohol and strike the two white stones together to light it. Four fireflies (green, red, blue and yellow) fly out and land on four of the scribbled tiles. Note which tile each colour lands on; the tiles they choose can differ in your game (example from one game: green on the first tile of the top row, red on the fourth tile of the top row, blue on the second tile of the bottom row, yellow on the fifth tile of the bottom row).
- In the house, view the top drawer of the grey dresser on the portrait wall. Its lock has four windows under green, red, blue and yellow dots. Set each window to the scribble pattern of the tile where that colour's firefly landed. Take the token and the paper inside.
Weighing the stones and the metal chest
The paper from the dresser lists four lines built from the stone symbols, for example “ladder − chevrons”, “comb + chevrons”, “X” and “ladder”. Each line gives one digit for the metal chest by the grate. The scale has no numbers, so count tick marks.
- At the scale on the cavern table, put the stones on the pan one at a time. Count how many tick marks the needle moves from where it rests with the pan empty: the resting position is 0 and the first tick is 1. The stones are marked with an X, a ladder, a comb (a line with three crossbars) and a double chevron. Example readings: X 8, ladder 6, comb 3, double chevron 2.
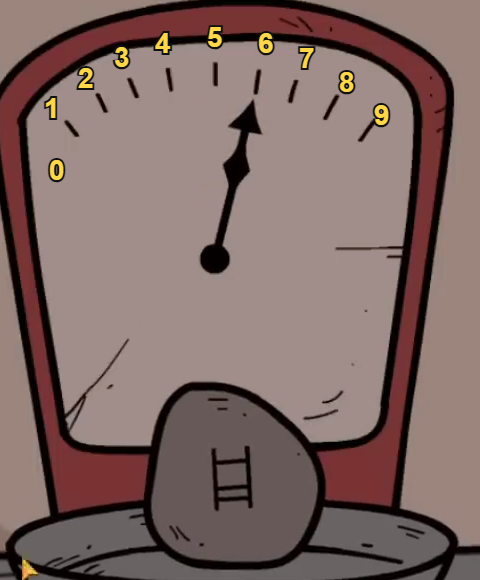
Count ticks from the resting position (0). Here the ladder stone reads 6. - Work out each line of the dresser paper with your own readings. With the example values: ladder − chevrons = 6 − 2 = 4, comb + chevrons = 3 + 2 = 5, X = 8 and ladder = 6, giving 4-5-8-6. Your paper or weights may differ.
- In the house, open the padlock on the metal chest beside the grate. Its wheels show numbers as groups of strokes: count every line in a symbol to get its value (the single slash is 1, two bars are 2, and so on). Enter your four digits and take the paper, the last clue for the red-door panel, and the small pickaxe.
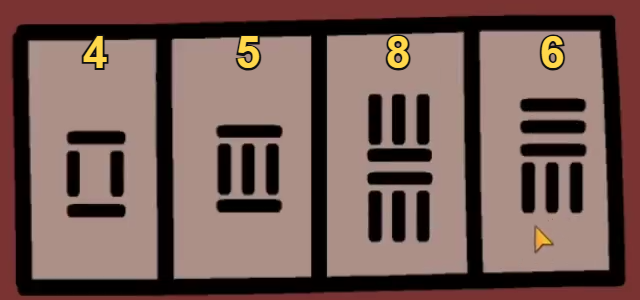
Example code 4-5-8-6. Each wheel's number equals the number of strokes in its symbol.
Red diamond, spiked gate and the last token
The skeleton's map shows where the red diamond is buried in the lamppost wall.
- At the lamppost wall, compare the skeleton's map with the wall (the lamppost is drawn at the right edge) and strike the place marked X with the small pickaxe. Take the red diamond from the hole.
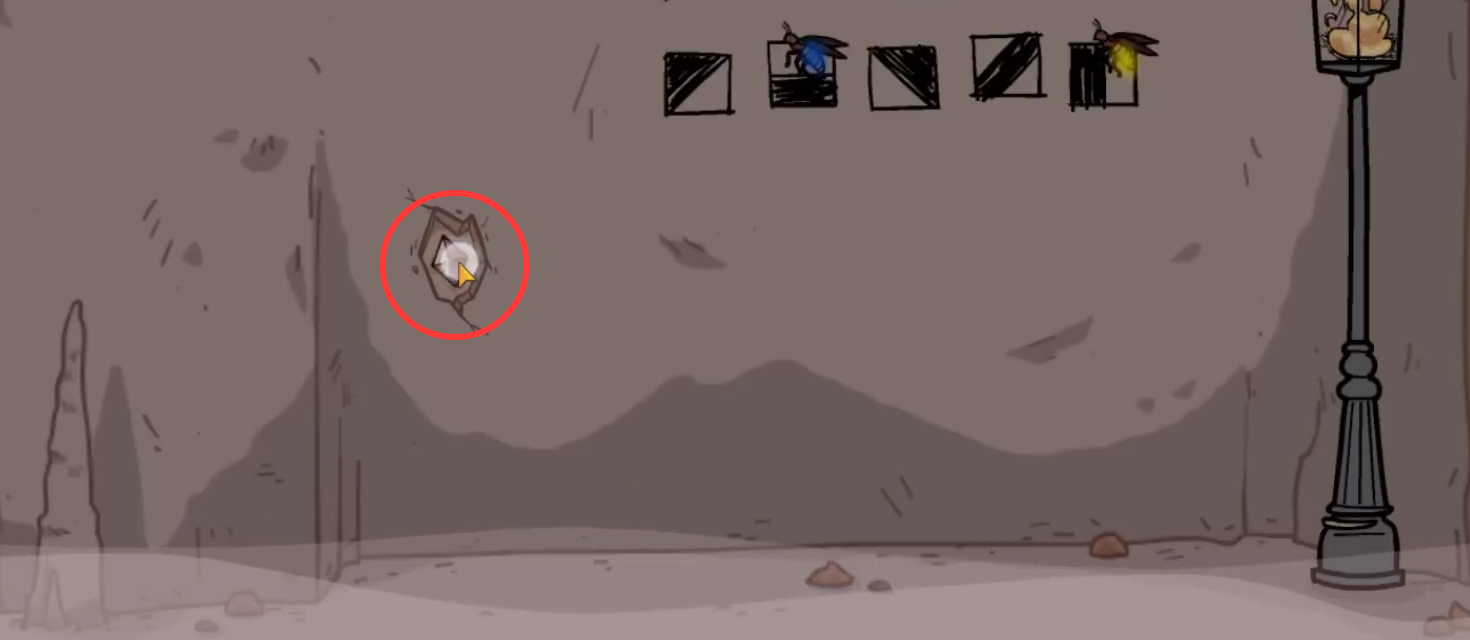
Example of the spot to strike, matching the X on the skeleton's map in one playthrough. - In the house, view the pedestal under the skull beside the portrait and put the red diamond into the diamond-shaped recess on the front of the pedestal. The skull's eyes glow red and the spikes blocking the gate in the cavern drop.
- Go through the opened gate in the pillar view. Note the red circles drawn on the wall, which are a clue for the token board (in one game: one token symbol above two empty circles; your drawing may differ), and pick up the token lying on the ground by the rock.
The token board beside the red door
You now have four tokens, three circle papers (from the jacket, the cabinet under the heads and the metal chest) and the wall drawing beyond the gate.
- Go to the red door in the house and view the panel on its left: a lever and twelve holes in three rows of four. Place all four tokens in holes; they can be moved afterwards. Each circle paper and the wall drawing shows a small piece of the board: a symbol marks the hole for that token and an empty circle marks a hole that stays empty. The clue arrangements differ between games, so work from your own papers and wall drawing. Arrange the tokens so that every clue fits at once, then pull the lever. The red door opens.
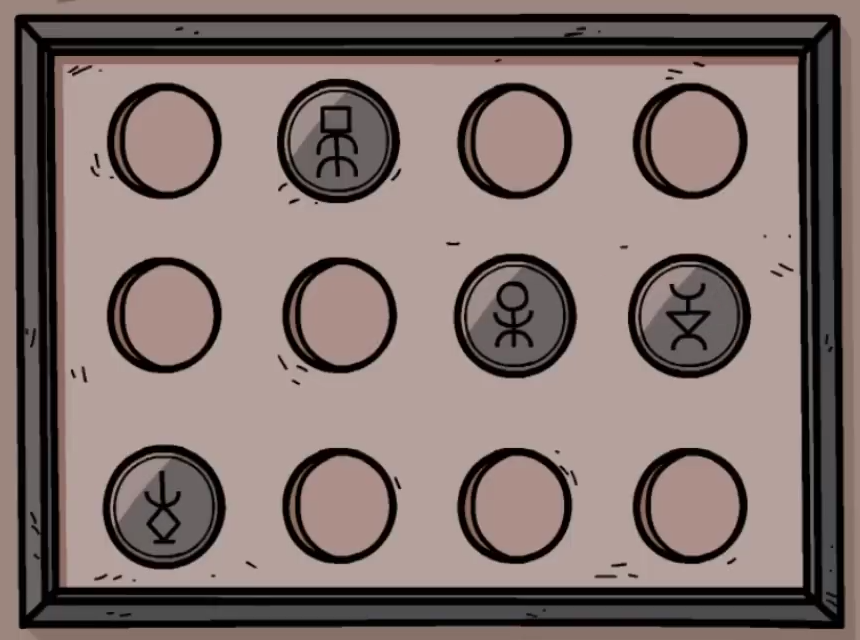
Arrangement that opened the door in one playthrough. Check it against your own papers before pulling the lever.
The crystal seeds
Laia remembers she still needs the seeds before going through the red door.
- Go back down to the cavern and through the spiked gate. Tap the root hanging from the ceiling and take the three crystal seeds.
- Return to the open red door in the house and go through it. Watch the final scenes until the “Thanks for playing!” screen appears.